Factory Pro Shift Kit - justsomedude.comjustsomedude.com/riding/ShiftKitQAD.pdf · When you open up...
10
Factory Pro Shift Kit – Quick and Dirty Install Prepared by: JustSomeDude Insane amounts of help from: MoMan Special thanks to everyone at YZF600r.com!! Tools used in this how-to 10mm socket (shallow – ¼” drive) Paint scraper (or razor blade) 10mm wrench Pliers 5mm allen bit (with socket adapter) Mini-wire-cutters (or mini-pliers) 3/8” ratchet (with ¼” adapter) Automotive Magnetic Tool 6” extension for ¼” drive Small zip-ties Flathead screwdriver Blue loctite Torque wrench WD-40 *Please note, there is a HUGE difference between this how-to, and the previously existing how-to for the Shift Kit Install at yzf600r.com. While the other how-to suggests removing the clutch… this how-to demonstrates a method that shows the kit being installed without clutch removal. First – I recommend reading these instructions over COMPLETELY a few times to familiarize yourself with the parts and process as much as possible. When you open up your factory pro shift kit, there are 3 items: the new roller spring, roller, and clutch cover gasket. Before taking your bike apart and diving into the installation, I strongly suggest completing Step 1 below that preps the spring. Step1 – New Spring Preparation (requires: pliers, small zip-tie, Shift Kit Spring, and endless patience!) Estimated time, 15-20 min. The new spring is much stiffer than the old spring. This added stiffness can be a serious headache later during installation. To avoid such problems, we want to pre-compress the spring. To do this, you first want to get a zip-tie looped around the spring ends (refer to Photo 1.1 for zip-tie orientation). Next, grab the two ends of the spring in your pliers. Squeeze the pliers down to get the spring ends together. Be careful… a light grip could cause the spring to fly out, and go missing under some furniture, a work bench, into your eye!, etc. Once you have the spring fairly compressed, tighten the zip-tie with your third hand. ☺ This process is easier with a second person to help you, as you will probably need 1 hand for the pliers, 1 to steady/hold on to the spring, and 1 to tighten the zip-tie. NOTE: The knuckle of the zip-tie should be on the inside of the flat spring end. This will allow you to remove the zip-tie after the spring is installed. Refer to Photo 1.2.
-
Upload
phungkhanh -
Category
Documents
-
view
220 -
download
0
Transcript of Factory Pro Shift Kit - justsomedude.comjustsomedude.com/riding/ShiftKitQAD.pdf · When you open up...

Factory Pro Shift Kit – Quick and Dirty Install Prepared by: JustSomeDude
Insane amounts of help from: MoMan Special thanks to everyone at YZF600r.com!!
Tools used in this how-to 10mm socket (shallow – ¼” drive) Paint scraper (or razor blade) 10mm wrench Pliers 5mm allen bit (with socket adapter) Mini-wire-cutters (or mini-pliers) 3/8” ratchet (with ¼” adapter) Automotive Magnetic Tool 6” extension for ¼” drive Small zip-ties Flathead screwdriver Blue loctite Torque wrench WD-40
*Please note, there is a HUGE difference between this how-to, and the previously existing how-to for the Shift Kit Install at yzf600r.com. While the other how-to suggests removing the clutch… this how-to demonstrates a method that shows the kit being installed without clutch removal. First – I recommend reading these instructions over COMPLETELY a few times to familiarize yourself with the parts and process as much as possible. When you open up your factory pro shift kit, there are 3 items: the new roller spring, roller, and clutch cover gasket. Before taking your bike apart and diving into the installation, I strongly suggest completing Step 1 below that preps the spring. Step1 – New Spring Preparation (requires: pliers, small zip-tie, Shift Kit Spring, and endless patience!) Estimated time, 15-20 min. The new spring is much stiffer than the old spring. This added stiffness can be a serious headache later during installation. To avoid such problems, we want to pre-compress the spring. To do this, you first want to get a zip-tie looped around the spring ends (refer to Photo 1.1 for zip-tie orientation). Next, grab the two ends of the spring in your pliers. Squeeze the pliers down to get the spring ends together. Be careful… a light grip could cause the spring to fly out, and go missing under some furniture, a work bench, into your eye!, etc. Once you have the spring fairly compressed, tighten the zip-tie with your third hand. ☺ This process is easier with a second person to help you, as you will probably need 1 hand for the pliers, 1 to steady/hold on to the spring, and 1 to tighten the zip-tie. NOTE: The knuckle of the zip-tie should be on the inside of the flat spring end. This will allow you to remove the zip-tie after the spring is installed. Refer to Photo 1.2.
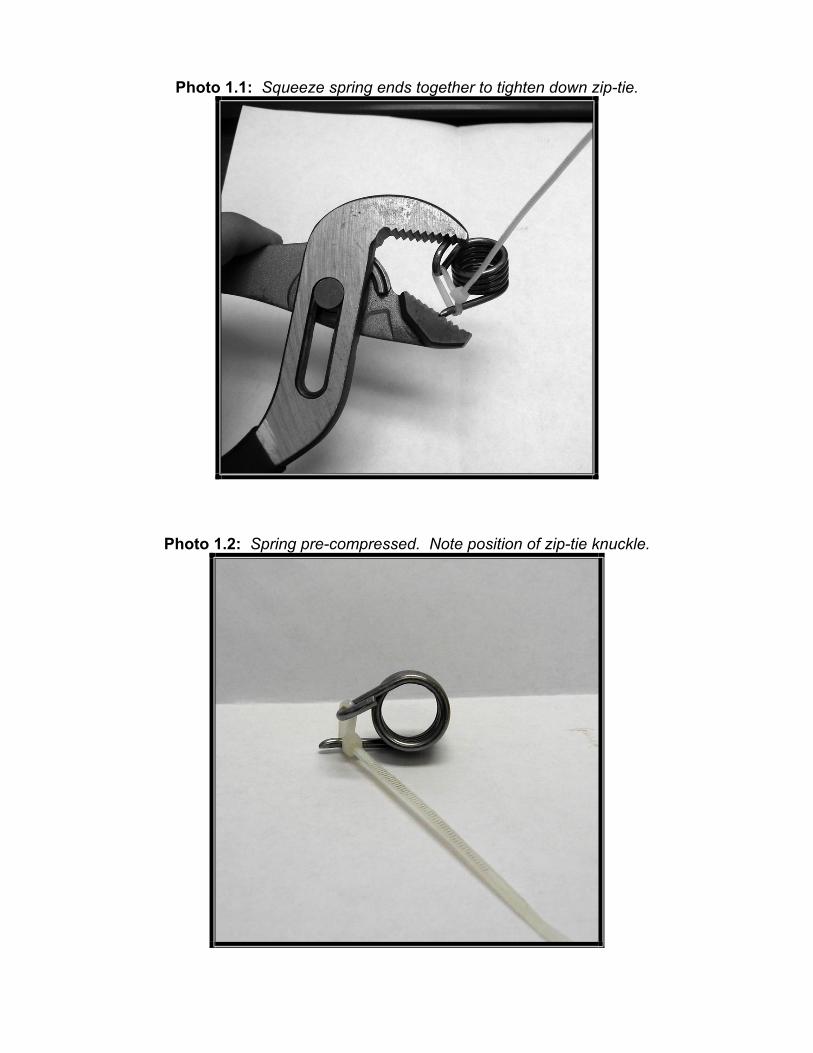
Photo 1.1: Squeeze spring ends together to tighten down zip-tie.
Photo 1.2: Spring pre-compressed. Note position of zip-tie knuckle.
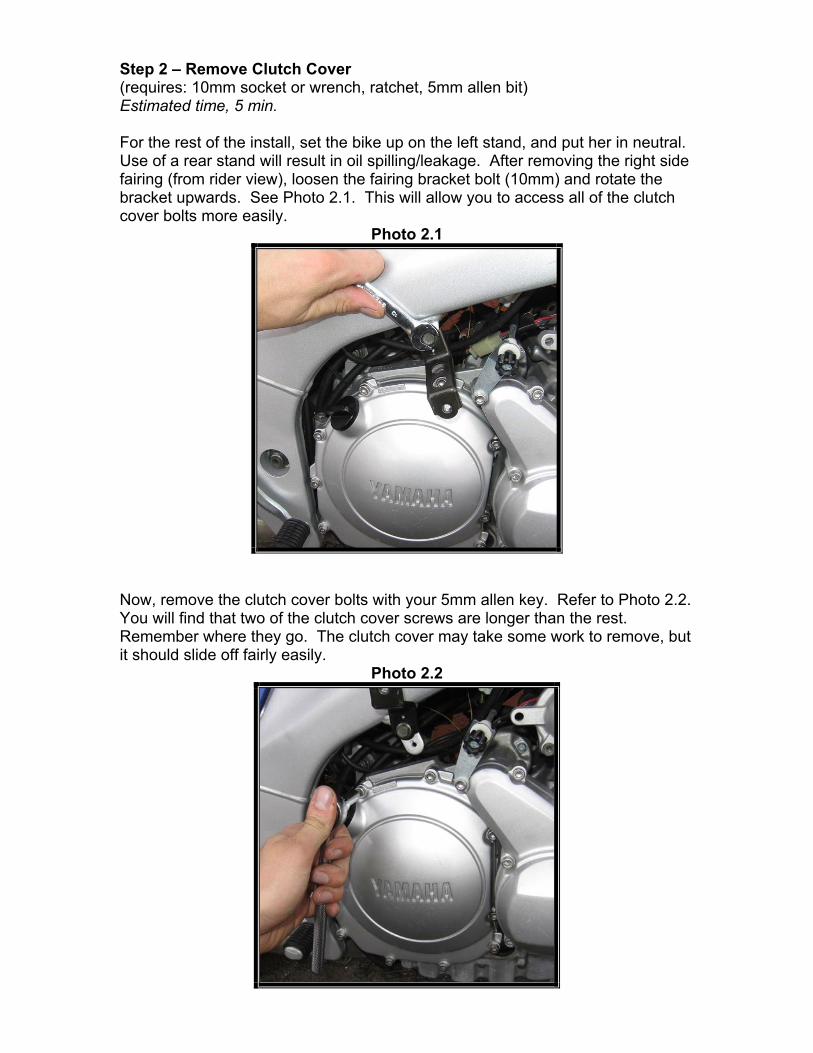
Step 2 – Remove Clutch Cover (requires: 10mm socket or wrench, ratchet, 5mm allen bit) Estimated time, 5 min. For the rest of the install, set the bike up on the left stand, and put her in neutral. Use of a rear stand will result in oil spilling/leakage. After removing the right side fairing (from rider view), loosen the fairing bracket bolt (10mm) and rotate the bracket upwards. See Photo 2.1. This will allow you to access all of the clutch cover bolts more easily.
Photo 2.1
Now, remove the clutch cover bolts with your 5mm allen key. Refer to Photo 2.2. You will find that two of the clutch cover screws are longer than the rest. Remember where they go. The clutch cover may take some work to remove, but it should slide off fairly easily.
Photo 2.2

Step 3 – Removal of Stock Spring and Roller (requires: 10mm socket and ratchet, 6” socket extension, magnetic tool) Estimated time, 5 min. ****Please note – I took these photos AFTER shift kit installation. So photos will show the new roller in place.**** Before beginning, note the position of the roller arm in the star cam. See point (A) in photo below. The new roller MUST rest in the same curved slot. Now, using your 10mm socket and ratchet drive with 6” extension, unscrew the roller bolt labeled (B). As the bolt begins to back out, your shallow 10mm socket may start to wedge itself behind the gear located just in front of the bolt. This will take some finagling to work around. Be gentle – don’t force anything. Refer to Photo 3.1 below. Behind the roller is the stock spring, which has some tension on it. Be careful as you unscrew the bolt not to allow parts to fall into the oil pan. If they do – don’t freak out – grab your magnetic tool gizmo, and fish any necessary parts out.
Photo 3.1
Pull out the bolt, stock roller, and slide the stock spring out. (sorry – no photo) You are now ready to begin installing your new roller and spring!

Step 4 – Installation of Factory Pro Shift Kit (requires: 10mm socket and ratchet, 6” socket extension, torque wrench, flathead screwdriver, loctite, magnetic tool – just in case) Estimated time, 30 min. 4.1 First, place the new spring with zip-tie installed exactly where the stock
spring was located. The position of the new spring on the bolt shaft is identical to the spring position shown in Photo 1.2 above. The flat end of the spring should be at the inside of the bike, with the curved end closest to you. Both spring ends should be pointing left. The long end of the zip-tie should be sticking out towards you.
4.2 Now – this is where things will get frustrating. You need to get the roller arm
tucked into the curved part of the spring arm. Don’t worry - I dropped it into the oil pan about 6 times trying to do this on my hands and knees – if you drop it in, just fish it out. See some fishing in Photo 4.2a.
Photo 4.2a

Once you get the roller balanced on the curved spring end, you need to fully compress the spring and seat the roller bearing under the star cam. To do this, add a few drops of loctite to the roller bolt and get it started in with a rotation or two. This will take some finagling, as the gear may hinder your ability to fully seat the 10mm socket on the bolt head. Once the bolt is started, the roller becomes a lot easier to work with. To seat the roller bearing under the star cam, I used a flat head screwdriver to push down on the roller arm, while pushing it in/under the star cam.
Photo 4.2b
4.3 With the roller arm seated, hold the bearing in place (as it may pop out) with
your index finger, and screw the bolt down snug enough to hold the roller arm in place. See photo 4.3. You need some play left in the bolt to get the zip-tie out in Step 5 below.
Photo 4.3

Step 5 – Removal of Zip-Tie (requires: mini wire-cutters or mini-pliers, a plethora of f-bombs) Estimated time, 10-20 min. This is another frustrating/cramped job. To remove the zip-tie, you must get a set of mini-pliers or wire-cutters underneath the roller arm to grab the zip-tie knuckle. See Photo 5.1. If the mini-pliers are used, grab the knuckle and twist it until it snaps. If mini wire-cutters are used, try to simply cut any part of the zip-tie that is accessible underneath the roller (just don’t cut the long piece hanging out – you need that to pull the zip-tie out!!). Once the zip-tie loop is cut, grab hold of the long zip-tie end, and slowly pull it out. Be VERY careful here… as the zip-tie is wedged between a few surfaces. Pulling too hard or quickly could result in zip-tie bits stuck in your clutch. This wouldn’t be a good thing, and would require you to start all over again (if you choose to clean the plastic zip-tie bits out).
Photo 5.1
DON’T FORGET: Once the zip-tie is out, tighten the roller bolt to 7.2 ft-lbs!!! Then pat yourself on the back… you just installed your shift kit!!!
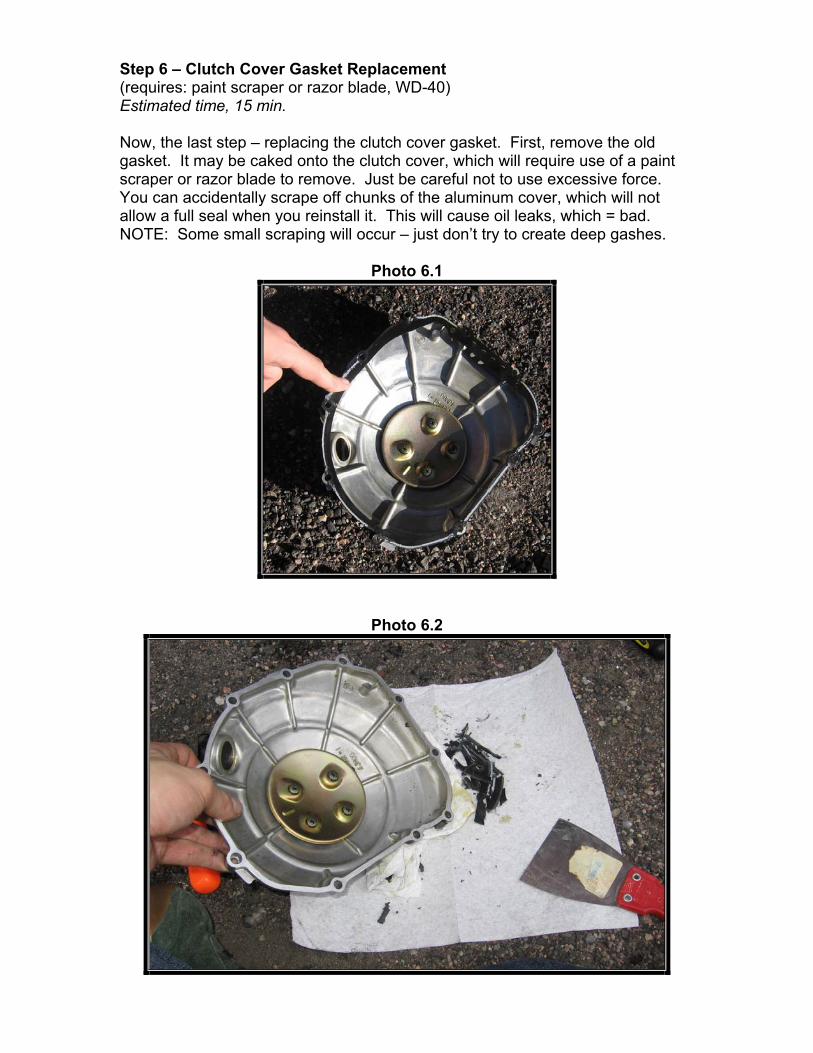
Step 6 – Clutch Cover Gasket Replacement (requires: paint scraper or razor blade, WD-40) Estimated time, 15 min. Now, the last step – replacing the clutch cover gasket. First, remove the old gasket. It may be caked onto the clutch cover, which will require use of a paint scraper or razor blade to remove. Just be careful not to use excessive force. You can accidentally scrape off chunks of the aluminum cover, which will not allow a full seal when you reinstall it. This will cause oil leaks, which = bad. NOTE: Some small scraping will occur – just don’t try to create deep gashes.
Photo 6.1
Photo 6.2

Before reinstalling the clutch cover, I recommend cleaning out the inside of the cover to remove any bits of scraped off gasket that may have stuck to it. I did this simply by splashing a few sprays of WD-40 across the surface.
Photo 6.3
Now place the new gasket on the bike at the clutch cover location. There are two bolt “sleeves” sticking out that you can “hang” the gasket on. (These are the same “sleeves” that designate where the longer clutch cover bolts go). After setting the gasket in place, install the clutch cover and screws, and tighten the allen bolts to 8.7ft-lbs. each. Don’t forget to put the fairing bracket back in place!!! Reinstall your right side fairing, and you’re all done! ☺ Estimated total time: 1.5hours. More time may be required as you familiarize yourself with certain parts of the bike, remove and reinstall fairings, etc. As a result, I recommend blocking out at least 3 hours of time for this project if it is your first time doing work on these parts. The frustrating thing is, after you do it, you realize you could do it again in about 30 minutes. Such is the way of the learning process. Best of luck!!!

Factory Pro Shift Kit – Quick and Dirty Install
ADDITIONAL NOTES
1) Step 1, spring prepping. Try to prep the spring the same day you do the
shift kit install. If you get the spring compressed with the zip-tie and let it sit around for a while, say – a day or two, the zip-tie may snap due to the tension. Trust me - I speak from experience. ☺
2) I highly recommend having a 2nd person around for some of the install,
because it just makes things easier (such as Step 1). Before taking ANY stock parts out, consider having a friend shift through the gears after you take the clutch cover off. Watch the roller… watch the star cam… see what’s going on. I am a visual learner, and being able to see what was going on and what I was working on, really helped me out. Just make sure she’s back in neutral before you continue with the install.
3) Final Check!! This also requires a 2nd person. Before putting the clutch
cover back on, have your buddy shift through a couple of gears. Watch to make sure the roller and star cam are working correctly. The first few shifts will be pretty stiff since the spring is brand new… this will eventually “lighten up” as the spring “breaks in.”
4) One Troubleshooting Note: While a million things can go wrong, I can
explain one problem that I encountered. When I was shifting through gears to test the roller out after I completed the install, everything just stopped working. I felt no tension on the shift lever, and the bike was not shifting gears.
What happened was, the “shift shaft” (my name for it – and can be seen just above the pliers in Photo 5.1) pushed out about ½” on the right side of the bike due to my action on the shift lever. This caused the shift arm to disengage from the star cam, resulting in no contact whatsoever. If you look on the inside of the clutch cover, towards the bottom, there is a little aluminum “knob” sticking out. This keeps the shift shaft held in place, to keep the shift arm engaged on the star cam. There is nothing holding the shift shaft when the cover is removed, which can allow some movement. If this happens to you, simply push the shift shaft back into the bike. And the problem is solved. NOTE: This happened to me because I was working alone, and couldn’t observe the action in the clutch while shifting gears at the other side of the bike. I finally had a friend come and help me solve the issue by working the shifts for me. I was then able to watch the clutch and see the problem. A bit of a “d’oh!” moment. This shouldn’t happen with the clutch cover installed.
This HOW-TO was last modified: October 12, 2006