Facsimile Quick Reference Guide -...
28
Facsimile Quick Reference Guide Model No. KX-PW821DL KX-PW821DW KX-PW821DL Main unit: Portable handset: KX-PW821 KX-FKN518 Thank you for purchasing a Panasonic product. This guide explains some basic features and operations, but not all of them. For further details, see the Japanese operating instructions. This product is designed for use in Japan. Panasonic cannot provide service for this product if used outside Japan. KX-PW821DL includes 1 portable handset and 1 main unit. KX-PW821DW includes 2 portable handsets and 1 main unit. Any details given in this guide are subject to change without notice. This unit is equipped with the voice guide features. (Japanese only) Cancel the voice guide features after installations and connections. For details about voice guide, please see page 10. Table of Contents Finding the controls …………………………………………………………… 2 Installations and connections ………………………………………………… 4 Setting your facsimile telephone number to the main unit ………………… 7 Setting your logo to the main unit …………………………………………… 8 Character input mode for the main unit ……………………………………… 8 Character input and command key table for the portable handset ……… 9 Voice guide…………………………………………………………………… 10 Automatic dialing on the main unit ………………………………………… 11 Recording a telephone conversation on the main unit ………………… 12 Automatic dialing on the portable handset (KX-FKN518) ……………… 13 Writing on the LCD while talking ………………………………………… 14 Intercom ……………………………………………………………………… 15 Sending faxes ……………………………………………………………… 16 Copying documents ………………………………………………………… 16 Sending a memo written on the LCD……………………………………… 17 Receiving faxes ……………………………………………………………… 18 Operating the built-in answering device ………………………………… 22 Night mode…………………………………………………………………… 24 Call block …………………………………………………………………… 25 SD Memory Card …………………………………………………………… 26 Trademarks ………………………………………………………………… 27 Specifications ………………………………………………………Back cover
Transcript of Facsimile Quick Reference Guide -...

Facsimile
Quick Reference Guide
Model No. KX-PW821DLKX-PW821DW
KX-PW821DL
Main unit:Portable handset:
KX-PW821KX-FKN518
Thank you for purchasing a Panasonic product.
This guide explains some basic features and operations, but not all of them. For further details, see the Japanese operating instructions.This product is designed for use in Japan.Panasonic cannot provide service for this product if used outside Japan.KX-PW821DL includes 1 portable handset and 1 main unit.KX-PW821DW includes 2 portable handsets and 1 main unit.Any details given in this guide are subject to change without notice.
This unit is equipped with the voice guide features. (Japanese only)Cancel the voice guide features after installations and connections.For details about voice guide, please see page 10.
Table of Contents Finding the controls …………………………………………………………… 2Installations and connections ………………………………………………… 4Setting your facsimile telephone number to the main unit ………………… 7Setting your logo to the main unit …………………………………………… 8Character input mode for the main unit ……………………………………… 8Character input and command key table for the portable handset ……… 9Voice guide …………………………………………………………………… 10Automatic dialing on the main unit ………………………………………… 11Recording a telephone conversation on the main unit ………………… 12Automatic dialing on the portable handset (KX-FKN518) ……………… 13Writing on the LCD while talking ………………………………………… 14Intercom ……………………………………………………………………… 15Sending faxes ……………………………………………………………… 16Copying documents ………………………………………………………… 16Sending a memo written on the LCD ……………………………………… 17Receiving faxes ……………………………………………………………… 18Operating the built-in answering device ………………………………… 22Night mode …………………………………………………………………… 24Call block …………………………………………………………………… 25SD Memory Card …………………………………………………………… 26Trademarks ………………………………………………………………… 27Specifications ………………………………………………………Back cover

2
Finding the controls
Main unit
10月10日(日)
1 Liquid crystal display (LCD)a-j refer to the touch buttons.a. Phonebook f. Functionb. Playback g. Redialc. Fax/Copy h. Speed Dialerd. Handwriting i. Intercome. SD indicator j. VolumeThe display turns off after about 2 minutes of inactivity.To turn on the display, touch the panel.
2 Touch panel can be operated by touching it. (See below)
3 Stylus pen
4 Auto Answer button & indicator— light on: answering device activated.— light off: used as a regular telephone.
5 Call/Fax List button starts a search in— the Number Display (Caller ID) log.— the fax list stored in memory.
6 Call/Fax List indicator lights when— a call was missed. (For Number Display service users.)— a fax was stored in memory.
7 Monitor button
8 SD Memory Card cover
9 Tone button switches to tone dialing.Night mode button
10 Sharp buttonKey lock button can lock the main unit so that no calls or settings can be made. To turn key lock on, touch this button for about 3 seconds until a single beep is heard.
To turn key lock off, touch this button for about 3 seconds.
11 Stop button
To use the touch panelExample : To use the phonebook Example : To dial numbers
To adjust the volumeTo adjust the ringer volume when the unit is on stand by
Touch 音 量 (Volume) Touch 呼出音量 (Ringer Volume) Touch 大 (High) 小 (Low) repeatedly Touch 決 定 (Set)
To adjust the receiver volume while talking, touch 大 (High) 小 (Low) repeatedly.
To adjust the speaker volume while listening to the recorded messages or using the monitor, touch 大 (High) 小(Low) repeatedly.
Touch 電話帳を使う .Touch .
“ ” refers to the current setting.Example: Setting the dialing mode
To select a name from the phonebook, touch the desired name.(Selected name is highlighted.)
Touch ( ) to scroll through the name list.
( ) indicates that the list does not extend beyond the current screen.

3
Finding the controls
Portable handset (KX-FKN518)
● To change Hiragana into Kanji.
● To adjust the volume.
● To redial the phone numbers in the redial list. The last 10 phone numbers dialed are stored in memory.
● To make/answer calls.
● To put a call on hold.● To start a search in the
Number Display log.(For Number Displayservice users.)
● To use the speakerphone.
● For call waiting service users.
● To clear letters/numbers.Sharp buttonKey lock button● To lock the portable handset so that no calls or settings
can be made. To turn key lock on, press this button for about 3 seconds until a single beep is heard.● “ ” is displayed.● To turn key lock off, press this button for about 3
seconds until a single beep is heard.
● To use the phonebook.
and buttons refer to the function displayed on the bottom of the display. They function differently depending on the mode.
Dial buttons
Earpiece Liquid crystal display
Microphone
Do not cover the microphone while talking.
Function menu that iscontrolled by or
Portable handset number (and name)No link to the main unit
Battery strength
Tone button● To switch to tone dialing.
● To end a call.● To end or exit from editing or
other operations.
How to use key
How to use buttons
● To page the main unit and/or portable handset(s).
■ To adjust the ringer volume when the portable handset is on stand by
(Select “呼出音量”)
(press
repeatedly) or
■ To adjust the receiver volume while talking, press repeatedly
■ To adjust the speaker volume while listening to the recorded messages or using the speakerphone,
press repeatedly

4
Installations and connections
When the unit runs out of the ink film, the following message will be displayed.
フィルムがなくなりました U23交換してください (KX-FAN190)
Install a new ink film.
Installing the ink film
1
2
2
1
Open the back cover.
Open the control panel.
Replacement ink film:KX-FAN190 (15 m) ¥714KX-FAN190W (15 m X 2) ¥1,208KX-FAN191 (15 m) (*1) ¥893KX-FAN191W (15 m X 2) (*1) ¥1,523 ・As of August 2010. ・Tax included.
*1 KX-FAN191/KX-FAN191W leaves a fainter print trail on the film than does the KX-FAN190/190W.
3
4 If the ink film is slack, tighten it bywinding this gear (orange).
Insert the ink film.Insert the orangegear into the left slotof the main unit.
Insert the white gear into the right slotof the main unit.
5 Close the back cover pressing “ ” down on both sides until it clicks into place.
6 Close the control panel.

5
Installations and connections
Installing recording paper (A4 size)
2 Set up the recording paper stands.
Pull out the front stand first.
Recording paper
Printing side is on the back.
1 Open the recording paper tray.
① Remove the recording paper and fold the recording paper stands in.
② Close the recording paper tray.
Folding the recording paper tray

6
Installations and connections
Connecting the main unit
1 Raise the antenna.
4
3
2 Connect the cord and place the handset on the main unit.
Connect the telephone line cord.
Telephone line cord(supplied accessory)
Connect the power cord.
Wall jack
Power cordPower outlet(AC 100 V)
After the Connecting...
① This unit will automatically select the dialing mode (Pulse/Tone).
②When the following is displayed, touch機 能 (Function) to set the date and time.
③ Enter the correct year/month/day.Example: October 10, 2010
Touch 2 0 1 0 1 0
1 0 .
④ Enter the correct hour/minute in a 24-hourclock entry.Example: 15:45 (3:45 PM)
Touch 1 5 4 5 .
⑤ Touch 決 定 (Set).
⑥When the following is displayed, touch (Stop).
日付・時刻を設定するには[機能] 押す
選んでケータイの設定を開始します[決定] を押してください
If you cannot make a call...
To adjust the date and time
1. Touch 機 能 (Function), then touch .
2. Enter the correct year/month/day/hour/minute.
3. Touch 決 定 (Set), then touch (Stop).
Set the dialing mode with the main unit.
1. Touch 機 能 (Function).
2. Touch .
3. Touch to select the desired setting.
4. Touch (Stop).
プッシュ : Tone 20 : Pulse (20 PPS)
10 : Pulse (10 PPS) 自動 : Auto (Default)

7
Installations and connections
Setting your facsimile telephone number to the main unit
1 Touch 機 能 (Function).
5 Touch (Stop).
3 Touch 1 2 3 4 56 7 8 9 0 to enter your facsimile telephone
number, up to 20 digits.Example: +098 7654··
2 Touch .
4 Touch 決 定 (Set).
Setting up the portable handset(KX-FKN518)
1 Press on the battery cover and slide the cover.
2 Insert the battery into the compartment and close the battery cover.
After your Panasonic battery is fully charged, it will last up to about 5 hours of conversation.
Battery
Power outlet(AC 100 V)
Charger
3 Connect the charger to the power outlet, then place the portable handset on the charger for about 10 hours.
The スペース (Space) button replaces the digit with a
space.
To correct a mistake, touch 消 去 (Erase).
登録しました

8
3 Enter your logo, up to 30 characters, using the LCD.
To enter English characters, touch 文字切替 (Character
input mode) repeatedly until English letters are displayed.Detailed instructions are given on the right.
Setting your logo to the main unit
1 Touch 機 能 (Function).
5 Touch (Stop).
Example: Micah1. Touch M .
2. Touch 小文字 (Lower case) i .
3. Touch c .
4. Touch a .
5. Touch h .
4 Touch 決 定 (Set).
2 Touch .
Cursor
登録しました
Cursor
Character input mode for the main unit
To change the character input mode, touch 文字切替(Character input mode) repeatedly. Input mode can be switched in the following order:Hiragana → Katakana → English → Numbers → Signs
English input mode
To enter N~Z/A~M, touch N~Z切替 (Change to N-Z)/
A~M切替 (Change to A-M).
To enter lower case letters,
touch n~z切替 (Change to n-z)/
a~m切替 (Change to a-m).
To enter lower case/upper case letters,
touch 小文字 (Lower case)/ 大文字 (Upper case).
Sign input mode
To move the cursor to the left and right,
touch .
To delete a character, touch 消 去 (Delete).
To insert a space, touch スペース (Space).
There are 3 pages of different signs.
To enter a different sign, touch ページ切替 (Next page).
Character (Signs)@ . _ – & $ ¥ % + = ̃ ^ !? / – # ‚ ; : | ・ ’” () [ ] { } 〈 〉「 」、。゛ 。
The characters on the display are somewhat different from those shown in the character list.

9
Character input and command key table for the portable handset
Pressing the dial keys will select a character as shown below.
Character Hiragana Katakana English Numbers
Display of the portable handset [漢] [カナ] [英] [数]
Dial keyPortable handset( KX-FKN518 )
あいうえおぁぃぅぇぉ
アイウエオァィゥェォ @ . _ – & $ ¥ % + = ̃ ^ 1
かきくけこ カキクケコ A B C a b c 2
さしすせそ サシスセソ D E F d e f 3
たちつてとっ タチツテトッ G H I g h i 4
なにぬねの ナニヌネノ J K L j k l 5
はひふへほ ハヒフヘホ M N O m n o 6
まみむめも マミムメモ P Q R S p q r s 7
やゆよゃゅょ ヤユヨャュョ T U V t u v 8
らりるれろ ラリルレロ W X Y Z w x y z 9
わをんー!? ( ) ワヲンー!? ( ) ! ? / ー # ‚ ; : | ・ ’ ” ( ) [ ] { } 〈 〉「 」
0
゛°、 。 、 。
Command keys
Used to change the character input mode.
Used to move the cursor to the left and right.
Used to delete a character.
Used to insert a space.
The characters on the display are somewhat different from those shown in the character input and command key table.

10
Operation guide The unit starts the following voice guidance in Japanese:
Operations To cancel the operation guide (using the main unit)
Send a fax機 能 なし
Copy
Add entries to the phonebook
機 能 なし Store phonebook entries in the speed dialer
Make a call using the phonebook/redial/speed dialer/call memory
Reading-out dial The unit announces the number dialed in Japanese, when you make a call with the main unit.
To cancel the reading-out dial
機 能 なし
Reading-out phonebookThe unit reads out stored names* when the phonebook is searched.
To cancel the reading-out phonebook
機 能 なし
Incoming name announcement (for Number Display service subscribers only)
The unit announces the caller’s name* when a call is received from a caller whose name and phone number are stored in the phonebook.
To cancel the incoming name announcement
機 能 なし
Voice guide
* Names will only be read out when their “フリガナ ” (readings) are stored in katakana in the phonebook.English, numbers and signs in “フリガナ ” are not read out.

11
Automatic dialing on the main unit
Storing names and telephone numbers in the phonebook
Making a voice call using the phonebook
1 Touch 電話帳を使う (Phonebook), then touch 探す (Search).
2 Touch 新規登録 (Register).
2 Select the desired name.
3 Lift the handset.
Editing a stored name or number in the phonebook
3 Touch ボタン切替 (More buttons), then
touch 修 正 (Edit).
4 Edit the name (see “Character input mode for the main unit” on page 8 for instructions).
If you do not need to edit the name, skip to step 5.
5 Touch 決 定 (Set).
8 Edit the telephone number.If you do not need to edit the telephone number, skip to step 9.
10Select the group number.If you do not need to change the group number, skip to step 11.
1 Touch 電話帳を使う (Phonebook), then touch 探す (Search).
2 Select the desired name.
1 Touch 電話帳を使う (Phonebook).
“XXX” shows the remainingstation numbers you can store.You can program up to 150 stations, including 4 pre-programmed stations.
3 Enter the name, up to 20 characters (see “Character input mode for the main unit” on page 8 for instructions).
4 Touch 決 定 (Set) twice.
5 Enter the telephone number, up to 24 digits.
To correct a mistake, touch 消 去 (Erase).
6 Touch 決 定 (Set).
7 Select the group number [ グループ1: (Group 1) to グループ9: (Group 9)].
8 Touch 決 定 (Set).
To program other items, repeat steps 3 to 8.
9 Touch (Stop) to exit the program.
12Touch (Stop).
11 Touch 決 定 (Set).
9 Touch 決 定 (Set).
6 Edit the kana.If you do not need to edit the kana, skip to step 7.
7 Touch 決 定 (Set).
XXX

12
Automatic dialing on the main unit
Recording a telephone conversation on the main unit
Storing names and telephone numbers in the speed dialer
Making a voice call using the speed dialer
You can store up to 9 names and telephone numbers which are stored in the phonebook. The dialing buttons ( to ) function as memory stations.
3 Touch 新規登録 (Register).
1 Touch 短 縮 (Speed dialer).
5 Touch 登 録 (Set).
To program other items, repeat steps 2 to 5.
6 Touch (Stop) to exit the program.
4 Select the desired name.
2 Select the memory station by touching the LCD.
Example: speed dialer 1
1 Touch 短 縮 (Speed dialer).
2 Select the memory station by touching the LCD.
Erasing a stored name and number in the speed dialer
3 Lift the handset.
1 Touch 短 縮 (Speed dialer).
2 Select the memory station by touching the LCD.
4 Touch (Stop) to exit the program.
3 Touch 消 去 (Erase), then touch は い (Yes).
Memory station number
1 While talking, touch 通話録音 (Record).
2 Touch いいえ (Cancel the precaution voice message)
and the recording starts.
3 Touch (Stop) to end the recording.

13
Automatic dialing on the portable handset (KX-FKN518)
Storing names and telephone numbers in the phonebook
Making a voice call using the phonebook
1 Press (Phonebook).
3 Enter the name, up to 20 characters (see the table on page 9 for instructions).
4 Press twice.
3 Press (Talk).
5 Enter the telephone number, up to 24 digits.
To correct a mistake, press (Flash/Erase).
6 Press .
9 Press (Off) to exit the program.
Editing a stored name or number in the phonebook
3 Press .
4 Edit the name (see the table on page 9 for instructions).
If you do not need to edit the name, skip to step 5.
5 Press .
8 Enter the correct telephone number.If you do not need to edit the telephone number, skip to step 9.
11Press .
1 Press (Phonebook).
2 Press (Search button) repeatedly until the
desired name is displayed.
2 Press (Search button) repeatedly until the
desired name is displayed.
1 Press (Phonebook).
7 Enter the group number ( to ).
10Edit the group number.If you do not need to edit the group number, skip to step 11.
8 Press .To program other items, repeat steps 3 to 8.
9 Press .
12Press (Off) to exit the program.
検索は[ , ]を押す
2 Press .“XXX” shows the remaining station numbers you can store.You can program up to 150 stations, including 4 pre-programmed stations.
名前?
空き ×××件
6 Edit the kana.If you do not need to edit the kana, skip to step 7.
7 Press .

14
Writing on the LCD while talking
1 While talking, touch その他のボタンファクスなど (More buttons).
3 Touch 新しく書く (New).
4 Touch 書く (Write).
6 Touch 保存 (Save).
5 Write on the LCD with the stylus pen.
7 Touch 本体に保存する (Save to main unit) or SDに
保存する
(Save to SD Card).
8 Touch (Stop).
2 Touch 手書き (Handwriting).
モード切替書く
ペン切替太
保 存 プレビュー中 止
How to write on the LCDBe sure not to touch the LCD except with the stylus pen.
You cannot write when something else has already touched the surface before you write with the stylus pen.
Information about display
To scroll display contentsTouch the dial keys and slide your finger in the desired direction to scroll.
To switch pen/eraserTouch「ペン切替」(Switch Pen/Eraser) repeatedly.
ペン切替太 (Thick)
ペン切替細 (Fine)
ペン切替消しゴム (Eraser)
To view the entire image
Touch プレビュー (Preview).
Or you can touch the image and slide your finger
to scroll when モード切替書く
(Write) is switched to モード切替移動
(Scroll) by touching the button.
モード切替書く
ペン切替太 保 存 プレビュー中 止
Correct
Incorrect
15
Intercom
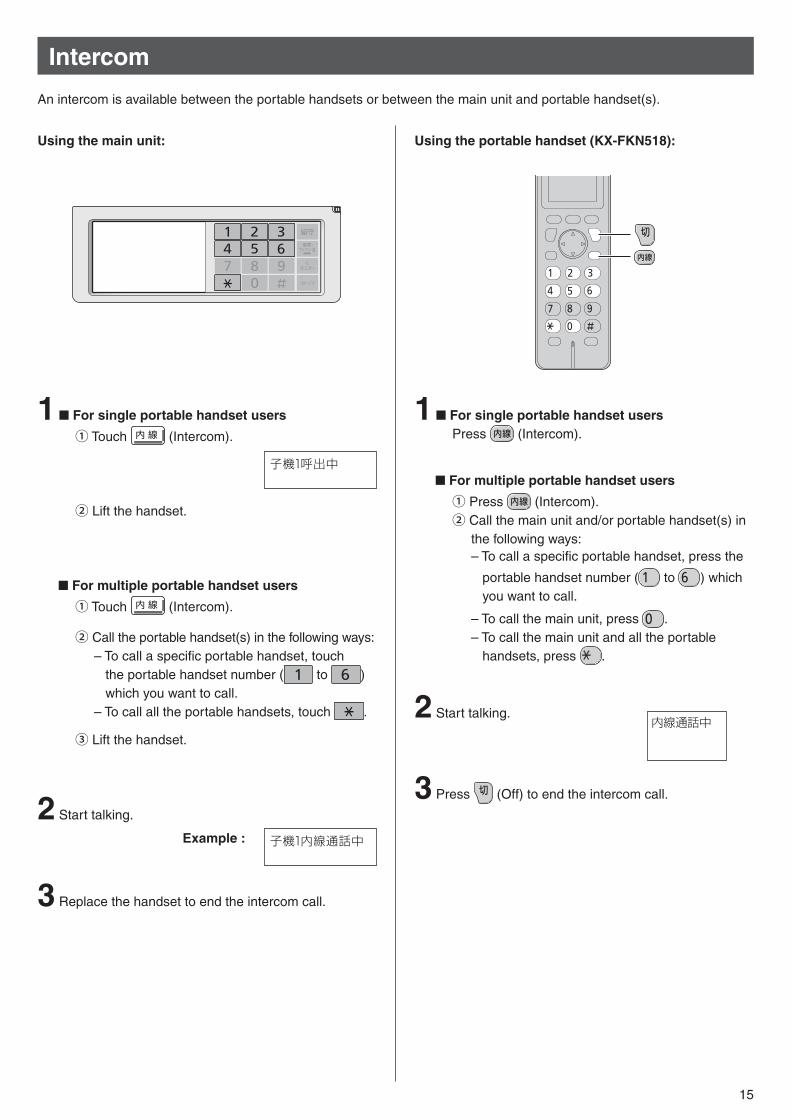
An intercom is available between the portable handsets or between the main unit and portable handset(s).
Using the main unit: Using the portable handset (KX-FKN518):
1 For single portable handset usersPress (Intercom).
For multiple portable handset users
① Press (Intercom).② Call the main unit and/or portable handset(s) in
the following ways:– To call a specific portable handset, press the
portable handset number ( to ) which you want to call.
– To call the main unit, press .– To call the main unit and all the portable
handsets, press .
3 Press (Off) to end the intercom call.
1 For single portable handset users
① Touch 内 線 (Intercom).
② Lift the handset.
For multiple portable handset users
① Touch 内 線 (Intercom).
② Call the portable handset(s) in the following ways:– To call a specific portable handset, touch
the portable handset number ( to )which you want to call.
– To call all the portable handsets, touch .
③ Lift the handset.
2 Start talking.
子機1呼出中
3 Replace the handset to end the intercom call.
2 Start talking.
Example : 子機1内線通話中
内線通話中

16
Sending faxes
1 Open the document cover, and adjust the width of the document guides to the size of the document.
2 Insert the document (up to 5 pages) FACE UP until a single beep is heard.
3 If necessary, touch 画 質 (Resolution) repeatedly to
select the desired resolution (see below).
FACE UP Documentguides
Document
Document cover
4 Dial the fax number.
5 Touch ファクス (Fax).
The unit will start fax transmission.
Sending a fax manually
To select the resolution
Select the desired resolution according to the type of document, by touching 画 質 (Resolution) repeatedly.
画質=ふつう字 (Standard) for printed or typewritten originals with normal-sized characters.
画質=小さい字 (Fine) for originals with minute printing.
画質=写真 (Photo) for originals containing photographs.
1 Insert the document (up to 5 pages) FACE UP until a single beep is heard.
3 Select the desired name.
1 Insert the document (up to 5 pages) FACE UP until a single beep is heard.
3 Select the memory station by touching the LCD.
Sending a fax using automatic dialingUsing the phonebook
Using the speed dialer
4 Touch ファクス (Fax).
The unit will start fax transmission.
2 When the display returns to the stand-by screen after
5 seconds, touch 電話帳を使う
(Phonebook), 探す
(Search).
2 When the display returns to the stand-by screen after 5 seconds, touch 短 縮 (Speed dialer).
4 Touch ファクス (Fax).
The unit will start fax transmission.
Cancel the voice guide features before sending a fax. (See page 10)
Copying documentsCancel the voice guide features before copying a document. (See page 10)
1 Install the recording paper (see page 5).
2 Insert the document (up to 5 pages) FACE UP until a single beep is heard.
3 When the display returns to the stand-by screen after
5 seconds, touch ファクス/コピー
(Fax/Copy).
If necessary, before the display changes, touch 画 質 (Resolution) repeatedly to select the desired
resolution (see above).
4 Touch コピーをする (Copy).
The unit will start copying.

17
1 Touch 手書き (Handwriting).
1 Touch 手書き (Handwriting).
1 Touch 手書き (Handwriting).
3 Touch 書く (Write).
3 Select a memo.
3 Select a memo.
5 Dial the fax number.
6 Touch ファクス (Fax).
The unit will start fax transmission.
4 Write on the LCD with the stylus pen.
4 Touch ボタン切替 (More buttons).
4■ To send the memo, touch ファクス送信 (Send a fax).
■ To view the memo, touch 表 示 (Display). To finish,
touch (Stop).
5■ To delete the memo, touch 消 去 (Delete), then
touch は い (Yes).
■ To print the memo, touch 印 刷 (Print).
If you want to delete the memo, touch は い (Yes).
If you want to hold the memo, touch いいえ (No).
■ To save the memo to the SD Memory Card, touch
SD保存 (Save to SD Card), then touch は い (Yes).
2 Touch 新しく書く (New).
2 Touch 本体の一覧を見る
件10 (fax list in the main unit memory).
2 Touch 本体の一覧を見る
件10 (fax list in the main unit memory).
You can send or save a memo written on the LCD.
Writing on the LCD Deleting/printing a memo/saving a memo to the SD Memory Card
Sending/viewing a memo
Sending a memo written on the LCD
モード切替書く
ペン切替太
保 存 プレビュー中 止
6 Touch 本体に保存する (Save to main unit) or SDに
保存する
(Save to SD Card).
7 Touch (Stop).
5 Touch 保存 (Save).

18
Receiving faxes
Receiving a fax manually (AUTO ANSWER off)
Using the main unit:
2 When:– document reception is required, – a fax calling tone (slow beep) is heard, or– no sound is heard,
touch その他のボタンファクスなど (More buttons), ファクス (Fax), then replace
the handset.The unit will start fax reception.
1 When you hear a ring, lift the handset to answer the call.
Receiving faxes
Using the portable handset (KX-FKN518):
2 When receiving a call, the unit will receive a fax document or record a voice message automatically depending on the caller’s request.
Receiving a fax automatically(AUTO ANSWER on)
1 If the (Auto answer) light is off, turn it on by
touching .
2 When:– document reception is required, – a fax calling tone (slow beep) is heard, or– no sound is heard,
press .
3 Press (Search button) repeatedly until the
“ ファクス受信 ” is displayed, then press .
4 Press .
The main unit will start fax reception.
1 When you hear a ring, lift the portable handset from
the charger, then press (Talk) to answer the call.
You can select beforehand whether to receive faxes by “Receive in memory” or “Receive on recording paper”.
The received fax will be stored in the main unit fax memory or the SD Memory Card. You can check the contents on the display, then print them if necessary.
The received fax will be printed on recording paper.
Setting/canceling “Receive in memory”
Touch 機 能 (Functions), 見てから印刷入切 (Receive in memory),
then は い (Yes).
(Changes each time they are touched.)
Receive on :recording paper
Receive in memory :(Default setting)
Receive in memory
With no display: Receive on recording paper
19
日
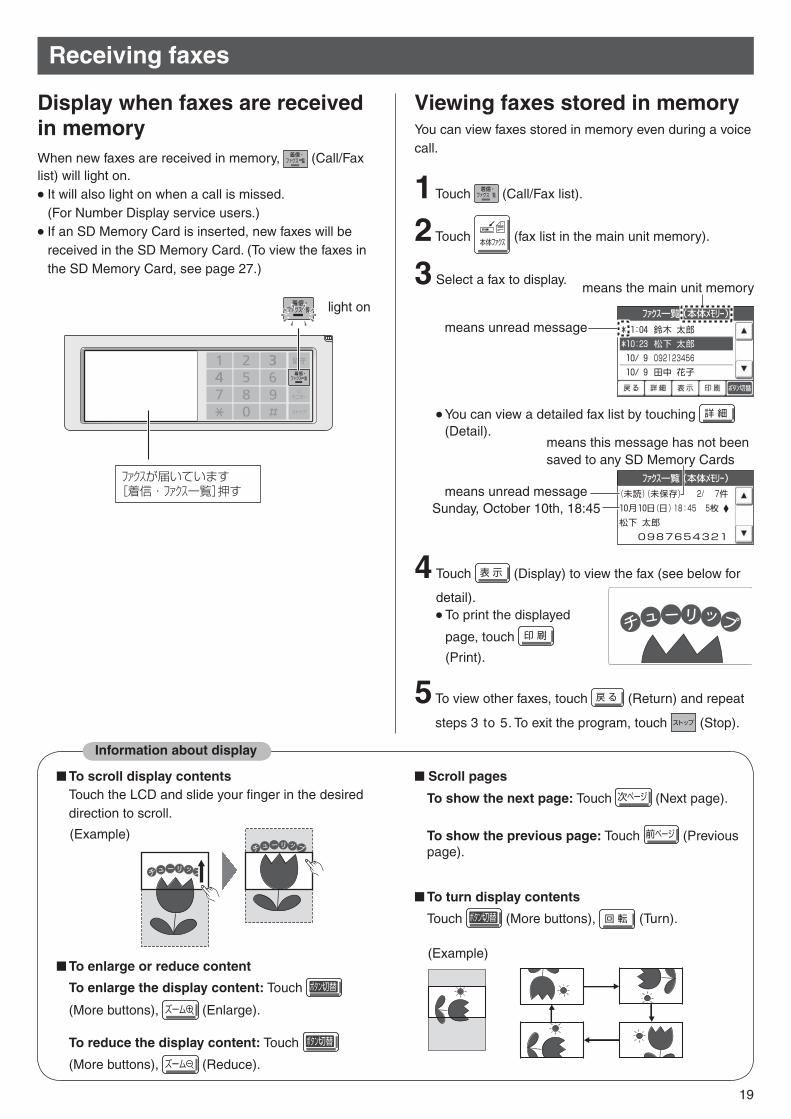
Display when faxes are received in memory
1 Touch (Call/Fax list).
Viewing faxes stored in memory
When new faxes are received in memory, (Call/Fax list) will light on.
It will also light on when a call is missed.(For Number Display service users.)If an SD Memory Card is inserted, new faxes will be received in the SD Memory Card. (To view the faxes in the SD Memory Card, see page 27.)
You can view faxes stored in memory even during a voice call.
Receiving faxes
3 Select a fax to display.
You can view a detailed fax list by touching 詳 細(Detail).
4 Touch 表 示 (Display) to view the fax (see below for
detail).To print the displayed
page, touch 印 刷
(Print).
5 To view other faxes, touch 戻 る (Return) and repeat
steps 3 to 5. To exit the program, touch (Stop).
Information about display
To enlarge or reduce content
To enlarge the display content: Touch ボタン切替
(More buttons), ズーム (Enlarge).
To reduce the display content: Touch ボタン切替
(More buttons), ズーム (Reduce).
To turn display contents
Touch ボタン切替 (More buttons), 回 転 (Turn).
To scroll display contentsTouch the LCD and slide your finger in the desired direction to scroll.
2 Touch 本体ファクス (fax list in the main unit memory).
(Example)
(Example)
Sunday, October 10th, 18:45means unread message
means unread message
means the main unit memory
Scroll pages
To show the next page: Touch 次ページ (Next page).
To show the previous page: Touch 前ページ (Previous page).
means this message has not been saved to any SD Memory Cards
ファクスが届いています[着信・ファクス一覧]押す

20
3 Select the desired fax to print.
4 Touch 印 刷 (Print).
Printing a specific fax stored in memory
1 Touch (Call/Fax list).
Deleting a specific fax stored in memory
6 Touch (Stop).
Receiving faxes
1 Touch (Call/Fax list).
3 Select the desired fax to delete.
5 If you want to delete the fax, touch は い (Yes).
If you want to hold the fax, touch いいえ (No).
6 If you want to delete other faxes, repeat steps 3 to 5.
7 Touch (Stop).
4 Touch ボタン切替 (More buttons), 消 去 (Delete).
Do you delete the new fax ?
消去しますか?このファクスは未読です
or
Do you delete the fax ?
消去しますか?
5 After printing, the following is displayed.
If you want to delete the fax, touch は い (Yes).
If you want to hold the fax, touch いいえ (No).
印刷した内容を消去しますか?
Do you delete the printed contents ?
2 Touch 本体ファクス (fax list in the main unit memory). 2 Touch 本体ファクス (fax list in the main unit memory).

21
3 Select a fax.
Adding a memo on a received fax
1 Touch (Call/Fax list).
Receiving faxes
5 Touch ボタン切替 (More buttons) twice.
2 Touch 本体ファクス (fax list in the main unit memory).
4 Touch 表 示 (Display).
You can add a memo on a received fax stored in memory using the LCD.
6 Touch 手書き (Handwriting).
7 Touch 書く (Write).
9 Touch 保存 (Save).
8 Write on the LCD with the stylus pen.
・ground pork・shrimps・cabbage・leek
ペン切替太
モード切替書く 保 存 プレビュー中 止
10Touch 本体に保存する (Save to main unit) or SDに
保存する
(Save to SD Card).
11Touch (Stop).
3 Select a fax.
4 Touch ボタン切替 (More buttons) twice.
5 Touch ファクス転送 (Forward a fax).
6 Dial the fax number.
7 Touch ファクス (Fax).The unit will start fax transmission.
Forwarding received faxes stored in memory
1 Touch (Call/Fax list).
2 Touch 本体ファクス (fax list in the main unit memory).

22
Recording your own greeting messageYou can record your own greeting message. When receiving a call, it will be played to callers instead of the pre-recorded Japanese greeting message.
4 Touch 開 始 (Start) and speak your greeting message
after a beep, up to 16 seconds, to the handset.
5 Touch 終 了 (End) and replace the handset.
Your greeting message will be played back automatically.
1 Touch 機 能 (Function).
2 Touch .
Erasing your own greeting message
3 Lift the handset.
受話器を取ってください
1 Touch 機 能 (Function).
2 Touch .
3 Touch は い (Yes).
The pre-recorded Japanese greeting message will be played when you receive a call.
消去しますか?
Operating the built-in answering device
23
Operating the built-in answering device
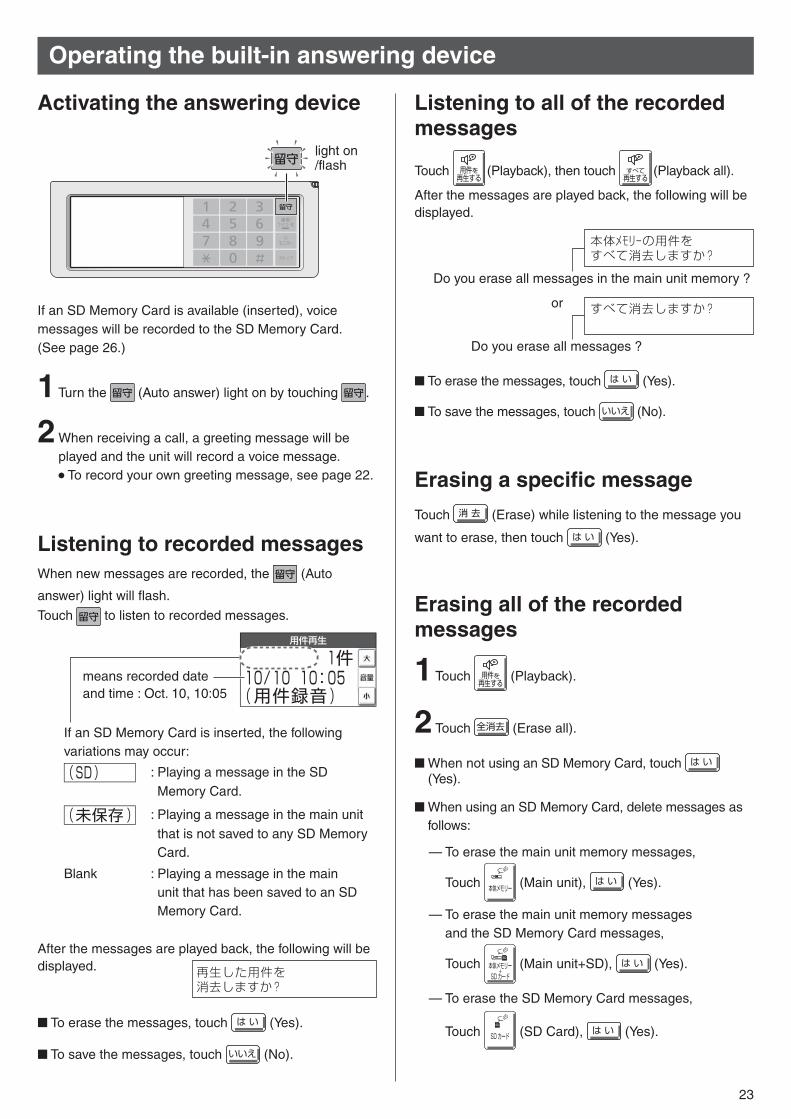
Erasing a specific message
Touch 消 去 (Erase) while listening to the message you
want to erase, then touch は い (Yes).
Erasing all of the recorded messages
2 Touch 全消去 (Erase all).
1 Touch 用件を再生する
(Playback).
When not using an SD Memory Card, touch は い(Yes).
When using an SD Memory Card, delete messages as follows:
— To erase the main unit memory messages,
Touch 本体メモリー (Main unit), は い (Yes).
— To erase the main unit memory messages and the SD Memory Card messages,
Touch 本体メモリー+
SDカード (Main unit+SD), は い (Yes).
— To erase the SD Memory Card messages,
Touch SDカード (SD Card), は い (Yes).
2 When receiving a call, a greeting message will be played and the unit will record a voice message.
To record your own greeting message, see page 22.
Activating the answering device
1 Turn the (Auto answer) light on by touching .
Listening to recorded messages
Listening to all of the recorded messages
When new messages are recorded, the (Auto
answer) light will flash.
Touch to listen to recorded messages.
Touch 用件を再生する
(Playback), then touch すべて再生する
(Playback all).
After the messages are played back, the following will be displayed.
To erase the messages, touch は い (Yes).
To save the messages, touch いいえ (No).
If an SD Memory Card is available (inserted), voice messages will be recorded to the SD Memory Card. (See page 26.)
After the messages are played back, the following will be displayed.
To erase the messages, touch は い (Yes).
To save the messages, touch いいえ (No).
means recorded date and time : Oct. 10, 10:05
If an SD Memory Card is inserted, the following variations may occur:
: Playing a message in the SD Memory Card.
: Playing a message in the main unit
that is not saved to any SD Memory Card.
Blank : Playing a message in the main unit that has been saved to an SD Memory Card.
再生した用件を消去しますか?
Do you erase all messages ?
すべて消去しますか?or
Do you erase all messages in the main unit memory ?
本体メモリーの用件をすべて消去しますか?

24
Operating the built-in answering device
Operating the answering device from a remote location
Operation: Listening to a recorded message from a remote location
Turn the (Auto answer) light on before you go out.Remote operations are available only from a touch tone telephone.
1. Call your unit.2. Enter the remote operation ID during the greeting
message.3. Touch 2 or wait 4 seconds.
Only the new recorded messages will be played back.To listen to all the recorded messages, press 4 after the new messages have been played back.
Preparation: Programming the remote operation ID
1. Touch 機 能 (Function).
2. Touch .
3. Enter any 4-digit number (remote operation ID) except and #.
4. Touch 決 定 (Set).
5. Touch (Stop).
Night mode
Touch (Night mode) for about 3 seconds.
“ ” is displayed and lights on.
When a call is received during night mode, the unit will handle the call silently, either by storing the received fax into memory or by recording the caller’s message.
Night mode allows you to select a block of time during which the unit will not ring for outside calls or make sounds when you change the settings. This feature is useful when you do not want to be disturbed, for example, while sleeping.
Turn off the night modeTouch (Night mode) for about 3 seconds.
Printing received fax documentsWhen new faxes are received, the (Call/Fax list)
light will turn on.To print the faxes, see “Printing a specific fax stored in memory” on page 20.To print the faxes in the SD Memory Card, see page 27.
Turn on the night mode
Listening to recorded messagesWhen new messages are recorded, the following will bedisplayed.
Touch 用件を再生する
(Playback), then touch 新規のみ再生する
(Playback new
messages) to listen to recorded messages.
After the messages are played back, the following will be displayed.
To erase the messages, touch は い (Yes).
To save the messages, touch いいえ (No).
再生した用件を消去しますか?
新しい用件が録音されました
Example :

25
Call block
While the unit is ringing, touch 通話拒否 (Block).
OR
While you are on an incoming call, touch 通話拒否 (Block),
then touch 音声を流して切る (Voice).
The unit announces a message to the caller
twice, then hangs up automatically. The message is announced in Japanese and means “We’re sorry, but your call cannot be connected.”.
Blocking the incoming calls
2 Touch ピンポーンを鳴らす (Chime).
Chimes are heard by the caller.
Using the main unit:
To block a call using a message
To block a call using chimes
1 While you are on an incoming call, touch 通話拒否 (Block).
While the unit is ringing, press twice.
ORWhile you are on an incoming call,
1 Press .
2 Press (Search button) repeatedly until “通話拒否”
is displayed.
3 Press twice.The unit announces a message to the caller twice, then hangs up automatically. The message is announced in Japanese and means “We’re sorry, but your call cannot be connected.”.
Using the portable handset (KX-FKN518):
3 Explain to the caller that a visitor came and hang up.
1 While you are on an incoming call, press .
2 Press (Search button) repeatedly until “通話拒否”
is displayed, then press .
3 Press (Search button) repeatedly until “チャイム” is
displayed, then press .
4 Explain to the caller that a visitor came and hang up.
To block a call using a message
To block a call using chimes
To block the call, press .
To cancel blocking, press .
When the following is displayed, press to cancel.
迷惑設定しますか?
拒否設定しますか?
For Number Display service subscribersIf you subscribe to Number Display service, the message heard by the caller will change according to the caller’s situation.
Example : If the caller requested not to send caller’s information, the message heard by the caller will change to mean“Your phone number is blocked by service provider. Please call again with adding ‘186’ to the beginning of the phone number.”.
When the following is displayed after blocking an incoming call, you can set the unit to block the call from the same telephone number.
To block the call, touch は い (Yes).
To cancel blocking, touch いいえ (No).
When the following is displayed, touch いいえ (No) to cancel.
迷惑設定しますか ?
拒否設定しますか ?
Using the main unit: Using the portable handset:
26
SD Memory Card
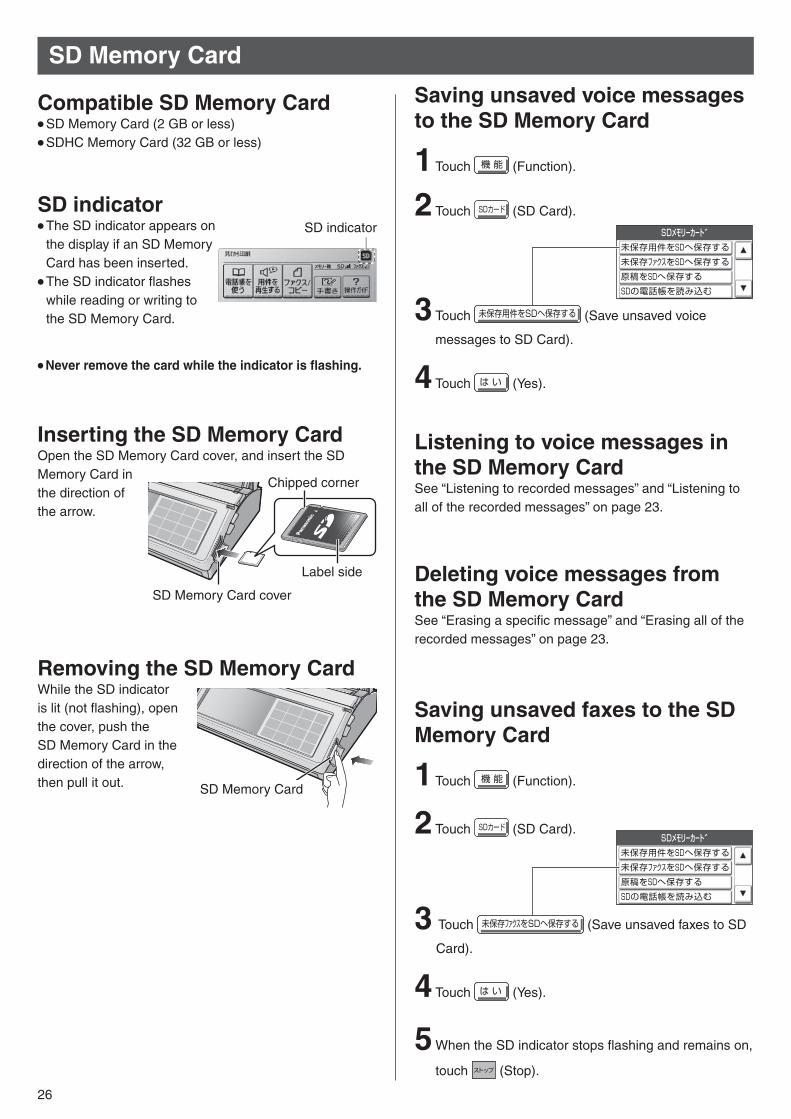
Compatible SD Memory CardSD Memory Card (2 GB or less)SDHC Memory Card (32 GB or less)
1 Touch 機 能 (Function).
2 Touch SDカード (SD Card).SD indicatorThe SD indicator appears on the display if an SD Memory Card has been inserted.The SD indicator flashes while reading or writing to the SD Memory Card.
Never remove the card while the indicator is flashing.
Saving unsaved voice messages to the SD Memory Card
4 Touch は い (Yes).
Listening to voice messages in the SD Memory CardSee “Listening to recorded messages” and “Listening to all of the recorded messages” on page 23.
Deleting voice messages from the SD Memory CardSee “Erasing a specific message” and “Erasing all of the recorded messages” on page 23.
1 Touch 機 能 (Function).
2 Touch SDカード (SD Card).
Saving unsaved faxes to the SD Memory Card
SD indicator
Inserting the SD Memory CardOpen the SD Memory Card cover, and insert the SD Memory Card in the direction of the arrow.
Label side
Chipped corner
SD Memory Card cover
Removing the SD Memory CardWhile the SD indicator is lit (not flashing), open the cover, push the SD Memory Card in the direction of the arrow, then pull it out. SD Memory Card
5 When the SD indicator stops flashing and remains on,
touch (Stop).
4 Touch は い (Yes).
3 Touch 未保存用件をSDへ保存する (Save unsaved voice
messages to SD Card).
3 Touch 未保存ファクスをSDへ保存する (Save unsaved faxes to SD
Card).

27
SD Memory Card
Trademarks
2 Touch SDファクス (Fax in SD Card).
1 Touch (Call/Fax list).
5 To view the fax, touch 表 示 (Display).
To print the fax, touch 印 刷 (Print).
After printing:
If you want to delete the fax, touch は い (Yes).
If you want to hold the fax, touch いいえ (No).
Viewing/Printing faxes in the SD Memory Card
4 Select a fax to view/print.
2 Touch SDファクス (Fax in SD Card).
1 Press (Call/Fax list).
Deleting faxes from the SD Memory Card
Displaying documents/Listening voice messages on a PC
OS environmentMicrosoft® Windows® 98 operating systemMicrosoft® Windows® Millennium Edition operating systemMicrosoft® Windows® 2000 operating systemMicrosoft® Windows® XP operating systemMicrosoft® Windows Vista® operating systemMicrosoft® Windows® 7 operating system
Image file : (TIFF format)Folder : \PRIVATE\MEIGROUP\PCC\FAX\DOC
Audio file : (WAVE format : It can be played using Windows Media® Player or QuickTime.) Folder : \PRIVATE\MEIGROUP\PCC\FAX\REC
3 Touch .
1 Touch 機 能 (Function).
2 Touch SDカード (SD Card).
Formatting SD Memory CardTo use an SD Memory Card formatted on a PC or other device, format it as follows.Formatting the SD Memory Card deletes all stored data; this data cannot be recovered.
5 Touch は い (Yes).
Microsoft, Windows, Windows Vista and Windows Media are either registered trademarks or trademarks of Microsoft Corporation in the United States and/or other countries.QuickTime is a trademark of Apple Computer, Inc., registered in the U.S. and other countries.All other trademarks identified herein are the property of their respective owners.
4 Touch ボタン切替 (More buttons), 消 去 (Delete).
5 Touch は い (Yes).
3 Select the desired fax to delete.4 Touch SDをフォーマットする (Format SD Card).
October 9th
(Date or time of reception)
means the SD Memory Card

Specifications
PNQX3015ZA YK0810MT0
KX-PW821DLKX-PW821DW Main unit Portable handset
(KX-FKN518) Battery charger
Power supply AC 100 V (50 Hz/60 Hz)Ni-MH battery (Part no. KX-FAN51)DC 3.6 V, 650 mAh
AC 100 V (50 Hz/60 Hz)
Power consumption
Transmission: Approx. 10 WReception: Approx. 15 WCopy: Approx. 16 WStand by: Approx. 0.6 W(When the F-net service is not in use.)Maximum(*1): Approx. 130 W
• Charging: Approx. 1.2 W• Stand by:
Approx. 0.5 W(When the portable handset is off the charger.)
Dimensions(H x W x D)
Approx. 86 X 296 X 191 mm (without handset, projections)Approx. 265 X 296 X 231 mm(recording paper tray opened, without handset, projections)
Approx. 171 X 44.5 X 33.5 mm Approx. 34 X 72.5 X 100.5 mm
Mass (Weight) Approx. 2.4 k (10 m ink film installed)
Approx. 157 (battery installed) Approx. 160
Operatingenvironment 5 °C – 35 °C, 45 % – 85 % RH (Relative Humidity)
KX-PW821DL KX-PW821DW Main unit
Applicable line Public Switch Telephone Network (Pulse/Tone), F-Net, NCC Lines
DC resistance 280 ΩCompatibility G3 compatible
Document size A4 – A5 (Max. 210 mm in width, Max. 530 mm in length)
Effective scanning size 208 mm (A4)
Effective printing size 202 mm (A4 size plain paper)
Transmission time Approx. 15 s/page (Original mode) (*2)
Modem speed 9,600 / 7,200 / 4,800 / 2,400 bps; Automatic fallback
Halftone level 64-level
Scanning densityHorizontal : 8 pels/mm Vertical : 7.7 lines/mm (Fine/Photo), 3.85 lines/mm (Standard)
Scanner type Contact image sensor
Printer type Thermal transfer printing on plain paper
Data compression system Modified Huffman (MH), Original mode
Recording paper size A4: 210 mm x 297 mm (Plain paper)
Answering deviceGreeting message: Digital recording system (up to 16 sec)
Pre-recording greeting messageICM Recording: Digital recording system (Approx. 12 min. in total)
SD Memory Card capacity
Image data(such as received faxes) : Max.1000 data/Max.approx.50000 sheets (*3) using 32 GB SDHC Memory Card
Audio data(such as recorded messages): Max.1000 data/Max.approx.1000 hours using 32 GB SDHC Memory Card
SD Memory Card format FAT16/FAT12 (SD Memory Card), FAT32 (SDHC Memory Card)
Memory capacity Max. Approx. 50 pages (Only receiving fax etc.) (*3)Max. Approx. 12 min. (Only recording message)
*1 When copying a 100 % black document.*2 Transmission speed is based on an A4-size document of 700 characters sent in standard resolution at 9,600 bps. The
actual transmission speed depends upon the contents of the page, resolution, telephone line conditions and capability of the other party’s machine.
*3 The memory capacity is based on an A4-size document of 700 characters sent in standard resolution (8 x 3.85 lines/mm).
Panasonic System Networks Co., Ltd. 2010C