Facilitation skills workbook - Tearfund Learntilz.tearfund.org/~/media/Files/TILZ/Fac skills...
84
Facilitation skills workbook Partnership In Local LAnguage ResourceS by Sophie Clarke, Rachel Blackman and Isabel Carter
Transcript of Facilitation skills workbook - Tearfund Learntilz.tearfund.org/~/media/Files/TILZ/Fac skills...

Facilitation skillsworkbook
Partnership In Local LAnguage ResourceS
by Sophie Clarke, Rachel Blackman and Isabel Carter

FACILITATION SKILLS WORKBOOK
Training material for people facilitating small group discussions and activities using PILLARS Guides
By Sophie Clarke, Rachel Blackman and Isabel Carter
Illustration: Rod Mill
Design: Wingfinger
© Tearfund 2004
ISBN 1 904364 49 7
Published by Tearfund. A company limited by guarantee.Regd in England No 994339. Regd Charity No 265464.
Tearfund is an evangelical Christian Relief and development agencyworking through local partners to bring help and hope to communities in need around the world.Tearfund, 100 Church Road, Teddington, Middlesex, TW11 8QE, UKTel: +44 20 8977 9144Web: www.tilz.info
PILLARS (Partnership In Local LAnguage ResourceS) Guides providepractical, discussion-based information on community developmentissues such as food security, micro-credit, nutrition and communitymobilisation. They are designed for use in small community groups,such as youth groups, women’s groups, farmers’ groups and literacygroups. The Guides aim to increase the knowledge, skills and confidenceof group members by drawing out and building on existing knowledgeand experience, and by encouraging a practical response.
This Workbook is designed as training material for people who are using,or intend to use, PILLARS Guides in their local communities. It seeks toimprove participants’ facilitation skills, so that they are equipped to leaddiscussion in a way that encourages the sharing of indigenous knowledgeand new ideas. These skills will also be relevant and useful in many otherareas of people-centred development work.
The PILLARS Guides are available from Tearfund, in English, French,Spanish and Portuguese. They have also been translated into a number ofnational and local languages around the world. Details can be found onTearfund’s learning website, www.tilz.info E-mail: [email protected]

1
CHARTS AND HANDOUTS 2
INTRODUCTION 3
What are facilitation skills? 3
Format of the training 4
Planning the training 5
TRAINING CONTENT 7
SESSION 1 Introductory session 7
SESSION 2 Introduction to PILLARS 10
SESSION 3 Overview of the PILLARS Guides 14
SESSION 4 The knowledge debate 17
SESSION 5 Facilitation skills 19
SESSION 6 Facilitation: overcoming the difficulties 23
SESSION 7 Participation 27
SESSION 8 Using PILLARS Guides to encourage 31participation
SESSION 9 Participatory learning and action tools: 1 32
SESSION 10 Participatory learning and action tools: 2 34
SESSION 11 Using PILLARS Guides to strengthen 35literacy skills
SESSION 12 Using role-play to share information 38
SESSION 13 Further practice in using PILLARS 40 Guides
SESSION 14 Introduction to field study visit 41
SESSION 15 Adapting PILLARS materials for a 44field study visit
SESSION 16 Preparation for field study visit 46
SESSION 17 Field study visit 47
SESSION 18 Feedback and reflection on field study visit 48
SESSION 19 Opportunities for using PILLARS Guides 49with community groups
SESSION 20 Opportunities for promoting the 51PILLARS Guides
SESSION 21 Monitoring and evaluation, and 53Training Evaluation Form
SESSION 22 Closing ceremony 56
MENTORING AND 57FOLLOW-UP TRAINING
APPENDICES
A Running a facilitation skills workshop 59
B Workshop timetable 61
C Handouts 62
D Energisers 73
E Participatory Bible studies 74
F Useful resources 76
INDEX 78
GLOSSARY 80
Contents

CHARTS
1 Training objectives 8
2 Training committees 9
3 Information sources 11
4 Sources of information on health 11
5 The PILLARS Guides 12
6 The aims of the PILLARS Guides 12
7 The PILLARS production process 13
8 Questions on the PILLARS Guides 14
9 The PILLARS Guides and their format 15
10 The use of the PILLARS Guides 16
11 The knowledge debate:1 17
12 The knowledge debate:2 18
13 Sharing knowledge 18
14 Differences between school teaching 20and facilitation
15 Characteristics of a good facilitator 21
16 Skills of a good facilitator 21
17 Tips for empowering others 23
18 Tips for dealing with difficult questions 24
19 Tips for managing conflict 24
20 Tips for handling dominant people 25
21 Tips for working with shy people 25
22 Tips for good facilitation 25
23 Participation 27
24 Different levels of participation 28
25 Barriers to participation 29
26 Things that encourage participation 29
27 Examples of community participation 29
28 Encouraging participation in PILLARS 30discussions
29 Participatory learning and action tools: 32a summary
30 Participatory learning and action tools: examples 33
31 Using PILLARS Guides to strengthen 35literacy skills
32 How can PILLARS Guides strengthen 36literacy skills?
33 Strengthening literacy skills: ways of 36working through a double page
34 Why role-play? 38
35 Aspects of a good role-play 38
36 Purpose of field study visit 41
37 Field study visit 42
38 The PILLARS Guides 42
39 Learning objectives 45
40 Information about the group 46
41 Feedback on the field study visit 48
42 Opportunities for using the PILLARS Guides 49
43 Promoting PILLARS 51
44 Peer support 52
45 Ways of developing facilitation skills 52
46 Assessing the impact of the Guides on 54community groups
HANDOUTS
1 The PILLARS Guides 62
2 The PILLARS Guides and their format 63
3 Characteristics and skills of a good facilitator 64
4 Tips for good facilitation 65
5 Participation 66
6 Participatory learning and action tools: examples 67
7 Strengthening literacy skills: ways of 68working through a double page
8 Field study visit 69
9 Opportunities for using the PILLARS Guides 70
10 Improving your facilitation skills: 71a self-assessment
11 Assessing the impact on the community 72groups using the Guides
2
Charts and Handouts

Facilitation skills are essential for anyone seeking toguide a group of people through a process oflearning or change in a way that encourages allmembers of the group to participate. Each personhas a unique viewpoint and valuable knowledge toshare. Without their contribution, the group’s abilityto understand or respond to a situation is reduced.
The facilitator’s role is to draw out knowledge andideas from different members of a group. They canhelp them learn from each other and think and acttogether. Facilitation is about empowering others. Itinvolves letting go of control over the outcome of aprocess and giving that responsibility to the group.
PILLARS GUIDES
PILLARS (Partnership In Local LAnguageResourceS) Guides provide practical, discussion-based information on community developmentissues. These include food security, micro-credit,nutrition and community mobilisation. (See chart 5for details). The Guides are designed for use in smallcommunity groups such as youth groups, women’sgroups, farmers’ groups and literacy groups. Ideally,one or two double pages should be used each timea group meets, allowing plenty of time to discussthe issues raised and carry out some of thepractical ideas suggested. The Guides aim toincrease the knowledge, skills and confidence ofgroup members by drawing out and building onexisting knowledge and experience, and byencouraging a practical response.
The discussions should ideally be facilitated by anexisting group member who is confident aboutsharing new ideas with others. This person shouldbe committed to helping the group achieve its aimsmore effectively through learning together.
Those facilitating the discussions do not needspecial training or knowledge. However, skills infacilitation are very important in order to encourage
full participation within the group. It is alsorecommended that people leading the discussionsfirst read through and understand the purpose ofthe Guides that they are using. They should be fullyliterate in the language in which the Guides are tobe used, and should be comfortable with theconcepts and terms used.
FACILITATION SKILLS WORKBOOK
This Workbook is specifically designed as trainingmaterial for people who are using or intend to usePILLARS Guides in their local communities. Itseeks to improve participants’ facilitation andinformal training skills, so that they are equipped tolead discussions in a way that encourages thesharing of local knowledge and new ideas. It alsoseeks to provide participants with the opportunityto become familiar with several PILLARS Guides sothat they can select the most appropriate materialsfor use in their work. It uses participatory methodsand involves many practical sessions and role-playso that participants learn by doing.
The training material is designed to be adapted to the specific training needs of the users. It caneither be delivered as a workshop or as part ofother, on-going training activities (see FORMAT
OF THE TRAINING, page 4). It can also be usedalongside the PILLARS Workbook, which takes an organisation through the PILLARS process,whereby people are trained not only to use but alsoto translate and write PILLARS Guides in their locallanguage.
However, the skills outlined in this Workbook willbe useful in many different areas of people-centreddevelopment work. Parts of it are therefore usefulfor training people who are leading any kind ofparticipatory learning or change process.
FACILITATION SKILLS WORKBOOK 3
IntroductionWhat are facilitation skills?

OUTCOMES OF THE TRAINING
By the end of the training, it is anticipated thatparticipants will have:
■ understood the origins and aims of the PILLARSGuides and production process
■ become familiar with the content of variousPILLARS Guides and of how they can beadapted for use with different target groups toachieve specific aims
■ understood the difference between teaching andfacilitating
■ understood the role of a facilitator and identifiedqualities and skills of a good facilitator
■ identified barriers and incentives to people’sparticipation in a discussion or learning process,and strategies for overcoming those barriers
■ practised using participatory learning and actiontools to draw out the knowledge of a group
■ practised and gained confidence in usingPILLARS Guides with community groups
■ identified how PILLARS can be integrated intoongoing work.
The Workbook can be adapted to suit the specificneeds of those using it. Though the focus is ontraining people to use PILLARS Guides, the skillsand techniques will be useful in many differentcontexts and areas of work.
This training can be delivered in a number of ways.
Some organisations may wish to integrate thetraining into other work activities. It isrecommended that two sessions are given at atime. This is because a theoretical session is oftenfollowed by a practical session and it is moreeffective if trainees participate in these sessionstogether. Should this option be chosen, thecomplete training course could be given over aperiod of 11 weeks, covering two sessions perweek. Alternatively, one session could be coveredeach week, taking 22 weeks in total.
4 FACILITATION SKILLS WORKBOOK
Introduction
Format of the training
Other organisations may prefer to organise a fiveday training workshop, and work through thecontent of this Workbook according to the timetablegiven in APPENDIX B, page 61.
Extra sessions that provide participants with furtheropportunities to practise using the Guides can beadded as necessary. Staff of other organisationscan be invited to facilitate or participate in thetraining so that the learning can be shared morewidely.
This initial training should be followed by a periodof six to twelve months in which the participantsapply the learning and work through a PILLARSGuide with a local community group. Theparticipants could work in small groups of two tofour so that they can support and encourage oneanother in their role as group facilitators. Wherepossible, a mentoring scheme, which providesfurther support for the trainees in their role asfacilitators, is recommended. This time of practicalexperience should then be followed by furthertraining, several months after the initial training hasbeen completed. This will provide trainees with anopportunity to reflect together on their experienceas group facilitators, and to develop further skillsand techniques which will better equip them for thisrole. It could also help them train others to facilitate.See MENTORING AND FOLLOW-UP TRAINING, page57, for more details.
Encourage participants to support each other in developing facilitation skills.
Phot
o: Is
abel
Car
ter,
Tear
fund

FACILITATION SKILLS WORKBOOK 5
Introduction
SELECTING THE TRAINING PARTICIPANTS
Participants should have experience in communitydevelopment. Experience and commitment tosharing information and to adult education orliteracy work is desirable. They should be peoplewho want to see positive change in theircommunity. They need to be able to committhemselves to using PILLARS Guides withcommunity groups on a regular basis over a longperiod of time.
If possible, the participants should come fromdifferent organisations or local communities andshould bring a range of skills and experience. Theyshould come in groups of two to four, so they caneasily meet to work together and support eachother after the initial training. Participants couldinclude teachers, health workers, church workers,development workers and leaders of existingcommunity groups. A balance of men and womenof different ages should be sought. They need to be people who have time to apply what they havelearnt and pass on these skills to others. This mayoften mean that they are not the people with themost experience or responsibility within anorganisation. They need to be literate in thelanguage in which the PILLARS Guides will be used and should preferably speak this language astheir mother tongue.
THE FACILITATION TEAM
The organisation providing the training will need toprovide two to three people to help with the admin-istration and facilitation. The training sessions areintensive and hard work (but also good fun!). Theirsuccess will depend on good organisation and aclear definition of responsibilities. The trainingfacilitators need time in their work schedule to planand prepare. They should also have time to provideon-going mentoring and support to the participantsin their new role as PILLARS facilitators. Thoseleading the training should model facilitation skillsand encourage each participant to contribute fullyto the different training activities to the best oftheir ability. They should help and encourageparticipants to work together and learn from each
other. They need to support and challenge theparticipants to take responsibility for their ownlearning.
EQUIPMENT
The following materials are required for thetraining: plenty of flipchart paper, marker pens,writing paper, coloured card, ballpoint pens andmasking tape (for sticking flipchart sheets to thewalls). It helps to have lots of wall space forflipcharts and posters. Participants should beprovided with a pen, pencil, rubber, folder andnotepad. Movable tables and chairs are needed.An overhead projector can be useful for presentingnew material.
Tearfund has produced a number of PILLARSGuides that may be relevant to those participatingin the training and to the communities they workwith. However, many of the training activities arebased on double pages of Mobilising the communityor Building the capacity of local groups. Theseprovide a good introduction to group working,which is central to PILLARS. They include manydifferent activities that are useful to communityfacilitators. References to the appropriate Guideand double page are listed next to each activitydescribed. Where possible, alternatives are given sothat activities can be made relevant to the needsand priorities of the group.
At least one of these two Guides should beavailable in the local language. In some cases,Guides will need to be translated prior to thetraining. There should be enough copies for eachparticipant to use during the training and to takeaway with them. Copies of other PILLARS Guidesshould be circulated during the training so thatparticipants can see the range of issues covered.
Most sessions involve the use of flipcharts andhandouts. These are listed under the ‘Materials’section of each session and are found in boxes inthe text. The handouts are repeated in Appendix C,pages 62–72, where they are laid out in such a waythat they can be easily photocopied.
Planning the training

The charts are designed to be used in differentways:
■ Some of the charts will need to be copied ontoflipchart paper in advance.
■ Other charts are intended to summarise orsupplement ideas put forward by theparticipants. These charts do not need to becopied. The training facilitators can simply referto them and add ideas as relevant.
■ Some of the longer charts are also provided ashandouts. If the facilitating organisation hasaccess to an overhead projector, these chartscan be made into acetates and presented on theoverhead projector. This avoids the need forcopying large amounts of text onto flipchartpaper.
These different methods of use are referred to at relevant points in the training material. Charts
and handouts should ideally be translated into thelocal language before each training session.Understanding of the concepts and terms usedshould be checked (see Glossary, page 80).
TRAINING ACTIVITIES
The initial sessions of the training involve a certainamount of presentation by those facilitating. Thesepresentations do not involve the active participationof the trainees, and it may be appropriate to useenergisers – short games or activities – to getpeople moving again. If people’s energy levels are high, they will not only enjoy the training morebut they will also learn more effectively! A list ofenergisers can be found in Appendix D, page 73. Ifthere is not enough time to do an energiser, simplyasking people to stand up and say hello to someonesitting on the other side of the room can be enoughto help people relax and engage again.
Much of the training centres around groupactivities and discussions. These will giveparticipants an opportunity to act both asfacilitators and group members. They will beencouraged to take responsibility for differentaspects of the workshop. This will increase theirawareness of the advantages of working togetherthrough direct personal experience. Theseparticipatory activities include role-play, groupBible study and debate. The role of the trainingfacilitators is to make these tasks easier for the
participants, and to help them learn and worktogether. They will need to prepare well for eachactivity, with the appropriate materials ready foruse, and anticipate problems or questions that mayarise.
The training facilitators will also need to try tobalance the groups in terms of gender, age andexperience or confidence in the particular activitybeing carried out. For the first few sessions of thetraining, participants should stay in the sameworking groups, unless specifically indicated. Thishelps them build good relationships with a smallernumber of participants as they learn to worktogether. As the training progresses, the participantscan be put in different groups according to theirorganisation, place of origin or area of interest.Some training sessions specify how these groupsshould be formed for the purpose of particularactivities. Otherwise, groups can be formed atrandom. For example, to form five groups, eachparticipant can be given a number between one andfive. Participants can then find others with the samenumber and form a group.
The field study visit will require good preparation,well in advance. The purpose of this visit is forparticipants to visit local community groups topractise their facilitation skills and to pilot thePILLARS materials in a real life situation. Three orfour groups should be identified who are locatednear the venue, and who can meet for two to threehours to participate in discussions and activitiesbased on PILLARS Guides. The purpose of the visitshould be explained clearly (see Session 14, page41) and arrangements made for transport and anyother practical needs.
6 FACILITATION SKILLS WORKBOOK
Introduction

SESSION 1Introductory sessionAim
To encourage relationship-building with andbetween participants and to introduce the purposeand content of the training.
Objectives
The participants will:
■ introduce themselves
■ discuss their hopes and concerns about thetraining
■ establish objectives for the training
■ form committees which will take responsibilityfor different aspects of the training.
Materials
■ Coloured card, flipchart, marker pens.
Pre-prepared flipcharts:1 Training objectives (page 8)2 Training committees (page 9)
PROGRAMME
FACILITATOR’S INTRODUCTION 5 minutes
Give a warm welcome to all participants. Introducethe training facilitators. Introduce the purpose ofthe training. Give any necessary administration orhousekeeping notices.
INDIVIDUAL INTRODUCTIONS 25 minutes
Pass round a box of matches. Participants take it inturn to light a match and to state their name, wherethey are from and the group or organisation thatthey work with. They are allowed to speak for only
as long as the match is alight. This can be anenjoyable way of ensuring that the introductions donot overrun, and that everyone has the sameamount of time to introduce themselves.
GROUP INTRODUCTIONS 25 minutes
Group Portrait is an activity that helps participantsto find out more about each other, in a relaxed way.
■ Divide the participants and training facilitatorsinto groups of about four or five. Ensure thateach group includes men and women ofdifferent ages, where possible.
■ Ask the members of each group to sit togetherand to introduce themselves. They should nottalk about anything too serious or anythingrelated to their work. For example, they can askeach other about their families, what they enjoydoing in their spare time, what unusual abilitiesor skills they have, or what animal they mostassociate themselves with and why.
■ Give each group a piece of flipchart paper, andask them to produce a drawing of their groupwhich includes each group member and theirnames.
■ Display the charts on a wall where everyone cansee. Ask one person in each group to presenttheir drawing.
This exercise is a good way to break the ice, to getpeople working together and to help themremember each other’s names.
HOPES AND CONCERNS 20 minutes
In the same groups of four or five, participants will reflect on their expectations for the training.Help them to identify what they hope to learn andapply to their work by the end of the training.Encourage them to think about their different worksituations and what specific concerns or difficultiesthey may face at present. Give each group a pen
FACILITATION SKILLS WORKBOOK 7
Training content

and two sheets of different coloured card. On onepiece of card, they are to write three hopes for thetraining. On the other, they are to write threeconcerns.
When they have all finished, ask one member ofeach group to stick their card on a piece of flipchartpaper at the front and present their hopes andconcerns. When each group has done this, inviteother participants to add any further comments.
The training facilitators should respond, addressingany concerns that have been raised. Invite opendiscussion. The issues raised should be revisited atthe end of the training.
Stick the Hopes and Concerns sheets on a side wallfor easy reference.
TRAINING OBJECTIVES 10 minutes
Present the training objectives on Chart 1. Ask ifthere are particular objectives that are not clear toparticipants, or if there are others that they wish toadd to the training.
TRAINING COMMITTEES 10 minutes
Explain that during the training, the participants willshare responsibility for different tasks. Explain therole of the different committees, listed on page 9,and check that participants understand what eachcommittee will involve. Ideally, members of eachcommittee should change during the training.
Worship committee
Where appropriate, lead some worship songs and aparticipatory Bible study before the training begins,using the studies in APPENDIX E (page 74). Beginand end each training session with prayer.
Review committee
Lead a 5–10 minute activity that reviews thelearning of the previous training session. Thismight involve a short quiz or a game in whichpeople have to use any new skills or ideas theyhave learnt. Those leading this review should avoidgiving a narrative report of the whole of theprevious session. The aim is to reinforce thelearning and to help people focus on the content of the training.
Social committee
Lead energisers, such as songs or games, for use atrelevant points during the sessions and helparrange additional entertainment that may beplanned. See APPENDIX D (page 73) for ideas.
Timekeeping committee
Keep participants and facilitators to time. A bell orsome kind of musical instrument could be usefulhere!
Stick up Chart 2 (page 9) and ask participants toput their name against at least two differentcommittees during different training sessions.
GROUND RULES 5 minutes
Ask the participants what attitudes and behaviourthey consider to be important as they learn andwork together during the training. This mightinclude listening to each other, respecting eachother’s views, keeping to time. Write these down forpeople to refer to throughout the training. Theseagreed ways of working are to guide people’sthinking and behaviour and encourage a sense ofjoint responsibility.
8 FACILITATION SKILLS WORKBOOK
Session 1
That participants will have:
● understood the origins and aims of thePILLARS Guides and production process
● become familiar with the content of variousPILLARS Guides and of how they can beadapted
● understood the difference between teachingand facilitating
● discussed the role of a facilitator andidentified the qualities and skills of a goodfacilitator
● identified barriers and incentives to people’sparticipation in a discussion or learningprocess, and strategies for overcoming thesebarriers
● practised using participatory learning andaction tools to draw out the knowledge of agroup
● practised and gained confidence in usingPILLARS Guides with community groups
● identified how PILLARS Guides can beintegrated into ongoing work.
1 Training objectives

LEARNING AND ACTION POINTS 5 minutes
At the end of each training session it can be helpfulfor participants to reflect individually on what theyhave learnt and how they will apply it to theirsituation. Give each participant three colouredcards: for example, red, yellow and green. At theend of each session, they will be encouraged towrite one thing on each piece of card:
■ on one card, one thing they will stop doing as aresult of what they have learnt
■ on another card, one thing they will put intopractice but not immediately (they may need tofeed back to their organisation before decidingexactly how they can take it forward)
■ on the last card, one thing they have learnt thatthey will put into practice immediately.
They should use the same colour coding each time they use this method of reflecting andplanning. These ideas can be shared informallywith other participants, but the purpose is to helppeople record the learning and apply it.
FACILITATION SKILLS WORKBOOK 9
Session 1
2 Training Committees
Sessions 1–4 Sessions 5–8 Sessions 9–12 Sessions 13–16 Sessions 17–22
Worship
Review
Social
Timekeeping
Participants take time to discuss learning.
Phot
o: Is
abel
Car
ter,
Tear
fund

SESSION 2Introduction to PILLARSAim
To introduce participants to the origins and aims ofthe PILLARS Guides and process.
Objectives
■ To provide an overview of the research that ledto the development of the PILLARS Guides andprocess.
■ To establish the aims of the Guides.
■ To establish the target groups.
■ To familiarise participants with the differentGuides available.
■ To inform participants of the differenttranslations that are available and of thepossibilities of producing further translationsthrough the PILLARS process.
■ To explain the PILLARS process – the aim, thecontent of each workshop, and a summary ofwhere it has been piloted and the learning thathas resulted.
Materials
■ Copies of different PILLARS Guides andFootsteps (where available)
Pre-prepared flipcharts:3 Information sources (page 11)4 Sources of information on community health
(page 11)5 The PILLARS Guides (page 12)6 The aims of the PILLARS Guides (page 12)7 The PILLARS production process (page 13)
Handout 1 (see Appendix C, page 62)The PILLARS GuidesThe aims of the PILLARS Guides
PROGRAMME
THE ORIGINS OF PILLARS 20 minutes
Explain that the idea for PILLARS developed fromexperience and research during the 1990s. Since1989, the Christian relief and development agency,
Tearfund, has published Footsteps, a quarterlynewsletter linking health and development workersworldwide, available in various national andinternational languages. Participants can be showncopies of this, where available.
In the 1990s, readership surveys were carried outto find out how readers were using Footsteps andhow it could be improved. The surveys showed thatmany readers were sharing Footsteps and ideas fromit within their community groups. Some readerswere using it for training purposes. Others weretranslating articles into local languages.
Detailed research was started in 1994 in Ghana and Uganda to explore the sources and flow ofideas and information used and preferred by localpeople. It is sometimes said that there is no pointproducing printed materials for people with lowlevels of literacy. The research showed that this isnot the case. Appropriate materials produced inlocal languages can be very powerful indevelopment.
Activity 40 minutesDISCUSSION OF INFORMATION SOURCES
• Divide participants into groups of five or sixaccording to their geographical area of origin ororganisation.
• Ask each group to consider the questions on Chart 3(page 11) about where people access information onhealth. However, if there is another topic that is morerelevant to the interests and needs of the participants,such as agriculture, nutrition or credit facilities, thiscould be considered instead. Each group should writetheir answers onto Chart 4 (page 11).
• After discussion, ask each group to stick their charton the wall. Ask the participants to compare thedifferent answers. Discuss the differences and thesimilarities. Which information source do communitieshave the most access to? Which information source dopeople trust the most?
• Looking at the charts, how often do people in thecommunities the participants work with access writteninformation, and how much do they trust it?
People’s attitudes to the written word can rangefrom distrust and fear to unquestioning acceptance.These attitudes will be affected by levels of literacy,access to and use of the written word.
10 FACILITATION SKILLS WORKBOOK
Session 2

Explain that for some people, this is a time ofinstant communication – the information age.Television, computers and other technologies bringinformation into their homes and places of workfrom all around the world.
But for many other people there is still aninformation famine. They have little or no accesseven to newspapers or the radio. This is especiallythe case for those who:
■ are not literate
■ live in remote areas
■ do not speak a national or international language
■ do not have the money to buy informationsources such as books, a radio, computer ortelevision.
People who feel left behind in the information agemay also feel that they have little to offer; no-onewants to listen to their ideas. They have to rely onlocal information sources, especially those withintheir community.
The PILLARS approach seeks to improve access toinformation from outside the local community, andto encourage the local generation and sharing ofideas.
THE PILLARS GUIDES 25 minutes
Put participants back into the same groups of fiveor six. Pass round all available copies of thePILLARS Guides. Give each group ten minutes toconsider the following questions:
■ What does PILLARS stand for?
■ Give the titles of three PILLARS Guides
■ What do you think are the aims of the PILLARSGuides?
Ask the groups to feed back their ideas. Give outHandout 1 (see Appendix C, page 62) and presentChart 5 (page 12) for discussion.
Explain that the Guides are designed for use insmall group situations where one or more peopleare literate and can confidently lead others indiscussion. They can be used with any group ofpeople who meet regularly, such as youth groups,women’s groups, farmers’ groups and literacygroups. Ideally just one or two double pages shouldbe used each time the group meets, allowing plentyof time to discuss the issues raised and carry outsome of the practical ideas suggested. Only oneperson in each group needs to have a copy of aGuide, and only one needs to be able to read.However, if the group wishes to strengthen their
FACILITATION SKILLS WORKBOOK 11
Session 2
Information source Access Trust
1
2
3
4
5
● Where do the communities you work withobtain information on health? List five different sources of information inthe first column of Chart 4, eg: healthcentre, community health worker.
● How much access do these communities haveto these different sources of information? List them in order of priority in the secondcolumn of Chart 4, giving each informationsource a number between 1 and 5, where 1indicates the least access and 5 the greatestaccess.
● How much do people in the communities youwork with trust these different sources ofinformation, and why? List them in order of priority in the thirdcolumn of Chart 4, giving each source anumber between 1 and 5, where 1 indicateslittle trust and 5 indicates the greatestamount of trust. For example, they may trustcommunity health workers because they havetraining and experience.
3 Information sources
4 Sources of information on health

literacy skills, it is helpful to have more than onecopy available to the group. The Guides can also beused during training workshops. The group shouldgradually work through the whole Guide togetherand identify ways to use what they have learnt tomake positive changes which help them achievetheir aims as a group or improve life in the widercommunity.
Using Chart 6, explain that the Guides aim toincrease the knowledge, skills and confidence ofgroup members by introducing discussion-basedinformation on a community development issue, sothat the group can successfully manage changewithin their own situation without depending onoutside intervention. This Chart is also included onHandout 1.
Training facilitators should explain that the Guideswill only achieve these aims if the group discussionsare led by someone who encourages the groupmembers to share their knowledge and experienceand to learn from each other. He or she should beable to accompany the group over time through thislearning process. This person is the group facilitator.Later sessions will look at the role of the facilitatorin more detail, and at the skills, characteristics andstrategies the facilitator needs in order to lead agroup effectively.
TRANSLATION OF THE GUIDES 5 minutes
Explain that the PILLARS Guides are designed tobe easily translated and adapted to different localcontexts. The Guides use simple language and aslittle technical information as possible. The designfiles are available on a CD-ROM, and translatedtext can simply be typed over the existing text andthe illustrations retained. However, new illustrationsshowing people, clothing, vegetation and physicalstructures that would be found in the local contextcan make the Guides even more relevant andattractive to readers.
The Guides have been translated and new Guideswritten in over 30 national and local languages,either by individual trained translators, or by groupsof development workers during a PILLARS training
12 FACILITATION SKILLS WORKBOOK
Session 2
PILLARS stands for Partnership In Local LAnguage ResourceS
The Guides are designed for use in smallcommunity groups, eg: youth groups, women’sgroups, farmers’ groups, literacy groups.
One person acts as the facilitator, and leads thegroup in discussions and activities based on theGuides.
The Guides below are currently available inEnglish (E) and French (F), with most alsoavailable in Spanish (S) and Portuguese (P):
● Building the capacity of local groups(E, F, S, P)
● Improving food security (E, F, S)
● Credit and loans for small businesses(E, F, S, P)
● Agroforestry (E, F)
● Preparing for disasters (E, F, S, P)
● Mobilising the community (E, F, S, P)
● Healthy eating (E, F, S, P)
● Mobilising the church (E, F, S, P)
● Responding more effectively to HIV andAIDS (E, F, S, P)
Some are also available in other national andlocal languages. A full list is available onTearfund’s learning website, www.tilz.info
5 The PILLARS Guides
The PILLARS Guides aim to:
● encourage group members to share theirknowledge and experience and to learn fromeach other
● help people learn and adopt new ideas andskills by discussing the information presented
● encourage and enable a practical response tothe information
● build the confidence of the group and itsindividual members as they have access toprinted and relevant discussion-basedinformation in their local language
● encourage a group learning process thatequips a group to initiate and manage change
● strengthen the literacy skills of the group.
6 The aims of the PILLARS Guides

process. These languages include Hindi (India),KiSwahili (East Africa), Burmese (Myanmar),Mandarin (China), Yoruba (Nigeria) and Mooré(Burkina Faso).
THE PILLARS PRODUCTION PROCESS15 minutes
Using Chart 7, explain that the PILLARSproduction process is a new approach toproducing written information. The aim of theprocess is to stimulate the sustained production ofwritten materials in languages that are useful tolocal people. This is achieved through training agroup of church, community or developmentworkers in translation, writing and facilitation skillsand establishing a Regional Language Committeeto sustain the production and use of PILLARSGuides. The PILLARS production process is notjust about translating information produced byother people in international languages. It is abouthelping local people develop the confidence andskills they need to record and share their ownideas and experiences. It is also about encouragingpride in the local language and giving value tolocal knowledge and culture.
The training brings together 20 to 25 developmentworkers for three five-day training workshops overa period of 9 to 15 months. The first workshop
introduces participants to the aims of the PILLARSGuides and production process and equips themwith facilitation and translation skills. They applythese to a group translation of a selected PILLARSGuide. Participants field-test this translation withlocal community groups. Following the firstworkshop, they pilot a draft of the Guide in theirown local communities. They also conduct abaseline survey to find out the information needsand priorities of the communities. During thesecond workshop, participants translate a secondGuide and choose a topic for a new Guide. Duringthe third workshop, they write this Guide, form acommittee and plan how they will use and continueto produce PILLARS Guides.
The PILLARS process has been piloted in Uganda,Southern Sudan, Nigeria, Burkina Faso, Myanmar,Ethiopia and Brazil. In Ethiopia, the process hasbeen conducted with a refugee group who havefound it a powerful way of restoring their sense ofidentity as a displaced people group. It helpedguide them in a participatory planning process asthey prepare to return to their own country.
There is a separate workbook available fororganisations interested in using this process totranslate and write new PILLARS Guides in locallanguages. Copies can be obtained from Tearfund(see Appendix F for the address).
FACILITATION SKILLS WORKBOOK 13
Session 2
Phot
o: S
ophi
e Cl
arke
, Tea
rfun
d
Group translating a PILLARS Guide, Ethiopia.
● A new approach to producing writteninformation, in local languages, that is usefulto local people.
● It is based around three training workshopsof five days each, over a period of 9 to 15months.
● The training is aimed at development, health,literacy or church workers, who are willingand able to produce and facilitate discussionswith local groups using PILLARS Guides, overa sustained period of time.
● The training has been piloted in differentcountries and contexts.
7 The PILLARS production process

SESSION 3Overview of the PILLARS GuidesAim
For participants to familiarise themselves with thecontent of the different PILLARS Guides availableand the different ways in which they can be used.
Objectives
■ To learn about the topics and content ofdifferent PILLARS Guides.
■ To identify the distinctiveness of the Guides interms of the content, design and language used.
Materials
■ Two or three different PILLARS Guides for eachgroup, including Mobilising the community andBuilding the capacity of local groups whereavailable
■ Flipchart paper, marker pens
Pre-prepared flipcharts:8 Questions on the PILLARS Guides (page 14)9 The PILLARS Guides and their format (page 15)10 The use of the PILLARS Guides (page 16)
Handout 2 (see Appendix C, page 63)The PILLARS Guides and their format
PROGRAMME
Activity 1 25 minutesQUESTIONS AND FEEDBACK
• Divide participants into groups of four or five. Askeach group to work through the questions on Chart 8.Choose one person in each group to take notes.Encourage each participant to share their views.
• Ask each group to give feedback on each question,sharing a maximum of three ideas for each.
14 FACILITATION SKILLS WORKBOOK
Session 3
Looking at two or three different PILLARSGuides, answer the following questions:
● What is the difference between thePILLARS Guides and other books you haveused as training materials? Think about:• the topics• the type of language used• the design.
● What do you think is the purpose of:• the main text?• the illustrations?• the discussion questions?• the Bible studies?
8 Questions on the PILLARS Guides

THE PILLARS GUIDES AND THEIRFORMAT 20 minutes
Present Chart 9, summarising the nature andpurpose of the different sections of each Guide.Where points have already been raised duringfeedback, refer back to the group’s answers ratherthan presenting them as new ideas. In this way, theknowledge and the ideas of the group act as thestarting point, which models the intended approachof the PILLARS discussions. The chart can then begiven out as Handout 2 (page 63).
Explain that each double page of a Guide can beused on its own, as it addresses a different topic.However, the Guides are designed in such a waythat each double page builds on the page before.Some key ideas are repeated or presented in aslightly different way, to help people understandand learn from the material and have time to reflecton how it applies to their situation. Ideally, a groupshould work through a whole PILLARS Guide.They should look at one double page together each
time they meet and start the next discussion with asummary of the last topic before moving on to thenext one. They should also keep a record of theirlearning, plans and their subsequent action.
The Guides are designed for local communitygroups. The language is simple, with manyillustrations and discussion questions to help usersunderstand the ideas and apply them to theircontexts. Some Guides will be more relevant tocertain groups than others. This will depend on thegroup in question: on their needs, interests andaims as a group. Before deciding which Guide touse, each group should be clear about what theywant to learn and how they want to use thislearning. They can then decide which Guide will bemost relevant and can develop their own learningaims for the discussion process.
FACILITATION SKILLS WORKBOOK 15
Session 3
CONTENT OF GUIDES
● One single theme, divided into 20–24 topics of a double page each.
● Bible studies relating to the text.
CONTENT OF EACH DOUBLE PAGE
Each topic includes text, an illustration anddiscussion questions.
TextAIM – to introduce new ideas.
• A short, simple title, not longer than one line,summarises the message of the double page.
• Between 75 and 150 words, divided into shortparagraphs.
• Simple words, avoiding the use of long and difficult terms or jargon.
• Large print.
IllustrationsAIM – to reinforce the message of the text, aidmemory, be attractive to users, communicatemeaning of double page to those who are notliterate. The illustrations:
• are adapted to the region• are clear and understandable• avoid using difficult symbols • use the same style throughout the Guide.
Discussion questionsAIM – not to check understanding, but to relatethe information to the lives of the users; to drawout and build on existing knowledge.
• Several open questions (who, what, why, when, how, where) that encourage people to share theirexperience of the topic being addressed, andencourage group discussion.
• Include practical exercises to illustrate a newidea and help groups to apply the learning.
BIBLE STUDIES
AIM – to link God’s word with practicaldevelopment-related information, and encouragethe group to apply biblical principles to theirdevelopment work.
• Several questions on a passage relating to aparticular topic.
9 The PILLARS Guides and their format

Activity 2 1 hourREADING AND DISCUSSING PILLARS
• Ask participants to work in the same groups, and toimagine themselves taking part in a meeting of a localcommunity group such as a women’s, farmers’,literacy or credit group. Ask the group to read throughone of the following double pages from Building thecapacity of local groups: Waiting for change (A1), orfrom Mobilising the Community: Understanding thepurpose of a group (C1) or Group members (C11).
• Ask them to consider the two questions in Chart 10.The first refers to the PILLARS material beingdiscussed. The second refers to the discussionprocess. It is important that the participants reflect notonly on the relevance of the PILLARS materials, butalso on how to encourage all members of the group toparticipate in discussion and learn from the new ideaspresented.
• Ask each group to choose a different person to share their answers.
Summarise the learning by saying that the aim ofthe discussion-based approach is to draw out theknowledge and experience of individual groupmembers. However, this will only happen if thediscussion is well facilitated. This type of learningis appropriate for adult learners, who bring theirown personal knowledge and experience to anylearning process. It is also appropriate for acommunity development intervention which seeksto put local people at the centre of any process ofchange, and to start from their own knowledge,needs and priorities.
16 FACILITATION SKILLS WORKBOOK
Session 3
1 Do you think this material is appropriate foryour target communities? Think about:• the language used• the illustrations• the discussion-based approach.
2 Reflect on the discussion you had as you readthrough a double page together. • Did anyone lead the discussion? • Did everyone participate? • Did you feel comfortable sharing your ideas
in the group?• What could have encouraged more people to
share their ideas?
10 The use of the PILLARS Guides
Phot
o: Is
abel
Car
ter,
Tear
fund
Discussing potential uses of PILLARS Guides, Brazil.

SESSION 4The Knowledge DebateAim
To debate the issues behind the value of differentpeople’s knowledge in a way that is enjoyable,challenging and thought-provoking.
Objectives
The participants will:
■ prepare and present a case either for or againstthe question for debate (from two differentviewpoints)
■ gain awareness of using debate as a teachingtool
■ gain awareness and understanding of the needto value both local and outside knowledge whenencouraging participation in development.
Materials
Pre-prepared flipcharts:11 The Knowledge Debate 1 (page 17)12 The Knowledge Debate 2 (page 18)13 Sharing knowledge (page 18)
PROGRAMME
INTRODUCTION 15 minutes
This debate is designed to help people consider therelative value of different people’s knowledge.Participants may not have thought about thisquestion before this session. Suggest that they donot take the debate too seriously. It should be fun.The purpose is to give them a chance to listen to,and reflect on, other viewpoints in order to helpthem explore the question together.
Show Chart 11 with the Debate motion.
Elect a Chairperson (if possible, someone with asense of humour) and a timekeeper from amongthe participants. Put the remaining participants intothree groups: A, B and C. Try to split up those whoare more confident about sharing their ideas, andensure that there is a balance of men and womenin each group. Explain that participants will beasked to take a viewpoint that is not necessarily
their own. Emphasise that this is the best way tohave a balanced debate. However, at the end theywill each be asked to vote according to their ownviews.
Each group will argue for or against the motion.They will really be arguing about the value of theirown knowledge.
■ GROUP A will take the viewpoint of outsideexperts – surveyors and water engineers.
■ GROUP B will take the viewpoint of adevelopment NGO working closely with thelocal community (they can take on particularcharacters within this NGO, eg: developmentworker, director, office staff).
■ GROUP C will take the viewpoint of the localcommunity (they can play different characters,eg: elders, pastor, youth, women responsible forwater collection).
GROUP PREPARATION 30 minutes
Give the groups about 30 minutes to prepare.Explain the process and the timings, using Chart 12(page 18).
Each group should choose a first and secondspeaker; ideally, one female, the other male. Theywill each have a maximum of two minutes topresent their case. When all six speakers havepresented, the Chairperson will invite contributionsfrom other participants (a maximum of one minutefor any one participant). The first speaker for eachgroup will then have two minutes to sum up theircase.
FACILITATION SKILLS WORKBOOK 17
Session 4
‘When choosing a site for
a well, the knowledge of
outside experts is more
important than the
knowledge of anyone else’.
11 The Knowledge Debate: 1

Encourage the use of role-play – taking on certaincharacters and using props. The local communitymay want to speak in the local language.
DEBATE 1 hour
Encourage lively, even heated, debate. If necessary,the training facilitators should be ready to start theopen discussion with some controversialstatements.
Finally, ask participants to stop playing their roleand ask them to vote. In other words, whether they have been arguing for or against the motion,they should now vote whichever way theypersonally feel.
If the motion is defeated, the chairperson may wishto hold a further vote and let people vote betweenthe NGO and community. Hopefully, the outcomeof the vote will raise the relative value of differentpeople’s knowledge.
Bring the session to a close by asking participantsto share key observations. Present the summaryshown on Chart 13, acknowledging ideas whichhave already been shared and giving more time tonew points which have not been raised.
Conclude by saying that the next training sessionwill look further at the value of participation anddifferent ways to encourage it.
Remind participants to write out learning andaction points on their coloured evaluation cards –on one piece of card, one thing they will stop doingas a result of what they have learnt; on another,one thing they will do in the medium term, and onanother, one thing they will apply immediately.They should try to do this at the end of everysession.
18 FACILITATION SKILLS WORKBOOK
Session 4
● We can often think that outside experts withtechnical knowledge know best. However,everyone’s knowledge is valid and importantfor understanding a situation.
● Each person has a right to contribute to adiscussion that relates to their owndevelopment. The outcome is improved ifeveryone participates.
● Language can prove a real barrier toinfluencing decision-making. Wherediscussions are not held in the languagespoken by the local community this can meanthat they are unable to participate fully inthe decision-making process.
● Debate may prove a useful learning tool inother situations as it encourages people tosee a situation from a different perspective.
13 Sharing knowledge
Speaker Debate Group Time
First speaker FOR A 2 mins
First speaker AGAINST B 2 mins
First speaker AGAINST C 2 mins
Second speaker FOR A 2 mins
Second speaker AGAINST B 2 mins
Second speaker AGAINST C 2 mins
Contributions from other 15–30 mins participants (open discussion)
Summing up AGAINST C 2 mins
Summing up AGAINST B 2 mins
Summing up FOR A 2 mins
Vote 2 mins
12 The Knowledge Debate: 2
SESSION 5Facilitation skills Aim
To establish the key differences between teachingand facilitating, to learn about the skills andcharacteristics of a good facilitator, and to practisefacilitating discussions using PILLARS Guides.
Objectives
■ To highlight the difference between teaching andfacilitating.
■ To discuss the role of a facilitator and identifyqualities and skills of a good facilitator.
■ To gain skills in facilitating discussions in smallgroups using PILLARS Guides.
Materials
■ The PILLARS Guides Building the capacity oflocal groups and Mobilising the community
Pre-prepared flipcharts:14 Differences between school teaching and
facilitation (page 20)15 Characteristics of a good facilitator (page 21)16 Skills of a good facilitator (page 21)
Handout 3 (see Appendix C, page 64)Differences between school teaching and facilitationCharacteristics of a good facilitatorSkills of a good facilitator
PROGRAMME
Activity 1 25 minutesROLE-PLAY
Role-play can be a very effective way ofintroducing new ideas and illustrating key learningpoints in an engaging and enjoyable way.
Before the session, you will need to set up tworole-plays showing two groups working through adouble page of a PILLARS Guide together. Thiscould be either Mobilising the Community, Waitingfor change (A1), or Building the capacity of localgroups, Understanding the purpose of a group (C1)or Group members (C11).
• Choose one person to lead each of these discussions– either one of the training facilitators or a participantwho is confident in leading others.
• Ask one of them to present the chosen double pagein the way a traditional teacher would present it to aclass. They should not allow any participation, butshould simply ask the group to respond to thediscussion questions and then tell them whether theiranswers were right or wrong.
• Ask the other group leader to facilitate a participatorydiscussion of the same double page, in which eachgroup member shares their ideas and is encouraged tolisten to, and learn from, others.
• Ask five participants to join each leader and brieflyprepare their role-play.
• During the session, ask them to act out the role-playin front of the rest of the participants. Ask thosewatching to reflect on the difference between the tworole-plays. Reflect on the style of the person leadingthe discussion and the level of participation by thegroup members. Which role-play illustrates the type ofinteraction that we would hope to see when groupsuse the PILLARS Guides?
Activity 2 20 minutesDIFFERENCES BETWEEN SCHOOL TEACHING
AND FACILITATION
• Ask participants to think back to their experience ofbeing at school. What methods were used to teachnew ideas? Ask participants to brainstorm in pairs for about ten minutes on the following question: ‘What is the difference between school teaching andfacilitation?’ Ask them to note down their ideas.
• Divide a piece of flip chart paper into two columnsheaded ‘School teaching’ and ‘Facilitation’. Then bringthe group back together and ask each pair to write uptwo ideas under each column. Using Chart 14 (page20), add any points that have not already been raised.This Chart can also be shared as Handout 3 (page 64).
A school teacher may use some facilitationtechniques to encourage students to be active inthe learning process. However, information is oftenpresented from the front, as children may not havemuch personal experience to share on a particulartopic, or may need to be given answers in order tocomplete a syllabus or to pass an exam. Bycontrast, adult learners bring a wealth of
FACILITATION SKILLS WORKBOOK 19
Session 5

experience and knowledge to any learning process.This needs to be recognised, drawn out and builton. Facilitation skills are essential in this process.
THE PURPOSE OF FACILITATION 10 minutes
The Brazilian educator, Paolo Freire, believed thateducation should be liberating. Rather than givinglearners answers, education should aim to increasethe learner’s awareness so that they are able toidentify problems and their causes, and findsolutions to them. A facilitator’s role is to help agroup through this process by asking questions thatencourage new ways of thinking about andanalysing their situation. The facilitator does notknow all the answers. Their role is to help thegroup think critically about their own needs andinterests, and to make decisions for themselves.There should be a balance between offering ideasto guide the group and patiently listening andquestioning.
The facilitator’s role is also to encourage eachmember of the group to contribute to the best oftheir ability. Everyone has valuable knowledge and avaluable contribution to make. But people can bereluctant to share their knowledge. They may lackthe confidence or may not consider what they knowto be important. Sometimes people do not want toshare their knowledge because it gives them acertain amount of power and advantage overothers. However, when we do share our knowledge,everyone benefits. The person sharing it does notlose it after giving it away, and the person receivingit has received something new which they in turncan pass on to others. The facilitator’s role is tobuild trust and respect between the members of thegroup and to encourage dialogue and learning, fromwhich the whole group will benefit.
20 FACILITATION SKILLS WORKBOOK
Session 5
SCHOOL TEACHING FACILITATION
Teacher starts from their own knowledge
Teacher follows a pre-set curriculum
Teacher presents new information from the front
Information flows in just one direction, from teacher to students
Teacher brings extensive knowledge of the subject
Teacher is concerned with students understanding the right answer
Teacher works for the community and may come from outside the community
Teacher has a formal relationship with the students, based on their status as a teacher
Facilitator starts from the knowledge of the group
Facilitator addresses issues identified by the group ortheir community and adapts new ideas to the needs andculture of the group
Facilitator uses practical, participatory methods, eg:group discussion and activities in which all members ofthe group participate
Information flows in many different directions betweenthe facilitator and individual group members – a genuineexchange of ideas
Facilitator draws out and builds on the knowledge of thegroup, and knows where to find further information onthe subject
Facilitator encourages and values different views
Facilitator works with the community and may come fromwithin the community
Facilitator is considered as an equal, and has relationshipsbased on trust, respect and a desire to serve
14 Differences between school teaching and facilitation
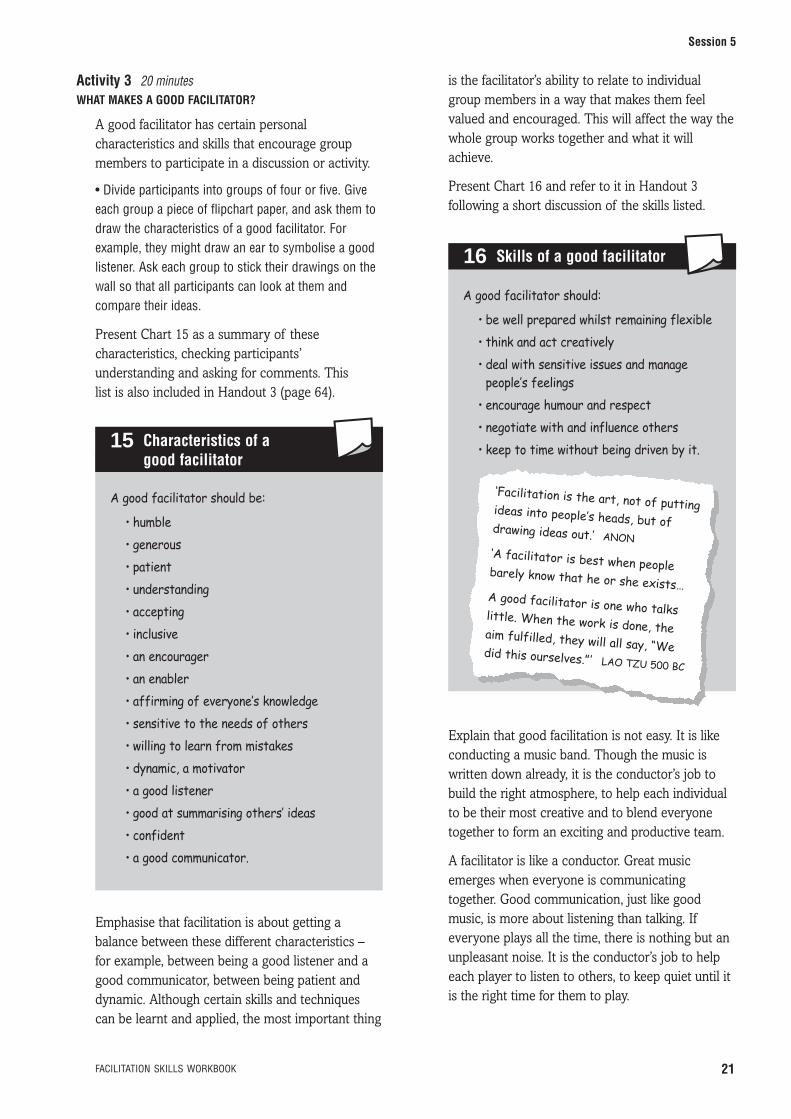
Activity 3 20 minutesWHAT MAKES A GOOD FACILITATOR?
A good facilitator has certain personal characteristics and skills that encourage groupmembers to participate in a discussion or activity.
• Divide participants into groups of four or five. Giveeach group a piece of flipchart paper, and ask them todraw the characteristics of a good facilitator. Forexample, they might draw an ear to symbolise a goodlistener. Ask each group to stick their drawings on thewall so that all participants can look at them andcompare their ideas.
Present Chart 15 as a summary of these characteristics, checking participants’understanding and asking for comments. This list is also included in Handout 3 (page 64).
Emphasise that facilitation is about getting abalance between these different characteristics –for example, between being a good listener and agood communicator, between being patient anddynamic. Although certain skills and techniquescan be learnt and applied, the most important thing
is the facilitator’s ability to relate to individualgroup members in a way that makes them feelvalued and encouraged. This will affect the way thewhole group works together and what it willachieve.
Present Chart 16 and refer to it in Handout 3following a short discussion of the skills listed.
Explain that good facilitation is not easy. It is likeconducting a music band. Though the music iswritten down already, it is the conductor’s job tobuild the right atmosphere, to help each individualto be their most creative and to blend everyonetogether to form an exciting and productive team.
A facilitator is like a conductor. Great musicemerges when everyone is communicatingtogether. Good communication, just like goodmusic, is more about listening than talking. Ifeveryone plays all the time, there is nothing but anunpleasant noise. It is the conductor’s job to helpeach player to listen to others, to keep quiet until itis the right time for them to play.
FACILITATION SKILLS WORKBOOK 21
Session 5
‘Facilitation is the art, not of puttingideas into people’s heads, but ofdrawing ideas out.’ ANON‘A facilitator is best when peoplebarely know that he or she exists…A good facilitator is one who talkslittle. When the work is done, theaim fulfilled, they will all say, “Wedid this ourselves.”’ LAO TZU 500 BC
A good facilitator should be:
• humble • generous• patient• understanding• accepting• inclusive• an encourager • an enabler • affirming of everyone’s knowledge• sensitive to the needs of others• willing to learn from mistakes• dynamic, a motivator• a good listener• good at summarising others’ ideas• confident• a good communicator.
15 Characteristics of a good facilitator
A good facilitator should:
• be well prepared whilst remaining flexible• think and act creatively• deal with sensitive issues and manage
people’s feelings• encourage humour and respect• negotiate with and influence others• keep to time without being driven by it.
16 Skills of a good facilitator

A good facilitator is interested not only in whetheran objective is achieved but how. The process isjust as important as the product. The process ofbuilding local knowledge and skills is vital if thegroup is to gain the confidence and ability toinitiate and sustain positive change.
Ask participants to think of situations where people were not consulted about an issue thatdirectly affected them. This could be a develop-ment project where the organisation involved didnot consult the community about what changes itwanted to make. As a result, the project did notlead to lasting change because the community didnot want to remain involved. What difference doesit make if people’s ideas and experience are takeninto account in future planning and activities?Emphasise that even if this process takes time, itleads to better relationships and more sustainablechange. A well-facilitated discussion process isessential.
Activity 4 30 minutesFACILITATION PRACTICE
This activity needs to be prepared in advance.
Divide participants into working groups of five orsix. Each group will need a facilitator – someonewho has already demonstrated a certain level of
confidence in leading others in discussion, who canmodel good facilitation to their group. Thesefacilitators should be approached before the start of the session. This will give them time to lookthrough a selected double page and familiarisethemselves with the content. Allocate one of thefollowing pages to each facilitator: Mobilising thecommunity, A secret in a box (A10), or Building thecapacity of local groups, Working together (C2).
• During the session, ask each working group toimagine that they are members of a local communitygroup. Ask each working group to work through adouble page together. Tell them not to worry if theyfind it difficult! There will be plenty of opportunity topractise facilitating discussions throughout the weekand to become familiar with the content and layout ofthe Guides.
• After 20 minutes, bring the groups back together. Askone or two people to share what they learnt during thediscussions. Did everyone participate? Was it difficultto facilitate?
Explain that in the next session, the participantswill look at techniques for dealing with particulardifficulties faced when facilitating group discussion.
22 FACILITATION SKILLS WORKBOOK
Session 5
Practising facilitation skills, India.
Phot
o: Is
abel
Car
ter,
Tear
fund

SESSION 6Facilitation: overcomingthe difficultiesAim
To provide participants with the opportunity topractise facilitating and participating in a discussionusing a double page of a PILLARS Guide.
Objectives
■ To look at some of the challenges faced whenfacilitating and ways to overcome them.
■ To look at some tips for good facilitation.
Materials
Pre-prepared flipcharts:17 Tips for empowering others (page 23)18 Tips for dealing with difficult questions (page 24)19 Tips for managing conflict (page 24)20 Tips for handling dominant people (page 25)21 Tips for working with shy people (page 25)22 Tips for good facilitation (page 25)
Handout 4 (see Appendix C, page 65)As the above flipcharts
PROGRAMME
CHALLENGES FOR FACILITATORS 30 minutes
Ask the groups to reflect on the discussions in theprevious session. Is it harder to be a facilitator or ateacher? Hopefully they will say it is much harderto be a facilitator! Why can facilitation be difficult?Ask participants to brainstorm in pairs for aboutten minutes. Then bring the group back togetherand write up their suggestions on a flipchart.
Answers might include:
■ taking control
■ difficult questions
■ managing conflict
■ handling dominant people
■ working with shy people.
Taking control
Say that one of the greatest difficulties facilitatorscan face is the temptation to take control of adiscussion or change process. This is often out of agenuine desire to help the group move forwards. Ifwe are used to a top-down teaching style, and havenot had the chance to observe good facilitators atwork, it can be very difficult to change ourapproach to sharing ideas.
Present Chart 17 and give out Handout 4.
One way to encourage the group to takeresponsibility for their own learning and progress is by asking the group to write some ground rulesfor participation so that each person feels free toshare their ideas. Such rules might include notinterrupting, respecting different views and agreeingon a maximum number of points that each personcan make to any one discussion. If the group writesthem, they will have shared ownership and a sharedresponsibility to ensure that they are respected. Thegroup could also write their own learning objectives,and measure their progress against them over time.
Difficult questions
Explain that dealing with people’s questions can bedifficult. Facilitators may often feel that they needto have all the answers. They may lack confidencein their own ability to deal with questions on aparticular subject. It is essential that they arefamiliar with the content of the Guide as a whole,not just the double page being presented. Theyshould read for understanding, and check that theyare clear on the meaning of the concepts andlanguage used. They should consider which ideas
FACILITATION SKILLS WORKBOOK 23
Session 6
EMPOWERING OTHERS● Be patient.● Listen to others and show that their opinions
are valued.● Be open to learning from the group so that
information sharing is multi-directional.● Encourage the group to discover solutions for
themselves and to take responsibility fortheir own learning and progress.
17 Tips for…

might need further explanation when they arediscussing them with the group. It is very helpfulfor them to know where to go to find moreinformation, eg: other publications, government orNGO offices, radio programmes, and so on.Facilitators can also draw on the wisdom andknowledge of other members of the community,outside of the immediate group, who mayspecialise in the topic being discussed.
Present Chart 18, on Handout 4.
Activity 1 hourROLE-PLAY
In order to explore the other difficulties listed andhow they might be overcome, tell participants thatthey are going to use role-play.
• Put the participants in three working groups. Askeach group to choose one person to facilitate adiscussion of pages C2, Working together, of Buildingthe capacity of local groups or A10, A secret in a box,of Mobilising the community.
• Give each working group ten minutes to prepare arole-play of 3–5 minutes, before acting it out in frontof the rest of the participants. One group is going toshow what happens when there is conflict betweenmembers of a group. Another is going to show whathappens when one or two people dominate thediscussion. The last group is going to show theproblems that are caused by people being too shy toparticipate.
• Following each role-play, ask participants about thedifficulty the facilitator faced. How did they try toovercome it?
Highlight the following learning points:
Managing conflict
Sometimes people will have strong and conflictingideas on a subject. Poor relationships within thegroup will also affect the way the group workstogether as a whole. A facilitator needs to besensitive to possible differences and tensions andencourage people to work through these, keepingtheir common goals and interests in mind. If theconflict is not related to the topic being discussed,a good facilitator needs to ask people to put this toone side.
Present Chart 19, on Handout 4.
Handling dominant people
Sometimes there is one person who dominates thediscussion, confident that they have all the rightanswers. A good facilitator needs to make sure thatothers have the opportunity to speak. They couldinvite them by name, or split the group into smallergroups, or introduce a quota system, in which eachperson is given three stones or bits of paper, andthey have to give one up every time they speak.When they have no more, they cannot speak again!
24 FACILITATION SKILLS WORKBOOK
Session 6
MANAGING CONFLICT● Acknowledge the conflict.● Try to establish the cause of the conflict.● If it is related to the topic in question, help
lead the participants to a place of agreement,encouraging mutual respect.
● If it is unrelated to the topic, and onlyinvolves several group members, encouragethem to resolve this disagreement later,outside of the group setting.
19 Tips for…
DEALING WITH DIFFICULTQUESTIONS● Prepare for group discussions by reading
through the discussion material and becomingfamiliar with the concepts and language.
● Anticipate people’s questions where possibleand think of possible responses.
● Do not be afraid to say that you do not knowthe answer to a question! Instead say you willget back to the group with more information.
● Refer to the list of additional resources inthe back of each PILLARS Guide whererelevant.
18 Tips for…

Present Chart 20, on Handout 4.
Working with shy people
Sometimes people may be very shy or afraid toexpress their views in a group. A facilitator caneither put people into smaller groups or ask peopleto discuss questions first in pairs. They can also useother practical activities such as mapping, ranking,seasonal calendars, timelines (see Session 9, page32) to help people express their views. The mosteffective way of encouraging people who are shy isto refer back to and use their ideas, so they knowthey are important and of value.
Present Chart 21, on Handout 4.
Ask each group to re-enact their role-play, with thefacilitator putting into practice suggested ways ofovercoming the difficulty faced. If the audience
think they could do a better job, they are allowed tostop the role-play and tell the actors how theyshould continue. This reinforces the learning andkeeps everyone involved.
TIPS FOR GOOD FACILITATION 15 minutes
Present Chart 22, on Handout 4.
Each point can be explained in more detail:
BE PREPARED When good facilitators are at work,it looks as though they do it effortlessly andwithout preparation. Don’t believe it! The bestfacilitators have done the necessary research,planned the discussions and practised. Be clearabout the aims of the discussion. Think about howthe topic will be introduced (eg: with role-play or aposter). Are there other questions that could beasked to check the group has understood thematerial, and to help them apply it to theirsituation? How can people’s ideas be recorded asthe topic is discussed, and who will do this? Howcan people apply what they have learnt during thediscussion?
BE FLEXIBLE Facilitators need to be prepared tochange their plans if necessary. The needs andinterests of the group members should guide thediscussion so it is relevant.
BE ENERGETIC If facilitators want others to beenergetic, they have to be enthusiastic and excitedthemselves.
FACILITATION SKILLS WORKBOOK 25
Session 6
HANDLING DOMINANT PEOPLE● Give them responsibility within the group.● Reinforce alternative behaviour.● Place with other similar types or in the same
group as the facilitator.● Limit the number of times each person can
speak, so that each member is treatedequally.
20 Tips for…
GOOD FACILITATION● Be prepared. ● Be flexible.● Be energetic. ● Encourage humour. ● Be clear. ● Think positive. ● Embrace mistakes and limitations. ● Be sensitive. ● Use a variety of techniques, methods and
activities.
22 Tips for…
WORKING WITH SHY PEOPLE● Encourage them individually, within and
outside of the group.● Establish reasons for their silence.● Give notice of the topic before the
discussion, so that they have time to prepare.● Give them responsibility for note-taking and
feedback.● Place them in a supportive group.● Give them time.● Use role-play to build up confidence and skills.
21 Tips for…
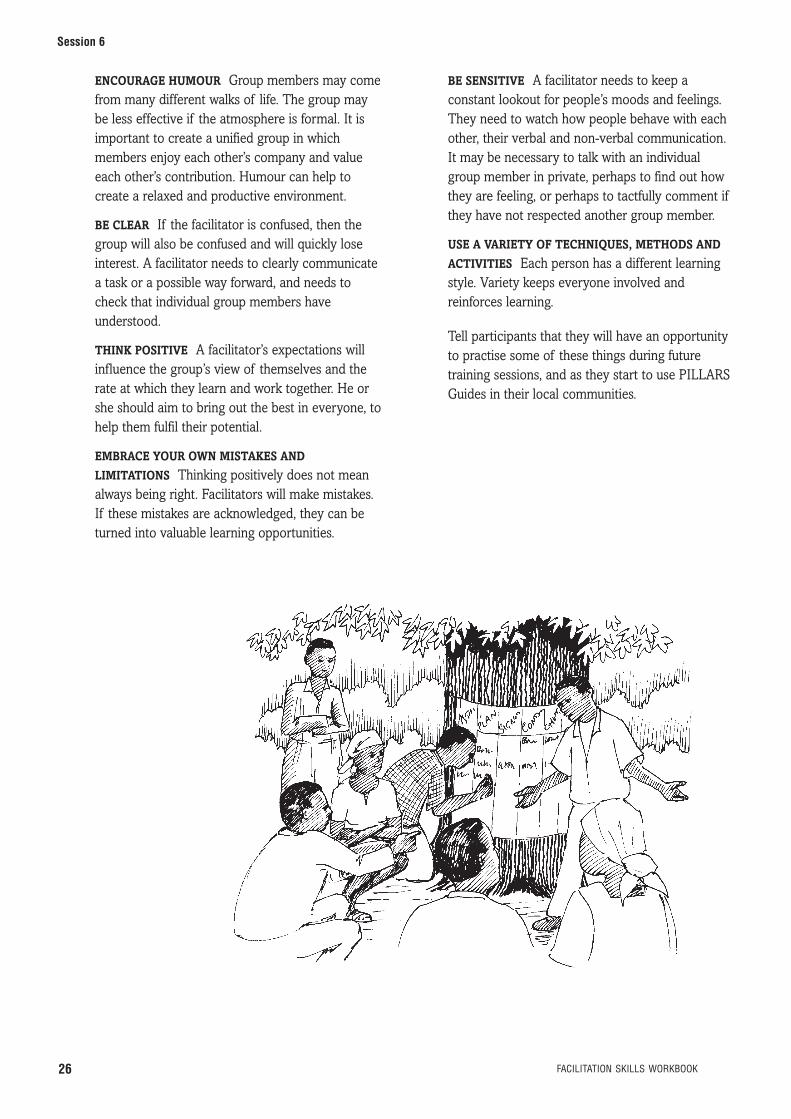
ENCOURAGE HUMOUR Group members may comefrom many different walks of life. The group maybe less effective if the atmosphere is formal. It isimportant to create a unified group in whichmembers enjoy each other’s company and valueeach other’s contribution. Humour can help tocreate a relaxed and productive environment.
BE CLEAR If the facilitator is confused, then thegroup will also be confused and will quickly loseinterest. A facilitator needs to clearly communicatea task or a possible way forward, and needs tocheck that individual group members haveunderstood.
THINK POSITIVE A facilitator’s expectations willinfluence the group’s view of themselves and therate at which they learn and work together. He orshe should aim to bring out the best in everyone, tohelp them fulfil their potential.
EMBRACE YOUR OWN MISTAKES AND
LIMITATIONS Thinking positively does not meanalways being right. Facilitators will make mistakes.If these mistakes are acknowledged, they can beturned into valuable learning opportunities.
BE SENSITIVE A facilitator needs to keep aconstant lookout for people’s moods and feelings.They need to watch how people behave with eachother, their verbal and non-verbal communication.It may be necessary to talk with an individualgroup member in private, perhaps to find out howthey are feeling, or perhaps to tactfully comment ifthey have not respected another group member.
USE A VARIETY OF TECHNIQUES, METHODS AND
ACTIVITIES Each person has a different learningstyle. Variety keeps everyone involved andreinforces learning.
Tell participants that they will have an opportunityto practise some of these things during futuretraining sessions, and as they start to use PILLARSGuides in their local communities.
26 FACILITATION SKILLS WORKBOOK
Session 6

SESSION 7ParticipationAims
To introduce the theory behind participation.
Objectives
■ To highlight the links between facilitation andparticipation.
■ To introduce the theory behind participation,looking at definitions, advantages, disadvantages,barriers and incentives to it.
Materials
Pre-prepared flipcharts:23 Participation (page 27)24 Different levels of participation (page 28)25 Barriers to participation (page 29)26 Things that encourage participation (page 29)27 Existing community participation: Examples
(page 29)28 Encouraging participation in PILLARS discussions
(page 30)
Handout 5 (see Appendix C, page 66)Different levels of participationBarriers to participationThings that encourage participationEncouraging participation in PILLARS discussions
PROGRAMME
INTRODUCTION TO PARTICIPATION20 minutes
The main aim of a facilitator is toencourage individual members of a groupto participate in a discussion or activity.Encouraging active participation indiscussion and practical responses to it arethe main purposes of using PILLARSGuides with community groups.Understanding barriers to participationcan help participants become moreeffective facilitators and help them leadothers to actively participate in theircommunities.
The term participation is widely used by thoseworking in development. But what does it actuallymean?
Ask participants to split into working groups offour or five to discuss the meaning of the term‘participation’. Ask each group to share three ideas.Write these on a flipchart. Add any points that mayhave been omitted from Chart 23.
DEGREES OF PARTICIPATION 15 minutes
Present Chart 24, on page 28, and explain thatthere are different levels of participation. This canalso be given to participants as Handout 5.
Explain that passive participation includesattending meetings, sharing information and takingpart in consultations where ‘participants’ may notactively contribute their views or knowledge to the
FACILITATION SKILLS WORKBOOK 27
Session 7
Mapping the local area.
● Each member of a group learning from andcontributing to a discussion or changeprocess.
● Listening to and valuing different views, inorder to build a more accurate andrepresentative picture of a situation.
● Working together and building relationshipsbetween individuals and between differentsocial or cultural groups.
● Sharing responsibility.
23 Participation
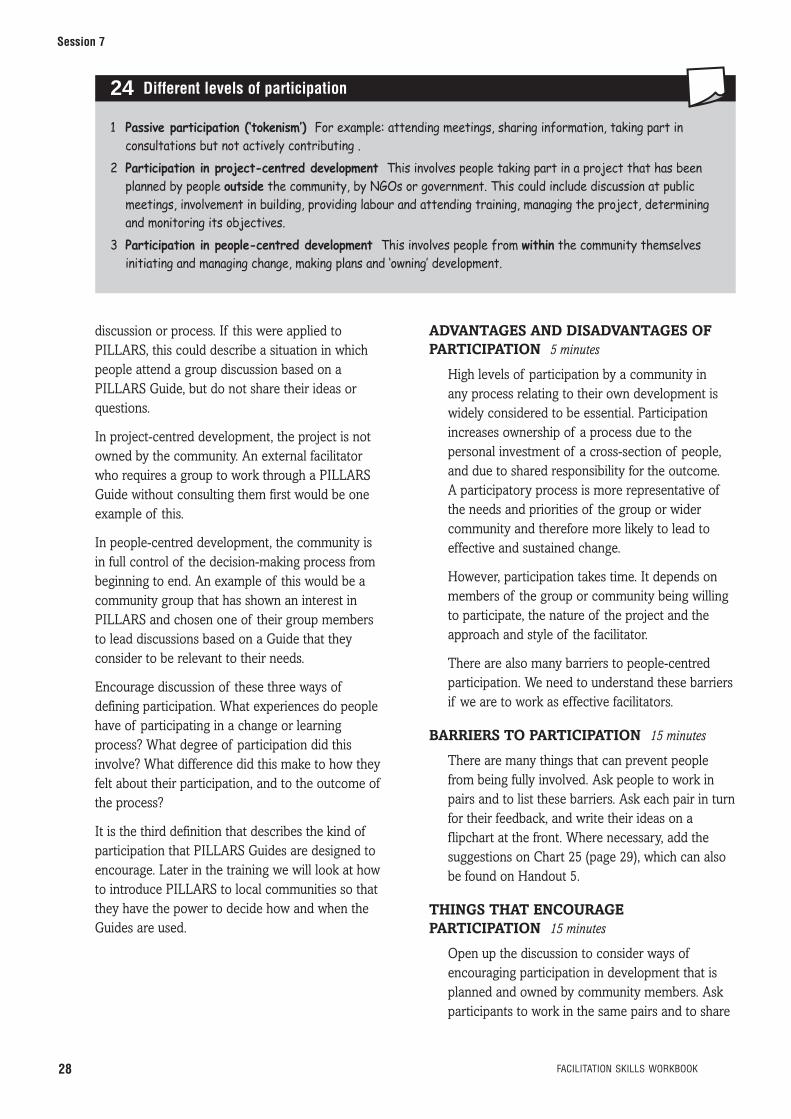
discussion or process. If this were applied toPILLARS, this could describe a situation in whichpeople attend a group discussion based on aPILLARS Guide, but do not share their ideas orquestions.
In project-centred development, the project is notowned by the community. An external facilitatorwho requires a group to work through a PILLARSGuide without consulting them first would be oneexample of this.
In people-centred development, the community isin full control of the decision-making process frombeginning to end. An example of this would be acommunity group that has shown an interest inPILLARS and chosen one of their group membersto lead discussions based on a Guide that theyconsider to be relevant to their needs.
Encourage discussion of these three ways ofdefining participation. What experiences do peoplehave of participating in a change or learningprocess? What degree of participation did thisinvolve? What difference did this make to how theyfelt about their participation, and to the outcome ofthe process?
It is the third definition that describes the kind ofparticipation that PILLARS Guides are designed toencourage. Later in the training we will look at howto introduce PILLARS to local communities so thatthey have the power to decide how and when theGuides are used.
ADVANTAGES AND DISADVANTAGES OFPARTICIPATION 5 minutes
High levels of participation by a community in any process relating to their own development iswidely considered to be essential. Participationincreases ownership of a process due to thepersonal investment of a cross-section of people,and due to shared responsibility for the outcome.A participatory process is more representative ofthe needs and priorities of the group or widercommunity and therefore more likely to lead toeffective and sustained change.
However, participation takes time. It depends onmembers of the group or community being willingto participate, the nature of the project and theapproach and style of the facilitator.
There are also many barriers to people-centredparticipation. We need to understand these barriersif we are to work as effective facilitators.
BARRIERS TO PARTICIPATION 15 minutes
There are many things that can prevent peoplefrom being fully involved. Ask people to work inpairs and to list these barriers. Ask each pair in turnfor their feedback, and write their ideas on aflipchart at the front. Where necessary, add thesuggestions on Chart 25 (page 29), which can alsobe found on Handout 5.
THINGS THAT ENCOURAGEPARTICIPATION 15 minutes
Open up the discussion to consider ways ofencouraging participation in development that isplanned and owned by community members. Askparticipants to work in the same pairs and to share
28 FACILITATION SKILLS WORKBOOK
Session 7
1 Passive participation (‘tokenism’) For example: attending meetings, sharing information, taking part inconsultations but not actively contributing .
2 Participation in project-centred development This involves people taking part in a project that has beenplanned by people outside the community, by NGOs or government. This could include discussion at publicmeetings, involvement in building, providing labour and attending training, managing the project, determiningand monitoring its objectives.
3 Participation in people-centred development This involves people from within the community themselvesinitiating and managing change, making plans and ‘owning’ development.
24 Different levels of participation

their ideas, adding the suggestions on Chart 26where these have not already been put forward.Refer to the same Chart on Handout 5.
BUILDING ON EXISTING COMMUNITYPARTICIPATION15 minutes
Participation is not new – it is already taking placein our communities. The best way to encourage it isto build on existing participation in the life of thecommunity, rather than setting up new groups orspaces.
Divide the participants into places of origin oraccording to their organisations. Ask them todiscuss how people already participate in the life oftheir community. Ask each group to list their ideason a flipchart, and to share them with others. Addany points from Chart 27 that have not alreadybeen raised.
Remind participants that PILLARS Guides aredesigned to be used by existing community groupssuch as women’s groups, farmers’ groups, youthgroups or credit groups. Although new groups canbe formed specifically for the purpose of usingPILLARS Guides, it helps if relationships alreadyexist between the different group members. Theremay already be facilitators within the groups whoare able to lead the discussion. PILLARS seeks tobuild on existing participation, so the Guides canbe used as an integral part of the regular activitiesof a group, helping the group achieve its aims.
FACILITATION SKILLS WORKBOOK 29
Session 7
● Reluctance to challenge those in authority● Loss of power, position or influence● Fear of the consequences of change ● Self-interest● Lack of self-confidence● Lack of social skills or experience of
participation● Lack of resources – time and money● Lack of information about the process and
the mechanisms for facilitation● Not invited to participate – marginalised by
the facilitating organisation● Lack of ownership of the process or lack of
faith in the facilitating institution● Language● Culture of dependence – prefer being told
what to do● Knowledge is power – fear that if it is shared,
power will be lost
25 Barriers to participation:
● Self-interest – meeting their own needs● Caring about the needs of others● Enjoying working with others● Future gain● Desire to belong● Reinforcement of cultural and social values● Sense of identity and unity● Being able to achieve more together than
alone● Desire to change, learn
26 Things that encourage participation:
● Networks and social groups such as farmingor food processing cooperatives
● Faith-based groups● Trade● Farming communal plots of land● Sharing information● Cultural activities● Crisis situations● Public health
27 Examples of existing community participation

ENCOURAGING PARTICIPATION INPILLARS DISCUSSIONS 20 minutes
Explain to participants that they have now lookedat the theory behind participation and the barriersand incentives to this. They have seen thatparticipation of group members depends on theattitudes and approach of the facilitator. However,there are also certain techniques that a facilitatorcan use to encourage group members to share theirideas or to get involved in an activity.
Present Chart 28, and refer participants to the sameChart on Handout 5.
Explain the different techniques in more detail:
SEATING A facilitator can encourage people to sitin a circle rather than in lines. This makes everyonefeel included and of equal value – it also makes iteasier for participants to see and hear each other.
INTRODUCING THE TOPIC The facilitator shouldread through the pages and think how to introducethe topic in a way that relates it to real lifesituations.
■ Drama or role-play can be a very effective wayof introducing a new idea. Participants could beasked to act out a scene in the meeting, or thefacilitator could prepare a role-play before themeeting involving one or two group members.
■ A poster can be a good starting point fordiscussion, especially where some groupmembers have low levels of education orliteracy.
LEADING THE DISCUSSION A good facilitator uses a variety of techniques to encourage groupmembers to participate in a discussion or activityand to help them to apply the learning to their lives.Not everyone feels comfortable sharing their viewsverbally. Those who are more confident are notalways representative of their community. A goodfacilitator needs to be very sensitive to differentneeds and interests of each person in the group. Itcan help to re-phrase people’s ideas and repeatthem to the group, to check that everyone hasunderstood. They can ask the group to present andshare information using drawings, diagrams orvisual aids, so that everyone can participate. Anywritten record of the group’s ideas should be keptso that the learning can be used in futurediscussions or shared with others.
APPLYING THE LEARNING There may be apractical activity that could be carried out followingthe group discussion, to help the group apply whatthey have learnt. People learn best by doing. Thefacilitator should prepare any materials that wouldbe needed for this before the meeting takes place.
30 FACILITATION SKILLS WORKBOOK
Session 7
● Seating Group members sit in a circle, or ina semi-circle.
● Introducing the topic Use role-play, anenergiser or a poster to start the discussion.
● Leading the discussion Use techniques toencourage each group member to participate,and to make sure that their ideas areunderstood and recorded in some way.
● Applying the learning Follow the discussionwith a practical activity or further discussionthat makes the ideas relevant to the needsand interests of the group.
28 Encouraging participation in PILLARS discussions

SESSION 8Using PILLARS Guides toencourage participation Aim
To increase participants’ understanding of thecontent of the PILLARS Guides and to providefurther practice in using Guides to facilitate smallgroup discussion.
Objectives
■ To become more familiar with the content of thePILLARS Guides.
■ To reflect on the qualities of a good groupleader.
■ To become more confident in using the Guidesto encourage discussion and action.
■ To practise facilitation skills and participatorylearning and action tools.
Materials
■ From Building the capacity of local groups,copies of pages:
The role of leaders (C4)What makes a good leader? (C5)How to choose leaders (C6)
PROGRAMME This session is an opportunity for participants toput some of the learning of the previous sessionsinto practice, by working through a double page ofa PILLARS Guide together, and reflecting on whatmakes a good leader. Some of the participants willbe able to practise their facilitation skills. Otherswill be asked to contribute to group discussion andthen to give their views on how well the discussionwas facilitated. This should encourage reflectionboth on the content and the process of thediscussion and reinforce learning in a relaxed and enjoyable way.
Activity 1 hour 30 minutesUSING PILLARS GUIDES
• Divide the participants into working groups of four tofive. Ask each group to select one member to facilitatea discussion using one of the double pages listed inMaterials. Give each group 45 minutes for discussion.
• Next, ask each group to select another member tofacilitate a different double page from those listedabove, again for 45 minutes.
• Bring all the working groups back together to sharetheir experiences. What did they learn about thecharacteristics of a good leader? How wouldfacilitators change their approach to encourage morepeople to participate in the discussion?
PILLARS Guides encourage a collective learningprocess. Each discussion should ideally lead tosome sort of practical activity or change. Thismeans that those using the Guides not only need tounderstand the information, but they also need toknow how to apply it to their own situation. Thefacilitator should always encourage the group tothink about how they want to use what they havelearnt, in a very practical way. The next sessionswill look at tools and techniques which a facilitatorcan use to help a group reflect on and record theirneeds, concerns and plans.
FACILITATION SKILLS WORKBOOK 31
Session 8

SESSION 9Participatory learningand action tools: 1Aim
To learn about and practise different techniqueswhich can be used to encourage participation.
Objectives
■ To understand the theory behind participatorylearning and action tools.
■ To see different participatory learning and action tools modelled and evaluate theirstrengths and weaknesses.
■ To develop skills and confidence in usingparticipatory learning and action tools toencourage participation.
■ To practise and gain confidence in facilitationskills.
■ To evaluate their own and each other’sfacilitation skills.
Materials
■ Copies of Building the capacity of local groups,Mobilising the community, Mobilising the Church
■ Beans or stones
■ Flipchart paper, marker pens
Pre-prepared flipchart:29 Participatory learning and action tools:
A summary (page 32)
Handout 6 (see Appendix C, page 67)Participatory learning and action tools: Examples
PROGRAMME
PARTICIPATORY LEARNING AND ACTION TOOLS 45 minutes
Training facilitators will need to prepare chartsillustrating the different tools listed in Chart 29before the beginning of the session. Examples ofthese tools can be found in, and copied from, thePILLARS Guides, as listed in Chart 30.
Explain that there are a number of tools that canbe used to encourage people to participate. Theseseek to draw out different viewpoints, so diversityis captured and a more representative picture isbuilt of a situation. Using a variety of differenttechniques allows people with different abilities andlearning preferences to participate.
Present Chart 29.
32 FACILITATION SKILLS WORKBOOK
Session 9
A demonstration of how to produce a community timeline.
● MAPPING People work in small groups toproduce a map of their community. Theycompare their maps in order to understandhow others see the community.
● RANKING People work in small groups todecide together which particular issues orneeds are their priority.
● TIMELINE People work in small groups toexpress how a particular aspect of life haschanged over time.
● MATRIX SCORING AND RANKING Peoplework in small groups to compare the value orimportance of different things by placingobjects or symbols on a simple chart.
● VENN DIAGRAMS People work in smallgroups to discuss and illustrate therelationships between different individuals or groups within the community.
29 Participatory learning and action tools: a summary

Put up the pre-prepared charts illustrating anexample of each tool as listed on Chart 30. Ask theparticipants to get up and look at each example.What do they think the picture shows? How couldit be used? These tools should be explained inmore detail, using Chart 30, and given toparticipants as Handout 6.
Other examples from PILLARS Guides wouldinclude Mobilising the community, Seasonal calendar(A13), Assessing local resources (A7), and Buildingthe capacity of local groups, Working together (C2).
Tell participants they will have an opportunity topractise some of these tools later in this sessionand in the next training session.
Activity 30 minutesROLE-PLAY
• Divide participants into four working groups from the same organisation or community. Give each groupa blank piece of flipchart paper and a marker pen.
• Participants should pretend they are members of a community group that they work with, or are part of.Ask them to work through Mobilising the community,Mapping the local area (A11), together. They couldmap out the training venue, or their organisations orcommunities. Each group should draw a map of the
same area, but from a different perspective; onegroup’s map drawn from the perspective of a group of young girls, another from the perspective of a group of young boys, another from the perspective ofa group of women, and the last map from theperspective of a group of men.
Put all the flipcharts on the wall. Ask them tocompare their drawings. What is the same? What is different? Why? What do these differences teachus about the different ways in which differentpeople see a local area?
Explain that the value of this type of activity is that it captures different views within a community,by splitting it into smaller groups of the samegender and age, and asking each group to sharetheir views. This helps build a more completeunderstanding of the needs and interests of acommunity.
FACILITATION SKILLS WORKBOOK 33
Session 9
MAPPING People are asked to draw a map of theircommunity. This could include natural resources,water sources, healthcare services, key people inthe community etc. Different groups of people maylook at their community in different ways. It isuseful to ask key groups, such as women, men, youngpeople, older people, people with disabilities, todraw separate maps and then compare them. SeeMobilising the community, Mapping the local area(A11), as an example.
RANKING This involves giving a value to differentitems so that they can be arranged in order ofpriority. Community needs or training needs could beranked in order of priority. See Mobilising thecommunity, Preparing questionnaires (A17), for anexample.
TIMELINE People can be asked to express how aparticular aspect of life has changed over time. This
could include income, wellbeing, training, educationalneeds. The aspect could vary from very poor to verygood. See Mobilising the community, Communitytimeline (A12), for an example.
MATRIX SCORING AND RANKING This involvesusing tables called matrices, and seeds, beans orother objects to express preferences and comparethrough scoring, eg: compare relative importance ofa list of concerns, or of living conditions atdifferent times of year. See Mobilising thecommunity, Preparing information charts (A18), asan example.
VENN DIAGRAMS These identify individuals andinstitutions that are important in and for acommunity or group, or within an organisation, andtheir relationships. See Mobilising the Church, Howdo we see our church? (B3), as an example.
30 Participatory learning and action tools: examples

SESSION 10Participatory learningand action tools: 2Aim
To practise different techniques that can be used toencourage participation.
Objectives
■ To further develop skills and confidence in usingparticipatory learning and action tools toencourage participation.
■ To practise and gain confidence in facilitationskills.
■ To evaluate their own and each other’sfacilitation skills.
Materials
■ Copies of Building the capacity of local groups,Mobilising the community, Mobilising the Church
■ Beans or stones
■ Flipchart paper, marker pens
PROGRAMME
Activity 1 1 hourSTRENGTHS AND WEAKNESSES OF LEARNING TOOLS
This activity should be set up in advance, so thatthe participant facilitating has an opportunity toprepare the material to be facilitated.
• Working in the same groups as the previous session,ask participants to practise using other participatorylearning and action tools found in the PILLARS Guides.Ask groups to choose from the following doublepages, and think about how they can apply them to theworkshop community. They should choose one personto facilitate the discussion.
■ Mobilising the communityCommunity timeline (A12)
■ Mobilising the Church How do we see our church? (B3)
• Ask each group to reflect on the strengths andweaknesses of the tool used and of the learning thatcame out of it. Did it encourage all members toparticipate? How could it be adapted for use indifferent situations? How could they use it in theirwork?
Activity 2 30 minutesCONSIDERING ALTERNATIVE TOOLS
• Working in the same groups, ask participants to lookat the other examples of participatory learning andaction tools which can be found in Mobilising thecommunity: Mapping the local area (A11), Seasonalcalendar (A13), Assessing local resources (A7), andBuilding the capacity of local groups: Workingtogether (C2).
• Ask them to reflect on the activities they think wouldbe useful to their community groups, and why. Howcould they use the information gathered by using thesetools to help their communities plan for, and manage,change? Ask each group to share one or two answerswith the rest of the group.
Tell the participants that they will have furtheropportunities to practise using these tools in futuretraining sessions.
CONCLUSIONS 15 minutes
Conclude by saying that there are three key pointsin encouraging active participation:
■ behaviour and attitudes of the facilitator
■ approaches and methods used by the facilitator
■ sharing and learning between facilitator andparticipants.
Participation is not just the application of particulartechniques – it is a process of dialogue, analysis,action and change. The behaviour, attitudes andapproach of the facilitator will determine howmuch people feel free to participate. Participatorylearning and action tools can provide a facilitatorwith practical ways to encourage this. However, itis important to remember that when using thesetechniques, the process is as important as theoutcome. It is the skills, knowledge and confidencethat people gain as they participate that are oflasting value.
34 FACILITATION SKILLS WORKBOOK
Session 10

SESSION 11Using PILLARS Guides tostrengthen literacy skillsAim
To increase participants’ understanding of why andhow the PILLARS Guides can be used tostrengthen literacy skills.
Objectives
■ To reflect on how the content, design andlanguage of the Guides helps strengthen theliteracy skills of users.
■ To practise using Guides to strengthen theliteracy skills of users.
Materials
■ Copies of Building the capacity of local groups,Mobilising the community, Mobilising the Church
Pre-prepared flipcharts:31 Using PILLARS Guides to strengthen
literacy skills (page 35)32 How can PILLARS Guides strengthen
literacy skills? (page 36)
Handout 7 (see Appendix C, page 68)Strengthening literacy skills: ways of workingthrough a double page
PROGRAMME
INTRODUCTION 10 minutes
The research that led to PILLARS showed thatgroups in which many members were not literatewere still interested in having access to printedinformation. As long as one or two members of agroup are literate, they are able to share theinformation with the rest of the group. Not everymember of the group has to be literate to benefitfrom the new ideas. As such, PILLARS Guides aredesigned to strengthen group literacy.
The Guides can also be used to strengthen theliteracy skills of individual group members. Literacyprogrammes are more successful where there arereading materials linked to local issues that readerscan identify with and are concerned about. Thisencourages those who are newly literate tocontinue to use their reading and writing skills. Itcan bring positive economic and social change byproviding access to relevant information. PILLARSGuides can provide useful follow-up material to abasic literacy class, since they address topics thatare relevant and useful for people’s daily lives.
Activity 1 50 minutesANALYSING PILLARS GUIDES
• In working groups of four to five, give participants 20minutes to discuss the questions on Chart 31.
• Ask each group to feedback their ideas. Then presentChart 32 (page 36).
Chart 33 (page 36), can be given as Handout 7.Explain that this simple way of working through adouble page can be useful when using the Guideswith any purpose in mind – not only for strength-ening literacy skills. Read Handout 7 together, andask for questions or comments.
FACILITATION SKILLS WORKBOOK 35
Session 11
1 List three reasons why PILLARS Guides maybe useful in strengthening literacy skills.
2 How can facilitators work through a doublepage of a PILLARS Guide in a way that willstrengthen the literacy skills of individualgroup members?
3 How could the PILLARS Guides be adapted sothat they are more useful in strengtheningthe literacy skills of the group members?
31 Using PILLARS Guides to strengthen literacy skills

36 FACILITATION SKILLS WORKBOOK
Session 11
THE DESIGN
• Illustrations Can be used on their own, helpreaders understand the text
• Titles Large print, summarise the message ofthe text
• Text Short paragraphs or bullet points make iteasier to understand
• Discussion questions Help readers apply theideas to their context
THE LANGUAGE AND STYLE
• Vocabulary Simple, accessible• Sentences Short
THE TOPICS
• Relevant topics motivate people to read theGuides, and to talk and write about their ownexperience
32 How can PILLARS Guides strengthen literacy skills?
● Look at the pictures together. Ask people:• What is happening in the pictures? • What ideas come to mind when you look atthem? AIM – to draw out the main ideas that arepresented in the text, and to draw out somekey vocabulary.
● Pre-view key vocabulary in the text. Write themost important words on a flipchart or board orproduce flash cards of the main key words. Askindividuals to read the words out loud. Put eachword in a different sentence.
• What does each word mean?AIM – to prepare readers for reading the text.
● Read the text together. Take it in turns to readone line each out loud.
AIM – to provide reading practice.
● Ask people to read the text again, this time ontheir own. Ask stronger readers to help weaker students where necessary.
AIM – to provide further reading practice.
● Ask questions about the text.• What does it talk about?• What is the main message of the text?
• What can we learn from the text?AIM – to check readers’ understanding of thetext.
● Talk through the discussion questions together,or in small groups.
AIM – to give readers the opportunity toexplore and comment on ideas presented in thetext, and to apply the information to their ownlives and experience.
● Ask people to copy down the key words on theflipchart/board.
AIM – to provide writing practice.
● Ask people to write a short answer to eachdiscussion question.
AIM – to provide further writing practice, andto capture individuals’ knowledge, experienceand thoughts.
● Review each lesson each week, or each time ofmeeting.
AIM – to build on what people have learnt and togive them a sense of progress.
33 Strengthening literacy skills: ways of working through a double page

Explain that the Guides can be adapted in thefollowing ways to make them more effective instrengthening the literacy skills of the users:
■ the double page can be enlarged – larger print,larger visuals – to aid understanding
■ when trying to stimulate literacy in a secondlanguage, bi-lingual Guides can be printed. Userscan check their understanding of the text in thesecond language against their understanding ofit in their first language.
■ The PILLARS production process, by whichliterature is translated and written locally in themother tongue, is also a way of encouragingpeople to read and write in their mother tongue,and to develop their literacy skills.
Activity 2 45 minutesSTRENGTHENING LITERACY SKILLS
• Divide the participants into small groups. Ask themto choose one person to lead the rest of the groupthrough one of the following double pages, in waysthat will strengthen the literacy skills of the users,referring to Handout 7:
■ Building the capacity of local groups, Unity isstrength (C3)
■ Mobilising the community, Waiting for change,(A1), Can our community make changes? (A2)
■ Mobilising the Church, What is the church? (B1)
• Ask the groups to reflect on what they have learnt.Do they know of any literacy groups that might beinterested in using the PILLARS Guides as readingmaterial? Do they know of any literacy workers whomight be interested in finding out about the Guides orreceiving training in using them in their work?
Conclude the session by asking participants to fillout their coloured learning and action cards and toshare one really positive thing they have enjoyedabout the session.
FACILITATION SKILLS WORKBOOK 37
Session 11

SESSION 12Using role-play to shareinformationAim
Participants learn how role-plays can be used toshare information and gain practical tips in usingthem.
Objectives
■ To consider the advantages of using role-play toshare information.
■ To consider what makes a good role-play.
■ To gain confidence in planning and using role-play to share information.
Materials
■ Copies of Mobilising the community
Pre-prepared flipcharts:34 Why role-play? (page 38)35 Aspects of a good role-play (page 39)
PROGRAMME
Introduction 35 minutes
Ask the participants to think of times when role-play has been used during the training. This listshould include the role-play illustrating thedifference between teaching and facilitating, andthe role-play illustrating the difficulties faced by afacilitator, during which the audience was allowedto participate second time round. Why was it used?What were the learning objectives?
Put participants in pairs and ask them to brainstormideas about why role-play is useful. Ask them tofeed back their ideas, adding those on Chart 34where they have not already been mentioned.
Ask participants to brainstorm what makes a goodrole-play. Add ideas from the list in Chart 35 wherethey have not already been mentioned.
Role-plays do not need many people to beeffective. A role-play involving two people can bejust as effective as role-play using a larger numberof people. People can ask questions afterwards tobring out the keys points from the audience.
Below are two activities to illustrate how role-playcan be used.
Activity 1 15 minutesTHE TRUST GAME
• Put participants in pairs. Ask one person in each pairto lead their partner around the room by holding theirhand in front of their partner’s face. The person beingled must keep their eyes open and follow their
38 FACILITATION SKILLS WORKBOOK
Session 12
● A non-threatening way of exploring sensitiveissues
● Allows people to practise alternative ways ofthinking and behaving
● Reinforces ideas in a way that is memorableand non-threatening
● A widely accepted form of communication inmany cultures and societies
● Entertaining and enjoyable for those actingand those watching
● Engages the audience on an emotional as wellas an intellectual level
● The audience does not need a high level ofliteracy
● Humour can break down barriers
34 Why role-play?
● Short and to the point● Confident participants● Participants speak clearly ● Uses the local language● Relevant to local culture● Relevant to the audience – rural / urban,
using local names and place names● Can be funny● Sensitive to the political situation
35 Aspects of a good role-play

partner’s hand. The person leading is allowed to taketheir partner all over the room and to put them inawkward positions. The participants then swap roles,so that each person has an opportunity both to leadand to follow.
Ask the participants how they felt leading and howthey felt being led. What do they think this activityillustrates?
The purpose of the activity is to explore powerrelationships and the issue of trust. A facilitator islike the leader in this exercise – and a leader haspower over the person being led, and may wellexperience themselves as being in a powerfulsituation. Those being facilitated are like the personbeing led – they have put their trust in thefacilitator and as such are quite vulnerable anddependent on the facilitator not abusing theirposition of power but using it to lead the group in a positive direction.
Activity 2 20 minutesIMAGE THEATRE
• Divide participants into small groups and ask eachgroup to select a leader. Ask each group leader toarrange the rest of their group into a physical imagethat represents a particular word given to them. Suchwords might include ‘participation’, ‘development’,‘change’, or any other word that the participants maywant to explore together.
• Tell the group leaders that they are allowed to put themembers of their group into any position that theythink helps people to understand that word. Thegroups should stay silent as the image is formed. Allthe groups should be asked to model the same word.
• The participants can then compare the differentimages and different interpretations of this word, toshow the different ways it can be understood andcommunicated to others.
Ask participants to reflect on what they have learntthrough this activity, and how they could use it intheir own work.
Role-play practice 35 minutes
Divide participants into groups of five or six.Ask them to choose one person to facilitateMobilising the community, Crossing the river (A8).Alternatively, divide participants by area of origin
or by organisation. Ask them to choose one personto facilitate a group discussion of Mobilising theCommunity, Using role-plays and song (A14). Thisencourages the participants to reflect on thedifferent ways in which they could use role-playwith local community groups, or in their work.
FACILITATION SKILLS WORKBOOK 39
Session 12
Acting out a role-play based on a PILLARS Guide, Nigeria.
Phot
o: Is
abel
Car
ter,
Tear
fund

SESSION 13Further practice in usingPILLARS GuidesAim
To increase participants’ understanding of thecontent of the PILLARS Guides and to providefurther practice in using Guides to facilitate smallgroup discussion.
Objectives
■ To become more familiar with the content of thePILLARS Guides.
■ To reflect on the theme of group meetings.
■ To become more confident in using the Guidesto encourage discussion and action.
■ To practise facilitation skills and participatorylearning and action tools.
Materials:
■ From Building the capacity of local groups,copies of pages:
Group members (C11)Making the most of meetings (C12)Setting aims and objectives (C13)
PROGRAMME This session will provide participants with furtherexperience of working through a double page of aGuide in a small group setting. The pages focus onthe theme of meetings. It is hoped that this willencourage further reflection on the value ofworking together and ways in which this can bemade even more effective. It will provide furtherexperience in facilitating group discussions.
Activity 1 hour 45 minutes
Divide the participants into working groups of fourto five. Ask each group to select one member tofacilitate a discussion using one of the doublepages listed above. This must be someone who hasnot had the opportunity to facilitate discussions inprevious training sessions. Give each group 45minutes for discussion. Then ask each group to
select another member to facilitate another givendouble page. Again, this should be someone whohas not yet had the opportunity to facilitate. Bringall the groups back together after an additional45 minutes. What did they learn about thecharacteristics of a good group leader? How wouldfacilitators change the way they facilitated so thatmore people participate in the discussion? Howconfident do the participants now feel in using thePILLARS Guides?
Stress that the role of the facilitator is to help thegroup explore a topic and to agree on how theywant to use the information and ideas they havediscussed. This means that they do not need tostick to the questions given but should add or omitquestions where necessary. They should rephrasepeople’s comments when necessary and encouragefurther analysis so that the group understands howthe information applies to their context.
Explain that using proverbs or traditional storiescan be an effective way of illustrating the relevanceof a particular topic. Culturally relevant forms ofcommunication, such as song or story-telling, are a good way of reinforcing understanding andhelping people to engage. This is particularly thecase where people have little access to printedinformation in their mother tongue, and may not beused to learning new ideas through reading.
Remind participants of the value of using role-playand energisers. Explain that they will have anopportunity to practise using the Guides with localcommunity groups and to try out these differentways of sharing information.
40 FACILITATION SKILLS WORKBOOK
Session 13

SESSION 14Introduction to fieldstudy visitAim
To introduce participants to the purpose of thefield study visits and begin the practicalpreparations.
Objectives
■ To introduce participants to the purpose of thefield study visit.
■ To inform participants about the groups to bevisited, to help them target their discussions andmaterials.
■ To run through the proposed activities for thefield study visits.
■ To begin preparing materials for discussion.
Materials
■ All available PILLARS Guides
■ Flipchart paper, marker pens
Pre-prepared flipcharts:36 Purpose of field study visit (page 41)37 Field study visit (page 42)38 The PILLARS Guides (page 42)
PROGRAMME
Introduction 1 hour
Explain that the purpose of the field visit is forparticipants to have an opportunity to put some ofwhat they have learnt during the training intopractice. Present Chart 36.
The participants will spend approximately twohours with a local community group. They willspend time getting to know, and finding out about,the group, before facilitating discussions based on adouble page of a PILLARS Guide. Participants canchoose a different double page according to theinformation they are given about the needs andpriorities of the groups to be visited. At the end ofthe visit, the participants will ask the communitygroups to look through and comment on severalPILLARS Guides, in order to find out whether theyare tools that might be useful in their groupactivities.
FACILITATION SKILLS WORKBOOK 41
Session 14
● To practise using PILLARS Guides with localcommunity groups
● To reflect on the relevance of the content ofthe Guides and of the discussion process
● To gain confidence in adapting PILLARSmaterials to the needs and interests of aparticular group
36 Purpose of field study visit
Gathering informationabout the community.

Tell the participants about the membership, aims,activities and interests of the community groupsthey will visit. Encourage them to take notes on thisas it will be information they will want to refer towhen planning their activities.
Present Chart 37, explaining that the field visit willincorporate four distinct elements.
Explain these different elements in more detail:
INTRODUCTIONS
Encourage the participants to consider how theywill introduce themselves to the community groupsthey visit. How will they find out about the group’sactivities, aims and membership? Can they think ofideas to bring some humour, fun, energisers orsong into the time they spend with the group, sothat it will be an enjoyable experience for them?Though the communities will have been briefedabout the visits, they may also have otherexpectations and it is worth discussing how tohandle these (eg: funding, resources, ongoingcontact).
GAINING INFORMATION ABOUT THE GROUP
AND THEIR INTERESTS
This is an excellent opportunity to gain moreunderstanding of the group and of their access to, and use of, various sources of information,especially printed information.
SMALL GROUP DISCUSSION
This will be the key part of the field visit. It willinvolve some participants leading a discussion witha small group based on a selected double page of aPILLARS Guide, with the additional support ofposters and activities such as role-play. Suggest thatthe participants link these as much as possible to
the group’s situation and interests. Encouragediscussion and questions by all members.
FEEDBACK ON THE DISCUSSION PROCESS
AND PILLARS GUIDES
Participants should then ask group members what they thought of the discussion. What did theythink of the style and approach of the peoplefacilitating? How did it differ from traditional schoolteaching? Had they ever participated in this type ofdiscussion before? Did they feel comfortable aboutsharing their ideas? What did they learn?
The participants should then briefly share withthem the aims of this type of group discussion (seeSESSION 2, Aims of PILLARS Guides).
The participants should give the group time to lookthrough a translated PILLARS Guide, or section ofa Guide, and to read through and discuss atranslated double page. They can ask the group tocomment on the Guides, using Chart 38, and leavecopies of Footsteps or PILLARS with the group byway of thanks. Find out if they would be interestedin using PILLARS Guides in the future, and taketheir address and contact details if they wish to besent copies.
Inform the participants that they will need toprepare a short presentation highlighting the keylearning points following the visit. There will be anopportunity for them to share their learning pointslater.
42 FACILITATION SKILLS WORKBOOK
Session 14
● What do the groups think of the content ofthe Guides / topics?
● Do they find the text easy to understand,and is it relevant to their context?
● What do they think of the format and designof the Guides?
● How much would they be prepared to pay fora Guide?
38 The PILLARS Guides
● Introductions 20 minutes● Gaining information about the group and their
interests 20 minutes● Small group discussion 40 minutes● Feedback on the PILLARS Guides
20 minutes
37 Field study visit

Activity 45 minutesPREPARING FOR THE FIELD STUDY VISIT
• Put participants into small working groups of five orsix. The working group should have a balance of menand women of different ages and backgrounds.However, if one of the groups visited is, for example, awomen’s group, it may be more appropriate for an all-female group of participants to work with them.
• Where different community groups are being visited,match one group of participants with each communitygroup, according to areas of experience or interest,and gender or age, if relevant. Where just one largecommunity group is being visited, discuss how thegroup can be divided on arrival. Are there participantswho would rather work with young people or withwomen if they are present?
• Ask participants to select one double page from aPILLARS Guide that is available in the language of use,according to what they know of the needs or interestsof the groups they will be working with. Where thisinformation is not available, encourage them to choosea more general topic that would be relevant to anygroup that meets and works together. Ask participantsto begin to think about how they will present thisdouble page to the group.
FACILITATION SKILLS WORKBOOK 43
Session 14

SESSION 15Adapting PILLARSmaterials for a fieldstudy visitAim
To prepare materials and activities for the fieldstudy visit.
Objectives
■ To prepare to use a double page of a PILLARSGuide with a local community group.
■ To practise adapting the illustrations andinformation from PILLARS Guides for a specifictarget audience.
■ To practise role-play, making posters, and otherparticipatory learning and action tools that canbe used to communicate and explore ideas.
Materials
■ Flipchart paper, marker pens
Pre-prepared flipchart:39 Learning objectives (page 45)
This session will provide an opportunity to preparematerials for small group discussions, to plan howinformation will be presented and discussionfacilitated.
PROGRAMME
SETTING OBJECTIVES FOR THE GROUP DISCUSSION 20 minutes
The participants need to be very clear about theobjectives of the discussion they are going to leadas part of the field study visit They should practisewriting these. The discussion needs to be learner-centred rather than facilitator-centred.Objectives need to start with a phrase like ‘By theend of this discussion, the learner will know aboutor be able to…’ A good objective answers thequestions:
■ What will the group know or be able to do bythe end of the session?
■ How will they learn this? What methods will youuse?
■ What degree of understanding will the grouphave?
Many objectives are too vague. At the end of thediscussion it can be difficult to tell whether theobjective has been achieved or not. A goodobjective is clear and measurable. All discussionsmust be completed in a limited time, so it isimportant that objectives are realistic, both interms of what the group can achieve, and in termsof the time available.
Activity 20 minutesSETTING OBJECTIVES FOR FIELD STUDY DISCUSSION
Divide participants into the groups they will workin during the field study visit. Ask each workinggroup to discuss Chart 39 (page 45). Then ask themto set objectives for the discussion they will lead.Ask each working group to share these with theother participants. Invite comments.
44 FACILITATION SKILLS WORKBOOK
Adapting a role-play for a field study visit, Brazil.
Phot
o: Is
abel
Car
ter,
Tear
fund

PREPARE YOUR MATERIALS 40 minutes
Posters are a valuable way of sharing informationwith many people, especially people who areunable to read. The participants could either copythe existing illustration from the double page of theGuide that they are planning to discuss, or theycould design their own poster, combining ideasfrom the original illustration and the text.
The layout and design of information in posters hasa huge influence on how likely people are to readand understand the meaning. There are three thingsto consider when designing posters: text, illustrationsand layout.
TEXT
The most effective posters often use very fewwords, and sometimes, none at all. Titles orheadings need to be short and, if possible, easy toremember. Consider the importance of making theposter useful for people who are semi-literate.Capital letters can be harder to read. Handwritingshould be clear and easy to read.
ILLUSTRATIONS
Discuss the relative advantages and disadvantagesof using photos and illustrations. Mention thatphotos must be of high quality to be useful. Photosalways define a certain cultural group or locationand do not photocopy well. Good clear lineillustrations reproduce well and have wider culturalapplication. Cartoons may be very useful if there issomeone with such skills available.
Introduce the idea that, as well as literacy, peopleneed to be visually literate. If people have littleexposure to illustrations or photos it is reallyimportant to:
■ use images of the whole body, rather than cut offhands, head or legs
■ avoid using symbols that people may notunderstand, such as arrows to show a cycle,dotted lines for rain, ticks or crosses, etc.
■ keep images to the same scale
■ be aware that the idea of perspective may notexist.
LAYOUT
Good poster design makes use of large headings,space or labels. Posters should be as simple andclear in their design as possible. Good use of colourcan help catch people’s attention. The informationshould look interesting.
Present examples of both good and bad posterdesign. Either use real examples or do simple,quick sketches to show that good posters ideallyhave one illustration (occasionally up to foursmaller illustrations) and a minimum amount oftext to get over one clear message.
Ask participants to work in their field visit groupsto design a poster that will help reinforce thelearning of the topic selected. The posters will beleft with the community as a reminder of thelearning.
Using role-play 25 minutes
Ask participants to consider how they might userole-play during the field visit. Answers couldinclude:
■ to introduce the need for the information theywill be sharing by highlighting the issues thisinformation will address.
■ to compare two imaginary situations, one beforeand one after introducing the new information.
Ask participants to work in their field visit groupsand design a role-play that will help present theideas they intend to discuss. They will have moretime in the planning session to practise this, ifneeded.
FACILITATION SKILLS WORKBOOK 45
Session 15
Are the following objectives good or bad? Why?Do they satisfy the points made above?
● To teach the group about planning.● To build a local classroom.● The group will be able to make a nutritious
meal for a baby using local vegetables.● To show the group how to make jam.● The group will be able to list five roles of a
treasurer.● The group will be able to prepare a seasonal
calendar in just 45 minutes, which shows howhousehold income varies during the year.
39 Learning objectives
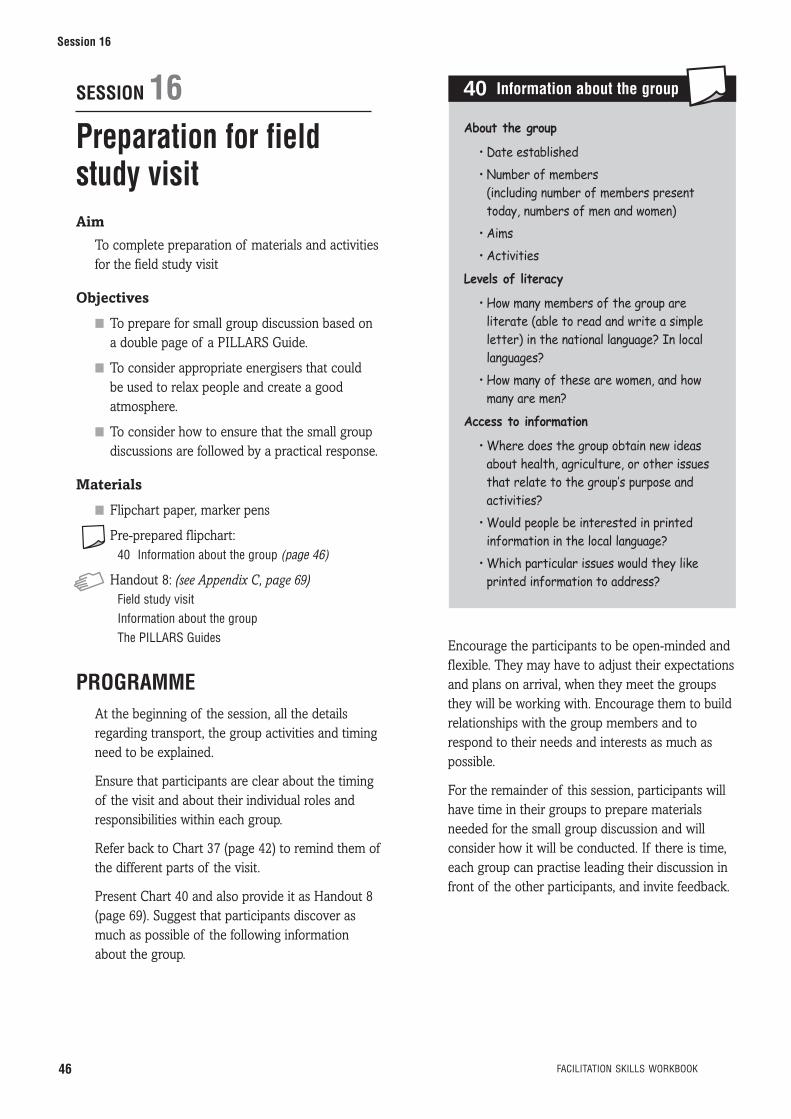
SESSION 16Preparation for fieldstudy visitAim
To complete preparation of materials and activitiesfor the field study visit
Objectives
■ To prepare for small group discussion based ona double page of a PILLARS Guide.
■ To consider appropriate energisers that could be used to relax people and create a goodatmosphere.
■ To consider how to ensure that the small groupdiscussions are followed by a practical response.
Materials
■ Flipchart paper, marker pens
Pre-prepared flipchart:40 Information about the group (page 46)
Handout 8: (see Appendix C, page 69)Field study visitInformation about the groupThe PILLARS Guides
PROGRAMME At the beginning of the session, all the detailsregarding transport, the group activities and timingneed to be explained.
Ensure that participants are clear about the timingof the visit and about their individual roles andresponsibilities within each group.
Refer back to Chart 37 (page 42) to remind them ofthe different parts of the visit.
Present Chart 40 and also provide it as Handout 8(page 69). Suggest that participants discover asmuch as possible of the following informationabout the group.
Encourage the participants to be open-minded andflexible. They may have to adjust their expectationsand plans on arrival, when they meet the groupsthey will be working with. Encourage them to buildrelationships with the group members and torespond to their needs and interests as much aspossible.
For the remainder of this session, participants willhave time in their groups to prepare materialsneeded for the small group discussion and willconsider how it will be conducted. If there is time,each group can practise leading their discussion infront of the other participants, and invite feedback.
46 FACILITATION SKILLS WORKBOOK
Session 16
About the group
• Date established• Number of members
(including number of members presenttoday, numbers of men and women)
• Aims• Activities
Levels of literacy
• How many members of the group areliterate (able to read and write a simpleletter) in the national language? In locallanguages?
• How many of these are women, and howmany are men?
Access to information
• Where does the group obtain new ideasabout health, agriculture, or other issuesthat relate to the group’s purpose andactivities?
• Would people be interested in printedinformation in the local language?
• Which particular issues would they likeprinted information to address?
40 Information about the group

SESSION 17Field study visitAim
To practise using PILLARS Guides with localcommunity groups.
Objectives
■ To build understanding of information needs andpriorities within grassroots community groups
■ To gain confidence in sharing information in avariety of ways
■ To gain confidence in using information fromPILLARS Guides with community groups
■ To explore a community group’s response tousing PILLARS Guides
Materials
■ Copies of Footsteps and PILLARS to leave witheach group
■ One notepad per discussion group
Handout 8 (see Appendix C, page 69)Field study visitInformation about the group The PILLARS Guides
■ Posters and other materials needed forfacilitating small group discussion
PROGRAMME This session will be slightly longer than the usual1 hour 45 minutes. The visit will last approximately2 hours, and additional time will be needed fortravel. It will follow the timings described on Chart37, Session 14, page 42.
Remind the participants that just one person fromeach working group should take notes during thevisit to record information about the group, aboutthe discussion and about the group’s views on thePILLARS Guides. They should do this discreetly, sothat the community groups are not made to feeluncomfortable. Each working group will have timeto prepare and present their feedback after the visit.
FACILITATION SKILLS WORKBOOK 47
Session 17
Setting off on a field visit, Uganda.
Phot
o: Is
abel
Car
ter,
Tear
fund
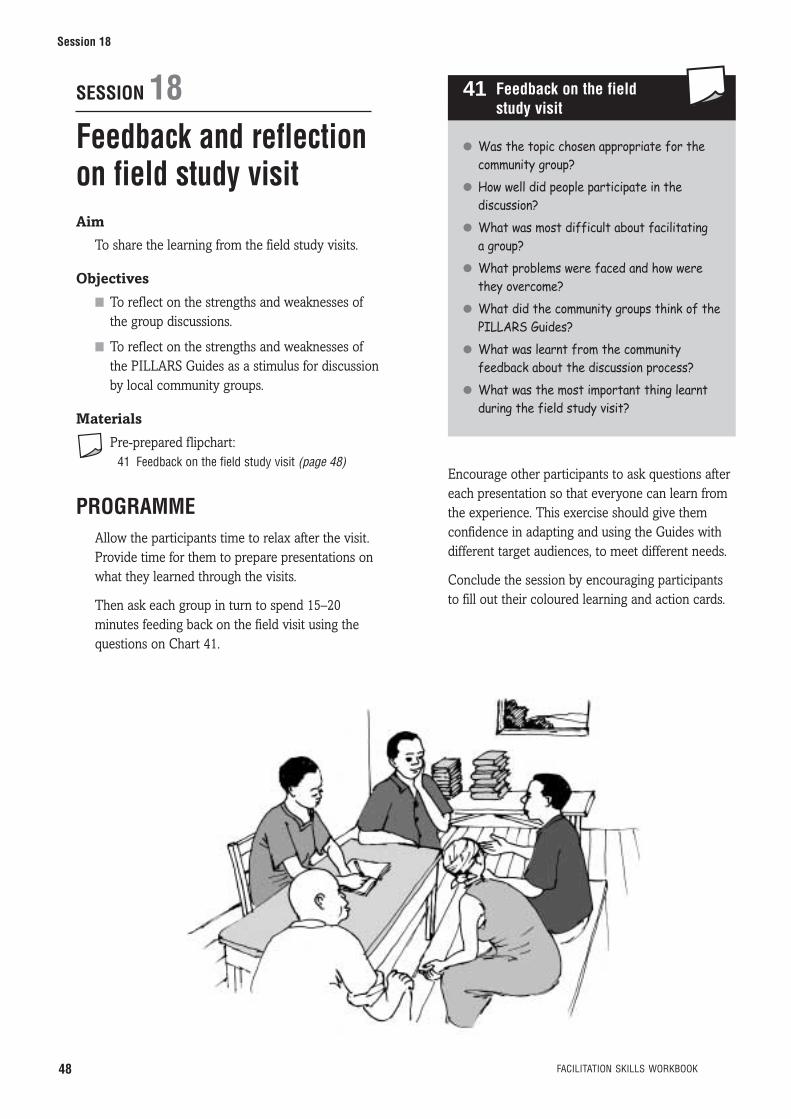
SESSION 18Feedback and reflectionon field study visitAim
To share the learning from the field study visits.
Objectives
■ To reflect on the strengths and weaknesses ofthe group discussions.
■ To reflect on the strengths and weaknesses ofthe PILLARS Guides as a stimulus for discussionby local community groups.
Materials
Pre-prepared flipchart:41 Feedback on the field study visit (page 48)
PROGRAMME Allow the participants time to relax after the visit.Provide time for them to prepare presentations onwhat they learned through the visits.
Then ask each group in turn to spend 15–20minutes feeding back on the field visit using thequestions on Chart 41.
Encourage other participants to ask questions aftereach presentation so that everyone can learn fromthe experience. This exercise should give themconfidence in adapting and using the Guides withdifferent target audiences, to meet different needs.
Conclude the session by encouraging participantsto fill out their coloured learning and action cards.
48 FACILITATION SKILLS WORKBOOK
Session 18
● Was the topic chosen appropriate for thecommunity group?
● How well did people participate in thediscussion?
● What was most difficult about facilitating a group?
● What problems were faced and how werethey overcome?
● What did the community groups think of thePILLARS Guides?
● What was learnt from the communityfeedback about the discussion process?
● What was the most important thing learntduring the field study visit?
41 Feedback on the field study visit
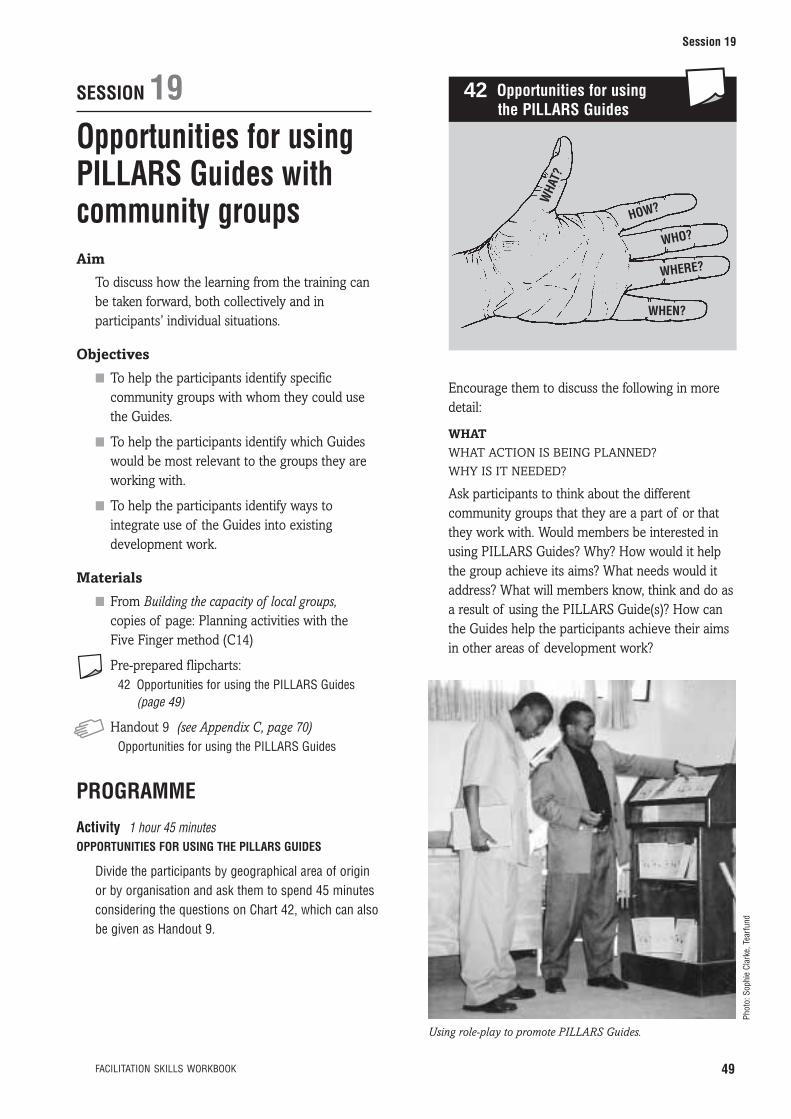
SESSION 19Opportunities for usingPILLARS Guides withcommunity groupsAim
To discuss how the learning from the training canbe taken forward, both collectively and inparticipants’ individual situations.
Objectives
■ To help the participants identify specificcommunity groups with whom they could usethe Guides.
■ To help the participants identify which Guideswould be most relevant to the groups they areworking with.
■ To help the participants identify ways tointegrate use of the Guides into existingdevelopment work.
Materials
■ From Building the capacity of local groups,copies of page: Planning activities with the Five Finger method (C14)
Pre-prepared flipcharts:42 Opportunities for using the PILLARS Guides
(page 49)
Handout 9 (see Appendix C, page 70)Opportunities for using the PILLARS Guides
PROGRAMME
Activity 1 hour 45 minutesOPPORTUNITIES FOR USING THE PILLARS GUIDES
Divide the participants by geographical area of originor by organisation and ask them to spend 45 minutesconsidering the questions on Chart 42, which can alsobe given as Handout 9.
Encourage them to discuss the following in moredetail:
WHAT
WHAT ACTION IS BEING PLANNED?
WHY IS IT NEEDED?
Ask participants to think about the differentcommunity groups that they are a part of or thatthey work with. Would members be interested inusing PILLARS Guides? Why? How would it helpthe group achieve its aims? What needs would itaddress? What will members know, think and do asa result of using the PILLARS Guide(s)? How canthe Guides help the participants achieve their aimsin other areas of development work?
FACILITATION SKILLS WORKBOOK 49
Session 19
42 Opportunities for using the PILLARS Guides
WHA
T?
HOW?
WHO?
WHERE?
WHEN?
Using role-play to promote PILLARS Guides.
Phot
o: S
ophi
e Cl
arke
, Tea
rfun
d

HOW
HOW WILL THE WORK BE CARRIED OUT?
WHAT RESOURCES ARE NEEDED?
Think about how the Guides should be introducedto community groups, so that they understand theirrelevance to their situation and have ownership ofthe materials and the discussion process.
Think about the information needs and interests ofthe group, and the level of education and literacy ofthe group members. Which Guide is going to bemost relevant to them? Is this Guide available inthe local language? How many copies are needed?
WHO
WHO IS GOING TO CARRY OUT THIS WORK?
DO THEY NEED TRAINING?
Who is going to facilitate the group discussions?Perhaps the participants themselves will be doingthis, but are there other group members with thetime and skills needed to lead the group through aPILLARS Guide? How could participants share theknowledge and skills they have learnt during thetraining to help others with facilitation skills?
WHERE
WHERE IS THE WORK TO BE DONE?
In which community, and with which group couldthe Guides be used? Where does the group meet?
WHEN
WHEN IS THE WORK GOING TO BE DONE?
HOW LONG WILL IT TAKE?
When does the group usually meet? Could they usePILLARS Guides during their regular meetings?How long will it take them to work through a wholePILLARS Guide together?
Ask each group to share their ideas with the otherparticipants. Ask individual participants to developa plan of action based on these five questions asthey consider how they will use the Guides in theirown community.
50 FACILITATION SKILLS WORKBOOK
Session 19

SESSION 20Opportunities forpromoting the PILLARSGuidesAim
To help participants reflect on how they will sharewhat they have learnt during the training withothers.
Objectives
■ To help participants identify specific ways topromote the Guides in their communities andorganisations.
■ To identify opportunities for promoting theGuides to other agencies.
■ To help participants consider how they mightimprove their facilitation skills and pass on thelearning and skills to others.
Materials
Pre-prepared flipcharts:43 Promoting PILLARS (page 51)44 Peer support (page 52)45 Ways of developing your facilitation skills
(page 52)
From Building the capacity of local groups,copies of page: Planning activities with the Five Finger method (C14) (See session 19)
Handout 10 (see Appendix C, page 71)Improving your facilitation skills: a self-assessment
PROGRAMME
Activity 45 minutesPROMOTING PILLARS
• In the same groups as the previous session andusing the same five questions, ask participants toconsider how they will promote PILLARS:
■ within their local communities
■ within their facilitating organisations / churches
■ to other organisations / churches
Present Chart 43, which provides some ideas.
This can be explained in more detail:
WITHIN LOCAL COMMUNITIES
■ Give an introduction to the PILLARS Guides – tothe topics, the layout, the different ways in whichthey can be used.
■ Explain how people are likely to benefit fromusing them and the educational advantages ofgoing through a Guide together.
■ Develop the specific aims of using PILLARSwith the community group in question.
■ Ensure that people are informed about themeetings well in advance; that they know whereand when they are taking place and that they arein a place and at a time that is convenient forgroup members.
■ Be committed to building relationships withdifferent members of the community.
■ Avoid creating unrealistic expectations.
WITHIN A FACILITATING ORGANISATION
OR CHURCH
■ Identify specific opportunities to share the visionfor, and aims of, PILLARS.
■ Train others:
• How can the knowledge and skills learntduring the training be passed on to others?
FACILITATION SKILLS WORKBOOK 51
Session 20
● Within local communities• Identify groups who can use the Guides to
achieve particular aims• Introduce the Guides available and explain
how they can be used● Within a facilitating organisation or church
• Identify specific opportunities forpromoting PILLARS
• Train others to use the Guides● To other organisations or churches
• Identify specific opportunities forpromoting PILLARS
43 Promoting PILLARS

• Who would benefit from this learning?
• What specific opportunities are there to do this?
TO OTHER ORGANISATIONS OR CHURCHES
■ What opportunities are there for networking, andfor sharing the vision and aims of PILLARS?
■ Are there events already planned wherePILLARS could be promoted?
Ongoing support 30 minutes
Encourage participants to think of practical ways inwhich they can support each other in their role asfacilitators following this workshop. Present Chart44, which provides some suggestions.
Ask participants what additional support theymight need from the facilitating organisation. Dothey feel that they need further training? Do theyneed more PILLARS Guides translated into theirlocal language, or more Guides printed anddistributed?
Refer to the section on MENTORING AND FOLLOW-
UP TRAINING on page 57. Discuss and agree onhow the peer and official mentoring process will beconducted, and when follow-up training will beheld.
Developing their facilitation skills30 minutes
During the course of the training, participants willhave the opportunity to develop their facilitationskills. But how can they continue to enhance theseskills, following the workshop? Present Chart 45,and ask participants to add to this list.
Remind participants that although facilitation skillsand tools are important, the facilitator’s ability tobuild good relationships with the group, toencourage and support them, is key to the group’ssuccess. If a facilitator has a genuine desire toserve people and see them grow, the group will feelconfident about trying out new ideas and taking onnew roles.
Give out Handout 10 (page 71), which participantscan use as a checklist to help participants assessand improve their facilitation skills.
52 FACILITATION SKILLS WORKBOOK
Session 20
● Setting up a regular newsletter or an emailnetwork to share learning and ideas
● Visiting each other to watch each otherfacilitate and evaluate each other’s progress
● Organising refresher training days to sharepractical experience of facilitatingdiscussions using PILLARS Guides and tobuild on the initial knowledge and skills gained
● Organising an event to promote PILLARS tothe different organisations and communitiesto which they belong
44 Peer support
● Practise● Become more self-aware● Set specific learning objectives and evaluate
progress ● Watch and learn from others, eg: visit a
group in another community● Ask for feedback from the group and from
other facilitators● Be open to correction and willing to learn
from mistakes
45 Ways of developingfacilitation skills

SESSION 21Monitoring andevaluation Aim
To consider ways of monitoring and evaluating theuse and impact of the Guides and to evaluate thetraining.
Objectives
■ To establish the importance of monitoring andevaluating the use and impact of the Guides.
■ To look at a process for conducting a baselinesurvey.
■ To identify ways of measuring the impactagainst this original data.
■ To establish the different types of impact thatmay result from using the Guides.
■ To give the participants the opportunity toevaluate the workshop, with reference to theiroriginal hopes and concerns.
Materials
Pre-prepared flipchart:46 Assessing the impact of the Guides on
community groups (page 54)
Handout 11 (see Appendix C, page 72)Assessing the impact of the Guides on community groupsTraining Evaluation Form (page 55)
PROGRAMME
Activity 15 minutesTHE CHANGE GAME
■ Participants stand in two rows, A and B, each facinga partner.
■ Row A turn their backs to Row B.
■ People in Row B change something about theirappearance.
■ Row A turn round again and have to say what haschanged.
■ Participants swap roles several times, so that theyeach have a turn changing their appearance andguessing what has changed.
Ask participants what this game teaches themabout the nature of change and about how changeis perceived. Point out that change often occursonly at surface level, and may be short-term andtemporary. PILLARS is seeking to stimulate deepand lasting change. In order to know if the use ofthe Guides is contributing to any change in thegroup, in terms of their knowledge, skills base orconfidence, we need to know something about allof these things before we start using the Guideswith them. It is useful to have what is called abaseline. This is information which we can measureagainst at a later date.
Baseline survey 10 minutes
Explain that Tearfund has developed amethodology and format for a PILLARS baselinesurvey. This can be carried out by those wishing touse the PILLARS Guides to help them understandthe information needs and priorities of the users. Itincludes questions about the nature and purpose ofthe user group, the group’s access to informationabout community development issues, the group’slevels of literacy, and ways in which the groupmight use printed information to achieve its aims.This survey can be conducted with a number ofdifferent community groups. The data will help the participants and community groups plan howthey will use the PILLARS Guides, with whom andfor what purpose. A follow-up survey can beconducted after using the Guides for a certainperiod of time, to try to understand the impact thatthey may have had.
The baseline survey is available from Tearfund –see Appendix F for the address.
Assessing the impact of the Guides oncommunity groups 40 minutes
Facilitators are good people to assess the impactthat the Guides are having on the groups usingthem, in terms of increasing awareness, increasingconfidence, changing attitudes or changingbehaviour. It may be helpful for them to keep arecord of who attends each group meeting, and oftheir gender and educational background. Afterseveral months of using PILLARS Guides with
FACILITATION SKILLS WORKBOOK 53
Session 21

community groups, facilitators can assess theprogress of the group, and their own progress asfacilitators.
The questions in Chart 46 will provide facilitatorswith a helpful way of assessing impact, and ofconsidering future possibilities. Present this Chart,and refer participants to Handout 11 (page 72).
Explain how this data could be collected andanalysed in order for it to help facilitators increasethe impact of the Guides. For example, a reportingmechanism could be established by a co-ordinatingorganisation. Answers to the questions in Chart 46could be sent by facilitators on a regular basis andanalysed. It is hoped that the answers will also helpfacilitators reflect on their own personal progress
and plan how they can make improvements to theway they work with their groups.
Evaluation 30 minutes
Since this is the final teaching session of thetraining, review the objectives, hopes and concernsthat were discussed in Session 1. Then ask eachparticipant to fill out a copy of the TrainingEvaluation Form (opposite page). This helps thosefacilitating the training to understand what theparticipants have enjoyed, and how it could beimproved. It also helps participants to reflect onhow they can apply what they have learnt, and onwhat further support they might need in order to do this.
54 FACILITATION SKILLS WORKBOOK
Session 21
Implementation
● Which community group are you currently usingthe Guides with?
● Was the group already established, or was itestablished so that people could use PILLARStogether?
● Which Guides have you used?● How is the content of the Guide relevant to this
particular group?
Impact
● Which ideas from these Guides have beenadopted by the group, if any?
● What is the group doing differently as a resultof using the PILLARS Guides?
● How appropriate is the language chosen (the locallanguage) to present this information to thisparticular group, and on this particular subject?
● What do people particularly value about theGuide?
● What do people particularly not like about theGuide?
● Do you see any change in the ability of individualgroup members (i) to share their ideas? (ii) totake responsibility for themselves, and for othermembers of the group? (iii) to participate inactivities that result from the PILLARS Guides?
● Do you see any change in the ability of the groupas a whole to share ideas with the widercommunity, or take responsibility for thedevelopment of their community?
● Have you used the Guides with groups thatalready existed or with groups establishedespecially for using PILLARS Guides? Do you seeany difference in the impact on the users in eachcase?
Future possibilities
● How could you integrate the use of the Guidesinto other development activities that are takingplace in your community?
● How could you get wider ownership of thePILLARS Guides and process in your community?
● Are there other people or agencies who you thinkshould be made aware of PILLARS in yourregion?
● Can you identify other members of thecommunity who would be able to facilitatediscussions using the Guides?
● Can you identify other groups who would beinterested in using the Guides?
● Can you identify other topics which wouldinterest the community and could be written asnew PILLARS Guides?
46 Assessing the impact of the Guides on community groups

1 Did the training meet your expectations?
2 Which session did you find the most useful?
3 Which session did you find the least useful?
4 The sessions were relevant and useful
5 The training was well structured
6 The sessions were well presented
7 The participatory teaching methods used during the training were useful
8 What was the most important thing that you have learnt during the training?
9 What skills have you learnt or developed during the training?
10 How do you hope to use what you have learnt during the training?
11 What further training or support do you need in order to use PILLARS Guides in your work and in your communities?
Name
Organisation
TrainingEvaluation Form
Strongly agree Agree Disagree Strongly disagree
❏ ❏ ❏ ❏Strongly agree Agree Disagree Strongly disagree
❏ ❏ ❏ ❏Strongly agree Agree Disagree Strongly disagree
❏ ❏ ❏ ❏Strongly agree Agree Disagree Strongly disagree
❏ ❏ ❏ ❏
FACILITATION SKILLS WORKBOOK 55

SESSION 22Closing CeremonyAim
To bring the training to a formal close, and topromote PILLARS.
Objectives
■ To celebrate the progress the participants havemade during the training.
■ To encourage participants as they look to thefuture.
■ To promote PILLARS to other organisations.
Materials
Copies of PILLARS Guides and certificates to giveto participants.
THE CEREMONY The closing ceremony is an opportunity tocelebrate what the participants have learnt. It isalso an opportunity to inform others aboutPILLARS and to encourage them to support theparticipants as they apply the learning to theirindividual situations.
It is recommended that community leaders,church leaders, senior members of staff from theorganisations represented, and key local figures ineducation or government are invited to attend.Invite several participants to share what they havelearnt during the training, and how they hope touse the PILLARS Guides and share the learningwith others. If there are a number of outsidepeople present, it may be helpful to share some ofthis learning by showing posters, or by using role-play or participatory tools that have formed animportant part of the training. One member of thefacilitation team should also share what they havelearnt and enjoyed about the training.
Give each participant a training certificate and acopy of each PILLARS Guide available in theirlanguage. If mentoring or follow-up training havebeen planned, provide participants with detailsabout this (see next section for details).Congratulate them on the progress they havemade, and encourage them in their future role asfacilitators.
56 FACILITATION SKILLS WORKBOOK
Session 22
Closing ceremony, Nigeria.
Phot
o: S
ophi
e Cl
arke
, Tea
rfun
d

Mentoring process
Developing good facilitation skills takes time.Though this initial training will help people tounderstand the process of good facilitation, it isonly by putting ideas and tools into practice thatthese skills will really be learnt and retained.
People who lack confidence, or have only used orexperienced a traditional teaching style, will oftenlapse back into more formal training methods. It istherefore important to support participants toensure that this new learning develops andbecomes a part of their approach to working withcommunity groups.
When selecting participants, ensure that there are always two, and preferably three or four,participants working near each other. They mayeither work for the same organisation or live withina short distance of each other. This small group ofparticipants should ideally include a balance ofmen and women of different ages. See the sectionon SELECTING PARTICIPANTS on page 5 for moredetails.
Peer mentoring process
Participants may prefer to work together in twos for a couple of months as they lead discussionsusing the PILLARS Guides with groups in theircommunities. This can be a really useful support forparticipants who lack confidence. The participantscan share responsibility for presenting the newideas and leading the discussion.
If participants prefer to work on their own, theyshould make arrangements to observe each otherfacilitating a group discussion once a month.Where three or four participants work near eachother, they should visit a different participant eachmonth, so that each participant observes each ofthe others at work. When visiting others,participants should arrive at the meeting together.
Following introductions, the visitor should simplyobserve the meeting. Afterwards the two shoulddiscuss how the meeting went and share any keyobservations that could help. Handouts 10 (page71) and 11 (page 72) – ‘Improving your facilitationskills’ and ‘Assessing the impact on the communitygroups using the Guides’ – can act as usefulchecklists for participants to work through whileobserving others, and to guide their feedback.
These monthly visits should continue over six totwelve months until follow-up training is held.
Official mentoring process
In addition to this peer mentoring process, trainingfacilitators should also plan to mentor each of theparticipants. Until follow-up training is held, eachtraining facilitator should plan two visits to eachsmall group of two to four participants. Duringtheir visit (which would normally take place overtwo days), the training facilitator would:
■ Observe each participant facilitating a discussionusing a PILLARS Guide with a community group.
■ Spend time with each participant individually,feeding back their observations and advisingthem on how they can improve their facilitationskills and overcome problems they haveencountered. It may help to identify particularlearning objectives for the following few months,as well as changes that the participants wouldlike to see in the community groups.
■ Bring together all the participants in the smallgroup, to discuss their progress, review the peermentoring process and identify any furthertraining needs.
FACILITATION SKILLS WORKBOOK 57
Mentoring and follow-up training

Follow-up training
This should consist of a two to three day review ofusing PILLARS Guides with community groups. Itshould provide participants with the opportunity to:
■ identify common challenges or problems faced,and share ideas about how these can beovercome
■ reflect on the relevance of the Guides, and waysin which they can be adapted
■ gain confidence in using a wider range ofpractical tools and techniques to encouragediscussion and participation (eg: proverbs andsayings from the local culture to reinforcelearning; ideas for starting and ending adiscussion)
■ share ideas on how to start and end a discussion,and where to access more information ondifferent topics so that they can be explored inmore depth
■ reflect on how the ideas raised in discussion canlead to a practical, active response on the part ofthe group
■ agree on a simple monitoring system forcollecting information on how PILLARS Guidesare being used
■ identify other community members who coulduse PILLARS Guides, and consider how the skillsand ideas from the training can be passed on tothem.
Training facilitators may wish to refer back toSessions 5–12 of the initial training for ideas onthese different areas. They may also want tosupplement the material with ideas from some ofthe resources listed in Appendix F, on page 76.
Training of trainers
In order to multiply the skills and learning so thatother members of the community groups areequipped to facilitate discussions using thePILLARS Guides, the organisation facilitating thetraining may wish to hold a ‘training of trainers’workshop. This would involve bringing some of theparticipants of the initial training back together fortwo to three days, to learn how to use this trainingWorkbook to train others in facilitation skills.
58 FACILITATION SKILLS WORKBOOK

FACILITATION SKILLS WORKBOOK 59
Appendix A
This training material can be used as the basis of a five-day training workshop, with each dayconsisting of four or five separate sessions ofapproximately 1 hour 45 minutes each.
A group of 20 to 30 participants should be invited to participate in the training. If possible the participants should come from differentorganisations or local communities and bring arange of skills and experience. They could includeteachers, health workers, church workers anddevelopment workers. A balance of men andwomen of different ages should be sought.
See FORMAT OF THE TRAINING (page 4) andPLANNING THE TRAINING (page 5) in theIntroduction of this Workbook for more details.
CHOOSING A WORKSHOP VENUE
Where an organisation decides to bring participantstogether for training, the venue should ideally be:
■ accessible, but in a peaceful location, away fromparticipants’ immediate workplaces
■ clean, with good washing facilities
■ reasonably priced
■ spacious, with a large meeting area and alsoquiet areas where participants can work in smallgroups
■ able to provide good food and refreshments ontime
■ equipped with comfortable accommodation forparticipants and facilitators.
FINANCE
The facilitating organisation will need to find fundsto host the training. A budget needs to be drawnup, to include the cost of staff time as well as otherinputs. See below for a list of items which shouldbe budgeted for. The exact costs will vary fromcountry to country.
WORKSHOP ACTIVITIES
A suggested timetable for a workshop can be foundin APPENDIX B, page 61. The workshop simplyfollows the sessions described here in the Work-book, over a five day period. It is recommendedthat this initial training is followed by refreshertraining, several months after the workshop, toreinforce the learning. See the previous sectionMENTORING AND FOLLOW-UP TRAINING, for details.
In some countries it may be appropriate to have aformal opening ceremony, either the night beforethe workshop begins or on the first morning, towhich members of the community and facilitatingorganisation might be invited.
Where appropriate, each day can begin with a timeof worship and small-group Bible study. The Biblestudies given in APPENDIX E, page 74, taken fromBuilding the capacity of local groups and Mobilisingthe community, should encourage participatory waysof studying the Bible and encourage groupmembers to understand how the Bible applies toand informs the different topics addressed by theGuides. It is important that the person leading thestudy on the first day sets a good example of this
Appendix A
RUNNING A FACILITATION SKILLS WORKSHOP
ITEM AMOUNT IN(name of currency)
WORKSHOP 1
A Stationery
B Workshop materials
C Venue
D Food and travel expenses for up to 25 participants
E External trainer(s) (optional)
Grand Total

60 FACILITATION SKILLS WORKBOOK
Appendix A
participatory approach. They should be wellprepared, with notes on each question and an ideaas to how to split the participants into groups sothat each group can look together at just one ortwo questions before feeding back. See APPENDIX
E, page 74, for a suggested methodology forleading a Bible study.
The day will then consist of four or five sessions, ofaround 1 hour 45 minutes each. Participants shouldbe encouraged to use the breaks to share learningand ideas with others, in a more relaxed andinformal manner. As the training is fairly intensive,it is important to use energisers such as games andshort group activities to keep energy levels highand to keep people engaged. See APPENDIX D, page73, for ideas.
There is a lot to do during the week. Thefacilitation team needs to ensure that participantsare on time for the start of each session and for themealtimes. It is hoped that the evenings and breakswill provide opportunities for more informalnetworking and exchange and for people to relaxand get to know one another.
See FORMAT OF THE TRAINING (page 4) andPLANNING THE TRAINING (page 5) in theIntroduction of this Workbook for more details.
Phot
o: Is
abel
Car
ter,
Tear
fund

FACILITATION SKILLS WORKBOOK 61
Appendix B
Appendix B
WORKSHOP TIMETABLE All sessions last 1 hour 45 minutes
Sess
ion
9
•Par
ticip
ator
y le
arni
ng a
ndac
tion
tool
s 1
Sess
ion
14
•Int
rodu
ctio
n to
fiel
d st
udy
visi
t
•Soc
ial t
ime
•Par
ticip
ants
dep
art
Sess
ion
4
•The
kno
wle
dge
deba
te
Sess
ion
8
•Usi
ng P
ILLA
RS G
uide
s to
enco
urag
e pa
rtici
patio
n
Sess
ion
13
•Fur
ther
pra
ctic
e in
usi
ngPI
LLAR
S Gu
ides
Sess
ion
18
•Fee
dbac
k an
d re
flect
ion
onfie
ld s
tudy
vis
it
Sess
ion
22
•Clo
sing
cer
emon
y
Sess
ion
3
•Loo
king
at P
ILLA
RS G
uide
sin
sm
all g
roup
s
•Ref
lect
ion
on c
onte
nt a
ndde
sign
of a
PIL
LARS
Gui
de
Sess
ion
7
•Par
ticip
atio
n
Sess
ion
12
•Usi
ng ro
le-p
lay
to s
hare
info
rmat
ion
Sess
ion
17
•Fie
ld s
tudy
vis
it
Sess
ion
21
•Mon
itorin
g an
d ev
alua
tion:
why
and
how
•Eva
luat
ion
of th
e w
orks
hop
Sess
ion
2
•Bac
kgro
und
to P
ILLA
RSGu
ides
•Aim
s of
PIL
LARS
Gui
des
and
proc
ess
Sess
ion
6
•Fac
ilita
tion:
ove
rcom
ing
the
diffi
culti
es
Sess
ion
11
•Usi
ng P
ILLA
RS G
uide
s to
stre
ngth
en li
tera
cy s
kills
Sess
ion
16
•Pre
para
tion
for f
ield
stu
dyvi
sit
Sess
ion
20
•Opp
ortu
nitie
s fo
r pro
mot
ing
PILL
ARS
Sess
ion
1
•Int
rodu
ctio
ns
•Hop
es a
nd c
once
rns
•Wor
ksho
p ob
ject
ives
and
timet
able
•Wor
ksho
p co
mm
ittee
s
•Gro
und
rule
s
Sess
ion
5
•Fac
ilita
tion
skill
s: th
edi
ffere
nce
betw
een
teac
hing
and
faci
litat
ion,
wha
t mak
es a
good
faci
litat
or
Sess
ion
10
•Par
ticip
ator
y le
arni
ng a
ndac
tion
tool
s 2
Sess
ion
15
•Ada
ptin
g PI
LLAR
S m
ater
ials
for a
fiel
d st
udy
visi
t
Sess
ion
19
•Opp
ortu
nitie
s fo
r usi
ng th
ePI
LLAR
S Gu
ides
with
loca
lco
mm
unity
gro
ups
•Fre
e tim
eDa
y 1
Day
2
Day
3
Day
4
Day
5
DEVOTIONAL

62 FACILITATION SKILLS WORKBOOK
Appendix C
Appendix C
HANDOUT 1The PILLARS Guides
PILLARS stands for Partnership In Local LAnguage ResourceS
The Guides are designed for use in small community groups, eg: youth groups, women’sgroups, farmers’ groups, literacy groups.
One person acts as the facilitator, and leads the group in discussions and activitiesbased on the Guides.
The Guides below are currently available in English (E) and French (F), with most alsoavailable in Spanish (S) and Portuguese (P):
● Building the capacity of local groups (E, F, S, P)
● Improving food security (E, F, S)
● Credit and loans for small businesses (E, F, S, P)
● Agroforestry (E, F)
● Preparing for disasters (E, F, S, P)
● Mobilising the community (E, F, S, P)
● Healthy eating (E, F, S, P)
● Mobilising the church (E, F, S, P)
● Responding more effectively to HIV and AIDS (E, F, S, P)
Some are also available in other national and local languages. A full list is available onTearfund’s learning website: www.tilz.info
The aims of the PILLARS Guides
The PILLARS Guides aim to:
● encourage group members to share their knowledgeand experience and to learn from each other
● help people learn and adopt new ideas and skills bydiscussing the information presented
● encourage and enable a practical response to theinformation
● build the confidence of the group and its individualmembers as they have access to printed and relevantdiscussion-based information in their local language
● encourage a group learning process that equips a groupto initiate and manage change
● strengthen the literacy skills of the group.

FACILITATION SKILLS WORKBOOK 63
HANDOUT 2Appendix C
The PILLARS Guides and their format
CONTENT OF GUIDES● One single theme, divided into 20–24 topics of a double page each.
● Bible studies relating to the text.
CONTENT OF EACH DOUBLE PAGE
Each topic includes text, an illustration and discussion questions.
TextAIM – to introduce new ideas.
• A short, simple title, not longer than one line, summarises the message of the double page.
• Between 75 and 150 words, divided into short paragraphs.
• Simple words, avoiding the use of long and difficult terms or jargon.
• Large print.
IllustrationsAIM – to reinforce the message of the text, aid memory, be attractive to users,communicate meaning of double page to those who are not literate. The illustrations:
• are adapted to the region
• are clear and understandable
• avoid using difficult symbols
• use the same style throughout the Guide.
Discussion questionsAIM – not to check understanding, but to relate the information to the lives of the users; to draw out and build on existing knowledge.
• Several open questions (who, what, why, when, how, where) that encourage people to share their experience of the topic being addressed, and encourage groupdiscussion.
• Include practical exercises to illustrate a new idea and help groups to apply thelearning.
BIBLE STUDIESAIM – to link God’s word with practical development-related information, and encouragethe group to apply biblical principles to their development work.
• Several questions on a passage relating to a particular topic.

64 FACILITATION SKILLS WORKBOOK
Appendix C
HANDOUT 3
Characteristics of a good facilitator
A good facilitator should be:
• humble • generous• patient • understanding• accepting • inclusive• an enabler •an encourager• affirming of everyone’s knowledge• sensitive to the needs of others• willing to learn from mistakes• dynamic, a motivator• a good listener• good at summarising others’ ideas • confident• a good communicator.
SCHOOL TEACHING FACILITATION
Differences between school teaching and facilitation
Teacher starts from their own knowledge
Teacher follows a pre-set curriculum
Teacher presents new information from the front
Information flows in just one direction, from teacher to students
Teacher brings extensive knowledge of the subject
Teacher is concerned with students understanding the right answer
Teacher works for the community and may come from outside the community
Teacher has a formal relationship with the students, based on their status as a teacher
Facilitator is considered as an equal, and has relationshipsbased on trust, respect and a desire to serve
Facilitator works with the community and may come fromwithin the community
Facilitator encourages and values different views
Facilitator draws out and builds on the knowledge of the group,and knows where to find further information on the subject
Information flows in many different directions between thefacilitator and individual group members – a genuine exchangeof ideas
Facilitator uses practical, participatory methods, eg: groupdiscussion and activities in which all members of the groupparticipate
Facilitator addresses issues identified by the group or theircommunity and adapts new ideas to the needs and culture ofthe group
Facilitator starts from the knowledge of the group
Skills of a good facilitator
A good facilitator should:
• be well prepared whilst remaining flexible• think and act creatively• deal with sensitive issues and manage people’s feelings
• encourage humour and respect• negotiate with and influence others• keep to time without being driven by it.
‘Facilitation is the art, not of puttingideas into people’s heads, but ofdrawing ideas out.’ ANON‘A facilitator is best when peoplebarely know that he or she exists…A good facilitator is one who talkslittle. When the work is done, theaim fulfilled, they will all say, “Wedid this ourselves.”’ LAO TZU 500 BC

FACILITATION SKILLS WORKBOOK 65
HANDOUT 4Appendix C
Dealing with difficult questions
● Prepare for group discussions by readingthrough the discussion material andbecoming familiar with the concepts andlanguage.
● Anticipate people’s questions wherepossible and think of possible responses.
● Do not be afraid to say that you do notknow the answer to a question! Instead sayyou will get back to the group with moreinformation.
● Refer to the list of additional resources inthe back of each PILLARS Guide whererelevant.
Good facilitation
● Be prepared
● Be flexible
● Be energetic
● Encourage humour
● Be clear
● Think positive
● Embrace mistakes andlimitations
● Be sensitive
● Use a variety of techniques,methods and activities
Tips for …
Empowering others
● Be patient.
● Listen to others and show that their opinions are valued.
● Be open to learning from the group so that informationsharing is multi-directional.
● Encourage the group to discover solutions for themselvesand to take responsibility for their own learning andprogress.
Managing conflict
● Acknowledge the conflict.
● Try to establish the cause of the conflict.
● If it is related to the topic in question,help lead the participants to a place ofagreement, encouraging mutual respect.
● If it is unrelated to the topic, and onlyinvolves several group members, encouragethem to resolve this disagreement later,outside of the group setting.
Handling dominant people
● Give them responsibility within the group.
● Reinforce alternative behaviour.
● Place with other similar types or in the samegroup as the facilitator.
● Limit the number of times each person canspeak, so that each member is treated equally.
Working with shy people
● Encourage them individually within and outside ofthe group.
● Establish reasons for their silence.
● Give notice of the topic before the discussion sothat they have time to prepare.
● Give them responsibility for note-taking andfeedback.
● Place them in a supportive group.
● Give them time.
● Use role-play to build up confidence and skills.

66 FACILITATION SKILLS WORKBOOK
Appendix C
HANDOUT 5
Barriers to participation
● Reluctance to challenge those in authority.
● Loss of power, position or influence.
● Fear of the consequences of change.
● Self-interest.
● Lack of self-confidence.
● Lack of social skills or experience of participation.
● Lack of resources – time and money.
● Lack of information about the process and the mechanisms for facilitation.
● Not invited to participate – marginalised by the facilitating organisation.
● Lack of ownership of the process or lack of faith in the facilitating institution.
● Language.
● Culture of dependence – prefer being told what to do.
● Knowledge is power – fear that if it is shared, power will be lost.
Different levels of participation
1 Passive participation (‘tokenism’) For example:attending meetings, sharing information, taking partin consultations but not actively contributing.
2 Participation in project-centred developmentThis involves people taking part in a project thathas been planned by people outside the community,by NGOs or government. This could includediscussion at public meetings, involvement inbuilding, providing labour and attending training,managing the project, determining and monitoringits objectives.
3 Participation in people-centred developmentThis involves people from within the communitythemselves initiating and managing change, makingplans and ‘owning’ development.
Encouraging participation in a PILLARS discussion
● Seating Group members sit in a circle, or in asemi-circle.
● Introducing the topic Use role-play, an energiseror a poster to start the discussion.
● Leading the discussion Use techniques toencourage each group member to participate, andto make sure that their ideas are understood andrecorded in some way.
● Applying the learning Follow the discussion with apractical activity or further discussion that makesthe ideas relevant to the needs and interests ofthe group.
Things that encourage participation
● Self-interest – meeting their ownneeds.
● Caring about the needs of others.
● Enjoying working with others.
● Future gain.
● Desire to belong.
● Reinforcement of cultural and socialvalues.
● Sense of identity and unity.
● Being able to achieve more togetherthan alone.
● Desire to change, learn.

FACILITATION SKILLS WORKBOOK 67
HANDOUT 6Appendix C
Participatory learning and action tools: examples
MAPPING People are asked to draw a map of their community. This couldinclude natural resources, water sources, healthcare services, key people inthe community etc. Different groups of people may look at their communityin different ways. It is useful to ask key groups, such as women, men, youngpeople, older people, people with disabilities, to draw separate maps and thencompare them. See Mobilising the community, Mapping the local area (A11),as an example.
RANKING This involves giving a value to different items so that they canbe arranged in order of priority. Community needs or training needs could beranked in order of priority. See Mobilising the community, Preparingquestionnaires (A17), for an example.
TIMELINE People can be asked to express how a particular aspect of lifehas changed over time. This could include income, wellbeing, training,educational needs. The aspect could vary from very poor to very good. SeeMobilising the community, Community timeline (A12), for an example.
MATRIX SCORING AND RANKING This involves using tables calledmatrices, and seeds, beans or other objects to express preferences andcompare through scoring, eg: compare relative importance of a list ofconcerns, or of living conditions at different times of year. See Mobilisingthe community, Preparing information charts (A18), as an example.
VENN DIAGRAMS These identify individuals and institutions that areimportant in and for a community or group, or within an organisation, andtheir relationships. See Mobilising the Church, How do we see our church?(B3), as an example.

68 FACILITATION SKILLS WORKBOOK
Appendix C
HANDOUT 7
Strengthening literacy skills: ways of working through a double page
● Look at the pictures together. Ask people:• What is happening in the pictures? • What ideas come to mind when you look at them? AIM – To draw out the main ideas that are presented in the text, and to drawout some key vocabulary.
● Pre-view key vocabulary in the text. Write the most important words on aflipchart or board or produce flash cards of the main key words. Askindividuals to read the words out loud. Put each word in a different sentence. • What does each word mean?AIM – To prepare readers for reading the text.
● Read the text together. Take it in turns to read one line each out loud.
AIM – To provide reading practice.
● Ask people to read the text again, this time on their own. Ask strongerreaders to help weaker students where necessary.
AIM – To provide further reading practice.
● Ask questions about the text.• What does it talk about?• What is the main message of the text?• What can we learn from the text?AIM – To check readers’ understanding of the text.
● Talk through the discussion questions together, or in small groups.
AIM – To give readers the opportunity to explore and comment on ideaspresented in the text, and to apply the information to their own lives andexperience.
● Ask people to copy down the key words on the flipchart/board.
AIM – To provide writing practice.
● Ask people to write a short answer to each discussion question.
AIM – To provide further writing practice, and to capture individuals’knowledge, experience and thoughts.
● Review each lesson each week, or each time of meeting.
AIM – To build on what people have learnt and to give them a sense ofprogress.

FACILITATION SKILLS WORKBOOK 69
HANDOUT 8Appendix C
Field Study visit
● Introductions 20 minutes
● Gaining information about the group and their interests 20 minutes
● Small group discussion 40 minutes
● Feedback on the PILLARS Guides 20 minutes
Information about the group
About the group
• Date established• Number of members (including number of members present today, numbers of men and women)
• Aims• Activities
Levels of literacy
• How many members of the group are literate (able toread and write a simple letter) in the nationallanguage? In local languages?
• How many of these are women, and how many are men?
Access to information
• Where does the group obtain new ideas about health,agriculture, or other issues that relate to the group’spurpose and activities?
• Would people be interested in printed information inthe local language?
• Which particular issues would they like printedinformation to address?
The PILLARS Guides
● What do the groups think of the content of the Guides / topics?
● Do they find the text easy to understand, and is itrelevant to their context?
● What do they think of the format and design of theGuides?
● How much would they be prepared to pay for a Guide?

70 FACILITATION SKILLS WORKBOOK
Appendix C
HANDOUT 9
Opportunities for using the PILLARS Guides
WHATWhat action is being planned? Why is it needed?Ask participants to think about the differentcommunity groups that they are a part of orthat they work with. Would members beinterested in using PILLARS Guides? Why?How would it help the group achieve its aims?What needs would it address? What willmembers know, think and do as a result ofusing the PILLARS Guide(s)? How can theGuides help the participants achieve aims inother areas of development work?
HOWHow will the work be carried out? What resources are needed?Think about how the Guides should be introduced to community groups, so that they understandtheir relevance to their situation and have ownership of the materials and the discussion process. Think about the information needs and interests of the group, and the level of education andliteracy of the group members. Which Guide is going to be most relevant to them? Is this Guideavailable in the local language? How many copies are needed?
WHOWho is going to carry out this work? Do they need training?Who is going to facilitate the group discussions? Perhaps the participants will be doing this, butare there group members with the time and skills needed to lead the group through a PILLARSGuide? How could participants share the knowledge and skills they have learnt during the trainingto help others with facilitation skills?
WHEREWhere is the work to be done?In which community, and with which group could the Guides be used? Where does the group meet?
WHENWhen is the work going to be done? How long will it take?When does the group usually meet? Could they use PILLARS Guides during their regular meetings?How long will it take them to work through a whole PILLARS Guide together?Ask each group to share their ideas with the rest of the group. Ask individual trainees to developan outline plan based on these five questions as they consider how they will use the Guides in theirown community.
WHA
T?
HOW?
WHO?
WHERE?
WHEN?

FACILITATION SKILLS WORKBOOK 71
HANDOUT 10Appendix C
Improving your facilitation skills: a self-assessment
● How did I make people feel relaxed and welcome?
● How relevant was the information to the group using it? How did I adapt the information so that it wasrelevant to the group?
● How did I encourage quiet members of the group to participate?
● How did I deal with differences of opinion?
● How did I deal with people who dominated the group discussion?
● How did I respond to questions from members of the group? Was I able to answer them? If not, howcould I find out more information that would help me deal with future questions?
● How did I introduce the discussion? How could I have done this better?
● How did I encourage further discussion?
● How did I deal with sensitive issues?
● Did I bring the discussion to a satisfactory conclusion? How could I have done this better?
● How did I ensure the group’s ideas were recorded for use in future discussion, group planning or forsharing with others?
● Did group members make any decisions about how to put learning into practice? If not, how could Iencourage this?
● What additional information or follow-up discussion is needed in order to address underlying views andattitudes to the topics discussed?
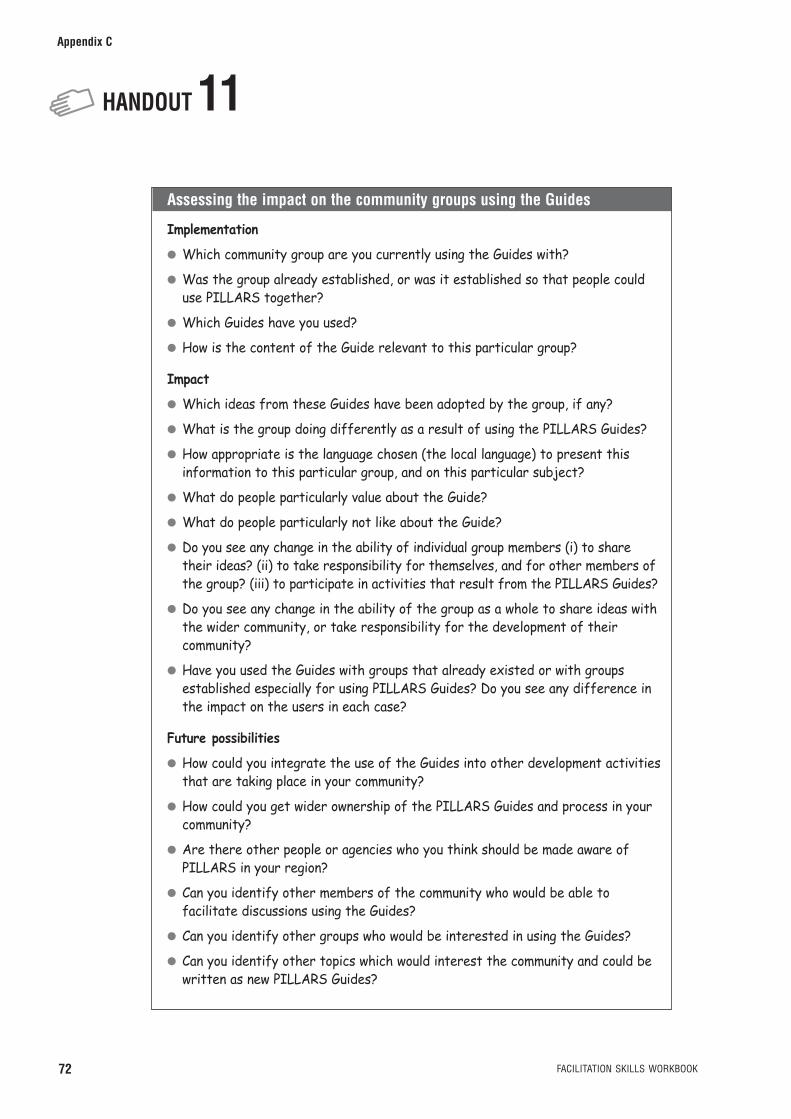
72 FACILITATION SKILLS WORKBOOK
Appendix C
HANDOUT 11
Assessing the impact on the community groups using the Guides
Implementation
● Which community group are you currently using the Guides with?
● Was the group already established, or was it established so that people coulduse PILLARS together?
● Which Guides have you used?
● How is the content of the Guide relevant to this particular group?
Impact
● Which ideas from these Guides have been adopted by the group, if any?
● What is the group doing differently as a result of using the PILLARS Guides?
● How appropriate is the language chosen (the local language) to present thisinformation to this particular group, and on this particular subject?
● What do people particularly value about the Guide?
● What do people particularly not like about the Guide?
● Do you see any change in the ability of individual group members (i) to sharetheir ideas? (ii) to take responsibility for themselves, and for other members ofthe group? (iii) to participate in activities that result from the PILLARS Guides?
● Do you see any change in the ability of the group as a whole to share ideas withthe wider community, or take responsibility for the development of theircommunity?
● Have you used the Guides with groups that already existed or with groupsestablished especially for using PILLARS Guides? Do you see any difference inthe impact on the users in each case?
Future possibilities
● How could you integrate the use of the Guides into other development activitiesthat are taking place in your community?
● How could you get wider ownership of the PILLARS Guides and process in yourcommunity?
● Are there other people or agencies who you think should be made aware ofPILLARS in your region?
● Can you identify other members of the community who would be able tofacilitate discussions using the Guides?
● Can you identify other groups who would be interested in using the Guides?
● Can you identify other topics which would interest the community and could bewritten as new PILLARS Guides?

During training sessions, there may be times whenenergy levels fall and people’s attention wanders.This is particularly true just after lunch or towardsthe end of the day, or during sessions that involvepresentation of new material and require a highlevel of concentration.
Energisers are short games or activities that canhelp refresh people when they are tired. They canhelp build relationships between the participants,by bringing them together to relax and do some-thing enjoyable together. Ideally, the energisersshould relate in some way to the content of thesession, and have a learning component whichparticipants can easily identify. In this way,learning is reinforced and those who are lesscomfortable with games are reassured that theyare actually an important part of the training!However, no one should be forced to participate,and sensitivity and wisdom will be needed whendeciding which energisers are appropriate to theculture, age and gender of the group.
Some ideas are given here.
BUZZ
Ask people to turn to the person next to them and talk about what has just been covered, anissue that has just arisen or a decision that has tobe made.
COUNTING IN THREES
Participants stand in a circle. They take it in turnsto count out loud around the circle. Every time anumber is reached that is a multiple of three orcontains the digit 3 (3, 6, 9, 12, 13, 15 etc) thatperson must clap instead of saying the number outloud. If someone makes a mistake, they drop out ofthe circle and the next person starts from number1 again.
RANKING
One person is asked to leave the room. Theremaining participants choose something on which
to rank themselves. This could be their height, theirhair colour or length, the month in which they havea birthday, and so on. The participants line upaccording to the ranking system they have secretlychosen and ask the person outside to come backinto the room. This person then has to guess howthe participants have been ranked.
KEEP MOVING
Ask participants to get up and speak to someonesitting on the other side of the room. You could askthem, for example, to share one thing they havelearnt so far in that training session, or one thingthey are still not sure about. You can also ask thegroup to stand and move to where they can look ata chart stuck on the wall or to where they can stickup their own ideas.
MIRRORS
Put people into pairs. One person is the actor, theother is the mirror. The mirror does whatever theactor does, mirroring their actions. After a fewminutes, change roles.
CAROUSEL
Stick up four pieces of blank flipchart paper indifferent places around the room. On each piece ofpaper, write one different word that relates to thatparticular session. It might, for example, be a worddescribing a concept that has just been presented,eg: PILLARS, or Participation. Divide participantsinto four groups, and give each group a pen. Askeach group to stand in front of a piece of flipchartand write down three things that come to mindwhen they think of the word written there. Afterone minute, ask the groups to move to anotherpiece of flipchart and do the same, adding threedifferent ideas to the list started by the previousgroup. Repeat until all four groups have written onall four pieces of flipchart. Then ask one person toread out each complete list, so the ideas can beshared with all the participants.
FACILITATION SKILLS WORKBOOK 73
Appendix D
ENERGISERS
Appendix D

74 FACILITATION SKILLS WORKBOOK
Appendix E
The five Bible studies in this Appendix shouldencourage participatory ways of studying the Bible.This in turn should encourage group members tounderstand how the Bible applies to and informsthe different topics addressed by the Guides.
KEY POINTS FOR ENCOURAGINGPARTICIPATORY BIBLE STUDY
■ It is really important that the Bible study isparticipatory, encouraging discussion in groups.If there is someone who can set a good examplein leading a Bible study in a participatory way,the training facilitators should make sure they do this the first morning. Brief these peoplethoroughly to ensure that it really will beparticipatory. Otherwise one of the trainingfacilitators could lead the first Bible study.
■ It is important that the person facilitating hasprepared for the study, making notes on eachquestion.
SUGGESTED METHODOLOGY FORFACILITATORS
■ Give a three minute explanation of the subjectand passage to be studied. Ask someone to readout the passage.
■ Divide people into small groups to read thepassage again and answer just one or twoquestions in each group. Questions should bewritten on bits of paper and copies given to eachgroup. Give them five to ten minutes to discuss.
■ Bring the groups back together. Ask eachquestion in turn, letting each group respond as itcomes to their turn.
■ Let people make further comments or reflections(without running over time).
■ Finish with a very brief conclusion or highlightone or two things that have seemed veryrelevant. Close in prayer.
Appendix E
PARTICIPATORY BIBLE STUDIES
1 Leadership: study one
Read 1 Timothy 3:1-10 This passagedescribes the qualities Paul consideredimportant for leaders in the church. What doesPaul say about the person who sets their hearton being an overseer (verse 1)?
● Which of the qualities listed for overseers anddeacons (verses 2-5 and 7-9) might beimportant within your church or organisationand why?
● What danger does verse 6 say there is in havinga recent convert as a church leader? Couldthere be the same danger for your organisationif you had a new member leading?
● What does verse 10 say about deacons?
2 Leadership: study two
Read the following verses: Exodus 3:11,Judges 6:15, 1 Samuel 9:21, 1 Kings 3:7,Jeremiah 1:6
● What sort of people is God choosing forleadership roles here?
● What are their attitudes?
● What model of leadership does Jesus show usin John 13:3-5?
● What does God say he looks at when he isselecting a leader? (1 Samuel 16:7)
Having reviewed the qualities and attitudes aleader needs and the work to be done, manypeople might feel (as did some of theseexamples) inadequate and unable to fulfil theleadership role. This can be a healthy attitude ifhandled correctly, as it means the leader willlook for support and not become proud.

FACILITATION SKILLS WORKBOOK 75
Appendix E
3 One body, many parts: study one
Read 1 Corinthians 12:12-26 and Romans 12:3-8
ONE BODY There is much we can learn from thesepassages about how a group works together. In anychurch or organisation there are a variety of people butthey form one body (1 Corinthians 12:12; Romans 12:4,5) and should be committed to, or belong to, oneanother (1 Corinthians 12:14-16; 12:26).
● What does this mean in practice for your organisation?
MANY PARTS Each member of the group has a gift touse. In these passages several dangers are highlightedwhen thinking about our own gifts and those of others.
● What warning does Romans 12:3 give us?
● What warning does 1 Corinthians 12:21-25 give us?
● What happens when we overvalue our own gifts andundervalue those of others or begin to boast about ourown gifts?
4 One body, many parts: study two
The Bible tells us that every personhas gifts (1 Corinthians 12:7, 11). Jesushimself also gave us some strongteaching on what happens to thosewho do not use their gifts (Matthew25: 14-30).
● Do you know what your gifts are andare you using them (Romans 12:6-8)?
1 Corinthians 4:7 reminds us that allwe have has been given to us – sothere is no room for pride.
● However, what is the opposite danger(1 Corinthians 12:15-20)?
● Is your organisation functioning well,like a healthy body, where eachdifferent member is playing their part?How can you encourage one anotherto do so?
5 Nothing is impossible with God
Read Judges 7:1-22.
● Why does the Lord say he cannot deliver Midianinto the hands of Gideon and his men?
● What does he not want Israel to end up doing?
● Which men turn back first? (Verses 2-3)
The Lord uses the way that the men drink fromthe river to decide who else shall not go withGideon. The majority of the army kneel down todrink and just 300 men lap with their tongues likea dog, with their hands to their mouths. God tellsGideon that these 300 men are the ones to gointo the battle.
● How does your organisation choose who will do acertain task? (Verses 4-8)
● Do you seek God’s advice?
We are told that the Midianite army is huge (verse 12).
● How does the Lord encourage Gideon not to beafraid and to believe that his small army will winthe battle?
Gideon and his men use the resources they haveto great effect: they work together (verses 17-18,20), with each man playing his part (verse 21),‘for the Lord and for Gideon’ (verses 18 and 20).They know that the victory is the Lord’s (verses15 and 22).
● How might this passage encourage yourorganisation as you face the tasks ahead of you?
If God has called us and we keep our eyes fixedon him, however immense the task seems andhowever small our resources are, we will succeed:‘For with God nothing is impossible.’(Luke 1:37).
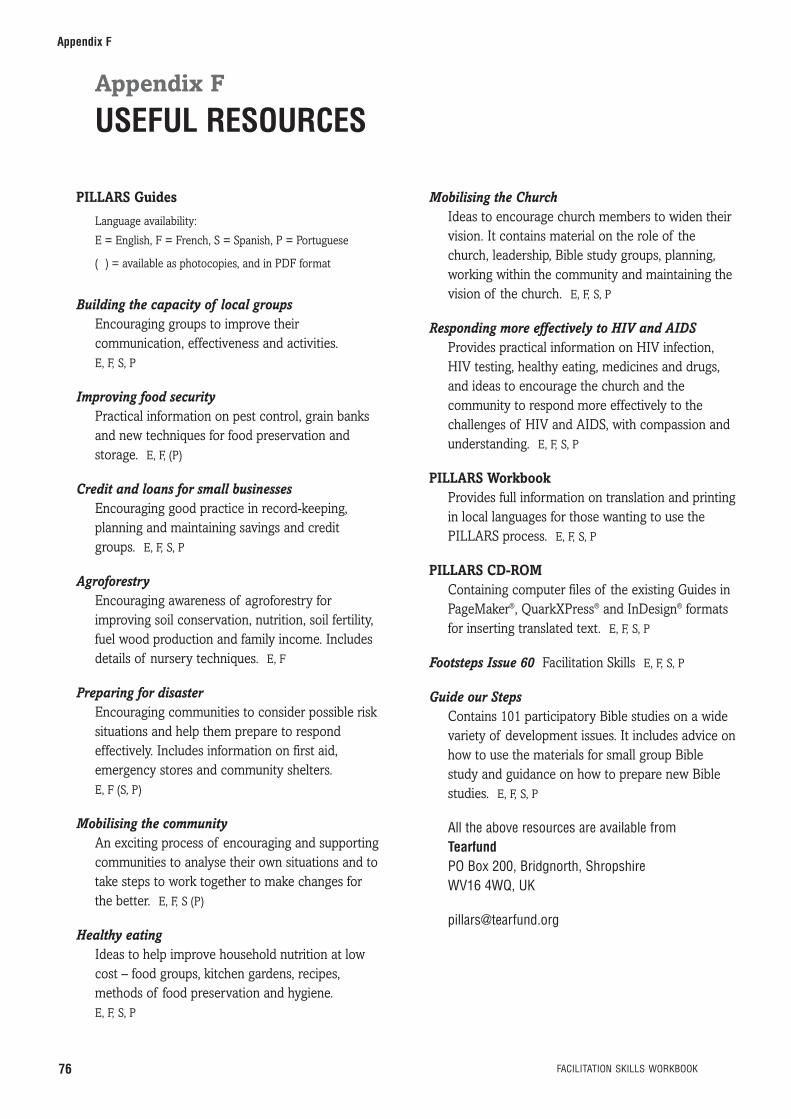
Mobilising the ChurchIdeas to encourage church members to widen theirvision. It contains material on the role of thechurch, leadership, Bible study groups, planning,working within the community and maintaining thevision of the church. E, F, S, P
Responding more effectively to HIV and AIDSProvides practical information on HIV infection,HIV testing, healthy eating, medicines and drugs,and ideas to encourage the church and thecommunity to respond more effectively to thechallenges of HIV and AIDS, with compassion andunderstanding. E, F, S, P
PILLARS WorkbookProvides full information on translation and printingin local languages for those wanting to use thePILLARS process. E, F, S, P
PILLARS CD-ROMContaining computer files of the existing Guides inPageMaker®, QuarkXPress® and InDesign® formatsfor inserting translated text. E, F, S, P
Footsteps Issue 60 Facilitation Skills E, F, S, P
Guide our StepsContains 101 participatory Bible studies on a widevariety of development issues. It includes advice onhow to use the materials for small group Biblestudy and guidance on how to prepare new Biblestudies. E, F, S, P
All the above resources are available fromTearfundPO Box 200, Bridgnorth, Shropshire WV16 4WQ, UK
76 FACILITATION SKILLS WORKBOOK
Appendix F
PILLARS Guides
Language availability:
E = English, F = French, S = Spanish, P = Portuguese
( ) = available as photocopies, and in PDF format
Building the capacity of local groupsEncouraging groups to improve theircommunication, effectiveness and activities.E, F, S, P
Improving food securityPractical information on pest control, grain banksand new techniques for food preservation andstorage. E, F, (P)
Credit and loans for small businessesEncouraging good practice in record-keeping,planning and maintaining savings and creditgroups. E, F, S, P
AgroforestryEncouraging awareness of agroforestry forimproving soil conservation, nutrition, soil fertility,fuel wood production and family income. Includesdetails of nursery techniques. E, F
Preparing for disasterEncouraging communities to consider possible risksituations and help them prepare to respondeffectively. Includes information on first aid,emergency stores and community shelters.E, F (S, P)
Mobilising the communityAn exciting process of encouraging and supportingcommunities to analyse their own situations and totake steps to work together to make changes forthe better. E, F, S (P)
Healthy eatingIdeas to help improve household nutrition at lowcost – food groups, kitchen gardens, recipes,methods of food preservation and hygiene.E, F, S, P
Appendix F
USEFUL RESOURCES

Training for Transformation:a handbook for community workersAnne Hope and Sally Timmel
This book focuses on five issues impacting on thedevelopment of communities around the world: theenvironment, gender and development, ethnic andracial conflict, intercultural understanding, andparticipation in government. Each section containscase studies, discussion starters and ideas for usewithin the community. E
Available from TALCTALC, PO Box 49, St Albans, Herts, AL1 5TX, UKE-mail: [email protected]
Participatory Workshops: a sourcebook of 21 sets of ideas and activitiesRobert Chambers
This book contains ideas, activities and tips for allthose who try to help others learn and change. Itwould be useful for facilitators, trainers, teachersand those who manage meetings and workshops. Itis written in an enjoyable, easy-to-read manner,designed to be read in short sections rather thanfrom beginning to end! It is full of illustrations andcartoons. E
Available from BlackwellsBlackwells Mail Order Dept, 48–51 Broad Street,Oxford, OX1 3BQ, UKE-mail: [email protected]: www.blackwell.co.uk
100 Ways to Energise Groups: games to use inworkshops, meetings and the community
This guide aims to be an ‘ideas book’ of sharedexperiences to help facilitators prepare forparticipatory workshops. It may also be useful forpeople who facilitate meetings and planningactivities using participatory techniques.Available free of charge. E, F, S
Available from HIV/AIDS AllianceHIV/AIDS Alliance, Queensbury House,104–106 Queen’s Road, Brighton, BN1 3XF, UKE-mail: [email protected] Website: www.aidsalliance.org
FACILITATION SKILLS WORKBOOK 77
Appendix F

78 PILLARS WORKBOOK
Index
G GuidesAims of the Guides 62
Content and layout of the Guides 14, 36
Format of the Guides 14, 63
Further practice in using the Guides 40
Guides available 62
Introduction to the Guides 3, 11
Monitoring and evaluating the impact of the Guides 48, 54
Promoting the Guides 51Strengthening literacy skills 35Translation of the Guides 12Using the Guides 49
H Hopes and concerns 7
I InformationInformation sources 11
Introduction activities 7
K Knowledge debate 17
L Learning and actionReflection cards 9
LiteracyUsing the Guides to
strengthen literacy skills 35, 68
M Mapping 32, 33
MaterialsPreparing materials 5, 45
Matrix 33
Monitoring and evaluationAssessing impact
on community groups 53, 72
Feedback on field study 48
Self-assessment 71
Training Evaluation Form 55
Mentoring and follow-up trainingFollow-up 58
Mentoring process 37
Official mentoring 57
Peer mentoring 57
B Baseline surveyConducting a baseline survey 53
Bible studyHow to lead a group Bible study 74
Suggested Bible studies 74
C Closing ceremony 56
Committees 8
D Debate 18
E Energisers 73
Equipment 5, 45
Evaluation form 55
F FacilitationAttitudes of a facilitator 21
Characteristics of a facilitator 21, 64
Facilitation practice 22, 41
Facilitation techniques 25
Overcoming the difficulties of facilitation 23
Purpose of facilitation 20
Skills of a facilitator 3, 19, 21, 64
The difference between teaching and facilitating 19, 64
Tips for empowering others 23, 65
Tips for good facilitation 25, 26
Tips for handling dominant people 25, 65
Tips for managing conflict 24, 65
Tips for working with shy people 25, 65
Field study visitIntroduction to … 6, 41, 47, 69
Preparation for … 46, 47, 69
Reflection on … 47, 48, 60
Five Finger Method 49, 70
Index

FACILITATION SKILLS WORKBOOK 79
Index
P ParticipantsSelecting the participants 5
ParticipationAdvantages and disadvantages
of participation 28
Barriers to participation 28, 29, 66
Building on existing community participation 29
Definitions of participation
Degrees of participation 27, 66
Encouraging participation 30, 66
Things that encourage participation 28
Participation, using PILLARS Guides to encourage 31
Participatory Bible study 74
Participatory learning 32, 34and action: theory
Participatory learning and action: tools 32, 34, 67
PILLARSOrigins of PILLARS 10
PILLARS Guide format 14, 15
PILLARS processProduction process 13
See also PILLARS Guides 11
PostersDesigning posters 45
PlanningPlanning for a discussion
based on a PILLARS Guide 6
Planning for the field study visit 43, 46
Planning for the workshop 5
R Ranking 32
Research findings 10
Resources 76
Role-playGood role-play 39
Using role-play 45
Using role-play to share information 38
Why role-play? 38
S Seasonal calendar 33
SupportOngoing support 52
T Timeline 32, 33, 67
TrainingFormat of the training 4
Training activities 6
Training certificate 56
Training content 4
Training objectives and outcomes 4, 8
Translation of the Guides 12
V Venn diagram 32
VenueChoosing a workshop venue 59
W WorkshopRunning a facilitation skills workshop 59
Workshop timetable 61

brainstorm to state what immediately comes to mind about an issue
CD-ROM compact disc storing information that can be read on a computer
energisers short games or activities to refresh people when they are tired
illustrations pictures, such as those found on each double page of a PILLARS Guide
mentoring advising, training, supporting someone as they develop new skills
NGO non-governmental organisation
peer mentoring advising, training, supporting someone with the same status or role
PILLARS Partnership In Local LAnguage ResourceS
pilot test, trial period
stimulus incentive, motivating factor
surveyor someone who carefully analyses a situation or people’s viewpoints
syllabus subjects in a course of study or teaching
text written material, such as that found on each double page of a PILLARS Guide
theoretical concerned with theory rather than practice
visual aids objects that can be used to illustrate or teach something
80 FACILITATION SKILLS WORKBOOK
GlossaryGlossary


Facilitation skills workbook
by Sophie Clarke, Rachel Blackman and Isabel Carter
ISBN 1 904364 49 7
Published by Tearfund
100 Church Road, Teddington, TW11 8QE, United Kingdom E