FA-VA5 Antenna Analyzer Setup with VNWA Windows Software€¦ · Click on Options and Select...
10
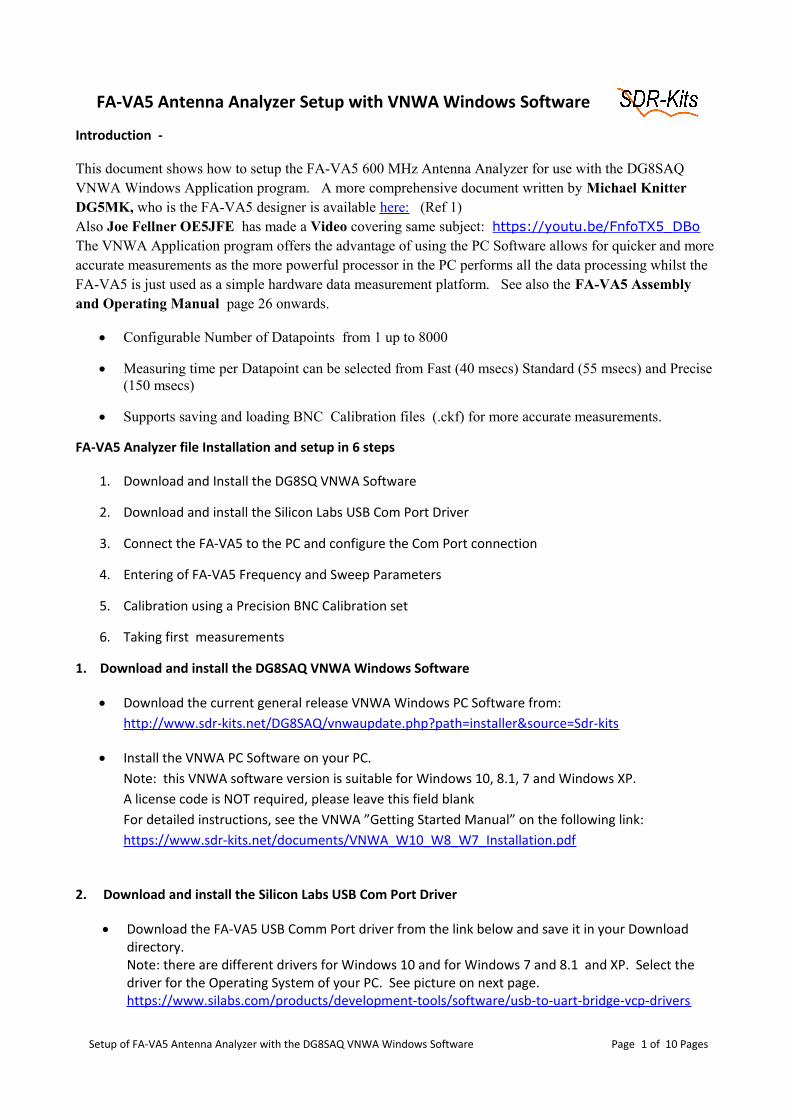
FA-VA5 Antenna Analyzer Setup with VNWA Windows Software Introduction - This document shows how to setup the FA-VA5 600 MHz Antenna Analyzer for use with the DG8SAQ VNWA Windows Application program. A more comprehensive document written by Michael Knitter DG5MK, who is the FA-VA5 designer is available here: (Ref 1) Also Joe Fellner OE5JFE has made a Video covering same subject: https://youtu.be/FnfoTX5_DBo The VNWA Application program offers the advantage of using the PC Software allows for quicker and more accurate measurements as the more powerful processor in the PC performs all the data processing whilst the FA-VA5 is just used as a simple hardware data measurement platform. See also the FA-VA5 Assembly and Operating Manual page 26 onwards. Configurable Number of Datapoints from 1 up to 8000 Measuring time per Datapoint can be selected from Fast (40 msecs) Standard (55 msecs) and Precise (150 msecs) Supports saving and loading BNC Calibration files (.ckf) for more accurate measurements. FA-VA5 Analyzer file Installation and setup in 6 steps 1. Download and Install the DG8SQ VNWA Software 2. Download and install the Silicon Labs USB Com Port Driver 3. Connect the FA-VA5 to the PC and configure the Com Port connection 4. Entering of FA-VA5 Frequency and Sweep Parameters 5. Calibration using a Precision BNC Calibration set 6. Taking first measurements 1. Download and install the DG8SAQ VNWA Windows Software Download the current general release VNWA Windows PC Software from: http://www.sdr-kits.net/DG8SAQ/vnwaupdate.php?path=installer&source=Sdr-kits Install the VNWA PC Software on your PC. Note: this VNWA software version is suitable for Windows 10, 8.1, 7 and Windows XP. A license code is NOT required, please leave this field blank For detailed instructions, see the VNWA ”Getting Started Manual” on the following link: https://www.sdr-kits.net/documents/VNWA_W10_W8_W7_Installation.pdf 2. Download and install the Silicon Labs USB Com Port Driver Download the FA-VA5 USB Comm Port driver from the link below and save it in your Download directory. Note: there are different drivers for Windows 10 and for Windows 7 and 8.1 and XP. Select the driver for the Operating System of your PC. See picture on next page. https://www.silabs.com/products/development-tools/software/usb-to-uart-bridge-vcp-drivers Setup of FA-VA5 Antenna Analyzer with the DG8SAQ VNWA Windows Software Page 1 of 10 Pages
Transcript of FA-VA5 Antenna Analyzer Setup with VNWA Windows Software€¦ · Click on Options and Select...
FA-VA5 Antenna Analyzer Setup with VNWA Windows Software
Introduction -
This document shows how to setup the FA-VA5 600 MHz Antenna Analyzer for use with the DG8SAQ VNWA Windows Application program. A more comprehensive document written by Michael Knitter DG5MK, who is the FA-VA5 designer is available here: (Ref 1)Also Joe Fellner OE5JFE has made a Video covering same subject: https://youtu.be/FnfoTX5_DBoThe VNWA Application program offers the advantage of using the PC Software allows for quicker and more accurate measurements as the more powerful processor in the PC performs all the data processing whilst the FA-VA5 is just used as a simple hardware data measurement platform. See also the FA-VA5 Assembly and Operating Manual page 26 onwards.
Configurable Number of Datapoints from 1 up to 8000
Measuring time per Datapoint can be selected from Fast (40 msecs) Standard (55 msecs) and Precise (150 msecs)
Supports saving and loading BNC Calibration files (.ckf) for more accurate measurements.
FA-VA5 Analyzer file Installation and setup in 6 steps
1. Download and Install the DG8SQ VNWA Software
2. Download and install the Silicon Labs USB Com Port Driver
3. Connect the FA-VA5 to the PC and configure the Com Port connection
4. Entering of FA-VA5 Frequency and Sweep Parameters
5. Calibration using a Precision BNC Calibration set
6. Taking first measurements
1. Download and install the DG8SAQ VNWA Windows Software
Download the current general release VNWA Windows PC Software from:http://www.sdr-kits.net/DG8SAQ/vnwaupdate.php?path=installer&source=Sdr-kits
Install the VNWA PC Software on your PC.Note: this VNWA software version is suitable for Windows 10, 8.1, 7 and Windows XP.A license code is NOT required, please leave this field blankFor detailed instructions, see the VNWA ”Getting Started Manual” on the following link:https://www.sdr-kits.net/documents/VNWA_W10_W8_W7_Installation.pdf
2. Download and install the Silicon Labs USB Com Port Driver
Download the FA-VA5 USB Comm Port driver from the link below and save it in your Download directory.Note: there are different drivers for Windows 10 and for Windows 7 and 8.1 and XP. Select the driver for the Operating System of your PC. See picture on next page.https://www.silabs.com/products/development-tools/software/usb-to-uart-bridge-vcp-drivers
Setup of FA-VA5 Antenna Analyzer with the DG8SAQ VNWA Windows Software Page 1 of 10 Pages

Find the Driver zip-file in the Directory where it was downloaded into.
Unzip the Driver zip-file and save the extracted Driver file in a different directory (Unzipping is generally done by selecting the zip-file and with a Right Hand Mouse click and selecting Extract button)
Open the unzipped Driver directory as shown in the picture on next page.
If your Computer has a 32 bit operating system, start the driver installation by clicking on the file CP210xVCPInstaller_x86.exe
If however your Computer has a 64 bit operating system then start the driver installation by clicking on the file CP210xVCPInstaller_x64.exe
Setup of FA-VA5 Antenna Analyzer with the DG8SAQ VNWA Windows Software Page 2 of 10 Pages
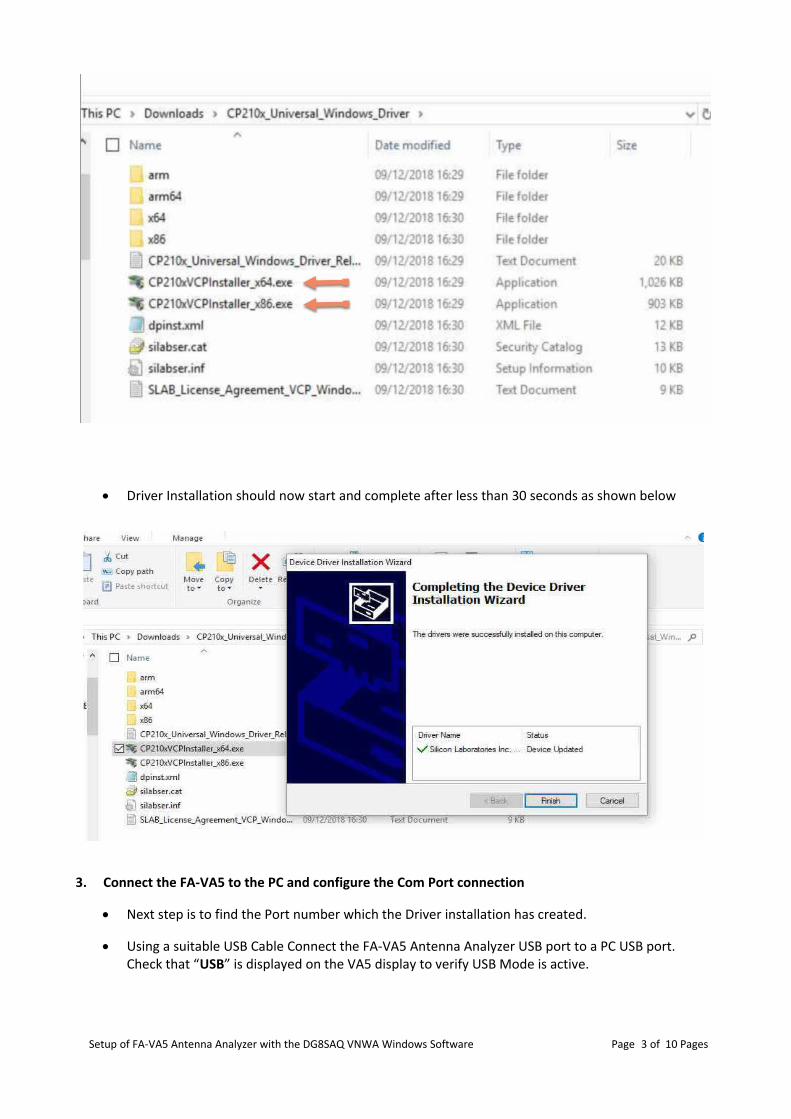
Driver Installation should now start and complete after less than 30 seconds as shown below
3. Connect the FA-VA5 to the PC and configure the Com Port connection
Next step is to find the Port number which the Driver installation has created.
Using a suitable USB Cable Connect the FA-VA5 Antenna Analyzer USB port to a PC USB port.Check that “USB” is displayed on the VA5 display to verify USB Mode is active.
Setup of FA-VA5 Antenna Analyzer with the DG8SAQ VNWA Windows Software Page 3 of 10 Pages
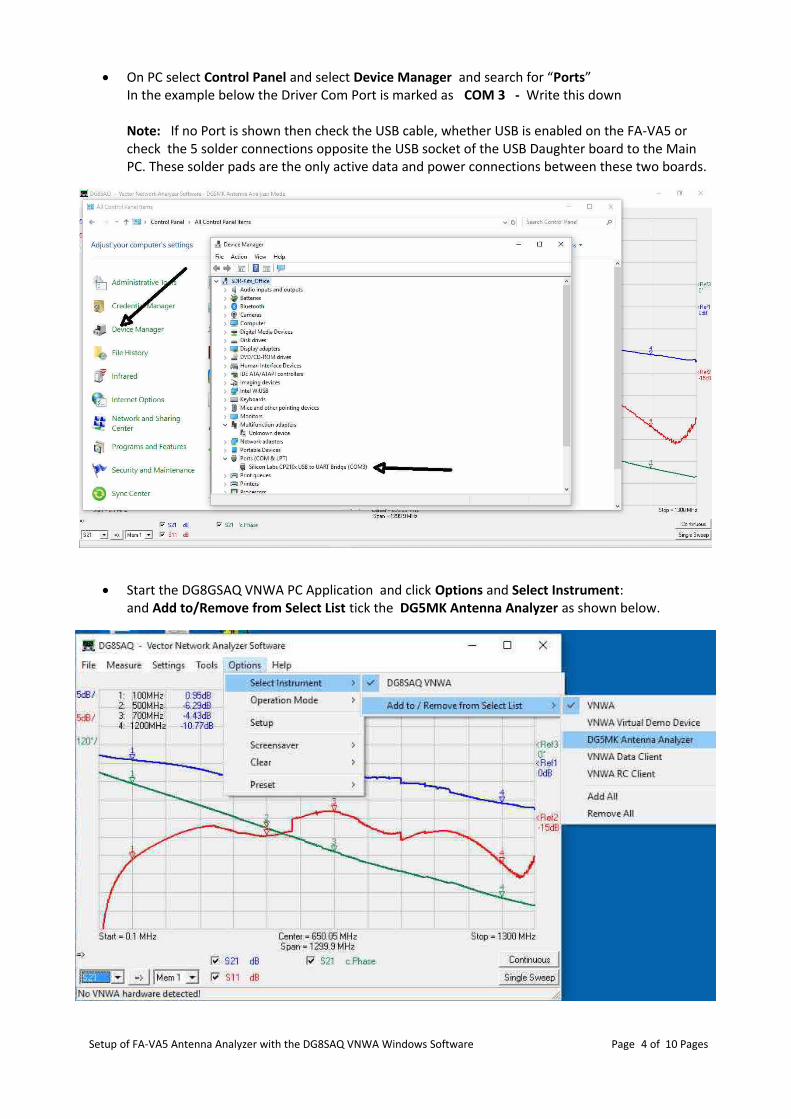
On PC select Control Panel and select Device Manager and search for “Ports”In the example below the Driver Com Port is marked as COM 3 - Write this down
Note: If no Port is shown then check the USB cable, whether USB is enabled on the FA-VA5 or check the 5 solder connections opposite the USB socket of the USB Daughter board to the Main PC. These solder pads are the only active data and power connections between these two boards.
Start the DG8GSAQ VNWA PC Application and click Options and Select Instrument: and Add to/Remove from Select List tick the DG5MK Antenna Analyzer as shown below.
Setup of FA-VA5 Antenna Analyzer with the DG8SAQ VNWA Windows Software Page 4 of 10 Pages
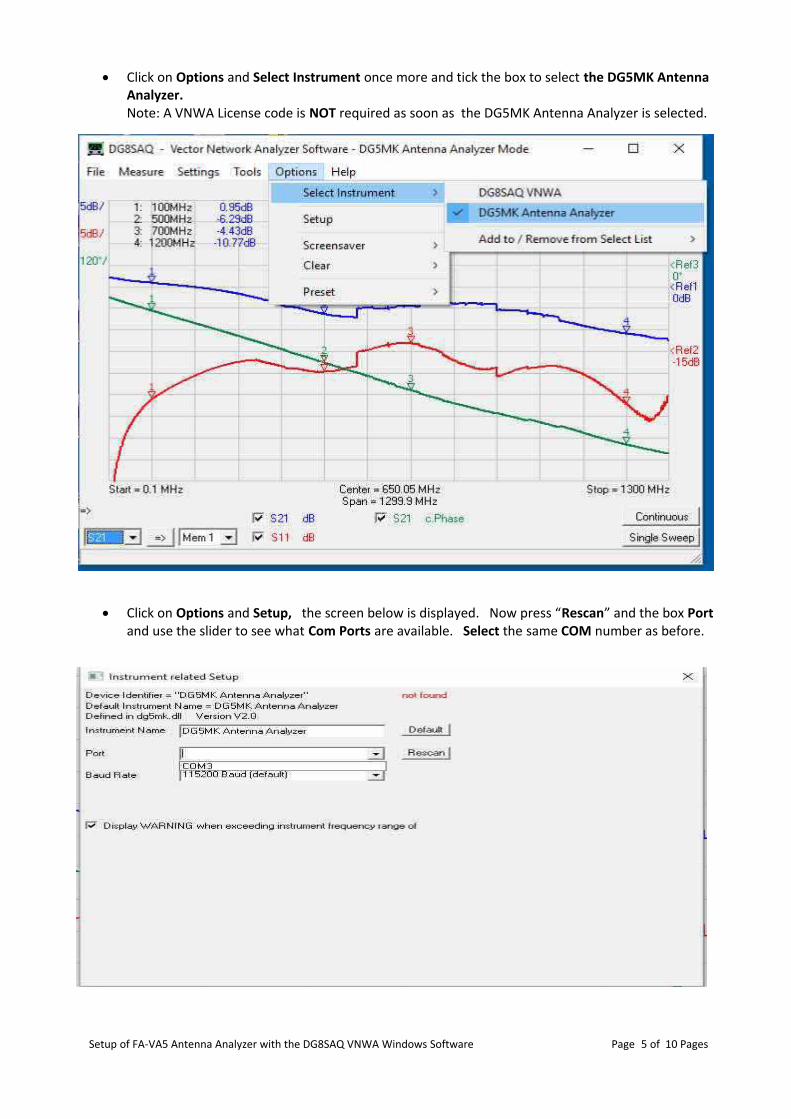
Click on Options and Select Instrument once more and tick the box to select the DG5MK Antenna Analyzer. Note: A VNWA License code is NOT required as soon as the DG5MK Antenna Analyzer is selected.
Click on Options and Setup, the screen below is displayed. Now press “Rescan” and the box Port and use the slider to see what Com Ports are available. Select the same COM number as before.
Setup of FA-VA5 Antenna Analyzer with the DG8SAQ VNWA Windows Software Page 5 of 10 Pages

The Instrument related Setup screen should now show connected and the FA-VA5 Antenna Analyzer is now controlled by the PC Application.
Note: If no COM Port number is shown, then unplug the USB cable and reinsert the cable.Now repeat the previous step. Sometimes the Rescan button needs to be pressed a second timebefore a COM Port number is displayed.
Setup of FA-VA5 Antenna Analyzer with the DG8SAQ VNWA Windows Software Page 6 of 10 Pages

4. FA-VA5 Basic Operation Parameters:
• Two screens are important to get familiar with the FA-VA5 functions:The first one is the Frequency Input screen. A single click on the Center and Span field will display the Input screen. This is where you can now enter the Start and Stop frequencies.
The second screen is for Sweep Settings and Dataset Import This screen is selected by clicking “Settings” and then “Sweep Settings” tab
You can select the number of datapoints from 1 to a maximum of 8192. This compares to only 100 points when the FA-VA5 is used as a standalone unit.Sweep mode offer a choice of three sampling-times per datapoint. Standard, Precise andFast, with sampling time per datapoint of 55, 150 and 40 msecs respectively.Note: a longer sampling time increases accuracyhowever at expense of a slower sweeptime.
Sweeptime = (number of datapoints selected) x (measuring time per datapoint) and showsthe duration of a single sweep.
Setup of FA-VA5 Antenna Analyzer with the DG8SAQ VNWA Windows Software Page 7 of 10 Pages
5. FA-VA5 Basic Calibration
Before using the FA-VA5 with the VNWA PC Application a Short – Open and Load Calibration (SOL) must be done. Any Master calibration which you may have done and stored on the FA-VA5 is NOT used by the PC Application.
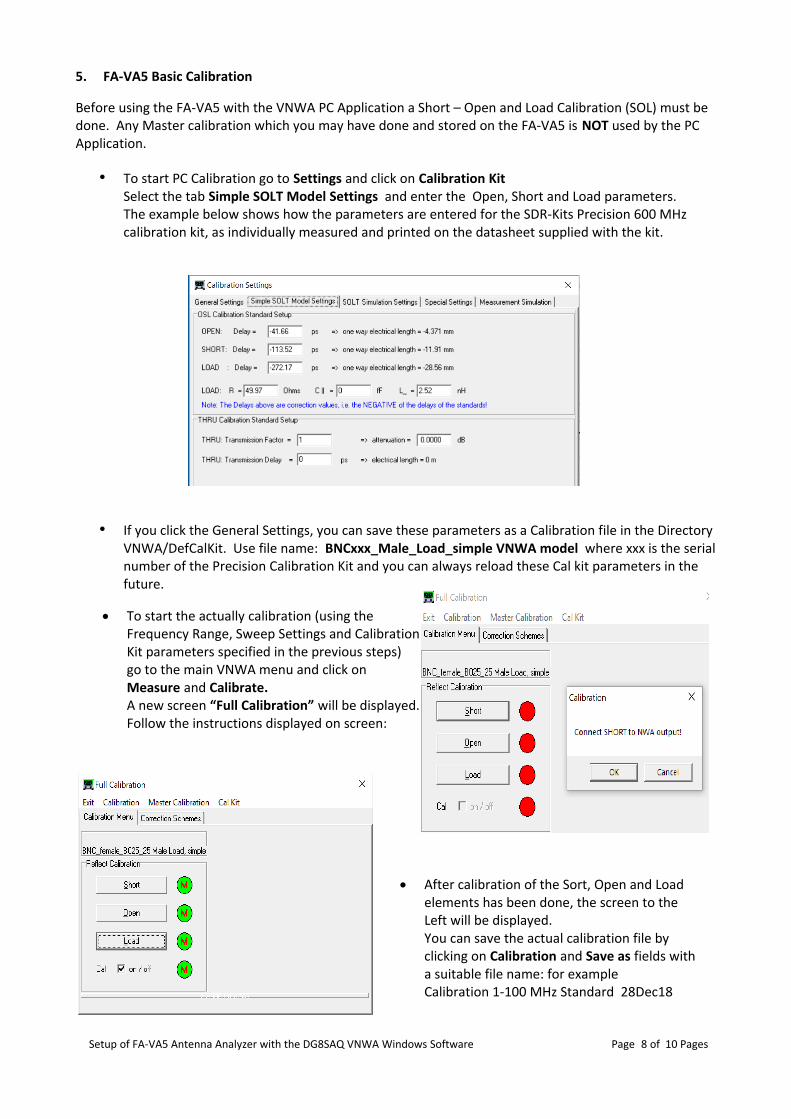
• To start PC Calibration go to Settings and click on Calibration KitSelect the tab Simple SOLT Model Settings and enter the Open, Short and Load parameters.The example below shows how the parameters are entered for the SDR-Kits Precision 600 MHz calibration kit, as individually measured and printed on the datasheet supplied with the kit.
• If you click the General Settings, you can save these parameters as a Calibration file in the Directory VNWA/DefCalKit. Use file name: BNCxxx_Male_Load_simple VNWA model where xxx is the serial number of the Precision Calibration Kit and you can always reload these Cal kit parameters in the future.
To start the actually calibration (using the Frequency Range, Sweep Settings and Calibration Kit parameters specified in the previous steps) go to the main VNWA menu and click on Measure and Calibrate. A new screen “Full Calibration” will be displayed. Follow the instructions displayed on screen:
After calibration of the Sort, Open and Loadelements has been done, the screen to the Left will be displayed. You can save the actual calibration file by clicking on Calibration and Save as fields witha suitable file name: for example Calibration 1-100 MHz Standard 28Dec18
Setup of FA-VA5 Antenna Analyzer with the DG8SAQ VNWA Windows Software Page 8 of 10 Pages

6. First Measurements
Once Calibration is done, we can conveniently measure what the 50R load performs like in practice.The return loss and VSWR of the calibration load are displayed below. It shows that the calibration was good as the measurements are as expected.
Frequency Markers can be easily added with a right hand mouse click on the trace and selecting “Add Frequency Marker” “Normal” Click on the marker number to select the desired frequency.Multiple Frequency Markers may be added.
I happen to have a 75 Ohm BNC Load, this is what we measure: VSWR is about 1.5:1 throughout the frequency range 1-100 MHz - as expected
Setup of FA-VA5 Antenna Analyzer with the DG8SAQ VNWA Windows Software Page 9 of 10 Pages
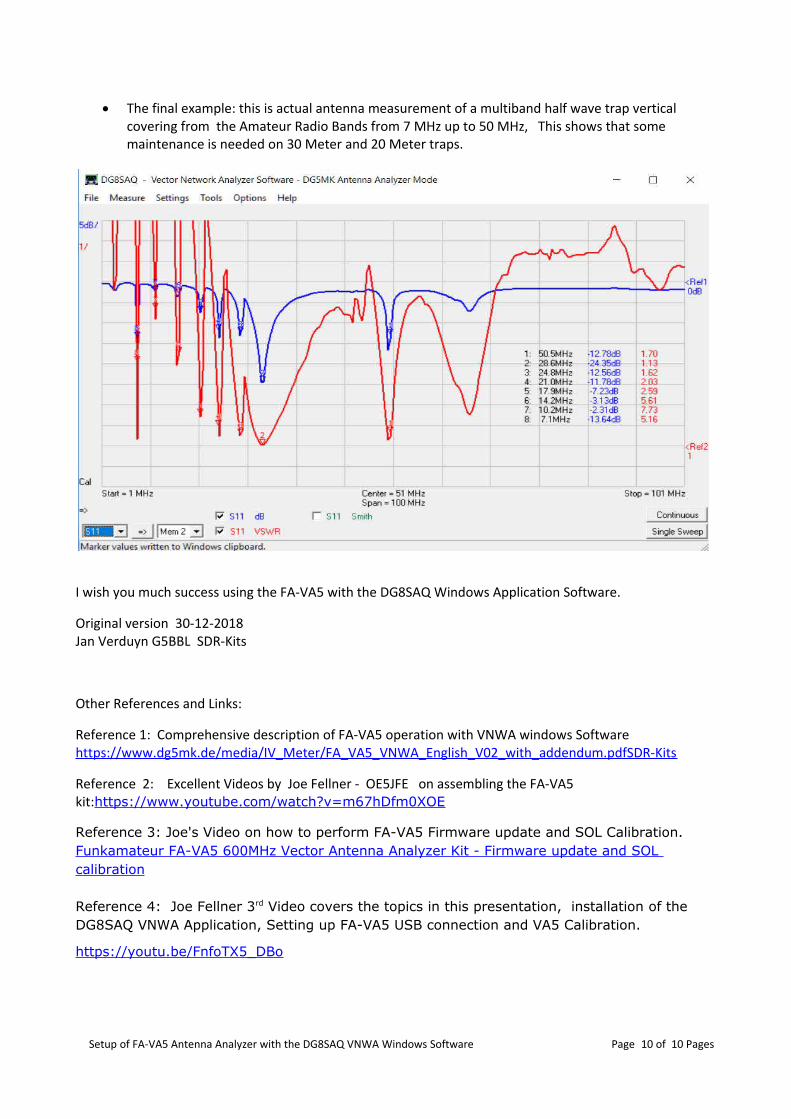
The final example: this is actual antenna measurement of a multiband half wave trap vertical covering from the Amateur Radio Bands from 7 MHz up to 50 MHz, This shows that some maintenance is needed on 30 Meter and 20 Meter traps.
I wish you much success using the FA-VA5 with the DG8SAQ Windows Application Software.
Original version 30-12-2018Jan Verduyn G5BBL SDR-Kits
Other References and Links:
Reference 1: Comprehensive description of FA-VA5 operation with VNWA windows Software https://www.dg5mk.de/media/IV_Meter/FA_VA5_VNWA_English_V02_with_addendum.pdfSDR-Kits
Reference 2: Excellent Videos by Joe Fellner - OE5JFE on assembling the FA-VA5 kit:https://www.youtube.com/watch?v=m67hDfm0XOE
Reference 3: Joe's Video on how to perform FA-VA5 Firmware update and SOL Calibration.Funkamateur FA-VA5 600MHz Vector Antenna Analyzer Kit - Firmware update and SOL calibration
Reference 4: Joe Fellner 3rd Video covers the topics in this presentation, installation of the DG8SAQ VNWA Application, Setting up FA-VA5 USB connection and VA5 Calibration.
https://youtu.be/FnfoTX5_DBo
Setup of FA-VA5 Antenna Analyzer with the DG8SAQ VNWA Windows Software Page 10 of 10 Pages