EXTERNAL GUIDE GUIDE FOR THE SUBMISSION … · external guide guide for the submission of third...
33
EXTERNAL GUIDE GUIDE FOR THE SUBMISSION OF THIRD PARTY DATA USING THE CONNECT DIRECT CHANNEL
Transcript of EXTERNAL GUIDE GUIDE FOR THE SUBMISSION … · external guide guide for the submission of third...
EXTERNAL GUIDE
GUIDE FOR THE SUBMISSION OF
THIRD PARTY DATA USING THE
CONNECT DIRECT CHANNEL
EXTERNAL GUIDE
GUIDE FOR THE SUBMISSION OF
THIRD PARTY DATA USING THE
CONNECT DIRECT CHANNEL
GEN-ENR-01-G01
REVISION: 2 Page 2 of 33
TABLE OF CONTENTS
1 PURPOSE 3
2 INTRODUCTION 3
3 ENROLMENT ON EFILING AND SUBMISSION OF 3RD PARTY DATA TO SARS 4
4 ENROLLING THE ORGANISATION 5
5 MANAGING TECHNICAL ADMINISTRATORS 8
5.1 Enrolling a Technical Administrator 8
5.2 Viewing details of a Technical Administrator 12
5.3 Deleting a Technical Administrator 13
6 SECURITY CERTIFICATE FROM SARS 15
6.1 Requesting a security certificate 15
6.2 Electronic request process 18
6.3 Manual request process 21
6.4 Deleting a certificate 24
7 MANAGING TECHNICAL USERS 24
7.1 Enrolling a Technical User 24
7.2 Viewing details of a Technical User 27
7.3 Deleting a Technical User 29
8 SUBMISSION DASHBOARD 31
9 FURTHER INFORMATION 32
10 CROSS REFERENCES 33
EXTERNAL GUIDE
GUIDE FOR THE SUBMISSION OF
THIRD PARTY DATA USING THE
CONNECT DIRECT CHANNEL
GEN-ENR-01-G01
REVISION: 2 Page 3 of 33
PURPOSE
The purpose of this document is to guide the Technical Users, Technical
Administrators and Business Administrators in uploading third (3rd) party data using
the Connect Direct channel. The guide also demonstrates how to enrol, activate and
delete a technical user, administrator and business administrator on eFiling.
1 INTRODUCTION
South African Revenue Service (SARS) implementation of a 3rd Party Data Platform
enables taxpayers to submit 3rd party supporting data to SARS via the following
channels:
eFiling (via a data submission form with a limited volume only)
SARS branch manual capturing (limited volume only)
Direct Data Flow (by using the Connect: Direct™ technology). Taxpayers are
required to enrol and activate for this channel (refer to the Connect: Direct™
Guide for how to use this channel)
Direct Data Flow (by using the Secure Web: https). Taxpayers are required to
enrol and activate for this channel.
Direct Data Flow channel reduces the overall administrative burden of large volume
data transfer, shorten data processing cycle times and provide for faster feedback.
Taxpayers who want to use the Direct Data Flow channel must have eFiling profiles to
enrol for this channel and activate it on eFiling.
Taxpayers choosing to use the Direct Data Flow channel need to be in possession of a
security certificate to ensure secure file submission. Taxpayers will also be required to
declare the accuracy of the data submitted to SARS by authorising the data
submission. To enable SARS to administer these security certificates and to
authenticate file submission, 3rd party data providers must request security certificates
as part of the enrolment and activation process.
Taxpayers will only be able to activate the Direct Data Flow Channel for the tax data
types below, due to the fact that the taxpayer must be issued with a security certificate
to be used with every file submission and that SARS must be able to authenticate file
submissions:
EXTERNAL GUIDE
GUIDE FOR THE SUBMISSION OF
THIRD PARTY DATA USING THE
CONNECT DIRECT CHANNEL
GEN-ENR-01-G01
REVISION: 2 Page 4 of 33
▫ Dividends (Withholding) Tax
▫ VAT201 supporting data
▫ IT3 (b), (c), (e) Medical and insurance submissions and
▫ Foreign Tax Information (FTI) and CRS
Note: Taxpayers can only submit a maximum of 20 IT3 submissions via the eFiling
channel
2 ENROLMENT ON EFILING AND SUBMISSION OF 3RD PARTY DATA
TO SARS
Non-eFilers wishing to use the Direct Data Flow channel should register for eFiling at
www.sarsefiling.co.za.
To manage 3rd
party data submission, the taxpayer must have the following three types
of users allocated in the enrolment and submission of 3rd
party data to SARS:
Business Administrator – This user is the same as the current eFiling full
administrator. The role of this user is to enrol the legal entity/organisation that
will be submitting data to SARS and the Technical Administrator. The taxpayer
is not required to allocate new eFiling administrators for the purposes of 3rd
party
data submissions if one already exists.
Technical Administrator – The role of this user is to request the security
certificate and to enrol technical users. If the taxpayer decides to change the
Technical Administrator, a new Technical Administrator must be added before
the existing one can be removed. There must always be at least one Technical
Administrator for each enrolled organisation.
Technical User – The role of this user is to submit the data files to SARS via the
Direct Data Flow channel. An organisation can have multiple Technical
Administrators and Technical Users in order to allocate work according to the
organisation’s requirements. The technical user must be a different person from
the technical administrator.
Important to note: Once enrollment of the organisation is completed, the person
who enrolled the organisation becomes the Business Administrator. This implies that
EXTERNAL GUIDE
GUIDE FOR THE SUBMISSION OF
THIRD PARTY DATA USING THE
CONNECT DIRECT CHANNEL
GEN-ENR-01-G01
REVISION: 2 Page 5 of 33
he/she (the Business Administrator) cannot be enrolled as a Technical Administrator
or a Technical User.
3 ENROLLING THE ORGANISATION
To enrol the organisation, the user must be logged into eFiling at
www.sarsefiling.co.za.
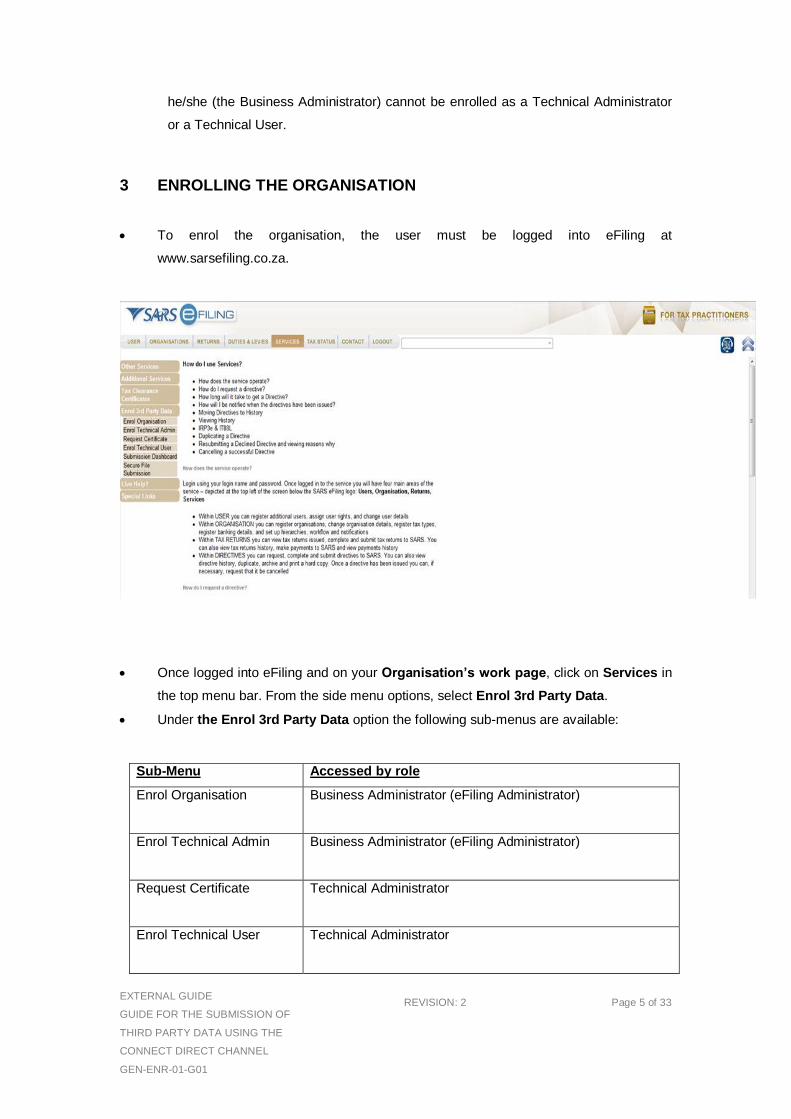
Once logged into eFiling and on your Organisation’s work page, click on Services in
the top menu bar. From the side menu options, select Enrol 3rd Party Data.
Under the Enrol 3rd Party Data option the following sub-menus are available:
Sub-Menu Accessed by role
Enrol Organisation Business Administrator (eFiling Administrator)
Enrol Technical Admin Business Administrator (eFiling Administrator)
Request Certificate Technical Administrator
Enrol Technical User Technical Administrator
EXTERNAL GUIDE
GUIDE FOR THE SUBMISSION OF
THIRD PARTY DATA USING THE
CONNECT DIRECT CHANNEL
GEN-ENR-01-G01
REVISION: 2 Page 6 of 33
Submission Dashboard Technical Administrator
Technical User
Secure File Submission Technical Administrator
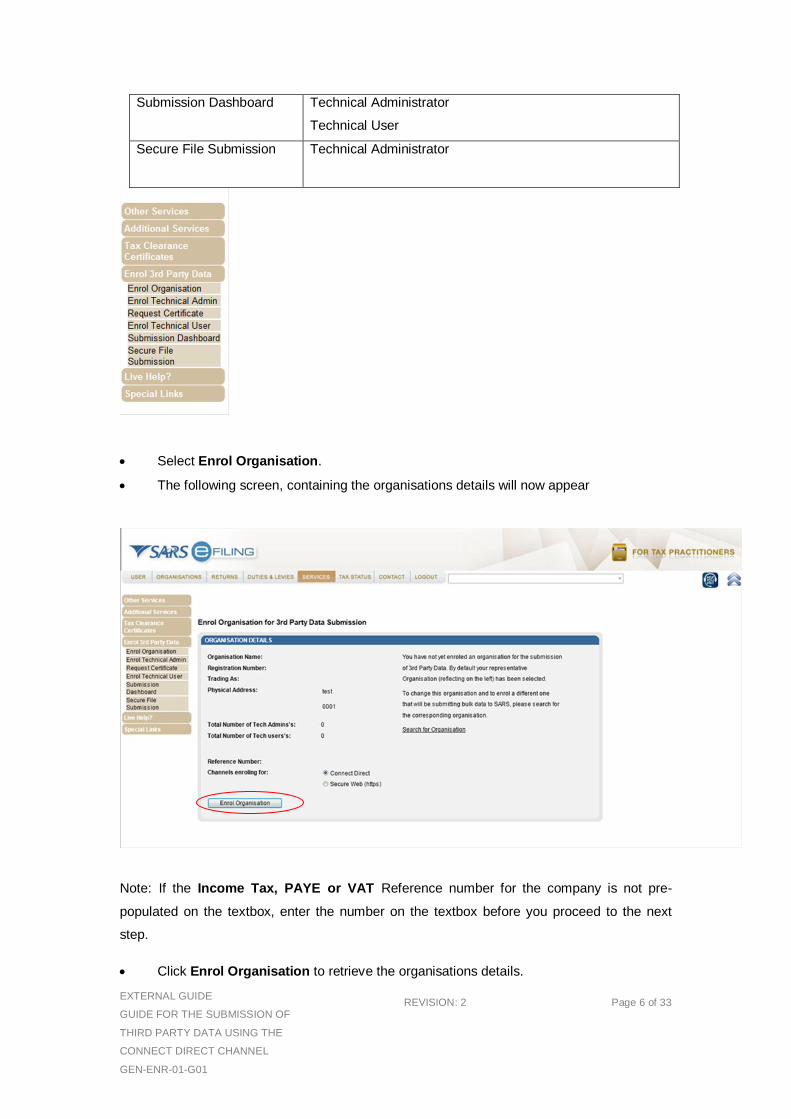
Select Enrol Organisation.
The following screen, containing the organisations details will now appear
Note: If the Income Tax, PAYE or VAT Reference number for the company is not pre-
populated on the textbox, enter the number on the textbox before you proceed to the next
step.
Click Enrol Organisation to retrieve the organisations details.
EXTERNAL GUIDE
GUIDE FOR THE SUBMISSION OF
THIRD PARTY DATA USING THE
CONNECT DIRECT CHANNEL
GEN-ENR-01-G01
REVISION: 2 Page 7 of 33
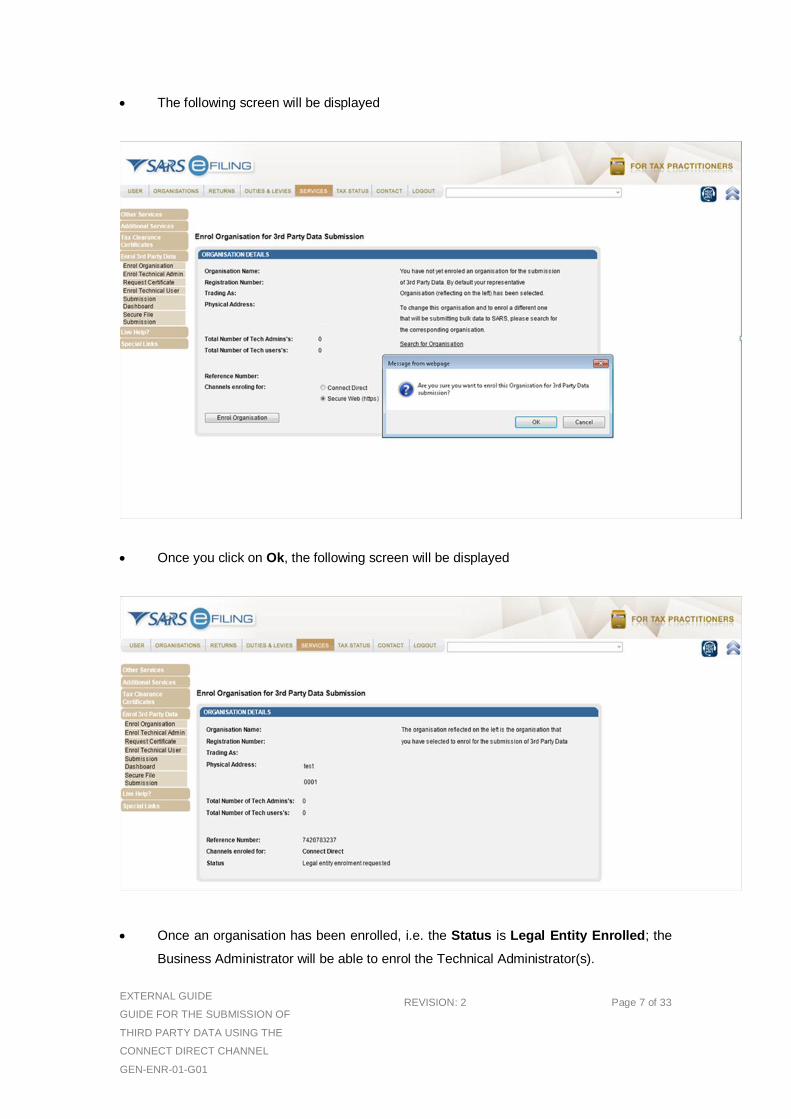
The following screen will be displayed
Once you click on Ok, the following screen will be displayed
Once an organisation has been enrolled, i.e. the Status is Legal Entity Enrolled; the
Business Administrator will be able to enrol the Technical Administrator(s).
EXTERNAL GUIDE
GUIDE FOR THE SUBMISSION OF
THIRD PARTY DATA USING THE
CONNECT DIRECT CHANNEL
GEN-ENR-01-G01
REVISION: 2 Page 8 of 33
Note:
The status will initially read as Legal Enrolment Requested. The status will later
change to Legal Entity Enrolled. The organisation can only enrol a technical
administrator if their status reads Legal Entity Enrolled.
The status will only change once the user has refreshed the screen
4 MANAGING TECHNICAL ADMINISTRATORS
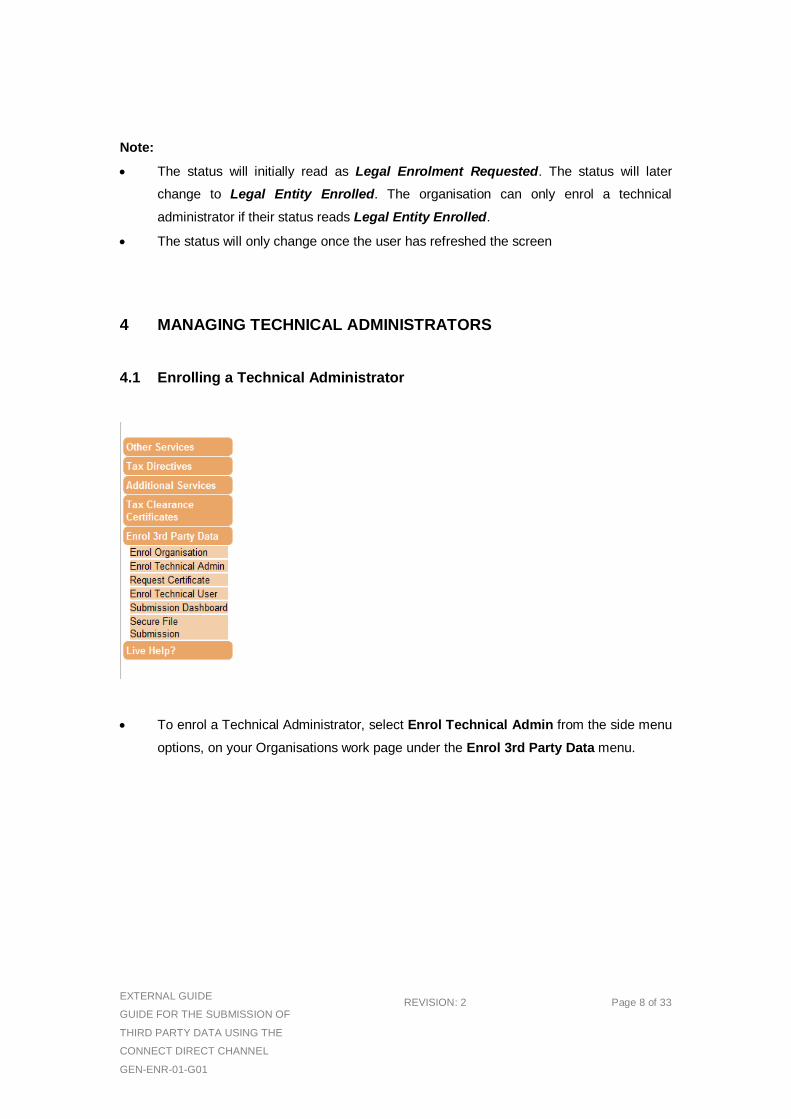
4.1 Enrolling a Technical Administrator
To enrol a Technical Administrator, select Enrol Technical Admin from the side menu
options, on your Organisations work page under the Enrol 3rd Party Data menu.
EXTERNAL GUIDE
GUIDE FOR THE SUBMISSION OF
THIRD PARTY DATA USING THE
CONNECT DIRECT CHANNEL
GEN-ENR-01-G01
REVISION: 2 Page 9 of 33
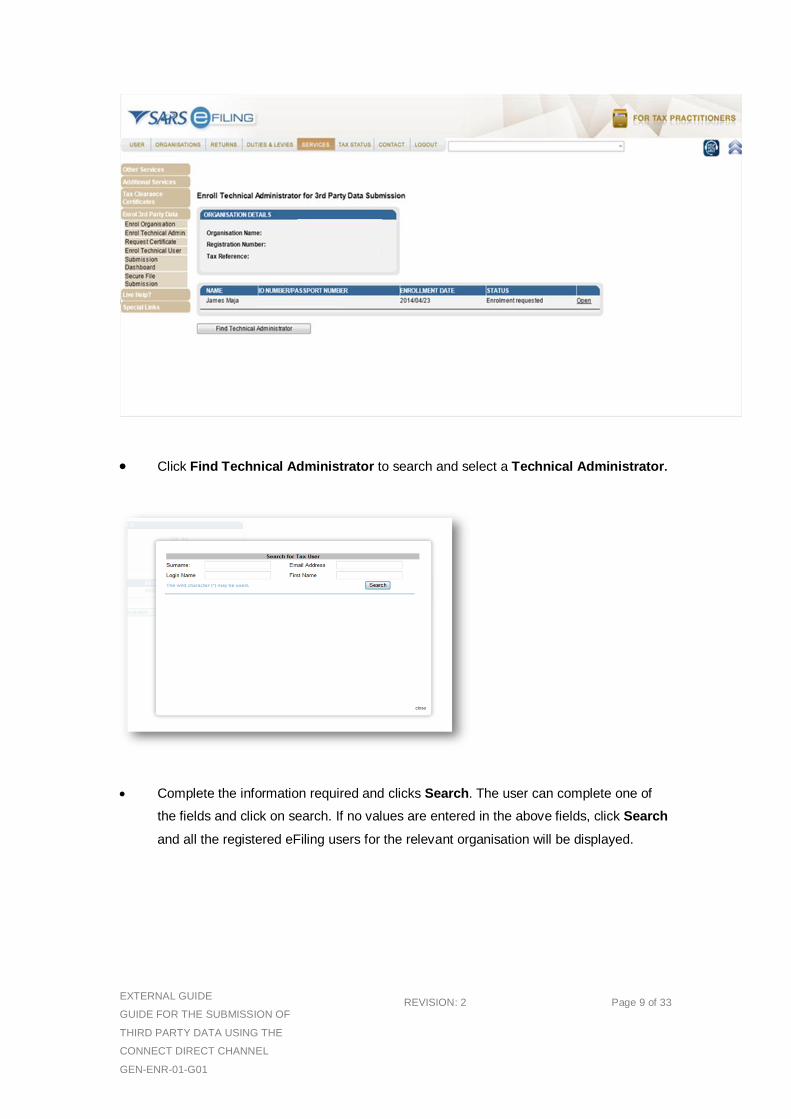
Click Find Technical Administrator to search and select a Technical Administrator.
Complete the information required and clicks Search. The user can complete one of
the fields and click on search. If no values are entered in the above fields, click Search
and all the registered eFiling users for the relevant organisation will be displayed.
EXTERNAL GUIDE
GUIDE FOR THE SUBMISSION OF
THIRD PARTY DATA USING THE
CONNECT DIRECT CHANNEL
GEN-ENR-01-G01
REVISION: 2 Page 10 of 33
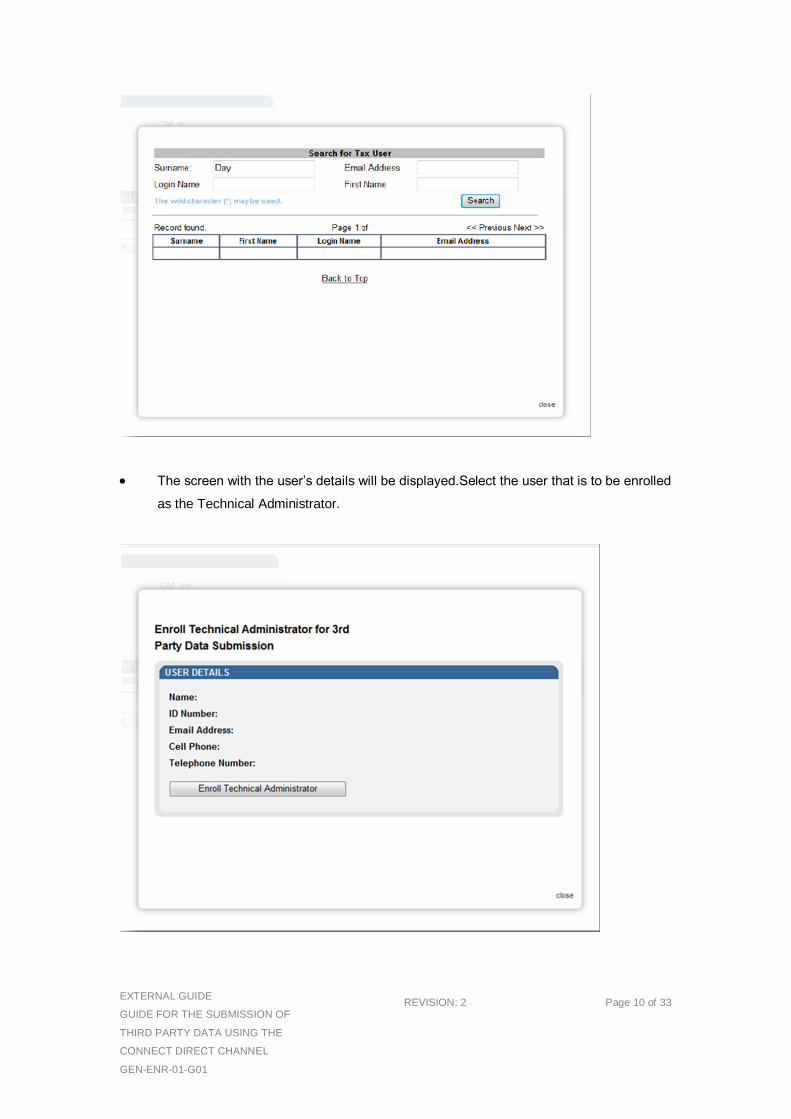
The screen with the user’s details will be displayed.Select the user that is to be enrolled
as the Technical Administrator.
EXTERNAL GUIDE
GUIDE FOR THE SUBMISSION OF
THIRD PARTY DATA USING THE
CONNECT DIRECT CHANNEL
GEN-ENR-01-G01
REVISION: 2 Page 11 of 33
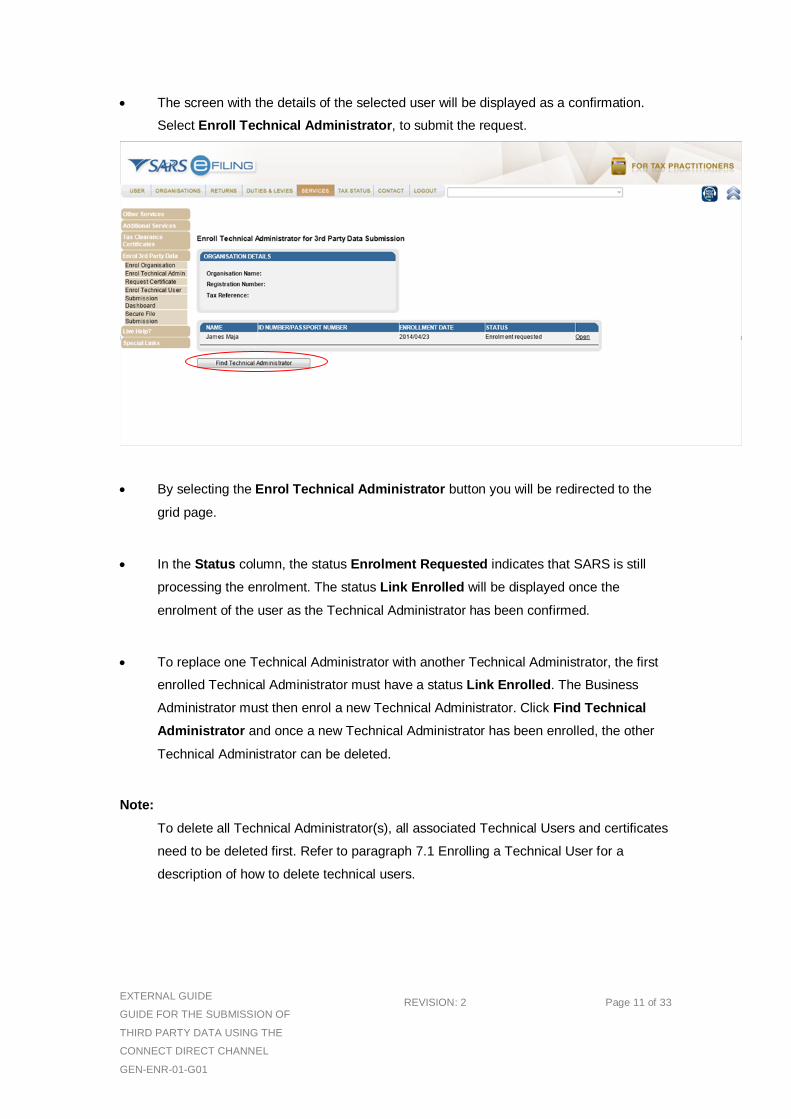
The screen with the details of the selected user will be displayed as a confirmation.
Select Enroll Technical Administrator, to submit the request.
By selecting the Enrol Technical Administrator button you will be redirected to the
grid page.
In the Status column, the status Enrolment Requested indicates that SARS is still
processing the enrolment. The status Link Enrolled will be displayed once the
enrolment of the user as the Technical Administrator has been confirmed.
To replace one Technical Administrator with another Technical Administrator, the first
enrolled Technical Administrator must have a status Link Enrolled. The Business
Administrator must then enrol a new Technical Administrator. Click Find Technical
Administrator and once a new Technical Administrator has been enrolled, the other
Technical Administrator can be deleted.
Note:
To delete all Technical Administrator(s), all associated Technical Users and certificates
need to be deleted first. Refer to paragraph 7.1 Enrolling a Technical User for a
description of how to delete technical users.
EXTERNAL GUIDE
GUIDE FOR THE SUBMISSION OF
THIRD PARTY DATA USING THE
CONNECT DIRECT CHANNEL
GEN-ENR-01-G01
REVISION: 2 Page 12 of 33
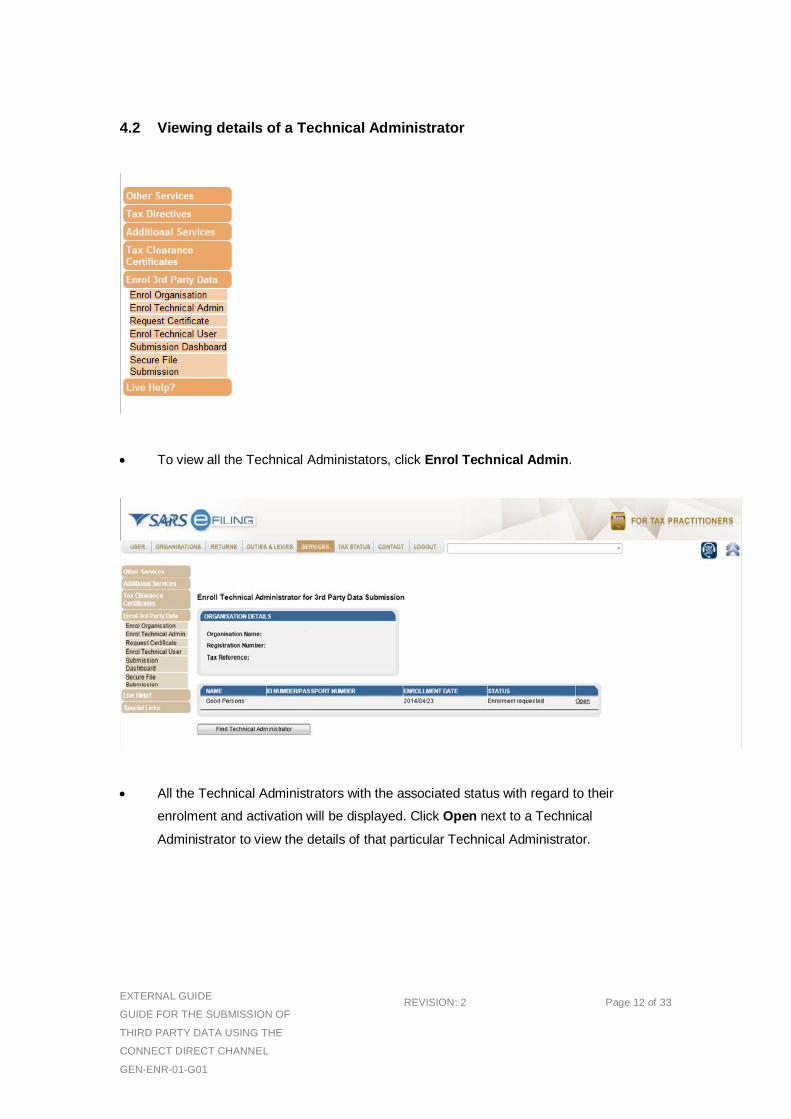
4.2 Viewing details of a Technical Administrator
To view all the Technical Administators, click Enrol Technical Admin.
All the Technical Administrators with the associated status with regard to their
enrolment and activation will be displayed. Click Open next to a Technical
Administrator to view the details of that particular Technical Administrator.
EXTERNAL GUIDE
GUIDE FOR THE SUBMISSION OF
THIRD PARTY DATA USING THE
CONNECT DIRECT CHANNEL
GEN-ENR-01-G01
REVISION: 2 Page 13 of 33
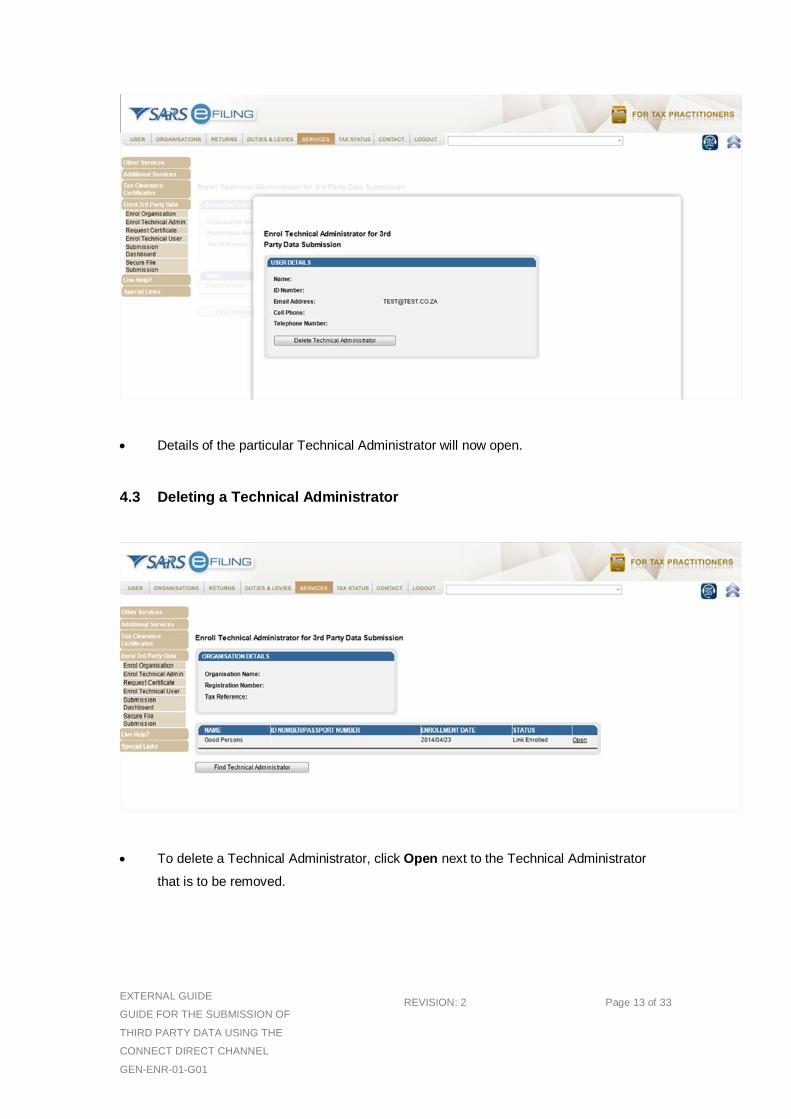
Details of the particular Technical Administrator will now open.
4.3 Deleting a Technical Administrator
To delete a Technical Administrator, click Open next to the Technical Administrator
that is to be removed.
EXTERNAL GUIDE
GUIDE FOR THE SUBMISSION OF
THIRD PARTY DATA USING THE
CONNECT DIRECT CHANNEL
GEN-ENR-01-G01
REVISION: 2 Page 14 of 33
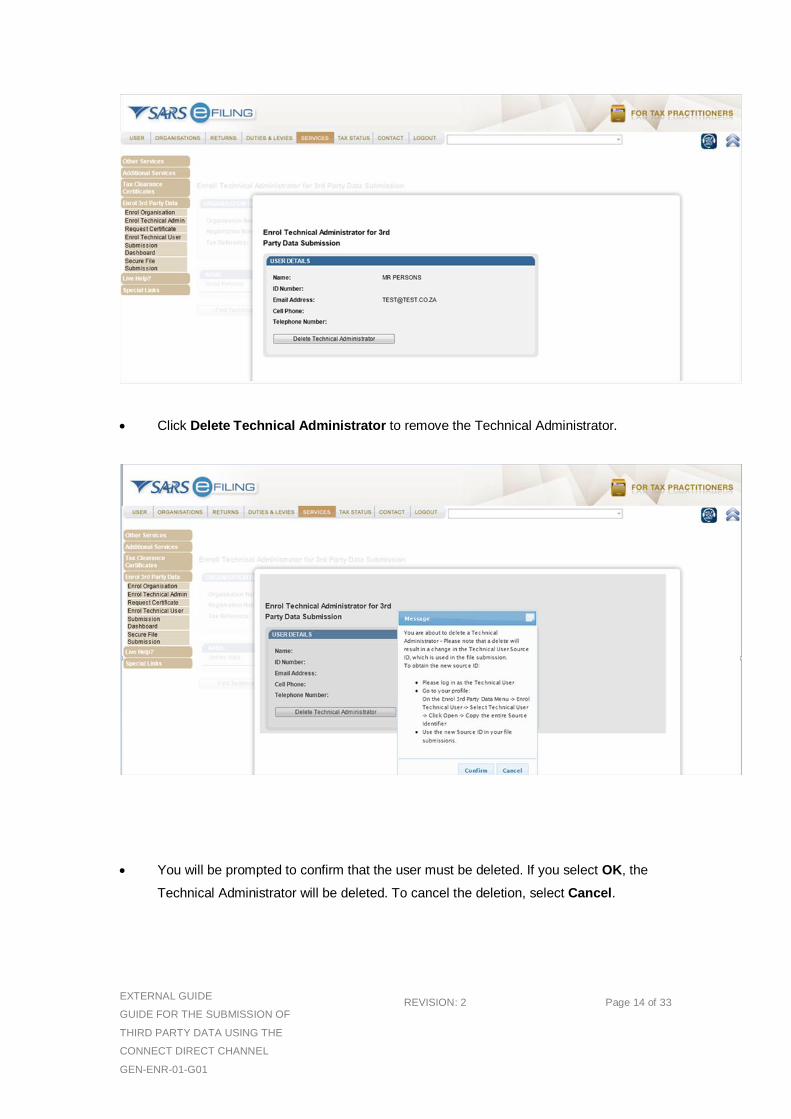
Click Delete Technical Administrator to remove the Technical Administrator.
You will be prompted to confirm that the user must be deleted. If you select OK, the
Technical Administrator will be deleted. To cancel the deletion, select Cancel.
EXTERNAL GUIDE
GUIDE FOR THE SUBMISSION OF
THIRD PARTY DATA USING THE
CONNECT DIRECT CHANNEL
GEN-ENR-01-G01
REVISION: 2 Page 15 of 33
To delete all Technical Administrator(s), all associated Technical Users and certificates
need to be deleted first. Refer to paragraph 7.1 Enrolling a Technical User for a
description of how to delete technical users.
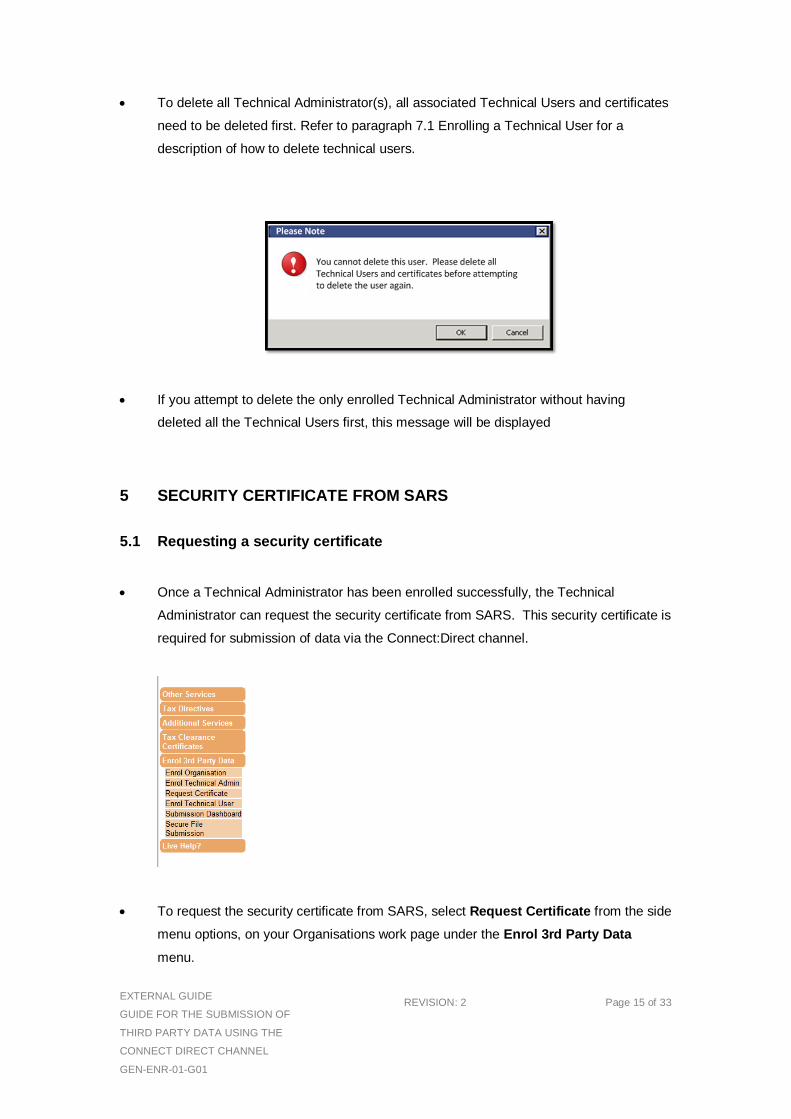
If you attempt to delete the only enrolled Technical Administrator without having
deleted all the Technical Users first, this message will be displayed
5 SECURITY CERTIFICATE FROM SARS
5.1 Requesting a security certificate
Once a Technical Administrator has been enrolled successfully, the Technical
Administrator can request the security certificate from SARS. This security certificate is
required for submission of data via the Connect:Direct channel.
To request the security certificate from SARS, select Request Certificate from the side
menu options, on your Organisations work page under the Enrol 3rd Party Data
menu.
EXTERNAL GUIDE
GUIDE FOR THE SUBMISSION OF
THIRD PARTY DATA USING THE
CONNECT DIRECT CHANNEL
GEN-ENR-01-G01
REVISION: 2 Page 16 of 33
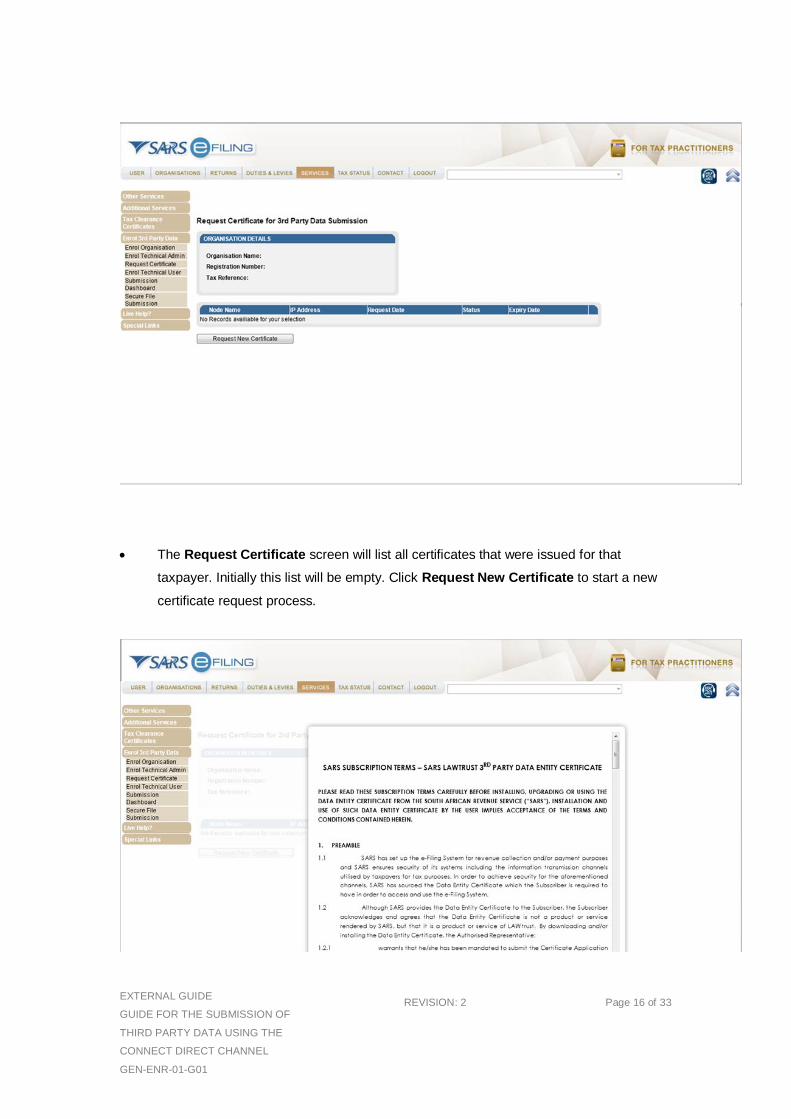
The Request Certificate screen will list all certificates that were issued for that
taxpayer. Initially this list will be empty. Click Request New Certificate to start a new
certificate request process.
EXTERNAL GUIDE
GUIDE FOR THE SUBMISSION OF
THIRD PARTY DATA USING THE
CONNECT DIRECT CHANNEL
GEN-ENR-01-G01
REVISION: 2 Page 17 of 33
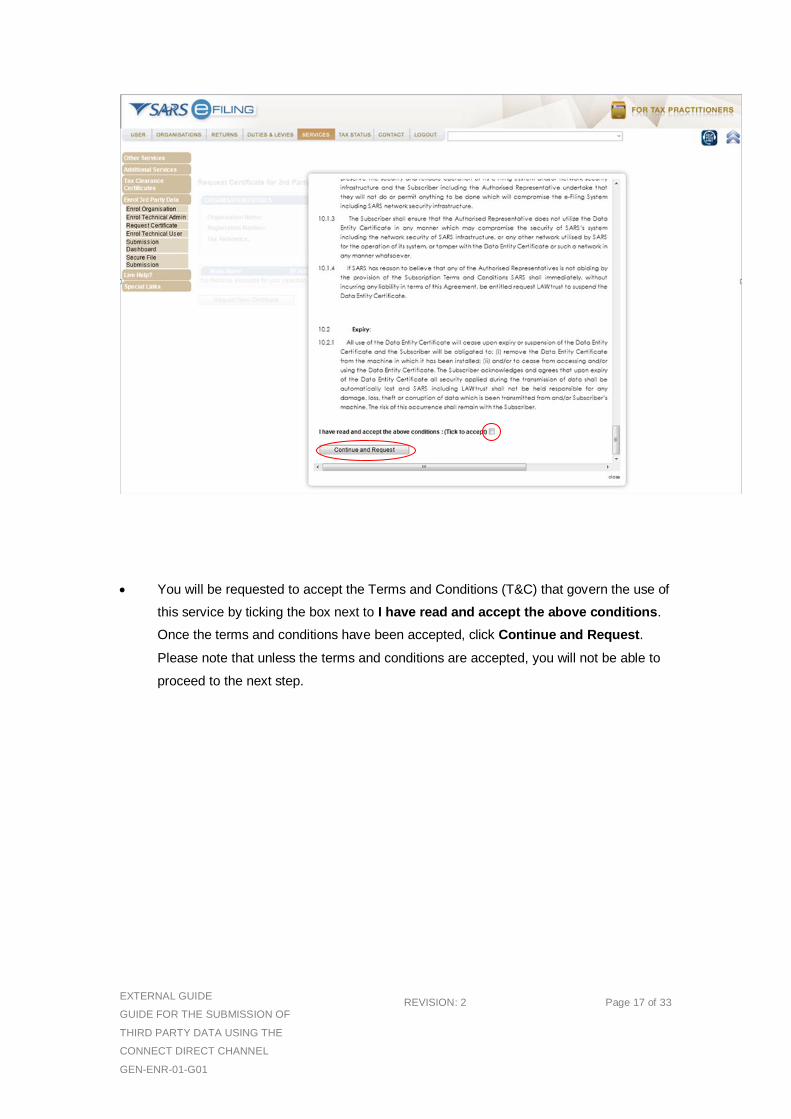
You will be requested to accept the Terms and Conditions (T&C) that govern the use of
this service by ticking the box next to I have read and accept the above conditions.
Once the terms and conditions have been accepted, click Continue and Request.
Please note that unless the terms and conditions are accepted, you will not be able to
proceed to the next step.
EXTERNAL GUIDE
GUIDE FOR THE SUBMISSION OF
THIRD PARTY DATA USING THE
CONNECT DIRECT CHANNEL
GEN-ENR-01-G01
REVISION: 2 Page 18 of 33
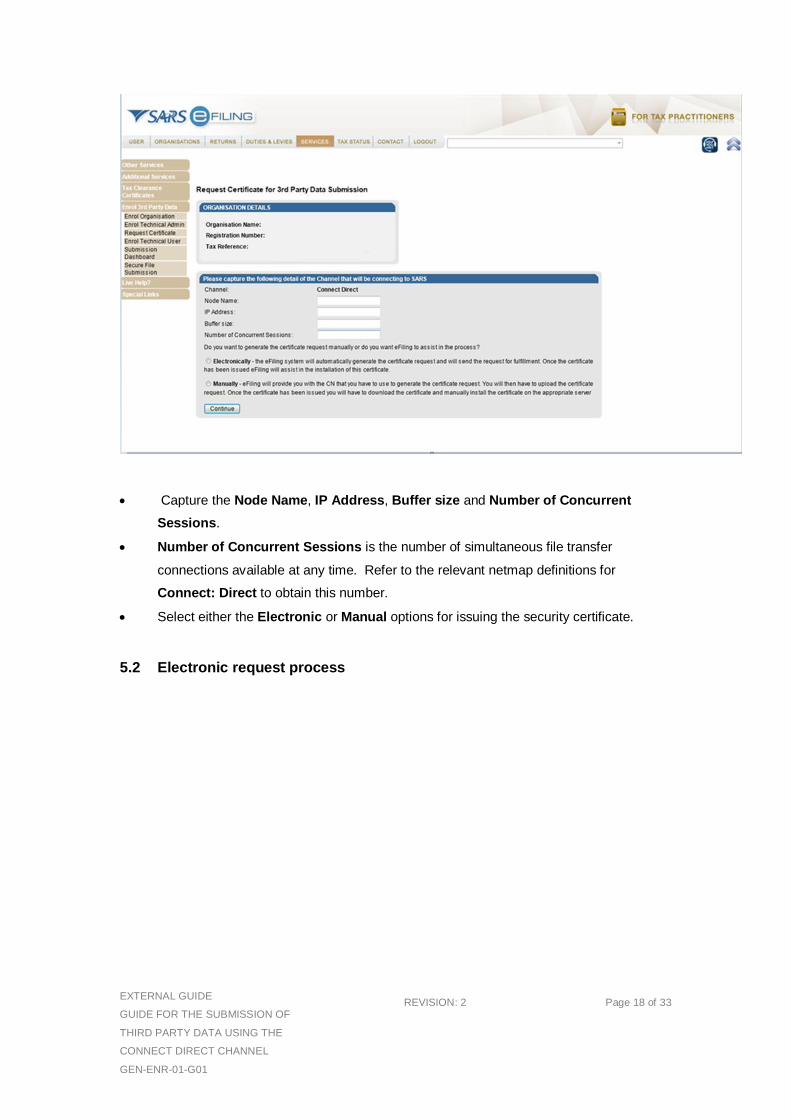
Capture the Node Name, IP Address, Buffer size and Number of Concurrent
Sessions.
Number of Concurrent Sessions is the number of simultaneous file transfer
connections available at any time. Refer to the relevant netmap definitions for
Connect: Direct to obtain this number.
Select either the Electronic or Manual options for issuing the security certificate.
5.2 Electronic request process
EXTERNAL GUIDE
GUIDE FOR THE SUBMISSION OF
THIRD PARTY DATA USING THE
CONNECT DIRECT CHANNEL
GEN-ENR-01-G01
REVISION: 2 Page 19 of 33
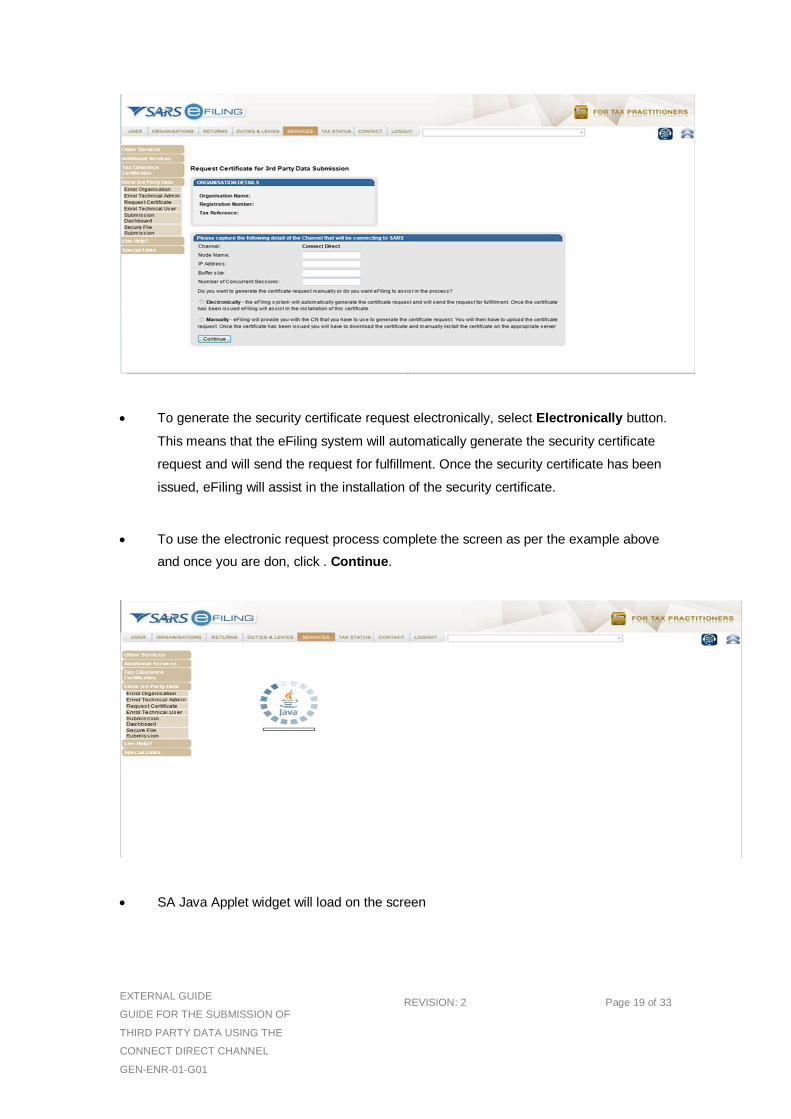
To generate the security certificate request electronically, select Electronically button.
This means that the eFiling system will automatically generate the security certificate
request and will send the request for fulfillment. Once the security certificate has been
issued, eFiling will assist in the installation of the security certificate.
To use the electronic request process complete the screen as per the example above
and once you are don, click . Continue.
SA Java Applet widget will load on the screen
EXTERNAL GUIDE
GUIDE FOR THE SUBMISSION OF
THIRD PARTY DATA USING THE
CONNECT DIRECT CHANNEL
GEN-ENR-01-G01
REVISION: 2 Page 20 of 33
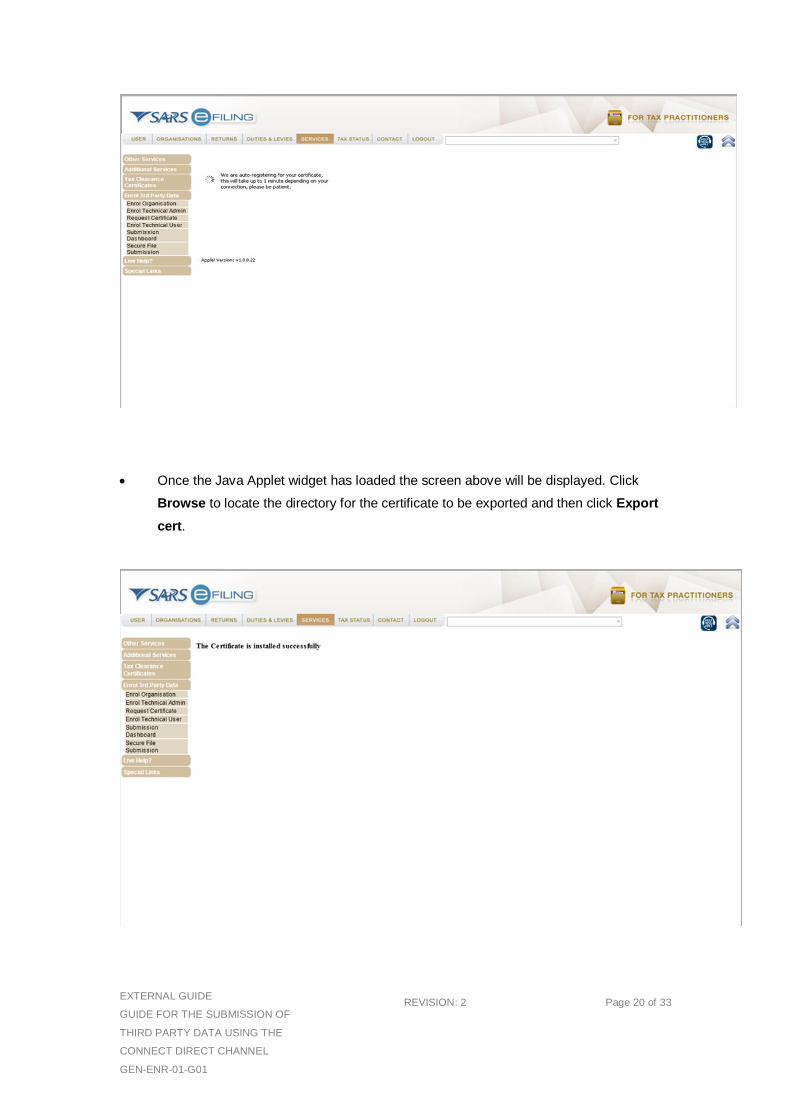
Once the Java Applet widget has loaded the screen above will be displayed. Click
Browse to locate the directory for the certificate to be exported and then click Export
cert.
EXTERNAL GUIDE
GUIDE FOR THE SUBMISSION OF
THIRD PARTY DATA USING THE
CONNECT DIRECT CHANNEL
GEN-ENR-01-G01
REVISION: 2 Page 21 of 33
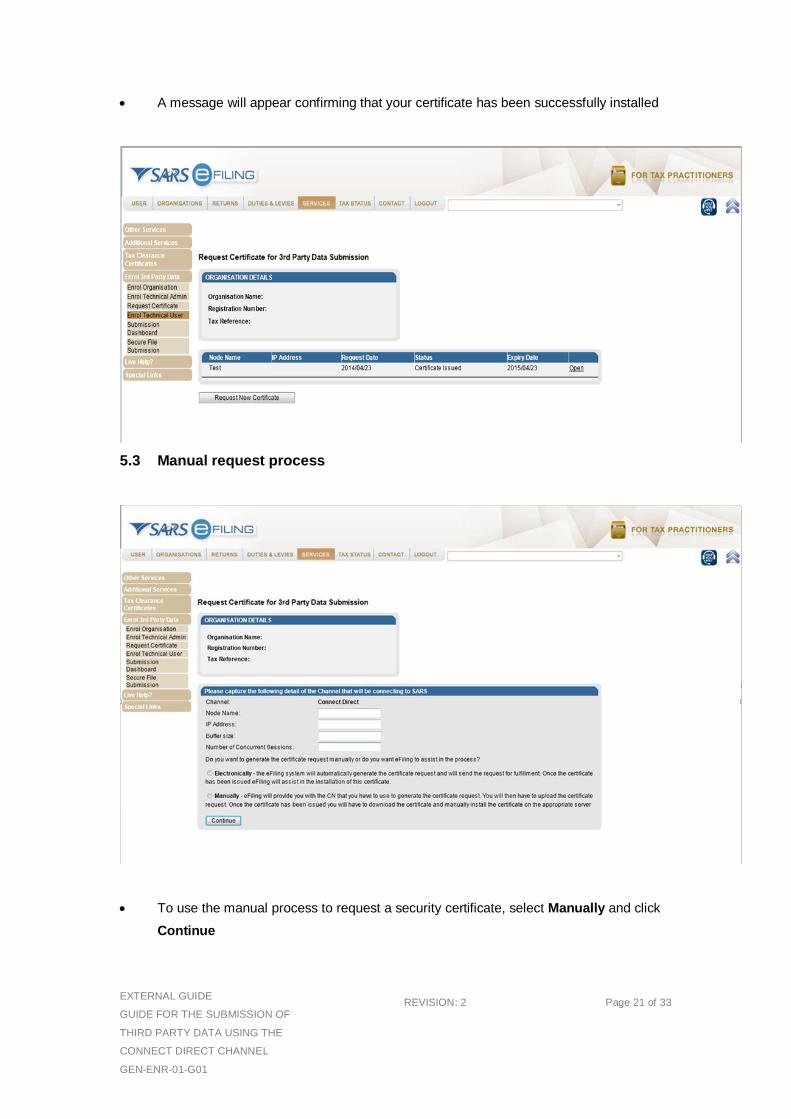
A message will appear confirming that your certificate has been successfully installed
5.3 Manual request process
To use the manual process to request a security certificate, select Manually and click
Continue
EXTERNAL GUIDE
GUIDE FOR THE SUBMISSION OF
THIRD PARTY DATA USING THE
CONNECT DIRECT CHANNEL
GEN-ENR-01-G01
REVISION: 2 Page 22 of 33
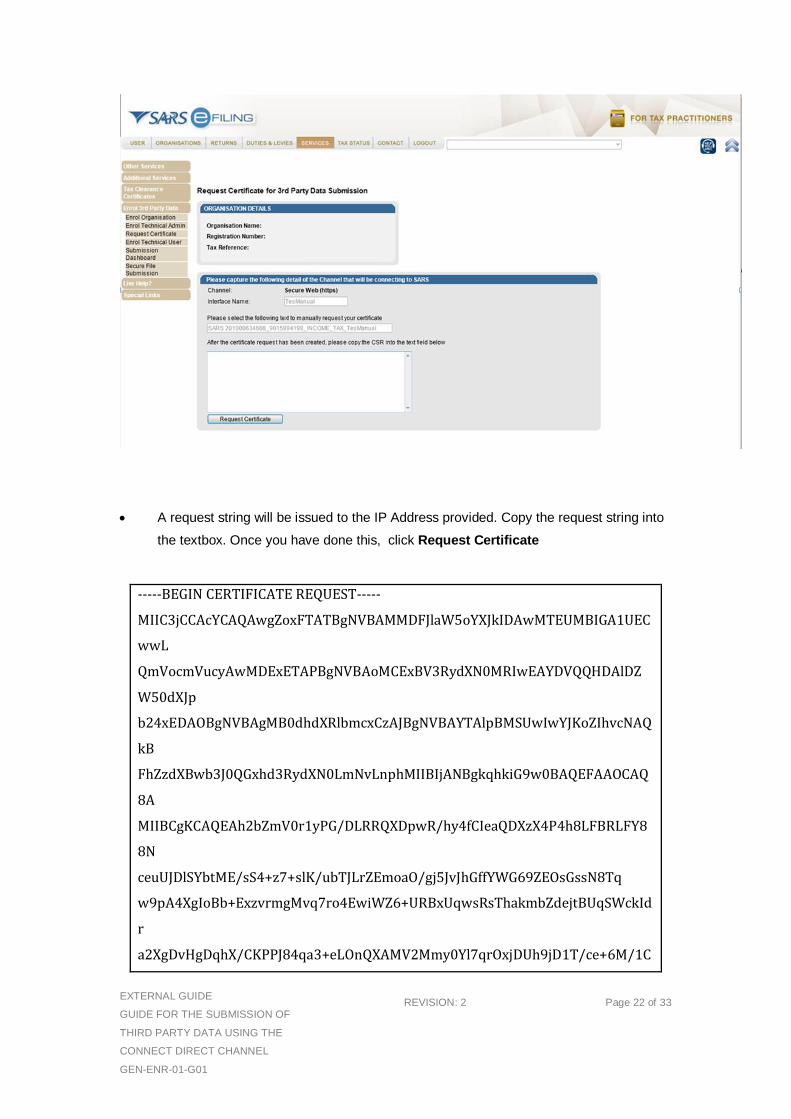
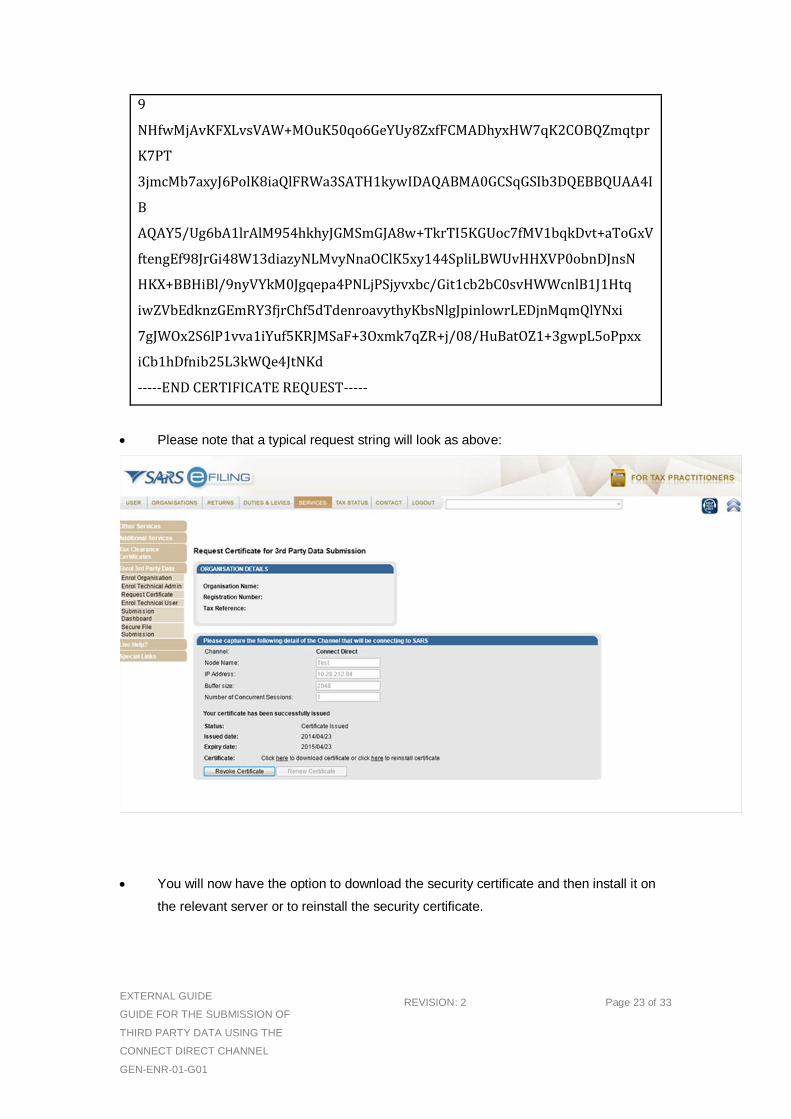
A request string will be issued to the IP Address provided. Copy the request string into
the textbox. Once you have done this, click Request Certificate
-----BEGIN CERTIFICATE REQUEST-----
MIIC3jCCAcYCAQAwgZoxFTATBgNVBAMMDFJlaW5oYXJkIDAwMTEUMBIGA1UEC
wwL
QmVocmVucyAwMDExETAPBgNVBAoMCExBV3RydXN0MRIwEAYDVQQHDAlDZ
W50dXJp
b24xEDAOBgNVBAgMB0dhdXRlbmcxCzAJBgNVBAYTAlpBMSUwIwYJKoZIhvcNAQ
kB
FhZzdXBwb3J0QGxhd3RydXN0LmNvLnphMIIBIjANBgkqhkiG9w0BAQEFAAOCAQ
8A
MIIBCgKCAQEAh2bZmV0r1yPG/DLRRQXDpwR/hy4fCIeaQDXzX4P4h8LFBRLFY8
8N
ceuUJDlSYbtME/sS4+z7+slK/ubTJLrZEmoaO/gj5JvJhGffYWG69ZEOsGssN8Tq
w9pA4XgIoBb+ExzvrmgMvq7ro4EwiWZ6+URBxUqwsRsThakmbZdejtBUqSWckId
r
a2XgDvHgDqhX/CKPPJ84qa3+eLOnQXAMV2Mmy0Yl7qrOxjDUh9jD1T/ce+6M/1C
EXTERNAL GUIDE
GUIDE FOR THE SUBMISSION OF
THIRD PARTY DATA USING THE
CONNECT DIRECT CHANNEL
GEN-ENR-01-G01
REVISION: 2 Page 23 of 33
9
NHfwMjAvKFXLvsVAW+MOuK50qo6GeYUy8ZxfFCMADhyxHW7qK2COBQZmqtpr
K7PT
3jmcMb7axyJ6PolK8iaQlFRWa3SATH1kywIDAQABMA0GCSqGSIb3DQEBBQUAA4I
B
AQAY5/Ug6bA1lrAlM954hkhyJGMSmGJA8w+TkrTI5KGUoc7fMV1bqkDvt+aToGxV
ftengEf98JrGi48W13diazyNLMvyNnaOClK5xy144SpliLBWUvHHXVP0obnDJnsN
HKX+BBHiBl/9nyVYkM0Jgqepa4PNLjPSjyvxbc/Git1cb2bC0svHWWcnlB1J1Htq
iwZVbEdknzGEmRY3fjrChf5dTdenroavythyKbsNlgJpinlowrLEDjnMqmQlYNxi
7gJWOx2S6lP1vva1iYuf5KRJMSaF+3Oxmk7qZR+j/08/HuBatOZ1+3gwpL5oPpxx
iCb1hDfnib25L3kWQe4JtNKd
-----END CERTIFICATE REQUEST-----
Please note that a typical request string will look as above:
You will now have the option to download the security certificate and then install it on
the relevant server or to reinstall the security certificate.
EXTERNAL GUIDE
GUIDE FOR THE SUBMISSION OF
THIRD PARTY DATA USING THE
CONNECT DIRECT CHANNEL
GEN-ENR-01-G01
REVISION: 2 Page 24 of 33
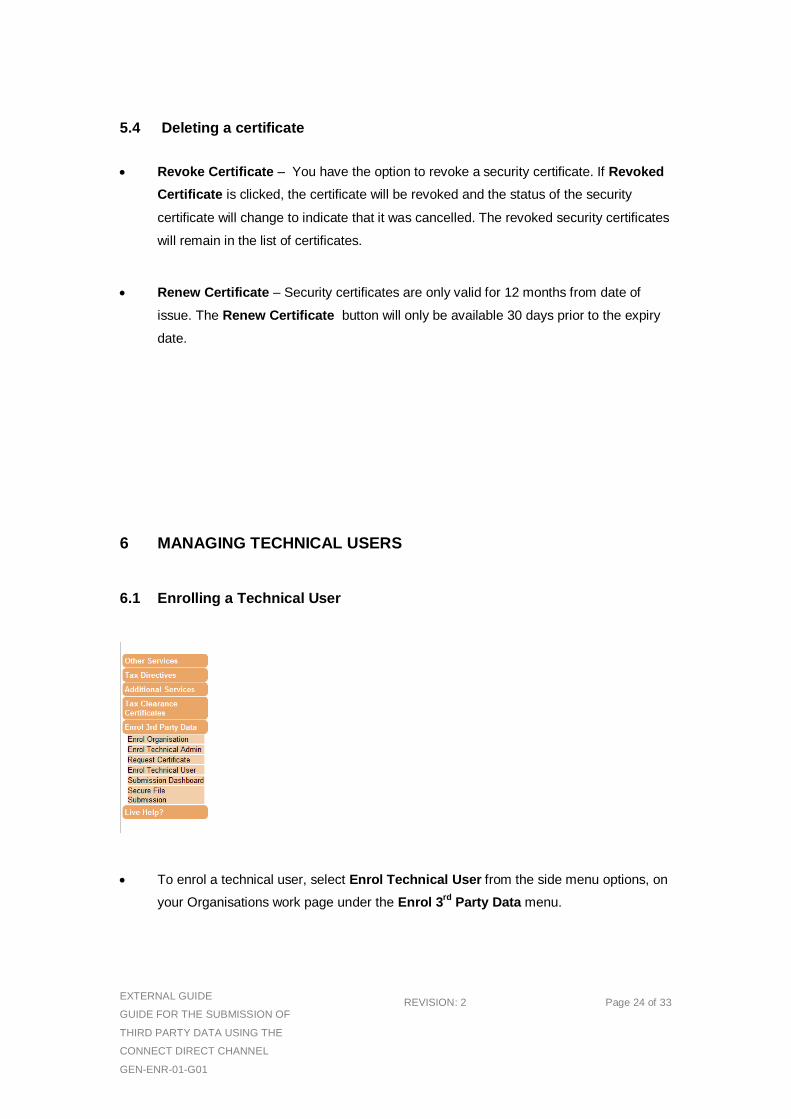
5.4 Deleting a certificate
Revoke Certificate – You have the option to revoke a security certificate. If Revoked
Certificate is clicked, the certificate will be revoked and the status of the security
certificate will change to indicate that it was cancelled. The revoked security certificates
will remain in the list of certificates.
Renew Certificate – Security certificates are only valid for 12 months from date of
issue. The Renew Certificate button will only be available 30 days prior to the expiry
date.
6 MANAGING TECHNICAL USERS
6.1 Enrolling a Technical User
To enrol a technical user, select Enrol Technical User from the side menu options, on
your Organisations work page under the Enrol 3rd
Party Data menu.
EXTERNAL GUIDE
GUIDE FOR THE SUBMISSION OF
THIRD PARTY DATA USING THE
CONNECT DIRECT CHANNEL
GEN-ENR-01-G01
REVISION: 2 Page 25 of 33
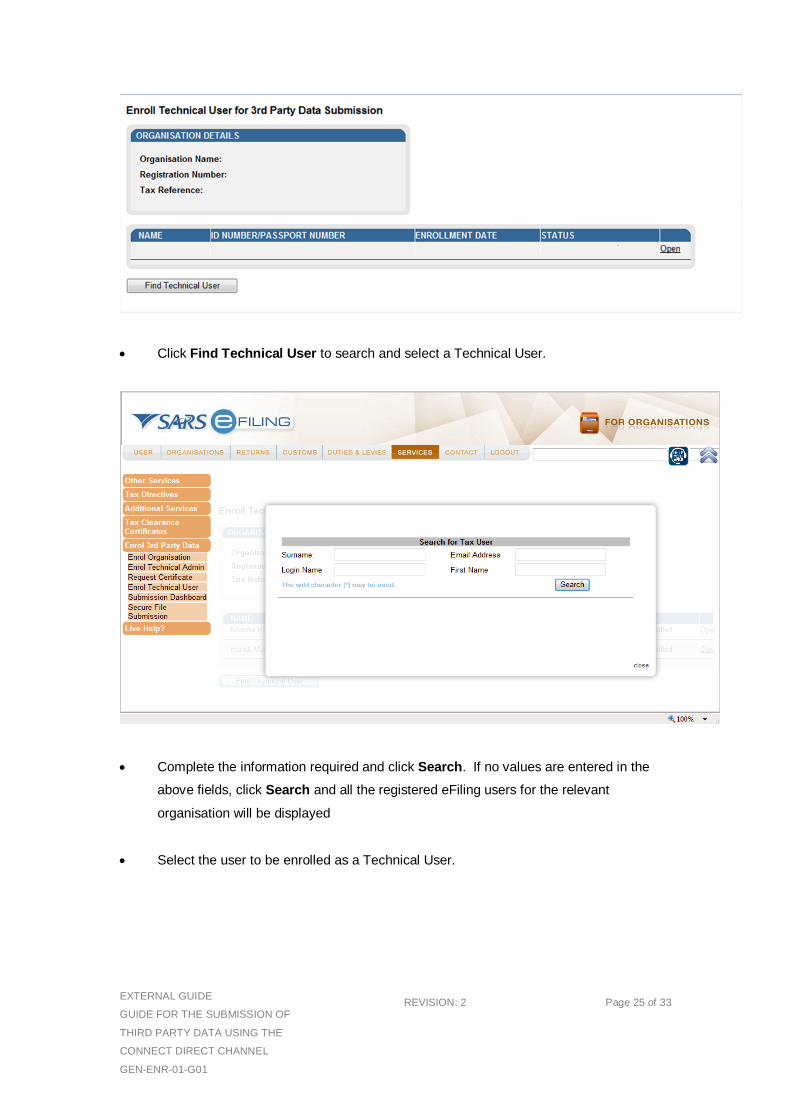
Click Find Technical User to search and select a Technical User.
Complete the information required and click Search. If no values are entered in the
above fields, click Search and all the registered eFiling users for the relevant
organisation will be displayed
Select the user to be enrolled as a Technical User.
EXTERNAL GUIDE
GUIDE FOR THE SUBMISSION OF
THIRD PARTY DATA USING THE
CONNECT DIRECT CHANNEL
GEN-ENR-01-G01
REVISION: 2 Page 26 of 33
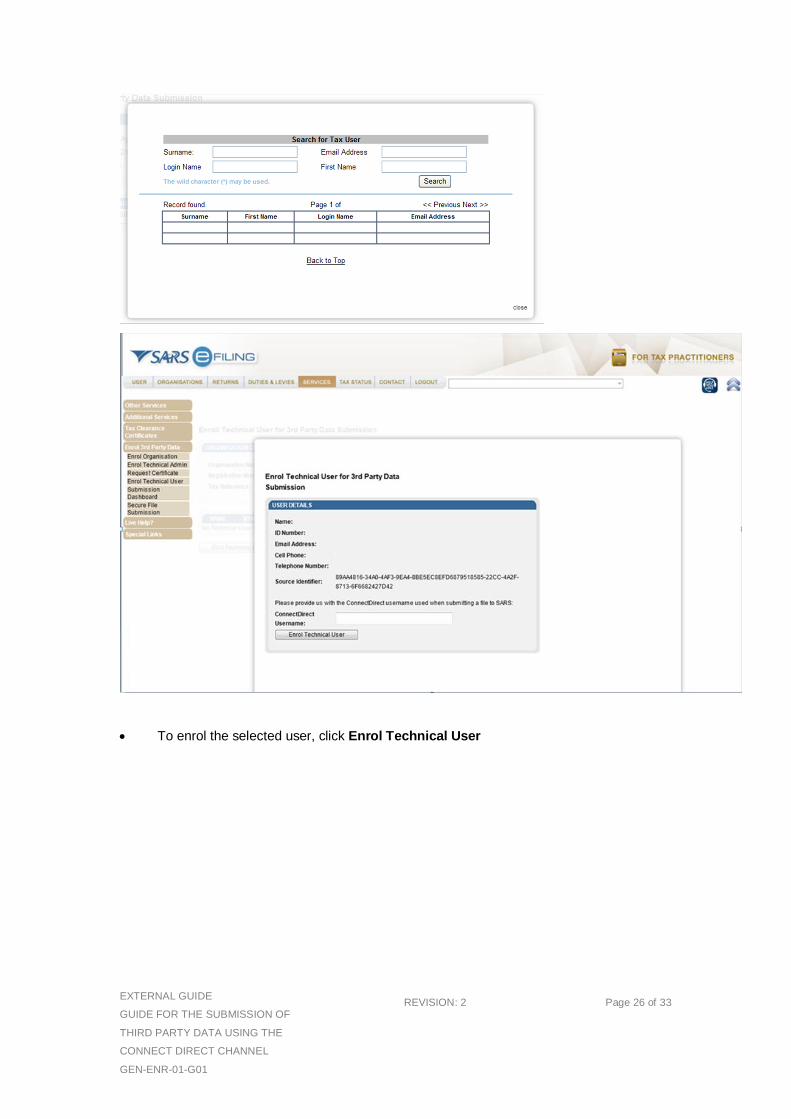
To enrol the selected user, click Enrol Technical User
EXTERNAL GUIDE
GUIDE FOR THE SUBMISSION OF
THIRD PARTY DATA USING THE
CONNECT DIRECT CHANNEL
GEN-ENR-01-G01
REVISION: 2 Page 27 of 33
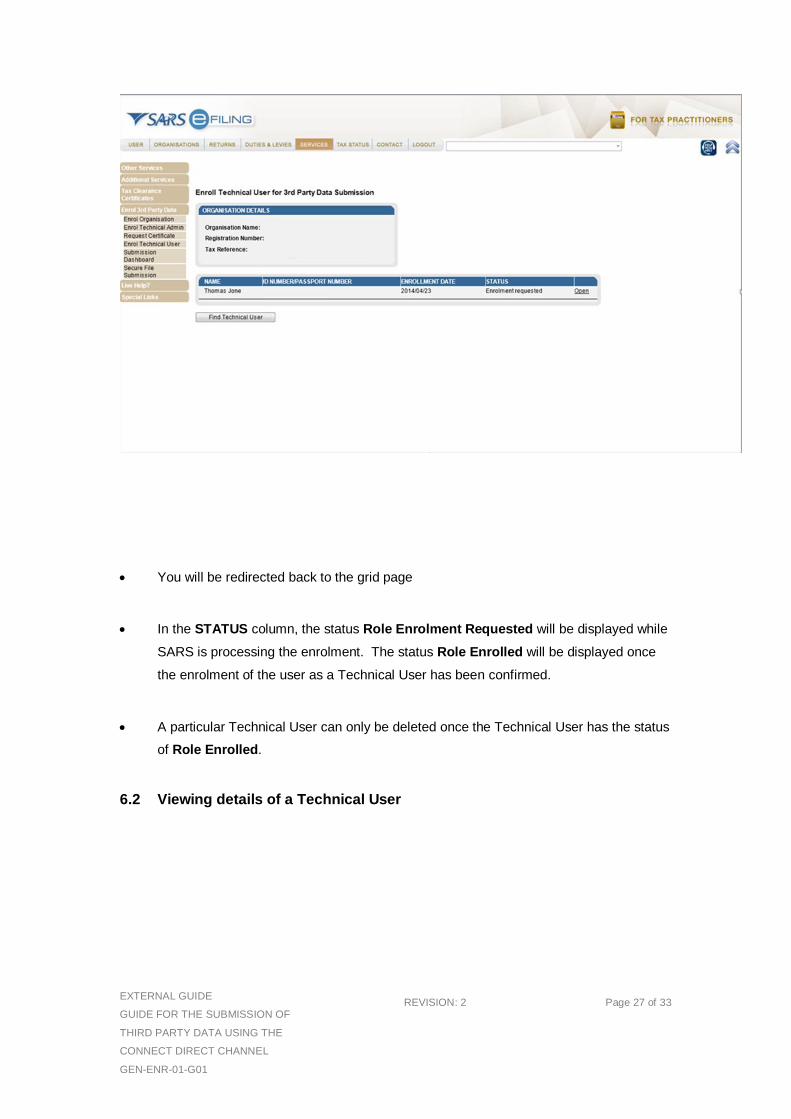
You will be redirected back to the grid page
In the STATUS column, the status Role Enrolment Requested will be displayed while
SARS is processing the enrolment. The status Role Enrolled will be displayed once
the enrolment of the user as a Technical User has been confirmed.
A particular Technical User can only be deleted once the Technical User has the status
of Role Enrolled.
6.2 Viewing details of a Technical User
EXTERNAL GUIDE
GUIDE FOR THE SUBMISSION OF
THIRD PARTY DATA USING THE
CONNECT DIRECT CHANNEL
GEN-ENR-01-G01
REVISION: 2 Page 28 of 33
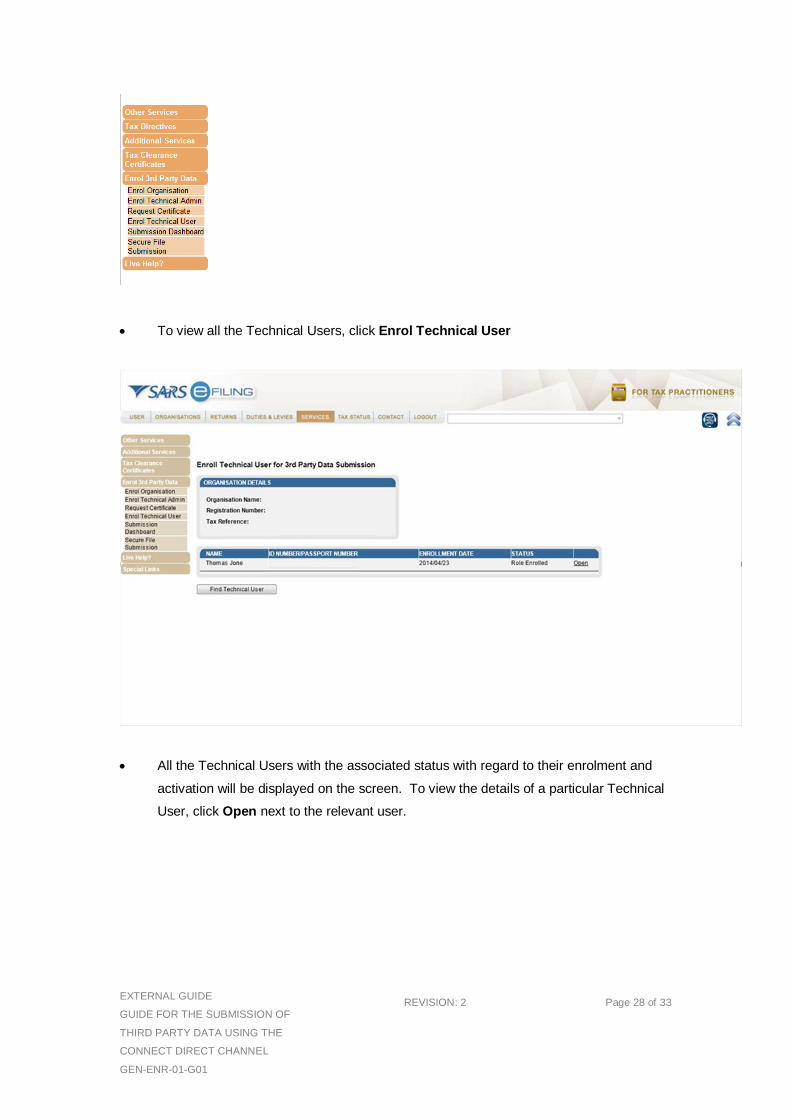
To view all the Technical Users, click Enrol Technical User
All the Technical Users with the associated status with regard to their enrolment and
activation will be displayed on the screen. To view the details of a particular Technical
User, click Open next to the relevant user.
EXTERNAL GUIDE
GUIDE FOR THE SUBMISSION OF
THIRD PARTY DATA USING THE
CONNECT DIRECT CHANNEL
GEN-ENR-01-G01
REVISION: 2 Page 29 of 33
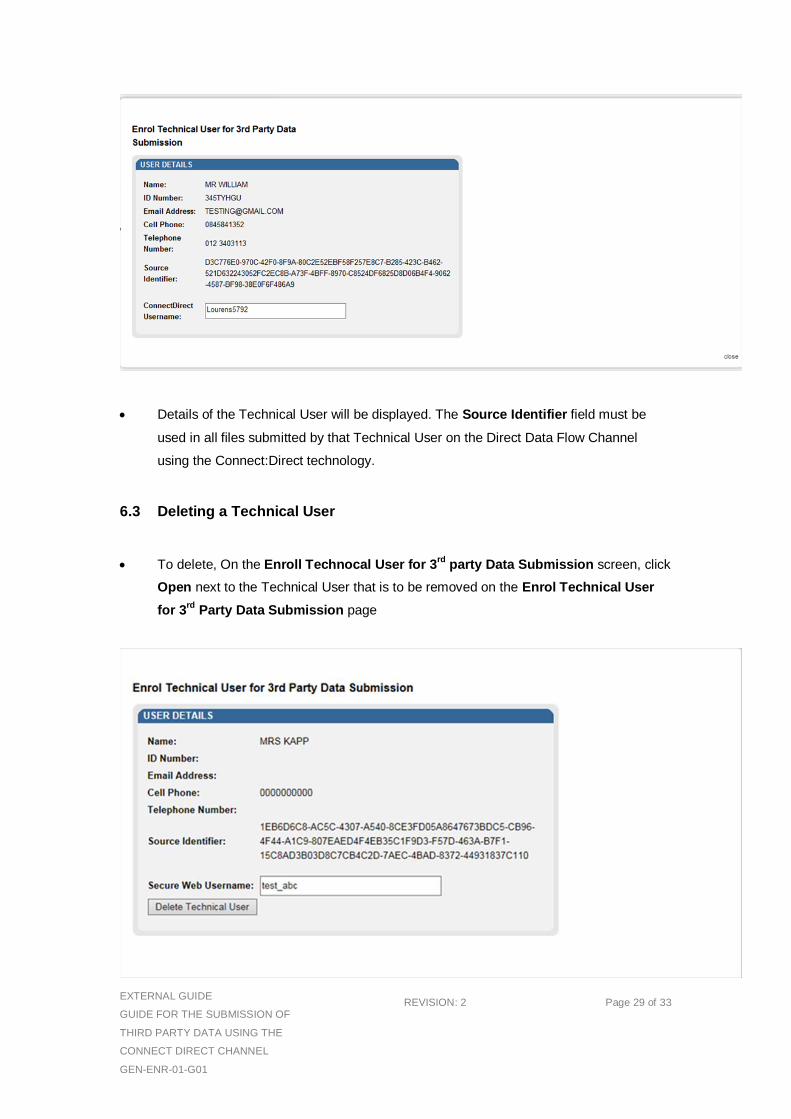
Details of the Technical User will be displayed. The Source Identifier field must be
used in all files submitted by that Technical User on the Direct Data Flow Channel
using the Connect:Direct technology.
6.3 Deleting a Technical User
To delete, On the Enroll Technocal User for 3rd
party Data Submission screen, click
Open next to the Technical User that is to be removed on the Enrol Technical User
for 3rd
Party Data Submission page
EXTERNAL GUIDE
GUIDE FOR THE SUBMISSION OF
THIRD PARTY DATA USING THE
CONNECT DIRECT CHANNEL
GEN-ENR-01-G01
REVISION: 2 Page 30 of 33
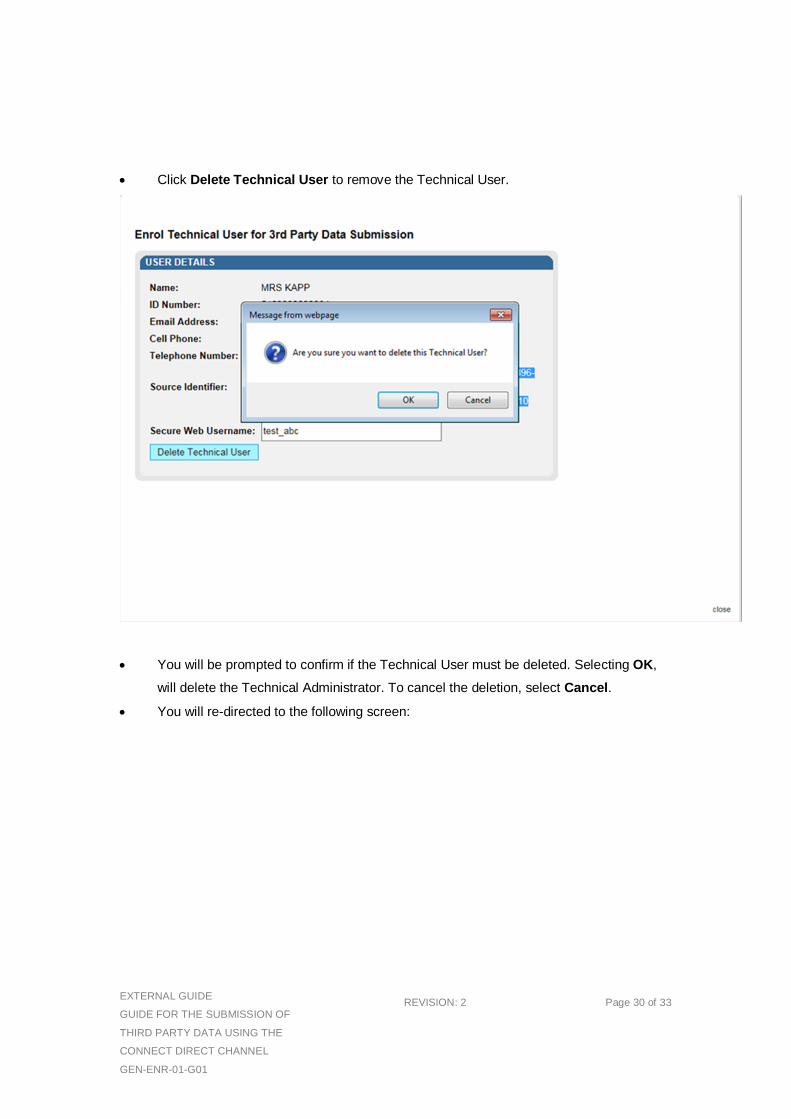
Click Delete Technical User to remove the Technical User.
You will be prompted to confirm if the Technical User must be deleted. Selecting OK,
will delete the Technical Administrator. To cancel the deletion, select Cancel.
You will re-directed to the following screen:
EXTERNAL GUIDE
GUIDE FOR THE SUBMISSION OF
THIRD PARTY DATA USING THE
CONNECT DIRECT CHANNEL
GEN-ENR-01-G01
REVISION: 2 Page 31 of 33
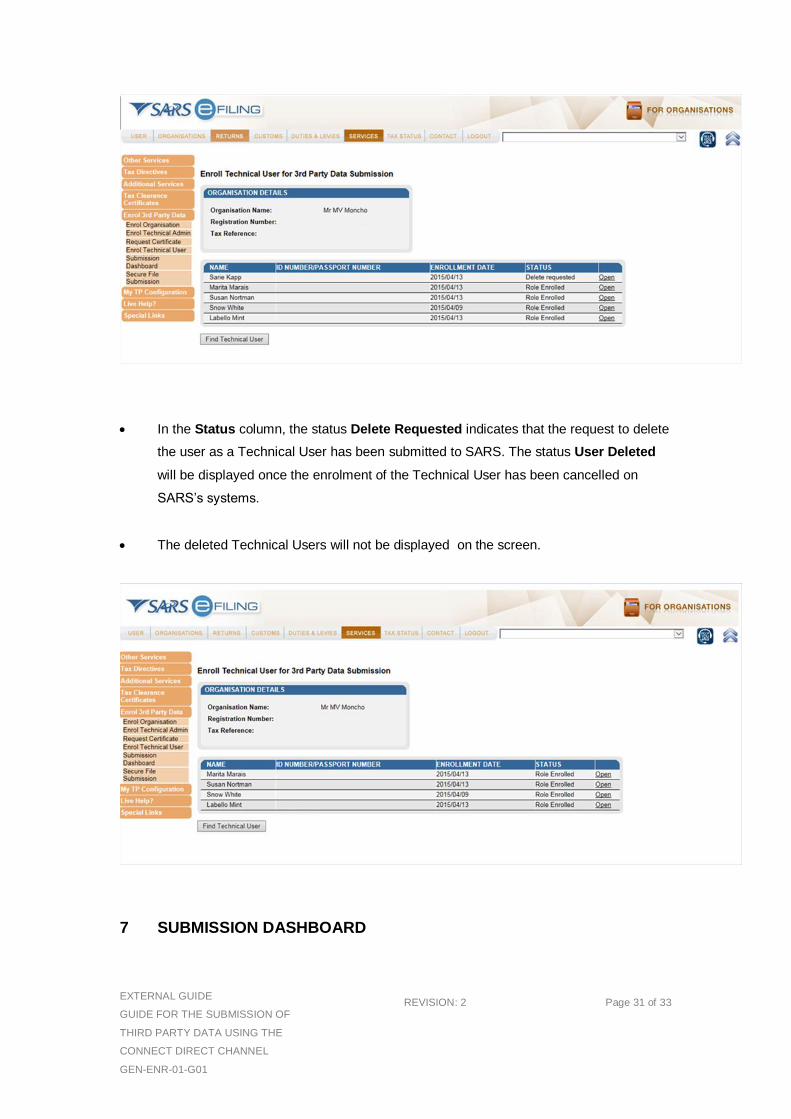
In the Status column, the status Delete Requested indicates that the request to delete
the user as a Technical User has been submitted to SARS. The status User Deleted
will be displayed once the enrolment of the Technical User has been cancelled on
SARS’s systems.
The deleted Technical Users will not be displayed on the screen.
7 SUBMISSION DASHBOARD
EXTERNAL GUIDE
GUIDE FOR THE SUBMISSION OF
THIRD PARTY DATA USING THE
CONNECT DIRECT CHANNEL
GEN-ENR-01-G01
REVISION: 2 Page 32 of 33
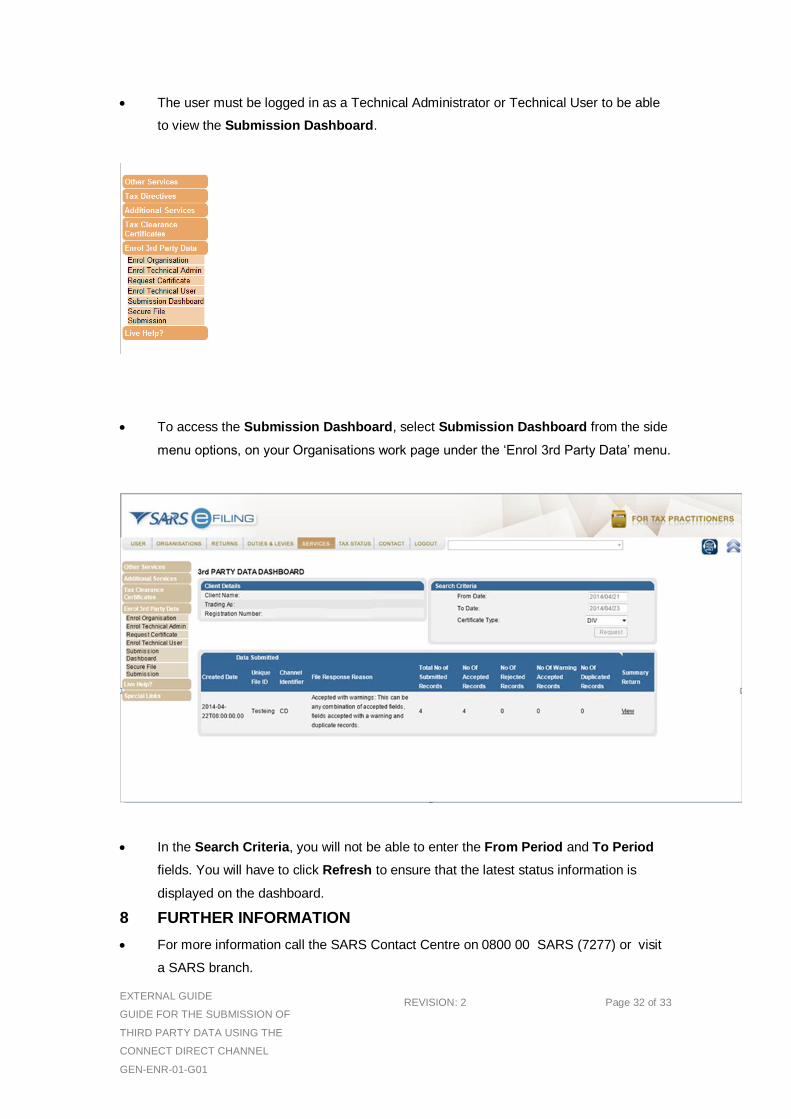
The user must be logged in as a Technical Administrator or Technical User to be able
to view the Submission Dashboard.
To access the Submission Dashboard, select Submission Dashboard from the side
menu options, on your Organisations work page under the ‘Enrol 3rd Party Data’ menu.
In the Search Criteria, you will not be able to enter the From Period and To Period
fields. You will have to click Refresh to ensure that the latest status information is
displayed on the dashboard.
8 FURTHER INFORMATION
For more information call the SARS Contact Centre on 0800 00 SARS (7277) or visit
a SARS branch.
EXTERNAL GUIDE
GUIDE FOR THE SUBMISSION OF
THIRD PARTY DATA USING THE
CONNECT DIRECT CHANNEL
GEN-ENR-01-G01
REVISION: 2 Page 33 of 33
DISCLAIMER
The information contained in this guide is intended as guidance only and is not considered to be a legal reference,
nor is it a binding ruling. The information does not take the place of legislation and readers who are in doubt regarding
any aspect of the information displayed in the guide should refer to the relevant legislation, or seek a formal opinion
from a suitably qualified individual.
For more information about the contents of this publication you may:
Visit the SARS website at www.sars.gov.za
Visit your nearest SARS branch
Contact your own tax advisor/tax practitioner
If calling from within South Africa, contact the SARS Contact Centre on 0800 00 SARS (7277)
If calling from outside South Africa, contact the SARS Contact Centre on +27 11 602 2093 (only between 8am
and 4pm South African time).
9 CROSS REFERENCES
DOCUMENT # DOCUMENT TITLE APPLICABILITY
GEN-ENR-01-G04 How to declare your Foreign Tax Information
(FTI) for the AEOI - External Guide
All


![Dhriti Bhatta 2014 PE Investment in Africa [External Submission]](https://static.fdocuments.us/doc/165x107/55a8696b1a28ab50028b46c4/dhriti-bhatta-2014-pe-investment-in-africa-external-submission.jpg)