Extending the Administration Console for Oracle WebLogic Server
96
Oracle® Fusion Middleware Extending the Administration Console for Oracle WebLogic Server 11g Release 1 (10.3.5) E13745-04 April 2011 This document tells how to extend the Oracle WebLogic Server Administration Console, change the Look and Feel, and add help for console extensions.
Transcript of Extending the Administration Console for Oracle WebLogic Server
Oracle® Fusion MiddlewareExtending the Administration Console for Oracle WebLogic Server
11g Release 1 (10.3.5)
E13745-04
April 2011
This document tells how to extend the Oracle WebLogic Server Administration Console, change the Look and Feel, and add help for console extensions.

Oracle Fusion Middleware Extending the Administration Console for Oracle WebLogic Server, 11g Release 1 (10.3.5)
E13745-04
Copyright © 2001, 2011, Oracle and/or its affiliates. All rights reserved.
Primary Author: Ben Gelernter
This software and related documentation are provided under a license agreement containing restrictions on use and disclosure and are protected by intellectual property laws. Except as expressly permitted in your license agreement or allowed by law, you may not use, copy, reproduce, translate, broadcast, modify, license, transmit, distribute, exhibit, perform, publish, or display any part, in any form, or by any means. Reverse engineering, disassembly, or decompilation of this software, unless required by law for interoperability, is prohibited.
The information contained herein is subject to change without notice and is not warranted to be error-free. If you find any errors, please report them to us in writing.
If this software or related documentation is delivered to the U.S. Government or anyone licensing it on behalf of the U.S. Government, the following notice is applicable:
U.S. GOVERNMENT RIGHTS Programs, software, databases, and related documentation and technical data delivered to U.S. Government customers are "commercial computer software" or "commercial technical data" pursuant to the applicable Federal Acquisition Regulation and agency-specific supplemental regulations. As such, the use, duplication, disclosure, modification, and adaptation shall be subject to the restrictions and license terms set forth in the applicable Government contract, and, to the extent applicable by the terms of the Government contract, the additional rights set forth in FAR 52.227-19, Commercial Computer Software License (December 2007). Oracle USA, Inc., 500 Oracle Parkway, Redwood City, CA 94065.
This software is developed for general use in a variety of information management applications. It is not developed or intended for use in any inherently dangerous applications, including applications which may create a risk of personal injury. If you use this software in dangerous applications, then you shall be responsible to take all appropriate fail-safe, backup, redundancy, and other measures to ensure the safe use of this software. Oracle Corporation and its affiliates disclaim any liability for any damages caused by use of this software in dangerous applications.
Oracle is a registered trademark of Oracle Corporation and/or its affiliates. Other names may be trademarks of their respective owners.
This software and documentation may provide access to or information on content, products, and services from third parties. Oracle Corporation and its affiliates are not responsible for and expressly disclaim all warranties of any kind with respect to third-party content, products, and services. Oracle Corporation and its affiliates will not be responsible for any loss, costs, or damages incurred due to your access to or use of third-party content, products, or services.

iii
Contents
Preface ................................................................................................................................................................ vii
Documentation Accessibility .................................................................................................................... viiConventions ................................................................................................................................................ vii
1 Introduction and Roadmap
1.1 Document Scope and Audience................................................................................................ 1-11.2 Guide to this Document ............................................................................................................. 1-21.3 Related Documentation.............................................................................................................. 1-21.4 New and Changed Features in This Release........................................................................... 1-2
2 Understanding Administration Console Extensions
2.1 What Is an Administration Console Extension?..................................................................... 2-12.1.1 How Do the WebLogic Portal Framework and WebLogic Portal Differ? ................... 2-22.2 Extension Points in the Administration Console ................................................................... 2-22.2.1 Hierarchy of UI Controls .................................................................................................... 2-22.2.2 The Administration Console Desktop .............................................................................. 2-42.2.2.1 Extending the Desktop ................................................................................................ 2-42.2.3 The Administration Console Look and Feel .................................................................... 2-42.2.3.1 Extending the Look and Feel ...................................................................................... 2-52.2.4 The Home Book and Page .................................................................................................. 2-52.2.4.1 Extending the Home Book .......................................................................................... 2-62.2.5 The ContentBook ................................................................................................................. 2-72.2.5.1 Extending the ContentBook ........................................................................................ 2-82.2.6 Summary of the Administration Console UI Controls .................................................. 2-82.3 JSP Templates and Tag Libraries .............................................................................................. 2-92.3.1 JSP Tag Libraries .................................................................................................................. 2-92.4 Example: How Struts Portlets Display Content .................................................................. 2-11
3 Setting Up a Development Environment
3.1 Set Up the Classpath (Optional) ............................................................................................... 3-13.2 Import Tag Libraries Into IDEs (Optional).............................................................................. 3-13.3 Create a Directory Tree for the Extension ............................................................................... 3-23.4 Configure Preferences to See UI Control Labels .................................................................... 3-3

iv
4 Creating a Message Bundle
5 Rebranding the Administration Console
5.1 Files Used to Create a Look and Feel ....................................................................................... 5-15.2 Overview of the Process............................................................................................................. 5-15.3 Expand the Look and Feel Template........................................................................................ 5-25.4 Modify or Replace Files.............................................................................................................. 5-35.4.1 Modify the Administration Console Banner ................................................................... 5-35.4.2 Modify the Login Page........................................................................................................ 5-45.4.3 Modify Colors, Fonts, Buttons, and Images..................................................................... 5-45.4.3.1 Style Sheet Properties................................................................................................... 5-45.4.3.2 Images Used In Conjunction with Style Sheets........................................................ 5-65.5 Use a Message Bundle for Your Look and Feel...................................................................... 5-75.6 Create a NetUI Extension File ................................................................................................... 5-85.7 Archive and Deploy the Extension........................................................................................... 5-9
6 Adding Portlets and Navigation Controls
6.1 Define a Portlet............................................................................................................................ 6-26.1.1 Define a JSP Portlet ............................................................................................................. 6-26.1.2 Define a Struts Portlet ......................................................................................................... 6-36.1.3 Define a Page Flow Portlet ................................................................................................ 6-46.1.4 Displaying a Title Bar for a Portlet.................................................................................... 6-56.1.4.1 Localizing a Portlet Title.............................................................................................. 6-66.1.4.1.1 Create a Backing Class for Localizing Portlet Titles......................................... 6-66.2 Define UI Controls (Optional)................................................................................................... 6-86.2.1 Create a Tab That Does Not Contain a Subtab................................................................ 6-86.2.2 Create a Tab That Contains Subtabs ................................................................................. 6-96.2.3 Create a Subtab ................................................................................................................. 6-116.2.4 Create a Control Without Tabs or Subtabs ................................................................... 6-126.3 Specify a Location for Displaying Portlets or UI Controls................................................. 6-126.3.1 Add a Portlet to the Desktop........................................................................................... 6-126.3.2 Add a Tab or Subtab to ContentBook............................................................................ 6-136.3.3 Example: Specifying Locations for Portlets and UI Controls..................................... 6-136.4 Add Nodes to the NavTreePortlet (Optional) ..................................................................... 6-146.4.1 Append a Single Node to the Root of the Existing Tree ............................................. 6-156.4.2 Append or Insert Nodes or Node Trees ........................................................................ 6-166.4.2.1 Create a NavTreeBacking Class............................................................................... 6-166.4.2.2 Invoke the NavTreeBacking Class .......................................................................... 6-186.4.2.3 Example: How a NavTreeExtensionBacking Class Adds a Node Tree to the
NavTreePortlet 6-196.5 Navigating to a Custom Security Provider Page ................................................................ 6-20
7 Using Oracle Templates and JSP Tags
7.1 Create and Use a Message Bundle in Your JSPs..................................................................... 7-27.2 Overview of Forms and Tables ................................................................................................. 7-37.2.1 Data Models for Forms and Tables ................................................................................... 7-3

v
7.2.1.1 Data Model for Forms.................................................................................................. 7-37.2.1.2 Data Model for Tables.................................................................................................. 7-37.2.2 Handles for ActionForms and Row Beans ...................................................................... 7-47.3 Create Struts Artifacts for Tables and Forms.......................................................................... 7-57.3.1 Create Struts Artifacts for a Form JSP: Main Steps......................................................... 7-57.3.1.1 Create Struts Action Classes for Handling Form Data ........................................... 7-67.3.1.2 Configure Struts ActionForms and Action Mappings ............................................ 7-87.3.2 Create Struts Artifacts for a Table JSP ........................................................................... 7-107.4 Create JSPs that Use Oracle Templates and JSP Tags......................................................... 7-127.4.1 WebLogic Server JSP Templates..................................................................................... 7-137.4.2 Create a Form JSP ............................................................................................................. 7-147.4.3 Create a Table JSP for Monitoring.................................................................................. 7-167.4.4 Create a Table Column for Navigating to Other Pages .............................................. 7-187.4.5 Add a Handle to Your Row Bean and Action Class.................................................... 7-187.4.6 Use the column-link Tag.................................................................................................. 7-197.4.7 Use the column-dispatch Tag ......................................................................................... 7-207.4.8 Add Buttons and Check Boxes to Tables....................................................................... 7-217.4.8.1 Add Buttons to a Table ............................................................................................. 7-217.4.8.2 Add Check Boxes and Buttons to a Table .............................................................. 7-227.4.8.3 Example: How Check Boxes and Buttons Process Data ...................................... 7-237.4.9 Configure Table Preferences ........................................................................................... 7-257.5 Create Other Portal Framework Files and Deploy the Extension..................................... 7-25
8 Adding Online Help for Console Extensions
8.1 Summary of Steps ....................................................................................................................... 8-18.2 Create the Helpset....................................................................................................................... 8-18.2.1 Helpset Files ......................................................................................................................... 8-18.3 Merging Helpsets........................................................................................................................ 8-28.3.1 Directory Structure for Merging Extension Help ........................................................... 8-28.4 Localizing Helpsets..................................................................................................................... 8-38.5 How Helpsets Are Merged ....................................................................................................... 8-48.6 Provide Support for Context-Sensitive Help .......................................................................... 8-58.6.1 Provide Help IDs ................................................................................................................. 8-58.6.1.1 helpid.............................................................................................................................. 8-58.6.1.2 helpurlpattern ............................................................................................................... 8-58.6.2 Map Help IDs to Help Files................................................................................................ 8-68.7 Rebranding Help......................................................................................................................... 8-68.8 Deploying Help ........................................................................................................................... 8-7
9 Archiving and Deploying Console Extensions
9.1 Archive and Deploy a Console Extension............................................................................... 9-19.1.1 Error Output During Deployment .................................................................................... 9-1

vi

vii
Preface
This preface describes the document accessibility features and conventions used in this guide—Oracle Fusion Middleware Extending the Administration Console for Oracle WebLogic Server.
Documentation AccessibilityOur goal is to make Oracle products, services, and supporting documentation accessible to all users, including users that are disabled. To that end, our documentation includes features that make information available to users of assistive technology. This documentation is available in HTML format, and contains markup to facilitate access by the disabled community. Accessibility standards will continue to evolve over time, and Oracle is actively engaged with other market-leading technology vendors to address technical obstacles so that our documentation can be accessible to all of our customers. For more information, visit the Oracle Accessibility Program Web site at http://www.oracle.com/accessibility/.
Accessibility of Code Examples in DocumentationScreen readers may not always correctly read the code examples in this document. The conventions for writing code require that closing braces should appear on an otherwise empty line; however, some screen readers may not always read a line of text that consists solely of a bracket or brace.
Accessibility of Links to External Web Sites in DocumentationThis documentation may contain links to Web sites of other companies or organizations that Oracle does not own or control. Oracle neither evaluates nor makes any representations regarding the accessibility of these Web sites.
Access to Oracle SupportOracle customers have access to electronic support through My Oracle Support. For information, visit http://www.oracle.com/support/contact.html or visit http://www.oracle.com/accessibility/support.html if you are hearing impaired.
ConventionsThe following text conventions are used in this document:

viii
Convention Meaning
boldface Boldface type indicates graphical user interface elements associated with an action, or terms defined in text or the glossary.
italic Italic type indicates book titles, emphasis, or placeholder variables for which you supply particular values.
monospace Monospace type indicates commands within a paragraph, URLs, code in examples, text that appears on the screen, or text that you enter.

1
Introduction and Roadmap 1-1
1Introduction and Roadmap
Administration Console extensions enable you to add content to the WebLogic Server Administration Console, replace content, and change the logos, styles and colors without modifying the files that are installed with WebLogic Server. For example, you can add content that provides custom monitoring and management facilities for your applications.
The Administration Console is a Java EE Web application that uses the WebLogic Portal framework, Apache Beehive, Apache Struts, Java Server Pages (JSP), and other standard technologies to render its user interface (UI) and content. It also uses the WebLogic Portal framework to enable extensions.
The following sections describe the contents and organization of this guide—Oracle Fusion Middleware Extending the Administration Console for Oracle WebLogic Server.
Section 1.1, "Document Scope and Audience"
Section 1.2, "Guide to this Document"
Section 1.3, "Related Documentation"
Section 1.4, "New and Changed Features in This Release"
1.1 Document Scope and AudienceThis document is a resource for software vendors who embed or rebrand WebLogic Server in their products, software vendors who develop security providers or other resources that extend the functionality of WebLogic Server, and Java EE application developers who want to provide custom monitoring and configuration features for their applications.
It is assumed that the reader is already familiar with using Java, JavaServer Pages, and Apache Struts or Apache Beehive to develop Java EE Web applications. This document emphasizes a hands-on approach to developing a limited but useful Administration
Note: The Monitoring Dashboard is implemented differently than the rest of the Administration Console, and you do not extend it in the same ways. Rather, you can create new views and charts, as described in "Using the Monitoring Dashboard" in Configuring and Using the Diagnostics Framework for Oracle WebLogic Server. However, some changes made to the styles of the Administration Console, as described in Chapter 5, "Rebranding the Administration Console," also apply to the Monitoring Dashboard.
Guide to this Document
1-2 Oracle Fusion Middleware Extending the Administration Console for Oracle WebLogic Server
Console extension. For information on applying Administration Console extensions to a broader set of management problems, refer to documents listed in Section 1.3, "Related Documentation."
1.2 Guide to this Document This chapter, Chapter 1, "Introduction and Roadmap," introduces the organization
of this guide.
Chapter 2, "Understanding Administration Console Extensions," introduces the building blocks for creating Administration Console extensions.
Chapter 3, "Setting Up a Development Environment," describes how to set up your environment for developing Administration Console extensions.
Chapter 4, "Creating a Message Bundle," describes how to encapsulate the text that your extension displays into properties files that can be localized.
Chapter 5, "Rebranding the Administration Console," describes how to create a WebLogic Portal Look and Feel and deploy it as an Administration Console extension.
Chapter 6, "Adding Portlets and Navigation Controls," describes how to add portlets that contain simple, static content to the Administration Console.
Chapter 7, "Using Oracle Templates and JSP Tags," describes how to create an extension that uses the Administration Console's JSP templates, styles, and JSP tag library.
Chapter 8, "Adding Online Help for Console Extensions," tells how to create help for a console extension and merge that help into the main Administration Console help system.
Chapter 9, "Archiving and Deploying Console Extensions," describes how to deploy your extension.
1.3 Related DocumentationBecause the Administration Console uses the WebLogic Portal framework to render its user interface, the process of extending the Administration Console is similar to creating or editing an existing WebLogic Portal application. For information on the WebLogic Portal framework, see:
Section 2.1.1, "How Do the WebLogic Portal Framework and WebLogic Portal Differ?"
"User Interface Development with Look & Feel Features" in Portal Development Guide for Oracle WebLogic Portal.
For information on JavaServer Pages, see JavaServer Pages Technology at http://java.sun.com/products/jsp/index.jsp.
For information on Apache Struts, see The Apache Struts Web Application Framework at http://struts.apache.org/.
For information on Apache Beehive, see http://beehive.apache.org/.
1.4 New and Changed Features in This ReleaseFor a comprehensive listing of the new WebLogic Server features introduced in this release, see What's New in Oracle WebLogic Server.

2
Understanding Administration Console Extensions 2-1
2Understanding Administration ConsoleExtensions
The following sections describe Administration Console extensions:
Section 2.1, "What Is an Administration Console Extension?"
Section 2.2, "Extension Points in the Administration Console"
Section 2.3, "JSP Templates and Tag Libraries"
Section 2.4, "Example: How Struts Portlets Display Content"
2.1 What Is an Administration Console Extension?An Administration Console extension is a WAR file that contains the resources for a section of a WebLogic Portal Web application. When you deploy the extension, the Administration Console creates an in-memory union of the files and directories in its WAR file with the files and directories in the extension WAR file. Once the extension has been deployed, it is a full member of the Administration Console: it is secured by the WebLogic Server security realm, it can navigate to other sections of the Administration Console, and if the extension modifies WebLogic Server resources, it participates in the change control process.
The simplest extension adds content to the Administration Console's home page (desktop). The WAR file for such an extension contains:
An Administration Console extension descriptor file, called netuix-extension.xml, that describes the location in the UI in which you want your extension to display.
An XML file that defines a WebLogic Portal portlet, which is a container for JSPs and other types of content.
A JSP file that contains the content you want to display.
The WAR file for more complex extensions can contain any of the following additional resources:
If the extension displays content in tabs within the Administration Console UI, the WAR contains XML files that describe other types of WebLogic Portal UI controls, such as tabs and subtabs (see Section 2.2, "Extension Points in the Administration Console").
If the extension uses Apache Struts to encapsulate business logic and navigation logic, the WAR file contains configuration files and Java classes for Apache Struts applications.

Extension Points in the Administration Console
2-2 Oracle Fusion Middleware Extending the Administration Console for Oracle WebLogic Server
If the extension uses Apache Beehive to encapsulate business logic and navigation logic, the WAR file contains configuration files and Java classes for Apache Beehive applications.
Java classes, image files, or other types of resources that can be used in Java EE Web applications.
2.1.1 How Do the WebLogic Portal Framework and WebLogic Portal Differ?The WebLogic Portal framework provides basic support for rendering the UI. The full WebLogic Portal product provides the framework and additional features such as personalization, interaction management, content management, and the ability for end users to customize their portal desktops.
If you have WebLogic Server, then you can use the WebLogic Portal framework when creating Administration Console extensions. If you want your own Web applications to provide a portal interface, you can purchase the WebLogic Portal product.
2.2 Extension Points in the Administration ConsoleAn extension point is a location in the Administration Console UI at which you can add or replace content. The UI for the Administration Console is rendered by groups of specialized WebLogic Portal components called UI controls. Each group of controls is responsible for rendering a specific part of the UI. For example, one group renders the two-column layout that you see after you log in to the Administration Console. Other groups render individual tabs in the tabbed interface.
The Administration Console attaches unique labels to many of its UI controls, and each labeled control is an extension point. You can also use these labels with WebLogic Server JSP tags to forward requests to specific UI controls. If a UI control is not identified by a label, you cannot extend it or forward to it. You must either interact with its labeled ancestor control or a labeled child control.
2.2.1 Hierarchy of UI ControlsUI controls for an application are defined in an XML file called a portal book file (.book file). The schema for this XML file specifies a hierarchy of UI controls, but some UI controls can be used at multiple levels in the hierarchy. The following list describes the types of UI controls that you will encounter most frequently while developing extensions (see Figure 2–1):
Desktop
The top level of the UI control hierarchy. It contains the Look and Feel for the Administration Console and the top-level book control.
Look and Feel
A collection of images, cascading style sheets, XML files, and other file types that control the appearance of a portal application.
Book
Aggregates a set of pages or other books. It can contain an optional menu control that provides navigation among its pages and books. Many books in the
Note: The Administration Console does not support WSRP portlets or portlets based on JSR 168.

Extension Points in the Administration Console
Understanding Administration Console Extensions 2-3
Administration Console use this menu control to render tabs, such as the domain's Configuration: General tab.
Page
Contains a layout, portlets, or books.
Layout
Defines a grid in the UI. Each column in the grid is called a placeholder, and each placeholder can host zero or more portlets or books.
Most pages in the Administration Console use a single column layout, but one of the top pages uses a two-column layout to create the left column that contains the Change Center, Domain Structure, and other portlets, and the right column that contains the tabbed interface.
Portlet
Defines static and dynamic content to display. You can add portlets to the Administration Console that contain JSP files or that forward to Struts Actions or Beehive Page Flows.
For information about the schema for UI controls, see Portal Support Schema Reference.
Figure 2–1 Subset of the UI Control Hierarchy
The following sections describe the extension points in the Administration Console:
Note: Figure 2–1 omits some intermediate controls in the hierarchy for the sake of brevity. For example, a book control does not directly contain a page control. Instead, a book contains a control named content, and the content control contains the page control.

Extension Points in the Administration Console
2-4 Oracle Fusion Middleware Extending the Administration Console for Oracle WebLogic Server
Section 2.2.2, "The Administration Console Desktop"
Section 2.2.4, "The Home Book and Page"
Section 2.2.5, "The ContentBook"
Section 2.2.6, "Summary of the Administration Console UI Controls"
2.2.2 The Administration Console DesktopEvery WebLogic Portal Web application must have at least one desktop control, and the Administration Console supports only one. Its label is defaultDesktopLabel (see Figure 2–2).
Figure 2–2 The Desktop
2.2.2.1 Extending the DesktopThe only type of extension that is supported at this level of the Administration Console is a Look and Feel extension, which replaces Oracle's logos, colors, and fonts with yours. See Chapter 5, "Rebranding the Administration Console."
You cannot replace the Home book or add other controls to the desktop.
2.2.3 The Administration Console Look and FeelThe Look and Feel for the Administration Console defines the fonts and colors, Oracle logos, the layout of portal components, and the navigation menus.

Extension Points in the Administration Console
Understanding Administration Console Extensions 2-5
2.2.3.1 Extending the Look and FeelCreating a simple Look and Feel extension that contains your company's logos, fonts, and color scheme requires you to replace the logos and some cascading style sheet (CSS) definitions in a sample Look and Feel included in WebLogic Server. Making complex changes to the WebLogic Server Look and Feel, such as changing the layout of portal components and navigation menus, requires a more advanced knowledge of WebLogic Portal Look and Feels. If you have Oracle Workshop for WebLogic Platform 9.2 or later, you can use its Look and Feel editor to make these complex changes. For more information about Look and Feels, see "User Interface Development with Look & Feel Features" in Portal Development Guide for Oracle WebLogic Portal.
2.2.4 The Home Book and PageThe top-level book in the Administration Console is identified by the label Home. It contains a single page (labeled page) within which resides all of the Administration Console content (see Figure 2–3).
Note: Because the Administration Console uses only the WebLogic Portal Framework, it supports only a single Look and Feel. Portal applications that use the entire set of features available with the Oracle WebLogic Portal product can support multiple Look and Feels that are personalized based on user or group ID.

Extension Points in the Administration Console
2-6 Oracle Fusion Middleware Extending the Administration Console for Oracle WebLogic Server
Figure 2–3 The Home Book and Page
The page page uses a two-column layout. The left column (layout location 0) contains portlets that provide essential services when using the Administration Console. The right column (layout location 1) contains:
Portlets:
– The topmost portlet displays a welcome message and contains buttons that launch online help and other services.
– The second portlet displays breadcrumbs, which are a series of hypertext links that keep a history of your navigation in the Administration Console.
– A third portlet is hidden by default and displays error messages and other status messages.
A book named ContentBook. See Section 2.2.5, "The ContentBook."
2.2.4.1 Extending the Home BookThe simplest extensions within the Home book add portlets to either column of its page page. For example, below the System Status portlet, you can add a portlet that monitors your applications.
More complex extensions can append a book to the Home book. Such an extension causes the Home book and the extension book to display as two separate tabs.

Extension Points in the Administration Console
Understanding Administration Console Extensions 2-7
2.2.5 The ContentBookThe ContentBook is a book that contains over 40 pages (see Figure 2–4), but it displays only one page at a time. Navigational controls throughout the Administration Console determine which page is displayed.
Figure 2–4 The ContentBook
In Figure 2–4, a page named CoreDomainBook contains a book named CoreDomainConfigGeneralBook. The CoreDomainConfigGeneralBook contains six child books and a special UI control named singleLevelMenu that renders a tab for each child book (Configuration, Monitoring, Control, Security, WebService Security, and Notes). In turn, each child book (such as DomainconfigTabPage) contains several child page controls and the singleLevelMenu control. The Look and Feel causes the singleLevelMenu control to generate subtabs for the page controls at this level (General, JTA, EJBs, Web Applications, SNMP, Logging, and Log Filters).
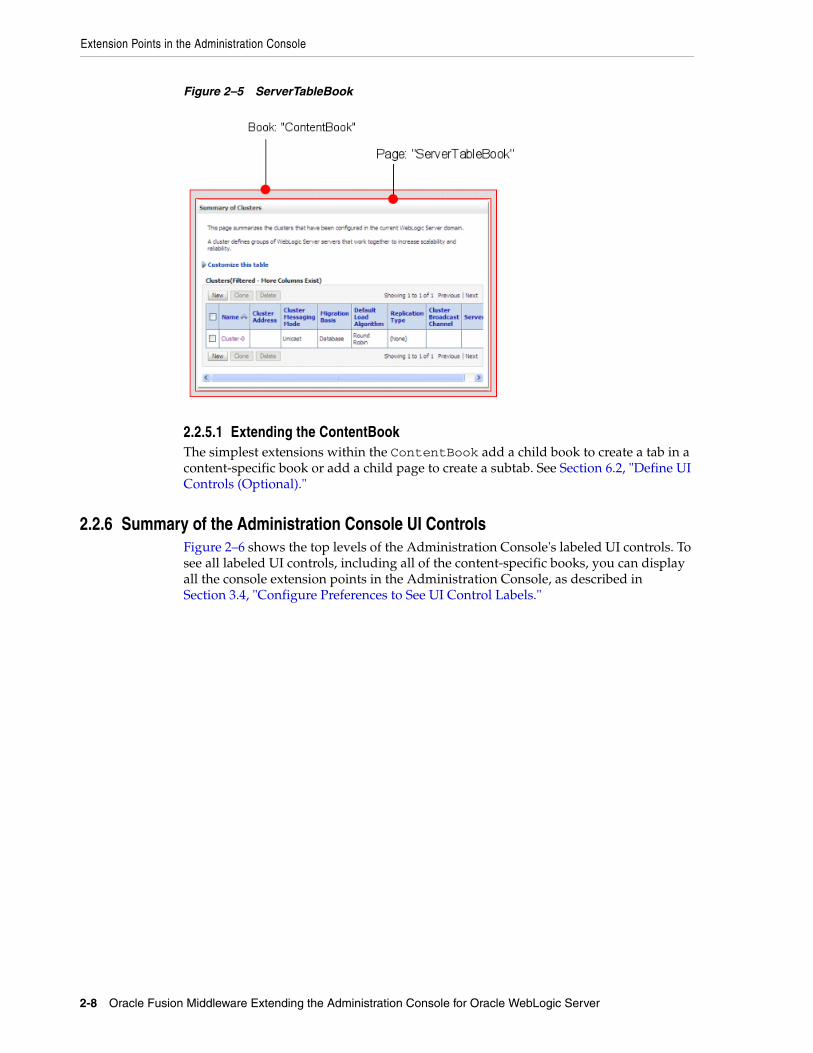
Some content-specific books do not display a tabbed interface for their child books. Figure 2–5 shows the ServerBook, which does not display a tabbed interface.
Extension Points in the Administration Console
2-8 Oracle Fusion Middleware Extending the Administration Console for Oracle WebLogic Server
Figure 2–5 ServerTableBook
2.2.5.1 Extending the ContentBookThe simplest extensions within the ContentBook add a child book to create a tab in a content-specific book or add a child page to create a subtab. See Section 6.2, "Define UI Controls (Optional)."
2.2.6 Summary of the Administration Console UI ControlsFigure 2–6 shows the top levels of the Administration Console's labeled UI controls. To see all labeled UI controls, including all of the content-specific books, you can display all the console extension points in the Administration Console, as described in Section 3.4, "Configure Preferences to See UI Control Labels."

JSP Templates and Tag Libraries
Understanding Administration Console Extensions 2-9
Figure 2–6 Summary of the UI Control Hierarchy
2.3 JSP Templates and Tag LibrariesOracle provides JSP templates and tag libraries that you can use to render such UI features as tables, data-entry boxes, and buttons. For information about the JSP templates, see Section 7.4.1, "WebLogic Server JSP Templates."
2.3.1 JSP Tag LibrariesThe Administration Console provides its own tag library (console-html.tld) that you can use in your Administration Console extensions. It also provides runtime support for a group of standard, third-party tag libraries that the Administration Console itself uses.
To import these third-party JSP tag libraries into your JSPs, you must use pre-defined, absolute URIs. The Administration Console's web.xml file maps these URIs to tag
JSP Templates and Tag Libraries
2-10 Oracle Fusion Middleware Extending the Administration Console for Oracle WebLogic Server
libraries within the WebLogic Server installation. This mapping facility enables Oracle to reorganize its installation directory without requiring you to change your JSPs.
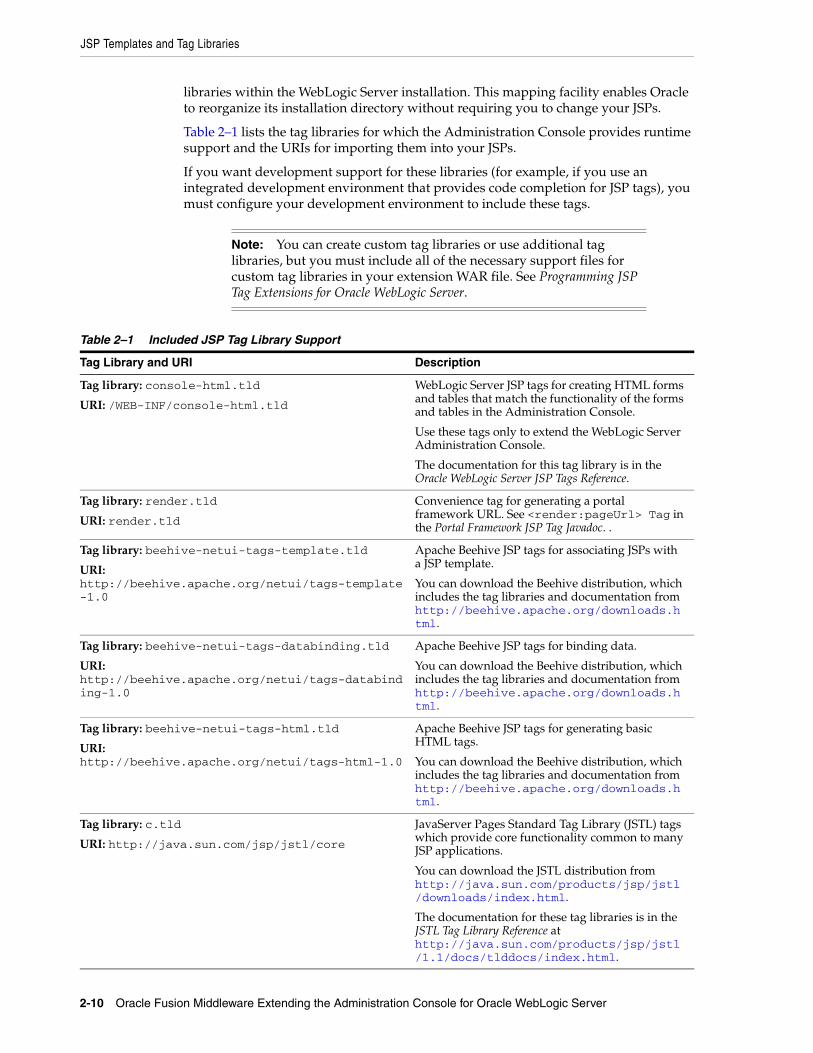
Table 2–1 lists the tag libraries for which the Administration Console provides runtime support and the URIs for importing them into your JSPs.
If you want development support for these libraries (for example, if you use an integrated development environment that provides code completion for JSP tags), you must configure your development environment to include these tags.
Note: You can create custom tag libraries or use additional tag libraries, but you must include all of the necessary support files for custom tag libraries in your extension WAR file. See Programming JSP Tag Extensions for Oracle WebLogic Server.
Table 2–1 Included JSP Tag Library Support
Tag Library and URI Description
Tag library: console-html.tld
URI: /WEB-INF/console-html.tld
WebLogic Server JSP tags for creating HTML forms and tables that match the functionality of the forms and tables in the Administration Console.
Use these tags only to extend the WebLogic Server Administration Console.
The documentation for this tag library is in the Oracle WebLogic Server JSP Tags Reference.
Tag library: render.tld
URI: render.tld
Convenience tag for generating a portal framework URL. See <render:pageUrl> Tag in the Portal Framework JSP Tag Javadoc. .
Tag library: beehive-netui-tags-template.tld
URI: http://beehive.apache.org/netui/tags-template-1.0
Apache Beehive JSP tags for associating JSPs with a JSP template.
You can download the Beehive distribution, which includes the tag libraries and documentation from http://beehive.apache.org/downloads.html.
Tag library: beehive-netui-tags-databinding.tld
URI: http://beehive.apache.org/netui/tags-databinding-1.0
Apache Beehive JSP tags for binding data.
You can download the Beehive distribution, which includes the tag libraries and documentation from http://beehive.apache.org/downloads.html.
Tag library: beehive-netui-tags-html.tld
URI: http://beehive.apache.org/netui/tags-html-1.0
Apache Beehive JSP tags for generating basic HTML tags.
You can download the Beehive distribution, which includes the tag libraries and documentation from http://beehive.apache.org/downloads.html.
Tag library: c.tld
URI: http://java.sun.com/jsp/jstl/core
JavaServer Pages Standard Tag Library (JSTL) tags which provide core functionality common to many JSP applications.
You can download the JSTL distribution from http://java.sun.com/products/jsp/jstl/downloads/index.html.
The documentation for these tag libraries is in the JSTL Tag Library Reference at http://java.sun.com/products/jsp/jstl/1.1/docs/tlddocs/index.html.

Example: How Struts Portlets Display Content
Understanding Administration Console Extensions 2-11
2.4 Example: How Struts Portlets Display ContentThe following steps describe how the portal framework uses an extension's source files to find and display a Struts portlet as a tab in ContentBook:
1. The portal framework starts by parsing the extension's netuix-extension.xml file.
The netuix-extension.xml file in this example specifies that the portal framework should load a .book file named medrecMonitor.book and display its contents as a child of the CoreDomainConfigGeneralBook book:
<book-extension> <book-location> <parent-label-location label="CoreDomainConfigGeneralBook"/> <book-insertion-point action="append"/> </book-location> <book-content content-uri="/controls/medrecMonitor.book"/>
Tag library: fmt.tld
URI: http://java.sun.com/jsp/jstl/fmt
JavaServer Pages Standard Tag Library (JSTL) tags which provide core functionality common to many JSP applications.
You can download the JSTL distribution from http://java.sun.com/products/jsp/jstl/downloads/index.html.
The documentation for these tag libraries is in the JSTL Tag Library Reference at http://java.sun.com/products/jsp/jstl/1.1/docs/tlddocs/index.html.
Tag library: struts-bean.tld
URI: http://struts.apache.org/tags-bean
Apache Struts tags for interacting with the Struts framework.
You can download the Struts distribution from http://struts.apache.org/download.cgi.
The documentation for these tag libraries is available from http://struts.apache.org/.
Tag library: struts-html.tld
URI: http://struts.apache.org/tags-html
Apache Struts tags for interacting with the Struts framework.
You can download the Struts distribution from http://struts.apache.org/download.cgi.
The documentation for these tag libraries is available from http://struts.apache.org/.
Tag library: struts-logic.tld
URI: http://struts.apache.org/tags-logic
Apache Struts tags for interacting with the Struts framework.
You can download the Struts distribution from http://struts.apache.org/download.cgi.
The documentation for these tag libraries is available from http://struts.apache.org/.
Tag library: struts-tiles.tld
URI: http://struts.apache.org/tags-tiles
Apache Struts tags for interacting with the Struts framework.
You can download the Struts distribution from http://struts.apache.org/download.cgi.
The documentation for these tag libraries is available from http://struts.apache.org/.
Table 2–1 (Cont.) Included JSP Tag Library Support
Tag Library and URI Description

Example: How Struts Portlets Display Content
2-12 Oracle Fusion Middleware Extending the Administration Console for Oracle WebLogic Server
</book-extension>
2. The portal framework loads the medrecMonitor.book file, which defines a page UI control and specifies that the page contains a portlet:
<netuix:page markupName="page" markupType="Page">... <netuix:portletInstance markupType="Portlet" instanceLabel="medrecMonitor.Tab.Portlet" contentUri="/portlets/medrec_monitor_tab.portlet"/></netuix:page>
3. The portal framework loads the portlet file, which names a Struts Action to run:
<portal:root> <netuix:portlet definitionLabel="MyPortlet" title="my.portlet.title"> <netuix:strutsContent module="/medrecMBean" action="MedRecMBeanFormAction" refreshAction="MedRecMBeanFormAction"/> </netuix:portlet></portal:root>
In the netuix:strutsContent element, the module="/medrecMBean" attribute indicates that the definition for the MedRecMBeanFormAction Struts Action is located in the Struts configuration file for the Struts module named medrecMBean. The Struts naming convention requires that this configuration file be named struts-auto-config-medrecMBean.xml.
4. The portal framework hands control to the Struts controller servlet, which parses the struts-auto-config-medrecMBean.xml file and finds the following definition for the MedRecMBeanFormAction:
<action path="/MedRecMBeanFormAction" type="com.bea.medrec.extension.MedRecMBeanFormAction" name="medrecMBeanEJBForm" scope="request" validate="false"> <forward name="success" contextRelative="true" path="/ext_jsp/form_view.jsp"/> </action>
5. When the Struts controller encounters the name="medrecMBeanEJBForm" attribute of the action element, it looks in the same Struts configuration file for the definition of a form bean that is named medrecMBeanEJBForm.
When it finds the following element in configuration file:
<form-bean name="medrecMBeanEJBForm" type="org.apache.struts.action.DynaActionForm"> <form-property name="name" type="java.lang.String"/> <form-property name="handle" type="com.bea.console.handles.Handle"/> <form-property name="totalRx" type="java.lang.Integer"/></form-bean>

Example: How Struts Portlets Display Content
Understanding Administration Console Extensions 2-13
it initializes a Java bean of type org.apache.struts.action.DynaActionForm with properties named name, handle, and totalRx.
6. The Struts controller invokes the com.bea.medrec.extension.MedRecMBeanFormAction class and passes to this class the DynaActionForm bean that it instantiated.
7. The MedRecMBeanFormAction class gathers data from an MBean in the MedRec application and populates the properties in the DynaActionForm bean with data from the MedRec MBean.
The MedRecMBeanFormAction class returns the populated DynaActionForm bean.
8. The Struts controller serializes the DynaActionForm bean, sets it in an HTTP request, and then forwards to a JSP.
9. The JSP uses JSP tags to display data in the DynaActionForm bean.
Figure 2–7 Overview of Loading a Struts Portlet

Example: How Struts Portlets Display Content
2-14 Oracle Fusion Middleware Extending the Administration Console for Oracle WebLogic Server

3
Setting Up a Development Environment 3-1
3Setting Up a Development Environment
Oracle provides all of the JSP tag libraries, schemas, and base Java classes that you need to develop a console extension. Because an Administration Console extension is a collection of XML files, Java classes, JSPs, and other standard Web-related resources, you can use any text editor or Integrated Development Environment to develop your extension.
The following sections describe setting up an environment for developing Administration Console extensions:
Section 3.1, "Set Up the Classpath (Optional)"
Section 3.2, "Import Tag Libraries Into IDEs (Optional)"
Section 3.3, "Create a Directory Tree for the Extension"
Section 3.4, "Configure Preferences to See UI Control Labels"
3.1 Set Up the Classpath (Optional)If you are creating Apache Struts classes or Beehive Page Flow classes for your extension, you need a set of Apache classes in your classpath. If you are adding nodes to the NavTreePortlet, you need a set of Oracle classes.
To add these classes to your classpath, run the following script:
WL_HOME\server\bin\setWLSEnv.cmd
or
WL_HOME\server\bin\setWLSEnv.sh
where WL_HOME is the directory in which you installed WebLogic Server.
Instead of using Oracle's script, you can add to your environment's classpath all of the JAR files in the WL_HOME/server/lib/consoleapp/webapp/WEB-INF/lib directory.
3.2 Import Tag Libraries Into IDEs (Optional)If you are using Oracle's JSP templates to create JSPs in your extension, you must use JSP tags from the JSP Standard Tag Library (JSTL), the Oracle Administration Console Extension Tag Library, and the Apache Beehive Page Flows Tag Library.
WebLogic Server installs a version of these tag libraries, which you can make available to your IDE. Alternatively, you can download your own copy of these standard tag libraries. For more information, see Section 2.3, "JSP Templates and Tag Libraries."

Create a Directory Tree for the Extension
3-2 Oracle Fusion Middleware Extending the Administration Console for Oracle WebLogic Server
3.3 Create a Directory Tree for the ExtensionAn Administration Console extension is a portion of a Web application and its resources must be organized into a directory structure that satisfies the requirements for standard Java EE Web applications. In addition, the WebLogic Portal framework, Apache Struts, and Apache Beehive require configuration files to be in specific locations.
To start working on your Administration Console extension, create a directory tree that matches the skeletal structure in Table 3–1.
Table 3–1 Directory Tree for an Administration Console Extension
Directory Description
root-dir The root directory of your extension. Oracle recommends that you do not create files in this directory.
The name of the directory has no programmatic significance. Choose a name that is meaningful to you.
When specifying URIs in your extension, the "/" (forward slash) character by itself represents this root directory.
root-dir/WEB-INF This directory must contain a file named netuix-extension.xml. This XML file functions as your extension's deployment descriptor.
If you use Apache Struts, you must locate your Struts configuration file in this directory.
root-dir/WEB-INF/classes If your extension uses a message bundle, your properties files must be in this directory.
If your extension uses custom classes, your package structure must start in this directory. For example, if you packaged your class files in a package named com.mycompany.extension, then create the following directory structure in the classes directory: com/mycompany/extension. Then save your compiled class files in this extension directory.
(optional) root-dir/WEB-INF/src If your extension uses custom classes, Oracle recommends that you save your pre-compiled Java source files in a package structure that starts in this directory.
When you archive your extension, you do not include this src directory.
(recommended) root-dir/ext_jsp Oracle recommends that you save all of your extension's JSP files below a directory named ext_jsp.
Creating a separate directory for your JSPs shields content developers from needing to learn about other support files such as the Portal framework XML files.
If your extension contains many JSPs, consider creating subdirectories below ext_jsp.
If you follow this recommendation, URIs for your JSPs will start with /ext_jsp. For example, /ext_jsp/myContent.jsp
The directory named root-dir/jsp is reserved. The root directory of your extension must not contain a directory named jsp.

Configure Preferences to See UI Control Labels
Setting Up a Development Environment 3-3
If you are extending the Administration Console's Look and Feel, your root directory will contain additional subdirectories. See Chapter 5, "Rebranding the Administration Console."
3.4 Configure Preferences to See UI Control LabelsWebLogic Server provides a configuration option for displaying the labels of the Administration Console's extension points. You use these labels to specify where you want your extension to display. To display these labels:
1. In the Administration Console toolbar, click Preferences.
2. Select the Extensions tab.
3. Select Show Definition Labels.
4. Click Save.
A field is displayed over each labeled control on the page. The field displays the value of the control's definitionLabel, prefixed by Book: or Label: to indicate whether it is a book or a label. See Figure 3–1.
(recommended) root-dir/controls Oracle recommends that you save all of your extension's portal book files (.book) below a directory named controls.
If your extension contains many books or pages, consider creating subdirectories below controls.
If you follow this recommendation, URIs for your books or pages will start with /controls. For example, /controls/myBook.book.
(recommended) root-dir/portlets Oracle recommends that you save all of your extension's portlet files (.portlet) below a directory named portlets.
If your extension contains many portlets, consider creating subdirectories below portlets.
If you follow this recommendation, URIs for your portlets will start with /portlets. For example, /portlets/myContent.portlet.
Table 3–1 (Cont.) Directory Tree for an Administration Console Extension
Directory Description

Configure Preferences to See UI Control Labels
3-4 Oracle Fusion Middleware Extending the Administration Console for Oracle WebLogic Server
Figure 3–1 Control Labels in the Administration Console User Interface

4
Creating a Message Bundle 4-1
4Creating a Message Bundle
Oracle recommends that you define all of the text strings that your Administration Console extension displays in a message bundle. A message bundle is a collection of text files (properties files) that contain key-value pairs (properties). You create one properties file for each language or locale that you want to support. If you name the properties file per a set of file-naming conventions, the Administration Console displays strings from the properties file whose locale matches the Web browser's locale setting.
To create a message bundle:
1. Create a text file that contains name-value pairs for each string you want to display. Use the equal sign (=) as the delimiter between the name and value, and place each property on its own line.
For example:
myextension.myTab.introduction=This page provides monitoring data for my application.myextension.myTab.TotalServletHits.label=Total hits for my servlet.
2. Save the file as root-dir/WEB-INF/classes/bundle.properties where
root-dir is the root directory of your extension
bundle is a unique value (do not use global, which is the name of a WebLogic Server bundle). Consider using your company name as the value for bundle.
The bundle.properties file is the default file that the Administration Console uses if the Web browser or the JVM have not specified a locale. It is a required file.
3. Save each localized version of the properties file as root-dir/WEB-INF/classes/bundle_locale.properties.
where locale is a locale code supported by java.util.Locale. See Locale in the J2SE API Specification, at shttp://java.sun.com/j2se/1.5.0/docs/api/java/util/Locale.html.
For example, mycompany_ja.properties.
For information about using message bundles, see Section 5.5, "Use a Message Bundle for Your Look and Feel" and Section 7.1, "Create and Use a Message Bundle in Your JSPs".

4-2 Oracle Fusion Middleware Extending the Administration Console for Oracle WebLogic Server

5
Rebranding the Administration Console 5-1
5Rebranding the Administration Console
This section describes how to create a WebLogic Portal Look and Feel and deploy it as an Administration Console extension. A Look and Feel extension enables you to replace some or all of Oracle's logos, colors, and styles in the Administration Console.
5.1 Files Used to Create a Look and FeelThe following types of files are used to create the look and feel of a console extension:
Cascading stylesheets (CSS). Most of the changes (and the easiest changes) are done by changing CSS.
Images. These may be referenced from CSS files or by the HTML generated by skeleton JSPs or content JSPs. If you change an image but keep it the same size and use the same name, you do not have to change the CSS or JSPs that reference it.
Skeleton Java Server (JSP) files.
JavaScript files. Client side behaviors come from JavaScript files. Oracle recommends that you do not change these files.
All of the Look and Feel files (CSS, skeleton, JavaScript and images) are subject to change with each release. Therefore, when you upgrade to a new release of WebLogic server, you may have to update your custom Look and Feel.
5.2 Overview of the ProcessFigure 5–1 illustrates the process. The steps in the process and the results of each are described in Table 5–1. Subsequent sections detail each step in the process.

Expand the Look and Feel Template
5-2 Oracle Fusion Middleware Extending the Administration Console for Oracle WebLogic Server
Figure 5–1 Administration Console Extension Development Overview
5.3 Expand the Look and Feel TemplateYour WebLogic Server installation includes a Look and Feel template that you can use as a starting point. Expand the template, and replace the images and styles with your own. There are two files:
build-new-laf.xml
This file is an ant script that creates the initial set of Look and Feel files for an extension. This script expands the Look and Feel files from laftemplate.zip (see below) and renames directories to correspond to the name of your extension.
laftemplate.zip
Table 5–1 Rebrand the Administration Console: Tasks and Results
Step Description Result
1. Expand the Look and Feel Template
WebLogic Server includes a Look and Feel template that you can use as a starting point. Expand the template to access the files.
A set of Look and Feel files you can modify.
2. Modify or Replace Files
Replace images and styles with your own to create a custom Look and Feel for the console.
A Look and Feel that contains your logos and styles.
3. (Optional) Use a Message Bundle for Your Look and Feel
If you want to change the text messages displayed in the banner, login, and login error pages, create your own message bundle and modify the pages to use messages from your bundle.
Localized properties files that contain your messages.
4. Create a NetUI Extension File
The NetUI Extension file describes the locations of files and directories in your Look and Feel.
netuix-extension.xml
5. Archive and Deploy the Extension
Archive the Look and Feel extension in a WAR file and copy it to your domain's console-ext directory.
See Chapter 9, "Archiving and Deploying Console Extensions."
When the Administration Console starts in your domain, it uses the Look and Feel extension that is in the domain's console-ext directory instead of the Look and Feel that Oracle packages and installs.

Modify or Replace Files
Rebranding the Administration Console 5-3
This template contains the initial set of Look and Feel files that build-new-laf.xml expands.
To expand the template:
1. If you do not already have Apache Ant installed (or available in an IDE), install and configure it. See The Apache Ant Project at http://ant.apache.org/.
2. From a command prompt, change to the following directory:
WL_HOME/server/lib/console-ext/templates
where WL_HOME is the directory in which you installed WebLogic Server.
3. Run Ant on build-new-laf.xml using the following syntax:
ant -f build-new-laf.xml -Dname=ext-name -Ddir=root-dir
where ext-name is the name of your extension and root-dir is your console extension development directory, for example:
ant -f build-new-laf.xml -Dname=myLAF -Ddir=c:\src\laf-ext
The files from laftemplate.zip are extracted into root-dir.
5.4 Modify or Replace FilesOnce the template is expanded, you can modify or replace the files to create your own Look and Feel. See the following:
Modify the Administration Console Banner
Modify the Login Page
Modify Colors, Fonts, Buttons, and Images
Making more complex changes to the WebLogic Server Look and Feel, such as changing the layout of portal components and navigation menus, requires a more advanced knowledge of WebLogic Portal Look and Feels. For more information, see "User Interface Development with Look & Feel Features" in Portal Development Guide for Oracle WebLogic Portal.
5.4.1 Modify the Administration Console BannerTo overwrite the sample Look and Feel's image files with your image files, do the following
1. To replace the logo in the Administration Console banner, save your own logo file as root-dir/framework/skins/ext-name/images/Branding_WeblogicConsole.gif.
To prevent the need to resize the banner frame, do not change the size of the image.
2. To change the background color of the banner, replace the following image file with one of the same size but that contains a different color: root-dir/framework/skins/ext-name/images/titlebar_bg.png
3. To replace the ALT text for the logo, change the value of the login.wlsident key in the global.properties file (and any bundle_locale.properties files). See Section 5.5, "Use a Message Bundle for Your Look and Feel."

Modify or Replace Files
5-4 Oracle Fusion Middleware Extending the Administration Console for Oracle WebLogic Server
To make more complex modifications, you can change the JSP and styles that render the banner. The root-dir/framework/skeletons/ext-name/header.jsp file determines the contents of the Administration Console banner. Within header.jsp, the style console-header-logo specifies the name and location of an image file that is used as the banner background. The style console-title specifies the name and location of the logo file. Both of these styles are defined in root-dir/framework/skins/ext-name/css/console.css.
5.4.2 Modify the Login PageThe login page asks users to enter a user ID and password. Table 5–2 summarizes the files that determine the appearance of the login page.
5.4.3 Modify Colors, Fonts, Buttons, and ImagesThe Administration Console uses several cascading style sheets (CSS) to specify its fonts and colors, as well as other properties such as spacing. To change these styles, open the style sheet and change the style's definition.
5.4.3.1 Style Sheet PropertiesTable 5–3 summarizes the Look and Feel styles defined in the style sheets. The styles themselves are not described in the table, because the style names in the style sheets are adequately descriptive, for example, background-color.
Note: You must precompile JSPs before deploying the extension.
Table 5–2 Files for the Login and Login Error Page Appearance
File Name and Path (Under root-dir/) Description
css/login.css Defines fonts and spacing for the login page.
framework/skins/ext-name/images/Branding_Login_WeblogicConsole.gifframework/skins/ext-name/images/Login_GC_LoginPage_Bg.gifframework/skins/ext-name/images/Loginarea_Background.png
Images for the login page. See Table 5–4 for more information about Login_GC_LoginPage_Bg.gif.and Loginarea_Background.png.
login/LoginForm.jsp Render the login page.
If you want to change the text that these pages display, modify the <fmt:message/> JSP tags to point to messages in your own message bundle. See Section 5.5, "Use a Message Bundle for Your Look and Feel."

Modify or Replace Files
Rebranding the Administration Console 5-5
Table 5–3 CSS Style Sheets Used for Look and Feel Extensions
File Name and Path (Under root-dir/) Styles
css/changemgt.css Styles for the Change Center ("Lock and Edit") panel.
css/content.css The following styles:
General console layout, such as margins.
The toolbar area.
Breadcrumbs.
Messages.
Data tables.
css/forms.css Styles for defining forms, such as configuration and monitoring page content areas.
css/jndinavtree.css Styles to define the navigation tree in the JNDI browser.
css/login.css Styles for the login page.
css/navtree.css Styles to define the navigation tree in the Domain Structure panel.
css/quicklinks.css Styles for the How Do I... panel.
css/systemstatus.css Styles for the System Status panel.
framework/skeletons/ext-name/css/layout.css Default styles for the grid on which the other user-interface items are arranged.
framework/skins/ext-name/css/console.css The following styles:
Console header and footer styles, including logo image file name and location, background color, size, etc.
Structural elements, such as margins and widths.
Background colors for content areas.
Breadcrumb styles.
Styles to enhance screen reader support.
framework/skins/ext-name/css/general.css The following styles:
The background color for the console, including the Domain Structure, How do I..., and System Status panes on the left side, as well as the areas behind content areas.
Typography throughout the console, including font family, font weight, font size, text color, text decoration, link styles, etc.
framework/skins/ext-name/css/menu.css.css Styles to define menu margins, padding, backgrounds, colors, etc.
framework/skins/ext-name/css/window.css The following styles:
Titlebar colors, borders, padding, alignment, image rollover behavior, etc.
Windows styles, such as border style and color, spacing, background image file name and location, etc.
Window content overflow handling.

Modify or Replace Files
5-6 Oracle Fusion Middleware Extending the Administration Console for Oracle WebLogic Server
5.4.3.2 Images Used In Conjunction with Style SheetsSeveral images are used in conjunction with the style sheets to create effects such as rounded and shaded corners on tabs and buttons. These are summarized in Table 5–4 and Table 5–5. To change any of these effects, you can substitute your image for the default image, using the same file name; or you can reference a different image file from the style sheet.
Other images than the ones listed in the tables are also used in the console, and some are referenced in the style sheets. However, these tables only show those that are used to create formatting effects, as mentioned above. Browse root-dir/framework/skins/ext-name images/ and root-dir/images/ to see the other images.
Note: Two tables show the association of the style sheets and the images. Table 5–4 shows files relative to root-dir/ and Table 5–5 shows files relative to root-dir/framework/skins/ext-name. There is no special significance that the files are grouped this way except to improve the readability of the tables.
Table 5–4 Images Used With Style Sheets (Under root-dir/)
Effect CSS File Image file
The surface of a button.
See also use of this image with login.css.
css/forms.css images/button_bg_n.png
The surface of a button when the mouse pointer rolls over it.
See also use of this image with login.css.
css/forms.css images/button_bg_mo.png
The surface of a button when it is pressed down.
See also use of this image with login.css.
css/forms.css images/button_bg_md.png
The background of the Welcome box that prompts for Username and Password when first starting WebLogic Server.
css/login.css framework/skins/ext-name/images/Loginarea_Background.png
The surface of the Log In button in the Welcome box.
See also use of this image in forms.css, listed above.
css/login.css images/button_bg_n.png
The surface of a button when the mouse pointer rolls over it.
See also use of this image in forms.css, listed above.
css/login.css images/button_bg_mo.png
The surface of a button when it is pressed down.
See also use of this image in forms.css, listed above.
css/login.css images/button_bg_md.png
The background of the Login page. css/login.css framework/skins/ext-name/images/Login_GC_LoginPage_Bg.gif

Use a Message Bundle for Your Look and Feel
Rebranding the Administration Console 5-7
5.5 Use a Message Bundle for Your Look and FeelIn the banner and login pages, the Administration Console uses JSTL tags to load text messages from localized properties files. For example, to display the window title in LoginForm.jsp:
1. The <fmt:setBundle basename="global" var="current_bundle" scope="page"/> tag in LoginForm.jsp sets the current message bundle to global.
This JSP tag looks in WEB-INF/classes for files with the following name pattern:
bundle[_locale].properties.
The default properties file for this bundle is global.properties in WL_HOME/server/lib/consoleapp/webapp/WEB-INF/classes/console.jar. If the Web browser or operating system specifies a different locale, then the JSP tag would load global_locale.properties.
2. The <fmt:message key="window.title" bundle="$current_bundle" /> tag opens the global.properties file and renders the text that is identified by the window.title key:
window.title=Oracle WebLogic Server Administration Console
If you want to change these messages, you can create your own properties files and modify the JSP tags to use your bundle. See Chapter 4, "Creating a Message Bundle."
Table 5–6 describes the text messages that the banner, login, and login error pages display.
Table 5–5 Images Used With Style Sheets (Under root-dir/framework/skins/ext-name/)
Effect CSS File Image file
Title bar at top of panels css/window.css images/titlebar_bg.png
Background for entire console. Visible at top of console behind logo.
css/console.css images/r_bg_global.png
The left edge of a tab. The top half of the image is used for unselected tabs and the bottom half is used for selected tabs.
css/menu.css images/tab_left.gif
The main surface of a tab. The top half of the image is used for unselected tabs and the bottom half is used for selected tabs.
css/console.css images/tab_right.gif
The corner of a shadow behind a panel. With default settings, it is at the top and bottom right corners.
css/window.css images/shadow-corners
The right side of a shadow behind a panel. css/window.css images/shadow-right.gif
The bottom of a shadow behind a panel. css/window.css images/shadow-bottom.gif

Create a NetUI Extension File
5-8 Oracle Fusion Middleware Extending the Administration Console for Oracle WebLogic Server
5.6 Create a NetUI Extension FileA NetUI Extension file, named netuix-extension.xml, is the deployment descriptor for your Look and Feel. It contains the names and locations of the files in your Look and Feel, and it causes the Administration Console to replace its Look and Feel with yours. See Section 5–1, "netuix-extension.xml.". For more information about this file, see the NetUI Extensions Schema Reference.
Example 5–1 netuix-extension.xml
<?xml version="1.0" encoding="UTF-8"?><weblogic-portal-extension xmlns="http://www.bea.com/servers/portal/weblogic-portal/8.0" xmlns:xsi="http://www.w3.org/2001/XMLSchema-instance"
xsi:schemaLocation="http://www.bea.com/servers/portal/weblogic-portal/8.0 netuix-extension-1_0_0.xsd">
<provider-info> <title>My LAF</title> <version>1.0</version> <description>My LAF.</description> <author>Me</author> <support-url>My URL</support-url> </provider-info>
<portal-file>/console.portal</portal-file> <desktop-extension> <look-and-feel-content title="myLAF" definitionLabel="myLAF" markupName="myLookAndFeel" skin="myLAF" skin-path="/framework/skins" skeleton="myLAF" skeleton-path="/framework/skeletons" default-window-icon="window-icon.gif" default-window-icon-path="images/"/>
</weblogic-portal-extension>
To modify this file:
1. Open the file in a validating XML editor (recommended) or a text editor.
2. In the <provider-info> element, change the information to describe your Look and Feel, developer contact and support URL.
Table 5–6 Messages in Banner and Login Pages
File (Under root-dir/) Message Key and Value
login/LoginForm.jsp window.title=Oracle WebLogic Server Administration Console login.wlsident=Oracle WebLogic Server Administration Console login.welcome2=Log in to work with the WebLogic Server domain login.username=Username: login.password=Password: login.submit=Log In
framework/skeleton/mycompany/header.jsp
window.title=Oracle WebLogic Server Administration Console

Archive and Deploy the Extension
Rebranding the Administration Console 5-9
The information in this element has no programmatic significance. It is intended to help your technical support team keep track of your software modifications.
3. In the <look-and-feel-content> element:
a. In the title, skin, and skeleton attributes, replace the myLAF value with the name of the directory you chose in step 3 in Section 5.3, "Expand the Look and Feel Template."
b. In the definitionLabel and markupName attributes, replace the myLAF value with the name of the directory you chose in step 2 or use some other string. These attributes are required by the portal framework, but are not used in a Look and Feel extension.
5.7 Archive and Deploy the ExtensionFor instructions on how to archive and deploy the extension, see Chapter 9, "Archiving and Deploying Console Extensions.".

Archive and Deploy the Extension
5-10 Oracle Fusion Middleware Extending the Administration Console for Oracle WebLogic Server

6
Adding Portlets and Navigation Controls 6-1
6Adding Portlets and Navigation Controls
In the Administration Console, all content is contained within portlets, so even the most minimal extension must define a portlet (and content for the portlet). You can add your portlet directly to the desktop, but if you want the portlet to display as a tab or subtab in the ContentBook, you must define books or pages to contain it. Your extension can also add a node to the NavTreePortlet, which enables users to navigate to your portlet directly from the desktop.
This section describes how to add portlets, UI controls, and NavTreePortlet nodes to the Administration Console.
Figure 6–1 illustrates the process. The steps in the process, and the results of each are described in Table 6–1. Subsequent sections detail each step in the process.
Figure 6–1 Adding Portlets and Navigation Controls Development Overview
Table 6–1 Model MBean Development Tasks and Results
Step Description Result
1. Section 6.1, "Define a Portlet."
Create an XML file to define a portlet that the portal framework can instantiate. A portlet definition includes instructions on which type of data to load: JSPs, Struts Actions, or Beehive Page Flows.
The portal's Look and Feel determines whether the portlet provides borders and minimize/maximize controls.
A .portlet XML file.
2. Section 6.2, "Define UI Controls (Optional)."
If you want your portlet to display in a tab, subtab, or in some other location within ContentBook, create an XML file that defines a page or book.
A .book XML file.

Define a Portlet
6-2 Oracle Fusion Middleware Extending the Administration Console for Oracle WebLogic Server
6.1 Define a PortletYou define a portlet in an XML file. The portlet definition includes instructions on which type of data to load: JSPs, Struts Actions, or Beehive Page Flows. The following sections describe how to define a portlet:
Section 6.1.1, "Define a JSP Portlet"
Section 6.1.2, "Define a Struts Portlet"
Section 6.1.3, "Define a Page Flow Portlet"
Section 6.1.4, "Displaying a Title Bar for a Portlet"
For more information about portlet XML files, see the entry in Portal Support Schema Reference.
6.1.1 Define a JSP Portlet To define a portlet that loads a JSP:
1. Copy the code from Example 6–1 and paste it into a new text file in root-dir/portlets (see Section 3.3, "Create a Directory Tree for the Extension").
Consider using the following naming convention:
content-name.portlet
where content-name is the name of a JSP file that the portlet contains. For example, if the portlet contains a JSP file named monitorEJB.jsp, then name the portlet XML file monitorEJB.portlet.
2. Replace the values in Example 6–1 as follows:
Label. Provide a unique identifier that the portal framework uses to identify this portlet.
(optional) Title. Provide a default title that this portlet displays if its title bar is visible. See Section 6.1.4, "Displaying a Title Bar for a Portlet."
3. Section 6.3, "Specify a Location for Displaying Portlets or UI Controls."
Create an XML file that describes whether you want your portal to display next to a labeled UI control or to replace the control.
A netuix-extension.xml file.
4. Section 6.4, "Add Nodes to the NavTreePortlet (Optional)."
You can create a link from the NavTreePortlet to any book or page in your extension.
WebLogic Server provides default support for appending control names to the end of the existing navigation tree. If you want to insert nodes in specific locations, or if you want to create a node tree, you create your own Java classes that describe the node and node location.
Additional entries in the .book XML file.
Optionally, Java classes that give you more control over the node that you are adding.
5. Archive and deploy the extension.
See Chapter 9, "Archiving and Deploying Console Extensions."
A WAR file that contains your extension.
Table 6–1 (Cont.) Model MBean Development Tasks and Results
Step Description Result

Define a Portlet
Adding Portlets and Navigation Controls 6-3
URI. Specifies the absolute path and file name of the JSP that the portlet contains starting from the root of the extension.
For example:
/ext_jsp/monitorEJB.JSP
You must precompile JSPs before deploying your extension.
Example 6–1 Template for a Portlet XML File that Loads a JSP File
<?xml version="1.0" encoding="UTF-8"?><portal:root xmlns:html="http://www.w3.org/1999/xhtml-netuix-modified/1.0.0" xmlns:portal="http://www.bea.com/servers/netuix/xsd/portal/support/1.0.0" xmlns:netuix="http://www.bea.com/servers/netuix/xsd/controls/netuix/1.0.0" xmlns:xsi="http://www.w3.org/2001/XMLSchema-instance" xsi:schemaLocation="http://www.bea.com/servers/netuix/xsd/portal/ support/1.0.0 portal-support-1_0_0.xsd"> <netuix:portlet definitionLabel="Label" title="Title" > <netuix:content> <netuix:jspContent contentUri="URI"/> </netuix:content> </netuix:portlet></portal:root>
6.1.2 Define a Struts PortletInstead of encapsulating your extension's business logic and navigation logic in JSP files, you can use the Apache Struts framework. See Section 7.3, "Create Struts Artifacts for Tables and Forms."
To create a portlet that loads (forwards to) a Struts Action:
1. Copy the code from Example 6–2 and paste it into a new text file in root-dir/portlets (see Section 3.3, "Create a Directory Tree for the Extension").
Consider using the following naming convention:
action-name.portlet
where action-name is the name of the Struts Action to which the portlet forwards.
2. Replace the values in Example 6–2 as follows:
Label. Provide a unique identifier that the portal framework uses to identify this portlet.
(optional) Title. Provide a default title that this portlet displays if its title bar is visible. See Section 6.1.4, "Displaying a Title Bar for a Portlet."
Struts-module. Specifies the Struts module that defines a Struts Action.
You must create your own Struts module to define the Actions and ActionForms that your Administration Console extension uses; the default Struts module is reserved for Oracle Actions and ActionForms. Each module includes its own, uniquely named configuration file. For information about Struts modules, see the Apache Struts User Guide at http://struts.apache.org/struts-doc-1.2.x/userGuide/index.html.

Define a Portlet
6-4 Oracle Fusion Middleware Extending the Administration Console for Oracle WebLogic Server
For example, if you specify "myModule" for Struts-module, the Struts controller servlet looks in the following location for the action:
root-dir/WEB-INF/struts-auto-config-myModule.xml
action-path. Specifies the path to a Struts Action that is defined in your Struts module.
refresh-action-path. Specifies the Action to invoke on subsequent requests for this portlet (for example, the user agent refreshes the document).
Note that this .portlet does not specify the name of a JSP. Instead, typically the Struts Action mapping forwards to a specific JSP upon successful operation.
Example 6–2 Template for a Portlet XML File that Forwards to a Struts Action
<?xml version="1.0" encoding="UTF-8"?><portal:root xmlns:html="http://www.w3.org/1999/xhtml-netuix-modified/1.0.0" xmlns:portal="http://www.bea.com/servers/netuix/xsd/portal/support/1.0.0" xmlns:netuix="http://www.bea.com/servers/netuix/xsd/controls/netuix/1.0.0" xmlns:xsi="http://www.w3.org/2001/XMLSchema-instance" xsi:schemaLocation="http://www.bea.com/servers/netuix/xsd/portal/ support/1.0.0 portal-support-1_0_0.xsd"> <netuix:portlet definitionLabel="Label" title="Title" > <netuix:strutsContent module="Struts-module" action="action-path" refreshAction="refresh-action-path"/> </netuix:portlet></portal:root>
6.1.3 Define a Page Flow Portlet To define a portlet that loads a Beehive Page Flow:
1. Copy the code from Example 6–3 and paste it into a new text file in root-dir/portlets (see Section 3.3, "Create a Directory Tree for the Extension").
Consider using the following naming convention:
pageFlow-name.portlet
where pageFlow-name is the name of the Page Flow that the portlet loads (forwards to). For example, if the portlet forwards to a Page Flow named myPageFlow.jpf, then name the portlet XML file myPageFlow.portlet.
2. Replace the values in Example 6–3 as follows:
Label. Provide a unique identifier that the portal framework uses to identify this portlet.
(optional) Title. Provide a default title that this portlet displays if its title bar is visible. See Section 6.1.4, "Displaying a Title Bar for a Portlet."
URI. Specifies the absolute path and file name of the JPF file that defines the Page Flow. The URI must be absolute starting from the root-dir/WEB-INF/classes directory.
For example, if your JPF file is root-dir/WEB-INF/classes/com/mycompany/extension/pageflows/myPageFlow.jpf, specify the following value
/com/mycompany/extension/pageflows/myPageFlow.jpf
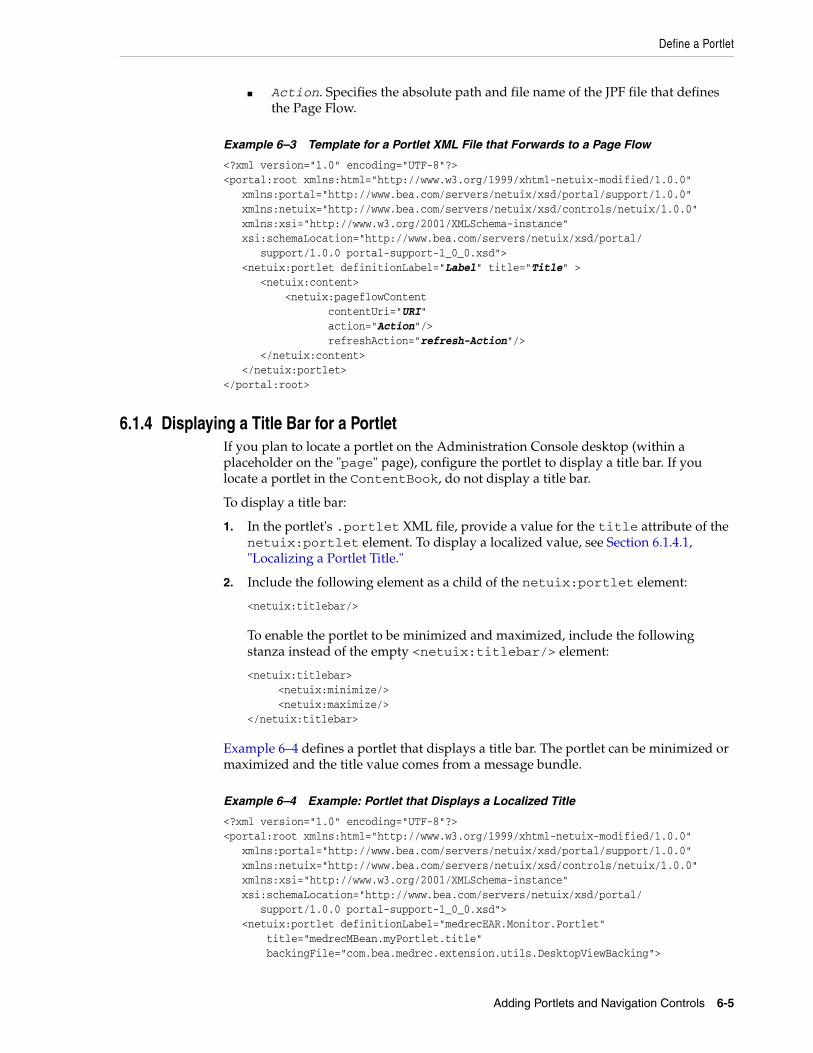
Define a Portlet
Adding Portlets and Navigation Controls 6-5
Action. Specifies the absolute path and file name of the JPF file that defines the Page Flow.
Example 6–3 Template for a Portlet XML File that Forwards to a Page Flow
<?xml version="1.0" encoding="UTF-8"?><portal:root xmlns:html="http://www.w3.org/1999/xhtml-netuix-modified/1.0.0" xmlns:portal="http://www.bea.com/servers/netuix/xsd/portal/support/1.0.0" xmlns:netuix="http://www.bea.com/servers/netuix/xsd/controls/netuix/1.0.0" xmlns:xsi="http://www.w3.org/2001/XMLSchema-instance" xsi:schemaLocation="http://www.bea.com/servers/netuix/xsd/portal/ support/1.0.0 portal-support-1_0_0.xsd"> <netuix:portlet definitionLabel="Label" title="Title" > <netuix:content> <netuix:pageflowContent contentUri="URI" action="Action"/> refreshAction="refresh-Action"/> </netuix:content> </netuix:portlet></portal:root>
6.1.4 Displaying a Title Bar for a PortletIf you plan to locate a portlet on the Administration Console desktop (within a placeholder on the "page" page), configure the portlet to display a title bar. If you locate a portlet in the ContentBook, do not display a title bar.
To display a title bar:
1. In the portlet's .portlet XML file, provide a value for the title attribute of the netuix:portlet element. To display a localized value, see Section 6.1.4.1, "Localizing a Portlet Title."
2. Include the following element as a child of the netuix:portlet element:
<netuix:titlebar/>
To enable the portlet to be minimized and maximized, include the following stanza instead of the empty <netuix:titlebar/> element:
<netuix:titlebar> <netuix:minimize/> <netuix:maximize/></netuix:titlebar>
Example 6–4 defines a portlet that displays a title bar. The portlet can be minimized or maximized and the title value comes from a message bundle.
Example 6–4 Example: Portlet that Displays a Localized Title
<?xml version="1.0" encoding="UTF-8"?><portal:root xmlns:html="http://www.w3.org/1999/xhtml-netuix-modified/1.0.0" xmlns:portal="http://www.bea.com/servers/netuix/xsd/portal/support/1.0.0" xmlns:netuix="http://www.bea.com/servers/netuix/xsd/controls/netuix/1.0.0" xmlns:xsi="http://www.w3.org/2001/XMLSchema-instance" xsi:schemaLocation="http://www.bea.com/servers/netuix/xsd/portal/ support/1.0.0 portal-support-1_0_0.xsd"> <netuix:portlet definitionLabel="medrecEAR.Monitor.Portlet" title="medrecMBean.myPortlet.title" backingFile="com.bea.medrec.extension.utils.DesktopViewBacking">

Define a Portlet
6-6 Oracle Fusion Middleware Extending the Administration Console for Oracle WebLogic Server
<netuix:titlebar> <netuix:minimize/> <netuix:maximize/> </netuix:titlebar> <netuix:content> <netuix:strutsContent module="/medrecMBean" action="RetrieveCustomMBeansAction" refreshAction="RetrieveCustomMBeansAction"/> </netuix:content> </netuix:portlet></portal:root>
6.1.4.1 Localizing a Portlet TitleBy default, the portlet displays the literal value that you enter in the <netuix:portlet> element's title attribute. To enable this title to be localized:
1. Create a Java class that retrieves the value of the title attribute, scans a property file for a key that matches the title attribute value, and returns the value of the property key.
For example, if you specify title="myPortlet.title", the Java class looks through your message bundle for myPortlet.title=MyCompany's Portlet and returns MyCompany's Portlet as the text to be displayed.
See Section 6.1.4.1.1, "Create a Backing Class for Localizing Portlet Titles."
2. In the .portlet file, include the following attributes in the <netuix:portlet> element:
title. Specify the key for a property that you have defined in your message bundle.
backingFile. Specify the fully-qualified name of a Java class that you created in the previous step.
For example:
<netuix:portlet definitionLabel="myPortlet" title="myPortlet.title" backingFile="com.mycompany.extension.utils.MyPortletBacking">
6.1.4.1.1 Create a Backing Class for Localizing Portlet Titles A backing class is a Java class that interacts directly with the portal framework APIs. To create a backing class that retrieves localized portlet titles:
1. Extend com.bea.netuix.servlets.controls.content.backing.AbstractJspBacking.
2. Implement the AbstractJspBacking.preRender(HttpServletRequest request, HttpServletResponse response) method.
See AbstractJspBacking.preRender() in the Java API Reference for Oracle WebLogic Portal.
In your implementation of this method:
a. Get the locale from the HttpServletRequest object.
Use the following API:
javax.servlet.http.HttpServletRequest.getSession().getAttribute( "org.apache.struts.action.LOCALE")

Define a Portlet
Adding Portlets and Navigation Controls 6-7
b. Get the message bundle.
Use the following API:
org.apache.struts.util.MessageResources.getMessageResources( "myBundle");
where myBundle is the name of your message bundle. (See Section 4, "Creating a Message Bundle.")
c. Get the value of the portlet's title property.
Use the following APIs:
PortletBackingContext bctx = PortletBackingContext.getPortletBackingContext( HttpServletRequest req);MessageResources.getMessage(locale, bctx.getTitle());
where locale is the locale that you retrieved from the HttpServletRequest object.
d. Reset the value of the portlet's title property to the localized value that you retrieved in the previous step.
Use the following API:
PortletBackingContext.getTitle(String title)
where title is the value that you retrieved from the message bundle.
Example 6–5 Example: Backing Class for Localizing a Portlet Title
package com.bea.medrec.extension.utils;import java.util.Locale;import javax.servlet.http.HttpServletRequest;import javax.servlet.http.HttpServletResponse;import org.apache.struts.util.MessageResources;import com.bea.netuix.servlets.controls.content.backing.AbstractJspBacking;import com.bea.netuix.servlets.controls.portlet.backing.PortletBackingContext;public class DesktopViewBacking extends AbstractJspBacking public boolean preRender(HttpServletRequest req, HttpServletResponse res) // Get the PortletBackingContext for current portlet. The // PortletBackingContext contains properties and methods // for the current portlet. PortletBackingContext bctx = PortletBackingContext.getPortletBackingContext(req); if (bctx != null) // If title does not contain a period, assume it's preLocalized // or follow the format for a key if (bctx.getTitle().indexOf(".")!=-1) // Get the locale from the HTTPServletRequest Locale locale = (Locale) req.getSession().getAttribute( "org.apache.struts.action.LOCALE"); // Find the message bundle named "medrecMBean" MessageResources messages = MessageResources.getMessageResources("medrecMBean"); // Get the value of the portlet's "title" property String msg = messages.getMessage(locale, bctx.getTitle()); // Reset the value of the "title" property with the // localized value. bctx.setTitle(msg);
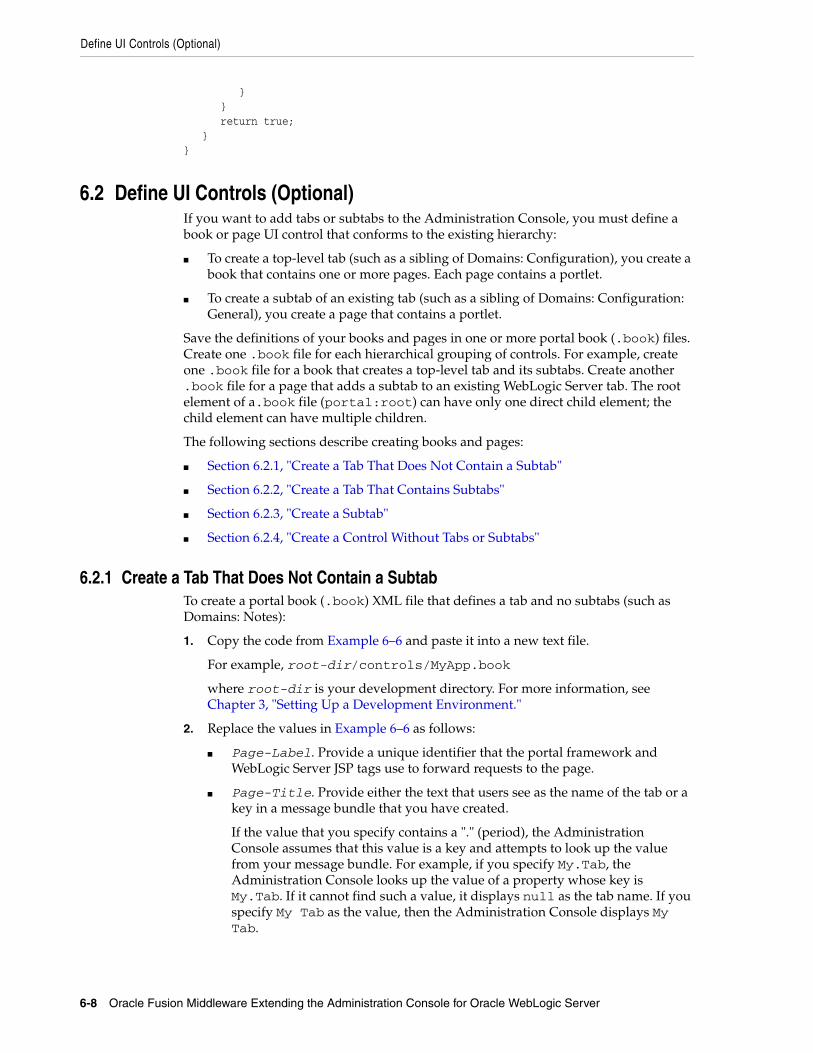
Define UI Controls (Optional)
6-8 Oracle Fusion Middleware Extending the Administration Console for Oracle WebLogic Server
return true;
6.2 Define UI Controls (Optional)If you want to add tabs or subtabs to the Administration Console, you must define a book or page UI control that conforms to the existing hierarchy:
To create a top-level tab (such as a sibling of Domains: Configuration), you create a book that contains one or more pages. Each page contains a portlet.
To create a subtab of an existing tab (such as a sibling of Domains: Configuration: General), you create a page that contains a portlet.
Save the definitions of your books and pages in one or more portal book (.book) files. Create one .book file for each hierarchical grouping of controls. For example, create one .book file for a book that creates a top-level tab and its subtabs. Create another .book file for a page that adds a subtab to an existing WebLogic Server tab. The root element of a.book file (portal:root) can have only one direct child element; the child element can have multiple children.
The following sections describe creating books and pages:
Section 6.2.1, "Create a Tab That Does Not Contain a Subtab"
Section 6.2.2, "Create a Tab That Contains Subtabs"
Section 6.2.3, "Create a Subtab"
Section 6.2.4, "Create a Control Without Tabs or Subtabs"
6.2.1 Create a Tab That Does Not Contain a SubtabTo create a portal book (.book) XML file that defines a tab and no subtabs (such as Domains: Notes):
1. Copy the code from Example 6–6 and paste it into a new text file.
For example, root-dir/controls/MyApp.book
where root-dir is your development directory. For more information, see Chapter 3, "Setting Up a Development Environment."
2. Replace the values in Example 6–6 as follows:
Page-Label. Provide a unique identifier that the portal framework and WebLogic Server JSP tags use to forward requests to the page.
Page-Title. Provide either the text that users see as the name of the tab or a key in a message bundle that you have created.
If the value that you specify contains a "." (period), the Administration Console assumes that this value is a key and attempts to look up the value from your message bundle. For example, if you specify My.Tab, the Administration Console looks up the value of a property whose key is My.Tab. If it cannot find such a value, it displays null as the tab name. If you specify My Tab as the value, then the Administration Console displays My Tab.

Define UI Controls (Optional)
Adding Portlets and Navigation Controls 6-9
Bundle. Specify the name of a message bundle that you have created. This bundle is used only if the value of the title attribute in the netuix:page element contains a ".". See Section 7.1, "Create and Use a Message Bundle in Your JSPs."
Portlet-Instance-Label. Provide a unique identifier that the portal framework and WebLogic Server JSP tags use to forward requests to the portlet instance.
Portlet-URI. Specify the path and file name of a portlet file that you created (see Section 6.1, "Define a Portlet"). The path must be relative to the root of the portal Web application.
For example:
/portlets/monitorEJB.portlet
Note that Example 6–6 defines a page, not a book, so the Administration Console Look and Feel will render the page as a tab with no subtabs.
Example 6–6 Template .book File that Creates a Tab with No Subtabs
<?xml version="1.0" encoding="UTF-8"?><portal:root xmlns:netuix="http://www.bea.com/servers/netuix/xsd/controls/netuix/1.0.0" xmlns:html="http://www.w3.org/1999/xhtml-netuix-modified/1.0.0" xmlns:xsi="http://www.w3.org/2001/XMLSchema-instance" xmlns:portal="http://www.bea.com/servers/netuix/xsd/portal/support/1.0.0" xsi:schemaLocation="http://www.bea.com/servers/netuix/xsd/portal/support /1.0.0 portal-support-1_0_0.xsd"> <netuix:page markupName="page" markupType="Page" definitionLabel="Page-Label" title="Page-Title" skeletonUri="/framework/skeletons/default/wlsworkspace/ page_content.jsp"> <netuix:meta name="skeleton-resource-bundle" content="Bundle"/> <netuix:content> <netuix:gridLayout columns="1" markupType="Layout" markupName="singleColumnLayout"> <netuix:placeholder flow="vertical" markupType="Placeholder" markupName="singleColumn_columnOne"> <netuix:portletInstance markupType="Portlet" instanceLabel="Portlet-Instance-Label" contentUri="Portlet-URI"/> </netuix:placeholder> </netuix:gridLayout> </netuix:content> </netuix:page></portal:root>
6.2.2 Create a Tab That Contains SubtabsTo create a portal book (.book) XML file that defines a tab and one or more subtabs:
1. Copy the code from Example 6–7 and paste it into a new text file. Save the file in a directory below root-dir.
For example, root-dir/controls//MyApp.book
where root-dir is your development directory. For more information, see Chapter 3, "Setting Up a Development Environment."

Define UI Controls (Optional)
6-10 Oracle Fusion Middleware Extending the Administration Console for Oracle WebLogic Server
2. To define the tab, replace the values in Example 6–7 as follows:
Book-Label. Provide a unique identifier that the portal framework and WebLogic Server JSP tags use to forward requests to the book. This is the same type of label that WebLogic Server provides for many of its UI controls. See Section 2.2, "Extension Points in the Administration Console."
Book-Title. Provide either the text that users see as the name of the tab or a key in a message bundle that you have created.
If the value that you specify contains a "." (period), the Administration Console assumes that this value is a key and attempts to look up the value from your message bundle. For example, if you specify My.Tab, the Administration Console looks up the value of a property whose key is My.Tab. If it cannot find such a value, it displays null as the tab name. If you specify My Tab as the value, then the Administration Console displays My Tab.
Bundle. Specify the name of a message bundle that you have created. This bundle is used only if the value of the title attribute in the netuix:book element contains a ".". See Section 7.1, "Create and Use a Message Bundle in Your JSPs."
3. To define the first subtab, replace the values in Example 6–7 as follows:
Page-Label. Provide a unique identifier that the portal framework and WebLogic Server JSP tags use to forward requests to the page.
Page-Title. Provide either the text that users see as the name of the subtab or a key in a message bundle that you have created.
If the value that you specify contains a "." (period), the Administration Console assumes that this value is a key and attempts to look up the value from your message bundle.
(optional) Metadata-Type and Metadata-ID. If you want to use the Administration Console's <wl:column-dispatch> JSP tag to create a hypertext link that forwards to this page, include a <netuix:meta> element and supply values for Metadata-Type and Metadata-ID. See Section 7.4.4, "Create a Table Column for Navigating to Other Pages."
Portlet-Instance-Label. Provide a unique identifier that the portal framework and WebLogic Server JSP tags use to forward requests to the portlet instance.
Portlet-URI. Specify the path and file name of a portlet file that you created (see Section 6.1, "Define a Portlet"). The path must be relative to the root of the portal Web application.
For example:
/portlets/monitorEJB.portlet
4. To create additional subtabs, add netuix:page elements as siblings to the netuix:page element in Example 6–7.
For more information about portal book XML files, see the Portal Support Schema Reference.
Note the use of the following elements in the .book file:
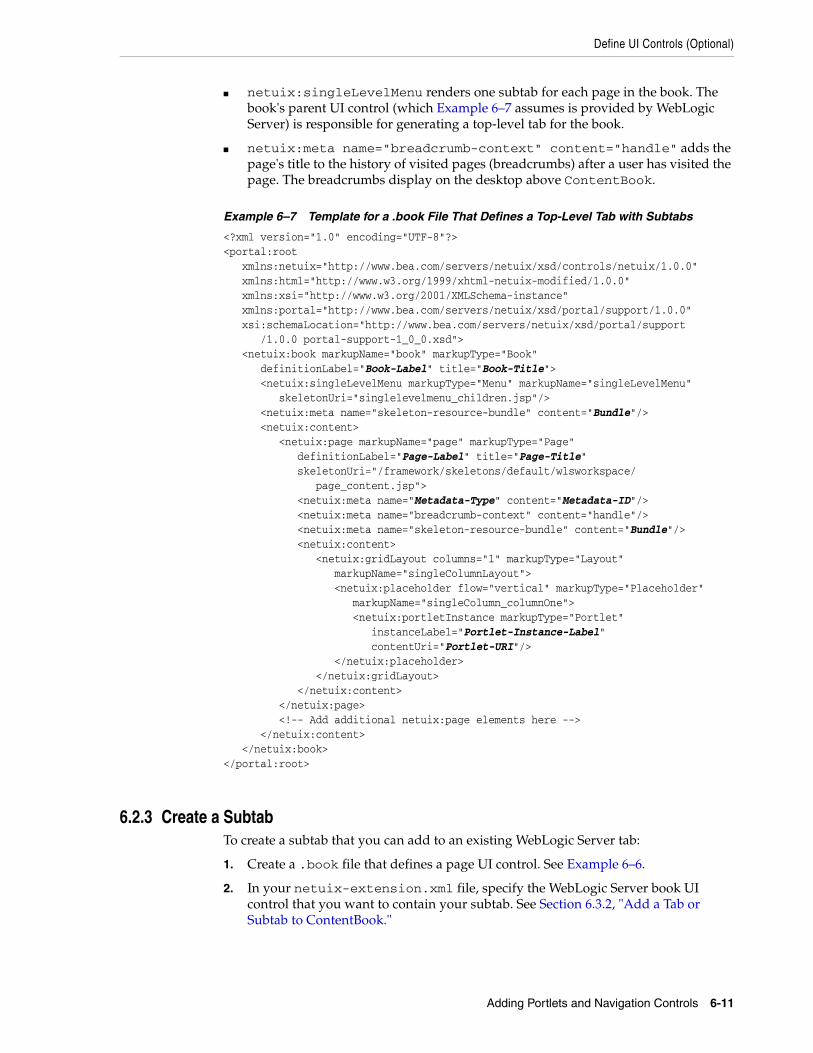
Define UI Controls (Optional)
Adding Portlets and Navigation Controls 6-11
netuix:singleLevelMenu renders one subtab for each page in the book. The book's parent UI control (which Example 6–7 assumes is provided by WebLogic Server) is responsible for generating a top-level tab for the book.
netuix:meta name="breadcrumb-context" content="handle" adds the page's title to the history of visited pages (breadcrumbs) after a user has visited the page. The breadcrumbs display on the desktop above ContentBook.
Example 6–7 Template for a .book File That Defines a Top-Level Tab with Subtabs
<?xml version="1.0" encoding="UTF-8"?><portal:root xmlns:netuix="http://www.bea.com/servers/netuix/xsd/controls/netuix/1.0.0" xmlns:html="http://www.w3.org/1999/xhtml-netuix-modified/1.0.0" xmlns:xsi="http://www.w3.org/2001/XMLSchema-instance" xmlns:portal="http://www.bea.com/servers/netuix/xsd/portal/support/1.0.0" xsi:schemaLocation="http://www.bea.com/servers/netuix/xsd/portal/support /1.0.0 portal-support-1_0_0.xsd"> <netuix:book markupName="book" markupType="Book" definitionLabel="Book-Label" title="Book-Title"> <netuix:singleLevelMenu markupType="Menu" markupName="singleLevelMenu" skeletonUri="singlelevelmenu_children.jsp"/> <netuix:meta name="skeleton-resource-bundle" content="Bundle"/> <netuix:content> <netuix:page markupName="page" markupType="Page" definitionLabel="Page-Label" title="Page-Title" skeletonUri="/framework/skeletons/default/wlsworkspace/ page_content.jsp"> <netuix:meta name="Metadata-Type" content="Metadata-ID"/> <netuix:meta name="breadcrumb-context" content="handle"/> <netuix:meta name="skeleton-resource-bundle" content="Bundle"/> <netuix:content> <netuix:gridLayout columns="1" markupType="Layout" markupName="singleColumnLayout"> <netuix:placeholder flow="vertical" markupType="Placeholder" markupName="singleColumn_columnOne"> <netuix:portletInstance markupType="Portlet" instanceLabel="Portlet-Instance-Label" contentUri="Portlet-URI"/> </netuix:placeholder> </netuix:gridLayout> </netuix:content> </netuix:page> <!-- Add additional netuix:page elements here --> </netuix:content> </netuix:book></portal:root>
6.2.3 Create a SubtabTo create a subtab that you can add to an existing WebLogic Server tab:
1. Create a .book file that defines a page UI control. See Example 6–6.
2. In your netuix-extension.xml file, specify the WebLogic Server book UI control that you want to contain your subtab. See Section 6.3.2, "Add a Tab or Subtab to ContentBook."

Specify a Location for Displaying Portlets or UI Controls
6-12 Oracle Fusion Middleware Extending the Administration Console for Oracle WebLogic Server
6.2.4 Create a Control Without Tabs or SubtabsThere is no requirement for books and pages in ContentBook to be accessible by tab or subtab. Many WebLogic Server pages that display summary tables are accessible from the NavTreePortlet but not from the tabbed interface (see Figure 2–5).
Any of the code listings in the previous sections can be located in a parent control that does not render tabs or subtabs for its children. See Section 6.3, "Specify a Location for Displaying Portlets or UI Controls."
6.3 Specify a Location for Displaying Portlets or UI ControlsAll locations for displaying your portlets or UI controls must be specified as relative to existing controls in the Administration Console. For example, you can specify that your portlet displays on the desktop below the System Status portlet.
To specify a location for displaying a portlet or UI control:
1. Create an XML file named netuix-extension.xml and save it in
2. root-dir/WEB-INF
3. where root-dir is your development directory. For more information, see Chapter 3, "Setting Up a Development Environment."
A NetUI Extension XML file (netuix-extension.xml) is the deployment descriptor for your extension. It declares each parent UI control in your extension and the location in which you want it to display (see Example 6–8). For more information, see the NetUI Extensions Schema Reference.
4. Create a <weblogic-portal-extension> root element.
5. (Optional) Create a <provider-info> element to describe your extension.
This element is for your information only. The portal framework does not use the data in this element.
6. Add the following element:
7. <portal-file>/console.portal</portal-file>
This required element specifies the name and relative location of the Administration Console's .portal file, which is the portal that you are extending.
8. Do one of the following:
Section 6.3.1, "Add a Portlet to the Desktop"
Section 6.3.2, "Add a Tab or Subtab to ContentBook"
6.3.1 Add a Portlet to the DesktopTo add a portlet to the Administration Console desktop, create the following stanza in your netuix-extension.xml file (see Example 6–8):
<page-extension> <page-location> <parent-label-location label="page"/> <page-insertion-point layout-location="layout" placeholder-position="0"/> </page-location> <portlet-content content-uri="portlet-URI" title="title" orientation="top" default-minimized="false"
Specify a Location for Displaying Portlets or UI Controls
Adding Portlets and Navigation Controls 6-13
instance-label="portlet-instance-label"/></page-extension>
where:
layout is one of the following values:
– 0 (zero) if you want the portlet to display in the left side of the Administration Console.
Extension portlets always display at the top of the left column.
– 1 (one) if you want the portlet to display in the right side.
Extension portlets always display at the bottom of the right column.
portlet-URI is the path and file name of your .portlet file. The path must be relative to the root of the portal Web application.
title is the title that displays in the portlet's title bar. If you specify a null value, the portal framework uses the title that you defined in the .portlet file.
portlet-instance-label is a unique identifier that the portal framework and WebLogic Server JSP tags use to forward requests to the portlet instance.
6.3.2 Add a Tab or Subtab to ContentBookTo add a control that renders a tab, create the following stanza in your netuix-extension.xml file (see Example 6–8):
<book-extension> <book-location> <parent-label-location label="Admin-Console-Book-Label"/> <book-insertion-point action="append"/> </book-location> <book-content content-uri="book-URI"/></book-extension>
where:
Admin-Console-Book-Label is the definitionLabel of an Administration Console book control that renders tabs for its child books.
book-URI is the path and file name of your .book file that defines the book control for your tab (and optional subtabs). The path must be relative to the root of the portal Web application.
To add a control that renders a subtab in an existing tab, create the same stanza as the previous step, where:
Admin-Console-Book-Label is the definitionLabel of an Administration Console book control that renders subtabs for its child pages.
book-URI is the path and file name of your .book file that defines the page control for your subtab. The path must be relative to the root of the portal Web application.
6.3.3 Example: Specifying Locations for Portlets and UI ControlsExample 6–8 is a netuix-extension.xml file that adds a tab to the WebLogic Sever Domain tabs, a subtab to the Domain: Configuration tab, and a portlet to the console desktop.

Add Nodes to the NavTreePortlet (Optional)
6-14 Oracle Fusion Middleware Extending the Administration Console for Oracle WebLogic Server
Example 6–8 Example netuix-extension.xml File
<?xml version="1.0" encoding="UTF-8"?><weblogic-portal-extension xmlns="http://www.bea.com/servers/portal/weblogic-portal/8.0" xmlns:xsi="http://www.w3.org/2001/XMLSchema-instance" xsi:schemaLocation="http://www.bea.com/servers/portal/weblogic-portal/ 8.0 netuix-extension-1_0_0.xsd"> <provider-info> <title>My Extension</title> <version>1.0</version> <description>Inserts a portlet on the desktop, a tab next to Domains:Configuration, and a subtab under Domains: Configuration. </description> <author>Me</author> <last-modified>02/03/2005</last-modified> <support-url>http://www.mycompany/support/index.jsp</support-url> </provider-info> <portal-file>/console.portal</portal-file> <!--Adds a tab to the Domain tabs --> <book-extension> <book-location> <parent-label-location label="CoreDomainConfigGeneralBook"/> <book-insertion-point action="append"/> </book-location> <book-content content-uri="/controls/page.book"/> </book-extension><!-- Adds a subtab to the Domain: Configuration tab--> <book-extension> <book-location> <parent-label-location label="DomainconfigTabPage"/> <book-insertion-point action="append"/> </book-location> <page-content content-uri="/controls/notespage.book"/> </book-extension> <!--Adds a portlet to the console desktop --> <page-extension> <page-location> <parent-label-location label="page"/> <page-insertion-point layout-location="0" placeholder-position="0"/> </page-location> <portlet-content content-uri="/portlets/desktop/desktop_view.portlet" title="My App Status" orientation="top" default-minimized="false" instance-label="PortletExtensionInstanceLabel" /> </page-extension></weblogic-portal-extension>
6.4 Add Nodes to the NavTreePortlet (Optional)The Domain Structure portlet (NavTreePortlet) contains a tree control that you can use to navigate to content in the Administration Console. Each node in the tree is a link to a UI page control. Nodes can also contain subnodes.
Your extension can add a single node at any location in the tree. It can also add a node that contains other nodes (node tree) at any location. For example, your extension can add a node or a node tree to the root of the existing navigation tree. In addition (or instead), it can add a node or node tree to the Environments node. (See Figure 6–2.)

Add Nodes to the NavTreePortlet (Optional)
Adding Portlets and Navigation Controls 6-15
Figure 6–2 Example: Adding Nodes or Node Trees
The following sections describe adding nodes to the NavTreePortlet:
Section 6.4.1, "Append a Single Node to the Root of the Existing Tree"
Section 6.4.2, "Append or Insert Nodes or Node Trees"
6.4.1 Append a Single Node to the Root of the Existing TreeTo append a node that links to one of your page controls, add the following attribute and attribute value to the netuix:page element in the control's .book file:
backingFile="com.bea.console.utils.NavTreeExtensionBacking"
For example, if you want to add a link to a page that you have created, in the .book file that defines your page, add the backingFile attribute:
<netuix:page definitionLabel="MyAppTableBook" title="My Page" markupName="page" markupType="Page" backingFile="com.bea.console.utils.NavTreeExtensionBacking">
The NavTreePortlet displays the value of the page element's title attribute as the link text. See Figure 6–3.
If the title attribute value is a key in your message bundle, the NavTreePortlet displays the localized value mapped to the key. Specify a message bundle name by adding metadata to the page configuration. Add a <netuix:meta> element as a child to <netuix:page>, for example:
<netuix:page definitionLabel="MyAppTableBook" title="My Page"> <netuix:meta name="skeleton-resource-bundle" content="3rdbundlename" />...</netuix:page>
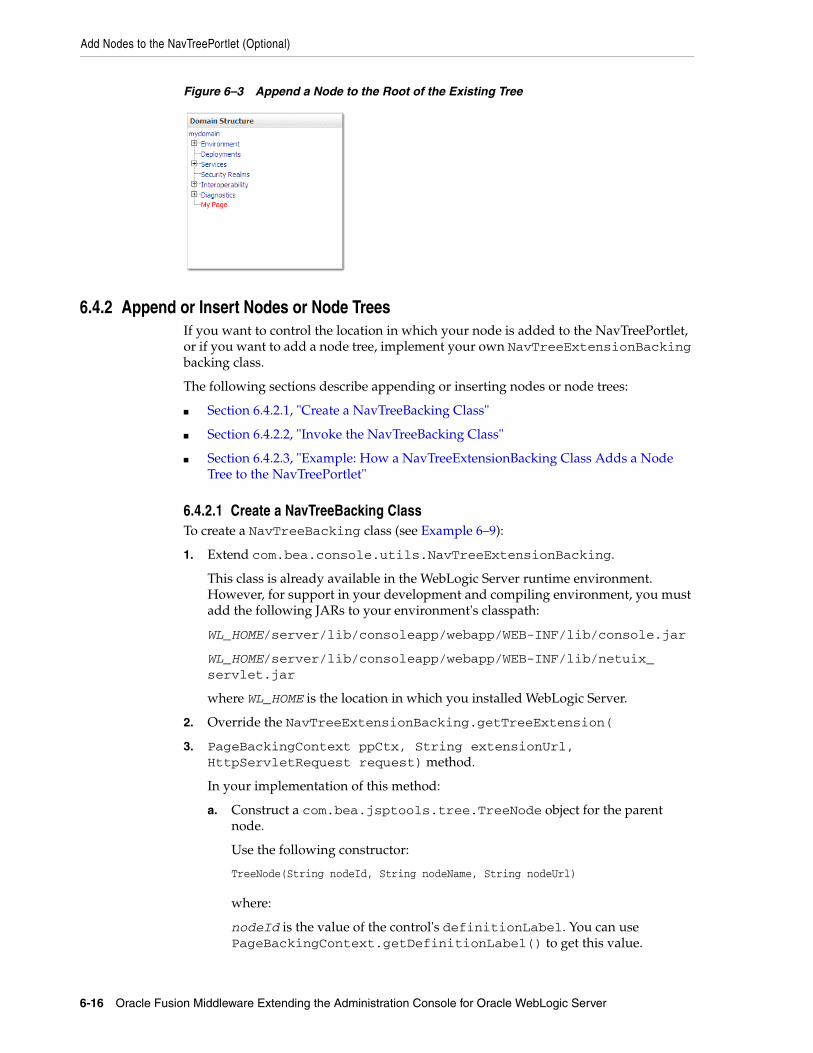
Add Nodes to the NavTreePortlet (Optional)
6-16 Oracle Fusion Middleware Extending the Administration Console for Oracle WebLogic Server
Figure 6–3 Append a Node to the Root of the Existing Tree
6.4.2 Append or Insert Nodes or Node TreesIf you want to control the location in which your node is added to the NavTreePortlet, or if you want to add a node tree, implement your own NavTreeExtensionBacking backing class.
The following sections describe appending or inserting nodes or node trees:
Section 6.4.2.1, "Create a NavTreeBacking Class"
Section 6.4.2.2, "Invoke the NavTreeBacking Class"
Section 6.4.2.3, "Example: How a NavTreeExtensionBacking Class Adds a Node Tree to the NavTreePortlet"
6.4.2.1 Create a NavTreeBacking ClassTo create a NavTreeBacking class (see Example 6–9):
1. Extend com.bea.console.utils.NavTreeExtensionBacking.
This class is already available in the WebLogic Server runtime environment. However, for support in your development and compiling environment, you must add the following JARs to your environment's classpath:
WL_HOME/server/lib/consoleapp/webapp/WEB-INF/lib/console.jar
WL_HOME/server/lib/consoleapp/webapp/WEB-INF/lib/netuix_servlet.jar
where WL_HOME is the location in which you installed WebLogic Server.
2. Override the NavTreeExtensionBacking.getTreeExtension(
3. PageBackingContext ppCtx, String extensionUrl, HttpServletRequest request) method.
In your implementation of this method:
a. Construct a com.bea.jsptools.tree.TreeNode object for the parent node.
Use the following constructor:
TreeNode(String nodeId, String nodeName, String nodeUrl)
where:
nodeId is the value of the control's definitionLabel. You can use PageBackingContext.getDefinitionLabel() to get this value.

Add Nodes to the NavTreePortlet (Optional)
Adding Portlets and Navigation Controls 6-17
Alternatively, you can enter the definitionLabel value that is in the control's .book file.
nodeName is the text that you want to display in the NavTreePortlet. You can create a String object that contains the text or use PageBackingContext.getTitle() to get this value from the page's .book file.
nodeURL is a URL to the control. Supply extensionUrl as the value of this parameter.
b. If you want to add a tree of nodes, construct additional TreeNode objects as children of the parent TreeNode.
For each child node, use the following constructor:
TreeNode(String nodeId, String nodeName, String nodeUrl, TreeNode parent)
where:
nodeId is the value of the control's definitionLabel. You can not use PageBackingContext.getDefinitionLabel() to get this value because the PageBackingContext available to this method is for the parent node. Instead, you must enter the definitionLabel value that is in the control's .book file.
nodeName is the text that you want to display in the NavTreePortlet.
nodeURL is a URL to the control. Supply the following value:
/console/console.portal?_nfpb=true&_pageLabel=definitionLabel
where definitionLabel is the definitionLabel of the page to which you want to link.
parent is any TreeNode that you have constructed. You can create multiple levels in your node tree by specifying a parent that is a child of node higher up in the hierarchy.
c. Pass the parent TreeNode object to the constructor for com.bea.console.utils.NavTreeExtensionEvent.
Use the following constructor:
NavTreeExtensionEvent(String pageLabel, String url, String parentPath, TreeNode node, int ACTION)
where:
pageLabel is the same nodeID value that you used when constructing the TreeNode object for the parent node.
url is the same nodeURL value that you used when constructing the TreeNode object for the parent node.
parentPath is the name of the node under which you want your node to display. Use / (slash) to represent the root of the navigation tree in the NavTreePortlet.
For example, if you want your node or node tree to display at the top level, specify /. If you want your node to display as a child of Environments, specify /Environments.
node is the parent TreeNode that you created in step a.

Add Nodes to the NavTreePortlet (Optional)
6-18 Oracle Fusion Middleware Extending the Administration Console for Oracle WebLogic Server
ACTION is NavTreeExtensionEvent.APPEND_ACTION. For information about other possible actions, see NavTreeExtensionEvent in the WebLogic Server Administration Console API Reference.
d. Return the NavTreeExtensionEvent object that you constructed.
4. Save the compiled class in a package structure under your extension's WEB-INF/classes directory.
Example 6–9 Example NavTreeExtensionBacking Class
package com.mycompany.consoleext;import com.bea.netuix.servlets.controls.page.PageBackingContext;import com.bea.jsptools.tree.TreeNode;import com.bea.console.utils.NavTreeExtensionBacking;import com.bea.console.utils.NavTreeExtensionEvent;public class CustomNavTreeExtension extends NavTreeExtensionBacking public NavTreeExtensionEvent getTreeExtension(PageBackingContext ppCtx, String extensionUrl) /* * Construct a TreeNode for the control that has invoked this method. */ TreeNode node = new TreeNode(ppCtx.getDefinitionLabel(), ppCtx.getTitle(),extensionUrl); /* * Construct a child TreeNode. */ TreeNode node1 = new TreeNode("MyAppGeneralTabPage", "MyApp General", "/console/console.portal?_nfpb=true&_pageLabel=MyAppGeneralTabPage", node); /* * Add the parent node (which includes its child) below the * Environment node in the NavTreePortlet. */ NavTreeExtensionEvent evt = new NavTreeExtensionEvent(ppCtx.getDefinitionLabel(),extensionUrl, "/Environment",node); return evt;
6.4.2.2 Invoke the NavTreeBacking ClassTo invoke the NavTreeBacking class and start the process described in Section 6.4.2.3, "Example: How a NavTreeExtensionBacking Class Adds a Node Tree to the NavTreePortlet":
1. Determine which UI page control you want to add as the parent node.
Only page controls can be added as nodes to the NavTreePortlet.
2. Add the following attribute and attribute value to the control's netuix:page element in the control's .book file:
backingFile="your-NavTreeBacking-class"
where your-NavTreeBacking-class is the fully-qualified name of the class you created in step 1.
Add Nodes to the NavTreePortlet (Optional)
Adding Portlets and Navigation Controls 6-19
6.4.2.3 Example: How a NavTreeExtensionBacking Class Adds a Node Tree to the NavTreePortletThe following example describes how a NavTreeExtensionBacking class adds the node tree illustrated in Figure 6–4:
1. As the portal framework loads your extension, it parses your extension's .book files and finds a netuix:page element.
For example:
<netuix:page definitionLabel="MyAppTablePage" title="My App" markupName="page" markupType="Page" backingFile="com.mycompany.utils.MyNavTreeExtension">
2. The portal framework instantiates a com.bea.netuix.servlets.controls.page.PageBackingContext object, which is an in-memory representation of the page UI control. The object contains properties that describe the page control's title and definitionLabel among other data.
3. When the portal framework encounters the backingFile attribute in the netuix:page element, it initializes the specified class (MyNavTreeExtension) and passes your page's PageBackingContext object to the class constructor. It also passes a String object that contains the page control's URI.
4. The MyNavTreeExtension class does the following:
a. It retrieves the title and definitionLabel values from the PageBackingContext object.
b. It constructs a com.bea.jsptools.tree.TreeNode object and passes the title and definitionLabel values along with the page control's URI to the constructor.
c. It constructs two additional TreeNode objects for two pages whose titles are "Monitor EJBs" and "Log Messages."
Because there is no way to retrieve the PageBackingContext objects or the URIs for these two pages, the values must be hard-coded in the MyNavTreeExtension class.
To make the pages into child nodes of the "My App" page node, the MyNavTreeExtension class uses a form of the TreeNode constructor that accepts the name of a parent node. For example:
TreeNode childnode1 = new TreeNode("MyAppMonitorEJB", "Monitor EJBs", "/console/console.portal?_nfpb=true&_pageLabel=MyAppMonitorEJB", node);
d. It constructs and returns a com.bea.console.utils.NavTreeExtensionEvent object.
The NavTreeExtensionEvent object describes the TreeNode objects that you constructed and indicates the location in the existing navigation tree at which you want to append your node tree.
5. The NavTreePortlet listens for NavTreeExtensionEvent objects. As the portlet initializes its tree, it appends nodes as specified by any NavTreeExtensionEvent objects that are broadcast.

Navigating to a Custom Security Provider Page
6-20 Oracle Fusion Middleware Extending the Administration Console for Oracle WebLogic Server
Figure 6–4 Example: Adding a Node Tree to the NavTreePortlet
6.5 Navigating to a Custom Security Provider PageIf you created a custom security provider and used WebLogic MBeanMaker to create MBeans to manage your provider, the Administration Console automatically generates pages to display the provider's configuration data. It also generates a link to your provider pages from the Security: Providers table.
However, you can create your own pages to customize this display. If you create your own pages, you need to redirect the link in the Security: Providers table from the pages that the Administration Console generates to your custom pages.
To redirect the link, include the following element as a child of your page's <netuix:page> element:
<netuix:meta type="configuration" content="MBean-class-name"/>
where MBean-class-name is the fully qualified name of your provider's MBean class.
For example:
<netuix:page markupName="page" markupType="Page" definitionLabel="SimpleSampleAuthorizerAuthorizerConfigCommonTabPage" title="tab.common.label" skeletonUri="/framework/skeletons/default/wlsworkspace /page_content.jsp"> <netuix:meta name="configuration" content="examples.security.providers.authorization.simple. SimpleSampleAuthorizerMBean"/> <netuix:content>...

7
Using Oracle Templates and JSP Tags 7-1
7Using Oracle Templates and JSP Tags
This section describes how to add a portlet that uses the Administration Console's JSP templates, styles, and user input controls. For example, you can add portlets that render your content as one of the following:
A table in the ContentBook that summarizes the resources you have provided and that enables users to navigate to a specific resource or to invoke actions on the resource from the table. (See Figure 2–5 for an example of a WebLogic Server table.)
A form in the ContentBook that enables users to monitor or configure resources that you have provided.
Figure 7–1 illustrates the process. The steps in the process, and the results of each are described in Table 7–1. Subsequent sections detail each step in the process.
Figure 7–1 Administration Console Extension Development Overview
Table 7–1 Model MBean Development Tasks and Results
Step Description Result
1. Section 7.1, "Create and Use a Message Bundle in Your JSPs."
Create a text file that contains a name/value pair for each text string that you want to display in your extension.
One or more.properties files.

Create and Use a Message Bundle in Your JSPs
7-2 Oracle Fusion Middleware Extending the Administration Console for Oracle WebLogic Server
7.1 Create and Use a Message Bundle in Your JSPsOracle recommends that you define all of the text strings that your JSPs display in a message bundle. For information about creating a message bundle, see Chapter 4, "Creating a Message Bundle."
To use the bundle in your JSPs:
1. Import the JSTL fmt.tld tag library:
<%@ taglib uri="http://java.sun.com/jsp/jstl/fmt" prefix="fmt" %>
2. Declare the name of your bundle:
<fmt:setBundle basename="bundle" var="current_bundle" scope="page"/>
where bundle is the name of your bundle.
3. When you want the JSP to output a string, use the following JSP tag:
<fmt:message key="property-name" bundle="$current_bundle"/>
For example:
<fmt:message key="myextension.myTab.introduction" bundle="$current_bundle"/>
2. Section 7.3, "Create Struts Artifacts for Tables and Forms."
The WebLogic Server JSP tags that render forms and tables assume that Apache Struts is the controller agent. The JSP tags use Java beans that are populated by Struts ActionForms (form beans) and submit user input to a Struts Action.
A Struts configuration file, Java beans, and Java classes that implement org.apache.struts.action.ActionForm and org.apache.struts.action.Action.
3. Section 7.4, "Create JSPs that Use Oracle Templates and JSP Tags."
WebLogic Server provides JSP templates that you can import into your JSPs. It also provides a JSP tag library to render the same UI controls that the Administration Console uses.
JSPs that match the Administration Console styles and structure.
5.Section 7.5, "Create Other Portal Framework Files and Deploy the Extension."
Create XML files that define a location for your extension.
A .portlet XML file that defines a portlet and configures it to launch a Struts Action.
A .book XML file that defines a page or book control (optional), a netuix-extension.xml file that describes where to locate your extension.
6. Archive and deploy the extension.
See Chapter 9, "Archiving and Deploying Console Extensions."
A WAR file that contains your extension.
Note: You must precompile JSPs before deploying your extension.
Table 7–1 (Cont.) Model MBean Development Tasks and Results
Step Description Result

Overview of Forms and Tables
Using Oracle Templates and JSP Tags 7-3
7.2 Overview of Forms and TablesWebLogic Server provides a <wl:form> JSP tag that can render a variety of HTML input controls, such as text controls, check boxes, and radio controls. You can configure a form to be read-only or to allow user input. Forms that allow user input must include buttons that enable users to post the form data for processing in the business layer.
WebLogic Server provides a <wl:table> JSP tag that renders data in a tabular format. Each row in the table represents a single entity such as a WebLogic Server instance, an application, or a log message (see Figure 7–2). You can configure table columns to render hypertext links, which enable users to navigate to pages that provide more information about an item in the table. You can also create a table column that contains an HTML check box control. If a user selects a check box for a table row and clicks a submit button, your extension can invoke business logic on behalf of the entire row. For example, you can use a check box to delete an item that a row represents.
Both of these tags use Apache Struts Actions and ActionForms to pass data between the business layer and the presentation layer.
7.2.1 Data Models for Forms and TablesApache Struts supports multiple techniques for instantiating and populating ActionForm beans (form beans). For example, you can code your own concrete Java bean that contains getter and setter methods for each property in the form. Or you can use the Struts DynaActionForm bean, which dynamically configures a Java bean to contain the properties that are declared in the Struts configuration file.
7.2.1.1 Data Model for FormsIf you are using Oracle JSP tags to render a form in the Administration Console, you can use any technique for creating and populating form beans that Struts supports. (The example in Section 2.4, "Example: How Struts Portlets Display Content" uses a DynaActionForm bean instead of coding a custom Java bean.)
Regardless of the technique that you choose, your Java bean must contain the following property:
handle, which can be of type com.bea.console.handles.Handle or a custom Handle class that you create.
The portal framework uses this property to correlate an ActionForm bean with the data source that populates the bean, such as an MBean. See Section 7.2.2, "Handles for ActionForms and Row Beans."
7.2.1.2 Data Model for TablesIf you are using Oracle JSP tags to render a table in the Administration Console, you must create two form beans: one bean that represents the rows in the table (called a row bean) and another bean (called a table bean) that contains the collection of row beans. Each property in the row bean is rendered as a table column. For example, in Figure 7–2, each row bean instance contains a name, state, health, and listenPort property.

Overview of Forms and Tables
7-4 Oracle Fusion Middleware Extending the Administration Console for Oracle WebLogic Server
Figure 7–2 Row Beans and Table Bean
To create a row bean, you must create a concrete Java bean that defines each property. You cannot use the Struts DynaActionForm bean to dynamically contain the properties that are declared in the Struts configuration file.
To create a table bean, you can use any technique for creating and populating form beans that Struts supports. Regardless of the technique that you choose, your table bean must contain the following properties:
content, which must be of type java.util.Collection
This is the property that you must use to contain the row beans.
handle, which can be of type com.bea.console.handles.Handle or a custom Handle class that you create.
While the portal framework requires you to declare this property for form beans and table beans, its usefulness is limited with table beans. Typically, a table bean is simply a collection of row beans; the row beans expose an underlying data source but the table bean does not. Unless you need to keep track of which Action class has populated your table bean, you do not need to set the value of this property of the table bean (but you must declare it). See Section 7.2.2, "Handles for ActionForms and Row Beans."
If you configure your table to include a column of check boxes, which enables you to invoke a Struts Action on the selected table row beans, your table bean must also contain the following property:
chosenContents, which can be an array of any primitive type or an array of com.bea.console.handles.Handle. For information on how to work with check boxes in a table, see Section 7.4.8, "Add Buttons and Check Boxes to Tables."
7.2.2 Handles for ActionForms and Row Beans To uniquely identify an instance of an ActionForm bean or a row bean and to establish a correlation between the bean and its underlying data source, you can create and use a Handle object. A Handle object is a Java object that implements the com.bea.console.handles.Handle interface.
The Apache Struts controller servlet places Handle objects in HttpServletRequest objects, thus making them available to any Struts Action, Beehive Page Flow, or JSP.
The Administration Console uses Handle objects when linking from a row in a table JSP (see Figure 7–2) to the corresponding configuration JSP. For example, for a ServerMBean instance named Server-0, the Administration Console populates row bean with data from the Server-0 MBean. The Administration Console passes the JMX object name for Server-0 to a new a Handle object (of type com.bea.console.handles.JMXHandle) and sets the Handle object as the value of the row bean's handle property (see Figure 7–3). When a user clicks a link in the table JSP, the Struts controller looks in the row bean's handle property, uses the
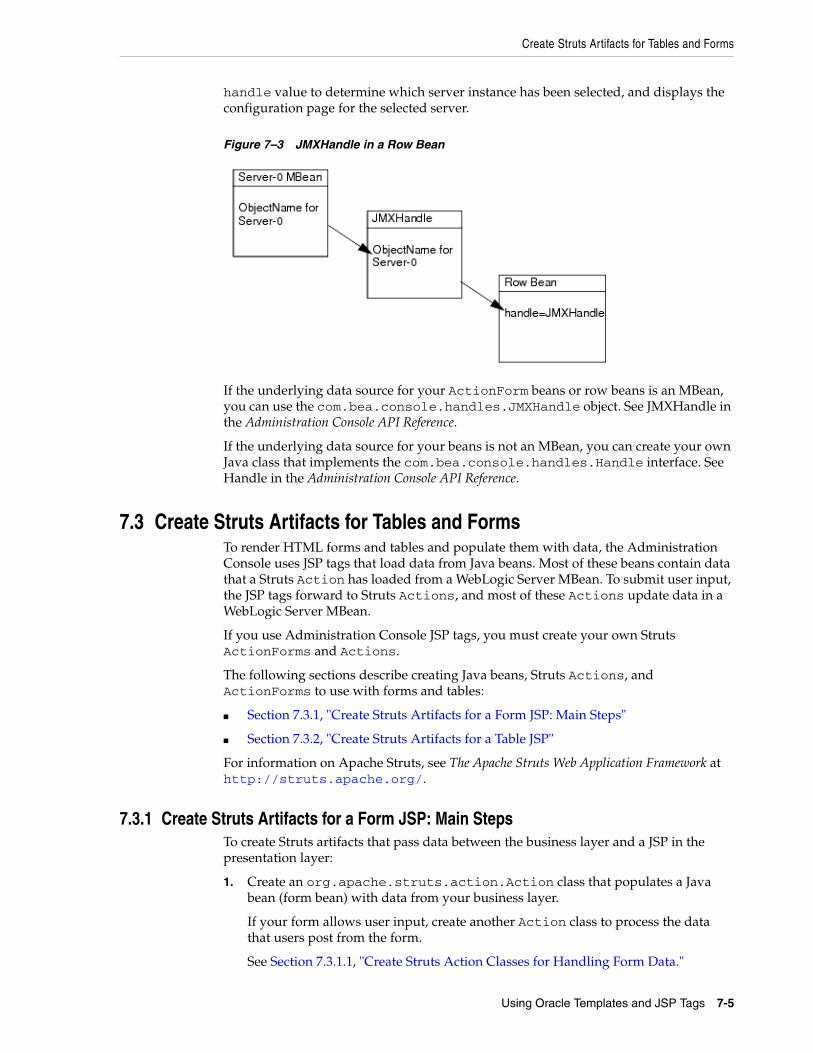
Create Struts Artifacts for Tables and Forms
Using Oracle Templates and JSP Tags 7-5
handle value to determine which server instance has been selected, and displays the configuration page for the selected server.
Figure 7–3 JMXHandle in a Row Bean
If the underlying data source for your ActionForm beans or row beans is an MBean, you can use the com.bea.console.handles.JMXHandle object. See JMXHandle in the Administration Console API Reference.
If the underlying data source for your beans is not an MBean, you can create your own Java class that implements the com.bea.console.handles.Handle interface. See Handle in the Administration Console API Reference.
7.3 Create Struts Artifacts for Tables and FormsTo render HTML forms and tables and populate them with data, the Administration Console uses JSP tags that load data from Java beans. Most of these beans contain data that a Struts Action has loaded from a WebLogic Server MBean. To submit user input, the JSP tags forward to Struts Actions, and most of these Actions update data in a WebLogic Server MBean.
If you use Administration Console JSP tags, you must create your own Struts ActionForms and Actions.
The following sections describe creating Java beans, Struts Actions, and ActionForms to use with forms and tables:
Section 7.3.1, "Create Struts Artifacts for a Form JSP: Main Steps"
Section 7.3.2, "Create Struts Artifacts for a Table JSP"
For information on Apache Struts, see The Apache Struts Web Application Framework at http://struts.apache.org/.
7.3.1 Create Struts Artifacts for a Form JSP: Main StepsTo create Struts artifacts that pass data between the business layer and a JSP in the presentation layer:
1. Create an org.apache.struts.action.Action class that populates a Java bean (form bean) with data from your business layer.
If your form allows user input, create another Action class to process the data that users post from the form.
See Section 7.3.1.1, "Create Struts Action Classes for Handling Form Data."

Create Struts Artifacts for Tables and Forms
7-6 Oracle Fusion Middleware Extending the Administration Console for Oracle WebLogic Server
2. In your Struts configuration file:
a. Declare the name and the properties of the form bean that your Action classes will populate and use.
If your form allows user input, you can use the same form bean to populate the form and to return user input to your Action class that processes data.
b. Create an Action mapping that the Struts controller uses to instantiate your form bean and invoke your Action class that populates the form.
If your form allows user input, create another Action mapping that the Struts controller uses when users submit the form.
See Section 7.3.1.2, "Configure Struts ActionForms and Action Mappings."
7.3.1.1 Create Struts Action Classes for Handling Form DataTo create Struts Action classes that handle form data:
1. Create an org.apache.struts.action.Action class that populates the form bean. (See Example 7–1.)
The Struts controller passes an empty ActionForm bean to your Action class. To populate the bean, implement the following method:
Action.execute(ActionMapping actionMapping, ActionForm actionForm, HttpServletRequest httpServletRequest, HttpServletResponse httpServletResponse)
Your implementation should:
a. Gather data from an underlying source, such as an MBean.
b. Cast the empty ActionForm bean as a DynaActionForm bean.
c. Invoke the DynaActionForm.set() method for each property that you defined in the <form-bean> element, except for the handle property.
For example, if you defined two properties named name and totalRx:
DynaActionForm form = (DynaActionForm) actionForm;form.set("name",namefromMBean);form.set("totalRx",totalRxfromMBean);
d. To establish a correlation between the form bean and its underlying data source, set the value of the handle property. (See Section 7.2.2, "Handles for ActionForms and Row Beans.")
For example, if your underlying data source is an MBean, use JMXHandle and set the handle property to the MBean's ObjectName:
ObjectName anMBean = new ObjectName("com.bea.medrec:Type=com.bea.medrec.controller. RecordSessionEJBMBean,Name=MedRecEAR");form.setHandle(new JMXHandle(anMBean));
e. Put the DynaActionForm bean into the request object that was also passed to the class:
httpServletRequest.setAttribute("form-bean-name", form);

Create Struts Artifacts for Tables and Forms
Using Oracle Templates and JSP Tags 7-7
where form-bean-name matches the name that you configure for the form bean in the Struts configuration file (see Section 7.3.1.2, "Configure Struts ActionForms and Action Mappings").
f. Return "success" in the ActionMapping.findForward() method for the ActionMapping object that was passed to the Action class:
g. return actionMapping.findForward("success");
2. If your form posts data for processing in the business layer, create another Action class that processes the form data.
When a user posts data from the form (by clicking an HTML button), the Struts controller passes a populated ActionForm bean to your Action class. To process the data, implement the following method:
Action.execute(ActionMapping actionMapping, ActionForm actionForm, HttpServletRequest httpServletRequest, HttpServletResponse httpServletResponse)
Your implementation should:
a. Cast the ActionForm bean that was passed in the request as a DynaActionForm bean.
b. Invoke the DynaActionForm.get() method for each property that you want to process.
For example, if you want to process the properties named name, totalRx, and handle:
DynaActionForm form = (DynaActionForm) actionForm;String nameValue = (String) form.get(namefromMBean);Integer totalValue = (Integer) form.get(totalRxfromMBean);JMXHandle handle = (JMXHandle) form.get(handle);
c. Process the data.
For example, if the name and totalRx properties represent attributes in a MBean and you want to change the values of the MBean attributes, use the handle property to get the JMX object name of the MBean instance, and then use JMX APIs to set the MBean attributes to the values that were posted from the form:
ObjectName oName = handle.getObjectName();MBeanServer.setAttribute(oName, new Attribute(("Name", nameValue));MBeanServer.setAttribute(oName, new Attribute(("TotalRx", totalValue));
d. Return "success" in the ActionMapping.findForward() method for the ActionMapping object that was passed to the Action class:
return actionMapping.findForward("success");
3. Compile the Action classes and save them in a package structure that begins in the root-dir/WEB-INF/classes directory.
Example 7–1 is an example org.apache.struts.action.Action class that accesses a custom MBean and uses it to populate a form bean.
Example 7–1 Example: Action Class that Populates a Form Bean
import javax.management.MBeanServer;import javax.management.ObjectName;import javax.management.MalformedObjectNameException;
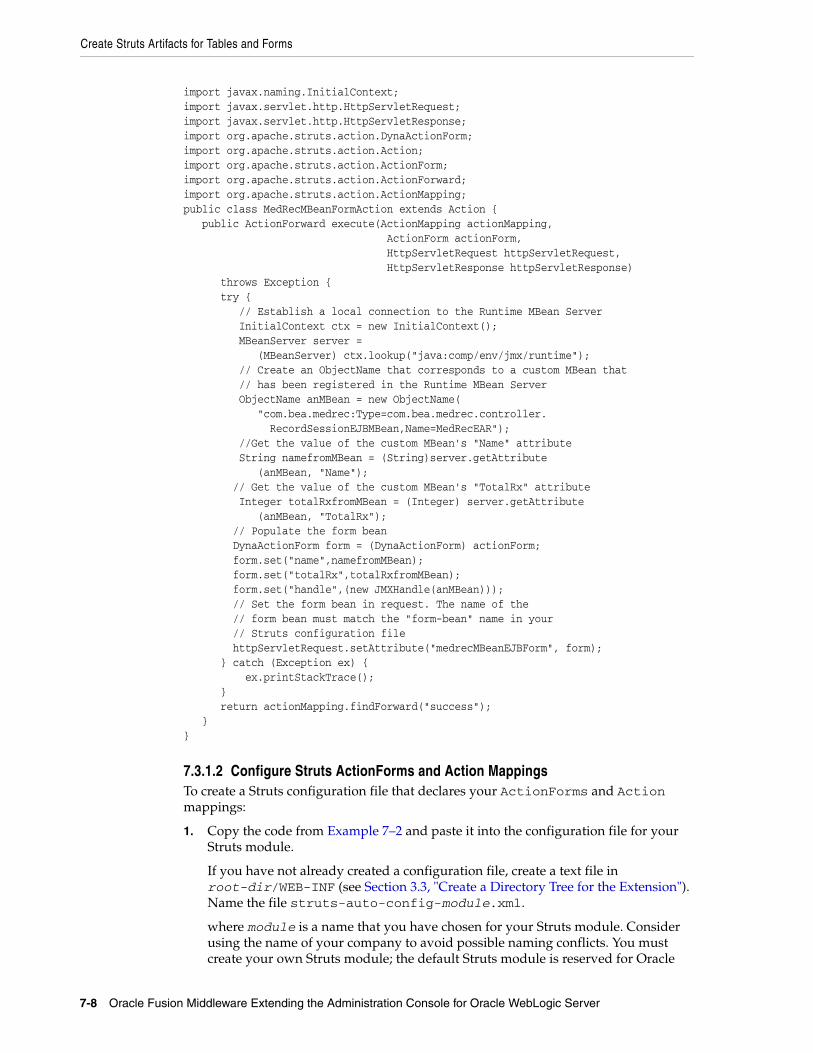
Create Struts Artifacts for Tables and Forms
7-8 Oracle Fusion Middleware Extending the Administration Console for Oracle WebLogic Server
import javax.naming.InitialContext;import javax.servlet.http.HttpServletRequest;import javax.servlet.http.HttpServletResponse;import org.apache.struts.action.DynaActionForm;import org.apache.struts.action.Action;import org.apache.struts.action.ActionForm;import org.apache.struts.action.ActionForward;import org.apache.struts.action.ActionMapping;public class MedRecMBeanFormAction extends Action public ActionForward execute(ActionMapping actionMapping, ActionForm actionForm, HttpServletRequest httpServletRequest, HttpServletResponse httpServletResponse) throws Exception try // Establish a local connection to the Runtime MBean Server InitialContext ctx = new InitialContext(); MBeanServer server = (MBeanServer) ctx.lookup("java:comp/env/jmx/runtime"); // Create an ObjectName that corresponds to a custom MBean that // has been registered in the Runtime MBean Server ObjectName anMBean = new ObjectName( "com.bea.medrec:Type=com.bea.medrec.controller. RecordSessionEJBMBean,Name=MedRecEAR"); //Get the value of the custom MBean's "Name" attribute String namefromMBean = (String)server.getAttribute (anMBean, "Name"); // Get the value of the custom MBean's "TotalRx" attribute Integer totalRxfromMBean = (Integer) server.getAttribute (anMBean, "TotalRx"); // Populate the form bean DynaActionForm form = (DynaActionForm) actionForm; form.set("name",namefromMBean); form.set("totalRx",totalRxfromMBean); form.set("handle",(new JMXHandle(anMBean))); // Set the form bean in request. The name of the // form bean must match the "form-bean" name in your // Struts configuration file httpServletRequest.setAttribute("medrecMBeanEJBForm", form); catch (Exception ex) ex.printStackTrace(); return actionMapping.findForward("success");
7.3.1.2 Configure Struts ActionForms and Action MappingsTo create a Struts configuration file that declares your ActionForms and Action mappings:
1. Copy the code from Example 7–2 and paste it into the configuration file for your Struts module.
If you have not already created a configuration file, create a text file in root-dir/WEB-INF (see Section 3.3, "Create a Directory Tree for the Extension"). Name the file struts-auto-config-module.xml.
where module is a name that you have chosen for your Struts module. Consider using the name of your company to avoid possible naming conflicts. You must create your own Struts module; the default Struts module is reserved for Oracle
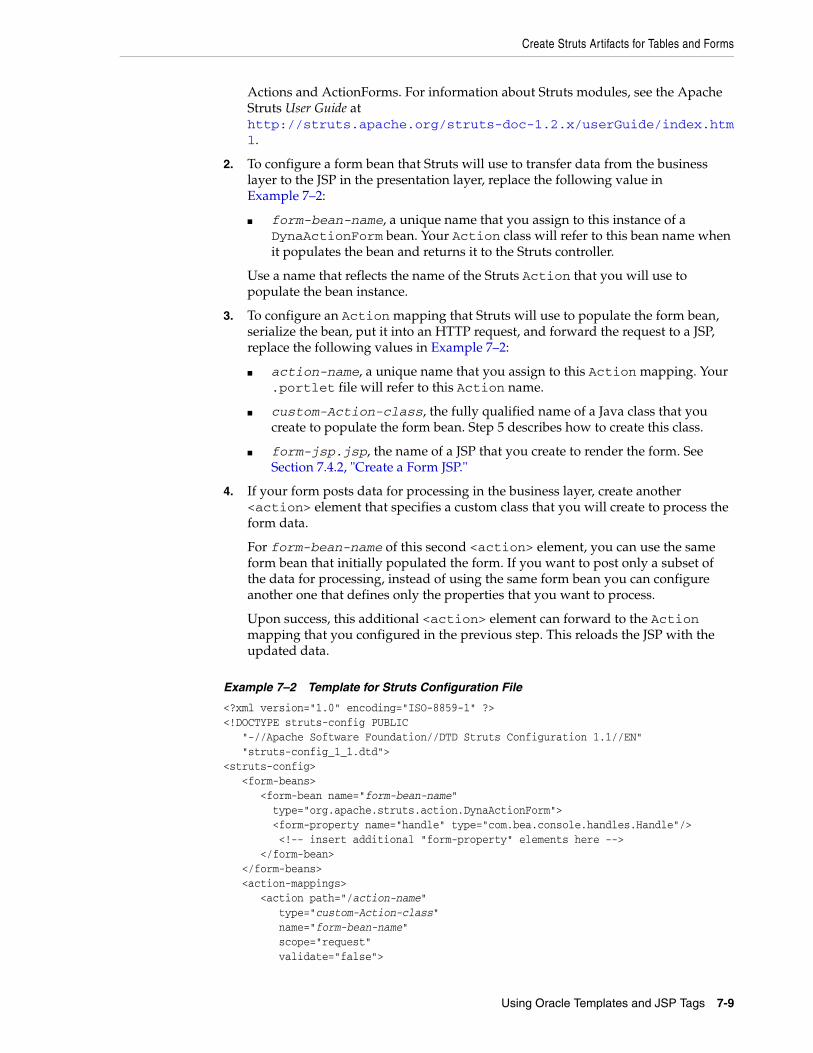
Create Struts Artifacts for Tables and Forms
Using Oracle Templates and JSP Tags 7-9
Actions and ActionForms. For information about Struts modules, see the Apache Struts User Guide at http://struts.apache.org/struts-doc-1.2.x/userGuide/index.html.
2. To configure a form bean that Struts will use to transfer data from the business layer to the JSP in the presentation layer, replace the following value in Example 7–2:
form-bean-name, a unique name that you assign to this instance of a DynaActionForm bean. Your Action class will refer to this bean name when it populates the bean and returns it to the Struts controller.
Use a name that reflects the name of the Struts Action that you will use to populate the bean instance.
3. To configure an Action mapping that Struts will use to populate the form bean, serialize the bean, put it into an HTTP request, and forward the request to a JSP, replace the following values in Example 7–2:
action-name, a unique name that you assign to this Action mapping. Your .portlet file will refer to this Action name.
custom-Action-class, the fully qualified name of a Java class that you create to populate the form bean. Step 5 describes how to create this class.
form-jsp.jsp, the name of a JSP that you create to render the form. See Section 7.4.2, "Create a Form JSP."
4. If your form posts data for processing in the business layer, create another <action> element that specifies a custom class that you will create to process the form data.
For form-bean-name of this second <action> element, you can use the same form bean that initially populated the form. If you want to post only a subset of the data for processing, instead of using the same form bean you can configure another one that defines only the properties that you want to process.
Upon success, this additional <action> element can forward to the Action mapping that you configured in the previous step. This reloads the JSP with the updated data.
Example 7–2 Template for Struts Configuration File
<?xml version="1.0" encoding="ISO-8859-1" ?><!DOCTYPE struts-config PUBLIC "-//Apache Software Foundation//DTD Struts Configuration 1.1//EN" "struts-config_1_1.dtd"><struts-config> <form-beans> <form-bean name="form-bean-name" type="org.apache.struts.action.DynaActionForm"> <form-property name="handle" type="com.bea.console.handles.Handle"/> <!-- insert additional "form-property" elements here --> </form-bean> </form-beans> <action-mappings> <action path="/action-name" type="custom-Action-class" name="form-bean-name" scope="request" validate="false">

Create Struts Artifacts for Tables and Forms
7-10 Oracle Fusion Middleware Extending the Administration Console for Oracle WebLogic Server
<forward name="success" contextRelative="true" path="/ext_jsp/form-jsp.jsp"/> </action> <!-- insert additional "action" elements here --> </action-mappings> <message-resources parameter="global"/> <message-resources parameter="validationmessages" key="VALIDATIONMESSAGES"/> <message-resources parameter="genresources" key="GENRESOURCES"/> <message-resources parameter="global" key="GLOBAL"/></struts-config>
7.3.2 Create Struts Artifacts for a Table JSPTo create a Java row bean, Struts Action, and ActionForm for a JSP that uses the WebLogic Server <wl:table> JSP tag:
1. To configure a bean that will function as the row bean, create a standard Java bean that contains one property for each data item that you want to display in the table.
Compile your Java bean and save it in a package structure that begins in the root-dir/WEB-INF/classes directory.
2. To configure a bean that will function as the table bean:
a. Copy the code from Example 7–2 and paste it into the configuration file for your Struts module.
If you have not already created a configuration file, create a text file in root-dir/WEB-INF (see Section 3.3, "Create a Directory Tree for the Extension"). Name the file struts-auto-config-module.xml
where module is a name that you have chosen for your Struts module. Consider using the name of your company to avoid possible naming conflicts. You must create your own Struts module; the default Struts module is reserved for Oracle Actions and ActionForms. For information about Struts modules, see the Apache Struts User Guide at http://struts.apache.org/userGuide/index.html.
b. Replace the following value in Example 7–2:
form-bean-name, a unique name that you assign to this instance of a DynaActionForm bean. Your Action class will refer to this bean name when it populates the bean and returns it to the Struts controller.
Use a name that reflects the name of the Struts Action that you will use to populate the bean instance.
c. Add the following property:
<form-property name="contents" type="java.util.Collection"/> This property will contain the collection of row beans that your Action class instantiates and populates.
3. To configure an Action mapping that Struts will use to populate the row beans and the table bean, serialize the beans, put them into an HTTP request, and forward the request to a JSP, replace the following values in Example 7–2:
action-name, a unique name that you assign to this Action mapping. Your .portlet file will refer to this Action name.
custom-Action-class, the fully qualified name of a Java class that you create to populate the row beans and table bean. Step 5 describes how to create this class.

Create Struts Artifacts for Tables and Forms
Using Oracle Templates and JSP Tags 7-11
form-jsp.jsp, the name of a JSP that you create to render the table. See Section 7.4.2, "Create a Form JSP."
4. Create an org.apache.struts.action.Action class that populates the row beans and table bean. (See Example 7–3.)
To populate the beans, implement the following method:
Action.execute(ActionMapping actionMapping, ActionForm actionForm, HttpServletRequest httpServletRequest, HttpServletResponse httpServletResponse)
Your implementation should:
a. Gather application data from underlying data sources, such as instances of an MBean.
b. Create instances of your row bean and populate them by invoking their setters for each property in the bean.
c. Assign all of your row bean instances to an ArrayList.
d. Cast the empty ActionForm bean (table bean) as a DynaActionForm bean.
e. Set the table bean's content property to contain the ArrayList of row beans:
DynaActionForm table = (DynaActionForm) actionForm;table.set("contents",rowBeanArray);
f. Put the table bean into the request object that was also passed to the class:
httpServletRequest.setAttribute("table-bean-name", table);
where table-bean-name is the name that you configured for the table bean in the Struts configuration file (see Example 7–2).
g. Return "success" in the ActionMapping.findForward() method for the ActionMapping object that was passed to the Action class:
h. return actionMapping.findForward("success");
5. Compile the Action class and save it in a package structure that begins in the root-dir/WEB-INF/classes directory.
Example 7–3 Example: Action Class that Populates a Row Bean and a Table Bean
import java.util.ArrayList;import java.util.Collection;import java.util.Iterator;import java.util.Set;import javax.management.MBeanServer;import javax.management.ObjectName;import javax.management.MalformedObjectNameException;import javax.naming.InitialContext;import javax.servlet.http.HttpServletRequest;import javax.servlet.http.HttpServletResponse;import org.apache.struts.action.DynaActionForm;import org.apache.struts.action.Action;import org.apache.struts.action.ActionForm;import org.apache.struts.action.ActionForward;import org.apache.struts.action.ActionMapping;public class RetrieveCustomMBeansAction extends Action

Create JSPs that Use Oracle Templates and JSP Tags
7-12 Oracle Fusion Middleware Extending the Administration Console for Oracle WebLogic Server
public ActionForward execute(ActionMapping actionMapping, ActionForm actionForm, HttpServletRequest httpServletRequest, HttpServletResponse httpServletResponse) throws Exception try // Establish a local connection to the Runtime MBean Server InitialContext ctx = new InitialContext(); MBeanServer server = (MBeanServer) ctx.lookup("java:comp/env/jmx/runtime"); // Create a name pattern for all MedRec EJB MBeans ObjectName namepattern = new ObjectName("com.bea.medrec:Type=com.bea.medrec.controller. RecordSessionEJBMBean,*"); // Get all MedRec EJB MBeans for all applications Set objects = server.queryNames(namepattern, null); // Walk through each of these MBeans and get the object name // and the value of its TotalRX attribute Iterator i = objects.iterator(); while (i.hasNext()) ObjectName anMBean = (ObjectName) i.next(); String identifier = anMBean.toString(); Integer totalRxfromMBean = (Integer) server.getAttribute(anMBean, "TotalRx"); // Instantiate a row bean. MedRecMBeanTableBean row = new MedRecMBeanTableBean(anMBean); // Set the properties of the row bean row.setCanonicalName(anMBean.getCanonicalName()); row.setTotalRxinTableBean(totalRxfromMBean); // Add each row bean to an ArrayList result.add(row); catch (Exception ex) ex.printStackTrace(); // Instantiate the table bean DynaActionForm form = (DynaActionForm) actionForm; // Set the array of row beans as the value of the table bean's "contents" // property form.set("contents",result); // Set the table bean in request. The name of the // table bean must match the "form-bean" name in your // Struts configuration file httpServletRequest.setAttribute("genericTableForm", form); return actionMapping.findForward("success");
7.4 Create JSPs that Use Oracle Templates and JSP TagsMost portlets in the Administration Console JSPs that are based on the tableBaseLayout_netui and configBaseLayout_netui templates.
The following sections describe how to create JSPs that use these templates:
Section 7.4.1, "WebLogic Server JSP Templates"
Section 7.4.2, "Create a Form JSP"
Section 7.4.3, "Create a Table JSP for Monitoring"

Create JSPs that Use Oracle Templates and JSP Tags
Using Oracle Templates and JSP Tags 7-13
Section 7.4.4, "Create a Table Column for Navigating to Other Pages"
Section 7.4.8, "Add Buttons and Check Boxes to Tables"
Section 7.4.9, "Configure Table Preferences"
7.4.1 WebLogic Server JSP TemplatesTable 7–2 describes the JSP templates that you can use for your Administration Console extensions. All of the templates are located in the /layouts directory, which is relative to the WEB-INF directory of the Administration Console. For more specific information about what a template does, open the JSP file and read the comment toward the beginning of the file.
If these templates do not meet your needs, you can create your own templates and structure the content directly in your JSP.
Table 7–2 Administration Console JSP Templates
Template Use for...
assistantBaseLayout_netui.jsp All standard assistant JSPs in the console.
assistantFormAndTableLayout_netui.jsp
All standard assistant JSPs in the console containing a table.
configBaseLayout_netui.jsp All standard configuration form JPSs in the console.
configBaseLayoutNoTransact.jsp All non-transaction configuration form JSPs in the console
configBaseLayoutWithButtons_netui.jsp
All standard configuration form JPs in the console with extra buttons in the button bar.
configIntroLayout_netui.jsp Simple pages with text only.
configNoFieldsLayout_netui.jsp All information pages.
configNoTransactAndTables_netui.jsp
Pages that contain non-transactional configuration and up to four tables.
filterAndTableLayout_netui.jsp All pages that have a table with filters above it.
formAndTableLayout_netui.jsp Configuration form JSPs that also contain a table.
formWithButtonsLayout_netui.jsp Form pages with a button bar; but they do not participate in Configuration Manager locking.
fourTablesLayout_netui.jsp All table pages with four tables.
standalone_layout.jsp Standalone pages, that is, pages outside the console Portal.
summarypage.jsp All summary pages.
tableBaseLayout_netui.jsp The Administration Console uses this template for all JSPs that render a single table.
tableBaseMonitoringLayout.jsp All single table pages that include table refresh functionality.
tablePreferencesLayout.jsp Deprecated.
threeTablesLayout_netui.jsp All table pages with three tables.
twoTablesLayout_netui.jsp All table pages with two tables.
twoTablesWithButtonsLayout.jsp Pages with two tables and a button bar.

Create JSPs that Use Oracle Templates and JSP Tags
7-14 Oracle Fusion Middleware Extending the Administration Console for Oracle WebLogic Server
7.4.2 Create a Form JSPBefore you create a form JSP, create Struts artifacts that pass data between the business layer and the JSP. See Section 7.3.1, "Create Struts Artifacts for a Form JSP: Main Steps."
To create a form JSP (see Example 7–4):
1. Create a JSP and save it in your development directory. Consider creating a subdirectory to contain all of the JSPs in your extension. For example, root-dir/jsp, where root-dir is your development directory. For more information, see Chapter 3, "Setting Up a Development Environment."
2. Import JSP tag libraries by including the following tags:
<%@ taglib uri="/WEB-INF/console-html.tld" prefix="wl-extension" %>
<%@ taglib uri="http://struts.apache.org/tags-html" prefix="html" %>
<%@ taglib uri="http://java.sun.com/jsp/jstl/fmt" prefix="fmt" %>
<%@ taglib uri="http://beehive.apache.org/netui/tags-template-1.0" prefix="beehive-template" %>
For information about these tag libraries, see Section 2.3.1, "JSP Tag Libraries."
3. (Optional) If you plan to use <fmt:message> tags to display localized text, use <fmt:setBundle/> to specify the name of the message bundle.
This <fmt:setBundle/> tag enables you to specify the bundle name once, and then refer to this value from <fmt:message> tags by variable.
4. Declare the JSP template for configuration pages by creating the following opening tag:
<beehive-template:template templatePage="/layouts/configBaseLayoutNoTransact.jsp">
Do not close the tag yet. All other JSP tags in a form JSP are nested in this template tag.
5. Create a <beehive-template:section name="configAreaIntroduction"> tag. Inside this tag, provide an introductory sentence or paragraph that describes the form. This description is rendered above the form.
6. Create the following opening tag:
7. <beehive-template:section name="form">
Do not close the tag yet.
8. Indicate that the next set of JSP tags output XHTML by creating the following tag:
<html:xhtml/>
Note: If your form modifies attributes of WebLogic Server MBeans, use the configBaseLayout_netui.jsp template instead. See Section 2.3.1, "JSP Tag Libraries."

Create JSPs that Use Oracle Templates and JSP Tags
Using Oracle Templates and JSP Tags 7-15
9. Create an opening <wl-extension:template name="/WEB-INF/templates/form.xml"> tag.
This template creates a form that matches Administration Console configuration pages (such as Domains: Configuration: General).
The template also generates a button that submits the form.
10. Create an opening <wl-extension:form> and specify values for the following attributes:
action, (optional) if your form accepts user input, specify the path of a Struts Action that is invoked when a user submits this form. The Struts module that defines the Action path is specified in the request.
bundle, (optional) specify the name of a message bundle that contains localized names of your column headings.
readOnly, (optional) specify "true" to make this form read-only (for example, if you are displaying read-only monitoring data).
11. For each property in the form bean that you want to display in the form, create a <wl-extension> tag corresponding to the type of control that you want to render (see WebLogic Server JSP Tags Reference):
<wl-extension:checkbox>
<wl-extension:chooser-tag>
<wl-extension:hidden>
<wl-extension:password>
<wl-extension:radio>
<wl-extension:select>
<wl-extension:text>
<wl-extension:text-area>
Alternatively, you can use <wl-extension:reflecting-fields>, which generates an HTML input tag for each property in a form bean. For example, for a bean property that contains a java.lang.String, the tag generates a text control; for a boolean, it generates a check box. This tag uses the default form bean, which is passed to the JSP in the request.
12. If your form accepts user input and does not modify the attributes of WebLogic Server MBeans, be sure to include the singlechange="false" attribute in the <wl-extension> tags described in the previous step.
This attribute enables users to post form data without starting a WebLogic Server edit session.
13. To generate text on the page that describes to users the purpose of each control, include the inlineHelpId attribute in each <wl-extension> tag in the previous step.
14. Close the <wl-extension:form>, <beehive-template:section>, and <beehive-template:template> tags.
Example 7–4 Example: Simple Form JSP
<%@ page language="java" %><%@ taglib uri="/WEB-INF/console-html.tld" prefix="wl-extension" %>

Create JSPs that Use Oracle Templates and JSP Tags
7-16 Oracle Fusion Middleware Extending the Administration Console for Oracle WebLogic Server
<%@ taglib uri="http://struts.apache.org/tags-html" prefix="html" %> <%@ taglib uri="http://java.sun.com/jsp/jstl/fmt" prefix="fmt" %> <%@ taglib uri="http://beehive.apache.org/netui/tags-template-1.0" prefix="beehive-template" %><fmt:setBundle basename="mycompany" var="current_bundle" scope="page"/><beehive-template:template templatePage="/layouts/configBaseLayoutNoTransact.jsp"> <beehive-template:section name="configAreaIntroduction"> <fmt:message key="mycompany.myresource.introduction" bundle="$current_bundle"/> </beehive-template:section> <beehive-template:section name="form"> <html:xhtml/> <wl-extension:template name="/WEB-INF/templates/form.xml"> <wl-extension:form action="/MyCompanyMyResourceUpdated" bundle="core"> <wl-extension:text property="MyResourceName" labelId="mycompany.myresource.name.label" inlineHelpId="mycompany.myresource.name.label.inlinehelp" singlechange="false"/> <wl-extension:select property="MyResourceWidgets" labelId="mycompany.myresource.widgets.label" inlineHelpId="mycompany.myresource.widgets.label.inlinehelp" singlechange="false"> <wl-extension:optionsCollection property="MyResourceAvailableWidgets" label="label" value="value"/> </wl-extension:select> </wl-extension:form> </wl-extension:template> </beehive-template:section> </beehive-template:template>
7.4.3 Create a Table JSP for MonitoringBefore you create a table JSP, create Struts artifacts that pass data between the business layer and the JSP. See Section 7.3.2, "Create Struts Artifacts for a Table JSP."
To create a table JSP for monitoring resources (see Example 7–5):
1. Create a JSP and save it in your development directory. Consider creating a subdirectory to contain all of the JSPs in your extension. For example, root-dir/ext_jsp, where root-dir is your development directory.
For more information, see Chapter 3, "Setting Up a Development Environment."
2. Import JSP tag libraries by including the following tags:
<%@ taglib uri="/WEB-INF/console-html.tld" prefix="wl-extension" %><%@ taglib uri="http://struts.apache.org/tags-html" prefix="html" %><%@ taglib uri="http://java.sun.com/jsp/jstl/fmt" prefix="fmt" %><%@ taglib uri="http://beehive.apache.org/netui/tags-template-1.0" prefix="beehive-template" %>
For information about these tag libraries, see Section 2.3.1, "JSP Tag Libraries."
Note: The directory named root-dir/jsp is reserved. The root directory of your extension must not contain a directory named jsp.

Create JSPs that Use Oracle Templates and JSP Tags
Using Oracle Templates and JSP Tags 7-17
3. (Optional) If you plan to use <fmt:message> tags to display localized text, use <fmt:setBundle/> to specify the name of the message bundle.
This <fmt:setBundle/> tag enables you to specify the bundle name once, and then refer to this value from <fmt:message> tags by variable.
4. Declare the JSP template for tables by creating the following opening tag:
<beehive-template:template templatePage="/layouts/tableBaseLayout_netui.jsp">
Do not close the tag yet. All other JSP tags in a table JSP are nested in this template tag.
5. Create a <beehive-template:section name="configAreaIntroduction"> tag. Inside this tag, provide an introductory sentence or paragraph that describes the table. This description is rendered above the table.
6. Create the following opening tag:
<beehive-template:section name="table">
Do not close the tag yet.
7. Create an opening <wl-extensions:table> tag and specify values for the following minimal attributes:
name, specify the name of the form bean that you configured for this table.
property, specify the name of the form-bean property that contains row beans.
bundle, (optional) specify the name of a message bundle that contains localized names of your column headings.
captionEnabled, (optional) specify "true" to generate a title above the table.
8. If you specified "true" for the captionEnabled attribute, create a <wl-extension:caption> tag. Inside this tag, provide a caption for the table.
9. For each property in the row bean that you want to display in the table, create a <wl-extension:column> tag and specify values for the following attributes:
property, specify the name of the row bean property
label, specify a key in your message bundle to display as the column heading
10. Close the <wl-extension:table>, <beehive-template:section>, and <beehive-template:template> tags.
Example 7–5 Example: Table JSP for Monitoring
<%@ page language="java" %><%@ taglib uri="/WEB-INF/console-html.tld" prefix="wl-extension" %> <%@ taglib uri="http://struts.apache.org/tags-html" prefix="html" %> <%@ taglib uri="http://java.sun.com/jsp/jstl/fmt" prefix="fmt" %> <%@ taglib uri="http://beehive.apache.org/netui/tags-template-1.0" prefix="beehive-template" %> <fmt:setBundle basename="core" var="current_bundle" scope="page"/> <beehive-template:template templatePage="/layouts/tableBaseLayout_netui.jsp"> <beehive-template:section name="configAreaIntroduction"> <fmt:message key="core.server.servertable.introduction" bundle="$current_bundle"/> </beehive-template:section>

Create JSPs that Use Oracle Templates and JSP Tags
7-18 Oracle Fusion Middleware Extending the Administration Console for Oracle WebLogic Server
<beehive-template:section name="table"> <wl-extension:table name="extensionForm" property="contents" captionEnabled="true" bundle="core"> <wl-extension:caption> <fmt:message key="server.table.caption" bundle="$current_bundle"/> </wl-extension:caption> <wl-extension:column property="name" label="server.table.label.name"/> <wl-extension:column property="clusterName" label="server.table.label.cluster"/> <wl-extension:column property="machineName" label="server.table.label.machine"/> </wl-extension:table> </beehive-template:section> </beehive-template:template>
7.4.4 Create a Table Column for Navigating to Other PagesYour table JSP can provide a link from each row to a configuration page or some other related page. The linking mechanism uses a Handle object to determine which pages are related to a specific table row (see Section 7.2.2, "Handles for ActionForms and Row Beans").
You can use any of the following JSP tags to link from a table:
<wl:column-link>, which requires you to specify the label of the page and portlet instance to which you want to link. The handle causes the portlet to display data related to the specific row that you selected.
<wl:column-dispatch>, which uses metadata to determine the page and portlet to display. Instead of specifying the page and portlet label, you add a metadata tag to the page declaration and then specify the metadata value in the <wl:column-dispatch> tag. Using metadata enables you to change page labels without breaking links. The handle is still used to cause the portlet in the page to display data related to the specific row that you selected.
The following sections describe how to create a table column for navigating:
Section 7.4.5, "Add a Handle to Your Row Bean and Action Class"
Section 7.4.6, "Use the column-link Tag"
Section 7.4.7, "Use the column-dispatch Tag"
7.4.5 Add a Handle to Your Row Bean and Action ClassTo create and populate a handle property:
1. In your row bean, add a property named handle whose data type is com.bea.console.handles.Handle:
public com.bea.console.handles.Handle getHandle() return handle;public void setHandle(Handle handle) this.handle = handle;

Create JSPs that Use Oracle Templates and JSP Tags
Using Oracle Templates and JSP Tags 7-19
2. In the Struts Action class that populates the row bean, set the value of the handle property.
If you populate your row bean from data in an MBean, create a com.bea.console.handles.JMXHandle object that contains the JMX ObjectName of the MBean. Then set the JMXHandle object as the value of the handle property:
javax.management.ObjectName anMBean = new ObjectName("com.bea.medrec:Type=com.bea.medrec.controller. RecordSessionEJBMBean,Name=MedRecEAR");row.setHandle(new JMXHandle(anMBean));
If your populate your row bean from some other type of data source, you can create a JMXHandle object by passing a String to the constructor instead of an ObjectName. The String must contain the following character sequence: Type=identifier, where identifier is something that is meaningful to you:
row.setHandle(new JMXHandle("Type=myDataSource"));
You can also create and set a custom Handle object. See Handle in the Administration Console API Reference.
3. Recompile your row bean and Action class.
7.4.6 Use the column-link TagTo use the <wl:column-link> tag:
1. At the top of the table JSP, add the following statement to import the render tag library into your table JSP:
<%@ taglib uri="render.tld" prefix="render" %>
Oracle provides this tag library in its runtime environment.
2. In the <wl:table> tag, add the following attribute:
checkBoxValue="handle"
3. In the <wl:column> tag that renders the column from which you want to link, nest the <wl:column-link> JSP tag:
<wl:column-link portlet="portlet-instanceLabel"> <render:pageUrl pageLabel="page-definitionLabel"/></wl:column-link>
where:
portlet-instanceLabel is the label of the portlet instance to which you want to link.
The label is defined in the instanceLabel attribute of the <netuix:portletInstance> element, which is in the .book file for the page that contains the portlet.
page-definitionLabel is the unique label of the page that contains the instance of the portlet to which you want to link.
The label is defined in the definitionLabel attribute of the <netuix:page> element, which is in the page's .book file.
For example:

Create JSPs that Use Oracle Templates and JSP Tags
7-20 Oracle Fusion Middleware Extending the Administration Console for Oracle WebLogic Server
<wl:column property="Name" label="medrecMBean.name.label"> <wl:column-link portlet="medrecMonitorTabPortlet"> <render:pageUrl pageLabel="medrecMonitor"/> </wl:column-link></wl:column>
7.4.7 Use the column-dispatch TagTo use the <wl:column-dispatch> tag:
1. In the .book file that defines the page to which you want to link, find the page's <netuix:page> element and nest the following element:
<netuix:meta name="perspective-name" content="ObjectType-value"/>
where:
perspective-name is a name that is meaningful to you. This value must match the value that you specify in the perspective attribute of the <wl:column-dispatch> tag. For example, specify myCompany-configuration-page.
ObjectType-value is the value of the ObjectType property in the row bean's Handle object. See Handle.getObjectType() in the Administration Console API Reference.
For example, assume that you populate your row bean from data in an MBean. You use the MBean's ObjectName to construct a JMXHandle object and then set the object as the value of the row bean's handle property. If the MBean's ObjectName is "com.mycompany:Name=myApp1,Type=myAppMBean", then the value of JMXHandle.ObjectType is myAppMBean.
For example:
<netuix:meta name="myCompany-configuration-page" content="myAppMBean"/>
2. In the table JSP, in the <wl:table> tag, add the following attribute:
3. checkBoxValue="handle"
4. In the <wl:column> tag that renders the column from which you want to link, nest the <wl:column-dispatch> JSP tag:
<wl:column-dispatch perspective="perspective-name"/>
where:
perspective-name matches the perspective-name value that you specified in the .book file.
For example:
<wl:column property="Name" label="medrecMBean.name.label"> <wl:column-dispatch perspective="myCompany-configuration-page"/> </wl:column-link> </wl:column>
Note: The <render:pageUrl/> tag is a convenience tag for generating a portal framework URL.

Create JSPs that Use Oracle Templates and JSP Tags
Using Oracle Templates and JSP Tags 7-21
7.4.8 Add Buttons and Check Boxes to TablesIn a table that you create using the <wl:table> tag, you can use buttons by themselves or in conjunction with a column of check boxes or radio buttons.
When used by themselves, buttons can forward to page UI control. For example, in the WebLogic Server Servers table (see Figure 7–2), users click on a New button to launch the Create a Server assistant.
When used in conjunction with a check box, buttons can process data on behalf of one or more table rows. For example, if each row in your table represents an instance of a custom MBean that provides monitoring data for your application, you can enable users to select a check box for one or more rows and click a button that resets the values in the corresponding MBean instances.
The following sections describe adding check boxes and buttons to tables:
Section 7.4.8.1, "Add Buttons to a Table"
Section 7.4.8.2, "Add Check Boxes and Buttons to a Table"
Section 7.4.8.3, "Example: How Check Boxes and Buttons Process Data"
7.4.8.1 Add Buttons to a TableTo add buttons to a table:
1. In the table JSP, add the following attributes to the <wl-extension:table> tag:
singlechange="false"controlsenabled="true"
The controlsenabled attribute enables the table to display buttons. The singlechange attribute enables users to click the button without having to lock the domain's configuration. (See WebLogic Server JSP Tags Reference.)
2. Immediately after the <wl-extension:table> opening tag, add the following tags:
<wl:button-bar> <wl:button-bar-button labelid="button-label" pageLabel="page-definitionLabel"/></wl:button-bar>
where:
button-label is the text that you want to display on the button or the name of a property that you have defined in the bundle that has been declared in the JSP's <fmt:setBundle> element.
page-definitionLabel is the unique label of the page that contains the instance of the portlet to which you want to forward.
The label is defined in the definitionLabel attribute of the <netuix:page> element, which is in the page's .book file.
For example, to link to the Servers table page:
<wl:button-bar> <wl:button-bar-button labelid="Servers" pageLabel="ServerTableBook" />
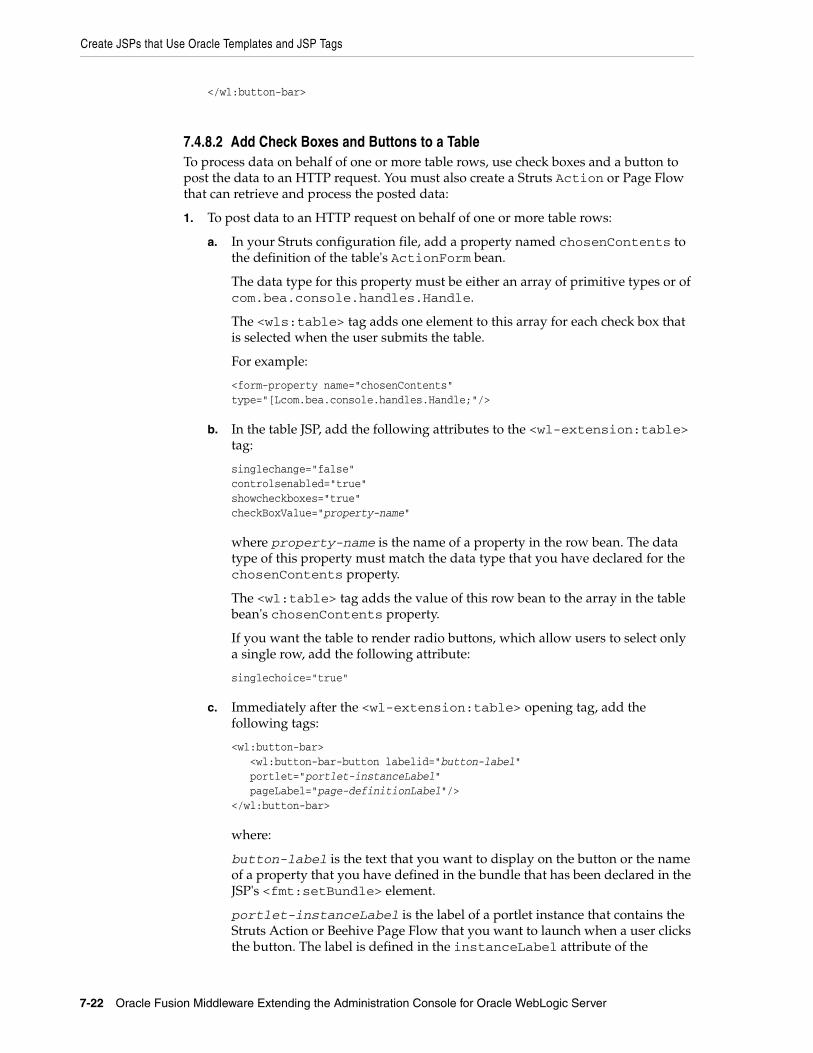
Create JSPs that Use Oracle Templates and JSP Tags
7-22 Oracle Fusion Middleware Extending the Administration Console for Oracle WebLogic Server
</wl:button-bar>
7.4.8.2 Add Check Boxes and Buttons to a TableTo process data on behalf of one or more table rows, use check boxes and a button to post the data to an HTTP request. You must also create a Struts Action or Page Flow that can retrieve and process the posted data:
1. To post data to an HTTP request on behalf of one or more table rows:
a. In your Struts configuration file, add a property named chosenContents to the definition of the table's ActionForm bean.
The data type for this property must be either an array of primitive types or of com.bea.console.handles.Handle.
The <wls:table> tag adds one element to this array for each check box that is selected when the user submits the table.
For example:
<form-property name="chosenContents"type="[Lcom.bea.console.handles.Handle;"/>
b. In the table JSP, add the following attributes to the <wl-extension:table> tag:
singlechange="false"controlsenabled="true"showcheckboxes="true"checkBoxValue="property-name"
where property-name is the name of a property in the row bean. The data type of this property must match the data type that you have declared for the chosenContents property.
The <wl:table> tag adds the value of this row bean to the array in the table bean's chosenContents property.
If you want the table to render radio buttons, which allow users to select only a single row, add the following attribute:
singlechoice="true"
c. Immediately after the <wl-extension:table> opening tag, add the following tags:
<wl:button-bar> <wl:button-bar-button labelid="button-label" portlet="portlet-instanceLabel" pageLabel="page-definitionLabel"/></wl:button-bar>
where:
button-label is the text that you want to display on the button or the name of a property that you have defined in the bundle that has been declared in the JSP's <fmt:setBundle> element.
portlet-instanceLabel is the label of a portlet instance that contains the Struts Action or Beehive Page Flow that you want to launch when a user clicks the button. The label is defined in the instanceLabel attribute of the

Create JSPs that Use Oracle Templates and JSP Tags
Using Oracle Templates and JSP Tags 7-23
<netuix:portletInstance> element, which is in the .book file for the page that contains the portlet.
Instead of immediately launching an Action or Page Flow, you can specify a portlet that contains a JSP. The JSP can ask users for confirmation before launching an Action or Page Flow.
page-definitionLabel is the unique label of the page that contains the instance of the portlet to which you want to forward.
The label is defined in the definitionLabel attribute of the <netuix:page> element, which is in the page's .book file.
2. To create a Struts Action that can process the posted data:
a. Create a portlet that forwards to a Struts Action. Make sure that the portlet's instanceLabel matches the value that you specified in step 1c.
For example:
<netuix:portletInstance markupType="Portlet" instanceLabel="medrecMonitor.Tab.Portlet" contentUri="/portlets/medrec_monitor_tab.portlet"/>
For information about creating a portlet, see Section 6.1, "Define a Portlet."
b. In your Struts configuration file, define an ActionForm bean that contains a property named chosenContents. The data type for this property must be the same data type that you specified in step 1a.
For example:
<form-bean name="processButtonForm" type="org.apache.struts.action.DynaActionForm"> <form-property name="chosenContents" type="[Lcom.bea.console.handles.Handle;"/> </form-bean>
c. In your Struts configuration file, define a Struts Action mapping that sends the data in the ActionForm bean to a Java class for processing.
For example:
<action path="/ProcessButtonAction" type="com.bea.medrec.extension.MedrecMBeanButtonAction" name="processButtonForm" scope="request" validate="false"> <forward name="success" contextRelative="true" path="/ext_jsp/button_view.jsp"/> </action>
7.4.8.3 Example: How Check Boxes and Buttons Process DataThe following steps describe a table that correlates a table row with an underlying MBean data source and clears the values of attributes in the MBean:
1. In a table JSP, you configure the <wl-extension:table> tag to render check boxes. You specify that if a user selects the check box for a row, the value of the row bean's handle property will ultimately be posted to the request object:
<wl-extension:table showcheckboxes="true"

Create JSPs that Use Oracle Templates and JSP Tags
7-24 Oracle Fusion Middleware Extending the Administration Console for Oracle WebLogic Server
checkBoxValue="handle" ...> The row bean's handle property contains a JMXHandle object, which contains the ObjectName of the MBean instance that populated the row.
2. When a user selects a row and clicks a button, the button adds the row bean's JMXHandle object to an array in the table bean's chosenContents property. Then it posts the table bean. (See Figure 7–4.)
3. The Struts controller serializes the table bean (which is a Struts ActionForm bean) and writes the serialized bean in the HTTP request object. Then it forwards the request to a specified portlet.
4. The portlet launches a Struts Action mapping, which does the following:
a. Creates an ActionForm bean and populates it with data from the HTTP request.
b. Invokes an Action class and makes the ActionForm bean available to the class.
c. The Action class iterates over the form bean's chosenContents array (which contains instances of JMXHandle). For each element in the array, the class does the following:
d. Gets the MBean ObjectName that is encoded in the JMXHandle object,
e. Uses an MBeanServer to look up the MBean.
f. Uses an MBeanServer to invoke an MBean operation that clears an attribute value.
g. Upon success, the Action mapping forwards to a JSP.
Figure 7–4 Example: Data Flow from Table to Struts Action

Create Other Portal Framework Files and Deploy the Extension
Using Oracle Templates and JSP Tags 7-25
7.4.9 Configure Table PreferencesBy adding a single attribute to the <wl:table> tag, you can enable your users to configure which table columns the table displays. The Administration Console persists the preference for each user and for each instance of the portlet that displays the table. If you reuse a table in multiple portlet instances, each user can set a different preference for the table in each portlet instance.
To enable users to configure the set of table columns that your table displays, add the following attribute to your <wl:table> tag: customize="true".
For example:
<wl-extension:table customize="true" ... >
When the Administration Console displays the JSP that contains the table, it renders a "Customize this table" link above the table title. The link causes the table JSP to display a section that contains a chooser control and an Apply or Reset button.
7.5 Create Other Portal Framework Files and Deploy the ExtensionYou can add your portlet directly to the desktop, but if you want your portlet to display as a tab or subtab in the ContentBook, you must define books or pages to contain it. In addition, you must create a netuix-extension.xml file which specifies where to locate your portlet, books, and pages and which functions as the deployment descriptor for your extension.
See Chapter 6, "Adding Portlets and Navigation Controls."
Create Other Portal Framework Files and Deploy the Extension
7-26 Oracle Fusion Middleware Extending the Administration Console for Oracle WebLogic Server

8
Adding Online Help for Console Extensions 8-1
8Adding Online Help for Console Extensions
The Administration Console help viewer is an Oracle WebLogic Portal Web application that uses an implementation of JavaHelp 2.0, an open source help system from Sun Microsystems.
This chapter tells how to create help for a console extension and merge that help into the main Administration Console help system.
8.1 Summary of StepsThe main steps required for creating console extension help topics are as follows:
1. Create a Javahelp helpset, including the HTML topic files and the Javahelp control files.
2. Establish context-sensitive links from the console extension to help topics.
3. Deploy the help system with the console extension.
8.2 Create the HelpsetYou can create a Javahelp system using the Javahelp software available from Sun Microsystems. Alternatively, you can use any help authoring tool that creates Javahelp. See the documentation for Javahelp or the documentation for your authoring tool for complete instructions.
For more in formation about JavaHelp and to download the Javahelp software, see JavaHelp System at http://java.sun.com/javase/technologies/desktop/javahelp/.
8.2.1 Helpset FilesThe following files are required by the Administration Console help system. These files together are called a "helpset."
Topic files (.html)
These HTML files contain the help content. You can use any editor that can create HTML files to create these files.
Helpset file (.hs)
This XML file defines the helpset for the extension, including information such as the name and location of the map file, helpset title, etc.
For a console extension helpset, the name of the Helpset file must start with the name of the extension. For example, the name of the Helpset file for the Jolt

Merging Helpsets
8-2 Oracle Fusion Middleware Extending the Administration Console for Oracle WebLogic Server
console extension is jolt.hs. (The Jolt console extension is a standard extension the Administration Console.) For localized helpsets, append the locale information to the end of the name of the extension, for example, jolt_en_US.hs.
Mapping file (.jhm)
This XML file maps context help IDs to help topics.
Table of contents file (.xml)
This XML file defines the table of contents for the help.
The following files are optional:
Index file (.xml)
This XML file defines the index for the help.
Full text search database
These database files are generated using the Javahelp software or a Help authoring tool that creates Javahelp:
There are further considerations for merging helpsets and for providing localized helpsets. See Section 8.3.1, "Directory Structure for Merging Extension Help" and Section 8.4, "Localizing Helpsets."
8.3 Merging HelpsetsThe table of contents and the search database for a console extension's helpset are automatically merged into the main Administration Console help, provided that the extension's helpset is organized and named properly. Extension helpsets are merged only when the help is deployed on the same server instance as the Administration Console.
The Administration Console's helpset file sets the merge type to the Javahelp AppendMerge type. That type defines how console extension helpsets are merged into the main console help.
See "Merging Helpsets" at http://docs.sun.com/source/819-0913/author/merge.html for more information about Javahelp merging. See also Section 8.5, "How Helpsets Are Merged" for more information about how helpsets are merged in WebLogic Server.
8.3.1 Directory Structure for Merging Extension HelpFor an extension's help to be merged with the main console help, the help files must be organized as follows. The name of the directory containing the helpset files must be bea-helpsets.
...\console_extension\bea_helpsets\extension_name_locale.hs
...\console_extension\bea_helpsets\locale\extension_name-map.jhm
...\console_extension\bea_helpsets\locale\extension_name-toc.xml
...\console_extension\bea_helpsets\locale\extension_name-search\search database files
...\console_extension\bea_helpsets\locale\topics_dir\HTML topic files...
...\console_extension\bea-helpsets\locale\topics_dir\images\Graphic files...
...\console_extension\PortalConfig\...
...\console_extension\WEB-INF\...
...\console_extension\Other extension source directories...

Localizing Helpsets
Adding Online Help for Console Extensions 8-3
For example:
...\my_ext\webapp\bea_helpsets\my_ext_en_US.hs
...\my_ext\webapp\bea_helpsets\en_US\my_ext_map.jhm
...\my_ext\webapp\bea_helpsets\en_US\my_ext_toc.xml
...\my_ext\webapp\bea_helpsets\en_US\my_ext-search\search database files...
...\my_ext\webapp\bea_helpsets\en_US\pagehelp\HTML topic files...
...\my_ext\webapp\bea_helpsets\en_US\taskhelp\HTML topic files...
...\my_ext\webapp\bea-helpsets\en_US\taskhelp\images\Graphic files...
...\my_ext\webapp\jsp\...
...\my_ext\webapp\PortalConfig\...
...\my_ext\webapp\WEB-INF\...
8.4 Localizing HelpsetsMultiple localized helpsets can be simultaneously included in help. The help viewer uses the same strategy used by java.util.ResourceBundle for locating locale-specific help files. The help viewer expects the following directory structure under the bea-helpsets directory for your extension:
...\extension_name_locale_1.hs
...\extension_name_locale_2.hs
...\extension_name_locale_3.hs
...\locale_1\map.jhm
...\locale_1\toc.xml
...\locale_1\search\Search db files...
...\locale_1\topics\HTML topic files...
...\locale_1\topics\images\Graphic files... (optional)
...\locale_2\map.jhm
...\locale_2\toc.xml
...\locale_2\my_search\Search db files...
...\locale_2\topics\HTML topic files...
...\locale_1\topics\images\Graphic files... (optional)
...\locale_3\map.jhm
...\locale_3\toc.xml
...\locale_3\search\Search db files...
...\locale_3\topics\HTML topic files
...\locale_3\topics\images\Graphic files... (optional)For example, see Figure 8–1.
Note: The HTML topic files and graphic files may be located in multiple directories and subdirectories, but they all must be under ...\console_extension\bea_helpsets\locale\.

How Helpsets Are Merged
8-4 Oracle Fusion Middleware Extending the Administration Console for Oracle WebLogic Server
Figure 8–1 Directory Structure for Localized Help
If the help content for the locale specified in the browser is not found, the help viewer displays the content from the default folder.
8.5 How Helpsets Are Merged Administration Console helpsets are parsed and helpset objects are created and cached the first time a user requests help from the help viewer. The help viewer searches the server extension and domain extension folders for extension helpsets and merges them with the Administration Console helpsets. The console looks for extensions in these locations:
WL_HOME/server/lib/console-ext
WL_HOME/server/lib/console-ext/autodeploy
DOMAIN_HOME/console-ext
Helpsets are merged according to the following rules:
1. If console help and extension help exist for the user-requested locale, the extension help is merged with the console help.
2. If console help and extension help do not exist for the user-requested locale, console help in English is displayed. The help viewer searches for extension help for the English locale and, if found, the extension help is merged with the console help.
3. If console help for the user-requested locale exists but extension help for that locale does not exist, the help viewer searches for the extension help for the English locale, and if found, the extension help is merged with the console help.
4. When searching for an extension's helpset for a particular locale, the help viewer looks for a helpset for the language, country, and variant. If all three are not found, the help viewer looks for the language and country. If that is also not found, the help viewer looks for the language, as shown in the following list.
a. language + "_" + country + "_" + variant
b. language + "_" + country
c. language
Provide Support for Context-Sensitive Help
Adding Online Help for Console Extensions 8-5
8.6 Provide Support for Context-Sensitive HelpUsers request help from the Administration Console by clicking he Help link in the content header menu at the top of the Administration Console. That link displays the help topic for the current page.
To provide context sensitive help for console extension pages, you must
Section 8.6.1, "Provide Help IDs" for books, pages, or targets within pages.
Section 8.6.2, "Map Help IDs to Help Files" in the Javahelp map (.jhm) file.
At this time, console extension developers cannot provide links in the How do I... pane on the left side of the Administration Console or More Info... links in the configuration and monitoring pages on the right side.
8.6.1 Provide Help IDsEach Portal page or book can have a help ID, and targets in pages can have help IDs. You must specify helpids or helpurlpatterns.
8.6.1.1 helpidSpecify the help context for portal pages and books by specifying a help ID and a bundle name using a meta-tag with the name helpid. Separate the help ID and the bundle name with a semicolon (;). Alternatively, portals and books can inherit the context from ancestor pages or books.
Help IDs can contain only alphanumeric characters, hyphens (-) and underscores (_). Any other characters are rejected, and a generic error message is displayed.
The help Web application reads the help ID and bundle name from the helpid meta-data. If the page or book does not set a helpid, the help application recursively searches parent pages and books to get a helpid. The helpid from the closest parent is used.
The overall Home book for the Administration Console has a helpid, which ensures that if a helpid for a context is not found, the default help page for the console is displayed. The helpid value is assigned to a JavaScript variable, bea.wls.console.pageHelpKey.
When the Help link in the content header is clicked, the helpid is passed as a query parameter to the help Web application. The help Web application uses the helpid to query the helpset mapping (.jhm) file and returns the help resource.
The following example shows how the helpid is assigned for the Configuration > General tab of the Settings for JoltConnectionPool page of the Jolt console extension. This snippet is taken from the JoltFullFeatures.book file.
<netuix:page markupName="page" markupType="Page" definitionLabel="JoltConnectionPoolConfigGeneralTabPage" title="tab.general.label" presentationClass="page-content"><netuix:meta name="helpid" content="Jolt.jolt.joltconnectionpoolconfiggeneral.title;jolt"/>
8.6.1.2 helpurlpatternThe Administration Console provides an alternate method for invoking help. A general help URL pattern can be defined using helpurlpattern meta-data tag in portal pages and books. The value of the pattern can contain variables that can be
Rebranding Help
8-6 Oracle Fusion Middleware Extending the Administration Console for Oracle WebLogic Server
substituted in any page/book using a netuix meta tag. For example, set the value of helpurlpattern meta-tag as follows:
<netuix:meta name="helpurlpattern" content= "/consolehelp/console-help.portal?_nfpb=true&_pageLabel=page&helpId=$helpid"/>
and then specify the helpid value using <netuix:meta> tag.
<netuix:meta name="helpid" content="applications.CreateDeploymentPlan"/>
The helpid variable in the URL pattern is substituted by the value provided in the helpid meta-tag.
The helpurlpattern can be specified in any page or book. If not specified, the parent pages and books are searched recursively to find a helpurlpattern. The helpurlpattern from the closest parent is used. Once a pattern is found, any variable substitution values that are defined in the current page or book are applied to the URL pattern to arrive at a valid URL.
The helpurlpattern is convenient way when you want to provide an alternate URL for an extension's help. Consider an extension named my_extension. You wants to direct a request for help to a Web page. The extension my_extension defines the helpurlpattern in the root page or book as follows:
<netuix:meta name="helpurlpattern" content="http://my_web_site.com/my_product/docs/$product_name/index.html"/>
A product_name meta-tag can provide a value for substitution.
<netuix:meta name="product_name" content="my_extension"/>
The resulting help link points to http://my_web_site.com/my_product/docs/my_extension/index.html.
8.6.2 Map Help IDs to Help FilesMap the help IDs defined in portal pages and books to the HTML help topic files in the Javahelp map (.jhm) file. For example, the following element in the map file associates the help ID domainconfig to the topic file domainConfig.html, which is located in the Pages directory.
<mapID target="domainconfig" url="Pages/domainConfig.html"/>
The path to the specified topic file is relative to the location of the map file, which is in the locale directory. See Section 8.3.1, "Directory Structure for Merging Extension Help."
8.7 Rebranding HelpThe help Web application can be rebranded by providing a Look and Feel (LAF) and targeting it to the help Web application's portal (console-help.portal). An extension LAF can rebrand the help Web application only if it is deployed on the same server instance as the Administration Console Web application. For information about changing the look and feel, see Chapter 5, "Rebranding the Administration Console."

Deploying Help
Adding Online Help for Console Extensions 8-7
8.8 Deploying HelpExtension help is merged onto console help only if the help Web application is deployed on the same server instance as the console. It will not merge if the help Web application is deployed on a different server instance.
Similarly, help Web application are rebranded only if the help Web application is deployed on the same server instance.
Deploying Help
8-8 Oracle Fusion Middleware Extending the Administration Console for Oracle WebLogic Server

9
Archiving and Deploying Console Extensions 9-1
9Archiving and Deploying ConsoleExtensions
After you create a directory tree of source files, precompiled JSP files, and Java class files for your console extension, archive the directory tree in a WAR file and copy the WAR file into your WebLogic Server domain. For information about the files and directories to create in your extension's directory tree, see Section 3.3, "Create a Directory Tree for the Extension".
If you want to divide your console extensions into independently deployable components, you can create and deploy multiple archives that contain subsets of your extension. Each archive must contain all of the classes and portal framework files needed to render its own content. For example, if your extension modifies the Administration Console Look and Feel as well as adds portlets to the desktop, you can create one archive for the Look and Feel extension and another archive that contains the files needed to add your portlet to the desktop.
9.1 Archive and Deploy a Console ExtensionTo archive and deploy your console extension:
1. Archive your extension directory into a WAR file. The name of the WAR file has no programmatic significance, so choose a name that is descriptive for your purposes.
The contents of your root-dir directory must be the root of the archive; the root-dir directory name itself must not be in the archive. If you use the Java jar command to create the archive, enter the command from the root-dir directory. For example:
c:\root-dir\> jar -cf my-extension.war *
2. Copy the WAR file into each domain's domain-dir/console-ext directory, where domain-dir is the domain's root directory.
3. Restart the Administration Server for each domain.
9.1.1 Error Output During DeploymentIf the Administration Console encounters deployment errors, it outputs error and warning messages to standard out and to the Administration Server's server log file.
If you do not see error or warning messages and you do not see your extension in the Administration Console, you might have named the wrong parent UI control in your netuix-extension.xml file. For example, if you name a parent UI control that does

Archive and Deploy a Console Extension
9-2 Oracle Fusion Middleware Extending the Administration Console for Oracle WebLogic Server
not render tabs for its children, then your extension is deployed but there is no menu control for accessing it.