Extending An Android App Using the IBM Push for Bluemix Cloud Service
17
© 2009 IBM Corporation Extending an Android app using the IBM Push for Bluemix cloud service Susan Rizzo – IBM Mobile Cloud 9 November 2014
-
Upload
ibm-developerworks -
Category
Mobile
-
view
235 -
download
0
Transcript of Extending An Android App Using the IBM Push for Bluemix Cloud Service

© 2009 IBM Corporation
Extending an Android app using the IBM Push for Bluemix cloud service
Susan Rizzo – IBM Mobile Cloud
9 November 2014

© 2014 IBM Corporation2
A fast path to setup of the BlueList Push sample
This presentation was created to show you how to quickly create & configure the IBM BlueMix Mobile Sample “BlueList Push for Android” using Android Studio.
What you'll need to get started!– Google Developers Console ( https://cloud.google.com/console/project )
• You'll need a gmail ID for this :-)
– Bluemix account ( https://ace.ng.bluemix.net/ )
– Git client (pick one of the many git clients available)• You'll need this to download (“git clone”) the code
– Gradle installed ( http://www.gradle.org/ )• Download Gradle zip and extract into directory of your choice
– Android Studio ( http://developer.android.com/sdk/installing/studio.html )• Follow the installation instructions provided
– Cloud Foundry ( http://docs.cloudfoundry.org/devguide/installcf/ )• Install the cf Command Line Interface (CLI)
Source: http://www.ibm.com/developerworks/library/mo-android-push-app/index.html
IBM Push for Bluemix – Fast Path

© 2014 IBM Corporation3
Create Project in Google Developers Console with GCM setup*** Quick Summary of Steps ***
Go to Google Developers Console (https://console.developers.google.com )
Login (with gmail userid)
Create a Project ...
Open your Project, and click on APIs & auth > APIs ...
Enable
Click on APIs & auth > Credentials ... …– Scroll down to the Public API access section, and click on …
– Select then click on (No IP addresses need to be entered)
Save your API KEY ...
Save your Project Number …
* You will need your API KEY & Project Number to configure the IBM Bluemix Push Service.Source: http://www.ibm.com/developerworks/library/mo-android-push-app/index.html
© 2014 IBM Corporation5
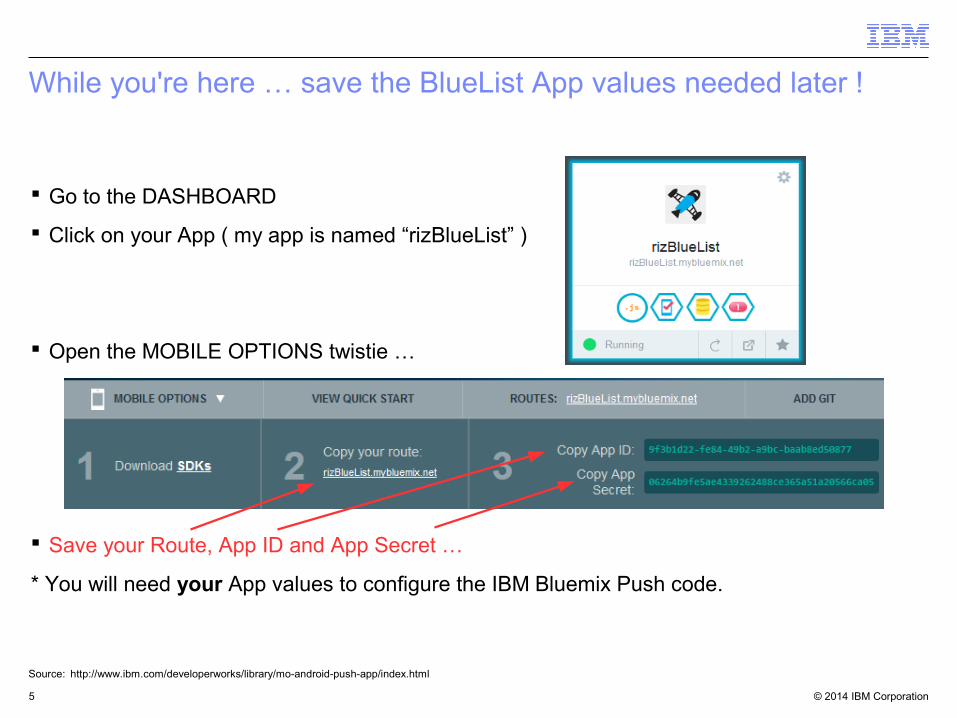
While you're here … save the BlueList App values needed later !
Go to the DASHBOARD
Click on your App ( my app is named “rizBlueList” )
Open the MOBILE OPTIONS twistie …
Save your Route, App ID and App Secret …
* You will need your App values to configure the IBM Bluemix Push code.
Source: http://www.ibm.com/developerworks/library/mo-android-push-app/index.html

© 2014 IBM Corporation6
Configure IBM Push service on BlueList app on Bluemix *** Quick Summary of Steps ***
Once your app has been created, navigate to the Push panel
Click on the Push icon or use the left-hand panel navigation
Click the button under
Enter the values you saved from your GCM setup/configuration, click
Source: http://www.ibm.com/developerworks/library/mo-android-push-app/index.html

© 2014 IBM Corporation7
Configure IBM Push service on BlueList app on Bluemix *** Quick Summary of Steps ***
Once your app has been created, navigate to the Push panel
Click on the Push icon or use the left-hand panel navigation
Click the button under
Enter the values you saved from your GCM setup/configuration, click
Source: http://www.ibm.com/developerworks/library/mo-android-push-app/index.html

© 2014 IBM Corporation8
GIT the mobilecloud bluelist-push code
Source: http://www.ibm.com/developerworks/library/mo-android-push-app/index.html
IBM Push for Bluemix – Fast Path
Open a Command Prompt, and use the git clone command to create a copy of the bluelist-push code locally on your machine.
The command and command results are shown here:

© 2014 IBM Corporation9
Locate the Node.js server-side code for bluelist-push
Source: http://www.ibm.com/developerworks/library/mo-android-push-app/index.html
IBM Push for Bluemix – Fast Path
From your Command Prompt, cd bluelist-push\bluelist-push-node
If you view the directory listing (dir), you will see the files shown below.– You will need to edit files: app.js & manifest.yml
© 2014 IBM Corporation10
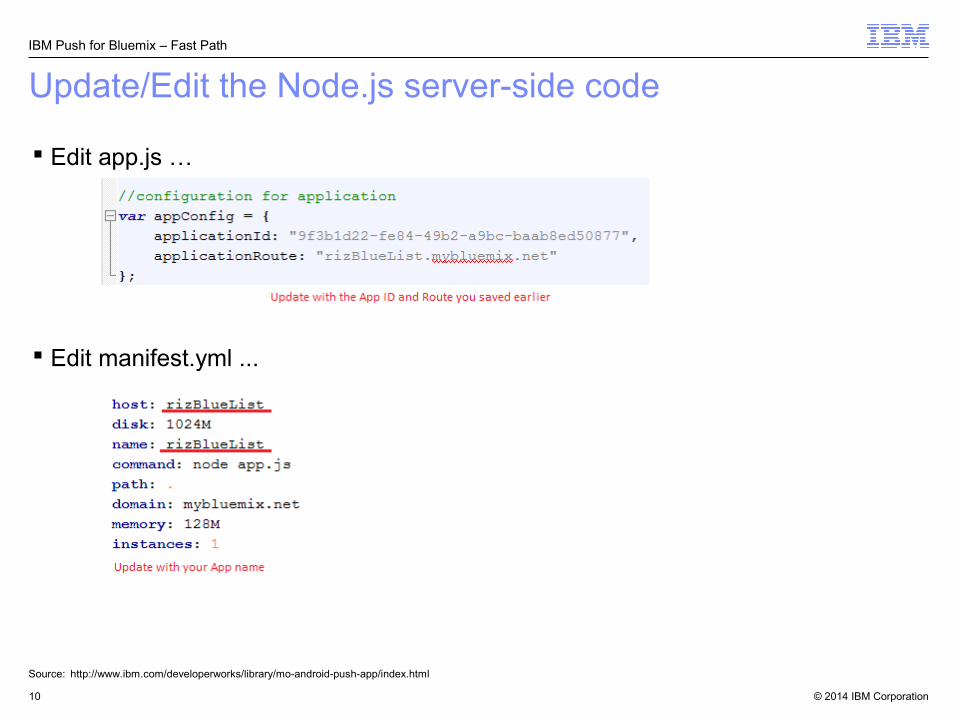
Update/Edit the Node.js server-side code
Source: http://www.ibm.com/developerworks/library/mo-android-push-app/index.html
IBM Push for Bluemix – Fast Path
Edit app.js …
Edit manifest.yml ...

© 2014 IBM Corporation11
Use cf to “login” to Bluemix
Source: http://www.ibm.com/developerworks/library/mo-android-push-app/index.html
IBM Push for Bluemix – Fast Path
From your Command Prompt– Verify cf CLI version 6+ installed: cf –version– Log in to Bluemix: cf login -a https://api.ng.bluemix.net
© 2014 IBM Corporation12
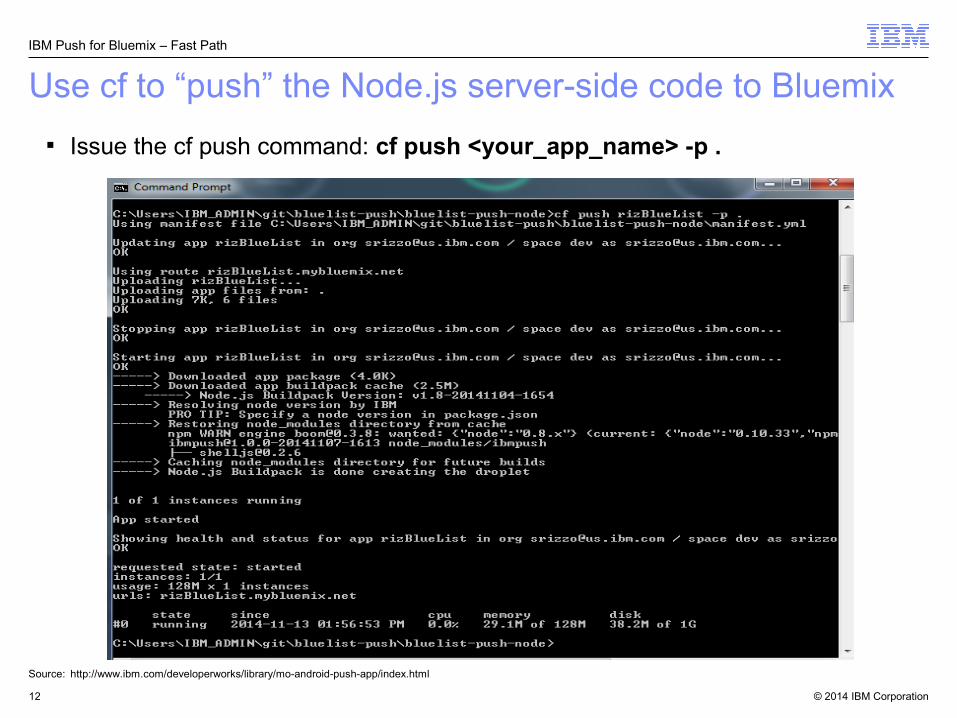
Use cf to “push” the Node.js server-side code to Bluemix
Source: http://www.ibm.com/developerworks/library/mo-android-push-app/index.html
IBM Push for Bluemix – Fast Path
Issue the cf push command: cf push <your_app_name> -p .
© 2014 IBM Corporation13
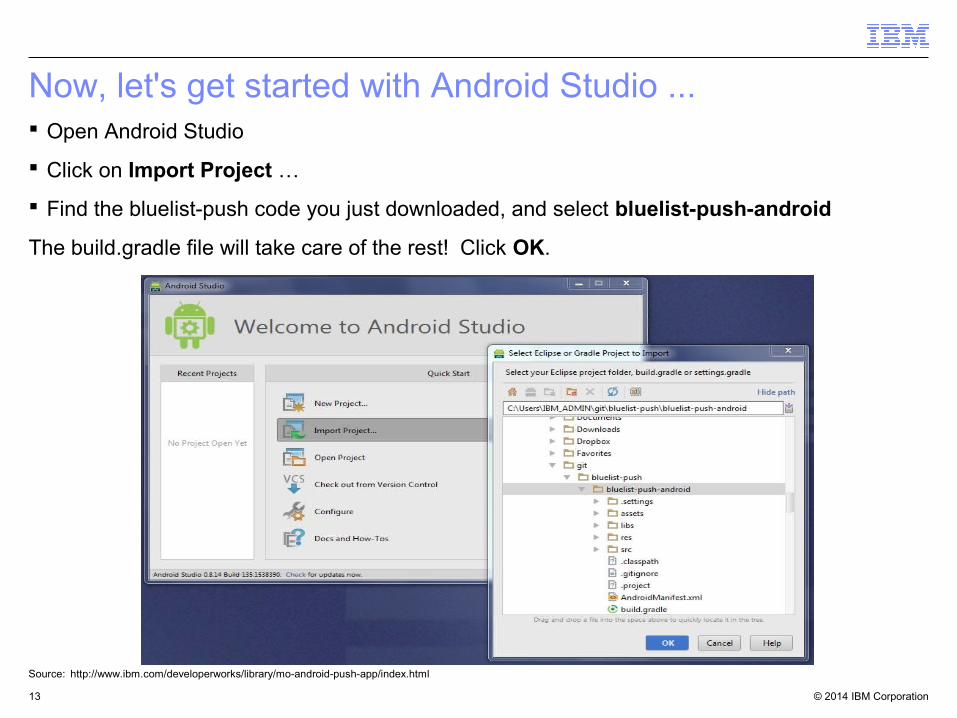
Now, let's get started with Android Studio ... Open Android Studio
Click on Import Project …
Find the bluelist-push code you just downloaded, and select bluelist-push-android
The build.gradle file will take care of the rest! Click OK.
Source: http://www.ibm.com/developerworks/library/mo-android-push-app/index.html

© 2014 IBM Corporation14
Getting the project setup using Gradle
First Time …
The first time you try to import a new project, you'll probably get prompted with the pop-up window asking if you want to use Gradle.
Click OK. This will take a bit of time at first, but it will save lots of time later.
Source: http://www.ibm.com/developerworks/library/mo-android-push-app/index.html
© 2014 IBM Corporation15
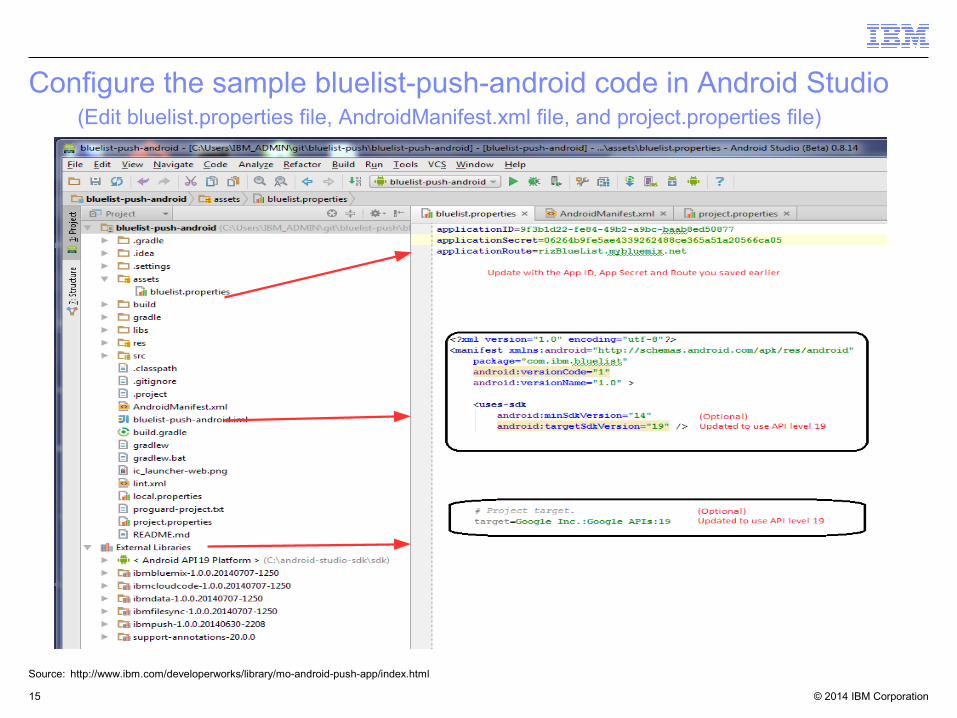
Configure the sample bluelist-push-android code in Android Studio (Edit bluelist.properties file, AndroidManifest.xml file, and project.properties file)
Source: http://www.ibm.com/developerworks/library/mo-android-push-app/index.html

© 2014 IBM Corporation16
Check your Android SDK Manager for Google Play services
Open your Android SDK Manager …
Make sure you have Google Play services installed …
Check to see what Android API levels you have installed so you know what API levels your Android emulator can use ( I have multiple API levels, but will be using API 19 here ) ...
Source: http://www.ibm.com/developerworks/library/mo-android-push-app/index.html
© 2014 IBM Corporation17
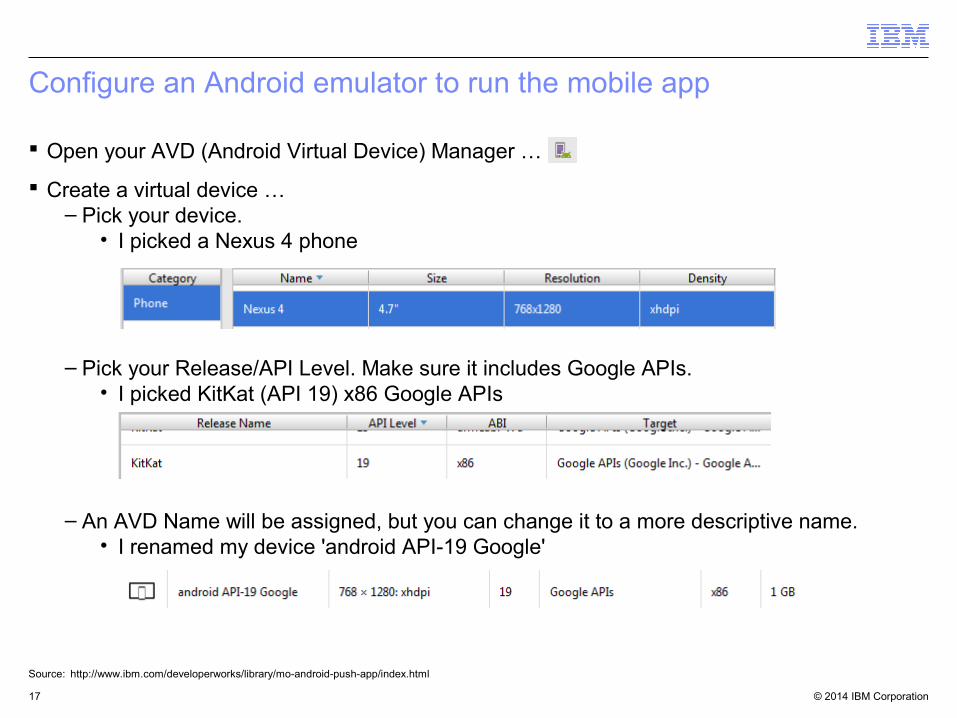
Configure an Android emulator to run the mobile app
Open your AVD (Android Virtual Device) Manager …
Create a virtual device …– Pick your device.
• I picked a Nexus 4 phone
– Pick your Release/API Level. Make sure it includes Google APIs. • I picked KitKat (API 19) x86 Google APIs
– An AVD Name will be assigned, but you can change it to a more descriptive name.• I renamed my device 'android API-19 Google'
Source: http://www.ibm.com/developerworks/library/mo-android-push-app/index.html
© 2014 IBM Corporation18
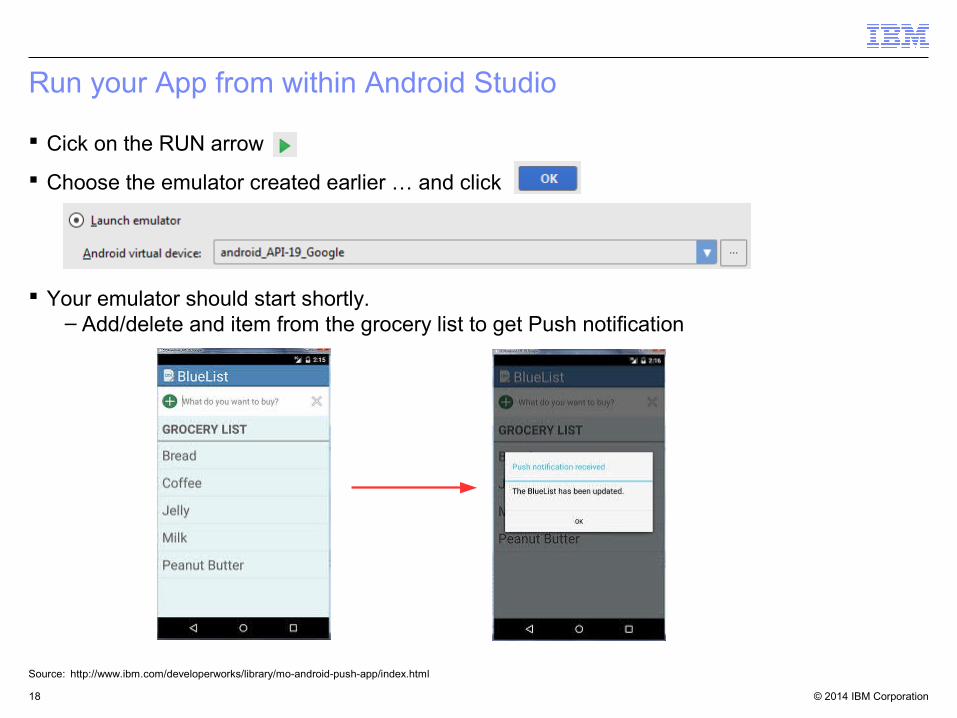
Run your App from within Android Studio
Cick on the RUN arrow
Choose the emulator created earlier … and click
Your emulator should start shortly. – Add/delete and item from the grocery list to get Push notification
Source: http://www.ibm.com/developerworks/library/mo-android-push-app/index.html