ExpressCard 2000 - MagTek · MasterCard® is a registered trademark and PayPass™ and Tap & Go™...
85
MagTek I 1710 Apollo Court I Seal Beach, CA 90740 I Phone: (562) 546-6400 I Technical Support: (888) 624-8350 www.magtek.com ExpressCard 2000 Instant Issuance Card Personalization System Installation and Operation Manual March 2017 Manual Part Number: D99875600-53 REGISTERED TO ISO 9001:2008
Transcript of ExpressCard 2000 - MagTek · MasterCard® is a registered trademark and PayPass™ and Tap & Go™...

MagTek I 1710 Apollo Court I Seal Beach, CA 90740 I Phone: (562) 546-6400 I Technical Support: (888) 624-8350
www.magtek.com
ExpressCard 2000 Instant Issuance Card Personalization System
Installation and Operation Manual
March 2017
Manual Part Number:
D99875600-53
REGISTERED TO ISO 9001:2008

ExpressCard 2000| Instant Issuance Card Personalization System | Installation and Operation Manual
Page 2 of 85 (D99875600-53)
Copyright © 2006 - 2017 MagTek, Inc.
Some material Copyright © 2012 Evolis, Inc. Printed in the United States of America
INFORMATION IN THIS PUBLICATION IS SUBJECT TO CHANGE WITHOUT NOTICE AND
MAY CONTAIN TECHNICAL INACCURACIES OR GRAPHICAL DISCREPANCIES. CHANGES OR IMPROVEMENTS MADE TO THIS PRODUCT WILL BE UPDATED IN THE NEXT
PUBLICATION RELEASE. NO PART OF THIS DOCUMENT MAY BE REPRODUCED OR
TRANSMITTED IN ANY FORM OR BY ANY MEANS, ELECTRONIC OR MECHANICAL, FOR ANY PURPOSE, WITHOUT THE EXPRESS WRITTEN PERMISSION OF MAGTEK, INC.
MagTek® is a registered trademark of MagTek, Inc. MagnePrint® is a registered trademark of MagTek, Inc.
Magensa™ is a trademark of MagTek, Inc.
MagneSafe™ is a trademark of MagTek, Inc.
ExpressCard 2000 is a trademark of MagTek, Inc. AAMVA™ is a trademark of AAMVA.
American Express® is a registered trademark of American Express Marketing & Development Corp.
ANSI®, the ANSI logo, and numerous other identifiers containing "ANSI" are registered trademarks,
service marks, and accreditation marks of the American National Standards Institute (ANSI). EMVCo™ and EMV™ are trademarks of EMVCo and its licensors.
ISO® is a registered trademark of the International Organization for Standardization.
MasterCard® is a registered trademark and PayPass™ and Tap & Go™ are trademarks of MasterCard International Incorporated.
Microsoft® and Windows® are registered trademarks of Microsoft Corporation.
UL™ and the UL logo are trademarks of UL LLC. Visa® and Visa payWave® are registered trademarks of Visa International Service Association.
TiltWatch® is a registered trademark of ShockWatch, Inc.
TrueType® is a trademark of Apple Inc., registered in the United States and other countries.
All other system names and product names are the property of their respective owners.

ExpressCard 2000| Instant Issuance Card Personalization System | Installation and Operation Manual
Page 3 of 85 (D99875600-53)
Table 1.1 - Revisions
Rev Number Date Notes
1.01 Jun 18, 2013 Initial Release
2.01 Aug 2013 Additional / updated photos, video links, updated tech content
3.01 Apr 10, 2014 Document Client Certificate Option; update sequence for card
path cleaning; miscellaneous clarity improvements
40 Oct 23, 2014 Update technical specifications; add information to Physical
Installation Planning; update tipper foil replacement
50 Nov 21, 2014 Add general ribbon troubleshooting
51 May 17, 2016 Update screenshots, document template, and table formats; minor wording cleanup
52 Jan 26, 2017 Update technical specifications; update to current standards
for logo, page numbers, title, chip cards, powering off,
copyrights
53 March 9, 2017 Minor clarifications and structural fixes

ExpressCard 2000| Instant Issuance Card Personalization System | Installation and Operation Manual
Page 4 of 85 (D99875600-53)
SAFETY
This product has been evaluated by multiple safety certification agencies, including
Underwriters Laboratories (UL) and the United States Federal Communications
Commission (FCC Class A and Class B), and is designed to protect both the user and the
device. This document is written specifically to work in conjunction with these safety and
integrity features to protect the user and the device. It is very important to follow all steps
in the product documentation carefully, in the order in which they are described, and at
the recommended times. Failure to do so could result in personal injury, and / or cause
damage to the device, and / or void the product warranty.
SAFETY REQUIREMENTS
Caution: Never do any of the following:
DO NOT use a ground adapter plug to connect equipment to a power socket-outlet that lacks a ground
connection terminal.
DO NOT attempt any maintenance function that is not specifically described in this manual or in other ExpressCard 2000 instructional documents published by MagTek.
DO NOT remove any of the covers or guards that are fastened with screws. There are no user-serviceable areas within these covers.
DO NOT override or “cheat” electrical or mechanical interlock devices.
DO NOT use EC2000 supplies or cleaning materials for other than their intended purposes.
DO NOT operate the equipment if you or anyone else have noticed unusual noises or odors.
Consider the following before operating the ExpressCard 2000:
Connect the EC2000 to a properly grounded AC power socket-outlet. If in doubt, have the socket-outlet checked by a qualified electrician. Improper connection of the device’s grounding conductor
creates a risk of electric shock.
Place the EC2000 on a solid surface that can safely support the device’s weight plus the weight of a person leaning against it (such as a service technician).
Be careful when moving or relocating the device. Use proper lifting techniques.
Use materials and supplies specifically designed for MagTek devices. Using unsuitable materials
may result in poor performance, and in some cases may be hazardous.

1 - Table of Contents
ExpressCard 2000| Instant Issuance Card Personalization System | Installation and Operation Manual
Page 5 of 85 (D99875600-53)
1 Table of Contents
Safety ................................................................................................................................................... 4
Safety Requirements ..................................................................................................................... 4
1 Table of Contents ........................................................................................................................ 5
2 Introduction ................................................................................................................................. 9
2.1 Introduction to EC2000 Features ..................................................................................... 9
2.2 Introduction to EC2000 Components ............................................................................ 10
3 Planning and Preparation ....................................................................................................... 13
3.1 Physical Installation Planning ......................................................................................... 13
3.2 Network Planning .............................................................................................................. 15
3.3 Configuration Planning .................................................................................................... 17
3.4 Disposal Planning ............................................................................................................. 18
4 Receiving, Unpacking, and Packing....................................................................................... 19
4.1 How to Receive the EC2000............................................................................................ 19
4.2 How to Unpack the EC2000 ............................................................................................ 20
4.3 How to Pack the EC2000 ................................................................................................. 24
4.4 How to Ship the EC2000 .................................................................................................. 25
5 Installation ................................................................................................................................. 26
5.1 Installation Checklist ........................................................................................................ 26
6 Operation ................................................................................................................................... 30
6.1 Finding the Serial Number ............................................................................................... 30
6.2 Powering On, Powering Off, and Restarting ................................................................. 30
6.3 The Touchscreen ............................................................................................................... 31
6.3.1 About the Touchscreen ............................................................................................. 31
6.3.2 About the Status Page .............................................................................................. 31
6.3.3 About the Help Page ................................................................................................. 32
6.3.4 How to Use the Help Page........................................................................................ 32
6.4 Error Messages .................................................................................................................. 32
6.4.1 About Error Messages ............................................................................................... 32
6.4.2 How to Clear Error Messages................................................................................... 33
6.5 Top Access Door Security ................................................................................................ 33
6.5.1 About the Top Access Door ...................................................................................... 33
6.5.2 How to Use the Keys to Unlock the Top Access Door .......................................... 33
6.5.3 How to Use the Touchscreen to Unlock the Top Access Door ............................ 37

1 - Table of Contents
ExpressCard 2000| Instant Issuance Card Personalization System | Installation and Operation Manual
Page 6 of 85 (D99875600-53)
6.6 About Passwords and Asterisks ..................................................................................... 37
6.7 Card Stock .......................................................................................................................... 38
6.7.1 About Card Stock ....................................................................................................... 38
6.7.2 How to Load / Remove Card Stock ........................................................................ 39
6.8 Image Printer ..................................................................................................................... 43
6.8.1 About the Image Printer ........................................................................................... 43
6.8.2 How to Install / Remove the Image Printer Ribbon ............................................ 43
6.8.3 About Selecting and Synchronizing the Image Printer Ribbon .......................... 46
6.8.4 How to Select and Synchronize the Image Printer Ribbon ................................. 46
6.9 Foil Tipper ........................................................................................................................... 48
6.9.1 About the Foil Tipper ................................................................................................. 48
6.9.2 How to Install / Remove the Tipper Foil Roll ........................................................ 48
6.10 Indent Printer ................................................................................................................. 50
6.10.1 About the Indent Printer ....................................................................................... 50
6.10.2 How to Install / Remove the Indent Ribbon Cartridge .................................... 50
6.11 Processing Cards ........................................................................................................... 51
6.11.1 How to Create Sample Cards ............................................................................... 51
6.11.2 About Card Personalization Software ................................................................ 51
6.11.3 About Transactions................................................................................................ 52
6.11.4 About the Transaction Queue .............................................................................. 52
6.11.5 How to Process Transactions In the Transaction Queue ................................. 52
6.11.6 About the Card Path / Sequence of Processes ................................................ 53
6.11.7 About the Card Output Bin ................................................................................... 53
6.11.8 About the Card Rejection Bin .............................................................................. 53
6.11.9 About the Manual Feed Slot ................................................................................ 53
7 Maintenance .............................................................................................................................. 55
7.1 Cleaning .............................................................................................................................. 55
7.1.1 IMPORTANT: Warranty Coverage ............................................................................ 55
7.1.2 About Cleaning .......................................................................................................... 55
7.1.3 About Cleaning the Card Cleaning Roller .............................................................. 56
7.1.4 How to Clean the Card Cleaning Roller .................................................................. 56
7.1.5 About Cleaning the Card Path ................................................................................. 56
7.1.6 How to Clean the Card Path..................................................................................... 57
7.1.7 About Cleaning the Image Print Head ................................................................... 57
7.1.8 How to Clean the Image Print Head ....................................................................... 57

1 - Table of Contents
ExpressCard 2000| Instant Issuance Card Personalization System | Installation and Operation Manual
Page 7 of 85 (D99875600-53)
7.2 Replacing the Card Cleaning Roller ............................................................................... 58
7.2.1 About Replacing the Card Cleaning Roller ............................................................ 58
7.2.2 How to Replace the Card Cleaning Rollers............................................................ 58
7.3 Replacing the Image Print Head .................................................................................... 59
7.3.1 About Replacing the Image Print Head ................................................................. 59
7.3.2 How to Replace the Image Print Head ................................................................... 59
7.4 Re-Aligning Embossed and Printed Characters ........................................................... 61
7.4.1 About Re-Aligning Embossed and Printed Characters ........................................ 61
7.4.2 How to Align Embossed and Printed Characters .................................................. 62
8 Configuration ............................................................................................................................. 65
8.1 Network (TCP/IP) Configuration ..................................................................................... 65
8.1.1 About TCP/IP Settings .............................................................................................. 65
8.1.2 How to Configure TCP/IP Settings .......................................................................... 65
8.2 Authorizing the Device ..................................................................................................... 66
8.2.1 About Authorization .................................................................................................. 66
8.2.2 How to Manually Re-Authorize the Device ............................................................ 67
8.3 Client Certificate Option ................................................................................................... 67
8.4 Passwords .......................................................................................................................... 67
8.4.1 About Passwords ....................................................................................................... 67
8.4.2 How to Change / Reset Passwords ........................................................................ 68
8.5 Changing Computer Name .............................................................................................. 68
8.6 Card Processing Setup ..................................................................................................... 68
8.6.1 About Card Processing ............................................................................................. 68
8.6.2 How to Set Up LAN-based Processing .................................................................... 69
8.6.3 How to Set Up Internet-based Processing ............................................................. 69
8.7 How to Enable / Disable Touchscreen Unlock.............................................................. 70
8.8 About Configuration Options ........................................................................................... 70
8.9 How to Modify Configuration Options ............................................................................ 70
8.9.1 About the QueueDisplay Configuration Option ..................................................... 70
9 Troubleshooting ........................................................................................................................ 71
9.1 First Steps .......................................................................................................................... 71
9.2 Troubleshooting “Offline” Status .................................................................................... 71
9.3 Troubleshooting Not Responding to Incoming Transactions ..................................... 72
9.4 Troubleshooting Communication Problems ................................................................. 72
9.5 Troubleshooting Card Exit Problems .............................................................................. 72

1 - Table of Contents
ExpressCard 2000| Instant Issuance Card Personalization System | Installation and Operation Manual
Page 8 of 85 (D99875600-53)
9.6 Troubleshooting Card Feed Problems ........................................................................... 72
9.7 Troubleshooting Print Quality Problems ........................................................................ 73
9.8 Troubleshooting Color Problems .................................................................................... 73
9.9 Troubleshooting Picture Alignment Problems.............................................................. 73
9.10 Troubleshooting Magnetic Stripe Encoding Problems ............................................ 73
9.11 Troubleshooting Image Printer Ribbon Breaking ..................................................... 73
9.12 Troubleshooting Tipping ............................................................................................... 74
9.13 Troubleshooting Ribbon Continuously Feeding ........................................................ 74
9.14 Troubleshooting General Ribbon Errors ..................................................................... 74
9.15 Common Error Messages ............................................................................................. 74
9.16 How to Remove Stuck Cards ....................................................................................... 79
Appendix A Supplies................................................................................................................... 80
Appendix B Technical Specifications ....................................................................................... 82
Appendix C Software Updates .................................................................................................. 85

2 - Introduction
ExpressCard 2000| Instant Issuance Card Personalization System | Installation and Operation Manual
Page 9 of 85 (D99875600-53)
2 Introduction This section introduces ExpressCard 2000’s features and components. See this YouTube video for a demonstration of features.
2.1 Introduction to EC2000 Features Increase card activation and usage while enhancing cardholder satisfaction and security with ExpressCard
2000 (EC2000). EC2000 can securely, fully personalize any CR80-sized credit, debit, ATM, gift, loyalty, or membership card in as little as 90 seconds. Personalization includes embossing, indent printing, foil
tipping, and full-color image printing, all in one compact card personalization device (CPD). Now you
can inspire loyalty and increase card usage with cards that feature photos of family, friends, pets, and holidays. ExpressCard 2000 provides the custom personalization you need to distinguish yourself from
your competitors.
ExpressCard 2000 is supported by QwickCards.com and a wide range of third-party software solutions,
creating a complete, secure instant issuance system for distributed locations that can be maintained and
controlled centrally. With the feature-rich solution offered by EC2000, financial institutions will be able
to meet current market needs and also support new card issuance trends, including chip cards, contactless cards, flat cards, and photo cards.
EC2000 uses the security of MagTek’s advanced MagneSafe™ Security Architecture, and MagnePrint® card authentication technology for magnetic stripe reading/encoding. It can be configured for point-to-
point authentication to ensure that card creation requests only come from authorized workstations.
ExpressCard 2000’s physical and logical security features exceed compliance requirements for instant issuance published by Visa® and MasterCard®.
EC2000’s MagnePrint Reference Capture Module captures and registers each card’s unique MagnePrint®
signature as it is issued. This registered signature can then be used to protect legitimate cardholders by validating that the card being used at an ATM, teller window, home banking, or POS location is
authentic, not a counterfeit copy.
ExpressCard 2000 gives your customers the freedom to express themselves.

2 - Introduction
ExpressCard 2000| Instant Issuance Card Personalization System | Installation and Operation Manual
Page 10 of 85 (D99875600-53)
2.2 Introduction to EC2000 Components This section identifies the components of the EC2000, and is referenced frequently in this document.
Refer to the figures on the following pages to see what each item looks like:
1) Magnetic swipe rail (MSR)
2) Top access door handles
3) Top access door lock
4) Touchscreen
5) Hopper bay windows
6) Card output bin
7) Manual feed slot
8) Power button
9) Product serial number
10) Windows product key
11) Product identification tag
12) Power connector
13) Ethernet data port
14) Security anchor
15) XY transport (parked in Home position)
16) Image printer
17) Card stock hoppers 1 and 2
18) Exit transport
19) Card rejection bin
20) Hopper deck
21) Rear indent printer
22) Embosser
23) Foil tipper
24) Hopper transport (parked at manual feed slot)
25) AC power cord
26) Card weights
27) Card cleaning roller wipe
28) Blank white card stock
29) Touchscreen stylus
30) Support DVD
31) Cleaning card
32) Sample card
33) Rear indent cartridge
34) Tubular keys
35) Image print head cleaning pen

2 - Introduction
ExpressCard 2000| Instant Issuance Card Personalization System | Installation and Operation Manual
Page 11 of 85 (D99875600-53)
Figure 2-1 - EC2000 Components, Isometric View (Part 1 of 4)
Figure 2-2 - EC2000 Components, Back View (Part 2 of 4)

2 - Introduction
ExpressCard 2000| Instant Issuance Card Personalization System | Installation and Operation Manual
Page 12 of 85 (D99875600-53)
Figure 2-3 - EC2000 Components, Top View (Part 3 of 4)
Figure 2-4 - EC2000 Components, Accessories Kit (Part 4 of 4)

3 - Planning and Preparation
ExpressCard 2000| Instant Issuance Card Personalization System | Installation and Operation Manual
Page 13 of 85 (D99875600-53)
3 Planning and Preparation The guidelines in the following sections will assist management and network administrators in planning for the physical and network requirements of using an ExpressCard 2000 (EC2000). The most effective
way to ensure smooth installation of the EC2000 is to consider these factors before receiving the device.
3.1 Physical Installation Planning The EC2000 must be installed on a flat, level surface capable of supporting the weight of the EC2000 plus the weight of a person leaning against it (such as a service technician). See Appendix B for details.
If the EC2000 is placed on a non-level surface, it will not work correctly.
Make sure the EC2000’s placement during normal operation will provide the physical clearances shown
around the sides in Figure 3-1 (see Appendix B Technical Specifications for device dimensions). This
spacing allows adequate cooling and will keep the rear cable connectors from crushing against the wall.
Figure 3-1 - Physical Clearance Space (Top View)
Make sure the EC2000’s position during maintenance and insertion of consumables will provide the
physical clearances shown in Figure 3-2. In general, the installation location must allow users to:
Use the touchscreen on the front
Press the power button
Access the card output hopper
Open the top access door and reach into the device to replace consumables and perform general
maintenance
Access the rear of the device for the power connector, Ethernet connector, and security anchor.

3 - Planning and Preparation
ExpressCard 2000| Instant Issuance Card Personalization System | Installation and Operation Manual
Page 14 of 85 (D99875600-53)
Figure 3-2 - Physical Clearance Space for Maintenance (Right Side View)
The physical placement of the EC2000 should also provide a means of attaching the EC2000 to a secure
fixed point. There are two options for this:
The base of the EC2000 can be directly bolted to the surface beneath it. This requires a through-hole
in the surface and a bolt/nut of appropriate length, diameter, and strength.
The security anchor on the rear of the EC2000 can be attached to a security cable or chain.
If the device is installed in an enclosure, in addition to the other requirements in this section, the enclosure must provide sufficient venting to maintain the ambient temperatures specified in Appendix B. This
includes flow of fresh air into the enclosure under the power of at least one active exhaust fan.
If the device is installed on a sliding platform, in addition to the other requirements in this section, the
platform must slide out to provide full access to all sides of the device, and the slides of the platform must
also support the weight of the device plus the weight of a person (such as a technician) leaning on the
device when the platform is fully extended.

3 - Planning and Preparation
ExpressCard 2000| Instant Issuance Card Personalization System | Installation and Operation Manual
Page 15 of 85 (D99875600-53)
3.2 Network Planning There are two EC2000 features that place requirements on EC2000’s connection to the Internet (see
Figure 3-3).
Figure 3-3 - MagTek Central Security Server and Certificate Authority Connection
One of the requirements is a required security measure, and the other is an optional feature:
The EC2000 includes an authorization feature which allows card personalization to be deactivated in
the event of a security breach. The device ships in the unauthorized state, and requires a call to
MagTek Support Services to authorize. The device must then regularly connect to MagTek’s Certificate Authority (CA) via the Internet at pre-determined intervals to re-authorize.
When used with MagTek’s web-based card personalization service QwickCards.com, the EC2000
regularly polls the QwickCards service via the Internet to retrieve card processing transactions.
MagTek recommends selecting one of two internet connection topologies to support these processes. In
both topologies the EC2000 uses Secure Sockets Layer (SSL) for all Internet-bound traffic, and in neither case does MagTek require the EC2000 to have an Internet-routable network connection:
Network Security Topology Option #1: No Proxy Server. In the first configuration option, the
EC2000 transmits SSL requests directly to MagTek’s CA (and optionally QwickCards.com) via an Internet gateway.
Network Security Topology Option #2: Proxy Server. In the second configuration, the EC2000
transmits SSL requests to MagTek’s CA (and optionally QwickCards.com) via a proxy server on the card issuer’s network. The proxy server enables the card issuer to monitor EC2000 network traffic,
and the EC2000 does not communicate directly with the Internet.
The network infrastructure supporting the chosen topology should be in place before attempting to set up
the EC2000. In addition:
1) An operational Ethernet jack or network appliance should be available within reasonable cabling distance (10-12’) from the EC2000’s final install location.

3 - Planning and Preparation
ExpressCard 2000| Instant Issuance Card Personalization System | Installation and Operation Manual
Page 16 of 85 (D99875600-53)
2) The physical cable path from the EC2000 to its connection destination should be appropriately secured against unauthorized access.
3) Firewalls should be configured to allow bidirectional communication from the EC2000 via Secure
Sockets Layer (SSL) on port 443. No other open ports are required. Standard destination servers are:
a) https://authorization.magensa.net for any EC2000 device.
b) https://qwickcardsjs.com for EC2000 devices to be used with QwickCards.com.
4) If the network primarily uses static IP addresses, an appropriate IP address should be allocated and ready for use by the EC2000.
5) If the network provides local DNS lookups, MagTek advises creating an entry for the EC2000’s IP address using the name EC-serial-number (see section 6.1 Finding the Serial Number). This will
prevent users from seeing errors when using a web browser to connect to the EC2000 via https.
6) If using a proxy server, proxy information should be available prior to setting up the EC2000.
7) A system administrator should select and configure a secure workstation from which users can create
card processing transactions for the EC2000:
a) If users will process cards using local card personalization software, the EC2000 and the card
personalization workstation must be on the same LAN, or must have an alternate way to connect directly by IP address, such as a VPN. In any case, the PC and the EC2000 must be able to
communicate via port 443 SSL.
b) If users will process cards via QwickCards.com, the workstation must be equipped with a working web browser and an Internet connection, and be able to communicate via SSL.
8) A system administrator should select and configure a secure workstation from which administrators can perform updates to the EC2000. At the administrator’s discretion, it may share a workstation with the card personalization software, with some additional requirements:
a) The workstation must have a working web browser.
b) The workstation must have bidirectional access to port 443 SSL.
c) The workstation must have secure provisions for obtaining files, either via the network (such as SFTP or e-mail with an Internet gateway) or via removable media, such as USB drives.
d) The workstation must be within the same LAN as the EC2000, or must provide some alternate means of connecting directly to the EC2000 directly by IP address, such as a secure VPN to the EC2000’s LAN or an Ethernet crossover cable.
e) For convenience, if local DNS is not available, the workstation can be set up with an entry in its hosts file that binds the EC2000’s IP address to a text name of the form EC-serial_number (see
section 6.1 Finding the Serial Number). For more information on the Windows hosts file, see
the Microsoft Knowledgebase article located at http://support.microsoft.com/kb/972034.

3 - Planning and Preparation
ExpressCard 2000| Instant Issuance Card Personalization System | Installation and Operation Manual
Page 17 of 85 (D99875600-53)
3.3 Configuration Planning EC2000 features can be customized based on customer application needs. Before installing the EC2000,
it is beneficial to determine how features will be configured. Configurable features include:
Card design. There is a wide variety of techniques to optimize card designs for instant issuance. MagTek can advise your designers on techniques that make best use of the EC2000’s capabilities.
Device passwords. Determine which passwords will be held by which users, and what the passwords will be. See section 6.6 About Passwords and Asterisks, and section 8.4.2 How to Change / Reset
Passwords for details.
Touchscreen top access door unlock. By default, the EC2000 requires a user to open the top access door with one of the two included keys. The device can be configured to allow users to open the top
access door using the touchscreen. See section 6.5 Top Access Door Security for details.
Status page queue display. By default, the EC2000’s touchscreen shows users a simple device status page. The default can be changed to show a more advanced “Queue Display” page during
normal operation, which lists transactions in process from all users. See section 6.11.4 About the
Transaction Queue and section 8.9.1 About the QueueDisplay Configuration Option).
Two-sided color, color front / monochrome (single color) back, or two-sided monochrome
printing. The EC2000’s image printing feature can operate in either color or monochrome on each side of the card, and in half-width or full-width mode, depending on the images sent to the device and
the ribbon that is loaded. Choose and order ribbons appropriate to the application before setup.
Tipper foil colors. The EC2000 can tip embossed characters with a variety of foil colors. Order tipper foil rolls appropriate to the application before installation and setup.
Embossing character set. The EC2000 embosser may or may not contain all characters required for your embossing application. MagTek can work with you to produce any additional characters, and
the embosser wheel is designed to make it easy for you to add new characters.
Indent printing. The standard EC2000 model can indent-print on the rear of the card. Order spare indent ribbon cartridges appropriate to the application before installation and setup.
Card personalization software. Using the EC2000 to process personalized cards requires use of
card personalization software, such as QwickCards.com. Determine what card personalization software you will use, and how it will be configured. Processes for installing and configuring the
chosen card personalization software will vary, and are beyond the scope of this document, but some
features will require the EC2000 to be configured a specific way to support them.
Card stock types. The EC2000 can print to a variety of card stock types, and can have up to seven
types of stock loaded simultaneously. Determine what type(s) of stock your application will use and
which hoppers should be loaded with which stock. MagTek suggests labeling hoppers with decals showing what type of stock they should hold, which is determined by the configuration of the card
personalization software that will drive the EC2000. Order card stock before installation and setup.
Pre-loaded hoppers. For additional security and more reliable image printing, you may choose to have card stock pre-loaded into card stock hoppers at a secure, dust-free off-site facility. Hoppers
may be labeled with a thumbnail image of the stock in the indentation near the handle, secured with
tamper-resistant seals, and shipped to instant issuance locations on demand.

3 - Planning and Preparation
ExpressCard 2000| Instant Issuance Card Personalization System | Installation and Operation Manual
Page 18 of 85 (D99875600-53)
3.4 Disposal Planning MagTek strongly advises customers to put standard security and disposal procedures in place to ensure
EC2000 users securely dispose of used supplies. Consumable supplies used in the EC2000, such as
image printer ribbons and tipper foil rolls, contain retrievable negatives of processed cards. Signs documenting standard procedures can be hung near the EC2000 to remind users of these procedures.
Similarly, although the EC2000 has security features that deter unauthorized access to blank card stock loaded into the device, custom-printed card stock that is not yet loaded into the EC2000 should be stored
securely, and processed and rejected cards should be disposed of securely. MagTek advises customers to
put standard procedures in place to ensure EC2000 users securely dispose of unused or discarded stock.
MagTek offers security devices that can be used for supply storage, and can advise on supply disposal
procedures. Contact your sales representative or MagTek Support Services for additional assistance.

4 - Receiving, Unpacking, and Packing
ExpressCard 2000| Instant Issuance Card Personalization System | Installation and Operation Manual
Page 19 of 85 (D99875600-53)
4 Receiving, Unpacking, and Packing Caution: The EC2000 weighs approximately 85 lbs. and is specifically designed to be lifted
by no fewer than two people. Use safe lifting techniques when moving it.
4.1 How to Receive the EC2000 Follow these steps to receive, inspect, and safely deliver the EC2000 to its installation location:
1) Inspect the device’s packaging for shipping damage, including checking the box’s TiltWatch® sensors. If either of the sensors is red or if damage is visible, take photographs and contact either
your company’s Shipping and Receiving department or MagTek Support Services for guidance.
2) Determine whether an additional package has arrived which contains supplies specific to your installation, such as tipper foil rolls, indent ribbon cartridges, and image printer ribbons. The EC2000
can not be used without at least one of these supplies. The package should accompany the EC2000.
3) If there is no visible damage and the TiltWatch® sensor is still silver, move the EC2000 and any
additional related packages to its installation location as follows:
a) Determine where the EC2000 will be installed (see section 3 Planning for details).
b) Obtain an appropriate wheeled carrier designed to safely move boxes like the EC2000’s.
c) With a partner, use the box’s handles to lift it onto the carrier and secure it if necessary.
d) Include any additional packages of supplies shipped from MagTek.
e) Wheel the box and any separate accessory shipments to the installation location.
f) With a partner, place the boxes on the floor in front of the EC2000’s install location.
4) EC2000 unpacking and setup continues in the following sections.

4 - Receiving, Unpacking, and Packing
ExpressCard 2000| Instant Issuance Card Personalization System | Installation and Operation Manual
Page 20 of 85 (D99875600-53)
4.2 How to Unpack the EC2000
The EC2000’s shipping container consists of a top shell and a bottom shell that completely
overlap each other. Do not cut the tape on the box – it is an integral part of the top shell.
Follow these steps to unpack the EC2000 and prepare it for installation (see this YouTube video for a
demonstration):
1) Double-check that the EC2000 box is placed on the floor in front of its installation location.
2) With a partner, remove the top half of the EC2000’s shipping container as shown in Figure 4-1:
a) Stand on either side of the box, facing the handles.
b) Hook a finger into the outer cardboard layer of the handle, and separate it from the inner layer as shown in Figure 4-2.
c) Lift the outer layer slowly but firmly. You will see the top shell separating at the very bottom of the box. Continue lifting until the top shell is completely separated, and set it aside.
Figure 4-1 – Two Partners Lifting EC2000 Lid

4 - Receiving, Unpacking, and Packing
ExpressCard 2000| Instant Issuance Card Personalization System | Installation and Operation Manual
Page 21 of 85 (D99875600-53)
Figure 4-2 - Using the EC2000 Lid Handles
3) Remove the accessory box (contents shown in Figure 2-4) and set it aside.
4) Remove the packing foam from the top of the EC2000 box (shown in Figure 4-3) and set it aside.
Figure 4-3 - EC2000 Foam Inserts
5) Open the EC2000’s anti-static bag as shown in Figure 4-4.

4 - Receiving, Unpacking, and Packing
ExpressCard 2000| Instant Issuance Card Personalization System | Installation and Operation Manual
Page 22 of 85 (D99875600-53)
Figure 4-4 - Removing Anti-Static Bag
6) Rotate the box so the EC2000’s touchscreen faces away from the surface where it will be installed.
7) With a partner, safely and carefully lift the EC2000 from the box to its installation location (see Figure 4-5 on page 22).
Figure 4-5 - Removing the EC2000 from the Box
8) Inspect the EC2000 and report any damage to your sales representative.
9) Unpack the accessories box using Figure 2-4 to make sure all accessories are included. Report any
missing items to your sales representative for replacement.
10) Locate the tubular keys, and test them both in the top access door’s lock (see section 6.5 Top Access
Door Security for details). Leave the top access door open.
11) Carefully remove the three yellow beaded ties (shown in Figure 4-6 and Figure 4-7) that secure the XY transport and the hopper transport during shipping. Pack them in the accessories box.

4 - Receiving, Unpacking, and Packing
ExpressCard 2000| Instant Issuance Card Personalization System | Installation and Operation Manual
Page 23 of 85 (D99875600-53)
12) Return the empty accessories box and all packing materials to the main box, and replace the top shell.
13) Continue setup in section 5 Installation.
Figure 4-6 - XY Transport Shipping Tie
Figure 4-7 - Hopper Transport Shipping Tie

4 - Receiving, Unpacking, and Packing
ExpressCard 2000| Instant Issuance Card Personalization System | Installation and Operation Manual
Page 24 of 85 (D99875600-53)
4.3 How to Pack the EC2000
The EC2000’s shipping container consists of a top shell and a bottom shell that completely
overlap each other. Do not cut the tape on the box – it is an integral part of the top shell.
Follow these steps for shipping the EC2000 to minimize risk of injury and damage to the device. If there
are conditions that prevent safe execution of any step, contact MagTek Support Services:
1) Make sure the EC2000 is powered on (see section 6.2 Powering On, Powering Off, and Restarting for details).
2) Prepare the EC2000’s original box as follows:
a) Obtain a wheeled carrier designed to safely move 85-lb. boxes like the EC2000’s.
b) Put the EC2000’s box on the floor in front of the EC2000.
c) With a partner, lift the top shell off the box and set it aside (see section 4.2 How to Unpack the
EC2000 for details).
d) Inspect the top and bottom shell to make sure they are intact and will protect the device from impact and weather during transport.
e) Remove the small accessories box shown in Figure 2-4 and set it aside.
f) Remove the top layer of packing foam and set it aside.
3) Open the top access door of the EC2000 (see section 6.5 Top Access Door Security for details).
4) Remove all cards from inside the device:
a) Remove cards from the card rejection bin and dispose of them per your company’s standards.
b) Remove cards from the card output bin and dispose of them per your company’s standards.
5) Clean out the card stock hoppers:
a) Remove all card stock and card weights from the card stock hoppers (see section 6.7 Card Stock for details) and secure pre-printed card stock according to your company’s standards.
b) Put card weights in a bag and pack them in the accessories box.
c) Re-install all hoppers in the device, making sure they are empty and securely fastened.
6) Remove the image printer ribbon (see section 6.8.2 How to Install / Remove the Image Printer
Ribbon for details) and dispose of it per your company’s secure disposal standards.
7) Remove the indent ribbon cartridge (see section 6.10 Indent Printer for details) and dispose of it per your company’s secure disposal standards.
8) Remove the tipper foil roll (see section 6.9 Foil Tipper for details) and dispose of it per your company’s secure disposal standards.
9) Power off the device using the power switch on the front panel.
10) Secure the hopper transport using a yellow beaded strap included with the device, or an equivalent strap such as a nylon cable tie (Figure 4-7, page 23).
11) Secure the XY transport using a yellow beaded strap shipped with the device, or an equivalent strap such as a nylon cable tie (see Figure 4-6, page 23).
12) Perform a final check to make sure there are no unsecured parts inside the EC2000, such as
cards, card stock, or card weights.
13) Disconnect the network cable from the EC2000.
14) Unplug the power cable from the AC power socket-outlet, then disconnect the power cable from the EC2000 power connector and pack it in the accessories box.
15) Disconnect any physical security hardware attaching the EC2000 to its installation location (see section 5.1 Installation Checklist for details).

4 - Receiving, Unpacking, and Packing
ExpressCard 2000| Instant Issuance Card Personalization System | Installation and Operation Manual
Page 25 of 85 (D99875600-53)
16) Perform a final check to make sure there is nothing attached to the EC2000.
17) Close and secure the device’s top access door using the tubular key (see section 6.5 Top Access Door
Security).
18) Pack the keys and any available accessories (shown in Figure 2-4) in the accessories box.
19) Seal the accessories box with packing tape.
20) Lay the bottom layer of foam flat in the EC2000 box with the hollow center facing up.
21) Place the anti-static bag on top of the bottom layer of foam and lay its open edges over the sides of the box.
22) With a partner, lift the EC2000 into the box, making sure it fits securely into the bottom foam and the anti-static bag.
23) Wrap the anti-static bag around the top of the EC2000 and tape it closed.
24) Line up the top foam with the EC2000’s touchscreen, and insert it into the box so it fits evenly with the top edges of the box.
25) Insert the accessories box into the slot in the top foam.
26) With a partner, use the top shell’s handles to lower it all the way onto the lower shell.
27) Work with your company’s Shipping and Receiving department to ship the device, using the steps in the following section for reference.
4.4 How to Ship the EC2000 Follow these steps to safely ship the EC2000:
1) Make sure the steps in 4.3 How to Pack the EC2000 are complete.
2) If you are returning the device to MagTek and have not received a prepaid shipping label with a replacement device, contact MagTek Support Services to request one.
3) Use the wheeled carrier to move the packed EC2000 to a Shipping and Receiving area.
4) Remove the TiltWatch® sensors and affix new ones to the front and side of the box, if available.
5) Affix a shipping label to the box.
6) Take photographs of the box to document its condition before shipping.
7) Ship the EC2000. Be sure the device is insured for its replacement value.

5 - Installation
ExpressCard 2000| Instant Issuance Card Personalization System | Installation and Operation Manual
Page 26 of 85 (D99875600-53)
5 Installation Before installing a new EC2000, be sure to consult section 3 Planning to make sure all supporting electrical, network, and physical infrastructure are in place.
5.1 Installation Checklist Follow these steps to install the EC2000 (see this YouTube video for a demonstration):
1) Determine how the EC2000’s chassis will be secured, per the physical installation plan (see section 3.1 Physical Installation Planning).
2) If the physical installation plan includes using the security anchor on the rear of the device, thread a
cable or chain through the security anchor (see Figure 5-1), and lock the cable to a secure stationary anchor point.
Figure 5-1 - Security Anchor
3) If the plan includes bolting the EC2000 chassis directly to the surface it is installed on:
a) Open the EC2000’s top access door (see section 6.5 Top Access Door Security for details).
b) Remove the two thumb screws on the left side of the backplane (see Figure 5-2) and remove the service access door on the bottom left side of the device.
c) Locate the 3/8 inch diameter anchor hole in the front right of the lower chassis (see Figure 5-3).
d) Select an appropriately-sized lag bolt or similar anchoring device and make sure it fits the hole.
e) Use a pencil to lightly mark the mounting surface through the anchor hole.
f) Use a pencil to lightly outline the EC2000’s front feet on the mounting surface.
g) Move the EC2000 to expose the hole marked on the mounting surface.
h) Drill a through-hole sized for the mounting hardware at the mark, and make sure the mounting hardware fits through the hole without slipping all the way through.
i) Move the EC2000 so its feet and anchor hole line up with the hole and marks.
j) Fasten the mounting hardware to the surface through the anchor hole, making sure it is secure. MagTek recommends feeding a lag bolt up through the mounting surface into the EC2000 chassis
and attaching a nut inside the EC2000.
k) Replace the left service access door and thumb screws, and close the top access door.

5 - Installation
ExpressCard 2000| Instant Issuance Card Personalization System | Installation and Operation Manual
Page 27 of 85 (D99875600-53)
Figure 5-2 - Thumb Screws to Unlock Left Service Access Door
Figure 5-3 – Left Service Access Door and Anchor Hole Location

5 - Installation
ExpressCard 2000| Instant Issuance Card Personalization System | Installation and Operation Manual
Page 28 of 85 (D99875600-53)
4) Determine whether the EC2000 will be connected to a local area network (for normal operation) or
will operate as a standalone device (for demonstration purposes only), and connect its network jack (shown in Figure 5-4) via an appropriate cable. Using the wrong cable can cause connection errors:
a) If the EC2000 will be connected to a Local Area Network (LAN), use a standard Ethernet cable to connect the EC2000 to the allotted Ethernet jack or network device.
b) If the EC2000 will be used in demonstration mode, use an Ethernet crossover cable to connect the EC2000 directly to the demonstration computer.
Figure 5-4 - Connecting the EC2000 to a Network
5) Insert the provided AC power cord firmly into the EC2000’s power connector (see Figure 5-5), and
connect the other end to a properly grounded AC socket-outlet.
Figure 5-5 - Connecting the EC2000 to Power
6) Power on the EC2000 (see section 6.2 Powering On, Powering Off, and Restarting for details).
7) Determine the EC2000’s serial number (see section 6.1 Finding the Serial Number).
8) Contact MagTek Support Services and request help with these steps:
a) Learn default passwords, which are required to configure the device (see section 8.4 Passwords for more information).

5 - Installation
ExpressCard 2000| Instant Issuance Card Personalization System | Installation and Operation Manual
Page 29 of 85 (D99875600-53)
b) Configure the EC2000’s TCP/IP settings to work correctly on your network (see section 3.2
Network Planning and section 8.1 Network (TCP/IP) for details).
c) Authorize the device (see section 8.2 Authorizing the Device for details).
9) Open the EC2000’s top access door (see section 6.5 Top Access Door Security for details).
10) Load card stock into the EC2000’s card stock hoppers (see section 6.7 Card Stock for details).
11) If necessary, install an image printer ribbon and calibrate the image printer (see section 6.8 Image
Printer for details).
12) If necessary, install a tipper foil roll (see section 6.9 Foil Tipper for details).
13) If necessary, install an indent ribbon cartridge (see section 6.10 Indent Printer for details).
14) Test the device by creating sample cards (see section 6.11.1 How to Create Sample Cards).
15) Determine how the device’s software will be configured:
a) Change all device passwords from defaults (see section 6.6 About Passwords and Asterisks, and section 8.4.2 How to Change / Reset Passwords for details.).
b) If the configuration plan includes it, enable the touchscreen unlock feature (see 6.5 Top Access
Door Security for details).
16) If necessary, align printed images with embossed characters. See section 7.4 Re-Aligning Embossed
and Printed Characters for details.

6 - Operation
ExpressCard 2000| Instant Issuance Card Personalization System | Installation and Operation Manual
Page 30 of 85 (D99875600-53)
6 Operation
6.1 Finding the Serial Number Some procedures in this manual (such as product authorization, updates, and password resets) require
using the device’s serial number, sometimes in combination with other characters. The device’s serial
number is a seven-character alphanumerical code starting with “B,” and can be found on the rear of the
device or in the upper left corner of the Help page (see section 6.3.3 About the Help Page for details).
6.2 Powering On, Powering Off, and Restarting To power on the EC2000, press the round power button on the front of the device (see Figure 6-1).
Figure 6-1 - Powering On the EC2000
The EC2000 will take about one minute to initialize, during which the screen will be blank. After
the device has booted, it will display the Status page, which looks like Figure 6-2 or Figure 6-3,
depending on how the device is configured (see section 6.11.4 About the Transaction Queue and
section 8.9.1 About the QueueDisplay Configuration Option for details).
Figure 6-2 - Status Page If QueueDisplay = True

6 - Operation
ExpressCard 2000| Instant Issuance Card Personalization System | Installation and Operation Manual
Page 31 of 85 (D99875600-53)
Figure 6-3 - Status Page If QueueDisplay = False
To power off the EC2000, press the power button on the front panel and wait until the blue power button
light turns off. Powering off will take a maximum of 35 seconds.
To restart the EC2000, press the power button on the front panel and wait until the blue power button
light turns off, then press the power button again to power it back up.
6.3 The Touchscreen
6.3.1 About the Touchscreen
Treat the EC2000’s touchscreen as you would any other LCD monitor:
Do not touch the touchscreen with sharp or rough objects.
Do not use chemical cleaners on the touchscreen.
Do not use abrasive cleaners or cleaning tools on the touchscreen.
Do not spray the touchscreen directly or use excessive amounts of water to clean it.
The touchscreen on the front of the EC2000 can be operated using either the included stylus or a fingertip.
If the touchscreen accumulates smudges or fingerprints, wipe it using a soft dry cloth. If that fails to remove the smudges, moisten the cloth and wipe the touchscreen again. If smudging continues to be a
problem, instruct users to wash their hands before using the device, or to use the included stylus or the
corner of a blank stock card instead of their fingers.
6.3.2 About the Status Page
The Status page is the default page displayed on the EC2000’s touchscreen. It shows the system’s
current status, including whether the device is “Ready” or “Offline,” and error messages that may prevent
normal operation. If the “Queue Display” feature is enabled, it will also show a list of all transactions that
have not yet been processed by the device (see 6.11.4 About the Transaction Queue and section 8.9.1
About the QueueDisplay Configuration Option for details). Press the Status button at any time to
return to this page.
When the Status page shows the EC2000 is “Offline,” the device will not process cards.
6 - Operation
ExpressCard 2000| Instant Issuance Card Personalization System | Installation and Operation Manual
Page 32 of 85 (D99875600-53)
6.3.3 About the Help Page
The EC2000 has a Help page that provides information about the device’s hardware, firmware, and
software. The information includes the list of authorized features, the device serial number, and the
current device configuration. It also contains a list of step-by-step video guides the user can view on the
touchscreen. Information provided on the Help page is useful when troubleshooting.
6.3.4 How to Use the Help Page
To open the Help page, press the Help button at the bottom of any page. From the Help page, you can
do the following:
Find the serial number of the device in the upper left corner.
Press the Version Information button to see software and firmware versions installed on the device.
Press the Device Information button and scroll through the list to see information about the device,
including serial number, identification number, ribbon information, encoder and decoder information, device options, and the number of successful or failed transactions.
Press the Device Status button to show the status of the EC2000’s subsystems and their sensors.
This page can be helpful with troubleshooting.
Press the Device Capabilities button to show which features are authorized.
Press the Video button to open a menu of video presentations that demonstrate cleaning the image
printer, magnetic stripe encoder, and feed rollers; cleaning the print head; replacing the ribbon, and
more. To play a video, select it from the list and press the play button ( ).
6.4 Error Messages
6.4.1 About Error Messages
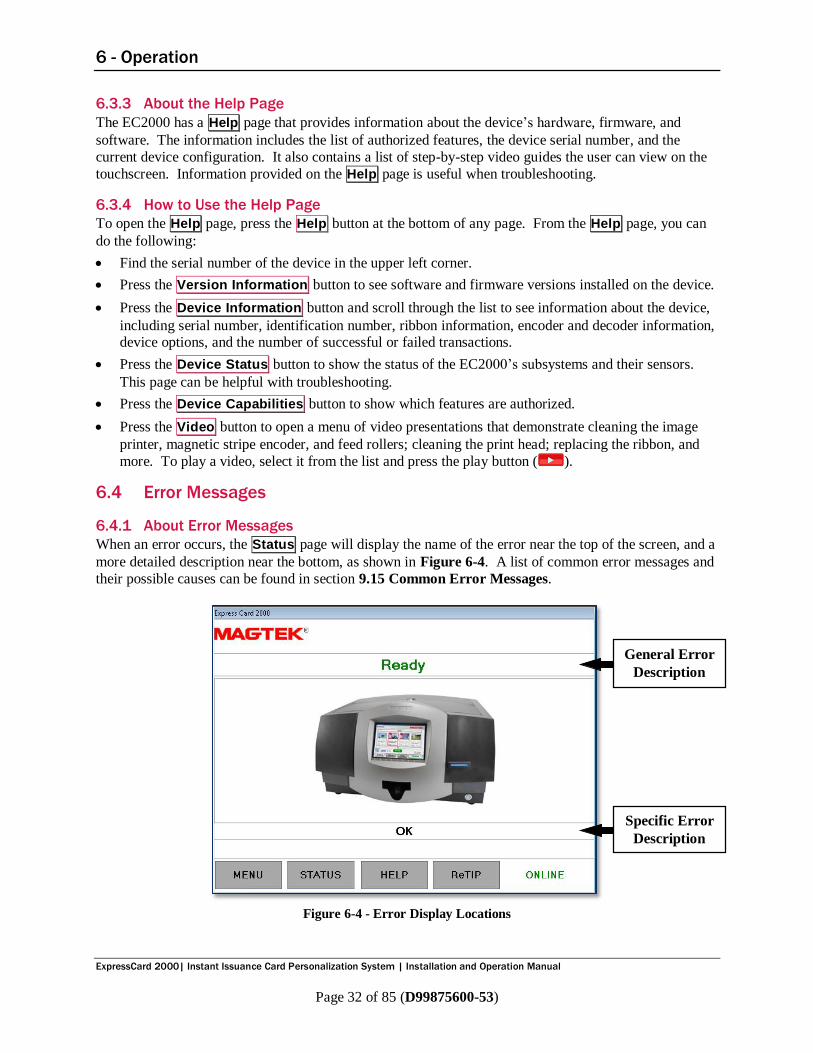
When an error occurs, the Status page will display the name of the error near the top of the screen, and a
more detailed description near the bottom, as shown in Figure 6-4. A list of common error messages and
their possible causes can be found in section 9.15 Common Error Messages.
Figure 6-4 - Error Display Locations
Specific Error
Description
General Error
Description

6 - Operation
ExpressCard 2000| Instant Issuance Card Personalization System | Installation and Operation Manual
Page 33 of 85 (D99875600-53)
6.4.2 How to Clear Error Messages
The EC2000 will continue to display most errors on the touchscreen until the user corrects the problem that caused the error. After correcting the problem, clear the error message and return to normal use by
pressing the Status button to return to / refresh the Status page, then attempt the operation again.
6.5 Top Access Door Security
Figure 6-5 - Top Access Door Movement
6.5.1 About the Top Access Door
The EC2000 secures all consumables (such as card stock and image printer ribbons) under the top access
door, which users must unlock before opening. There are two ways to unlock the top access door:
A mechanical key lock using a tubular key;
A touchscreen unlock function which authorized users can activate using the Case/Door button.
By default, the Case/Door button is disabled. In a typical installation, an advanced user with the
administrator passwords will enable the feature and store the tubular keys in a secure location. See
section 8.7 How to Enable / Disable Touchscreen Unlock for details.
6.5.2 How to Use the Keys to Unlock the Top Access Door
The EC2000 comes with two identical tubular keys that are unique to the device. For security reasons,
keys can not be re-issued; if keys are lost or misplaced or the lock stops functioning, contact your sales representative for assistance with replacing both the lock and the keys.
To unlock the top access door using one of the tubular keys:
1) Line up the tab on the outside of the key with the slot on the top access door lock, and insert the key. When locked, the slot will point toward the rear of the device.

6 - Operation
ExpressCard 2000| Instant Issuance Card Personalization System | Installation and Operation Manual
Page 34 of 85 (D99875600-53)
Figure 6-6 - Inserting the Key in the Top Access Door Lock
2) Turn the key 90 degrees clockwise and leave the key in the lock. As a security measure, it can not be
removed when the top access door is unlocked.
3) Grab the top access door’s indented handles just in front of and just behind the lock.
Figure 6-7 - Opening the Top Access Door
4) Lift the handles upward, and follow the folding motion upward and toward the rear of the device.
5) Use your other hand to guide the front edge of the top access door straight away from you until it stops.

6 - Operation
ExpressCard 2000| Instant Issuance Card Personalization System | Installation and Operation Manual
Page 35 of 85 (D99875600-53)
Figure 6-8 - Lifting the Top Access Door
6) Lean the folded top access door away from you to prop it open. It is important that the top access door be open all the way, not leaning on anything behind the device (see Figure 6-9).
Figure 6-9 - Top Access Door In Open Position
To lock the top access door with the tubular key:
1) Tilt the top access door so it points straight up.
2) Pull the front edge of the top access door straight toward you.

6 - Operation
ExpressCard 2000| Instant Issuance Card Personalization System | Installation and Operation Manual
Page 36 of 85 (D99875600-53)
Figure 6-10 - Closing the Top Access Door
3) Grab the top access door’s indented handles just in front of and just behind the lock to support it. Be
careful to keep your fingers within the indented handles and not in the space between the top
access door panels, otherwise your finger will be pinched when the door closes.
4) Release the front edge as the cover flattens, to avoid pinching your fingers.
Figure 6-11 - Lowering the Top Access Door Safely
5) Lower the top access door using the handles, and gently press it closed.

6 - Operation
ExpressCard 2000| Instant Issuance Card Personalization System | Installation and Operation Manual
Page 37 of 85 (D99875600-53)
Figure 6-12 - Final Closing of the Top Access Door
6) Turn the key 90 degrees counterclockwise to lock the top access door, and remove the key.
7) Pull up firmly on the top access door’s handles to make sure it is locked.
6.5.3 How to Use the Touchscreen to Unlock the Top Access Door
To open the top access door or the card access door from the front display panel, follow these steps:
1) If the EC2000 is not already displaying the Status page, press the Status button.
2) Press the Menu button to open the Main Menu page.
3) Press the Case/Door button to open the Unlatch Case/Door page. If the Case/Door button is
grayed out, the touchscreen top access door unlock feature is disabled (see section 6.5.1 About the
Top Access Door for more information).
4) Enter the required passwords when prompted.
5) To unlock the top access door, press the Unlock Top Door button. The EC2000 will click and
display a countdown timer on the touchscreen, during which the top access door will remain
unlocked. When the countdown timer reaches zero, the electronic lock will re-engage.
6) Open the door as described in section 6.5.2 How to Use the Keys to Unlock the Top Access Door. To close the top access door after using the touchscreen unlock feature, follow the steps in section 6.5.2
How to Use the Keys to Unlock the Top Access Door, then gently press it closed until it is locked.
6.6 About Passwords and Asterisks The EC2000 secures subsets of menu features using different passwords. The buttons for features that require passwords are marked with an asterisk (*). The color of the asterisk indicates which password(s)
the user will be prompted for upon pressing the button. Password types, their associated asterisk colors,
and the general functions they secure are summarized in Table 6.1.
If a user enters an incorrect password three times in a row, the device will go into lockdown mode to
prevent unauthorized use. Lockdown mode must be cleared by entering the administrator password.
6 - Operation
ExpressCard 2000| Instant Issuance Card Personalization System | Installation and Operation Manual
Page 38 of 85 (D99875600-53)
Table 6.1 - EC2000 Password Types
Password Type Asterisk Color Associated Features
Setup Password 1 Setup Password 2
Red (*) Change TCP/IP Settings Update software / firmware
Edit configuration values
Service Password 1
Service Password 2
Blue (*) Direct control of components in the device,
including image printer, embosser.
Unlock Password 1 Unlock Password 2
Gold (*) Unlock the top access door
Key Entry Password 1
Key Entry Password 2
Purple (*) Load encryption keys
Administrator Yellow (*) Unlock “lockdown mode” after a user enters an
incorrect set of passwords three times.
6.7 Card Stock
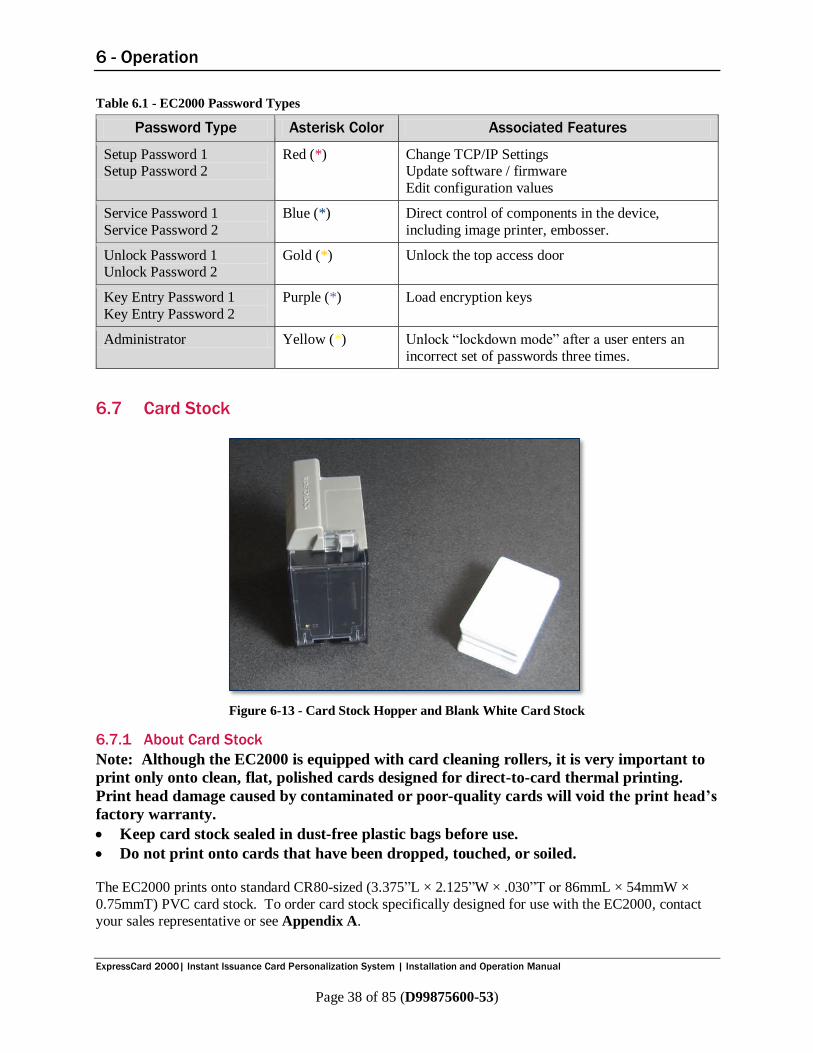
Figure 6-13 - Card Stock Hopper and Blank White Card Stock
6.7.1 About Card Stock
Note: Although the EC2000 is equipped with card cleaning rollers, it is very important to
print only onto clean, flat, polished cards designed for direct-to-card thermal printing.
Print head damage caused by contaminated or poor-quality cards will void the print head’s
factory warranty.
Keep card stock sealed in dust-free plastic bags before use.
Do not print onto cards that have been dropped, touched, or soiled. The EC2000 prints onto standard CR80-sized (3.375”L × 2.125”W × .030”T or 86mmL × 54mmW ×
0.75mmT) PVC card stock. To order card stock specifically designed for use with the EC2000, contact
your sales representative or see Appendix A.

6 - Operation
ExpressCard 2000| Instant Issuance Card Personalization System | Installation and Operation Manual
Page 39 of 85 (D99875600-53)
To determine the stock level in each of the EC2000’s seven card stock hoppers, look through the hopper
bay windows on the right side of the device (see Figure 6-14).
Figure 6-14 - Checking Card Stock Levels
It is important to load only one type of stock into each of the card stock hoppers, otherwise the device will
process cards that do not match the previews the user sees in the card personalization software.
The EC2000 holds a maximum of 700 CR80-sized cards (100 cards per card stock hopper – see section
6.7 Card Stock). It will automatically feed each card off the bottom of the stack. Card customization
software can also specify that stock for a specific operation should be fed into the manual feed slot (see section 6.11.9 About the Manual Feed Slot for details).
6.7.2 How to Load / Remove Card Stock
Remove card stock from the EC2000 as follows (see this YouTube video for a demonstration):
1) Stand in front of the EC2000 and open the top access door (see section 6.5 Top Access Door
Security for details).
2) Locate the seven card stock hoppers installed in the EC2000 (see Figure 2-3 on page 12).
3) Navigate to Menu > Maintenance to open the Maintenance Menu page.
4) Press the Remove Hoppers button to move the hopper transport out of the way.
5) Remove the hopper you want to unload (see Figure 6-15):

6 - Operation
ExpressCard 2000| Instant Issuance Card Personalization System | Installation and Operation Manual
Page 40 of 85 (D99875600-53)
Figure 6-15 – Removing Card Stock Hopper
a) Press down on the hopper release button (labeled with a yellow arrow) near the bottom of the hopper. The hopper will move away from your finger, toward its release position.
b) Gently push the hopper all the way to its release position.
c) Lift the hopper and remove it from the EC2000.
6) Open the hopper as follows (see Figure 6-16):
Figure 6-16 - Opening Card Stock Hopper
a) Turn the hopper around so its clear loading door is facing you.
b) Slide the gray door release lever, located at the top of the door, to the right and hold it.
c) Pull the door toward you so it swings open.
7) Remove the card weight from the hopper.
8) If you are changing the type of card stock in the hopper or are packing the EC2000 for transport, remove all existing card stock from the hopper.
9) Repeat the procedure for any other hoppers you want to unload.
Load card stock into hoppers as follows:
1) Obtain the card stock you will be loading.

6 - Operation
ExpressCard 2000| Instant Issuance Card Personalization System | Installation and Operation Manual
Page 41 of 85 (D99875600-53)
2) Determine which hopper the card stock should be loaded into. This depends on how the card personalization software is set up (see section 8.6 Card Processing Setup). The hoppers may be labeled with decals that indicate the type of stock they should hold.
3) Remove a stack of 100 or fewer cards from the packaging. Handle cards only along the edges; oil or dirt from hands can cause poor quality prints. If you touch or drop a stock card, dispose of it
according to your company’s secure disposal procedures.
Figure 6-17 - Do Not Touch Or Drop Card Stock
4) If static charge has accumulated on the card stock and is causing stock cards to stick together, riffle the stack (like shuffling a deck of cards) to separate them.
5) Orient the card stock with magnetic stripes toward the floor, facing the right wall of the hopper, or with chips facing the ceiling, toward the rear wall of the hopper.
6) Load the stack of cards into the EC2000 card stock hopper and push the stack all the way to the back of the hopper. Figure 6-20 shows how card stock should look in the hopper, and Figure 6-21 shows
common problems with hopper loading.
Figure 6-18 - Loading Card Stock and Weight
7) Place a card weight on top of the loaded card stock. Shake gently to make sure the cards and the card weight are loose inside the hopper. Packing cards too tightly can cause card feed problems.
8) Close the hopper’s door and make sure the door release lever clicks closed.
9) Turn the hopper around so the “Lock” arrow on the handle points to the right side of the EC2000.

6 - Operation
ExpressCard 2000| Instant Issuance Card Personalization System | Installation and Operation Manual
Page 42 of 85 (D99875600-53)
Figure 6-19 - Inserting and Locking Card Stock Hopper
10) Re-insert the hopper into the EC2000 in the release position. Be sure the hopper is level and that all
four lock pins on the bottom have inserted into the hopper deck.
11) Slide the hopper into the locked position (the direction indicated by the “Lock” arrow on the handle) until you feel a click as it locks in place.
12) Repeat the procedure for any other hoppers you want to load.
Figure 6-20 - Correct Card Stock Hopper Loading

6 - Operation
ExpressCard 2000| Instant Issuance Card Personalization System | Installation and Operation Manual
Page 43 of 85 (D99875600-53)
Figure 6-21 - Incorrect Card Stock Hopper Loading
6.8 Image Printer
6.8.1 About the Image Printer
Depending on which type of ribbon is loaded, the EC2000 can produce color or monochrome images on
the front and back of card stock. For instructions on loading ribbons into the image printer, see section 6.8.2 How to Install / Remove the Image Printer Ribbon. To order ribbons specifically designed for
use with the EC2000, contact your sales representative or see Appendix A.
Do not touch the colored portion of the ribbon; oil or dirt from hands can impair printing.
6.8.2 How to Install / Remove the Image Printer Ribbon
To remove the color or monochrome ribbon from the image printer, follow these steps (see this YouTube
video for a demonstration):
1) Open the top access door of the EC2000 (see section 6.5 Top Access Door Security for details).
2) Remove any jewelry or accessories that could touch the print head.

6 - Operation
ExpressCard 2000| Instant Issuance Card Personalization System | Installation and Operation Manual
Page 44 of 85 (D99875600-53)
3) Locate the image print head inside the EC2000. See section 2.2 Introduction to EC2000
Components for details.
4) Press the image printer’s release button to unlock it as shown in Figure 6-22.
Figure 6-22 - Unlocking the Image Print Head
5) Gently lift up the print head until it swings completely open and stays in position.
Figure 6-23 - Lifting the Image Print Head
6) Lift both the supply spool and the takeup spool of the ribbon out of the image printer (Figure 6-24) and set it aside.

6 - Operation
ExpressCard 2000| Instant Issuance Card Personalization System | Installation and Operation Manual
Page 45 of 85 (D99875600-53)
Figure 6-24 Removing the Image Printer Ribbon
7) MagTek recommends cleaning the card cleaning roller, card path, and print head when replacing the
ribbon. See section 7.1 Cleaning for more information.
To install a color or monochrome ribbon in the image printer, follow these steps:
1) Remove the ribbon from the packaging and remove any stickers or bands tying the spools together. The spool with all the ribbon on it is called the supply spool, and the other end is the take-up spool.
2) Orient the ribbon so the supply spool is near the card stock hoppers. The ribbon stretched between the two spools should be facing toward the ceiling (see Figure 6-25).
Figure 6-25 – Inserting the Image Printer Ribbon
3) Place the supply spool between the notches near the hinge of the print head.
4) Unroll the take-up spool and place it between the notches on the other side of the print head.
5) Close the print head and press until you feel it lock.
6) Calibrate the ribbon sensor (see section 6.8.4 How to Select and Synchronize the Image Printer
Ribbon for details).
7) Close the EC2000’s top access door.
6 - Operation
ExpressCard 2000| Instant Issuance Card Personalization System | Installation and Operation Manual
Page 46 of 85 (D99875600-53)
6.8.3 About Selecting and Synchronizing the Image Printer Ribbon
Each side of a printed card processed by the EC2000 consumes a varying number of card-sized panels of dye from the image printer ribbon, depending on the ribbon type and whether the card is printed on both
sides. After inserting a new ribbon, the EC2000 must be calibrated so it will recognize the loaded
ribbon’s type and will align the ribbon’s panels properly with card stock during printing.
6.8.4 How to Select and Synchronize the Image Printer Ribbon
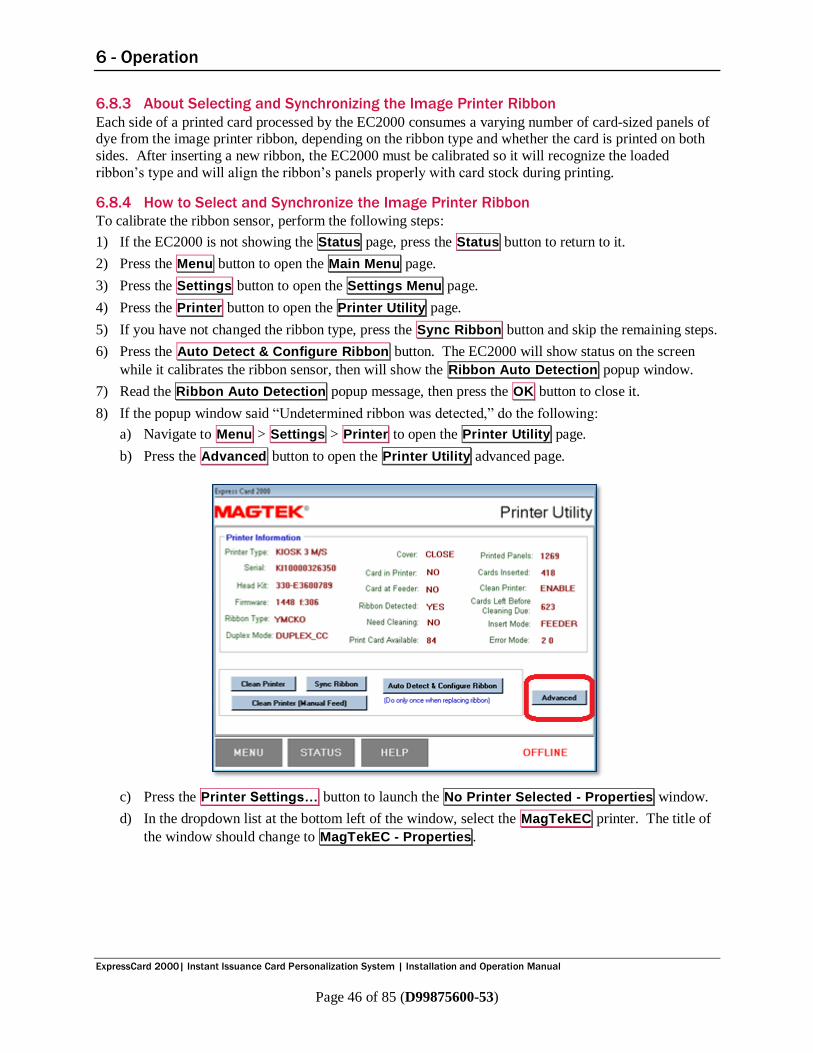
To calibrate the ribbon sensor, perform the following steps:
1) If the EC2000 is not showing the Status page, press the Status button to return to it.
2) Press the Menu button to open the Main Menu page.
3) Press the Settings button to open the Settings Menu page.
4) Press the Printer button to open the Printer Utility page.
5) If you have not changed the ribbon type, press the Sync Ribbon button and skip the remaining steps.
6) Press the Auto Detect & Configure Ribbon button. The EC2000 will show status on the screen
while it calibrates the ribbon sensor, then will show the Ribbon Auto Detection popup window.
7) Read the Ribbon Auto Detection popup message, then press the OK button to close it.
8) If the popup window said “Undetermined ribbon was detected,” do the following:
a) Navigate to Menu > Settings > Printer to open the Printer Utility page.
b) Press the Advanced button to open the Printer Utility advanced page.
c) Press the Printer Settings… button to launch the No Printer Selected - Properties window.
d) In the dropdown list at the bottom left of the window, select the MagTekEC printer. The title of
the window should change to MagTekEC - Properties .

6 - Operation
ExpressCard 2000| Instant Issuance Card Personalization System | Installation and Operation Manual
Page 47 of 85 (D99875600-53)
e) In the navigator on the left side of the window, twist open the Printing heading.
f) Select the Ribbon item in the navigator list.
g) In the main area of the window, change the Ribbon setting to match the ribbon you are using.
h) Change the Front side and Back side settings setting to match the ribbon and your
application (for example, for KO ribbons, use Duplex front Monochrome / back
Monochrome).
i) Press the OK button to close the MagTekEC - Properties window.
9) Press the Status button to return to the Status page.

6 - Operation
ExpressCard 2000| Instant Issuance Card Personalization System | Installation and Operation Manual
Page 48 of 85 (D99875600-53)
6.9 Foil Tipper
6.9.1 About the Foil Tipper
The EC2000 can tip embossed characters with multiple foil colors, depending on which type of tipper foil is loaded. For instructions on inserting and removing tipper foil rolls, see section 6.9.2 How to Install /
Remove the Tipper Foil. To order tipper foil rolls specifically designed for use with the EC2000,
contact your sales representative or see Appendix A.
6.9.2 How to Install / Remove the Tipper Foil Roll
To replace the EC2000’s tipper foil roll, follow these steps (see this YouTube video for a demonstration):
1) Determine what color foil you wish to install and obtain a new tipper foil roll.
2) Open the top access door (see section 6.5 Top Access Door Security).
3) Locate the foil tipper on the inside front of the EC2000 (see section 2.2 Introduction to EC2000
Components for details).
4) Press down on the orange release lever on the right side of the foil tipper.
5) Gently pull the foil spool assembly to the right and remove it from the EC2000.
6) Pull the small yellow foil release tab at the end of the yellow spool.
7) Remove the tipper foil roll from the yellow spool and set it on the tabletop.
8) Remove the tipper foil roll from the orange spool and set it on the tabletop.
9) Dispose of the used tipper foil roll per your company’s standard disposal procedures.
10) Place the orange core of the new roll on the orange spool, being careful to thread the foil under the two foil guide pins as shown in Figure 6-27.

6 - Operation
ExpressCard 2000| Instant Issuance Card Personalization System | Installation and Operation Manual
Page 49 of 85 (D99875600-53)
Figure 6-26 - Putting Foil Roll On Spool Assembly
11) Pull the small yellow foil release tab at the end of the yellow spool, then place the large portion of the
new roll on the yellow spool as shown in Figure 6-26, being careful to thread the foil over the geared guide pin and under the bottom guide pin.
12) Press the small yellow foil release tab at the end of the yellow spool to secure the new roll.
13) Rotate the orange core until you can press it firmly onto the orange spool. Continue rotating until the foil is tight across the guide pins as shown in Figure 6-27.
Figure 6-27 - Re-inserting the Tipper Foil Spool Assembly
14) Place the foil spool assembly back into the EC2000 foil tipper, carefully threading the foil under the tipper heater. Press firmly until you feel a click. If the tipper foil spool assembly does not click
into place, rotate the orange spool a bit and try again.
15) Close and secure the top access door.

6 - Operation
ExpressCard 2000| Instant Issuance Card Personalization System | Installation and Operation Manual
Page 50 of 85 (D99875600-53)
6.10 Indent Printer
6.10.1 About the Indent Printer
The EC2000 can perform indent printing on the rear of cards if an indent ribbon cartridge is loaded (see
section 2.2 Introduction to EC2000 Components). To order indent ribbon cartridges designed for use
with the EC2000, contact your sales representative or see Appendix A.
6.10.2 How to Install / Remove the Indent Ribbon Cartridge
To remove an indent ribbon cartridge from the EC2000’s indent printer, follow these steps (see this YouTube video for a demonstration):
1) Open the top access door (see section 6.5 Top Access Door Security for details).
2) Navigate to Menu > Maintenance to open the Maintenance Menu page.
3) Press the Unload Cartridge button to move the indent ribbon cartridge out of the embosser.
Figure 6-28 - Indent Cartridge Release Button
4) Press the orange release button next to the indent ribbon cartridge shown in Figure 6-28.
5) Lift the indent ribbon cartridge toward the ceiling to remove it.
To install an indent ribbon cartridge for the EC2000’s indent printer, follow these steps:

6 - Operation
ExpressCard 2000| Instant Issuance Card Personalization System | Installation and Operation Manual
Page 51 of 85 (D99875600-53)
1) Make sure the top access door is open and the EC2000 is showing the Maintenance Menu page, as
described in the previous steps.
Figure 6-29 - Indent Ribbon Cartridge Orientation
2) Orient the indent ribbon cartridge as shown in Figure 6-29.
3) Insert the cartridge between the orange release button and the embosser, as shown in Figure 6-28.
4) Press the cartridge firmly toward the floor until you feel a click.
5) Pull up gently on the cartridge to make sure it is locked in place.
6) Press the Load Cartridge button. The EC2000 will load the indent ribbon cartridge into the
embosser and lock it in place for use.
7) Press the Status button to return the EC2000 to the Status page.
8) Close the top access door (see section 6.5 Top Access Door Security for details).
6.11 Processing Cards
6.11.1 How to Create Sample Cards
The simplest way to test the EC2000 is to create sample cards, which does not require a network
connection or any additional software. To create a sample card, follow these steps (see this YouTube video for a demonstration):
1) Press the Menu button to open the Main Menu page.
2) Press the Samples button to open the Samples page, which presents four sample card options.
3) Select the sample you wish to create. Options 1 and 2 are designed to use preprinted card stock, and will not include full-color images on the front of the card.
4) The EC2000 will use a default card stock hopper for each sample. If you want to use stock from a different hopper, select the hopper number from the dropdown list at the bottom of the screen, then
press the Change button.
5) Press the Print button. The EC2000 will create the selected sample card.
6.11.2 About Card Personalization Software
Users process transactions for the EC2000 using card personalization software. This can be a secure
online service such as QwickCards.com, or a local custom application. Users also have the option to create sample cards from the front panel of the device for test purposes.

6 - Operation
ExpressCard 2000| Instant Issuance Card Personalization System | Installation and Operation Manual
Page 52 of 85 (D99875600-53)
The specific EC2000 features available to a user depend on the card personalization software, its
configuration, and the configuration of the EC2000. For setup and usage instructions for card personalization software, see the documentation for the software you are using.
6.11.3 About Transactions
Every request a user sends to the EC2000 to process a card is sent as a transaction. Transactions contain
instructions telling the EC2000 to perform one or more operations to the card. Common transactions
include issuing a new personalized card or changing the card PIN.
6.11.4 About the Transaction Queue
The EC2000 receives transactions from card personalization software either directly through a Local Area
Network, or by polling an Internet site. The card personalization software can send a transaction for immediate processing, or may direct the EC2000 to hold the transaction in a queue.
When it receives queued transactions, the EC2000’s configuration determines whether it will immediately process them or hold them in the queue until a user signals the EC2000 to process them. The EC2000
indicates queued transactions need to be manually processed by showing Auto Process: OFF in the
lower right corner of the queue (see Figure 6-30).
Users will not be able to see or interact with queued transactions on the Status page unless
the EC2000 is configured to display the transaction queue. See section 6.11.4 About the
Transaction Queue and section 8.9.1 About the QueueDisplay Configuration Option for details.
Figure 6-30 - Status Page With Transaction Queue
6.11.5 How to Process Transactions In the Transaction Queue
To process the top transaction listed in the queue on the EC2000’s Status page, do one of the following:
If you want to turn Auto Process ON so all future transactions will be processed automatically,
press the Resume button.
If you want to keep Auto Process OFF so transactions will continue to be held in the transaction
queue for manual processing, press the Print button.

6 - Operation
ExpressCard 2000| Instant Issuance Card Personalization System | Installation and Operation Manual
Page 53 of 85 (D99875600-53)
6.11.6 About the Card Path / Sequence of Processes
Card stock is fed through the EC2000 along a predetermined path that is always the same, regardless of the set of operations included in the card processing transaction. The hopper transport picks up a single
stock card either from the manual feed slot or from the card stock hoppers, then this sequence begins:
1) If the transaction is queued, the EC2000 removes it from the transaction queue.
2) The EC2000 encodes the magnetic stripe and / or chip card data, if the transaction calls for it.
3) The EC2000 prints front-side images and text, if the transaction calls for it.
4) The EC2000 flips the card and prints rear images and text, if the transaction calls for it.
5) The EC2000 creates rear indented text, if the transaction calls for it.
6) The EC2000 embosses characters, if the transaction calls for it.
7) The EC2000 foil tips embossed characters, if the transaction calls for it.
8) The EC2000 ejects the card into the card output bin.
9) The EC2000 reports Ready status.
If an unrecoverable error occurs at any point during these steps, the EC2000 will report the error, cancel the transaction, and attempt to move the stock card to the card rejection bin. See section 6.4.2 How to
Clear Error Messages for instructions on resuming normal operation after an error.
6.11.7 About the Card Output Bin
During normal operation, successfully processed cards will emerge from the card output bin on the front
panel of the EC2000. For convenience, the card output bin has a storage capacity of 10 cards. See section 2.2 Introduction to EC2000 Components for help locating the card output bin.
6.11.8 About the Card Rejection Bin
When errors occur that prevent a card from being processed properly, the partially-processed card will be
redirected to the internal card rejection bin beneath the top access door, where it will be securely stored
until a user with a key or administrator passwords empties the bin. See section 2.2 Introduction to
EC2000 Components for help locating the card rejection bin. See section 6.5 Top Access Door
Security for information about opening the top access door.
6.11.9 About the Manual Feed Slot
The manual feed slot (sometimes called the “exception feed slot” or “hopper 8”) on the front of the
EC2000 can be selected by card personalization software when the user should manually feed a single
stock card or an already-printed card through any combination of processes the EC2000 is capable of performing (see section 6.11.6 About the Card Path / Sequence of Processes).
Examples of situations where the manual feed slot can be useful include:
Producing a “one-off” personalized card from card stock that is not available from the hoppers.
Changing the data encoded on an existing card’s magnetic stripe (for example, the PIN).
One special feature of the manual feed slot is that, in addition to taking flat stock cards, it can also take
stock cards that have already been embossed, which supports changing magnetic stripe data on embossed cards.
If the EC2000 is configured to use the transaction queue (see section 6.11.4 About the Transaction
Queue), transactions that target the manual feed slot do not automatically move to the top of the queue. Instead, the EC2000 will process transactions in order, and when the transaction requiring manual feed

6 - Operation
ExpressCard 2000| Instant Issuance Card Personalization System | Installation and Operation Manual
Page 54 of 85 (D99875600-53)
(sometimes called an “exception”) reaches the top of the queue, the EC2000 will pause and flash the light
surrounding the manual feed slot.
The manual feed slot is referred to in some software as “Hopper 8,” but in most cases it is not exposed in
the EC2000’s user interface. Instead, processes that prompt users to use the manual feed slot must be
implemented in the card personalization software. See the personalization software’s user manual for details. See section 8.6 Card Processing Setup for more information about personalization software’s
interaction with the EC2000.

7 - Maintenance
ExpressCard 2000| Instant Issuance Card Personalization System | Installation and Operation Manual
Page 55 of 85 (D99875600-53)
7 Maintenance
7.1 Cleaning The EC2000 has been designed to give you long service, and needs only minimal regular maintenance.
Please comply with the instructions given below to ensure satisfactory performance.
7.1.1 IMPORTANT: Warranty Coverage
THE MANUFACTURER’S WARRANTY IS SUBJECT TO STRICT ADHERENCE TO THE
ROUTINE SERVICING AND MAINTENANCE INSTRUCTIONS, IN PARTICULAR THE IMAGE
PRINTER CLEANING CYCLES. ANY FAILURE TO FOLLOW THE MAINTENANCE AND SERVICING PROCEDURES DESCRIBED IN THIS SECTION VOIDS THE PRINT HEAD
WARRANTY.
MagTek disclaims any liability when there has been a failure to carry out required maintenance on the
image printer. The print head is a wearing part and an extremely sensitive image printer component. Its
useful life can be seriously curtailed by the presence of dust, liquids or solids in the device’s immediate environment, on the print head, or on stock cards. Users must take all necessary precautions to insert only
clean card stock, free of dust deposits or foreign bodies, into the device. The frequency and quality of
cleaning are decisive factors enabling users to extend the print head’s useful life and to ensure excellent
print quality. Particular care must therefore be taken with cleaning. Users must comply with the servicing and maintenance instructions as fully described in this section.
In addition, the use of MagTek brand ribbons (MagTek Genuine Ribbons) also ensures that the device operates properly. Use of ribbons not approved by MagTek may as a consequence affect the quality and
reliability of image printing, produce low quality images, and even affect the image printer’s operation.
The manufacturer’s warranty does not cover physical damage or quality problems caused by using non-
MagTek approved ribbons.
7.1.2 About Cleaning
To maintain consistent print quality, completely clean the EC2000 when the following occurs:
After every 1000 cards
After changing the image printer ribbon
During routine maintenance
If there are frequent card jams
If there are problems with print quality
If there are magnetic stripe encoding errors
If the feed rollers are not shiny and clean
When the EC2000 signals that maintenance is required
Cleaning the EC2000 requires an EC2000 Cleaning Kit available from MagTek, which includes:
Wipes used to clean the card cleaning roller.
Cleaning cards used to clean the card feed rollers, magnetic stripe encoder, and image printer platen.
A cleaning pen used to clean the image print head.
To order the EC2000 Cleaning Kit, see Appendix A or contact your sales representative.

7 - Maintenance
ExpressCard 2000| Instant Issuance Card Personalization System | Installation and Operation Manual
Page 56 of 85 (D99875600-53)
7.1.3 About Cleaning the Card Cleaning Roller
The EC2000’s card cleaning roller, located below the image printer’s ribbon, removes lint and other particles from the surfaces of card stock before printing. These particles accumulate on the card cleaning
roller over time and must be wiped off. If a cleaning roller is damaged or worn, it should be replaced (see
section 7.2 Replacing the Card Cleaning Roller for details).
7.1.4 How to Clean the Card Cleaning Roller
To clean the card cleaning roller (see this YouTube video for a demonstration):
1) Obtain a card cleaning roller wipe from the EC2000 Cleaning Kit.
2) Remove any jewelry or accessories that could touch the print head during cleaning.
3) Open the EC2000’s top access door (see section 6.5 Top Access Door Security).
4) Open the image printer and remove the ribbon (see section 6.8 Image Printer).
Figure 7-1 - Removing the Card Cleaning Roller
5) Remove the cleaning roller (see Figure 7-1).
6) Unwrap the wipe and rub it gently over the entire surface of the roller. Pay special attention to spots
that feel uneven, which may be dirt or dust stuck to the roller. If there are any uneven or rough spots you can not wipe off, contact MagTek Support Services for assistance.
7) When the card cleaning roller has dried, re-install it into the image printer.
8) If you have not already done so, clean the card path and print head.
9) Re-install the image printer ribbon.
10) Close the image printer (see section 6.8 Image Printer), and close the top access door.
11) Re-synchronize the image printer ribbon (see section 6.8.4 How to Select and Synchronize the
Image Printer Ribbon).
12) Create a sample card (see 6.11.1 How to Create Sample Cards).
13) Press the Status button to return to the Status menu.
7.1.5 About Cleaning the Card Path
The path cards travel through the EC2000 should be cleaned regularly (see section 6.11.6 About the
Card Path / Sequence of Processes). The card path includes:
The manual feed slot,
All feed rollers,

7 - Maintenance
ExpressCard 2000| Instant Issuance Card Personalization System | Installation and Operation Manual
Page 57 of 85 (D99875600-53)
The black rubber platen roller in the image printer,
The magnetic stripe encoder in the image printer.
Cleaning the card path involves feeding a cleaning card into the manual feed slot and telling the EC2000
to move it through the path.
7.1.6 How to Clean the Card Path
To clean the image print head using a cleaning card, follow these steps (see this YouTube video for a
demonstration):
1) Obtain a cleaning card from the EC2000 Cleaning Kit.
2) Remove the cleaning card from its package and let it dry for one minute.
3) Open the EC2000’s top access door (see section 6.5 Top Access Door Security).
4) Remove the image printer ribbon (see section 6.8.2 How to Install / Remove the Image Printer
Ribbon) and close the image printer.
5) Using the touchscreen, navigate to Menu > Maintenance to open the Maintenance Menu page.
6) Press the Clean Printer… button to launch the Printer Utility page.
7) Press the Clean Printer (Manual Feed) button to begin the cleaning process. The EC2000 will
show a popup dialog box. Leave it there for now.
8) Insert the cleaning card into the manual feed slot on the front of the device and press OK to close the
dialog box. The EC2000 will run the cleaning card through the card path and eject it into the card output hopper when done.
9) If the cleaning card sticks in the manual feed slot, let it dry for one more minute and try again.
10) Remove and dispose of the cleaning card.
11) If you have not already done so, clean the card cleaning roller and print head.
12) Re-install the image printer ribbon.
13) Close the image printer (see section 6.8 Image Printer), and close the top access door.
14) Re-synchronize the image printer ribbon (see section 6.8.4 How to Select and Synchronize the
Image Printer Ribbon).
15) Create a sample card (see 6.11.1 How to Create Sample Cards).
16) Press the Status button to return to the Status menu.
7.1.7 About Cleaning the Image Print Head
The EC2000’s image print head is a delicate device made partly of glass. Smudges and dirt on the print
head can accumulate with use, and can cause print quality problems, so it is important to clean the print
head regularly, thoroughly, and carefully. Cleaning the print head involves swiping it with a specially designed cleaning pen, which is similar to a marker but contains cleaning fluid instead of ink.
7.1.8 How to Clean the Image Print Head
Be cautious when following the steps in this section:
Avoid contact between the print head and any metal, sharp, or rough objects.
Avoid touching the print head directly with your fingers, as it could affect print quality
or permanently damage the print head. To clean the image print head, follow these steps (see this YouTube video for a demonstration):
1) Obtain a print head cleaning pen from the EC2000 Cleaning Kit.
2) Remove any jewelry or accessories that could touch the print head during cleaning.

7 - Maintenance
ExpressCard 2000| Instant Issuance Card Personalization System | Installation and Operation Manual
Page 58 of 85 (D99875600-53)
3) Open the EC2000’s top access door (see section 6.5 Top Access Door Security).
4) Power off the EC2000 completely.
5) Unplug the EC2000’s power cord from the wall.
6) Open the image printer (see section 6.8 Image Printer).
Figure 7-2 - Cleaning the Image Print Head
7) Locate the print head (see Figure 7-2). The area you want to clean is the front face of the thin brown
glass layer closest to the ceiling.
8) Take the cap off the cleaning pen.
9) Gently swipe the cleaning pen back and forth along the print head 10-15 times, until the head feels /
looks clean. The print head is slightly textured, so if you are making proper contact you should feel a very slight vibration or “squeak” during each swipe.
10) Wipe the cleaning pen on a piece of clean paper, then put the cap back on the cleaning pen.
11) Wait until the print head has completely dried (approximately two minutes).
12) If you have not already done so, clean the card path and card cleaning roller.
13) Re-install the image printer ribbon.
14) Close the image printer (see section 6.8 Image Printer), and close the top access door.
15) Re-synchronize the image printer ribbon (see section 6.8.4 How to Select and Synchronize the
Image Printer Ribbon).
16) Press the Status button to return to the Status menu.
17) Create a sample card (see 6.11.1 How to Create Sample Cards).
18) If streaking persists, replace the image print head (see section 7.3.1 About Replacing the Image
Print Head for details).
7.2 Replacing the Card Cleaning Roller
7.2.1 About Replacing the Card Cleaning Roller
The EC2000’s card cleaning roller, located below the image printer’s ribbon, removes lint and other
particles from the surfaces of card stock before printing. If a cleaning roller is damaged or worn, it should be replaced.
7.2.2 How to Replace the Card Cleaning Rollers
To replace the card cleaning roller:

7 - Maintenance
ExpressCard 2000| Instant Issuance Card Personalization System | Installation and Operation Manual
Page 59 of 85 (D99875600-53)
1) Obtain a replacement card cleaning roller.
2) Open the EC2000’s top access door (see section 6.5 Top Access Door Security).
3) Open the image printer and remove the ribbon (see section 6.8 Image Printer).
4) Remove the card cleaning roller and discard it (see Figure 7-3).
Figure 7-3 - Removing the Card Cleaning Roller
5) Install the new card cleaning roller in the image printer.
6) Re-install the ribbon and close the image printer (see section 6.8 Image Printer).
7) Close the EC2000’s top access door.
7.3 Replacing the Image Print Head
7.3.1 About Replacing the Image Print Head
The EC2000’s image print head is a sensitive component. It directly impacts the quality of card prints,
and regular servicing along with an environment free from dust or other particles ensure a lengthy useful life. Nonetheless, the print head may sometimes need to be replaced. The EC2000 incorporates a unique
design that enables users to do this without needing tools.
Before replacing the print head, contact MagTek Support Services or your MagTek dealer to check
whether replacement is advisable and to order the part. During the print head’s warranty period, MagTek
will provide free exchanges for defective print heads, provided:
You have used only MagTek consumables (ribbons and maintenance products).
You have followed the cleaning and servicing cycles scrupulously.
You are working in a dust-free environment complying with the device’s specifications.
You are using flat cards, with no rough patches which could damage the print head surface.
7.3.2 How to Replace the Image Print Head
To replace the image print head, follow these steps:
1) Obtain a replacement image print head.
2) Note the code shown on the white label stuck on the print head. You will be asked for this code in a later step.
3) Open the EC2000’s top access door (see section 6.5 Top Access Door Security for details).

7 - Maintenance
ExpressCard 2000| Instant Issuance Card Personalization System | Installation and Operation Manual
Page 60 of 85 (D99875600-53)
4) Unplug the EC2000’s power cable from the wall outlet.
5) Open the image printer (see section 6.8 Image Printer for details).
6) Locate the print head (see Figure 7-4).
Figure 7-4 - Locating the Image Print Head
7) Press in on the forks facing the right of the printer. The print head will move inward with a springy
resistance. Guide the whole print head assembly out of the groove that locks it in place.
8) Tilt the head carefully, and gently disconnect the cable without using force on the mechanism.
9) Connect the new print head into its socket the way the old print head was connected (see Figure 7-4), making sure it is facing the right way. This part is fragile: Do not use force to connect the cable.
10) Insert the print head back into the slot, push inward gently against the spring, and guide the print head back into the locked position.
11) Close the image printer.
12) Navigate to Menu > Settings > Printer > Advanced > Commands… to open the Printer Utility
page.
13) Select the Command text box and use the on-screen keyboard to enter the (case-sensitive) command
Pkn;x where x is the print head kit code number you noted above, then press the Send button. For
example, if the print head kit number is 179-004-00048, the command to be entered is: Pkn;179-004-
00048. If the print head kit number is not entered correctly, the image printer may malfunction and
the warranty may be voided.
14) The “Response” text box should report “OK.” If it reports an error, try again.
15) Thoroughly clean the EC2000 (see section 7.1 Cleaning for details).
16) Re-install the ribbon (see section 6.8.2 How to Install / Remove the Image Printer Ribbon).
17) Close the EC2000’s top access door.

7 - Maintenance
ExpressCard 2000| Instant Issuance Card Personalization System | Installation and Operation Manual
Page 61 of 85 (D99875600-53)
7.4 Re-Aligning Embossed and Printed Characters Embossed and printed characters must only be re-aligned in rare cases where the solution where the
EC2000 is being used includes one or more card designs that emboss on top of printed characters, without
using the foil tipping feature. Otherwise, it is not necessary to perform any of the steps in this section.
7.4.1 About Re-Aligning Embossed and Printed Characters
In applications that do not use the foil tipping feature, the EC2000 can apply coloring to embossed characters using a two-step process:
1) First, the EC2000 prints the characters on the stock card as part of the image.
2) Later, the EC2000 stamps the raised or indented characters into the card directly atop the image.
Clearly it is important to print and stamp the characters precisely on top of each other. Occasionally, after
periodic maintenance or firmware updates, embossed and printed characters may become misaligned.
Re-aligning them is called Tuning, and it involves adjusting both character position and the character spacing. Figure 7-5 shows what a card may look like if the position is not properly tuned.
Figure 7-5 - Embosser Not Properly Tuned
The EC2000 has multiple fonts on the embosser wheel, which can be tuned together and / or individually.
Custom applications may use the fonts in different ways, but the most typical arrangement is shown in
Figure 7-6. The list of available fonts and their typical uses is in Table 7.1.

7 - Maintenance
ExpressCard 2000| Instant Issuance Card Personalization System | Installation and Operation Manual
Page 62 of 85 (D99875600-53)
Figure 7-6 - Fonts and Corresponding Font IDs
Table 7.1 - Fond ID Fields
FIELD ID DESCRIPTION
Font ID1 Generally used for the Primary Account Number (PAN), the account number on either a debit or a credit card.
Font ID2 Generally used for the cardholder name and the card expiration date.
Font ID3 Reserved for devices equipped with Visa Electron or American Express fonts.
Font ID4 The rear indent font, generally used for the CVV code on the back side of the
card next to the magnetic stripe.
7.4.2 How to Align Embossed and Printed Characters
In this tuning procedure, you will need to notice subtle differences in alignment between embossed
characters and the ink on top of them. The easiest way to do this is to lay the card flat at eye height so
you are looking at the character from the edge of the card, and note how light or dark the character looks. Then turn the card around and note how light or dark the character looks from the other side. The lighter-
looking side is the side the embossed text needs to move AWAY from. For example, if the right side
looks lighter, the embossed character needs to move to the left.
To change calibration values on the EC2000 “Tuning” pages, select the New field next to the value you
want to change, then use the up and down arrows to adjust the value. If you want the value to move in
larger or smaller amounts when you press the arrows, press the N per tap button between the arrows.

7 - Maintenance
ExpressCard 2000| Instant Issuance Card Personalization System | Installation and Operation Manual
Page 63 of 85 (D99875600-53)
Follow these steps to tune the embosser so embossed characters are aligned with image-printed
characters: 1) Install the type of image printer ribbon you want to calibrate with. Embosser tuning can be ribbon-
specific, so you should repeat this procedure for every type of ribbon that will be used in the device.
2) Note this procedure is to adjust the embosser to accommodate the image position; it does not adjust
the printer’s image placement. Calibrate the printer to set the desired image size and position first.
3) Issue two samples from Menu > Samples to “warm up” the EC2000.
4) Navigate to Menu > Settings > Tuning to open the Tuning (Move Embossing) page.
5) Make sure the ribbon information in the upper left corner matches the ribbon you are using. If it doesn’t, calibrate the image printer (see section 6.8.4 How to Select and Synchronize the Image
Printer Ribbon) before continuing.
6) If you are using a color ribbon (YMCKO, YMCKOK, etc.), turn on the Color checkbox.
7) Calibrate the Card X Offset and Card Y Offset settings:
a) Press the Advanced… button to open the Tuning (Advanced) page.
b) Press the Print button. The EC2000 will create an “X_SPI” card containing a printed and
embossed “0” in the lower left and upper right corners. Use a marker to take notes about the current settings and whether you need to adjust them up or down.
c) Look at the 0 at the lower left corner of the sample card from all angles, and determine whether
the embossed character is to the left, right, above, or below the printed character.
d) Press the Back button to return to the Tuning (Move Embossing) page.
e) If the embossed “0” in the lower left corner appears to the left of the printed “0,” increase the
Card X Offset setting and press the Save button.
f) If the embossed “0” in the lower left corner appears to the right of the printed “0,” decrease the
Card X Offset setting and press the Save button.
g) If the embossed “0” in the lower left corner appears higher than the printed “0,” decrease the
Card Y Offset setting and press the Save button.
h) If the embossed “0” in the lower left corner appears lower than the printed “0,” increase the
Card Y Offset setting and press the Save button.
i) Repeat the process until the embossed “0” in the lower left corner lines up as closely as possible with the printed “0.”
8) Calibrate the X_SPI and Y_SPI settings, which changes the spacing of characters:
a) Press the Advanced… button to open the Tuning (Advanced) page.
b) Press the Print button. The EC2000 will create an “X_SPI” card containing a printed and
embossed “0” in the lower left and upper right corners. Use a marker to take notes about the
current settings and whether you need to adjust them up or down.
c) Look at the 0 at the upper right corner of the sample card from all angles, and determine whether the embossed character is to the left, right, above, or below the printed character.
d) If the embossed “0” at the upper right corner appears to the left of the printed “0”, increase the
X_SPI value and press the large Save button.
e) If the embossed “0” at the upper right corner appears to the right of the printed “0”, decrease
the X_SPI value and press the large Save button.
f) If the embossed “0” at the upper right corner appears higher than the printed “0”, decrease the
Y_SPI value and press the Set button, then the Save button.
g) If the embossed “0” at the upper right corner appears lower than the printed “0”, increase the
Y_SPI value and press the Set button, then the Save button.
h) Repeat the process until the embossed “0” In the upper right corner lines up as closely as possible
with the printed “0.”
9) Decrease the Card X Offset setting by 1 and Save to allow more room to adjust the individual
fonts. This provides about 10 more steps that each Font ID can move further to the left if needed.
10) Press the Back button to return to the Tuning (Move Embossing) page.

7 - Maintenance
ExpressCard 2000| Instant Issuance Card Personalization System | Installation and Operation Manual
Page 64 of 85 (D99875600-53)
11) Calibrate the Font ID1 X Offset and Font ID1 Y Offset settings:
a) Press the Print button. The EC2000 will create a test card using every available font ID.
b) Look only at the first character of the PAN (Font ID1) from all angles, and determine whether
the embossed character is to the left, right, above, or below the printed character. c) If the embossed character appears to the left of the printed character, increase the Font ID1 X
Offset value and press the Save button.
d) If embossed character appears to the right of the printed character, decrease the Font ID1 X
Offset value and press the Save button.
e) If the embossed character appears higher than the printed character, increase the Font ID1 Y
Offset value and press the Save button.
f) If the embossed character appears lower than the printed character, decrease the Font ID1 Y
Offset value and press the Save button.
g) Repeat the process until the embossed and printed first character of Font ID1 is aligned.
12) Repeat the same process for Font ID2, looking only at the first character of the long alphabet string
at the bottom of the test card. 13) Repeat the same process for Font ID3 (if installed), looking only at the first character of the string
of digits on the rear of the test card. IMPORTANT NOTE: Because Font ID3 is on the rear of the
card, adjust the Font ID3 X Offset in the opposite direction than for other fonts (where the instructions say “increase,” decrease the value instead.)
14) Repeat the same process for Font ID4, looking only at the first character of the string of front-
indented characters. 15) Calibrate the Font ID1 X SPI and Font ID1 Y SPI (steps per inch) settings:
a) Press the Print button. The EC2--- will create a test card with all font IDs. Look only at the last
character of the PAN (Font ID1) from all angles, and determine whether the embossed character
is to the left, right, above, or below the printed character.
b) Press the Advanced… button to open the Tuning (Advanced) page.
c) If the embossed character appears to the left of the printed character, increase the Font ID1 steps
per inch adjustment and press the Save button.
d) If embossed character appears to the right of the printed character, decrease the Font ID1 steps
per inch adjustment and press the Save button.
e) Press the Back button to return to the Tuning (Move Embossing) page.
f) Repeat the process until the embossed and printed last character of Font ID1 is aligned.
16) Repeat the same process for Font ID2, looking only at the last character of the long alphabet string
at the bottom of the test card. 17) Repeat the same process for Font ID3 (if installed), looking only at the last character of the string
of digits on the rear of the test card.
18) Repeat the same process for Font ID4, looking only at the last character of the string of front-indented characters.
19) Press the Set Default button to save the settings as defaults. Enter the setup passwords.
20) Write down the settings for the current ribbon, then repeat the process for all ribbon types that will be
used in the EC2000 (YMCKO, YMCKOK, KO, etc.). After replacing the ribbon, start by setting all
values on the Tuning (Move Embossing) and Tuning (Advanced) pages to the same values as the
previous ribbon. Only small fine-tuning to existing values may be necessary.

8 - Configuration
ExpressCard 2000| Instant Issuance Card Personalization System | Installation and Operation Manual
Page 65 of 85 (D99875600-53)
8 Configuration This section describes the various configuration options in the EC2000’s software, and provides instructions for configuring each option. See this YouTube video for a demonstration.
8.1 Network (TCP/IP) Configuration
8.1.1 About TCP/IP Settings
By default, the EC2000 will obtain an IP address automatically using DHCP. However, with most
networks, the device must be configured to use a static IP address. With some networks, the EC2000 may
also need to be configured to use a proxy server.
8.1.2 How to Configure TCP/IP Settings
Follow these steps to configure the network interface:
1) Obtain the TCP/IP settings and proxy server settings from your network administrator.
2) If this is a new EC2000, you do not yet have the passwords required to change settings. To obtain default passwords, authorize the device to process transactions, and change settings:
a) Determine the EC2000’s serial number (see section 6.1 Finding the Serial Number).
b) Call MagTek Support Services (see section 9 Troubleshooting for contact information).
3) If the EC2000 is not already displaying the Status page, press the Status button.
4) Press the Menu button to open the Main Menu page.
5) Press the Settings button to open the Settings Menu page.
6) Press the TCP/IP button to open the TCP/IP Utility page.
7) If you have not yet entered passwords, the TCP/IP Utility page will prompt you for two passwords in
sequence.
a) Enter the first password and press the E (“Enter”) button.
b) Enter the second password and press the E (“Enter”) button.
c) The EC2000 will unlock the full TCP/IP Utility page.
8) If you are configuring a static IP address:
a) Make sure the checkbox next to Obtain Automatically is turned OFF.
b) Press the Keypad button to display the on-screen keyboard.
c) Fill in the IP Address, Subnet Mask, Default Gateway, and DNS Server fields, using the on-
screen keyboard and pressing the E (“Enter” button) to finalize values. If you do not know what
values to use, contact your network administrator.
d) If you receive an error “MTECUtility DHCP Disable Failed Error Code: 70,” make sure you have entered a valid subnet address.
e) When finished, the page should look somewhat like Figure 8-1.
f) Press the Set New button to finalize the static IP address settings.

8 - Configuration
ExpressCard 2000| Instant Issuance Card Personalization System | Installation and Operation Manual
Page 66 of 85 (D99875600-53)
Figure 8-1 - Static IP Address Settings
9) If you are configuring a proxy server:
a) Press the Advanced button to open the Proxy Settings page.
b) Make sure the Use Proxy checkbox is turned ON.
c) Select each of the fields on the page, and use the on-screen keyboard to enter values.
d) Double-check the values you have entered, then press the Save button to confirm them.
e) Press the Back arrow to return to the TCP/IP Utility page.
10) Network configuration is complete. Press the Status button to return to the Status page.
8.2 Authorizing the Device
8.2.1 About Authorization
As a security measure, the EC2000 is shipped in the Deauthorized state, meaning personalization
features are not available. When deauthorized, the Status page shows a message in the lower status area
stating Error Machine is Deauthorized . Contact MagTek Support Services to obtain default passwords
and for instructions to authorize the device (see section 8.4 Passwords for more information).
Every 24 hours after the EC2000 is authorized, the device will automatically attempt to connect to
MagTek’s Certificate Authority (CA) to re-authorize. This requires the device to be powered on and
connected to the Internet [see section 8.1 Network (TCP/IP) Configuration].
If re-authorization does not occur within 7 days, the EC2000 will stop issuing personalized cards until it
is able to connect to the CA and re-authorize its security certificate. The device will continue to create
sample cards even when deauthorized.
The time remaining until the next required re-authorization can be viewed using the Device Information
button on the Help page (see section 6.3.3 About the Help Page). In some circumstances (for example,
if a lengthy power or network outage has caused the EC2000 to deauthorize and the automatic re-authorization will not happen soon enough), it may be necessary to re-authorize the EC2000 manually.

8 - Configuration
ExpressCard 2000| Instant Issuance Card Personalization System | Installation and Operation Manual
Page 67 of 85 (D99875600-53)
8.2.2 How to Manually Re-Authorize the Device
To re-authorize the device and test the Internet connection used for re-authorization, follow these steps:
1) Make sure the device has been authorized once in the past with assistance from MagTek Support
Services. The device can not be manually re-authorized until a user has put it through that process.
2) If the EC2000 is not already displaying the Status page, press the Status button.
3) Press the Menu button to display the Main Menu page.
4) Press the Settings to open the Settings Menu page.
5) Press the Authorize/Deauthorize button to open the Device Authorize/Deauthorize page.
6) If you want to test the connection to MagTek’s CA, press the Test Authorize/Deauthorize
Connection button. When a successful connection has been established, the EC2000 will display a
message on the Device Authorize/Deauthorize page stating “The authorize/deauthorize connection
is successfully tested.”
7) If you want to manually re-authorize the EC2000, press the Request To Authorize Device button.
When the re-authorization process has completed, the EC2000 will display a message on the Device
Authorize/Deauthorize page stating “The device is successfully authorized.”
8.3 Client Certificate Option The EC2000 can be configured for point-to-point authentication by refusing transactions from any card
issuance workstation that does not have a certificate installed.
To configure the client certificate options, follow these steps:
1) From the EC2000 touchscreen, navigate to Menu > Settings > Authorization to open the Device
Authorize / Deauthorize page.
2) Under the Client Certificate Options label, press the … button.
3) Press the OK button to acknowledge that setup passwords are required, and to open the Client
Certificate Options first password page.
4) Enter the first service password and press the E button.
5) Enter the second service password and press the E button. The touchscreen will return to the
Authorize / Deauthorize page with a new Client Certificate Options box at the bottom.
6) Select the option you wish to use, then press the Apply button:
a) The Ignore option directs the EC2000 to accept transactions from senders that present or do not
present certificates for the https transaction.
b) The Require option directs the EC2000 to reject transactions from senders that do not present a
client certificate. For senders that present a valid client certificate, the device will negotiate an
SSL connection with the sender, which will provide authentication, message integrity validation,
and message encryption.
8.4 Passwords
8.4.1 About Passwords
When the EC2000 is shipped, all passwords are set to factory defaults, which can be used to change all passwords to customer-selected values (see section 6.6 About Passwords and Asterisks for more
information). To obtain default passwords to perform setup, call MagTek Support Services.

8 - Configuration
ExpressCard 2000| Instant Issuance Card Personalization System | Installation and Operation Manual
Page 68 of 85 (D99875600-53)
8.4.2 How to Change / Reset Passwords
To reset the EC2000’s passwords to factory defaults (if you do not have the Administrator password), follow these steps:
1) Determine the EC2000’s serial number (see section 6.1 Finding the Serial Number).
2) Contact MagTek Support Services (see section 9 Troubleshooting for contact information).
To change any of the EC2000’s passwords if you have the Administrator password, follow these steps:
1) If the EC2000 is not already displaying the Status page, press the Status button.
2) Press the Menu button to open the Main Menu page.
3) Press the Settings button to open the Settings Menu page.
4) Press the Change Pwd button to open the Change Passwords page.
5) Open the Select a Password drop-down menu and select the password you wish to change. The EC2000 will prompt with “Enter current password X and press ‘E’ key.”
6) Use the on-screen keypad to enter the existing password you are changing. When done, press the E
button to confirm. The EC2000 will prompt with “Enter new password X and press ‘E’.”
7) Use the on-screen keypad to enter the new password. The new password must be between 7 and 16
characters long. When done, press the E button to confirm. The EC2000 will report prompt with
“Enter password X again and press ‘E.’”
8) Use the on-screen keypad to enter the new password again. This is to make sure the password will
be set to what you intended. When done, press the E button to confirm.
9) The EC2000 will report “Password is changed successfully.”
10) Press the Status button to return to the Status page.
8.5 Changing Computer Name
Note: Changing the computer name will invalidate the SSL certificate, and, as a result, the
device’s internal web page may no longer function. Changing the computer name can also
introduce complications receiving technical support for the device.
By default, the EC2000 computer name is based upon the device’s serial number (EC-XXXXXXX). To
change the EC2000 computer name, follow these steps:
1) If the EC2000 is not already displaying the Status page, press the Status button.
2) Press the Menu button to open the Main Menu page.
3) Press the Settings button to open the Settings Menu page.
4) Press the Cmptr Name button to open the Change Computer Name page.
5) Enter the required passwords.
6) Enter the new computer name using the onscreen keyboard, and press the E button when done.
8.6 Card Processing Setup
8.6.1 About Card Processing
The EC2000 can be set up to process personalized cards from a variety of sources:
Users can use a local card issuance and personalization client, which sends transactions to the EC2000 via SSL on the Local Area Network (LAN).

8 - Configuration
ExpressCard 2000| Instant Issuance Card Personalization System | Installation and Operation Manual
Page 69 of 85 (D99875600-53)
Users can use an Internet-based card personalization service, such as QwickCards.com. In this case, the EC2000 must be set up to poll the personalization service regularly using SSL over the Internet to
retrieve transactions.
Depending on which of these is selected, the EC2000 may need to be configured to either receive
transactions directly, or to regularly check for incoming transactions. Additionally, if the EC2000 has
been set up with a data key (contact MagTek Support Services for details), the card personalization software which creates transactions must encrypt them using the same key.
See the sections below for steps to set up the EC2000 in these situations. For information on setting up and using the card personalization software used to send transactions to the EC2000, see that software’s
documentation or contact the company that provided the software. For information on implementing card
personalization software that can send transactions to the EC2000, contact MagTek Support Services and request the set of manuals and references for programming the EC2000.
8.6.2 How to Set Up LAN-based Processing
Reserved for future content.
8.6.3 How to Set Up Internet-based Processing
To set up the EC2000 to regularly poll QwickCards.com for transactions:
1) Determine the EC2000’s serial number (see section 6.1 Finding the Serial Number).
2) Contact MagTek Support Services.
3) Support will walk you through a process that includes Menu > Settings > Service >
QwickCards , reading them a challenge code, and entering a passcode to enable the device.
4) When complete, the EC2000 will display a QwickCards Settings page similar to that in Figure 8-2.
Figure 8-2 - QwickCards Settings Page
5) Press the Save button to commit the configuration changes.
6) See the QwickCards documentation for information about adding and configuring the device to make it available in the list of issuance locations.

8 - Configuration
ExpressCard 2000| Instant Issuance Card Personalization System | Installation and Operation Manual
Page 70 of 85 (D99875600-53)
8.7 How to Enable / Disable Touchscreen Unlock To enable or disable the Case/Door button, contact MagTek Support Services (see section 9
Troubleshooting for contact information). MagTek Support Services will ask for the EC2000’s serial
number (see section 6.1 Finding the Serial Number).
8.8 About Configuration Options The EC2000 has a multitude of options that can be configured during setup to modify the behavior of the
device. Configuration options are set using the Configuration Editing page.
8.9 How to Modify Configuration Options To view or modify the current configuration options, follow these steps:
1) If the EC2000 is not already displaying the Status page, press the Status button.
2) Press the Menu button to open the Main Menu page.
3) Press the Settings button to open the Settings Menu page.
4) Press the Edit Config. button to open the Configuration Editing page.
5) If prompted, enter the required setup passwords.
6) Press the Expand All button to expand all entries in the list of settings in the middle of the page.
7) Use the scrollbar to scroll through the list of settings in the middle of the page, and locate the configuration option you wish to view or modify in the list.
8) Select the value below the configuration option you wish to modify. The EC2000 will display the current value in on the right side of the screen.
9) Select the value you want by selecting the displayed value and changing it.
10) Repeat for any other configuration options you wish to modify.
11) Press the Save button to save the changes you have made. The EC2000 will pop up a dialog box
reporting “The modified configuration has been saved.”
12) Press the OK button to dismiss the dialog box.
13) Press the Status button to return to the Status page.
8.9.1 About the QueueDisplay Configuration Option
Users will not be able to see or interact with queued transactions on the Status page unless
the EC2000 is configured to display the transaction queue.
If the EC2000’s QueueDisplay setting is True, the default Status page will look like Figure 6-2 on page
30. If QueueDisplay is False, the default Status page will look like Figure 6-3 on page 31.

9 - Troubleshooting
ExpressCard 2000| Instant Issuance Card Personalization System | Installation and Operation Manual
Page 71 of 85 (D99875600-53)
9 Troubleshooting This section is intended as a quick reference to common problems known to occur with the EC2000 during operation. If you are unable to resolve a problem with the EC2000 after reviewing this section,
contact MagTek Support Services by phone or by email:
Phone: (651) 415-6800
Toll Free: (888) 624-8350
Email: [email protected]
9.1 First Steps Follow these steps to eliminate the most common causes of errors users encounter when using the
EC2000:
1) Make sure the EC2000 is connected to power and powered on.
2) Make sure the EC2000 is connected to a functioning network plug or network appliance.
3) Make sure that at least one of the card stock hoppers contains card stock.
4) Make sure card stock in all card stock hoppers is oriented properly (see Figure 6-18, page 41).
5) Make sure cards stock is properly stacked in the card stock hoppers. See section 6.7 Card Stock for instructions on how to load cards; see Figure 6-20 and Figure 6-21 on page 42 for graphical depictions of properly and improperly stacked cards.
6) Make sure each loaded hopper’s card stock is loose enough that it moves when shaken.
7) Make sure the card weights are inserted on top of the card stock in every hopper.
8) Check the image printer:
a) Make sure it has ribbon remaining (see section 6.8.2 How to Install / Remove the Image
Printer Ribbon).
b) Make sure the EC2000 is configured to recognize the ribbon (see section 6.8.3 About Selecting
and Synchronizing the Image Printer Ribbon).
c) Make sure the image printer is securely closed.
9) If embossed characters are not being foil-tipped, make sure the tipper foil roll is loaded correctly (see section 6.9 Foil Tipper).
10) Make sure the indenter has an indent cartridge loaded.
11) Inspect the card path.to make sure there are no stuck cards (see section 6.11.6 About the Card Path /
Sequence of Processes).
12) Make sure the EC2000’s top access door is securely closed.
9.2 Troubleshooting “Offline” Status If the device’s Status page displays “Offline,” the problem is most likely due to an image printer
problem.
1) Perform the steps in section 9.1 First Steps.
2) Open the top access door and inspect the image printer.
3) Check to see if there is a card in the image printer. If there is, remove it and the device’s status should change to “Ready.”
4) If the device still shows “Offline,” restart the device (see section 6.2 Powering On, Powering Off,
and Restarting for details).

9 - Troubleshooting
ExpressCard 2000| Instant Issuance Card Personalization System | Installation and Operation Manual
Page 72 of 85 (D99875600-53)
9.3 Troubleshooting Not Responding to Incoming Transactions If the card personalization software reports it is successfully sending transactions to the EC2000, but the
EC2000 is not processing transactions, check the following:
1) Check to see if the manual feed slot is flashing. If it is, the device is waiting for a user to feed the appropriate stock into the manual feed slot.
2) If the Status page is set to not display the transaction queue (see section 6.11.4 About the
Transaction Queue):
a) Make sure the card personalization software is sending immediate transactions instead of queued transactions.
b) If the card personalization software is set to send queued transactions, temporarily set the Status
page to show the queue (see section 8.9.1 About the QueueDisplay Configuration Option).
c) Turn AutoProcess ON (see section 6.11.5 How to Process Transactions In the Transaction Queue).
d) If desired, set the Status page back to showing the simple status page.
3) If the Status page is set to display the transaction queue, perform one of the steps in section 6.11.5
How to Process Transactions In the Transaction Queue.
9.4 Troubleshooting Communication Problems If the device cannot communicate, check the following:
1) Check the Ethernet cable or crossover cable. It must be plugged into the Ethernet port to establish any connection; refer to section 5.1 Installation Checklist for details.
2) Make sure the security certificate is valid and up to date. See 8.1 Passwords for details.
3) If unable to connect to the network, try using the EC2000’s IP address instead of name to connect. See section 8.1 Network (TCP/IP) for details.
9.5 Troubleshooting Card Exit Problems If cards stay in the exit transport ramp rather than dropping into the output hopper, open the device’s top access door check the following:
1) Make sure your card stock conforms to the specifications in Appendix B Technical Specifications.
2) Make sure the exit ramp is clean and free of debris or adhesives.
3) Make sure the air holes in the exit ramp are not obstructed.
4) Use a cleaning card to clean the card guide rollers, found on the exit ramp just before the foil tipper.
9.6 Troubleshooting Card Feed Problems If cards do not feed from the card stock hopper or jam in the image printer:
1) Perform the steps in section 9.1 First Steps.
2) Clean the card path (see section 7.1.6 How to Clean the Card Path for details).
3) Clean the card cleaning rollers (see section 7.1.4 How to Clean the Card Cleaning Roller).
4) Make sure cards are not stuck together. If they are, remove the stack and separate the cards manually by riffling it as though you were shuffling a deck of cards.
5) Make sure the card stock hoppers are correctly installed.
6) Make sure the card stock hoppers are correctly aligned by homing the card stock hopper using Menu
> Settings > Service > MCP Cmds > Shuttle Home . Hopper misalignment is rare, but may
occur if the belt has slipped or if some stock cards sticking out from the hopper. In the latter case, the
EC2000 will produce a loud grinding noise when toggling between hoppers.

9 - Troubleshooting
ExpressCard 2000| Instant Issuance Card Personalization System | Installation and Operation Manual
Page 73 of 85 (D99875600-53)
7) If this is a new installation or you are using card stock that has not been tested, check the stock to make absolutely certain it conforms to CR80 standard dimensions.
9.7 Troubleshooting Print Quality Problems If the device is producing cards with poor print quality, check the following:
1) Perform the steps in section 9.1 First Steps.
2) Determine whether the problem occurs with all card stock or with specific hoppers.
3) If the problem is with a specific card stock, make sure the card stock is clean and conforms to the
requirements described in section 6.7 Card Stock.
4) Ensure the image printer ribbon is properly installed and configured, is clean, still has panels remaining on the supply spool, and is not wrinkled (see section 6.8 Image Printer).
5) Clean the card cleaning rollers (see section 7.2 Replacing the Card Cleaning Roller).
6) Manually clean the print head (see section 7.1 Cleaning for detail).
7) If these steps do not resolve the problem, take digital photos or scans of cards that show the problem you are seeing, and contact MagTek Support Services for assistance.
9.8 Troubleshooting Color Problems If the device is producing cards that do not match the colors in the design, follow the steps in section 6.8.4
How to Select and Synchronize the Image Printer Ribbon.
9.9 Troubleshooting Picture Alignment Problems If the device is producing cards where some elements are misaligned:
1) If embossed characters do not line up with printed characters, follow the steps in section 7.4 Re-
Aligning Embossed and Printed Characters to re-align where the embosser places characters.
2) If images are consistently printing off the edges of card stock, contact MagTek Support Services.
3) If images are not printing squarely on the card stock, contact MagTek Support Services.
9.10 Troubleshooting Magnetic Stripe Encoding Problems If the device is issuing cards that seem to have improperly encoded magnetic stripes:
1) Check more than one card on more than one card reader.
2) If read problems occur across multiple cards and multiple readers:
a) Check card stock to make sure it isn’t defective.
b) Clean the card path (see section 7.1.6 How to Clean the Card Path) and process / test another card.
3) If cleaning does not fix the problem, contact MagTek Support Services.
9.11 Troubleshooting Image Printer Ribbon Breaking If image printer ribbons are breaking in the EC2000, perform the following steps:
1) Clean the image printer completely (see section 7.1 Cleaning).
2) Make sure the correct ribbon type is selected (see section 6.8.4 How to Select and Synchronize the
Image Printer Ribbon).
3) Rule out problems with the specific ribbon:
a) Remove the ribbon and inspect it for defects.
b) Install another ribbon and see if the problem persists.
4) Carefully check card stock’s surface, flatness, and overall quality to make sure the card stock is not snagging or “roughing up” the ribbon.

9 - Troubleshooting
ExpressCard 2000| Instant Issuance Card Personalization System | Installation and Operation Manual
Page 74 of 85 (D99875600-53)
5) If these steps do not resolve the ribbon breakage issue, contact MagTek Support Services.
9.12 Troubleshooting Tipping Tipping problems can have different causes:
The card design. If you are using a new, untested design, it is possible the characters are spaced too
close together. When this happens, characters can have their edges crushed when the embosser squeezes nearby characters into the card, and those edges may not tip correctly.
Embosser issues. If embossed characters are not pressed far enough into the card stock, they may not
tip. This can be caused by mechanical wear, mechanical calibration, software calibration for the whole embosser, software calibration for individual characters, or other issues. Contact a qualified
service technician to perform diagnostics and fix the problem.
Tipper heater. If the tipper heater is dirty or damaged, it may not heat evenly or press the embossed characters evenly, and may need to be replaced. Contact a qualified service technician to diagnose
and fix the problem.
9.13 Troubleshooting Ribbon Continuously Feeding If the ribbon won’t stop feeding, recalibrate the ribbon sensor (see section 6.8.3 About Selecting and
Synchronizing the Image Printer Ribbon).
9.14 Troubleshooting General Ribbon Errors If the device reports problems detecting the ribbon, such as “Undetermined Ribbon Was Detected,” and the steps in section 6.8.3 About Selecting and Synchronizing the Image Printer Ribbon do not solve
the problem, the ribbon sensor may need to be re-calibrated. Follow these steps:
1) Close the image printer.
2) Close the top access door.
3) From the touchscreen, open Menu > Settings > Printer to open the Printer Utility page.
4) Press the Advanced button to open the Printer Utility advanced page.
5) Press the Color Sen Adj button to re-calibrate the ribbon sensor.
6) Re-try performing the steps that originally produced the problem.
9.15 Common Error Messages Table Table 9.1 lists common error messages that will be shown on the Status page, and possible
causes. Refer to Figure 6-4 to see where errors will be displayed to the user.

9 - Troubleshooting
ExpressCard 2000| Instant Issuance Card Personalization System | Installation and Operation Manual
Page 75 of 85 (D99875600-53)
Table 9.1 - Error Messages and Explanations
Error Message Possible Causes / Suggested Steps
Busy Device is currently processing a transaction. If no transaction appears to be in process, check to see if there is a card jam. If the
problem continues, perform a System Reset, then restart the device.
Encoder is busy processing a card. Wait until process completes.
Image printer is busy printing. Wait until the current transaction is complete. This message can occur if the ribbon is not present, is
broken, or a card is stuck in the print path. Ensure the print path is
clear and the ribbon is inserted correctly. If the error does not clear
by itself (after closing the top access door) you may need to perform a System Reset or restart the device.
Error Opening Encoder No communication with the Encoder. Possible cable disconnection.
Restart the device. May also be seen as “Encoder Communication”.
Printer Error Ejecting Card A card is jammed in the Encoder. Possible double card pick or
warped card.
No Card Present A command cannot continue because no card is present in the Encoder.
Possible card feed error from card stock hopper. See section 9.6
Troubleshooting Card Feed Problems.
Move Card to Encoder Card did not transfer from card stock hopper to Encoder.
Possible card feed error from card stock hopper. See section 9.6
Troubleshooting Card Feed Problems.
Waiting for Encode
Completion
Encoder Encode
A card could not be encoded or timed out during attempt to encode.
Possible misorientation with magnetic stripe, debris on magnetic
stripe, or the card is not feeding from card stock hopper.
Possible card feed error from card stock hopper. See section 9.6
Troubleshooting Card Feed Problems.
Error Preparing for Encoding Incorrect characters in track 1, 2, or 3.
Error Encode Verify Failed to verify that specific data is present on the card before encoding. Data may not be present or there is a misorientation of
magnetic stripe.
Error Encoding Card Card did not transfer from card stock hopper to encoder in time or
the system failed to verify that specific data is present on the card
after encoding.
Initializing Printer
Error Getting Display
This error indicates that the image printer has lost communication with the motherboard. Reboot the system and if this does not clear
the error verify that the USB cable is connected to the rear of the
image printer and the motherboard.

9 - Troubleshooting
ExpressCard 2000| Instant Issuance Card Personalization System | Installation and Operation Manual
Page 76 of 85 (D99875600-53)
Error Message Possible Causes / Suggested Steps
Error Ejecting Card A card could not be transferred from the Encoder to the Printer.
Card Jam A card is jammed inside the image printer. May have occurred
during transition from flipper to print station.
Error Initializing Embosser Could not initialize the Embosser (the embosser stalled when the system was initialized, a cable is disconnected, or there is an error
with the X-Y card clamp). Restart the system and check
connections between the embosser and motherboard.
Error Embossing Card Embosser jammed while embossing a character. Possible incorrect knuckle setting or embossing angles. Ensure the card has been
ejected and the device returns to a ready condition.
Move Card to Embosser Card did not transfer to the Embosser. The card may not be fully
seated in the XY Transport Clamp, the card may be at an angle in
the XY Transport Clamp, or the Embosser sensor may not be detecting the card. Ensure the card path is clear and resume
operation.
Timeout Move Card to
Embosser
Card did not transfer to the Embosser in time.
Error Opening Controller The controller board could not be initialized. Possible cable disconnection from board to PC.
Get Configuration The internal device configuration file is corrupted.
Error Ejecting Card No card was detected at the card output bin during transfer from X-
Y to Exit module, or the card output bin was blocked while a card
was being transferred (e.g., two cards at once). Check to ensure that a card is not present or stuck in the card path. If the error does not
clear, perform a System Reset. If that does not work, restart the
device.
The card did not eject from the encoder during transport to the
image printer. May be caused by two cards that are stuck together.
Perform a System Reset to remove the card.
Ejectbin Full The card output bin is full or the card output sensor is blocked.
Rejectbin Full The card rejection bin is full or the card rejection sensor is blocked.
Hopper Empty The currently selected card stock hopper is empty, the weight is not
placed on the top of the stack, or the cards are not fully inserted. If
the cards are loaded completely and correctly and the problem persists, you may need to restart the device.
Error Reading Card A card could not be read or timed out during attempt to read.
Possible misorientation with magnetic stripe, debris on magnetic
stripe, or the card is not feeding from card stock hopper.
Get Modelnumber Could not retrieve the model number of the controller board. Possible cable disconnection from board to PC.

9 - Troubleshooting
ExpressCard 2000| Instant Issuance Card Personalization System | Installation and Operation Manual
Page 77 of 85 (D99875600-53)
Error Message Possible Causes / Suggested Steps
Get Sensors Could not retrieve the sensor status from the controller board.
Possible cable disconnection from board to PC.
Pending “Pending” is the status returned when monitoring a transaction. The status will change to “Busy” after reaching the top of the queue.
Not Activated The EC2000 has not been through the initial authorization process.
Contact MagTek Support Services.
Error Initializing Initialization of the device failed.
Top Door Open The top door is open. Close the top door. If still reporting, then
check the top door sensor.
Access Door Open The access door is open. Close the access door. If still reporting, then check the access door sensor.
Door Status Failed The door sensor status was not returned from the Controller.
All Bin Full The card output bin and card rejection bin are full. Empty both bins
or check the bin sensors.
Offline The device is Offline and will not process cards until it is set to an
Online state. Close all doors and click the Status button to set to Online.
Job Not Found Could not find the requested transaction. Queue ID is invalid.
No Job The transaction was not queued due to an error in the transaction.
DHCP Lease Could Not Be
Renewed, Error Code: 82
There is no network connection. Make sure the patch cable to the
device is connected and verify connectivity to the network.

9 - Troubleshooting
ExpressCard 2000| Instant Issuance Card Personalization System | Installation and Operation Manual
Page 78 of 85 (D99875600-53)
Error Message Possible Causes / Suggested Steps
Error XY XY module did not go to the Home position. Possible cable
disconnection or failed sensor. Check to ensure that a card is not
present or stuck in the card path and that the ribbon cable is properly seated. If the error does not clear, restart the device.
XY module did not transition to image printer station. Possible cable disconnection or failed sensor. Check to ensure that a card is
not present or stuck in the card path. If the error does not clear,
restart the device.
XY module did not transition to Embosser station. Possible cable
disconnection or failed sensor. Check to ensure that a card is not
present or stuck in the card path. If the error does not clear, restart the device.
XY module did not transition to eject module. Possible cable disconnection. Check to ensure that there is nothing blocking the
card path and, if necessary, clear the path. If this problem persists,
the EC2000 will require service.
XY module card clamp did not fully open or close. Possible cable
disconnection or failed sensor. Check to ensure that the card has
cleared the path and, if necessary, clear the path. If this problem persists, the EC2000 may require service.
No Card to Process No data is present in the transaction to process Magnetic stripe,
Embossing, or Printing.
Error Selecting Specified
Hopper
Incorrect card stock hopper was selected in the transaction.
Error Creating Image Image data in the transaction is missing, corrupted, or is not Base64 encoded. Adjustment of the print data location is required so that
the text conforms to the print head position.
Text data in the transaction is missing or corrupted. Adjust the print
data so it conforms to the text requirements of the image printer.
The image printer reported an error during the printing of the card.
Possible corrupted image data. Adjust the print data.
Invalid Command The transaction command is invalid. See XML reference manual for
a list of correct commands. Possible sending of chip card and
independent commands as a queued transaction instead of a process transaction.
Queued transactions are not supported for chip card and independent commands.
The immediate transaction or queued transaction was sent to the web interface incorrectly.

9 - Troubleshooting
ExpressCard 2000| Instant Issuance Card Personalization System | Installation and Operation Manual
Page 79 of 85 (D99875600-53)
Error Message Possible Causes / Suggested Steps
Invalid XML The transaction has an XML error. The XML data sent to the
EC2000 was not correctly formatted or contains incorrect syntax.
Please verify the code/command being sent.
Invalid Type Invalid chip cart type selection. See XML reference for proper chip
card types.
Encoding Smart Card Failed Chip card command failed. The chip card module may not be
powered on or there may be a card misorientation.
Invalid Data The data sent to a chip card is incorrect. See the XML reference manual for the proper command data structure.
Card Jam At Tipper Station A card is stuck either before, inside, or after the tipper. Remove the
tipper foil spool assembly and remove the stuck card.
Card Jam At Shuttle-Roller
Station
Card is already stuck in hopper transport. Remove stuck card from
hopper transport.
Error pushing card from a hopper to the roller station
The hopper transport could not pull a card from the hopper designated by the current transaction. Open the top access door and
remove any stuck cards. If this error happens again, follow general
troubleshooting steps in section 9.1 First Steps.
9.16 How to Remove Stuck Cards In some instances, such as when cards are stuck together because of static electricity or because a stock
card is bent, the EC2000’s image printer may fail to output a card properly. When this occurs, the
EC2000 will report “Error Ejecting Card” on the Status page, and it may be necessary to remove the
card(s) manually. To remove a stuck card, follow these steps:
1) Open the top access door of the EC2000 (see section 6.5 Top Access Door Security).
2) If the card is not visible or is at the entrance to the image printer, direct the EC2000 to automatically move the card to an accessible location:
a) Press the Menu button to open the Main Menu page.
b) Press the Maintenance button to open the Maintenance Menu page.
c) Press the Eject Blocked Card button. The EC2000 will attempt to move cards from areas you
can’t reach (such as inside the image printer or hopper transport) to areas you can reach.
3) If the card is still not visible:
a) Open the image printer and remove the ribbon (see section 6.8 Image Printer).
b) If the card is stuck inside the image printer, slide it manually toward the image printer output. If there is more than one card, guide them out one at a time, starting with the one on top.
c) Re-install the ribbon and close the image printer cover.
d) Check the exit ramp to see if the card is stuck beneath the tipper.
4) Close and secure the EC2000’s top access door.
5) Create a sample card to make sure the EC2000 is now operating properly.
6) If this does not solve the problem or if you encounter problems performing these steps, contact
MagTek Support Services.

Appendix A - Supplies
ExpressCard 2000| Instant Issuance Card Personalization System | Installation and Operation Manual
Page 80 of 85 (D99875600-53)
Appendix A Supplies The following supplies are available for the EC2000. To order supplies, contact your sales representative.
Quantity Name Part # Notes
Ribbons
1 ea. YMCKO-K Ribbon 93400047 Six-panel color YMCKO-K image printer
ribbon will produce up to 200 cards.
1 ea. YMCKO Ribbon 93400048 Five-panel color YMCKO image printer ribbon will produce up to 200 cards.
1 ea. YMCKO Half-Panel
Ribbon
93400050 Half-panel color YMCKO image printer ribbon
will produce up to 400 cards.
1 ea. Black Ribbon 93400049 Black monochrome image printer ribbon will
produce up to 1000 cards.
1 ea. KO Ribbon 93400054 Black and overlay monochrome image printer ribbon will produce up to 500 cards.
1 ea. Gold Ribbon 93400052 Gold monochrome image printer ribbon will
produce up to 1000 cards.
1 ea. Silver Ribbon 93400051 Silver monochrome image printer ribbon will
produce up to 1000 cards.
1 ea. Gold Tipper Foil Roll 33070895 Gold tipper foil roll will produce up to 1800 cards.
1 ea. Silver Tipper Foil Roll 33070896 Silver tipper foil roll will produce up to 1800
cards.
1 ea. Black Tipper Foil Roll 33070897 Black tipper foil roll will produce up to 1800
cards.
1 ea. Black Rear Indent
Ribbon Cartridge
33070621 Black indent ribbon cartridge will produce up
to 16,000 characters, averaging 2000-5000
cards.
1 ea. White Front Indent
Ribbon Cartridge
White indent ribbon cartridge will produce up
to 16,000 characters, averaging 2000-5000 cards.
1 ea. Blank White Card Stock 96500055 Blank CR80 card stock for applications that do
not use pre-printed card stock.
Accessories
1 ea. EC2000 Cleaning Kit 96700027 Includes 12 cleaning cards, 12 card cleaning
roller wipes, and 2 print head cleaning pens
50 ea. EC2000 Cleaning Card 96700022 Pack of 50 pre-saturated cards for cleaning the card path.
1 ea. EC2000 Cleaning Card 96700025 Single pre-saturated card for cleaning the card
path. Minimum order of 12.

Appendix A - Supplies
ExpressCard 2000| Instant Issuance Card Personalization System | Installation and Operation Manual
Page 81 of 85 (D99875600-53)
Quantity Name Part # Notes
1 ea. EC2000 Image Print
Head Cleaning Pen
96700021 Multi-use cleaning pen for image print head.
40 ea. EC2000 Card Cleaning Roller Wipe
96700023 Pack of 40 wipes for the card cleaning roller.
1 ea. EC2000 Card Cleaning
Roller Wipe
96700024 Single wipe for the card cleaning roller.
Minimum order of 12.
1 ea. EC2000 User Installation
and Operation Manual
D99875600 Manual providing instructions for planning,
installing, configuring, using, and troubleshooting an EC2000.
1 ea. EC2000 Programming
Reference Manual XML
Specification
D99875611 Manual providing instructions for developing
customized card personalization applications
compatible with the EC2000 (XML portion).
Extra Parts
1 ea. Tipper Foil Spool
Assembly
33070650 Spare tipper foil spool assembly, convenient
for pre-loading foil rolls for fast swap-in.
1 ea. EC2000 Print Head Replacement image print head for EC2000.

Appendix B - Technical Specifications
ExpressCard 2000| Instant Issuance Card Personalization System | Installation and Operation Manual
Page 82 of 85 (D99875600-53)
Appendix B Technical Specifications
Physical Characteristics
Dimensions (L x W x H): 24.7 in. x 26.8 in. x 15.1 in. (627 mm x 680 mm x 384 mm)
Weight: Device: 88 lbs. (39.9 kg)
Accessories: 3.8 lbs. (1.7 kg)
Physical Security: ⅜” chassis anchor hole for desktop / counter mounting
Ring-shaped security anchor
System Interface (W x H): 4.5 in. x 3.75 in. (114 mm x 95 mm) touchscreen
Operational Characteristics
Card issuance times: Card-to-card cycle measurements. Times include 2-sided image
printing, front overlay, embossing, rear indenting, and foil tipping.
~104 seconds for embossing and tipping pre-lithographed stock
~132 seconds for 2-sided monochrome images ~146 seconds for color front / monochrome back images
~163 seconds for 2-sided color images
Card output bin capacity: 10 cards (at 30 mil thickness)
Card rejection bin capacity: 20 cards (at 30 mil thickness)
Duty cycle: 50 cards per day (15,000 cards per year)
Electrical Characteristics
Power Requirements: 100 VAC to 240 VAC at 50 or 60 Hz (Auto-adjusting)
Power Consumption: Sleep: 15 Watts
Idle: 60 Watts Peak: 200 Watts
Data Ports: Ethernet 100 base-T (external)
USB 2.0 (internal)
Card Stock Characteristics
The EC2000 is designed to use card stock that meets the specifications listed ISO/IEC 7810 and IEC/ISO 7811-1 through 7811-6.
Card Stock Hopper Capacity: 700 stock cards total (100 cards x 7 card stock hoppers)
Accepted card types: PVC, Optical memory cards with PVC finish
Polyester cards with polished PVC finish (monochrome only)
Accepted card sizes: CR80 (3.370"L x 2.125"W / 85.6 mm L x 54 mm W)
Acceptable card thickness: 0.020" (20 mil / 0.508 mm) to 0.050" (50 mil/ 1.27 mm)
50 mil cards can be used for single-sided printing only.
Max. embossed relief height for returned cards is 0.019 in. (0.48 mm)

Appendix B - Technical Specifications
ExpressCard 2000| Instant Issuance Card Personalization System | Installation and Operation Manual
Page 83 of 85 (D99875600-53)
Physical Characteristics
Card stock warpage tolerance: Stock cards lying convex-side-up on a flat rigid surface should
measure no more than 0.10” (2.5 mm) to the top face of the card.
Printing Characteristics
Printing Technology: Color / monochrome via dye-sublimation resin thermal transfer
Printing Resolution: Resolution 300 dpi
Up to 16.7 million colors / 256 shades per pixel
Printing Fonts: TrueType fonts used from on-board Windows drivers
Overlay laminates available: 0.03 mil clear varnish overlay in YMCKO, YMCKOK ribbons
0.03 mil hologram varnish overlay ribbon, “Genuine Globes” design
Embossing Characteristics
The EC2000 embosser module has a wide variety of configurable settings. MagTek sets each device’s
factory defaults to conform to ISO/IEC 7811 standard as described in this section.
Embosser functions: Foil-tipped embossing Rear and / or front indent
Image printed embossing
Embosser fonts: FontID1: Farrington 7B from ISO/IEC 7811-1, typically used for the
account number on the front of financial cards.
FontID2: Gothic is used for the cardholder name and expiration date
on the front of financial cards.
FontID3: Front Indent is used for the BIN (Bank ID Number) on the
front of financial cards (Note: This is an optional feature that is not
included with the EC2000 by default).
FontID4: Rear Indent is used for the account number on the rear
signature panel of financial cards.
Embossed character spacing: Farrington 7B: 0.143 in. ± 0.006 in. (3.63 mm ± 0.15 mm) Gothic: 0.100 in. ± 0.006 in. (2.45 mm ± 0.15 mm)
Embossed relief height: Relief height is measured from the non-embossed surface of the card
to the highest point on the embossed character.
Farrington 7B: 0.016 in. (0.40 mm) to 0.019 in. (0.48 mm)
Gothic: 0.014 in. (0.36 mm) to 0.018 in. (0.46 mm)
Encoding Characteristics
Card Encoding: MagnePrint reference capture module Chip card contact module per ISO 7816, EMV L1
3-track magnetic stripe encoder per ISO 7810 / 7811 (HiCo or LoCo
cards)

Appendix B - Technical Specifications
ExpressCard 2000| Instant Issuance Card Personalization System | Installation and Operation Manual
Page 84 of 85 (D99875600-53)
Physical Characteristics
Card Reading: Magnetic Swipe Rail (MSR) supported formats:
Magnetic Stripe: ANSI/ISO/AAMVA/CDL tracks 1, 2, and 3 Chip Card: ISO 7816-1, -2, and -3
Environmental Tolerance
Operating temperature: 65°F to 86° F (18°C to 30°C)
Operating relative humidity: 20% to 80% without condensation
Storage temperature: 30° F to 104° F (-1.1°C to 40°C)
Storage relative humidity: 90% or below without condensation
Acoustic Characteristics
Sound level, idle (standby): 64 dBA @ 1m
Sound level, embossing: 70 dBA @ 1m

Appendix C - Software Updates
ExpressCard 2000| Instant Issuance Card Personalization System | Installation and Operation Manual
Page 85 of 85 (D99875600-53)
Appendix C Software Updates Periodically, MagTek will send e-mail notifications to customers that include software updates to apply to the EC2000. These notifications will typically include step-by-step instructions detailing how an EC2000
administrator should apply the attached update. Before an EC2000 administrator can apply updates, it
may be necessary for a system administrator to prepare a workstation specifically for this purpose. See section 3.2 Network Planning for details.
The provided instructions generally include the following steps, though there may be
additional steps pertinent to the specific patch being applied. The steps below are for
informational purposes only. Follow the instructions provided with the patch.
1) On a workstation set up to allow connections to the EC2000, obtain access to the .cab update file provided in the e-mail from MagTek.
2) Determine the EC2000’s IP address or DNS name [see section 3.2 Network Planning and 8.1
Network (TCP/IP) Configuration for details].
3) Launch a web browser on the workstation and browse to either https://<ec2000_name> or https://<ec2000_ip_address>, where <ec2000_name> is generally the letters “EC-” followed by the
device’s serial number. The browser will show a web page entitled “ExpressCard 2000 Main Page.”
4) Click the Upload Software link on the left side of the page. The browser will display a page like the one shown in Figure 9-1.
Figure 9-1 - ExpressCard 2000 File Upload Page
5) Click the Browse… button.
6) Navigate to the .cab file downloaded from MagTek.
7) Click the Send button to upload the file to the EC2000.
8) The EC2000 will automatically restart at least once.
9) Monitor the upload status using the Upload Status link in the browser. When update is complete, the EC2000 will report that status on the Upload Status screen.