
Exploring Russia PAGE SAMPLE - A Journey Through...
13
Grades 1-6 A Journey Through Learning www.ajourneythroughlearning.com Exploring Russia Learning Lapbook with Study Guide A J T L Copyright 2013 A Journey Through Learning 1 SAMPLE PAGE
Transcript of Exploring Russia PAGE SAMPLE - A Journey Through...

Grades 1-6
A Journey Through Learning www.ajourneythroughlearning.com
Exploring Russia Learning Lapbook with Study Guide
A
JT
L
Copyright 2013 A Journey Through Learning 1
SAMPLE P
AGE

Authors-Paula Winget and Nancy FilecciaCopyright © 2013 A Journey Through Learning
Pages may be copied for other members of household only. For group use, please see our website to purchase a classroom/co-op license.
Please check our website at:www.ajourneythroughlearning.com
While you are there, sign up for our email newsletter and receive a FREE lapbook!
You’ll also receive great discount codes, special offers, find out what’s new and what’s to come!
Join us on Facebook!
Clipart is from www.clipart.com with permission.
Copyright 2013 A Journey Through Learning 2
SAMPLE P
AGE

Things to Know
Hamburger Fold-Fold horizontally Hotdog Fold-Fold vertically
Dotted Lines-These are the cutting lines.
Accordion Fold-This fold is like making a paper fan. Fold on the first line so that title is on top. Turn over and fold on next line so that title is on top again. Turn over again and fold again on the next line so that title is on top. Continue until all folds are done.
Cover Labels-Most of the booklets that are folded look nicer with a label on top instead of just a blank space. They will be referred to as “cover label.”
Folder 1
This placement key tells you the template goes in the first folder at the top of the left flap.
How do I know where to place each template in the folder?
How Long Does it Take to Complete the Lapbook?
Doing a study guide page and mini-booklet a day, a 3-folder lapbook takes about one month to complete. However, you can expand the study portion and make it last as long as you like! That’s the beauty of homeschooling! Do it YOUR way!
Lapbook Assembly Choices
(see photos on how to fold and glue your folders together)We recommend using Zip Dry Glue or Elmer's Extreme.
Choice #1 -Do not glue your folders together until you have completely finished all three folders. It is easier to work with one folder instead of two or three glued together.
Choice #2 -Glue all of your folders together before beginning. Some children like to see the entire project as they work on it. It helps with keeping up with which folder you are supposed to be working in. The choices are completely up to you and your child!
Copyright 2013 A Journey Through Learning 3
SAMPLE P
AGE

Folding a Lapbook Base
Gather the number of folders required for the project. Fold them flat as seen here.
Original fold line
For each folder, fold the left and right sides inward toward the original line to create two flaps. Crease so that the highest part of each flap is touching the original line. It is important not to let the two flaps overlap. You may want
to take a ruler and run it down each crease to
make it sharper.
Highest part of flap.
GLUE
GLUE
Glue your folders together by putting glue (or you may staple) on the inside of the flaps. Then press the newly glued flaps together with your hands until they get a good strong hold to each other. Follow this step to add as many folders as you need for your project. Most of our lapbooks have either 2 or 3 folders.
GLUE
GLUE
Photo of a completedlapbook base
Copyright 2013 A Journey Through Learning 4
SAMPLE P
AGE

*Lapbook Pages*3 Colored File Folders*Scissors*Glue*Stapler*Brads (not needed for every lapbook. If brads are not available, a stapler will do.)*Hole Puncher (again, not needed for every lapbook.)
To make the storage system (optional)
See details below about the use of a storage system.
*Duct tape (any color)*One 3-ring binder*Hole Puncher
My child has made several lapbooks. Can I store all of the lapbooks together in one place?
Yes! A three-ring binder serves as a great place to keep your lapbooks. This method of storage not only keeps your lapbooks from getting lost but also keeps them neat and readily available to share with dad, grandparents, friends, etc. When you are through sharing your lapbooks, just place the three-ring binder back on your bookshelf! Below are step-by-step directions of how to prepare each lapbook to be placed a in a three-ring binder.
Supplies and Storage
Close the lapbook. Measure a piece of duct tape that is as long as the lapbook. Place the edge of the duct tape on the top edge of the lapbook. Then fold the duct tape over so that it can be placed on the bottom edge. Make sure to leave enough duct tape sticking out from the edges to punch three holes. Be careful when punching the holes that you do not punch the holes in the folder. If you do, that’s okay. Then place in three-ring binder. Depending on the size of your three-ring binder, you can store many lapbooks in it.
Copyright 2013 A Journey Through Learning 5
SAMPLE P
AGE

Table of Contents
Introduction to RussiaEnvironmental Regions
Borders and Land FormsSiberia
Art and CultureRivers and LakesNatural ResourcesThe Land of Russia
Three Famous Russian SymbolsA Very Brief History of Russia
The Russian RevolutionVladimir Lenin
Josef StalinThe Cold War
The Fall of Communism
Copyright 2013 A Journey Through Learning 6
SAMPLE P
AGE
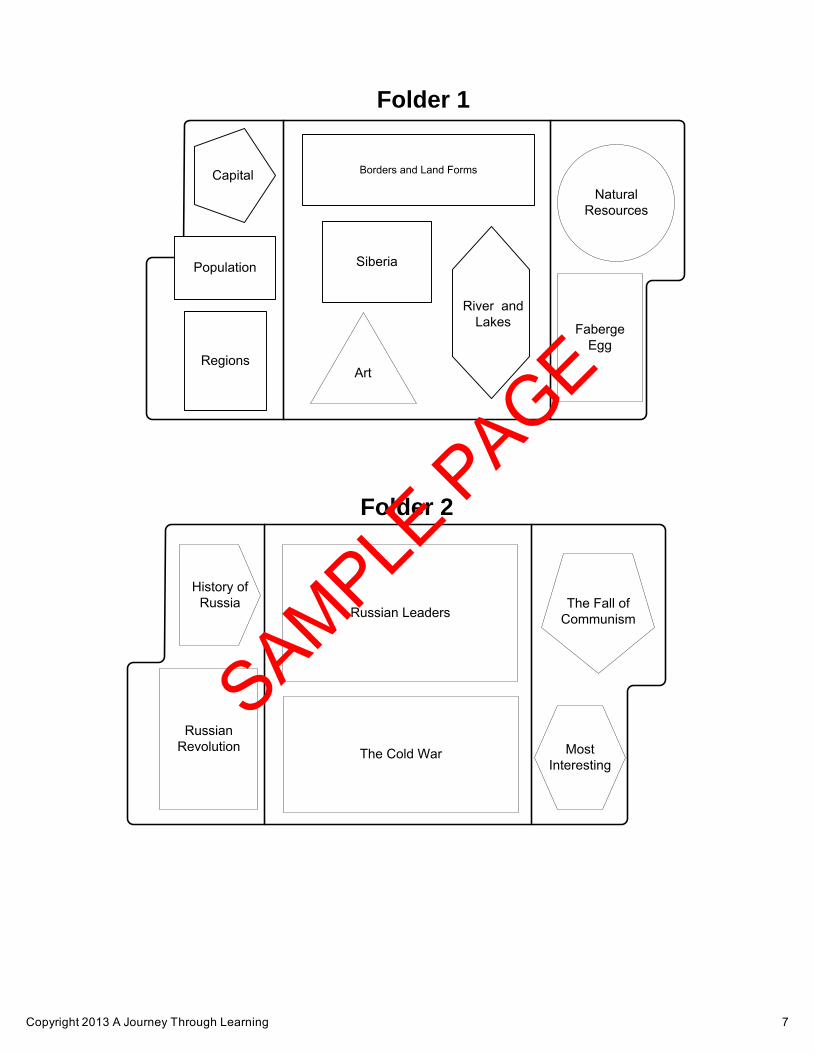
Folder 2
Folder 1
Capital
Population
Regions
Borders and Land Forms
Siberia
Art
River and Lakes
Natural Resources
Faberge Egg
History of Russia
Russian Revolution
Russian Leaders
The Cold War
The Fall of Communism
Most Interesting
Copyright 2013 A Journey Through Learning 7
SAMPLE P
AGE

Cut out around the dotted lines. Glue to the front of your closed lapbook.
Exploring Russia
Copyright 2013 A Journey Through Learning 8
SAMPLE P
AGE

Read Introduction to Russia
Have you ever been on a long road trip across the United States? If so, you might have thought that the trip was endless! The fact is the United States IS a big country, but it is not the largest in the world. The largest country in the world is Russia.
The country of Russia is located across two continents, Europe and Asia. Russia occupies about 1/10 of the world’s surface. It is almost twice as big as the United States! If you were to ride a car from the Russian capital of Moscow in the west to the city of Vladivostok in the east, you would travel across nine time zones. The landscape will change dramatically from tundra to steppe to mountains, lakes and rivers. The diversity of this huge country is truly amazing!
Even though Russia is the largest country in the world, it is not the most populated. Russia has the 9th largest population in the world. Its population is mostly Russians, but there are many ethnic groups represented including Tartars, Ukrainians, and Bashkir, among others that also call Russia home. Of the more than 140 million people who live in this country, about three quarters live in city areas. The largest cities in the country are Moscow (the capital) and St. Petersburg.
Russia is a federation. A federation is a country formed by regions and republics under a central government. Russia's official name is the Russian Federation.
Copyright 2013 A Journey Through Learning 9
SAMPLE P
AGE

Folder 1Read Introduction to Russia.
Hotdog fold in the middle. Cut out around shape. Do not cut
on the fold. Glue booklet into lapbook. Directions: What is the capital of Russia? Write the answer in the booklet.
What is the capital of Russia?
Copyright 2013 A Journey Through Learning 10
SAMPLE P
AGE

Hamburger fold
Folder 1Read Introduction to Russia.
Cut out this piece and hamburger fold on middle line. There will be a tab sticking out. Do not cut off. Fold tab up and over to keep booklet closed. (Like a match book) Glue into folder. Directions: What is the population of Russia? Write it in the booklet.
Population
Copyright 2013 A Journey Through Learning 11
SAMPLE P
AGE

Environmental Regions
There are three main environmental regions in Russia: tundra, forest, and steppe. The tundra covers around ten percent of the land. There are no trees in the tundra. The soil is poor because of the harsh temperatures and poor draining conditions. The soil is typically shallow with only a thin layer of soil resting on the permafrost (the area that is always frozen). In the tundra region closest to the Arctic Circle, there are wide areas of land completely bare. Further south, there is more vegetation, usually lichen, moss, and some shrubs.
The largest environmental region of Russia is the Taiga. The Taiga is also known as the Boreal Forest region. This forest is the largest in the world, and it has the largest reserve of timber (wood). In its warmer regions, Russia has large areas of deciduous forests. Deciduous forests are forests made out of deciduous trees (trees that shed their leaves in the fall).
The regions that extend from southern Ukraine through northern Kazakhstan to the Altai is known as the steppe. Steppes are grassy plains with temperate climates of cold winters and warm summers. There is not a lot of rain on the steppes, but the rain that falls is enough to sustain short grasses. Throughout history, the steppe has been an important travel route. It was through the Russian steppe that the caravans carrying silk and spices traveled between Europe and Asia. The Mongols, a nomadic (traveling) people, also roamed throughout the steppe terrorizing and conquering the land.
Copyright 2013 A Journey Through Learning 12
SAMPLE P
AGE

Read Regions.
Cut out the booklet as one piece. Fold the two flaps inward. Fold the booklet in the center on the red line. Glue the two flaps down to create a pocket. Glue into lapbook. Cut out the three small pieces.Directions: There are three main types environmental regions in Russia. Tell about them on the cards. Store cards in pocket.
Folder 1
Steppe Forest Tundra
Flap
Flap
Environmental Regions
Copyright 2013 A Journey Through Learning 13
SAMPLE P
AGE


![[320] Web 1: Selenium · Page A Page B Page C Page D how to scrape a webpage graph? how to scrape a complicated page?](https://static.fdocuments.us/doc/165x107/6039986564b34c71e02207cb/320-web-1-selenium-page-a-page-b-page-c-page-d-how-to-scrape-a-webpage-graph.jpg)

