Expense Report Processing Workshop - Schedschd.ws/hosted_files/imug2017/24/IMUG2017 Expense...
14
Expense Reporting Time: 10:45-11:45 Date: Wednesday, June 21, 2017 Time: 10:45-11:45 Date: Thursday, June 22, 2017 Page 1 of 14 Expense Report Processing Workshop Join us in learning how to use some of our newest functionality – Employee Expense Reporting. This workshop will show you how to setup and use Employee Expense Reporting. After setup, we will walk through an example entry of an Employee Expense and talk about what our next phase of the project should entail. We’re looking for input from you as to how you’d like to see the product evolve. Objectives: By the end of the session you should be able to: Setup Employee Expense Reporting for the average employee entry, including Billable expenses. Scan and itemize receipts and create an Expense Report. Approve or Reject an Expense Report and resulting actions an employee can take to resubmit. Create Recoverable expense invoices that will be billed back to customers. Steps: 1. Logon to Multiview Username: manager Password: manager Database: MV 2. Navigate to the Accounts Payable Module and the Expense Report Entry Form. 3. Cancel and click on the SETUP button in the toolbar. The Setup form consists of 5 different areas that must be completed prior to entry of the first Employee Expense. The Setup form consists of Options, Departments, Expense Types, Customers and User Options.
Transcript of Expense Report Processing Workshop - Schedschd.ws/hosted_files/imug2017/24/IMUG2017 Expense...
Expense Reporting
Time: 10:45-11:45 Date: Wednesday, June 21, 2017 Time: 10:45-11:45 Date: Thursday, June 22, 2017
Page 1 of 14
Expense Report Processing Workshop
Join us in learning how to use some of our newest functionality – Employee Expense Reporting. This workshop will show you how to setup and use Employee Expense Reporting. After setup, we will walk through an example entry of an Employee Expense and talk about what our next phase of the project should entail. We’re looking for input from you as to how you’d like to see the product evolve.
Objectives:
By the end of the session you should be able to:
Setup Employee Expense Reporting for the average employee entry, including Billable expenses.
Scan and itemize receipts and create an Expense Report.
Approve or Reject an Expense Report and resulting actions an employee can take to resubmit.
Create Recoverable expense invoices that will be billed back to customers.
Steps:
1. Logon to Multiview Username: manager
Password: manager
Database: MV
2. Navigate to the Accounts Payable Module and the Expense Report Entry Form.
3. Cancel and click on the SETUP button in the toolbar.
The Setup form consists of 5 different areas that must be completed prior to entry of the first Employee Expense. The Setup form consists of Options, Departments, Expense Types, Customers and User Options.

Expense Reporting
Time: 10:45-11:45 Date: Wednesday, June 21, 2017 Time: 10:45-11:45 Date: Thursday, June 22, 2017
Page 2 of 14
4. The first tab of the form to Setup is the Options Tab. It consists of a Customer setup, an AP Doc type
and an Expense Doc Type. The AP Doc Type has probably already been setup if your company is a
user of Workflow. The EXP Doc Type is a new Document type specifically used with Employee
Expenses, and will have to be setup as a new External Document Type. Different External Document
Types are used to identify the separation between regular AP Documents and Employee Expense
Receipts. Mailbox Id reflects the mailbox where the system should retrieve images.
a) The Customer List consists of two drop down items – All Active Customers or Selected
Customers. If the user selects Selected Customers, they would then be able to select a ‘shortlist’
of Customer Ids that can be used by Employees when entering ‘Billable’ expenses – or expenses
that are incurred but are to be billed back to a Customer.
b) Allow Blank Customer is a simple drop down list indicating Yes or No. When an employee enters a
recoverable expense, this option indicates that the employee must either enter a known
customer or is allowed to leave it blank, allowing it to be entered in Accounting when the
Unbilled Line is put onto an invoice.

Expense Reporting
Time: 10:45-11:45 Date: Wednesday, June 21, 2017 Time: 10:45-11:45 Date: Thursday, June 22, 2017
Page 3 of 14
c) Departments allows a company to personalize the information that their employees will see
when entering their expense receipt item. The Departments will typically map to a particular unit
in a particular company. The employee needs only to know which ‘Department’ they are creating
the receipt item for.
d) Expense Types allows a company to personalize the type of expense that is being recorded for
the Receipt item. The Expense type will typically map to a specific account. This, coupled with
the unit, will create the start of a distribution required in AP and (if so desired) in AR. This is also
the area that the user can setup an Expense Type as Billable. The Billable Distribution will many
times be the same Account in AP and in AR (Suspense) as the Billable expenses are in transition
to be billed to a customer. Billable Expenses are saved in an Unbilled AR table that allows a user
to pick and choose the lines that should go onto an AR invoice.

Expense Reporting
Time: 10:45-11:45 Date: Wednesday, June 21, 2017 Time: 10:45-11:45 Date: Thursday, June 22, 2017
Page 4 of 14
e) The Customers tab allows a user to select a number of customers that they would like to appear
in the Billable Customer list (rather than the full complement of customers), if the user has
chosen the ‘Selected Customers’ drop down in the Customer List in the first Options tab.
f) The User Options tab will allow the user doing the setup to select defaults for particular users. If
an employee entering expenses works only for a specific Department or only incurs very specific
Expense Types (e.g. Lodging only), the items can be filled in so as to lessen the burden on the
employee (and errors). In addition, the user can also enter in a default currency id and SHOULD
enter the Employee Vendor Id. This is the Vendor Id that is associated with the Employee who is
entering the expenses, so that the completed and approved Expense Report becomes an
Employee Expense Voucher.

Expense Reporting
Time: 10:45-11:45 Date: Wednesday, June 21, 2017 Time: 10:45-11:45 Date: Thursday, June 22, 2017
Page 5 of 14
5. A secondary setup for Expense Report Processing is the Workflow setup. A new Workflow type has
been added and will have to be initiated prior to completing the first Expense Report. To see the
Workflow, goto the Main Menu and select Workflow. In the Workflow section, access Workflow
Review. The new Workflow (Expense Reports) has already been setup, but usually you would have to
create it anew by going to Add New System Event Workflow in the Workflow Administrator.
a) Access the Expense Reports workflow by using the Workflow Review form (Workflow menu
Workflow Review). Click on the Version 1 Current version under Expense Report. In the right-
hand panel, click on View Workflow Design.
b) It’s a simple workflow in this case, but could become complicated based upon your approval
process and setup. This could be termed as the “Pre-Voucher for Expense Reports”. A simple
expense report enters workflow on one end after entry by the Employee and comes out the
other end as a Voucher and (potentially) Unbilled AR items. In this case:

Expense Reporting
Time: 10:45-11:45 Date: Wednesday, June 21, 2017 Time: 10:45-11:45 Date: Thursday, June 22, 2017
Page 6 of 14
i) The Expense Report enters workflow and will most likely continue onto the Approval step. In
this case, it’s a simple flow – all items will goto user IMUG01 or the Position Employee
Expense Authorization.
ii) Once the Expense Report has been approved, it must flow into a Set Final Voucher Options
node. This node must be setup with the Final Voucher Owner. The Final Voucher Owner will
be a member of the Accounting Department that is tasked with Expense Reporting. If this is
not present, the final voucher cannot be created because there is no authorized user
assigned to the voucher. In this case, the Manager will be the Final Voucher Owner.
Expense Reporting
Time: 10:45-11:45 Date: Wednesday, June 21, 2017 Time: 10:45-11:45 Date: Thursday, June 22, 2017
Page 7 of 14
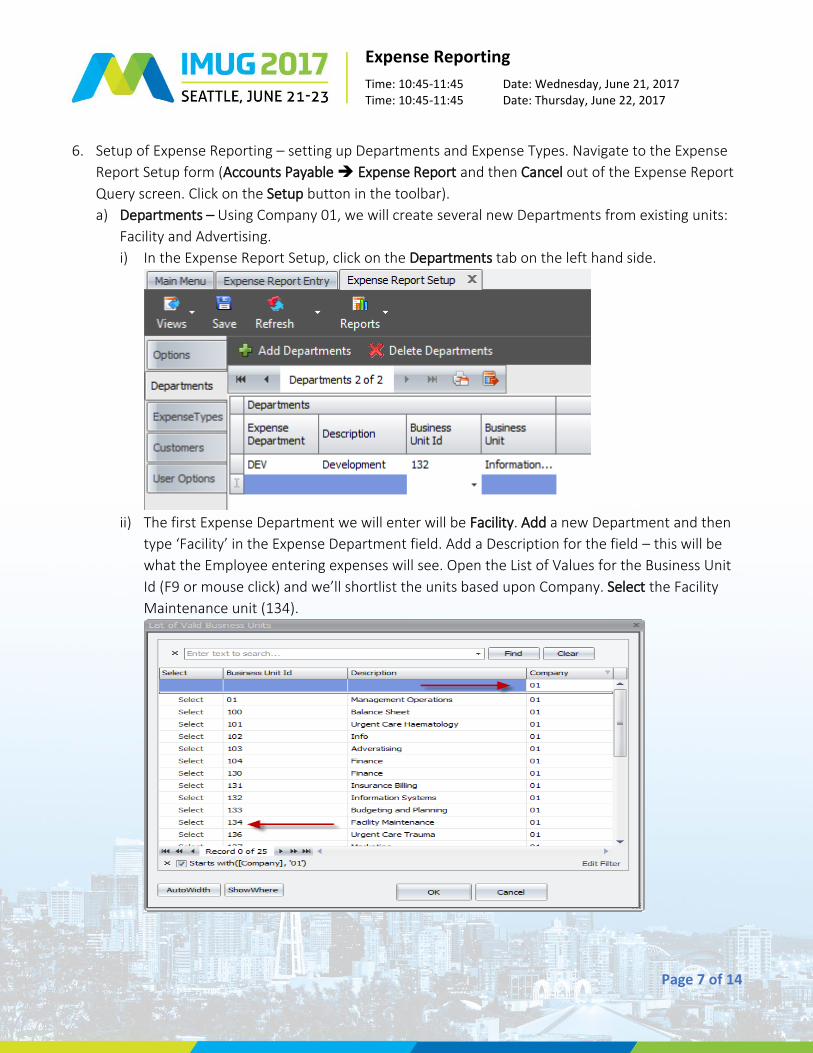
6. Setup of Expense Reporting – setting up Departments and Expense Types. Navigate to the Expense
Report Setup form (Accounts Payable Expense Report and then Cancel out of the Expense Report
Query screen. Click on the Setup button in the toolbar).
a) Departments – Using Company 01, we will create several new Departments from existing units:
Facility and Advertising.
i) In the Expense Report Setup, click on the Departments tab on the left hand side.
ii) The first Expense Department we will enter will be Facility. Add a new Department and then
type ‘Facility’ in the Expense Department field. Add a Description for the field – this will be
what the Employee entering expenses will see. Open the List of Values for the Business Unit
Id (F9 or mouse click) and we’ll shortlist the units based upon Company. Select the Facility
Maintenance unit (134).

Expense Reporting
Time: 10:45-11:45 Date: Wednesday, June 21, 2017 Time: 10:45-11:45 Date: Thursday, June 22, 2017
Page 8 of 14
iii) We will enter a second Department to round out the entry for Departments. Repeat the step
above, but enter Advertising as the Department and ‘Advertising Department’ as the
Description. Choose unit 103, which is the Advertising Department. SAVE your entries.
b) Expense Types – We will add two different Expense Types to the already existing types. One will
be a regular type and the second will be a ‘Billable’ type. The billable type allows the Accounting
Department to include lines from the Unbilled AR onto an invoice for a particular Customer.
i) In the Expense Report Setup, click on the Expense Types tab on the left hand side.
ii) The first Expense Type we will enter will be Accommodations. Add a new Expense Type and
then type ‘Accommodations-NB’ in the Expense Type field. Add a Description for the field –
this will be what the Employee entering expenses will see (e.g. Accommodations – Non
Billable). Indicate also that Accommodations type is NOT billable (leave it at no). Save your
changes.

Expense Reporting
Time: 10:45-11:45 Date: Wednesday, June 21, 2017 Time: 10:45-11:45 Date: Thursday, June 22, 2017
Page 9 of 14
iii) Since our line is made up of Departments (Units) and Expense Types (Accounts) we will have
to enter a corresponding account in the GL for Accommodations. The Employee entering
expenses does not see this account – they only see the Expense Type, therefore it is
important to identify the Expense Type succinctly for the non-financial employees.
Clicking on the Accommodations Line, we will then Add Distributions at the bottom. You must
highlight the line to which you want to add a distribution.
Select Chart Id 01. For the AP Account No, launch the List of Values and shortlist the accounts
by typing Hotel in the Description. As you can see, you are not bound by the description of
the GL Account when naming the Expense Type. Select 650075. Since this is a non-billable
item, we will not enter further information. The user can enter more than one distribution
when there are multiple Chart of Accounts (e.g. multiple companies). Otherwise, One
Expense Type = One Expense Distribution.
iv) Repeat the steps above for a Billable Expense Type. The difference comes when you enter the
distribution:
Expense Type: Accommodation – B
Expense Type Description: Accommodation – Billable
Billable: YES
Entering the distribution for this line. Ensure that you have selected the line you want to add
the distribution to, and click Add Distribution on the bottom half.
Chart id: 01
AP Account No: 211100 (Employee Expense Billable)
AR Account No: 211100 (Employee Expense Billable)
AR Trans Type: CUST

Expense Reporting
Time: 10:45-11:45 Date: Wednesday, June 21, 2017 Time: 10:45-11:45 Date: Thursday, June 22, 2017
Page 10 of 14
c) Customers – Under the Options tab of the setup, you could setup a Customer List to be All Active
Customers (which is how we left it), or Selected Customers. If you were to choose Selected
Customers, the Customers tab of this Setup form is where you would setup the list of Selected
Customers. If there are only a select number of Customers that are billed expenses, they can be
chosen in here to create a `shortlist` for the Employees entering expenses. This list then has to
be maintained by A/P when new customers are available for billing of employee expenses.
d) User Options – User Options would be where you, as the Administrator of the Expense Reporting
system, could set the default Expense Department, Expense Type and Currency Id of a particular
user. At the very least, you need to link the Employee’s User Id with the Employee Vendor Id,
otherwise the user will not be able to file Expense Reports.
Find Manager. We will keep everything blank except for the Employee Vendor Id.
Employee Vendor Id: MIX-A-LOT and SAVE the line.

Expense Reporting
Time: 10:45-11:45 Date: Wednesday, June 21, 2017 Time: 10:45-11:45 Date: Thursday, June 22, 2017
Page 11 of 14
Processing Employee Expenses – Billable vs Non-Billable
Steps
1. Logon to Multiview
Username: manager
Password: manager
Database: MV
2. Enter a New Expense Report
Access Accounts Payable Expense Report (Accounts Payable Vouchers – Expense Report.
Click on New Expense Reports on the bottom of the Query screen. Alternately, if you have
already Queried or Cancelled, click on Add Expense Reports in the toolbar.
Hit the SPACEBAR to default today’s date and add a Description (e.g. Seattle Trip). Click on Save
on the toolbar.
On the top Toolbar, click on Add Receipts. This will enable you to start entering receipts for a
particular Expense Report.
Navigate to i:\Images\Expense Report Images. Open the PDF called
Accommodation_IMUG20172.PDF. The Load New External Documents form pops up.
Enter 01 in the Company Id field and click on Next at the bottom of the form. On the next form
you can View the document, or Add a new document if you so wish. We will click on Finish at the
bottom.
Expense Reporting
Time: 10:45-11:45 Date: Wednesday, June 21, 2017 Time: 10:45-11:45 Date: Thursday, June 22, 2017
Page 12 of 14
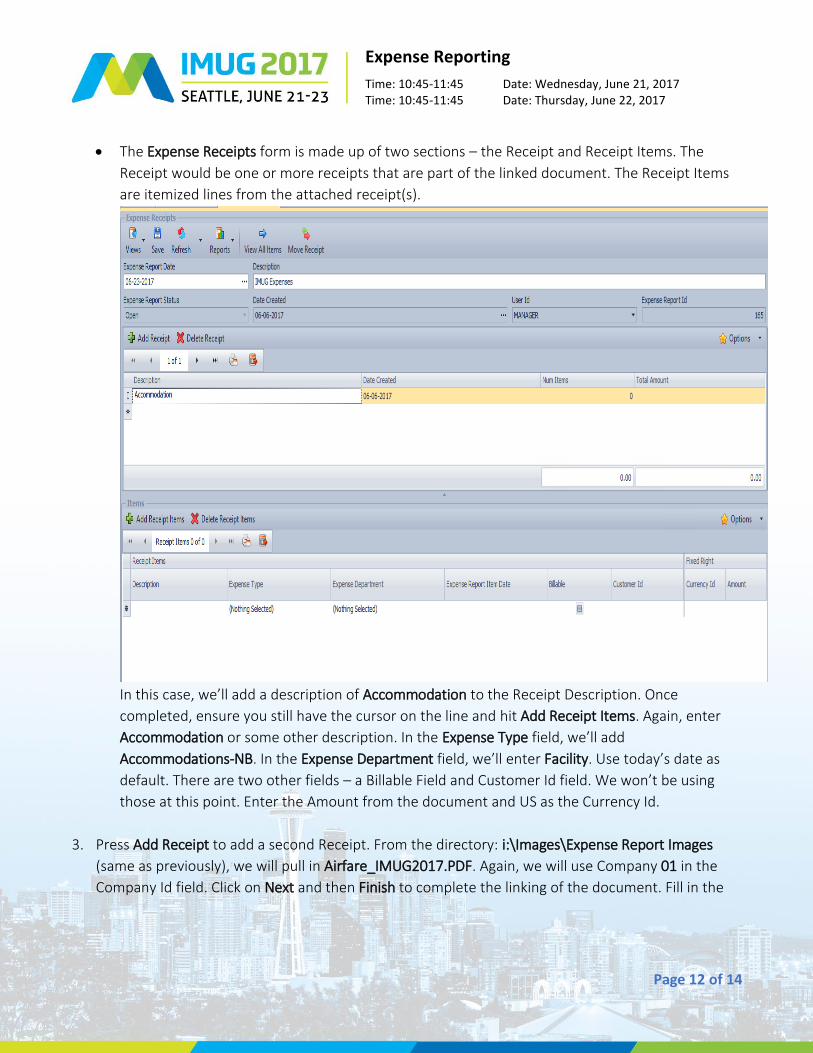
The Expense Receipts form is made up of two sections – the Receipt and Receipt Items. The
Receipt would be one or more receipts that are part of the linked document. The Receipt Items
are itemized lines from the attached receipt(s).
In this case, we’ll add a description of Accommodation to the Receipt Description. Once
completed, ensure you still have the cursor on the line and hit Add Receipt Items. Again, enter
Accommodation or some other description. In the Expense Type field, we’ll add
Accommodations-NB. In the Expense Department field, we’ll enter Facility. Use today’s date as
default. There are two other fields – a Billable Field and Customer Id field. We won’t be using
those at this point. Enter the Amount from the document and US as the Currency Id.
3. Press Add Receipt to add a second Receipt. From the directory: i:\Images\Expense Report Images
(same as previously), we will pull in Airfare_IMUG2017.PDF. Again, we will use Company 01 in the
Company Id field. Click on Next and then Finish to complete the linking of the document. Fill in the

Expense Reporting
Time: 10:45-11:45 Date: Wednesday, June 21, 2017 Time: 10:45-11:45 Date: Thursday, June 22, 2017
Page 13 of 14
following information: Receipt Description: Airfare – Jill Sample
Ensure that you have this line highlighted as current.
Receipt Items:
Receipt Item Description: Airfare – Jill Sample - Billable
Expense Type: Airfare-B
Expense Dept: Facility
Expense Date: <Spacebar>
Billable: <Checked on>
Customer Id: 6032400 <Ru-de Investments Inc.>
Amount: $1,429.51
Currency Id: US
Add a new Receipt Item
Receipt Item Description: Airfare – Jill Sample
Expense Type: Airfare-NB
Expense Dept: Facility
Expense Date: <Spacebar>
Billable: <off>
Customer Id: <Not Used>
Amount: $1,000
Currency Id: US
We’ve now split the above receipt into two different items – one is a billable portion of the receipt
and the second is a non-billable portion. You can see that we can split Receipts into smaller Receipt
Items – so you might have 4 or 5 pages of receipts (which would count as one ‘Receipt’), but you
may have 10 or 15 different receipt items.

Expense Reporting
Time: 10:45-11:45 Date: Wednesday, June 21, 2017 Time: 10:45-11:45 Date: Thursday, June 22, 2017
Page 14 of 14
4. We have now completed the Expense Report. We can review the Receipts and Receipt items as we
wish. We’ll close this tab and return to the Report Expense tab to manage our Expense Reports.
5. The Expense Report tab allows a user to view the Expense Reports that are in Workflow, Open or
ones that have been Rejected or Approved for the Logged-in User.
6. On the toolbar, we will take a look at the buttons and their results.
Add Receipts: will allow the user to add new receipts to an Expense Report.
Edit Receipts: will allow the user to edit the receipts in an open Expense Report.
Submit Expense: will allow the user to submit the Expense Report through Workflow for approval.
Re-Open Expenses: will allow the user to re-open an Expense Report that is presently in Workflow
(NOT Open, Rejected or Approved).
View Expense Items: will allow the user to query on an Expense Report and pivot the results, if so
desired. These Expense Reports belong to the logged-in user.
Analyze All Expenses: will allow the user to query and analyze ALL Expense Reports from ALL users.
User must have security for this functionality.
7. We will Submit the Expense Report for approval, so that we can view the Voucher results and create
an invoice.
Once you’ve Submitted the Expense Report, we’ll continue to the ToDo List of this user (Manager), since the workflow has been setup for this user to approve all.