
Exercises for Windows - University of...
18
Exercises for Windows
Transcript of Exercises for Windows - University of...

Exercises for Windows


CAChe User Interface for Windows
Application
Document
window
window(workspace)
Style bar
Tool palette
Group Select
Select tool
Select entire molecule
Select Similar
Atom tool
Rotate
Translate
Zoom
Toolbar
Element type box
Style bar
Hybridization box Charge boxBond type box

-2 CAChe Workbook

21-3 CAChe Workbook
Exercises for Windows 21
I. Building BasicsBuild:
1. Choose Start | Programs | CAChe | Workspace. The application opens, containing an empty document window referred to as the workspace.
2. Click on the Atom tool icon. Your cursor turns into the Atom tool shown to the right.
3. Select the arrow button in the Element Type box located on the left of the Style bar. A drop down list of elements appears. Select C-Carbon. The default hybridization is sp3.
4. Look in the Hybridization box. If the hybridization is not sp3, click on the arrow. From the drop down menu, select sp3-tetrahedron. The carbon atom is now sp3 hybridized.
5. Click once in the workspace to deposit a single carbon (C) atom. Do not double click unless you want multiple atoms.
6. Click on the existing C atom, hold the button down and drag away (click-drag). Release the mouse button. Another C atom appears connected to the first C atom with a with a single bond. Add three more C atoms by doing a click-drag. You should have a string of five C atoms.
7. Return to the Element Type list and select O-oxygen. Make the atom sp3 hybridized.
8. Click-drag from the C next to the end. A red O atom is connected to the C atom.
9. Click on the Select tool icon. The cursor changes into an arrow shown to the right.
10. Click in the workspace but not on any atoms or bonds. This selects all atoms and bonds in a molecule.
CH3CH2CH2CHCH3
OH
! TIP
For most actions, you can click on Edit | Undo to undo your last command.
21

Exercises for Windows
21-4 CAChe Workbook
11. Select Beautify | Comprehensive. If the skeleton structure was built correctly, the correct number of hydrogen atoms are present and the angles are proper for sp3 hybridization.
12. Click File | Save. Save the molecule with the name “2-pentanol” in the appropriate location. The molecule saves as a chemical sample “.csf” file type.
II. Viewing the StructureOpen the molecule “2-pentanol” from Exercise I in the Editor.
Translate, Rotate, and Zoom1. Change the position of the molecule by translating, rotating, and zooming.
Experiment with each of these three modes.
Rotate: Click on the Rotate icon. In the window there is a circle around the molecule and your cursor is an arrow. Click and drag your cursor to rotate the molecule. Movement inside the circle produces rotation around the X and Y axes while movement outside the circle allows rotation around the Z axis.
Translate: Click on the Translate icon. The cursor appears as a hand. Click and drag the mouse to move the molecule around on the screen.
Zoom: Click on the Zoom icon. The cursor becomes a magnifying glass. Click and drag the magnifying glass up or down to zoom in or out.
The following keys are very useful for repositioning the atom:
The Beautify menu has the following correction abilities:
Valence - Adds hydrogens to make the correct number of total bonds. For a neutral carbon, that number is four; for a neutral oxygen it is two; a neutral nitrogen three and a positively charged nitrogen is four.
Configuration - Changes the hybridization to match the number and type of bond. For example, an atom with a total of four attachments or electron pairs is sp3, three total attachments is sp2 and two total is sp.
Rings -Gives ring structures the proper shape.
Translate
Zoom
Rotate

CAChe Workbook 21-5
Press the Control key and f at the same time to center the structure and scale the molecule to fit the window. If only one atom is selected, the structure is centered around the selected atom but no scaling is done.
Press i to return the molecule to the initial scale and orientation.
2. Enter the Select tool mode.
3. Select View | Atom Attributes. The Atom Attributes dialog box opens. The options in the Atom Attributes box allow you to change the way the atoms and bonds are displayed.
4. Click on the Label tab to display the list of label options.
5. Click in the square next to Atomic Symbol. The square has a check mark inside, indicating that the option is selected. Click OK. The element letter appears on each atom.
6. Select View | Atom Attributes. Click on the Shape tab to display the list of options. Locate the “Scale Spheres such that” section. The default view is usually scaled to 0.2 times the van der Waals radius. To view the atoms at their true size, set this number to be 1.0. This mode is known as the space-filling view.
A quick way to reach the space-filling mode is to click on the space-filling icon on the toolbar. The icon is a short cut for the command View | Space Filling.
! NOTE
Viewing with labels enables easy inspection of charges. However, the structures are more suitable for formal reports without the labels.

Exercises for Windows
21-6 CAChe Workbook
Experiment with the different view options.
7. Return the molecule to 0.2 atom scaling before continuing with other exercises. You can either change the scale in the Atom Attributes box, or you can click on the Ball and Cylinder icon in the Tool bar.
III. Modifying structuresOpen the “2-pentanol” file from Exercise I, and change the structure to:
1. Click on the C-O bond using the Select tool to select the bond. Click on the arrow in the Bond type box on the Style bar. A pop up menu appears. Select Double; the C-O bond is now double. The sp3 hybridization is wrong for atoms with double bonds.
2. Click on the C atom connected to the O atom. Select sp2 - trigonal plane in the Hybridization box.
3. Repeat this process for the O atom and set it also for sp2 hybridization.
4. Select Beautify | Comprehensive.
5. Save this structure. You will use it later in the tutorial.
IV. Further modificationsIn this section we will use several methods to add or change atoms. These methods are generally interchangeable. Start with “2-pentanol” from Part III and modify it in the following manner:
1. Click on the Select tool icon to enter the Select tool mode.
2. Select the hydrogen (H) atom that you want to replace with a bromine (Br) atom.
Scale = 0.2 Scale = 1.0
CH3CH2CH2CCH3
O
! NOTE
In this case Beautify would have corrected the hybridization but this exercise was intended to show how to change the hybridization.

CAChe Workbook 21-7
3. Click on the arrow in the Element type box on the Style bar. In the pop up menu, select Periodic Table. A Periodic Table opens in a dialog box.
4. Select the element Br. Click OK. The H atom is replaced with a Br atom. Look in the Hybridization box; make sure the hybridization is sp3.
5. Check the Charge box; make sure the charge is 0. If the charge is not 0, you can change the charge by clicking the up arrow to get a positive charge and the down arrow to get a negative charge.
6. Select the O atom. In the Charge box, change the charge to +1.
7. Select Beautify | Comprehensive. The missing hydrogen is added and the bond distances and angles are corrected.
8. Select in order, the H atom connected to the O atom, followed by the O atom and then the C atom attached to the O.
9. Select Adjust | Bond Angle. A Set Bond Angle dialog box opens, displaying the bond angle in degrees. You can label, record or adjust the angle. In this case, you will label the angle. Select Define Geometry Label, and then Unlock Geometry. Unlock geometry allows the angle to change as you modify the structure. Click OK. The label appears on the bond angle.
In the same manner, you can label the atom distance by selecting two bonded atoms and select Adjust | Atom Distance.
10. Select File | Save as. The Save as command leaves the last saved version of the file intact, and saves the current molecule as a different file. Name the file “modifications.”
V. Using the Fragment Library Build:
1. Select File | Open. The Open dialog box appears. Click on the down arrow in the “Look in:” box. Find the CAChe folder on the hard drive, and double click on it to open the folder. The contents of the CAChe folder are displayed in the box. Open the Fragment Library folder. Another list of folders is displayed.
2. Open the Cyclic folder. A list of CAChe documents is displayed.
3. Choose cyclopentane. Click Open. A document window opens with a model of cyclopentane.
NO 2
! TIP
The CAChe folder is generally located in the Program Files/ Fujitsu on the C: drive.
! NOTE
The Fragment Library is a collection of common compounds, ions, functional groups, etc. that you can use in building molecules.
Exercises for Windows
21-8 CAChe Workbook
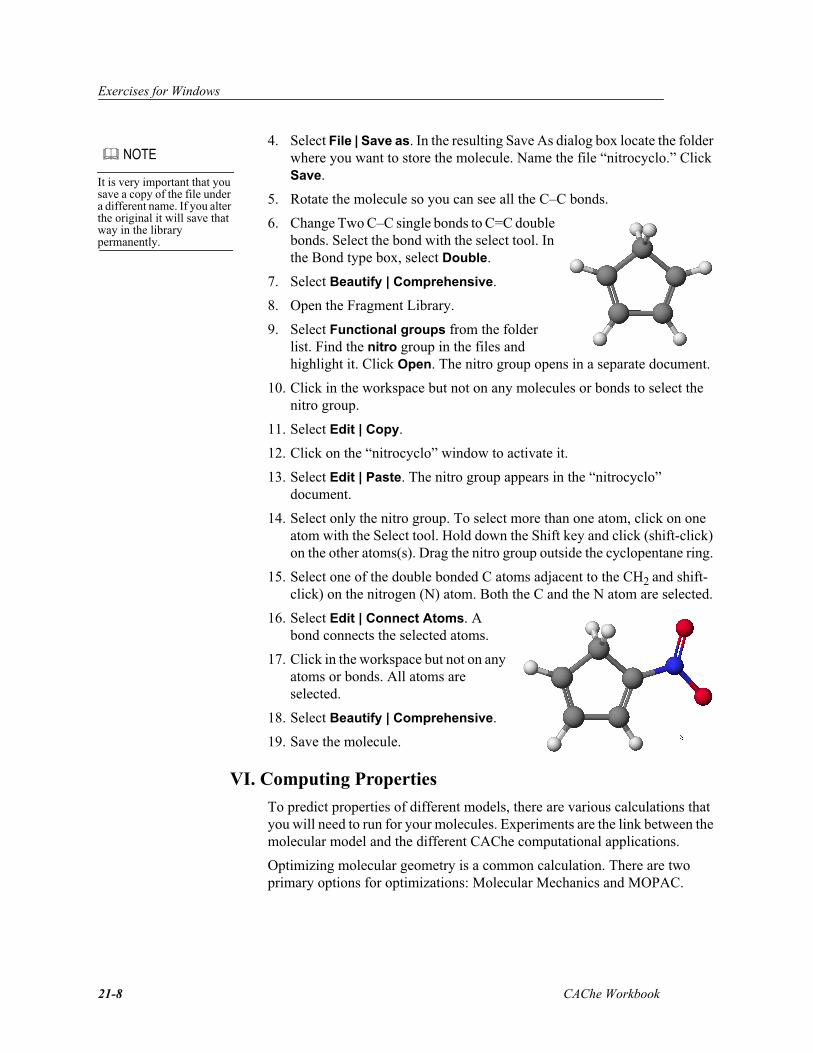
4. Select File | Save as. In the resulting Save As dialog box locate the folder where you want to store the molecule. Name the file “nitrocyclo.” Click Save.
5. Rotate the molecule so you can see all the C–C bonds.
6. Change Two C–C single bonds to C=C double bonds. Select the bond with the select tool. In the Bond type box, select Double.
7. Select Beautify | Comprehensive.
8. Open the Fragment Library.
9. Select Functional groups from the folder list. Find the nitro group in the files and highlight it. Click Open. The nitro group opens in a separate document.
10. Click in the workspace but not on any molecules or bonds to select the nitro group.
11. Select Edit | Copy.
12. Click on the “nitrocyclo” window to activate it.
13. Select Edit | Paste. The nitro group appears in the “nitrocyclo” document.
14. Select only the nitro group. To select more than one atom, click on one atom with the Select tool. Hold down the Shift key and click (shift-click) on the other atoms(s). Drag the nitro group outside the cyclopentane ring.
15. Select one of the double bonded C atoms adjacent to the CH2 and shift-click) on the nitrogen (N) atom. Both the C and the N atom are selected.
16. Select Edit | Connect Atoms. A bond connects the selected atoms.
17. Click in the workspace but not on any atoms or bonds. All atoms are selected.
18. Select Beautify | Comprehensive.
19. Save the molecule.
VI. Computing PropertiesTo predict properties of different models, there are various calculations that you will need to run for your molecules. Experiments are the link between the molecular model and the different CAChe computational applications.
Optimizing molecular geometry is a common calculation. There are two primary options for optimizations: Molecular Mechanics and MOPAC.
! NOTE
It is very important that you save a copy of the file under a different name. If you alter the original it will save that way in the library permanently.

CAChe Workbook 21-9
Molecular Mechanics
Molecular Mechanics is a computational application that treats molecules like balls connected by springs. Optimizations depend on the bond types and atom hybridizations. Since simple classical physics is used for the optimization, no information about electronic properties or reactivity is determined.
MOPAC
An application that uses a quantum mechanical approach can give the electronic properties of a molecule. MOPAC is such a program and we can use it to find properties such as heats of formation, orbital energies and shapes, and the distribution of electrons.
Optimize a molecule1. Open the molecule “nitrocyclo” in the Workspace.
2. Select Experiment | New. An Experiment dialog box opens.
3. Click on the arrow in the Property of: box. Select chemical sample.
4. Click on the arrow in the Property: box. Select optimized geometry. The Property menu is different for each class of property. Below is a table of available properties listed for the first four property classes.
Chemical sample Atom BondChemical sample
conformations
There are five classes of properties to choose from:
• chemical sample properties
• atom properties
• bond properties
• sample conformation properties
• reaction and transition state properties.
Exercises for Windows
21-10 CAChe Workbook
5. Click on the arrow in the Using: box. Select PM3 geometry, which uses MOPAC and PM3 parameters to optimize the molecule.
6. Click Start. A calculation window appears and information about the progress of the optimization scrolls in the window. When the calculations end, MOPAC reports a heat of formation. Other properties are also calculated and stored in the molecule file.
Generate MOs and Other Surfaces
Now that we have electronic information from the MOPAC calculations, we can compose pictures of the molecule surfaces and individual molecular orbitals (MOs).
1. Click in the molecule window to activate it.
2. Select Experiment | New. The Experiment box opens.
3. Select Property of: chemical sample, Property: HOMO & LUMO, and Using: standard procedure. Click Start. The calculation window opens, showing the progression of the calculation. When the calculation is done it will say “Tabulation complete.”
4. Return to the molecule window. As a second surface example, tabulate the electrophilic susceptibility.
5. Select Experiment | New.
6. Select Property of: chemical sample, Property: electrophilic susceptibility, and Using: standard procedure. Click Start.
7. Save the molecule after the calculations are complete.
VII. Visualizing PropertiesWe will now look at some of the properties that we calculated using MOPAC.
1. Open the molecule “nitrocyclo” in the Workspace.
2. Select View | Show Surfaces. A Show Surfaces dialog box opens containing a list of Displayed surfaces.
Optimized geometryHeat of formationIR transitionsUV-visible transitionsCurrent energyElectron densityHOMO and LUMOHOMO-4 to LUMO+4All molecular orbitalsElectrostatic isopotentialSusceptibilitySuperdelocalizability
Atomic partial charge Calculated bond orderCalculated bond strain
Rigid mapOptimized mapSequence of conformationsDynamics trajectory
CAChe Workbook 21-11
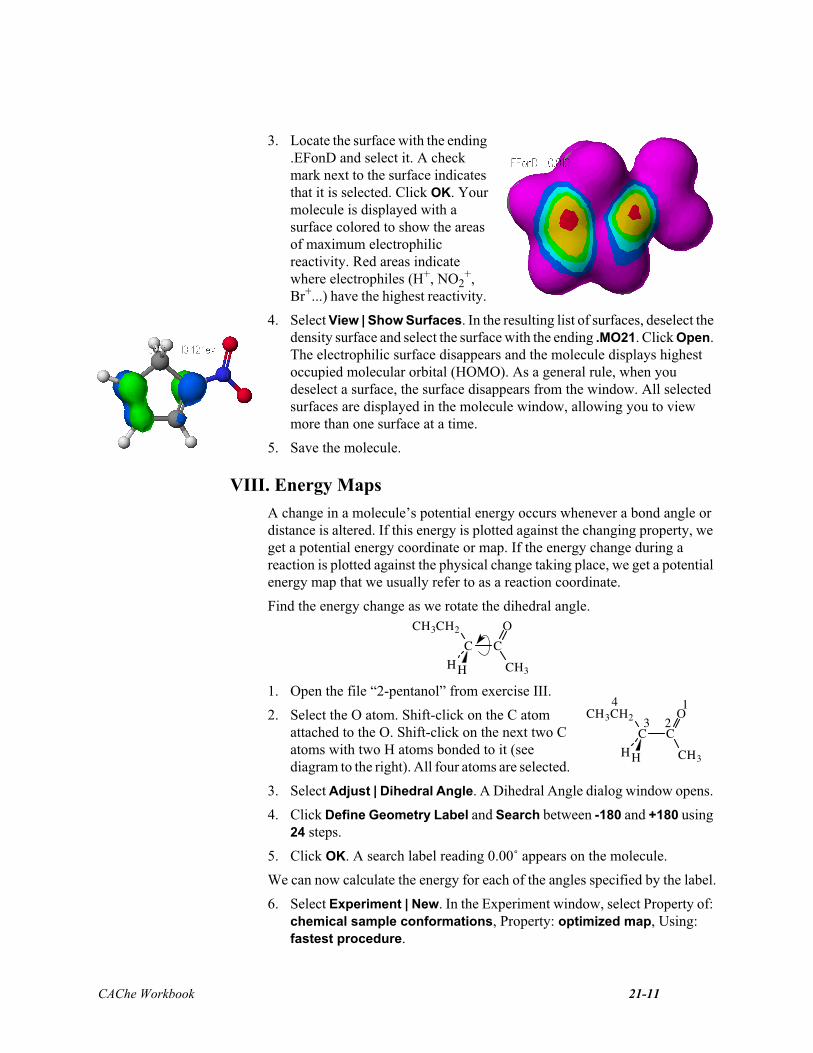
3. Locate the surface with the ending .EFonD and select it. A check mark next to the surface indicates that it is selected. Click OK. Your molecule is displayed with a surface colored to show the areas of maximum electrophilic reactivity. Red areas indicate where electrophiles (H+, NO2
+, Br+...) have the highest reactivity.
4. Select View | Show Surfaces. In the resulting list of surfaces, deselect the density surface and select the surface with the ending .MO21. Click Open. The electrophilic surface disappears and the molecule displays highest occupied molecular orbital (HOMO). As a general rule, when you deselect a surface, the surface disappears from the window. All selected surfaces are displayed in the molecule window, allowing you to view more than one surface at a time.
5. Save the molecule.
VIII. Energy MapsA change in a molecule’s potential energy occurs whenever a bond angle or distance is altered. If this energy is plotted against the changing property, we get a potential energy coordinate or map. If the energy change during a reaction is plotted against the physical change taking place, we get a potential energy map that we usually refer to as a reaction coordinate.
Find the energy change as we rotate the dihedral angle.
1. Open the file “2-pentanol” from exercise III.
2. Select the O atom. Shift-click on the C atom attached to the O. Shift-click on the next two C atoms with two H atoms bonded to it (see diagram to the right). All four atoms are selected.
3. Select Adjust | Dihedral Angle. A Dihedral Angle dialog window opens.
4. Click Define Geometry Label and Search between -180 and +180 using 24 steps.
5. Click OK. A search label reading 0.00˚ appears on the molecule.
We can now calculate the energy for each of the angles specified by the label.
6. Select Experiment | New. In the Experiment window, select Property of: chemical sample conformations, Property: optimized map, Using: fastest procedure.
C CCH3
O
HH
CH3CH2
C CCH3
O
HH
CH3CH21
234

Exercises for Windows
21-12 CAChe Workbook
7. Click Start. A window opens, showing the progression of the calculation. When the calculation is done it opens the map window on the left and molecule window on the right.
The map file is saved in the same location as your molecule with the same name as the molecule only with the ending .map.
8. Click on the reaction coordinate line in the left window and observe the corresponding changes in the molecule. Click on the molecule window to activate it. Enlarge and rotate the molecule so you can see the changes.
In some experiments you may need to adjust the axes. To do this, double click on the axis label. An Axis Attributes dialog box appears. Click on the Range tab. Adjust the range as needed.
9. Save the molecule.
IX. ProjectLeaderProjectLeader can automate the calculation process. This application is especially useful when the same calculation must be done on numerous molecules.
1. Build the four molecules below.
The quickest way to do this is to start with a cyclohexane fragment. (find the folders CAChe/Fragment Library/Cyclic/Cyclohexane-boat).
! NOTE
Another way to reach the Axis Attributes box is to select View | Graph Attributes. Click Attributes for the axis you wish to alter.
Cl
H
H
H
H
HH
H
H
H
H
H
Br
H
H
H
H
HH
H
H
H
H
H
H
H
H
HH
H
H
H
H
HCl
H
H
H
H
HH
H
H
H
H
HBr
H

CAChe Workbook 21-13
2. Replace an equatorial H atom with a Cl atom. Beautify the structure and save the molecule as “equatCl.”
3. Select the carbon atom with the Cl attached and then select Edit | Invert Chirality.
4. Beautify the structure and select File | Save as. Save the document as “axialCl.”
5. Replace the Cl atom with a Br atom. Beautify the structure and save as “axialBr.”
6. Repeat step 3 only with Br. Beautify the structure and save as “equatBr.”
ProjectLeader1. Open the ProjectLeader application on your hard drive. When the
program opens, there is an untitled table. The first column heading is labeled Chemical Sample.
2. Double-click in the first cell below the Chemical Sample heading. An Open dialog box containing a list of file locations appears. Find the location of your files. Select the “equatCl” file and click Open.
3. Repeat this operation in the next cell below and add the file “equatBr.”
4. Double-click in the top cell in the second column (column B). An Enter Property dialog box opens. Click in the circle next to Property of. The circle fills in black. Click on the arrow in the Property of box to display the pull down menu. Select chemical sample.
5. Click Next >, and the dialog box options change. In the Kind of Property box select heat of formation.
6. Select Next>. The options in the dialog box change again. In the Kind of procedure box, select standard procedure.
7. Click OK to return to the table. Column B has the label “Heat of Formation.”
8. Double-click in the top cell in the third column (column C). In the Enter Property box, click in the circle next to Chemical Sample. Click OK.
9. Double-click in the first cell below the new Chemical Sample heading in column C.
10. Select the “axialCl” file and click Open.
11. Repeat this operation in the next cell below and add the file “axialBr.”
12. Double-click in the top cell in the fourth column (column D). In the Enter Property dialog box select the following options: Property of | Chemical sample, Kind of Property: heat of formation, Kind of procedure: standard procedure.
13. Click OK. A Column Select dialog box opens asking you to select the source of the energy calculation. Select Column C. Click OK.
Exercises for Windows
21-14 CAChe Workbook
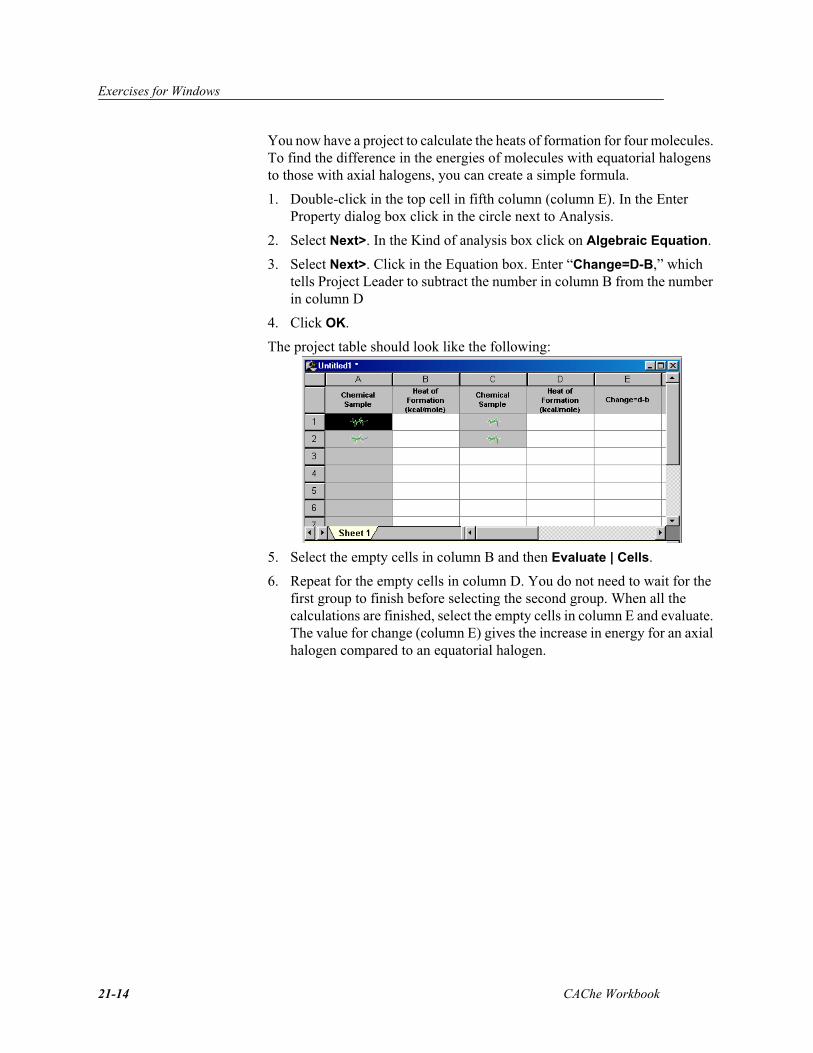
You now have a project to calculate the heats of formation for four molecules. To find the difference in the energies of molecules with equatorial halogens to those with axial halogens, you can create a simple formula.
1. Double-click in the top cell in fifth column (column E). In the Enter Property dialog box click in the circle next to Analysis.
2. Select Next>. In the Kind of analysis box click on Algebraic Equation.
3. Select Next>. Click in the Equation box. Enter “Change=D-B,” which tells Project Leader to subtract the number in column B from the number in column D
4. Click OK.
The project table should look like the following:
5. Select the empty cells in column B and then Evaluate | Cells.
6. Repeat for the empty cells in column D. You do not need to wait for the first group to finish before selecting the second group. When all the calculations are finished, select the empty cells in column E and evaluate. The value for change (column E) gives the increase in energy for an axial halogen compared to an equatorial halogen.

CAChe Workbook 21-15
Using the Procedure EditorSome experiments in this workbook requires special procedure options. The best way to do this is to duplicate an existing experiment, alter it and save it as a new experiment. It is easy to alter the default procedures; be aware of this when you are creating new experiments. For more information on using the Procedure Editor, consult your CAChe User Guide manual.
1. Open a new experiment in the Workspace.
2. Select the options that are closest to what you need for your experiment
3. Select Edit. The Procedure Editor application opens. In the Procedure Editor, a CAChe Experiment Environment window with two columns, opens. In the left column is a tree view of the experiment environment.
4. Locate the folder where the experiment is located, and double click on the folder. For example, open Environment/Workspace/chemical sample/optimized geometry. Double click on the optimized geometry folder. The contents of the folder should open in the folder tree and in the window on the right.
5. Select the experiment closest to the one that you need in the window to the right.
6. Select Edit | Copy, followed by Edit | Paste. A copy of the experiment appears as “experimentname[2].”
7. Rename the experiment copy, by clicking on the experiment name once and typing in a new name.
Exercises for Windows
21-16 CAChe Workbook
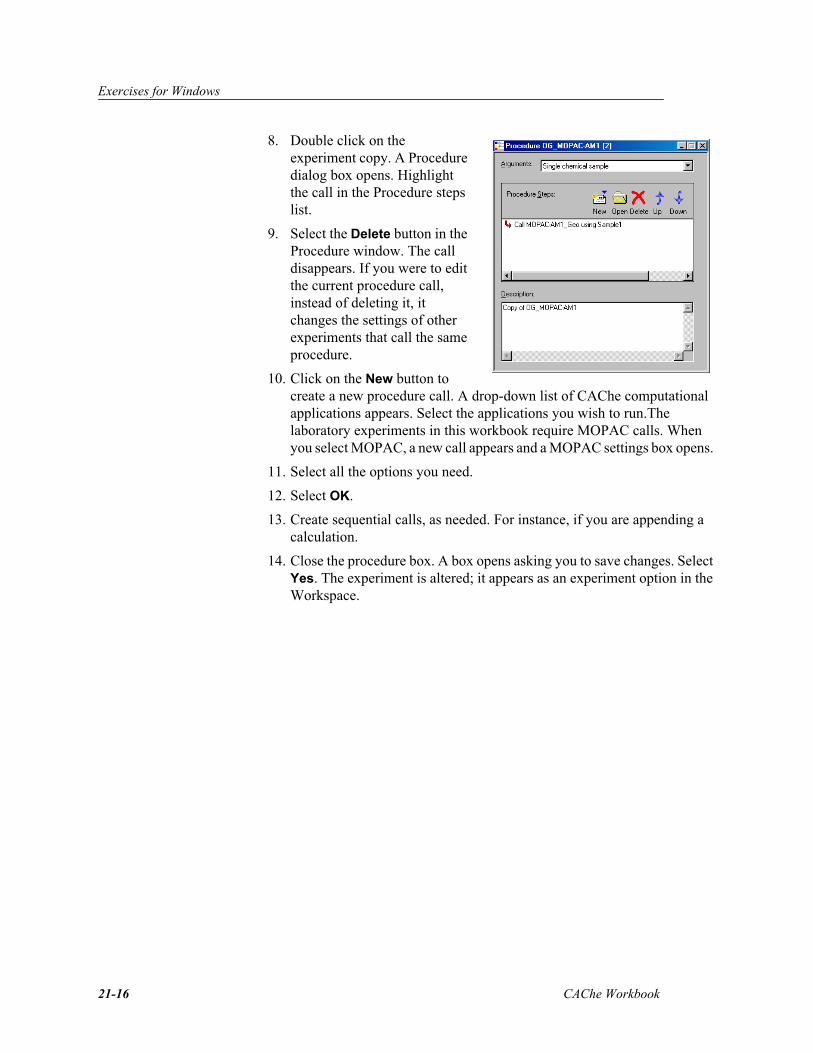
8. Double click on the experiment copy. A Procedure dialog box opens. Highlight the call in the Procedure steps list.
9. Select the Delete button in the Procedure window. The call disappears. If you were to edit the current procedure call, instead of deleting it, it changes the settings of other experiments that call the same procedure.
10. Click on the New button to create a new procedure call. A drop-down list of CAChe computational applications appears. Select the applications you wish to run.The laboratory experiments in this workbook require MOPAC calls. When you select MOPAC, a new call appears and a MOPAC settings box opens.
11. Select all the options you need.
12. Select OK.
13. Create sequential calls, as needed. For instance, if you are appending a calculation.
14. Close the procedure box. A box opens asking you to save changes. Select Yes. The experiment is altered; it appears as an experiment option in the Workspace.