EVO Manufacturing EVO-3035 JLU Rocker Steps · EVO Manufacturing EVO-3035 JLU Rocker Steps READ...
8
EVO Manufacturing EVO-3035 JLU Rocker Steps READ BEFORE INSTALLATION:
Transcript of EVO Manufacturing EVO-3035 JLU Rocker Steps · EVO Manufacturing EVO-3035 JLU Rocker Steps READ...

EVO Manufacturing
EVO-3035 JLU Rocker Steps
READ BEFORE INSTALLATION:

1. Safely park vehicle on level ground.
2. Start by preassembling both driver and passenger side rocker steps off the vehicle. Insert step
plate into main rail. From the outside in, loosely install the supplied 5 ¼” button head bolts with
nuts.

3. Loosely preassemble the inner seam mount brackets to main rocker rails. The inner seam
mount brackets with the 4-bolthole pattern on top will be used at both the front and middle
locations on each side rail. The inner seam mount with the 2-bolthole pattern on top will be
used at the rear location only.
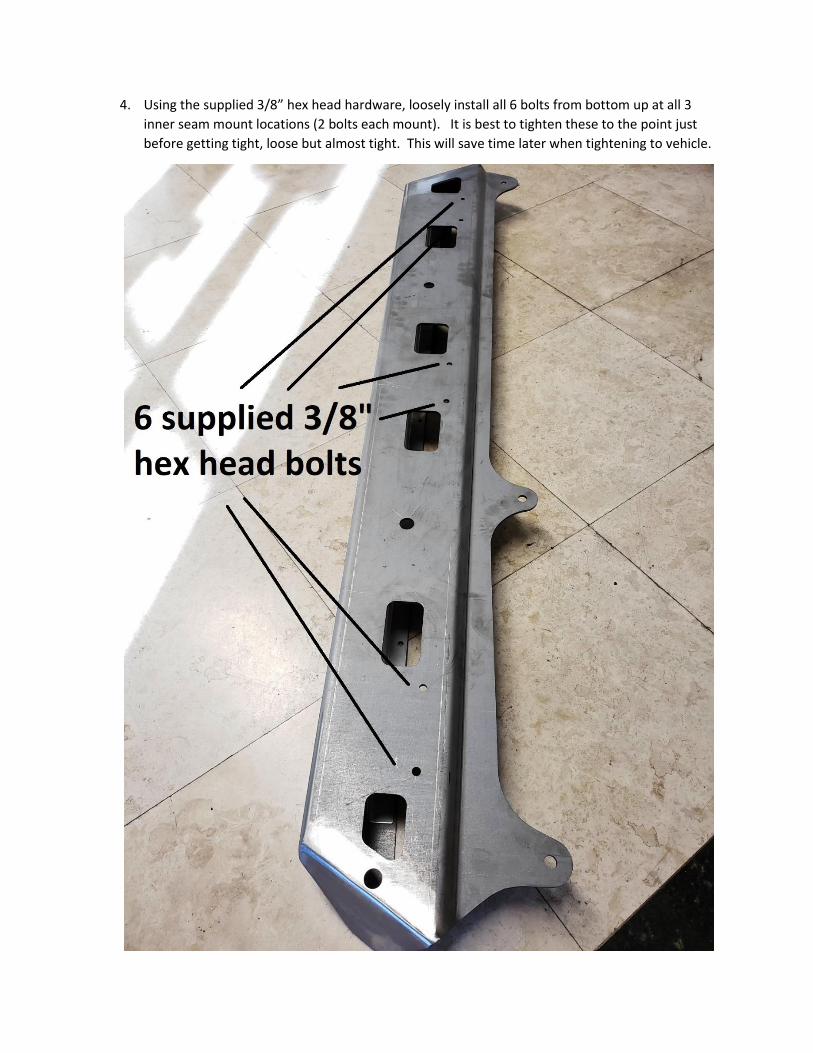
4. Using the supplied 3/8” hex head hardware, loosely install all 6 bolts from bottom up at all 3
inner seam mount locations (2 bolts each mount). It is best to tighten these to the point just
before getting tight, loose but almost tight. This will save time later when tightening to vehicle.

5. From the top down install all 10 5/16” button head screws. Keep the 3 5/16” button head
bolts at the inner seam mount brackets loose, just before tight. The other 7 can be tightened
at this time.

6. Tighten the 5 ¼” button head bolts from step 2
7. Repeat preassembly on other Rocker Step.
8. Remove factory steps/Rubicon Rails on both driver and pass side. There are 6 pinch seam nuts
and 3 body bolts on each side.
9. Starting on driver side. Remove the 3 body mount bolts. Retain the middle and rear factory
body mount bolts.
10. Using supplied 5/16” hex head bolts with washers. Install through inner seam mount bracket at
most forward and most rearward locations (on bolt at the front of rocker step and bolt at the
rear of rocker step. With 2 people, lift Bomber into location and insert front and rear bolts into
existing pinch seam holes at vehicles body seam. Loosely install nut at each of these locations
on top the 5/16 hex head bolts. This will loosely hold part to vehicle.

11. Using supplied 5/16” hardware, loosely install the remaining 4 5/16” hex bolts, washer and
nuts at the inner seam mount bracket locations.
12. Insert the supplied crush tube at the front body mount. Between the Bomber Rocker and the
body mount. Loosely (just before tightening) install the supplied M12 bolt with washer at this
front body mount.
13. Reinstall the middle and rear body mount bolts, just before tight.
14. Using a jack, apply an upward and inward pressure to the Rocker Step, lifting it up to an
approximate level/as installed location.
15. Tighten all 3 body mount bolts.
16. Tighten the 3 upper 5/16” button head bolts and the 6 lower 3/8” hex head bolts at the inner
seam mounts.
17. Tighten the 6 5/16” hex head bolts at inner seam mount brackets at body pinch seam.
18. Repeat on opposite side.

Size
Recommended Torque
Grade 2 Grade 5 Grade 8 18-8 S/S Bronze Brass
Coarse Fine Coarse Fine Coarse Fine Coarse Fine Coarse Fine Coarse Fine
#4* - - - - - - 5.2 - 4.8 - 4.3 -
#6* - - - - - - 9.6 - 8.9 - 7.9 -
#8* - - - - - - 19.8 - 18.4 - 16.2 -
#10* - - - - - - 22.8 31.7 21.2 29.3 18.6 25.9
1/4 4 4.7 6.3 7.3 9 10 6.3 7.8 5.7 7.3 5.1 6.4
5/16 8 9 13 14 18 20 11 11.8 10.3 10.9 8.9 9.7
3/8 15 17 23 26 33 37 20 22 18 20 16 18
7/16 24 27 37 41 52 58 31 33 29 31 26 27
1/2 37 41 57 64 80 90 43 45 40 42 35 37
9/16 53 59 82 91 115 129 57 63 53 58 47 51
5/8 73 83 112 128 159 180 93 104 86 96 76 85
3/4 125 138 200 223 282 315 128 124 104 102 118 115
7/8 129 144 322 355 454 501 194 193 178 178 159 158
1† 188 210 483 541 682 764 287 289 265 240 235 212