Everyone can Grow!
140
Everyone can Grow! Book 2 Student Materials Written by: Rachel Elam Special thanks to Hannah Burch and Toby Una
Transcript of Everyone can Grow!

Everyone can Grow! Book 2
Student Materials Written by: Rachel Elam
Special thanks to Hannah Burch and Toby Una

Everyone can Grow!
2
Foreword
Welcome to Everyone can Grow! a curriculum to bring gardening indoors. If you are reading this,
you must have an interest in growing plants, but may not have a yard to do it in, or maybe you just like
the idea of having plants indoors so you can reap the health benefits, like increased focus, creativity,
better air quality, a higher pain tolerance, and improved sleep. It is amazing what keeping plants can do
for you and your home.
In this student manual you will find a compilation of handouts that correspond to the Everyone
can Grow! curriculum and activities. These instructions are meant to get you started on your indoor
gardening adventure and are not extensive guides. There is a plethora of information online that can
help answer questions once you get past the introductory knowledge. Like all hobbies, keeping plants
has its own vocabulary, which can be a learning curve to a new hobbyist. It is my hope that you have a
lot of fun with these activities, learn about science, and how plants work. Tending plants can be a
relaxing and enjoyable hobby for everyone, so welcome and I hope you plan to stay!
Everyone can Grow!
3
Table of Contents
Foreword ................................................................................................................................................. 2
Table of Contents ..................................................................................................................................... 3
1. Basic botany ................................................................................................................................. 7
For science! .......................................................................................................................................... 7
What is botany? ................................................................................................................................... 7
Brief history of botany .......................................................................................................................... 7
Uses of botany ...................................................................................................................................... 7
Parts of a plant ..................................................................................................................................... 8
Botany terminology .............................................................................................................................. 8
Biological Terms ................................................................................................................................... 8
Flower terms ...................................................................................................................................... 11
Fruit terms ......................................................................................................................................... 12
Life cycles and reproduction ............................................................................................................... 13
Life cycle and reproduction of non-vascular plants ............................................................................. 14
Life cycles of vascular plants .............................................................................................................. 14
Seedless vascular plant ...................................................................................................................... 14
Seeded vascular plant ........................................................................................................................ 15
Reproduction of a gymnosperm .......................................................................................................... 15
Reproduction of an angiosperm .......................................................................................................... 16
Plant cells ........................................................................................................................................... 17
Cell terminology ................................................................................................................................. 18
Basic photosynthesis .......................................................................................................................... 20
The color of light and photosynthesis ................................................................................................. 23
2. Illustrated guide to plant terminology .......................................................................................... 24
Types of plants ................................................................................................................................... 26
Forbs .................................................................................................................................................. 26
Vines .................................................................................................................................................. 26
Shrubs ............................................................................................................................................... 27
Trees .................................................................................................................................................. 27
Vocabulary for describing leaves ......................................................................................................... 27
Parts of a leaf ..................................................................................................................................... 28
Types of leaf arrangements ................................................................................................................. 28
Leaf shapes ........................................................................................................................................ 32
Leaf apices ......................................................................................................................................... 38
Leaf bases .......................................................................................................................................... 40
Leaf margins ....................................................................................................................................... 44
Leaf venation ...................................................................................................................................... 46

Everyone can Grow!
4
3. Light sources .................................................................................................................................... 49
A guide to comparing and understanding light sources for growing plants ......................................... 50
Introduction ....................................................................................................................................... 50
Vocabulary ........................................................................................................................................ 50
More on lights .................................................................................................................................... 53
Do I have enough light? ..................................................................................................................... 53
4. Soils for indoor gardening ................................................................................................................. 56
A guide to understanding soil and its components ............................................................................. 56
Basic soil types .................................................................................................................................. 56
Moisture control ................................................................................................................................ 56
Drainage ............................................................................................................................................ 57
Compost ............................................................................................................................................ 57
Additional soil amendments ............................................................................................................... 60
Basic soil recipes ............................................................................................................................... 60
5. The basics of indoor plant care ......................................................................................................... 62
Introduction ....................................................................................................................................... 62
Notes on Latin names: Binomial nomenclature .................................................................................. 62
Caring for plants ................................................................................................................................ 62
Repotting a plant ............................................................................................................................... 62
Basic propagation .............................................................................................................................. 63
Finding the right light ........................................................................................................................ 64
Caring for tropical plants ................................................................................................................... 64
Tips for growing certain tropical plants .............................................................................................. 65
Caring for succulents ......................................................................................................................... 66
Caring for food crops ......................................................................................................................... 67
Tips for growing certain food crops .................................................................................................... 67
Basic companion planting .................................................................................................................. 68
6. Growing sprouts ............................................................................................................................... 70
Health benefits of sprouts .................................................................................................................. 70
Growing sprouts in a jar .................................................................................................................... 71
Growing sprouts in pots ..................................................................................................................... 72
7. Growing oyster mushrooms .............................................................................................................. 73
Supplies needed ................................................................................................................................. 73
8. Basic hydroponics and aquaponics ................................................................................................... 75
Introduction ....................................................................................................................................... 76
What is hydroponics? ........................................................................................................................ 76
Six common types of hydroponic systems .......................................................................................... 76
What is aquaponics? .......................................................................................................................... 76
Tips about fish ................................................................................................................................... 77

Everyone can Grow!
5
Four types of aquaponics systems ...................................................................................................... 77
Parts of the system ............................................................................................................................. 77
Know your water ................................................................................................................................ 78
Plants to grow..................................................................................................................................... 78
Nutrients ............................................................................................................................................ 78
System maintenance .......................................................................................................................... 79
Example system 1: 2-liter bottle hyro/aquaponics .............................................................................. 79
Aquaponics versions ........................................................................................................................... 85
Example System 2: PVC pipe hydro/aquaponics ................................................................................ 85
Aquaponicss versions ......................................................................................................................... 87
9. Common indoor pests, diseases, and remedies .................................................................................. 89
Bacterial diseases ............................................................................................................................... 89
Fungal diseases .................................................................................................................................. 89
utritional deficiencies ......................................................................................................................... 90
Viral diseases ..................................................................................................................................... 91
Common indoor pests ......................................................................................................................... 91
Aphids ................................................................................................................................................ 91
Fungus gnats ..................................................................................................................................... 92
Mealy bugs ......................................................................................................................................... 92
Scale .................................................................................................................................................. 93
Slugs/Snails ....................................................................................................................................... 93
Spider mites ....................................................................................................................................... 93
Springtails .......................................................................................................................................... 94
Thrips ................................................................................................................................................. 94
Whiteflies ........................................................................................................................................... 94
10. Building terrariums and vivariums .................................................................................................. 95
A guide to the basics .......................................................................................................................... 95
The ecology of a vivarium: Basic parts of an ecosystem ...................................................................... 95
Building a vivarium or terrarium ........................................................................................................ 97
Tools .................................................................................................................................................. 98
The debate on silicone ........................................................................................................................ 99
Simple soil mixes ................................................................................................................................ 99
Suggested materials per size of enclosure ......................................................................................... 100
Building a background ..................................................................................................................... 101
Finishing the bottom: Building a dam, false bottom, soil, and planting ............................................ 104
Building a screen door ...................................................................................................................... 106
11. Natural fish keeping ...................................................................................................................... 108
A foreword about natural fish keeping .............................................................................................. 108
How to set up an aquatic ecosystem ................................................................................................. 108

Everyone can Grow!
6
Choosing the correct kinds of fish .................................................................................................... 109
Tools ................................................................................................................................................ 110
Putting it together ............................................................................................................................ 110
12. Maintenance crews ....................................................................................................................... 112
Raising and breeding cockroaches ................................................................................................... 112
Raising and breeding crickets .......................................................................................................... 114
Raising and breeding isopods .......................................................................................................... 117
Raising and breeding springtails ...................................................................................................... 119
Raising and breeding worms ............................................................................................................ 120
Why Eisenia fetida (red wiggler) for composting worms? .................................................................. 120
Life cycle of a worm .......................................................................................................................... 121
13. Herbariums ................................................................................................................................... 125
What is an herbarium? .................................................................................................................... 125
Why to keep an herbarium ............................................................................................................... 125
Sample label for specimens .............................................................................................................. 125
Example of laminated herbarium specimen ..................................................................................... 126
A clearer scan of the same sample ................................................................................................... 126
How to preserve specimens .............................................................................................................. 127
Building a plant press ...................................................................................................................... 127
Putting it together ............................................................................................................................ 128
14. Pressed plant art ........................................................................................................................... 129
Pressed plant paper ......................................................................................................................... 129
Pressed plant bookmark .................................................................................................................. 132
Pressed plant portrait ...................................................................................................................... 134
15. Concrete planters .......................................................................................................................... 135

Everyone can Grow!
7
1. Basic botany
For science!
What is botany?
The definition of botany is the study of plants. The study of botany includes scientific observations,
microscopy, biology, and chemistry of plants. Although they are not plants, fungi and many times protists
(single celled photosynthesizing life forms) are also considered a part of botany. Basically, anything that
can photosynthesize has been historically grouped with the study of botany. Almost everything but
animals anyway.
Brief history of botany
Historically, botany has been regarded as its own science. Even today, some people do not see botany as
a legitimate science, but just a part of biology and chemistry. However, botany does encapsulate the
relationships between organisms and allows for further development of how plants work on an intimate
level. By focusing on just plants, their functions and components, scientists of all kinds can learn more
about these wonderful lifeforms and their many functions in their respective ecosystems.
Uses of botany
Since botany studies the uses and functions of plants, it can be used in many fields such as agriculture,
medicine, ecology, and natural history. People have historically used plants in many ways for many things
and botany is simply the newest term to describe that understanding.

Everyone can Grow!
8
Parts of a plant
Botany terminology
Biological Terms
Algae: The plural form of alga, meaning a single celled plant or protist such as seaweed. These are
typically found in water and moist places.
Angiosperm: A flowering, fruiting plant.
Auxins: A plant hormone that aids in the elongation of cells and regulates plant growth.
Bark: This is the outermost layer of the stems and roots of plants that have secondary growth (wood),
such as trees.
Everyone can Grow!
9
Binomial nomenclature: This is the scientifically accepted method for naming and classifying life
forms. It was invented in the late 1500s to early 1600s by Swedish botanist Gaspard Bauhin but refined
and popularized by Swedish botanist Carl Linnaeus in the 1700s.
Biology: The study of life.
Botany: The study of plants.
Bryophyte: Non-vascular land plants that include mosses, liverworts, and hornworts.
Cones: Not a fruit, but instead contains naked seeds without ovaries.
Conifer: A tree with scale-like or needle-like leaves that bears a naked seed within cones.
Cotyledon: The seed leaves, or the first leaves to emerge from a germination seed. These are not true
leaves.
Deciduous: A tree that loses its leaves annually.
Desiccate: To dry up. A state of extreme dryness. Usually after the plant or its reproductive parts have
died.
Dicot: Short for dichotomous. Having two seed leaves (cotyledons).
Dioecious: A plant where each one has only a single gender and requires an opposite gender to
reproduce.
Dormant: A time when a plant’s growth temporarily stops, such as flower bulbs in winter or deciduous
trees.
Endosperm: A seed’s food source. It contains starch and nutrients to help the seed survive and
germinate.
Epicotyl: The area of a seedling stem above the cotyledon(s).
Evergreen: A plant that does not drop its leaves annually.
Fiddlehead: A new leaf on a fern.
Geophyte: A plant with a bulb, tuber, or rhizome. It has some form of underground fleshy base.
Geotropism: This means that plant roots will always grow towards gravity and plant shoot systems will
always grow against gravity.
Gibberellin: A group of plant hormones that aids in germinating, stem elongation, and flowering.
Gymnosperm: A plant that does not produce flowers or fruit but instead produces cones and naked
seeds.
Hardwood tree: Another name for an angiosperm tree.

Everyone can Grow!
10
Heartwood: The center, non-living portion of a tree. This is where the xylem and phloem compress to
produce wood.
Herbaceous stem: A non-woody stem such as a dandelion stem.
Hilum: The scar on a seed that shows where it was attached to its fruit or cone.
Hypocotyl: The stem of a plant below the cotyledons and above the root.
Lichen: A mutualism between a fungi and either an alga or cyanobacteria. Technically not a plant, but
instead a fungi and protist or bacteria.
Monocot: A plant that germinates with a single cotyledon.
Monoecious: A plant where each one has both genders on the same plant. It may or may not self-
pollinate.
Naked seed: A seed from a gymnosperm without an ovary. These typically come from cones.
Phloem: These are a series of tubes inside plants where food is transported up and down the stem and
roots.
Plumule: Where the shoot of a plant emerges from a seed.
Radicle: Where the root of a plant emerges from a seed.
Sapling: A young plant that is more than a few feet tall, but not mature.
Sapwood: The part of the tree that is actively growing and alive. This is where the functioning xylem and
phloem are.
Seed coat: The epidermis of a seed. Its skin.
Seedling: A young plant that is less than a few feet tall.
Self-pollination: A plant that does not need another plant to pollinate it. It can be from the same flower
on a plant or a different flower on the same plant.
Softwood tree: Another name for gymnosperm trees.
Sori: Plural for sorus which are the spore producing receptacles on the underside of a fern frond.
Sporangia: Plural for sporangium which is the receptacle where asexual spores are forms.
Stomata: Plural for stoma which are holes on the undersides of leaves that allow for gas exchange. They
typically can open and close via two guard cells to regulate water loss.
Taxonomy: the branch of science concerned with classification, especially of living things.
Terminal bud: The bud at the end of a branch or twig.

Everyone can Grow!
11
Testa: Another word for seed coat.
Transpiration: When a plant releases water as a gas from its leaves.
Vascular: A plant that has xylem and phloem.
Woody stem: A stem with secondary growth from its vascular system, such as a tree.
Xylem: Tubes in a plant that allow it to transport water up and down its stem and roots.
Flower terms
Anther: The part of the stamen that contains the pollen, the male part of the plant.
Bi-lateral symmetry: This refers to a flower that when cut in half, each half mirrors the other. Peruvian
lilies and violets are good examples of this.
Calyx: A whirl of protective sepals of a flower that typically cover the bud before blooming.
Capitulum: The entire head of the flower including the ovary.
Catkin: This is the male flower of trees such as alder and hazel.
Carpel: The female reproductive parts of a flower. This includes the ovary, stigma, and style.
Composite flowers: A plant such as asters that have ray flowers and disc flowers. An example is
sunflowers.
Corolla: A word for all the petals on a flower collectively.
Disc flowers: The flowers at the center of a composite flower.
Filament: The slender part of the stamen that supports the anther.

Everyone can Grow!
12
Imperfect flowers: Flowers that only have either male or female reproductive parts.
Inflorescence: A group or clusters of flowers on a single main stem or a complex cluster of stems.
Nectar guides: Ultraviolet lines on a flower that guide insects to nectar to encourage them to pollinate
the flower.
Ovary: The part of a flower where the seeds form.
Ovary inferior: The ovary is below the petals of the flower.
Ovary superior: The ovary is above the petals of the flower.
Peduncle: The stem of a flower.
Radial symmetry: This refers to a flower that is symmetrical around an axis. Sunflowers and tulips are
good examples of this.
Ray flowers: The flowers around the margin of a composite flower.
Sepals: Modified leaves under the petals of the flower. These usually overlap the calyx.
Stamen: The collective name for the male parts of a flower, the anther and filament.
Fruit terms
Accessory fruit: A fruit where the seed are outside the ovary, such as strawberries
Achene: A type of dry fruit with a single seed that does not open to release the seed. Examples are
buttercup and strawberry.
Aggregate fruit: A fruit formed from several carpels of the same flower, such as a blackberry.
Berry: A type of fruit that does not contain a stone or singular hard seed, but instead is a fleshy fruit
containing many seeds. Examples include watermelons, grapes, and tomatoes.
Capsule: This is the most common type of dry fruit. It splits open to release its seeds. Examples include
Brazil nuts, and witch hazel.
Caryopsis: A dry indehiscent fruit where the seed coat is fused with the epidermis. An example is wheat.
Cypsela: a single seeded dry fruit derived from the individual florets in a capitulum of an inferior ovary
(e.g., dandelion).
Dehiscent: This means that a dry fruit has a specific seam that the seed pod splits open.
Drupe: Also called a stone fruit. This is a fleshy fruit with a single, hard seed.
Dry fruits: Seeds surrounded by a dry pericarp
Everyone can Grow!
13
Fleshy fruits: These are fruits with an ovary.
Follicle: A dry fruit that opens on only one side. An example is columbine.
Hesperidium: A fruit with a rind and a sectioned pulp such as citrus fruit.
Indehiscent: A dry fruit that does not split open.
Legume: A dry, dehiscent pod that splits on both sides, such as a pea or bean.
Lomentum: A type of indehiscent legume such as the seeds of a golden chain tree.
Nut: A single, hardened achene such as an acorn.
Pepo: A berry with a hard rind such as a watermelon.
Pericarp: The part of the fruit that is formed from the wall of the ovary. It can be fleshy or dry.
Pome: A fruit with a thin skin where the flesh is not a part of the ovary but grown from another part of
the plant. The seeds are in chambers in the center of the fruit. An example is an apple.
Samara: A Samara is an independent dry indehiscent fruit which has part of the fruit wall extended to
form a wing such as maple seeds.
Schizocarp: A seed that breaks into several samara, such as maple or carrot.
Silicle: A dry fruit with two fused carpels where the length of the fruit is three times more than the
width, such as shepard's purse.
Silique: A long narrow seed that splits open when mature such as a radish seed.
Stone fruit: See drupe.
Utricle: An indehiscent, bladder-like seed vessel such as duckweed seeds.
Life cycles and reproduction
There is more than one type of plant life cycle as well as different strategies for reproduction. It is
important to understand these differences so that the proper environment can be given to plants if
reproduction is desired. Some notes to keep in mind when breeding plants are to know the plant’s
personal life cycle and whether or not it can self-pollinate. This will make all the difference in whether or
not you will need a pollinator. Some plants have both male and female flowers on the same plant
(monoecious) and some have only one gender per plant (dioecious). You may need several individuals of
a single species for reproduction, so keep that in mind.

Everyone can Grow!
14
Life cycle and reproduction of non-vascular plants
Life cycles of vascular plants
Seedless vascular plant

Everyone can Grow!
15
Seeded vascular plant
Reproduction of a gymnosperm

Everyone can Grow!
16
Reproduction of an angiosperm

Everyone can Grow!
17
Plant cells

Everyone can Grow!
18
Cell terminology
Adjacent cell wall: This is simply showing where the cell walls intersect. Note the intercellular space
between the cells.
Cell wall: This is the epidermis or the outermost layer of the plant cells. Plant cell walls are made of
cellulose.
Chloroplast: This is the plastid where photosynthesis takes place.
Chromoplast: This is a pigmented plastid. They usually contain yellow or orange pigments and are what
you see when plants turn these colors in fall.
Cristae of the mitochondria: Plural for crista. These are the little partial partitions in a mitochondrion
that are caused by the folding of the inner membrane.
Cytoplasm: Simply put, this is the stuff that is inside the cell that all the organelles within the cells float
around in.
Elaioplast: This is essentially a droplet of fat. They are specialized storage container for lipids (fats).
Golgi complex: This part of the cell functions to take simple molecules and combines them into more
complex molecules. Then it gift wraps them into vesicles and either stores them for later use or sends
them out of the cell.
Granum: Plural grana. This is a stack of thylakoids within the stroma of a chloroplast.
Inner membrane of the mitochondria: This separates the mitochondrial matrix from the
intermembrane space.
Intercellular space: This is the space between cells.
Leucoplast: A plastid that stores oil or starch.
Matrix of the mitochondria: This is a gel-like substance that is thicker than cytoplasm and fills the
inner membrane.
Mitochondrion: Singular form of mitochondria. These are unique as organelles because they have their
own DNA and are thought to be descended from bacteria. You may know this as the “powerhouse of the
cell”. Their main function is to take in nutrients and break them down into energy, much like a digestive
system. They create molecules that are full of energy that the cell then uses for other processes.
Nuclear envelope: Also called the nuclear membrane. This is the double layered membrane that
surrounds the nucleus. The nuclear envelope surrounds the nucleus with a double membrane with
multiple pores. The pores regulate the passage of macromolecules like proteins and RNA, but permit free
passage of water, ions, ATP and other small molecules.

Everyone can Grow!
19
Nuclear pore: This is a tiny hole in the nuclear envelope that is lined with proteins and regulates small
molecules that enter and exit the nucleus. It allows some molecules to pass freely through, like water
and certain types of ions.
Nucleolus: This is the nucleus of the nucleus. It functions to rewrite rRNA and combines it with
proteins.
Nucleus: This is the largest organelle in a cell where the genetic material is stored.
Organelle: Any of the specialized structures within the cell.
Outer membrane of the mitochondria: These function much like the plant’s cell wall. Just like a cell
wall, it regulates everything that enters and exits the cell.
Peroxisome: This is an organelle that breaks down long chain fatty acids that are then given to the
mitochondria to make energy.
Plasma membrane: This is the innermost wall of a cell wall or vacuole. It is another barrier to regulate
the passages of molecules into and out of the cell.
Plasmodesmata: Plural for plasmodesma. This is a thread of cytoplasm that forms a tube through the
cell wall. It uses it to communicate with other cells.
Plastid: This refers to a family of small organelles such as chloroplasts.
Proteinoplast: Also called proteoplasts, aleuroplasts, and aleuronaplasts. These are unique to plants
and are used to store food.
Ribosome: These organelles can be found either in the cytoplasm or in the rough endoplasmic
reticulum. They function to synthesize proteins.
Rough endoplasmic reticulum: This is a labyrinth of membranes that is connected to the smooth
endoplasmic reticulum. The ribosomes stuck on its surface are why it is called "rough". It functions to
help in the production of proteins.
Smooth endoplasmic reticulum: This is a labyrinth of membranes that is connected to the rough
endoplasmic reticulum. This part of the endoplasmic reticulum is inside the rough portion and does not
have ribosomes attached to it. It functions to detoxify organic chemicals.
Stroma: This is a colorless liquid within a chloroplast that finishes the steps in photosynthesis.
Thylakoid: These are in stacks called grana in the chloroplast. They function to produce the light-
dependent reactions of photosynthesis.
Tonoplast: This is a membrane that separates a vacuole from the cytoplasm in a cell.
Vacuole: This is storage container in plant cells. They can store many things, chiefly water, but also
food and enzymes.

Everyone can Grow!
20
Basic photosynthesis

Everyone can Grow!
21
The chemical equation for photosynthesis:
6CO2 + 6H2O + sunlight = C6H12O6 + 6O2
The equation in English: 6 carbon dioxide molecules, 6 water molecules, and light becomes sugar
(glucose) and 6 oxygen molecules.
Basically, the plant absorbs carbon dioxide and light energy using its leaves while absorbing
water through its roots and then processes it into sugar which is the basis of energy for the plant while
the oxygen it releases is useful for other lifeforms, like humans. Roots also absorb oxygen from the water
in the soil, especially at night.
Types of photosynthesis
C3: This is a three-chain carbon method of photosynthesis that uses the Calvin cycle to turn carbon
dioxide into sugars through the use of enzymes. This is not a perfect cycle and is not highly energy
efficient.
C4: This method of photosynthesis uses an intermediary four chain carbon molecule for producing
sugars for the plant. It reduces the inefficacy from the Calvin cycle by saving more carbon atoms during
the process.
CAM: This type of photosynthesis is used almost exclusively by succulents. These plants store energy
from the sun during the day and produce energy at night. They also keep their stoma closed during the
day to prevent water loss. CAM uses a more complex system of chemicals that are not present in C3 or
C4 photosynthetic plants.

Everyone can Grow!
22
The journey of photosynthesis through a C3 leaf

Everyone can Grow!
23
The color of light and photosynthesis
Photosynthesis can get very technical and may be a challenge to understand all the parts,
chemical reactions, and biology. However, in regards to plants, there is one very important point to
make about photosynthesis and that is that is reacts more strongly to certain colors of light over others.
Plants actually have two kinds of chlorophyll, called “A” and “B”. There is a lot more of “A” in
plants. Chlorophyll A absorbs mostly blue and red light from light sources while chlorophyll B absorbs
green and yellow light. Why plants look green is because for the most part they are reflecting the green
light off their leaves so our eyes pick up the green as its color. Plants do not tend to grow well under just
yellow or green light due to the low concentrations of chlorophyll B in their leaves.
More to consider: Plants use blue light to grow their stems, leaves, and root systems and red
light grows the flowers and fruits. This can help when choosing artificial light sources for plants. You
can maximize one or the other type of growth by using a certain color of light.

Everyone can Grow!
24
2. Illustrated guide to plant terminology
Dedicated to Garden Raised Bounty in Olympia, Washington
Parts of a plant

Everyone can Grow!
25
Parts of a twig:

Everyone can Grow!
26
Types of plants
Plants grow in a plethora of unique ways. Here we will focus on some of the easiest to describe; forbs,
vines, shrubs, and trees. Each type has a specific description. Although it is important to remember that
plants do not grow certain ways because we classify them! Sometimes a plant may fit several descriptions.
However, knowing the differences between the unique ways that plants grow can help give you a strong
start towards learning about the wonderful world of plants around you!
Forbs
Forb: An herbaceous flowering plant that is not grass.
Forbs include all the beautiful wildflowers you will see as you go about your daily life or explore
outside. They do not produce secondary growth (bark) and many only live for one season (annual). Finding
forbs is easy, if you have ever picked a dandelion or a buttercup, you have found forbs! They can grow
just about anywhere, so keep your eyes peeled and you will see some of the most beautiful plants on earth!
Vines
Vine: A plant that trails and makes a long, extended stem. These may be mistaken for shrubs under
certain conditions.
Vines are found in many places. Honeysuckle is a beautiful flowering vine that can be found in
gardens and even in the wild. A Washington State native called trailing blackberry is a popular vine, they
make delicious fruit every fall! Vines, like forbs, do not typically make secondary growth, but some can.
Plants don’t like to be classified easily sometimes!
Everyone can Grow!
27
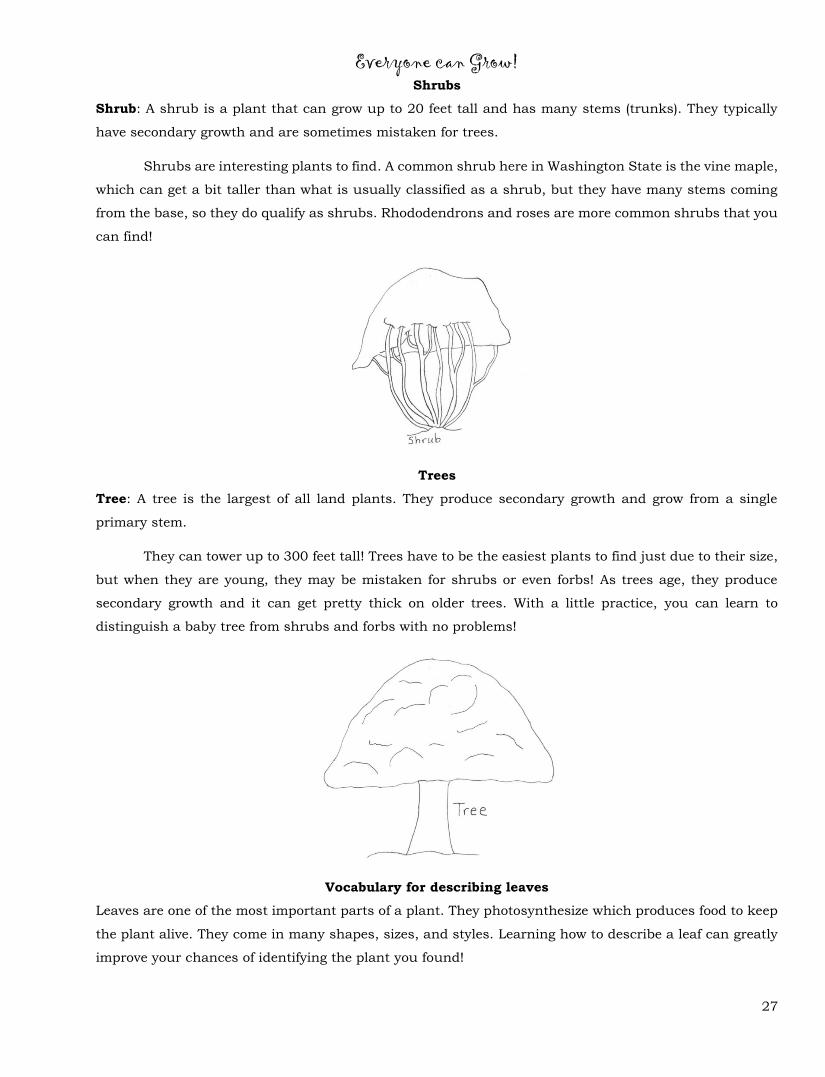
Shrubs
Shrub: A shrub is a plant that can grow up to 20 feet tall and has many stems (trunks). They typically
have secondary growth and are sometimes mistaken for trees.
Shrubs are interesting plants to find. A common shrub here in Washington State is the vine maple,
which can get a bit taller than what is usually classified as a shrub, but they have many stems coming
from the base, so they do qualify as shrubs. Rhododendrons and roses are more common shrubs that you
can find!
Trees
Tree: A tree is the largest of all land plants. They produce secondary growth and grow from a single
primary stem.
They can tower up to 300 feet tall! Trees have to be the easiest plants to find just due to their size,
but when they are young, they may be mistaken for shrubs or even forbs! As trees age, they produce
secondary growth and it can get pretty thick on older trees. With a little practice, you can learn to
distinguish a baby tree from shrubs and forbs with no problems!
Vocabulary for describing leaves
Leaves are one of the most important parts of a plant. They photosynthesize which produces food to keep
the plant alive. They come in many shapes, sizes, and styles. Learning how to describe a leaf can greatly
improve your chances of identifying the plant you found!

Everyone can Grow!
28
A leaf consists of many parts and always ends in a bud. If you don’t see a bud, keep following what
you believe is the petiole until you can find it. Remember that some buds will only appear during certain
times of the year as well.
Many times, you will see leaves of slightly different shapes on a tree, use this guide to narrow down
the shapes you see. Remember that plants do not follow our guidelines; we simply find ways to simplify
what we see so we can describe it to others.
Parts of a leaf
The parts of a simple leaf are mostly the same for compound, except that the terms describe the leaflets.
Types of leaf arrangements
Thought all leaves were simple? Well, some are, and some are called compound, where they are made up
of leaflets. These compound leaves can get fairly complex in structure and are a sight to behold. To be
even stranger, some leaves don’t have a petiole and they are called sessile. These leaves connect directly
onto the twig they sprouted from.
Alternate: These leaves are one per node and alternate the side they are on as you look down the branch.
Example: Red Alder.

Everyone can Grow!
29
Opposite: These leaves come in pairs, one on each side of the branch at a node as you look down the
branch. Example: Maple.
Whorled: These leaves circle around the stem. Example: Bedstraw.
Simple: These leaves are a single blade with a petiole. They are one of the most common leaves to find.
Example: Red Alder.
Compound: These leaves are like simple leaves, but are arranged on a long petiole that is called a rachis
above the lower pair of leaflets. The leaf ends where the bud is found. They can be pinnately or
palmately compound. Example: Blackberry, fern, elderberry.
Pinnately compound: Leaves that have leaflets along a rachis forming a line of leaflets. Example:
Elderberry.
Pinnate: One set of leaflets on the rachis. Example: Oregon grape.

Everyone can Grow!
30
Paripinnate: When a compound leaf ends without a leaflet at the end of its rachis. Example: Cassia
grandis.
Imparipinnate: When a compound leaf ends with a leaflet at the end of it rachis. Example: Oregon grape.
Bipinnate: Having a set of stems on their rachis before their leaflets. Example: Mimosa tree.

Everyone can Grow!
31
Tripinnate: Having a set of stems on their rachis’ stems. Stem-ception! Example: Lady fern.
Palmately compound: Having its rachis all stem from the petiole. Example: Buckeye.
Bifoliate: Has two leaflets stemming from the same petiole. Example: Amphilophium buccinatorium.
Biternate: A compound leaf with several palmately compound leaves stemming from the same petiole.
Example: Columbine.

Everyone can Grow!
32
Trifoliate: Has three leaflets stemming from the same petiole. Example: Clover.
Leaf shapes
Leaves come in a myriad of shapes and sizes. This will introduce you to some of many different shapes
you may see when you are studying the flora around you. With compound leaves, these shapes can
describe the leaflets on the leaf. Keep in mind that leaves can have multiple shapes on a single plant!
Many plants will have different leaf shapes when young than when they are mature. Doesn’t that keep
things interesting?
Acicular: Rounded, three-dimensional leaves. Example: Pine.
Cordate: the leaf is shaped more or less like a heart, with the point of the heart at the apex of the leaf.
Example: Black Cottonwood.

Everyone can Grow!
33
Deltoid: This leaf is somewhat triangular in shape. It has a truncate base and a tapering apex. Example:
Aspen.
Elliptic: This leaf is pointed at both ends and has a broader center than a lanceolate leaf. Football shaped.
Example: Anubias, rhododendron.
Falcate: This is a curved lanceolate leaf. You cannot bend the curve out of these leaves, it is simply their
shape. Sickle shaped. Example: Mimosa, pecan.
Everyone can Grow!
34
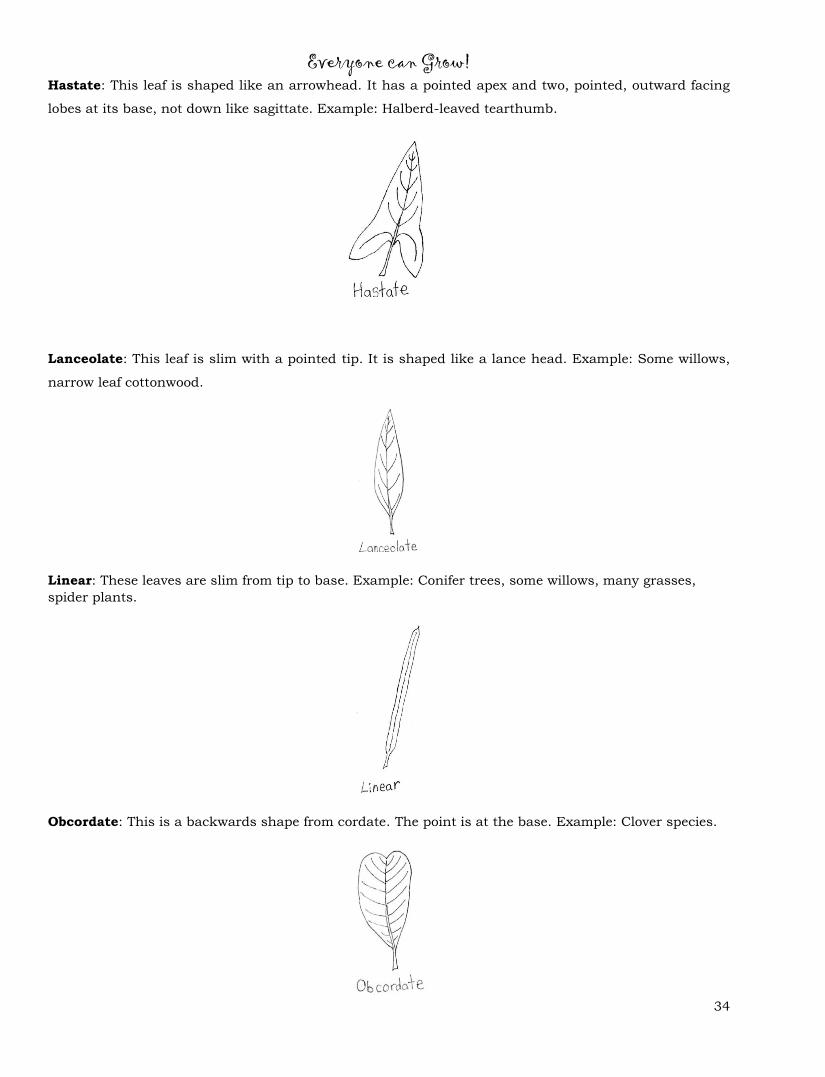
Hastate: This leaf is shaped like an arrowhead. It has a pointed apex and two, pointed, outward facing
lobes at its base, not down like sagittate. Example: Halberd-leaved tearthumb.
Lanceolate: This leaf is slim with a pointed tip. It is shaped like a lance head. Example: Some willows,
narrow leaf cottonwood.
Linear: These leaves are slim from tip to base. Example: Conifer trees, some willows, many grasses,
spider plants.
Obcordate: This is a backwards shape from cordate. The point is at the base. Example: Clover species.

Everyone can Grow!
35
Oblong: This leaf is narrower than oval, with a pointed tip and base. Example: Schefflera.
Obonate/Obovate: This is the backwards version of ovate. This time the tip of the egg is at the base.
Example: Farkleberry/sparkleberry.
Orbicular: This leaf is just as it sounds, round. Example: Oconee bells.

Everyone can Grow!
36
Oval: This leaf has a rounded apex and base and maintains an overall oval appearance. The widest part
of the leaf is the middle. Example: Oval leaved blueberry.
Palmate/Palmately Lobed: These leaves have lobes that all fan out from the midrib. Example: Maple,
thimbleberry.
Peltate: With this leaf, there is no clear apex or base, and the stem connects to the middle of the leaf.
Example: Nasturtium.
Pinnately Lobed: These leaves have lobes that move along the midrib. Example: Oak.

Everyone can Grow!
37
Reniform: This leaf is shaped like a kidney bean or rounded.
Sagittate: This leaf is arrowhead shaped with its lobes facing back and down, not out like hastate.
Example: Goosefoot plant.
Spatulate: This leaf is shaped like a spatula. It narrowly follows the midrib like a handle and then flares
out into a rounded apex like a flat spatula. Example: Wooton's groundsel

Everyone can Grow!
38
Leaf apices
Leaf apex (plural apice): This is the tip of the leaf. This section will show you some of the more common
apices, briefly define them, and how to tell them apart. Many of these terms will be familiar from the leaf
shapes and some are used for describing the same shape in different parts of a leaf.
Acuminate (also called long tapering): Tapers somewhat suddenly near the tip, leaving a long point at the
top of the leaf. Example: Ficus species.
Acute: The leaf apex is an acute angle that is less than 90°. Example: Red alder.
Cuspidate: Has a small point or tapered tip at the end of the leaf. Shorter and more pointed than
acuminate and has a larger point than mucronate. Example: Holly species.

Everyone can Grow!
39
Emarginate: Has an “m” shape at the end of the leaf. Remember the “m” in emarginate to remember the
shape it makes. Example: European alder, umbrella pine.
Mucronate: Has a tiny point at the end of the leaf, is smaller than cuspidate and acuminate. Example:
Clasping milkweed.
Notched: Makes a deeper “m” shape than emarginate. Example: Gingko.
Obtuse (also called rounded): This is a simple, rounded apex, like a rainbow. Example: Jade tree.

Everyone can Grow!
40
Truncate: Squared off across the top. Example: Tulip tree, Calamus caryotoides.
Leaf bases
The base of the leaf is the area directly above the petiole. In sessile leaves without a petiole, the base is
directly connected to the tree. Many of these terms have been used before, and will seem familiar at this
point. The reason they are being repeated here is because leaves do not always fit neatly into our
organizational patterns.
Having an idea of how the terms refer to specific parts of a leaf can help you to identify the specific
leaf shape that you are looking at. Always keep in mind that plants may show several different bases
depending on many factors.
Acute: The base of the leaf makes a rounded acute angle leading to the petiole. Example: Red alder.
Attenuate: The base of this leaf is acute, typically sharply angled and continues down part of the petiole
until it tapers off. Example: Narrowleaf cottonwood.
Everyone can Grow!
41
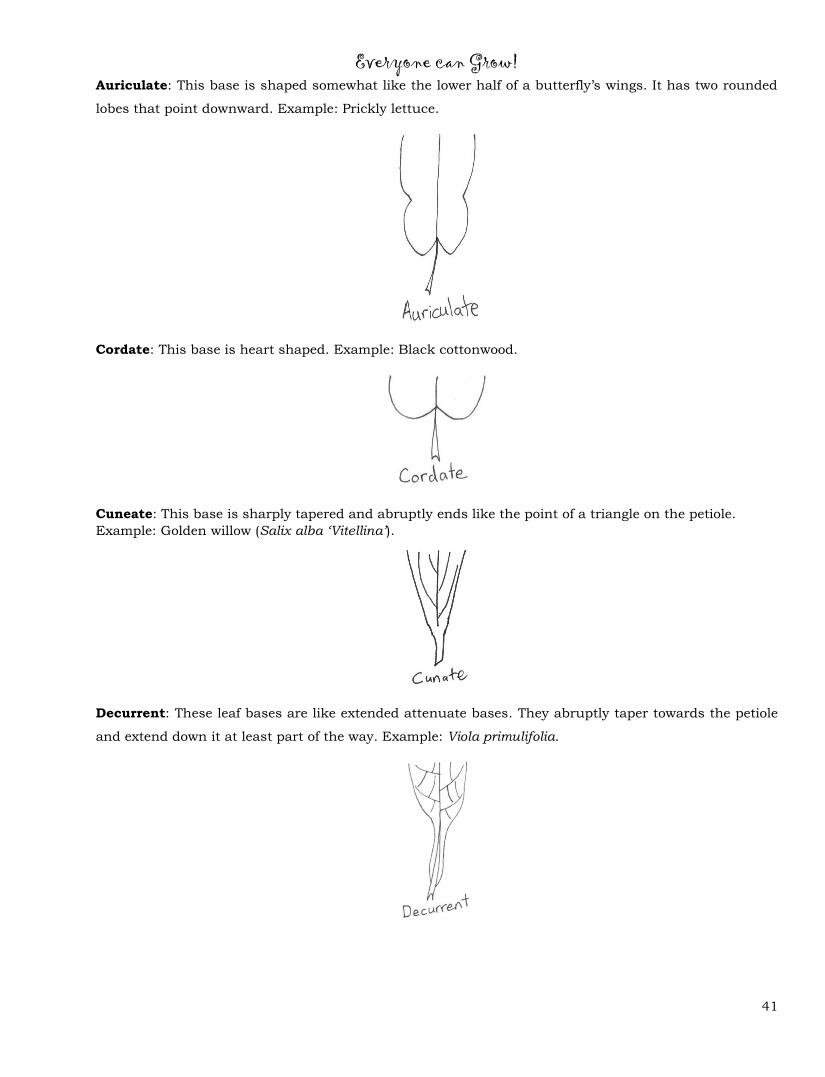
Auriculate: This base is shaped somewhat like the lower half of a butterfly’s wings. It has two rounded
lobes that point downward. Example: Prickly lettuce.
Cordate: This base is heart shaped. Example: Black cottonwood.
Cuneate: This base is sharply tapered and abruptly ends like the point of a triangle on the petiole.
Example: Golden willow (Salix alba ‘Vitellina’).
Decurrent: These leaf bases are like extended attenuate bases. They abruptly taper towards the petiole
and extend down it at least part of the way. Example: Viola primulifolia.

Everyone can Grow!
42
Hastate: This is an arrow shaped leaf base. Example: Halberd-leaved tearthumb and Persicaria arifolia.
Inequilateral (Oblique): This means that the leaf base does not connect evenly on both sides of the
petiole. Example: Slippery elm.
Obtuse/Rounded: An obtuse leaf base has an angle greater than 90°. It is not as perfectly round as
what is called a rounded base. However, the two are very similar and using the terms interchangeablely
does happen. Example: Cascara buckthorn (lower leaves) and snowberry.
Peltate: This leaf does not have an official base, as the leaf is connected to its petiole from inside the
margin of the leaf. Example: Nasturtium.

Everyone can Grow!
43
Sagittate: This base is wedge shaped. It has two lobes that point backwards. Example: Elephant ear.
Sessile: This means that the leaf has no petiole, but does not necessarily clasp the stem. Example: Trillium
species.
Stem Clasping: The leaves surround and clasp the stem. Example: Clasping milkweed.
Truncate: This leaf base is either flat to slightly turned up or down. It makes an angle very near 180°.
Example: Quercus shumardii, Tulip tree.

Everyone can Grow!
44
Leaf margins
The edge of a leaf.
Entire: The edge of the leave is smooth. Example: Red huckleberry.
Ciliate: This leaf has tiny hairs along its margin. This is often combined with other margins
descriptions. Example: Great mullein.
Crenate: The edge of the leaf softly wobbles. Also called scalloped. Example: Lace-bark elm.
Dentate: The edges of this leaf are scalloped, but come to a toothy point. Example: Thimbleberry.

Everyone can Grow!
45
Serrate: This leaf has forward pointing teeth. Example: Stinging nettle.
Doubly Serrate: this leaf takes it a step further and has small forward pointing teeth on larger forward
pointing teeth. Example: Red alder.
Sinuate: The edge of this leaf has waves, but they are not deep enough to be considered lobes. Example:
Caucasian Oak.
Lobate: This leaf has lobes. To be considered lobes, indentations cannot connect to the midrib. Example:
Maple species.

Everyone can Grow!
46
Undulate: The margin of this leaf is widely wavy. The waves are broader than sinuate. Example: African
violet.
Spiny/Pungent: This leaf has sharp spines on its margin. Example: English holly.
Leaf venation
The veins of the leaf are where fluids and sugars that the plant produces flows into and out of the leaf.
They are the highway of the plant’s surface.
Arcuate: Veins branch off midrib and bend toward the leaf apex. Example: Dogwood species.

Everyone can Grow!
47
Cross-Venulate: Secondary veins off the midrib have smaller veins that connect the larger ones in a broad
network. Example: Stinging nettle.
Dichotomous: A variation of pinnate venation where the veins branch from the ends into pairs.
Example: Lime tree.
Longitudinal: Veins are mostly aligned along the axis of the leaf. Example: Cinnamon plants.
Everyone can Grow!
48
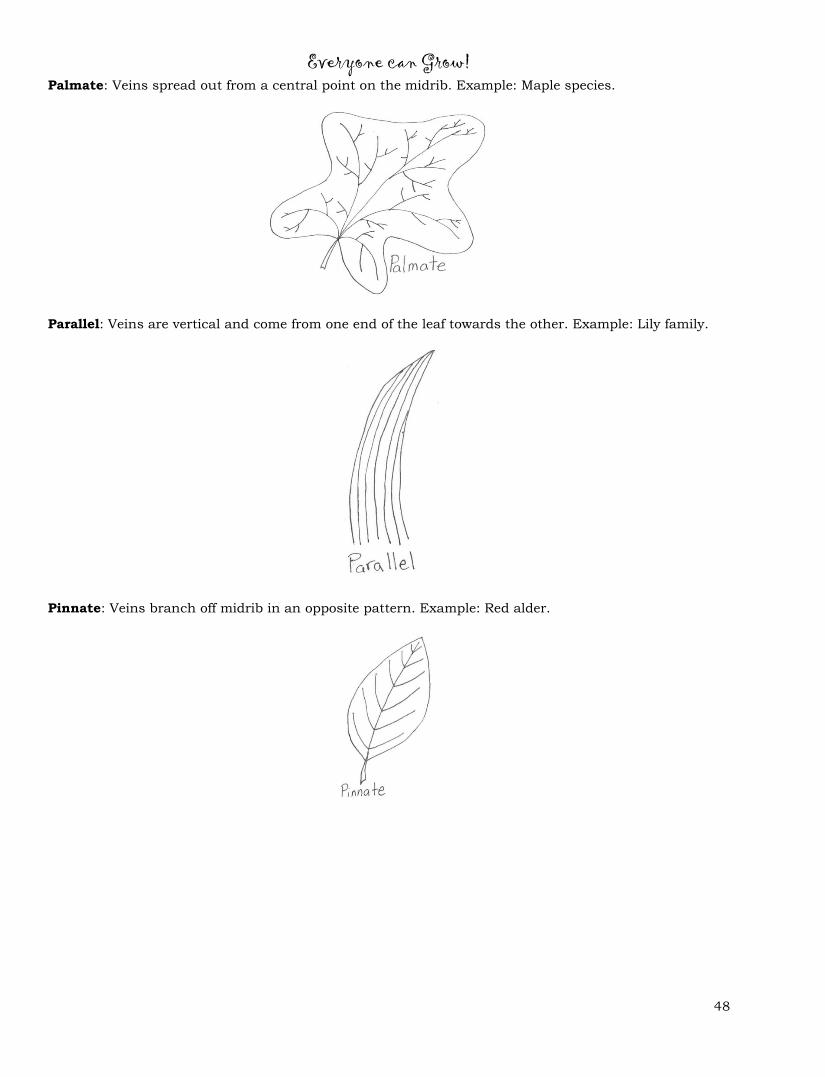
Palmate: Veins spread out from a central point on the midrib. Example: Maple species.
Parallel: Veins are vertical and come from one end of the leaf towards the other. Example: Lily family.
Pinnate: Veins branch off midrib in an opposite pattern. Example: Red alder.

Everyone can Grow!
49
Reticulate: Smaller veins branch from larger ones connected to the midrib to make a net-like appearance.
It makes a complex net. Example: Hibiscus.
Rotate: These veins are found primarily in peltate leaves. They face all directions from a single central
point. Example: Nasturtium.

Everyone can Grow!
50
3. Light sources
A guide to comparing and understanding light sources for growing plants
Introduction
Let's get this handout started by saying DON’T USE WATTS TO COMPARE GROW LIGHTS. Ahem.
Now that that is out of the way, here's why: Different light sources use different amounts of power to
deliver their light, but that tells us nothing about the quality of the light. It is true however, that a 50watt
light won't match a 1000watt light for output but using watts really doesn't help for many things, such as
comparing LEDs to fluorescent lights since LED lights use less power overall. This is not saying that LEDs
are always the best lights and this guide will help you make your own determinations. Starting with basic
terminology will help when talking about light sources.
Vocabulary
Correlated Color Temperature (CCT): This tells you what wavelengths of light a bulb will produce, lower
temperatures (for example, 3,000k) produce red light and higher temperatures produce blue light (for
example, 5,000k). When choosing the color of light for plants, 6,500k is considered “daylight” and is the
most recommended color.

Everyone can Grow!
51
Color Rendering Index (CRI): This describes the ability of artificial light sources to portray the colors of
an object correctly in comparison to a natural light source.
Current: This represents the rate of flow of electric charge and is usually measured in amperes.
Halogen Bulbs: This bulb replaces a filament with a capsule of gas. The gas produces light when an
electric current runs through it.
High Intensity Discharge (HID): This is a type of bulb that uses a different gas than halogen bulbs to
produce intense light. They don’t seem too common for use as gardening lights, but they are out there.
High Pressure Sodium (HPS): These lights produce mainly red spectrum light that is commonly used to
stimulate the growth of flowers and fruit of plants. They tend to take time (around 5 minutes) to warm up
and turn on.
Light Emitting Diode (LED): These are the latest additions to grow lights and the technology has
increased in the last few years. They are great lights and highly energy efficient. Their biggest drawback
is that the high efficiency ones that can handle anything cost around $800 at the time of this writing.
Low Pressure Sodium (LPS): See High Pressure Sodium (HPS).

Everyone can Grow!
52
Lumens: This measurement tells us how bright a light is to a human eye, it has nothing to do with
growing plants. However, since companies seem consistent in using this as a measurement for plant
lights, it has been stated that higher lumen output does increase plant growth, though there are no
direct recommendations for how many lumens are needed for optimum plant growth. Personally, I go
with around 1,000 lumens or more. With LEDs this is easy to achieve with low power consumption.
Wattage for lumens chart
Lumens
(Brightness)
250+ 450+ 800+ 1100+ 1600+
Incandescent 25W 40W 60W 75W 100W
Halogen 18W 28W 42W 53W 70W
CFL 6W 9W 12W 15W 20W
LED 4W 6W 10W 12W 18W
Luminous Flux: This refers to the amount of light that is emitted per second in all directions. It is
represented by lumens.
Lux: This is a measurement of lumens per square meter, still not telling us anything about growing plants.
Yet, once again, companies use this as a measurement, so it helps to know what it is.
Photoactive Radiation: See definition of Photosynthetic Active Radiation.
Photosynthetic Active Radiation (PAR): This refers to the wavelengths (in nanometers) that plants use
to grow. They have their highest photosynthesis rate between 400nm-500nm and 600nm-700nm,
meaning that light between 500nm-600nm is not useful to plants. PAR is not to be confused with a
parabolic aluminized reflector (PAR) which refers to the type of bulb, not the light quality. If you see
something like PAR38 it means the bulb is 38x1/8” or 4¾” in diameter. If there is a number attached to
the “PAR” then it is not talking about light quality. Interestingly, PAR is mostly within the visible light
spectrum for humans, so using other measurements like color temperature is not too far from the truth
for what a plant will use to photosynthesize.
Photosynthetic Photon Flux (PPF): This is the measurement of photons in the range of photosynthesis,
which is between 400nm and 700nm. It does not tell you how much light will reach the plants or the
quality of the spectrum the light will produce, but it does say how good the light is at producing PAR.
Photosynthetic Active Radiation Efficacy: See Photosynthetic Active Radiation (PAR).
Voltage: This is the measure of the force of electricity flowing through a wire.
Watt: This represents the amount of energy used by the light bulb per hour.

Everyone can Grow!
53
More on lights
Note that most of these terms are used for human lighting and not plants. It is important to
understand that plants can use light that is not visible to our eyes and this needs to be taken into
consideration when choosing lights for plants.
Does this mean that you can't use lights designed for human use for plants? Well, no. You can use
general lights for plants, just understand that comparing them gets tough when you don't have the proper
information. For instance, choosing a higher lumen output will most likely help plants simply because it
has higher light output overall, but it must be taken with the color temperature to know that the light
produced will be within the PAR range. Plants use photons to photosynthesize and very few lights even
mention photon output (if any). Something to remember is that blue light grows leaves and red light grows
flowers and fruit, so knowing what you are growing will tell you what light range you need.
Do I have enough light?
To check the intensity of light coming from a window, place an opaque object in the space that
you'd like your plant (or place the pot there) and look at the shadow. The darker the shadow, the more
intense the light. East and west windows can be bright, but southern and southwestern windows give the
brightest light. Even if plants have natural light from a window, it can sometimes still be useful to have a
timed grow light to supplement or increase the amount of light a plant receives. It is good to use timers,
so you don't have to worry about turning the lights on and off on time every day.
Another way to tell if plants are getting enough light is watching for etiolation. This is when a plant
grows tall (called leggy growth), the stem becomes thin, the intervals (distance) between sets of leaves
becomes longer, and the plant becomes pale in color as it reaches for light. If you aren’t sure what a
healthy version of your plan is supposed to look like, do an internet search for a picture, and they shouldn’t
be too hard to find. It is good to have a healthy comparison if it is your first time growing a plant.

Everyone can Grow!
54
Yes, etiolation is subtle at times, so it'll take some practice to gain confidence in understanding your plant.
Like learning plant sign language!
Sometimes all that will be needed to help a plant that is etiolated is to physically lower the light
source closer to the plant. Be cautious, decreasing the distance to the light can increase the heat from the
light source. If your plant is in a window and showing signs of etiolation, try to find out what facing your
window has. If it is west or north facing, you may need to supplement light with a bulb. South facing
windows allow the brightest light to enter the room when compared to any other window facing, while east
facing windows have cool morning light. North windows do not give bright light and tend to be colder.
West windows get the hottest afternoon light, so they may not be appropriate for delicate plants.
If the plant is too thin and tall, it might be prudent to cut it back to two nodes. A node is where
leaves grow and may be little bumps or buds on the sides of the plant. Or you may have to bury the plant
in a deep pot to encourage rooting higher on the stem. Every plant is an individual and it is important to
know the specific growth habits of your specific species if possible. Take time to research before trimming
a plant to make sure it will back bud and repair itself. It is best to avoid extreme etiolation, but it can
happen, so it is better to know what to do as well as how to avoid it.
To help supplement light, some plants can be put outside in summer depending on the
temperature in your area. To get a plant used to being outside, wait until the night temperatures are the
same as indoors (no less than 60°F) leave it out during the day in a shady spot for a week or so, then
gradually move it into the sun. Be aware of sun scald, or brown, crispy, dead edges on leaves and leaves
that are starting to curl, that is the plant telling you it is burning up and needs to move out of direct sun.
This may sound overly complicated, but basically, the conclusion for choosing lights is that most
light companies don't make it easy to determine the best lights or compare between different brands or
types. Somethings I can say that have worked for me: Using soft white (5,000k) 60-watt equivalent LED
bulbs for low light houseplants like Epipremnum aureum, Sansevieria, Zamioculcas zamiifolia,
Philodendron cordatum, etc. and 5,000k, 100-watt equivalent LED bulbs for deep vivariums that are 24
inches tall.
Why do I say 60-watt or 100-watt equivalent bulbs? Especially since I started out demanding that
lights not be compared by watts?! Unfortunately, light bulb companies do not make it easy to compare
most types of lights and it is easiest to let you know precisely what I use to give you an easy (and cheaper)
start.
I also use 6,500k, high output, T5 tube fixtures for crops or succulents. These come in 2-foot and
4-foot fixtures and these lights or their equivalent will be necessary for a more serious indoor gardener. I
personally avoid higher output LED fixtures because they tend to have only blue and red LEDs which
gives a purplish light. I don't prefer my home to look like a constant party, so I look for 5000k-6500k lights
because they most closely represent natural sunlight.

Everyone can Grow!
55
For medium light to high light plants, such as succulents and cacti, it really is best to have some
light from a window, but if not, look for higher intensity lights that provide blue light for foliage plants,
and a combination of blue and red light for flowering/fruiting plants.
It may sound silly but looking up marijuana growers and studying their research for indoor grow
lights is very efficient since they have historically grown their plants in closets and other hidden places.
They really understand plant lighting more than anyone else! Overall, it almost seems best to do personal
research for this topic but understanding how lights are described is a good way to get started.

Everyone can Grow!
56
4. Soils for indoor gardening
A guide to understanding soil and its components
Basic soil types
Clay: This soil type has fine particles and does not drain well on its own. Most clay-based soils will also
have a high percentage of silt, which is extremely fine and not well draining. For indoor houseplants it is
not ideal to use this type of soil.
Loam: This soil type has many different sizes of particles and is high in nutrients, drains well, and holds
moisture. This is the best balance of clay, sand, and organic matter.
Sand: This soil type is mostly large particles, so it drains easily. Although sand is explained in more detail
below, in natural systems sand tends to be low on organic matter. However, some sandy soils can be rich
in nutrients, it is just more of a risk to see those nutrients drain away with watering.
Moisture control
These parts help keep moisture in a soil mix. They may or may not have a high nutrient density. A tip for
working with coconut fiber, peat moss, and vermiculite is to wear a dust mask to keep yourself from
breathing the dry ingredients.
Bark nuggets: For soil purposes, only used chemically untreated, undyed bark. It can be difficult to source
at times, but typically the cheaper, "natural" bark will be untreated. Do not use cedar chips as the high
concentration of tannins will burn roots. Fir and other conifer nuggets are fine for use with most moisture
loving plants and helps with both aeration and water retention as well as providing some nutrients as it
slowly breaks down.
Coconut coir: Low nutrients, high moisture retention capacity. This is a good choice for sustainable
gardening practices, as it comes from the interior fibers, (coir) of the husk of a coconut seed. This does
not decrease soil pH, so it is a suitable choice as a base for moisture for tropical soils.
Sphagnum peat moss (either shredded or whole): This is a traditional choice for moisture retention,
however it comes from ancient peat bogs that take generations to form and is not a highly renewable
resource. It also lowers soil pH, which is a point to keep in mind with certain plants. To harvest peat moss,
peatbogs must be drained, and the moss is harvested via a vacuum system. This destroys the peatbog
beyond natural repair. It is highly recommended to use coconut coir over peat moss to better preserve
these delicate habitats.
Vermiculite: This refers to a group of heat expanded hydrated laminar minerals which resemble mica.
The heat puffs the minerals into accordion shaped pellets that have a pH of 7.0. They are sterile, do not
decompose, and do not mold. This is useful for increasing both aeration of soils as well as moisture control
as the plates in the material hold both water and allow for air penetration.
Everyone can Grow!
57
Drainage
These parts help with soil aeration and drainage while holding little to no water in the soil. A tip for working
with carbon, perlite, and sand is to wear a dust mask to prevent breathing the dry ingredients.
Carbon: There are many sources of carbon that can be used for building a purifying drainage layer or as
a soil additive. The most common two are lump charcoal and aquarium filter carbon. Lump charcoal is by
far more cost-effective than filter carbon. The only drawback is that lump charcoal must be hammered to
the appropriate size before use. One thing to note when using carbon is that is can only absorb so many
impurities and then it will begin to release its stored impurities. Where this point is, is a mystery, but it
is something to consider.
Pebbles: Good examples of pebbles are aquarium substrate pebbles. They are tiny and not usually larger
than around 1/4 inch. Having natural colored pebbles ranging from 1/8-1/4 inch.
Perlite: This is an incredibly lightweight volcanic glass that is popped in volcanos like popcorn, expanding
the obsidian particles up to 13 times their size. It holds some moisture, but far less than vermiculite and
around 50% more than pumice.
Pumice: This is an igneous rock that is highly pitted and holds little water. It is a difficult to source, but
fantastic addition to many soil mixes, especially desert mixes or for plants like Lithops and Pleiospilos.
Sand: There are many types and grain sizes to sand. Typical play sand is extremely fine and will not give
good aeration. Using aquarium sand or construction sand can give the necessary drainage. If the sand is
too fine, it will actual slow down drainage and can cause soil to become septic if allowed to stagnate.
Compost
These parts are specifically for nutrients, but typically also add to moisture control. Keep this in mind so
your soil doesn't get too moisture heavy. If the compost is very dry, wear a dust mask to prevent breathing
the dry ingredients. Generally, there are three main types of compost: Worm, Animal Manure Compost,
and Fungi Compost.
Worm compost (vermicompost)
This is a wonderfully nutrient rich fertilizer made from the feces of worms. It has many names
such as worm castings, vermicompost, worm manure, and worm humus. It is by far the easiest and most
consistent compost that can be made for indoor gardens and ever people in small spaces like apartments
can keep a mini worm bin and produce their own worm compost. One of the best things about worm
compost is that it is rich in bacterial life and adds an abundance of beneficial organisms to houseplants
that otherwise would live in sterile soil conditions. It is difficult to say exactly what the nutritive content
of this compost will be since it highly depends on what is fed to the worms. Even fresh manure can be
added to a worm bin, so it can be used to enhance other types of compost as well. Just remember not to
overload your bin with too much food so it doesn't begin to rot using fungal methods.
Animal manure compost

Everyone can Grow!
58
This is any manure that is produced by harvesting the feces of an animal and letting it sit with
other organic matter such as paper and straw until it decomposes and becomes very dark, crumbly, and
no longer smells of sulfur. It can take over year for this process to occur if you’re creating it from scratch,
but you can also buy it in the store as well. The downside to producing animal manure is that it isn’t
always cost effective or easy to obtain for the average consumer. For indoor gardening, composting manure
isn’t as practical as worm compost. It’s important to compost most animal manures instead of just
applying it raw, because depending on the animal the nitrogen levels present in the manure can cause
chemical burns on the plants and seeds. Another thing to consider is that generally only the manure of
herbivores should be used when creating compost, because compost from carnivores can put humans at
risk for pathogen contamination. Using carnivore manure as compost goes beyond the scope of this
handout and lesson plan, and in general goes beyond the scope of indoor gardening. Never use cat feces
for compost, because it contains the pathogen toxoplasmosis. This pathogen is incredibly harmful to
pregnant woman and it’s not worth the risk to use for indoor gardening.
One of the most important things to know when producing compost from raw manure is the
nitrogen levels typically given off by each animal. The term “hot” manure is used when referring to manure
that has very high levels of nitrogen, because high levels of nitrogen can burn the roots of a plant and
keep them from flourishing. “Hot” manure should always be composted with nitrogen rich materials in
order to ensure that the manure will not burn the plants. On the other hand, “Cold” manure can be used
without having to compost it, and this usually refers to cow manure. Omnivores produce the “hottest”
manure and any type of manure produced by an omnivore should not be used if it hasn’t been composted
first, because the carbon to nitrogen ratio will be off and likely kill the plant.
There are many options in stores for purchasing the right compost blend, and it’s a matter of
understanding what your plants need in terms of pH and nutrition. If you’re looking to make the compost
yourself talking to local farmers is a good way to get manure and they may have some tips on how to
compost it. However, it is critically important to know what the animals are being fed when you obtain
manure from a farmer, and it’s also important to understand that you will be looking at close to a year
timeline to create compost. For a new gardener, it’s probably best to start with buying compost from your
local hardware or home improvement store. If you are set on finding a local source of manure, cow manure
is probably the best and most versatile type to start with, because it doesn’t necessarily need to be
composted.
To summarize, it’s important to know what your plant needs and accommodate that. Growing
plants is a learning process and mistakes happen. It’s okay to experiment with a variety of composts to
find what works best for you. Above all, if you buy manure locally know where it is coming from and how
to compost it appropriately. This is extra important when working with houseplants, because improperly
composted manure can make you, your family, or your pets sick.
Chicken manure: More acidic than most manures. Chicken manure can lower the pH of the soil,
especially if it’s added raw onto plants. Therefore, chicken manure and other types of poultry should

Everyone can Grow!
59
always be composted before use. Chicken manure is highly balanced in nutritional content and has high
amounts of nitrogen, accompanied by slightly smaller yields of phosphorus and potassium. This is the
ideal compost material if you are trying to grow vegetables indoors.
Horse manure: Horse manure has the correct carbon to nitrogen ration already present, so it can be
directly applied to a bed without having to compost it. However, it is beneficial to let this manure age for
at least one to two months. In terms of nutritional content, horse manure is slightly better than cow
manure although people tend to not use it in compost because horses don’t break down seeds in their
digestive system so if it is directly applied to crops it may cause weeds. Composting occurs at high
temperatures and kills seeds.
Goat manure: Goat manure consists of nitrogen packed pellets. It must be composted or aged before it
can be used, and this is typically done with the bedding material. Straw is a good substitute if you don’t
have bedding material. Also, if you get the manure from a farmer you could ask them for some of the
bedding material. This provides the balance between carbon and nitrogen that is required to create
balanced compost.
Sheep manure: Sheep manure has high levels of potassium in it compared to most other manures. Sheep
manure typically consists of nitrogen packed pellets. It must be composted or aged before it can be used,
and this is typically done with the bedding material. (See Goat Manure for what to do if you don’t have
any bedding material.) This provides the balance between carbon and nitrogen that is required to create
balanced compost.
Llama/alpaca manure: Their feces are nitrogen packed pellets. It must be composted or aged before it
can be used, and this is typically done with the bedding material. This provides the balance between
carbon and nitrogen that is required to create balanced compost.
Rabbit/guinea pig/rodent manure: Rabbit manure makes one of the best herbivore composts, because
rabbits eat a more varied diet that consists of grass and some vegetables. This leads to more nutrients in
the feces. The downside is that rabbits don’t produce a lot of feces. However, when dealing with
houseplants this could be an asset considering that not very much of this compost is needed to have an
effect. The best way to create compost with rabbit feces is to soak the feces in water for 48 hours to create
a “tea” and then apply it sparingly to the plants that need to be fertilized. The only note on rat and mice
feces is that they are omnivores so they will have higher nitrogen.
Side Note: “Tea” is used to describe to a mixture of compost and water that is steeped and aged and then
then carefully poured into plants.
More information: http://www.homecompostingmadeeasy.com/composttea.html
Cow manure: This has the correct carbon to nitrogen ratio already present, so it can be directly applied
to a bed without having to compost it. However, it is beneficial to let this manure age for at least one to
two months. It’s important to take into consideration that it does matter what type of cow the manure is
coming from. For example, it’s okay to use the manure from dairy cows straight off the farm, but it’s not
Everyone can Grow!
60
as high in nutrients as manure from steers (cows raised for beef) but the manure from the steers should
be aged and composted before use in indoor gardening.
Bat manure: This is one of the most valued manures of all time. It can be found at the store usually in
powdered form. When applying this to a plant make sure to first wet the soil, sprinkle on the powder, and
then wet the soil again to allow the guano to sink in. Guano is usually powdered because it is highly
concentrated, even more than chicken feces. If you choose this method, be warned that a little goes a long
way.
Additional soil amendments
Always wear a dust mask when working with powders or dry ingredients.
Alfalfa Meal: Contains triacontanol a plant growth promoter. A good source of nitrogen.
Azomite: A good source of trace elements and minerals and is used as a remineralizer.
Bone meal: A good source of phosphate and calcium.
Blood meal: A good source of nitrogen and trace minerals.
Dolomite Lime: Raises the soil pH and contains magnesium and calcium to help with plant growth.
Greensand: A mix of many trace minerals, potash, silica, magnesium, and iron. Used to break up clay
soils.
Gypsum: A mix of sulfur and calcium. It is used to break up clay soils.
Kelp Meal: Increases plants' resistance to stress and adds micronutrients.
Humus: Decayed plant matter used as fertilizer and increases moisture retention and drainage
Rock Dust: Adds a broad range of trace minerals to soil.
Rock Phosphate: Adds phosphate to soils over a long period of time.
Sulfur: Lowers soil pH
Topsoil: A commercially composted, rough soil that is unsuitable for potted indoor plants, but can be
used as an additive.
Basic soil recipes
Wear a dust mask when mixing soil. Believe me, you will thank me later!
High moisture plants: Examples include dracaena, ficus, and fittonia. For tropical plants that like to be
in more humid and moist conditions using a ratio that has more moisture controlling elements like
coconut coir will be necessary, however, most plants will not appreciate staying soggy, so drainage is still
important. An example of a tropical soil mix is below:
• 2-parts coconut coir

Everyone can Grow!
61
• 2-part organic compost
• 1-part bark nuggets
• 1-part coarse sand
• 1-part crushed lump charcoal (optional)
Moisture tolerant plants: These plants can handle being a bit wet and a bit dry, examples include
epipremnum, heartleaf philodendron, and begonia. These require a more balanced mix:
• 1-part coconut coir
• 1-part organic compost
• 1-part bark nuggets
• 1-part coarse sand
• 1-part perlite
• 1-part lump charcoal (optional)
Low moisture plants: These are mostly succulents and cacti, these can still range with how much
moisture the plants need so two different recipes are below:
General cactus mix:
• 2-parts coarse sand
• 1-part organic compost
• 1-part small gravel or pumice
• 1-part perlite
Lithops and mesemb mix:
• 8-parts small gravel or pumice
• 1-part organic compost
Everyone can Grow!
62
5. The basics of indoor plant care
Introduction
This guide provides general knowledge for how to care for various types of plants, such as tropicals,
succulents, and food crops, as well as tips for a few of each type of plant. It also contains a simple guide
for companion planting and choosing plants for mixed planters. This is by no means meant to be an
exhaustive work, instead it is meant to help the beginner understand what to expect when caring for
houseplants. In the age of the internet, anyone can look up specific plant care with the click of a button,
and no single guide can make up for good old-fashioned research.
Notes on Latin names: Binomial nomenclature
Most plants have what is known as a common name, which differs depending on locality. For
instance, Sansevieria trifasciata has many common names, such as snake plant, mother-in-law’s-tongue,
and viper’s hemp bowstring. As if plants need to be so complicated that even knowing what plant someone
is talking about gets confusing. However, all plants have a scientific name that also describe it and that
name is invaluable when diagnosing problems and learning the specific care for a plant.
When reading Latin names, it is important to understand how the Latin naming system (binomial
nomenclature) works. For example: The cast iron plant has the Latin name Aspidistra elatior. Aspidistra
is the genus of the plant and elatior is the species. Genus and species are part of the taxonomic system
used to identify plants. In many cases, there are many species that fall under one genus. In binomial
nomenclature, the genus is always capitalized while the species is never capitalized. Generally, both the
genus and species should always be italicized. The only time that the species isn’t italicized when the
abbreviation sp. is put before it. Sp. stands for unknown species. Spp. stands for multiple species.
Caring for plants
To keep a garden indoors it is important to understand the basic needs that plants have in order
to help them thrive in their new environment. Every home is different so it may take some tweaks and
adjustments to find the best combination of conditions for a desired plant. Don’t give up! Sometimes
learning how to take care of plants means that some will die, that is not the end of plant keeping, just a
learning opportunity.
Repotting a plant
Repotting a plant can be a daunting task for a new plant keeper. It appears the plant will give up
the ghost if it is not performed correctly. However, for the most part, plants are forgiving of being repotted
and will not die at the lightest touch. It is always a good idea to look up tips for specific plants, but
repotting has the same basic steps regardless of the plant. There are two basics ways to repot a plant:
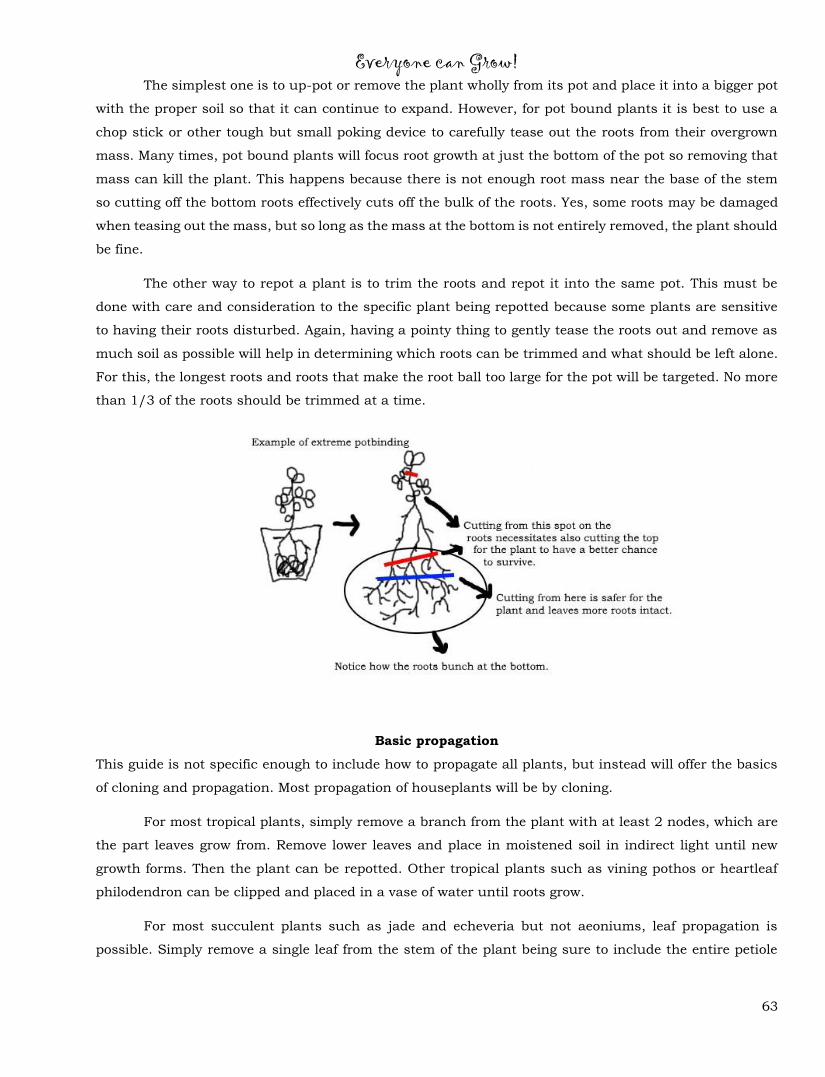
Everyone can Grow!
63
The simplest one is to up-pot or remove the plant wholly from its pot and place it into a bigger pot
with the proper soil so that it can continue to expand. However, for pot bound plants it is best to use a
chop stick or other tough but small poking device to carefully tease out the roots from their overgrown
mass. Many times, pot bound plants will focus root growth at just the bottom of the pot so removing that
mass can kill the plant. This happens because there is not enough root mass near the base of the stem
so cutting off the bottom roots effectively cuts off the bulk of the roots. Yes, some roots may be damaged
when teasing out the mass, but so long as the mass at the bottom is not entirely removed, the plant should
be fine.
The other way to repot a plant is to trim the roots and repot it into the same pot. This must be
done with care and consideration to the specific plant being repotted because some plants are sensitive
to having their roots disturbed. Again, having a pointy thing to gently tease the roots out and remove as
much soil as possible will help in determining which roots can be trimmed and what should be left alone.
For this, the longest roots and roots that make the root ball too large for the pot will be targeted. No more
than 1/3 of the roots should be trimmed at a time.
Basic propagation
This guide is not specific enough to include how to propagate all plants, but instead will offer the basics
of cloning and propagation. Most propagation of houseplants will be by cloning.
For most tropical plants, simply remove a branch from the plant with at least 2 nodes, which are
the part leaves grow from. Remove lower leaves and place in moistened soil in indirect light until new
growth forms. Then the plant can be repotted. Other tropical plants such as vining pothos or heartleaf
philodendron can be clipped and placed in a vase of water until roots grow.
For most succulent plants such as jade and echeveria but not aeoniums, leaf propagation is
possible. Simply remove a single leaf from the stem of the plant being sure to include the entire petiole

Everyone can Grow!
64
and set it on moistened, well-draining soil and it will begin to grow roots and a baby plant in around 3-4
weeks. This takes a lot of time, so be patient.
For most food crops, propagation will come from seeds that the plants make at the end of the
season. For fruiting plants, choose the best looking, most well-formed fruit and allow it to completely ripen
and fall off the plant on its own, this will yield the best seeds to keep for next year. For herbs or root crops
like carrots or onions, allow the strongest looking plant to grow until it forms a seed head and then allow
it to ripen fully before removing. Tying a mesh bag over the seed head can prevent the loss of seeds.
Finding the right light
The needs of plants vary greatly, so finding the right light is important for each individual type of
plant that is kept. There are two basic types of light, direct and indirect. Direct light is intense, bright
light that directly touches the leaves of a plant. Indirect light is less intense and may bounce off other
surfaces such as the ceiling and walls or move through a screen such as a curtain before coming into
contact with leaves. Many plants are naturally adapted to indirect light because they grow under larger
plants in the wild. It is a good idea to spend some time looking up the specific needs of any plant that is
desired to be kept. This gives it the best chance to thrive.
Below is a guide for window light and definitions to help get things started:
• North windows: These windows give good indirect low to moderate light, but have the
added effect of being very cold in winter. Don’t put plants too close to the window,
especially if they are sensitive to the cold.
• South windows: The best light in the house! South facing windows give the most intense
light and warmth for most of the year. Be careful not to put light sensitive plants in these
windows or they will burn.
• East windows: A great choice for cool morning light that is fairly intense and afternoon
light that is indirect. Plants in east facing windows can burn if they are sensitive to light,
so keep those plants a few feet from the window if burns are noticed.
• West windows: These are ok light-wise. It is best to put moderate to low light needing
plants in these windows, and they can get fairly hot, dry, direct light in the afternoons,
which may harm certain species of plants. This is the least useful window facing of all.
Caring for tropical plants
Tropical plants are some of the most commonly kept plants, however, succulents are beginning
to gain in popularity in recent years due to their smaller, more compact sizes. Most tropical plants
require well-draining, but moisture retaining soil and appreciate humidity, so misting and/or keeping a
humidifier near tropical plants may help them thrive. It is important to look up specific species to
determine whether the plant will appreciate water sprayed directly on its leaves or not. African violets
(Saintpaulia spp.) and begonias (Begonia spp.) will wilt if their leaves stay wet, but ficus (Ficus spp.) and

Everyone can Grow!
65
pothos (Epiprenum areum) love the attention. Tropical plants are not cold hardy and should never be
allowed to drop below 50˚F or they will quickly become damaged and may die. Some tropical plants even
appreciate being somewhat pot bound, such as peace lilies (Spathiphyllum, spp.). This means that they
like filling their pots with roots and are accepting of tight spaces. However, it is still a good idea to repot
peace lilies every few years to keep them healthy and give them new soil.
Tips for growing certain tropical plants
• African violet (Saintpaulia): Do not allow the leaves to remain wet or they will rot! Since they do
not like their leaves being wet, it is best to water them from the bottom, such as sitting them in a
tray of water. However, they also love humidity, so keeping them on a tray of pebbles with water
is a great way to help them grow.
• Bird’s nest fern (Asplenium nidus): This fern benefits from humidity. Placing the fern on top of a
tray of pebbles filled with water or adding a humidifier nearby can help increase the humidity
and make it happier.
• Calathea spp.: Remove all dead stems to keep the plant clean. This plant enjoys a shower to keep
dust off of its leaves. It prefers humidity so a tray of pebbles with water or a humidifier can
increase its growth.
• Cast iron plant (Aspidistra elatior): This plant may have issues with spider mites and scale
insects. If the leaves are becoming pale and yellow, check for an infestation, although yellowing
leaves can also be caused from overwatering.
• Fiddle leaf fig (Ficus lyrate): This plant can be extremely picky at times. Once it gets used to its
home, moving it can cause it to lose leaves. The huge leaves on this plant attract dust and will
require regular cleaning with a damp cloth. This plant is not a good candidate to bring to a
shower since moving it stresses the plant. It also appreciates being misted or having a humidifier
nearby.
• Heart-leaf philodendron (Philodendron scandens): This plant tends to do so well it is almost
forgettable. Therefore, take some time to give it a shower or use a damp cloth to clean the dust
off the leaves. Regular pruning will keep this plant at its best, and keep the internodes between
leaves shorter.
• Kentia palm (Howea fosteriana): This is another dust attractor. Keeping the plant free of fuzzballs
and giving it a nice misting once a week can help keep it in its best shape.
• Peace lily (Spathiphyllum): Large leafed plants need to be regularly dusted by showering or wiping
with a damp cloth. Thrips are a common insect on peace lilies and may present themselves as
little dark-colored insects on the undersides of leaves. Prevention is best, which means keeping
an eye on the plant and routinely inspecting it for pests.
• Pothos (Epiprenum aureum): This plant grows extremely fast in some cases. Prune regularly to
keep it under control or the internode length can reach over three inches! These are very
forgiving plants and can handle both under and overwatering like a champ.

Everyone can Grow!
66
• Venus flytrap (Dionaea muscipula): When a head dies it can be cutoff with scissors. If the traps
turn black in fall it could just mean that the plant is going dormant for winter. This is a perfectly
normal part of the lifecycle. The traps of the plant are extremely fragile. Each one only opens four
to five times before it dies. Therefore, it’s important not to poke the traps.
Caring for succulents
Most succulents want as much light as they can get. However, there are a few exceptions, such
as aloe vera (Aloe vera) and snake plants (Sansevieria trifasciata), which prefer indirect light. Snake
plants take it a step further and can even be grown in shade. Succulents typically require well-draining,
sandy soil that does not retain much moisture, to prevent root rot. Since succulents retain water in their
leaves, they do not need to be watered often. This means allowing the soil to fully dry out in between
watering. In fact, most succulents prefer to go long periods without water. If the leaves of the succulent
begin to pucker, they need water. If they turn yellow, they have been overwatered and those leaves will
fall off soon. South and east facing windows are some of the best places in the house for a succulent. If
they do not get enough light, they can etiolate, which means they grow tall and the intervals between
leaves grow longer and longer. This leads to the plant looking gangly and reduces its health. If the plant
appears to be reaching for light, and no brighter space is available, it may be best to supplement the
light with a grow bulb.
Tips for growing certain succulents
• African spear (Sansevieria cylindrica): Like most plants, this one will attract dust over time. Wipe
off dust with a damp cloth, it does not appreciate its leaves being wet.
• Aloe vera (Aloe vera): Aloe Vera has very similar symptoms that result from overwatering, under
watering, too much light, and too little light. If the leaves of the plant are turning reddish brown
or just brown the plant may be getting too much light or is being overwatered. If the leaves
become wrinkled the plant needs more water. Keeping the plant in indirect light is one of the
easiest ways to prevent browning from too much sun.
• Echeveria (Echeveria sp.): It is perfectly normal to have dry crispy leaves at the base of the plant,
because this is part of the typical aging process of an echeveria.
• Jade plant (Crassula ovata): When grown indoors this plant will likely never become taller than
two feet. If purchased in a pot it will most likely come with multiple cuttings. Therefore, these
cuttings will have to be separated and placed in different pots. A maximum of three plants
should be kept in one pot.
• Prickly pear cactus (Opuntia sp.): Moving the cactus to a cooler spot during the winter, keeping
the soil dry, and providing lots of light can encourage the cactus to produce flowers. Especially if
the cactus is moved to a slightly warmer place in the spring and nurtured with fertilizer.
• Snake plant (Sansevieria trifasciata): This is a beautifully forgiving plant that can live almost
anywhere it is put, including some of the most shaded corners of a home. It does not require
frequent watering but is also forgiving of being overwatered. If the leaves are puckering or

Everyone can Grow!
67
beginning to flop over, they are too dry. If they begin to turn yellow, they have been overwatered.
Since this plant can get fairly tall, it is a good idea to put it in a relatively heavy pot to keep it
from falling over.
• ZZ plant (Zamioculcas zamiifolia): Browning leaves indicate sunburn. This plant is another great
plant for the darker areas of a home since they are fairly forgiving of watering and light. These
plants can become shocked if moved quickly to a new location but typically recover well.
Caring for food crops
Growing food indoors can be quite a challenge. Crops require as much light as succulents and
have unique needs in order to produce their fruit. Herbs, lettuces, and greens are the easiest indoor
crops to grow, since the leaves are what is desired to be harvested. All they need is high light, well-
draining, moisture retaining soil, and to be kept moist and not wet. Be sure to use food safe fertilizers
with any crops that are intended for consumption. For fruit bearing crops such as tomatoes and
peppers, it is important to ensure they are well fertilized with a nitrogenous fertilizer and it may help to
hand pollinate the flowers using a cotton swab to ensure a better crop. Ground crops like carrots and
potatoes are simple enough to grow so long as they have proper light and a container that is deep
enough for them to grow down into. Almost any plant that can be grown outdoors can be grown indoors
with the proper research and if the conditions for that plant are met. Since it is typically less humid
indoors than outside, it may be necessary to build a greenhouse type of area for food crops and/or add a
humidifier nearby.
Tips for growing certain food crops
• Arugula: When in an environment that is hot enough it will begin to flower. The good news is
that the flower is edible. Furthermore, cutting back the arugula stem once or twice can increase
the yield. It is best to harvest when the leaves are about three to four inches, because this is
when the flavor is the best.
• Carrots: To check to see if a carrot is ready to harvest, dust off the top soil and see its diameter
in the ground. If it is about an inch wide, it should be harvest size underground.
• Ginger: Store bought ginger root can be used to grow it. Just look for a well-formed root with at
least one “eye”. This is where the stem will grow. Cut off the part with the eye and soak it
overnight in warm water before planting in pre-moistened soil. Ginger takes a long time to grow,
so expect to wait 2-3 weeks or longer before it sprouts.
• Kale: When using an artificial light to grow kale make sure it is set on a timer or that the light is
turned on and off at a scheduled time every night. If the artificial light is on too long it will result
in a low yield for the crop. It is recommended that the kale gets 8 hours of light a day to optimize
overall yield.
• Lettuce greens: When the lettuce gets to be about 4 inches tall it is ready to eat. Only cut from
the plants what you are going to eat that day, because lettuce tends to go bad quickly. This also
helps keep the lettuce producing leaves longer.

Everyone can Grow!
68
• Meyer lemon: These can be grown from seeds from lemons bought in-store. They take 2-3 years
before they will bear fruit.
• Microgreens: Use a piece of cardboard to lightly press the seeds into the soil when planting
microgreens. They can be grown in almost any container including plastic disposable containers
so long as it has drainage holes. It is easy enough to poke holes through most types of soft
plastic. If using a hard-plastic container, it may be necessary to use a screw or drill to make the
hole so the plastic doesn’t crack.
• Scallions: These can be harvested at six inches tall. If the bulb at the base is left intact, it will
continue to grow greens that can be harvested, leading to a steady supply of scallions.
• Tomatoes: Small tomato varieties are easiest to grow indoors, such as Tiny Tim, Toy Boy, and
Red Robin.
Basic companion planting
Companion planting is the act of planting crops that are either beneficial or at least neutral to each other
nearby one another. Plants are competitive, and some have very good mechanisms for slowing and
stopping the growth of their competitors. Other plants have taken a different route and promote certain
other plant's growth or help it along based on things they do, such as nitrifying plants in the pea family.
A fantastic example of companion planting is what is known as Three Sisters and is a traditional Native
American way to grow crops together. The sisters are a legume such as beans or peas planted with tall
corn stalks and a squash at the base. The corn acts as stakes for the beans to grow on while they nitrify
the soil that helps the squash grow. This type of mutual benefit can happen in any garden, even an indoor
one.
Some basic rules for companion planting are:
• Do not plant root crops nearby each other, they tend to need the same nutrients and will compete.
• Many times plants from the same family can both compete, and cross pollinate, so keep them
apart. An example of this is carrots, parsley, dill, fennel, and celery (all in the Apiaceae family).
o The exception to this seems to be brassicas (e.g. broccoli, cabbage, cauliflower, kale,
Brussels sprouts, turnip, mustard, kohlrabi, collard, etc.), although they do cross pollinate,
many of them can be grown nearby without negative effects.
• Herbs are friendly to most fruiting crops, so they are versatile in a garden.
• It is a good idea to use the harvest times for companion planting, such as how radishes only require
about 30 days to harvest and can be planted and harvested before most long season crops are
even large enough to notice their presence.
• Shade loving plants can be deliberately planted near or under larger plants.
• Alliums (onion family) hate beans and beans hate them, so keep them apart.
Some common companions are:
• Tomatoes and basil

Everyone can Grow!
69
• Brassicas and herbs
• Marigolds and beans
• Chamomile and alliums, especially onions
• Lettuce and alliums
• Arugula with almost anything but strawberries
Tips for mixing plants in planters
Making a planter with a mix of plants is a wonderful way to make a beautiful and contained garden
in any home. Besides companion planting food crops to make good partners, tropical or succulent plants
of similar care needs can be planted together to make works of art in a pot.
Don't put plants together if they are not identified. Be sure to look up specific care
requirements for every plant that is considered for the planter and understand what their needs are. This
means mixing succulents and tropicals in the same pot will not likely work out for one or the other type
of plant, but mixing plants of similar growth pattern can be beautiful. Remember that in the wild, plants
evolved to outcompete other plants. However, they can live together with plants that mimic the similar
conditions to what is found in the wild.
With most mixed plant planters, there will be a foreground, midground, and background, unless
the plants are arranged from the center and allowed light from directly above. To choose the right plants
for each position, be sure to look up maximum growth sizes and growth rates. Putting fast-growing plants
with slower growing plants will result in the loss of the slower growers. A good example of this is pothos
(Epiprenum aureum) and heart-leaf philodendron (Philodendron cordatum). They are both epiphytic in
nature and share many of the same growing requirements, however the philodendron grows much slower
than pothos and will eventually become suppressed by the larger, stronger pothos.
Remember that any two different plants will inevitably compete, as that is how plants survive in
the wild. The trick is to find plants that have different needs and similar growth rates, so the competition
is kept to a minimum. In this way, it becomes extremely important to do research before putting plants
together in the same pot.
Everyone can Grow!
70
6. Growing sprouts
Health benefits of sprouts
Sprouts are at their most potent a week after sprouting. By allowing the seeds to germinate, the seedling
begins to metabolize the starches that were stored in the endosperm of the seed. This unlocks it as
nutrients that are then accessible during consumption. They contain many different vitamins, minerals,
and enzymes that are useful to our digestive systems. Sprouts are also known for helping with metabolic
processes, anemia, and weight loss, the immune system, and heart health to name a few.
List of popular seeds to sprout:
Alfalfa
Barley
Basil
Beet
Broccoli
Brown rice (requires cooking after sprouting)
Buckwheat
Celery
Chia
Cilantro
Clover
Garlic seed
Kale
Lentils
Mung bean
Peas
Radish
Soybean
Vitamins sprouts contain:
Folate
Niacin
Pantothenic acid
Riboflavin
Thiamin
Vitamin A
Vitamin C
Vitamin K
Minerals sprouts contain:
Calcium
Copper
Iron
Magnesium
Manganese
Zinc

Everyone can Grow!
71
Growing sprouts in a jar
Supplies needed:
• Seeds
• Water
• A mason jar with 2-part lid
• Fiberglass screen (can be window screen)
Putting it together
• It is very simple to grow sprouts in a jar.
o Even large jars can be used effectively as long as they can be inverted to pour out the water.
o Don’t use a jar you can’t lift when it is full of water!
• All you need to do is cut a piece of fiberglass screen to just bigger than the size of the top of your jar
• Add seeds to the jar
• Fill the jar with water
• Then add the mesh and outer ring of the top.
o To maintain these sprouts, pour out water daily through the mesh without opening the jar.
o Rinse sprouts, and refill with water.
• They will take about a week to ten days to sprout.
• When the sprouts have their first true leaves they are ready to be harvested.
o These can be kept in the refrigerator for five days before use.

Everyone can Grow!
72
Growing sprouts in pots
Supplies needed:
• Seeds
• Water
• At least a 4-inch square or round pot (larger is great too)
• Tray that holds water (seedling trays work great!)
• Fine soil mix
• Fiberglass screen (window screen)
Putting it together
• First prepare your soil by shaking it to make anything bulky come to the top and then scrape off anything
big, wood chips, charcoal pieces, stones, etc.
o These pieces can be tossed back into your soil container for repotting plants.
• Next cut a piece of fiberglass window screen to fit the bottom of your pot, this will keep the finer soil from
escaping.
• Add in soil until the pot is filled to about ½ inch from the top of the pot.
• Moisten soil thoroughly and allow to drip out.
• Add seeds to the top of the soil and sprinkle on a bit more soil to lightly cover the seeds.
o If using larger seeds, add a bit more soil over the seeds, you’ll have room if you left ½ inch at the top
of the pot.
• Mist the top layer of soil to moisten and put the pot in a tray that is at least an inch deep. This way further
watering will come from the bottom of the pot through the tray.
• Place your sprouts in the brightest window possible to give them the most photosynthetic capacity which
will enhance their nutrition.
• Keep the soil moist always. Leaving some water in the tray can help with this.
• Seeds should sprout in around 7-10 days and should be ready in a week.
• Once they show their first true leaves, they can be harvested by cutting the stems above the soil line.
o Sometimes a second harvest will grow from seeds that have not yet germinated, so keep the soil
moist.
• When replanting the next batch of sprouts, the roots and stems of the first batch can be incorporated into
the mix, added to a worm bin, or set aside to allow to compost before reusing.

Everyone can Grow!
73
7. Growing oyster mushrooms
What are oyster mushrooms?
These are a type of gourmet edible fungus that grows on fallen logs in damp places. These mushrooms are known
for helping the body detox. They are also just plain delicious and super easy to grow and keep going. The
mycelium of oyster mushrooms can live for many years so long as it is kept fed, somewhat like fertilizing a plant.
Life cycle of an oyster mushroom
It may be simplest to think of mushrooms as the fruit of a tree. The actual tree is the mycelium which is
underground. The mushrooms are the end result of two fungi with different genetics coming together to form one
body, literally. This process is called karyogamy. Now the cells then have two nuclei instead of one. It is this form
of mycelium that grows mushrooms. The nice thing is that as the mushrooms grow, the mycelium can be split and
parts that have not yet formed this relationship can bond together and keep growing. So long as the mycelium is
fed, it will continue to grow.
Supplies needed
• A cardboard ½ gallon milk or juice carton with lid. Rinsed well.
• Stapler with staples.
• Unscented compressed paper cat litter or small animal bedding.
• Guinea pig food pellets, only pellets, no seeds! (Oxbow is expensive for this but works great.)
• A handful of oyster mushroom mycelium
o This can be sourced from many places online, even Lowes and Home Depot sells kits that can be
used or broken up into several cartons.
• Misting bottle
Putting it together
• Rinse and dry a ½ gallon carton.
o Any kind of waxed-based paper juice or milk carton works.
o An easy way to do this is to pull open the top like it doesn’t have a cap to easily get inside the
carton.
• Using a bucket or large bowl, soak 6 handfuls of compressed paper bedding with 1 handful of guinea
pig food until it all puffs up and decompresses. Squeeze out excess moisture, it must be wet, but not
dripping.
• Mix in 1 handful of mycelia.
o There is no need to be too gentle, just don’t be so rough that you smoosh it all. Mycelium is hardy.
• Compact the mix into the waxed container, reclose and staple along the top edge. Being compact is totally
fine for the mycelium.

Everyone can Grow!
74
o Make sure to screw on the top to the container but leave it loose because mycelium breathes
oxygen like us.
• It takes a few weeks before the mycelium will have taken over the container.
• Be sure to mist your mycelium every few days once you see a mass forming. This is where the mushrooms
will grow from.
• You can get several harvests out of one carton
Finished oyster kits
If you lose the cap to one of the bottles, a bit of wax paper
and a rubber band work as a replacement. Just poke a hole
in the wax paper so there is still air flow.
This is what it will look like after approximately 3 weeks. This
lump is where the mushrooms grow.
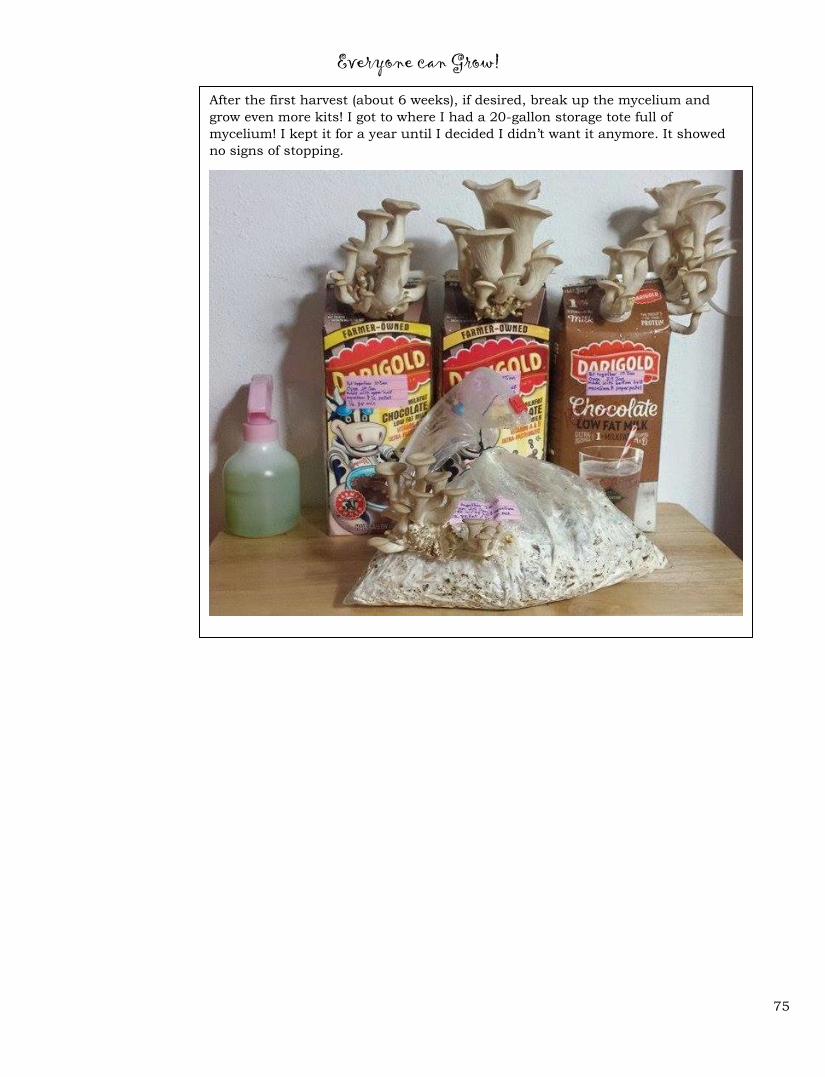
Everyone can Grow!
75
After the first harvest (about 6 weeks), if desired, break up the mycelium and
grow even more kits! I got to where I had a 20-gallon storage tote full of
mycelium! I kept it for a year until I decided I didn’t want it anymore. It showed
no signs of stopping.

Everyone can Grow!
76
8. Basic hydroponics and aquaponics
Introduction
Hydroponics and aquaponics are methods of growing plants in water instead of soil. Hydroponic systems get their
nutrients from fertilizers added to the water and aquaponics systems get their nutrients from fish waste. Either
way, the plant roots are partially submerged in nutrient enriched water, which supports the life of the plant.
What is hydroponics?
A basic hydroponic system consists of a container to hold water, a container to hold the plants, and a
bubbler. Of course, more complicated systems can be made with more plants and pumps to cycle the water, giving
the roots time to be submerged in water and time to breathe. For the purposes of this curriculum, simple systems
will be the focus.
Six common types of hydroponic systems
Nutrient Film Technique (NFT): A constant flow of nutrient solution circulated over fully exposed and submerged
plant roots. No growing medium is used.
Drip System: A timer-controlled pump drips nutrient solution on the base of the plant, which is planted in a
growing medium.
Water Culture: Plants are kept on a floating platform. Usually Styrofoam is used for the floating platform. Roots
are almost completely submerged except for the base of the roots nearest to the stem.
Wick System: Nutrient solution passively moves from the nutrient solution reservoir to the growing medium
through a wick.
Ebb and Flow System (Flood and Drain System): A pump floods the growing tray with the nutrient solution and
then it is quickly drained. This allows the roots to breathe during the ebb and absorb nutrients during the flow.
Aeroponics: A timed pump set on short cycles applies the nutrient solution to the fully exposed plant roots. The
solution is applied in sessions of a few seconds to a few minutes. Again, this allows the roots to have time to breathe
and keeps them moist while allowing them to absorb nutrients.
What is aquaponics?
Aquaponics uses similar methods to hydroponics with fish added. The plants get their nutrients from fish
waste instead of a nutrient solution. In a sense, it is a small ecosystem that recycles waste. When making an
aquaponics system, it is important to keep in mind the size of the system. Water volume, number and size of the
fish, and number of plants are necessary considerations when designing it. It is important to understand basic fish
keeping for success in aquaponics otherwise the system can suffer. Just like hydroponics, maintenance is
important to keep the system functioning properly. Feeding the fish too much or too often will make the water toxic
to the fish. To avoid this, feed the fish an appropriate amount (as much as they can eat in a minute or two) every
other day and change about 25% of the water once a week. This will reduce the build-up of ammonia and nitrite

Everyone can Grow!
77
which can kill the fish and burn the roots of plants. If there are enough plants, the tank can be cleaned less often,
as the plants absorb the nitrogen in the water.
Tips about fish
Another important note about aquaponics systems concerns the interaction between the fish and the plant
roots. If the system has the roots and fish in the same water, be sure the fish will not damage the roots. This means
any kind of omnivorous or herbivorous fish are unwise to keep in such a system. Examples include carp (goldfish,
koi, etc.) and cichlids, they are voracious eaters and can destroy roots quickly. The best fish for single tank systems
would be small, harmless fish like white clouds, guppies, and bettas as well as other small fish. For larger scale
systems, larger fish, such as tilapia can be used, but allowing the fish and roots to share the same tank may not
be appropriate or the most effective.
Four types of aquaponics systems
Flood table: This system has an upper container that aquarium water is pumped into and then drains back into
the fish aquarium. It uses the upper table as a filtration system and separates the fish from the plants and their
roots.
Media-based: The plants are grown in a media and the fish waste is filtered through it. (Media could be expanded
clay beads, rockwool, or coconut coir.)
Raft-based: A foam raft floats on top of filtered fish waste (like the water culture system in hydroponics).
Hybrid system: A combination of the media and raft-based systems.
Parts of the system
Here are parts that can be used in a slightly more complicated system.
Water Pump: This pump moves the water through the system. When picking out a water pump, it is important to
consider the height the water will be pumped (delivery height), flow rate, and the tube size where the water is
discharging.
Air Pump: This pump aerates and keep nutrients evenly mixed in the water.
Air Stones: The air from the air pump enters the water through air stones to diffuse the oxygen in small bubbles.
Tubing: Hoses and tubing can be used to move the water through the system. Irrigation tubing can be used, but
flexible black vinyl is better than clear tubing. Clear tubing can grow algae that clogs the system.
Flood Trays and Channels: Household items can be used to create water holding reservoirs. PVC pipe or plastic
containers work great.

Everyone can Grow!
78
Pots: Some possible types of pots to use are net pots (2-3 inch common), circular and square plastic pots (circle
easiest to find, square most efficient with space), grow bags (difficult to reuse, but cheap and can roll sides to adjust
pot volume), fabric pots (quick draining, good for flood and rain system, easy to reuse), and terracotta pots (not as
common, porous so water and air can pass, but heavy and fragile).
Growing Medium: Some hydroponic systems require the plants to be rooted in a medium consisting of stone wool.
Stone wool is melted basaltic rock spun into fibers like cotton candy and has good water retention and porosity.
Know your water
The type of water used in the system is very important. It is especially important to know if your water is
soft water or hard water. Soft water contains a low concentration of calcium and magnesium ions as well as lower
concentrations of other minerals. An example of this is distilled water. Hard water contains a high concentration
of calcium and magnesium ions. Examples include most city tap water and mineral water. Because of this, it is
important to test water before use. There are test strips available for pools and spas that can make quick work of
this and are accurate enough to give an idea of the hard or softness of the water.
Soft water is better to use in a hydroponic system because the lower mineral content makes it easier to
stabilize the pH. Hard water can be used, but it needs to be treated before being added to the system. Without
treatment, the high level of calcium in the water will cause a brown build up on the roots. To treat hard water DO
NOT run it through a softener as it will make the water too salty for the plants. Instead, either use a reverse
osmosis filter or buy a base solution mix to add to the water. These methods reduce the concentration of calcium
present in the water.
Chlorine in unfiltered tap water can also be a concern for hydroponics and aquaponics. Chlorine
disinfects the water, so it is safe for people to drink, but can be harmful to plants and is deadly to fish. Chlorine
is an essential micronutrient that plants need, but too much can have toxic effects. For chlorine removal, leave a
container of water on the counter for 24-48 hours. Chlorine degrades in UV light and will disappear in 1-2 days.
Plants to grow
The best plants to grow are ones that do not have long roots that will restrict the water flow of the system.
Some of the easier plants to start with are lettuce, spinach, mint, basil, and strawberries. Tomatoes, peppers, and
cucumbers can also be grown, but long roots may need to be trimmed to prevent clogging.
Nutrients
Just like with all plants, hydroponic plants need nutrients. The macronutrients needed are nitrogen,
potassium, phosphorus, sulfur, magnesium, and calcium. The micronutrients needed are iron, cobalt, zinc,
chlorine, and selenium. The source of these nutrients can vary. Usually, store bought hydroponic nutrient solution
is used, but worm castings can be used as an alternative.

Everyone can Grow!
79
System maintenance
There are several things that need to be checked regularly (1-3 days) to ensure that the system is function
at its best. It is always important to keep an eye on your system to catch any problems early.
Nutrient Balance: The plants will tell you what nutrients are lacking. Use the Common Indoor pests, disease, and
remedies handout to decode any symptoms that show up.
pH Balance: Using either pH paper test strips or a digital pen to measure the pH. A good range is 5.5-6.5, but 6.0
is ideal for optimum growth. If the measurement is outside of this range, use pH adjusters to get it back in balance.
Water Level: Make sure there is enough water in the system for it to flow correctly to all the plants and that the
roots can reach it. Before adding water, mix it with the correct amount of nutrients. After adding water, check the
pH to make sure it is still in the desired range.
Changing Water: The water in the whole system should be changed about every 3 weeks. Drain the container that
holds the water. How to do this will vary depending on your set up. Once the water has been drained, rinse the
container and remove any solids that are present. Be careful about using soap because soap residuals can be
harmful to the plants. Once the container is clean, refill it with already mixed nutrient solution and water.
Example system 1: 2-liter bottle hyro/aquaponics
This is a very basic system that is easy and cheap to make.
Materials:
• 2-liter bottle
• Airline tubing
• Dechlorinated water
• Decorative paper, placemat, or bendable plastic sheet
• Expanded clay beads
• Fancy rocks
• Small hacksaw
• Hot glue gun
• Measuring tape
• Nutrient solution or mix
• Paper towel
• Plant with established root system (mint)
• Plastic tray or bowl with flat bottom and at least 1” sides
• Scissors
• Small binder clip
• Soldering iron
• Splash of vegetable oil

Everyone can Grow!
80
• Straightedge
• Utility knife
Procedure:
Step 1: To prepare the 2-liter bottle, empty and rinse it with water. Then use the utility knife to cut off the label.
Try to remove as much of the label as you can to leave the glue exposed. To remove the label glue, put the bottle in
hot water from the tap and scrub glue with oil on a paper towel. Use soap to remove oil from outside of bottle. Rinse
the bottle well to remove oil and soap.
Step 2: With the utility knife, cut around the bottle about 3 inches from the bottom.
Step 3: Using the soldering iron, make a hole about 1 inch in diameter in the center of the bottom of the bottle and
a hole just large enough for the airline tubing to fit in the neck of the bottle.
Step 4: Using scissors and possibly a hacksaw, cut the bottom of the bottle from the melted hole to the outside
edge.

Everyone can Grow!
81
Step 5: Hot glue the cap of the bottle to the center of the plastic tray/bowl.
Step 6: Cut a piece of airline tubing that reaches from the hole in the neck of the bottle, around the bottle twice,
to the top of the cutoff bottom. Cut one end of the tubing at a 45° angle. It is better to cut this piece too long the
first time, then shorten it later.
Step 7: Once the bottle is cool, push the angled end of the tubing into the hole in the neck of the bottle. Turn the
tubing so that the shorter side of the angle is on the bottom and the longer side is on top. Push enough tubing
through so that the end is in the center of the mouth of the bottle
Step 8: Use some hot glue to make a ring around tubing on the INSIDE of the bottle. This will prevent the tubing
from pulling out of the bottle.

Everyone can Grow!
82
Step 9: Once the hot glue cools, pull the tubing tight so that the hot glue ring is pressed against the bottle.
Step 10: Using the hot glue again make a seal around the tubing on the OUTSIDE of the bottle. You will probably
need to hold the tubing in place while the glue cools so that everything stays in place.
Step 11: Once the glue is cooled, screw the bottle to the cap attached to the plastic tray.

Everyone can Grow!
83
Step 12: Cut a piece of decorative paper, placemat or plastic sheet to fit around half of the bottle. Use hot glue to
attach the paper to the bottle. This will block excess light from hitting the water, especially if the system is in the
window.
Step 13: Put rocks in the tray around the bottle for support to prevent it from tipping when the water and plant
are added. These can be glued in or not. Add some rocks to the inside of the bottle around the tubing as well.
Step 14: Glue a binder clip in the middle of the bottle on the outside. It will act as a hook for the tubing. Attach
the other binder clip to the cut edge on the "top" of the bottle that is now in the air.

Everyone can Grow!
84
Step 15: Run the tubing through the binder clips and possibly wrap it around the bottle once to reduce the excess.
Step 16: After the tubing is secured, add the water with the correct amount of nutrient solution mixed in. Fill the
bottle about 2/3 full.
Step 17: If your plant is rooted in soil, carefully remove as much soil as possible from the roots. Try soaking it in
water to prevent root damage.
Step 18: Take the bottom of the bottle from earlier and put the roots through the hole. It should look like the leaves
of the plant are in a bowl and the roots are hanging out the bottom. The crown of the plant should be just above
the hole in the bottom of the piece.
Step 19: Add about 1-1.5 inches expanded clay beads around the plant.
Step 20: Put this piece in the bottle with the root in the water.
Step 21: Put the bubbler hose into the bottle between the water part and the plant part. Set the bubbler so that is
it high enough to create bubbles, but low enough so that the water doesn't spill out.

Everyone can Grow!
85
Step 22: When needed, unclip the airline tubing to drain.
Aquaponics versions
Materials
• 1 snail
• 2 small fish (white cloud)
• Everything listed above EXCEPT nutrient solution
• Fish food
• Water that has had time to sit for 24 hours to dechlorinate
• OPTIONAL: Aquarium dechlorinator or conditioner
Procedure
• Complete the steps above, but instead of adding water with nutrient solution, just use plain water (possibly
with dechlorinator or conditioner) and add the animals.
• Remember to feed the fish every few days.
Modifications
To accommodate more plants, a fish tank can be used following the same idea. Use Styrofoam to create a
raft that floats on top of the fish tank. Cut 2” holes about 2-3 inches apart. Use either 2” net pots or solo cups with
holes punched in the bottom to hold the plants in the Styrofoam. More fish will need to be added to the tank to
support the plants.
Example System 2: PVC pipe hydro/aquaponics
This system is more advanced than example system 1. It is designed to grow many plants and can easily be made
larger or smaller.
Check out this video for the system described below: https://www.youtube.com/watch?v=AaKDQiWYJow

Everyone can Grow!
86
Materials
• ¼” drill bit
• ½” drill bit
• 1x large plastic or metal container (30-50 gallons)
• 1x 4” diameter PVC pipe (5-8” long)
• 2x 4” diameter PVC pipe (5’ long)
• 2x 4” diameter PVC end caps
• 2x 4” PVC elbow fittings
• 3/8” black tubing- at least 10 feet
• 3” hole saw and drill
• 2”x4” wood scraps
• Expanded clay beads
• Nutrient solution
• Plant with established root system (mint)
• PVC glue
• Rocks
• Small clamp
• Solo cups or 2” net pots
• Table or frame to hold pipes above ground
• Water pump 100-155 gallons per hour (gph)-either pond or fountain pump with 3/8” converter
Step 1: Use the hole saw to cut holes in one side of the pipe. With a 5’ pipe, evenly space 7 holes with some space
on the ends of the couplings. On one of the pipes, drill a ½” hole about 3 inches from the end of the pipe on the
opposite side of the other 7 holes. The 7 large holes will be facing up and the small hole will be facing down.
Step 2: Now it's time to glue the pipes together. Follow the directions on the glue bottle for how to apply the glue.
Attach 1 elbow fitting to each pipe. Then, glue the smaller straight fitting to the other end of each elbow fitting. It
should look like a "U". Let the glue dry before tampering with it too much. Attach the end caps to the pipes. If the
seam leaks, then glue it, but not gluing it allows for easier cleaning.
Step 3: If you are using solo cups, drill about 10 holes in the bottom of each cup with the ¼” drill bit. It may be
easier to stack several cups up and drill them at the same time. Remove all the pieces of the cup, so they don't clog
the system.
If you are using net cups, then you don't need to do this step.
Step 4: Double check to make sure the PVC glue is dry before moving on to this step. Place the connected pipes
on the table of frame that you want your system to sit on. Leave 2-3 inches of the ends of the pipes hanging off the
table or frame so that there is room to connect the water hoses. Place about 2-3 inches worth of blocks under the

Everyone can Grow!
87
end of the "U" that does NOT have the little hole on the bottom. This will be where the water will enter from the
tank. Place about 1 inch of blocks under the bend of the "U". Do not put any blocks under the end of the "U" with
the little hole on the bottom. This little hole is where the water will leave the pipes to go back into the tank.
These heights may need to be adjusted depending on the speed of the water moving through the pipes and the
speed of the pump. For water moving too fast, decrease the difference in the block height to decrease the slope of
the pipe. If the water is moving too fast, root growth will be limited, and the plants will not be able to extract
nutrients from the water. For water moving too slowly, increase the difference in the block heights to increase the
slope of the pipe. If the water moves too slowly, algae will build up in the pipes and there will not be enough oxygen
for the plants.
Step 5: Place the tank on the floor below the ends on the pipes. When filling the tank with water, consider the
"Know your water" section of this handout. Mix in the nutrient solution following the instructions on the package.
Add the rocks to the bottom of the tank. You may want to set a timer on the pump.
Step 6: Set up the water pump to bring the water into the more elevated end of the pipe. Clamp the tube to the
pipe so it doesn’t fall out. With 3/8” black tubing may need to be cut to eliminate the excess. It is important to use
black tubing because it will prevent algae from growing in the tube. Secure the pump to the bottom of the tank
with the rocks. To limit splashing when the water returns to the tank, add the excess tubing that goes from the
tank to the small PVC hole.
Step 7: Put the solo cups or net pots in the holes of the PVC pipe. Add expanded clay beads and 1 plant to each
cup or pot.
Step 8: Turn on the pump and your system is ready to go!
Aquaponicss versions
Materials
• 3-5 fish
• Everything listed above EXCEPT nutrient solution
• Fish food
• Water that has had time to sit for 24 hours to dechlorinate
• OPTIONAL: Aquarium dechlorinator or conditioner
Procedure
• Complete the steps above, but instead of adding water with nutrient solution, just use plain water and add
the fish.
• Remember to feed the fish every few days.
Modifications
To make sure enough oxygen is in the tank for the fish, either add a bubbler to break the surface tension
of the water or make sure that the water reentering the tank from the pipe breaks surface tension and creates

Everyone can Grow!
88
bubbles as it reenters the tank. The number of fishes can vary depending on the type of fish and the size of the
tank. This system can be easily expanded with more pipes and a larger or more tanks.

Everyone can Grow!
89
9. Common indoor pests, diseases, and remedies
Introduction
This is by no means a definitive guide. This guide is designed to help new gardeners understand how to avoid
disease and treat if necessary or possible. The best treatment for any pest or disease is prevention. Nutritional
deficiencies are arguably the easiest issue to treat because repotting is very common when purchasing new plants,
so they can become healthy simply because of improved soil conditions. However, if you are not experienced, please
look for the healthiest plants possible and do some background research to know for sure what the plant you would
like to own looks like when healthy. (This mistake is easy to make, especially with succulents. Research is key!)
This is really the best way to prevent disease and ensure that your indoor garden is the most beautiful and
productive that it can be.
Bacterial diseases
Unfortunately, it is difficult to positively identify most bacterial diseases and many times they start with a
fungal infection. Thankfully, most are treated the same way using copper fungicide or neem oil. However, most
bacterial diseases should not appear in indoor gardening plants and are uncommon to see.
Fungal diseases
Like many other diseases in plants, fungal diseases are prone to infecting weakened plants, so taking steps
to ensure the strength of the plant is very important. Fungal diseases may take the opportunity to become a
secondary infection to plants afflicted with insects or may show up on their own if a plant is in the correct
environment for the disease. This will mostly be if the plant has another issue such as recovering from sun burn,
over or under watering, or some other plant care issue. Most fungal diseases can be treated with copper-based
fungicides or neem oil. Since fungi require water to survive, controlling it can be as simple as allowing plants to dry
out and removing any signs of infection as soon as it is identified.
Anthracnose
Although fungal infections are uncommon on indoor plants, if plants are brought outdoors in summer, it
may become an issue depending on a variety of factors. It is good to know how to treat such issues just in case.
Anthracnose affects both deciduous and conifer trees as well as grass, with the most common houseplants that can
be affected being ficus and palm trees, cyclamen, and succulents.
Treatment: First, prune and dispose of any diseased leaves and tissues, catching it early is the best chance your
plant has to survive. Copper based fungicides can be used, but are not considered highly effective against this
disease. It is best to boost the plant’s immune system through proper care and preventive maintenance.
Crown rot and root rot
Crown rot in succulents typically happens when water is allowed to sit in the rosettes or other spaces on
top of the plants. In tropical and other plants crown rot has more to do with consistently wet soil and typically
happens at the soil line.

Everyone can Grow!
90
Root rot usually happens when plants are kept overly wet. Fungal spores require water to germinate and
infect plants. Making sure that the soil is well draining and not over-watered is the key to prevention. Since many
big box stores tend to overwater their plants, this disease is one of the most common.
Healthy roots are typically white and solid roots and those affected by root rot will be brown and soft. They
will easily fall apart and may have a smell if in an advanced condition. Identifying root rot will typically appear as
nutrient deficiencies and the leaves will become yellow and begin to die. Inspecting plants that show these
symptoms could save its life.
Treatment: Remove the plant from its pot and inspect the soil and roots, the soil should never be soggy or dripping.
Rinse as much soil out of the roots as possible and remove any rotted, brown roots. Do not reuse infected soil
unless it is cooked at 300˚F for at least an hour to kill the fungi. Allow the plant to dry out for an hour and repot
in fresh soil that is well draining. If reusing the same pot, clean it with 1:9 ratio bleach to water and allow it to sit
for 30 minutes to disinfect before repotting. Pots should always have drainage holes to allow excess water to flow
out and away from the plant. Perlite, coarse sand, and bark nuggets are all good ways to increase the drainage of
soil. Make sure to let the soil dry out a bit between watering and research the specific plants to ensure proper
watering practices are used.
utritional deficiencies
Any issue that a plant has should be compared to nutritional deficiencies since they are arguably the
simplest to treat.
Treatments by deficiency:
Boron: Borax can be used at 1 tsp per gallon to treat specifically for boron, but it is important to remember that
this deficiency may also be attributed to over-fertilizing plants.
Calcium: Treat by mixing ground eggshells into the topsoil. Lime, gypsum and dolomite may also be used, but are
typically more expensive and may be more difficult to source.
Copper: This can be as simple as spraying copper-based fungicide on the leaves and allowing the plant to absorb
it. Also, check that the soil pH is 6.0-7.0 for best copper absorption.
Iron: Ensure the soil pH is not above 7.0 and preventing iron absorption. Seaweed extract, compost, or chelated
iron are good ways to boost iron in soils.
Magnesium: Use dolomite or 1-2 tsp per gallon of Epsom salts to raise magnesium.
Manganese: Ensure the soil pH is not above 7.0 for proper absorption. Using a foliar fertilizer with manganese
seems to be one of the few ways to boost this nutrient.
Molybdenum: Ensure that the soil pH is 6.0-7.0 for proper absorption. Compost and manure should have this
nutrient so using a bit of that should work well.
Nitrogen: Manure is probably one of the best ways to increase nitrogen. Steer is one of the best manures.

Everyone can Grow!
91
Phosphorus: The easiest way to treat this deficiency is to use manure or bone meal which are both fairly easy to
source.
Potassium: Manure and seaweed are both great choices for fixing this deficiency.
Sulphur: 1-2tsp per gallon of Epsom salts should boost soil sulfur content.
Zinc: Kelp extract has a good amount of zinc if it can be sourced. Foliar fertilizers can be directly sprayed onto the
affected areas and increase the rate of recovery substantially.
Viral diseases
There are no cures for viral diseases on plants, so care must be taken to prevent such disease. The most commonly
seen virus in plants is called the mosaic virus. Removing infected areas can help if the disease is in its earliest
stages, but there is very little that can be done once the disease becomes systemic. Viruses are transmitted through
insect infestations of plants, so making sure that plants are well cared for and inspected for pests is imperative to
success in preventing viral infections.
Common indoor pests
Aphids
These are small (~1/8”), soft bodied insects that are typically green or brown. They tend to cluster on the
new growth of plants. These appear on plants in spring if they find their way into an indoor garden. Mostly, they
must be brought in on another plant and can quickly spread if tender plants are nearby. As they grow, they leave
little white exoskeletons behind which may appear to be dead aphids, but are just shed skins. They drink sap from
the tender stems of plants. Their little nibbles can cause weakness in a plant’s immune system and attract fungal
and bacterial diseases, so treating as soon as possible is imperative for the plant’s health.
Treatment: These are fairly easy to kill with soapy water in a misting bottle. Apply soapy water and allow it to dry.
Extreme infestations can be rinsed off with a jet of water if you have a sprayer on your sink. Otherwise, several
applications of soapy water will generally take care of the problem. There are also commercial insecticides as well,
but they can have a drying effect on the plant as well as being made with harsher chemicals that can be harmful
to people or animals. Continue treatment for at least a few days after the last insect is seen to be sure that they are
destroyed. These don’t tend to get to a desperate point, but if the indoor garden is too large to want to use other
methods, then using a systemic insecticide such as imidacloprid can be appropriate. Be advised, do not use this
on food crops, as it is poison. It enters into the vascular system of plants and makes them toxic for consumption.
Everyone can Grow!
92
Fungus gnats
More irritating than a danger to plants, the larvae of these tiny cousins of the mosquito eat fungus and soft
parts of stems and roots. They buzz around and go for the eyes (or at least my eyes…)! As irritating as this is, they
are mostly harmless unless they get to high numbers.
Treatment: Controlling these can be almost a constant battle. Completely getting rid of them can be very difficult
if they infest tropical vivariums. There is a wonderfully harmless treatment by a bacterium called Bacillus
thuringiensis subspecies israelensis (Bti) found in a product called Mosquito Bits. This bacterium is harmful to
fungus gnat and mosquito larvae, but harmless to humans and animals. It can even be added to animal’s drinking
water, which is a testament to its harmless nature. Continue treatment for at least a few days after the last insect
is seen to be sure that they are destroyed. This works best as a preventative, because if the bacteria are present,
they will control the larvae automatically.
If treating a severe infestation, the soil can be removed from the plants and baked at 300°F for 30 minutes
to kill any living fungus gnats or their larvae and eggs. Another technique is to use a bug zapper in one of their
many forms. This will control adults well and can help with more than just fungus gnats.
Mealy bugs
These are perhaps the most hated pests of the indoor garden, which many a gardener has thrown away a
plant just for being infested. They are tenacious, quick-spreading, and difficult to completely eradicate. Any plant
infested with these insects should be quarantined immediately. Their lifecycle is interesting in that the females stay
in the powdery white nymph stage while males grow into a tiny, two-winged insect that does not eat and only exists
to reproduce. Although there are also species of mealybugs that have adapted to not need males at all. To control
an infestation of these, vigilance and persistence must be used.
Treatment: Prune off minor infestations and use a cotton swab or soft toothbrush dipped in alcohol to rub off any
visible insects. Neem oil can be useful to slow the progress of their development and insecticidal soap works if used
for enough time to prevent a next generation from developing, which can take up to two months. Continue to treat
plants for at least a month to prevent re-infestation. Indoor bug zappers can be effective for controlling the flying
adults. If the indoor garden is too large, or other methods are not controlling the infestation then using a systemic
insecticide such as imidacloprid can be appropriate. Be advised, do not use this on food crops, as this is poison
that enters the plant and makes it toxic for consumption. However, this insures the infestation ends, because as
they attempt to drink the sap from the plants, they are poisoned and die. Regardless of the treatment, try to pick
off any visible pests with a cotton swab or a soft toothbrush to expedite the treatments.

Everyone can Grow!
93
Scale
These insects can look like a scar or scab on a plant, but can be picked off. When they infest a plant heavily
they are easier to tell that they are not some other disease. Again, these don’t usually just show up out of nowhere
but must be brought in on another plant. They are less likely to infect other plants, but it is still a good idea to
quarantine an infected plant.
Treatment: Prune infected leaves and branches if possible. Neem oil is a good way to control this insect. Insecticidal
soaps are also an effective treatment. It will most likely take several treatments to completely destroy the infestation.
Continue treatment for at least a few days after the last insect is seen to be sure that they are destroyed. If the
indoor garden is too large, or other methods are not controlling the infestation then using a systemic insecticide
such as imidacloprid can be appropriate. Be advised, do not use this on food crops, as this is poison that enters
the plant and makes it toxic for consumption. However, this insures the infestation ends, because as they attempt
to drink the sap from the plants, they are poisoned and die.
Slugs/Snails
These nasty little buggers eat the tender leaves, stems, and roots of succulents and other plants. They are
an irritating addition to tropical vivariums and can be a real trick to get rid of when there are other animals involved.
However, they are harmless to pets or animals in a vivarium, so at least that is nice. If the animals being kept in
the vivarium are Cuban false chameleons or blue tongued skinks, they just might take care of the problem
themselves!
Treatment: For regular terrariums or houseplants, beer traps work very well, which is just beer in a little bowl
near the infested plants. As does diatomaceous earth. This causes tiny cuts on the animals that cause them to
dehydrate and die. Hand picking and destroying individuals through crushing, freezing, or drowning in a bowl of
water also tends to be effective. Do not allow indoor slugs and snails to be released into outdoor areas. They can
carry diseases that are not present in the ecosystem and cause more damage there than on a plant or in a vivarium.
For vivariums where a pet may live, it is best to hand pick them over other methods. Adding a leaf of lettuce before
dark and then checking it in the morning can also be an effective way to remove them safely. As far as treatment
goes, this might seem the most gruesome, but remember that with these types of pests, a choice must be made
between the life of the plant or the pest.
Spider mites
These little buggers tend to appear during hot, dry spells and are typically brought in on plants that are
already infested. They make little webs all over plants.
Treatment: Quarantining affected plants and trimming off affected parts is a good way to control the pests. Rinsing
plants with a sprayer can reduce their numbers before treatment and then insecticidal soap applied to the plants
over the course of a few days including a few days after the last insect is spotted should terminate the infestation.
If the indoor garden is too large, or other methods are not controlling the infestation then using a systemic
Everyone can Grow!
94
insecticide such as imidacloprid can be appropriate. Be advised, do not use this on food crops, as this is poison
that enters the plant and makes it toxic for consumption. However, this insures the infestation ends, because as
they attempt to drink the sap from the plants, they are poisoned and die.
Springtails
These are completely harmless, and very tiny arthropods that appear as white or grey bugs that can bounce
and seemingly disappear at times. They can do no harm to plants or animals. They are widely used as feeders for
small froglets of species such as dart frogs. They are detrivores which is a fantastic addition to vivariums and
terrariums, and can sometimes be found in houseplants that stay consistently moist.
Treatment: Don’t worry, be happy!
Thrips
These have a variety of appearances from opaque brown to translucent green. They are similar in appears
to springtails, but most springtails will be white. There are 6,000 varieties of these sap suckers. They don’t tend to
appear unless they are brought in on new plants, so good quarantine measures can control them.
Treatment: Giving the plants a strong spray to reduce their numbers before treatment can raise its effectiveness.
Neem oil is a good way to interrupt their life cycle. If the indoor garden is too large, or other methods are not
controlling the infestation then using a systemic insecticide such as imidacloprid can be appropriate. Be advised,
do not use this on food crops, as this is poison that enters the plant and makes it toxic for consumption. However,
this insures the infestation ends, because as they attempt to drink the sap from the plants, they are poisoned and
die.
Whiteflies
These are not terribly common indoors, but can be difficult to control if a plant infested with them is brought
in.
Treatment: They are mostly immune to commercial pesticides. Controlling them involves a several pronged attack
that includes sticky traps and Neem oil applications to the plants. There are other treatments such as another
insect called the whitefly parasite, but it is inappropriate for indoor gardening. Indoor bug zappers can be effective
for controlling the flying adults. If the indoor garden is too large, or other methods are not controlling the infestation
then using a systemic insecticide such as imidacloprid can be appropriate. Be advised, do not use this on food
crops, as this is poison that enters the plant and makes it toxic for consumption. However, this insures the
infestation ends, because as they attempt to drink the sap from the plants, they are poisoned and die.
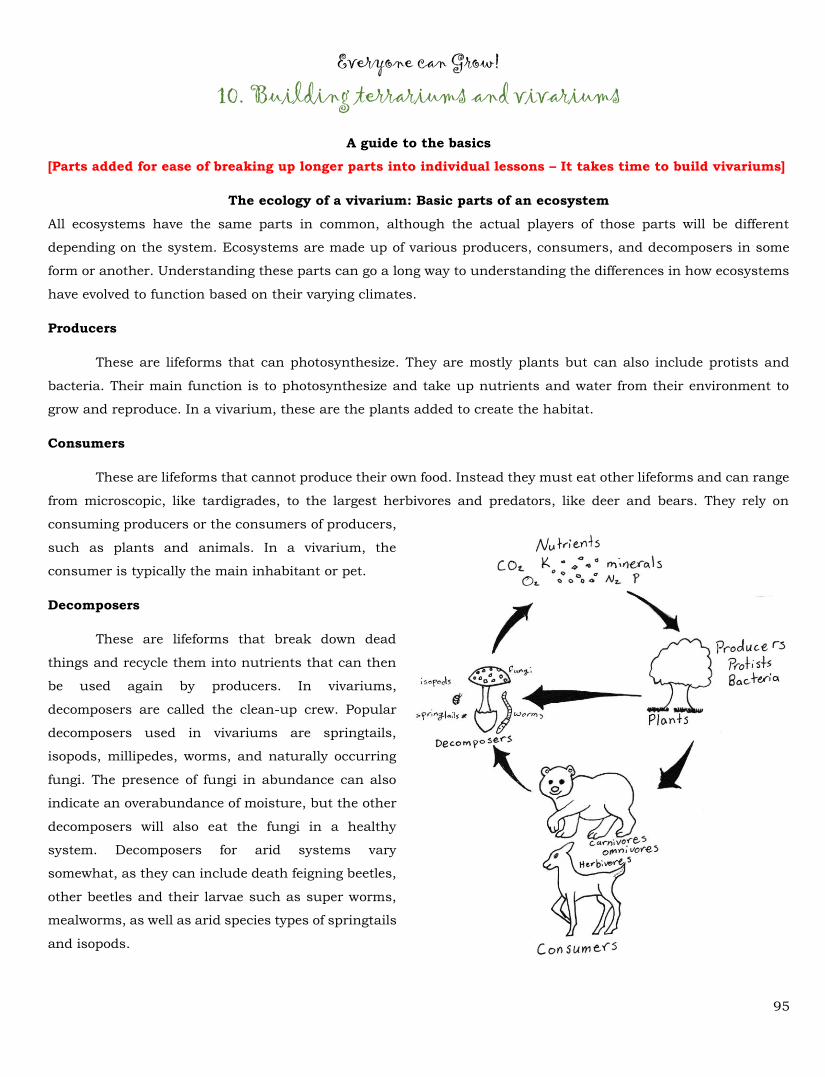
Everyone can Grow!
95
10. Building terrariums and vivariums
A guide to the basics
[Parts added for ease of breaking up longer parts into individual lessons – It takes time to build vivariums]
The ecology of a vivarium: Basic parts of an ecosystem
All ecosystems have the same parts in common, although the actual players of those parts will be different
depending on the system. Ecosystems are made up of various producers, consumers, and decomposers in some
form or another. Understanding these parts can go a long way to understanding the differences in how ecosystems
have evolved to function based on their varying climates.
Producers
These are lifeforms that can photosynthesize. They are mostly plants but can also include protists and
bacteria. Their main function is to photosynthesize and take up nutrients and water from their environment to
grow and reproduce. In a vivarium, these are the plants added to create the habitat.
Consumers
These are lifeforms that cannot produce their own food. Instead they must eat other lifeforms and can range
from microscopic, like tardigrades, to the largest herbivores and predators, like deer and bears. They rely on
consuming producers or the consumers of producers,
such as plants and animals. In a vivarium, the
consumer is typically the main inhabitant or pet.
Decomposers
These are lifeforms that break down dead
things and recycle them into nutrients that can then
be used again by producers. In vivariums,
decomposers are called the clean-up crew. Popular
decomposers used in vivariums are springtails,
isopods, millipedes, worms, and naturally occurring
fungi. The presence of fungi in abundance can also
indicate an overabundance of moisture, but the other
decomposers will also eat the fungi in a healthy
system. Decomposers for arid systems vary
somewhat, as they can include death feigning beetles,
other beetles and their larvae such as super worms,
mealworms, as well as arid species types of springtails
and isopods.
Everyone can Grow!
96
Types of ecosystems
Different areas around the world have different temperature ranges, precipitation, and soil types. Animals have
evolved in these areas to best adapt to them, so when recreating their habitat, it is imperative to understand the
conditions that have shaped their evolution.
Rainforest (tropical and temperate)
These have climates are usually wet and humid. Most rainforest ecosystems are hot and humid, with heavy
rainfall, but there are two temperate rainforests in the world, one is in the United States in the Pacific Northwest
from Oregon to British Colombia including Western Washington and the other is near New Zealand including some
of the surrounding islands such as New Caledonia. These are some of the most common vivariums to build and
require good insulation by glass or acrylic to hold in moisture. Heat for these types of vivariums is usually best in
the form of a heat panel or under tank reptile heater over a light which can reduce the moisture in the ecosystem.
Temperate
These have climates with more seasonal changes, with hot summers and cold winters. The variability in
temperature can be difficult to reproduce in vivariums, but typically can be kept at a range of temperatures that
allow it to survive, such as 68˚F-80˚F. Their water needs are easy enough to handle, as they are at a mid-point
between rainforests and deserts, so just watering when the soil is dry about an inch down. These vivariums may
not require a false bottom to catch water due to the more moderate watering needs.
Desert
These have climates that are typically hot and dry with very little rainfall. The soil is usually either very
heavy clay or fine sand, which repels water instead of absorbing it. This may seem contradictory to the mental
image of sandy dunes in a desert that many typically associate with desert ecosystems. That is only one type of
desert, and not necessarily the most common type that plants and animals that are kept in captivity are from. Most
reptiles that are kept are from clay deserts and would never live on a purely sandy substrate.
Note that this is also in contradiction to typical substrates sold at pet stores for reptiles. There are only a
few captive animals that come from deep sand ecosystems and they are certain spiders and scorpions. However,
many times these will actually be living on a packed clay substrate in the wild and still not live on coarse sand.
This is why it is important to conduct proper research on animals before building it an ecosystem to live in.
A note on hermit crabs
This is an example of how researching the ecology of an animal can make all the difference in its livelihood.
In the case of hermit crabs, they may not be a good choice for captive animals since they require both salt and
fresh water, as well as an area of dry land that is deep enough for them to burrow. There are many species of hermit
crabs with two main species sold in pet stores. Identifying the type of hermit crab they are is another challenge for
responsible pet owners.

Everyone can Grow!
97
Regrettably, these animals have far more complex habitats than is shown in pet stores and because of this,
they are hardly able to live full and healthy lives in captivity. It is also worth noting that breeding hermit crabs in
captivity is extremely difficult due to their life cycle including intertidal pools where the young can be a part of
plankton. Without the ability to naturally release their eggs this way, breeding is nearly impossible. Sadly, this
means they are collected directly from the wild, reducing their native populations and reducing the genetic diversity
of the animals. Nothing good to be sure. The more you know, the better life is for the animal.
[PART 1]
Building a vivarium or terrarium
General tips
• CAUTION: Make sure to source native plants ethically and do not pick a plant if there are not 10 more in
the area. Be sure to not collect plants from public lands, National or State Parks without proper permission.
• Lists are your friend! Make sure you know what you need and make a list to keep track of everything to
make sure you have it when you need it.
• Not all terrariums need ALL the parts. Make sure to plan ahead of time and understand what will be needed
for the particular type of set up you wish to build.
• If you are building a vivarium for a specific animal, research its needs so your habitat will match. This works
the same for more advanced tropical plants.
• All arid and closed terrariums need false bottoms, but not all open terrariums and vivariums may need one.
When in doubt, build one, it won’t harm a build.
• Adding plant pots to the back wall can be a great way to add terracing and allow vining plants to cascade
down the vivarium. This can look very dramatic!
o When adding pots, make sure to angle the pot up towards the top of the vivarium. Do not add pots
with the bottom flush with the back. You won’t be able to plant anything in it!
• Should the worst happen, and you get silicone or Great Stuff on your hands, these are some methods to get
it off:
o Silicone: If thick, use paper towels to remove globs, then rub hands together to dry out the rest and
it will bead up and flake off. There will still be some residue which can be removed with rubbing
alcohol. Anything else will wear off in time and is not dangerous.
o Great Stuff foam: This stuff is terrible when it gets on hands. When wet, it can be removed with
acetone like nail polish remover, but when it dries it must be picked off or abraded off with something
like sandpaper. It will eventually wear off on its own as well but can be nasty. Once it dries it is not
dangerous, but it is still uncomfortable to have on skin.
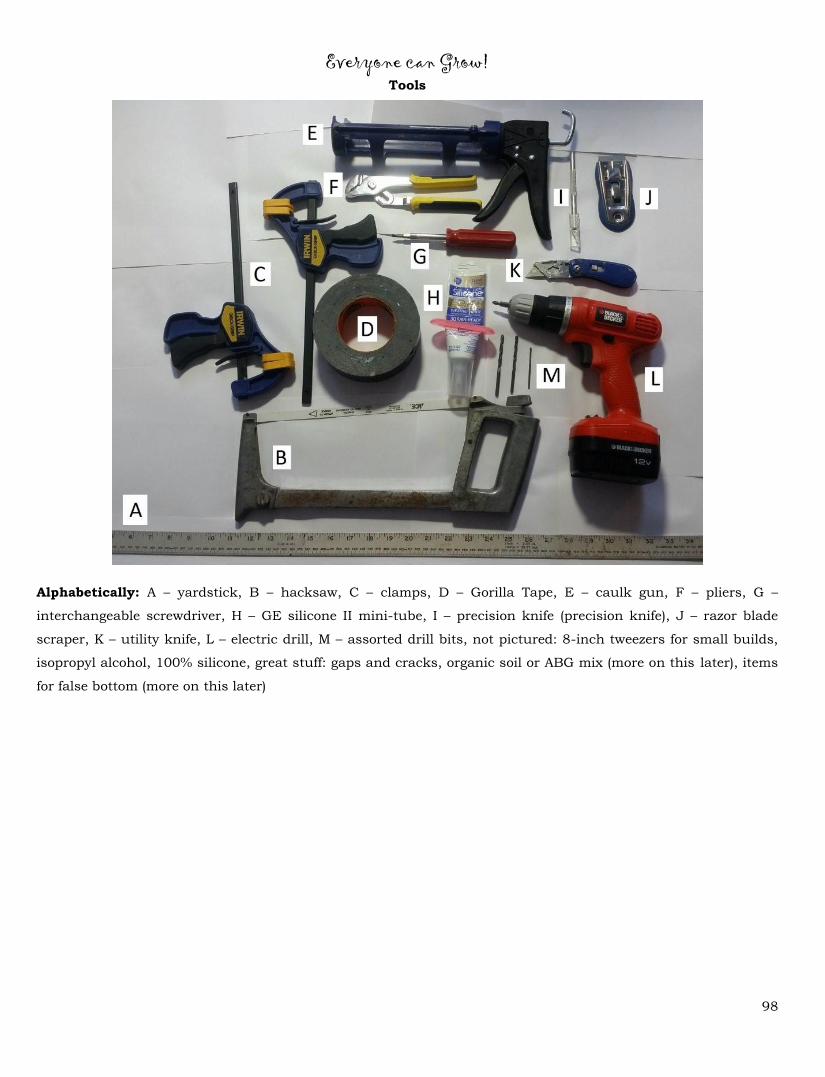
Everyone can Grow!
98
Tools
Alphabetically: A – yardstick, B – hacksaw, C – clamps, D – Gorilla Tape, E – caulk gun, F – pliers, G –
interchangeable screwdriver, H – GE silicone II mini-tube, I – precision knife (precision knife), J – razor blade
scraper, K – utility knife, L – electric drill, M – assorted drill bits, not pictured: 8-inch tweezers for small builds,
isopropyl alcohol, 100% silicone, great stuff: gaps and cracks, organic soil or ABG mix (more on this later), items
for false bottom (more on this later)

Everyone can Grow!
99
The debate on silicone
It is very important to note that there is a huge debate over the safeness of using GE 100% silicone II as it
may outgas an ammonia-based compound for up to five years. This is supposedly the anti-molding agent in the
silicone. Some have claimed it is toxic to fish and amphibians, while others claim to have used it with no issues.
To be safe, follow these suggestions: for reptiles 100% silicone II works without issue (it is what I use), to be careful
use silicone I for amphibians, and for fish use aquarium safe silicone only. If unsure how you want to use the
vivarium, the safest silicone is always aquarium-safe silicone, since fish are the most sensitive to quality.
Pictured above: GE 100% silicone II in black, GE 100% silicone I in black, and Aqueon aquarium safe silicone in
clear.
Simple soil mixes
Homemade tropical soil mix
• 2 parts coco fiber
• 1 part coarse sand
• 1 part bark chips (untreated)
• 1 part organic soil or compost
Homemade temperate soil mix
• 1 part coco fiber
• 1 part coarse sand
• 1 part bark chips (untreated)
• 2 parts organic soil or compost
Homemade desert soil mix (NOTE: Different species of cacti and succulents have different requirements. This mix
is very generalized and may not be the best for your specific plant.)
• 2 parts coarse sand
• 1 part bark chips
• 2 part organic soil or compost
• 2 part pumice

Everyone can Grow!
100
Suggested materials per size of enclosure
(Please note that these are estimates and not exact. More is usually better.)
10-gallon, vertical:
• Great stuff x 1
• 100% silicone x 1 (at least 10oz) tube
• Soil mix: At least 4 quarts (I always end up using more!)
10-gallon, horizontal:
• Great stuff x 1
• 100% silicone x 1 (at least 10oz) tube
• Soil mix: At least 8 quarts
20-gallon tall, vertical (12.5”x16”x24”):
• Great stuff x 2
• 100% silicone x 2 (at least 10oz) tubes
• Soil mix: At least 8 quarts
20-gallon long, vertical (12.5”x12.5”x30”):
• Great stuff x 2
• 100% silicone x 2 (at least 10oz) tubes
• Soil mix: At least 8 quarts
20-gallon tall, horizontal
• Great stuff x 2
• 100% silicone x 2 (at least 10oz) tubes
• Soil mix: At least 8 quarts
20-gallon long, horizontal
• Great stuff x 2
• 100% silicone x 2 (at least 10oz) tubes
• Soil mix: At least 12 quarts
29-gallon vertical
• Great stuff x 4 cans
• 100% silicone x 4 (at least 10oz) tubes
• Soil mix: At least 10 quarts
29-gallon horizontal

Everyone can Grow!
101
• Great stuff x 4 cans
• 100% silicone x 4 (at least 10oz) tubes
• Soil mix: At least 12 quarts
40-gallon breeder vertical
• Great stuff x 5 cans
• 100% silicone x 5 (at least 10oz) tubes
• Soil mix: At least 12 quarts
40-gallon breeder horizontal
• Great stuff x 5 cans
• 100% silicone x 5 (at least 10oz) tubes
• Soil mix: At least 16 quarts
55-gallon
• Great stuff x 6 cans
• 100% silicone x 6 (at least 10oz) tubes
• Soil mix: At least 16 quarts
75-gallon
• Great stuff x 8 cans
• 100% silicone x 8 (at least 10oz) tubes
• Soil mix: At least 20 quarts
Building a background
Step 1: Clean the inside of the walls of the tank with soap and allow to dry, then wipe it down with isopropyl alcohol
to make sure all residues are gone from the glass and allow the foam to adhere well (fig. 1). This step is important,
because the foam will not stick to dirty glass and will peel off.
Fig. 1: These two already have dams made and adhered to the fronts to show how much space there is for soil,
plants, etc.
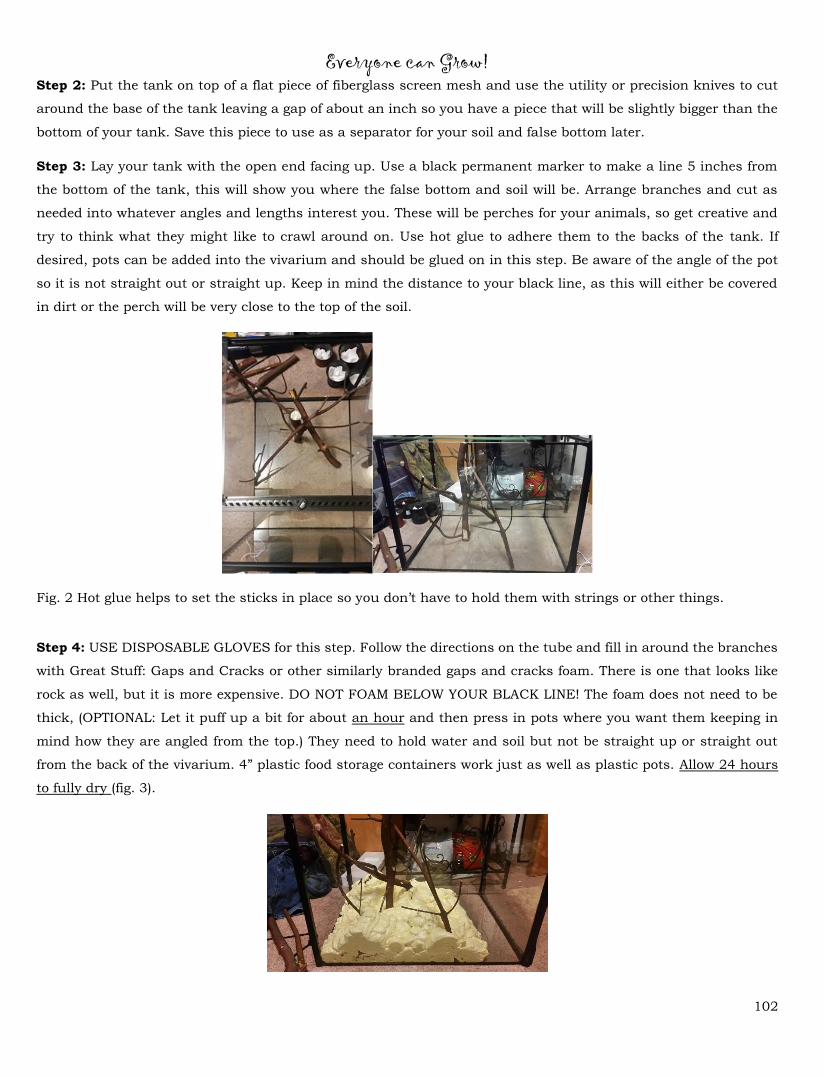
Everyone can Grow!
102
Step 2: Put the tank on top of a flat piece of fiberglass screen mesh and use the utility or precision knives to cut
around the base of the tank leaving a gap of about an inch so you have a piece that will be slightly bigger than the
bottom of your tank. Save this piece to use as a separator for your soil and false bottom later.
Step 3: Lay your tank with the open end facing up. Use a black permanent marker to make a line 5 inches from
the bottom of the tank, this will show you where the false bottom and soil will be. Arrange branches and cut as
needed into whatever angles and lengths interest you. These will be perches for your animals, so get creative and
try to think what they might like to crawl around on. Use hot glue to adhere them to the backs of the tank. If
desired, pots can be added into the vivarium and should be glued on in this step. Be aware of the angle of the pot
so it is not straight out or straight up. Keep in mind the distance to your black line, as this will either be covered
in dirt or the perch will be very close to the top of the soil.
Fig. 2 Hot glue helps to set the sticks in place so you don’t have to hold them with strings or other things.
Step 4: USE DISPOSABLE GLOVES for this step. Follow the directions on the tube and fill in around the branches
with Great Stuff: Gaps and Cracks or other similarly branded gaps and cracks foam. There is one that looks like
rock as well, but it is more expensive. DO NOT FOAM BELOW YOUR BLACK LINE! The foam does not need to be
thick, (OPTIONAL: Let it puff up a bit for about an hour and then press in pots where you want them keeping in
mind how they are angled from the top.) They need to hold water and soil but not be straight up or straight out
from the back of the vivarium. 4” plastic food storage containers work just as well as plastic pots. Allow 24 hours
to fully dry (fig. 3).
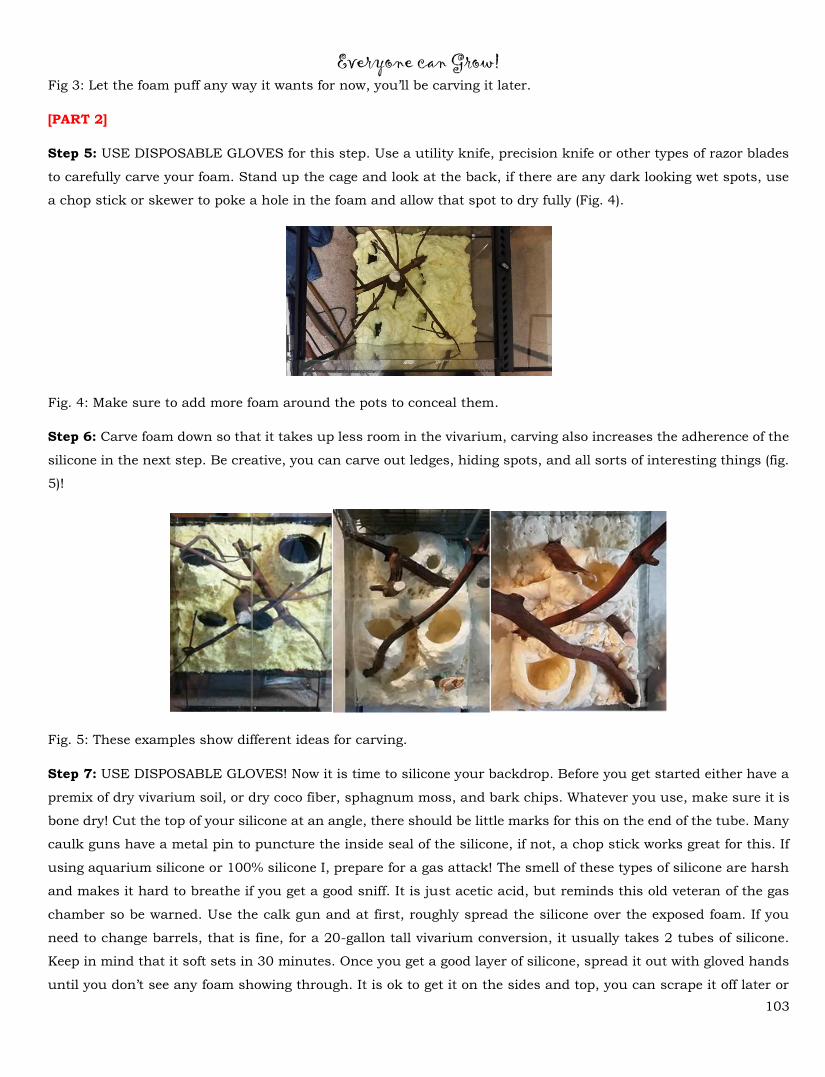
Everyone can Grow!
103
Fig 3: Let the foam puff any way it wants for now, you’ll be carving it later.
[PART 2]
Step 5: USE DISPOSABLE GLOVES for this step. Use a utility knife, precision knife or other types of razor blades
to carefully carve your foam. Stand up the cage and look at the back, if there are any dark looking wet spots, use
a chop stick or skewer to poke a hole in the foam and allow that spot to dry fully (Fig. 4).
Fig. 4: Make sure to add more foam around the pots to conceal them.
Step 6: Carve foam down so that it takes up less room in the vivarium, carving also increases the adherence of the
silicone in the next step. Be creative, you can carve out ledges, hiding spots, and all sorts of interesting things (fig.
5)!
Fig. 5: These examples show different ideas for carving.
Step 7: USE DISPOSABLE GLOVES! Now it is time to silicone your backdrop. Before you get started either have a
premix of dry vivarium soil, or dry coco fiber, sphagnum moss, and bark chips. Whatever you use, make sure it is
bone dry! Cut the top of your silicone at an angle, there should be little marks for this on the end of the tube. Many
caulk guns have a metal pin to puncture the inside seal of the silicone, if not, a chop stick works great for this. If
using aquarium silicone or 100% silicone I, prepare for a gas attack! The smell of these types of silicone are harsh
and makes it hard to breathe if you get a good sniff. It is just acetic acid, but reminds this old veteran of the gas
chamber so be warned. Use the calk gun and at first, roughly spread the silicone over the exposed foam. If you
need to change barrels, that is fine, for a 20-gallon tall vivarium conversion, it usually takes 2 tubes of silicone.
Keep in mind that it soft sets in 30 minutes. Once you get a good layer of silicone, spread it out with gloved hands
until you don’t see any foam showing through. It is ok to get it on the sides and top, you can scrape it off later or

Everyone can Grow!
104
wipe it with a paper towel while wet. While it is still wet, either dust your soil mix or use the parts in this order:
bark, moss, coco fiber, that way the big pieces get a chance to stick before the finer parts take up all the space. Let
dry without moving it for at least 24 hours before continuing to the next step.
Fig. 6: Some examples of what finished backgrounds look like
[PART 3]
Finishing the bottom: Building a dam, false bottom, soil, and planting
For vertical enclosures it is necessary to build a dam to keep the soil from escaping the front of the enclosure. There
are many ways to do this, with one of the simplest being to cut a piece of black corrugated plastic to the size of the
front of the enclosure and then silicone it to the front. A suggestion for if you use silicone is to drill tiny holes in
the upper corners of the plastic through the plastic and frame of the fish tank and take small, stiff pieces of wire
or zip ties and secure it from the top corners.
Step 1: Cut a piece of corrugated plastic to the width of the front of the enclosure and 5” high. While the tank is
on its back, put a bead of silicone starting from the bottom edge of the frame up 5” both sides. Lay the piece of
corrugated plastic on top of the bead of silicone. Press it down firmly along the edge and add weights near the edges
(books tend to work, or a measuring tape, etc.) and allow to dry in that position for 24 hours.
Step 2 (For tropical vivariums only): With the dam in place, the next step is to make the false bottom, there are
many ways to do this, such as a 1” layer of aquarium gravel (heavy), expanded clay beads (lighter), or using a piece
of ceiling egg crate (lightest weight!). After adding the false bottom, put the layer of fiberglass mesh screen over the
false bottom.
Additional instructions for cutting a piece of fiberglass mesh:
1. Unroll the mesh and set the vivarium on top of it.
2. Using a scissor, cut a piece that is approximately 1” larger then the base of the vivarium.

Everyone can Grow!
105
Additional instructions for using eggcrate as a false bottom:
1. Measure the inside bottom of the vivarium.
(This one is a square so it is 11.5”x11.5” inside diameter.)
2. Mark the eggcrate with permanent marker and use wire cutters to cut the eggcrate.

Everyone can Grow!
106
(Cut as close to a line as possible for a smoother fit. When cutting eggcrate, inevitably there are pieces that
stick out. These snap off easily with fingers or the handle of the wire cutters.)
3. Cut four long pieces that are one square wide, making two of the lengths two squares shorter than the
others to make a lifted bottom. Set the eggcrate in the bottom of the vivarium and add a layer of mesh on
top.
Step 3: Add a thin layer of crushed lump charcoal or aquarium carbon on top the mesh, this will hold it down and
filter the water as it goes into the false bottom.
Step 4: Add soil with the back angling up from the front. Also add soil to any pots in your vivarium
Step 5: Now you can add your plants and water the whole vivarium well to get it off to a good start.
Building a screen door
Suggested Materials per size of enclosure:
Step 1: measure the front of your vivarium to determine the lengths of the screen frame needed. Using a hacksaw,
cut the frame to these lengths keeping in mind that the blade of a hack saw is 1/16” thick. To get around this, you
can simply cut and measure each piece individually. Take care not to bend the frame, though it is ok if it is not
perfect. Connect the pieces of frame using screen corners.
Step 2: Lay the completed frame on top of a piece of fiberglass screen mesh and use a utility knife to cut around
the edge.
Step 3: Line up the screen on the frame and lay some spline at one of the corners. Use a spline tool or a flathead
screwdriver to push the spline into the frame over the screen, pressing the screen into the frame. When finished,
trim excess spline with a razorblade and if you think it feels too prickly on the edges of the screen, add a bead of
100% silicone over the spline to cover it. Allow silicone 24 hours to dry.
Step 4: Lay the door face side up on a table and measure halfway on one side. Drill a hole and add a handle if you
want too, this is not completely necessary, but it is a nice touch and makes the door easier to open. Add a small
bead of silicone over the inside of the screw to keep it from rusting.
Step 5: Wipe down the hinge side of the screen and tank with alcohol. This preps the surface for adhesive. Take
gorilla tape and carefully pull it out lining it up with the inside edge of the screen frame. It’s ok if it is not perfect,
you can trim extra. Carefully press the tape onto the screen to remove air bubbles, I use a credit card or rubber
scraper for this.

Everyone can Grow!
107
Step 6: Carefully insert the door into the tank frame and smooth the tape over the frame and side of the tank. Trim
any excess tape with a razor blade. Gorilla tape is very strong and works well as a membrane hinge.
Step 7: To be able to lock the door, use a turn button a few inches in from the top of the dam. Use a drill to preset
the hole and then screw the turn button in by hand, or super carefully with a screw gun. Silicone the point interior
of the screw unless you have the tools to cut the screw (I have never figured this part out.).

Everyone can Grow!
108
11. Natural fish keeping
A foreword about natural fish keeping
As far as this work is concerned, there is only one foremost resource for learning about keeping a proper natural
aquarium and that is Diana Walstad’s research contained in her book, Ecology of the planted aquarium. There is
no better resource for gaining an in-depth knowledge of aquariums as an ecosystem. All of these notes either
directly come from her book or were inspired by it through the practice of utilizing its knowledge. To more fully
understand this method of fish keeping, there is no greater recommendation than to read her book for yourself.
How to set up an aquatic ecosystem
Natural fish keeping is the simplest way to keep fish. This technique requires less equipment and expenses overall.
It allows fish to live in self-controlling environments without the use of most fish keeping equipment, except in the
case of heat, which must still be supplemented for tropical varieties of fish. Since this system mimics nature, it
regulates disease and algae naturally.
Selecting the size of a tank
This will depend heavily upon the kinds of fish desired, which will be explained in further detail below. Basically,
if the size of the tank is restricted to physical space in a room or apartment, or by rules in an apartment contract,
then only go up to the size allowed. There are a lot of negative attitudes about aquariums and water damage caused
by larger ones, so be sure to know the limits. Other than this, a minimum tank size should be no smaller than 2.5
gallons for the sake of the fish inhabiting it.
Selecting lights for aquariums
This is not the same as selecting lights for plants. Water filters light and changes the way it is distributed in the
water column which means that aquatic plants tend to require less light overall. However light sources ranging
from 5000k-6500k light temperature like what is suggested for land plants seem to still be the best color of light
for aquatic plants. What may differ is the strength required for the light. A 60-watt equivalent LED is all that will
be required and any more light will only encourage the growth of algae. Even lower wattage lights, such as 40-watt
equivalent LEDs may be all that is necessary. Experimenting with different bulbs would be good depending on the
plants chosen. Fluorescent tube lights are more recommended for aquariums due to their even distribution of
lights. The same equivalency applies.
Selecting plants
Based on the experience of others who have made these types of tanks, they suggest the following plants, listed
below by scientific name for easy researching of each plant type. Common names can be very confusing and
misleading, using the scientific names guarantees that the plant you are looking for is the plant you will find. (Spp.
= multiple species.)
• Anubias spp.
• Bacopa caroliniana

Everyone can Grow!
109
• Ceratopteris thalictroides
• Cryptocoryne wendtii
• Echinodorus grisebachii (large tanks only!)
• Egeria najas
• Eleocharis parvula or E. acicularis
• Elodea spp.
• Hornworts and liverworts (various)
• Hydrocharis morsus-ranae and Lemnoideae
• Hygrophila difformis
• Ludwigias spp. (especially L. brevipes)
• Najas spp.
• Pistia spp.
• Rotala spp.
• Salvinia spp.
• Valisnaria spp.
• Vesicularia dubyana
Choosing the correct kinds of fish
Once the size of the aquarium desired is chosen, the correct kinds of fish can be determined. Most fish may either
grow to be large individuals or be schooling fish, which means you must keep more than one for the mental health
of the fish (yes, fish have mental health, we all do…). This means that research is important when choosing fish. If
working with a small tank of 2.5-5 gallons, only the smallest fish will work, such as a school of three of the tiniest
fish such as rainbow tetras, white clouds, guppies or a single betta could be kept. Bettas can be highly aggressive
so they are best kept alone in small aquariums. Starting with the general rule of 1” fish per gallon can help keep
the tank from being overloaded, especially for beginners. Allowing the tank to become well established before adding
fish also goes a long way to mitigate overcrowding. Remember that in this method of fish keeping, the plants are
cycling the water in lieu of mechanical devices like filters and bubblers, so they must be ready to do their part for
the fish. NOTE: If choosing tropical fish like neon tetras, rainbow fish, or other sensitive tropical fish, be sure to
have a heater to keep the water at 78˚F. Guppies, bettas, and white clouds can be kept at lower temperatures, but
be warned that the plants will grow more slowly in colder environments, even 72˚F. This makes the establishing
time for the tank even more important for the survival of the fish!
Quarantines: Tips for new fish in established aquariums
If adding fish to an established aquarium, be mindful that they may bring new disease with them. This necessitates
that use of a quarantine tank to allow new fish to prove their health. Quarantine for at least two weeks, but a
month is much better. Otherwise, the entire tank may succumb to whatever disease the new fish has brought.
Unfortunately, big box pet stores do not have very effective programs in place to quarantine new fish, so every
shipment adds to whatever bacteria and disease load is already in their tanks. Most use a single large filtration

Everyone can Grow!
110
system that flows through all of their tanks, so a disease in one can spread quickly to all of the them. This is
something to be mindful of when purchasing new fish.
Tools
• Aquarium (minimum size 2.5 gallons for a single betta or 2 one-inch fish)
• Aquarium water conditioner or water that has had at least 24 hours to out gas chlorine
• Spray bottle with conditioned or out gassed water
• Organic soil mix or a 1:1 mix of organic compost and coconut coir (no fertilizers!)
• Small aquarium gravel
• Various aquatic plants (fully aquatic plants will grow more slowly, which is not necessarily a bad thing)
• Aquarium heater (depending on the types of fish desired)
• After 2 months: Add fish!
Putting it together
Step 1: Add a 1” layer of soil and add water until it is just above the soil line. Add more water if necessary during
that time to expand the soil as much as possible. The bigger the tank, the more soil can be added, up to about 4
inches, where it won’t make much difference to the plants anymore.
Step 2: Add a 0.5”-1” layer of gravel around the bases of plants on top of the soil to keep the soil from leaching
into the water. Add more gravel if necessary if soil seems to be leaching. This may happen if the soil continues to
expand. (My experience showed the soil expanded by ¼" over a week, but I have heard complaints that the soil
expands through the rocks.)
Step 3: Add plants by burying their roots through the rock layer. Allow 15-30 minutes for the agitated soil to settle
back down. Use a spray bottle to clean soil from the sides of the aquarium before the next step.
Step 4: Cup your hand just under the surface of the water and pour dechlorinated or out gassed water onto your
hand to fill the tank. (TIP: Clean any floating debris by taking a paper towel and inserting it into the water on one
side of the tank slowly, then carefully pull it to the other side. If done tediously enough, it removes debris from the
surface of the water.) If the water is brown or cloudy, take a small cup and slowly scoop out water until just above
the plants. Add water using the above method and repeat until the water is clearer. This will help reduce the time
it takes to clear out the debris from planting the tank. In time, it should all settle, and the water should not stay
cloudy. If it does, repeat this step every few days until the water has the desired amount of clarity. Until animals
are added, it is not imperative to condition or outgas the water, but plants do not like high levels of chlorine,
so it is a risk depending on your local tap water.
Step 5: Use either a fluorescent tube or LED bulb to light the tank. There is a balance between growing plants and
growing algae, and one factor is to not allow the tank to receive too much natural sunlight. An hour or two a week
at the most will help the plants without encouraging algae. Remember that in nature, water reflects and absorbs a
lot of light before it gets to aquatic plants, but indoors, the sides of the tank allow us to see in, but also allow in
excess light. (TIP: Buy a light timer and never worry about the tank getting too much light if you can’t be home. 12
hours of light should be sufficient for aquatic plant growth.)

Everyone can Grow!
111
Step 6: Monitor the tank for 2 months before adding animals. Why 2 months? It allows the plants and good bacteria
to grow and become well established before the fish are added. The plants especially need time to become
established which takes a minimum of three weeks for their roots to settle and begin to grow again. This time frame
ensures the proper amount of oxygen and nitrogen cycling can take place when fish are added. Shrimp, snails, and
fish can now be added. If added all at once, no quarantine will be needed. (See the note above about quarantines.)
Step 7: Enjoy! Continue to monitor the aquarium and prune back plants as needed. The plants will establish a
pecking order and the weakest will die back. Allowing this to happen naturally will strengthen the ecosystem of the
aquarium that much more, just like in nature, where the strongest plants continue to grow and thrive to keep the
ecosystem alive.

Everyone can Grow!
112
12. Maintenance crews
Foreword on maintenance crews
Maintenance crews are your detritivore friends and food for certain insectivore pets. Keeping a colony available is
a great way to keep backups in case of a system collapse or if more vivariums are wanted. It is cheaper to keep a
stock of the creatures instead of buying new cultures for each vivarium.
WARNING ABOUT HUMANS CONSUMING INSECTS
Arthropods such as crickets and roaches and crustaceans such as isopods are an excellent source of protein no
matter what eats them. However, be aware that people with shellfish allergies may react to them because they are
actually closely related! Who knew?
Raising and breeding cockroaches
Cockroaches have a bad reputation for being invasive to homes, but the truth of the matter is that only about 35
of the total 4,500 species of cockroaches are invasive in homes. That's less than 1%. For feeding reptile and
amphibian pets, dubia cockroaches are considered the best feeders. However, they grow to be 1.5" long which may
not be suitable for all insectivores. You may end up with a lot of large adults that cannot be eaten by smaller
predators. Turkish red runner cockroaches only grow to about an inch long, but it is important to be sure your
animals will eat the chosen meal. This can be done through buying small quantities of cockroaches online and
seeing which ones the animal prefers. Keeping the animals in higher temperatures, such as mid-80s, helps the
animals grow more quickly, which can help if a lot of food is needed for pets or personal consumption. FUN FACT:
Only cockroaches that are invasive to homes are called roaches, otherwise there is no difference between the two
terms.
Life cycle of a cockroach
These have interesting methods for giving birth, some species like dubia (Blaptica dubia) and Turkish red runner
(Blatta lateralis) cockroaches lay an ootheca, which is a protein sack produced by the mother where eggs are
encased. For Madagascar hissing cockroaches (Gromphadorhina portentosa) and German roaches (Blattella
germanica), they keep the ootheca inside their bodies, which gives an appearance of live birth. Either way, they
typically have less than 20 babies at a time but can lay several ootheca in their lifetimes. It is important to learn
about the specific cockroaches you are keeping knowing the specifics of the animals you are keeping. Identifying
male and female cockroaches is typically impossible until the animals are mature, when the males will grow
wings. Females tend to have stubby wings or no wings, even as adults. The total lifespan of cockroaches is highly
dependent upon the species. Turkish cockroaches live only 6-12 months, while dubia cockroaches live an average
of 16 months, and Madagascar hissing cockroaches can live up to 5 years.
Tools
• Hot glue gun and hot glue sticks
• Utility knife
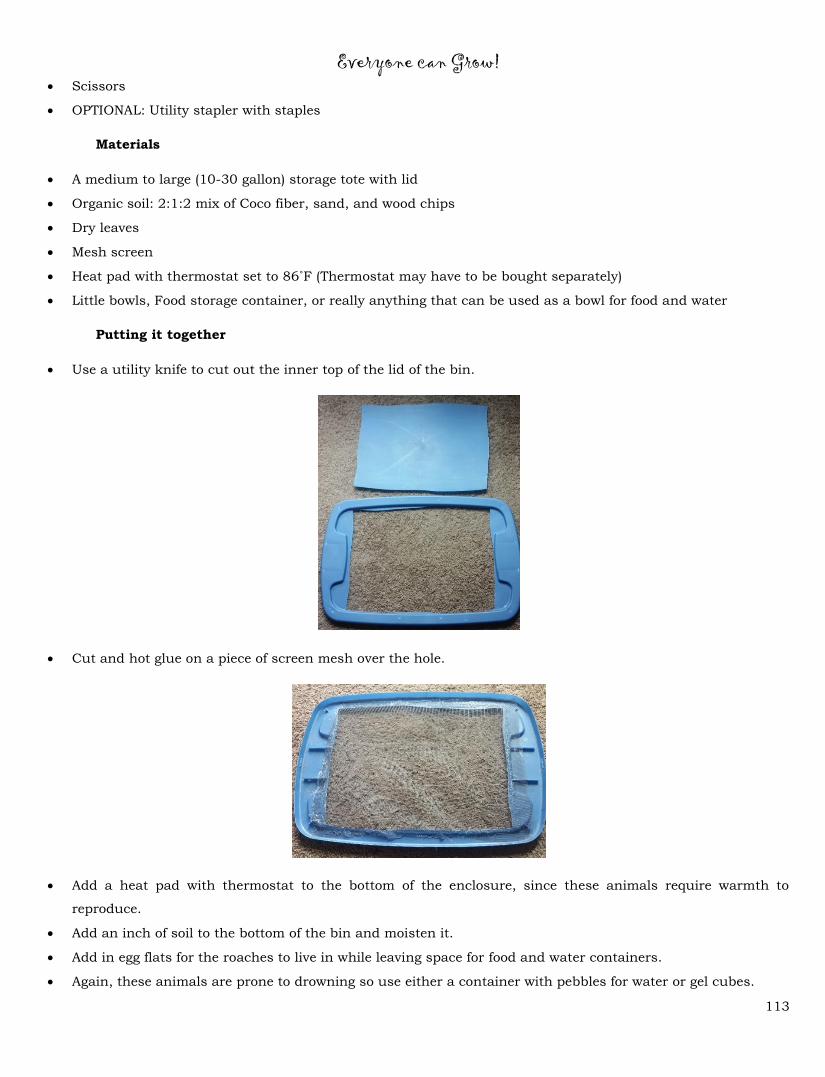
Everyone can Grow!
113
• Scissors
• OPTIONAL: Utility stapler with staples
Materials
• A medium to large (10-30 gallon) storage tote with lid
• Organic soil: 2:1:2 mix of Coco fiber, sand, and wood chips
• Dry leaves
• Mesh screen
• Heat pad with thermostat set to 86˚F (Thermostat may have to be bought separately)
• Little bowls, Food storage container, or really anything that can be used as a bowl for food and water
Putting it together
• Use a utility knife to cut out the inner top of the lid of the bin.
• Cut and hot glue on a piece of screen mesh over the hole.
• Add a heat pad with thermostat to the bottom of the enclosure, since these animals require warmth to
reproduce.
• Add an inch of soil to the bottom of the bin and moisten it.
• Add in egg flats for the roaches to live in while leaving space for food and water containers.
• Again, these animals are prone to drowning so use either a container with pebbles for water or gel cubes.

Everyone can Grow!
114
• When the enclosure is ready, add in the roaches and snap on the lid.
• Change out their food every few days as it dries out. So long as there isn’t mold on their potatoes and carrots,
they can continue to nibble them.
• If these are meant for human consumption, do not eat the first generation of roaches, but give them time to
reproduce.
Raising and breeding crickets
The honest truth on crickets is that they are easy to learn how to take care of but take time and patience to master.
Temps get too high, too low, too wet, too dry, and mass die offs can be seen. As frustrating as this may seem, these
are a staple to many insectivore diets, as they have high protein and low fat. For smaller insectivores, these will
never outgrow your animals, making them a good way to save money on buying live crickets at the local pet store.
Building their enclosure is simple enough, all you need is some aluminum screen mesh, a bin, hot glue,
some cardboard egg flat, and a little food storage container with some coco fiber in it for them to lay eggs. Their
diet includes fresh carrots, potatoes, and greens with cricket powder diet for added calcium and protein as well as
something with rocks in it or gel for water. They are prone to drowning so don’t let them have a water bowl unless
it is a bottle cap with only a very thin layer of water in it. Expanding water crystals work best, but also adding a
layer of rocks to the bottom of the water bowl and not allowing the water to rise above the rocks is also fairly safe.
For the laying bin, keep a small heating pad on a thermostat set to 86˚F. A cheap Jump Start thermostat works
fine for crickets.
REMOVAL OF DEAD CRICKETS IS IMPERATIVE TO THEIR HEALTH! They will eat and potentially get
parasites from other dead crickets. Keeping the dead cleaned up is very important to good health.
Life cycle of a cricket
A note to start is that contrary to popular belief, only male crickets chirp and they use their wings and not
their legs to make the sound. This means that they are noisy and may be best in a room away from where you
sleep. Banded crickets have smaller wings than other species, so they might be the quietest crickets kept in
captivity, but the fully mature adults will still make noise. Since they tend to want to chirp with the cover of
darkness the chirping can be reduced by keeping a timed light over them during the night or whenever it is wished
for them to be quiet.
The breeding cycle for crickets is quite amazing. They lay 50-100 eggs every 2-3 days over a 60-day period.
This equates to about 1,000-1,500 eggs at the end of the cycle. They prefer to incubate at 86˚F for about 7-10 days
but can incubate at lower temperatures such as regular room temperature, it just takes longer to incubate. When
the eggs begin to hatch it is important to move the bin to another container. A 16” x 8” x 4” sweater box is sufficient
for raising the pinhead sized babies into small crickets. (It is important to keep in mind that crickets are
cannibalistic, so it may be best to have an adult bin and a baby bin to keep the mature crickets from eating the
eggs and babies. Sexing crickets is easy enough, since females have an ovipositor on their abdomens that appears
as a dark protrusion. Their total lifespans should be around 8-10 weeks. However, the first generation that is
shipped to you will have a shorter lifespan due to the stress of packaging and shipping.

Everyone can Grow!
115
Tools
• Hot glue gun and hot glue sticks
• Utility knife
• Scissors
Materials
• A medium to large (10-30 gallon) storage tote with lid
• At least one food storage container (such as Glad or Rubbermaid) with lid or a rubber band that fits the top
• OR a bottom of a plastic bottle the size of a 2-liter or Gatorade bottle with a rubber band that fits the tops
• Mesh screen - Aluminum screen is best for crickets
• Heat pad with thermostat set to 86˚F (Thermostat may have to be bought separately)
Putting it together
• Use a utility knife to cut the center out of the bin lid.
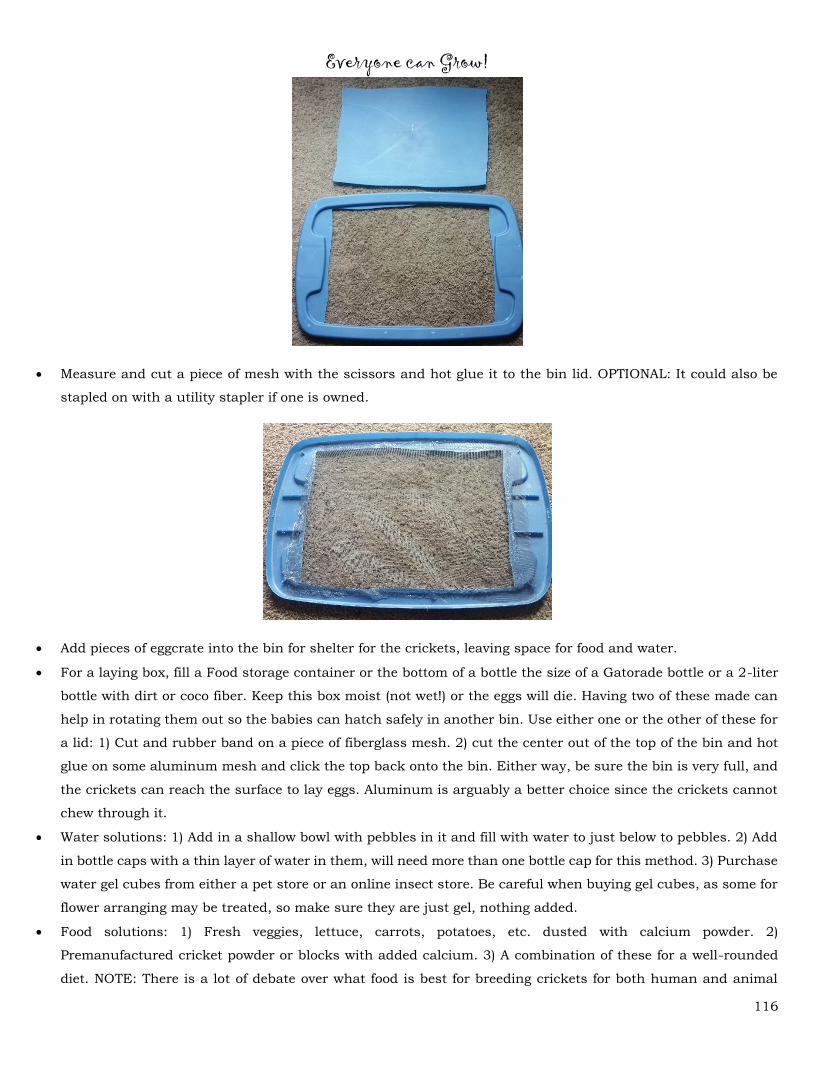
Everyone can Grow!
116
• Measure and cut a piece of mesh with the scissors and hot glue it to the bin lid. OPTIONAL: It could also be
stapled on with a utility stapler if one is owned.
• Add pieces of eggcrate into the bin for shelter for the crickets, leaving space for food and water.
• For a laying box, fill a Food storage container or the bottom of a bottle the size of a Gatorade bottle or a 2-liter
bottle with dirt or coco fiber. Keep this box moist (not wet!) or the eggs will die. Having two of these made can
help in rotating them out so the babies can hatch safely in another bin. Use either one or the other of these for
a lid: 1) Cut and rubber band on a piece of fiberglass mesh. 2) cut the center out of the top of the bin and hot
glue on some aluminum mesh and click the top back onto the bin. Either way, be sure the bin is very full, and
the crickets can reach the surface to lay eggs. Aluminum is arguably a better choice since the crickets cannot
chew through it.
• Water solutions: 1) Add in a shallow bowl with pebbles in it and fill with water to just below to pebbles. 2) Add
in bottle caps with a thin layer of water in them, will need more than one bottle cap for this method. 3) Purchase
water gel cubes from either a pet store or an online insect store. Be careful when buying gel cubes, as some for
flower arranging may be treated, so make sure they are just gel, nothing added.
• Food solutions: 1) Fresh veggies, lettuce, carrots, potatoes, etc. dusted with calcium powder. 2)
Premanufactured cricket powder or blocks with added calcium. 3) A combination of these for a well-rounded
diet. NOTE: There is a lot of debate over what food is best for breeding crickets for both human and animal
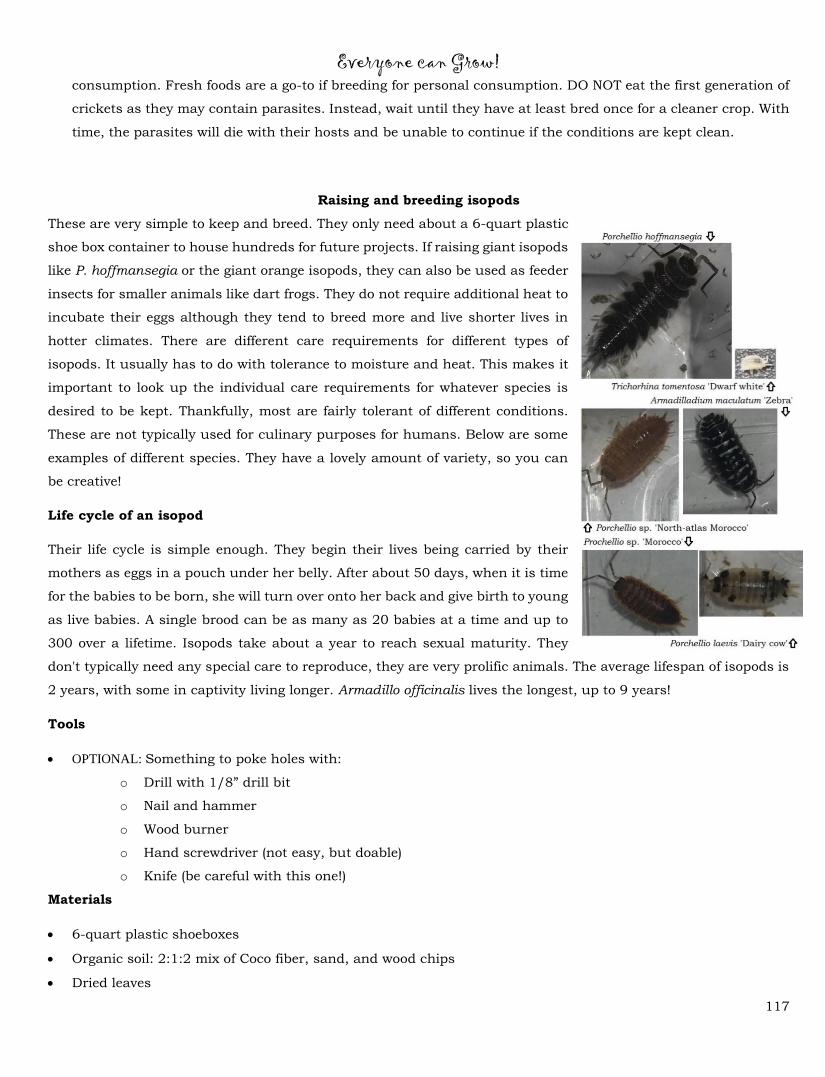
Everyone can Grow!
117
consumption. Fresh foods are a go-to if breeding for personal consumption. DO NOT eat the first generation of
crickets as they may contain parasites. Instead, wait until they have at least bred once for a cleaner crop. With
time, the parasites will die with their hosts and be unable to continue if the conditions are kept clean.
Raising and breeding isopods
These are very simple to keep and breed. They only need about a 6-quart plastic
shoe box container to house hundreds for future projects. If raising giant isopods
like P. hoffmansegia or the giant orange isopods, they can also be used as feeder
insects for smaller animals like dart frogs. They do not require additional heat to
incubate their eggs although they tend to breed more and live shorter lives in
hotter climates. There are different care requirements for different types of
isopods. It usually has to do with tolerance to moisture and heat. This makes it
important to look up the individual care requirements for whatever species is
desired to be kept. Thankfully, most are fairly tolerant of different conditions.
These are not typically used for culinary purposes for humans. Below are some
examples of different species. They have a lovely amount of variety, so you can
be creative!
Life cycle of an isopod
Their life cycle is simple enough. They begin their lives being carried by their
mothers as eggs in a pouch under her belly. After about 50 days, when it is time
for the babies to be born, she will turn over onto her back and give birth to young
as live babies. A single brood can be as many as 20 babies at a time and up to
300 over a lifetime. Isopods take about a year to reach sexual maturity. They
don't typically need any special care to reproduce, they are very prolific animals. The average lifespan of isopods is
2 years, with some in captivity living longer. Armadillo officinalis lives the longest, up to 9 years!
Tools
• OPTIONAL: Something to poke holes with:
o Drill with 1/8” drill bit
o Nail and hammer
o Wood burner
o Hand screwdriver (not easy, but doable)
o Knife (be careful with this one!)
Materials
• 6-quart plastic shoeboxes
• Organic soil: 2:1:2 mix of Coco fiber, sand, and wood chips
• Dried leaves

Everyone can Grow!
118
• A small bottlecap
• Fish food
• Fresh carrot or potato slices
• Misting bottle with water
• Isopod culture
Putting it together
• If desired, use either a nail and hammer or a small drill bit on a drill to punch about 5 holes in each of the
narrow ends of the boxes. I’ve kept my isopods in boxes without any holes, and had no issues with them,
although I do check them weekly and that gives them some new air as well.
• Put about an inch of soil mix into the bottom of the bin and crumple on some dead leaves.
• Moisten the mix with water and mist the top layer well.
• Add in a bottlecap full of fish food and a few slices of carrot or potato.
o Using a bottlecap keeps the fish food dry so it doesn’t mold. Otherwise, it’ll be a bundle of mold in
about a day or two.
• Add in the isopods and enjoy!
• To maintain, make sure that the species you have can handle dryness or need moisture. Keep it at the
proper level and change out the food every few weeks so they have something tasty to eat.
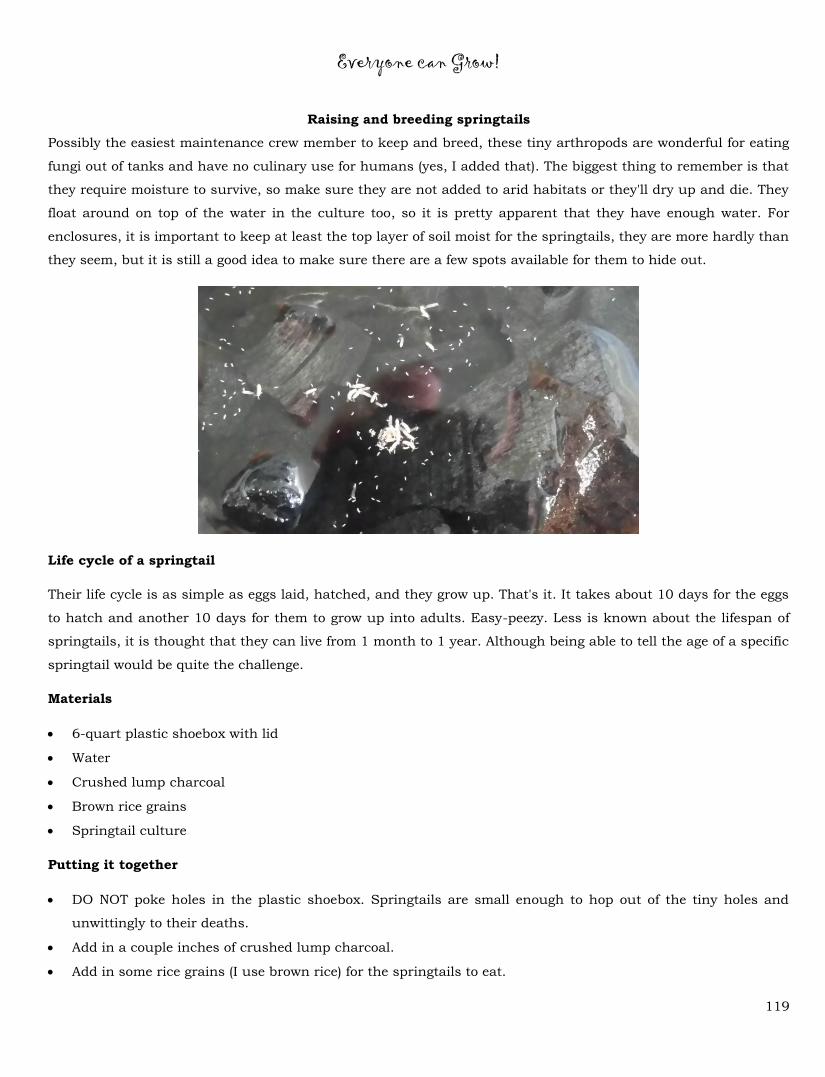
Everyone can Grow!
119
Raising and breeding springtails
Possibly the easiest maintenance crew member to keep and breed, these tiny arthropods are wonderful for eating
fungi out of tanks and have no culinary use for humans (yes, I added that). The biggest thing to remember is that
they require moisture to survive, so make sure they are not added to arid habitats or they'll dry up and die. They
float around on top of the water in the culture too, so it is pretty apparent that they have enough water. For
enclosures, it is important to keep at least the top layer of soil moist for the springtails, they are more hardly than
they seem, but it is still a good idea to make sure there are a few spots available for them to hide out.
Life cycle of a springtail
Their life cycle is as simple as eggs laid, hatched, and they grow up. That's it. It takes about 10 days for the eggs
to hatch and another 10 days for them to grow up into adults. Easy-peezy. Less is known about the lifespan of
springtails, it is thought that they can live from 1 month to 1 year. Although being able to tell the age of a specific
springtail would be quite the challenge.
Materials
• 6-quart plastic shoebox with lid
• Water
• Crushed lump charcoal
• Brown rice grains
• Springtail culture
Putting it together
• DO NOT poke holes in the plastic shoebox. Springtails are small enough to hop out of the tiny holes and
unwittingly to their deaths.
• Add in a couple inches of crushed lump charcoal.
• Add in some rice grains (I use brown rice) for the springtails to eat.

Everyone can Grow!
120
• Add in the springtail culture.
• As the rice grains begin to mold, the springtails have yummy food to eat. Add more rice as the grains are eaten.
Add water to keep up to at least an inch below the charcoal.
• Tip: I added some leaves thinking they would make nice plates for the springtails to eat from. It is not
recommended to do this, it makes the water nasty really fast. (Thankfully the charcoal continuously purifies
the water)
• In the below picture all those noticeable white dots are adult springtails and the barely visible white dots are
babies! This is a baby boom for this culture.
Raising and breeding worms
This is the most complex of the maintenance crew members. They require a constant supply of fresh vegetation to
decompose in order to stay healthy and reproduce. In a vivarium, their numbers will remain low, but they till the
soil, which is a necessary part of the vivarium ecosystem cycle. Really, the only way to breed these is in a composting
bin, which is great for a number of reasons, such as recycling food waste, creating a steady supply of compost for
indoor garden use, and a steady supply of worms for use as maintenance crews or feeders for animals such as
axolotls.
Why Eisenia fetida (red wiggler) for composting worms?
These are the ideal worm species for worm bins because of the niche they inhabit in nature. They are top dwelling
worms that feed off the bacteria that breaks down rotting plants. This is unlike deeper dwelling worms such
as Lumbricus terrestris (night crawlers or earthworms), which are better for tilling and distributing nutrients deeper
into the soil as well as providing aeration. The bin will be small out of necessity if it is for smaller living space, such
as a single person household, or for apartments. (I personally use my worm bin mostly for tossing away pruning
from my indoor garden and an occasional bouquet, I don’t eat a lot of fresh food to share with the worms!)
What is vermicompost?
Vermicompost is quite simply compost made by worms. As they break down the organic materials they
produce vermicast (worm castings). These castings have less bacteria and more nutrients in them than the raw
organic material. This compost tends to take less time than other methods.
Conditions to keep the worm bin

Everyone can Grow!
121
• Red wigglers are not frost tolerant so the best is to keep the worm bin indoors where the temperatures will
range from 50° F to 86° F. Temperatures above or below this range may harm the worms.
• Most moisture for the worm bin will come from the scraps added to the bin, however, it may become
necessary to mist the top layer to keep up some humidity if the bin begins to look overly dry. This will be more
of an issue if the weather is hot and dry.
• Worms are averse to light, so keep them in a dark place. Under the kitchen sink or in a closet works well.
They will actively avoid light but will be all over the top of the food scraps in the dark.
Life cycle of a worm
Worms can live up to 2 years in favorable conditions.
Tips
Do put into a worm bin
• Aged animal manure such as horse or cow
• Cardboard (So long as it is shredded)
• Coffee grounds and filters in moderation
• Crushed egg shells (in moderation, these help with egg production for worms)
• Fruit Waste but NOT CITRUS!
• Garden Waste (pruning, stems, roots, leaves, etc.)
• Starches (pasta, potatoes, rice, grains) not too much though!
• Vegetable Waste (carrots, lettuce, beans, peas, leafy vegetables, etc.)
Do NOT put into a worm bin
• Acidic vegetables and fruit like onions and chili peppers
• Bones (won’t compost)
• Citrus (very acidic, can kill the worms!)
• Dairy products (smells terrible)

Everyone can Grow!
122
• Living sprouts or potato eyes
o Worms won’t go for things that show any signs of life
• Meat products (smells terrible)
• Pet feces (particularly fresh feces can have bad bacteria that can hurt your worms, no carnivore feces!)
Tools
• Something to poke holes with:
o Drill
o Nail and hammer
o Wood burner
o Hand screwdriver (not easy, but doable)
o Knife (be careful with this one!)
• Something to cut with:
o Wood burner
o Utility knife
o Scissors (might work if they are sharp enough, but be careful)
• Hot glue gun.
Materials
• x2 roughneck Rubbermaid bins 15”x10”x7” or similar sized opaque bins with lids.
• Fiberglass screen (window screen).
• A handful of soil from outside.
• Newspaper or other kind of paper. Shredded as thinly and evenly as possible.
o Super tip: Use a paper shredder to make quick work of shredding the paper thinly and evenly.
• Vegetable or plant scraps

Everyone can Grow!
123
o Can be the ends of carrots, old veggies, leaves from pruning houseplants, apple cores, peels like
banana, potato, or carrot, etc.
o WARNING: Do not use citrus, it is harmful for red worms.
• About a pound of red worms.
o These can be sourced at most pet stores or online.
o I started with 100 red wigglers.
Putting it together
• Start by poking holes all along the top edge of one bin and then inside that bin, poke holes along the
bottom. (MAKE THE HOLES SMALLER THAN THE PICTURE! It would have solved a lot of issues...)
o Then cut a piece of window screen to fit the bottom and hot glue it in place. This keeps the worms
from escaping (unless your holes are much smaller, then you might not need this).
• Using whatever sharp tool, you have cut out the interior of one of the lids.
o Cut a piece of screen to fit and hot glue it in place.
• Next, put the shredded paper into the bin without holes in the bottom and soak it for 15 minutes.
o Wring out the paper so it is not dripping and add it to the part of the bin with holes in the bottom.
o Dump the extra water out of the second bin. You don’t need it.
o Now put the first bin into the second bin so it doesn’t get the floor wet.
o Sprinkle in the handful of soil and add the worms, then put the food scraps on top.
• When the bin is put together it should look something like this. The other lid can be used as a bottom but
isn’t really that necessary.
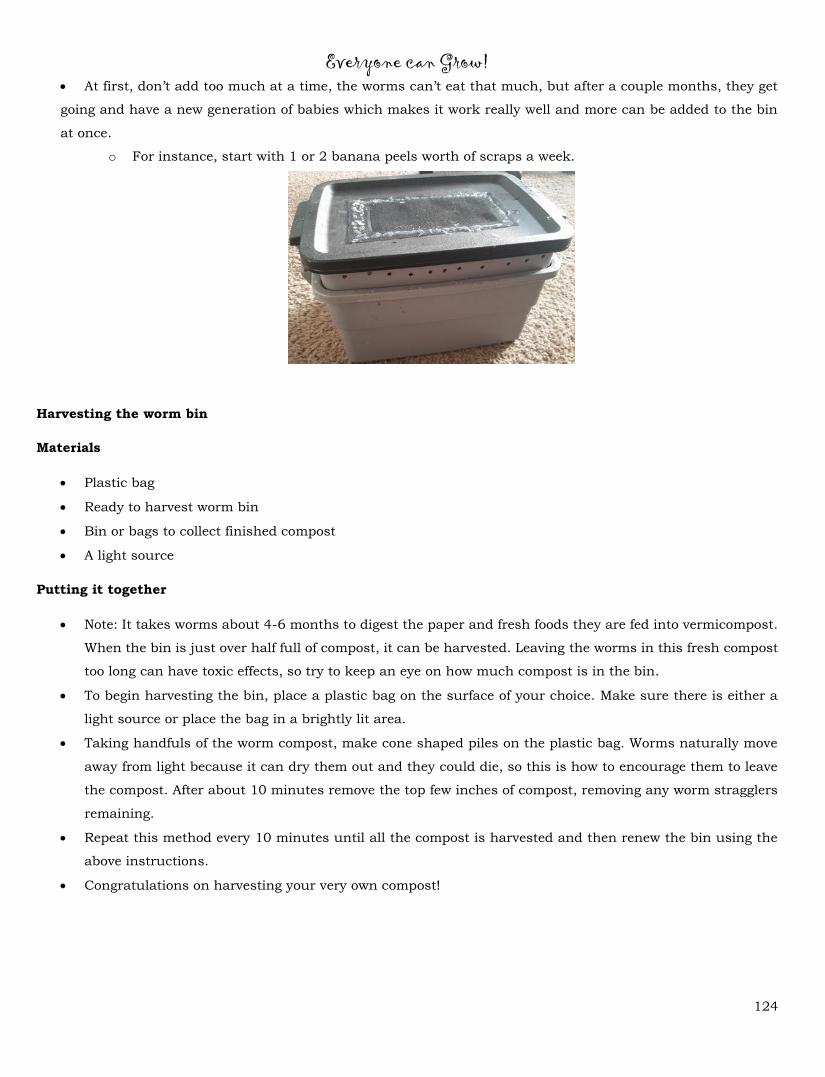
Everyone can Grow!
124
• At first, don’t add too much at a time, the worms can’t eat that much, but after a couple months, they get
going and have a new generation of babies which makes it work really well and more can be added to the bin
at once.
o For instance, start with 1 or 2 banana peels worth of scraps a week.
Harvesting the worm bin
Materials
• Plastic bag
• Ready to harvest worm bin
• Bin or bags to collect finished compost
• A light source
Putting it together
• Note: It takes worms about 4-6 months to digest the paper and fresh foods they are fed into vermicompost.
When the bin is just over half full of compost, it can be harvested. Leaving the worms in this fresh compost
too long can have toxic effects, so try to keep an eye on how much compost is in the bin.
• To begin harvesting the bin, place a plastic bag on the surface of your choice. Make sure there is either a
light source or place the bag in a brightly lit area.
• Taking handfuls of the worm compost, make cone shaped piles on the plastic bag. Worms naturally move
away from light because it can dry them out and they could die, so this is how to encourage them to leave
the compost. After about 10 minutes remove the top few inches of compost, removing any worm stragglers
remaining.
• Repeat this method every 10 minutes until all the compost is harvested and then renew the bin using the
above instructions.
• Congratulations on harvesting your very own compost!
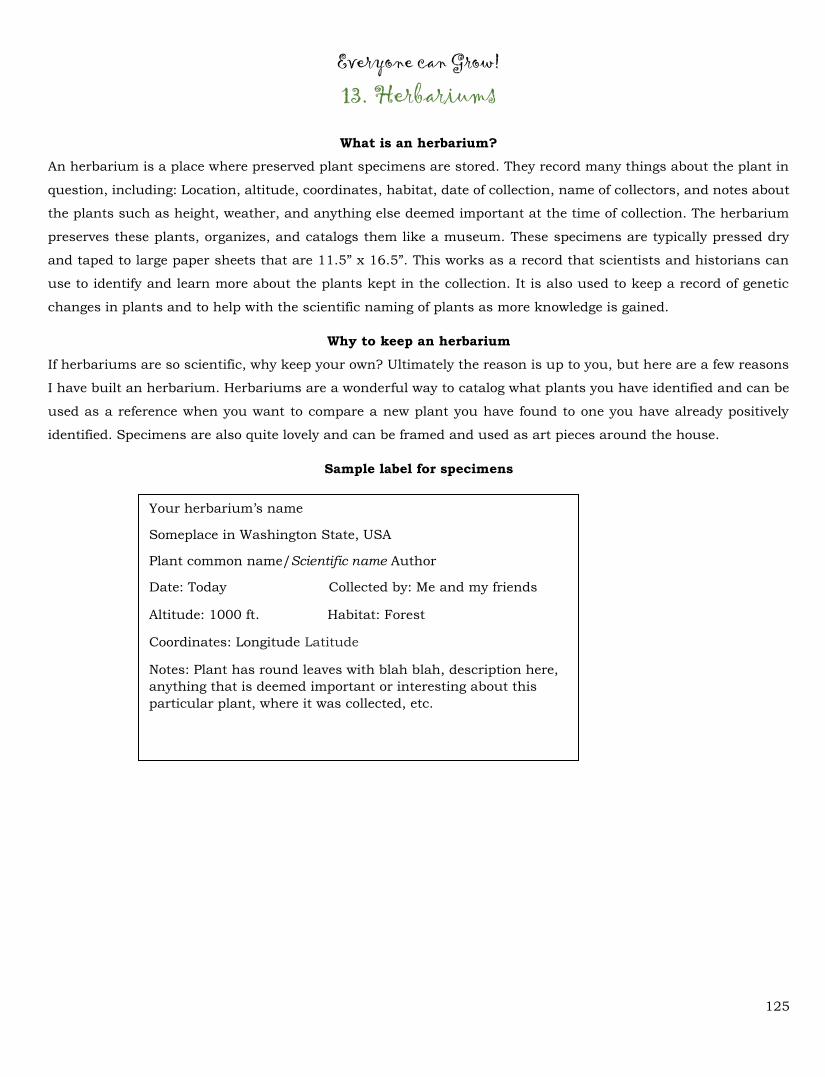
Everyone can Grow!
125
13. Herbariums
What is an herbarium?
An herbarium is a place where preserved plant specimens are stored. They record many things about the plant in
question, including: Location, altitude, coordinates, habitat, date of collection, name of collectors, and notes about
the plants such as height, weather, and anything else deemed important at the time of collection. The herbarium
preserves these plants, organizes, and catalogs them like a museum. These specimens are typically pressed dry
and taped to large paper sheets that are 11.5” x 16.5”. This works as a record that scientists and historians can
use to identify and learn more about the plants kept in the collection. It is also used to keep a record of genetic
changes in plants and to help with the scientific naming of plants as more knowledge is gained.
Why to keep an herbarium
If herbariums are so scientific, why keep your own? Ultimately the reason is up to you, but here are a few reasons
I have built an herbarium. Herbariums are a wonderful way to catalog what plants you have identified and can be
used as a reference when you want to compare a new plant you have found to one you have already positively
identified. Specimens are also quite lovely and can be framed and used as art pieces around the house.
Sample label for specimens
Your herbarium’s name
Someplace in Washington State, USA
Plant common name/Scientific name Author
Date: Today Collected by: Me and my friends
Altitude: 1000 ft. Habitat: Forest
Coordinates: Longitude Latitude
Notes: Plant has round leaves with blah blah, description here,
anything that is deemed important or interesting about this
particular plant, where it was collected, etc.

Everyone can Grow!
126
Example of laminated herbarium specimen
A clearer scan of the same sample

Everyone can Grow!
127
How to preserve specimens
This is simple enough, not all specimens need to be large like a scientific herbarium; individual leaves, flowers, or
twigs can be used for a personal vivarium, although it is a good idea to save enough of the plant in question to be
able to assess a positive identification later. For trees and shrubs this means collecting a twig with at least two
nodes, which allows for an easy determination between opposite and alternate leaf arrangement. For non-woody
plants and herbs, gathering their blooms is very useful, and if not, as much of the plant as possible. It can
sometimes be challenging to identify flowering plants without their flowers.
Preserving specimens is as simple as using paper towels or newspapers to wrap the specimen and adding
pressure with something flat and heavy over at least three weeks to allow them to fully dry out and be pressed flat.
Using books or other flat, heavy things like boards or even using a piece of wood or cardboard for its flatness and
adding cups or other objects to give pressure to the specimens all work to help the plant be pressed nice and flat.
It is necessary to press the needs to be pressed very flat and allowed to completely dry out before it is mounted.
After the specimen is pressed, it can be mounted on a piece of thick paper. If attempting to make specimens
at the general standard for science, they must be mounted on a special herbarium paper measuring 11.5” x 16.5”
in size and there are more standards for the size of the collected piece. Since this is mostly for personal use, it is
suggested to use card stock. It is less expensive and easier to find. Using Mod Podge sealant or Elmer’s glue thinned
in water are great ways to preserve and stick the sample to the paper. Holding the specimen on with a few short
strips of tape helps as well. If feeling particularly adventurous, the specimens can be heat laminated using a typical
office laminator. However, thick specimens like those of conifers do not work well with this technique and will put
the laminator at risk. (After around 200 specimens, the laminator broke, but the conifers never did work well with
the laminator.) Regardless of the techniques used, over the years, the color will slowly drain from the specimen and
that is normal. It will still retain its shape which can be used for identification.
Building a plant press
If there is a desire to make many specimens and keep an extensive herbarium, then building a plant press would
be a good idea. To make a full-sized press, the pressing boards need to be at least 12” x 17” so they fully overlap
the specimen.
Tools
• Saw or hacksaw
• Measuring tape
• Marker
• Utility knife
• Scissors
Materials
• 7/16” Thick 2’ x 4’ plywood (Anything that is stiff will work, thin panels that are wobbly won’t give good
pressure)
• Cardboard

Everyone can Grow!
128
• Newspaper
• 2 Ratchet straps
Putting it together
• Measure and cut 2 boards to the desired size.
• Measure and cut several pieces of cardboard and newspaper to fit inside the two wood pieces.
• When stacking specimens in the press, be sure to use a piece of newspaper on the top and bottom of a
specimen, and then add a piece of cardboard in between the newspaper stacks. This way the specimens
get good amounts of pressure without being bent in any particular direction.
• Tighten the straps onto the press, putting pressure on the specimens. Leave it for about three weeks.
More specimens can be added, and if so, it would be wise to date the specimens to be sure that they are
properly dried.

Everyone can Grow!
129
14. Pressed plant art
Pressed plant paper
Making paper is an art even if you are not adding in bits of pressed nature. It can get messy and being prepared
means having lots of absorbent material around in case of a spill. Thankfully, it isn't that hard and mostly takes
a bit of patience and enough room to work. Most handmade paper is thicker than typical copy paper, though with
practice, the paper can be made much thinner. This is just one method of recycling paper for personal reuse.
Tools
• Saw or hacksaw
• Stapler
• Scissors
• Bucket with water
• Bin that the deckle can span so the slurry can be poured into it.
• Flat towel (microfiber is best, but any absorbent towel can work)
• Sponge
• Deckle (this is a mesh mold for shaping paper) or any framed fine sieve
• Duct tape
• Something to pulp the paper with:
o Blender
o Food processor
o Mortar and pestle
o Hand or electric kitchen beater
Materials
• To make a deckle
o Screen mesh (metal mesh works better for this, but fiberglass works if stretched taut)
o Wood picture frames (from the dollar store is fine) good sizes are 8" x 10" or 8.5" x 11" bigger or
smaller frames are fine depending upon the size of the paper desired.
• Mesh frame
o Cut a piece of mesh that is the same size as the mold or larger. Use duct tape or Gorilla tape to
make a border around the edge of the mesh to stabilize it and create a frame. The tape will be
stuck to itself to make the frame.

Everyone can Grow!
130
Mesh frames
• Old newspaper or other strips of used paper (not laminated or waxed paper)
• Food coloring
• Pressed petals, leaves, little bits of plant, seeds, confetti, glitter, etc.
Putting it together
• First the strips of used paper must be soaked in hot water until it becomes pulpy. This does not take long,
maybe a few minutes. Although leaving the paper overnight really helps reduce the ink on the pieces and
grants a more uniform color throughout. (Soak it for a week and it becomes nice pulp.)
o Using a paper shredder is a great way to quicken the process of making strips of paper.
• As the paper soaks, begin making the deckles (paper mold).
o Take the backing and glass out of the frames until all that is left is the wood edge.
▪ Use a flathead screwdriver to pry up the holders and save your fingers!
▪ Use a pliers to then pull them out once the frame is isolated. Be careful on this step or you
may break the frames. Do not pull up, pull out.
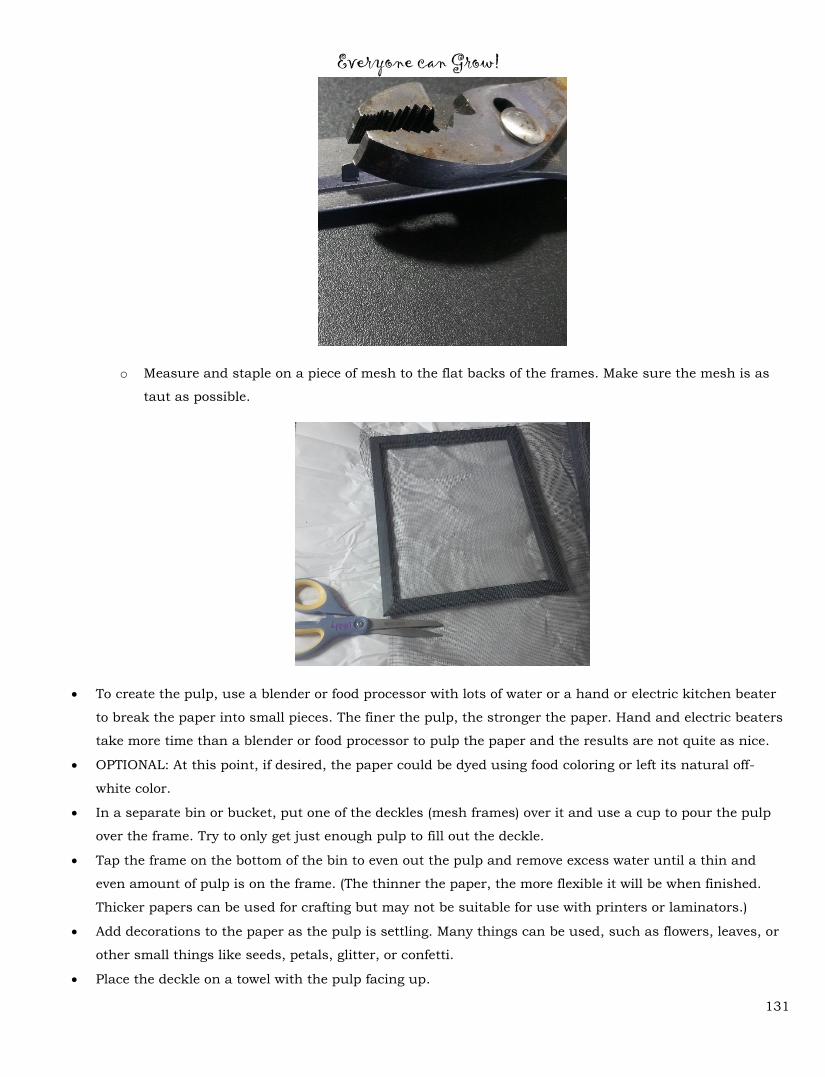
Everyone can Grow!
131
o Measure and staple on a piece of mesh to the flat backs of the frames. Make sure the mesh is as
taut as possible.
• To create the pulp, use a blender or food processor with lots of water or a hand or electric kitchen beater
to break the paper into small pieces. The finer the pulp, the stronger the paper. Hand and electric beaters
take more time than a blender or food processor to pulp the paper and the results are not quite as nice.
• OPTIONAL: At this point, if desired, the paper could be dyed using food coloring or left its natural off-
white color.
• In a separate bin or bucket, put one of the deckles (mesh frames) over it and use a cup to pour the pulp
over the frame. Try to only get just enough pulp to fill out the deckle.
• Tap the frame on the bottom of the bin to even out the pulp and remove excess water until a thin and
even amount of pulp is on the frame. (The thinner the paper, the more flexible it will be when finished.
Thicker papers can be used for crafting but may not be suitable for use with printers or laminators.)
• Add decorations to the paper as the pulp is settling. Many things can be used, such as flowers, leaves, or
other small things like seeds, petals, glitter, or confetti.
• Place the deckle on a towel with the pulp facing up.

Everyone can Grow!
132
• Place the second frame on top of the pulp and use a sponge at first to very gently dab out excess liquid
and return the liquid to the bin. There are still fibers in the water that can be used to make more paper.
After a few times of dabbing out water, more pressure can be added. Pressing on the paper helps bind the
fibers together and strengthens the paper.
• Invert the frames and release the paper from the deckle.
• Now there are options for finishing the paper. Either way, the more pressure exerted on the paper as it
dries will help it hold together more strongly.
o Method 1: Use a hair dryer or heat gun to blow it almost dry (it takes forever if using a hair dryer
unless the paper is small and thin) and then use towels or paper towels to wrap the paper. Use a
low setting on a clothes iron to dry and flatten it through the towels (this also presses the fibers
together which strengthens the paper). Be careful to not let the paper heat up too much. After it is
dry, it can be stored in a book to maintain its flatness or pressed under a book before use to help it
become flat.
▪ DO NOT USE ANY METHOD WITH HEAT IF THE PAPER HAS LIVE SEEDS IMBEDDED.
o Method 2: A low energy method is to take something water resistant such as a piece of plywood or
the plastic lid of a storage bin and lay a kitchen towel on it, add the paper on top of it, and add one
more dish towel on top. Use another piece of wood, plastic, etc. to protect objects used as weights
from the water (wood works better than plastic because it breathes and allows it to dry more
efficiently). Then use books to weigh the pile down, pressing the paper fibers together and
producing a nice, flat piece of paper. Give it at least 24 hours to dry. If not dry after the first 24
hours, it should be dry enough to hang or otherwise leave open to finish drying without coming
apart.
• After the paper is dry it is technically finished and can be used for any art project desired and even used
in a printer if the pulp was fine enough and the paper is not too thick.
Pressed plant bookmark
This is an easy and fun way to make gifts for friends and family. It is a wonderful project for children and can be
enjoyed by anyone. There are a few ways to make lovely bookmarks and they will be explained here.
Tools
• Laminator with 3mm or 5mm 9" x 11" sheets
• Paper cutter
• Single hole punch
• Scissors
• Mod Podge or Elmer's craft glue
• Clear tape
Materials
• Pressed petals, flowers, leaves, etc.

Everyone can Grow!
133
• Card stock paper
• Ribbon
Putting it together
• A good size for a bookmark is 2" x 6".
• Decide what kind of bookmark to make: paper, laminate, or a combination.
• Cut paper to a desired shape if using paper. If using laminate, it helps to make a blank out of paper to
help keep the size relative.
• Punch a hole in one end of the bookmark to mark the top.
• TIP: If this follows the prior pressed plant paper activity, the same paper making idea can be used to make
these as well.
o Another idea is to cut the flower paper to the appropriate size and add additional flowers and
decorations to the bookmarks using Mod Podge. However, handmade paper is far thicker than
normal paper unless it is crafted carefully, so it may not be able to be laminated.
• When using glue to attach flowers, add a layer first and then another on top after the first has had time to
dry (about 20 minutes).
• After finishing decorating the bookmark, take some ribbon and fold it in half to create a fold, push the fold
through the punched hole in the bookmark and loop the ends through the folded end to create a tassel.
Cut the length of the tassel to whatever is desired.
• These can typically be laminated after finishing and drying, just make sure any glue is entirely dry before
lamination because it won't dry after and it can ruin the plants inside.
• Yay! Bookmarks! Now you can save you place on all your favorite plants in the dichotomous key.

Everyone can Grow!
134
Pressed plant portrait
These "portraits" are lovely ways to use pressed plants. They can even be identified! This will be a pressed
bouquet.
Tools
• Laminator with 3mm or 5mm 9" x 11" sheets
• Mod Podge or Elmer's glue
• ¼" Tape or any tape cut in ¼" width.
Materials
• Pressed plants
• Paper: Card stock, handmade paper, laminate
• Picture frame or shadow box frame
Putting it together
• Before getting any glue or adhesives involved, arrange the plants in the desired positions.
o Take some time to really settle it together.
• If using Mod Podge, put a layer of glue onto the paper or canvas first. There is no need for a heavy layer,
just enough to help it stick.
o Tape can always be used to pin the plants down instead of glue.
• These look best if either just glued or just laminated.
o A laminated piece can be hole punched and have a string tied to them to hang without a frame.

Everyone can Grow!
135
15. Concrete planters
Scrap cloth planters
These are a great way to reuse old clothes that aren't in good enough shape to donate. This is a fun and messy
activity, so be ready with gloves and lots of plastic to keep the workstation clean.
Tools
• Scissors
• Drill with drill bit or a screwdriver with a screw
• Several buckets, jars, or pots, bowls, etc. To use as an insert
• Scrap cloths (old rags, clothes, etc.) to wrap around the bucket
• Trash bags or other plastic sheets
• Disposable gloves
• Paintbrush
• Hot glue gun with hot glue sticks
• OPTIONAL: Concrete pigments
• OPTIONAL: Spray paint
Materials
• Concrete or mortar mix
• Water
• Rope
Putting it together
• Begin by covering the work area in plastic or other water-proof material. This will help with clean up in
the end.
This mortar mix sets in an hour when used
according to the package directions.

Everyone can Grow!
136
o Cutting the sides of a few trash bags to open them flat works well.
• Next, cut the cloth into the desired size. The easiest way to do this is to lay the cloth out flat, take the
lower left corner of the cloth and fold it up and over until it lines up with the top edge of the cloth. This
will form a perfect square. If a rectangle or other shape is desired, they can also be used, but squares are
an easy shape to start with.
• Next, get the insert ready by taking a bucket, jar, or a pot of the desired size and wrapping either layers of
plastic bags or wrapping some other scraps of cloth around the intended insert. This will make it easier to
get it out of the dried concrete cloths.
• In a separate bowl or bucket, pour in some concrete and water and mix well. There is not a recipe for how
much water to use. It really depends on what type of mortar or concrete is being used.
o Wearing disposable gloves can help keep hands cleaner during this step. The consistency does
need to be somewhat loose, so experiment a bit with how well it absorbs into the cloth and
spreads. If using terry cloth, more water is needed to soak into the fabric.
• Dip and fully cover the cloth to be made into a pot and add more concrete mix on top and use some water
to help it soak in. Make sure all the cloth has fully absorbed the mixture and cannot be seen through the
mix.
• There are two ways to use the insert: One is to drape the cloth over the top of the insert and shape the
creases as desired. The other is to put the insert on top of the cloth and lift the cloth up over the insert
and tie a rope around it. If desired, trim excess cloth around the rope to make a uniform lip on the top of
the cloth.

Everyone can Grow!
137
• While it is wet, the folds can be shaped as desired.
• Allow it a day to dry and untie and remove the rope (if used) and insert used.
• Use a paintbrush to add more concrete to the outside of the cloth and reinforce the outside of the pot.
• Allow this layer to dry. It will become lighter in color as it dries.
• If desired, tie a nice, clean rope to the pot for a bit of flair.
• If painting is desired, the pot can be painted before or after the rope is tied depending on the desired effect
on colors.

Everyone can Grow!
138
• Add some holes in the bottom of the pot using either a drill bit and drill or by screwing in a screw and
wallowing it back out of the hole. If a planter does not have holes, it should not be used for plants. Even
the most careful watering regiment tends to overwater and damage the roots of plants over time.
• Add some feet to the pot by using a glue gun to put some little dots of glue on the bottom in different
places and use a piece of plastic over a table to help level the pot while the hot glue dries. These feet are
nice because they'll keep the pot slightly lifted to help with drainage and keep it from slipping because the
hot glue retains a slight stickiness to it.
Concrete and coco fiber pots
These pots are thick but light because of the light weight of the coco fiber. They are simple to make and have a lot
of flexibility as to the shapes they can take on depending what is used as a mold.
Tools
• Pot or bowl to use as a mold
• Plastic bags or sheets
• OPTIONAL: Spray paint
• OPTIONAL: Dust mask
Materials
• Concrete or mortar mix
• Water
• Coco fiber (must be unbricked)
Putting it together

Everyone can Grow!
139
• First, if using coco fiber bricks, put the brick or bricks in a bucket and add warm water to soften it and
allow it to expand. Add more water as needed.
• Strain excess water out of the coco fiber. Drier is better.
o When dry, this can be very dusty, so wear a mask if necessary.
• When ready to mix the concrete, use a 1-part concrete to 2-parts coco fiber in a bin or bowl and mix dry
before slowly adding water. Once the mixture holds together it can be used.
• Using the chosen mold, add a piece of plastic to inside of it and take handfuls of the mixture and press it
along the inside edges of the mold to create the pot. Add a hole in the center of the bottom with a finger by
pressing through the mix and wallowing out about an inch diameter hole. This is the only drainage this
pot will have, and one large hole does less to disrupt the integrity of the bowl than many small holes.
o Although the pots can be made thin, they will not be as strong if not at least ½" thick.
• When the mold has an even layer of the mix pressed into it, use the top rim of the bowl to even out the top
line of the pot if desired and give it at least a day to harden. It will gradually become lighter in color as it
dries.
o It hardens enough to take out of the mold in a night if a fan is used.
o Give it at least a full day to fully dry.
• When fully dry it can be painted inside and out or left as is for the desired effect.
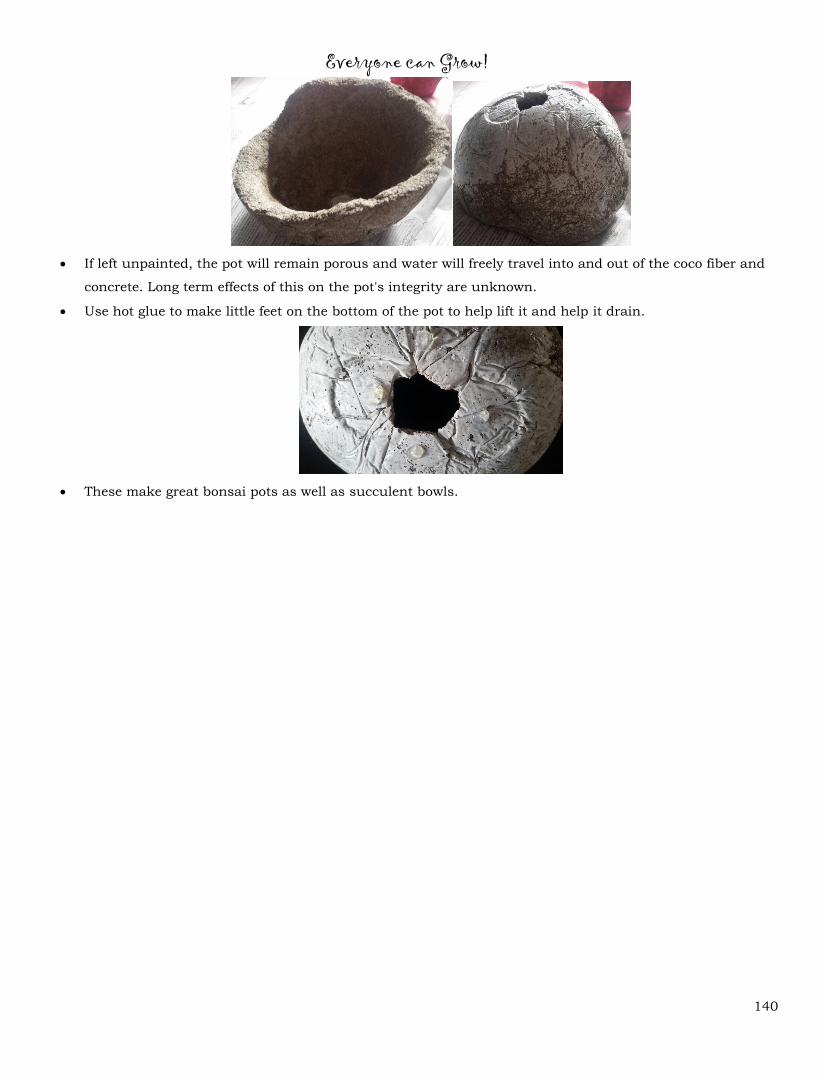
Everyone can Grow!
140
• If left unpainted, the pot will remain porous and water will freely travel into and out of the coco fiber and
concrete. Long term effects of this on the pot's integrity are unknown.
• Use hot glue to make little feet on the bottom of the pot to help lift it and help it drain.
• These make great bonsai pots as well as succulent bowls.