EVENTS IN THREE-DIMENSIONAL SPACE - Community …faculty.ccp.edu/faculty/cherbert/csci...
30
After finishing this chapter, you should be able to: Provide a brief definition of each the following terms: absolute direction, BDE event for- mat, Cartesian coordinates, command driven interface, dimension, Euclidean 3-space, event handler, event listener, event trigger, event-driven programming, to frame an object, Graphical User Interface (GUI), object-relative direction, object-relative position, ordered pair, orientation, pan, point of view, quantification, side effects, tilt, zoom. Describe what is meant by event-driven programming, including how event listeners, event, triggers, and event handlers work to together to make events function. Describe what is meant by an object’s point of view, and list and describe the six object-relative directions and six object-relative positions in Euclidean 3-space. List and describe the nine event types available in Alice. Describe basic camera operations, including, move, pan, tilt, and zoom, and how to implement these in Alice. Create Alice events to allow the user to manipulate objects moving in three- dimensional space. EVENTS IN THREE-DIMENSIONAL SPACE 1 3 3 Chapter C5777 36525 9/21/05 1:49 PM Page 1
Transcript of EVENTS IN THREE-DIMENSIONAL SPACE - Community …faculty.ccp.edu/faculty/cherbert/csci...

After finishing this chapter, you should be able to:
� Provide a brief definition of each the following terms: absolute direction, BDE event for-mat, Cartesian coordinates, command driven interface, dimension, Euclidean 3-space,event handler, event listener, event trigger, event-driven programming, to frame anobject, Graphical User Interface (GUI), object-relative direction, object-relative position,ordered pair, orientation, pan, point of view, quantification, side effects, tilt, zoom.
� Describe what is meant by event-driven programming, including how event listeners,event, triggers, and event handlers work to together to make events function.
� Describe what is meant by an object’s point of view, and list and describe the sixobject-relative directions and six object-relative positions in Euclidean 3-space.
� List and describe the nine event types available in Alice.
� Describe basic camera operations, including, move, pan, tilt, and zoom, and how toimplement these in Alice.
� Create Alice events to allow the user to manipulate objects moving in three-dimensional space.
EVENTS IN THREE-DIMENSIONALSPACE
1
3
3 Chapter C5777 36525 9/21/05 1:49 PM Page 1

2 Chapter 3 • Events in Three-Demensional Space
There are two readings in this chapter. The first is relatively short, describing event-drivenprogramming. The second, which is a bit longer, discusses the nature of three-dimensional space. They are combined in this chapter because events in Alice are oftenused to manipulate objects in three-dimensional space.
EVENT-DRIVEN PROGRAMMING
One of the most important places in the history of computer technology is the Xerox PaloAlto Research Center (Xerox PARC) in California. Xerox PARC was established as a researchlab where some of the world’s best computer scientists and designers could work to improvemodern computer technology. We see their innovations almost every time we use a moderncomputer. Local area networks, the laser printer, and the Graphical User Interface (GUI)were all developed or refined at Xerox PARC.
A GUI has icons on the computer screen and a mouse to control a pointer that can be used tooperate the computer. Most modern software, such as word processing, electronic spreadsheets,Internet browsers, and computer games, depends on the use of a GUI. Before GUIs existed peo-ple had to control a computer by typing in commands in what was called a command-driveninterface. Often it was necessary to write or run a computer program in order to complete tasksthat involved more than a few steps, such as formatting the output for a document.
It’s no coincidence that the use of personal computers really took off after the introductionof the graphical user interface. The Apple Macintosh approach to computing and theMicrosoft Windows operating system each incorporate a GUI based directly on develop-ments at Xerox PARC.
For more information on XEROX PARC see www.parc.com.
The use of a GUI on a computer system requires event-driven programming. An eventoccurs whenever an event listener detects an event trigger and responds by running amethod called an event handler. An event listener is a combination of hardware and soft-ware that repeatedly checks the computer system for the event trigger. Modern operatingsystems contain facilities to let programmers set up event listeners in their software. Anevent trigger can be any activity or condition selected by the programmer, such as someonepressing the enter key, or a bank account balance going below zero. An event handler is amethod that is activated when the event trigger occurs. Almost any method can serve as anevent handler. When the event listener detects an event trigger, an event handler is calledinto action.
Events are often employed to provide user controls in computer software. In Alice, eventscan be used to manipulate objects moving in three-dimensional space. So, before beginningto work with events in Alice, let’s explore the nature of three-dimensional space.
3 Chapter C5777 36525 9/21/05 1:49 PM Page 2

3Three-Dimensional Space
THREE-DIMENSIONAL SPACE
A dimension is a way of measuring something. The word dimension is a derivative of theancient Latin word demetiri, meaning to measure out. It is an abstract idea, a conceptinvented by people to help us understand something. We create a dimension whenever weassign a value on a continuous scale to some property. This process is called quantification.For example, a survey might contain the question, “On a scale of 1 to 10, how much do youlike chocolate ice cream?” Someone has created a scale to quantify the popularity of choco-late ice cream, making popularity a dimension of the chocolate ice cream.
If you wish to measure the location of a point on a straight line, then you only need onenumber. You could mark a starting point on the line, and then measure distance—how far apoint is from the starting point. By using negative and positive numbers, you could alsoindicate which direction. Figure 3-1 shows a line marked with a scale to help us quantify thelocation of each point on the line.
In addition to the concepts of distance and direction, we also have the concept of orientation,which means the direction an object is facing. If an object is facing the positive direction onour line, toward higher numbers, its orientation would be forward. An object facing the nega-tive direction, toward lower numbers, would be facing backward.
Location and orientation together are known as the point of view of an object. Figure 3-2shows three people in a straight line with the point of view for each of them.
Actually, there are two ideas of direction. A direction can be in relation to a scale of mea-surement, called absolute direction, or from the point of view of another object, calledobject-relative direction. In Figure 3-2, the absolute direction of the boy on the bicycle isbackward, but the direction he is facing in relation to Alice is forward. Object-relative posi-tion can also be considered. From the coach’s point of view, Alice is behind the boy, whilethe coach is in front of the boy. In front of and behind are two object-relative positions.
FIGURE 3-1: A straight line marked with a scale of measurement.
0 2 3 4–1–2–3–4 1
3 Chapter C5777 36525 9/21/05 1:49 PM Page 3

4 Chapter 3 • Events in Three-Demensional Space
On a flat surface, like a sheet of paper, you need two values to specify an object’s position.You need two scales of measurement, each called an axis. The first would measure theobject’s position along a straight line, and the second how far it is from that straightline along a second straight line. Our flat surface is two-dimensional. Such a flat two-dimensional surface is called a plane.
The French mathematician René Descartes developed a system of quantification for twodimensions called Cartesian coordinates. Cartesian coordinates have an X-axis, and a Y-axis.The location of each point is referred to by an ordered pair of the form (x, y), in which x rep-resents the point’s location along the X-axis and y represents its location along the Y-axis. Anordered pair is any pair in which one dimension is always listed first, and another dimensionis always listed second. For example, a set of numbers showing the temperature at varioustimes throughout the day might be given in the form of ordered pairs with the format (time,temperature). The data set would look something like this: (8:00 am, 54°), (9:00 am, 56°),(10:00 am, 59°), (11:00 am, 61°), and so on. In Cartesian coordinates, the X-axis value is alwayslisted first. Figure 3-3 shows several points marked on a Cartesian plane.
FIGURE 3-2: Three people in a straight line with the one-dimensional point of view for each person.
0 2 3 4–1–2–3–4 1
COACH BOY ON ABICYCLE
GIRL
Location: 3; Orientation:Backward
Location: 0; Orientation:Backward
Location: –4; Orientation:Forward
3 Chapter C5777 36525 9/21/05 1:49 PM Page 4

5Three-Dimensional Space
Moving up or down off of a flat plane requires a third axis and a third number to indicatehow far a point is above or below the plane. In other words, a third dimension is needed.Thus, instead of an ordered pair to indicate location, an ordered triplet is used, withthree values. Each point has x, y, and z coordinates. Figure 3-4 shows three buildings with anx-axis, a y-axis, and a z-axis for orientation in three-dimensional space. You can think of theX-axis as running east and west, the Y-axis as running north and south, and the Z-axis asrunning up and down.
The physical world around us is a three-dimensional space. Mathematicians sometimes callsuch a space a Euclidean 3-space after the ancient Greek mathematician, Euclid. Aroundthe year 300 B.C., Euclid wrote one of the most popular textbooks of all time, The Elements,about geometry on flat surfaces and in a corresponding three-dimensional space. Today wealso have non-Euclidean geometries, such as hyperbolic geometry and parabolic geometry,to describe location, distance, etc., on curved surfaces, but the virtual world of Alice is asimple Euclidean 3-space.
FIGURE 3-3: Several points marked on a plane with cartesian coordinates.
2
3
4
–1
–2
–3
–4
1
2 3 4–1–2–3–4 10, 0
(2,1)
(0,2)
(–2,0)
(–2,–3)Point (0,0) Is Called The Origin
Y-axis
X-axis
3 Chapter C5777 36525 9/21/05 1:49 PM Page 5

6 Chapter 3 • Events in Three-Demensional Space
You saw that on a straight line an object can be facing forward or backward, eitherabsolutely, or in relation to another object. You also saw that on a straight line there werethe object-relative positions, in front of and behind. In Alice’s Euclidean 3-space, there aresix object-relative directions, one opposing pair of directions for each axis. There are alsosix object-relative positions. Figure 3-5a shows the six object-relative directions—forwardand backward, left and right, and up and down. Figure 3-5b shows the six object-relativepositions—in front of and behind, to the left of and to the right of, and above and below.
Is there a real four-dimensional space? Albert Einstein pointed out that time is a dimension,and suggested what he called a four-dimensional space-time continuum. Many importantdevelopments in the field of Physics during the past 100 years have been based onEinstein’s work. So, you see, the simple of idea of quantification, of applying a system ofmeasurement to something like the location of a point in space, can lead to some verysophisticated results. In fact, almost all of modern science is based on dimensioning—quantifying the properties of objects, and then studying how those quantities change andaffect one another.
FIGURE 3-4: The ground on which these buildings sit is a plane with an x-axis and a y-axis; Distance above or belowthe ground can be measured according to a z-axis.
Y - axis
X - axis
Z-ax
is
3 Chapter C5777 36525 9/21/05 1:49 PM Page 6

7Tutorial 3A—Events in Alice
The goal of this chapter is to learn about computer programming in the three-dimensionalspace of Alice. Even though direction and movement will be referred to, the text will try todo so without getting too caught up in the mathematics of it all, so that instead,, you canfocus on concepts of computer programming and algorithm development.
TUTORIAL 3A—EVENTS IN ALICE
In this tutorial, you will explore events in Alice and create several simple events. Beforestarting, you should have an understanding of the nature of event-driven programming, asdiscussed in the first reading above, especially the terms, event trigger and event handler.You should also have an understanding of methods, as discussed in Chapter 2.
EXPLORING EVENTS
In this part of the chapter, you will explore the event tiles.
1. Start the Alice software and open the amusementPark example world. In
the Events area of the Alice interface, you see seven event tiles, as shown in
Figure 3-6.
FIGURE 3-5: Object-relative directions in three-dimensional space (a) and object-relative positions in three-dimensionalspace (b).
backward left
right forward
down
behind
above
to the left of
to the right of in front of
below
a b
up
3 Chapter C5777 36525 9/21/05 1:49 PM Page 7

8 Chapter 3 • Events in Three-Demensional Space
If you cannot see all seven events at once, then it may be necessary to adjust the size of theareas in your Alice interface. You can do this by clicking the background space betweenareas and dragging the pointer to resize the areas. To lengthen the Events area, clickbetween the Events area and the Editor area and drag the pointer down the screen.
2. The first tile contains an event to let the user move the camera with the
four arrow keys on the keyboard. The other six event tiles are of the form
When the world starts do <event handler>. These events run programs to
animate the amusement park rides when the world starts.
3. Play the world and use the arrow keys to move the camera around to look
at the various parts of the amusement park. You can see the effects of the
six events that animate the amusement park rides. Also notice that the
camera moves down slightly when it moves forward, and up slightly when
it moves backward. This is because the original camera position was tilted
slightly downward. Take a few minutes to look around the amusement park
before continuing. If you restart the world, the camera will move back to its
original position.
FIGURE 3-6: The seven event tiles in the amusementPark example world.
3 Chapter C5777 36525 9/21/05 1:49 PM Page 8

9Tutorial 3A—Events in Alice
CREATING A SAMPLE WORLD FOR EVENT EXPLORATION
You are going to start a new Alice world with two objects, a blue ballerina and a pink balle-rina, to use in exploring the different Alice events types.
To start a new world for event exploration:
1. Exit Alice and restart the Alice software with a blank world using the grass
template. The amusementPark world uses a lot of memory, and exiting and
restarting Alice is a good way to be sure that it is cleared from the memory
before continuing.
2. You are going to build a world with two objects, a blueBallerina and a
pinkBallerina, similar to Figure 3-7. Click the green ADD OBJECTS button
and add a blueBallerina and a pinkBallerina to the world from the People
folder in the Local Gallery.
3. Move the ballerinas apart from each other and turn them to face the camera,
as seen in Figure 3-7. When you are finished setting up this simple world,
click the DONE button to exit Scene Editor mode and return to the standard
Alice interface.
4. Next, you are going to create a world-level method to make both ballerinas
spin at once. Click the world tile in the Object tree, and then click the
FIGURE 3-7: The two ballerinas world after adding a world.both spin method.
3 Chapter C5777 36525 9/21/05 1:49 PM Page 9

10 Chapter 3 • Events in Three-Demensional Space
methods tab in the Details area. Now click the create new method button,
and when the dialog box appears, name the method both spin and click OK.
5. You now need to add instructions to the both spin method to make the two
ballerinas spin. The code in the Editor area in Figure 3-7 shows what this
will look like when you are done. First click and drag a do together tile
from the bottom of the Editor area into the instruction zone to replace the
phrase Do Nothing in world.both spin method.
6. Click the blueBallerina tile in the Object tree and then the methods tab in
the Details area. Drag and drop a blueBallerina turn method tile from the
Details area into the do together tile in the world.both spin method. Choose
left and 1 revolution as values for the direction and amount parameters.
7. Click the pinkBallerina tile in the Object tree and drag and drop a
pinkBallerina turn tile into the world.both spin method below the
blueBallerina turn tile. Choose the same values, left and 1 revolution, for
the direction and amount parameters.
8. You are finished creating your new method and now need to add the method
to the default event tile as the event handler. Make sure that the world is
selected in the Object tree, and the methods tab is selected in the Details
area. Drag the both spin tile from the methods tab into the Events area and
drop it in place of world.my first method as the event handler in the
default event.
9. You no longer need world.my first method, so drag the world.my first
method tile from the methods tab and drop it the trash can; the method is
removed from the world.
10. Now play the world and you should see both ballerinas spin together.
Before proceeding, save the world using the name two ballerinas. If you
wish to save a copy of the world during the rest of this tutorial, save it with
a different name, so that your basic ballerina world is saved.
ALICE EVENT TYPES
In the Events area, you can see only the When the world starts, do world.both spindefault event. Whenever the create new event button is clicked, a list of the nine eventtypes in Alice appears, as shown in Figure 3-8.
3 Chapter C5777 36525 9/21/05 1:49 PM Page 10

11Tutorial 3A—Events in Alice
You are next going to look at several of the nine event types, experimenting with a few ofthem. Remember, our goal is to learn something about events and building object controlswith events, not to learn everything there is to know about events in Alice. You’ll beginwith When the world starts.
1. Click the create new event button, and then click When the world starts. A
new event tile of that form will appear in the Events area.
2. This event functions the same as the default event, which you have already
seen. It will cause a method to run whenever the world starts. You can
change the form of the When the world starts event to make a method run
continuously while the word is playing. To do so, right click the new event
tile (make sure you click on the blue background of the tile itself, and not a
parameter within the tile.) On the menu, three items will appear: delete,
change to, and disable. The delete option will remove an event from your
world. The disable option will keep the event, but it will not function until
you again right-click the event and enable it. You need to change the form
of our event, so click change to, and then click While the world is running.
Now you can see a more sophisticated version of an event handler, as
shown in Figure 3-10.
FIGURE 3-9: When the world starts event tile.
FIGURE 3-8: A list of the nine Alice event types.
3 Chapter C5777 36525 9/21/05 1:49 PM Page 11

12 Chapter 3 • Events in Three-Demensional Space
3. Note that the When the world starts event has been changed to the form
While the world is running. This event tile has places for three different
event handlers. You can tell the world what methods to run when the
world begins to run, during the time that the world is running, and when
the world ends running. This format for an event in Alice is called the BDE
format, for Before, During, and After. There are BDE formats for several dif-
ferent events. What you see in Figure 3-10 is only one of several event types
with the BDE format. You are going to make the pink ballerina spin to her
right while the word is running.
4. Click the pinkBallerina tile in the Object tree and drag and drop a
pinkBallerina turn tile into our event tile in place of None following the
phrase During:. Choose the values left and 1 revolution for the direction
and amount parameters.
5. Now play our world again. Notice two things—first, the pink ballerina con-
tinues to spin while the word is running, and second, when the world
starts, she spins more quickly. Restart the world, and you will see this hap-
pen. Why does she spin more quickly when the world starts? This is a side
effect of two event handlers running at the same time. Both spin as the
default event handler causes the pink ballerina to spin left. Combined with
the spin from the new event you just added, she spins twice as fast the first
time around.
6. Change the direction of the spin to right in the while the world is running
method and then run the world again. Now what happens? The pink balle-
rina doesn’t spin at all the first time, because the two methods triggered by
the two events cancel each other out. After the first method stops, she spins
to her right. Two events or methods that overlap may sometimes cause unin-
tended results known as side effects. Professionals who test computer soft-
ware routinely check for such side effects.
FIGURE 3-10: While the world is running event tile.
3 Chapter C5777 36525 9/21/05 1:49 PM Page 12

13Tutorial 3A—Events in Alice
THE WHEN ANY KEY IS TYPED EVENT
Alice has a When any key is typed event that can be used to add controls or user interactionto a world. The event trigger will be the press of a key, and the event handler can be almostanything that can be coded in an Alice method.
To add a When any key is typed event tile to the world:
1. Click the create new event button again, and this time click When any key
is typed from the menu that appears. This event type will cause a method
to run whenever a key is pressed. It takes two parameters: the first is the
key that will trigger the event, and the second is the method that will serve
as the event handler. The event tile is shown in Figure 3-11.
2. Let’s set up an event and give it a try. Click the any key box and you will be
allowed to select a key from a drop-down menu. The menu contains a list
of several control keys, such as space for the space bar and enter for the
enter key, followed by the words, letters, and numbers with small arrow-
heads after them. These small arrowheads show us that these menu items
lead to sub-menus, with the various letter and number keys listed on the
sub-menus.
3. Select letter from the menu and then the letter B for blue as the trigger key
for this event. Then click the blueBallerina tile in the Object tree and then
the methods tab in the Details area. Drag a blueBallerina turn method tile
from the Details area and drop it into the event tile in place of Nothing;
choose right and 1 revolution as values for the direction and amount
parameters.
4. Now play the Alice world. Wait at least one second until the opening move
is complete, then try the B key a few times. Each time you press it, the blue
ballerina spins to her right. If you hold down the B key, notice that she will
not continue to spin. Note that Alice event triggers are not case sensitive—
this event will be triggered by a capital B or a lowercase b. Stop the world
when you are finished experimenting.
FIGURE 3-11: When any key is typed event tile.
3 Chapter C5777 36525 9/21/05 1:49 PM Page 13

14 Chapter 3 • Events in Three-Demensional Space
THE WHILE ANY KEY IS PRESSED EVENT
You can change the form of the When any key is typed event to make a method run continu-ously as long as the triggering key is held down.
To change to a While any key is pressed event:
1. Right-click the when any key is pressed event tile, click change to, and
then click while any key is pressed. Now you can see a more sophisticated
version of an event handler, similar to the one you saw above for While the
world is running, as shown in Figure 3-12.
2. Notice that the B key is still in place as our trigger, but that the three event
handlers are now all empty. Drag and drop a blueBallerina turn tile into
place after During:, as you did before, with the values right and 1 revolution
as parameters.
3. Now play the world again, and, after the opening move is complete, try
pressing and holding down the B key a few times for different durations.
Notice that even though the method calls for the ballerina to turn one com-
plete revolution, when you let go of the key the method stops, even if the
ballerina is in mid turn.
THE WHEN THE MOUSE IS CLICKED ON ANYTHING EVENT
Alice has an event type that will cause a method to run whenever the mouse is clicked onan object. Let’s experiment with it.
To add a When the mouse is clicked on anything event to the world:
1. Click the create new event button, and select when the mouse is clicked on
something from the menu that appears. A new tile of this type will be added
to the Events area, as shown in Figure 3-13. New events are added to the bot-
tom of the Events area, so it may be necessary to scroll down in the Events
area to find the new event.
FIGURE 3-12: While any key is pressed event tile.
3 Chapter C5777 36525 9/21/05 1:49 PM Page 14

15Tutorial 3A—Events in Alice
2. You’re going to create an event to make the blueBallerina roll one revolu-
tion whenever the mouse is clicked on her. First, click the word anything
in our new event tile, and a menu of the objects in this Alice world will
appear. Select blueBallerina, the entire blueBallerina as our target object.
Next, make sure that the blueBallerina is selected in the Object tree, and
that the methods tab is selected in the Details area. Drag the blueBallerina
roll tile from the methods tab and drop it to replace Nothing in our event
tile. Choose the values right and 1 revolution for the direction and amount
parameters.
3. Now play the world and try our new method. After the opening move, click
the blue ballerina and watch her roll. The B key event is still active, so you
can try that also. Experiment a little. What happens if you click the blue
ballerina while holding down the B key to make her turn? The two meth-
ods combine to cause unexpected results. If things get really messed up,
you can restart the world and try again.
ADDITIONAL NOTES ABOUT MOUSE EVENTS
Sometimes it is very difficult to click an object while it is moving, so it is best to choose astationary object as the target object. For example, you could put a tree into the world andmake the ballerina spin while the mouse is pressed on the tree. In the interest of time, youwill skip that for now, but you may want to try it on your own some time.
You can change the When the mouse is clicked on something event to be While the mouse isclicked on something, with the BDE format. This change will be similar to what you didwith the When any key is typed and While any key is pressed event types.
Alice also has an event type to let users change the position of an object while a world isrunning. This event type is Let the mouse move <objects>. However, this event typerequires the use of a data structure called a list, which isn’t covered until Chapter 8, sowe’ll look at it when we get there.
FIGURE 3-13: When the mouse is clicked on anything event tile.
3 Chapter C5777 36525 9/21/05 1:49 PM Page 15

16 Chapter 3 • Events in Three-Demensional Space
TUTORIAL 3B—BUILDING CAMERA CONTROLS WITH EVENTS
In this tutorial, you are going to build controls to allow the user to manipulate the camerawhile a world is running. The tutorial will be brief because Alice has several event typeswith built-in event handlers for camera control.
OPEN AN EXISTING WORLD
You are going to add some camera controls to the lakeSkaterDemoStart world that isincluded with the Alice software.
1. First, start the Alice software. If it is already open, then close it and open it
again to make sure that the old Alice world has been cleared from the com-
puter’s memory. When the Welcome to Alice! dialog box appears, open the
lakeSkaterDemoStart world from the Examples tab. Be careful—this is not
the same lakeSkater world that you saw in Chapter 1, but a similar world
named lakeSkaterDemoStart. lakeSkaterDemoStart is a nice world to use for
experimenting with camera controls because it contains some interesting
winter scenery with a frozen lake, hills, and trees.
2. Note that once the world loads, you can see the world window with three sets
of blue arrows below it to manipulate the camera, as shown in Figure 3-14.
The curved arrow on the right is the camera’s tilt control. It is used to tilt the camera up ordown, similar to the way that you might tilt your head up and down. The center control is amixed control, to zoom and pan the camera. A camera can zoom in and zoom out, and pan
FIGURE 3-14: The LakeSkaterDemoStart world window with the camera controls at the bottom.
3 Chapter C5777 36525 9/21/05 1:49 PM Page 16

17Tutorial 3B—Building Camera Controls with Events
left and pan right. Zooming in means the camera is moved in closer to get a tighter shot ofsomething, so that it fills more of the screen. Zooming out means the camera is moved outfurther to get a longer shot of something, so that it becomes smaller on the screen. Panningmeans to turn the camera left or right without moving the position of the camera, althoughit is possible that you could pan and move at the same time.
Most cameras have a lens that will allow the photographer to zoom in and zoom out with-out moving the camera. In Alice, you zoom in and zoom out by actually moving the cameraforward and backward.
Remember, an object in 3-D space can move in six different directions: forward, backward,left, right, up, and down. The left set of arrows at the bottom of the world window is themove control, which provides controls to move the camera left and right, and up and down,while the vertical arrows in the center set move the camera forward and backward.
Take a few minutes to experiment with the camera controls and explore the landscape inthis Alice world. Try to see if you understand the concepts of tilt, zoom, pan, and move.Pick an object, such as a particular tree, and see if you can frame it in the world window. Toframe an object means to position the camera so that it fills the screen. You could frame anindividual object, a group of objects, or a particular scene.
The blue arrows can be used to control the Alice camera before a world starts, but theydon’t work once a world is running. There are three Alice events designed to let us manipu-late the camera once a world is running:
� Let the mouse orient the camera
� Let the mouse move the camera
� Let the arrow keys move the camera
We’ll look at each one individually.
THE LET THE MOUSE ORIENT THE CAMERA EVENT
In this section, you will let the mouse orient the camera.
1. Click the create new event button, and you can now see a list of the nine
event types in Alice, as shown earlier in Figure 3-8. Select Let the mouse
orient the camera, the last item in the list. You should see a new event of
this type appear in the Event area, as shown in Figure 3-15.
3 Chapter C5777 36525 9/21/05 1:49 PM Page 17

18 Chapter 3 • Events in Three-Demensional Space
2. This event calls a special hidden event handler that will let the user pan
the camera with the mouse when an Alice world is running. You cannot tilt
or zoom the camera with this event, you can only pan left and right.
3. Play the world and try panning left and right by dragging the mouse. After
you are finished experimenting, stop the Alice world.
THE LET THE MOUSE MOVE THE CAMERA EVENT
Alice has an event to allow the user to move the camera by clicking and dragging the mousearound the window for the playing world.
1. Click the create new event button, and this time click the second-to-last
item in the list, Let the mouse move the camera. As before, you should see
a new event of this type appear in the Event area, as shown in Figure 3-16.
2. Note that this event is only slightly different from the Let the mouse orient
the camera event. It allows the user to pan the camera left and right (not
move the camera as the name implies), and move the camera backward and
forward.
3. Play the world and then test the new event by dragging the mouse. Do you
see how this is different from Let the mouse orient the camera? When you
are finished, stop the world before continuing.
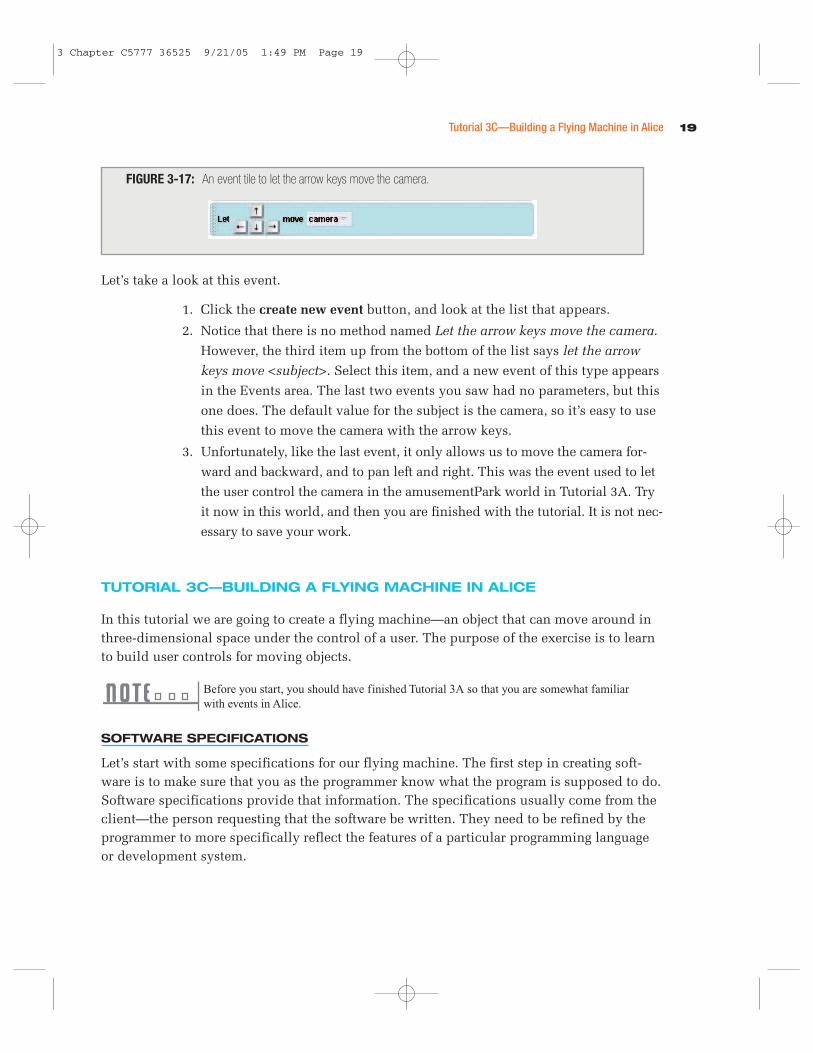
THE LET THE ARROW KEYS MOVE THE CAMERA EVENT
A separate event in Alice allows the user to move the camera while the world is running byusing the arrow keys, as shown in Figure 3-17.
FIGURE 3-16: Let the mouse move the camera event tile.
FIGURE 3-15: Let the mouse orient the camera event tile.
3 Chapter C5777 36525 9/21/05 1:49 PM Page 18
19Tutorial 3C—Building a Flying Machine in Alice
Let’s take a look at this event.
1. Click the create new event button, and look at the list that appears.
2. Notice that there is no method named Let the arrow keys move the camera.
However, the third item up from the bottom of the list says let the arrow
keys move <subject>. Select this item, and a new event of this type appears
in the Events area. The last two events you saw had no parameters, but this
one does. The default value for the subject is the camera, so it’s easy to use
this event to move the camera with the arrow keys.
3. Unfortunately, like the last event, it only allows us to move the camera for-
ward and backward, and to pan left and right. This was the event used to let
the user control the camera in the amusementPark world in Tutorial 3A. Try
it now in this world, and then you are finished with the tutorial. It is not nec-
essary to save your work.
TUTORIAL 3C—BUILDING A FLYING MACHINE IN ALICE
In this tutorial we are going to create a flying machine—an object that can move around inthree-dimensional space under the control of a user. The purpose of the exercise is to learnto build user controls for moving objects.
Before you start, you should have finished Tutorial 3A so that you are somewhat familiarwith events in Alice.
SOFTWARE SPECIFICATIONS
Let’s start with some specifications for our flying machine. The first step in creating soft-ware is to make sure that you as the programmer know what the program is supposed to do.Software specifications provide that information. The specifications usually come from theclient—the person requesting that the software be written. They need to be refined by theprogrammer to more specifically reflect the features of a particular programming languageor development system.
FIGURE 3-17: An event tile to let the arrow keys move the camera.
3 Chapter C5777 36525 9/21/05 1:49 PM Page 19

20 Chapter 3 • Events in Three-Demensional Space
In this part of the tutorial, you will review and refine the specifications but not actually cre-ate the code. Remember the program development cycle discussed in the last chapter—design, code, test, and debug? The development of clear specifications is part of the designprocess that should occur before coding begins.
In this case, the following specification will be given as a starting point for the flyingmachine world:
1. It should contain a flying machine in a somewhat realistic environment.
2. The flying machine should be able to move in three-dimensional space.
3. There should be user controls to turn the object up, down, left, and right
while the flying machine is in motion.
4. The user should be able to find the flying machine if it moves off camera.
REFINING SPECIFICATIONS
Let’s refine each of these specifications by adding more precise details. First, you need tofind objects in the Alice object galleries that could serve as our flying machine, and pickone of them.
1. Start the Alice software and open a blank world with the grass template.
Next, click the ADD OBJECTS button to look at the Alice galleries. The
Vehicles folder seems like a good place to start, so let’s look there. Scroll
through it, and you will see object class tiles for a Biplane, a Blimp, a
Helicopter, a Jet, a NavyJet, and a Seaplane, as shown in Figure 3-18. Don’t
add anything to the world yet; you are just looking through the galleries for
ideas to help in refining the specifications.
2. So far, you have worked with the grass template, so let’s pick for our speci-
fications the seaplane and start with the water template for this world.
Right now you’re just putting together the specifications, so close the object
gallery and note the revision to the first specification, as follows:
1. Create a water world with a seaplane in it.
FIGURE 3-18: Some of the object class tiles from the Vehicles folder in the Local Gallery.
3 Chapter C5777 36525 9/21/05 1:49 PM Page 20

21Tutorial 3C—Building a Flying Machine in Alice
3. Our specifications call for the world to look somewhat realistic, so let’s add
a few items to our water world to make it look better. The vehicle gallery
contains a sailboat, and the environment gallery contains two different
islands. You can use these. Our revised first specification looks like this:
1. Create a water world with a seaplane in it:a. Select the water template.b. Add a seaplane to the world.c. Add a few more items—perhaps an island or two, and a sailboat.
4. Our second specification says that the object should be able to move in
three-dimensional space. To do this you will create an event to keep the sea-
plane moving while the world is playing. The primitive move method has
parameters for distance and amount. Our refined specifications will call for
the seaplane to move forward, with 1 meter as the amount. This event will
keep happening while the world is running—as soon as the seaplane fin-
ishes moving forward 1 meter, it will move forward another meter, and so
on, for as long as the world runs. Our revised second specification is:
2. Create an event—while the world is running, do seaplane move forward
one meter.
5. The primitive move method has additional parameters that are not often
used. We can get to them by clicking the word more in the turn method and
then selecting style from the list that appears. Four styles are available, as
seen in Figure 3-19: gently, begin gently, end gently, and abruptly. Gently
means that our movement will begin and end gently. Abruptly means that
the movement will be at a constant speed. If we choose abruptly, then the
motion of our seaplane will look more even.
So, now, our specification should say:
2. Create an event—while the world is running do: seaplane move forward
one meter, style = abruptly.
FIGURE 3-19: The move and turn events have four style parameters.
3 Chapter C5777 36525 9/21/05 1:49 PM Page 21

22 Chapter 3 • Events in Three-Demensional Space
6. Our specifications don’t call for us to be able to modify the seaplane’s
speed, so for now we will assume the speed to be constant. When we set up
and then test the world, we can change the speed by changing the distance
parameter for each move from 1 meter to a larger or smaller amount. We
need user controls to make the seaplane turn up, down, left, and right. The
built-in method for controlling an object with the keyboard lets us move
objects, but not turn them. We need to build our own controls—left arrow
to turn left, right arrow to turn right, down arrow to turn down, and up
arrow to turn up. The turn method has two commonly used parameters—
direction and amount. We need to decide what direction and amount each
key will make the seaplane turn.
Left and right are easy, but the turn method does not have parameters up
and down, it has parameters forward and backward. Is turning up the same
as turning forward or backward? Try this: stand or sit facing straight ahead.
Tilt your head backward. Did your face move up or down? We can see that
turning backward makes an object’s orientation turn up, and, conversely,
turning forward makes an object’s orientation turn down.
We also need to decide how much the seaplane will turn each time we
press one of the arrow keys. Try one-eighth of a revolution. That’s equiva-
lent to 45 degrees. So, all together, we have the following control event
specifications:
3. Create four turn control events:a. When the left arrow key is pressed turn left 1/8 revolution.b. When the right arrow key is pressed turn right 1/8 revolution.c. When the up arrow key is pressed turn backward 1/8 revolution.d. When the down arrow key is pressed turn up left 1/8 revolution.
7. Finally, the fourth specifications says that the user needs to be able to find
the flying machine if it moves off camera, which we can probably expect to
happen at some point. There are several ways to do this, but one simple
way is to choose a key to let the user point the camera at the seaplane
whenever that key is pressed. Let’s use an easy key—the spacebar. Our find
the seaplane event specification now looks like this:
4. Create an event: When the spacebar is pressed, point the camera at the
seaplane.
3 Chapter C5777 36525 9/21/05 1:49 PM Page 22

23Tutorial 3C—Building a Flying Machine in Alice
Let’s list all of our more detailed specifications together:
1. Create a world with a seaplane in it:
a. Select the water template.
b. Add a seaplane to the world.
c. Add and position a few more items—an island or two, and a sailboat.
2. Create an event—while the world is running do: seaplane move forward 1
meter, style = abruptly.
3. Create four turn control events:
a. When the left arrow key is pressed turn left 1/8 revolution.
b. When the right arrow key is pressed turn right 1/8 revolution.
c. When the up arrow key is pressed turn backward 1/8 revolution.
d. When the down arrow key is pressed turn up left 1/8 revolution.
4. Create an event: When the spacebar is pressed, point the camera at the
seaplane.
CODE THE WORLD—SPECIFICATION 1, CREATE A WORLD WITH A SEAPLANE
Now you are ready to create our world. Following the specifications, you need to create awater world with a seaplane in it. Note that this specification is a bit subjective. What lookssomewhat realistic to one person may not look so to another.
To create the world with a seaplane:
1. First, start the Alice software. If it is already open, close it and restart Alice.
2. When the Welcome to Alice! dialog box appears, select the water world
from the Templates tab.
3. Once the blank water world opens, click the ADD OBJECTS button, and
add a seaplane to the world from the Vehicles folder in the Local Gallery.
Also add a sailboat from this gallery and position it somewhere on the
water away from the seaplane.
4. Next, add an island or two from the Environment gallery and position them
in the world.
5. When you are finished setting up the world, click the DONE button.
CODE THE WORLD—SPECIFICATION 2, ANIMATE THE SEAPLANE
An event is needed to make the seaplane move continuously. Almost everything is spelledout in the second revised specification—while the world is running do: seaplane moveforward 1 meter, style = abruptly.
3 Chapter C5777 36525 9/21/05 1:49 PM Page 23

24 Chapter 3 • Events in Three-Demensional Space
To animate the seaplane:
1. Click the create new event button and choose when the world starts for the
event type.
2. When the new event appears in the Events area, right click it. From the
menu that appears, select change to, and then When the world is running.
3. Next, make sure that the seaplane is selected in the Object tree and that the
methods tab is selected. Drag and drop a seaplane move tile into the event in
place of None following the phrase During:.
4. Choose the values, forward and 1 meter, for the direction and amount para-
meters. Also, click the word more, and then select style from the menu that
appears, similar to Figure 3-19, and change the style to abruptly so that our
seaplane will move more smoothly. If the seaplane moves too slowly when
the world is tested, remember that we can change the speed by changing
the distance parameter for this event.
CODE THE WORLD—SPECIFICATION 3, ADD TURN CONTROLS
Next, four control events are needed to add controls to turn the seaplane, one for each of thefour arrow keys.
To add turn controls to the world:
1. Click the create new event button, and select When any key is typed as our
event type. A new event tile of the form When any key is typed will appear
in the Events area.
2. Change the any key parameter to be the left arrow key.
3. Make sure that the seaplane is selected in the Object tree and that the meth-
ods tab is selected in the Details area. Drag and drop a seaplane turn
method tile into our new event in place of Nothing following the word Do,
and choose the value left for the direction parameter. For the amount para-
meter, select other from the amount parameter list. A calculator style key-
pad will appear. Type 1 / 8 and then click OK.
4. Now the world has a control to turn left. In a similar manner, create three
more events to provide controls to turn right, up, and down.
CODE THE WORLD—SPECIFICATION 4, ADD A FIND CONTROL
We can expect that our seaplane will move off camera while the world is running, so ourspecifications call for us to create a method to point the camera at the seaplane when thespacebar is pressed.
3 Chapter C5777 36525 9/21/05 1:49 PM Page 24

25Tutorial 3C—Building a Flying Machine in Alice
To add a control to find the seaplane:
1. Start by clicking the create new event button, and select When any key is
typed as the event type.
2. When the new event appears, click the any key parameter and select space
from the menu that appears, similar to what you did above to create arrow
key controls.
3. Next, make sure that the camera is selected in the Object tree and that the
methods tab is selected in the Details area. Drag and drop a camera point at
method tile into your new event in place of None, and select seaplane, the
entire seaplane when the menu of possible target objects appears.
4. When this step is finished, you should be done coding your seaplane
world. Save the world with the name seaplane before continuing.
TEST THE WORLD
Once you are finished coding the world, try it to see if it works properly—that is, accordingto the specifications. A test plan is often used in professional software development. Such aplan often includes a series of questions based on the specifications. You need to determineif this world meets each of the original specifications, so your test plan might include thefollowing questions:
1. Does the flying machine look like a flying machine in a somewhat realistic
environment? (This is a fairly subjective requirement, with a loose standard
for what looks realistic.)
2. Is it able to move in three-dimensional space?
3. Are there user controls to turn the object up, down, left, and right while the
object is in motion? Does each of these work properly?
4. Can the user find the flying machine if it moves off camera?
To see if the world meets the specifications, play it several times, answering the questionsfrom the test plan as you go along. It might also be good to let someone else, such as a fel-low student or your instructor, do so as well. We want to see if it meets our specifications,and if there are any obvious problems or side effects in our finished world.
DEBUG THE WORLD
This may be the hardest part of the entire exercise. If the world does not meet one of the spec-ifications, see if you can isolate the problem and fix it. Usually the problem lies in the coderelated to the failed specification, but not always—sometimes it is a side-effect of other code.
Remember that software development is a cycle. If we find any errors, we need to repeat thesteps in the cycle to review our design specifications, code any changes, test, and debug.
3 Chapter C5777 36525 9/21/05 1:49 PM Page 25

Chapter 3 • Events in Three-Demensional Space26
CHAPTER SUMMARY
This chapter consisted of discussions of events and three- dimensional space, followed by hands-on tutorials involvingevents, camera controls, and construction of a flying machine in Alice.
The discussion of events included the following:
� A modern personal computer requires event-driven programming for its graphical user interface (GUI),
which has icons on the computer screen and a mouse to control a pointer that can be used to operate
the computer.
� An event occurs when an event listener detects an event trigger and responds by running an event handler.
� An event listener is a combination of hardware and software that repeatedly checks the computer system
for the event trigger.
� An event trigger can be any activity or condition that causes an event to occur.
� An event handler is a method that is activated when the event trigger occurs. Almost any method can
serve as an event handler.
� When the event listener detects an event trigger, an event handler is called into action.
The discussion of three-dimensional (3D) space included the following:
� A dimension is a way of measuring something. It is an abstract idea invented by people to help us under-
stand something.
� Only one dimension is needed to measure the location of a point on a straight line; on a flat plane two
dimensions are needed; and in real physical space, three dimensions.
� A three-dimensional space, like the physical world around us, is sometimes referred to as Euclidean
3-space. The 3D worlds of Alice are Euclidean 3-spaces.
� The concepts of distance and direction together make up an object’s point of view.
� A direction or position in relation to a scale of measurement, is called absolute, and from the point of
view of a specific object, called object-relative.
� In Alice’s Euclidean 3-space, there are six object-relative directions—forward, backward, left, right, up, and
down; and six object-relative positions—in front of, behind, to the left of, to the right of, above, and below.
In Tutorial 3A you explored events in Alice and saw some of Alice’s nine different event types that can be used to pro-vide mouse and keyboard controls. You also saw that some events have a BDE format, for Before, During, and After anevent trigger occurs.
In Tutorial 3B you experimented with events to create camera controls. You saw that a camera can move, pan, tilt, and zoom.
In Tutorial 3C you created a flying machine in Alice. You applied what you had learned about events and the ideas fromChapter 2 about a program development cycle to design the world before coding it.
3 Chapter C5777 36525 9/21/05 1:49 PM Page 26

Review Questions 27
REVIEW QUESTIONS
1. Define each of the following terms:
� absolute direction
� BDE event format
� Cartesian coordinates
� command driven interface
� dimension
� Euclidean 3-space
� event handler
� event listener
� event trigger
� event-driven programming
� frame (v.)
� Graphical User Interface (GUI)
� object-relative direction
� object-relative position
� ordered pair
� orientation
� pan
� point of view
� quantification
� side effects
� tilt
� zoom
2. Describe the difference between the terms object-relative position and object-relative direction.
3. Create a drawing of a number line and with three objects at different points on the number line. Foreach object, list the following:
a. The point of view of each object.b. The distance and absolute direction from each object to each other object.c. The object-relative direction from that object to each of the other two objects.
4. Describe the function of each of the blue arrows that appears below the world window in the stan-dard Alice interface.
5. Does the cabin in Alice’s lakeSkaterDemoStart world have a back door? To answer this questionyou will need to open the world and manipulate the camera using the camera controls below theworld window so that you can see the back of the cabin.
6. Describe an Alice event of the BDE format that will make a ballerina jump up when a key ispressed, spin around for as long as the key is held down, and return to the ground when the userlets go of the key.
7. Individual keyboard events can be created to control the camera.
a. Describe a set of two keyboard events to allow the user to pan the camera.b. Describe a set of two keyboard events to allow the user to tilt the camera.c. Describe a set of two keyboard events to allow the user to zoom the camera in and out.
8. List and describe each of the four style parameters that can be used for move, turn, and roll methods:Why is the abruptly style used in the following event:
While the world is running, move seaplane forward 1 meter style = abruptly?
9. Why wasn’t Alice’s built-in method for moving a seaplane used in the seaplane world in Tutorial 3C?
10. Look up the aviation terms pitch, roll, and yaw in a dictionary, or find a website on basic aeronau-tics, and read about them. How are they related to our seaplane controls?
3 Chapter C5777 36525 9/21/05 1:49 PM Page 27

Chapter 3 • Events in Three-Demensional Space28
EXERCISES
1. Create a simple Alice world to let a user drive a vehicle, such as a car, around on the ground. TheVehicles folder in the Local Gallery has a Zamboni machine, which could be driven around thelakeSkaterDemoStart world.
2. Create your own set of camera controls to allow the user to pan, tilt, zoom, and move the camera.The built-in controls do not allow for all of these options. Remember, in Alice we simulate zoomingin and out by moving the camera closer or farther away.
3. Alice has a Take Picture button to capture the image from the world window while a world is play-ing. Open the amusementPark world and, for each of the following, use the camera control arrowsto frame the object or group of objects before playing the world, then play the world and take theindicated picture:
a. The octopus ride.b. The Alice fountain.c. The roller coaster and carousel together.d. One of the teacups in the teacup ride.e. Most of the amusement park, shown from slightly up in the air.
4. Modify the seaplane world to include a barrel roll control. This would make the plane roll one com-plete revolution whenever a chosen key is pressed.
5. Modify the seaplane world to make the seaplane’s propeller spin while the world is running. Doesthe propeller need to turn or roll to make this work?
6. Modify the seaplane world to make the turn events work more smoothly. To do this, we can changethe form of each of the turn control events to while the arrow key is pressed instead of when thearrow key is typed, and change each turn’s style to abruptly. You may also want to experiment withthe turn at speed primitive method in place of the turn method.
7. Try to create a speed control for the seaplane world. This is a little harder than it looks. Here aresome ideas:
a. You may want to create an object variable for the seaplane called speed.b. Set the initial value of the speed to zero.c. Pass the speed variable as the amount parameter to the seaplane’s movement method instead of a fixed
amount.d. Create two controls—one to increase the speed and one to decrease it. We can use a math expression to
do this.
8. Create a simple Alice world to fly a pterodactyl instead of a plane. There is a pterodactyl in theAnimals folder in the Local Gallery. You could build a method to flap its wings while the world inmotion, and then use this as an event handler while the world is in motion. Do the wings need toturn or roll? Should they go up and then down, or down and then up? How far should they move?
3 Chapter C5777 36525 9/21/05 1:49 PM Page 28

Exercises 29
9. Find a book or a website with information on how to make films or videos so that you can learnmore about camera movements, angles, etc. to improve your Alice worlds. Write a short report onyour findings for your fellow students.
10. The people folder in the local Alice gallery has ebuilder and shebuilder classes to let you createyour own Alice characters. These characters will have built in methods to stand, walk, and showdifferent moods. Experiment with the hebuilder or shebuilder in a simple Alice world to build acharacter of your own, and then create several events to show what the character can do. Forexample, create a method to make the character walk when the “W” key is pressed, or showconfusion when the “C” key is pressed.
3 Chapter C5777 36525 9/21/05 1:50 PM Page 29

3 Chapter C5777 36525 9/21/05 1:50 PM Page 30