EVDO 3
59
Mandalay PLMN/PSTN Yangon HLR Yangon MSCe (V) CS & PS Domain PDSN AAA BSC Network Structure
description
EVDO
Transcript of EVDO 3

Mandalay
PLMNPSTN
Yangon
HLR
Yangon
MSCe (V)
CS amp PS Domain
PDSN AAA
BSC
Network Structure
BTS3606 Specifications
70dBA (The noise varies with the ambient temperature)
Cabinet dimensions (Height x Width x Depth)
1400 mm x 600 x 650
Power supply -48 V DC (ranging from-40 V DC to -60 V DC)
Weight 250 kg
Power consumption 3400 W
Ambient temperature -5C to 50 C
Relative humidity 5 to 90
Equipment room noise
Reliability
Availability 99999
MTBF 100000 h
MTTR 1 h
BTS3606 Cabinet
(1) CDDU Sub rack
(2) Switch Box
(3)Fan Box
(4) Ccombined Sub rack
(5) Cable Trough
(6)Power Supply Sub rack
(7)Tool Kit
Installing Cabinet on Cement Floor
Installation Flowchart
Positioning the Cabinet Determine the installation position of expansion bolts according to the
positioning dimensions specified in the project design and construction
blueprint and the location of installation holes on the cabinet Use a tape to determine the marking points according to the distance from the
cabinet to the reference Connect the marking points and draw two lines with 520 mm (2047in) interval
and parallel to the reference
441 mm
520 mm650 mm
600 mm
Front side
Side of cabinet
Positioning the Holes for Expansion BoltsPositioning the Holes for Expansion Bolts
A Settling the Drill BitA Settling the Drill Bit B Drilling HolesB Drilling Holes
Move the base away and use a chisel to punch a pitMove the base away and use a chisel to punch a pit
1)1) Hold the drill stock firmly and keep the drill Hold the drill stock firmly and keep the drill bit vertical to the groundbit vertical to the ground
2) Drill holes while using a vacuum cleaner to 2) Drill holes while using a vacuum cleaner to clean the dust inside the holesclean the dust inside the holes
Installing Expansion bolt Assembly
A M12 Expansion Bolt AssemblyA M12 Expansion Bolt Assembly B Putting the Expansion Bolt Assembly into the HoleB Putting the Expansion Bolt Assembly into the Hole
1) Slightly tighten the expansion bolt assembly1) Slightly tighten the expansion bolt assembly
2) Put the expansion bolt assembly vertically into the hole2) Put the expansion bolt assembly vertically into the hole
3) Use a hammer to strike the expansion bolt assembly into the hole completely3) Use a hammer to strike the expansion bolt assembly into the hole completely
Unscrewing the bolt and accessory
Installing the Frame
1 Install the lower frame bull Key points
The insulation plate is installed correctly The fixing hole of the lower frame aimed at the hole of
the expansion bolt Ensure the space between the two lower frames
2 Level the lower framebull Key points
Use the horizontal ruler Ensure that two directions of the cabinet are level The leveling pad is inserted to the correct place
BTS3606
Install Module RF sub rack
Installing the CTRM
proceed as follows
Make sure the subrack is clean
Wear an antistatic wrist strap and insert the grounding terminal of the wrist strap into the anti-static jack on the
side door of the cabinet
Align the CTRM with the relevant slot
Insert the CTRM gently along the guide rail until it is fully engaged as shown Figure
Installing the CTRM
Installing the CDDU Inside the Cabinet
Installing the CDDU Inside the Cabinet
To install the CDDU inside the cabinet proceed as follows Remove the cover of the cabinet and the front plate of the CDDU subrack Make sure that the internal
CDDU subrack is clean Wear an antistatic wrist strap and insert the grounding terminal of the wrist strap into the anti-static jack on
the side door of the cabinet Remove four black protective covers from both sides of the CDDU Align the CDDU with the relevant slot Insert the CDDU gently along the guide rail until it is fully engaged as shown in
Installing the CDDU inside the cabinet
SECTOR 1TX 1
SECTOR 1RX 1
SECTOR 2RX 2
SECTOR 3RX 3
SECTOR 2TX 2
SECTOR 3TX 3
Installing the CDDU Inside the Cabinet
Internal cable wiring BTS 3606
S(111) Configuration
The S(111) refers to the configuration of three sectors each of which is configured
with one carrier
Shows RF cable connections indicated by blue lines
S(222) Configuration
The S(222) refers to the configuration of three sectors each of which is configured with two
carriers
Install Power Cable
-48V2
-48V1
GND
PGND
Bar Ground
BTS 3606
PS48300
The overview of power connection
Installing Power Cables
The installation procedures of power cables includebull1048698 Preparing power cables
tools required tape wire nipper paper knife hydraulic pliers insulating tapes soldering iron and solder wire
bull1048698 Connecting power cables Connecting - 48 V Power Cable (Blue) or +24 V Power Cable (Red) to the Cabinet)
-48V1 -48V2-48V1
BGND
PGND
RECTIFIER -48V1BTS3606 -48V1
RECTIFIER -48V2BTS3606 -48V2
RECTIFIER BGND1BTS3606 BGND1
RECTIFIER BGND2BTS3606 BGND2
3) The Power label (-48V From BTS3606) 4) The Power label (BGND From BTS3606)
Format Label on BTS3606
BTS3606 -48V1RECTIFIER -48V1
BTS3606 -48V2RECTIFIER -48V2
BTS3606 BGND1RECTIFIER BGND1
BTS3606 BGND2RECTIFIER BGND2
1) The Power label (-48V From Rectifier) 2) The Power label (BGND From Rectifier)
Format Label on Emerson Rectifier
Format Label on Emerson Rectifier and BTS3606
GROUND BAR BTS3606 PGND
BTS3606 PGND GROUND BAR
5) The PGND label (PGND From BTS3606) 6) The PGND label (PGND From GROUND BAR)
Install indoor cable ladder and feeder
Over view of RF Antenna ampFeeder
Sect
or
Antenna
Feeder
Jumper
Jumper
BTS cabinet
Antenna
Feeder
Jumper
Jumper
BTS cabinet
Sect
orC
BSe
ctor
Sect
orA
Indoor feeder cable
Outdoor feeder cable
Grounding of lightning protection
Install Cable Ladder Install and feeder
Label No 1 TX1RX1
Label No 2 TX2RX2
Label No 3 TX3RX3
Install Cable Ladder Install and feeder
Install outdoor RF Antenna ampFeeder
Over view of RF Antenna ampFeeder
Sect
or
Antenna
Feeder
Jumper
Jumper
BTS cabinet
Antenna
Feeder
Jumper
Jumper
BTS cabinet
Sect
orC
BSe
ctor
Sect
orA
Indoor feeder cable
Outdoor feeder cable
Hoisting the Antenna onto the tower
Jumper shield
Antennas should be in the 45-degree protected area of lightning rod
The curve waterproof of Cable Jumper
Curve water proofCover water proof
Prepare 78 antenna and feeder connector(See the installation manual for more details)
Prepare Feeder Connector
Feeder Clamp
Route Antenna and Feeder
Make a water curve for the antenna and feeder outside the feeder window entry
Installed antenna and feeder nameplates
Installed 3-in-1 feeder clip
Route Antenna and Feeder
Grounding of installed on the tower When feeder along the tower equal or less than 60 M
Grounding point
1
2
3 4
Grounding of installed on the tower When feeder along the tower equal or less than 60 M
Lead the earthing cable of a lightning earthing clip from the top down The appropriate angle formed by the
clip and the feeder is not greater than 15 Connect the earthling cables of the lightning earthling clips outside to the outdoor earthling bar or well-
grounded outdoor cabling rack
Peel the antirust paint off the grounded point of the cabling rack Recoat the point with antirust paint after
installing the earthling cable Coat all the exposed connectors that are difficult to be wrapped in insulation
tape with antirust paint to guarantee good contact
Install Lightning earthling Clip
From top to down
From down to top
Lightning Earth Accessories
Wrap the feeder with three layers of waterproof-insulating tape squeeze the tape stuck to the feeder to make sure no air remains between the tape layers then wrap the water proof-insulating tape with PVC tape again to prevent wearing and aging of the water proof-insulating tape
Wind three layers of waterproof and insulation tape around the clip Wind the first layer from the bottom up the second from the top down and the third from the bottom up
Install Lightning earthing Clip
Water proof protection on the window inlet
Shield silicone water prove at feeder inlet (inside amp outside container)
Inside container Outside container
Install GPSGLONASS
Position requirements for installation
WHBB23B The support of the GPSGLONASS antenna is fixed firmly In the area of its 90-degree vertical angle there is no barrier (check when the GPSGLONASS antenna exist) ยด Support antenna GPS ยางแนนหนา ทำามม 90 องศากบแนวระนาบ 05
1) Surrounding building or other obstacles 2) GPSGLONASS Antenna
Installing Antenna Stands on Tower
Installing UNONCORE GPS Antenna
UTONCORE GPS antenna
Lightning arrester
Installing UNONCORE GPS Antenna
Installing UNONCORE GPS Antenna
BTS
Ant
Label 1
Label 2
Label 3
Label 4
Feeder Label
Installing label feederInstalling label feeder
DDPU DDPU DDPU
ANT_0B
ANT_0B
ANT_0B
ANT_0B
ANT_0A
ANT_0A
ANT_0A
ANT_0A
ANT_0B
ANT_0B
ANT_0A
ANT_0A
ANT_0B
ANT_0B
ANT_0A
ANT_0A
ANT A ANT B ANT C
ANT_0B
ANT_0A
ANT_1B
ANT_1A
ANT_2B
ANT_2A
ANT_3B
ANT_3A
Sector 2 Sector 4Sector 1 Sector 5Sector3
ANT_4B
ANT_4A
Jumper 14
Jumper 12
Feeder 1-58 or 78
SECTOR 0TRX 1
SECTOR 0TRX 2
SECTOR 1TRX 1
SECTOR 1TRX 2
SECTOR 2TRX 1
SECTOR 2TRX 2
The label on Jumper Feeder BTS3606
Label on indoor Jumper BTS3606
The letters on the feeder nameplates are described as followsANT_0A Transmitting ANT_0B ReceivingANT_1ATransmitting ANT_1B ReceivingANT_2A Transmitting ANT_2B Receiving
Install Antenna and Feeder System ndash Feeder Nameplate
ANT _ 0B
ANT _ 0A
ANT _ 1B
ANT _ 1Al
ANT _ 2B
ANT _ 2A
7) The label on outdoor feeder 78
GPS _ 0
8) The label on outdoor feeder GPS
SECTOR 0 SECTOR 1 SECTOR 2
E1 Cable wiring
E1 cable connect from BTS to DDF boxOn the wall
DB 25
DDF box
External alarm E1 cable Grounding point
E1 cable terminate with DDF box
From BTS To microwave rack Connect ground cable
Vertical Ladder for DDF
DDF bundle cable for optic metro 1000 and Metro 3000
25 cmWrap heat shrink
1 cmStick label
25 cmBundle cable line
Please put the heat shrink bundle the cable and stick label according this picture Which connector not use cover it with the plastic sack
Thanks
- Slide 1
- BTS3606 Specifications
- BTS3606 Cabinet
- Installing Cabinet on Cement Floor
- Positioning the Cabinet
- Positioning the Holes for Expansion Bolts
- Installing Expansion bolt Assembly
- Unscrewing the bolt and accessory
- Installing the Frame
- BTS3606
- Slide 11
- Installing the CDDU Inside the Cabinet
- Slide 13
- Internal cable wiring BTS 3606
- S(111) Configuration
- S(222) Configuration
- Slide 17
- Slide 18
- Slide 19
- Format Label on BTS3606
- Format Label on Emerson Rectifier
- Format Label on Emerson Rectifier and BTS3606
- Slide 23
- Over view of RF Antenna ampFeeder
- Slide 25
- Slide 26
- Slide 27
- Slide 28
- Slide 29
- Slide 30
- Slide 31
- Slide 32
- Prepare Feeder Connector
- Slide 34
- Route Antenna and Feeder
- Route Antenna and Feeder
- Slide 37
- Slide 38
- Install Lightning earthling Clip
- Lightning Earth Accessories
- Slide 41
- Install Lightning earthing Clip
- Water proof protection on the window inlet
- Install GPSGLONASS
- Position requirements for installation
- Installing Antenna Stands on Tower
- Installing UNONCORE GPS Antenna
- Slide 48
- Slide 49
- Slide 50
- Installing label feeder
- Slide 52
- Install Antenna and Feeder System ndash Feeder Nameplate
- Slide 54
- Slide 55
- Slide 56
- Slide 57
- Slide 58
- Slide 59
-

Installing the CDDU Inside the Cabinet
Installing the CDDU Inside the Cabinet
To install the CDDU inside the cabinet proceed as follows Remove the cover of the cabinet and the front plate of the CDDU subrack Make sure that the internal
CDDU subrack is clean Wear an antistatic wrist strap and insert the grounding terminal of the wrist strap into the anti-static jack on
the side door of the cabinet Remove four black protective covers from both sides of the CDDU Align the CDDU with the relevant slot Insert the CDDU gently along the guide rail until it is fully engaged as shown in
Installing the CDDU inside the cabinet
SECTOR 1TX 1
SECTOR 1RX 1
SECTOR 2RX 2
SECTOR 3RX 3
SECTOR 2TX 2
SECTOR 3TX 3
Installing the CDDU Inside the Cabinet
Internal cable wiring BTS 3606
S(111) Configuration
The S(111) refers to the configuration of three sectors each of which is configured
with one carrier
Shows RF cable connections indicated by blue lines
S(222) Configuration
The S(222) refers to the configuration of three sectors each of which is configured with two
carriers
Install Power Cable
-48V2
-48V1
GND
PGND
Bar Ground
BTS 3606
PS48300
The overview of power connection
Installing Power Cables
The installation procedures of power cables includebull1048698 Preparing power cables
tools required tape wire nipper paper knife hydraulic pliers insulating tapes soldering iron and solder wire
bull1048698 Connecting power cables Connecting - 48 V Power Cable (Blue) or +24 V Power Cable (Red) to the Cabinet)
-48V1 -48V2-48V1
BGND
PGND
RECTIFIER -48V1BTS3606 -48V1
RECTIFIER -48V2BTS3606 -48V2
RECTIFIER BGND1BTS3606 BGND1
RECTIFIER BGND2BTS3606 BGND2
3) The Power label (-48V From BTS3606) 4) The Power label (BGND From BTS3606)
Format Label on BTS3606
BTS3606 -48V1RECTIFIER -48V1
BTS3606 -48V2RECTIFIER -48V2
BTS3606 BGND1RECTIFIER BGND1
BTS3606 BGND2RECTIFIER BGND2
1) The Power label (-48V From Rectifier) 2) The Power label (BGND From Rectifier)
Format Label on Emerson Rectifier
Format Label on Emerson Rectifier and BTS3606
GROUND BAR BTS3606 PGND
BTS3606 PGND GROUND BAR
5) The PGND label (PGND From BTS3606) 6) The PGND label (PGND From GROUND BAR)
Install indoor cable ladder and feeder
Over view of RF Antenna ampFeeder
Sect
or
Antenna
Feeder
Jumper
Jumper
BTS cabinet
Antenna
Feeder
Jumper
Jumper
BTS cabinet
Sect
orC
BSe
ctor
Sect
orA
Indoor feeder cable
Outdoor feeder cable
Grounding of lightning protection
Install Cable Ladder Install and feeder
Label No 1 TX1RX1
Label No 2 TX2RX2
Label No 3 TX3RX3
Install Cable Ladder Install and feeder
Install outdoor RF Antenna ampFeeder
Over view of RF Antenna ampFeeder
Sect
or
Antenna
Feeder
Jumper
Jumper
BTS cabinet
Antenna
Feeder
Jumper
Jumper
BTS cabinet
Sect
orC
BSe
ctor
Sect
orA
Indoor feeder cable
Outdoor feeder cable
Hoisting the Antenna onto the tower
Jumper shield
Antennas should be in the 45-degree protected area of lightning rod
The curve waterproof of Cable Jumper
Curve water proofCover water proof
Prepare 78 antenna and feeder connector(See the installation manual for more details)
Prepare Feeder Connector
Feeder Clamp
Route Antenna and Feeder
Make a water curve for the antenna and feeder outside the feeder window entry
Installed antenna and feeder nameplates
Installed 3-in-1 feeder clip
Route Antenna and Feeder
Grounding of installed on the tower When feeder along the tower equal or less than 60 M
Grounding point
1
2
3 4
Grounding of installed on the tower When feeder along the tower equal or less than 60 M
Lead the earthing cable of a lightning earthing clip from the top down The appropriate angle formed by the
clip and the feeder is not greater than 15 Connect the earthling cables of the lightning earthling clips outside to the outdoor earthling bar or well-
grounded outdoor cabling rack
Peel the antirust paint off the grounded point of the cabling rack Recoat the point with antirust paint after
installing the earthling cable Coat all the exposed connectors that are difficult to be wrapped in insulation
tape with antirust paint to guarantee good contact
Install Lightning earthling Clip
From top to down
From down to top
Lightning Earth Accessories
Wrap the feeder with three layers of waterproof-insulating tape squeeze the tape stuck to the feeder to make sure no air remains between the tape layers then wrap the water proof-insulating tape with PVC tape again to prevent wearing and aging of the water proof-insulating tape
Wind three layers of waterproof and insulation tape around the clip Wind the first layer from the bottom up the second from the top down and the third from the bottom up
Install Lightning earthing Clip
Water proof protection on the window inlet
Shield silicone water prove at feeder inlet (inside amp outside container)
Inside container Outside container
Install GPSGLONASS
Position requirements for installation
WHBB23B The support of the GPSGLONASS antenna is fixed firmly In the area of its 90-degree vertical angle there is no barrier (check when the GPSGLONASS antenna exist) ยด Support antenna GPS ยางแนนหนา ทำามม 90 องศากบแนวระนาบ 05
1) Surrounding building or other obstacles 2) GPSGLONASS Antenna
Installing Antenna Stands on Tower
Installing UNONCORE GPS Antenna
UTONCORE GPS antenna
Lightning arrester
Installing UNONCORE GPS Antenna
Installing UNONCORE GPS Antenna
BTS
Ant
Label 1
Label 2
Label 3
Label 4
Feeder Label
Installing label feederInstalling label feeder
DDPU DDPU DDPU
ANT_0B
ANT_0B
ANT_0B
ANT_0B
ANT_0A
ANT_0A
ANT_0A
ANT_0A
ANT_0B
ANT_0B
ANT_0A
ANT_0A
ANT_0B
ANT_0B
ANT_0A
ANT_0A
ANT A ANT B ANT C
ANT_0B
ANT_0A
ANT_1B
ANT_1A
ANT_2B
ANT_2A
ANT_3B
ANT_3A
Sector 2 Sector 4Sector 1 Sector 5Sector3
ANT_4B
ANT_4A
Jumper 14
Jumper 12
Feeder 1-58 or 78
SECTOR 0TRX 1
SECTOR 0TRX 2
SECTOR 1TRX 1
SECTOR 1TRX 2
SECTOR 2TRX 1
SECTOR 2TRX 2
The label on Jumper Feeder BTS3606
Label on indoor Jumper BTS3606
The letters on the feeder nameplates are described as followsANT_0A Transmitting ANT_0B ReceivingANT_1ATransmitting ANT_1B ReceivingANT_2A Transmitting ANT_2B Receiving
Install Antenna and Feeder System ndash Feeder Nameplate
ANT _ 0B
ANT _ 0A
ANT _ 1B
ANT _ 1Al
ANT _ 2B
ANT _ 2A
7) The label on outdoor feeder 78
GPS _ 0
8) The label on outdoor feeder GPS
SECTOR 0 SECTOR 1 SECTOR 2
E1 Cable wiring
E1 cable connect from BTS to DDF boxOn the wall
DB 25
DDF box
External alarm E1 cable Grounding point
E1 cable terminate with DDF box
From BTS To microwave rack Connect ground cable
Vertical Ladder for DDF
DDF bundle cable for optic metro 1000 and Metro 3000
25 cmWrap heat shrink
1 cmStick label
25 cmBundle cable line
Please put the heat shrink bundle the cable and stick label according this picture Which connector not use cover it with the plastic sack
Thanks
- Slide 1
- BTS3606 Specifications
- BTS3606 Cabinet
- Installing Cabinet on Cement Floor
- Positioning the Cabinet
- Positioning the Holes for Expansion Bolts
- Installing Expansion bolt Assembly
- Unscrewing the bolt and accessory
- Installing the Frame
- BTS3606
- Slide 11
- Installing the CDDU Inside the Cabinet
- Slide 13
- Internal cable wiring BTS 3606
- S(111) Configuration
- S(222) Configuration
- Slide 17
- Slide 18
- Slide 19
- Format Label on BTS3606
- Format Label on Emerson Rectifier
- Format Label on Emerson Rectifier and BTS3606
- Slide 23
- Over view of RF Antenna ampFeeder
- Slide 25
- Slide 26
- Slide 27
- Slide 28
- Slide 29
- Slide 30
- Slide 31
- Slide 32
- Prepare Feeder Connector
- Slide 34
- Route Antenna and Feeder
- Route Antenna and Feeder
- Slide 37
- Slide 38
- Install Lightning earthling Clip
- Lightning Earth Accessories
- Slide 41
- Install Lightning earthing Clip
- Water proof protection on the window inlet
- Install GPSGLONASS
- Position requirements for installation
- Installing Antenna Stands on Tower
- Installing UNONCORE GPS Antenna
- Slide 48
- Slide 49
- Slide 50
- Installing label feeder
- Slide 52
- Install Antenna and Feeder System ndash Feeder Nameplate
- Slide 54
- Slide 55
- Slide 56
- Slide 57
- Slide 58
- Slide 59
-

Over view of RF Antenna ampFeeder
Sect
or
Antenna
Feeder
Jumper
Jumper
BTS cabinet
Antenna
Feeder
Jumper
Jumper
BTS cabinet
Sect
orC
BSe
ctor
Sect
orA
Indoor feeder cable
Outdoor feeder cable
Grounding of lightning protection
Install Cable Ladder Install and feeder
Label No 1 TX1RX1
Label No 2 TX2RX2
Label No 3 TX3RX3
Install Cable Ladder Install and feeder
Install outdoor RF Antenna ampFeeder
Over view of RF Antenna ampFeeder
Sect
or
Antenna
Feeder
Jumper
Jumper
BTS cabinet
Antenna
Feeder
Jumper
Jumper
BTS cabinet
Sect
orC
BSe
ctor
Sect
orA
Indoor feeder cable
Outdoor feeder cable
Hoisting the Antenna onto the tower
Jumper shield
Antennas should be in the 45-degree protected area of lightning rod
The curve waterproof of Cable Jumper
Curve water proofCover water proof
Prepare 78 antenna and feeder connector(See the installation manual for more details)
Prepare Feeder Connector
Feeder Clamp
Route Antenna and Feeder
Make a water curve for the antenna and feeder outside the feeder window entry
Installed antenna and feeder nameplates
Installed 3-in-1 feeder clip
Route Antenna and Feeder
Grounding of installed on the tower When feeder along the tower equal or less than 60 M
Grounding point
1
2
3 4
Grounding of installed on the tower When feeder along the tower equal or less than 60 M
Lead the earthing cable of a lightning earthing clip from the top down The appropriate angle formed by the
clip and the feeder is not greater than 15 Connect the earthling cables of the lightning earthling clips outside to the outdoor earthling bar or well-
grounded outdoor cabling rack
Peel the antirust paint off the grounded point of the cabling rack Recoat the point with antirust paint after
installing the earthling cable Coat all the exposed connectors that are difficult to be wrapped in insulation
tape with antirust paint to guarantee good contact
Install Lightning earthling Clip
From top to down
From down to top
Lightning Earth Accessories
Wrap the feeder with three layers of waterproof-insulating tape squeeze the tape stuck to the feeder to make sure no air remains between the tape layers then wrap the water proof-insulating tape with PVC tape again to prevent wearing and aging of the water proof-insulating tape
Wind three layers of waterproof and insulation tape around the clip Wind the first layer from the bottom up the second from the top down and the third from the bottom up
Install Lightning earthing Clip
Water proof protection on the window inlet
Shield silicone water prove at feeder inlet (inside amp outside container)
Inside container Outside container
Install GPSGLONASS
Position requirements for installation
WHBB23B The support of the GPSGLONASS antenna is fixed firmly In the area of its 90-degree vertical angle there is no barrier (check when the GPSGLONASS antenna exist) ยด Support antenna GPS ยางแนนหนา ทำามม 90 องศากบแนวระนาบ 05
1) Surrounding building or other obstacles 2) GPSGLONASS Antenna
Installing Antenna Stands on Tower
Installing UNONCORE GPS Antenna
UTONCORE GPS antenna
Lightning arrester
Installing UNONCORE GPS Antenna
Installing UNONCORE GPS Antenna
BTS
Ant
Label 1
Label 2
Label 3
Label 4
Feeder Label
Installing label feederInstalling label feeder
DDPU DDPU DDPU
ANT_0B
ANT_0B
ANT_0B
ANT_0B
ANT_0A
ANT_0A
ANT_0A
ANT_0A
ANT_0B
ANT_0B
ANT_0A
ANT_0A
ANT_0B
ANT_0B
ANT_0A
ANT_0A
ANT A ANT B ANT C
ANT_0B
ANT_0A
ANT_1B
ANT_1A
ANT_2B
ANT_2A
ANT_3B
ANT_3A
Sector 2 Sector 4Sector 1 Sector 5Sector3
ANT_4B
ANT_4A
Jumper 14
Jumper 12
Feeder 1-58 or 78
SECTOR 0TRX 1
SECTOR 0TRX 2
SECTOR 1TRX 1
SECTOR 1TRX 2
SECTOR 2TRX 1
SECTOR 2TRX 2
The label on Jumper Feeder BTS3606
Label on indoor Jumper BTS3606
The letters on the feeder nameplates are described as followsANT_0A Transmitting ANT_0B ReceivingANT_1ATransmitting ANT_1B ReceivingANT_2A Transmitting ANT_2B Receiving
Install Antenna and Feeder System ndash Feeder Nameplate
ANT _ 0B
ANT _ 0A
ANT _ 1B
ANT _ 1Al
ANT _ 2B
ANT _ 2A
7) The label on outdoor feeder 78
GPS _ 0
8) The label on outdoor feeder GPS
SECTOR 0 SECTOR 1 SECTOR 2
E1 Cable wiring
E1 cable connect from BTS to DDF boxOn the wall
DB 25
DDF box
External alarm E1 cable Grounding point
E1 cable terminate with DDF box
From BTS To microwave rack Connect ground cable
Vertical Ladder for DDF
DDF bundle cable for optic metro 1000 and Metro 3000
25 cmWrap heat shrink
1 cmStick label
25 cmBundle cable line
Please put the heat shrink bundle the cable and stick label according this picture Which connector not use cover it with the plastic sack
Thanks
- Slide 1
- BTS3606 Specifications
- BTS3606 Cabinet
- Installing Cabinet on Cement Floor
- Positioning the Cabinet
- Positioning the Holes for Expansion Bolts
- Installing Expansion bolt Assembly
- Unscrewing the bolt and accessory
- Installing the Frame
- BTS3606
- Slide 11
- Installing the CDDU Inside the Cabinet
- Slide 13
- Internal cable wiring BTS 3606
- S(111) Configuration
- S(222) Configuration
- Slide 17
- Slide 18
- Slide 19
- Format Label on BTS3606
- Format Label on Emerson Rectifier
- Format Label on Emerson Rectifier and BTS3606
- Slide 23
- Over view of RF Antenna ampFeeder
- Slide 25
- Slide 26
- Slide 27
- Slide 28
- Slide 29
- Slide 30
- Slide 31
- Slide 32
- Prepare Feeder Connector
- Slide 34
- Route Antenna and Feeder
- Route Antenna and Feeder
- Slide 37
- Slide 38
- Install Lightning earthling Clip
- Lightning Earth Accessories
- Slide 41
- Install Lightning earthing Clip
- Water proof protection on the window inlet
- Install GPSGLONASS
- Position requirements for installation
- Installing Antenna Stands on Tower
- Installing UNONCORE GPS Antenna
- Slide 48
- Slide 49
- Slide 50
- Installing label feeder
- Slide 52
- Install Antenna and Feeder System ndash Feeder Nameplate
- Slide 54
- Slide 55
- Slide 56
- Slide 57
- Slide 58
- Slide 59
-

Install Cable Ladder Install and feeder
Label No 1 TX1RX1
Label No 2 TX2RX2
Label No 3 TX3RX3
Install Cable Ladder Install and feeder
Install outdoor RF Antenna ampFeeder
Over view of RF Antenna ampFeeder
Sect
or
Antenna
Feeder
Jumper
Jumper
BTS cabinet
Antenna
Feeder
Jumper
Jumper
BTS cabinet
Sect
orC
BSe
ctor
Sect
orA
Indoor feeder cable
Outdoor feeder cable
Hoisting the Antenna onto the tower
Jumper shield
Antennas should be in the 45-degree protected area of lightning rod
The curve waterproof of Cable Jumper
Curve water proofCover water proof
Prepare 78 antenna and feeder connector(See the installation manual for more details)
Prepare Feeder Connector
Feeder Clamp
Route Antenna and Feeder
Make a water curve for the antenna and feeder outside the feeder window entry
Installed antenna and feeder nameplates
Installed 3-in-1 feeder clip
Route Antenna and Feeder
Grounding of installed on the tower When feeder along the tower equal or less than 60 M
Grounding point
1
2
3 4
Grounding of installed on the tower When feeder along the tower equal or less than 60 M
Lead the earthing cable of a lightning earthing clip from the top down The appropriate angle formed by the
clip and the feeder is not greater than 15 Connect the earthling cables of the lightning earthling clips outside to the outdoor earthling bar or well-
grounded outdoor cabling rack
Peel the antirust paint off the grounded point of the cabling rack Recoat the point with antirust paint after
installing the earthling cable Coat all the exposed connectors that are difficult to be wrapped in insulation
tape with antirust paint to guarantee good contact
Install Lightning earthling Clip
From top to down
From down to top
Lightning Earth Accessories
Wrap the feeder with three layers of waterproof-insulating tape squeeze the tape stuck to the feeder to make sure no air remains between the tape layers then wrap the water proof-insulating tape with PVC tape again to prevent wearing and aging of the water proof-insulating tape
Wind three layers of waterproof and insulation tape around the clip Wind the first layer from the bottom up the second from the top down and the third from the bottom up
Install Lightning earthing Clip
Water proof protection on the window inlet
Shield silicone water prove at feeder inlet (inside amp outside container)
Inside container Outside container
Install GPSGLONASS
Position requirements for installation
WHBB23B The support of the GPSGLONASS antenna is fixed firmly In the area of its 90-degree vertical angle there is no barrier (check when the GPSGLONASS antenna exist) ยด Support antenna GPS ยางแนนหนา ทำามม 90 องศากบแนวระนาบ 05
1) Surrounding building or other obstacles 2) GPSGLONASS Antenna
Installing Antenna Stands on Tower
Installing UNONCORE GPS Antenna
UTONCORE GPS antenna
Lightning arrester
Installing UNONCORE GPS Antenna
Installing UNONCORE GPS Antenna
BTS
Ant
Label 1
Label 2
Label 3
Label 4
Feeder Label
Installing label feederInstalling label feeder
DDPU DDPU DDPU
ANT_0B
ANT_0B
ANT_0B
ANT_0B
ANT_0A
ANT_0A
ANT_0A
ANT_0A
ANT_0B
ANT_0B
ANT_0A
ANT_0A
ANT_0B
ANT_0B
ANT_0A
ANT_0A
ANT A ANT B ANT C
ANT_0B
ANT_0A
ANT_1B
ANT_1A
ANT_2B
ANT_2A
ANT_3B
ANT_3A
Sector 2 Sector 4Sector 1 Sector 5Sector3
ANT_4B
ANT_4A
Jumper 14
Jumper 12
Feeder 1-58 or 78
SECTOR 0TRX 1
SECTOR 0TRX 2
SECTOR 1TRX 1
SECTOR 1TRX 2
SECTOR 2TRX 1
SECTOR 2TRX 2
The label on Jumper Feeder BTS3606
Label on indoor Jumper BTS3606
The letters on the feeder nameplates are described as followsANT_0A Transmitting ANT_0B ReceivingANT_1ATransmitting ANT_1B ReceivingANT_2A Transmitting ANT_2B Receiving
Install Antenna and Feeder System ndash Feeder Nameplate
ANT _ 0B
ANT _ 0A
ANT _ 1B
ANT _ 1Al
ANT _ 2B
ANT _ 2A
7) The label on outdoor feeder 78
GPS _ 0
8) The label on outdoor feeder GPS
SECTOR 0 SECTOR 1 SECTOR 2
E1 Cable wiring
E1 cable connect from BTS to DDF boxOn the wall
DB 25
DDF box
External alarm E1 cable Grounding point
E1 cable terminate with DDF box
From BTS To microwave rack Connect ground cable
Vertical Ladder for DDF
DDF bundle cable for optic metro 1000 and Metro 3000
25 cmWrap heat shrink
1 cmStick label
25 cmBundle cable line
Please put the heat shrink bundle the cable and stick label according this picture Which connector not use cover it with the plastic sack
Thanks
- Slide 1
- BTS3606 Specifications
- BTS3606 Cabinet
- Installing Cabinet on Cement Floor
- Positioning the Cabinet
- Positioning the Holes for Expansion Bolts
- Installing Expansion bolt Assembly
- Unscrewing the bolt and accessory
- Installing the Frame
- BTS3606
- Slide 11
- Installing the CDDU Inside the Cabinet
- Slide 13
- Internal cable wiring BTS 3606
- S(111) Configuration
- S(222) Configuration
- Slide 17
- Slide 18
- Slide 19
- Format Label on BTS3606
- Format Label on Emerson Rectifier
- Format Label on Emerson Rectifier and BTS3606
- Slide 23
- Over view of RF Antenna ampFeeder
- Slide 25
- Slide 26
- Slide 27
- Slide 28
- Slide 29
- Slide 30
- Slide 31
- Slide 32
- Prepare Feeder Connector
- Slide 34
- Route Antenna and Feeder
- Route Antenna and Feeder
- Slide 37
- Slide 38
- Install Lightning earthling Clip
- Lightning Earth Accessories
- Slide 41
- Install Lightning earthing Clip
- Water proof protection on the window inlet
- Install GPSGLONASS
- Position requirements for installation
- Installing Antenna Stands on Tower
- Installing UNONCORE GPS Antenna
- Slide 48
- Slide 49
- Slide 50
- Installing label feeder
- Slide 52
- Install Antenna and Feeder System ndash Feeder Nameplate
- Slide 54
- Slide 55
- Slide 56
- Slide 57
- Slide 58
- Slide 59
-

Route Antenna and Feeder
Make a water curve for the antenna and feeder outside the feeder window entry
Installed antenna and feeder nameplates
Installed 3-in-1 feeder clip
Route Antenna and Feeder
Grounding of installed on the tower When feeder along the tower equal or less than 60 M
Grounding point
1
2
3 4
Grounding of installed on the tower When feeder along the tower equal or less than 60 M
Lead the earthing cable of a lightning earthing clip from the top down The appropriate angle formed by the
clip and the feeder is not greater than 15 Connect the earthling cables of the lightning earthling clips outside to the outdoor earthling bar or well-
grounded outdoor cabling rack
Peel the antirust paint off the grounded point of the cabling rack Recoat the point with antirust paint after
installing the earthling cable Coat all the exposed connectors that are difficult to be wrapped in insulation
tape with antirust paint to guarantee good contact
Install Lightning earthling Clip
From top to down
From down to top
Lightning Earth Accessories
Wrap the feeder with three layers of waterproof-insulating tape squeeze the tape stuck to the feeder to make sure no air remains between the tape layers then wrap the water proof-insulating tape with PVC tape again to prevent wearing and aging of the water proof-insulating tape
Wind three layers of waterproof and insulation tape around the clip Wind the first layer from the bottom up the second from the top down and the third from the bottom up
Install Lightning earthing Clip
Water proof protection on the window inlet
Shield silicone water prove at feeder inlet (inside amp outside container)
Inside container Outside container
Install GPSGLONASS
Position requirements for installation
WHBB23B The support of the GPSGLONASS antenna is fixed firmly In the area of its 90-degree vertical angle there is no barrier (check when the GPSGLONASS antenna exist) ยด Support antenna GPS ยางแนนหนา ทำามม 90 องศากบแนวระนาบ 05
1) Surrounding building or other obstacles 2) GPSGLONASS Antenna
Installing Antenna Stands on Tower
Installing UNONCORE GPS Antenna
UTONCORE GPS antenna
Lightning arrester
Installing UNONCORE GPS Antenna
Installing UNONCORE GPS Antenna
BTS
Ant
Label 1
Label 2
Label 3
Label 4
Feeder Label
Installing label feederInstalling label feeder
DDPU DDPU DDPU
ANT_0B
ANT_0B
ANT_0B
ANT_0B
ANT_0A
ANT_0A
ANT_0A
ANT_0A
ANT_0B
ANT_0B
ANT_0A
ANT_0A
ANT_0B
ANT_0B
ANT_0A
ANT_0A
ANT A ANT B ANT C
ANT_0B
ANT_0A
ANT_1B
ANT_1A
ANT_2B
ANT_2A
ANT_3B
ANT_3A
Sector 2 Sector 4Sector 1 Sector 5Sector3
ANT_4B
ANT_4A
Jumper 14
Jumper 12
Feeder 1-58 or 78
SECTOR 0TRX 1
SECTOR 0TRX 2
SECTOR 1TRX 1
SECTOR 1TRX 2
SECTOR 2TRX 1
SECTOR 2TRX 2
The label on Jumper Feeder BTS3606
Label on indoor Jumper BTS3606
The letters on the feeder nameplates are described as followsANT_0A Transmitting ANT_0B ReceivingANT_1ATransmitting ANT_1B ReceivingANT_2A Transmitting ANT_2B Receiving
Install Antenna and Feeder System ndash Feeder Nameplate
ANT _ 0B
ANT _ 0A
ANT _ 1B
ANT _ 1Al
ANT _ 2B
ANT _ 2A
7) The label on outdoor feeder 78
GPS _ 0
8) The label on outdoor feeder GPS
SECTOR 0 SECTOR 1 SECTOR 2
E1 Cable wiring
E1 cable connect from BTS to DDF boxOn the wall
DB 25
DDF box
External alarm E1 cable Grounding point
E1 cable terminate with DDF box
From BTS To microwave rack Connect ground cable
Vertical Ladder for DDF
DDF bundle cable for optic metro 1000 and Metro 3000
25 cmWrap heat shrink
1 cmStick label
25 cmBundle cable line
Please put the heat shrink bundle the cable and stick label according this picture Which connector not use cover it with the plastic sack
Thanks
- Slide 1
- BTS3606 Specifications
- BTS3606 Cabinet
- Installing Cabinet on Cement Floor
- Positioning the Cabinet
- Positioning the Holes for Expansion Bolts
- Installing Expansion bolt Assembly
- Unscrewing the bolt and accessory
- Installing the Frame
- BTS3606
- Slide 11
- Installing the CDDU Inside the Cabinet
- Slide 13
- Internal cable wiring BTS 3606
- S(111) Configuration
- S(222) Configuration
- Slide 17
- Slide 18
- Slide 19
- Format Label on BTS3606
- Format Label on Emerson Rectifier
- Format Label on Emerson Rectifier and BTS3606
- Slide 23
- Over view of RF Antenna ampFeeder
- Slide 25
- Slide 26
- Slide 27
- Slide 28
- Slide 29
- Slide 30
- Slide 31
- Slide 32
- Prepare Feeder Connector
- Slide 34
- Route Antenna and Feeder
- Route Antenna and Feeder
- Slide 37
- Slide 38
- Install Lightning earthling Clip
- Lightning Earth Accessories
- Slide 41
- Install Lightning earthing Clip
- Water proof protection on the window inlet
- Install GPSGLONASS
- Position requirements for installation
- Installing Antenna Stands on Tower
- Installing UNONCORE GPS Antenna
- Slide 48
- Slide 49
- Slide 50
- Installing label feeder
- Slide 52
- Install Antenna and Feeder System ndash Feeder Nameplate
- Slide 54
- Slide 55
- Slide 56
- Slide 57
- Slide 58
- Slide 59
-

Grounding of installed on the tower When feeder along the tower equal or less than 60 M
Grounding point
1
2
3 4
Grounding of installed on the tower When feeder along the tower equal or less than 60 M
Lead the earthing cable of a lightning earthing clip from the top down The appropriate angle formed by the
clip and the feeder is not greater than 15 Connect the earthling cables of the lightning earthling clips outside to the outdoor earthling bar or well-
grounded outdoor cabling rack
Peel the antirust paint off the grounded point of the cabling rack Recoat the point with antirust paint after
installing the earthling cable Coat all the exposed connectors that are difficult to be wrapped in insulation
tape with antirust paint to guarantee good contact
Install Lightning earthling Clip
From top to down
From down to top
Lightning Earth Accessories
Wrap the feeder with three layers of waterproof-insulating tape squeeze the tape stuck to the feeder to make sure no air remains between the tape layers then wrap the water proof-insulating tape with PVC tape again to prevent wearing and aging of the water proof-insulating tape
Wind three layers of waterproof and insulation tape around the clip Wind the first layer from the bottom up the second from the top down and the third from the bottom up
Install Lightning earthing Clip
Water proof protection on the window inlet
Shield silicone water prove at feeder inlet (inside amp outside container)
Inside container Outside container
Install GPSGLONASS
Position requirements for installation
WHBB23B The support of the GPSGLONASS antenna is fixed firmly In the area of its 90-degree vertical angle there is no barrier (check when the GPSGLONASS antenna exist) ยด Support antenna GPS ยางแนนหนา ทำามม 90 องศากบแนวระนาบ 05
1) Surrounding building or other obstacles 2) GPSGLONASS Antenna
Installing Antenna Stands on Tower
Installing UNONCORE GPS Antenna
UTONCORE GPS antenna
Lightning arrester
Installing UNONCORE GPS Antenna
Installing UNONCORE GPS Antenna
BTS
Ant
Label 1
Label 2
Label 3
Label 4
Feeder Label
Installing label feederInstalling label feeder
DDPU DDPU DDPU
ANT_0B
ANT_0B
ANT_0B
ANT_0B
ANT_0A
ANT_0A
ANT_0A
ANT_0A
ANT_0B
ANT_0B
ANT_0A
ANT_0A
ANT_0B
ANT_0B
ANT_0A
ANT_0A
ANT A ANT B ANT C
ANT_0B
ANT_0A
ANT_1B
ANT_1A
ANT_2B
ANT_2A
ANT_3B
ANT_3A
Sector 2 Sector 4Sector 1 Sector 5Sector3
ANT_4B
ANT_4A
Jumper 14
Jumper 12
Feeder 1-58 or 78
SECTOR 0TRX 1
SECTOR 0TRX 2
SECTOR 1TRX 1
SECTOR 1TRX 2
SECTOR 2TRX 1
SECTOR 2TRX 2
The label on Jumper Feeder BTS3606
Label on indoor Jumper BTS3606
The letters on the feeder nameplates are described as followsANT_0A Transmitting ANT_0B ReceivingANT_1ATransmitting ANT_1B ReceivingANT_2A Transmitting ANT_2B Receiving
Install Antenna and Feeder System ndash Feeder Nameplate
ANT _ 0B
ANT _ 0A
ANT _ 1B
ANT _ 1Al
ANT _ 2B
ANT _ 2A
7) The label on outdoor feeder 78
GPS _ 0
8) The label on outdoor feeder GPS
SECTOR 0 SECTOR 1 SECTOR 2
E1 Cable wiring
E1 cable connect from BTS to DDF boxOn the wall
DB 25
DDF box
External alarm E1 cable Grounding point
E1 cable terminate with DDF box
From BTS To microwave rack Connect ground cable
Vertical Ladder for DDF
DDF bundle cable for optic metro 1000 and Metro 3000
25 cmWrap heat shrink
1 cmStick label
25 cmBundle cable line
Please put the heat shrink bundle the cable and stick label according this picture Which connector not use cover it with the plastic sack
Thanks
- Slide 1
- BTS3606 Specifications
- BTS3606 Cabinet
- Installing Cabinet on Cement Floor
- Positioning the Cabinet
- Positioning the Holes for Expansion Bolts
- Installing Expansion bolt Assembly
- Unscrewing the bolt and accessory
- Installing the Frame
- BTS3606
- Slide 11
- Installing the CDDU Inside the Cabinet
- Slide 13
- Internal cable wiring BTS 3606
- S(111) Configuration
- S(222) Configuration
- Slide 17
- Slide 18
- Slide 19
- Format Label on BTS3606
- Format Label on Emerson Rectifier
- Format Label on Emerson Rectifier and BTS3606
- Slide 23
- Over view of RF Antenna ampFeeder
- Slide 25
- Slide 26
- Slide 27
- Slide 28
- Slide 29
- Slide 30
- Slide 31
- Slide 32
- Prepare Feeder Connector
- Slide 34
- Route Antenna and Feeder
- Route Antenna and Feeder
- Slide 37
- Slide 38
- Install Lightning earthling Clip
- Lightning Earth Accessories
- Slide 41
- Install Lightning earthing Clip
- Water proof protection on the window inlet
- Install GPSGLONASS
- Position requirements for installation
- Installing Antenna Stands on Tower
- Installing UNONCORE GPS Antenna
- Slide 48
- Slide 49
- Slide 50
- Installing label feeder
- Slide 52
- Install Antenna and Feeder System ndash Feeder Nameplate
- Slide 54
- Slide 55
- Slide 56
- Slide 57
- Slide 58
- Slide 59
-
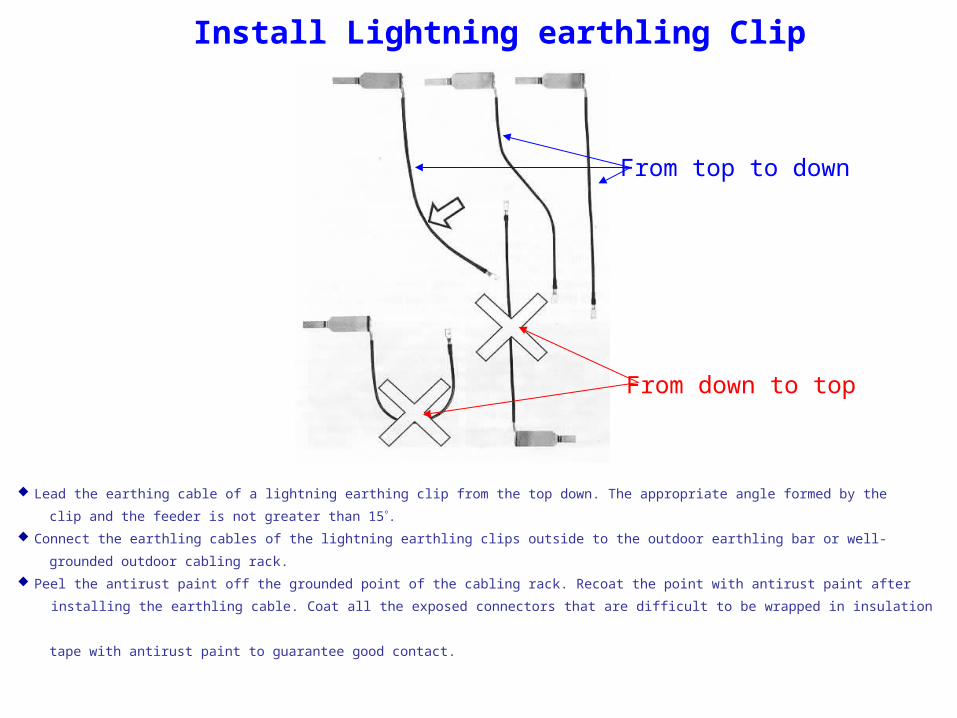

Installing UNONCORE GPS Antenna
Installing UNONCORE GPS Antenna
BTS
Ant
Label 1
Label 2
Label 3
Label 4
Feeder Label
Installing label feederInstalling label feeder
DDPU DDPU DDPU
ANT_0B
ANT_0B
ANT_0B
ANT_0B
ANT_0A
ANT_0A
ANT_0A
ANT_0A
ANT_0B
ANT_0B
ANT_0A
ANT_0A
ANT_0B
ANT_0B
ANT_0A
ANT_0A
ANT A ANT B ANT C
ANT_0B
ANT_0A
ANT_1B
ANT_1A
ANT_2B
ANT_2A
ANT_3B
ANT_3A
Sector 2 Sector 4Sector 1 Sector 5Sector3
ANT_4B
ANT_4A
Jumper 14
Jumper 12
Feeder 1-58 or 78
SECTOR 0TRX 1
SECTOR 0TRX 2
SECTOR 1TRX 1
SECTOR 1TRX 2
SECTOR 2TRX 1
SECTOR 2TRX 2
The label on Jumper Feeder BTS3606
Label on indoor Jumper BTS3606
The letters on the feeder nameplates are described as followsANT_0A Transmitting ANT_0B ReceivingANT_1ATransmitting ANT_1B ReceivingANT_2A Transmitting ANT_2B Receiving
Install Antenna and Feeder System ndash Feeder Nameplate
ANT _ 0B
ANT _ 0A
ANT _ 1B
ANT _ 1Al
ANT _ 2B
ANT _ 2A
7) The label on outdoor feeder 78
GPS _ 0
8) The label on outdoor feeder GPS
SECTOR 0 SECTOR 1 SECTOR 2
E1 Cable wiring
E1 cable connect from BTS to DDF boxOn the wall
DB 25
DDF box
External alarm E1 cable Grounding point
E1 cable terminate with DDF box
From BTS To microwave rack Connect ground cable
Vertical Ladder for DDF
DDF bundle cable for optic metro 1000 and Metro 3000
25 cmWrap heat shrink
1 cmStick label
25 cmBundle cable line
Please put the heat shrink bundle the cable and stick label according this picture Which connector not use cover it with the plastic sack
Thanks
- Slide 1
- BTS3606 Specifications
- BTS3606 Cabinet
- Installing Cabinet on Cement Floor
- Positioning the Cabinet
- Positioning the Holes for Expansion Bolts
- Installing Expansion bolt Assembly
- Unscrewing the bolt and accessory
- Installing the Frame
- BTS3606
- Slide 11
- Installing the CDDU Inside the Cabinet
- Slide 13
- Internal cable wiring BTS 3606
- S(111) Configuration
- S(222) Configuration
- Slide 17
- Slide 18
- Slide 19
- Format Label on BTS3606
- Format Label on Emerson Rectifier
- Format Label on Emerson Rectifier and BTS3606
- Slide 23
- Over view of RF Antenna ampFeeder
- Slide 25
- Slide 26
- Slide 27
- Slide 28
- Slide 29
- Slide 30
- Slide 31
- Slide 32
- Prepare Feeder Connector
- Slide 34
- Route Antenna and Feeder
- Route Antenna and Feeder
- Slide 37
- Slide 38
- Install Lightning earthling Clip
- Lightning Earth Accessories
- Slide 41
- Install Lightning earthing Clip
- Water proof protection on the window inlet
- Install GPSGLONASS
- Position requirements for installation
- Installing Antenna Stands on Tower
- Installing UNONCORE GPS Antenna
- Slide 48
- Slide 49
- Slide 50
- Installing label feeder
- Slide 52
- Install Antenna and Feeder System ndash Feeder Nameplate
- Slide 54
- Slide 55
- Slide 56
- Slide 57
- Slide 58
- Slide 59
-

Installing UNONCORE GPS Antenna
BTS
Ant
Label 1
Label 2
Label 3
Label 4
Feeder Label
Installing label feederInstalling label feeder
DDPU DDPU DDPU
ANT_0B
ANT_0B
ANT_0B
ANT_0B
ANT_0A
ANT_0A
ANT_0A
ANT_0A
ANT_0B
ANT_0B
ANT_0A
ANT_0A
ANT_0B
ANT_0B
ANT_0A
ANT_0A
ANT A ANT B ANT C
ANT_0B
ANT_0A
ANT_1B
ANT_1A
ANT_2B
ANT_2A
ANT_3B
ANT_3A
Sector 2 Sector 4Sector 1 Sector 5Sector3
ANT_4B
ANT_4A
Jumper 14
Jumper 12
Feeder 1-58 or 78
SECTOR 0TRX 1
SECTOR 0TRX 2
SECTOR 1TRX 1
SECTOR 1TRX 2
SECTOR 2TRX 1
SECTOR 2TRX 2
The label on Jumper Feeder BTS3606
Label on indoor Jumper BTS3606
The letters on the feeder nameplates are described as followsANT_0A Transmitting ANT_0B ReceivingANT_1ATransmitting ANT_1B ReceivingANT_2A Transmitting ANT_2B Receiving
Install Antenna and Feeder System ndash Feeder Nameplate
ANT _ 0B
ANT _ 0A
ANT _ 1B
ANT _ 1Al
ANT _ 2B
ANT _ 2A
7) The label on outdoor feeder 78
GPS _ 0
8) The label on outdoor feeder GPS
SECTOR 0 SECTOR 1 SECTOR 2
E1 Cable wiring
E1 cable connect from BTS to DDF boxOn the wall
DB 25
DDF box
External alarm E1 cable Grounding point
E1 cable terminate with DDF box
From BTS To microwave rack Connect ground cable
Vertical Ladder for DDF
DDF bundle cable for optic metro 1000 and Metro 3000
25 cmWrap heat shrink
1 cmStick label
25 cmBundle cable line
Please put the heat shrink bundle the cable and stick label according this picture Which connector not use cover it with the plastic sack
Thanks
- Slide 1
- BTS3606 Specifications
- BTS3606 Cabinet
- Installing Cabinet on Cement Floor
- Positioning the Cabinet
- Positioning the Holes for Expansion Bolts
- Installing Expansion bolt Assembly
- Unscrewing the bolt and accessory
- Installing the Frame
- BTS3606
- Slide 11
- Installing the CDDU Inside the Cabinet
- Slide 13
- Internal cable wiring BTS 3606
- S(111) Configuration
- S(222) Configuration
- Slide 17
- Slide 18
- Slide 19
- Format Label on BTS3606
- Format Label on Emerson Rectifier
- Format Label on Emerson Rectifier and BTS3606
- Slide 23
- Over view of RF Antenna ampFeeder
- Slide 25
- Slide 26
- Slide 27
- Slide 28
- Slide 29
- Slide 30
- Slide 31
- Slide 32
- Prepare Feeder Connector
- Slide 34
- Route Antenna and Feeder
- Route Antenna and Feeder
- Slide 37
- Slide 38
- Install Lightning earthling Clip
- Lightning Earth Accessories
- Slide 41
- Install Lightning earthing Clip
- Water proof protection on the window inlet
- Install GPSGLONASS
- Position requirements for installation
- Installing Antenna Stands on Tower
- Installing UNONCORE GPS Antenna
- Slide 48
- Slide 49
- Slide 50
- Installing label feeder
- Slide 52
- Install Antenna and Feeder System ndash Feeder Nameplate
- Slide 54
- Slide 55
- Slide 56
- Slide 57
- Slide 58
- Slide 59
-