E*Value Training Guide - UW Medicine
12
E*Value Training Guide How to Use Case Logs Students View Updated March 5, 2019 Author: Donna Painchaud, Dept of BIME
Transcript of E*Value Training Guide - UW Medicine

E*Value Training Guide How to Use Case Logs
Students View
Updated March 5, 2019 Author: Donna Painchaud, Dept of BIME

Page 1 of 10
HOW TO USE CASE LOGS (Student’s View) This document is used to aid you on how to use the Case Logs tool in the E*Value system.
Log into E*Value, select the .Clinical Encounters program. Click the Continue Login button .
Click on the Case Logs tab.
Under the Case Log Management Section > Manage Case Logs – Select Log New Case

Page 2 of 10
The Log New Case Screen appears.
On the MAIN tab (required fields are indicated with a red asterisk *).
• Course – Click on the drop down to select the course the encounter should be logged under: o Emergency Medicine Clerkship o Family Medicine Clerkship o Internal Medicine Clerkship o Obstetrics and Gynecology Clerkship o Pediatrics Clerkship o Psychiatry Clerkship o Neurology Clerkship o Neurosurgery Clerkship o Surgery Clerkship
• Care Setting – Click the radio button to select the Care Setting in which you had the patient encounter:
o Alternative Methods o Inpatient o Outpatient
Note: If you are not certain which care setting to select, please contact the clerkship department.

Page 3 of 10
• Interaction Dates – This is the date in which you had the patient encounter. • Notes – NO PATIENT ID (not required). This text box allows you to put any notes you would like to
reference for your case logs regarding the patient encounter. DO NOT include any information that will identify an individual patient.
Click the Next button or click on the Diag tab to enter in the Diagnosis.
The DIAGNOSIS tab appears.

Page 4 of 10
In the Diagnosis (Diag) window, the list of all the required clinical encounters for all departments will be listed. To filter the encounters list needed only for the clerkship you are submitting the patient encounter, use the
Group drop down (or click the funnel ) to select the clerkship in which the diagnosis can be found. The Group drop down is used to select diagnosis that are grouped together for selection based on the Clerkship.
• Emergency Medicine Clerkship • Family Medicine Clerkship • Internal Medicine Clerkship • Obstetrics and Gynecology Clerkship • Pediatrics Clerkship • Psychiatry Clerkship • Neurology Clerkship • Neurosurgery Clerkship • Surgery Clerkship
In this example, Family Medicine Clerkship has been selected. The list of diagnosis that are grouped into Family Medicine Clerkship now appear in the Diag* box to select from.

Page 5 of 10
NOTE: Diag* is a required field.
Use the Filter function to filter down the list by a specific name. For example: typing in “ch” – will narrow down the selection to anything with

Page 6 of 10
After you have selected your diagnosis group, select the diagnosis you are logging.
Select your role in the diagnosis* from the drop down menu.
• Alternative Method • Observation • Participated
After you have selected the Role for the Diagnosis, click the Add Diagnosis button , this will save all the diagnoses with that selected Role level.
The diagnosis selected will appear below. If more than one Role level was used i.e. Observed one diagnosis and Participated in another, you can log each diagnosis separately for that encounter by changing the Role, after Add Diagnosis.
The below example, shows what the Diag tab will look like once all diagnosis criteria has been selected.

Page 7 of 10
NOTE: If a patient has multiple diagnoses in one encounter, more than one diagnosis can be selected for your case log entry. You can continue to add more diagnoses one by one as described in the steps above or you can add multiple diagnosis at one time by pressing and holding the Control button when selecting multiple diagnosis. Each case log entry is considered one patient encounter – multiple diagnoses selected are considered as part of that same encounter.
To remove a diagnosis from the list, click the red minus sign in the Remove column that corresponds to the Diagnosis entry.
To move the diagnosis up to a higher position on the list, click the green up and down arrows in the Move column that corresponds to the Diagnosis entry.
Once all diagnoses are logged, click the Next button. or the REVIEW tab. This will take the page where you can review the diagnosis you have just logged.
Clicking the Cancel button , will cancel the diagnosis entered
Page 8 of 10
After review of the entry, click the Save Record button to save the entry. Clicking the Cancel button
will bring you back to the Main tab, which will allow you to make any changes to the entry before the record is saved.
To print the encounter entry click the Print this page button .
Note: Do not use the Save as Template feature.

Page 9 of 10
Review Diagnoses for All Encounters enter:
Select the Case Logs tab to Edit, Delete or Review your entries.
Under the Case Log Management Section > Manage Case Logs – Select Review & Manage Submitted Case Logs
The Review & Manage Submitted Case Logs screen appears.
Select the filter criteria you would like to search on.
Page 10 of 10
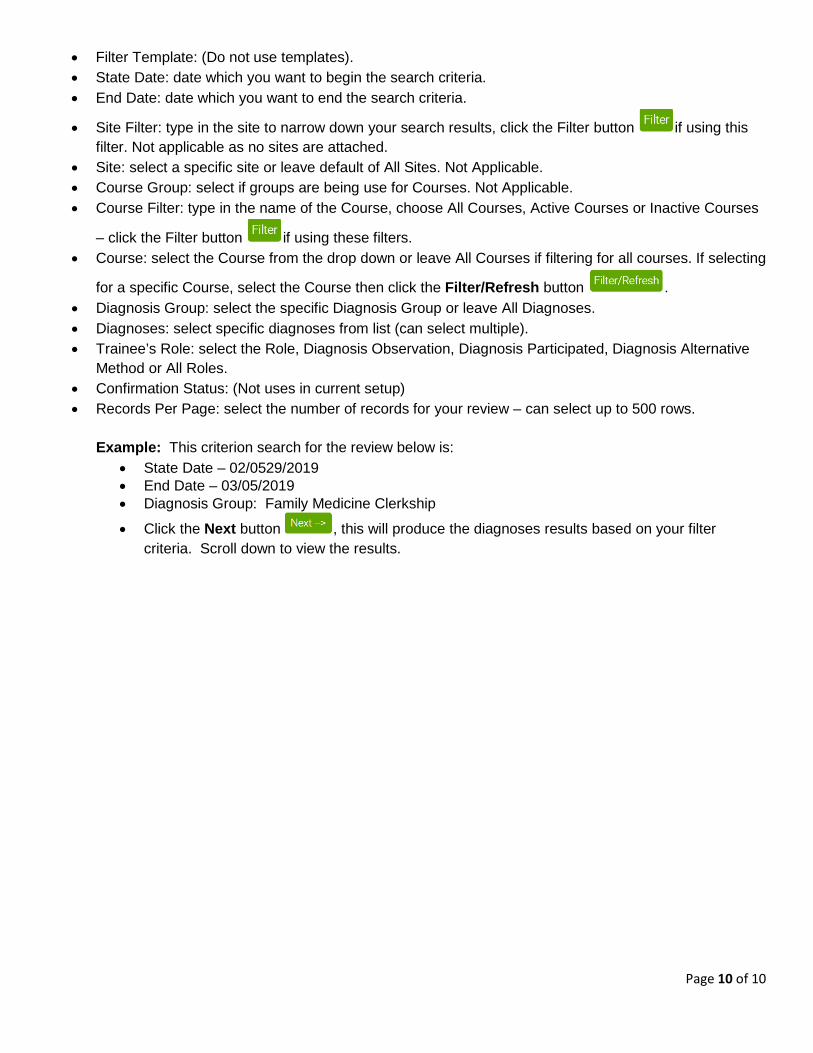
• Filter Template: (Do not use templates). • State Date: date which you want to begin the search criteria. • End Date: date which you want to end the search criteria.
• Site Filter: type in the site to narrow down your search results, click the Filter button if using this filter. Not applicable as no sites are attached.
• Site: select a specific site or leave default of All Sites. Not Applicable. • Course Group: select if groups are being use for Courses. Not Applicable. • Course Filter: type in the name of the Course, choose All Courses, Active Courses or Inactive Courses
– click the Filter button if using these filters. • Course: select the Course from the drop down or leave All Courses if filtering for all courses. If selecting
for a specific Course, select the Course then click the Filter/Refresh button . • Diagnosis Group: select the specific Diagnosis Group or leave All Diagnoses. • Diagnoses: select specific diagnoses from list (can select multiple). • Trainee’s Role: select the Role, Diagnosis Observation, Diagnosis Participated, Diagnosis Alternative
Method or All Roles. • Confirmation Status: (Not uses in current setup) • Records Per Page: select the number of records for your review – can select up to 500 rows.
Example: This criterion search for the review below is:
• State Date – 02/0529/2019 • End Date – 03/05/2019 • Diagnosis Group: Family Medicine Clerkship
• Click the Next button , this will produce the diagnoses results based on your filter criteria. Scroll down to view the results.

Page 11 of 10
To Edit, Delete or Review your entries – use the Action column menu items.
Select Edit to make any changes to your encounter starting from the Main tab. For example, a Role was logged incorrectly or you logged a Diagnosis with several others on the same encounter, however the date was not correct.
Select Delete to delete the entire encounter.
Select Review to review the entire encounter starting with the Main tab, however this is only a review of what was entered, and no changes can be made using the Review link, changes can be made using the Edit link.