
ethiopia Country Managers facilITators traIniNg...
65
ETHIOPIA Country Managers A product of The Luminos Fund SS-ETH-CMN-FieldGuide-v1.0 facilITators traIniNg guide
Transcript of ethiopia Country Managers facilITators traIniNg...
ethiopia
Country Managers
A product of The Luminos Fund
SS-ETH-CMN-FieldGuide-v1.0
facilITators traIniNg guide

Speed School Ethiopia: Facilitators Training Guide 1
facilITators traIniNg guide
ethiopia
Country Managers
© The Luminos Fund 2017. All rights reserved.
SS-ETH-CMN-FacilitatorsTrainingGuide-v1.02
TABLE OF CONTENTS
About Speed School 4
How to Use This Guidebook 5
1. INTRODUCTION AND SCHEDULE 8
1.1. Objectives 8
1.1.1. Introduction to the Speed School Model 8
1.1.2. What is an Effective Facilitator? 9
1.1.3. Organization and Supervision of Facilitators 10
1.1.4. Setting a Training Schedule 11
1.1.5. Sample Weekly Training Schedule 14
1.1.6. Diagnostic Testing 18
2. CURRICULUM 19
2.1. Objectives 19
2.1.1. The Speed School Program 19
2.1.2. Speed School Program Principles 20
2.1.3. The Speed School Program and the National Curriculum 20
2.1.4. Speed School Program Guides 21
2.1.5. Curricular Materials 22
2.1.6. Accelerated Annual Lesson Plan Dates 23
2.1.7. Native Language Phase 24
2.1.8. Sample Classroom Schedule (Native Language Phase) 24
2.1.9. Accelerated Learning Principles 25
3. TEACHING STRATEGIES AND FACILITATING LEARNING 26
3.1. Objectives 26
3.1.1. Introduction 26
3.1.2. Learning Methods: The Learning Pyramid 30
3.2. Teaching Methods 31
3.2.1. Class Method 31
3.2.2. Group Method 31
3.2.3. Dramatization and Role-Play 33
3.2.4. Activity/Exercises Method 33
Speed School Ethiopia: Facilitators Training Guide 3
3.2.5. Discussion Method 35
3.2.6. Excursions and Field Trips 36
3.2.7. Selecting Appropriate Teaching/Learning Methods 37
3.3. Using Teaching and Learning Materials 37
3.3.1. Introduction 37
3.3.1. Using TLMs 39
3.3.2. Protection and Storage of TLMs 40
4. CLASSROOM MANAGEMENT 41
4.1. Objectives 41
4.1.1. Introduction 41
4.1.2. Facilitator Characteristics 41
4.1.3. Classroom Practices 42
4.1.4. Discipline 43
4.1.5. Sources and Causes of Misbehavior 43
4.1.6. Managing the Sources of Misbehavior 45
4.1.7. Using Rewards and Punishment 45
4.1.8. Conclusion 46
5. APPENDICES 47
5.1. Appendix A: Schedules 47
5.1.1. Training Schedule 48
5.1.2. Weekly Calendar 49
5.2. Appendix B: Teaching Basic Skills 53
5.2.1. Topic: Pre-Reading Activities - Left-to-Right Eye Movement 53
5.2.2. Topic: Pre-Reading Skills – Visual Discrimination and Memory Skills 54
5.2.3. Topic: Pre-Reading Skills - Auditory Discrimination Memory Skills 55
5.2.4. Topic: Letter Recognition 55
5.2.5. Topic: Use of Syllabic Method in Teaching Reading 56
5.2.6. Topic: Word and Word Boundary Recognition 58
5.2.7. Topic: Teaching Reading 60

SS-ETH-CMN-FacilitatorsTrainingGuide-v1.04
ABOUT SPEED SCHOOLThe Luminos FundThe Speed School programme is a comprehensive response to help out-of-school children get back to and learn in school. In just ten months, using an accelerated learning approach, Speed School equips children with the reading, writing and maths skills they need to enter mainstream school in fourth grade. The programme has helped over 100,000 children back to school in West Africa and Ethiopia.
In 2015, with the concept proven, Legatum announced plans to scale the programme committing US $10 million into a pooled funding vehicle called the Luminos Fund enabling many more donors to collaborate in raising US $250 million and impacting six million out-of-school children.
For more details visit www.luminosfund.org
Legatum FoundationThe Legatum Foundation is the development arm of the Legatum Group, a global private investment firm which allocates capital to projects, people and ideas that create sustainable prosperity. The Foundation invests in community-based organisations and projects that have impacted the lives of over 100 million people since 1999.
With the assistance of longtime partner Geneva Global, Legatum has incubated and launched new philanthropic investment funds to address global challenges.
For more details visit www.legatum.org
Geneva GlobalGeneva Global is an innovative social enterprise that works with clients to maximize the performance of their global philanthropic and social impact initiatives. Geneva Global provides strategic advice, independent research, and programme management. Their work on behalf of clients has directly benefited more than 90 million people through over 1,500 projects in over 100 countries.
For more details visit www.genevaglobal.com
Speed School Ethiopia: Facilitators Training Guide 5
HOW TO USE THIS GUIDEBOOKPurposeThe Facilitators’ Training Guide contains the principles and a variety of activities to train new Speed School facilitators in Ethiopia and to refresh the skills of existing Speed School facilitators. This guide is intended to be dynamic, and we will add new ideas and methods to it on an annual basis if needed.
The guide has two main goals: to provide an overview of the Speed School program and to provide basic teaching strategies. This guide alone does not contain all of the information and content necessary to be a successful Speed School facilitator. It is expected that you will use this guide to help plan your training, while also relying on the following materials for content:
• Speed School Quality Manual• Accelerated Learning Principles• Speed School Annual Plans• Minimum Learning Competencies• Text books for grades 1 – 3• Teaching Methods• Lesson Plans• Samples or models of classroom materials and other training
materials used in the past
AudienceIt is expected that this guide will be used by
• Training officers and community mobilizers from implementing partners
• Government education supervisors who will be involved in facilitator training to train Speed School classroom facilitators
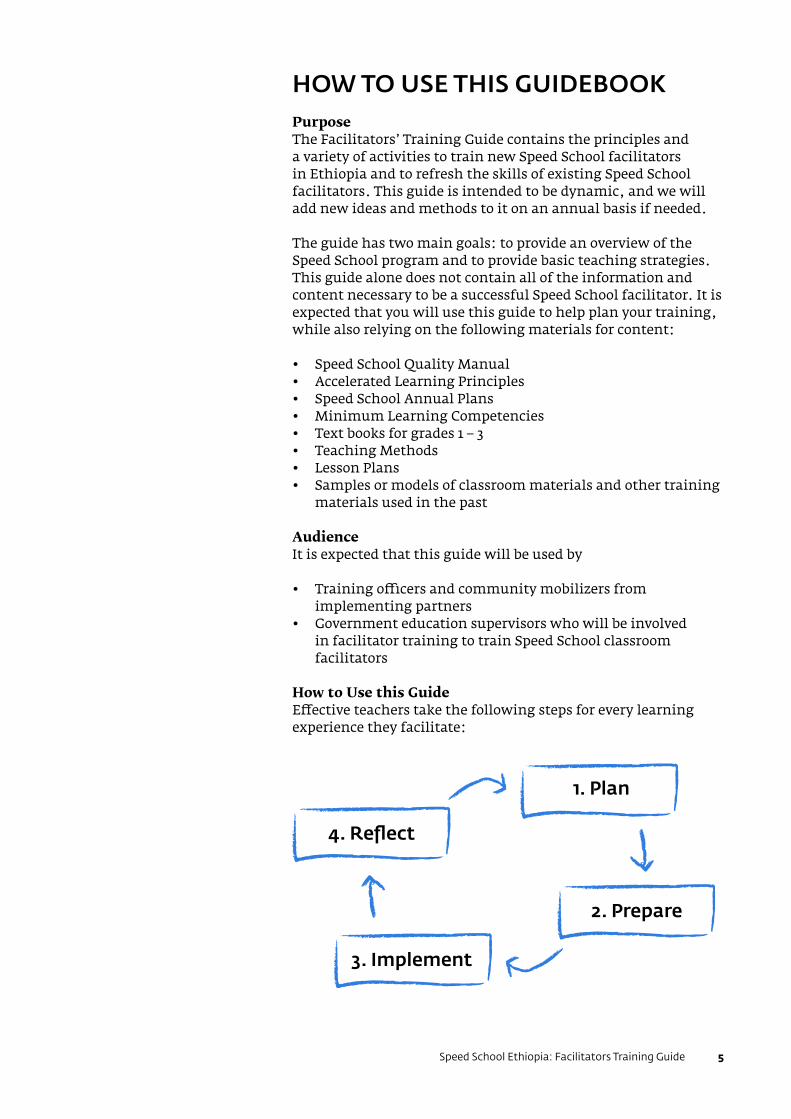
How to Use this GuideEffective teachers take the following steps for every learning experience they facilitate:
1. Plan
3. Implement
2. Prepare
4. Reflect

SS-ETH-CMN-FacilitatorsTrainingGuide-v1.06
This is a very simple framework that you can use yourself in training facilitators and that you can introduce to facilitators to help them improve their teaching practice.
1. Plan: This step includes understanding the annual calendar, creating a schedule, and mapping out the pace of the curriculum.
2. Prepare: This includes refreshing the facilitator’s content knowledge, practicing what will happen in the classroom, and gathering or preparing materials.
3. Implement: Based on planning and preparation, implement the lesson in the classroom. Note: when you are training facilitators, look for opportunities for them to practice implementing lessons.
4. Reflect: Effective teachers take time to reflect on what went well and what could be improved in each lesson. They use the insights gained through reflection to begin the four step process again – planning and then preparing for the next lesson.
Most of the content of this facilitators’ training guide is focused on steps one and two. But as you use this guide, be sure to look for opportunities to
• Model effective teaching strategies yourself• Make the learning experience interactive• Provide opportunities for facilitators to practice
(implement) what they learn• Make time for facilitators to reflect on their own practice
D Trainer Note:The plan-prepare-implement-reflect framework will be helpful as facilitators practice what they learn in training. Put a copy of the framework on the chalkboard or post it in the room to remind facilitators to follow each step.
Speed School Ethiopia: Facilitators Training Guide 7
Learning Objectives
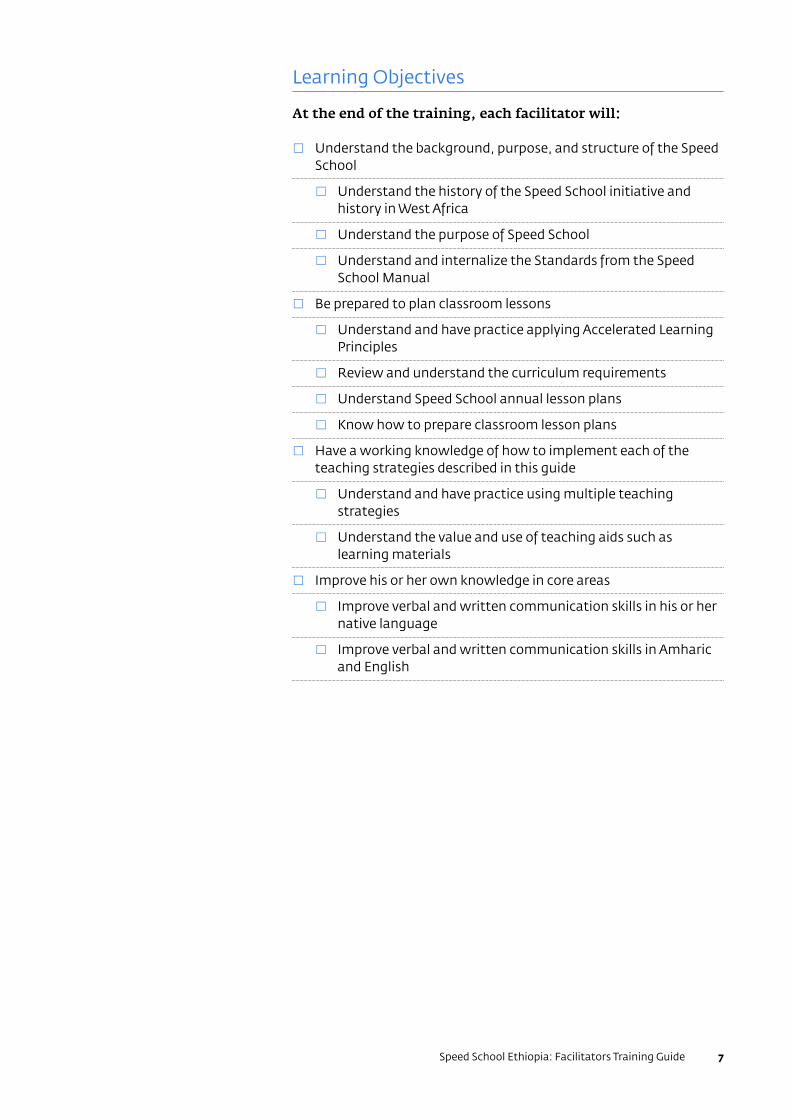
At the end of the training, each facilitator will:
□ Understand the background, purpose, and structure of the Speed School
□ Understand the history of the Speed School initiative and history in West Africa
□ Understand the purpose of Speed School
□ Understand and internalize the Standards from the Speed School Manual
□ Be prepared to plan classroom lessons
□ Understand and have practice applying Accelerated Learning Principles
□ Review and understand the curriculum requirements
□ Understand Speed School annual lesson plans
□ Know how to prepare classroom lesson plans
□ Have a working knowledge of how to implement each of the teaching strategies described in this guide
□ Understand and have practice using multiple teaching strategies
□ Understand the value and use of teaching aids such as learning materials
□ Improve his or her own knowledge in core areas
□ Improve verbal and written communication skills in his or her native language
□ Improve verbal and written communication skills in Amharic and English
SS-ETH-CMN-FacilitatorsTrainingGuide-v1.08
1. Introduction and Schedule
1.1. OBJECTIVESThe purpose of this section is to enable you as the trainer to map out what you will cover during the 21 days of facilitator training. This section also provides an introduction to the role of the classroom facilitator.
The content of this section will enable each facilitator to:
□ Understand the purpose and structure of the Speed School model, including
□ the Speed School Standards
□ the history and background of Speed Schools in West Africa
□ Understand the qualities of an effective Speed School facilitator
□ Reflect on his/her strengths and areas in need of improvement, including knowledge and skills, such as proficiency in the native language, Amharic and English
□ Take ownership of the 21 days of training, setting aside time to improve upon any areas of weakness, and particularly to improve language proficiency and handwriting, and identifying opportunities to do lesson planning and teaching practice
1.1.1. Introduction to the Speed School Model
The Speed School system is a new partnership between parents, school, and community on behalf of out-of-school children (OOSC). The objective of Speed School is to empower each child with skills, knowledge, and character for lifelong learning and to enable OOSC to join formal school after completing Speed School. Speed School uses an accelerated learning approach, which is an effective learning process using active learning strategies that makes learning natural, easier, and faster.
The major focus of the Ethiopia Speed School program is to enroll children ages nine through 14 who never went to school,
Speed School Ethiopia: Facilitators Training Guide – Introduction And Schedule 9
or dropped out of primary school, into an accelerated program covering three years of content in one year. The Ethiopia Speed School model utilizes some accelerated learning principles (ALP) and a condensed curriculum.
1.1.2. What is an Effective Facilitator?
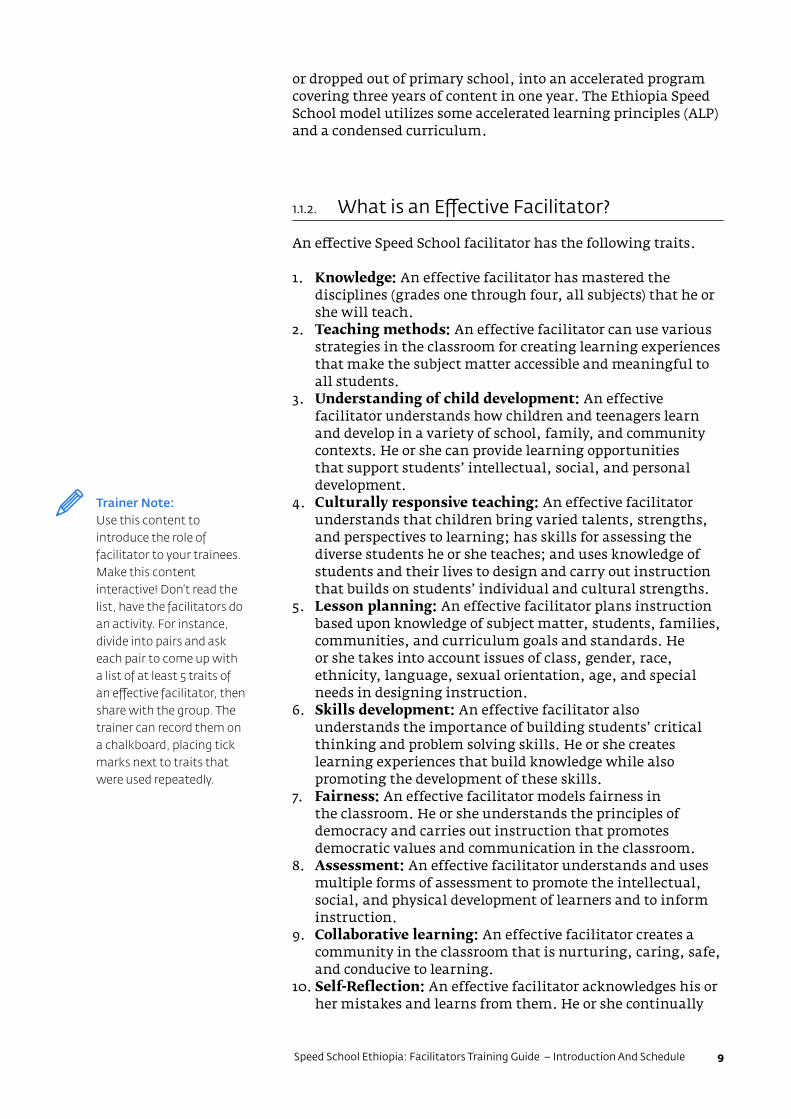
An effective Speed School facilitator has the following traits.
1. Knowledge: An effective facilitator has mastered the disciplines (grades one through four, all subjects) that he or she will teach.
2. Teaching methods: An effective facilitator can use various strategies in the classroom for creating learning experiences that make the subject matter accessible and meaningful to all students.
3. Understanding of child development: An effective facilitator understands how children and teenagers learn and develop in a variety of school, family, and community contexts. He or she can provide learning opportunities that support students’ intellectual, social, and personal development.
4. Culturally responsive teaching: An effective facilitator understands that children bring varied talents, strengths, and perspectives to learning; has skills for assessing the diverse students he or she teaches; and uses knowledge of students and their lives to design and carry out instruction that builds on students’ individual and cultural strengths.
5. Lesson planning: An effective facilitator plans instruction based upon knowledge of subject matter, students, families, communities, and curriculum goals and standards. He or she takes into account issues of class, gender, race, ethnicity, language, sexual orientation, age, and special needs in designing instruction.
6. Skills development: An effective facilitator also understands the importance of building students’ critical thinking and problem solving skills. He or she creates learning experiences that build knowledge while also promoting the development of these skills.
7. Fairness: An effective facilitator models fairness in the classroom. He or she understands the principles of democracy and carries out instruction that promotes democratic values and communication in the classroom.
8. Assessment: An effective facilitator understands and uses multiple forms of assessment to promote the intellectual, social, and physical development of learners and to inform instruction.
9. Collaborative learning: An effective facilitator creates a community in the classroom that is nurturing, caring, safe, and conducive to learning.
10. Self-Reflection: An effective facilitator acknowledges his or her mistakes and learns from them. He or she continually
D Trainer Note:Use this content to introduce the role of facilitator to your trainees. Make this content interactive! Don’t read the list, have the facilitators do an activity. For instance, divide into pairs and ask each pair to come up with a list of at least 5 traits of an effective facilitator, then share with the group. The trainer can record them on a chalkboard, placing tick marks next to traits that were used repeatedly.
SS-ETH-CMN-FacilitatorsTrainingGuide-v1.010
inquires into the nature of teaching and learning, reflects on his or her own learning and professional practice, evaluates the effects of his or her choices and actions on others, and seeks out opportunities to grow professionally.
11. Relationship: An effective facilitator builds relationships with school colleagues, families, and agencies in the community to support students’ learning and well-being, and works to foster an appreciation of diversity among students and colleagues.
12. Communication skills: An effective facilitator possesses literacy skills that enable him or her to communicate effectively with students, parents, and colleagues and to model communication skills in the classroom. He or she can speak fluently and write in his or her native language, Amharic, and English.
13. Commitment: An effective facilitator develops dispositions expected of professional educators. These include belief in the potential of schools to promote social justice, passion for teaching, commitment to the ethical and enculturation responsibilities of educators, commitment to ensuring equal learning opportunities for every student and to serving as agents of change and stewards of best practice, and commitment to reflection, inquiry, critical thinking, and life-long learning.
14. Facilitation Skills: An effective facilitator cultivates and facilitates learning by creating interactive, self-directed, motivating, and educational classroom activities.
1.1.3. Organization and Supervision of Facilitators
Three log books are used by facilitators and supervisors in the process of training and supervision:
• In book one, facilitators should write notes for daily lesson plans (standard lesson plans are provided).
• In book two, facilitators write student assessments (rubrics).• In book three, supervisors will write comments based on
their observation of the facilitator.
Observation, feedback, and evaluation of facilitator performance is essential to a facilitator’s success and to the success of his or her students. A supervisor will observe the performance of each facilitator every two weeks and give feedback.
A more formal facilitator evaluation is done every month. This evaluation is based on an assessment of the students’ progress and is conducted by a supervisor. A monthly incentive is provided to facilitators based on the results of this evaluation and is prorated based on student achievement. For instance, if all the students have achieved the proficiency goal for that month, the facilitator will receive the full incentive. If 50
Speed School Ethiopia: Facilitators Training Guide – Introduction And Schedule 11
percent of the students achieve the expected proficiency, the facilitator will receive 50 percent of the incentive.
1.1.4. Setting a Training Schedule
Facilitators’ training spans 21 days, with approximately six to seven hours of training time each day (this does not include time spent for meals, breaks, and transitions). This gives you about 140 total hours of training time.
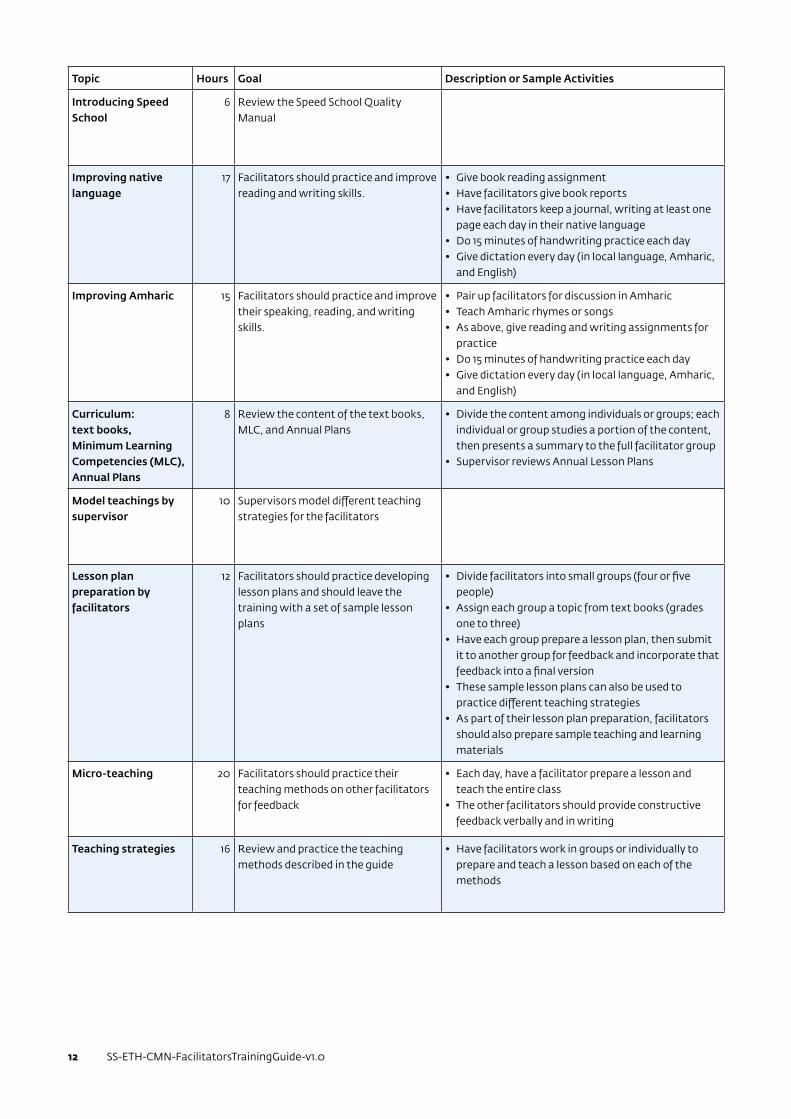
Below, we have listed topics that you will cover with an estimate of the number of hours required for each topic. Please use these estimates as you map out your own schedule for the 21 day training period. Don’t forget to build in time for interaction, practice, and reflection.
SS-ETH-CMN-FacilitatorsTrainingGuide-v1.012
Topic Hours Goal Description or Sample Activities
Introducing Speed School
6 Review the Speed School Quality Manual
Improving native language
17 Facilitators should practice and improve reading and writing skills.
• Give book reading assignment• Have facilitators give book reports• Have facilitators keep a journal, writing at least one
page each day in their native language• Do 15 minutes of handwriting practice each day• Give dictation every day (in local language, Amharic,
and English)
Improving Amharic 15 Facilitators should practice and improve their speaking, reading, and writing skills.
• Pair up facilitators for discussion in Amharic• Teach Amharic rhymes or songs• As above, give reading and writing assignments for
practice• Do 15 minutes of handwriting practice each day• Give dictation every day (in local language, Amharic,
and English)
Curriculum: text books, Minimum Learning Competencies (MLC), Annual Plans
8 Review the content of the text books, MLC, and Annual Plans
• Divide the content among individuals or groups; each individual or group studies a portion of the content, then presents a summary to the full facilitator group
• Supervisor reviews Annual Lesson Plans
Model teachings by supervisor
10 Supervisors model different teaching strategies for the facilitators
Lesson plan preparation by facilitators
12 Facilitators should practice developing lesson plans and should leave the training with a set of sample lesson plans
• Divide facilitators into small groups (four or five people)
• Assign each group a topic from text books (grades one to three)
• Have each group prepare a lesson plan, then submit it to another group for feedback and incorporate that feedback into a final version
• These sample lesson plans can also be used to practice different teaching strategies
• As part of their lesson plan preparation, facilitators should also prepare sample teaching and learning materials
Micro-teaching 20 Facilitators should practice their teaching methods on other facilitators for feedback
• Each day, have a facilitator prepare a lesson and teach the entire class
• The other facilitators should provide constructive feedback verbally and in writing
Teaching strategies 16 Review and practice the teaching methods described in the guide
• Have facilitators work in groups or individually to prepare and teach a lesson based on each of the methods
Speed School Ethiopia: Facilitators Training Guide – Introduction And Schedule 13
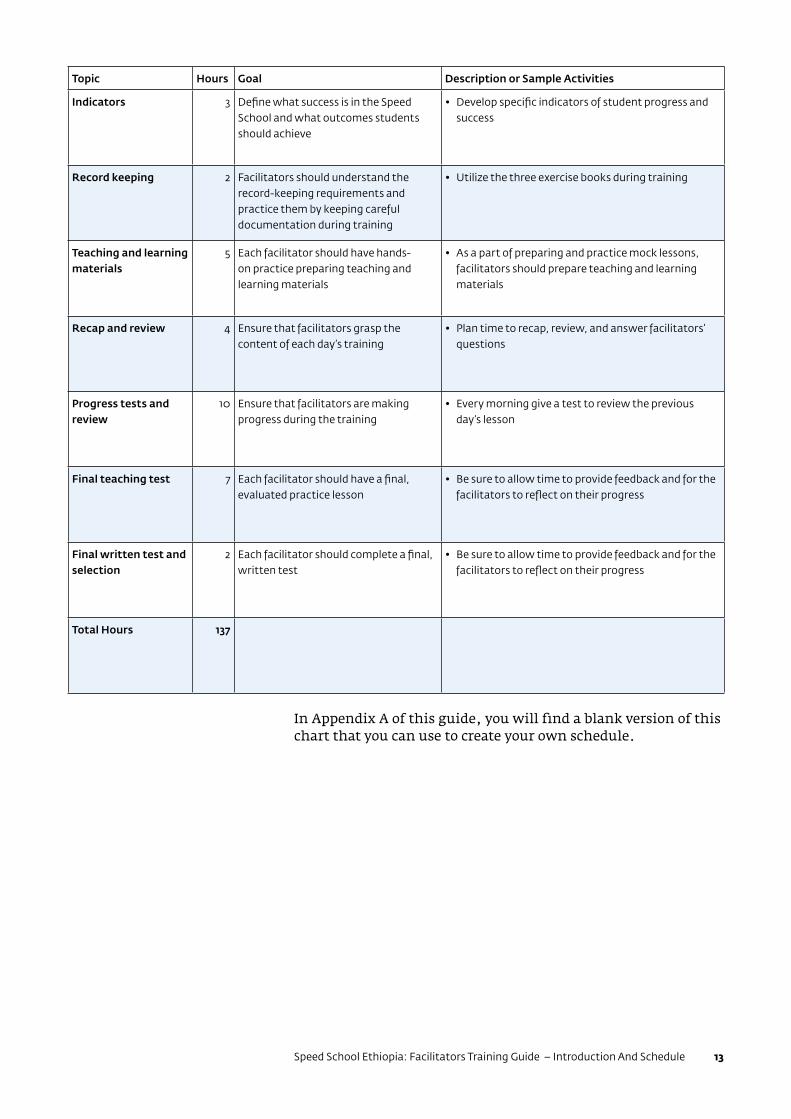
Topic Hours Goal Description or Sample Activities
Indicators 3 Define what success is in the Speed School and what outcomes students should achieve
• Develop specific indicators of student progress and success
Record keeping 2 Facilitators should understand the record-keeping requirements and practice them by keeping careful documentation during training
• Utilize the three exercise books during training
Teaching and learning materials
5 Each facilitator should have hands-on practice preparing teaching and learning materials
• As a part of preparing and practice mock lessons, facilitators should prepare teaching and learning materials
Recap and review 4 Ensure that facilitators grasp the content of each day’s training
• Plan time to recap, review, and answer facilitators’ questions
Progress tests and review
10 Ensure that facilitators are making progress during the training
• Every morning give a test to review the previous day’s lesson
Final teaching test 7 Each facilitator should have a final, evaluated practice lesson
• Be sure to allow time to provide feedback and for the facilitators to reflect on their progress
Final written test and selection
2 Each facilitator should complete a final, written test
• Be sure to allow time to provide feedback and for the facilitators to reflect on their progress
Total Hours 137
In Appendix A of this guide, you will find a blank version of this chart that you can use to create your own schedule.
SS-ETH-CMN-FacilitatorsTrainingGuide-v1.014
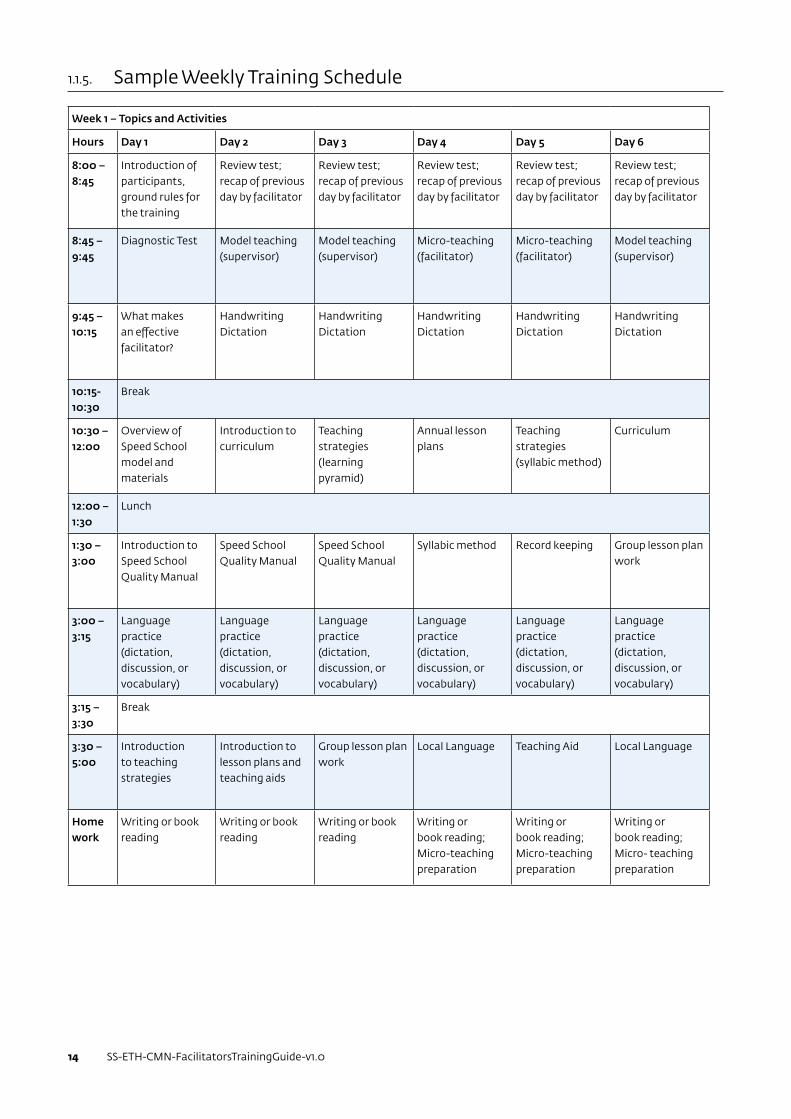
1.1.5. Sample Weekly Training Schedule
Week 1 – Topics and Activities
Hours Day 1 Day 2 Day 3 Day 4 Day 5 Day 6
8:00 – 8:45
Introduction of participants, ground rules for the training
Review test; recap of previous day by facilitator
Review test; recap of previous day by facilitator
Review test; recap of previous day by facilitator
Review test; recap of previous day by facilitator
Review test; recap of previous day by facilitator
8:45 – 9:45
Diagnostic Test Model teaching (supervisor)
Model teaching (supervisor)
Micro-teaching (facilitator)
Micro-teaching (facilitator)
Model teaching (supervisor)
9:45 – 10:15
What makes an effective facilitator?
Handwriting Dictation
Handwriting Dictation
Handwriting Dictation
Handwriting Dictation
Handwriting Dictation
10:15-10:30
Break
10:30 – 12:00
Overview of Speed School model and materials
Introduction to curriculum
Teaching strategies (learning pyramid)
Annual lesson plans
Teaching strategies (syllabic method)
Curriculum
12:00 – 1:30
Lunch
1:30 – 3:00
Introduction to Speed School Quality Manual
Speed School Quality Manual
Speed School Quality Manual
Syllabic method Record keeping Group lesson plan work
3:00 – 3:15
Language practice (dictation, discussion, or vocabulary)
Language practice (dictation, discussion, or vocabulary)
Language practice (dictation, discussion, or vocabulary)
Language practice (dictation, discussion, or vocabulary)
Language practice (dictation, discussion, or vocabulary)
Language practice (dictation, discussion, or vocabulary)
3:15 – 3:30
Break
3:30 – 5:00
Introduction to teaching strategies
Introduction to lesson plans and teaching aids
Group lesson plan work
Local Language Teaching Aid Local Language
Home work
Writing or book reading
Writing or book reading
Writing or book reading
Writing or book reading; Micro-teaching preparation
Writing or book reading; Micro-teaching preparation
Writing or book reading; Micro- teaching preparation
Speed School Ethiopia: Facilitators Training Guide – Introduction And Schedule 15
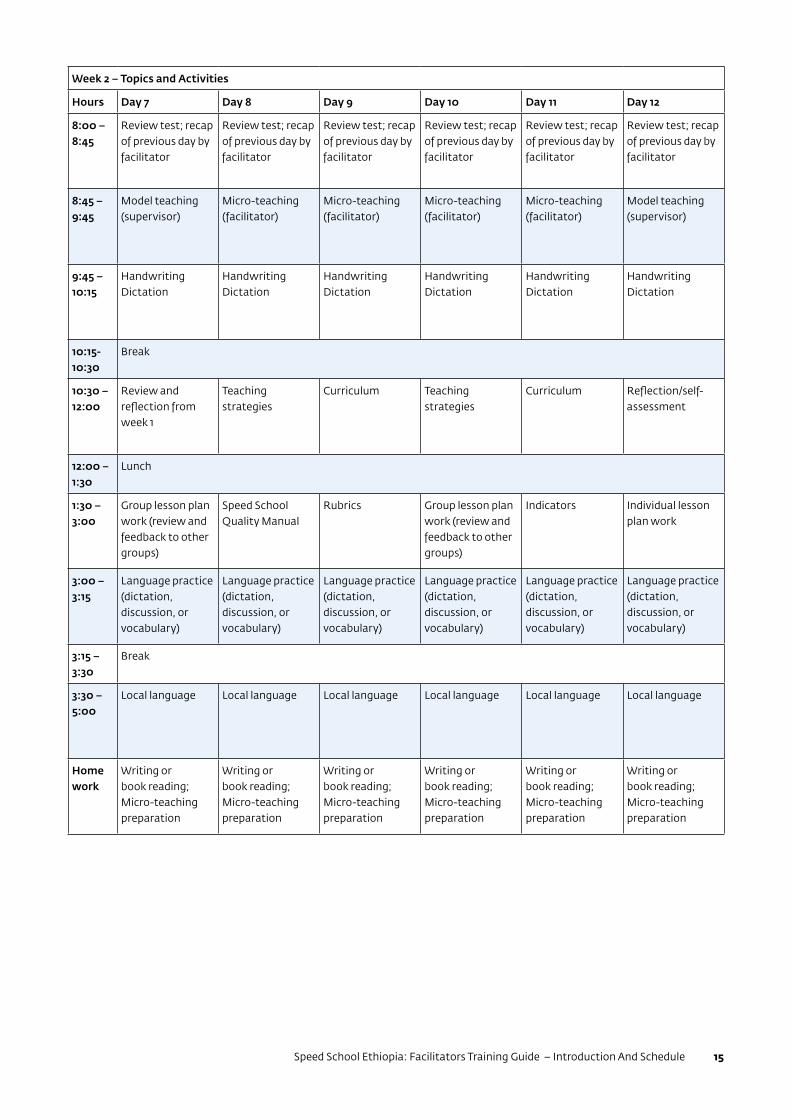
Week 2 – Topics and Activities
Hours Day 7 Day 8 Day 9 Day 10 Day 11 Day 12
8:00 – 8:45
Review test; recap of previous day by facilitator
Review test; recap of previous day by facilitator
Review test; recap of previous day by facilitator
Review test; recap of previous day by facilitator
Review test; recap of previous day by facilitator
Review test; recap of previous day by facilitator
8:45 – 9:45
Model teaching (supervisor)
Micro-teaching (facilitator)
Micro-teaching (facilitator)
Micro-teaching (facilitator)
Micro-teaching (facilitator)
Model teaching (supervisor)
9:45 – 10:15
Handwriting Dictation
Handwriting Dictation
Handwriting Dictation
Handwriting Dictation
Handwriting Dictation
Handwriting Dictation
10:15-10:30
Break
10:30 – 12:00
Review and reflection from week 1
Teaching strategies
Curriculum Teaching strategies
Curriculum Reflection/self-assessment
12:00 – 1:30
Lunch
1:30 – 3:00
Group lesson plan work (review and feedback to other groups)
Speed School Quality Manual
Rubrics Group lesson plan work (review and feedback to other groups)
Indicators Individual lesson plan work
3:00 – 3:15
Language practice (dictation, discussion, or vocabulary)
Language practice (dictation, discussion, or vocabulary)
Language practice (dictation, discussion, or vocabulary)
Language practice (dictation, discussion, or vocabulary)
Language practice (dictation, discussion, or vocabulary)
Language practice (dictation, discussion, or vocabulary)
3:15 – 3:30
Break
3:30 – 5:00
Local language Local language Local language Local language Local language Local language
Home work
Writing or book reading; Micro-teaching preparation
Writing or book reading; Micro-teaching preparation
Writing or book reading; Micro-teaching preparation
Writing or book reading; Micro-teaching preparation
Writing or book reading; Micro-teaching preparation
Writing or book reading; Micro-teaching preparation
SS-ETH-CMN-FacilitatorsTrainingGuide-v1.016
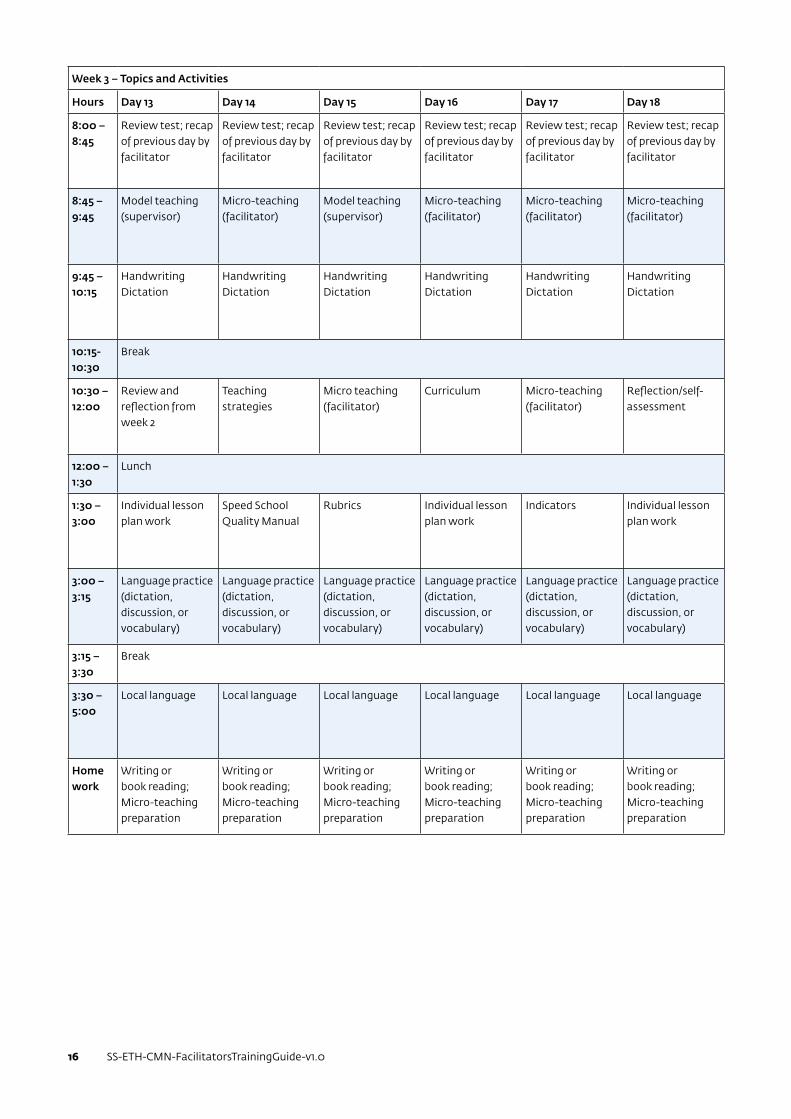
Week 3 – Topics and Activities
Hours Day 13 Day 14 Day 15 Day 16 Day 17 Day 18
8:00 – 8:45
Review test; recap of previous day by facilitator
Review test; recap of previous day by facilitator
Review test; recap of previous day by facilitator
Review test; recap of previous day by facilitator
Review test; recap of previous day by facilitator
Review test; recap of previous day by facilitator
8:45 – 9:45
Model teaching (supervisor)
Micro-teaching (facilitator)
Model teaching (supervisor)
Micro-teaching (facilitator)
Micro-teaching (facilitator)
Micro-teaching (facilitator)
9:45 – 10:15
Handwriting Dictation
Handwriting Dictation
Handwriting Dictation
Handwriting Dictation
Handwriting Dictation
Handwriting Dictation
10:15-10:30
Break
10:30 – 12:00
Review and reflection from week 2
Teaching strategies
Micro teaching (facilitator)
Curriculum Micro-teaching (facilitator)
Reflection/self-assessment
12:00 – 1:30
Lunch
1:30 – 3:00
Individual lesson plan work
Speed School Quality Manual
Rubrics Individual lesson plan work
Indicators Individual lesson plan work
3:00 – 3:15
Language practice (dictation, discussion, or vocabulary)
Language practice (dictation, discussion, or vocabulary)
Language practice (dictation, discussion, or vocabulary)
Language practice (dictation, discussion, or vocabulary)
Language practice (dictation, discussion, or vocabulary)
Language practice (dictation, discussion, or vocabulary)
3:15 – 3:30
Break
3:30 – 5:00
Local language Local language Local language Local language Local language Local language
Home work
Writing or book reading; Micro-teaching preparation
Writing or book reading; Micro-teaching preparation
Writing or book reading; Micro-teaching preparation
Writing or book reading; Micro-teaching preparation
Writing or book reading; Micro-teaching preparation
Writing or book reading; Micro-teaching preparation
Speed School Ethiopia: Facilitators Training Guide – Introduction And Schedule 17
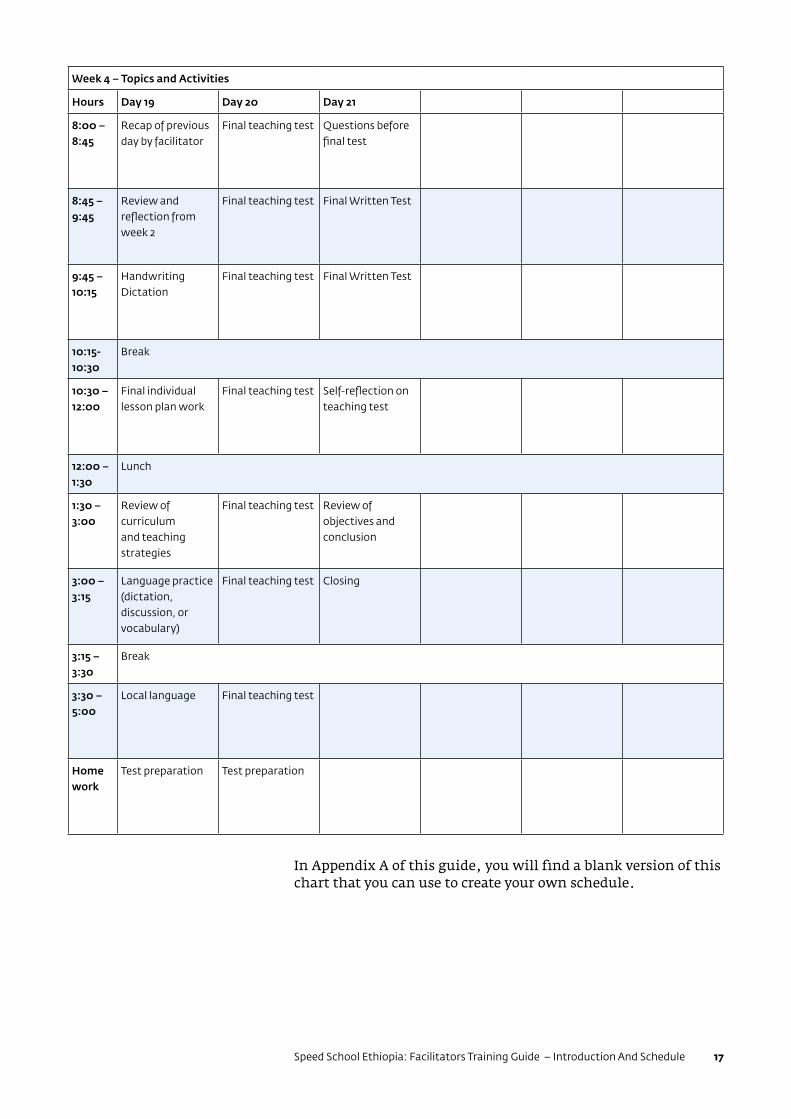
Week 4 – Topics and Activities
Hours Day 19 Day 20 Day 21
8:00 – 8:45
Recap of previous day by facilitator
Final teaching test Questions before final test
8:45 – 9:45
Review and reflection from week 2
Final teaching test Final Written Test
9:45 – 10:15
Handwriting Dictation
Final teaching test Final Written Test
10:15-10:30
Break
10:30 – 12:00
Final individual lesson plan work
Final teaching test Self-reflection on teaching test
12:00 – 1:30
Lunch
1:30 – 3:00
Review of curriculum and teaching strategies
Final teaching test Review of objectives and conclusion
3:00 – 3:15
Language practice (dictation, discussion, or vocabulary)
Final teaching test Closing
3:15 – 3:30
Break
3:30 – 5:00
Local language Final teaching test
Home work
Test preparation Test preparation
In Appendix A of this guide, you will find a blank version of this chart that you can use to create your own schedule.
SS-ETH-CMN-FacilitatorsTrainingGuide-v1.018
1.1.6. Diagnostic Testing
You may have noticed that day one on the sample schedule includes a diagnostic test. The purpose of conducting a diagnostic test is to find out the competency level of your trainees in different subjects. By identifying areas of strength and weakness, you can focus your training time on the most important areas of need.
In order to conduct a diagnostic test, you should:
1. Plan and prepare a test that covers Amharic, native language, English, and math. The test should be relatively simple at about an eighth grade level.
2. Review and evaluate the completed tests, checking handwriting, spelling, grammar, and marking any errors.
3. Use the information gained in the diagnostic test to focus more learning time on areas of weakness or to give supplementary work to trainees who may need extra practice in a particular area.
Speed School Ethiopia: Facilitators Training Guide – Curriculum 19
2. Curriculum
2.1. OBJECTIVESThe purpose of this section is to provide you, the trainer, with an overview of the Speed School curriculum that can also be used by facilitators during training.
The content of this section will enable each facilitator to:
□ Understand and explore the Speed School content and subjects covered
□ Have an idea of how three years of instruction are to be compacted into one academic year
□ Become familiar with the prescribed text books
□ Understand how Accelerated Learning Principles are incorporated in the Speed School curriculum
2.1.1. The Speed School Program
The Speed School model uses a condensed version of the national primary school curriculum in the implementation country. Its focus is on literacy and numeracy skills required in primary school first cycle (grades one through four) and on innovative curriculum delivery methods. Each Speed School curriculum is implemented differently in each country, based upon national curriculum standards. The Speed School curriculum is intended for use with children ages nine through 14 who have not previously attended school.
The reasons for using a customized and condensed curriculum for the Speed School initiative are many, including:
• Speed Schools are designed as temporary catch up programs to enable students to progress to the standard national curriculum.
• The Speed School initiative seeks to respect the national curriculum, not to replace it; our assumption is that the national curriculum has been determined to best support students’ learning and future success in Ethiopia.
• The resources, time, and expense of preparing a new curriculum and text books is too great to be worthwhile.
D Trainer Note:This section contains many tables and schedules that explain the sequence of the curriculum. In order to make this content accessible to facilitators, you may need to print copies for them, then review them together.
SS-ETH-CMN-FacilitatorsTrainingGuide-v1.020
2.1.2. Speed School Program Principles
The Speed School program is based on the following concepts:
• Older students can learn within a shorter time span and at a faster pace than younger children.
• Mastering Literacy at an early age is key to academic success.• Children who have been out of school can be more motivated
and enthusiastic to learn.• Older children can learn at a faster pace than younger
children.• Individual attention to each student’s learning process
produces better results.
Research and experience based on Speed Schools in West Africa and Ethiopia demonstrate that if students acquire skills in reading, writing, and mathematics, they will be poised for academic success. Therefore, the Speed School program emphasizes these skill areas.
The Speed School Program also utilizes enrichment strategies, such as reading supplementary books, group learning, peer teaching, experiential learning, and activity-based learning.
2.1.3. The Speed School Program and the National Curriculum
The main difference between the Speed School curriculum and the national curriculum is the greater emphasis on literacy and numeracy in the Speed School program and the weaving together of literacy and numeracy with other subjects.
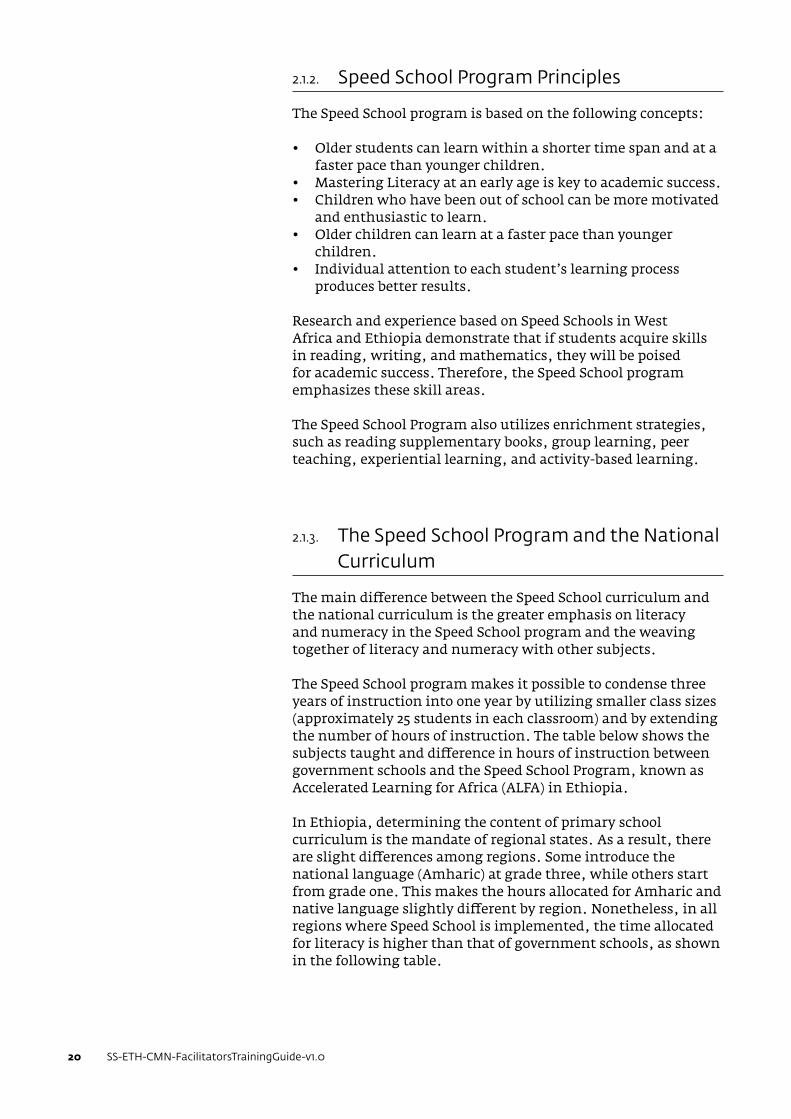
The Speed School program makes it possible to condense three years of instruction into one year by utilizing smaller class sizes (approximately 25 students in each classroom) and by extending the number of hours of instruction. The table below shows the subjects taught and difference in hours of instruction between government schools and the Speed School Program, known as Accelerated Learning for Africa (ALFA) in Ethiopia.
In Ethiopia, determining the content of primary school curriculum is the mandate of regional states. As a result, there are slight differences among regions. Some introduce the national language (Amharic) at grade three, while others start from grade one. This makes the hours allocated for Amharic and native language slightly different by region. Nonetheless, in all regions where Speed School is implemented, the time allocated for literacy is higher than that of government schools, as shown in the following table.
Speed School Ethiopia: Facilitators Training Guide – Curriculum 21
*SNNPR – Southern Nations, Nationalities, and Peoples’ Region
**Hours allocated for Amharic varies from region to region: Oromiya & Tigrai have fewer hours and Amhara has more hours
2.1.4. Speed School Program Guides
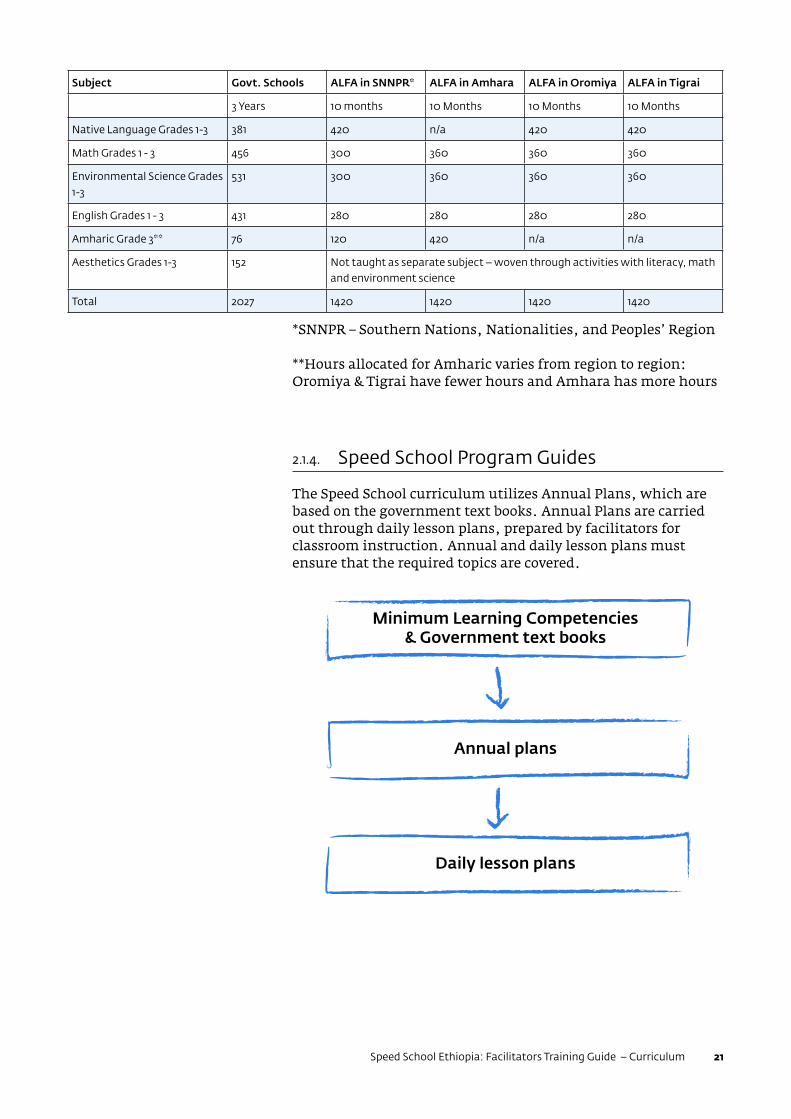
The Speed School curriculum utilizes Annual Plans, which are based on the government text books. Annual Plans are carried out through daily lesson plans, prepared by facilitators for classroom instruction. Annual and daily lesson plans must ensure that the required topics are covered.
Minimum Learning Competencies& Government text books
Annual plans
Daily lesson plans
Subject Govt. Schools ALFA in SNNPR* ALFA in Amhara ALFA in Oromiya ALFA in Tigrai
3 Years 10 months 10 Months 10 Months 10 Months
Native Language Grades 1-3 381 420 n/a 420 420
Math Grades 1 - 3 456 300 360 360 360
Environmental Science Grades 1-3
531 300 360 360 360
English Grades 1 - 3 431 280 280 280 280
Amharic Grade 3** 76 120 420 n/a n/a
Aesthetics Grades 1-3 152 Not taught as separate subject – woven through activities with literacy, math and environment science
Total 2027 1420 1420 1420 1420
SS-ETH-CMN-FacilitatorsTrainingGuide-v1.022
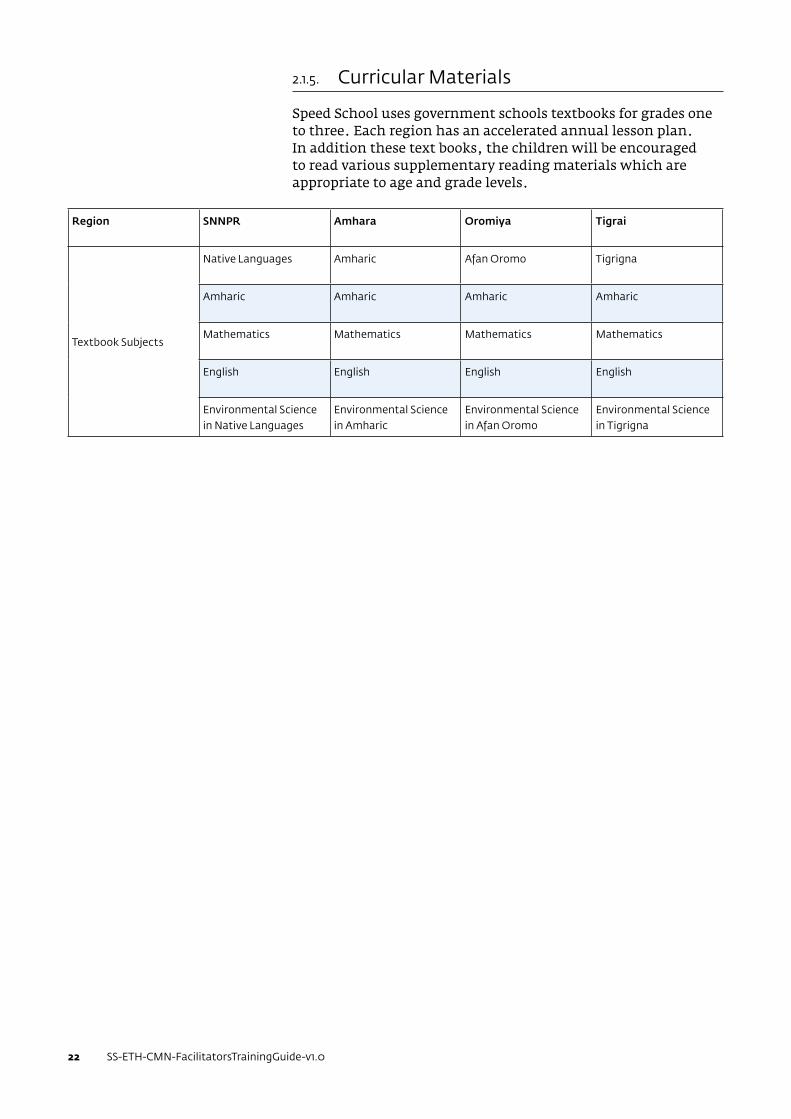
2.1.5. Curricular Materials
Speed School uses government schools textbooks for grades one to three. Each region has an accelerated annual lesson plan. In addition these text books, the children will be encouraged to read various supplementary reading materials which are appropriate to age and grade levels.
Region SNNPR Amhara Oromiya Tigrai
Textbook Subjects
Native Languages Amharic Afan Oromo Tigrigna
Amharic Amharic Amharic Amharic
Mathematics Mathematics Mathematics Mathematics
English English English English
Environmental Science in Native Languages
Environmental Science in Amharic
Environmental Science in Afan Oromo
Environmental Science in Tigrigna
Speed School Ethiopia: Facilitators Training Guide – Curriculum 23
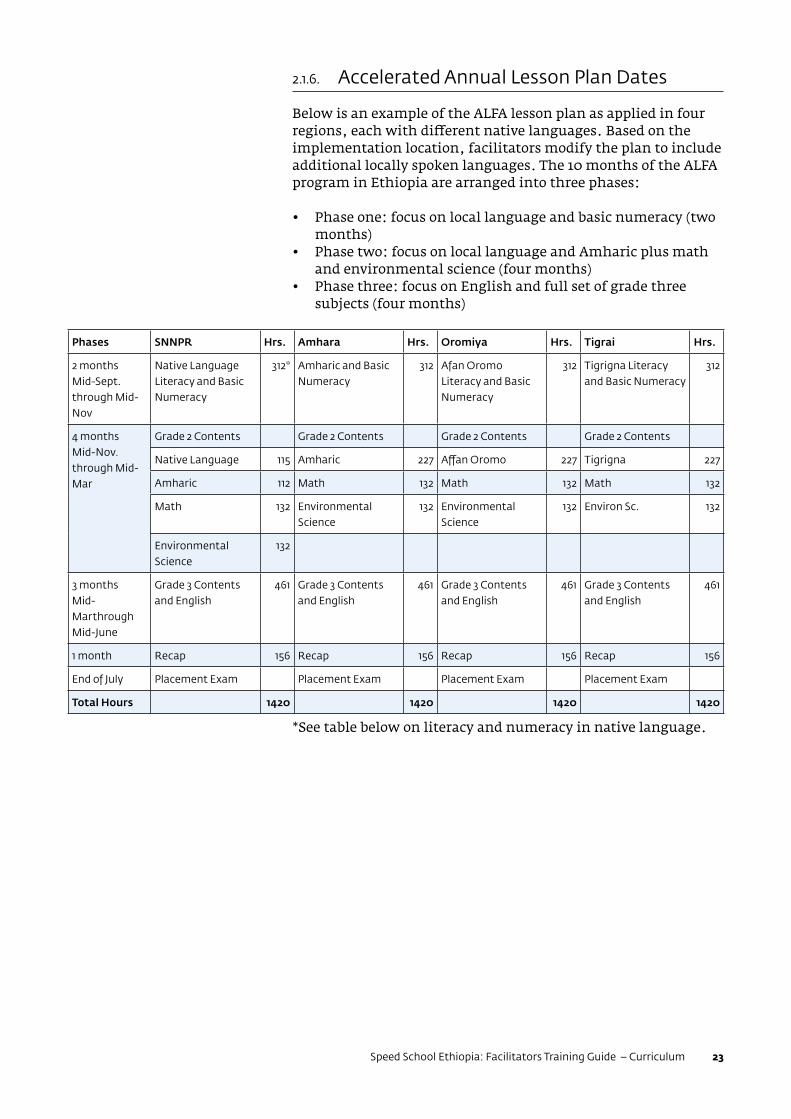
2.1.6. Accelerated Annual Lesson Plan Dates
Below is an example of the ALFA lesson plan as applied in four regions, each with different native languages. Based on the implementation location, facilitators modify the plan to include additional locally spoken languages. The 10 months of the ALFA program in Ethiopia are arranged into three phases:
• Phase one: focus on local language and basic numeracy (two months)
• Phase two: focus on local language and Amharic plus math and environmental science (four months)
• Phase three: focus on English and full set of grade three subjects (four months)
*See table below on literacy and numeracy in native language.
Phases SNNPR Hrs. Amhara Hrs. Oromiya Hrs. Tigrai Hrs.
2 months Mid-Sept. through Mid-Nov
Native Language Literacy and Basic Numeracy
312* Amharic and Basic Numeracy
312 Afan Oromo Literacy and Basic Numeracy
312 Tigrigna Literacy and Basic Numeracy
312
4 months Mid-Nov. through Mid-Mar
Grade 2 Contents Grade 2 Contents Grade 2 Contents Grade 2 Contents
Native Language 115 Amharic 227 Affan Oromo 227 Tigrigna 227
Amharic 112 Math 132 Math 132 Math 132
Math 132 Environmental Science
132 Environmental Science
132 Environ Sc. 132
Environmental Science
132
3 months Mid-Marthrough Mid-June
Grade 3 Contents and English
461 Grade 3 Contents and English
461 Grade 3 Contents and English
461 Grade 3 Contents and English
461
1 month Recap 156 Recap 156 Recap 156 Recap 156
End of July Placement Exam Placement Exam Placement Exam Placement Exam
Total Hours 1420 1420 1420 1420
SS-ETH-CMN-FacilitatorsTrainingGuide-v1.024
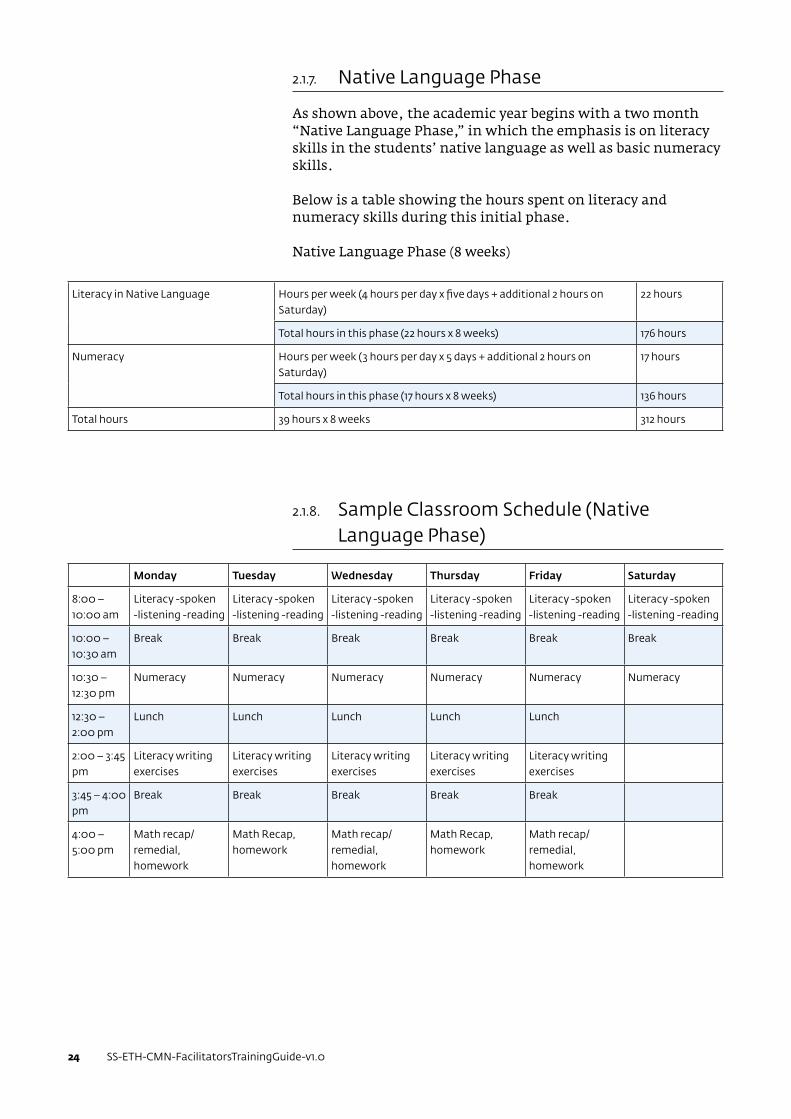
2.1.7. Native Language Phase
As shown above, the academic year begins with a two month “Native Language Phase,” in which the emphasis is on literacy skills in the students’ native language as well as basic numeracy skills.
Below is a table showing the hours spent on literacy and numeracy skills during this initial phase.
Native Language Phase (8 weeks)
2.1.8. Sample Classroom Schedule (Native Language Phase)
Literacy in Native Language Hours per week (4 hours per day x five days + additional 2 hours on Saturday)
22 hours
Total hours in this phase (22 hours x 8 weeks) 176 hours
Numeracy Hours per week (3 hours per day x 5 days + additional 2 hours on Saturday)
17 hours
Total hours in this phase (17 hours x 8 weeks) 136 hours
Total hours 39 hours x 8 weeks 312 hours
Monday Tuesday Wednesday Thursday Friday Saturday
8:00 – 10:00 am
Literacy -spoken -listening -reading
Literacy -spoken -listening -reading
Literacy -spoken -listening -reading
Literacy -spoken -listening -reading
Literacy -spoken -listening -reading
Literacy -spoken -listening -reading
10:00 – 10:30 am
Break Break Break Break Break Break
10:30 – 12:30 pm
Numeracy Numeracy Numeracy Numeracy Numeracy Numeracy
12:30 – 2:00 pm
Lunch Lunch Lunch Lunch Lunch
2:00 – 3:45 pm
Literacy writing exercises
Literacy writing exercises
Literacy writing exercises
Literacy writing exercises
Literacy writing exercises
3:45 – 4:00 pm
Break Break Break Break Break
4:00 – 5:00 pm
Math recap/ remedial, homework
Math Recap, homework
Math recap/ remedial, homework
Math Recap, homework
Math recap/ remedial, homework
Speed School Ethiopia: Facilitators Training Guide – Curriculum 25
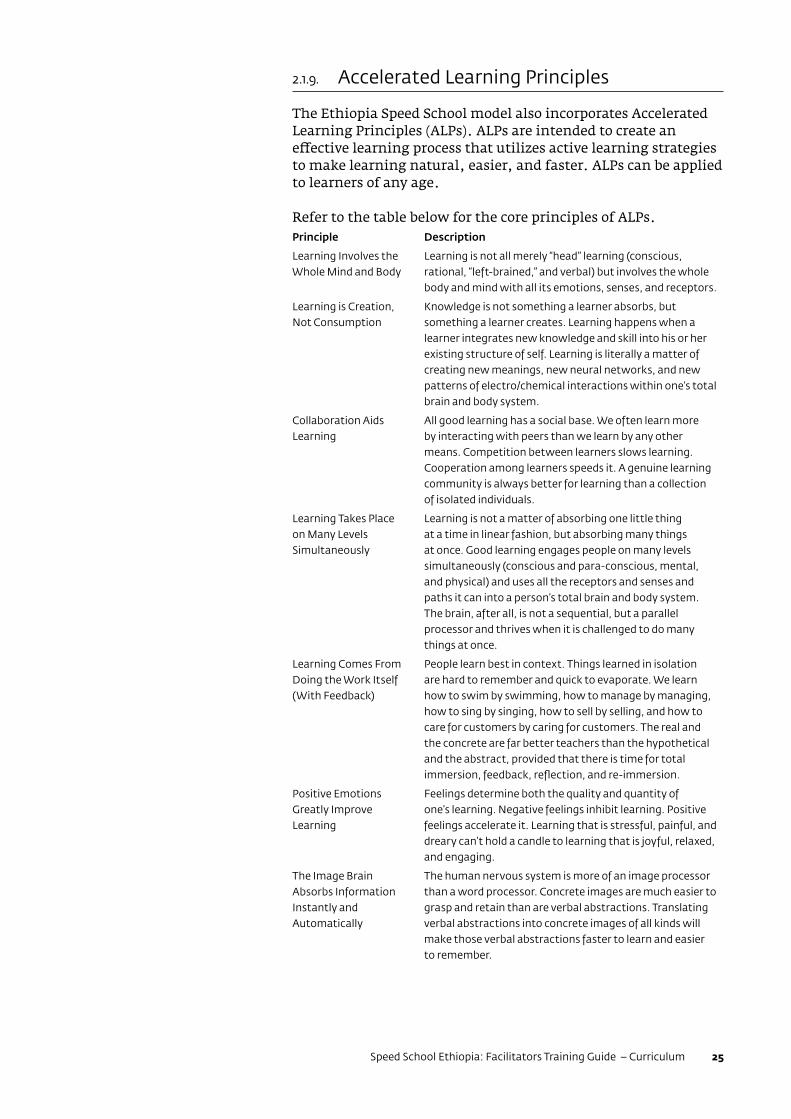
2.1.9. Accelerated Learning Principles
The Ethiopia Speed School model also incorporates Accelerated Learning Principles (ALPs). ALPs are intended to create an effective learning process that utilizes active learning strategies to make learning natural, easier, and faster. ALPs can be applied to learners of any age.
Refer to the table below for the core principles of ALPs.Principle Description
Learning Involves the Whole Mind and Body
Learning is not all merely “head” learning (conscious, rational, “left-brained,” and verbal) but involves the whole body and mind with all its emotions, senses, and receptors.
Learning is Creation, Not Consumption
Knowledge is not something a learner absorbs, but something a learner creates. Learning happens when a learner integrates new knowledge and skill into his or her existing structure of self. Learning is literally a matter of creating new meanings, new neural networks, and new patterns of electro/chemical interactions within one’s total brain and body system.
Collaboration Aids Learning
All good learning has a social base. We often learn more by interacting with peers than we learn by any other means. Competition between learners slows learning. Cooperation among learners speeds it. A genuine learning community is always better for learning than a collection of isolated individuals.
Learning Takes Place on Many Levels Simultaneously
Learning is not a matter of absorbing one little thing at a time in linear fashion, but absorbing many things at once. Good learning engages people on many levels simultaneously (conscious and para-conscious, mental, and physical) and uses all the receptors and senses and paths it can into a person’s total brain and body system. The brain, after all, is not a sequential, but a parallel processor and thrives when it is challenged to do many things at once.
Learning Comes From Doing the Work Itself (With Feedback)
People learn best in context. Things learned in isolation are hard to remember and quick to evaporate. We learn how to swim by swimming, how to manage by managing, how to sing by singing, how to sell by selling, and how to care for customers by caring for customers. The real and the concrete are far better teachers than the hypothetical and the abstract, provided that there is time for total immersion, feedback, reflection, and re-immersion.
Positive Emotions Greatly Improve Learning
Feelings determine both the quality and quantity of one’s learning. Negative feelings inhibit learning. Positive feelings accelerate it. Learning that is stressful, painful, and dreary can’t hold a candle to learning that is joyful, relaxed, and engaging.
The Image Brain Absorbs Information Instantly and Automatically
The human nervous system is more of an image processor than a word processor. Concrete images are much easier to grasp and retain than are verbal abstractions. Translating verbal abstractions into concrete images of all kinds will make those verbal abstractions faster to learn and easier to remember.
SS-ETH-CMN-FacilitatorsTrainingGuide-v1.026
3. Teaching Strategies and Facilitating Learning
3.1. OBJECTIVESThe content of this section will enable each facilitator to:
□ Explore and practice a variety of teaching strategies that can be used in Speed School classes
□ Understand the effectiveness of different strategies, based on the learning pyramid
□ Consider the advantages and disadvantages of different learning/teaching methodologies
□ Understand how to implement learning/teaching strategies for different groups of students, practice the strategies, and reflect on them
□ Define, identify, and prepare teaching and learning materials
□ Demonstrate how to use teaching and learning materials
3.1.1. Introduction
Facilitating learning is the act of supporting learners so that they can grasp knowledge, skills, and attitudes through activities, discussion, reading, and several other methods. Teaching is a process of facilitating the acquisition of ideas, knowledge, skills, attitudes, beliefs, and any other capabilities to a person with a view to bringing about particular changes in the person. A facilitator needs to explore various methods in order to enhance learning in the classroom. The focus of this section is to expose trainees to some of these methods.
Speed School Ethiopia: Facilitators Training Guide – Teaching Strategies And Facilitating Learning 27
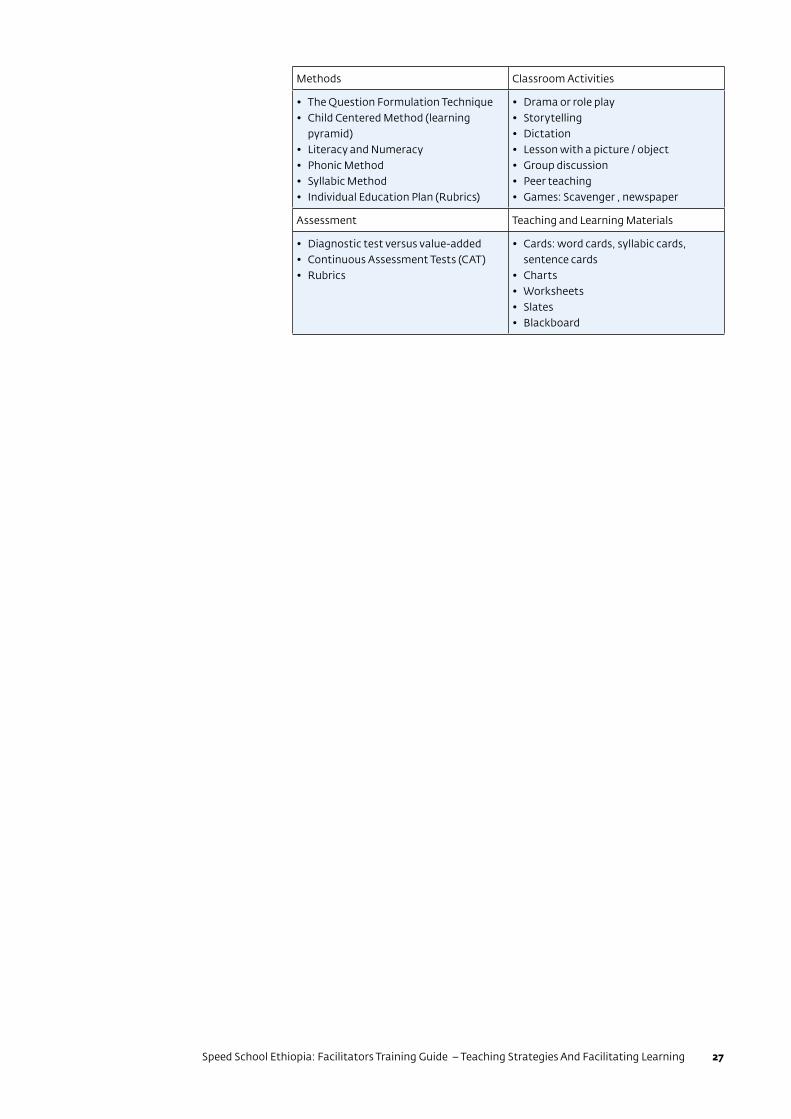
Methods Classroom Activities
• The Question Formulation Technique• Child Centered Method (learning
pyramid)• Literacy and Numeracy• Phonic Method• Syllabic Method• Individual Education Plan (Rubrics)
• Drama or role play• Storytelling• Dictation• Lesson with a picture / object• Group discussion• Peer teaching• Games: Scavenger , newspaper
Assessment Teaching and Learning Materials
• Diagnostic test versus value-added• Continuous Assessment Tests (CAT)• Rubrics
• Cards: word cards, syllabic cards, sentence cards
• Charts• Worksheets• Slates• Blackboard
SS-ETH-CMN-FacilitatorsTrainingGuide-v1.028
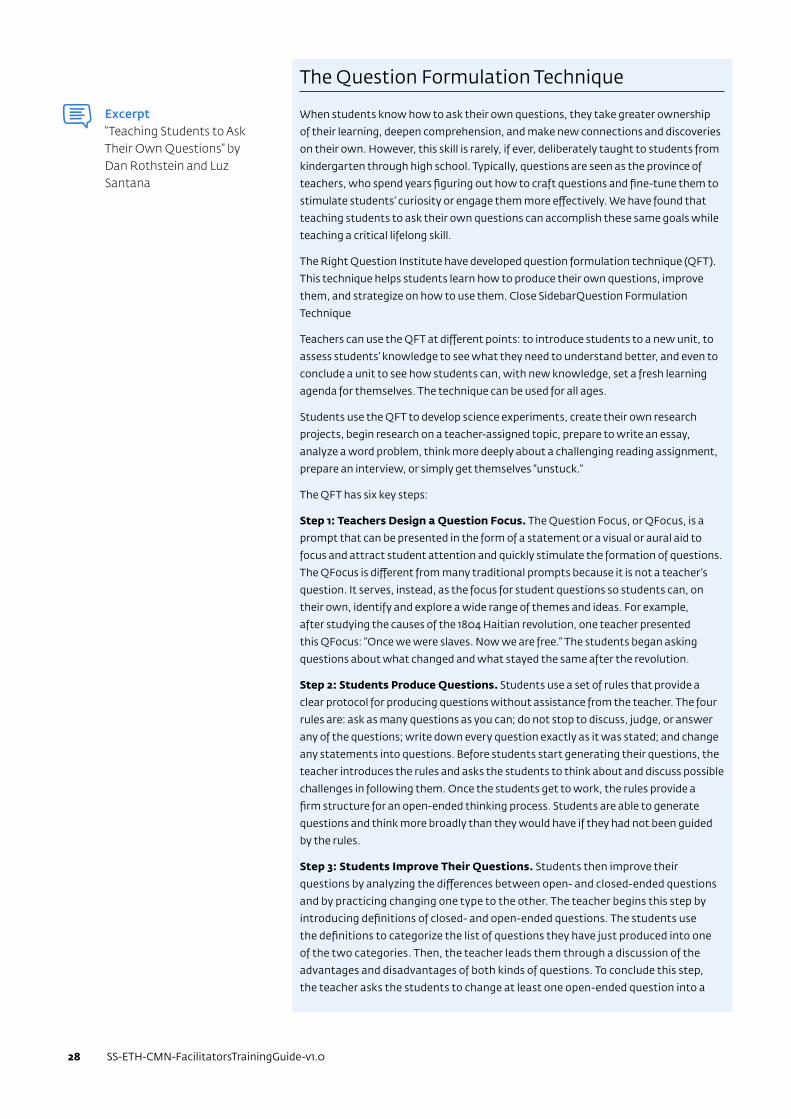
The Question Formulation Technique
When students know how to ask their own questions, they take greater ownership
of their learning, deepen comprehension, and make new connections and discoveries
on their own. However, this skill is rarely, if ever, deliberately taught to students from
kindergarten through high school. Typically, questions are seen as the province of
teachers, who spend years figuring out how to craft questions and fine-tune them to
stimulate students’ curiosity or engage them more effectively. We have found that
teaching students to ask their own questions can accomplish these same goals while
teaching a critical lifelong skill.
The Right Question Institute have developed question formulation technique (QFT).
This technique helps students learn how to produce their own questions, improve
them, and strategize on how to use them. Close SidebarQuestion Formulation
Technique
Teachers can use the QFT at different points: to introduce students to a new unit, to
assess students’ knowledge to see what they need to understand better, and even to
conclude a unit to see how students can, with new knowledge, set a fresh learning
agenda for themselves. The technique can be used for all ages.
Students use the QFT to develop science experiments, create their own research
projects, begin research on a teacher-assigned topic, prepare to write an essay,
analyze a word problem, think more deeply about a challenging reading assignment,
prepare an interview, or simply get themselves “unstuck.”
The QFT has six key steps:
Step 1: Teachers Design a Question Focus. The Question Focus, or QFocus, is a
prompt that can be presented in the form of a statement or a visual or aural aid to
focus and attract student attention and quickly stimulate the formation of questions.
The QFocus is different from many traditional prompts because it is not a teacher’s
question. It serves, instead, as the focus for student questions so students can, on
their own, identify and explore a wide range of themes and ideas. For example,
after studying the causes of the 1804 Haitian revolution, one teacher presented
this QFocus: “Once we were slaves. Now we are free.” The students began asking
questions about what changed and what stayed the same after the revolution.
Step 2: Students Produce Questions. Students use a set of rules that provide a
clear protocol for producing questions without assistance from the teacher. The four
rules are: ask as many questions as you can; do not stop to discuss, judge, or answer
any of the questions; write down every question exactly as it was stated; and change
any statements into questions. Before students start generating their questions, the
teacher introduces the rules and asks the students to think about and discuss possible
challenges in following them. Once the students get to work, the rules provide a
firm structure for an open-ended thinking process. Students are able to generate
questions and think more broadly than they would have if they had not been guided
by the rules.
Step 3: Students Improve Their Questions. Students then improve their
questions by analyzing the differences between open- and closed-ended questions
and by practicing changing one type to the other. The teacher begins this step by
introducing definitions of closed- and open-ended questions. The students use
the definitions to categorize the list of questions they have just produced into one
of the two categories. Then, the teacher leads them through a discussion of the
advantages and disadvantages of both kinds of questions. To conclude this step,
the teacher asks the students to change at least one open-ended question into a
G Excerpt“Teaching Students to Ask Their Own Questions” by Dan Rothstein and Luz Santana
Speed School Ethiopia: Facilitators Training Guide – Teaching Strategies And Facilitating Learning 29
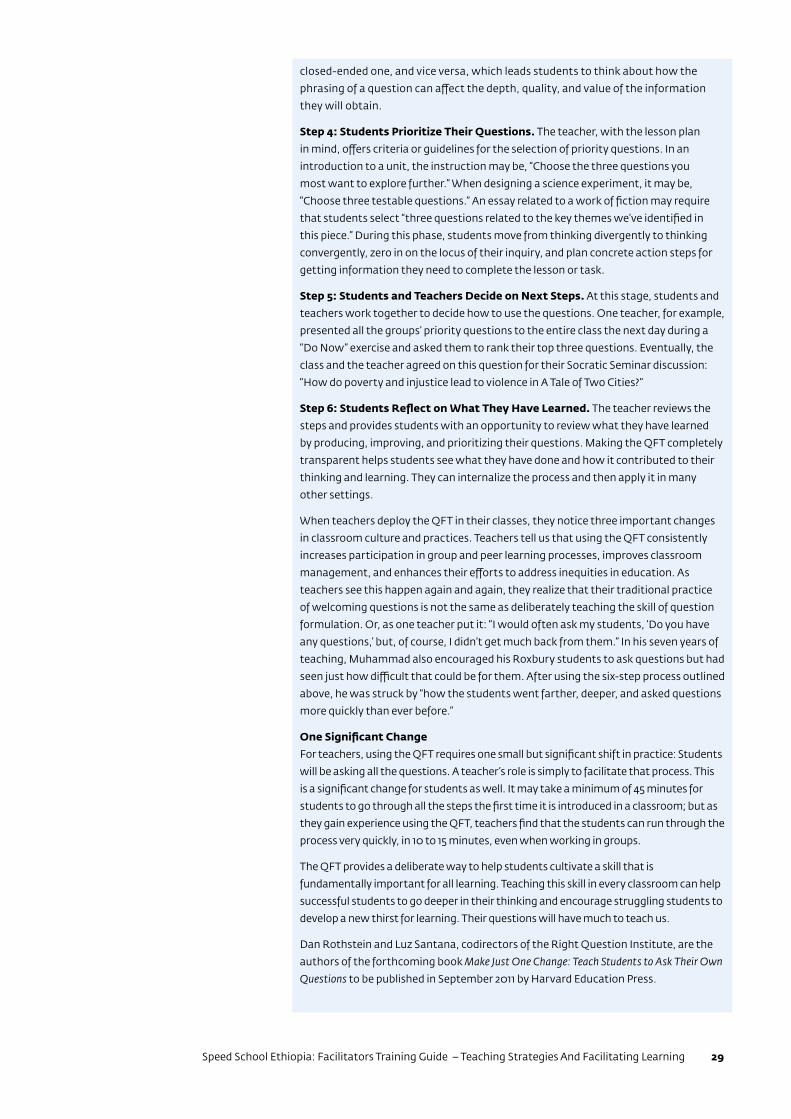
closed-ended one, and vice versa, which leads students to think about how the
phrasing of a question can affect the depth, quality, and value of the information
they will obtain.
Step 4: Students Prioritize Their Questions. The teacher, with the lesson plan
in mind, offers criteria or guidelines for the selection of priority questions. In an
introduction to a unit, the instruction may be, “Choose the three questions you
most want to explore further.” When designing a science experiment, it may be,
“Choose three testable questions.” An essay related to a work of fiction may require
that students select “three questions related to the key themes we’ve identified in
this piece.” During this phase, students move from thinking divergently to thinking
convergently, zero in on the locus of their inquiry, and plan concrete action steps for
getting information they need to complete the lesson or task.
Step 5: Students and Teachers Decide on Next Steps. At this stage, students and
teachers work together to decide how to use the questions. One teacher, for example,
presented all the groups’ priority questions to the entire class the next day during a
“Do Now” exercise and asked them to rank their top three questions. Eventually, the
class and the teacher agreed on this question for their Socratic Seminar discussion:
“How do poverty and injustice lead to violence in A Tale of Two Cities?”
Step 6: Students Reflect on What They Have Learned. The teacher reviews the
steps and provides students with an opportunity to review what they have learned
by producing, improving, and prioritizing their questions. Making the QFT completely
transparent helps students see what they have done and how it contributed to their
thinking and learning. They can internalize the process and then apply it in many
other settings.
When teachers deploy the QFT in their classes, they notice three important changes
in classroom culture and practices. Teachers tell us that using the QFT consistently
increases participation in group and peer learning processes, improves classroom
management, and enhances their efforts to address inequities in education. As
teachers see this happen again and again, they realize that their traditional practice
of welcoming questions is not the same as deliberately teaching the skill of question
formulation. Or, as one teacher put it: “I would often ask my students, ‘Do you have
any questions,’ but, of course, I didn’t get much back from them.” In his seven years of
teaching, Muhammad also encouraged his Roxbury students to ask questions but had
seen just how difficult that could be for them. After using the six-step process outlined
above, he was struck by “how the students went farther, deeper, and asked questions
more quickly than ever before.”
One Significant Change
For teachers, using the QFT requires one small but significant shift in practice: Students
will be asking all the questions. A teacher’s role is simply to facilitate that process. This
is a significant change for students as well. It may take a minimum of 45 minutes for
students to go through all the steps the first time it is introduced in a classroom; but as
they gain experience using the QFT, teachers find that the students can run through the
process very quickly, in 10 to 15 minutes, even when working in groups.
The QFT provides a deliberate way to help students cultivate a skill that is
fundamentally important for all learning. Teaching this skill in every classroom can help
successful students to go deeper in their thinking and encourage struggling students to
develop a new thirst for learning. Their questions will have much to teach us.
Dan Rothstein and Luz Santana, codirectors of the Right Question Institute, are the
authors of the forthcoming book Make Just One Change: Teach Students to Ask Their Own
Questions to be published in September 2011 by Harvard Education Press.
SS-ETH-CMN-FacilitatorsTrainingGuide-v1.030
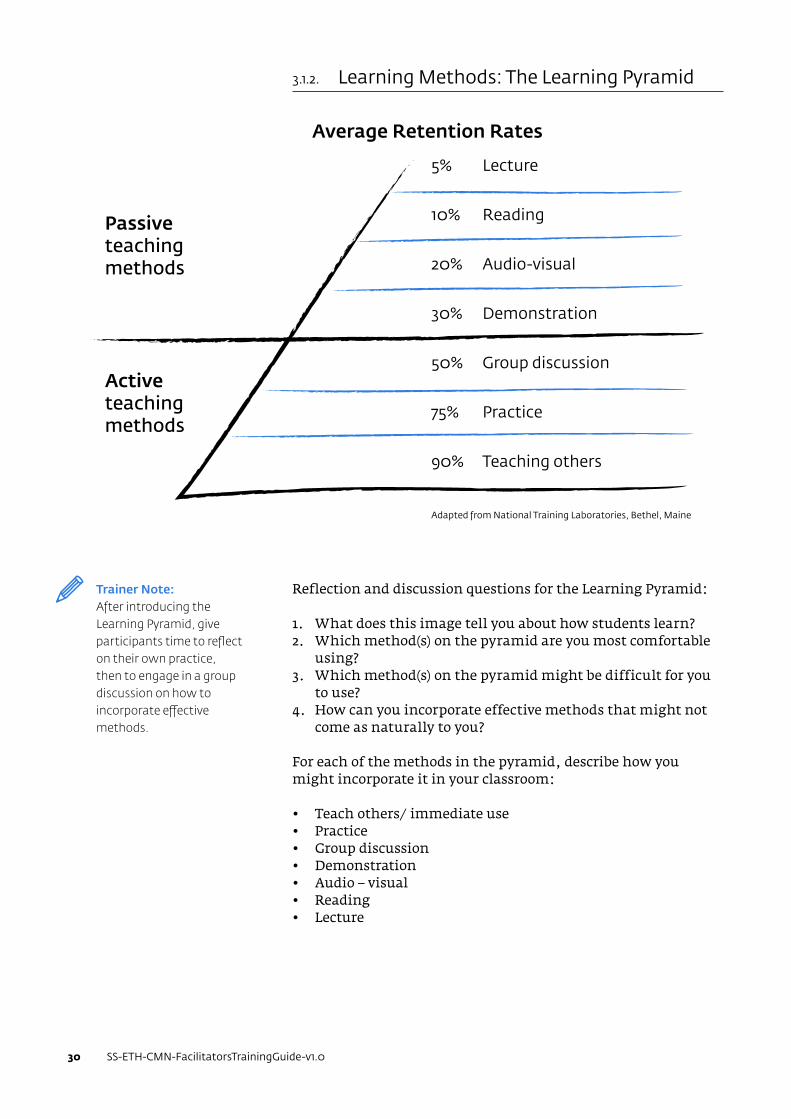
3.1.2. Learning Methods: The Learning Pyramid
Reflection and discussion questions for the Learning Pyramid:
1. What does this image tell you about how students learn?2. Which method(s) on the pyramid are you most comfortable
using?3. Which method(s) on the pyramid might be difficult for you
to use?4. How can you incorporate effective methods that might not
come as naturally to you?
For each of the methods in the pyramid, describe how you might incorporate it in your classroom:
• Teach others/ immediate use• Practice• Group discussion• Demonstration• Audio – visual• Reading• Lecture
Average Retention Rates
5% Lecture
Passiveteaching methods
Activeteaching methods
10% Reading
20% Audio-visual
30% Demonstration
50% Group discussion
75% Practice
90% Teaching others
Adapted from National Training Laboratories, Bethel, Maine
D Trainer Note:After introducing the Learning Pyramid, give participants time to reflect on their own practice, then to engage in a group discussion on how to incorporate effective methods.
Speed School Ethiopia: Facilitators Training Guide – Teaching Strategies And Facilitating Learning 31
3.2. TEACHING METHODSThe following section describes several teaching methods along with the advantages, disadvantages, and implementation considerations of each.
• Class method• Group method• Dramatization or role-play• Activity/Exercises method• Discussion method• Field trips or excursions
3.2.1. Class Method
The class teaching method is based on the supreme role of the teacher. The teacher takes a prominent position at the front of the classroom facing the students. He or she lectures and asks questions which pupils are expected to answer. The teacher may use the chalkboard. Children are expected to listen and absorb what is taught.
Advantages1. Knowledge is acquired in a consistent, systematic way.2. The teacher is able to teach a large class.3. A topic is presented once, therefore saving time.4. Common errors and difficulties are dealt with right away.5. Classroom management may be easier because students are
not moving around the room or talking at the same time.
Disadvantages1. Learning Pyramid shows that Lecture method has a low
retention rate.2. The technique is not differentiated, so both the more
advanced students and the students who are further behind may have difficulty.
3. Students are not given any social experience.4. Students may be bored.5. It doesn’t give much opportunity to discover students’
hidden potential because it is not student-led.
3.2.2. Group Method
The group method is a modification of the class method. To simplify the problem of teaching large classes with a wide range of ability, children are put into groups and assigned tasks according to their interests and ability. The teacher attends to each group to give necessary guidance.
D Trainer Note:Each of the methods should be introduced to facilitators and then practiced multiple times during training. Be sure to allow time for facilitators to reflect on what went well or what could be improved each time a method is practiced.
SS-ETH-CMN-FacilitatorsTrainingGuide-v1.032
There are various ways of grouping children in the classroom for instructional purposes. For simplicity, we examine just two ways:
• Ability Group: This consists of putting children who are at the same academic level in the same group.
• Mixed Ability Group: This is the grouping of children with varied levels of academic performance.
Advantages1. Smaller groups allow for more active participation of all
students, which contributes to their understanding of the lesson.
2. Students may feel more motivated when they are assigned tasks that suit their academic level or ability.
3. It may reduce frustration, as students progress at their own pace.
4. It can cultivate a team spirit and build social and conflict resolution skills.
5. Smaller groups can allow students to take leadership roles.6. Students’ needs are better met because they can be
regrouped for remediation and enrichment.7. Groups create room for students’ hidden talents to come out
through leadership or student-led activities.
Disadvantages1. Planning and delivery of lessons is more time consuming
and taxing for the facilitator, because multiple lessons must be delivered.
2. Classroom management and control may be more difficult because the teacher cannot attend to all groups at the same time.
3. More advanced students may dominate activities.
Implementing groupingThe following principles will help facilitators to plan-prepare-implement-reflect while using the grouping method.
1. Groups should not be too large, e.g., five groups of five students.
2. Visit each group frequently to explain issues, answer questions, and provide guidance.
3. Vary and review membership of groups regularly.4. Groups must be given sufficient and suitable assignments.5. Teaching and learning materials should be provided to guide
the groups’ work.6. Task must be well defined.7. Leaders must be appointed to supervise groups.8. Tasks must be commensurate with pupils’ age, ability and
capability to accomplish.
Speed School Ethiopia: Facilitators Training Guide – Teaching Strategies And Facilitating Learning 33
3.2.3. Dramatization and Role-Play
Dramatization and role-playing are ways to have students practice real life situations. Role-playing is a learning method in which students act out a real life situation to learn lessons. Drama can be fiction or can be a real life situation. Another difference between the two is that a dramatization is scripted or planned, whereas a role-play is unscripted. Using dramatization or role-play as a teaching method is a good way for students to practice literacy skills.
Advantages1. Allows students to share ideas with each other.2. Develops students’ communication skills.3. Allows students to socialize with each other.4. Develops students’ creative talents.5. Can help to make an abstract lesson or concept more
concrete.6. It helps students remember what is taught.7. Promotes cooperation among students.
Disadvantages1. Students who are observing a dramatization or role-play but
not participating may become bored.2. Script must be well planned to be effective.3. Students may be too shy, self-conscious, or nervous to
participate fully.4. The message or lesson can get lost if the dramatization or
role-play is not well-planned.
Note: Make it clear to students that roles being played are “made up” and not meant to be a reflection of the person acting them.
Implementing a dramatization or role playImplementing this method, as with any method, requires several planning and preparation steps, including: determining the theme or plot in support of the lesson, selecting the characters, assigning roles to characters, setting the scenes, and rehearsing roles.
3.2.4. Activity/Exercises Method
The activity method places the student in the center of the teaching and learning process. It requires students to discover facts or concepts and to acquire skills for themselves instead of being told things which they may more easily forget. The activity method makes students discoverers of knowledge and skills through hands-on experiences.
SS-ETH-CMN-FacilitatorsTrainingGuide-v1.034
Elements of the Activity MethodStudents using the activity method are busy and working independently (or in groups) throughout the lesson. Students may be involved in:
• Handling and using of objects and materials.• Observing events and materials.• Experimenting or trying different things with the materials
to see what happens.• Sorting and grouping materials according to their
similarities and differences.• Discussing what they or others are doing.• Communicating to others what they are doing or
discovering.• Comparing what they found with what others found.• Trying to understand why they got certain results.• Raising questions for further investigation.• Making measurements using appropriate materials.• Recording findings and drawing conclusions or generalizing
what they found.
Implementing an activity lessonThe most important step is to consult the appropriate curricular materials to determine the objectives and closely align the activity to the lesson objectives. Once that initial planning has been done, preparation for an activity lesson may include:
• Identifying and gathering appropriate materials.• Pre-testing the materials to ensure the activity will go as
planned.• Predicting and preparing for any challenges, obstacles, or
unintended situations that may occur during the lesson.• Preparing to deliver the activity through either group work,
pair work, or individual work and having a supervisory strategy, including how to control noise during the activity.
The facilitator’s role in an activity lessonThe facilitator is a guide and resource to students in an activity lesson, rather than an instructor. That role includes the following:
1. Give precise and clear instructions at the beginning of the activity so that students know what is expected of them.
2. Engage frequently with each group as they work to supervise, redirect, and keep them on task.
3. Provide encouragement to students as they work.4. Evaluate whether students are getting the point of the
activity and shift strategies should the need arise.5. Ask probing questions to generate new activities.6. Transition from an activity or set of materials if students are
losing interest.7. Allow students to work on their own pace.8. At the end of the activity/exercise, the facilitator must give
students as opportunity to review what they learned.
Speed School Ethiopia: Facilitators Training Guide – Teaching Strategies And Facilitating Learning 35
Role of the student during an activity lessonStudents should be active and engaged in the activity lesson, including:
1. Interacting with the materials provided.2. Freely communicating with other students to promote
understanding and peer learning.3. Participating in a discussion of the activity afterwards to
draw conclusions from it.4. Recording their work.
Advantages1. Students engage multiple senses in the learning process and
are active physically as well as mentally.2. Students have opportunities to communicate, interact, and
share ideas with each other.3. Students cooperate with each other and develop a sense of
responsibility.4. Students may learn better since the activity method draws
on their sense of curiosity, knowledge, and previous experiences.
5. It exposes students to local materials and environment when utilizing objects obtained locally.
6. The activity method can be fun for students because they have a natural tendency to play and explore.
Disadvantages1. Activities can be time-consuming.2. It involves the use of more material resources and sometimes
space.3. Class could be very noisy, making it difficult for students to
stay on task and focused.
3.2.5. Discussion Method
In the discussion method, the facilitator poses a question or series of questions and initiates a discussion of a topic or issue. Discussions can take the form of small group discussions, debates, whole class discussion, or a panel discussion.
Implementing a discussion lessonTo effectively facilitate a discussion lesson, the facilitator should plan, prepare, and implement by:
1. Preparing a list of questions beforehand2. Directing the discussion3. Making sure that every pupil is participating4. Ensuring that the group does not digress and redirected
when needed5. Staying conscious of time6. Restating or reviewing key points made in the discussion.
SS-ETH-CMN-FacilitatorsTrainingGuide-v1.036
Advantages1. It provides opportunities for development of communication
skills, critical and evaluative thinking, and listening skills.2. Students teach and learn from each other.3. It provides practice for problem-solving.4. It provides an opportunity for students to ask questions and
clarify concepts they don’t understand.
Disadvantages1. Some students may try to dominate or suppress the
discussion.2. Students who are quiet, shy, or believe themselves to be
weaker students may not participate fully.3. There will not be full participation by all students if they
believe they will be judged or ridiculed by others.
3.2.6. Excursions and Field Trips
An excursion or field trip is a visit organized by the facilitator or school for educational purposes. We use excursion to refer to a visit that may last a day or more and field trip to refer to a visit of a few hours or up to a day.
Implementing an excursion or field tripTo use this method effectively, the facilitator should plan, prepare, and implement by:
• Seeking all necessary permissions, including consent of the head teacher, and written permission from the District Director of Education and parents.
• Visit the proposed site, meet with on-site staff, and discuss the lesson objectives and the activities the students will do.
• Prepare information in writing for school leaders and the site staff, including the date and time of the trip, number of people involved, and intended activities.
• Discuss the purpose of the trip with students ahead of time and give specific instructions so that they know what to bring (e.g., food and water), where they need to be, and what they can expect to be doing.
The facilitator’s role in an excursion or field tripThe facilitator should work closely with site staff to ensure that children are safe and engaged during the trip. The facilitator must ensure that children are active, that they are in the right places at the right times, and that they are engaged by drawing their attention to important objects or ideas.
After the trip, the facilitator should make sure that the lesson objectives were accomplished by discussion of what was learned on the trip, assigning follow up work, and writing thank you letters to the hosts of the trip.
Speed School Ethiopia: Facilitators Training Guide – Teaching Strategies And Facilitating Learning 37
Advantages1. It provides students with hands-on experiences.2. It cultivates a healthy school-community relationship.3. Doing something outside of the classroom can be interesting
and motivating for students.4. It can broaden students’ horizons, exposing them to new
places or experiences.
Disadvantages1. It is time consuming.2. Some parents may not allow their children to go on the trip,
and the lesson will have to be delivered to those children though a different method.
3.2.7. Selecting Appropriate Teaching/Learning Methods
Many things influence the selection of teaching/learning method. However, there are four general factors the facilitator must take into consideration when selecting teaching/learning method. These factors are:
• The Training Objective: what are the proposed learning outcomes? What are learners expected to know or be able to do as a result of the session? Does one method ensure reaching the objectives better than other methods?
• The Content: depending on the subject matter to be covered, you opt for theoretically based or practically oriented methods.
• The Facilitator: are you, as a facilitator, competent enough to use the various methods?
• The Learners: does the method take into account group size, age of students, level and other special characteristics of the students.
3.3. USING TEACHING AND LEARNING MATERIALS
3.3.1. Introduction
Teaching and Learning Materials (TLMs, also called teaching aids) are those materials that the teacher prepares and uses to engage multiple senses and thereby appeal to different learning styles in the classroom. TLMs may be audio, visual, audio and visual, or tactile/sensory. Audio TLMs include things like recorded tapes, discs, and radio. Visual TLMs include items such
SS-ETH-CMN-FacilitatorsTrainingGuide-v1.038
as charts, maps, or sketches. Audio-Visual TLMs include motion pictures or anything else that combines picture and sound. Tactile or sensory TLMs include objects that can be seen and touched.
TLMs can be particularly useful in primary grades by helping students see abstract concepts as more concrete. Students need to see, feel, smell, taste, hear, and manipulate materials in order to understand the concepts, principles, or skills that are taught by the teacher. In other words, children learn better when one or more of their senses are used in the learning process.
TLMs can help to:
• Illustrate the lesson in a new and different way• Consolidate or summarize what has been taught, e.g., in a
display in the classroom• Facilitate better understanding or retention of a topic by
accommodating different learning styles• Connect abstract concepts to concrete images, sounds,
object, etc.• Capture students’ interest and attention, especially when
the materials are visually interesting• Overcome the limitations of imagination, by making new
experiences accessible• Encourage active participation, especially if students can
manipulate or use the materials• Adds aesthetic value to the classroom environment
A good TLM is:
• Attractive and appealing to the pupils’ eyes• Easy to use, handle, and manipulate• Realistic• Harmless to the users• Bold and clear• Correct in terms of labeling, spelling and grammar• If possible, prepared from locally available materials and not
expensiveIn order to ensure that the TLM serves the objectives of the lesson, the facilitator’s planning and preparation must ensure that the TLM is:
• Related to and supports the lesson• Suitable for the age and experience of the students• Gender sensitive, particularly with the pictures and
language used• Cost effective, i.e., it should be the type that the financial
resources of the school can provide
D Trainer Note:You could introduce the topic of TLMs with a brainstorming exercise, either in small groups or one large group. Ask participants to brainstorm:
1. What are TLMs?2. Why are they used?3. How are they used?
Speed School Ethiopia: Facilitators Training Guide – Teaching Strategies And Facilitating Learning 39
3.3.1. Using TLMs
Planning and PreparationsUsing TLMs effectively requires planning and preparation.
• Prepare by studying the materials to determine when and how to present them, how to integrate questions and activities with TLMs, and where to place emphasis with TLMs.
• Organize the TLMs, making sure they are ready for use and will not require any classroom time to organize or arrange.
• Prepare the classroom to ensure that there is enough space, appropriate seating, lighting, and sound for all students to benefit from the TLM.
• Prepare the students to make use of the TLM, by providing background information on the subject (especially if the TLM may be unfamiliar, like an abacus, geoboard, slides, television, etc.), letting them know what they are expected to learn from the materials, and what they are expected to do with the materials.
Implementing TLMs• Introduce all materials adequately to students and provide
explanations, comments or demonstrations as needed• Make sure that all students have the opportunity to see,
hear, or touch the materials
Reflect on the MaterialsAs with all classroom lessons, you should reflect on whether your objectives were achieved, what went well, and what could be improved. Start by asking:
• Did the material help me to achieve the purpose of the lesson?
• Did students seem to understand and appreciate the use of the material?
• Were the students confused?• How could the material be improved to better achieve my
objectives?• Was it worth the time and energy I spent to prepare and use
it?
Displaying TLMsUnless a good TLM is well displayed, its value is not maximized. In displaying TLMs, you need to:
• Hang them on the wall of the classroom at the eye level of the pupils
• Hang them straight• Put them on a flat table or surface so that pupils can see
clearly• Flash cards at a moderate speed and from the left to the right
of the teacher
SS-ETH-CMN-FacilitatorsTrainingGuide-v1.040
• Present them one at a time as the topic is being treated in a particular lesson
• Bear in mind that some materials have to hang for a longer time in order to help pupils to remember and to reinforce important points from the lesson. But change them periodically so they do not lost their effectiveness.
• Remember that it is worthwhile to display children’s work too. This will serve as a source of encouragement to them.
3.3.2. Protection and Storage of TLMs
Many TLMs can be used more than once if they are protected and stored carefully. For protection of TLMs, following these guidelines:
1. Materials that are susceptible to dust, damp, winds, rain (water), like paper or cardboard materials, should be stored in a sealed, airtight container.
2. Metallic TLMs should be cleaned and oiled after use.3. Termites, borers, bats, and other small creatures, which
are found in school offices and store rooms, destroy paper, cloth, and wood TLMs. Careful cleaning and disinfecting of the TLMs is necessary. Spreading camphor balls where materials are stored will prevent mice from causing damage. Mousetraps can also be set in the rooms where the materials are kept (but keep traps out of reach of students).
4. Mount pictures, charts, maps and similar objects on strong backing materials and bind edges of paper TLMs with strips of sticky paper such as masking or cello tape. Reinforce corners with hard material such as layers of cardboards or plywood.
5. Use cardholders or display frames made from brown paper for pictures that will be handled by students during a lesson.
6. Instruct students to handle TLMs with care.7. Store paper materials flat (rather than rolled or folded)
whenever possible to prevent tearing.
Store TLMs in a safe and accessible space, following these guidelines:
1. Heavy and/or delicate equipment, which can be damaged when it is moved should have a permanent storage space.
2. Utilize cupboards in the classrooms or head teacher’s office.3. 3. Specimens and models can be stored in containers such
as plastic boxes, polythene bags, matchboxes, or other available containers.
4. In schools with resource centers, TLMs should be placed there for safe storage.
In conclusion, facilitators should be encouraged to utilize several teaching methods to reach and engage different types of learners.
Speed School Ethiopia: Facilitators Training Guide – Classroom Management 41
4. Classroom Management
4.1. OBJECTIVESThe content of this section will enable each facilitator to:
□ Understand and practice basic methods of classroom management
□ Understand how to create a classroom conducive to discipline and learning
□ Understand and practice methods of rewarding or correcting student behavior
4.1.1. Introduction
Classroom management is the art or process of establishing and enforcing class norms, rules, and culture that allow students to effectively learn. Each facilitator must be capable of managing his or her class so that students know what to expect, know what is expected of them, and are free from distractions to their learning. Some of the elements of effective management include planning, organization, communication, human relations, classroom authority, and discipline.
First and foremost, a facilitator should model the types of behaviors he or she wishes to see in students. The facilitator should demonstrate efficiency, authority, and self-control in order to effectively manage the class. The following lists of personal characteristics and practices provide a solid foundation for good classroom management.
4.1.2. Facilitator Characteristics
• Dignity: The facilitator should behave in a dignified manner in the classroom, never engaging in arguments or physical struggles with students.
D Trainer Note:This section provides a great opportunity for you as the trainer to utilize the teaching method of role-playing. Have facilitators play the roles of student and facilitator in true-to-life classroom situations to practice classroom management skills.

SS-ETH-CMN-FacilitatorsTrainingGuide-v1.042
• Consistency and fairness: The facilitator should apply classroom rules and make decisions consistently, avoiding favoritism and treating all children equally.
• Self-reflection: An effective facilitator must be aware of his or her own strengths and weaknesses.
• Responsible: The facilitator should be someone upon whom students can rely, someone who is alert to his or her roles and responsibilities and consistent in supporting students’ learning.
• Enthusiasm: The teacher should be energetic and model enthusiasm and interest in the subjects taught.
• Communication: The teacher should communicate clearly and effectively, modeling and allowing for an open flow of information between students, parents, and other school personnel.
4.1.3. Classroom Practices
• Discipline: Instead of relying on punishment to ensure appropriate behavior, an effective teacher helps students become self-disciplined without the use of force or threat.
• Punishment: Use punishments and rewards judiciously. Frequent punishment or rewards can create a climate in the classroom wherein students only perform well when offered a reward or threatened with a punishment. When it is absolutely necessary for a student to be punished, the consequences should be proportional to the offence and should not shame or belittle the student.
• Good Human Relations: The facilitator must work in harmony with various individuals and groups within the school and community, including students, parents, head teachers, staff, school management committee, and the wider community. The facilitator should establish cordial, cooperative relationships with others.
• Methodical: The facilitator should be methodical in the presentation of lessons and also use a variety of teaching methods.
• Punctuality: The facilitator should model punctuality in the classroom and help students learn to abide by a calendar or schedule.
• Preparation and knowledge of subject matter: The facilitator should come to class every day prepared for the lesson and with knowledge of the subject matter.
• Classroom environment: The physical classroom should be free of distractions, if possible. The facilitator should set up the room and seating arrangement in a way that best suits the purposes of that day’s work.
The facilitator operates with authority in the classroom, meaning that ultimately he or she has control over what happens in the classroom. A facilitator’s authority is established through mutual respect between the facilitator and students.

Speed School Ethiopia: Facilitators Training Guide – Classroom Management 43
As described in the characteristics and practices above, when a teacher conducts him or herself with dignity, consistency, and fairness, students learn to trust and respect his or her authority.
4.1.4. Discipline
Discipline refers to the ability of students to accept and abide by the norms and rules of the classroom in order for effective learning to occur.
Disciplined behavior is demonstrated as:• Respect for authority and respect for peers• Cooperative effort• Willingness to do tasks that may be unpleasant or not what
the student wants to do
Undisciplined behavior is demonstrated by:• Insolence• Continued disturbance in the classroom• Failure to complete assignments satisfactorily• Apathy (i.e. showing no interest, feeling, or commitment to
what is going on in the classroom)• Fighting with other pupils• Cheating• Damage to school property or the property of others
4.1.5. Sources and Causes of Misbehavior
It can be helpful for a facilitator to consider what might be the cause of a student’s misbehavior in the classroom. Often, misbehavior begins when a student is physically exhausted, hungry, frustrated, or bored. Understanding the sources of misbehavior can help the facilitator prevent or correct it. The causes of misbehavior can be categorized as causes and sources that are in the classroom, at the school, and unique to the student and outside of the teacher or school’s control.
Sources of misbehavior in the classroom• Misbehavior can occur when lessons are not interesting or
engaging to students. This is one reason that facilitators should utilize a combination of teaching methods.
• Students may become frustrated or bored and misbehave when the content of a lesson is above or below their ability level.
• When only the teacher (or a single student) is active in a lesson, other students may misbehave out of boredom or for attention.
• Children have trouble sitting still and focusing for extended periods of time. They need opportunities to be active and
SS-ETH-CMN-FacilitatorsTrainingGuide-v1.044
energetic. The daily schedule should allow this and avoid having long blocks of academic time without breaks or active lessons. Also, facilitators should give thought to which subjects are taught at certain times of the day. In general, students may be more attentive just before lunch than later in the afternoon. This may vary by class and the facilitator should observe which times seem most suited for focused work with his or her students.
• Children are very sensitive to insult or shaming by adults and may react by misbehaving if the facilitator insults, belittles, or shames them.
• The classroom environment and seating arrangement can affect students’ ability to focus and be attentive during lessons.
• The facilitator’s attitude and treatment of students can also be a cause of misbehavior – when a teacher demonstrates apathy, unfairly favors particular students, or enforces rules inconsistently, students may misbehave.
Sources at the school• Shortages of materials or facilities can make students
uncomfortable or distracted and therefore prone to misbehavior. If the school does not have sufficient classroom space, desks or tables and chairs, toilet, and textbooks, children may misbehave.
• Students may have difficulty concentrating or paying attention in class if the school is sited near a market or main road or somewhere with noise and distractions.
Sources related to the individual student• Students arrive at school with differing levels of mental,
emotional, and physical wellness. Ill-health, hunger, exhaustion, or other sources of physical discomfort can make it difficult for students to demonstrate self-control in the classroom.
• What can be perceived as misbehavior can also be caused by a physical limitation, such as a student having difficulty seeing or hearing.
• Transitions, unpredictability, or new situations can cause anxiety in children and may result in misbehavior. For instance, at the beginning of the school year or after a holiday break, students may feel lonely or homesick, have trouble concentrating, misbehave or even wet him or herself.
• Students have different learning styles as well as different levels of experience and aptitude. Students may be frustrated or bored at times, making it difficult for them to exercise self-control.
Speed School Ethiopia: Facilitators Training Guide – Classroom Management 45
4.1.6. Managing the Sources of Misbehavior
Depending on the source of a student’s misbehavior, the teacher can try to take steps to prevent or correct it, such as:
• Using varied teaching methods, multi-sensory experiences, and clear instruction so that all students are engaged; allowing students to be active participants in the lesson; introducing lessons to capture students’ attention and relating lessons to the needs of the students.
• Ensuring that lessons are appropriate for students’ level and ability, and that assignments are relevant, related to lessons, challenging (but appropriate), and interesting.
• Providing feedback (such as marking assignments) so that students feel engaged.
• Modeling enthusiasm, maintaining a sense of humor, and treating students with kindness.
• Planning and re-evaluating the daily schedule.• Providing sufficient breaks for students to use the toilet, eat,
and get exercise.• Sending sick students for appropriate care or medical
attention• Remaining fair and firm in maintaining order in the
classroom.• Maintain a sense of humor and an attitude of compassion
with students.• Minimize distractions, such as noise or visual obstructions,
as much as possible.
4.1.7. Using Rewards and Punishment
Rewards include words of encouragement, praise, or material rewards (e.g., biscuits, pencils, etc.). Encouragement should be given freely and fairly (not singling out one student or demonstrating favoritism), but other types of rewards should be used sparingly. A facilitator should not create a dynamic where students only perform well when offered a reward or attempt to curry favor with students by offering rewards.
Punishment should also be used sparingly. The most effective form of punishment is for the student to experience the natural consequence of his or her offence – e.g., if a student did not finish an assignment, he or she may need to miss a fun activity in order to complete the assignment. Corporal punishment, insult, shame, or ridicule are not effective methods of dealing with misbehavior and should be avoided at all times. Also, using manual labor as a punishment is ineffective, as it can lead the child to have negative feelings and association with manual work.
SS-ETH-CMN-FacilitatorsTrainingGuide-v1.046
The following may be effective ways to correct misbehavior:
• Correction or reproof: Before resorting to punishment, a student must know that he or she is doing something wrong. The facilitator should clearly correct a student, kindly but firmly letting the student know what is expected and what he or she should be doing differently.
• Redirection: When a student is not behaving as instructed, it may help to redirect his or her actions (e.g., if a student is having trouble focusing, is staring out the window or talking to other students, the facilitator can ask that child to read aloud or take a more active role in the lesson).
• Isolation: A student may need to be moved to a different space in the classroom, especially if he or she is distracting others or being distracted by something. Moving a student away from other students may help eliminate the distraction.
• Detention: If a student’s behavior (such as tardiness) has resulted in lost time in class, it is reasonable to have the child stay late or give up some break time to make up work. This time should be limited and supervised.
• Deprivation: A student may be deprived of a fun or interesting activity or free time during the school day as a consequence of misbehavior.
4.1.8. Conclusion
Rather than relying on punishment to maintain order in the classroom, an effective facilitator works to build an environment of discipline and self-control among students. By modeling appropriate behavior and treating students with respect and kindness, the facilitator builds a climate of trust. And by being well-prepared and using engaging teaching methods, the facilitator does not have to rely on punishment to keep students on task. Encouraging self-discipline in students can be accomplished by creating a climate of mutual respect – so that students believe “I will do well to my friends and other people and I will expect them to do same to me.”

Speed School Ethiopia: Facilitators Training Guide – Appendices 47
5. Appendices
5.1. APPENDIX A: SCHEDULES
SS-ETH-CMN-FacilitatorsTrainingGuide-v1.048
5.1.1. Training Schedule
Topic Hours Goal Description or Sample Activities
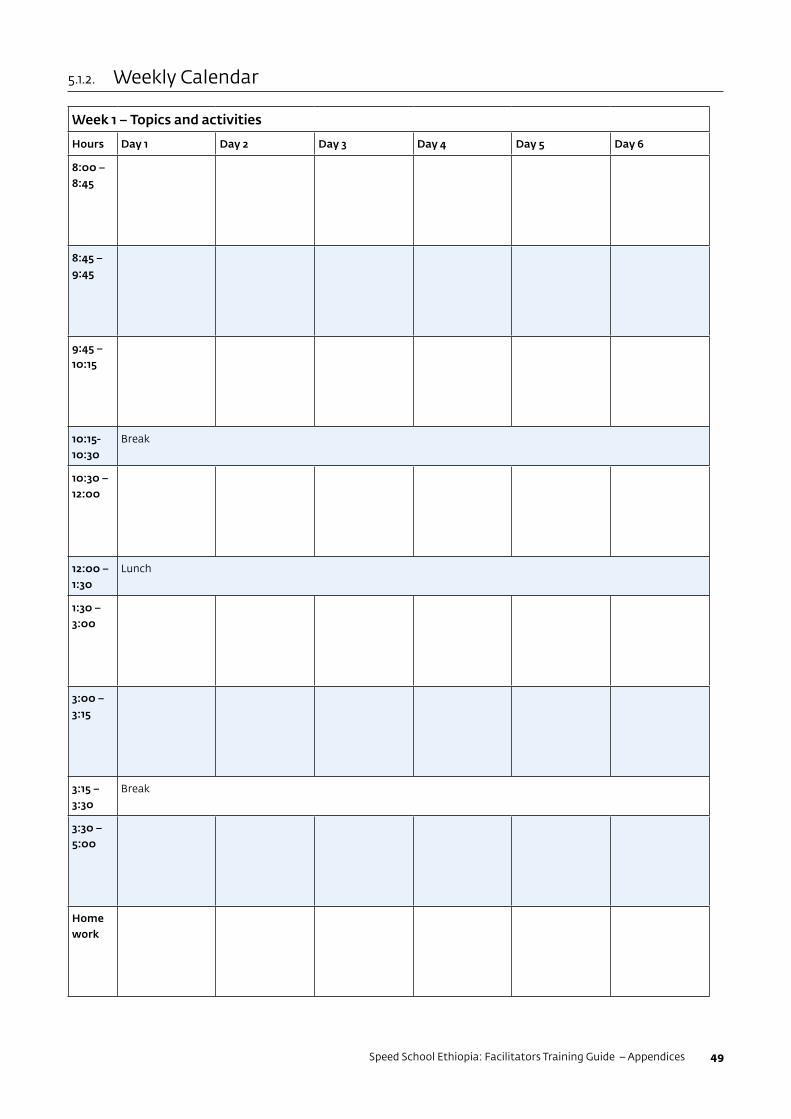
Speed School Ethiopia: Facilitators Training Guide – Appendices 49
5.1.2. Weekly Calendar
Week 1 – Topics and activities
Hours Day 1 Day 2 Day 3 Day 4 Day 5 Day 6
8:00 – 8:45
8:45 – 9:45
9:45 – 10:15
10:15-10:30
Break
10:30 – 12:00
12:00 – 1:30
Lunch
1:30 – 3:00
3:00 – 3:15
3:15 – 3:30
Break
3:30 – 5:00
Home work
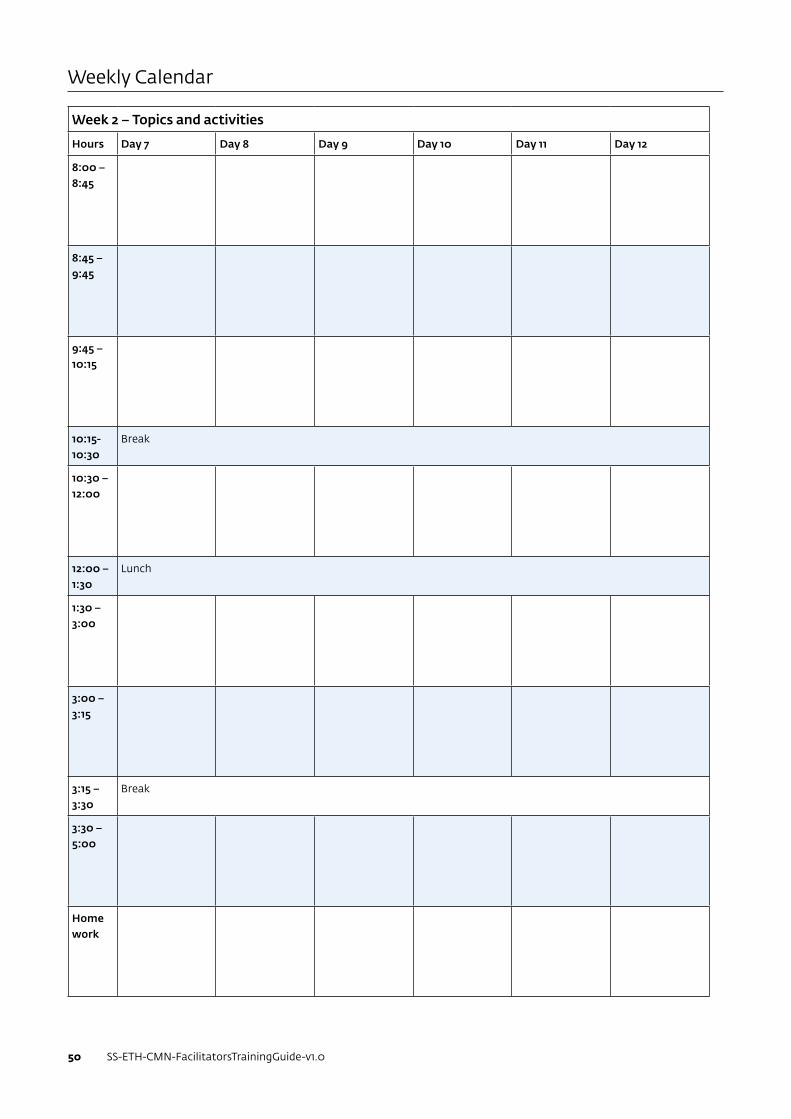
SS-ETH-CMN-FacilitatorsTrainingGuide-v1.050
Weekly Calendar
Week 2 – Topics and activities
Hours Day 7 Day 8 Day 9 Day 10 Day 11 Day 12
8:00 – 8:45
8:45 – 9:45
9:45 – 10:15
10:15-10:30
Break
10:30 – 12:00
12:00 – 1:30
Lunch
1:30 – 3:00
3:00 – 3:15
3:15 – 3:30
Break
3:30 – 5:00
Home work
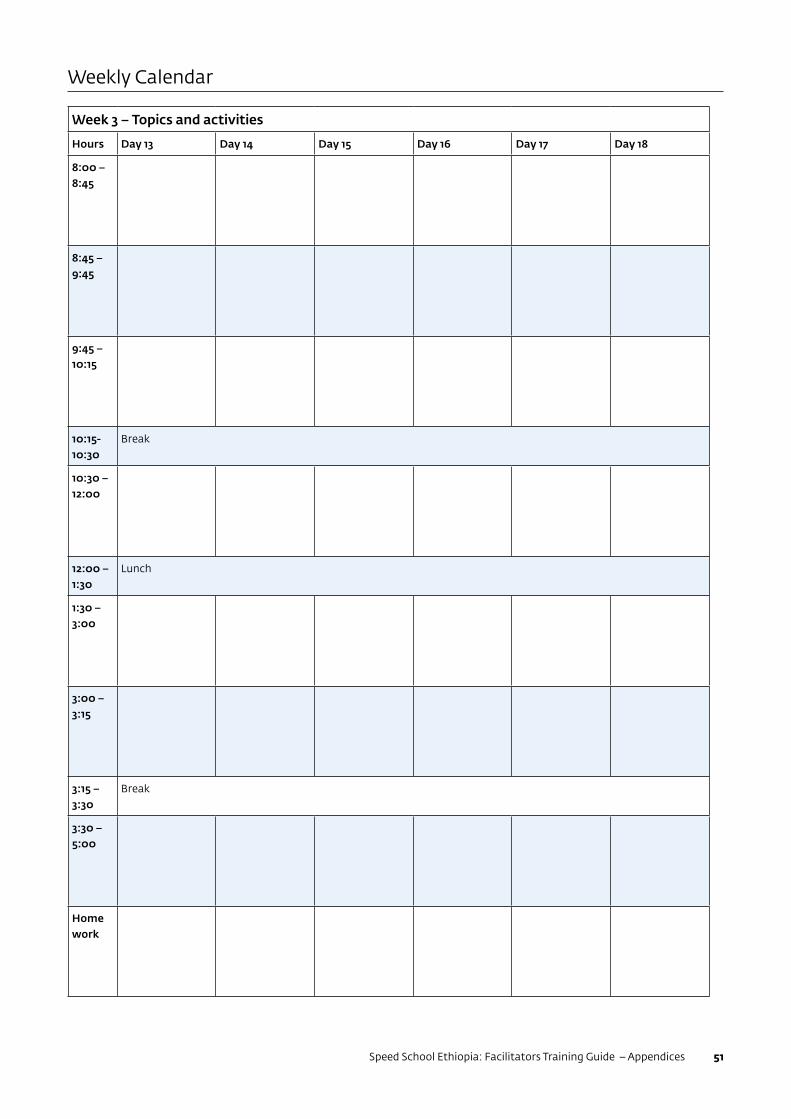
Speed School Ethiopia: Facilitators Training Guide – Appendices 51
Weekly Calendar
Week 3 – Topics and activities
Hours Day 13 Day 14 Day 15 Day 16 Day 17 Day 18
8:00 – 8:45
8:45 – 9:45
9:45 – 10:15
10:15-10:30
Break
10:30 – 12:00
12:00 – 1:30
Lunch
1:30 – 3:00
3:00 – 3:15
3:15 – 3:30
Break
3:30 – 5:00
Home work
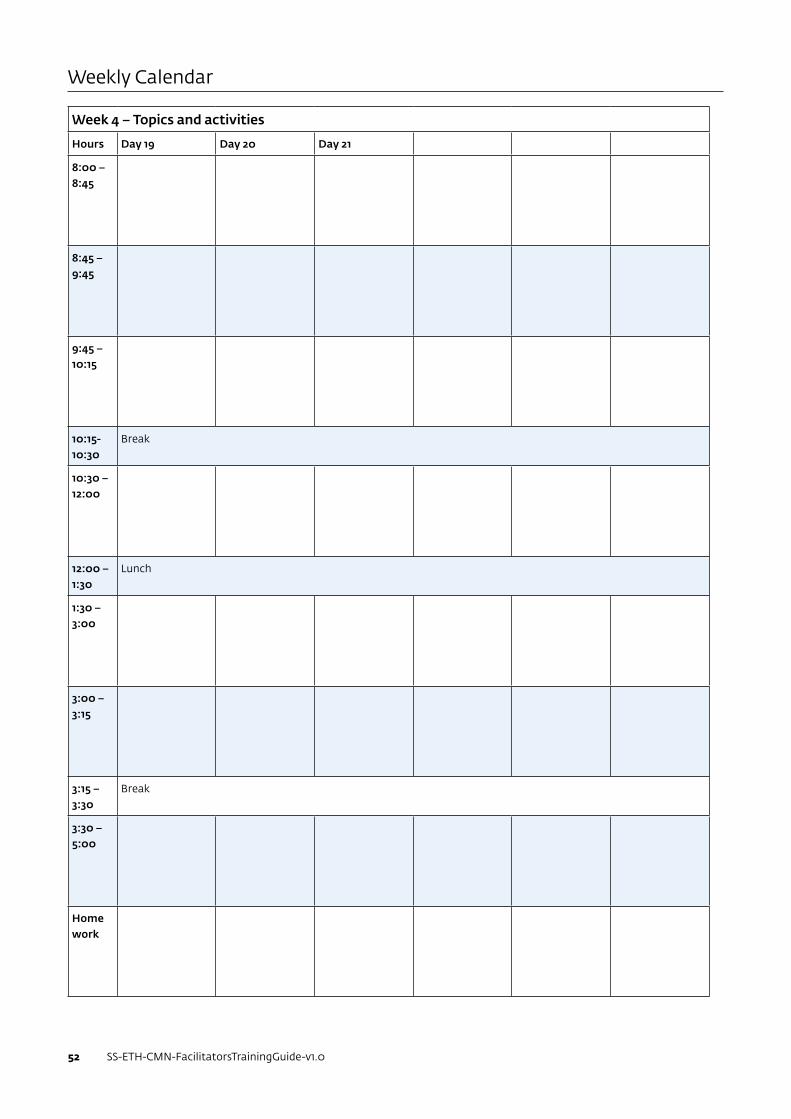
SS-ETH-CMN-FacilitatorsTrainingGuide-v1.052
Weekly Calendar
Week 4 – Topics and activities
Hours Day 19 Day 20 Day 21
8:00 – 8:45
8:45 – 9:45
9:45 – 10:15
10:15-10:30
Break
10:30 – 12:00
12:00 – 1:30
Lunch
1:30 – 3:00
3:00 – 3:15
3:15 – 3:30
Break
3:30 – 5:00
Home work
Speed School Ethiopia: Facilitators Training Guide – Appendices 53
5.2. APPENDIX B: TEACHING BASIC SKILLS
5.2.1. Topic: Pre-Reading Activities - Left-to-Right Eye Movement
Objectives:1. Identify pre-reading activities.2. Demonstrate the use of some pre-reading activities.
Introduction:• Use the sequencing of activities to develop left-to-right eye
movement• E.g. Concrete -> semi-concrete -> semi-abstract -> abstract• Ask pupils to walk with you from the left side to the right
side of the classroom• Ask 10 pupils to come to the front and stand in line, one
pupil at a time• Let each pupil call out his or her name starting from the left
to the right hand side, while those seated will follow with their eyes moving from left to right, as their colleagues call out their names
• Provide pupils with materials like books, number cards, letter cards, etc.
Activity 1: Left-to-right eye movementTake pupils through the following:
• Opening pages of books from left to right.• Counting from left to right.• Reading numbers from left to right.
Activity 2: Review• Ask pupils to tell what lessons they have learnt from the
above exercise.• Emphasis should be on left-to-right eye movement.• Let pupils tell what impact the exercise has on a child who is
a beginning to read.
Activity 3: Demonstration• Ask a pupil to demonstrate the use of Activity 1 in primary 1
class.
Activity 4: Self-assessment• Ask the pupil to assess him/herself after the demonstration
lesson.• Ask the rest of the pupils to comment on the demonstration
lesson.

SS-ETH-CMN-FacilitatorsTrainingGuide-v1.054
Activity 5: Evaluation• Let pupils tell what they have learnt.• Ask them to evaluate your lesson.
5.2.2. Topic: Pre-Reading Skills – Visual Discrimination and Memory Skills
Objectives:1. Identify visual discrimination/memory skills activities.2. Demonstrate the use of visual discriminating/memory
skills activities in class.
Introduction:• Provide pupils with materials like shapes, objects, pictures,
letter cards, etc.
Activity 1: Visual discrimination• Let them match large objects with smaller objects. (e.g. big
books with smaller books)• Let them identify very dark with well-lighted places. (Closed
classroom vs opened classroom)• Rough surfaces with smooth surfaces. (sample certificate
cards)• March lower case letters with their corresponding upper case
letters.• Classify given sounds into syllables. (e.g. use of claps to
determine syllables)
Activity 2: Review• Ask pupils to tell what lessons they have learnt from the
above exercise.• Emphasis should be on visual discrimination.• Let pupils tell what impact the exercise has on a child who is
a beginning to read.
Activity 3: Demonstration• Ask a pupil to demonstrate Activity 1.
Activity 4: Self-assessment• Ask the pupil to assess him/herself after the demonstration
lesson.• Ask the rest of the pupils to comment on the demonstration
lesson.
Activity 5: Evaluation• Let pupils tell what they have learnt.• Ask them to evaluate your lesson.
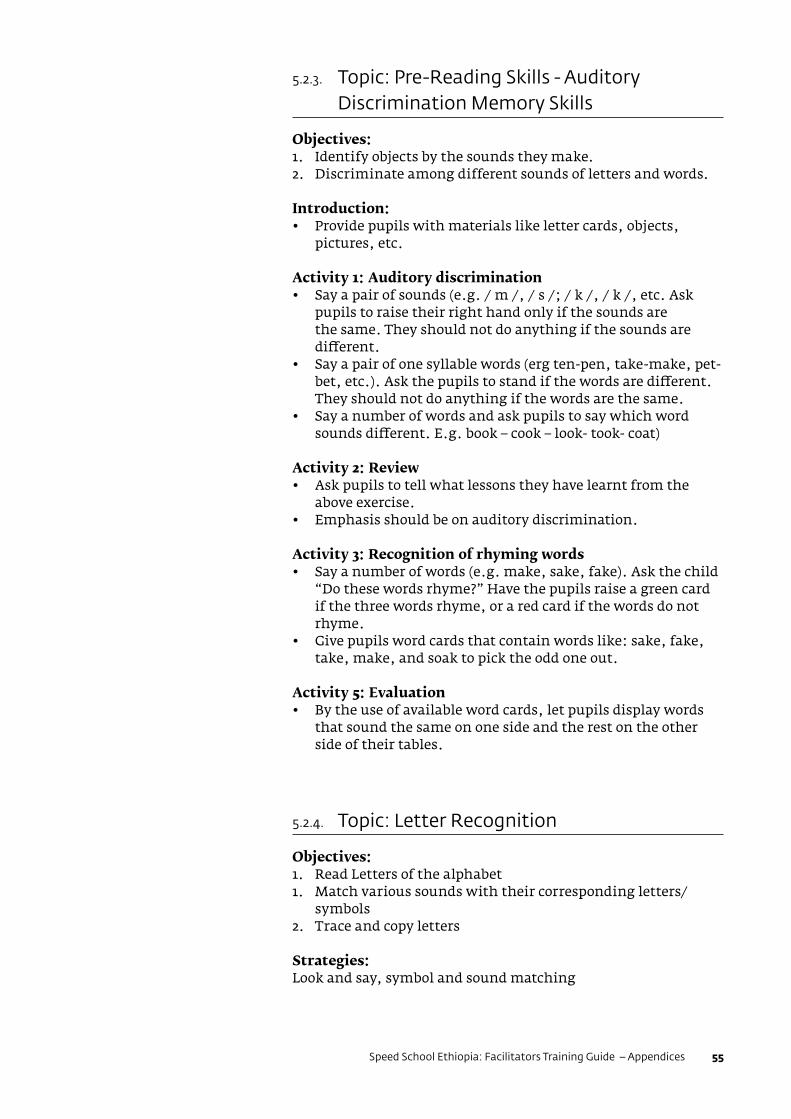
Speed School Ethiopia: Facilitators Training Guide – Appendices 55
5.2.3. Topic: Pre-Reading Skills - Auditory Discrimination Memory Skills
Objectives:1. Identify objects by the sounds they make.2. Discriminate among different sounds of letters and words.
Introduction:• Provide pupils with materials like letter cards, objects,
pictures, etc.
Activity 1: Auditory discrimination• Say a pair of sounds (e.g. / m /, / s /; / k /, / k /, etc. Ask
pupils to raise their right hand only if the sounds are the same. They should not do anything if the sounds are different.
• Say a pair of one syllable words (erg ten-pen, take-make, pet-bet, etc.). Ask the pupils to stand if the words are different. They should not do anything if the words are the same.
• Say a number of words and ask pupils to say which word sounds different. E.g. book – cook – look- took- coat)
Activity 2: Review• Ask pupils to tell what lessons they have learnt from the
above exercise.• Emphasis should be on auditory discrimination.
Activity 3: Recognition of rhyming words• Say a number of words (e.g. make, sake, fake). Ask the child
“Do these words rhyme?” Have the pupils raise a green card if the three words rhyme, or a red card if the words do not rhyme.
• Give pupils word cards that contain words like: sake, fake, take, make, and soak to pick the odd one out.
Activity 5: Evaluation• By the use of available word cards, let pupils display words
that sound the same on one side and the rest on the other side of their tables.
5.2.4. Topic: Letter Recognition
Objectives:1. Read Letters of the alphabet1. Match various sounds with their corresponding letters/
symbols2. Trace and copy letters
Strategies:Look and say, symbol and sound matching
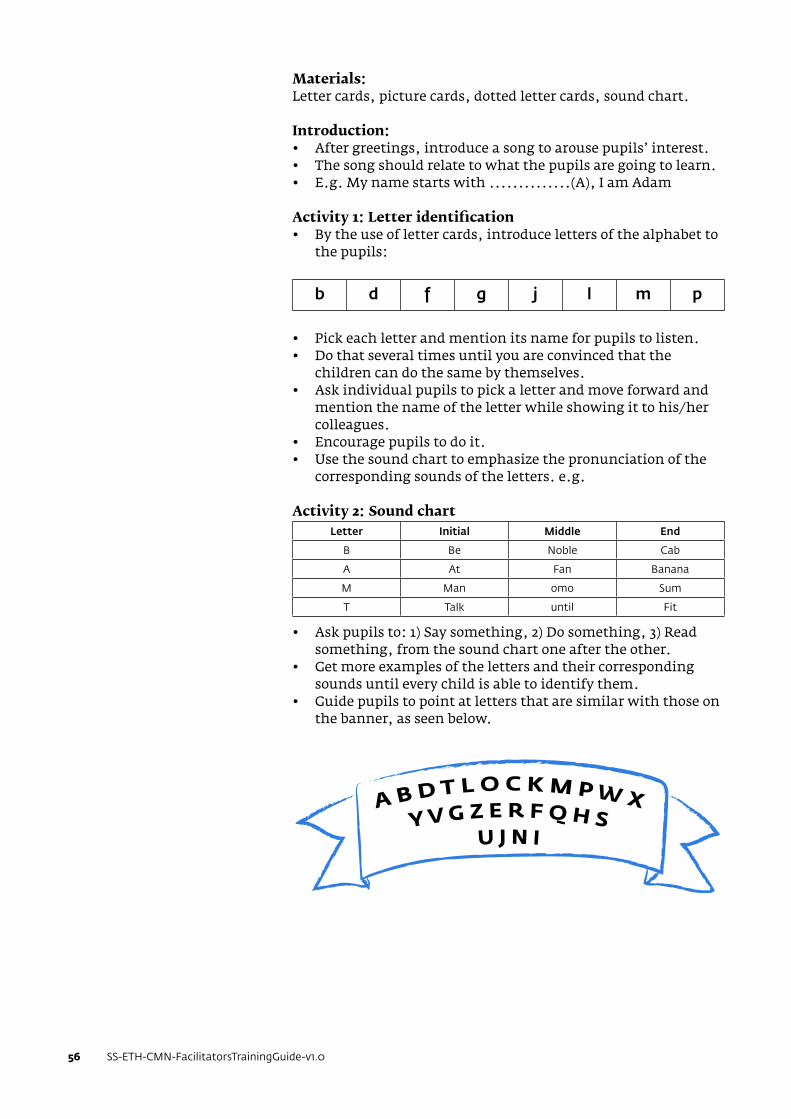
SS-ETH-CMN-FacilitatorsTrainingGuide-v1.056
Materials:Letter cards, picture cards, dotted letter cards, sound chart.
Introduction:• After greetings, introduce a song to arouse pupils’ interest.• The song should relate to what the pupils are going to learn.• E.g. My name starts with ..............(A), I am Adam
Activity 1: Letter identification• By the use of letter cards, introduce letters of the alphabet to
the pupils:
b d f g j l m p
• Pick each letter and mention its name for pupils to listen.• Do that several times until you are convinced that the
children can do the same by themselves.• Ask individual pupils to pick a letter and move forward and
mention the name of the letter while showing it to his/her colleagues.
• Encourage pupils to do it.• Use the sound chart to emphasize the pronunciation of the
corresponding sounds of the letters. e.g.
Activity 2: Sound chartLetter Initial Middle End
B Be Noble Cab
A At Fan Banana
M Man omo Sum
T Talk until Fit
• Ask pupils to: 1) Say something, 2) Do something, 3) Read something, from the sound chart one after the other.
• Get more examples of the letters and their corresponding sounds until every child is able to identify them.
• Guide pupils to point at letters that are similar with those on the banner, as seen below.
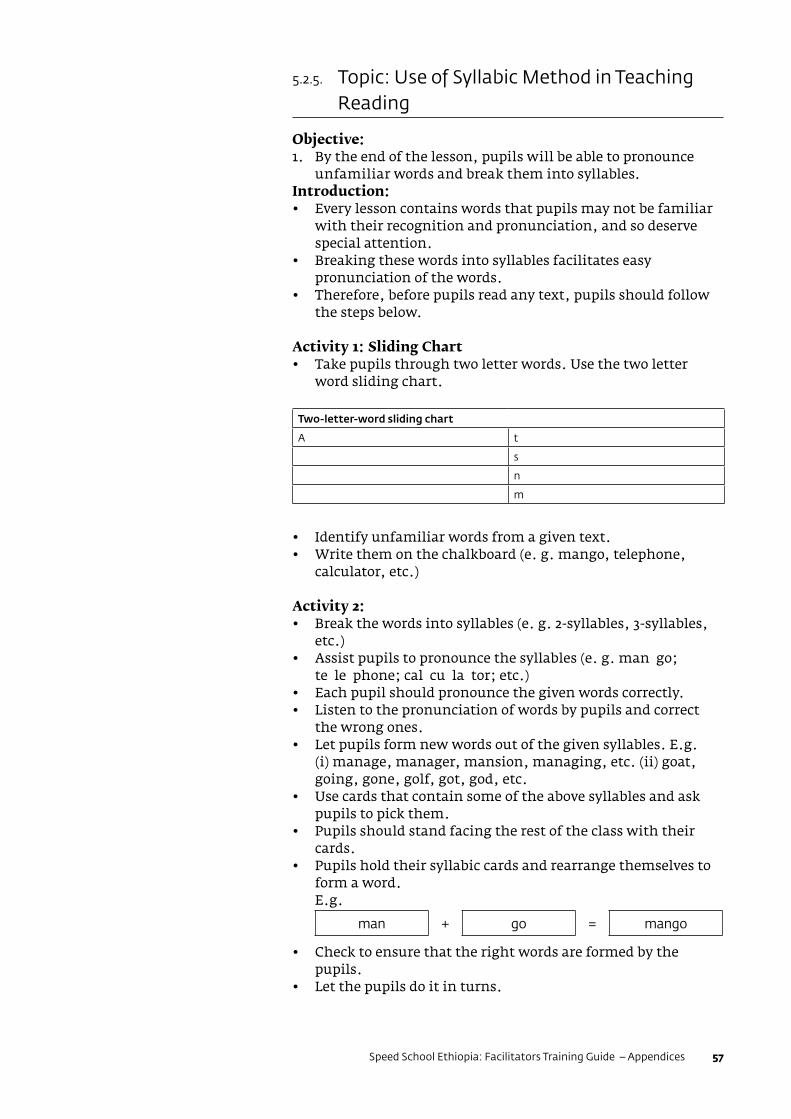
Speed School Ethiopia: Facilitators Training Guide – Appendices 57
5.2.5. Topic: Use of Syllabic Method in Teaching Reading
Objective:1. By the end of the lesson, pupils will be able to pronounce
unfamiliar words and break them into syllables.Introduction:• Every lesson contains words that pupils may not be familiar
with their recognition and pronunciation, and so deserve special attention.
• Breaking these words into syllables facilitates easy pronunciation of the words.
• Therefore, before pupils read any text, pupils should follow the steps below.
Activity 1: Sliding Chart• Take pupils through two letter words. Use the two letter
word sliding chart.
Two-letter-word sliding chart
A t
s
n
m
• Identify unfamiliar words from a given text.• Write them on the chalkboard (e. g. mango, telephone,
calculator, etc.)
Activity 2:• Break the words into syllables (e. g. 2-syllables, 3-syllables,
etc.)• Assist pupils to pronounce the syllables (e. g. man go;
te le phone; cal cu la tor; etc.)• Each pupil should pronounce the given words correctly.• Listen to the pronunciation of words by pupils and correct
the wrong ones.• Let pupils form new words out of the given syllables. E.g.
(i) manage, manager, mansion, managing, etc. (ii) goat, going, gone, golf, got, god, etc.
• Use cards that contain some of the above syllables and ask pupils to pick them.
• Pupils should stand facing the rest of the class with their cards.
• Pupils hold their syllabic cards and rearrange themselves to form a word. E.g.
man + go = mango
• Check to ensure that the right words are formed by the pupils.
• Let the pupils do it in turns.
SS-ETH-CMN-FacilitatorsTrainingGuide-v1.058
Activity 3:• Select some words from a given text and ask pupils to break
them into syllables.
Activity 4:• Select some words from a given text and ask pupils to read
them out.• Write down unfamiliar words on the chalkboard and ask
pupils to read them out.• Give more words to pupils and ask them to break them into
syllables.
Activity 5:• Ask pupils to underline the syllables of the following words:
• banana• pay• making• going• manager
• Answers:1. ba na na2. pay3. ma king4. go ing5. ma na ger
5.2.6. Topic: Word and Word Boundary Recognition
Objectives:By the end of the session, pupils will be able to
1. Recognize words from the phonic slide.2. Read out words to their colleagues.3. Decode secret numbers.4. Identify word boundaries.
Introduction:• Ask pupils to mention names of items in the classroom.• Let pupils sing 'Rolly Polly Rolly Polly' followed by action
words:
Procedure:Rolly Polly Rolly PollyRolly Polly Rolly PollyJump jump jumpRolly Polly Rolly PollyWalk walk walkRolly Polly Rolly PollyLaugh laugh laughRolly Polly Rolly Polly
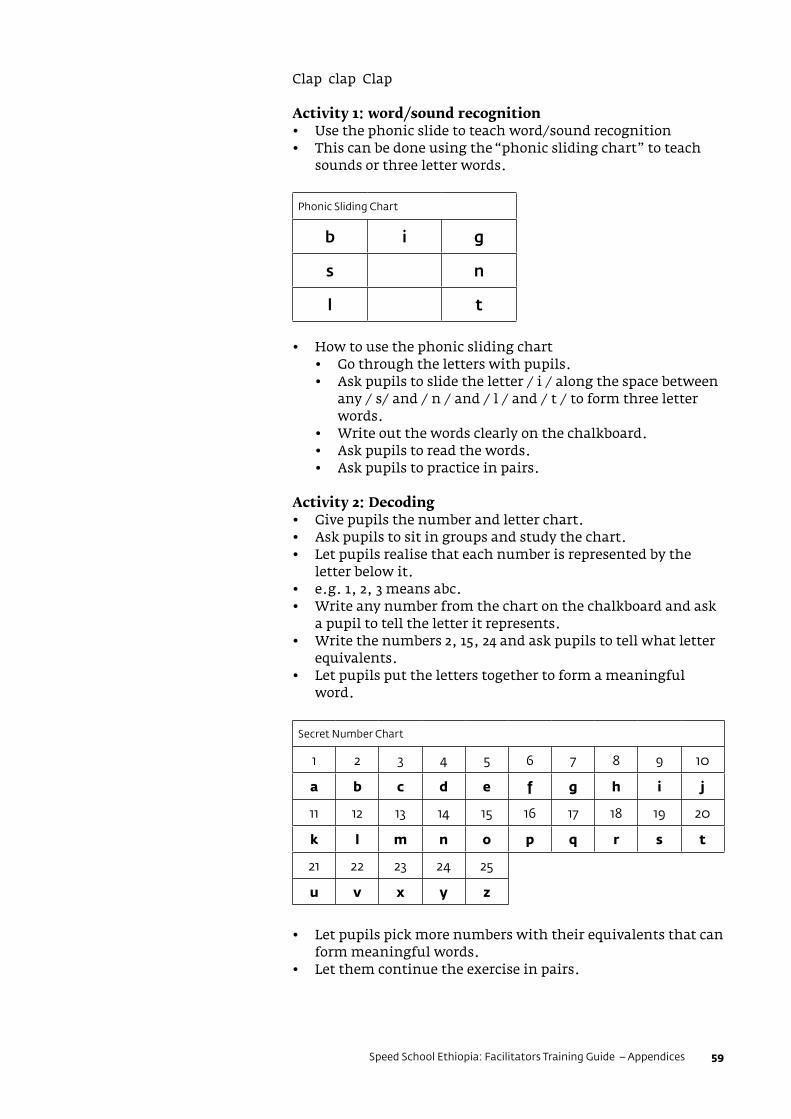
Speed School Ethiopia: Facilitators Training Guide – Appendices 59
Clap clap Clap
Activity 1: word/sound recognition• Use the phonic slide to teach word/sound recognition• This can be done using the “phonic sliding chart” to teach
sounds or three letter words.
Phonic Sliding Chart
b i g
s n
l t
• How to use the phonic sliding chart• Go through the letters with pupils.• Ask pupils to slide the letter / i / along the space between
any / s/ and / n / and / l / and / t / to form three letter words.
• Write out the words clearly on the chalkboard.• Ask pupils to read the words.• Ask pupils to practice in pairs.
Activity 2: Decoding• Give pupils the number and letter chart.• Ask pupils to sit in groups and study the chart.• Let pupils realise that each number is represented by the
letter below it.• e.g. 1, 2, 3 means abc.• Write any number from the chart on the chalkboard and ask
a pupil to tell the letter it represents.• Write the numbers 2, 15, 24 and ask pupils to tell what letter
equivalents.• Let pupils put the letters together to form a meaningful
word.
Secret Number Chart
1 2 3 4 5 6 7 8 9 10
a b c d e f g h i j
11 12 13 14 15 16 17 18 19 20
k l m n o p q r s t
21 22 23 24 25
u v x y z
• Let pupils pick more numbers with their equivalents that can form meaningful words.
• Let them continue the exercise in pairs.
SS-ETH-CMN-FacilitatorsTrainingGuide-v1.060
Activity 3: Word formation• Display word cards with the same word like “beautiful” on
pupils’ tables.• Ask the pupils to form as many words as they can from the
word “beautiful”• The one who is able to form more words wins the day.• Let pupils do same in groups.
Activity 4: Word boundary recognition• Write down a “running sentence” for pupils to separate the
words. E.g. MynameisKofi.• Ask pupils to sit in pairs and identify the word boundaries in
the following:• Thebook.• Mybook• Thetable• Thebookisonthetable.
• Write down similar exercises for pupils to do.
5.2.7. Topic: Teaching Reading
ObjectivesBy the end of the session, participants will be able to:
1. Define reading;2. Explain types of reading;3. State the stages of reading;4. List sources of reading;5. State four importance of reading.
Introduction: What is reading?• Reading is said to be an activity characterized by the
translation of symbols, or letters, into words and sentences that have meaning to the individual. The ultimate goal of reading is to be able to understand written material, to evaluate it, and to use it for one’s needs.
• In order to read, one must follow a sequence of characters arranged in a particular spatial order. For example, English flows from left to right, Hebrew from right to left, and Chinese from top to bottom. The reader must know the pattern and use it consistently. Ordinarily, the reader sees the symbols on a page, transmitting the image from the eye to the brain, but reading also can be accomplished by touch, as in the Braille system, a printing method designed for the blind that involves raised or punched dots.
Types of reading• Reading can be done aloud or silently
What are the stages of a reading lesson?• Preliminary reading stage• Reading stage

Speed School Ethiopia: Facilitators Training Guide – Appendices 61
• Post reading stage
Preliminary reading stage (for reading aloud)• At the preliminary reading stage, you can use picture or
pictures to discuss with pupils. You can ask pupils questions that can let them express themselves with ease. Use the “Wh” questions to help them describe or talk about the picture or pictures. For example, what is the color of----, who is---- , where is-----, etc. This can generate pupils’ interest to improve upon their listening and speaking skills.
• The use of prediction activity can also motivate the pupils to read. Here, you can let them guess what the topic or title of a passage is about or what they think will happen after looking at a picture relating to a passage.
• Another important aspect of preliminary reading stage is the teaching of new words so that the words become part of the children’s vocabulary.
Reading stage (for reading aloud)The following activities are done:
• Reading aloud: this is to ensure that the children pronounce the words well.
• Matching of jumbled words: e.g. connecting the related words in two columns with arrows
Book Iron
Nail Paper
Leather Clay
Pot Bag
• Re-arranging of jumbled words into sentences: e.g. (snake boy the killed the): This is to help establish the fact that children are able to recognize words that they know or have learnt already.
Post reading stage• At the post reading stage, pupils read are tasked to answer
questions after putting them into groups to read aloud.• They also work in groups to solve problems given to them
by their teacher. e.g. matching and re-arranging jumbled words and sentences.
Reading Comprehension: Stages of Reading• Preliminary Reading Stage - The following activities are done
at the preliminary reading stage:• Predictions• The teaching of new words
• Reading Stage - the activities involved include:• Pre-reading questions are displayed by the teacher.
Questions that relate to the passage serve as a guide to the children.
SS-ETH-CMN-FacilitatorsTrainingGuide-v1.062
• The teacher reads the passage aloud, which serves as model reading. Correct pronunciation of words is done to the hearing of pupils.
• Teacher now guides pupils to do silent reading. Enough time is given to the pupils to read at their own pace for better understanding of the text.
• Post Reading Stage - the activities involved include:• Pupils are to answer comprehension questions. The
questions help the teacher to know whether the passage as a whole has been understood by the pupils.
• The pupils answer questions on referral words and sentences. This is to make them critical readers as they have to know what these referral words and sentences refer to.
• Pupils then answer the questions into their exercise books.
Sources of readingThe following are some of the sources of reading:
• Newspapers• Magazines• Posters• Novels• Bill boards• Brochures• Poetry books• Banners• Signboards• Television
Importance of readingThe benefits or importance of reading include the following:
• It leads to understanding of issues• Identification of instructions• Communication• It makes one to be confident in him/herself

Speed School Ethiopia: Facilitators Training Guide 63