ESX Patch Management with ‘VMTS-ESX Patch Manager’ ESX Patch Manager - Documenta… · ·...
37
VMTS-ESX Patch Manager Documentation www.vmts.net 11/09/2007 Page 1 of 37 Mark Bedford & Massimiliano Daneri ESX 3 Patch Management & ESX Host upgrade automation With Installation & User Documentation Guide
Transcript of ESX Patch Management with ‘VMTS-ESX Patch Manager’ ESX Patch Manager - Documenta… · ·...

VMTS-ESX Patch Manager Documentation www.vmts.net
11/09/2007 Page 1 of 37 Mark Bedford & Massimiliano Daneri
ESX 3 Patch Management
&
ESX Host upgrade automation
With
Installation &
User Documentation Guide

VMTS-ESX Patch Manager Documentation www.vmts.net
11/09/2007 Page 2 of 37 Mark Bedford & Massimiliano Daneri
Contents
INTRODUCTION TO VMTS ESX PATCH MANAGER ................................................................. 3
FEATURES: ........................................................................................................................................... 3 PATCH MANAGEMENT OVERVIEW ......................................................................................................... 3 SYSTEM REQUIREMENTS: ...................................................................................................................... 4 WINDOWS SERVICE’S REQUIRED: ......................................................................................................... 4 NON-SUPPORT: ..................................................................................................................................... 4
INSTALLING VMTS ESX PATCH MANAGER ............................................................................... 5
INSTALLATION OF THE PROGRAM ......................................................................................................... 5 SETUP WIZARD ..................................................................................................................................... 7
VMTS ESX PATCH MANAGER PROGRAM USAGE .................................................................. 12
INTERFACE OVERVIEW ........................................................................................................................ 12 DOWNLOADING ESX PATCHES ........................................................................................................... 14
Automatically Downloading ESX Patches .................................................................................... 14 Manually Downloading ESX Patches ........................................................................................... 17
PATCHING ESX HOSTS ....................................................................................................................... 19 HOST MENU ....................................................................................................................................... 23 MULTIPLE HOSTS PATCHING .............................................................................................................. 25 ESX HOST UPGRADE .......................................................................................................................... 25
Downloading the ESX Host upgrade package .............................................................................. 26 Upgrading the ESX Host ............................................................................................................... 28
CREDENTIAL MANAGER ...................................................................................................................... 29 HOW TO PATCH AN ISOLATED ESX HOST ............................................................................................ 30 ESX PATCH MANAGER SETTINGS ...................................................................................................... 32
General ......................................................................................................................................... 32 Authentication ............................................................................................................................... 33 Ports .............................................................................................................................................. 34 WebServer ..................................................................................................................................... 34 Proxy ............................................................................................................................................. 35 Repository ..................................................................................................................................... 36 Integration .................................................................................................................................... 36
CREDITS .............................................................................................................................................. 37
You can find the most up-to-date technical documentation on our Web site at:
http://www.vmts.net/

VMTS-ESX Patch Manager Documentation www.vmts.net
11/09/2007 Page 3 of 37 Mark Bedford & Massimiliano Daneri
Introduction to VMTS ESX Patch Manager
As we all know patch management for ESX 3 in its current state is not the fastest or
easiest but really a manual slow process where you have to go to each and every host
or at best carry out via an ILO connection or equivalent with a basic script. This is not
such a problem for smaller infrastructures with 10 hosts or less but when medium to
large ESX farms are implemented it can become a nightmare trying to keep your hosts
up-to-date. The VMTS-ESX Patch Manager application was made to really help
speed this process up using a nice to use windows GUI based front-end complete with
a small in-built web server to upload the patches to the hosts that you can install
practically on any MS Windows system and works very well in practice!
Features:
Automatic latest patch retrieval from VMware Web site
Virtual Center or standalone Host Integration
Automated ESX Host upgrading
Support for Background Intelligent Transfer Service (Microsoft BITS)
Passwords saved securely inside the Microsoft Protected Storage space
Standard SSH Connection technology (with root or other users)
Use’s a tiny in-built Web server to deliver the patch’s
Multi Thread patching/updating implementation
Ease of use Configuration Wizard’s.
Patch management overview
The VMTS ESX Patch management system in its basic form consists of 4 servers
which communicate to move the patch from the patches download site on the
VMware downloads site all the way through to successfully installing them on your
chosen ESX Hosts.
Request for latest
patches update
SSH communication
Download patches
Patches transfer
VMware
HTTP/FTP server
online
VMTS ESX
Patch Manager
machine
VMware
ESX Host
VMware
VirtualCenter
Server
Communication
to VC Server
VMTS-ESX Patch Manager Documentation www.vmts.net
11/09/2007 Page 4 of 37 Mark Bedford & Massimiliano Daneri
If you are connecting directly to the ESX host and not via the VirtualCenter Server for
single ESX Host patching then the VirtualCenter Server is not included in this process
flow.
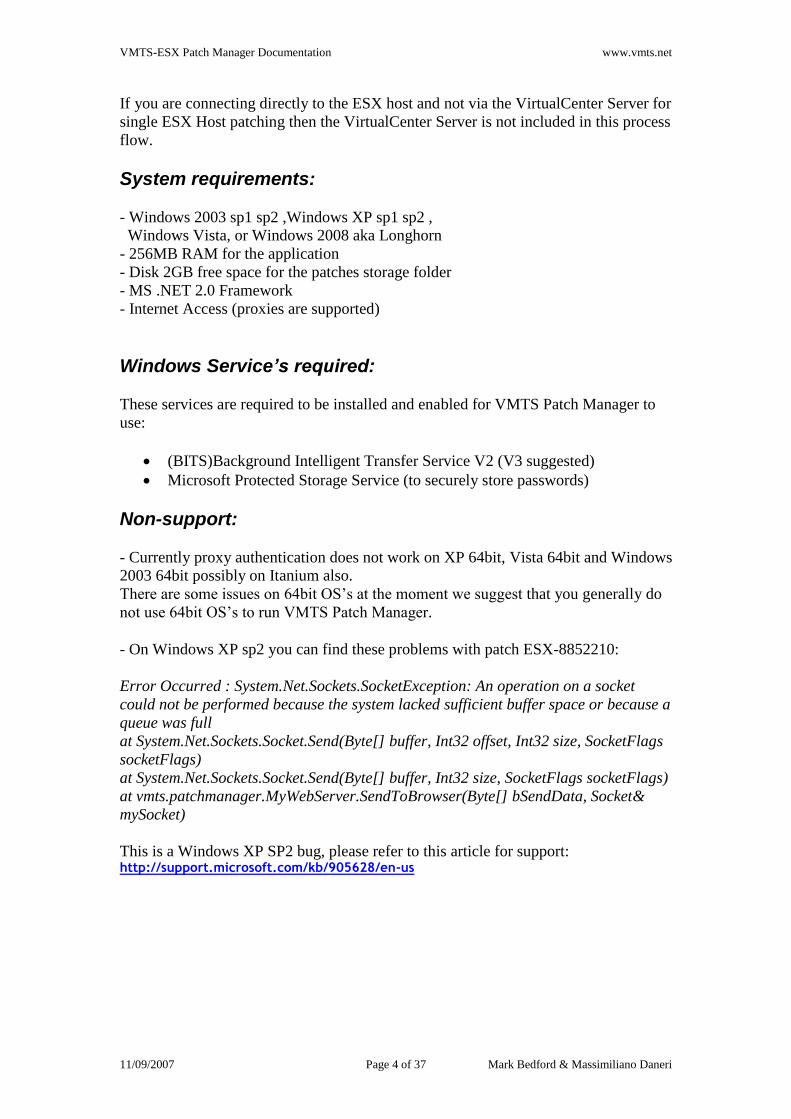
System requirements:
- Windows 2003 sp1 sp2 ,Windows XP sp1 sp2 ,
Windows Vista, or Windows 2008 aka Longhorn
- 256MB RAM for the application
- Disk 2GB free space for the patches storage folder
- MS .NET 2.0 Framework
- Internet Access (proxies are supported)
Windows Service’s required:
These services are required to be installed and enabled for VMTS Patch Manager to
use:
(BITS)Background Intelligent Transfer Service V2 (V3 suggested)
Microsoft Protected Storage Service (to securely store passwords)
Non-support:
- Currently proxy authentication does not work on XP 64bit, Vista 64bit and Windows
2003 64bit possibly on Itanium also.
There are some issues on 64bit OS’s at the moment we suggest that you generally do
not use 64bit OS’s to run VMTS Patch Manager.
- On Windows XP sp2 you can find these problems with patch ESX-8852210:
Error Occurred : System.Net.Sockets.SocketException: An operation on a socket
could not be performed because the system lacked sufficient buffer space or because a
queue was full
at System.Net.Sockets.Socket.Send(Byte[] buffer, Int32 offset, Int32 size, SocketFlags
socketFlags)
at System.Net.Sockets.Socket.Send(Byte[] buffer, Int32 size, SocketFlags socketFlags)
at vmts.patchmanager.MyWebServer.SendToBrowser(Byte[] bSendData, Socket&
mySocket)
This is a Windows XP SP2 bug, please refer to this article for support: http://support.microsoft.com/kb/905628/en-us

VMTS-ESX Patch Manager Documentation www.vmts.net
11/09/2007 Page 5 of 37 Mark Bedford & Massimiliano Daneri
Installing VMTS ESX Patch Manager
Installation of the program
Download the latest available version of the program ‘VMTS-ESX Patch
Manager’ from www.vmts.net
Run the setup program and accept any Windows security warnings as prompted.
Note: the following screenshot is from Windows 2003, prompts may differ
depending on OS type.
Accept ‘Next’ on the VMTS ESX Patch Manager setup welcome screen

VMTS-ESX Patch Manager Documentation www.vmts.net
11/09/2007 Page 6 of 37 Mark Bedford & Massimiliano Daneri
Specify the folder you want VMTS ESX Patch Manager installed to, the default
location is recommended
Click Install to start the installation Process
Once the installation is complete, click Finish to close the setup wizard

VMTS-ESX Patch Manager Documentation www.vmts.net
11/09/2007 Page 7 of 37 Mark Bedford & Massimiliano Daneri
Setup Wizard
You will find the VMTS ESX Patch manager Shortcut in your Start menu or
alternately on your desktop, ready to open.
When you start the program for the first time the setup wizard will start to run you
through entering details for your particular virtual Infrastructure.

VMTS-ESX Patch Manager Documentation www.vmts.net
11/09/2007 Page 8 of 37 Mark Bedford & Massimiliano Daneri
On the Authentication screen if you have followed the default ESX 3 installation
and so Root logins via SSH are disabled, then do not tick the ‘Use root user’ box.
If you use the same passwords for your ‘Root’ account and your ‘main ESX
admin’ account across all your Hosts then you can Enable Default Authentication
and click the small buttons to enter in your ‘Root’ and ‘main ESX admin’
account’s details so they are stored.
If you have enabled the allowing of login of the Root account via SSH, which is
not advised by VMware best practice! You can tick the ‘Use root user’ box and
use this authentication method and all authentication with the ESX Host’s will be
via the ‘Root’ account..
If you do not enter any details on this screen you will be prompted every time for
passwords when moving between hosts or carrying out any actions within the
program.
On the Web Server configuration screen the IP address of the server/workstation
you have installed the VMTS ESX Patch Manger program will already be
completed for you, it is recommend that you do not change this. The port defaults
to port 5050 which unless required you should leave to default also. The default
ticked ‘Autostart’ box allows the program to auto start and stop the internal web
server part of the program for when patches are uploaded to the Hosts during
normal patching and should be left ticked.

VMTS-ESX Patch Manager Documentation www.vmts.net
11/09/2007 Page 9 of 37 Mark Bedford & Massimiliano Daneri
On the Web Proxy Settings screen choose between these Authentication options:
- Autodetect: use the wpad DNS record
- Manually: you set the proxy address
- No Proxy: direct connection
- Use IE configuration: use the default IE configuration
Note: Using IE Configuration and Autodetect doesn't keep user and password
settings, you can use it only if your proxy support NTML settings or your proxy
doesn't require authentication
The Web Proxy Settings are used by VMTS ESX Patch Manager to connect to the
Internet to retrieve the latest patches list for ESX 3 from VMware and to
download the patches you request. If you are having problems connecting then use
the ‘Manually’ option and enter in your proxy’s, hostname or address, it’s port,
an account that has privileges to connect to the Internet via the proxy and its
authentication type, Basic or NTML.

VMTS-ESX Patch Manager Documentation www.vmts.net
11/09/2007 Page 10 of 37 Mark Bedford & Massimiliano Daneri
On the Port settings screen, you are presented the option of changing the Virtual
Center default port and SSH default port numbers. You should accept the defaults
unless you have specifically altered these in your virtual Infrastructure
configuration.
On the Patch Repository screen, enter an empty directory to store all the
downloaded and extracted ESX Patches in. Currently there are nearly 1.5 GB of
ESX patches for ESX 3.0.1 so a drive with 2Gb of space or more is recommended.

VMTS-ESX Patch Manager Documentation www.vmts.net
11/09/2007 Page 11 of 37 Mark Bedford & Massimiliano Daneri
On the last screen click ‘Finish’ to complete the setup wizard and start using the
program to patch.

VMTS-ESX Patch Manager Documentation www.vmts.net
11/09/2007 Page 12 of 37 Mark Bedford & Massimiliano Daneri
VMTS ESX Patch Manager Program usage
A VMware virtual Infrastructure can be divided into many Virtual Center run
separate infrastructures each with its own Virtual Center server administering it.
When starting VMTS ESX Patch Manager, enter the hostname or IP address of
the VirtualCenter you wish to connect to that the ESX Hosts you wish to patch are
administered by and click ‘Connect’.
Alternately the program allows you to connect to an individual host to patch, by
entering the IP or hostname of the ESX Host you want to patch and click
‘Connect’.
Interface overview
The main program screen is divided into 3 sections, these are:
Host/Infrastructure view (Red)
Patched downloaded/install view (Yellow)
Status tabs area (Blue)

VMTS-ESX Patch Manager Documentation www.vmts.net
11/09/2007 Page 13 of 37 Mark Bedford & Massimiliano Daneri
Host/Infrastructure (shown in Red): In this view VMTS ESX Patch Manager
reads your inventory from VirtualCenter and displays all of the ESX Hosts
connected to that current VirtualCenter. Selecting an ESX Host here allows you to
see what patches are installed in the Patched downloaded/install window.
Patched downloaded/install (shown in Yellow): In this view is shown a
summary of the ESX Hosts connected, the ESX Patches downloaded/installed and
is the main window that allows you to install ESX patches on your chosen host.
Status tabs area (shown in Blue): The status area displays 3 groups of live status
screens:
The ‘download tab’ displays the status of any patches currently being
downloaded to your patch repository folder from the VMware downloads
site.
The ‘Web Server tab’ displays the status of the small in-built web server
built into VMTS ESX Patch Manager and shows which patches are currently
being uploaded to ESX Host’s during the patching process.
The ‘ESX Hosts status tabs’ are named as each ESX Host name and each
displays the live status of the SSH commands as being issued to the Hosts.
Here you can see the actual patching taking place and so can be used as a
type of live Log of the patching process.

VMTS-ESX Patch Manager Documentation www.vmts.net
11/09/2007 Page 14 of 37 Mark Bedford & Massimiliano Daneri
Downloading ESX patches
Before you can install the ESX patches on the Hosts they have to be downloaded
to your patch repository folder on a local or network drive and extracted from the
tar files. This can be done automatically by VMTS ESX Patch Manager or
manually should the program not be able to gain access to the Internet itself.
Automatically Downloading ESX Patches
Click the ‘Hosts’ Cluster icon in the Host/Infrastructure view to bring up the list
of current ESX patches. Click the ‘Check Update’ button and the program will
connect to the VMware downloads site to check the latest released patches for
ESX 3. A few seconds after clicking on the ‘Check Update’ button, the list should
be updated with any new patches that may of become available since you last
checked.
Use the ‘Filter’ dropdown button to filter to just the version of ESX you are
running. For example if you were only running ESX 3.0.1 Hosts in your VMware
infrastructure then select ‘Filter’ then ‘ESX 3.0.1’ to just display patches for this
version, ignoring patches for previous releases of ESX server.
Next select the patches you wish to download by placing ticks in the download
column boxes. You can sort the patches by release date, by patch name e.t.c by
clicking on the relevant column header. Hovering your mouse over the icon

VMTS-ESX Patch Manager Documentation www.vmts.net
11/09/2007 Page 15 of 37 Mark Bedford & Massimiliano Daneri
displays a tooltip for a few seconds giving an explanation of what that patch
fixes/add’s/improves.
Click the ‘download’ button and the patches will start to download, the status of
the downloading can be seen in the ‘Download tab’ in the lower status area.
Patches can be Paused, Cancelled and Resumed using the relevant buttons in the
Download tab.
If the downloading fails, check your web proxy authentication settings in the
Tools > Settings menu, if these are set to be correct, you may have to use the
manually downloading patches procedure.

VMTS-ESX Patch Manager Documentation www.vmts.net
11/09/2007 Page 16 of 37 Mark Bedford & Massimiliano Daneri
Lastly you should see all the ticks in the download column which shows the
program can see the downloaded and extracted patches in the folder ready to use.

VMTS-ESX Patch Manager Documentation www.vmts.net
11/09/2007 Page 17 of 37 Mark Bedford & Massimiliano Daneri
Manually Downloading ESX Patches
If the auto patching and extracting feature is not working as possibly due to proxy
authentication issues you can manually carry out this procedure.
Firstly find the patches you wish to download, using the ‘Filter’ button to filter the
patches shown if you wish. Click the icon on each row of the ESX patch you
wish to download. This will send your default web browser straight to the tar file
on the VMware downloads site and you will be prompted to save the patch. This
should be saved to your chosen patch repository folder. Repeat this one by one for
all the ESX patches you wish to download.
Next you will un-tar the downloaded patches by using the un-tar feature built-in
VMTS Patch Manager. Do this by clicking on the ‘Action’ menu then ‘Extract
Patch’ and then select the directory used as your patch repository. Now the ‘Untar
File’ window is displayed, click the ‘Start’ button and the patches are un-tared,
once all patches are un-tared, you can close this window.

VMTS-ESX Patch Manager Documentation www.vmts.net
11/09/2007 Page 18 of 37 Mark Bedford & Massimiliano Daneri
Lastly you should see all the ticks in the download column which shows the
program can see the downloaded and extracted patches in the folder ready to use.

VMTS-ESX Patch Manager Documentation www.vmts.net
11/09/2007 Page 19 of 37 Mark Bedford & Massimiliano Daneri
Patching ESX Hosts
Select the ESX host you want to patch in the left Host/Infrastructure view and
click ‘Update’ to scan the host for which patches are currently installed and to
check which are currently missing.
If this is the first time you have connected to this ESX Host and you have not
enabled the default authentication option, you will be prompted to enter the Root
username/password followed by the ‘main ESX admin’ account’s details.
From this point onwards they are stored securely inside the Microsoft Protected
storage area and so you will not be prompted again for these credentials.
You can also use the right mouse button on the host name and select ‘Login
Settings’ to change the stored credentials at a later date.
The ‘Installed’ and ‘Installation Date’ columns will show which patches are
already installed and when they were installed. If you click on the relevant tab for
the ESX Host you are looking at in the lower ‘Status area’ you can see the SSH
returned results for the patches query to the server you chose.
To install a patch, tick its box in the ‘Installed’ column, to install ALL available
patches in chronological order, select all the patches by clicking the ‘Select All’
button. Lastly click the ‘Install’ button to start the actual ESX Patch install
procedure.

VMTS-ESX Patch Manager Documentation www.vmts.net
11/09/2007 Page 20 of 37 Mark Bedford & Massimiliano Daneri
The ‘Install Status’ window will now be displayed showing you a status of tasks.
Firstly the ESX Host will enter ‘Maintenance mode’ and so if you are using the
Enterprise version of ESX 3 all the active Virtual Machines on that host will
vacate the ESX Host to other ESX Hosts in the farm. If you are not using the
Enterprise version of ESX 3 or you have a single host then before trying to enter
‘Maintenance mode’, use the Virtual Infrastructure client to manually move the
Virtual Machines off the ESX Host or power them off.
Now the patching procedure has started, the patches will get uploaded to the ESX
host via a small FTP server built into the program and then it will call the
‘ESXupdate’ command to install the patches in correct chronological date order. If
a patch is not needed to be installed as it as been superseded, a ‘Downgrade’
warning will show during the install and will be skipped, this is normal to stop
downgrading of packages on the server by superseded ESX patches.

VMTS-ESX Patch Manager Documentation www.vmts.net
11/09/2007 Page 21 of 37 Mark Bedford & Massimiliano Daneri
If any errors are reported in the ‘Install Status’ screen, consult the relevant ‘Status
tab’ of the ESX Host you are patching in the bottom window to look for possible
errors to help troubleshoot.
Tip: You can enable the downgrading of packages installation by ticking the
‘Enable Downgrade’ check box on the Settings screen but this is not recommend
under normal patching operation.
Once the patching is complete you can reboot the ESX Host by clicking the
‘Reboot’ button. You can click ‘Close’ and you will see the ESX Host come back

VMTS-ESX Patch Manager Documentation www.vmts.net
11/09/2007 Page 22 of 37 Mark Bedford & Massimiliano Daneri
up in your Virtual Infrastructure Client in 5-15 minutes time depending on the
time your ESX Host takes to bootup.
As a purely optional step, after the successful patching and reboot of the ESX
Host, running the ‘esxupdate query’ command on the host proves all the patches
have been installed successfully.

VMTS-ESX Patch Manager Documentation www.vmts.net
11/09/2007 Page 23 of 37 Mark Bedford & Massimiliano Daneri
Host Menu
The ‘Host menu’ is accessible by clicking any ESX Host in the Host/Infrastructure
view with the right mouse button.
Here you can find the same commands present on the buttons bar plus some
additional commands:
SSH Root Conn. Only If enabled each SSH connection will be carried out as Root, otherwise it will
use a not Root account Use Default Auth
Use the credential’s set on the Setting Configuration Form
Login Settings Set the credential’s used to connect by SSH to the host
SSH Port Set the SSH TCP port, default is TCP port 22
Install start the patching installation process
Update Check what ESX patches are installed on the Host
Abort Task Abort the current task
Enter/Leave Maintenance Mode Enter or leave the ESX maintenance mode

VMTS-ESX Patch Manager Documentation www.vmts.net
11/09/2007 Page 24 of 37 Mark Bedford & Massimiliano Daneri
Reboot Restart/Shutdown the ESX Host
Putty
Run the Putty tty client
VPX Client Start the Virtual Infrastructure Client
WEB Access Open a web browser to the ESX Host web access page

VMTS-ESX Patch Manager Documentation www.vmts.net
11/09/2007 Page 25 of 37 Mark Bedford & Massimiliano Daneri
Multiple Hosts patching
Due to the Multi threaded design of the program, multiple ESX Hosts at the same
time can be handled and patched as long as you enter the correct Root and other
accounts credentials for each host. In the following example you can see we are
patching 2 ESX Hosts Sydney 01 & Sydney 02 at the same time, a separate
‘Install Status’ window is opened for each ESX Host being patched.
ESX Host upgrade
VMTS ESX Patch manager can also upgrade complete ESX hosts which is
accomplished in a simular way to patching by first downloading the ESX upgrade
package from the VMware site and then automating the install process through the
program with a few clicks. As a note, before upgrading any Hosts in your VMware
Infrastructure please remember to upgrade your VirtualCenter Server to a
compatible version before upgrading the Hosts connected to it.

VMTS-ESX Patch Manager Documentation www.vmts.net
11/09/2007 Page 26 of 37 Mark Bedford & Massimiliano Daneri
Downloading the ESX Host upgrade package
To start, select the ESX Host you wish to upgrade in the left Host/Infrastructure
view. You can check the current version of the Host you have selected by either
hovering the mouse of the Hosts name for a couple of seconds and a tool tip will
appear or by looking in the name box where the ESX version and build number is
displayed.
Click the ‘Upgrade’ button to bring up the ESX Upgrade options.
On the ESX Upgrade window you can download the relevant version of ESX you
wish to upgrade your hosts to. Click the ‘Download’ button for the version you
need

VMTS-ESX Patch Manager Documentation www.vmts.net
11/09/2007 Page 27 of 37 Mark Bedford & Massimiliano Daneri
Follow the link to the download patch and enter your VMware customer portal
login details and proceed to the download page. Make sure you select the
download from an earlier release of ESX Server 3 not the upgrade from ESX
version 2.
Download the .tar.gz upgrade package to your ESX patches repository and then
click the ‘Unpack’ button and point it to the downloaded file. This will extract the
downloaded .tar.gz upgrade package for you ready for ESX Patch manager to use,
once done click the ‘Done’ button.

VMTS-ESX Patch Manager Documentation www.vmts.net
11/09/2007 Page 28 of 37 Mark Bedford & Massimiliano Daneri
This download and extract process only needs to be done once, form now on you
can just upgrade the ESX Hosts.
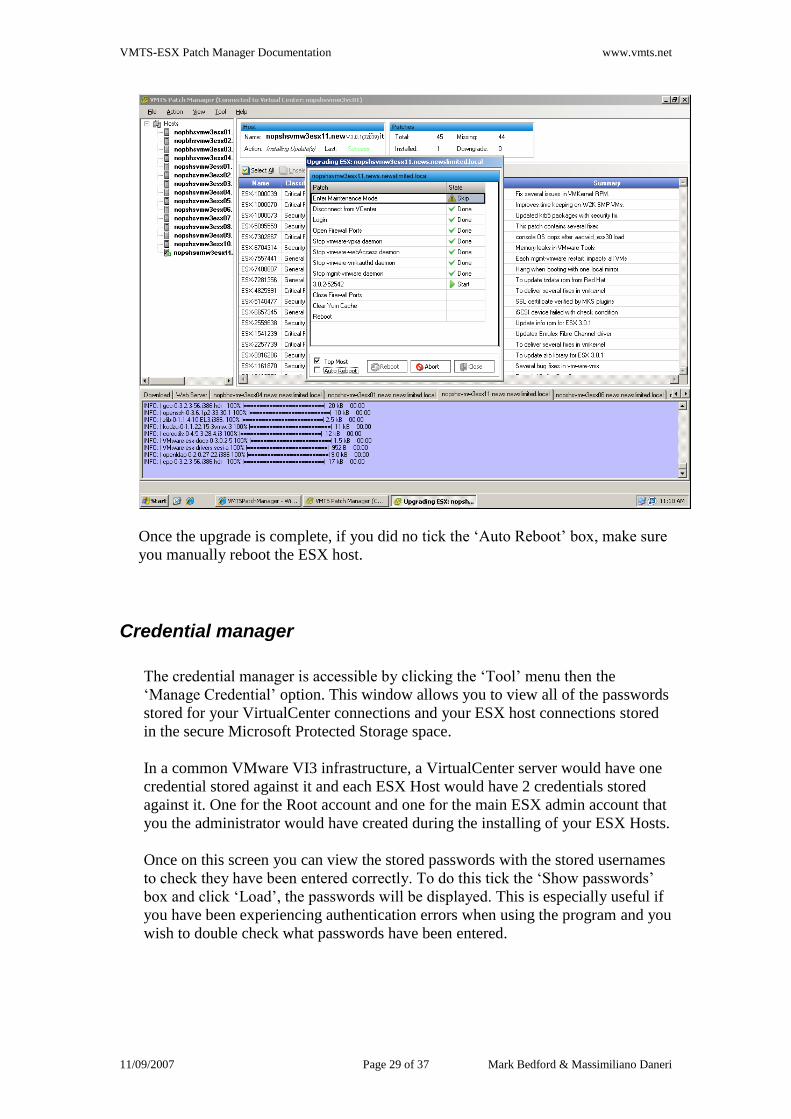
Upgrading the ESX Host
Now the ESX Host upgrade package is downloaded and extracted you will see
when clicking on the ‘Upgrade’ button that the box is ticked to show the upgrade is
downloaded ready to deploy. Click the radio button to the left of the version you
wish to upgrade to and click ‘Next’
On the following Upgrading window you can choose to make the Host ‘Auto
reboot’ after the upgrade or not via the tick box and then click the ‘Start’ button to
start the host upgrade process. Don’t forget you can click the Host you have chosen
to upgrade in the Status tab area in the bottom section to view the upgrade process
in real-time.
VMTS-ESX Patch Manager Documentation www.vmts.net
11/09/2007 Page 29 of 37 Mark Bedford & Massimiliano Daneri
Once the upgrade is complete, if you did no tick the ‘Auto Reboot’ box, make sure
you manually reboot the ESX host.
Credential manager
The credential manager is accessible by clicking the ‘Tool’ menu then the
‘Manage Credential’ option. This window allows you to view all of the passwords
stored for your VirtualCenter connections and your ESX host connections stored
in the secure Microsoft Protected Storage space.
In a common VMware VI3 infrastructure, a VirtualCenter server would have one
credential stored against it and each ESX Host would have 2 credentials stored
against it. One for the Root account and one for the main ESX admin account that
you the administrator would have created during the installing of your ESX Hosts.
Once on this screen you can view the stored passwords with the stored usernames
to check they have been entered correctly. To do this tick the ‘Show passwords’
box and click ‘Load’, the passwords will be displayed. This is especially useful if
you have been experiencing authentication errors when using the program and you
wish to double check what passwords have been entered.

VMTS-ESX Patch Manager Documentation www.vmts.net
11/09/2007 Page 30 of 37 Mark Bedford & Massimiliano Daneri
How to patch an isolated ESX host
If you have an isolated ESX host or if you want create a portable ESX Patcher,
you have to copy all contents of the following folder:
<drive>:\documents and settings\<username>\application data\VMTS ESX
Patch Manager
This is found on your ESX Patching machine, inside this directory you find all the
configuration, plus all of the downloaded ESX patches if you have not changed
the patch repository folder. If you have downloaded the patches to a different
folder be sure to copy this folder too.
Next you have to manually download the ESX patches files list by opening
Settings and going to the Repository tab

VMTS-ESX Patch Manager Documentation www.vmts.net
11/09/2007 Page 31 of 37 Mark Bedford & Massimiliano Daneri
Tick the Local XML ‘Enable’ box and click the ‘Download xml file’ button
Your web browser will open the ‘esxupdate.xml’ file, save this the same directory
you used before:
<drive>:\documents and settings\<username>\application data\VMTS ESX
Patch Manager
The default filename is ‘esxupdate.xml’ but you can change it as you can change
the directory by changing ‘File’ field.
If you do not need a portable ESX patcher or if you don’t want to copy the patches
file but you have an isolated ESX host and you have an internal web server or an
internal FTP server accessible from your ESX host, you could change the Web
Server configuration.

VMTS-ESX Patch Manager Documentation www.vmts.net
11/09/2007 Page 32 of 37 Mark Bedford & Massimiliano Daneri
Un-Tick the ‘Use Integrated WEB Server’ box and enter the external repository
address, you can choose between FTP and HTTP (not HTTPS). Now every time a
patch is needed it’s taken from this web/ftp site as needed.
ESX Patch Manager Settings
The Settings window can be reached by going to the ‘Tool’ menu then selecting
the ‘Settings’ option, here we can configure all of VMTS ESX Patch manager’s
settings in one place.
General
Auto Check
Status –
When the program starts it will query all known hosts attached
to the VirtualCenter automatically for version levels and their
patches installed.

VMTS-ESX Patch Manager Documentation www.vmts.net
11/09/2007 Page 33 of 37 Mark Bedford & Massimiliano Daneri
Manage ESX
Firewall –
The relevant ports will be opened on the ESX 3 Hosts built in
firewall prior to patching and then they will be closed off
again after patching is complete.
Enable
Downgrade -
Enables the option to force downgrading of patches, installing
older patches over new ones which under normal
circumstances is not advisable.
Check
Program
Update -
When the program starts it will check the internet to see if a
new version of VMTS ESX Patch Manager has been released
and will give you the option to update.
Disconnect
Host -
Will disconnect the ESX Host being upgraded from
VirtualCenter as a first step, this is a precautionary event to
stop any VirtualCenter users trying to interact with the Host
during patching.
Leave
Maintenance
Mode -
When ticked, the Host will exit Maintenance Mode once all
patching is complete and the Host has rebooted.
Clean Update
Cache -
When ticked the YUM cache on the ESX Host is cleaned once
patching is complete, this tidies and cleans up the ESX Hosts
local disk.
Authentication
Use root user - Use the Root user account to login to your ESX Hosts. This is
only possible if you have changed the default to Allow Root
user logins via SSH.
Default
Authentication
- Enable
If the same passwords are sued for your ‘Root’ account and
your ‘main ESX admin’ account across all your Hosts then
you can Enable Default Authentication and click the small
buttons to enter in your ‘Root’ and ‘main ESX admin’
account’s details so they are stored.

VMTS-ESX Patch Manager Documentation www.vmts.net
11/09/2007 Page 34 of 37 Mark Bedford & Massimiliano Daneri
Ports
VirtualCenter
– Default Port
The default TCP port used to communicate to the
VirtualCenter Server.
SSH – Default
Port
The default TCP port used to communicate to SSH running on
the ESX Host.
WebServer
Web Server –
Integrate
Use the integrated small footprint web server to upload
patches to the ESX Hosts.
Specify the IP address of the machine that has VMTS ESX
Patch manager installed and another port from the default of
port 5050 if already used.
The ‘AutoStart’ tick box makes the integrated web server start
when the program starts
Web Server -
External
Use another web server to store the ESX patches. This server
can be a HTTP or FTP server.

VMTS-ESX Patch Manager Documentation www.vmts.net
11/09/2007 Page 35 of 37 Mark Bedford & Massimiliano Daneri
Note: HTTPS or SFTP is not supported.
Web Server –
Vcenter Web
Server
Uses VirtualCenter’s built in Tomcat webserver to Host the
ESX patches repository. This option is only available if VMTS
ESX patch manager is installed on the VirtualCenter server.
Proxy
Authentication
-
Autodetect – Try to autodetect your proxy settings
Manually – enter all the proxy details manually
No proxy – use if direct connection to the internet, no proxys
used
Use IE configuration – Use Internet Explorers proxy settings
Address - When manually, enter the address or IP of your proxy server
including its port.
Username - Enter a username that has permission to use the proxy to gain
access to the Internet
Password - Enter your above usernames password
Domain - Enter the domain your user account sites in (sometimes not
relevant)
Authentication
Scheme -
Choose the correct authentication method for your proxy,
Negotite, Basic, NTLM (a Microsoft authentication protocol)
or Digest.

VMTS-ESX Patch Manager Documentation www.vmts.net
11/09/2007 Page 36 of 37 Mark Bedford & Massimiliano Daneri
Repository
Directory - The local folder where the ESX patches are stored if using the
integrated Web Server option on the ‘WebServer’ tab. This
can be any local folder you like that has enough space.
Warning the ESX patches repository can get very large 2+ Gb
Local XML - Enables you to download the XML file from the VMTS.net
site to a local folder, you would only want to do this if
patching offline from the Internet.
TarGz - Selects wether the downloaded TarGx ESX patches should be
Moved or Deleted after they have been extracted in the patches
repository.
Integration
Putty - If Putty is installed on your machine select its location here.
This enables integration into the right click option of any ESX
Host in the Host/Infrastructure view to open a console session.

VMTS-ESX Patch Manager Documentation www.vmts.net
11/09/2007 Page 37 of 37 Mark Bedford & Massimiliano Daneri
When Putty is installed and detected the path to the program
changes from Red to Black.
Putty can be downloaded from:
http://www.chiark.greenend.org.uk/~sgtatham/putty/
VPX Client - If the VMware Virtual Infrastructure Client is installed on
your machine select its location here. This enables integration
into the right click option of any ESX Host in the
Host/Infrastructure view to connect to the Host via the
VMware Virtual Infrastructure Client. When the VMware
Virtual Infrastructure Client is installed and detected the path
to the program changes from Red to Black.
The VMware Virtual Infrastructure Client can be most easily
downloaded from opening a Web Browser to any of your ESX
Hosts and clicking ‘Download the VMware Infrastructure Client’
WinScp - If WinScp is installed on your machine select its location here.
This enables integration into the right click option of any ESX
Host in the Host/Infrastructure view to open WinScp file
transfer session. When the WinScp is installed and detected
the path to the program changes from Red to Black.
WinScp can be downloaded from:
http://winscp.net/eng/index.php
Credits
Original concept and Programming - Massimiliano Daneri
This application and included code was developed in C# .NET 2.0 and VI SDK 2.0
This software is currently provided with no support or liability by the author as
Freeware and by Massimiliano Daneri ([email protected])
Documentation and GUI fix/language recommendations – Mark Bedford
Documentation is updated on a per version or per major feature addition basis as
needed. English language/grammar GUI and GUI fix changes suggested and fixed
as per needed. ([email protected])
End of Documentation.