ERIKA Enterprise Tutorial -...
23
ERIKA Enterprise Tutorial for the dsPIC (R) DSC platform version: 1.1.11 December 21, 2009
Transcript of ERIKA Enterprise Tutorial -...

ERIKA Enterprise Tutorial
for the dsPIC (R) DSC platform
version: 1.1.11December 21, 2009

About Evidence S.r.l.Evidence is a spin-off company of the ReTiS Lab of the Scuola Superiore S. Anna, Pisa,Italy. We are experts in the domain of embedded and real-time systems with a deepknowledge of the design and specification of embedded SW. We keep providing signifi-cant advances in the state of the art of real-time analysis and multiprocessor scheduling.Our methodologies and tools aim at bringing innovative solutions for next-generationembedded systems architectures and designs, such as multiprocessor-on-a-chip, recon-figurable hardware, dynamic scheduling and much more!
Contact InfoAddress:Evidence Srl,Via Carducci 64/ALocalita Ghezzano56010 S.Giuliano TermePisa - ItalyTel: +39 050 991 1122, +39 050 991 1224Fax: +39 050 991 0812, +39 050 991 0855
For more information on Evidence Products, please send an e-mail to the followingaddress: [email protected]. Other informations about the Evidence product linecan be found at the Evidence web site at: http://www.evidence.eu.com.
This document is Copyright 2005-2008 Evidence S.r.l.
Information and images contained within this document are copyright and the property of Evidence
S.r.l. All trademarks are hereby acknowledged to be the properties of their respective owners. The
information, text and graphics contained in this document are provided for information purposes only by
Evidence S.r.l. Evidence S.r.l. does not warrant the accuracy, or completeness of the information, text,
and other items contained in this document. Matlab, Simulink, Mathworks are registered trademarks
of Matworks Inc. Microsoft, Windows are registered trademarks of Microsoft Inc. Java is a registered
trademark of Sun Microsystems. OSEK is a registered trademark of Siemens AG. The Microchip Name
and Logo, and Microchip In Control are registered trademarks or trademarks of Microchip Technology
Inc. in the USA. and other countries, and are used under license. All other trademarks used are
properties of their respective owners. This document has been written using LaTeX and LyX.
2

Contents
1 RT-Druid and Erika Enterprise tutorial for dsPIC (R) DSC 4
2 Note for Windows XP and Windows Vista users 5
3 Installing Erika Enterprise and RT-Druid on Microsoft Windows 6
4 First RT-Druid startup and configuration 9
5 Compiling your first Erika Enterprise demo for dsPIC (R) DSC 13
6 History 22
3

1 RT-Druid and Erika Enterprise tutorial for dsPIC(R) DSC
This small tutorial describes a set of steps needed to compile a simple application thatshows the main features of Erika Enterprise and RT-Druid for the dsPIC (R) DSC platform.
This tutorial has been tested on a FLEX board produced by Evidence and EmbeddedSolutions and on a Microchip Explorer 16 development board from Microchip.
We presume that the reader is familiar with the MPLAB IDE debug environmentprovided by Microchip.
4

2 Note for Windows XP and Windows Vista
users
If you are using Windows, and especially if you are using Windows Vista, please lookcarefully at the following warnings:
Warning: The Evidence package installation path should NOT contain directoryname with spaces. For e.g. use c:/Evidence/Evidence
Warning: The Scilab package installation path should NOT contain directoryname with spaces. For e.g. use c:/Evidence/scilab-4.1.2
Warning: If using Vista, be aware that directories like c:/Programmi,c:/Users/Documenti are not REAL directories but are aliases. DO NOT USE THEM.Put your RT-Druid workspace under c:/Users/yourusername/workspace.
Warning: Please install cygwin into its default directory, c:/cygwin.
Warning: Also if from the Windows Vista Explorer your Microchip compilerseems to be installed under c:/Programmi/Microchip/..., please remember to specifythe REAL pathname. In particular, c:/Programmi DOES NOT EXISTS, whereasthe correct name is c:/Program Files.
5

3 Installing Erika Enterprise and RT-Druid on
Microsoft Windows
This chapter will guide the developer on the installation procedure of Erika Enterpriseand RT-Druid for the dsPIC (R) DSC platform.
The installation of Erika Enterprise and RT-Druid is composed of following packages:
• The Eclipse development environment, which is used by RT-Druid to provide thebasic development environment for Erika Enterprise applications.
• The Eclipse environment is based on the Java platform, so that a working JavaRuntime Environment must be present for using RT-Druid.
• The RT-Druid plugins, which provide the code generation for Erika Enterprise forEclipse.
• The Erika Enterprise source code.
• The Microchip MPLAB IDE.
• The Microchip C30 Compiler.
• A version of the Microchip C30 compiler recompiled from the GCC sources, whichenables basic C language compilation without the need to buy the full fledgedMicrochip C30 Compiler.
• A set of examples for the dsPIC (R) DSC Platform, which can be used to compilea first set of running examples for the Evidence/Embedded Solutions FLEX board,the Microchip Explorer 16 board, and others. These applications are organized in“templates”, available at project creation.
• A subset of the Cygwin environment [1], including a set of utilities like make, gawk,and few others, which are used during the compilation process of an Erika Enterpriseapplication.
To install the software, execute the following steps:
1. Install your favourite Java runtime environment, which is needed to run RT-Druid;as RT-Druid is a plugin of the Eclipse editor, which requires Java to be executed.
2. Install the latest version of the Microchip MPLAB IDE; you can use the defaultinstall directory. At the end of the install process, accept the system reboot.
6

3 Installing Erika Enterprise and RT-Druid on Microsoft Windows
3. Install the Microchip C30 Compiler, available from the Microchip web site. Evenin this case, you can use the default install directory. When it is asked to changethe default environment, please do accept.
4. Run the Erika Enterprise and RT-Druid installer.
5. The installer will prompt a list of packages which can be installed. Select all thepackages you wish to install and continue the installation procedure (see Figure3.1).
Figure 3.1: This screenshot shows the dialog box with the available install packages.
Note: The Erika Enterprise install package provides a version of the MicrochipC30 compiler recompiled from the GCC sources made available by Microchip.Although that compiler is able to compile Erika Enterprise applications, it doesnot include Microchip include files and libraries which are distributed with theMicrochip package only.
6. The installer will ask for a destination directory. If possible, please use c:/Evidence/Evidence(see Figure 3.2).
7. At this point, please check the first line of the file evidencedir\bin\mymake_cygwin.bat(where evidencedir is the directory you chose during the installation). For exam-ple, if Cygwin is installed inside C:\cygwin, then the first line of the file shouldlook like the following one:
@set EE_BASH_PATH=C:\ cygwin\bin\bash
...that is, the line contains the correct path to the bash.exe file in your Cygwininstallation. If you accepted the default settings, the correct pathname should beC:\cygwin\bin\bash as specified in the example before.
7

3 Installing Erika Enterprise and RT-Druid on Microsoft Windows
Figure 3.2: This screenshot shows the preferred destination dir for installing ErikaEnterprise.
Note: We ask to perform this check because it seems that on some Windowsmachines the Cygwin installer does not correctly set the registry keys used bythe Erika Enterprise installer.
The rest of this tutorial assumes that the Microchip MPLAB IDE is installed withinthe C:\Programmi\Microchip directory and that, consequently, the GNU Assemblerfor dsPIC (R) DSC is installed within C:\Programmi\Microchip\MPLAB ASM30 Suite\bin.Please note that these values may be different from the settings you have chosen on yourmachine. Please also read the chapter with the Windows Vista recommendations.
8

4 First RT-Druid startup and configuration
After all the required packages have been installed, you are ready to start RT-Druid forthe first time.
Please follow the next steps:
1. As the first step, run the Eclipse IDE from the Evidence menu inside the Startmenu of your Windows machine, choosing Start/Programs/Evidence/RT-Druid.
2. A dialog box will appear, prompting to choose the right workspace (see Figure4.1). Leave the default workpackage directory as it is, and proceed by pressing“OK”.
Figure 4.1: This screenshot shows the dialog box for the choice of the current workspacedirectory.
Warning: The workspace pathname MUST NOT contain any blank space,otherwise Erika Enterprise and RT-Druid may not work properly.
Note: If you are using Windows Vista, then the workspace directoryc:/Users/<username>/workspace works.
3. The Eclipse Welcome screen appears, like in Figure 4.2.
4. Before being able to correctly build your application, you should set the path tothe Microchip C30 compiler and the MPLAB ASM30 assembler programs. Fordoing so, please go to the “Preference” menu, as shown in Figure 4.3, and findthe “RT-Druid/Oil/PIC30 Configurator” form as depicted in Figure 4.4. The first
9

4 First RT-Druid startup and configuration
Figure 4.2: The Eclipse Welcome screen.
textbox, labeled Gcc path, refers to the installation directory of the Microchip C30compiler. The second textbox, labeled Asm path, refers to the installation directoryof the ASM30 assembler provided with the MPLAB IDE.
Warning: The install directories specified in the two textboxes of Figure 4.4does not include the bin directory!
That is, c:\Programmi\Microchip\MPLAB C30 is correct, whereasc:\Programmi\Microchip\MPLAB C30\bin is not.
Warning: The install directory of the assembler refers to the assembler pro-vided with MPLAB IDE and not the assembler provided with the C30 compiler.The reason is that the directory is used to call the assembler and also to copythe crt0.s file, which has a different position in the two assembler distributionsmade by Microchip.
Warning: If you are using a Student Editon of the Microchip C30 compilerwith an expired license, please check the “Use EE gcc to resolve dependen-cies” checkbox in Figure 4.4.
10

4 First RT-Druid startup and configuration
Figure 4.3: Go to the “Preference” menu.
Figure 4.4: Select paths for compiler and assembler.
5. Before creating and building your application, please deselect the “Build Auto-matically” flag inside the “Project” menu, as shown in Figure 4.5.
11

4 First RT-Druid startup and configuration
Figure 4.5: Deselect the “Build Automatically” flag in the “Project” menu.
12

5 Compiling your first Erika Enterprise demo for
dsPIC (R) DSC
You are now ready to compile your first Erika Enterprise demo. Please execute thefollowing steps:
1. Please select “New Project”, then “RT-Druid Oil and c/c++ Project” from the“File menu”, as in Figure 5.1.
Figure 5.1: Select “New project” from the “File” menu.
2. A Dialog box appear. Please select a template for the new project, as in Figure5.2.
3. Press “Next”.
4. Insert the name of the new project. Please type taskdemo (you can choose othernames of course). Please see Figure 5.3. Press the “Finish” button.
13
5 Compiling your first Erika Enterprise demo for dsPIC (R) DSC
Figure 5.2: Select a template for your project.
Figure 5.3: Type a name for the new project.
5. We are now ready to build the demo. Right click on the project name in theEclipse navigation bar, and choose “Build Project”1 (see Figure 5.4).
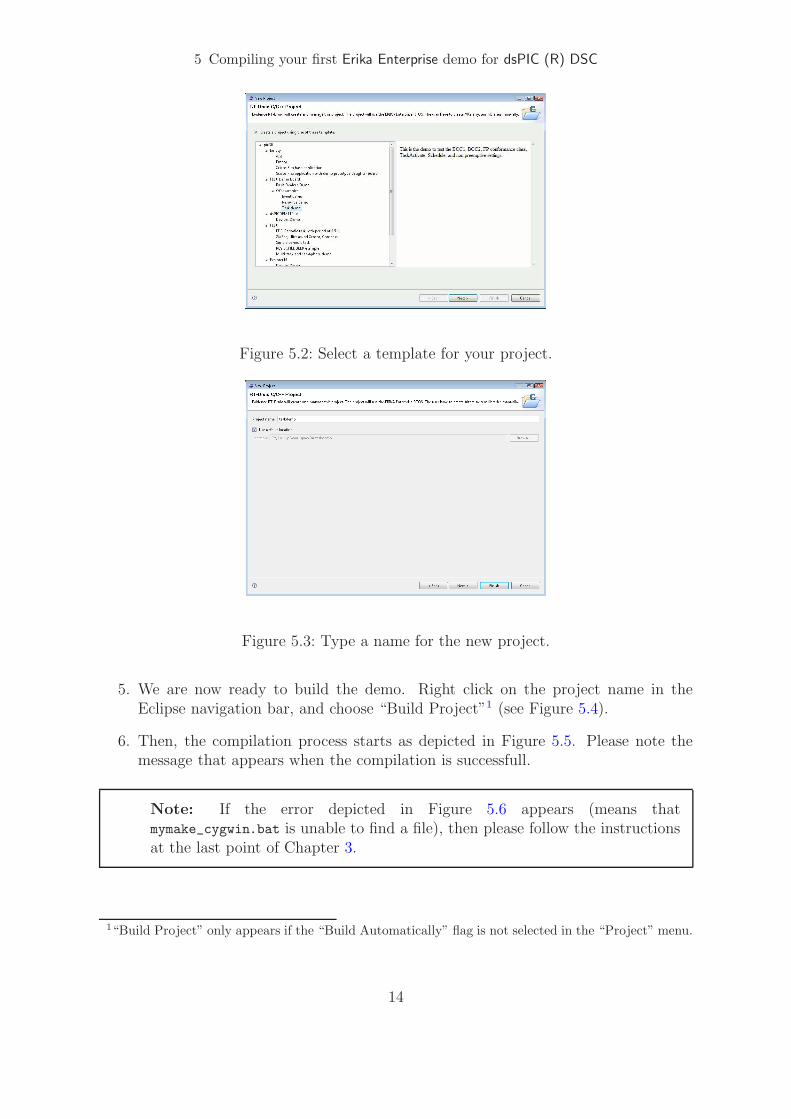
6. Then, the compilation process starts as depicted in Figure 5.5. Please note themessage that appears when the compilation is successfull.
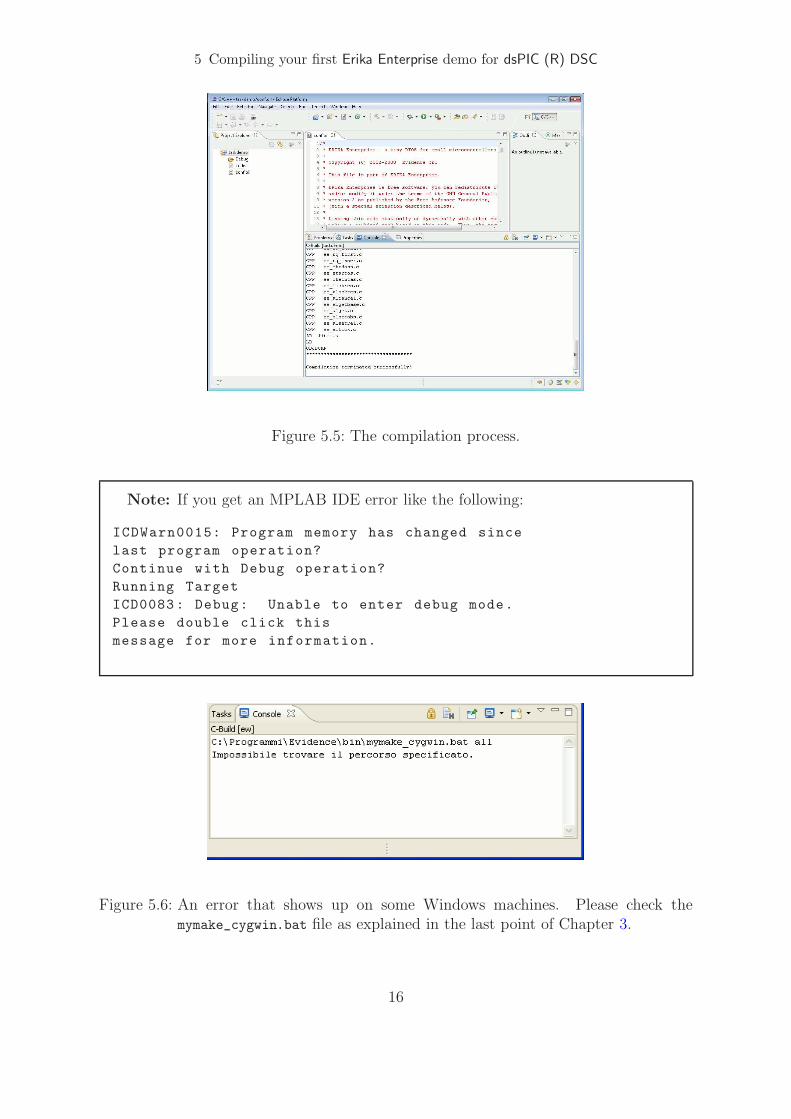
Note: If the error depicted in Figure 5.6 appears (means thatmymake_cygwin.bat is unable to find a file), then please follow the instructionsat the last point of Chapter 3.
1“Build Project” only appears if the “Build Automatically” flag is not selected in the “Project” menu.
14

5 Compiling your first Erika Enterprise demo for dsPIC (R) DSC
Figure 5.4: We are now able to build the project.
7. At the end of the compiling process you will be able to find a file named ‘pic30.cofinside the Debug directory inside the project, as shown in Figure 5.7.
8. You are now ready to import the produced COFF file inside Microchip MPLABIDE. To do that, open MPLAB IDE as in Figure 5.8.
9. Choose “Import...” from the “File” menu, as in Figure 5.9.
10. A dialog box appear. Please select the pic30.cof file that has been produced by thecompilation process in Eclipse, as shown in Figure 5.10. You can find that file insidethe Eclipse workspace you selected at the beginning in Figure 4.1. In this example,the file is stored inside the directory c:\Programmi\Evidence\eclipse\workspace\
pic30_oo_mono\Debug.
11. You have now imported the COFF file inside MPLAB IDE. There is no needto create a MPLAB IDE Project, because the compilation process is handled byEclipse. Figure 5.11 shows the “Disassembly Listing” and the “Program Memory”window. Please note that MPLAB IDE correctly recognizes the debug symbols ofthe source code produced inside Eclipse.
12. You can now start debugging the demo application using MPLAB IDE.
Figure 5.12 shows the Explorer 16 board running pic30\explorer16\Devices Demo
demo application, which uses the Explorer 16 onboard devices to monitor and displaythe environment temperature.
15
5 Compiling your first Erika Enterprise demo for dsPIC (R) DSC
Figure 5.5: The compilation process.
Note: If you get an MPLAB IDE error like the following:
ICDWarn0015: Program memory has changed since
last program operation?
Continue with Debug operation?
Running Target
ICD0083: Debug: Unable to enter debug mode.
Please double click this
message for more information.
Figure 5.6: An error that shows up on some Windows machines. Please check themymake_cygwin.bat file as explained in the last point of Chapter 3.
16

5 Compiling your first Erika Enterprise demo for dsPIC (R) DSC
Figure 5.7: The output file is ready to be programmed on the target board.
Please make sure that you have entered the debug mode and programmed thedevice from the Debugger Mode and not from the Programmer Mode.
Note: If you are using a FLEX board, please remember to set the device correctlyuinder the “Configure / Select device...” menu of MPLABIDE.
The correct settings for the dsPIC on the FLEX Full and the FLEX Light is shownin Figure 5.13. The correct settings for the PIC18 on the FLEX Full is shown inFigure 5.14.
17

5 Compiling your first Erika Enterprise demo for dsPIC (R) DSC
Figure 5.8: The Microchip MPLAB IDE.
Figure 5.9: Choose “Import...” from the “File” menu to import the coff file produced inEclipse.
18

5 Compiling your first Erika Enterprise demo for dsPIC (R) DSC
Figure 5.10: Select the COFF file you want to import.
Figure 5.11: Debug symbols are correctly recognized.
19

5 Compiling your first Erika Enterprise demo for dsPIC (R) DSC
Figure 5.12: The Explorer 16 board with the running demo program.
Figure 5.13: Selecting the dsPIC MCU mounted on the FLEX boards.
20

5 Compiling your first Erika Enterprise demo for dsPIC (R) DSC
Figure 5.14: Selecting the PIC18 MCU mounted on the FLEX Full boards.
21

6 History
Version Comment
1.0.0 Initial revision.1.1.0 Updated with information and screenshots about Erika Enterprise
version 1.4.1.1.3 Updated with new screenshots about configuration; added warn-
ings about blanks in pathnames.1.1.4 Added some changes to the install instructions from comments by
Simone Mannori.1.1.5 Added Cygwin error workaround when the installer can not find
the cygwin registry value.1.1.6 Typos found when translating the document in italian.1.1.7 Updated some figures Figure, added a few warning boxes.1.1.8 Added notes about MPLAB IDE.1.1.9 Added recommendations for Windows Vista.1.1.10 Updated screenshots for EE 1.4.3. Erika Enterprise Basic renamed
to Erika Enterprise.1.1.11 Revised entire document.
22