EQUIPMENT - University of Mississippi
8
EQUIPMENT 124 DIGITAL MULTI-METER A Digital Multi-Meter, D DMM, will measure several different quantities. You must determine which function the DMM will perform by selecting the following four items: • POWER SOURCE: Set the switch to DC (Direct Current) or AC (Alternating Current). We use DC for all experiments except Exp. 15, The Oscilloscope. • LEADS: The black lead should always plug into the "COM" jack. Although the color of the wire covering is irrelevant, it is standard to define the black wire as the common (ground). The red lead will be plugged into the "VΩ" jack when measuring voltage or resistance. Plug the red lead into the "mA" jack when measuring current (the "10A" jack is used only for Exp. 22 and Exp. 23). • DIAL: You must select the function the DMM will perform by turning the dial to the appropriate setting, as well as the appropriate scale. Select the lowest value that will accommodate your circuit, e.g., the '20V' setting will measure voltage up to 20 volts. • CONNECTION: You must connect the leads to your circuit properly, or the DMM could be damaged. A voltmeter is always connected in parallel; the leads connect to each end of the same element. An ammeter is always connected in series; a jumper must be removed from the circuit in order to place the ammeter into the circuit.
Transcript of EQUIPMENT - University of Mississippi

EQUIPMENT
124
DIGITAL MULTI-METER
A Digital Multi-Meter, DDMM, will measure several different quantities. You must
determine which function the DMM will perform by selecting the following four items:
• POWER SOURCE: Set the switch to DC (Direct Current) or AC (Alternating Current).
We use DC for all experiments except Exp. 15, The Oscilloscope.
• LEADS: The black lead should always plug into the "COM" jack. Although the color
of the wire covering is irrelevant, it is standard to define the black wire as the
common (ground). The red lead will be plugged into the "VΩ" jack when measuring
voltage or resistance. Plug the red lead into the "mA" jack when measuring current
(the "10A" jack is used only for Exp. 22 and Exp. 23).
• DIAL: You must select the function the DMM will perform by turning the dial to the
appropriate setting, as well as the appropriate scale. Select the lowest value that will
accommodate your circuit, e.g., the '20V' setting will measure voltage up to 20 volts.
• CONNECTION: You must connect the leads to your circuit properly, or the DMM
could be damaged.
A voltmeter is always connected in parallel; the leads connect to each
end of the same element.
An ammeter is always connected in series; a jumper must be removed
from the circuit in order to place the ammeter into the circuit.

EQUIPMENT
125
Fig. 4-A: Digital Multi-Meter (DMM)
Note the multipliers µ, m, K, and M on the different scales. This means you would
multiply the digital reading of the DMM by the appropriate multiplier. For example, the
200K scale for the ohmmeter means you should multiply the digital readout by 103.
Note also that the DMM will only read values up to the scale value. For example, the
20m10A
scale for the ammeter means the DMM will measure current up to 20mA if using
the mA jack, but will measure up to 10A if using the 10A jack.

EQUIPMENT
126
Fig. 5-A: Voltmeter (See also Fig. 8-A.) Voltmeter Reading: 5.27 V.
To use the DMM as a voltmeter, make these selections:
• POWER: Select DC or AC.
• LEADS: Plug the black lead into "COM" and the red lead into "VΩ".
• DIAL: Turn to the appropriate scale on "V".
• CONNECTION: Place leads on each end of the same element.
20V (DC) Scale
EQUIPMENT
127
Fig. 6-A: Ohmmeter (See also Fig. 9-A and 10-A.)
Ohmmeter Reading: 0.501×10³ Ω = 501 Ω.
To use the DMM as an ohmmeter, make these selections:
• POWER: Select DC or AC.
• LEADS: Plug the black lead into "COM" and the red lead into "VΩ".
• DIAL: Turn to the appropriate scale on "Ω".
• CONNECTION: Place leads on each end of the same element.
2K Ω Scale

EQUIPMENT
128
Fig. 7-A: Ammeter (See also Fig. 11-A.) Ammeter Reading: 10.2×10⁻³ A = 0.0102 A.
To use the DMM as an ammeter, make these selections:
• POWER: Select DC or AC.
• LEADS: Plug the black lead into "COM" and the red lead into "mA".
• DIAL: Turn to the appropriate scale on "A".
• CONNECTION: Remove a jumper, place leads into circuit (current travels from one
element, through the ammeter, into a different element).
200m A Scale
EQUIPMENT
129
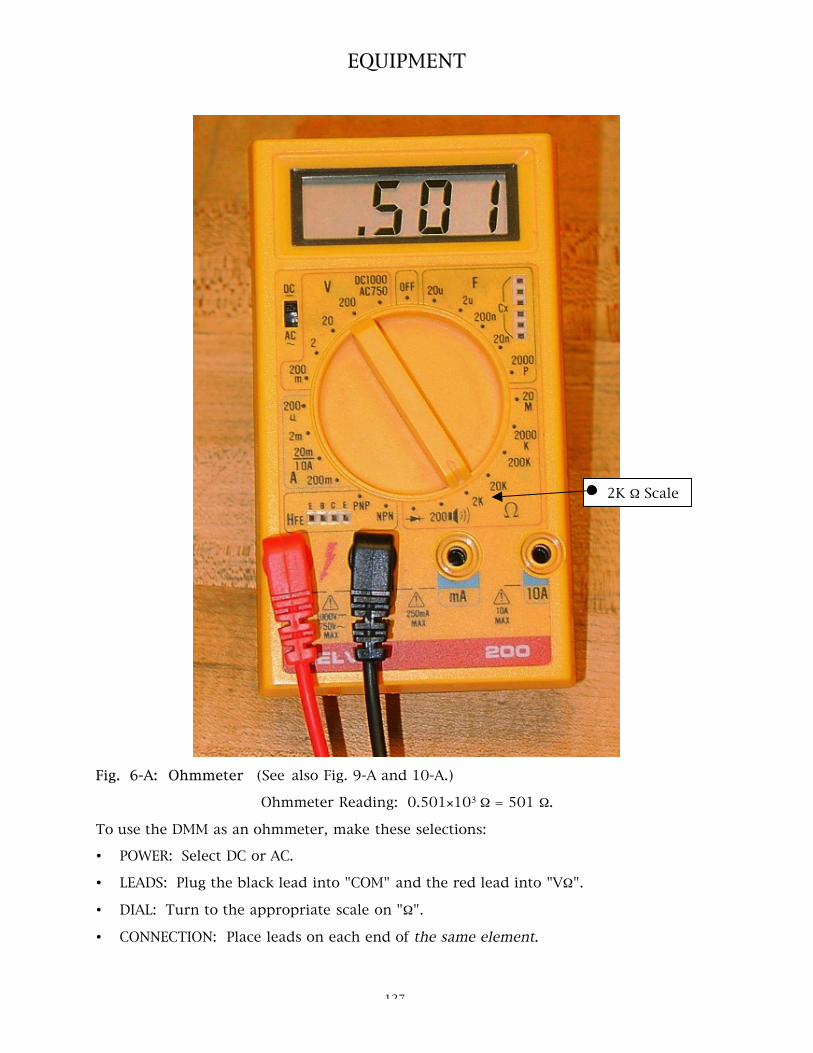
Fig. 8-A: VVoltmeter and Circuit Voltmeter Reading: 5.01 V.
Note that the circuit is complete, power supply plugged in and set to desired voltage.
The voltmeter is connected in parallel, as it measures voltage across an element in a
circuit.
VOLTMETER
Power Supply
LEADS

EQUIPMENT
130
Fig. 9-A: Ohmmeter and Circuit Ohmmeter Reading: 0.501 kΩ=501 Ω.
Note that the power supply has been disconnected in order to measure the resistance,
Req, of the circuit.
Fig. 10-A: Ohmmeter and Resistor Ohmmeter Reading: 0.200 kΩ=200 Ω.
Connect ohmmeter to resistor for resistance measurement of an individual element.
OHMMETER
Power Supply

EQUIPMENT
131
Fig. 11-A: Ammeter and Circuit Ammeter Reading: 9.9 mA = 0.0099 A.
Note that the ammeter is connected in series. A jumper has been removed from the
circuit so that the ammeter can be inserted, in series, to measure the current. Power
supply is connected and active.
AMMETER
Power Supply