Epyx the Masters Collection Advanced Hint Book
52
Transcript of Epyx the Masters Collection Advanced Hint Book


Contents
1 The Legend of Blacksilver 28 Space Station Oblivion
3 General Hints 29 A Missive from Memory 3 Beginning the Game 29 Travel Advisories 3 Staying Alive on Bantross 30 Teleporters 4 Unraveling Mysteries 30 Sector Engineering Plans 5 Geographic Guidelines 30 Amethyst 5 Castle 30 Lapis Lazuli 5 Temples 31 Emerald 5 Archive Exhibits 31 Malachite 6 Playing Games 31 Ruby 7 Castle Map 31 Aquamarine 8 Archives Maps 32 Beryl 9 Dungeons 32 Topaz 9 The Citadel 32 Niccolite
10 The Labyrinth 32 Alabaster 11 Island Caverns Maps 32 Opal 12 Taragas Mines Maps 33 Quartz 13 Marthbane Tunnels Maps 33 Diamond-The Light Side 15 Pits of Blackmire Maps 33 Obsidian 18 Deathspire Chasms Maps 33 Basalt 21 Citadel Maps 34 Polyhedron Map of Mitral 23 Labyrinth Maps 36 Ochre 25 Using Magic 36 Graphite 25 Tools, Talismans, and 36 Trachyte-The Dark Side
Gemstones 25 Serf 25 Apprentice 26 Adventurer 26 Warrior 26 Squire 27 Knight 27 Baro::. 27 A T"Chi ve Gems
.....

37 L.A. Crackdown 42 Sub Battle Simulator
37 Case Report 4677-88 43 Tactics for Wartime 38 Case Report Flow Chart Engagements
44 Tips for Practice Mode 44 Classic Sub Commander
Tactics 44 Daylight, Surface Attack 45 Strike and Flee Surface
Attack 46 Surface/Submerged Attack
Epyx ®, Past Load ®, LA. Crackdown'"", Space Station OblivionTW, Sub Banle SimuJator CII,"fa: Legend of Blacbilver"",lh:: ~ Collcctkm ®,lII1d
500Xl ® an: traden=b of Epyx,lnc. Apple ® is a tn&mark of Apple CompUICr, Ine. C~ ®, Commodcn: 64 ®, aod Commodore: 128'" "'" trademJUb of Commodore Electronics, Ltd. IBM !II is a trademsrk of International Bu!~s MacbiD:s CorpontiOll. Space Station Oblivion--incorporaling the 3 dUnensional enviro=tsimulato, IcDOwn as h;1 ~:j.i~.IJ' ,,, . Ij;I~"'H.IJ ' ,,, is a trademark of in=tivc So/tw"" Ltd. (U.K.) Lego ® is. tradenw-k of lnterlcgo A.G.
TJu Mastu5 Collulioll Hinl Boolc was written by Rulh Zultocr and Epyx, Inc. D1ustntions by Carlos Hueso. Special thanks to Bob Amn, Alan Dangerfield, Jill De Maria, Olris Gurley, Mark Lindstrom, Carolyn MeCarroD·Fra"er, Michael Milligao.lr., ChriJ Smith, Robert Stoner. and Wing Tang.
uS",d of Blacks .. "'" ",etioo e 1988 by Quest Softwan: and Ep)'t, Inc. All nih'" reserved. All other oeetions e 1988 by Epyx. Ine. Reproduction of all or any JX)rtiOD of this book i.5 not allowed .... ithout the specific written permission of Epyx, Inc.
E~ 600 Galveston Drive. Redwood City. CA 94063. (415) 366-0606
Customer Service Bulletin Board: (415) 364-0281.300/1200 Baud - 8 Bits - No Parity - 1 Stop Bit
Part 110(.90..\-60
-
B The~ndo£ lAC ILVER'· Squeezers, Quasit Hounds, Lypnopods. Brain Spates, Bone Worms, Bowel Roots. They want to fmd you, squeeze you, make you tingle. Pesky creatures, they'll jangle your nerves, crawl over your bones, and generally work their way under your skin. They won't stop until you're munched, crunched, or crumpled - until they've crept up and stenched you, pinched you, thrashed you, and gulped you.
But if you are one of the lucky ones, you can rescue the King ofThalen and escape! For John and Charles Dougherty, inventors of The Legend oj Blacksilver, relief is not so easy. Between them, the brothers from Lansing, Michigan have spent ten years in the company of dragons and dungeons, developing their own special genre of richly imaginative medieval fantasy games.
"Sometimes our worst nightmares give us ideas. Sometimes It's asking questions, like: If there were a hideous monster standing in front of me, what would he like to eat? How would he kill things?" says Charles. Experienced dungeon-masters, John and Charles began developing the scenarios, creatures, and plots for The Legend oj Blacksilver about a year and a half ago from bits and pieces of ideas and fantasies,
"We've always been into fantasy. Growing up, our heroes were the astronauts landing on the moon, people like John Glenn and Neil Armstrong. Our 'dungeon' was actually the 'space capsule' in our closet, complete with controls, sound effects, a primitive viewscreen, and two old kitchen chairs," John recollects. Along with the gift of resourcefulness, the Dougherty brothers have an even rarer asset for developing their powers of imagination - they are twins who think alike and even talk alike.
Yet the Doughertys bring very different skills and backgrounds to their current fulltime efforts to develop fantasy games . Charles, who holds a B.S. in psychology, Is concerned with a player's reactions and feelings when playing a game, John, who completed his M.S. in computer science, is interested in the technical aspects of game design and pays close attention to animation and sound effects. When Charles brought John a game that needed code conversion, John fell into the same schedule as his brother: 30 hours of work on games in addition to a 40-hour work week. Four years ~go John and Charles began to design and program games full-time.
1
To develop The Legend oJBlacksilver, "we'd get together with fIiends in creative groups, fantasy-game style," John says. Over the next year and a half, the informal sessions generated 2,000 ideas, which were eventually honed into over 60 locations of game activity. Towns, temples, citadels, castles, dungeons, archives, and wilderness scenarios took shape, along with three gambling games, four arcade-style games, and the inevitable legions of unspeakably horrid creatures.
For John and Charles, keeping track of each part of their creation became an adventure in itself. Individual story lines were meticulously chronicled and cross-related. Plots were concocted, tested, and tossed out if they led to dead ends or confusing inconsistencies. "Our game is so diverse - with so many difTerent viewpoints, characters, and games within games - at times we felt we should make it easier and limit the scope like many other games on the market," Charles reflects. 'Then we'd think, 'Naw - let's go for itl'" says John.
John and Charles share other concerns about game design. Both brothers believe that a good game should be complex while giving the player a fair chance to reason out a solution. ''I've seen so many games that are so arbitrary," says Charles. "You get to a room with two doors. Pick the right door and you get a prize. Pick the wrong door and you're dead. It's easy to create a game that's unfairly hard, or that forces the player into decisions that don·t make sense. It's not so easy to be challenging but fair," he continues.
In The Legend oj Blacksilver, the twins also attempt to provide the maximum number of choices in all circumstances, and many difTerent ways to solve the game. ''We don't want to take away people's free will at any point in the game. You even have the opportunity to join with the bad guy and take over the world. But then, you may have to deal with results that may not fit your expectations," Charles hints.
"Really, I suppose when you play The Legend oJ Blacks ilver you are given the opportunity to have more power. In normal life, the average person doesn't have all that much power - he has to get up in the morning, go to classes, or get work done. In The Legend oj Blacksilver, you enter a world where you have the ability to choose your destiny - and to make decisions of life and death. Through hard work, dedication, and intelligence, the player can think, 'Hey, I can become a hero and people will look up to me.' In fact. we recognize this feeling at the end of the game when we have a celebration for the hero," Charles comments.
The twins hope that people who play The Legend oj Blacksilver will form their own creativity groups and develop ideas for new games. "Fantasy games lead people into greater creativity. People don't Just play them, they get involved," says Charles.
If you want to get involved and find your own solution to The Legend oJBlacksilver, read on, and quickly. Because there's a Spine Quiver in yonder swamp and he's got you in his Sights. So if your hit points are low and your Glow Tips on the wane, study the following hints carefully. Spine Quivers aren't known for their patience ...
2
-

General Hints This section is intended to guide you Without telling you exactly what to do. If you're stuck, look over this section first. It may help you come up With your own ideas about how to proceed.
Beginning the Game
1. Explore the lands. Use the labels in your Legend oj Blacksilver package to mark the locations of towns, castles, and dungeons on your map of The Lands ofThalen and Maelbane.
2. Initially, refrain from using brute force to get what you want - save that for later. Meanwhile, learn your way around towns. Get to know who has the best prices, how to negotiate with the Arms Broker (start high), and how to talk to prisoners. Make a list of the shops in each town - that way you'll know who has the talismans and spells you may need later on.
3. Find the temples. Inside them, talk to everyone you can. Learn how to raise your hit points. Save some money and play the training games. The higher your attributes, the better you'll fight.
4, Find the castle. It's OK to open chests before you get the Prince's permission. Remember, the castle is not a hostile place.
Staying Alive on Bantross
Physically and fmancially, you're not very strong when you begin your adventure. Therefore, it's Wise to learn Which experiences you can and can't survive. As you fight monsters, learn which ones to avoid. But don't run away from every battle, because you need to fight to collect gold. Some hints follow:
1. Try not to fight unless you have a weapon. If you're too poor to buy one, fight only until you have enough gold for a Simple weapon. Or take out a loan to make your first purchase.
2. Armor is valuable. Try to get some, then remember to wear it.
3. If you're low on hit points, stay on terrains such as grass or forest, where the monsters aren't tough. (Be sure to return to mountainous terrain when you're properly eqUipped.) If you're extremely low on hit points, flee from all encounters.
3
4. Find out which creatures are friendly, and don't waste time fighting them. Instead, use Wait or Approach commands to encourage a friendly encounter and perhaps strike a useful deal.
5, When you're strong enough to fight, get in the first blow. If the monster doesn·t see you coming, the effect of your first blow is doubled. Use the Charge command for maximum effect on the first attack, then switch to the Battle command.
6. Eat monsters after killing them, but stop eating the ones that routinely make you sick. Avoid traveling across difficult terrains - they make you use up food at a faster rate.
7. As you accumulate money, put it in the banle If you die, your cash will be resurrected with you.
8. The temple archives are vital to your success. Remember to use your archive gems to open cabinets in the archives. An unused gem is a wasted opportunity.
9. Learn how to gamble. A skilled traveler can win money playing the three games of chance. Some tips for each:
Blackjack Watch the dealer's upturned card. It gives you a better idea of whether to hit or stay.
Helgh-Loagh You lose more often than you win, but since each win triples your bet, the odds are in your favor. In the long run, cautious gambling pays off. Play the odds: if the last card was lower than eight, guess high on the next one. If the last card was higher than eight. guess low.
Dragon Wheel This game is a little like the weather: you have to expect dry spells. If you bet small amounts, you can hit some healthy wins.
10. Write down the information and advice you pick up. Information that seems trivial at first glance might be important later on.
Unraveling Mysteries
If you don't know what to do or where to go, stop a moment to think about things you could be doing. Is there any place you've only partially raided or explored? Do you have extra archive gems? Are you carrying any other items but not using them?
Go to the castle to visit the Wizard Seravol periodically for advice on what to do next and for an opportunity to raise your character's level. The Prince is also a useful source of information.
4
Geographic Guidelines •
Major locations in the game are listed below, along with tips for exploring.
Castle
1. Find the throne room. If you have trouble getting in, speak to a guard.
2. Open all the chests you can, particularly In Orc-infested areas.
3. Find a way to clear the landslide and rescue Seravol. There's a special item in the archives that will help you. Once you've rescued Seravol, come back for news once in a while.
4. Armor Enchant and Glow Tip spells help you fight the Orc Guards. While fighting, position yourself carefully, battling only one Ore at a time.
5. Make sure to see the Apprentice.
6. Keep in touch with the Prince.
Temples
Thalen has three temples. At first. you might only find two of them. Some things to do in the temples are:
1. Use the special ring (located in a dungeon) to gain access to the Empath.
2. Visit the Seeker and keep his quest in mind.
Archive Exhibits
Within the temples, archive exhibits provide a rich source of information about the lands ofThaien and Maelbane, as well as an opportunity to pick up magical objects, weapons, and gold. Try to see every exhibit! The Open command helps you keep track of which exhibits you have used, Some tips are:
1. At both the Owl and Hawk Temples, after you speak to the Cleric, a stairway leading down to the archives opens. Stand on the stairs and choose Climb to enter the archives.
2. Drink the magic etherium and the Trainer will help Improve your magical talents. An archive exhibit might help you fmd the etherium.
5

Playing Gomes
" Playing Trapshoot. Hard-Rock Melee and Trist increases your character's attributes of dexterity. endurance. and intelligence. Use these strategies:
Trapshoot
1. Practice leading the traps. Traps near the top of the screen move more slowly than those near the bottom.
2. Once you've had some practice, don't wait for your current shot to hit or miss before moving the archer to his new position.
3. Try aiming the crossbow about 30 degrees above the horizon. Then fire twice quickly. The fIrst shot pulls the traps. The second shot often hits a target.
Hard-Rock Melee
1. You gain pOints for staying alive as well as for collecting gold. Since staying alive scores bonus points in every round. play more cautiously in the early rounds.
2. Don't drop your gold into the wrong basketl
Trtst
1. Whenever your opponent has a pit with one or two stones. see if you have any moves which would end at that pit. letting you score.
2. Use one turn to set up another. For example, use one turn to leave one or two stones in one of your opponent's pits. Cash in on your next move.
3. As you become more profiCient at Trist. the quality of your opponent's play improves. You'll need to start playing more defensively. Try not to leave any stones In your pits. especially if your opponent has a move that could end on that pit.
6
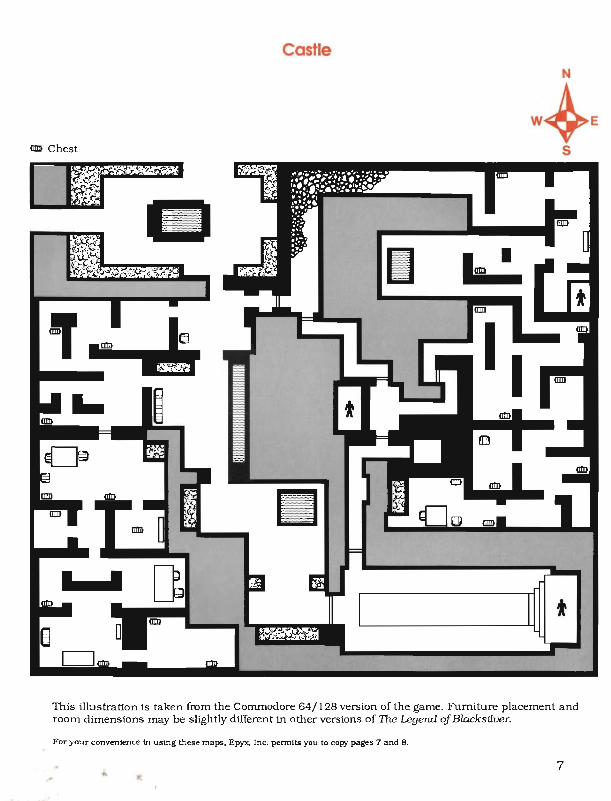
Castle
(JJI!I Chest
I
III
t
This illustration is taken from the Commodore 64/128 version of the game. Furniture placement and room dimensions may be slightly different in other versions of The Legend oJBlacksUver.
For yo'>r convenIence In using these maps. Epyx. Inc. permIts you to copy pages 7 and 8.
7
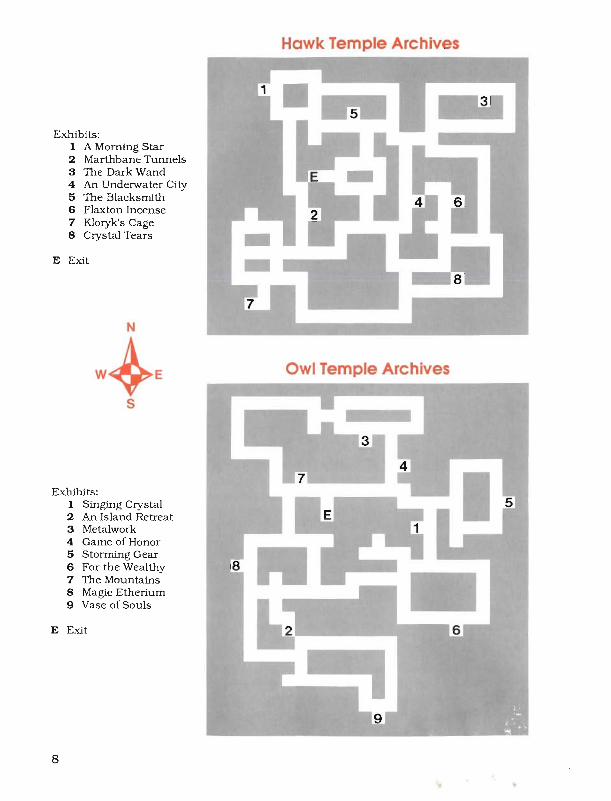
Exhibits: 1 A. Morning Star 2 Marthbane Tunnels 3 The Dark Wand 4 An Underwater City 5 The Blacksmith 6 Flaxton Incense 7 Kloryk's Cage 8 Crystal Tears
E Exit
Exhibits: 1 Singing Crystal 2 An Island Retreat 3 Metalwork 4 Game of Honor 5 Stonning Gear 6 For the Wealthy 7 The Mountains 8 Magic Etherium 9 Vase of Souls
E Exit
8
Hawk Temple Archives
Owl Temple Archives

Dungeons
If you map the dungeons yourself, it's best to use graph paper and let each square represent one step. Or use the following maps. Within the dungeons, try these hints:
1. Buy a Light spell before you enter a dungeon. Bring as much magiC as you can afford. Glow Tips and Armor Enchants make fighting much easier.
2. Some monsters have special abilities that render them particularly dangerous. Identify these creatures and use magiC to defeat them.
3. Don't open urns if your hit pOints are near maximum. Once opened, the urn won't be around later when you need it.
4, Until you learn your way around a dungeon, leave a few chests, urns, or cases untouched so they can serve as landmarks. Opening a chest. case, or urn makes it vanish.
5. As you progress in the game, dungeon layouts become trickier. For example, sometimes when you're headed downward, you have to climb up a level and then climb down through a different hole.
6. Walk off blindness by moving forward or backward through the corridors. Bumping into a wall or pivoting in place won't clear your vision.
The Citadel
Visitors are not welcome in Lord Mantrek's palace, so you need special storming gear to enter. Once inside, the guards will probably leave you alone while you explore. Use this to good advantage: get to know the palace layout before you open any chests.
1. Start out by opening chests near the exit, where your chance of escaping is better.
2. Find the special keys and learn how to unlock the remoter portions of the citadel. All the keys to citadel doors are stored within the citadel.
3. Visit the Mage. Make sure to take an elixir after seeing himl
4. See and help the Jester and attend to his quest. You'll find the object of his deSires far from the citadel. Without the Jester's special words, you can't get to the second level of the citadel.
5. Watch where you step when crossing the square flash room. If the floor becomes all one color, you didn't make it across.
9
6. Once you reach the second level. open all chests and talk to the Elf. Lomar the Loon. and the Baron. You gain something special from each encounter.
The Labyrinth
This magical fortress is on a faraway land across the seas. It is an enchanted place: the guards are not human. but magical apparitions. Some hints to help you explore the labyrinth are:
1. The labyrinth has two levels. with numerous teleports for transport from chamber to chamber throughout the levels. Teleports transport you to chambers with floors that match the color of the teleport.
2. On your labyrinth map. number each teleport and jot down the spot where each teleport transports you. Using the te1eports. you can see every chamber in the labyrinth and find the magical object that is crucial to your quest.
3. Special lines of magical power either alert guards or conceal you from their attention. so be careful where you step! Another magical force field alerts the guards only ifyou've plundered. undoing the prior protection ofa benevolent line of power you may have crossed. Exploration is safer if you wait to open chests.
4. There are many people to meet. and most are vital to the fulfillment of your adventure. Look for Rofar the Ravaged. the Giant. Ludicious the Leper. the Contortionist. Maximillian the Midget. and Vom the Illusionist. Rofar the Ravaged will ask you to come back after accomplishing something. Be sure you do. Also remember: a happy midget is a useful midget.
5. Most labyrinth door keys are hidden in the labyrinth. One labyrinth key is in the Pits of Blackmire.
10

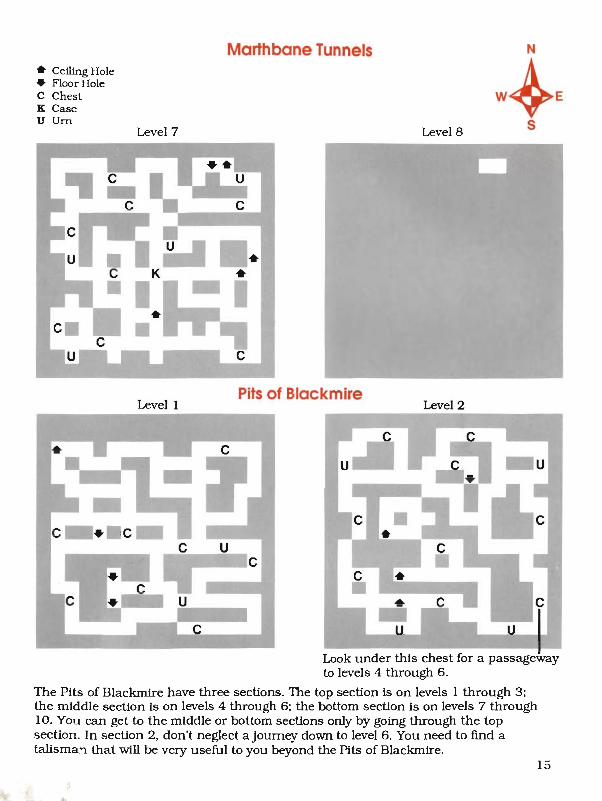
• Ceiling Hole .. FloorHole C Chest K Case U Urn
Levell
Level 3
Island Caverns
Level 2
Level 4
For your convenience In using these maps, Epyx. Inc. Permits you to copy pages II through 24.
11

....
• Ceiling Hole • Floor Hole C Chest K Case U Urn
u
12
e
-e
Taragas Mines
Level 1 Level 2
..Ie
e
Level 3 Level 4

. • Ceiling Hole • Floor Hole C Chest K Case U Urn
....-----
I u
Level 5
Levell
Taragas Mines N
W~E S
Leve16
Marthbane Tunnels Level 2
c
13

• Ceiling Hole • FloorHole C Chest K Case U Urn
C
Level 3
Level 5
C
Marthbane Tunnels
c
c
c
c
c
• K
•
u
Level 4
u
, c
I • c
Level 6
I ••
c
I c
u
Marthbane, level 4: Climb down to level 5, then go through a different passageway back to level 4 . Then use yet another passageway back to level 5.
14
• Ceiling Hole • Floor Hole C Chest K Case U Urn
c • C
Level 7
Levell
Morthbone Tunnels
c
• •
c
Pits of Blockmire
LevelS
Level 2
Look under this chest for a passageway to levels 4 through 6.
The Pits of Blackmire have three sections. The top section is on levels 1 through 3; the middle section is on levels 4 through 6; the bottom section is on levels 7 through 10. You can get to the middle or bottom sections only by going through the top section. In section 2. don't neglect a journey down to level 6. You need to find a talisma':l that will be very useful to you beyond the Pits of Blackmire.
15

• Ceiling Hole .. FloorHole C Chest K Case U Urn
• U U C •
c
Pits of Blackmire
Level 3 Level 4
Level 5 Level 6
I
Find a passageway on level 4 leading to level 5. Then find another passageway to return to level 4. Finally. use yet another passageway to go back to level 5. You must seek help in the labyrinth to journey deeper than level 6.
16

.. Ceiling Hole • FloorHole C Chest K Case U Urn
Level 7
Level 9
Pits of Blockmire N
W.E S
Level 8
Level 10
c::---
17
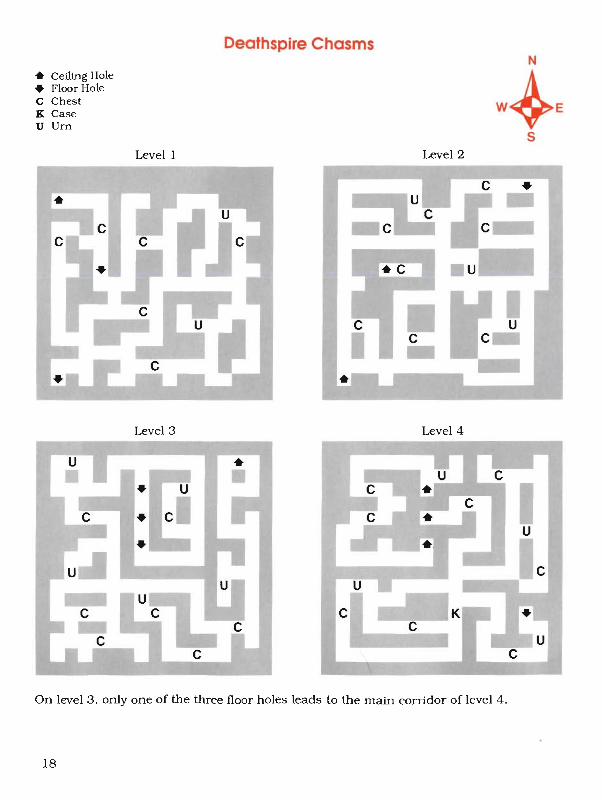
• Ceiling Hole • Floor Hole C Chest K Case U Urn
u
u
c
Level 1
Level 3
Deathspire Chasms
Level 2
c •
u c
Level 4
c
c
On level 3, only one of the three floor holes leads to the main corridor of level 4.
18

.. Ceiling Hole • FloorHole C Chest K Case U Urn
c
Deathspire Chasms
LevelS
Level 7
c c .-------. .. - . . u
c
Level 6
Level 8
c
N
W~E S
c u
On level 8, only one of the three floor holes leads to the main corridor of level 9.
19

.. Ceiling Hole
.. FloorHole C Chest K Case U Urn
..
u
:1 ..
Level 9
Level 11
Deathspire Chasms
-__ c u
Level 10
Level 12
Find a passageway on level 11 leading to level 12. Then find another passageway to return to level 11. Finally. use yet another passageway to go back to level 12.
20

Citadel N
IIIIII Chest W~E T Teleport
Levell S
This illustration is taken from the Commodore 64/128 version of the game. Furniture placement and room dimensions may be slightly different in other versions of 'The Legend of Blacksilver.
21

Citadel N
IlIIII Chest W~E T Teleport
S Level 2
• • • • Ii1 ~
• • •
This illustration Is taken from the Commodore 64/128 version of the game. Furniture placement and room dimensions may be slightly different in other versions of The Legend oj Blacksat>er.
22

mm Chest T Teleport
t
I II I
Labyrinth
Level 1
I II I
N
W~E S
II
This tIIustration Is taken from the Commodore 64/128 version of the game. Furniture placement and room dimensions may be slightly different In other versions of The Legend oJBlacksilver.
23

Labyrinth N
IIIIl) Chest T Teleport W.E
5 Level 2
This illustration is taken from the Commodore 64/128 version of the game. Furniture placement and room dimensions may be slightly different in other versions of The Legend of Blacksilver.
24
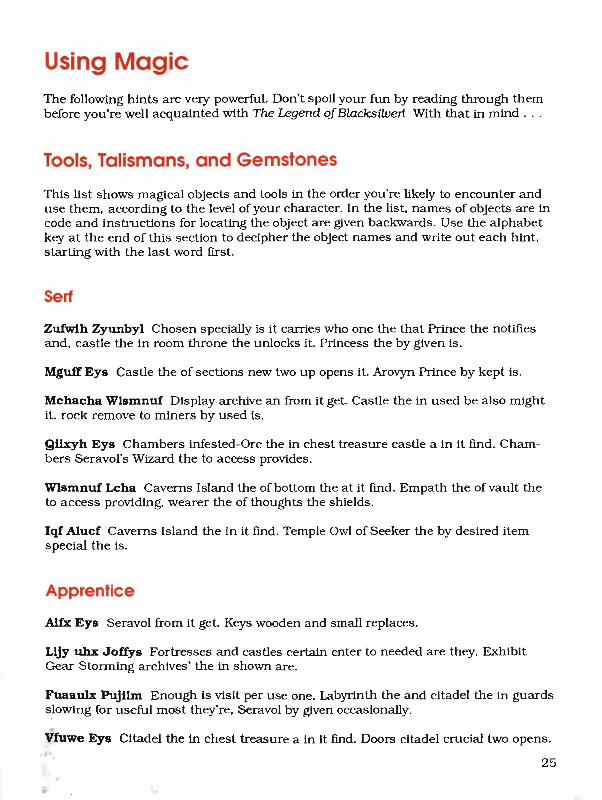
Using Magic The following hints are very powerful. Don't spoil your fun by reading through them before you're well acquainted with The Legend oJBlacksilverl With that in mind ...
Tools, Talismans, and Gemstones
This list shows magical objects and tools in the order you're likely to encounter and use them, according to the level of your character. In the list. names of objects are in code and instructions for locating the object are given backwards. Use the alphabet key at the end of this section to decipher the object names and write out each hint, starting with the last word fIrst.
Serf
Zufwih Zyunbyl Chosen specially is it carries who one the that Prince the notifies and, castle the In room throne the unlocks it. Princess the by given Is.
Mguff Eys Castle the of sections new two up opens it. Arovyn Prince by kept is.
Mchacha Wlsmnuf Display archive an from it get. Castle the in used be also might it. rock remove to miners by used Is,
Qiixyh Eys Chambers infested-Orc the in chest treasure castle a In it fmd. Chambers Seravol's Wizard the to access provides.
Wlsmnuf Leha Caverns Island the of bottom the at it fmd . Empath the of vault the to access providing, wearer the of thoughts the shields.
Iqf Mucf Caverns Island the in it fmd. Temple Owl of Seeker the by desired item special the is.
Apprentice
Alfx Eys Seravol from it get. Keys wooden and small replaces.
Lijy uhx Joffys Fortresses and castles certain enter to needed are they. Exhibit Gear Storming archives' the in shown are.
Fuaaul.x Pujilm Enough Is visit per use one. Labyrinth the and citadel the in guards s,lowing for useful most they're, Seravol by given occasionally.
Vfuwe Eys Citadel the in chest treasure a in It find. Doors citadel crucial two opens.
25

Mumm Ilv Citadel the inside someone from it purchase. Seravol to helpful.
Cllh Eys Chest treasure citadel remote a in it find. Citadel the of sections special to access gives.
Fony It find to Mines Taragas the to go. Jester the to meaningful.
Yuafy Mnunoynny It find to squares flashing of room the past. citadel the to go. Temple Eagle of Seeker the to special.
Adventurer
Wfcgvcha Ayul Exhibit archive an inside it find. Mountains over journey successful a for.
Koulnt Eys Chest treasure citadel a in it find . Citadel the of level second the on rooms unlocks.
Mcfpyl Wlchm Chests treasure various in them find . Temples the in training magiC purchasing in useful.
Mcahyn Lcha It need you·ll . Citadel the in Elf the Avone by sold.
Mnuzz Mantrek Lord by citadel the In held be might it. Durek King from stolen.
Buqe Nunnll Citadel in one get. Temple Hawk the of Seeker the to special.
Warrior
Vfuwe Quhx Blackmire of Pits the in deep is location rumored its. Archives the from stolen was relic ancient. powerful a.
Squire
Fulay Eys Labyrinth the in door crucial a opens .
Ugvyl Eys Labyrinth the in it find. Labyrinth the in door locked a opens .
Fixymnlhy Dungeon a to entrance the over one including. boulders heavy move to power the has it. Labyrinth the in Ravaged the Rofar by given.
Lomns Eys Dungeon that of level second the on chest special a opens it. Blackmire of Pits the in level third the on chest treasure a In located.
26
Knight
Meyfynih Eys Blackmire of Pits the in buried it find . Labyrinth the of section difficult most the opens.
Mnyyf Buggyl There Blacksmith the fmd you·ll. Crag Lost for Maelbane of shore North the near look. Rise will Maelbane. Displays archive the of one at it fmd. Maelbane on Blacksmith the to useful.
Vfuwemcfpyl Blade the forge to has still somebody, found once, course of. Blackmire of Pits the in buried some be might there. Taragas defeat to blade unbreakable an forge to necessary.
Baron
Xluaih'm Nyulm Archives the in tears dragon's find. Happen may things strange, statue dragon a of eyes the in put are tears if.
Archive Gems
You need special gems to open all of the archive exhibits. The list below shows where you might find these gems. Use the alphabet key to decipher the names and locations of the gemstones.
Vfoy Aygm WurnnJY wiggihm, funn mywncih Iz wumn1)r, Cmfuhx Wupylhm.
Lyx Aulhynm Nblioabion nby wcnuxyf.
Ugynbsmnm Wcnuxyf, Nuluaum Gchym.
Ygylufxm Cz zul yhioab ufiha ch nby augy, wbywe qcnb Jlchwy Ulipsh.
Syffiq XcugihKm Gulnbvuhy Nohhyfm, u fuvslchnb lymcxyhn.
Qbcny Xcuglhxm Jcnm iZ Vfuwegcly.
Vfuwe Ijuf Ihfs nby Echa wiofx bupy mowb u ayg.
Alphabet Key
U V W X Y Z A B C D E F G H I J K L M N 0 p Q R S T A B C D E F G H I J K L M N 0 p Q R S T U V W X Y Z
Example: Nby Fyayhx iz Vfuwemcfpyl = The Legend oj Blacksilver
27

SPACE STATION
OBLIVION. Two years ago, Ian Andrew had a great idea. He decided to create a computer game that puts the player into three dimensions, with the ability to move and look around in any direction. Ian, British developer of Space Station Oblivion, wanted to transport the player out of the usual two-dimensional game landscape and into a "freescape" that allows for complete freedom of movement from any position on the screen.
"I wanted to make something that was very different - to make people think," Ian said. But the programmers Ian turned to at the time all thought the Freescape concept "just too difficult for them to do." Fortunately, lan's brother Chris didn't share that reluctance. Chris saw the challenge of programming a three-dimensional environment as a welcome relief from his work programming business applications. Ian hired Chris and the project took off.
"We wanted to create the feeling of actually being in the Freescape environment," Ian recollects. "But it is difficult to design in 3-~, because you have to look at objects from all sides." That problem was solved by carting in Lego bricks - ''boxes of them," says lan, to complete the mind-bending design of Mitral's sectors. 'The Legos helped us visualize problems and keep track of how objects related to one another. We'd make up a room in Legos and work up the coordinates, then put the coordinates into the computer," Chris describes. The game. Chris and Ian hoped, would be one that "challenges the exploration instinct" and provides progressively harder tests of a player's imagination and navigational abilities.
Evidently the Legos did the trick. Fifteen months and thousands of work hours later Driller was fmished. Within three months of being released to the British public, Ian received word that players were fmding solutions to the perplexing puzzle. "I don't know how the determination of the American players compares with this," challenges Ian. now that Space Station Oblivion, the U.S. version of Driller, is being released.
If you happen to have three months (and a few sets of Legos) to spare, close this hint book right now, plant your rigs, and clear those sectors I But if Mitral's gas is pressuring you for time, or ifyou're running out of Rubicon crystals and into too many skanners. read onl
28
•

A Missive from Memory
Your drilling attempts thus far have not gone without effect on Mitral. Energy from your last drilling operation deflected off a scrap of intergalactic matter on Mitral's surface, activating dormant computer banks in the unknown U Sector. There, an archived engineering file flies loose from the memory arc and transmits to the probe, where you manage to quickly capture and print the file. Its terminology is cryptic, but the identity of its author is not - it is your name, or rather. the name of your grandfather on the document that follows.
Now the story comes back to you. An accomplished engineer with the Driller Federation, many years ago your grandfather found himself mistakenly banished to Mitral along with the outlaw Ketars. Instead of lamenting his fate. he painstakingly documented the defense systems and drilling coordinates of ail 18 drilling platforms. in hopes that his Disannament Survey would spare future generations from the consequences of irresponsible Ketar mining techniques.
If you can use your grandfather's Disarmament Survey to enter and clear all sectors. you will prove yourself worthy of the Driller Federation, clear your grandfather's name - and save Evath from destruction. The Evathians wish you luck in surviving the tremendous pressures of your mission.
Travel Advisories
Use the following Instructions to find the jet and fly successful reconnaissance.
Reconnaissance jet location: Far north hangar, Aquamarine. To get to Aquamarine. maneuver the probe west to Topaz. then walk up the steps to go over the low wail. Travel west again into Beryl. Sever the power lines to disable the laser. Fire at the symbols inside the shed to change them to squares. creating a doorway west to Aquamarine. To open the hangar, shoot the crack between the two doors for maxim urn pOints. Dock with the jet by maneuvering the probe under the jet and raising your vertical extension.
Fly reconnaissance in the jet. studying each sector's layout (see the polyhedron map of Mitral in this section). Accomplish the follOwing:
1. Throw the hidden switches on platforms surrounding each pole for entry into that pole. To enter The Dark Side, throw switches on Ochre. Basalt, Graphite. and Obsidian. To enter The Light Side. throw switches on Quartz. Nlccolite, Alabaster. and Opal.
2. Return the Jet to its hangar and dock with the probe. Return to each sector in the probe. Plant all rigs. Clear all sectors before proceeding to Trachyte.
29
•

Teleporters
For rapid transit between Amethyst. Emerald. Ruby. and Beryl, use the teleporters (large Ts) located in the four equatorial sectors. To activate the teleporters. drive onto the lift in Topaz. Fire at the west block to go up. Enter the suspended complex. locate the linker tunnel. and go through the tunnel to the complex in Amethyst. In this complex. disintegrate the blocks on the slab. shooting from right to left.
To teleport, run into the support beam of the T.
Sector Engineering Plans
A sector-by-sector design description follows. Each sector description ends with coordinates for exact drilling locations. Refer to the table on the polyhedron map to locate the correct x and y coordinates. For example. Amethyst's drilling coordinates are G5. G2. which translate to x = 6400. Y = 6050.
Amethyst
You start out in this sector. It contains a store with a Umited number of energy and shield crystals - shoot only what you need to restore your energy and shield levels.
Before shooting the tower. fly onto the top of it in the jet to absorb the shield and energy reserves stored inside.
In the store: Don't shoot the store walls from the outside or you will disintegrate the store. Shooting crystals on the right replenishes your shield energy. Shooting crystals on the left replenishes your energy level. To get the optimum use of shield crystals. fIrst shoot the shield crystals on the floor. When you've used up the floor shield crystals. regenerate them once by shooting the shield crystal on the pedestal. To get optimum use of the energy crystals. shoot the pedestal out from under the main energy crystal and let that crystal drop. Then shoot the floor energy crystals. and fmally the fallen crystal.
Shoot sections of the low wall, moving from the top down to gain maximum points. Shoot the cube (switch) near the north wall to gain access to Obsidian.
Drilling tip: X marks the spot. Face north. G5. G2
Lapis Lazuli
Shoot the pyramids to create a path through the sector and gain POints. Do not attempt to scale the low wall- look over it and shoot the small cube (switch) to
30

disintegrate the wall. Once you are on the other side of the wall. shoot the cube again to materialize a door to Emerald.
Drilling tip: Face north. E2, 07
Emerald
Stay close to the walls to escape the notice of the laser beacons guarding each door. Clever probe or Jet pilots can move diagonally across Emerald to escape laser fIre. You cannot pass the block near the north door without alerting the guard.
To raise your energy and shield levels, shoot the crystal until it disintegrates.
Drilling tip: Run into the slab to make room for your rig. Face east. 07, E2
Malachite
Stop the gate guard's attack by shooting its eyes. Don't shoot the nose! Shoot the guard's fangs and enter through the mouth. Shoot all other blocks for points.
You can enter Malachite's floating complex only with the Jet, flying through the hole at the bottom of the complex. Inside the complex, quickly shoot the four laser guards from right to left. Shoot the large slab (switch) which, when thrown in conjunction with the cube switch in Graphite, turns off the force field in Ochre.
Drilling tip: Face north. F7, F2
Ruby
When entering Ruby from Aquamarine, follow the arrows in Aquamarine precisely to travel along Ruby's girders. Otherwise, you risk a plunge to Mitral's surface. To travel along the girders, reduce your height to 0, set your angle to 90 degrees and step size to 50. At the Junctions, look left and right with each forward movement. Change directions only when you are aUgned with an intersecting girder.
The floating diamond-shaped block is a laser that returns fIre. Blast it once more to stop the attack.
Drilling tip: Stop exactly in the middle of a girder, Face east. 07, C4
Aquamarine
Drilling tip: Estimate the two arrows' intersection. Face south. F3, C7
31

Beryl
Look up. Disable the massive laser guarding the complex by shooting the three power lines. Once inside the complex. shoot the symbols on the northern wall to open exits to Basalt or Aquamarine. Three squares open the western door to Aquamarine. Three triangles open the northern door to Basalt. Only one door at a time is available. Shoot anywhere to re-materialize the exit out of the complex.
Drilling tip: This sector cannot be 100 percent cleared. Face north. H3. D6
Topaz
Shoot the laser guard to turn its fire away from you. To enter the overhead complex with the probe. move directly onto the elevator slab under the door. Turn to face two cube switches. Shoot the west switch to go up: east sWitch to go down. Within the complex. shoot the top of the east computer bank five times to permanently materialize the energy crystal. then shoot the crystal to gain energy.
Drilling tip: Climb onto the wall. Face south. D2. 82
Niccolite
To negotiate the mine field with minimal damage. move fast and remain close to the large blocks. Niccolite contains one of the four switches you must throw to enter The Light Side.
Drilling tip: Face north. A4. B5
Alabaster
Shoot the water in the swimming pool repeatedly to evaporate it. Go down the stairs to enter the pool pit. Alabaster contains one of four switches you must throw to enter The Light Side.
Drilling tip: Try the pool pit. Face west. E6. E2
Opal
Opal contains one of four switches you must throw to enter The Light Side.
Drilling tip: This sector cannot be 100 percent cleared. Use the numeric clue on the large slab. Face east. H5. H7
32

Quartz
To disable the guard, shoot the wire supporting the overhanging block. Go down the side of the fallen block to get to the other side of the wall. Quartz contains one of four switches you must throw to enter The Light Side.
Drilling tip: Use the X. Face west. C6, B6
Diamond - The Light Side
When switches on all surrounding sectors are set in the down position, the south wall in Opal disappears, giving access to The Light Side.
Shoot the two laser guards to gain access to the tunnel. In the tunnel. shoot the diamond on the wall over 20 times, then walk into it. The diamond and the main building disappear.
Do not shoot the two Mega crystals - run into them to gain energy or shield power. Mega crystals are not inexhaustible, so use them wisely.
Drilling tip: Search under the main building. Face toward the back wall. E2, D4
Obsidian
Bridge the crevasse by shooting or running into the nearby slab. Shoot pyramids in the crevasse to gam pOints.
Shoot the two attack lasers to disintegrate them and clear laser fIre outside the store. Beware of the store's lethal front door; come in through the back door (located at sector edge). Inside the store, shoot the laser guard from behind. Shoot crystals for extra energy and shield power. Exit the store through the front door.
Once you clear all 17 sectors, a switch appears. You must throw this switch to enter The Dark Side.
Drilling tip: Cross bridge. Face north. G6, G3
Basalt
Shoot the pyramid tower from the top down for maximum pOints. To access Trachyte, walk to the end of the L-shaped tunnel and throw the switch. This is one of four switches you must throw to enter Trachyte.
Drilling tip: Climb a hidden staircase to the top of the block. Face east. A7, C3
33
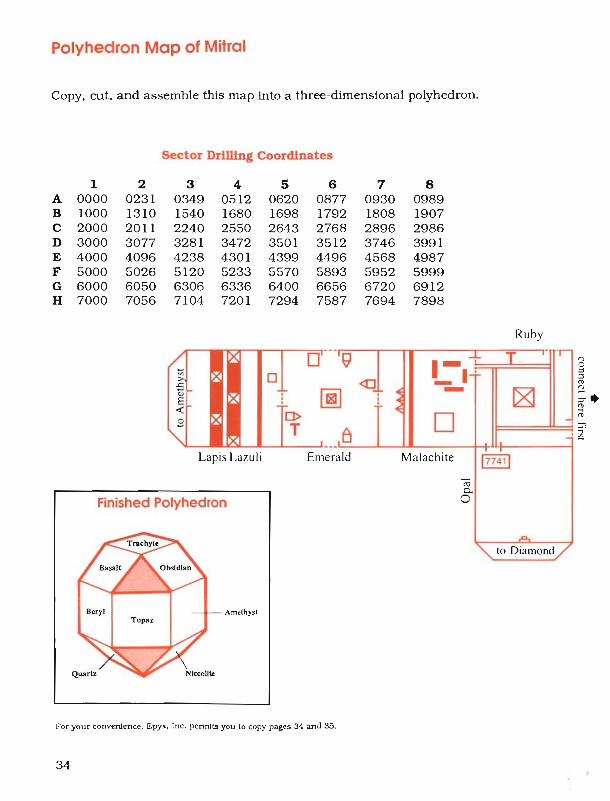
polyhedron Mop of Mitrol
Copy. cut, and assemble this map into a three-dimensional polyhedron.
Sector Drllllng Coordinates
1 2 3 4 5 6 7 8 A 0000 0231 0349 0512 0620 0877 0930 0989 B 1000 1310 1540 1680 1698 1792 1808 1907 C 2000 2011 2240 2550 2643 2768 2896 2986 D 3000 3077 3281 3472 3501 3512 3746 3991 E 4000 4096 4238 4301 4399 4496 4568 4987 F 5000 5026 5120 5233 5570 5893 5952 5999 G 6000 6050 6306 6336 6400 6656 6720 6912 H 7000 7056 7104 7201 7294 7587 7694 7898
Ruby
(.;- 12< 0 ~ K I 0
~r ')0 -,""
« - :r-g D>
""--T
~ 1- + T -
l <0 1-' -~ - ~ . .
...;
0 tJ , - .
Lapis Lazuli Emer aId Malachite 177411 (;i 0-
Finished Polyhedron 0
Po
" (0 Diamond /
Amethyst
For your convenience, Epyx, Inc. pennlts you to copy pages 34 and 35.
34

Trachyte/The Dark Side = North Pole Diamond/The Light Side = South Pole
;n I II ~ L-
<.::
~ LJ! <I)
."'" v Q) co
~ co T 0
u
Aquamarine Beryl Topaz
Quartz Diamond
~ ..c u o
~
o u u Z
Alabaster
35
Ochre
Deactivate the force field by setting switches in Graphite and in the complex on Malachite. As you approach the force field, shoot the extremely small laser guards. Ochre contains one of four switches you must throw to enter The Dark Side.
Drilling tip: Face west. B7, G7
Graphite
Find the pathway across the eastern end of the acid river. To cross, set your angle to gO degrees and your step size to 50.
Thrown in conJuction with the slab switch in Malachite, the small cube switch in Graphite turns off the force field in Ochre. Run into the cube switch to throw it.
Land the jet on the floating slab to make the slab disappear.
Line up odd-shaped objects as though in a gun sight. USing thIs alignment, shoot the wall to make a wall switch appear. Shoot the switch - It is among four you must activate to enter The Dark Side.
Drilling tip : Search under the slab. Face west. B4, G4
Trachyte - The Dark Side
To enter Trachyte, switches on Basalt, Ochre, and Graphite must be thrown and all 17 sectors must be cleared before setting the final switch on Obsidian. Throwing this switch disintegrates the northern wall of Obsidian.
On Trachyte, look at the generator from a gO-degree angle, so that only the left and bottom concentrator crystals and the main central crystal are Visible within the generator square. Shoot the bottom crystal followed by the central crystal, then shoot the right crystal. Finally, shoot the floor to destroy the generator.
After disintegrating the generator, walk Into the force field. Shuffie along the force field at a 45-degree angle facing left (as Viewed upon entry) to fmd its weak spot. When you can go no further, face forward again and move through the force field.
Now plant your last drtll rtg (face left: E6, G8) and celebralel Your daring actions, grace under pressure, and consummate engineering skills have saved your fellow Evathians from a ghastly, gaseous doom.
36
Case Report 4677-88
TO: Chief. LAPD FROM: A. J. Noodleman. Precinct Captain
Responding to your orders to solve L.A. Crackdown, we put our best resources to work. As you recommended. we locked Detectives Tang and Hall in interrogation cell W-24 with a PC, a microwave. 32 'IV dinners, a coffee machine. 87 packs of chewing gum. 20 legal pads, 185 pencils. and one copy of L.A. Crackdown. As you see by the information that follows, Hall and Tang managed to crack the case.
I recommend that Hall and Tang be promoted to SpeCial Agents/Narcotics Undercover Division. In addition, I suggest we deliver a copy of this report to Epyx, Inc., so THEY can get the solution out to the public. Maybe that will get people off our backs.
Tip 1 You can't break the case unless you discover distinct clues and pieces of evidence in the exact order in which they were created.
Tip 2 Guards turn vicious if they catch on to you. Lay low during the day and corne back to plant bugs and search for clues at night.
Tip 3 For Pete's sake, don't kill your rookie by making the guy work day and night. Time compression tires him out. Plant bugs. then go back to headquarters to wait around and let your rookie grab some Zs.
Tip 4 Doggone itl We find evidence, then it disappears I Don't let this happen to you. Photograph all physical evidence so it's around later when you want to review it.
Tip 5 Manage your bugs wisely. If you're not getting anything hot from a bug, pick it up and plant it in another room. After you've gotten good info from a bug, pocket the device so you're ready to plant it again.
Tip 6 Don't arrest anyone until you have an airtight case. And remember: go after the big fish, not the small fry.
37

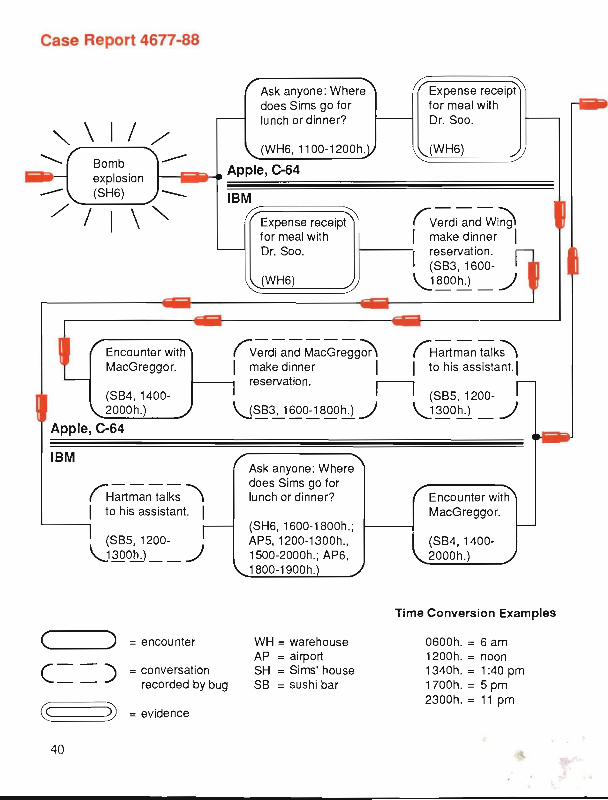
Case Report 4677-88
Assignment
(Pilot and Carmichae!\ I talk about Tuesday I I delivery. I I (IBM: WH2, I
1700-0200h.)
An encounter with any guard suggests something suspicious. (WH or AP)
r.------~
{ Hartman and a guard , talk about arrival of a
- - or - - -f----i Airport manager and
Rent receipt for hangar. WH6)
I Dolittle talk about hangar rent.
I (C-64, Apple: WH6, I ~ 700-0200h·L _ J
Case Notes
Examine boxes for counterfeit
Any guard says : Intruders will be shot! (WH or AP, 1700-0200h.)
You must encounter a guard, collect bugged information about the shipment, and see the bill of lading before you can search boxes for counterfeit computers. After you examine the boxes, collect information from your bug again. Go back to the ware house to check the rent receipt for the hangar. Then talk again with a guard and make a visit to the airport.
( ) = encounter
= conversation recorded by bug
cs= =:i) = evidence
38
WH = warehouse AP = airport SH = Sims' house SB = sushi bar
Time Conversion Examples
0600h. = 6 am 1200h. = noon 1340h. = 1:40 pm 1700h. = 5 pm 2300h. = 11 pm

ody of addict who tried to break in to find drugs. Search body for florist's receipt for gifts from Sims to
Gus Forman says: Lisa has info for you.
(C; from Lisa ;;;- "' I Sims, begging I
for drugs. (WH3,0600-1200h.,
\J. 400~600~ _ J (suspiCiOUS phone", I call: business is I
good. (SH1,2200-2300h.,
~500-0600~ _ J
Go to Sims' house to question Lisa. Lisa plays dumb.
(C-64, Apple: SH6, 2200-2400h.)
(IBM: SH6, 1200-1500h.)
Written memo from Sims, asking someone to take a pack-(C64, Apple : WH1 ,
1000-1200h., 1430-1600h.)
(Phon-;-conversa- "' I tion : Lisa swims I
every afternoon at home and is lonely.
age to Lisa at home. 1---__
(IBM: WH1 , 0600-0800h.,1000-1200h., 1400-1600h.)
Case Notes
(C-64, Apple : WH3)
(IBM: WH6)
At the airport, you discover a body. From the evidence you find on the body, you deduce that the addict worked for the florist. Plant bugs at WH3 and SH1 .
Bugged conversations reveal drug connections. Get over to Sims' house to question Lisa. Try to plant a bug before you leave.
Go back to the warehouse and talk to Gus Forman.
Get the info Lisa wants to tell you.
Back at the warehouse, search Sims' papers.
39
Case Report 4677-88
Ask anyone: Where does Sims go for lunch or dinner?
Expense receipt for meal with Dr. Soo.
80mb explosion
(WH6, 11 00-1200h.
r.--iiiiiliiit-.. Apple, C-64
(WH6)
--- (SH6) ___
/ \"
Encou nter with MacGreggor.
IBM -:::==========:;:-
Expense receipt for meal with Dr. Soo.
(WH6)
(verd~dWi~ , make dinner ,
r-----" reservation. (S83, 1600-
,-1800~ _ J
(Verdj;nd MaCGregg~ (Hartman t;lk;'\ , make dinner 'I to his assistant. I
1---"'1 reservation. r-------l (S84, 1400-2000h.)
Apple, C-64
IBM
(Hartma~lks " I to h is assistant. I
(S85, 1200-\J 300J!j __ J
( ) = encounter
= conversation recorded by bug
cs ~ = evidence
40
I I (S85, 1200-\jS8~1600-=.!. 800~ J '-1300~ _ J
Ask anyone: Where does Sims go for lunch or dinner?
(SH6, 1600-1800h.; AP5, 1200-1300h., 1500-2000h.; AP6, 1800-1900h.
WH = warehouse AP = airport SH = Sims' house S8 = sushi bar
Encounter with MacGreggor.
(S84, 1400-2000h.)
Time Conversion Examples
0600h. = 6 am 1200h. = noon 1340h. = 1 :40 pm 1700h. = 5 pm 2300h. = 11 pm

/-
.......,."" - Body of MacGreggor. :! Chem;cal analy,;, f-------i equipment.
(SB4)
computer disk labeled "Transmission Files/Hong Kong ." (SHS)
Encounter Verdi. He drops empty vials and runs. (C-64, Apple : WH1, 2400-0100h. on evennumbered days.) (IBM: APS, 1200-1300h. weekdays.)
" (WH1)
In living room after 2200h. Lisa confesses and is rubbed out. (SH6, 2200-2300h.)
Airline schedule and ticket to Hong Kong in Sims' name. (SHS)
Sims' attempted escape. You have 48 hours to arrest him.
Arrest Sims 1------1 with airtight case.
/';-----, ( Sims' house: Lisa ,
I
I
tells a friend she I watches TV every night after Sims goes to bed. I
l (SH6,0900-1100h.') '-!. ____ _ ;.;.v
(Dolitt;-warns Si~ I (C-64, Apple: SHS, I
1400-1600h.) I (IBM : SHS, 1400- I
1600h.; WH3, ~400-1600h .)_ ~
Cash in briefcase. (APS)
Case Notes
After you discover MacGreggor's body, check your SH6 bug.
After you find the computer disk, use time compress, go to HQ and rest until 2200 hours. Then go back to Sims' house to encounter Lisa.
Plant a bug at Sims' house. Then go to HQ and rest while your bug picks up info about Sims. Return to Sims' house to do a search.
Remember: Sims loves raw fish. Don't let that weasel escape!
41

SUBBATrLE ®
S I ~I l' L .\ T () I{
Dear Gordon Walton,
I am an owner of your Sub Battle Simulator . .. Let me say that I thoroughly enjoy the simulation and have spent many delightful and relaxing hours pitting my skills and judgment against its predominately accurate scenarios .
. . . I retired from the U.S. Navy in 1980 after 26 years of service, 23 of which were in the Submarine Force. I served on one destroyer, two diesel submarines, five nuclear submarines (in command of two) and a submarine tender (in command). Sub Battle allows me to vicariously return to some adventurous memories and I appreciate its high degree of realism and challenge .. .
Sincerely, George M. Henson Captain, U.S. Navy (ReL)
Whether you're an expertenced commander like Captain Henson, or don't know port from starboard, Sub Battle Simulator lets you step back into history to log as many hours of wartime command as you can handle.
And that's exactly what Gordon Walton, developer of Sub Battle Simulator, hoped for when he set a crew of researchers and programmers loose on the annals of American and German naval history. Fed by action reports from the U.S. Naval Archives, sub logbooks, design plans, and many other histortcal accounts, the research consumed over 500 hours in an etTort to provide the painstakingly accurate basis for each of the game's 60 wartime missions and campaigns.
"Many simulation games fake stuff - for example, how a vehicle moves," Gordon relates. 'We modeled multiple parameters - speed of dive. surface. oxygen and fuel capacities - for six types of subs," he explains. In addition, an "artificial Intelligence" conditioned-response system was developed to sift through the 80 to 100 factors invoked by the player's sub activity so that the proper enemy responses can occur.
42

'We're trying to make the enemy act appropriately, based on what he knows about your position, Say he might see the wake of your torpedo. He can get a fIx on your direction. If he sees your periscope, he knows your location. Distance plus speed plus time of day all factor into how he responds. If you had a night attack on a convoy of sixteen ships maintaining radio silence and spread across twenty-five miles, it would take a while before the farthest ships would be signaled about the attack and could respond," Gordon describes.
So the more you know about the enemy, and for that matter your own sub, the more successful your campaigns, Gordon counsels. He cites the Grayling and Tambor Battle of Midway missions of May 29, 1942 as the toughest challenges, because ammunition is limited and the Japanese ships can move faster than the American sub. But the Atlantic theater too holds its challenges. "If you can't play the German campaign at level three or four, you're not tough," Gordon says.
Toughness aside, we got as many tips as possible from Gordon, to give a bit of encouragement to those of you who may have only one or two years logged in at the helm of a battling sub. Don't let these tactics fall into the wrong hands.
Loose lips sink ships.
Tactics for Wartime Engagements 1. Try to get In the path of the convoy and submerge with periscope hidden, except
for occasional quick spotting of the enemy.
2. If the ship name is shown, the Target Data Computer (IDC) has calculated the appropriate gyro angle for the torpedo, so you don't need to lead the target.
3. If you want to sink all ships, engage the armed escorts fIrst. All other ships are lightly armed and most are slower than your top speed, so surface and use your deck gun after the escorts are taken out.
4. Uyou want to damage some battleships and/or carriers, but the convoy has too many escorts, fire your torpedoes then immediately dive to maximum depth and engage Silent Running to creep away.
If an escort locks onto you with active sonar Ooud pings), steer away from the circle he makes over you, keeping your profile as small as possible. Do not stop dead In the water, as the escort has a fIx on you and a depth charge hit will be fatal! Change depth by at least 60 feet every time you get a "depth charge splashes" warning to Increase your chances of escaping unharmed, since depth charges are set to explode at the depth of the enemy's last active sonar reading .
. . 43

5. Surface attacks are recommended for moonless nights, and only at lower levels of play, unless all nearby warships are sunk.
6. During a campaign, save your game after each mission! Otherwise you might be destroyed after investing hours in a number of missions and not have a saved game to return to. Saving your game also lets you return to a saved mission to try out different tactics.
Tips for Practice Mode
1. Use your mines as offensive weapons by sowing a mine field in the enemy's path. Then maneuver about 2,000 feet further from approaching ships, keeping the mine field between you and the convoy. If you attack. the ships will try to charge at you or escape, most likely heading straight into your mines!
2. Alert escorts by firing on the aircraft carrier. After sinking the carrier, dive and practice evading depth charges and breaking contact with the enemy.
Classic Sub Commander Tactics This section describes several standard scenarios for approaching, attacking, and fleeing enemy vessels. Battle situations may not occur exactly as shown in the illustrations, since Sub Battle Slmulator depends on your actions to plot an enemy response that is unique to each mission. Study these examples to improve your skills as a master tactician.
Daylight, Surface Attack
You're the bait! An escort, three merchantmen, and a transport are heading straight for your control station. Once they sight you (if they haven't already) you're guaranteed to have a fight on your hands.
44

Attock Strategy
If you are using time compress, slow down to 1 second = 30 seconds. Set a course of approximately 85 degrees to their target route to get in pOSition for a broadside attack. As you maneuver to fIring position, take care not to swing out of fIring range, or you'll lose the offensive along with the enemy. Once at the frring point, wait until two ships present an overlapping target - that way if you miss one ship, you'll hit another. Shoot as many torpedoes as possible before the enemy has time to turn and face you. Polish off the escort frrst - it is your only armed aggressor. Then sink as many other enemy ships as possible.
Escape Route
If you've sustained damage and think the escort is still active, break away fast, getting as much distance as possible between you and the escort.
Strike-and-Flee Surface Attack
You sight the tall end of a convoy, in this case consisting of a tanker and two des troyers. You want to fire on the tanker without drawing fire from the destroyers.
Attock and Escape Strategy
Timing is everything. Approach the convoy slowly at a gO-degree angle, maintaining as much distance as possible from the destroyers as you wait for them to pass. Fire your torpedoes at the trailing tanker then quickly break off your attack before the enemy can tum and return fire. If your timing is less than perfect on the attack approach, submerge and escape.
•
' ..
-Convo y Route
~ I 7 .. \ I I
~~~,' \~"p,
1 Approach i
45

Surface/Submerged Attack
While submerged, you catch sIght of a convoy of two merchantmen, one destroyer, one tanker, and a transpOrt, traveling faster than your top submerged speed. You particularly want to pick otT that tanker and transport!
AHack Strategy
Remain submerged until you're out of visual range of the convoy, then surface to run at your top speed. Stay out of visual range (l0,000 to 12,000 yards) and chase the convoy along its route, traveling in an arc toward the fITing point. Let the speed of the convoy detennine the shape of your arc. Your goal is a gutsy one - get directly in front of the oncoming ships and fITe. Once you're at the firing point. submerge then time compress to either 1 second = 5 seconds or 1 second = 30 seconds to get the best control of the timing for your attack. When the convoy moves Into range, fire straight on. Surface briefly and use your deck gun to obliterate any damaged ships.
Keep a wary eye out for the destroyer: although It may be damaged, it can still fire and sink you. The more 1nJtlal damage you can inllict with your torpedoes, the fewer deck gun rounds it takes to sink the destroyer.
- .-._.- Submerged Run ----- Surface Run
Atta ck Route
I~K~
12 ,000 Yds.
" h
~'==+:""'--I.~ .... Con voy Rou te
46
Firing Point
. .
~
•