EPSON Network Configuration Guide · 2019-06-12 · Connection settings for connecting to computer...
108
Network Configuration Guide © 2013 Seiko Epson Corporation. All rights reserved.
Transcript of EPSON Network Configuration Guide · 2019-06-12 · Connection settings for connecting to computer...

Network Configuration Guide
© 2013 Seiko Epson Corporation. All rights reserved.

Contents
Before completing settings 5
Network settings configuration ................................................... 5Wireless LAN connection ................................................................................................................6
Wired LAN connection .....................................................................................................................8
Selecting a connection method ................................................... 9
Connection settings for connecting to computer 11
Setting up a wireless LAN connection (Infrastructure Mode) ................................................................11Configuring settings for a wireless LAN using automatic push button
configuration (WPS) ................................................................................................................12
Wireless LAN settings using a PIN code (when automatically acquiring the IP address from the printer) ..........................................................................................20
Configuring settings for a wireless LAN manually ..............................................................27
Setting up a wireless LAN connection (Simple AP Mode) .....39Configuring settings for a wireless LAN in Simple AP Mode
using automatic push button configuration (WPS) .....................................................40
Configuring settings for a wireless LAN in Simple AP Mode manually .......................48
How to disconnect the printer from Simple AP Mode ......................................................54
Configuring settings for a wired LAN connection ..................55Setting the IP address for the printer manually ...................................................................61

Contents
Connecting from a portable terminal 64
Epson iLabel application for portable terminals ....................64
Connecting to a printer from a portable terminal such as a smartphone or tablet ...............................................66
Adding a second computer or portable terminal 67
Adding a computer .......................................................................67
Adding a terminal such as a smartphone or tablet ................71
Checking/changing the printer network settings 72
How to check the network settings on the printer alone .....72
How to check from a computer ..................................................74Network settings details that can be checked/changed .................................................77
Sending the network settings to the printer ........................................................................88
Initializing the Network Settings 89
Contents
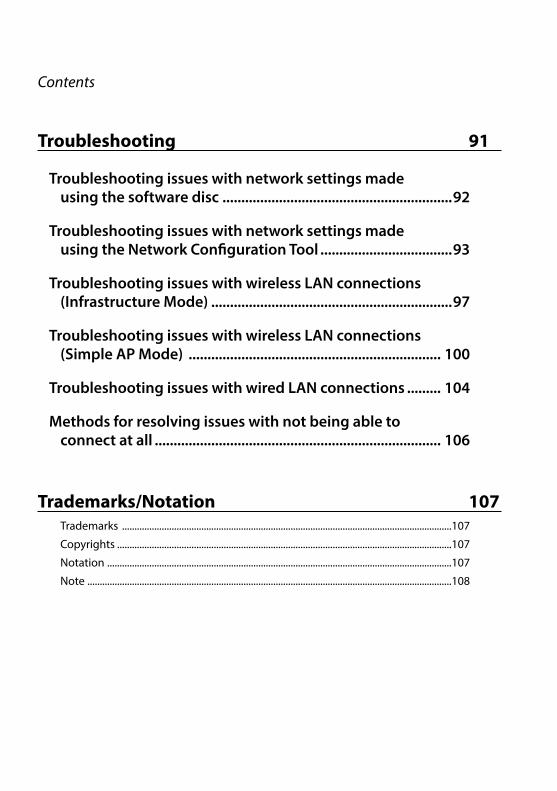
Troubleshooting 91
Troubleshooting issues with network settings made using the software disc .............................................................92
Troubleshooting issues with network settings made using the Network Configuration Tool ...................................93
Troubleshooting issues with wireless LAN connections (Infrastructure Mode) ................................................................97
Troubleshooting issues with wireless LAN connections (Simple AP Mode) ................................................................... 100
Troubleshooting issues with wired LAN connections ......... 104
Methods for resolving issues with not being able to connect at all ............................................................................ 106
Trademarks/Notation 107Trademarks .....................................................................................................................................107
Copyrights .......................................................................................................................................107
Notation ...........................................................................................................................................107
Note ...................................................................................................................................................108

5
Before completing settings
Network settings configuration
ImportantWhile installing the printer driver or other software, do not connect a network cable, a USB cable, or any other connection cable to the printer until you are instructed to do so.
This printer is compatible with the below types of network connections. Choose whichever one you want to connect to.
• Wireless LAN (Infrastructure Mode)
• Wireless LAN (Simple AP Mode)
• Wired LANNote that wireless LAN connections, wired LAN connections, and USB connections can be used together at the same time in any combination.
ImportantIf there are multiple computers and printers connected together, the connection method by which printing data is first sent is given first priority, regardless of the connection method used including USB connections. Try printing again if an error message appears.
Memo
This document lists network connection methods for connecting computers and printers together using the Windows operating system. If using the Mac OS X operating system, refer to the "Label Editor Lite for Macintosh User's Guide."

6
Before completing settings
Wireless LAN connectionThere are two types of wireless LAN connections available, one of which uses an access point to connect and the other which does not. Select the connection method that best matches your network environment.
�When using an access point (Infrastructure Mode)Infrastructure Mode is a communications mode that connects through a commercial access point, broadband router, or similar tool. Users connect via access points, which allows them to set up the computer and printer separately in different areas.
There are two configuration methods available, an automatic configuration method set up using Wi-Fi Protected Setup (WPS) and a manual configuration method.
Memo
With Wi-Fi Protected Setup (WPS), there are a wireless LAN configuration method, a pushbutton method, and a PIN code method available that are certified by the Wi-Fi Alliance, an association that promotes wireless LAN technology.
The lamp lights up when the printer is in Infrastructure Mode and connected to a wireless LAN.
Button
Lamp Lamp

7
Before completing settings
�When not using an access point (Simple AP Mode)In this mode, a computer, Smartphone, or other device communicates directly with the printer via a wireless connection without using an access point.
The below conditions must be met before this connection mode can be used.• The computer or portable terminal to be connected is set up for wireless LAN and the
wireless LAN switch is turned on
• The computer is not connected to a wireless LAN
• The computer is set up to acquire an IP address automaticallyThe lamp is turned on when the printer is configured for Simple AP Mode.
Button
Lamp Lamp
Important• Up to four devices can be connected at the same time with connections using
Simple AP Mode. You will not be able to connect a fifth or subsequent device if there are already four devices connected.
• You will not be able to connect to any devices connected to units other than the printer or to the Internet while connected to the printer. Your Internet connection will be disconnected when you run this configuration.
• The security mode is fixed to WPA2-PSK (AES).

8
Before completing settings
Wired LAN connectionThis method allows users to connect to the printer via a hub, router, or similar device using a wired cable.

9
Before completing settings
Selecting a connection methodSelect the method that best matches your system environment. If not sure which connection method to use, use the below flowchart to guide you through the available selections.
Can the computer be connected to the Internet?
No
Does the computer come with a wireless LAN function?
Yes
You can use a Wireless LAN (Simple AP Mode) connection.Check the next page for connection procedures.
Î Setting up a wireless LAN connection (Simple AP Mode) (p. 39)
Yes
No
You can use a USB connection.Check the manual provided with each product.
Is there a broadband router or access point available and does the computer have a wireless LAN function?
No
Is there an LAN cable connected to the computer? Yes
You can use a Wired LAN connection. Check the next page for connection procedures.
Î Configuring settings for a wired LAN connection (p. 55)
Yes
You can use a Wireless LAN (Infrastructure Mode).
Do you want to use automatic configuration for the access point?
Yes
Is the access point compatible with automatic configuration using the WPS button?
Yes
Check the next page for connection procedures.
Î Configuring settings for a wireless LAN using automatic push button configuration (WPS) (p. 12)
No
No
Check the next page for manual configuration procedures.
Î Configuring settings for a wireless LAN manually (p. 27)
Check the next page if the access point is compatible with automatic configuration using a PIN code.
Î Wireless LAN settings using a PIN code (when automatically acquiring the IP address from the printer) (p. 20)
10
Before completing settings
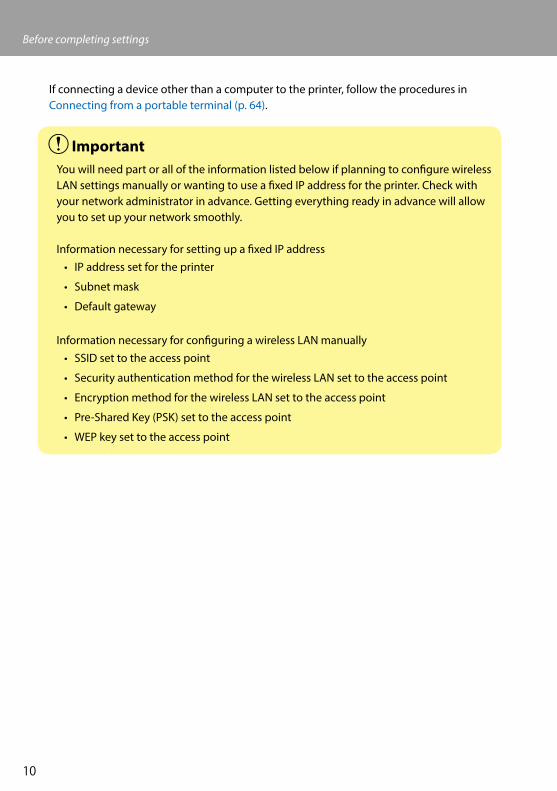
If connecting a device other than a computer to the printer, follow the procedures in Connecting from a portable terminal (p. 64).
ImportantYou will need part or all of the information listed below if planning to configure wireless LAN settings manually or wanting to use a fixed IP address for the printer. Check with your network administrator in advance. Getting everything ready in advance will allow you to set up your network smoothly.
Information necessary for setting up a fixed IP address• IP address set for the printer
• Subnet mask
• Default gateway
Information necessary for configuring a wireless LAN manually• SSID set to the access point
• Security authentication method for the wireless LAN set to the access point
• Encryption method for the wireless LAN set to the access point
• Pre-Shared Key (PSK) set to the access point
• WEP key set to the access point

11
Connection settings for connecting to computerUse the DVD-ROM that came with the printer to configure the connection settings for connecting to computer. Insert the DVD-ROM into the disc drive on the computer, and follow the instructions on screen to install the printer driver and configure the network settings. There are three different methods available for connecting to a computer, which are listed below. Select the method that best matches your system environment.
ImportantWhile installing the printer driver or other software, do not connect a network cable, a USB cable, or any other connection cable to the printer until you are instructed to do so.
Memo
The network settings can be checked and changed later on. For details, check the page listed below.
Î Checking/changing the printer network settings (p. 72)
Setting up a wireless LAN connection (Infrastructure Mode)
Here, a description will be provided of the method for setting up a wireless LAN connection in Infrastructure Mode. Select one of the below methods for configuring the settings.
Î Configuring settings for a wireless LAN using automatic push button configuration (WPS) (p. 12)
ÎWireless LAN settings using a PIN code (when automatically acquiring the IP address from the printer) (p. 20)
Î Refer to the “Memo“ in Configuring settings for a wireless LAN using automatic push button configuration (WPS) (p. 12)
Î Configuring settings for a wireless LAN manually (p. 27)
ImportantIn order for wireless LAN settings to be configured, the computer needs to be connected to a wireless LAN device such as an access point or router.

12
Connection settings for connecting to computer
Configuring settings for a wireless LAN using automatic push button configuration (WPS)
This configuration method can be selected when a WPS-enabled access point is used and other wireless devices (handsets) are set using the WPS button. Press the button on the back of the printer and the WPS button on the access point to start communications between the printer and access point and to trigger the necessary network settings to configure automatically. Other wireless devices (handsets) will also need to be set using the WPS button in order to enable this method to be used.
WPS
button
Memo
When configuring the wireless LAN settings, set the computer, printer, and access point up nearby to make it easier to run them as you will need to use all three to complete the procedures.
Insert the included DVD-ROM into the disc drive on the connected computer. Follow the instructions on screen to proceed.
1.

13
Connection settings for connecting to computer
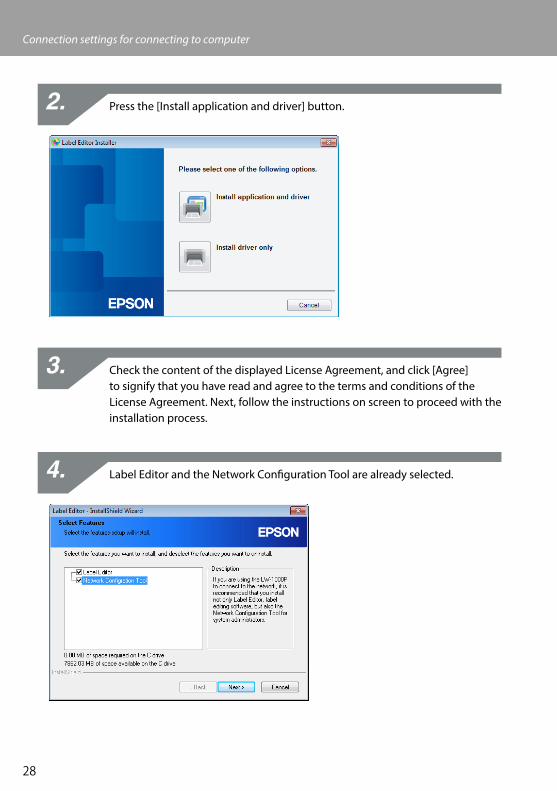
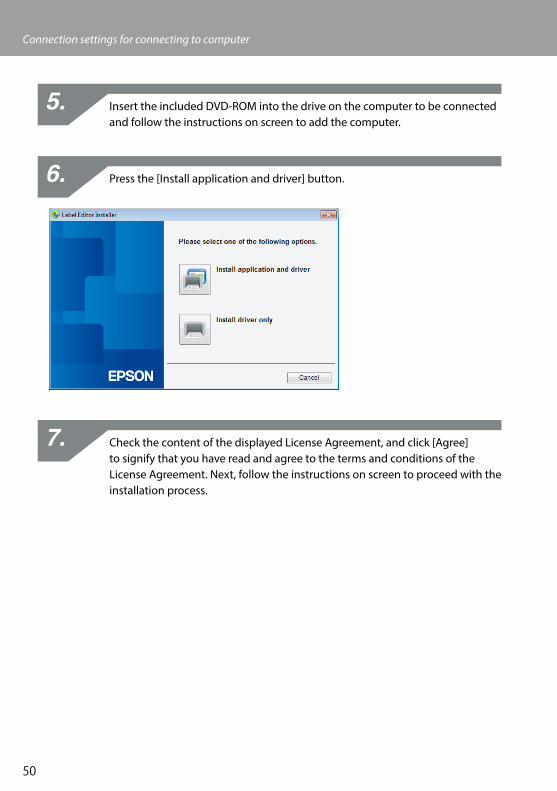
Press the [Install application and driver] button.
Check the content of the displayed License Agreement, and click [Agree] to signify that you have read and agree to the terms and conditions of the License Agreement. Next, follow the instructions on screen to proceed with the installation process.
Label Editor is already selected. Install the Network Configuration Tool if needed.
2.
3.
4.
14
Connection settings for connecting to computer
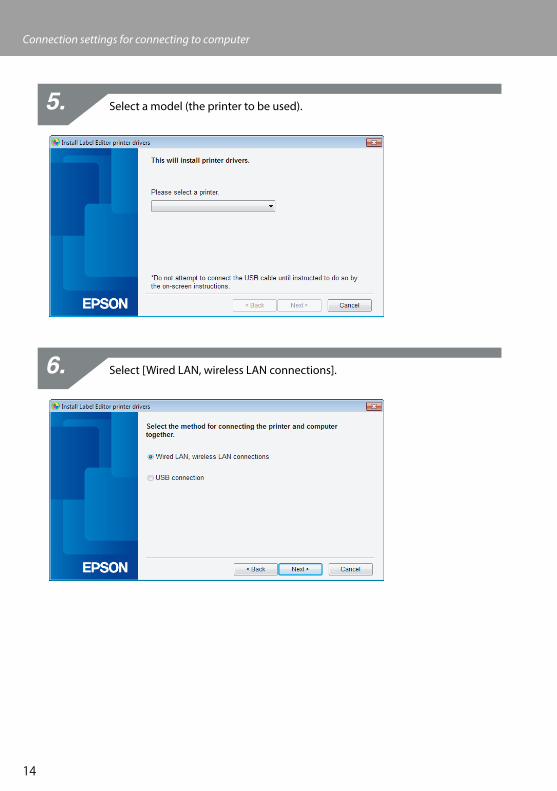
Select a model (the printer to be used).
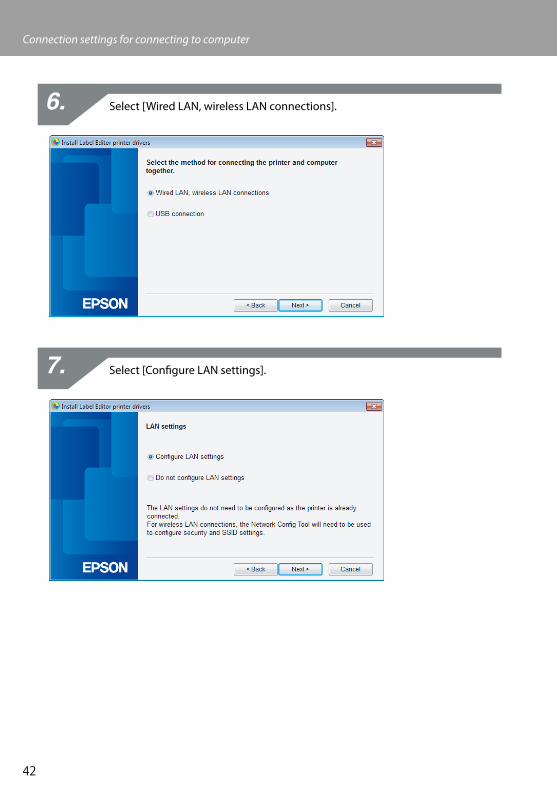
Select [Wired LAN, wireless LAN connections].
5.
6.
15
Connection settings for connecting to computer
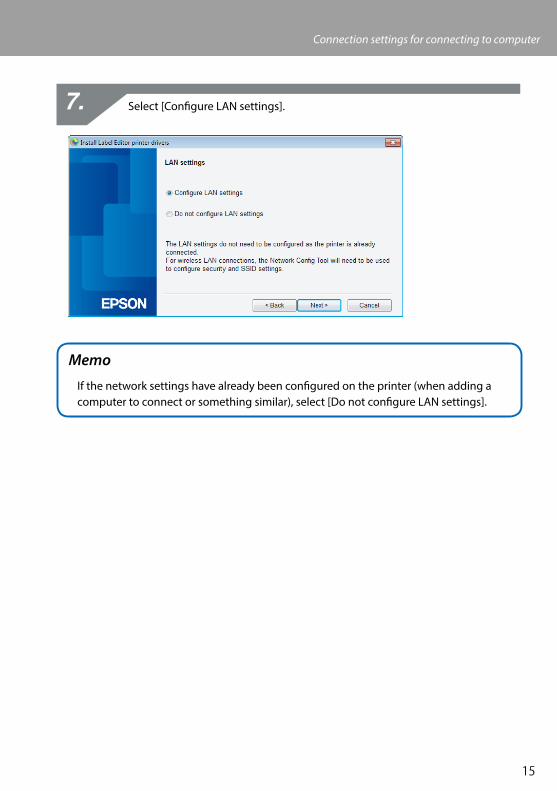
Select [Configure LAN settings].
Memo
If the network settings have already been configured on the printer (when adding a computer to connect or something similar), select [Do not configure LAN settings].
7.

16
Connection settings for connecting to computer
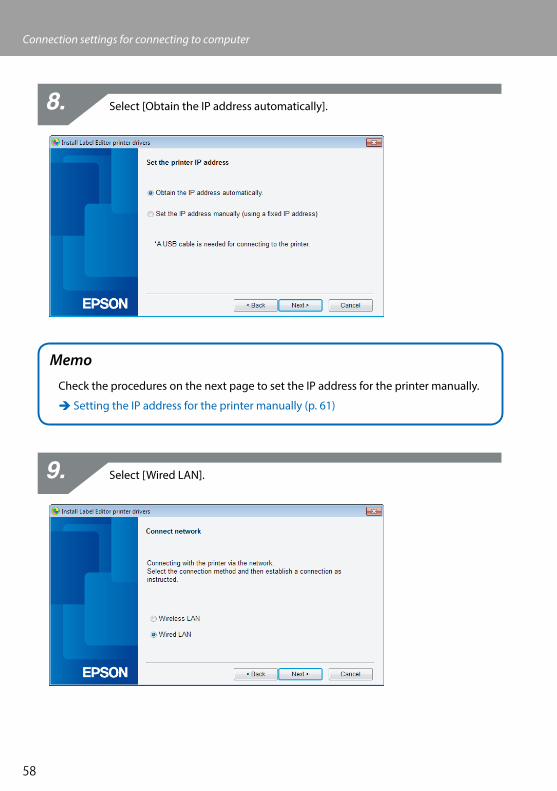
Select [Obtain the IP address automatically].
Memo
Check the procedures on the next page to set the IP address for the printer manually.
Î Refer to the “Memo“ in Wireless LAN settings using a PIN code (when automatically acquiring the IP address from the printer) (p. 20)
Select [Wireless LAN].
8.
9.

17
Connection settings for connecting to computer
With the network cable and USB cable left unconnected, turn on the power to the printer.
Press the button repeatedly to scroll through the printer connection modes until you get to Infrastructure Mode.
Button
Lamp Lamp
Memo
Press the button to switch the printer mode to Infrastructure Mode, which will
cause the lamp to start flashing.
You can also check the printer connection mode by printing out the network status from the printer. Check the next page for details.
ÎHow to check the network settings on the printer alone (p. 72)
10.
18
Connection settings for connecting to computer
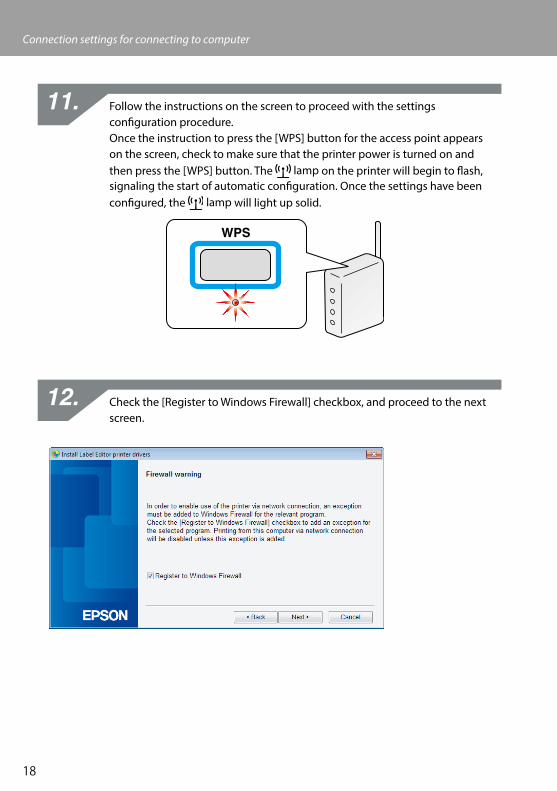
Follow the instructions on the screen to proceed with the settings configuration procedure. Once the instruction to press the [WPS] button for the access point appears on the screen, check to make sure that the printer power is turned on and then press the [WPS] button. The lamp on the printer will begin to flash, signaling the start of automatic configuration. Once the settings have been configured, the lamp will light up solid.
Check the [Register to Windows Firewall] checkbox, and proceed to the next screen.
11.
12.

19
Connection settings for connecting to computer
The installer will search the network and display a list of printers that are connected to the network. Select the printer to be used.
Memo
• The printer will appear once the network settings have been configured. Try completing the following procedures if the printer fails to show up:
If the IP address was set manually: Press the [Restart the search using a specified IP], and input the specified IP address on the screen that appears.
If the IP address was obtained automatically: Press the [Search again] button.
If the printer still fails to appear even after you have completed the above, it indicates that the printer network settings have not been configured completely. Try starting over from the beginning.
• Searches made using the [Search again] button will only be performed within the same network segment. To connect to a printer in a network segment outside of the range of the router, check the IP address of the printer that you wish to connect to and try searching again using [Restart the search using a specified IP].
If you follow the instructions shown on screen to continue configuring the settings, the network printer driver will begin installing. The settings configuration process will finish when the installation is completed.
Print a test page from the Label Editor to check to ensure that the printer is running correctly. For details, check the Label Editor User's Guide.
13.

20
Connection settings for connecting to computer
Wireless LAN settings using a PIN code (when automatically acquiring the IP address from the printer)
This configuration method can be selected if the access point used is compatible with a WPS PIN code input method. The description here lists procedures for when the IP address for the printer is to be acquired automatically. After the network settings have been configured for the printer and access point, install the printer driver and other necessary software, if any, using the included DVD-ROM.
Memo
• A PIN code issued by an access point cannot be registered and set for a printer.
• For details on how to register a PIN code to an access point, refer to the manual for the access point.
• When configuring the wireless LAN settings, set the computer, printer, and access point up nearby to make it easier to run them as you will need to use all three to complete the procedures.
• To set the IP address on the printer manually, refer to Configuring settings for a wireless LAN manually (p. 27) to configure the network settings on the printer and then complete the below procedures starting from Step 1 to set the IP address.
ImportantIf planning to configure the settings automatically using a PIN code, use the included tape cartridge to print the PIN code out from the printer.

21
Connection settings for connecting to computer
Insert a tape cartridge into the printer, and turn on the power.
Press and hold down the button located on the back of the printer for at least 3 seconds. The lamp will begin flashing, and the [PIN code] will then be printed out from the printer.
ImportantThe PIN code cannot be printed out in any other mode except for Infrastructure Mode.
If unable to print out the PIN code, press the button repeatedly to scroll through the printer connection modes until you get to Infrastructure Mode. You can confirm that
the printer is set to Infrastructure Mode by whether the lamp is flashing. You can also check by printing out the network status. Check the next page for details on how to print out the network status.
ÎHow to check the network settings on the printer alone (p. 72)
1.
2.

22
Connection settings for connecting to computer
Register the PIN code to the access point while the lamp is still flashing. The lamp will light up solid as soon as the connections to and settings for the
access point have been completed.
ImportantIf the lamp is turned off, it indicates that the network settings have not been configured properly. Return to Step 2 to try configuring the network settings.
Insert the included DVD-ROM into the disc drive on the connected computer. Follow the instructions on screen to proceed.
Press the [Install application and driver] button.
Check the content of the displayed License Agreement, and click [Agree] to signify that you have read and agree to the terms and conditions of the License Agreement. Next, follow the instructions on screen to proceed with the installation process.
3.
4.
5.
6.

23
Connection settings for connecting to computer
Label Editor is already selected. Install the Network Configuration Tool if needed.
Select a model (the printer to be used).
7.
8.

24
Connection settings for connecting to computer
Select [Wired LAN, wireless LAN connections].
Select [Do not configure LAN settings].
9.
10.

25
Connection settings for connecting to computer
Check the [Register to Windows Firewall] checkbox, and proceed to the next screen.
11.

26
Connection settings for connecting to computer
The printer set to the PIN code will appear on the screen. Select this printer to proceed.
Memo
• The printer will appear once the network settings have been configured. If the printer fails to appear, press the [Search again] button to try again. If the printer still fails to appear even after you have completed the above, it indicates that the printer network settings have not been configured completely. Try starting over from the beginning.
• Searches made using the [Search again] button will only be performed within the same network segment. To connect to a printer in a network segment outside of the range of the router, check the IP address of the printer that you wish to connect to and try searching again using [Restart the search using a specified IP].
If you follow the instructions shown on screen to continue configuring the settings, the network printer driver will begin installing. The settings configuration process will finish when the installation is completed.
Print a test page from the Label Editor to check to ensure that the printer is running correctly. For details, check the Label Editor User's Guide.
12.

27
Connection settings for connecting to computer
Configuring settings for a wireless LAN manuallyThis is a configuration method in which all information needed to configure a wireless LAN connection is input manually.
Install the Network Configuration Tool using the included DVD-ROM. Next, connect the printer to a computer with a USB cable, configure the necessary network settings, and then install the network printer driver using the DVD-ROM again.
ImportantPart or all of the below information will be needed to configure wireless LAN settings manually. Check with your network administrator in advance.
Information necessary for setting up a fixed IP address• IP address set for the printer
• Subnet Mask
• Default Gateway
Information necessary for configuring a wireless LAN manually• SSID set to the access point
• Security authentication method for the wireless LAN set to the access point
• Encryption method for the wireless LAN set to the access point
• Pre-Shared Key (PSK) set to the access point
• WEP key set to the access point
Insert the included DVD-ROM into the disc drive on the connected computer. Follow the instructions on screen to proceed.
1.
28
Connection settings for connecting to computer
Press the [Install application and driver] button.
Check the content of the displayed License Agreement, and click [Agree] to signify that you have read and agree to the terms and conditions of the License Agreement. Next, follow the instructions on screen to proceed with the installation process.
Label Editor and the Network Configuration Tool are already selected.
2.
3.
4.

29
Connection settings for connecting to computer
Select a model (the printer to be used).
Select [USB connection].
Memo
The USB printer driver will need to be installed before you can use the Network Configuration Tool. Select [USB connection] and install the USB printer driver.
5.
6.

30
Connection settings for connecting to computer
Follow the instructions on the screen to install the USB printer driver.
Memo
Follow the instructions shown on the screen to connect the computer and printer together using a USB cable.
Close the installer once you have finished installing the USB printer driver.
Start up the Network Configuration Tool. Click [Start] - [All Programs] (or [Programs]) - [EPSON] - [PrinterConfigTool] - [Network Config Tool], in the order given.
7.
8.
9.

31
Connection settings for connecting to computer
Select a printer.
Memo
The USB printer driver may not be installed correctly if the printer fails to appear. Try reinstalling the USB printer driver starting from the beginning of the installation procedures.
10.
32
Connection settings for connecting to computer
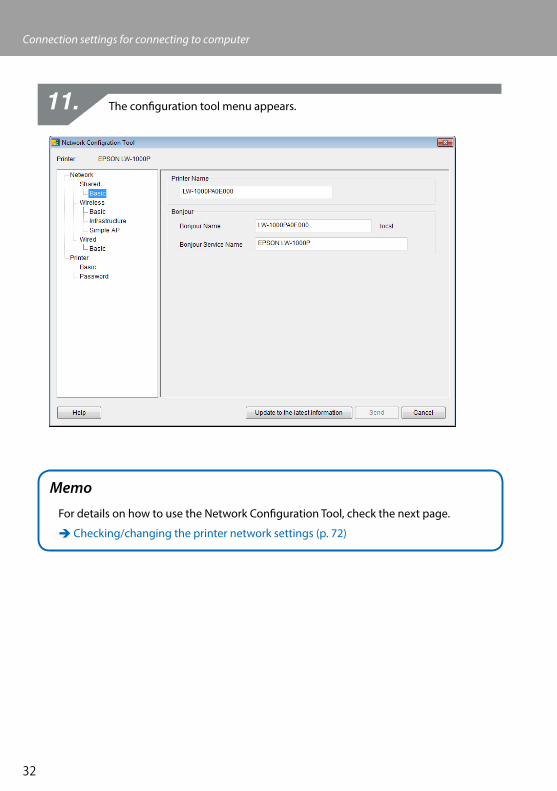
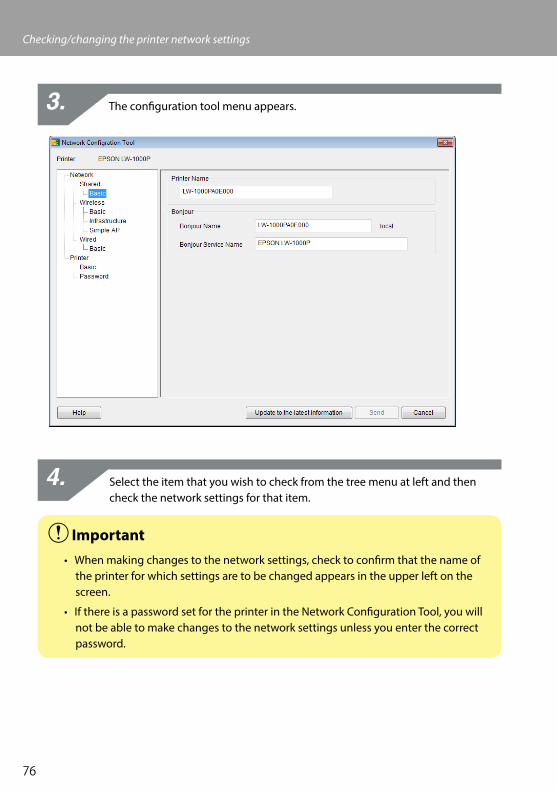
The configuration tool menu appears.
Memo
For details on how to use the Network Configuration Tool, check the next page.
Î Checking/changing the printer network settings (p. 72)
11.

33
Connection settings for connecting to computer
Select [Network] - [Wireless] - [Basic] from the tree menu at left and then select [Infrastructure] from the [Communication Mode] that appears at right.
ImportantDo not press the [Send] button until explicitly instructed to do so in the procedures listed in this manual.Wait until all settings have been configured and then press the [Send] button to send the setting details to the printer.
12.

34
Connection settings for connecting to computer
Enter the network settings information that you have prepared in advance.
Memo
• Check to make sure that all necessary settings have been entered correctly.
• Press the [Select an SSID] button to pull up the SSID for the wireless LAN detected by the printer. You will then be able to select the desired SSID, if the one you want is listed.
13.
35
Connection settings for connecting to computer
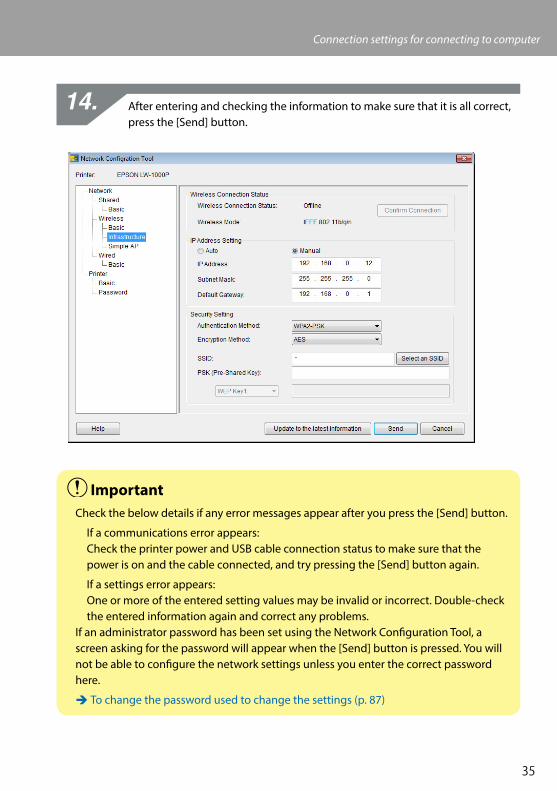
After entering and checking the information to make sure that it is all correct, press the [Send] button.
ImportantCheck the below details if any error messages appear after you press the [Send] button.
If a communications error appears: Check the printer power and USB cable connection status to make sure that the power is on and the cable connected, and try pressing the [Send] button again.
If a settings error appears: One or more of the entered setting values may be invalid or incorrect. Double-check the entered information again and correct any problems.
If an administrator password has been set using the Network Configuration Tool, a screen asking for the password will appear when the [Send] button is pressed. You will not be able to configure the network settings unless you enter the correct password here.
Î To change the password used to change the settings (p. 87)
14.

36
Connection settings for connecting to computer
Press the [Update to the latest information] button to upload the information sent to the printer, and check to make sure everything is set correctly.
Press the [Cancel] button to exit the Network Configuration Tool. Disconnect the USB cable from the printer and computer.
Run the installer from the DVD-ROM once again. Double-click on the Setup.exe located on the DVD-ROM as checked in Explorer.
15.
16.
17.

37
Connection settings for connecting to computer
Follow the instructions shown on the screen to proceed unitl the next screen appears. Once the screen appears, select [Wired LAN, wireless LAN connections].
Select [Do not configure LAN settings].
18.
19.

38
Connection settings for connecting to computer
Select the printer to be used.
Memo
• The printer will appear once the network settings have been configured.
When the IP address for the printer is set to be acquired automatically: If the printer fails to appear, press the [Search again] button to try again.
When the IP address for the printer is set to be fixed: Press the [Restart the search using a specified IP], and input the specified IP address.
If the printer still fails to appear even after you have completed the above, it indicates that the printer network settings have not been configured correctly. Try starting over from Step 9.
• Searches made using the [Search again] button will only be performed within the same network segment. To connect to a printer in a network segment outside of the range of the router, check the IP address of the printer that you wish to connect to and try searching again using [Restart the search using a specified IP].
If you follow the instructions shown on screen to continue configuring the settings, the network printer driver will begin installing. The settings configuration process will finish when the installation is completed.
Print a test page from the Label Editor to check to ensure that the printer is running correctly. For details, check the Label Editor User's Guide.
20.

39
Connection settings for connecting to computer
Setting up a wireless LAN connection (Simple AP Mode)
Here, a description will be provided of the method for setting up a wireless LAN connection in Simple AP Mode. The below conditions must be met before this connection mode can be used.
• The computer or phone to be connected is set up for wireless LAN and the wireless LAN switch is turned on
• The computer is not connected to a network through a wireless LAN.
• The computer or phone is set up to acquire an IP address automatically
There are two methods available for configuring settings for a wireless LAN in Simple AP Mode, as described below. First, try to configure the settings using the push button. If that does not work to connect the printer, next try to configure the settings manually.
Î Configuring settings for a wireless LAN in Simple AP Mode using automatic push button configuration (WPS) (p. 40)
Î Configuring settings for a wireless LAN in Simple AP Mode manually (p. 48)
Important• Up to four devices can be connected at the same time with connections using
Simple AP Mode. You cannot connect a fifth or subsequent device.
• You cannot connect devices other than a printer or connect to the Internet. Your Internet connection will be disconnected when you run this configuration.
• The security mode is fixed to WPA2-PSK (AES).

40
Connection settings for connecting to computer
Configuring settings for a wireless LAN in Simple AP Mode using automatic push button configuration (WPS)
Insert the included DVD-ROM into the drive on the computer to be connected and follow the instructions on screen to add the computer.
Press the [Install application and driver] button.
Check the content of the displayed License Agreement, and click [Agree] to signify that you have read and agree to the terms and conditions of the License Agreement. Next, follow the instructions on screen to proceed with the installation process.
1.
2.
3.

41
Connection settings for connecting to computer
Label Editor is already selected. Install the Network Configuration Tool if needed.
Select a model (the printer to be used).
4.
5.
42
Connection settings for connecting to computer
Select [Wired LAN, wireless LAN connections].
Select [Configure LAN settings].
6.
7.

43
Connection settings for connecting to computer
Select [Wireless LAN].8.
44
Connection settings for connecting to computer
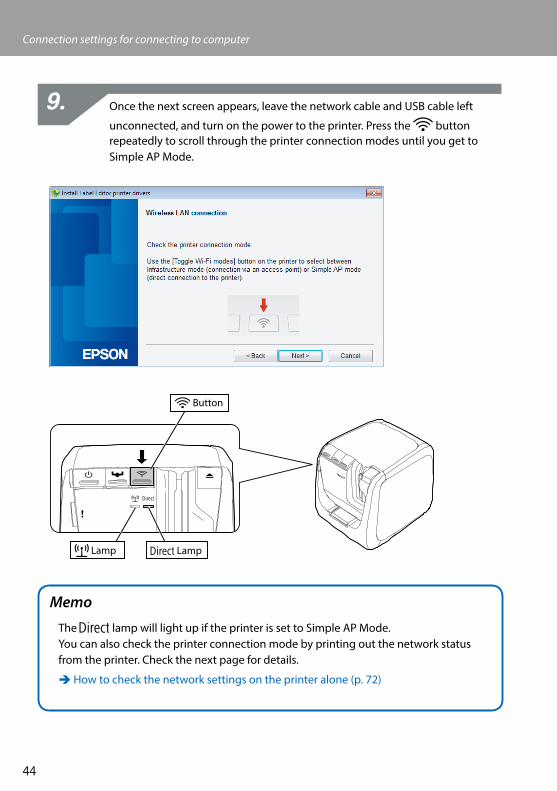
Once the next screen appears, leave the network cable and USB cable left
unconnected, and turn on the power to the printer. Press the button repeatedly to scroll through the printer connection modes until you get to Simple AP Mode.
Button
Lamp Lamp
Memo
The lamp will light up if the printer is set to Simple AP Mode.You can also check the printer connection mode by printing out the network status from the printer. Check the next page for details.
ÎHow to check the network settings on the printer alone (p. 72)
9.

45
Connection settings for connecting to computer
Follow the instructions on the screen to proceed with the settings configuration procedure. Once the instruction to press the button on the printer appears on the screen, check to make sure that the printer power is turned on and then press the button. The lamp on the printer will begin to flash, signaling the start of automatic configuration.
Click the Network Connection icon on the taskbar on your computer, and select the connection with the same SSID for the network status information. The printer and computer will communicate with each other to configure the settings. Once the settings have been configured, the lamp on the printer will light up.
10.
11.

46
Connection settings for connecting to computer
Check the [Register to Windows Firewall] checkbox, and proceed to the next screen.
12.

47
Connection settings for connecting to computer
Select a printer.
Memo
The printer will appear if it is set to Simple AP Mode.If the printer fails to appear, press the [Search again] button to try again.If the printer still fails to appear, check that the printer is set to the correct wireless LAN mode, and try running the search again.Check the procedures on the next page to configure the network settings manually in Simple AP Mode if unable to get the settings configured properly using the above steps.
Î Configuring settings for a wireless LAN in Simple AP Mode manually (p. 48)
If you follow the instructions shown on screen to continue configuring the settings, the network printer driver will begin installing. The settings configuration process will finish when the installation is completed.
Print a test page from the Label Editor to check to ensure that the printer is running correctly. For details, check the Label Editor User's Guide.
13.

48
Connection settings for connecting to computer
Configuring settings for a wireless LAN in Simple AP Mode manually
If not able to configure the settings for a wireless LAN in Simple AP Mode using automatic push button configuration (p. 40), try the procedures included here to configure the settings.After switching the printer mode to Simple AP Mode, change the wireless LAN settings on the computer manually.
With the network cable and USB cable left unconnected, turn on the power to the printer. Press the button repeatedly to scroll through the printer connection modes until you get to Simple AP Mode.
Button
Lamp Lamp
Memo
The lamp will light up if the printer is set to Simple AP Mode.
Press and hold down the button for at least 3 seconds, which will cause the network status to be printed out.
Memo
Check the next page for details on how to print out the network status.
ÎHow to check the network settings on the printer alone (p. 72)
1.
2.

49
Connection settings for connecting to computer
Check the network status information that was printed out. Configure the network settings using the [SSID] and [Password] listed in the <WLAN Simple AP> box.
<General> <WLAN Simple AP>Software 2.222 SSID DIRECT-LW-1000PXXXXXXXXPrinter LW-1000PXXXXXX Password 12345678Bonjour EPSON LW-1000P
MAC XXXXXXXXXXXX
WLAN Mode Infrastructure<LAN>IP Auto(192.168.0.1/255.255.255.0)
<WLAN Infrastructure>IP Auto(0.0.0.0/255.255.255.0)
SSID SSIDXXXXXXXXMAC XXXXXXXXXXXX
Click the Network Connection icon on the taskbar on your computer, and select the connection with the same SSID for the network status information.
Once the screen asking for you to input the security key appears, enter the details listed under "Password" in the network status information.
3.
4.
50
Connection settings for connecting to computer
Insert the included DVD-ROM into the drive on the computer to be connected and follow the instructions on screen to add the computer.
Press the [Install application and driver] button.
Check the content of the displayed License Agreement, and click [Agree] to signify that you have read and agree to the terms and conditions of the License Agreement. Next, follow the instructions on screen to proceed with the installation process.
5.
6.
7.

51
Connection settings for connecting to computer
Label Editor is already selected. Install the Network Configuration Tool if needed.
Select a model (the printer to be used).
8.
9.

52
Connection settings for connecting to computer
Select [Wired LAN, wireless LAN connections].
Select [Do not configure LAN settings].
10.
11.

53
Connection settings for connecting to computer
Select a printer.
Memo
If the printer fails to appear, press the [Search again] button to try again.If the printer still fails to appear, check that the printer is set to the correct wireless LAN mode, and try running the search again or start over from the beginning.
If you follow the instructions shown on screen to continue configuring the settings, the network printer driver will begin installing. The settings configuration process will finish when the installation is completed.
Print a test page from the Label Editor to check to ensure that the printer is running correctly. For details, check the Label Editor User's Guide.
12.

54
Connection settings for connecting to computer
How to disconnect the printer from Simple AP ModeUp to four wireless devices can be connected to a printer in Simple AP Mode.
If you attempt to connect other wireless devices than the ones already connected (a fifth or subsequent device), the Wi-Fi connection for devices not using the printer will be disconnected (either the device will be connected to a different network or the Wi-Fi will be turned off).
This will allow you to connect new devices to the printer.
Memo
If unable to specify a single device connected to the printer, change the Pre-Shared Key (PSK) for Simple AP Mode on the printer to enable up to four wireless devices to be connected at a time. Make sure to proceed carefully when attempting to change the Pre-Shared Key (PSK) for Simple AP Mode as all Wi-Fi connections for devices already connected will be disconnected if the Pre-Shared Key (PSK) for Simple AP Mode is changed.Check the next page for details on how to change the security key.
Î Checking/changing the printer network settings (p. 72)

55
Connection settings for connecting to computer
Configuring settings for a wired LAN connectionConnect the computer and printer to a commercial broadband router or hub via a LAN cable.
ImportantThe computer needs to be connected to a network device such as a router and the network enabled in advance before you will be able to proceed.
Insert the included DVD-ROM into the drive on the computer to be connected and follow the instructions on screen to add the computer.
Press the [Install application and driver] button.
Check the content of the displayed License Agreement, and click [Agree] to signify that you have read and agree to the terms and conditions of the License Agreement. Next, follow the instructions on screen to proceed with the installation process.
1.
2.
3.

56
Connection settings for connecting to computer
Label Editor is already selected. Install the Network Configuration Tool if needed.
Select a model (the printer to be used).
4.
5.

57
Connection settings for connecting to computer
Select [Wired LAN, wireless LAN connections].
Select [Configure LAN settings].
6.
7.
58
Connection settings for connecting to computer
Select [Obtain the IP address automatically].
Memo
Check the procedures on the next page to set the IP address for the printer manually.
Î Setting the IP address for the printer manually (p. 61)
Select [Wired LAN].
8.
9.

59
Connection settings for connecting to computer
Follow the instructions on the screen, and connect the printer to the hub or broadband router using a network cable.
Check the [Register to Windows Firewall] checkbox, and proceed to the next screen.
10.
11.

60
Connection settings for connecting to computer
The installer will search the network and display a list of printers that are connected to the network. Select the printer to be used.
Memo
• The printer will appear once the network settings have been configured.Try completing the following procedures if the printer fails to show up:
If the IP address was set manually: Press the [Restart the search using a specified IP], and input the specified IP address on the screen that appears.
If the IP address was obtained automatically: Press the [Search again] button.
If the printer still fails to appear even after you have completed the above, it indicates that the printer network settings have not been configured completely. Try starting over from the beginning.
• Searches made using the [Search again] button will only be performed within the same network segment. To connect to a printer in a network segment outside of the range of the router, check the IP address of the printer that you wish to connect to and try searching again using [Restart the search using a specified IP].
If you follow the instructions shown on screen to continue configuring the settings, the network printer driver will begin installing. The settings configuration process will finish when the installation is completed.
Print a test page from the Label Editor to check to ensure that the printer is running correctly. For details, check the Label Editor User's Guide.
12.

61
Connection settings for connecting to computer
Setting the IP address for the printer manuallyComplete the below procedures to manually configure the necessary settings to use a fixed IP address of the printer when the below screen appears while the network settings are being configured using the DVD-ROM.
Memo
The information needed for setting an IP address manually is as listed below. Check with your network administrator beforehand to prepare all information needed and help the process go more smoothly.
Printer IP address
Subnet Mask
Default Gateway
When the below screen appears while the network settings are being configured using the DVD-ROM, select [Set the IP address manually (using a fixed IP address)].
1.

62
Connection settings for connecting to computer
Install the USB printer driver in order to set the IP address for the printer. Follow the instructions shown on screen to install the printer driver.
ImportantFollow the instructions shown on the screen to connect the printer and computer together using a USB cable. Be sure to leave the USB cable connected once the USB printer driver has been installed as you will need it to set the IP address.
Select [Wired LAN].
Enter the IP Address, Subnet Mask, and Default Gateway for the printer.
2.
3.
4.

63
Connection settings for connecting to computer
Once the next screen appears, disconnect the USB cable from the printer. Next, select the network connection method to be used and proceed with configuring the settings.
5.
64
Connecting from a portable terminalA description will be provided of methods for connecting a portable terminal such as a smartphone or tablet to a printer that has had its network settings configured.
ImportantYou will need to configure the network settings in advance on the printer depending on the connection method.• The printer will be set to Simple AP Mode for cases involving one printer and one
portable terminal device.
Î Setting up a wireless LAN connection (Simple AP Mode) (p. 39)
• If connecting the printer via a network, the printer will be connected to the network.
Î Setting up a wireless LAN connection (Infrastructure Mode) (p. 11)
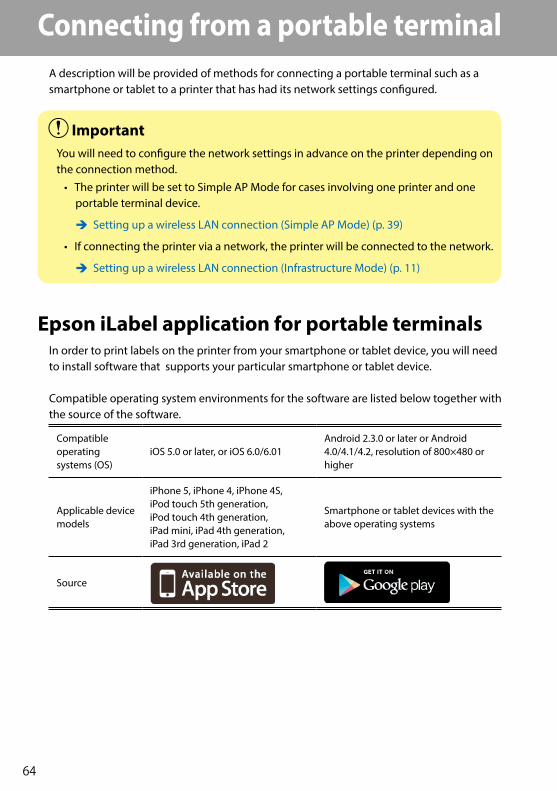
Epson iLabel application for portable terminalsIn order to print labels on the printer from your smartphone or tablet device, you will need to install software that supports your particular smartphone or tablet device.
Compatible operating system environments for the software are listed below together with the source of the software.
Compatible operating systems (OS)
iOS 5.0 or later, or iOS 6.0/6.01Android 2.3.0 or later or Android 4.0/4.1/4.2, resolution of 800×480 or higher
Applicable device models
iPhone 5, iPhone 4, iPhone 4S, iPod touch 5th generation, iPod touch 4th generation, iPad mini, iPad 4th generation, iPad 3rd generation, iPad 2
Smartphone or tablet devices with the above operating systems
Source

65
Connecting from a portable terminal
Memo
• Check the Seiko Epson Corporation for the latest information on compatible operating systems.
Î http://www.epson.com
• For details on how to install individual applications and their associated functions and features, check the pages provided by the distributors of the software directly.
• The smartphone or tablet to which the application is to be downloaded must have its wireless LAN function turned on and be in an environment where it can connect to a network before the application can be downloaded. Check the manual for your portable terminal device for instructions on how to configure network settings for your smartphone or tablet.
66
Connecting from a portable terminal
Connecting to a printer from a portable terminal such as a smartphone or tablet
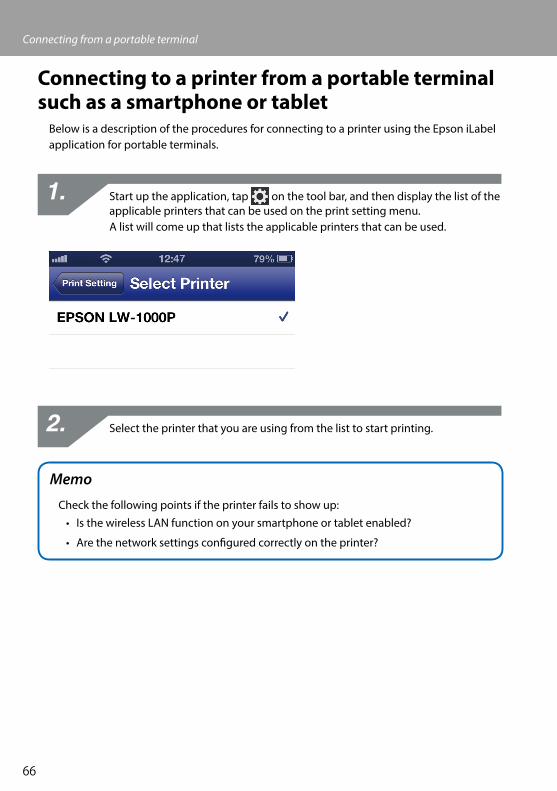
Below is a description of the procedures for connecting to a printer using the Epson iLabel application for portable terminals.
Start up the application, tap on the tool bar, and then display the list of the applicable printers that can be used on the print setting menu.A list will come up that lists the applicable printers that can be used.
Select the printer that you are using from the list to start printing.
Memo
Check the following points if the printer fails to show up:• Is the wireless LAN function on your smartphone or tablet enabled?
• Are the network settings configured correctly on the printer?
1.
2.

67
Adding a second computer or portable terminalBelow is a description of the procedures for enabling the printer to be used on a separate computer (a second or subsequent computer) or portable terminal device other than the computer used to configure the network settings for the printer via a network.
Adding a computerThe included DVD-ROM will be used to add another computer.
Insert the included DVD-ROM into the drive on the computer to be connected and follow the instructions on screen to add the computer.
Press the [Install application and driver] button.
Check the content of the displayed License Agreement, and click [Agree] to signify that you have read and agree to the terms and conditions of the License Agreement. Next, follow the instructions on screen to proceed with the installation process.
1.
2.
3.
68
Adding a second computer or portable terminal
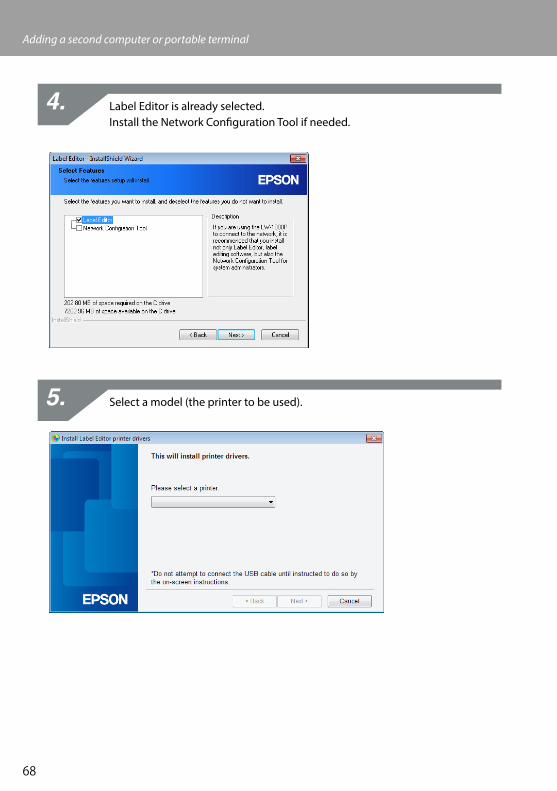
Label Editor is already selected. Install the Network Configuration Tool if needed.
Select a model (the printer to be used).
4.
5.

69
Adding a second computer or portable terminal
Select [Wired LAN, wireless LAN connections].
Select [Do not configure LAN settings].
6.
7.
70
Adding a second computer or portable terminal
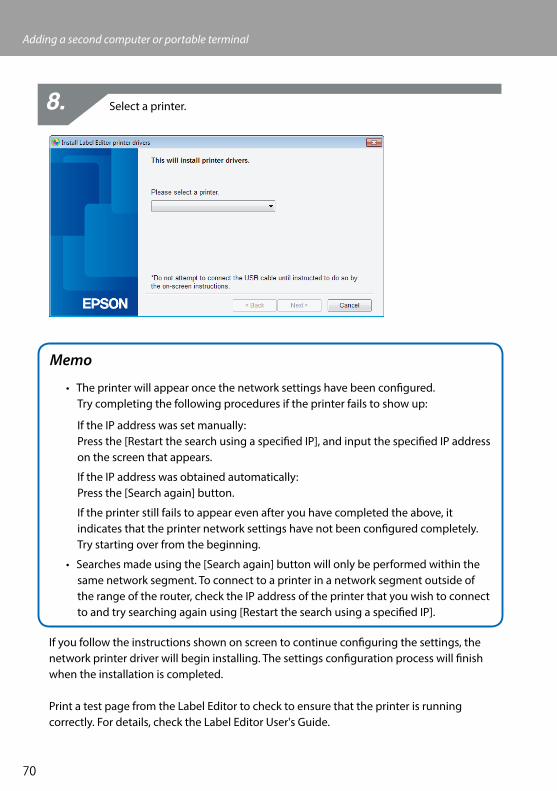
Select a printer.
Memo
• The printer will appear once the network settings have been configured. Try completing the following procedures if the printer fails to show up:
If the IP address was set manually: Press the [Restart the search using a specified IP], and input the specified IP address on the screen that appears.
If the IP address was obtained automatically: Press the [Search again] button.
If the printer still fails to appear even after you have completed the above, it indicates that the printer network settings have not been configured completely. Try starting over from the beginning.
• Searches made using the [Search again] button will only be performed within the same network segment. To connect to a printer in a network segment outside of the range of the router, check the IP address of the printer that you wish to connect to and try searching again using [Restart the search using a specified IP].
If you follow the instructions shown on screen to continue configuring the settings, the network printer driver will begin installing. The settings configuration process will finish when the installation is completed.
Print a test page from the Label Editor to check to ensure that the printer is running correctly. For details, check the Label Editor User's Guide.
8.

71
Adding a second computer or portable terminal
Adding a terminal such as a smartphone or tabletInstall the application using the procedures outlined in Connecting to a printer from a portable terminal such as a smartphone or tablet (p. 66).
Start up the application, tap on the tool bar, and then display the list of the applicable printers that can be used on the print setting menu. A list will come up that lists the applicable printers that can be used.

72
Checking/changing the printer network settingsThere are two methods available for checking the network settings for the printer, one is to check by printing the network status from the printer and the other is to check using the Network Configuration Tool. You can use the Network Configuration Tool to make changes to the printer network settings.
How to check the network settings on the printer alone
You can check the network settings by printing the network status from the printer.
Memo
To print the network settings from the printer, make sure to insert tape that is as wide as possible. Note that pre-cut labels cannot be used to print out network settings.
Check to make sure that the printer is not currently printing and then press
and hold down the button for at least 3 seconds.
Button
1.

73
Checking/changing the printer network settings
The network setting details will be printed out.
<General> <WLAN Simple AP>Software 2.222 SSID DIRECT-LW-1000PXXXXXXXXPrinter LW-1000PXXXXXX Password 12345678Bonjour EPSON LW-1000P
MAC XXXXXXXXXXXX
WLAN Mode Infrastructure<LAN>IP Auto(192.168.0.1/255.255.255.0)
<WLAN Infrastructure>IP Auto(0.0.0.0/255.255.255.0)
SSID SSIDXXXXXXXXMAC XXXXXXXXXXXX
The types of details printed out on the tape are as listed below.
Item Printing examples Description
<General> --- Prints out general setting details.
Software 2.222 Prints out the printer firmware version.
Printer LW-1000PXXXXXX Prints out the printer name.
Bonjour EPSON LW-1000P Prints out the Bonjour service name.
WLAN Mode InfrastructurePrints out the name of one of the below printer wireless LAN modes. Infrastructure/Simple AP/Disable Wi-Fi
<LAN> --- Prints out the settings for the Wired LAN.
IPAuto (192.168.0.1/ 255.255.255.0)
Prints out the specified IP address and subnet mask. Displays that the IP address is to be acquired automatically when Auto is printed out.
MAC XXXXXXXXXXXX Prints out the MAC address for the Wired LAN.
<WLAN Infrastructure> ---Prints out the settings for the wireless LAN Infrastructure Mode.
IPAuto (0.0.0.0/ 255.255.255.0)
Prints out the specified IP address and subnet mask. Displays that the IP address is to be acquired automatically when Auto is printed out.
MAC XXXXXXXXXXXX Prints out the MAC address for the wireless LAN.
SSID SSIDXXXXXXXX Prints out the SSID for the participating network.
<WLAN Simple AP> --- Prints out the settings for Simple AP Mode.
2.
3.

74
Checking/changing the printer network settings
Item Printing examples Description
SSIDDIRECT-LW-1000PXXXXXXXX
Prints out the SSID used in Simple AP Mode.
Password 12345678 Prints out the password used in Simple AP Mode.
How to check from a computerTo check the network settings from a computer, use the Network Configuration Tool, which is installed at the same time as Label Editor.
Important• If the Network Configuration Tool was not installed when the printer driver was
installed, use the included DVD-ROM to install it at this time in order to proceed.
• The network settings for the printer cannot be checked from a computer that does not have the proper USB printer driver or network printer driver installed.
• In order to check the network settings from a computer, you will need to have the printer and computer connected together using a USB cable or through a wired or wireless LAN.
Start up the Network Configuration Tool. Click [Start] - [All Programs] (or [Programs]) - [EPSON] - [PrinterConfigTool] - [Network Config Tool], in the order given.
1.

75
Checking/changing the printer network settings
Select a printer.
Memo
The USB printer driver may not be installed correctly if the printer fails to appear. Try reinstalling the USB printer driver starting from the beginning of the installation procedures.
2.
76
Checking/changing the printer network settings
The configuration tool menu appears.
Select the item that you wish to check from the tree menu at left and then check the network settings for that item.
Important• When making changes to the network settings, check to confirm that the name of
the printer for which settings are to be changed appears in the upper left on the screen.
• If there is a password set for the printer in the Network Configuration Tool, you will not be able to make changes to the network settings unless you enter the correct password.
3.
4.

77
Checking/changing the printer network settings
Network settings details that can be checked/changedSelect the details that you wish to check/set from the below list of items. Descriptions for items are listed on the specified reference pages.
Setting to check/change Setting item ConfigurableReference
page
General settings
To check/change the name of the printer used on the network
Printer Name Yes
p. 79Bonjour Name Yes
Bonjour Service Name Yes
Wireless LAN settings
To check/change the wireless LAN modeWireless LAN mode Yes
p. 80Wireless LAN MAC Address No
To check/change the Infrastructure Mode settings
Wireless LAN connection status
Connection status No
p. 81
Wireless LAN usage standards
No
IP address settings
How to acquire the IP address
Yes
IP Address Yes
Subnet Mask Yes
Default Gateway Yes
Security settings
Authentication Method Yes
Encryption Method Yes
SSID Yes
Security key(Passphrase)
Yes
To check/change Simple AP Mode settings
Wireless LAN connection status
Wireless LAN usage standards
No
p. 83
IP address settings
DHCP server status No
Publication Start IP Address
No
Specified IP address No
Subnet Mask No
Security settings
Authentication Method No
Encryption Method Yes
SSID Yes
Security key(Passphrase)
Yes

78
Checking/changing the printer network settings
Setting to check/change Setting item ConfigurableReference
page
Wired LAN settings
To check/confirm the wired LAN connection status
Connection status No
p. 85
Wired LAN MAC Address No
To check/change the IP address settings
How to acquire the IP address
Yes
IP Address Yes
Subnet Mask Yes
Default Gateway Yes
Printer settings
To check the software information Firmware version Nop. 86
To check the printer time-out settings Print Timeout Yes
To change the password used to change the settings
Password Yes p. 87
Important• In order to change the network settings for the printer, press the [Send] button
at the bottom of the screen, sending all setting values that can be set using the Network Configuration Tool including items not shown on screen to the printer, which will reflect the changes. To change the network settings, first confirm that all settings have been configured as desired and then press the [Send] button.
• Before attempting to make changes to the network settings, first press the [Update to the latest information] button, check the values set on the printer, and then make changes as desired.
• Press the Cancel button to reject changes made to the network settings and close the Network Configuration Tool.

79
Checking/changing the printer network settings
� To check/change the name of the printer used on the network Screen that appears when you select [Network] - [Shared] - [Basic] in the tree menu at left.Item details that can be checked/changed are as listed below.
(1)
(2)
(3)
# Item Configurable Setting details
1 Printer Name YesName of the printer used on the network. The printer is displayed under this name when checked from a Windows-based computer.
2 Bonjour Name YesBonjour name of the printer used on the network. The printer is displayed under this name when checked from a Mac OS-based computer.
3 Bonjour Service Name YesThe printer is displayed under this name when checked from an application on an iOS-based or Android OS-based portable terminal device.
80
Checking/changing the printer network settings
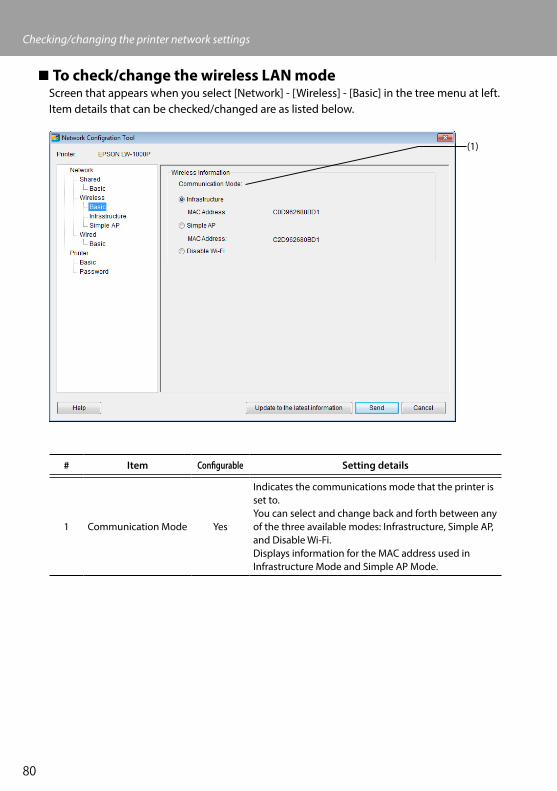
� To check/change the wireless LAN modeScreen that appears when you select [Network] - [Wireless] - [Basic] in the tree menu at left.Item details that can be checked/changed are as listed below.
(1)
# Item Configurable Setting details
1 Communication Mode Yes
Indicates the communications mode that the printer is set to.You can select and change back and forth between any of the three available modes: Infrastructure, Simple AP, and Disable Wi-Fi.Displays information for the MAC address used in Infrastructure Mode and Simple AP Mode.

81
Checking/changing the printer network settings
� To check/change the Infrastructure Mode settingsScreen that appears when you select [Network] - [Wireless] - [Infrastructure] in the tree menu at left.Item details that can be checked/changed are as listed below.
(1)
(2)
(3)(4)(5)
(6)(7)
(8)
(9)(10)

82
Checking/changing the printer network settings
# Item Configurable Setting details
1Wireless Connection Status
No
Displays the wireless LAN status as Online or Offline. Press the [Confirm Connection] button to update to the latest connection status. Also displays the applicable standards for the wireless LAN that you are connected to.
2 Auto/Manual Yes
You can select between [Auto] and [Manual] as the method to use to acquire the IP address. When [Auto] is selected, the IP Address, Subnet Mask, and Default Gateway are set automatically.
3 IP Address Yes* IP address set for the printer.
4 Subnet Mask Yes*Subnet mask of the network that the printer is connected to.
5 Default Gateway Yes*Default gateway of the network that the printer is connected to.
6Authentication Method
Yes
Security authentication method for the wireless LAN that the printer is set to.You can select from any of the following four types: Open/Shared/WPA-PSK/WPA2-PSK
7 Encryption Method Yes
Encryption method for the wireless LAN that the printer is set to.You can select from any of the following four types: None/WEP/TKIP/AES
8 SSID Yes
Displays the SSID of the network that the printer is connected to. Press the [Select an SSID] to pull up a list of SSIDs detected by the printer and then select the network that you are connected to.
9 PSK (Pre-Shared Key) YesDisplays the passphrase used in encrypted communications Used when a TKIP or AES is used in the Encryption Method.
10 WEP Key YesDisplays the WEP key used in encrypted communications Used when a WEP is used in the Encryption Method.
*You can set this option if [Manual] is selected as the method for acquiring the IP address.
83
Checking/changing the printer network settings
� To check/change Simple AP Mode settingsScreen that appears when you select [Network] - [Wireless] - [Simple AP] in the tree menu at left.Item details that can be checked/changed are as listed below.
(1)
(2)
(3)(4)
(5)
(6)
(7)(8)
# Item Configurable Setting details
1 Wireless Mode NoDisplays the applicable standards for the wireless LAN that you are connected to.
2 DHCP Settings NoDisplays the DHCP server status and publication start IP address for the printer.
3 IP Address No IP address set to the printer used in Simple AP Mode.
4 Subnet Mask No Subnet mask used in Simple AP Mode.
5Authentication Method
NoSecurity authentication method for the wireless LAN that the printer is set to.WPA2-PSK is selected automatically.
6 Encryption Method YesEncryption method for the wireless LAN that the printer is set to.AES is selected automatically.
7 SSID Yes
Displays the SSID used by the printer in Simple AP Mode."DIRECT-" will always be added to the beginning of the SSID.

84
Checking/changing the printer network settings
# Item Configurable Setting details
8 PSK (Pre-Shared Key) YesDisplays the PSK (Pre-Shared Key) used by the printer in Simple AP Mode.
ImportantIf you make changes to the Encryption Method, SSID, or PSK (Pre-Shared Key), the wireless devices connected in Simple AP Mode will be disconnected and will need to be reconfigured. Make sure to proceed carefully when attempting to change the SSID and PSK (Pre-Shared Key) for connected devices.

85
Checking/changing the printer network settings
� To check/confirm the wired LAN connection statusScreen that appears when you select [Network] - [Wired] - [Basic] in the tree menu at left.Item details that can be checked/changed are as listed below.
(1)
(2)
(3)
(4)(5)(6)
# Item Configurable Setting details
1Wired Connection Status
NoDisplays the connection status of the wired LAN. Press the [Confirm Connection] button to update to the latest connection information.
2 Wired MAC Address NoDisplays the MAC address of the printer used when connected to a wired LAN.
3 Auto/Manual Yes
You can select between [Auto] and [Manual] as the method to use to acquire the IP address. When [Auto] is selected, the IP Address, Subnet Mask, and Default Gateway are set automatically.
4 IP Address Yes* IP address set for the printer.
5 Subnet Mask Yes*Subnet mask of the network that the printer is connected to.
6 Default Gateway Yes*Default gateway of the network that the printer is connected to.
*You can set this option if [Manual] is selected as the method for acquiring the IP address.

86
Checking/changing the printer network settings
� To check the software information/To check the printer time-out settings
Screen that appears when you select [Printer] - [Basic] in the tree menu at left.Item details that can be checked/changed are as listed below.
(1)
(2)
# Item Configurable Setting details
1 Firmware No Displays the firmware version of the printer.
2 Print Timeout YesDisplays whether the printer is set to wait to receive print data until after a certain number of seconds have passed when printing is done via a network.

87
Checking/changing the printer network settings
� To change the password used to change the settingsScreen that appears when you select [Printer] - [Password] in the tree menu at left.Item details that can be checked/changed are as listed below.
(1)
(2)
# Item Configurable Setting details
1Change the administrator password
YesSelect this check box when you change the administrator password.
2 Administrator Password Yes
Used to enter the new password that is to be set. The new password needs to be entered twice to confirm the changes.If a password is set to the printer during this step, the password will need to be authenticated if you attempt to make changes to the network settings from the included DVD-ROM or from the Network Configuration Tool.
ImportantNote that if you leave the password line blank when you make changes, the password will remain blank.

88
Checking/changing the printer network settings
Sending the network settings to the printerAfter making changes to the network settings, press the [Send] button at the bottom of the screen to send the edited settings details to the printer and complete the configuration procedures.
ImportantIf there is a password for making changes set, the password entry screen will appear when you press the [Send] button. Enter the password that was set. To reset the password, you will need to initialize the printer to reset it to default settings. Once you have finished initializing the printer, reconfigure all settings including the network settings.
Î Initializing the Network Settings (p. 89)

89
Initializing the Network SettingsComplete the below procedures to initialize the network settings for the printer.
ImportantWhen the initialization process is run for the network settings, all settings related to Wireless LAN (Infrastructure Mode/Simple AP Mode) and Wired LAN are initialized and reset back to their factory defaults. The password used to change the network settings will also be reset.
Check to make sure that the power to the printer is turned off.
Hold down the button on the back of the printer and the button on the front of the printer while turning on the power to the printer.
Button Button
1.
2.

90
Initializing the Network Settings
The lamp, lamp, and lamp will light up, and initialization of the network settings will then begin.
Lamp Lamp
Lamp
The printer power will be turned off automatically once initialization of the network settings is completed.
Memo
If initializing the network settings, make sure to reconfigure the network settings once the initialization process is completed.
3.
4.
91
TroubleshootingThis section lists troubleshooting procedures for resolving issues with the network settings for the printer.
Î Troubleshooting issues with network settings made using the included DVD-ROM (p. 92)
Î Troubleshooting issues with network settings made using the Network Configuration Tool (p. 93)
Î Troubleshooting issues with wireless LAN connections (Infrastructure Mode) (p. 97)
Î Troubleshooting issues with wireless LAN connections (Simple AP Mode) (p. 100)
Î Troubleshooting issues with wired LAN connections (p. 104)
ÎMethods for resolving issues with not being able to connect at all (p. 106)
Memo
If unable to resolve issues using the Troubleshooting section in this manual, use the Internet to connect to the Seiko Epson Corporation homepage and check the "FAQ" section for further details.
Î http://www.epson.com

92
Troubleshooting
Troubleshooting issues with network settings made using the included DVD-ROM
� A "Unable to communicate with the printer. Connect the USB cable to the printer and turn the power on." message appearsIn order to install the USB printer driver, even when using the printer via a network, you will need to connect the printer to a computer using a USB cable. Check the USB connection status for the printer and computer.
� A "Printer cannot be found. Check the connection to the printer." message appearsCheck to make sure that the printer is not exhibiting any of the statuses listed below.
• The message appears when you press the [Search again] button on the [Select printer] screen. If the network settings for the printer were configured such that the printer and the computer used to install the software were placed in different network segments (that is, the printer is connected to a network outside of the range of the router as viewed from the computer), the printer will not be found during searches using the [Search again] button. In such cases, use the [Restart the search using a specified IP] button to search again using a specified IP address.
• The network settings for the printer may not be configured correctly. Have your network administrator check the information needed for configuring the network settings and then try to configure the settings again.
93
Troubleshooting
Troubleshooting issues with network settings made using the Network Configuration Tool
� A "Exchanging data for acquiring the printer information did not complete. Check the connection with the printer." message appearsCheck to make sure that the printer is not exhibiting any of the statuses listed below.
• Is the printer currently printing? If the printer is currently printing, wait until it is finished and then try again.
• Is the printer power turned off? Check to make sure that the power to the printer is turned on, and turn it on if it is not, and then try again.
• Check the status of the network. Check to make sure that the printer is communicating via the network. If unable to check the network status yourself, contact your network administrator for assistance.
� A "Unable to complete the settings because the password was invalid." message appears.If you set a password to the printer during setup, you will need to enter that same password again when you attempt to change the network settings. Make sure to enter the correct password set to the printer. If you have forgotten the password or do not know what it is, contact your network administrator for assistance. If necessary, reset the network settings to their initial default settings.
Î Initializing the Network Settings (p. 89)
Reset the network settings for the printer to the default settings and then reconfigure the settings.
• Wireless LAN settings (Infrastructure Mode)
Î Setting up a wireless LAN connection (Infrastructure Mode) (p. 11)
• Direct connection without using an access point
Î Setting up a wireless LAN connection (Simple AP Mode) (p. 39)
• Wired LAN connection
Î Configuring settings for a wired LAN connection (p. 55)

94
Troubleshooting
� A "Unable to set the data on the printer. Check the settings." message appears.Check to confirm that there are no errors, omissions, or other problems with the data input to the Network Configuration Tool.
� A "If the printer IP address or printer name (printer name, Bonjour name, or Bonjour service name) is changed, communication may become no longer possible." message appears.Clicking the [Confirm] button on the screen to accept changes to the IP address or name of the printer in the Network Configuration Tool will cause printing to be disabled unless the network printer driver settings are changed.
If unable to print, complete the below procedures in the order given to update the settings on the network printer driver.
Pull up the Windows [Printers and Faxes] screen.
Windows 8: Press the [X] key while holding down the [Windows] key and then click [Control Panel] from the list that pops up. In [Control Panel], click on [Devices and Printers].
Windows 7: Click on [Start] - [Devices and Printers] in the order given.
Windows Vista: Click on [Start] - [Control Panel] - [Hardware and Sound] - [Printer] in the order given.
Windows XP: Click on [Start] - [Printers and Faxes] in the order given.
Right-click on the icon for the printer for which the network settings were changed and then click on [Printer properties].
1.
2.

95
Troubleshooting
Click on [Ports], select the port that is checked off in [Ports], and then click [Configure Port...].
Enter the newly set IP address on the displayed screen, check the checkbox for “Yes” under [Tracking by printer name], and then press the [OK] button.
3.
4.

96
Troubleshooting
Memo
If unable to configure the settings properly, try installing the network printer driver from the included DVD-ROM.
Î Connection settings for connecting to computer (p. 11)
� To switch the printer for which network settings are to be checked/changedPress the [Cancel] button to exit the Network Configuration Tool. Then, restart the Network Configuration Tool, and select a printer.

97
Troubleshooting
Troubleshooting issues with wireless LAN connections (Infrastructure Mode)
� Is the power for the network device (access point/broadband router) turned on?
Check to make sure that the power on the network device is turned on. If the power is already turned on, check to ensure that the network is not currently being used and then turn the power off and back on again.
� Are the printer and network device (access point/broadband router) close enough to be within range of each other? Are there any obstacles that could be interfering with the signals?Try moving the computer and network device closer together and removing any obstacles that may be causing interference.
� Are you using the equipment near the printer that emits electromagnetic waves (such as a microwave oven or digital cordless telephone) or a wireless device?If you attempt to use the printer around devices that emit electromagnetic waves or wireless devices, signals emitted by such devices may interfere with printer communications, causing problems. Move the computer and network device (access point/broadband router) away from any such problematic equipment.
� Turn the printer power off and then back on again to reset it.You may not be able to connect the printer and network device (access point/broadband router) temporarily depending on the order in which you turned power on to the devices. After turning power back on to the printer, wait around 1 min. and then check the connection status.
� Is the printer set to Infrastructure Mode?Check the lamp on the printer to make sure that it is illuminated. If it is turned off, press the button to switch the settings.
98
Troubleshooting
� Is the correct SSID set to the printer?The printer will not be able to connect to the network device (access point/broadband router) if the SSID of the printer is different from that used for the network device. If connecting in Simple AP Mode, you will not be able to connect the printer to the network if the name of the network in Simple AP Mode and the SSID set for the printer are different. Check the SSIDs for the connection device and printer to see if they are the same or not.
Memo
Refer to the next page for procedures on how to check the SSID set for the printer.
Î Checking/changing the printer network settings (p. 72)
If not able to find the SSID for the network device being used, check the manual for the network device or ask the person who configured the network settings for assistance.
� Are the devices using the same wireless network security method as that set for the printer?The devices will not be able to connect if the printer, computer, and network device (access point/broadband router) are set up under different wireless network security methods. Reconfigure the settings in such cases so that the printer, computer, and network device all use the same wireless network security method. If unsure how to proceed, check the manual for your network device or consult with the person who configured the network settings for the devices.
� Is the privacy separator function enabled on the network device (access point/broadband router)?The printer and computer will not be able to communicate with each other if the privacy separator function (a function that prevents devices connected to the same access point from connecting to each other) is enabled on the network device being used. Follow the instructions in the manual for your network device to disable the privacy separator function.

99
Troubleshooting
� Are there several different computers and network devices connected to the same network?When there are several computers and network devices connected to a network, the IP addresses for the computers and network devices may not be able to be acquired from the DHCP server, resulting in the device or devices not being able to connect to the network. Turn off or disconnect any computer or network device not being used to increase the number of IP addresses available.
� Is the same IP address being used for more than one computer or other device?If the same exact IP address is used for more than one device connected to a network such as a printer or computer, network communications may become unstable or drop out. Check the IP address for each device and reset the IP addresses for any devices using the same one.
Memo
Proceed to the below page if still not able to connect even after checking the above items.
ÎMethods for resolving issues with not being able to connect at all (p. 106)
100
Troubleshooting
Troubleshooting issues with wireless LAN connections (Simple AP Mode)
� If unable to connect to the Internet while attempting to connect a printer in Simple AP Mode when using a USB-based mobile data communications terminal to connect a Windows-based computer to the InternetWhen both a Simple AP Mode connection to connect a printer is used with a low-speed mobile data communications device is used to connect to the Internet at the same time, the printer connection is prioritized, which may cause the Internet connection to drop out. Complete the below procedures to set up your system if unable to connect your computer to the Internet.
Pull up the Windows [Network Connections] screen.
Windows 8: Press the [X] key while holding down the [Windows] key and then click [Control Panel] from the list that pops up. In [Control Panel], select [Network and Internet] - [Network and Sharing Center] - [Change adapter settings] in the order given.
Windows 7: Click on [Start] - [Control Panel] - [Network and Internet] - [Network and Sharing Center] - [View network status and tasks] - [Change adapter settings] in the order given.
Windows Vista: Click on [Start] - [Network and Internet] - [Network and Sharing Center] - [Manage network connections] in the order given.
Windows XP: Click on [Start] - [Control Panel] - [Network and Internet Connections] - [Network Connections] in the order given.
1.

101
Troubleshooting
Select [Wireless Network Connection] (DIRECT-XXXXXXXX) and then right-click and select [Properties] from the menu displayed.
Select [Internet Protocol Version 4 (TCP/IPv4)], and click on [Properties].
2.
3.
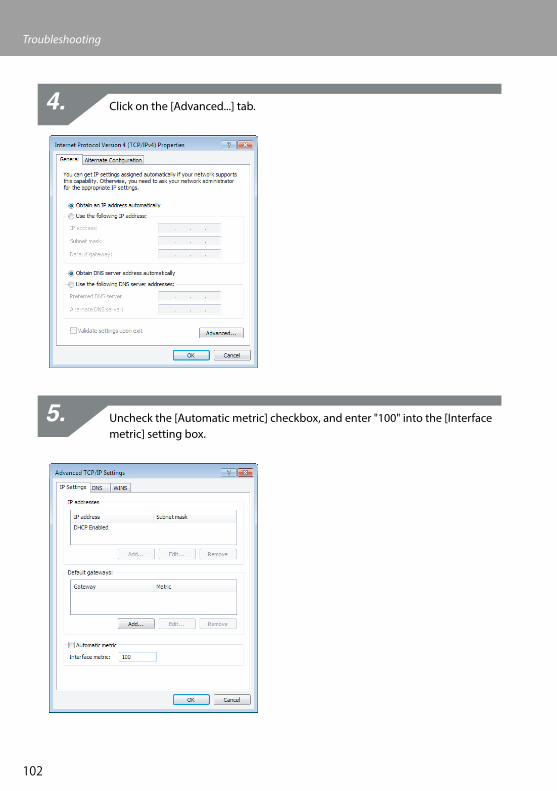
102
Troubleshooting
Click on the [Advanced...] tab.
Uncheck the [Automatic metric] checkbox, and enter "100" into the [Interface metric] setting box.
4.
5.

103
Troubleshooting
Close all open windows.
If still unable to connect to the Internet even after completing the above steps, repeat Step 3 above using [Internet Protocol Version 6 (TCP/IPv6)].
� The Wi-Fi connection was dropped suddenlyCheck to make sure that none of the below items are true.
• Is the power to the printer turned off?
• Has the Simple AP Mode security key been changed?
• Have the network settings for the printer been changed?
• If the Simple AP Mode security key was changed
Delete all connection settings for the "DIRECT-XXXXXXXX" registered to the wireless device. Next, go back and select "DIRECT-XXXXXXXX" again and then enter a new password for it. For more detailed procedure instructions, refer to the manual and other documentation for your wireless device.
� If the network settings were changedThe lamp being turned off indicates that the wireless LAN mode for the printer has been changed. To change from a connection under different network settings back to a Simple AP Mode connection, initialize the network settings for the printer, and then reconfigure the wireless LAN connection (Simple AP Mode) without first configuring the network settings for the printer.
Î Initializing the Network Settings (p. 89)
Î Setting up a wireless LAN connection (Simple AP Mode) (p. 39)
Memo
Proceed to the below page if still not able to connect even after checking the above items.
ÎMethods for resolving issues with not being able to connect at all (p. 106)
6.

104
Troubleshooting
Troubleshooting issues with wired LAN connections
� Is the power for the network device (broadband router/hub) turned on?Check to make sure that the power on the network device is turned on. If the power is already turned on, check to ensure that the network is not currently being used and then turn the power off and back on again.
� Is the LAN cable firmly inserted and connected?Check to make sure that the LAN cable is firmly and securely connected to both the printer and the network device (broadband router/hub).
Check the lamp (link lamp) used to display the connection status. If this lamp is turned off, try the below items.
• Try connecting to a different port
• Try connecting to a different hub
• Try replacing the LAN cable with a new one
� Turn the printer power off and then back on again to reset it.You may not be able to connect the printer and network device (broadband router/hub) temporarily depending on the order in which you turned power on to the devices. After turning power back on to the printer, wait around 1 min. and then check the connection status.
� Are there several different computers and network devices connected to the same network?When there are several computers and network devices connected to a network, the IP addresses for the computers and network devices may not be able to be acquired from the DHCP server, resulting in the device or devices not being able to connect to the network. Turn off or disconnect any computer or network device not being used to increase the number of IP addresses available.
105
Troubleshooting
� Is the same IP address being used for more than one computer or other device?If the same exact IP address is used for more than one device connected to a network such as a printer or computer, network communications may become unstable or drop out. Check the IP address for each device and reset the IP addresses for any devices using the same one.
Memo
Proceed to the below page if still not able to connect even after checking the above items.
ÎMethods for resolving issues with not being able to connect at all (p. 106)

106
Troubleshooting
Methods for resolving issues with not being able to connect at all
� Try reconfiguring the connection settings for the computer and network device.Check the manual for your network device or contact the manufacturer directly for instructions and assistance on how to connect a computer and the network device.
� Reset the network settings for the printer back to their initial default settings and then try reconfiguring the network settings for the printer.If still unable to connect even after checking the other items, initialize the network settings for the printer to return them to their initial default settings and try again.
Î Initializing the Network Settings (p. 89)
Reset the network settings for the printer to the default settings and then reconfigure the settings.
• Wireless LAN settings (Infrastructure Mode)
Î Setting up a wireless LAN connection (Infrastructure Mode) (p. 11)
• Direct connection without using an access point
Î Setting up a wireless LAN connection (Simple AP Mode) (p. 39)
• Wired LAN connection
Î Configuring settings for a wired LAN connection (p. 55)
� Check to confirm that the firmware for the network devices (access point, broadband router, computer network interface card, etc.) is updated to the latest version.Updating the firmware (software used to control devices) for the network devices to the latest version may resolve the issue in some cases. Check the manufacturer of the particular network device being used to see what the latest version is.
107
Trademarks/NotationTrademarks
• EPSON and EXCEED YOUR VISION are registered trademarks of Seiko Epson Corporation.
• Microsoft, Windows, and Windows Vista are registered trademarks of Microsoft Corporation in the United States of America and other countries.
• Apple, Mac OS, OS X, Bonjour, and iPhone are trademarks of Apple Inc. registered in the United States of America and other countries.
• Other product names used in this document are trademarks or registered trademarks of their respective companies.
© 2013 Seiko Epson Corporation. All rights reserved.
CopyrightsUsers intending to use photographs, books, maps, illustrations, paintings, print art, music, films, programs, and other creative works other than individuals intending to copy those works for personal use (which extends to but is limited to household use) will need to obtain permission of the copyright holder to use such works.
Notation
�Windows• Microsoft® Windows® 8 operating system
• Microsoft® Windows® 7 operating system
• Microsoft® Windows Vista®operating system
• Microsoft® Windows® XP operating system
• Microsoft® Windows® XP Professional x64 Edition operating system
The above operating systems are written out as Windows 7, Windows Vista, and Windows XP as applicable throughout this document. In addition, Windows will be used as the general name for the above operating systems overall.
�Mac OS• Mac OS X v. 10.5.8
• Mac OS X v. 10.6.x
• OS X Lion (written as Mac OS X v. 10.7.x in this document)
Throughout this document, Mac OS X will be used as the general name for the above operating systems overall.
108
Trademarks/Notation
Note• Reproducing and/or distributing this document in part or in its entirety is strictly
forbidden.
• The contents of this document are subject to change at any time without prior notice.
• Please contact Seiko Epson Corporation if you find any problems with this document such as unclear statements that are hard to understand, errors, or omissions.
• Seiko Epson Corporation shall accept no liability arising from the use of this product or for incidental or consequential damages arising from the use of this manual as written notwithstanding the provisions outlined in the previous item.
• Seiko Epson Corporation shall accept no liability to the purchaser of this product for damages, losses, costs, or expenses incurred by the purchaser as a result of inappropriate use or misuse of this product, failure to strictly comply with the operating and maintenance instructions listed in this manual, or the performance of unauthorized modifications, repairs, or alterations to this product by a third party other than Seiko Epson Corporation and its affiliates.