Epson ActionPrinter 4000 User's Manual
291
Transcript of Epson ActionPrinter 4000 User's Manual
7/21/2019 Epson ActionPrinter 4000 User's Manual
http://slidepdf.com/reader/full/epson-actionprinter-4000-users-manual 1/290

7/21/2019 Epson ActionPrinter 4000 User's Manual
http://slidepdf.com/reader/full/epson-actionprinter-4000-users-manual 2/290
E PSON” ~~~RP~
4 0 0 0
User s Manual

7/21/2019 Epson ActionPrinter 4000 User's Manual
http://slidepdf.com/reader/full/epson-actionprinter-4000-users-manual 3/290
FCC COMPLIANCE STATEMENT FOR AMERICAN USERS
This equipment has been tested and found to comply with the limits for a Class B digital
device, pursuant to Part 15 of the FCC rules. These limits are designed to provide reasonableprotection against harmful interference in a residential installation. This equipment generates,uses, and can radiate radio frequency energy and, if not installed and used in accordance with
the instructions, may cause harmful interference to radio communications. However, there isno guarantee that interference will not occur in a particular installation. If this equipment does
cause harmful interference to radio or television reception, which can be determined byturning the equipment off and on, the user is encouraged to try to correct the interference by
one or more of the following measures:
. Reorient or relocate the receiving antenna.
. Increase the separation between the equipment and the receiver.
. Connect the equipment into an outlet on a circuit different from that to which the receiveris connected.
. Consult the dealer or an experienced radio/TV technician for help.
WARNING
The connection of a non-shielded printer interface cable to this printer will invalidate the FCC
Certification of this device and may cause interference levels that exceed the limits established
by the FCC for this equipment. If this equipment has more than one interface connector, do notleave cables connected to unused interfaces.
Seiko Epson Corporation shall not be liable against any damages or problems arising from theuse of any options or any consumable products other than those designated as Original Epson
Products or Epson Approved Products by Seiko Epson Corporation.
All rights reserved. No part of this publication may be reproduced, stored in a retrieval
system, or transmitted, in any form or by any means, mechanical, photocopying, recording, orotherwise, without the prior written permission of Epson America, Inc. No patent liability is
assumed with respect to the use of the information contained herein. While every precautionhas been taken in the preparation of this book, Epson America, Inc. assumes no responsibilityfor errors or omissions. Neither is any liability assumed for damages resulting from the use ofthe information contained herein.
ActionPrinter is a trademark of Epson America, Inc.
Epson and Epson ESC/P are registered trademarks of Seiko Epson Corporation.SmartPark is a trademark of Epson America, Inc.
IBM is a registered trademark of International Business Machines Corporation.
Copyright © 1989 by Epson America, Inc.
Torrance, California
ii

7/21/2019 Epson ActionPrinter 4000 User's Manual
http://slidepdf.com/reader/full/epson-actionprinter-4000-users-manual 4/290
IMPORTANT SAFETY INSTRUCTIONS
1. Read all of these instructions and save them for later reference.
2. Follow all warnings and instructions marked on the product.
3. Unplug this product from the wall outlet before cleaning. Do not
use liquid cleaners or aerosol cleaners. Use a damp cloth for
cleaning.
4. Do not use this product near water.
5. Do not place this product on an unstable cart, stand, or table.
The product may fall, causing serious damage to the product.6. Slots and openings in the cabinet and the back or bottom are
provided for ventilation; to ensure reliable operation of the
product and to protect it from overheating, these openings must
not be blocked or covered. The openings should never be
blocked by placing the product on a bed, sofa, rug, or other
similar surface. This product should never be placed near or over
a radiator or heat register. This product should not be placed in a
built in installation unless proper ventilation is provided.
7. This product should be operated from the type of power source
indicated on the marking label. If you are not sure of the type of
power available, consult your dealer or local power company.
8. This product is equipped with a 3-wire grounding-type plug, a
plug having a third (grounding) pin. This plug will only fit into a
grounding type power outlet. This is a safety feature. If you are
unable to insert the plug into the outlet, contact your electricianto replace your obsolete outlet. Do not defeat the purpose of the
grounding type plug.
9. Do not locate this product where the cord will be walked on.
iii

7/21/2019 Epson ActionPrinter 4000 User's Manual
http://slidepdf.com/reader/full/epson-actionprinter-4000-users-manual 5/290
10. If an extension cord is used with this product, make sure that the
total of the ampere ratings on the products plugged into the ex-
tension cord do not exceed the extension cord ampere rating.
Also, make sure that the total of all products plugged into the
wall outlet does not exceed 15 amperes.
11. Never push objects of any kind into this product through cabinet
slots, as they may touch dangerous voltage points or short out
parts that could result in a risk of fire or electric shock. Never
spill liquid of any kind on the product.
12. Except as specifically explained in the User s Manual, do notattempt to service this product yourself. Opening or removing
those covers that are marked “Do Not Remove” may expose you
to dangerous voltage points or other risks. Refer all servicing in
those compartments to service personnel.
13. Unplug this product from the wall outlet and refer servicing to
qualified service personnel under the following conditions:
A. When the power cord or plug is damaged or frayed.
B. If liquid has been spilled into the product.
C. If the product has been exposed to rain or water.
D. If the product does not operate normally when the operating
instructions are followed. Adjust only those controls that
are covered by the operating instructions, since improper
adjustment of other controls may result in damage and will
often require extensive work by a qualified technician to
restore the product to normal operation.
E. If the product has been dropped or the cabinet has been
damaged.
F. If the product exhibits a distinct change in performance,
indicating a need for service.
iv

7/21/2019 Epson ActionPrinter 4000 User's Manual
http://slidepdf.com/reader/full/epson-actionprinter-4000-users-manual 6/290
Contents
Introduction 1
Features . . . . . . . . . . . . . . . . . . . . . . . . . . . . . . . . . . . . . . . . . . . . . . . . . . . . . 1
Options.. . . . . . . . . . . . . . . . . . . . . . . . . . . . . . . . . . . . . . . . . . . . . . . . . . . . 2 About This Manual . . . . . . . . . . . . . . . . . . . . . . . . . . . . . . . . . . . . . . . . . . . 4
Application Notes . . . . . . . . . . . . . . . . . . . . . . . . . . . . . . . . . . . . . . . . . . . . 5Where to Get Help. . . . . . . . . . . . . . . . . . . . . . . . . . . . . . . . . . . . . . . . . . . . 6
Chapter 1 Setting Up the Printer 1-1
Unpacking the Printer. . . . . . . . . . . . . . . . . . . . . . . . . . . . . . . . . . . . . . . . . 1-2Choosing a Place for the Printer . . . . . . . . . . . . . . . . . . . . . . . . . . . . . . . . 1-4
Assembling the Printer . . . . . . . . . . . . . . . . . . . . . . . . . . . . . . . . . . . . . . . . 1-6Testing the Printer . . . . . . . . . . . . . . . . . . . . . . . . . . . . . . . . . . . . . . . . . . . . 1-13Connecting the Printer to Your Computer . . . . . . . . . . . . . . . . . . . . . . . 1-22Setting Up Your Application Software. . . . . . . . . . . . . . . . . . . . . . . . . . . 1-25
Chapter 2 Paper Handling 2-1
Using Single Sheets . . . . . . . . . . . . . . . . . . . . . . . . . . . . . . . . . . . . . . . . . . . 2-2
Using Continuous Paper . . . . . . . . . . . . . . . . . . . . . . . . . . . . . . . . . . . . . . 2-6Switching Between Continuous and Single Sheets . . . . . . . . . . . . . . . . 2-13
Printing on Special Paper . . . . . . . . . . . . . . . . . . . . . . . . . . . . . . . . . . . . . . 2-20
Chapter 3 Using the Printer 3-1
Operating the Control Panel . . . . . . . . . . . . . . . . . . . . . . . . . . . . . . . . . . . 3-2Setting the DIP Switches. . . . . . . . . . . . . . . . . . . . . . . . . . . . . . . . . . . . . . . 3-6Page Length . . . . . . . . . . . . . . . . . . . . . . . . . . . . . . . . . . . . . . . . . . . . . . . . . 3-10
Skip Over Perforation . . . . . . . . . . . . . . . . . . . . . . . . . . . . . . . . . . . . . . . . . 3-11
Adjusting the Loading Position. . . . . . . . . . . . . . . . . . . . . . . . . . . . . . . . . 3-12Using Short Tear-Off. . . . . . . . . . . . . . . . . . . . . . . . . . . . . . . . . . . . . . . . . . 3-14
Selecting Typestyles . . . . . . . . . . . . . . . . . . . . . . . . . . . . . . . . . . . . . . . . . . 3-17
Selecting an International Character Set . . . . . . . . . . . . . . . . . . . . . . . . . 3-20
Choosing a Character Table . . . . . . . . . . . . . . . . . . . . . . . . . . . . . . . . . . . . 3-22
Using the Data Dump Mode . . . . . . . . . . . . . . . . . . . . . . . . . . . . . . . . . . . 3-24
Chapter 4 Software and Graphics 4-1
Enhancing Your Printing . . . . . . . . . . . . . . . . . . . . . . . . . . . . . . . . . . . . . . 4-2
Graphics . . . . . . . . . . . . . . . . . . . . . . . . . . . . . . . . . . . . . . . . . . . . . . . . . . . . 4-9User-defined Characters. . . . . . . . . . . . . . . . . . . . . . . . . . . . . . . . . . . . . . . 4-20
V

7/21/2019 Epson ActionPrinter 4000 User's Manual
http://slidepdf.com/reader/full/epson-actionprinter-4000-users-manual 7/290
Chapter 5 Using the Printer Options 5-1
The Cut Sheet Feeder . . . . . . . . . . . . . . . . . . . . . . . . . . . . . . . . . . . . . . . . . . 5-2
The Pull Tractor . . . . . . . . . . . . . . . . . . . . . . . . . . . . . . . . . . . . . . . . . . . . . . 5-17
The Multi-Font Module . . . . . . . . . . . . . . . . . . . . . . . . . . . . . . . . . . . . . . . 5-28
The Interface Boards . . . . . . . . . . . . . . . . . . . . . . . . . . . . . . . . . . . . . . . . . . 5-34
Chapter 6 Maintenance 6-1
Cleaning the Printer . . . . . . . . . . . . . . . . . . . . . . . . . . . . . . . . . . . . . . . . . . 6-2
Replacing the Ribbon . . . . . . . . . . . . . . . . . . . . . . . . . . . . . . . . . . . . . . . . . 6-4
Transporting the Printer. . . . . . . . . . . . . . . . . . . . . . . . . . . . . . . . . . . . . . . 6-10
Chapter 7 Troubleshooting 7-1
Problems and Solutions . . . . . . . . . . . . . . . . . . . . . . . . . . . . . . . . . . . . . . . 7-2
Power Supply .......................................... . . . . . . . . . . . . . . . . . . . . . . . .. . . . . 7-4
Printing . . . . . . . . . . . . . . . . . . . . . . . . . . . . . . . . . . . . . . . . . . . . . . . . . . . . 7-5
Paper Handling.. . . . . . . . . . . . . . . . . . . . . . . . . . . . . . . . . . . . . . . . . . . . 7-14
Options.. . . . . . . . . . . . . . . . . . . . . . . . . . . . . . . . . . . . . . . . . . . . . . . . . . . 7-24
Chapter 8 Technical Specifications
Printer Specifications. . . . . . . . . . . . . . . . . . . . . . . . . . . . . . . . . . . .
Interface Specifications . . . . . . . . . . . . . . . . . . . . . . . . . . . . . . . . . .Option Specifications . . . . . . . . . . . . . . . . . . . . . . . . . . . . . . . . . . .
Initialization . . . . . . . . . . . . . . . . . . . . . . . . . . . . . . . . . . . . . . . . . . .
8-1
. . . . . 8-2
. . . . . 8-9
. . . . . 8-13
. . . . . 8-15
Chapter 9 Command Summary 9-1
Using the Command Summary. . . . . . . . . . . . . . . . . . . . . . . . . . . . . . . . . 9-2Commands in Numerical Order . . . . . . . . . . . . . . . . . . . . . . . . . . . . . . . . 9-5
Commands Arranged by Topic. . . . . . . . . . . . . . . . . . . . . . . . . . . . . . . . . 9-8
Appendix A-1
Proportional Width Table. . . . . . . . . . . . . . . . . . . . . . . . . . . . . . . . . . . . . . A-2
Character Table . . . . . . . . . . . . . . . . . . . . . . . . . . . . . . . . . . . . . . . . . . . . . . A-6
Glossary
Index
v i

7/21/2019 Epson ActionPrinter 4000 User's Manual
http://slidepdf.com/reader/full/epson-actionprinter-4000-users-manual 8/290
Introduction
The Epson® ActionPrinter™ 4000 is an advanced 24-pin dot matrixprinter combining compact design and high performance with awide range of features.
Features
In addition to the high-quality printing and ease of operation youhave come to expect from Epson printers, the ActionPrinter 4000offers the following features:
Easy paper handling, featuring automatic single-sheet loading.
Compatibility with the Epson ESC/P® commands used by theLQ-510, LQ-500, LQ-800, LQ-850, LQ-950, LQ-1000, LQ-1050,LQ-1500, LQ-2500, and LQ-2550.
Fast draft mode printing of up to 180 characters per second.
An improved control panel design that allows direct selection ofcharacter fonts, as well as a choice of normal or condensedprinting.
The SmartPark™ paper handling system that lets you use singlesheets of paper without removing the continuous paper,eliminates paper waste with short tear-off, and allows easy andaccurate paper alignment.
Two built-in Letter Quality fonts (Roman and Sans Serif) forproducing high-quality documents.
A 360 x 360 dot per inch graphics mode.
A micro-adjustment feature that allows you to feed the paperforward or backward to finely adjust the loading and short tear-
off positions.
Introduction 1

7/21/2019 Epson ActionPrinter 4000 User's Manual
http://slidepdf.com/reader/full/epson-actionprinter-4000-users-manual 9/290
Introduction
l Fourteen international character sets, a legal symbol set, an italiccharacter table, and the Epson Extended Graphics charactertable.
l The ability to handle a wide range of paper types, includingenvelopes and labels.
Options
A variety of printer options is available for use with your printer.For detailed information on installing and using these options, see
Chapter 5.l Single-bin Cut Sheet Feeder (C806121)
The cut sheet feeder makes it possible to handle single-sheetpaper more easily and more efficiently. Up to 150 sheets ofstandard bond paper can be automatically fed into the printerwithout reloading.
2 Introduction

7/21/2019 Epson ActionPrinter 4000 User's Manual
http://slidepdf.com/reader/full/epson-actionprinter-4000-users-manual 10/290
Introduction
Pull Tractor Unit (C800061)
This option improves the performance of continuous paper
handling. It is especially useful with continuous multi-partforms.
Multi-Font Module (#7407)
The optional Multi-Font module adds to the number of fontsavailable in the Letter Quality mode.
Film Ribbon Cartridge (#7768)
The optional film ribbon cartridge provides you with evenhigher quality printing than the standard fabric ribbon.
Introduction 3

7/21/2019 Epson ActionPrinter 4000 User's Manual
http://slidepdf.com/reader/full/epson-actionprinter-4000-users-manual 11/290
Introduction
l Interface Boards
Optional interface boards are available to supplement the
printer s built-in parallel interface. Guidelines for choosing theright interface and instructions on installing the boards are givenin Chapter 5.
About This Manual
This user s manual provides fully illustrated, step-by-stepinstructions on setting up and operating your Epson printer.
Finding your way around
l Chapter 1 contains information on unpacking, setting up,testing, and connecting the printer. Be sure to read and followthese instructions first. Inside the back flap of this manual areillustrations of the printer in which all of the major parts areidentified.
l Chapters 2 and 3 cover paper handling and general printeroperation. This important information is necessary for the day-to-day operation of your printer.
4 Introduction

7/21/2019 Epson ActionPrinter 4000 User's Manual
http://slidepdf.com/reader/full/epson-actionprinter-4000-users-manual 12/290
Introduction
Chapter 4 shows you how to get the most from your printer. Itincludes advice on the use of software commands, graphics, and
creating your own user-defined characters. See Chapter 9 for auseful summary of printer commands.
If the printer does not operate properly or the printed results arenot what you expect, see Chapter 7 for troubleshootinginstructions.
Other chapters and the appendix contain information on printeroptions, general maintenance, and specifications. You will also
find a glossary of printer terms.At the back of this manual is a handy Quick Reference card thatcontains the information you are most likely to need.
Conventions used in this manual
WARNINGS must be followed carefully to avoid damageto your printer and computer.
CAUTIONS should be followed carefully to ensure that your printer operates correctly.
Notes contain important information and useful tips on the
operation of your printer.
Application Notes
Also included in the box with your printer is a booklet called Application Notes. It contains information on using specific software
applications with your printer. Be sure to look at the booklet afteryou set up your printer.
Introduction 5

7/21/2019 Epson ActionPrinter 4000 User's Manual
http://slidepdf.com/reader/full/epson-actionprinter-4000-users-manual 13/290
Where to Get Help
Customer service for Epson products is provided by a network of
authorized Epson Customer Care Centers throughout the UnitedStates.
Call the Epson Consumer Information Center at 1-800-922-8911 forthe following:
l Customer Care Center referrals
l Technical support referrals
l Information on Epson User Groups.
To locate or purchase accessories or supplies, contact your nearestEpson dealer or call 1-800-873-7766.
6 Introduction

7/21/2019 Epson ActionPrinter 4000 User's Manual
http://slidepdf.com/reader/full/epson-actionprinter-4000-users-manual 14/290
Chapter 1
Setting Up the Printer
Unpacking the Printer. . . . . . . . . . . . . . . . . . . . . . . . . . . . . . . 1-2
Checking the Parts. . . . . . . . . . . . . . . . . . . . . . . . . . . . . . . . 1-2
Choosing a Place for the Printer . . . . . . . . . . . . . . . . . . . . . . 1-4
Assembling the Printer. . . . . . . . . . . . . . . . . . . . . . . . . . . . . . 1-6Installing the Platen Knob . . . . . . . . . . . . . . . . . . . . . . . . . 1-6
Installing the Ribbon Cartridge. . . . . . . . . . . . . . . . . . . . . 1-7
Attaching the Paper Guide. . . . . . . . . . . . . . . . . . . . . . . . . 1-10
Testing the Printer. . . . . . . . . . . . . . . . . . . . . . . . . . . . . . . . . . 1-13
Plugging in the Printer . . . . . . . . . . . . . . . . . . . . . . . . . . . . 1-13
Running the Self Test . . . . . . . . . . . . . . . . . . . . . . . . . . . . . 1-14Checking the Operation . . . . . . . . . . . . . . . . . . . . . . . . . . . 1-21
Connecting the Printer to Your Computer . . . . . . . . . . . . . 1-22The Parallel Interface . . . . . . . . . . . . . . . . . . . . . . . . . . . . . 1-22
Setting Up Your Application Software . . . . . . . . . . . . . . . . 1-25
Choosing From a Menu . . . . . . . . . . . . . . . . . . . . . . . . . . . 1-25
Setting Up the Printer 1-1

7/21/2019 Epson ActionPrinter 4000 User's Manual
http://slidepdf.com/reader/full/epson-actionprinter-4000-users-manual 15/290
Unpacking the Printer
Checking the Parts
When you unpack the printer, make sure that you have all the partsshown below and that none have been damaged.
Printer
Platen knob
Ribbon cartridge
1-2 Setting Up the Printer
7/21/2019 Epson ActionPrinter 4000 User's Manual
http://slidepdf.com/reader/full/epson-actionprinter-4000-users-manual 16/290
After removing the parts, save the packaging materials in case youever need to transport your printer.
Note: Be sure to lift the printer cover and remove the pieces ofwhite packing material.
Setting Up the Printer 1-3

7/21/2019 Epson ActionPrinter 4000 User's Manual
http://slidepdf.com/reader/full/epson-actionprinter-4000-users-manual 17/290
Choosing a Place for the Printer
There are several important things to consider when selecting aplace to set up your printer. Keep the following in mind:
Place the printer on a flat, hard, stable surface. A soft surface,such as a padded counter or carpeted area, will block theventilation slots and may cause overheating.
Place the printer close enough to the computer for the printercable to reach.
Leave adequate room around the printer to allow for easyprinter operation and maintenance, and for unrestricted flow ofair around the printer.
Use a grounded outlet; do not use an adapter plug.
.nr ln I WARNING: Avoid locations that are subject to directsunlight, excessive heat, moisture, or dust.
I I
Avoid electrical outlets controlled by wall switches or automatictimers. Accidental interruption of power can wipe outinformation in both your computer s memory and in yourprinter s memory.
Avoid using outlets that share a circuit with large motors orelectrical appliances; this could cause fluctuations in linevoltage.
Keep the entire computer system away from potential sources ofelectromagnetic interference such as loudspeakers or the baseunits of cordless telephones.
1-4 Setting Up the Printer
7/21/2019 Epson ActionPrinter 4000 User's Manual
http://slidepdf.com/reader/full/epson-actionprinter-4000-users-manual 18/290
Choosing a Place for the Printer
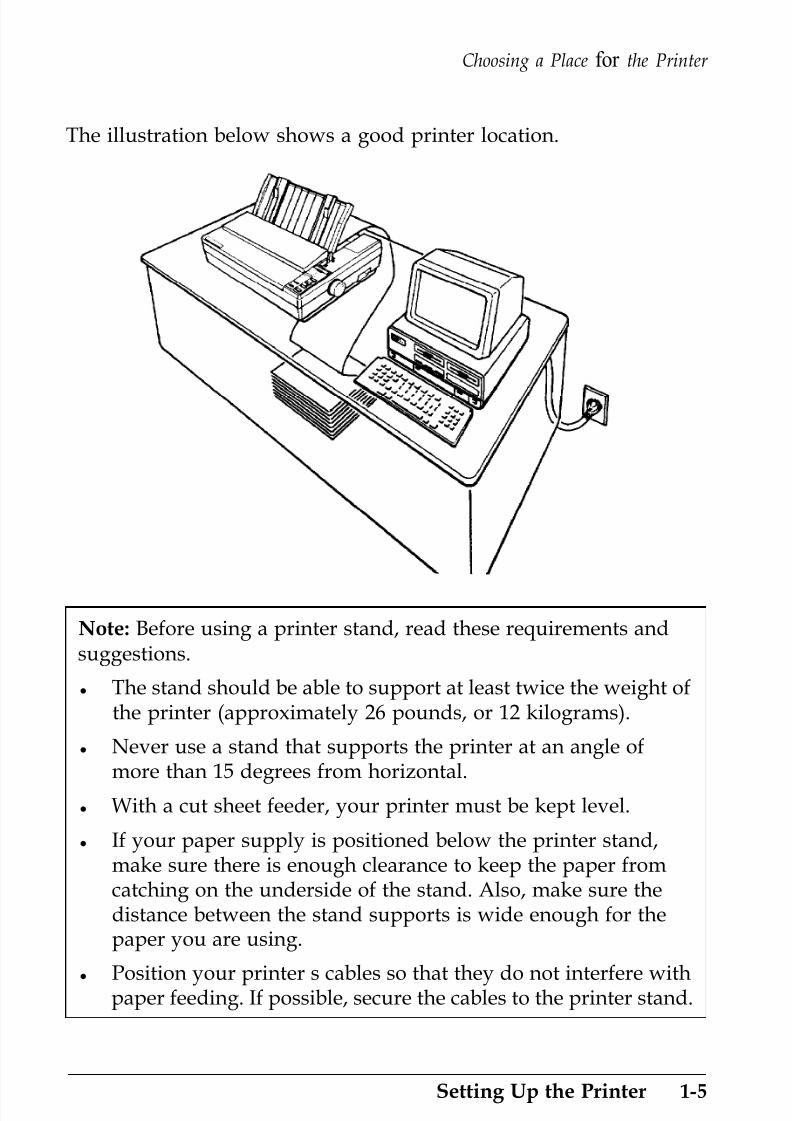
The illustration below shows a good printer location.
Note: Before using a printer stand, read these requirements andsuggestions.
l The stand should be able to support at least twice the weight ofthe printer (approximately 26 pounds, or 12 kilograms).
l Never use a stand that supports the printer at an angle ofmore than 15 degrees from horizontal.
l With a cut sheet feeder, your printer must be kept level.
l If your paper supply is positioned below the printer stand,make sure there is enough clearance to keep the paper fromcatching on the underside of the stand. Also, make sure thedistance between the stand supports is wide enough for thepaper you are using.
l
Position your printer s cables so that they do not interfere withpaper feeding. If possible, secure the cables to the printer stand.
Setting Up the Printer 1-5
7/21/2019 Epson ActionPrinter 4000 User's Manual
http://slidepdf.com/reader/full/epson-actionprinter-4000-users-manual 19/290
Assembling the Printer
After you ve decided on the best place to set up your printer, thenext step is to install the platen knob.
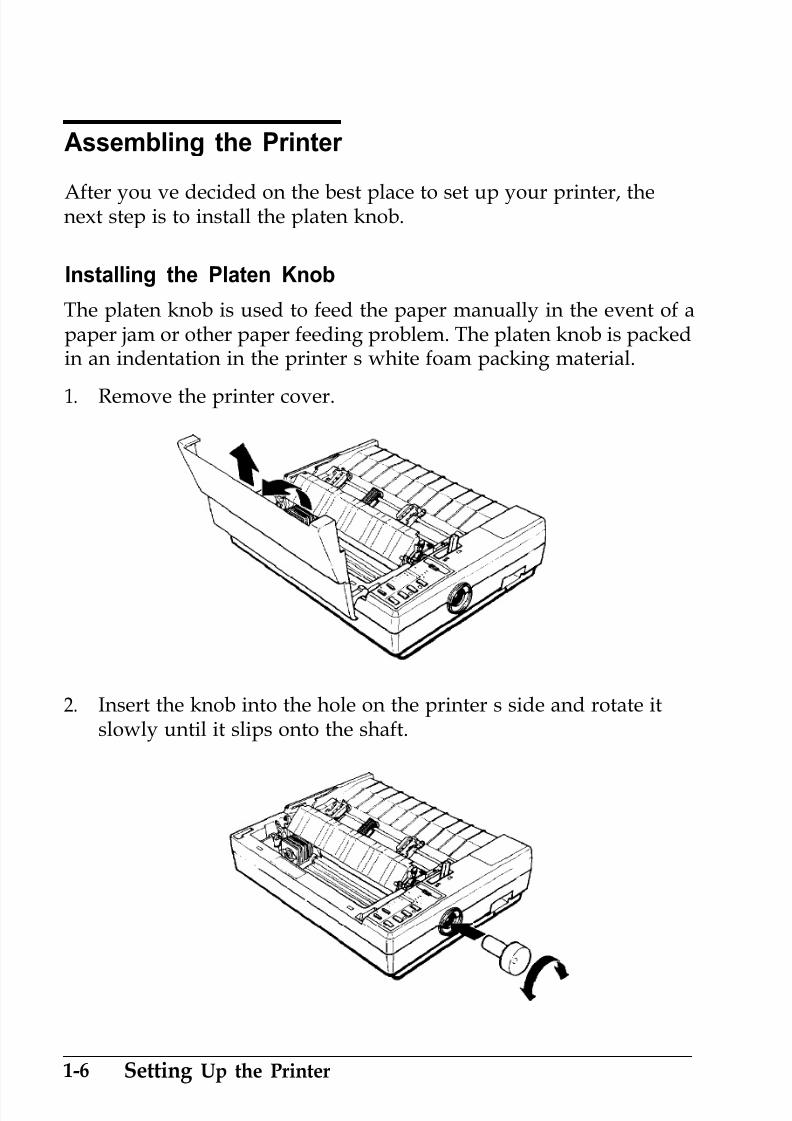
Installing the Platen Knob
The platen knob is used to feed the paper manually in the event of apaper jam or other paper feeding problem. The platen knob is packedin an indentation in the printer s white foam packing material.
1. Remove the printer cover.
2. Insert the knob into the hole on the printer s side and rotate itslowly until it slips onto the shaft.
1-6 Setting Up the Printer

7/21/2019 Epson ActionPrinter 4000 User's Manual
http://slidepdf.com/reader/full/epson-actionprinter-4000-users-manual 20/290
Assembling the Printer
3. Push firmly on the platen knob until it fits against the printer case.
0CAUTION: Do not use the platen knob to adjust the
. position of the paper. This interferes with the automaticpaper loading system and may cause a paper jam.
Installing the Ribbon Cartridge
Your printer s ribbon cartridge is designed for easy installation andremoval. Before installing the ribbon cartridge, make sure theprinter is turned off.
Install the ribbon cartridge as follows.
1. Slide the print head to the middle of the printer.
Setting Up the Printer 1-7

7/21/2019 Epson ActionPrinter 4000 User's Manual
http://slidepdf.com/reader/full/epson-actionprinter-4000-users-manual 21/290
Assembling the Printer
0CAUTION: Never move the print head while the printer is
turned on because this can damage the printer. Also, if
you have been using the printer, the print head may behot; let it cool for a few minutes before touching it.
2. Turn the ribbon-tightening knob in the direction of the arrow.This removes slack in the ribbon and makes it easier to install.
3. Open the paper tension unit cover.
1-8 Setting Up the Printer

7/21/2019 Epson ActionPrinter 4000 User's Manual
http://slidepdf.com/reader/full/epson-actionprinter-4000-users-manual 22/290
Assembling the Printer
4. Hold the ribbon cartridge by its handle and push it firmly downinto position, making sure the plastic hooks fit into the slots.
Note: Press lightly on both ends of the cartridge to make surethe plastic hooks are properly seated.
5. Use a pointed object, such as a ball point pen, to guide the
ribbon between the print head and ribbon guide while you turnthe ribbon-tightening knob to help feed the ribbon into place.
Setting Up the Printer 1-9

7/21/2019 Epson ActionPrinter 4000 User's Manual
http://slidepdf.com/reader/full/epson-actionprinter-4000-users-manual 23/290
Assembling the Printer
6. Slide the print head from side to side to make sure it movessmoothly. Also check that the ribbon is not twisted or creased.
7. Close the paper tension unit cover.
Attaching the Paper Guide
When you use single sheets, the paper guide helps to feed the papersmoothly and efficiently into the printer. Attach the paper guideusing the following procedure.
1-10 Setting Up the Printer

7/21/2019 Epson ActionPrinter 4000 User's Manual
http://slidepdf.com/reader/full/epson-actionprinter-4000-users-manual 24/290
Assembling the Printer
1. Place the paper guide on the printer as shown below.
2. Raise the paper guide until it locks into place.
Note: To lower the paper guide, lift up slightly to release itfrom its locked position; then gently lower it down onto theprinter.
Setting Up the Printer 1-11

7/21/2019 Epson ActionPrinter 4000 User's Manual
http://slidepdf.com/reader/full/epson-actionprinter-4000-users-manual 25/290
Assembling the Printer
3. Attach the printer cover by fitting the hooks on the cover intothe notches at the front of the printer and tilting the cover backinto place.
1-12 Setting Up the Printer

7/21/2019 Epson ActionPrinter 4000 User's Manual
http://slidepdf.com/reader/full/epson-actionprinter-4000-users-manual 26/290
Testing the Printer
Now that your printer is fully assembled, you can use its built-inself test function to see that the printer is working correctly beforeyou connect it to a computer. You should perform this test to makesure that your printer was not damaged during shipping and thatthe ribbon is correctly installed.
Before running the self test, you need to connect the printer to anelectrical outlet and load a sheet of paper.
Plugging in the Printer
1. Make sure that the printer is turned off.
Setting Up the Printer 1-13

7/21/2019 Epson ActionPrinter 4000 User's Manual
http://slidepdf.com/reader/full/epson-actionprinter-4000-users-manual 27/290
Testing the Printer
2. Plug the power cable into a properly grounded electrical outlet.
Running the Self Test
The self test can be run in the draft or Letter Quality mode,depending on which button you hold down as you turn on the
printer. Although the self test can be run with continuous paper, usesingle-sheet paper now because single-sheet loading is easier.
1. Make sure the printer is turned off.
2. Push the paper release lever back to the single-sheet position.
1-14 Setting Up the Printer

7/21/2019 Epson ActionPrinter 4000 User's Manual
http://slidepdf.com/reader/full/epson-actionprinter-4000-users-manual 28/290
Testing the Printer
3. While holding down the LINE FEED button (draft mode) or FORMFEED button (Letter Quality mode), turn on the printer. The
printer beeps several times andPOWER
andPAPER OUT
lightscome on.
Setting Up the Printer 1-15

7/21/2019 Epson ActionPrinter 4000 User's Manual
http://slidepdf.com/reader/full/epson-actionprinter-4000-users-manual 29/290
Testing the Printer
4. Move the left edge guide so that it locks in place next to theguide mark.
5. Adjust the right edge guide to match the width of your paper.Next, slide a sheet of paper down between the edge guides untilit meets resistance.
1-16 Setting Up the Printer

7/21/2019 Epson ActionPrinter 4000 User's Manual
http://slidepdf.com/reader/full/epson-actionprinter-4000-users-manual 30/290
Testing the Printer
WARNING: Never run the self test using paper that isnarrower than A4 size (8.27 inches or 210 mm) or letter
size (8.5 inches or 216 mm) to prevent the print head fromprinting directly onto the platen.
6. Press the LOAD/EJECT button to load the paper.
7. Press the ON LINE button to start the self test. A list of DIP switchsettings is printed first, followed by a series of characters. Theself test continues until the paper runs out or until you press theON LINE button.
Setting Up the Printer 1-17

7/21/2019 Epson ActionPrinter 4000 User's Manual
http://slidepdf.com/reader/full/epson-actionprinter-4000-users-manual 31/290
Testing the Printer
8. If the test results are satisfactory and you wish to stop the test,press the ON LINE button. If the test results are not satisfactory,see Checking the Operation later in this chapter for possiblecauses and solutions.
Note: To resume the test, press the ON LINE button once more.
9. If the paper is still loaded, press the LOAD/EJECT button or LINEFEED button to eject it. Then turn off the printer.
WARNING: After turning the power off, always wait atleast five seconds before turning it back on. Turning the
power on and off rapidly can damage the printer.
1-18 Setting Up the Printer

7/21/2019 Epson ActionPrinter 4000 User's Manual
http://slidepdf.com/reader/full/epson-actionprinter-4000-users-manual 32/290
Testing the Printer
Here is part of a typical self test printed in draft mode.
Draft mode
Country
USAFrance
Germany
U.K.
Denmark
Sweden
Italy
Spain
Font
RomanSans serif
Slot
D r a f t
condensed
Invalid
SW1-1 1-2 1-3
on on on
on on off
on off On
on off Off
off on on
off on off
off off on
off off offSW1-4 1-5
off Off
on off
off on
on
SC
o f f
Page length11"12"
Tear off mod
InvalidValid
1"SkipInvalid
ValidAuto LF
Invalid
Valid
Receive buff
1kbytes8kbytes
Graphics pri
$%&'() i-,-
./0123456789:;<=>
?@ARCDEFGHXJKLMNC
%a'(>*+,-
./0123456789:;
<=>?@ABCDEFGHI\JKLMNClF
is'()*+,-
./0123456789:;
~=>?@hBCDEFGHTJKLeMNOP~
'(>*+,-
./0123456789:;
<~>?@ABCDEFGH~JKLMNOPQR
O*+-,-
./0123456789:;
~=>?@~BCDEFGHIJKLMNQPgRS
>*+,-
./cu23456789:;
<=>?@ABCDEFGHIJKLMNOPQRST
+ , -- ou3456789:;
c=>?@hBCDEFGHIJKLMNOPQRSTlJ
f,-. /0123456789:;~=>?@ABCDEFGtlIJKCMNOPQRSTUV
,--./0123456789:;
<=>,?@ABCDEFGHTJKLMNOPQRSTUVW
Note: When using the optional cut sheet feeder, the first page ofthe self test printout is slightly different. For details, see the CutSheet Feeder section in Chapter 5.
Setting Up the Printer 1-19

7/21/2019 Epson ActionPrinter 4000 User's Manual
http://slidepdf.com/reader/full/epson-actionprinter-4000-users-manual 33/290
Testing the Printer
Here is part of a typical self test printed in Letter Quality mode.
Letter Quality modeCountry
USAFrance
Germany
U.K.
Denmark
Sweden
Italy
Spain
Font
Roman
Sans serifSlot
Draft
SW1-1 1-2 1-3
on on on
on on off
on off on
on off off
off on on
off on off
off off on
off off off
SW1-4 1-5off off
on off
off on
o n o n
Page length
11"12”
Tear off mode
InvalidValid
1"Skip
InvalidValid
Auto LF
InvalidValid
Receive buff.1kbytes
Condensed SW1-6 8kbytes
$%&'()*+,-,
&J()*+,-
./0123456789: ;<=>?CABCDEFGHIJKLMN(
%&'( )*+,-./0123456789*
.;<=>?CABCDEFGHIJKLMNOI
()*+,-
./0123456789:
;<=>?@ABCDEFGHIJKLMNOPC
‘ *+J-
./0123456789:;<=>?@ABCDEFGHIJKLMNOPQF
S a n s S e r i f 1 0
*+J-
0123456789:;<=>?@ABCDEFGHIJKLMNOPQRf
\ I
‘mrnrr r TrrA I . Al. A~rv CLI IT 111
L,., el-,mnm-l
1-20 Setting Up the Printer

7/21/2019 Epson ActionPrinter 4000 User's Manual
http://slidepdf.com/reader/full/epson-actionprinter-4000-users-manual 34/290
Testing the Printer
Checking the Operation
If the self test does not print properly, check the control panel and
the print head area. If paper is jammed, turn off the printer. Thenremove the paper using the platen knob and load a new sheet. Seethat all packing material and shipping restraints have been removedfrom inside the printer. (You can also see Chapter 7 for furtherinformation.)
Problem Solution
The printer does notprint.
The printer sounds likeit is printing, butnothing is printed.
The test did not printwhen you pressed theON LINE button.
The ribbon may not be installed properly.Turn off the printer, reinstall the ribboncartridge, and then tighten the ribbon byturning the ribbon-tightening knob. Makesure the ribbon passes between the print
head and ribbon guide. See page 1-9.
The ribbon may be worn. Replace theribbon cartridge. See page 6-4.
Turn off the printer and repeat the selftest. Make sure you hold down the FORMFEED or LINE FEED button the entire time
you are turning on the printer.
Turn off the printer and disconnect thecable from the host computer. Try the selftest again.
If the printer still does not print the selftest correctly, contact the store where youpurchased your printer or call the Epsontoll-free number (1-800-922-8911).
Setting Up the Printer 1-21

7/21/2019 Epson ActionPrinter 4000 User's Manual
http://slidepdf.com/reader/full/epson-actionprinter-4000-users-manual 35/290
Connecting the Printer to Your Computer
If the self test printed correctly, you are now ready to connect theprinter to your computer.
If your computer has a parallel interface and you have a suitableshielded cable, you should be able to connect your printerimmediately. The steps below describe how to connect the parallelinterface cable.
If your computer requires another type of interface, you need to
install an optional interface board. See the Interface Boards sectionin Chapter 5.
If you are not sure which type of interface cable is required, see yourcomputer manual.
The Parallel Interface
Connect the parallel interface cable as described below:
1. Make sure that both your printer and computer are turned off.
1-22 Setting Up the Printer

7/21/2019 Epson ActionPrinter 4000 User's Manual
http://slidepdf.com/reader/full/epson-actionprinter-4000-users-manual 36/290
Connecting the Printer to Your Computer
2. Plug the cable connector securely into the printer.
3. Squeeze the wire clips together until they lock in place on eitherside of the connector.
Setting Up the Printer 1-23

7/21/2019 Epson ActionPrinter 4000 User's Manual
http://slidepdf.com/reader/full/epson-actionprinter-4000-users-manual 37/290
Connecting the Printer to Your Computer
4. If your cable has a ground wire, connect it to the ground screwbeneath the interface connector.
5. Plug the other end of the cable into the computer. If there is a
ground wire at the computer end of the cable, attach it to theground connector at the back of the computer.
1-24 Setting Up the Printer
7/21/2019 Epson ActionPrinter 4000 User's Manual
http://slidepdf.com/reader/full/epson-actionprinter-4000-users-manual 38/290
Setting Up Your Application Software
Now that you have set up and tested the ActionPrinter 4000, youshould make sure that it works with your application programs.
Most application programs let you specify the type of printer youare using so that the program can take full advantage of theprinter s features. Many of these programs provide an installation orsetup menu that presents a list of printers to choose from.
If your application program has a printer selection menu, use the
instructions below.
Choosing From a Menu
Because the family of Epson printers shares a great manycommands, you can use an application program even if it does notlist the ActionPrinter 4000 on its printer selection menu. If theActionPrinter 4000 is not listed, choose one of the following printers.
They are listed in order of preference.
LQ-510 LQ-800 (LQ-1000)LQ-850 (LQ-950, LQ-1050) SQ-2500LQ-500 LQ-2500LQ-2550 LQ-1500
If none of these printers is listed, select the first one available on thefollowing list:
LQ LX Epson printerEX RX Standard printerFX MX Draft printer
To use all of the features of the ActionPrinter 4000, however, it isbest to use a program with the 4000 or one of the LQ printers on itsmenu. If your program does not list the 4000 or one of the LQ
printers, contact the software manufacturer to see if an update isavailable.
Setting Up the Printer 1-25

7/21/2019 Epson ActionPrinter 4000 User's Manual
http://slidepdf.com/reader/full/epson-actionprinter-4000-users-manual 39/290
Chapter 2
Paper Handling
Using Single Sheets . . . . . . . . . . . . . . . . . . . . . . . . . . . . . . . . . 2-2
Loading Paper . . . . . . . . . . . . . . . . . . . . . . . . . . . . . . . . . . . 2-2
Reloading During Printing. . . . . . . . . . . . . . . . . . . . . . . . . 2-5
Using Continuous Paper . . . . . . . . . . . . . . . . . . . . . . . . . . . . 2-6
Positioning Your Continuous Paper Supply. . . . . . . . . . 2-6
Loading Continuous Paper . . . . . . . . . . . . . . . . . . . . . . . . 2-7
Switching Between Continuous and Single Sheets . . . . . . 2-13
Switching to Single Sheets . . . . . . . . . . . . . . . . . . . . . . . . . 2-13
Switching Back to Continuous Paper. . . . . . . . . . . . . . . . 2-17
Printing on Special Paper. . . . . . . . . . . . . . . . . . . . . . . . . . . . 2-20The Paper Thickness Lever . . . . . . . . . . . . . . . . . . . . . . . . 2-20
Multi-part Forms . . . . . . . . . . . . . . . . . . . . . . . . . . . . . . . . . 2-23
Labels . . . . . . . . . . . . . . . . . . . . . . . . . . . . . . . . . . . . . . . . . . . 2-24
Envelopes . . . . . . . . . . . . . . . . . . . . . . . . . . . . . . . . . . . . . . . 2-26
Paper Handling 2-1

7/21/2019 Epson ActionPrinter 4000 User's Manual
http://slidepdf.com/reader/full/epson-actionprinter-4000-users-manual 40/290
Using Single Sheets
Your printer can accommodate single sheets with a width of 7.2inches or 182 mm to 10 inches or 254 mm.
If you do most of your printing on single sheets, you may find itmore convenient to install the optional cut sheet feeder. This optionautomatically inserts a new sheet and can hold up to 150 pages. Formore details, see Chapter 5.
Loading Paper 1. Push the paper release lever back to the single-sheet position.
2-2 Paper Handling

7/21/2019 Epson ActionPrinter 4000 User's Manual
http://slidepdf.com/reader/full/epson-actionprinter-4000-users-manual 41/290
Using Single Sheets
2. Turn on the printer. (The green POWER light should come on.)
Note: Do not insert paper in the printer before turning on the printer.
3. Move the left edge guide so that it locks in place next to the
guide mark. (You may want to change this position later,depending on the margin settings of your application program.)
Paper Handling 2-3

7/21/2019 Epson ActionPrinter 4000 User's Manual
http://slidepdf.com/reader/full/epson-actionprinter-4000-users-manual 42/290
Using Single Sheets
4. Adjust the right edge guide to match the width of your paper.Then slide the paper down between the edge guides until itmeets resistance.
5. Press the LOAD/EJECT button once to load the paper
automatically.
2-4 Paper Handling

7/21/2019 Epson ActionPrinter 4000 User's Manual
http://slidepdf.com/reader/full/epson-actionprinter-4000-users-manual 43/290
Using Single Sheets
CAUTION: Never advance the paper using the platenknob while the printer is turned on. If the platen turns
it more firmly. Then press the LOAD/EJECT button again.
6. Press the ON LINE button to set the printer on line. When the ONLINE light is lit, the printer can accept data from your computer.
You are now ready to begin printing.
Reloading During Printing
When you print a document of more than one page using single-
sheet paper, the printer stops printing when it reaches the bottom ofthe page. When this happens, the ON LINE light either goes offautomatically or remains on, depending on your applicationprogram software. If the ON LINE light remains on, the first thingyou should do is press the ON LINE button to take the printer off line.
Once the ON LINE light is off, remove the sheet that has just beenprinted (if necessary, press the LOAD/EJECT button to eject the page)
and load a new sheet. Press the ON LINE button to start printing thenext page and follow any additional prompts from your software.
Paper Handling 2-5

7/21/2019 Epson ActionPrinter 4000 User's Manual
http://slidepdf.com/reader/full/epson-actionprinter-4000-users-manual 44/290
Using Continuous Paper
The push tractor built into your printer is remarkably easy to loadand operate. Its low-profile design takes up little space and canhandle paper up to 10 inches or 254 mm wide.
Positioning Your Continuous Paper Supply
An important consideration for achieving smooth and trouble-freepaper feeding is the position of your paper supply.
Three ways of positioning your printer and continuous papersupply are shown below.
Be sure to align the paper supply with the paper loaded in thetractor so that the paper feeds smoothly into the printer.
2-6 Paper Handling

7/21/2019 Epson ActionPrinter 4000 User's Manual
http://slidepdf.com/reader/full/epson-actionprinter-4000-users-manual 45/290
Using Continuous Paper
Loading Continuous Paper
1. Be sure that the printer is turned off, then remove the paper
guide. Set the paper release lever to the continuous paperposition. This position is marked by the icon shown in theillustration below.
2. Release the sprocket units by pulling the sprocket lock leversforward as shown below.
Paper Handling 2-7

7/21/2019 Epson ActionPrinter 4000 User's Manual
http://slidepdf.com/reader/full/epson-actionprinter-4000-users-manual 46/290
Using Continuous Paper
3. Slide the left sprocket unit until it is one-half inch from thefarthest left position and press the lever back to lock it in place.
4. Slide the right sprocket unit so that it roughly matches the widthof your paper, but do not lock it.
2-8 Paper Handling

7/21/2019 Epson ActionPrinter 4000 User's Manual
http://slidepdf.com/reader/full/epson-actionprinter-4000-users-manual 47/290
Using Continuous Paper
5. Move the paper support midway between the two sprocketunits.
6. Open both sprocket covers.
0CAUTION: Make sure that your paper has a clean, straight
. edge before inserting it into the printer.
Paper Handling 2-9

7/21/2019 Epson ActionPrinter 4000 User's Manual
http://slidepdf.com/reader/full/epson-actionprinter-4000-users-manual 48/290
Using Continuous Paper
7. Fit the first three holes in the paper over the pins of bothsprockets.
8. Close the sprocket covers.
2-10 Paper Handling
7/21/2019 Epson ActionPrinter 4000 User's Manual
http://slidepdf.com/reader/full/epson-actionprinter-4000-users-manual 49/290
Using Continuous Paper
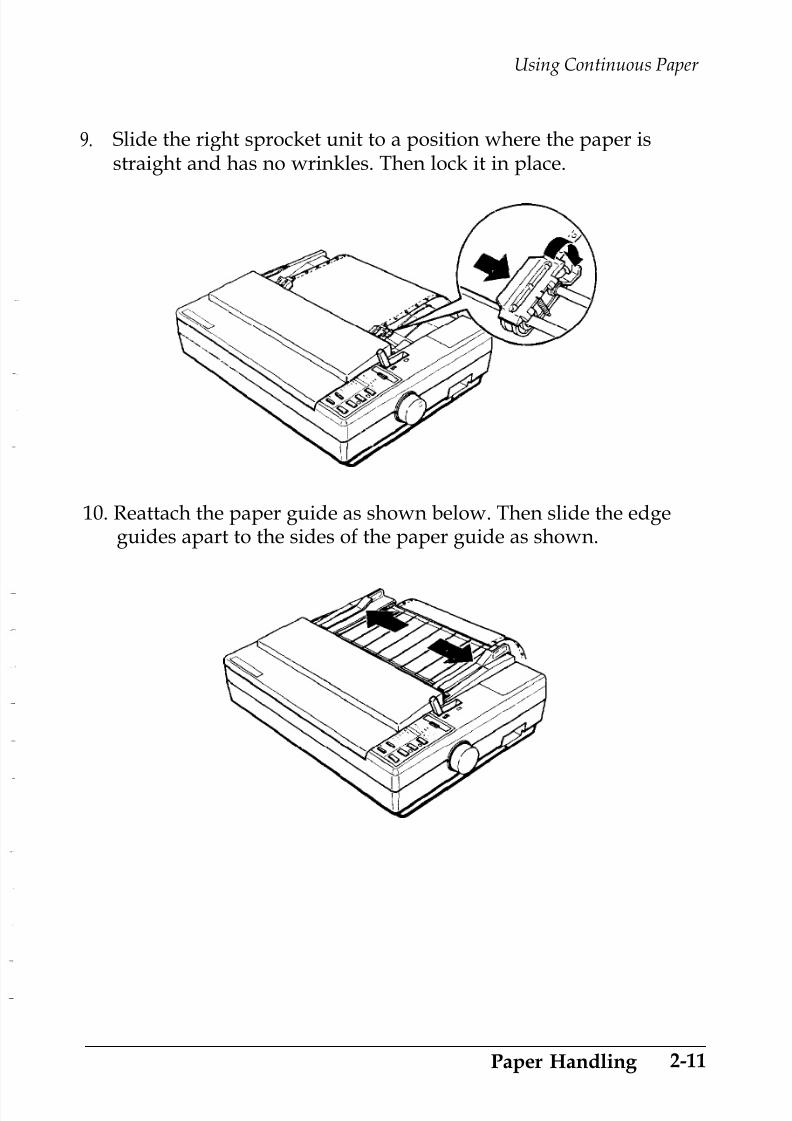
9. Slide the right sprocket unit to a position where the paper isstraight and has no wrinkles. Then lock it in place.
10. Reattach the paper guide as shown below. Then slide the edgeguides apart to the sides of the paper guide as shown.
Paper Handling 2-11

7/21/2019 Epson ActionPrinter 4000 User's Manual
http://slidepdf.com/reader/full/epson-actionprinter-4000-users-manual 50/290
Using Continuous Paper
11. Turn on the printer. It will beep because there is no paper in theprinter. Then press the LOAD/EJECT button to feed paper to the
loading position.
12. Press the ON LINE button to set the printer on line so that it canaccept data.
The printer remembers the loading position and advances each pageto the same position. If you need to adjust the loading position, usethe micro-adjustment feature. See the section on setting the loadingposition in Chapter 3.
0CAUTION: Never adjust the loading position using the
. platen knob and never turn the platen knob while theprinter is turned on.
2-12 Paper Handling

7/21/2019 Epson ActionPrinter 4000 User's Manual
http://slidepdf.com/reader/full/epson-actionprinter-4000-users-manual 51/290
Switching Between Continuous and Single Sheets
Even with continuous paper loaded in the printer, the SmartParkfeature allows you to easily switch to single-sheet printing withoutremoving the continuous paper from the tractor.
Switching to Single Sheets
To switch from continuous paper to single sheets, follow the stepsbelow.
1. If the printer is on line, press the ONprinter off line.
LINE button to set the
2. Tear off any outgoing sheets. If the paper has advanced past theprint head, you need to press the FORM FEED button to advanceyour document to a point where it can be easily removed.
Paper Handling 2-13

7/21/2019 Epson ActionPrinter 4000 User's Manual
http://slidepdf.com/reader/full/epson-actionprinter-4000-users-manual 52/290
Switching Between Continuous and Single Sheets
0CAUTION: Make sure you tear off your printed documentbefore pressing the LOAD/EJECT button. Reverse-feeding
several pages at a time may result in a paper jam. This isespecially true for narrow paper (less than 6 inches or152.4 mm wide).
3. Press the LOAD/EJECT button to feed the continuous paperbackward out of the printer and into the standby position. Thepaper is still attached to the tractor but no longer in the paper
path.
0.
CAUTION: Pressing the LOAD/EJECT button once may notfeed the paper far back enough to reach the standbyposition. If the PAPER OUT light does not come on, youneed to press the LOAD/EJECT button again. With normal-width continuous paper, you can press the LOAD/EJECT
button up to three times. If, however, you are usingnarrow paper (between 4 and 6 inches or 101.6 and 152.4mm) you should only press the LOAD/EJECT button once.Also, do not use this button to eject labels.
WARNING: Never feed labels backward through theprinter. Labels can easily come off
2-14 Paper Handling

7/21/2019 Epson ActionPrinter 4000 User's Manual
http://slidepdf.com/reader/full/epson-actionprinter-4000-users-manual 53/290
Switching Between Continuous and Single Sheets
4. Push the paper release lever back to the single-sheet position.This position is marked by the icon shown in the illustrationbelow.
5. Stand the paper guide upright and adjust the edge guides toroughly match the width of your paper.
Paper Handling 2-15
7/21/2019 Epson ActionPrinter 4000 User's Manual
http://slidepdf.com/reader/full/epson-actionprinter-4000-users-manual 54/290
Switching Between Continuous and Single Sheets
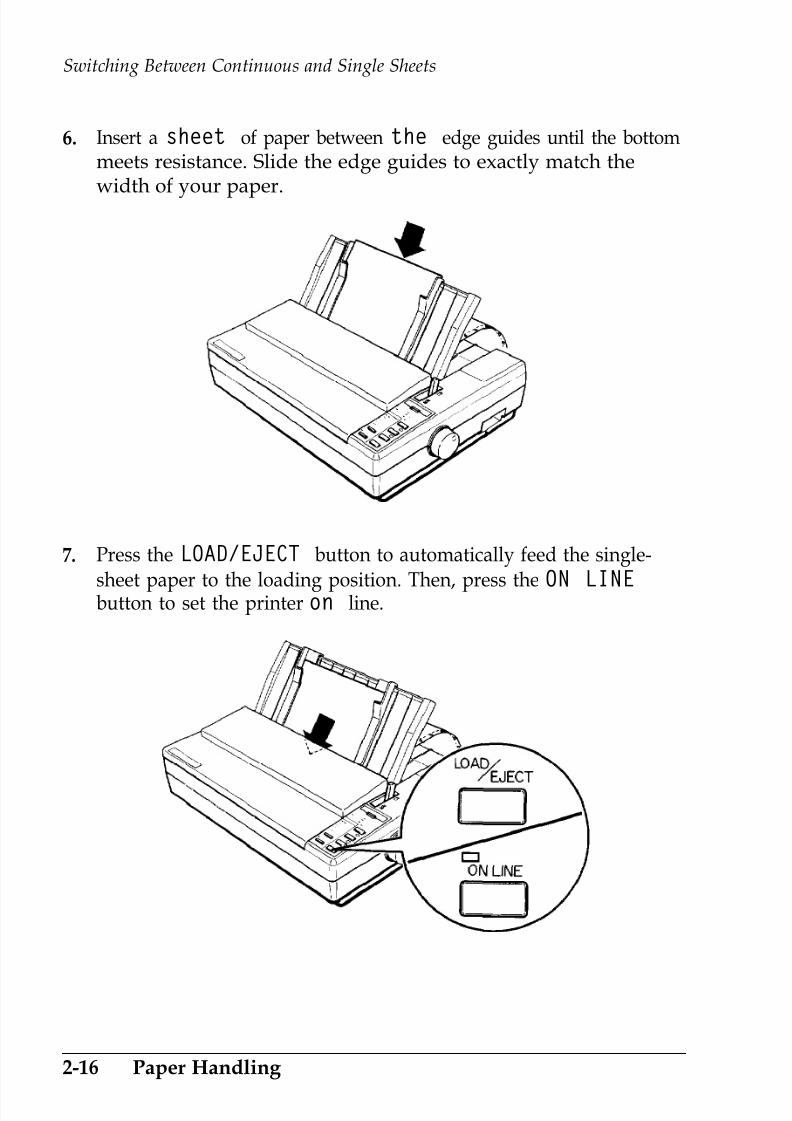
6.
7.
Insert a sheet of paper between the edge guides until the bottommeets resistance. Slide the edge guides to exactly match the
width of your paper.
Press the LOAD/EJECT button to automatically feed the single-
sheet paper to the loading position. Then, press the ON LINEbutton to set the printer on line.
2-16 Paper Handling

7/21/2019 Epson ActionPrinter 4000 User's Manual
http://slidepdf.com/reader/full/epson-actionprinter-4000-users-manual 55/290
Switching Between Continuous and Single Sheets
Switching Back to Continuous Paper
It is also easy to switch back to printing with continuous paper.
Before switching to continuous paper, make sure that the singlesheet is ejected and the printer is off line.
1. Slide the edge guides apart so they do not interfere withcontinuous paper feeding.
2. Lower the paper guide onto the printer.
Paper Handling 2-17

7/21/2019 Epson ActionPrinter 4000 User's Manual
http://slidepdf.com/reader/full/epson-actionprinter-4000-users-manual 56/290
Switching Between Continuous and Single Sheets
3. Pull the paper release lever forward to the continuous paperposition.
4. Press the LOAD/EJECT button to feed the continuous paper to theloading position.
2-18 Paper Handling

7/21/2019 Epson ActionPrinter 4000 User's Manual
http://slidepdf.com/reader/full/epson-actionprinter-4000-users-manual 57/290
Switching Between Continuous and Single Sheets
5. Press the ON LINE button to set the printer on line so that it canaccept data.
Paper Handling 2-19

7/21/2019 Epson ActionPrinter 4000 User's Manual
http://slidepdf.com/reader/full/epson-actionprinter-4000-users-manual 58/290
Printing on Special Paper
In addition to printing on single sheets and continuous paper, yourprinter can also print on a wide variety of paper types, includingmulti-part forms, labels, and envelopes.
Before printing on special types of paper, you need to change thepaper thickness setting.
WARNING: When printing on multi-part forms, labels, or
envelopes, make sure that your application programsettings keep the printing entirely within the printablearea.
For multi-part forms and labels you should not print anycloser than one-half inch from either side of the paper.
For information on the printable area for envelopes, seepage 2-26.
The Paper Thickness Lever
To accommodate various thicknesses of paper, your printer isequipped with a paper thickness lever that can be set to sevenpositions. These positions are identified by a scale on the printernext to the lever.
2-20 Paper Handling

7/21/2019 Epson ActionPrinter 4000 User's Manual
http://slidepdf.com/reader/full/epson-actionprinter-4000-users-manual 59/290
Printing on Special Paper
To change the paper thickness setting, follow these steps.
1. Make sure that the printer is turned off. Then remove the printer
cover.
bl
WARNING: If the printer has just been in use, the printhead may be hot. Allow it to cool before touching it.
2. Slide the print head to the middle of the printer.
Paper Handling 2-21

7/21/2019 Epson ActionPrinter 4000 User's Manual
http://slidepdf.com/reader/full/epson-actionprinter-4000-users-manual 60/290
Printing on Special Paper
3. Select the paper thickness you want according to the tablebelow. For normal use, the lever should always be set to
position 2 on the scale.
Paper Type Lever Position
Paper (single sheets or continuous) 2
Thin paper 2
24 lb paper 3
Multi-part forms2-sheet 3
3-sheet 4
Labels 4
Envelopes
Air mail 4 or 5Plain 6
Bond (20 lb) 6
Bond (24 lb) 7
Note: Lever position 1 is used only when the printed charactersare too light. Setting the lever to position 1 when you are usingthin paper may damage the print head.
l If the lever is set to position 4 or higher, the printing speed may
be reduced slightly.
2-22 Paper Handling

7/21/2019 Epson ActionPrinter 4000 User's Manual
http://slidepdf.com/reader/full/epson-actionprinter-4000-users-manual 61/290
Printing on Special Paper
4. Reattach the printer cover as shown below.
To help you check the position of the paper thickness lever, theorange MULTI-PART light on the control panel comes on if thelever is set to position 4 or higher.
WARNING: Always return the lever to position 2 whenyou go back to printing on ordinary paper. Continuousprinting with the lever set at a position higher than 2 canshorten the life of the print head. Printing past the edge ofenvelopes, multi-part forms, labels, or thicker-than-normal paper can damage the print head.
Multi-part Forms
With the built-in tractor unit, your printer can print on continuousmulti-part forms. You can use multi-part forms that have up to threeparts including the original. Make sure you set the paper thicknesslever to the proper position; see the table on page 2-22.
Paper Handling 2-23

7/21/2019 Epson ActionPrinter 4000 User's Manual
http://slidepdf.com/reader/full/epson-actionprinter-4000-users-manual 62/290
Printing on Special Paper
Except for the paper thickness lever setting, you load multi-partpaper the same way as continuous paper. For details, see the sectionon loading continuous paper in this chapter. Also see the sections onsetting the loading position and page length in Chapter 3.
0CAUTION: Multi-part forms should not be used with the
a single-sheet feeding system or the optional cut sheet
feeder.
Labels
If you need to print labels, always use labels mounted on acontinuous backing sheet with sprocket holes for use with a tractor.Do not try to print labels as single sheets because labels on a shiny
backing sheet almost always slip a little.
2-24 Paper Handling

7/21/2019 Epson ActionPrinter 4000 User's Manual
http://slidepdf.com/reader/full/epson-actionprinter-4000-users-manual 63/290
Printing on Special Paper
You load labels the same way that you load continuous paperexcept that the paper thickness lever must be adjusted for printinglabels. See the section on loading continuous paper earlier in thischapter. For the correct paper thickness setting, see the table onpage 2-22.
WARNING: Never feed labels backward through the
printer. Labels can easily peel off the backing and jam theprinter. Therefore, never use the LOAD/EJECT button toeject labels. Also, never use the short tear-off function withlabels. (Be sure to set DIP switch 2-2 to OFF.) If a labeldoes become stuck in the printer, call the Epson ConsumerInformation Center at 1-800-922-8911 for assistance.
Since labels are especially sensitive to temperature and
humidity, always use them under normal operatingconditions. Don t leave labels loaded in the printerbetween jobs; they curl around the platen and may jamwhen you resume printing.
Paper Handling 2-25

7/21/2019 Epson ActionPrinter 4000 User's Manual
http://slidepdf.com/reader/full/epson-actionprinter-4000-users-manual 64/290
Printing on Special Paper
Envelopes
You can feed envelopes individually using the single-sheet loading
feature. Before loading envelopes, adjust the position of the paperthickness lever according to the table on page 2-22. For details onpaper handling, see Using Single Sheets on page 2-2.
When manually feeding an envelope, you may have to push it downslightly while pressing the LOAD/EJECT button to get it to feedproperly.
0l
CAUTION: The printable area for envelopes is shown onthe next page. The print head must not go past the left orright edge of the envelope or other thick paper. Make sure
that your application program page setup keeps theprinting entirely within this printable area.
2-26 Paper Handling

7/21/2019 Epson ActionPrinter 4000 User's Manual
http://slidepdf.com/reader/full/epson-actionprinter-4000-users-manual 65/290
Printing on Special Paper
8.5 mm(0.33 ) or more
22 mm(0.87 ) or more
is only available at normaltemperature (41°F to 95°F or 5°C to 35°C).
I
To make sure that the printing fits within the printable area, alwaysprint a test sample using a normal sheet of paper before printing onenvelopes.
Paper Handling 2-27
7/21/2019 Epson ActionPrinter 4000 User's Manual
http://slidepdf.com/reader/full/epson-actionprinter-4000-users-manual 66/290
Chapter 3
Using the Printer
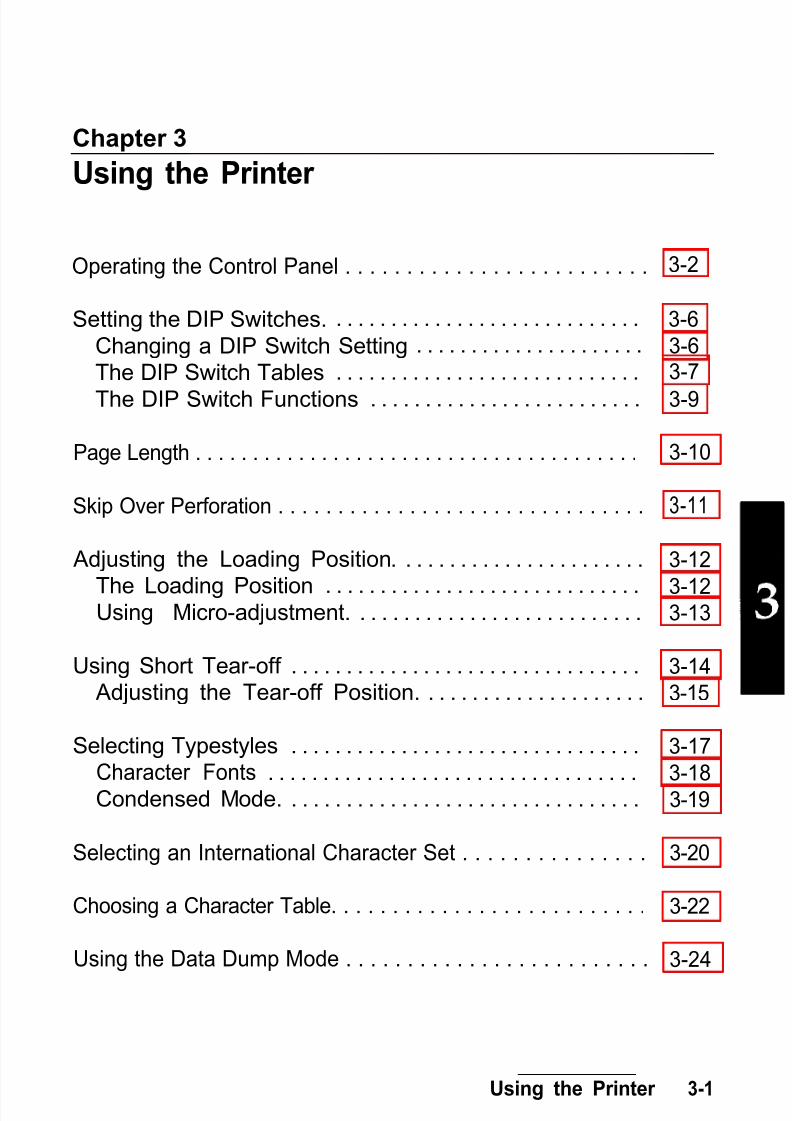
Operating the Control Panel . . . . . . . . . . . . . . . . . . . . . . . . . 3-2
Setting the DIP Switches. . . . . . . . . . . . . . . . . . . . . . . . . . . . . 3-6
Changing a DIP Switch Setting . . . . . . . . . . . . . . . . . . . . . 3-6
The DIP Switch Tables . . . . . . . . . . . . . . . . . . . . . . . . . . . . 3-7
The DIP Switch Functions . . . . . . . . . . . . . . . . . . . . . . . . . 3-9
Page Length . . . . . . . . . . . . . . . . . . . . . . . . . . . . . . . . . . . . . . . 3-10
Skip Over Perforation . . . . . . . . . . . . . . . . . . . . . . . . . . . . . . . 3-11
Adjusting the Loading Position. . . . . . . . . . . . . . . . . . . . . . . 3-12
The Loading Position . . . . . . . . . . . . . . . . . . . . . . . . . . . . . 3-12Using Micro-adjustment. . . . . . . . . . . . . . . . . . . . . . . . . . . 3-13
Using Short Tear-off . . . . . . . . . . . . . . . . . . . . . . . . . . . . . . . . 3-14
Adjusting the Tear-off Position. . . . . . . . . . . . . . . . . . . . . 3-15
Selecting Typestyles . . . . . . . . . . . . . . . . . . . . . . . . . . . . . . . . 3-17
Character Fonts . . . . . . . . . . . . . . . . . . . . . . . . . . . . . . . . . . 3-18
Condensed Mode. . . . . . . . . . . . . . . . . . . . . . . . . . . . . . . . . 3-19
Selecting an International Character Set . . . . . . . . . . . . . . . 3-20
Choosing a Character Table. . . . . . . . . . . . . . . . . . . . . . . . . . 3-22
Using the Data Dump Mode . . . . . . . . . . . . . . . . . . . . . . . . . 3-24
Using the Printer 3-1

7/21/2019 Epson ActionPrinter 4000 User's Manual
http://slidepdf.com/reader/full/epson-actionprinter-4000-users-manual 67/290
Operating the Control Panel
The indicator lights give you the current status of the printer. Thebuttons and paper handling functions let you control many of theprinter settings.
Lights
~~~~~~e~giJj+ihiy2s
aPOWER
higher. When this light is
l~l;l
0 READY-
0
PAPER OUT-
blinking, the micro-adjustment
-
SelecType _ _ _ _ _
00
DRAFT
O” ROMAN
no SANS SERIF
o SLOT
1
function can be used.
POWER (green)On when the POWER switch ison and power is supplied.
FONT
LINEFEED iz
LOAD CONDENSED EJECT
1I
-READY
(green)On when the printer is ready toaccept input data. Flickersduring printing.
P PER OUT (red)
On when the printer is out ofpaper or when continuouspaper is in the standby position.
ON LINE (green)On when the printer is on lineand ready to accept data.
3-2 Using the Printer

7/21/2019 Epson ActionPrinter 4000 User's Manual
http://slidepdf.com/reader/full/epson-actionprinter-4000-users-manual 68/290
Operating the Control Panel
Buttons
POWER Ftl; I READY
PAPER OUT
no
SANS SERIF
LOAD CONDENSED EJECT
-ON LINEThis button controls the printer son line and off line status. Pressthis button to put the printer online or to take it off line. When theprinter is on line, the ON LINE lightis on and the printer can receiveand print data from the computer.
FORM FEEDWhen the printer is off line, pressthis button to eject a single sheetof paper or to advance continuouspaper to the top of the next page.
LINE FEEDWhen the printer is off line, pressthis button to advance the paperone line, or hold it down toadvance the paper continuously.
L LOAD/EJECT
This button is used to feed paper
to the loading position or to ejectpaper that is already loaded.Paper is ejected forward if thepaper release lever is set to thesingle-sheet position andbackward (out of the paper path)if the release lever is set to thecontinuous paper position.
Using the Printer 3-3
7/21/2019 Epson ActionPrinter 4000 User's Manual
http://slidepdf.com/reader/full/epson-actionprinter-4000-users-manual 69/290
Operating the Control Panel
SelecType
I
FONT
DFQWER
FlLfI READY
PAPER OUT
CONDENSED
ON LINE
LOAD EJECT
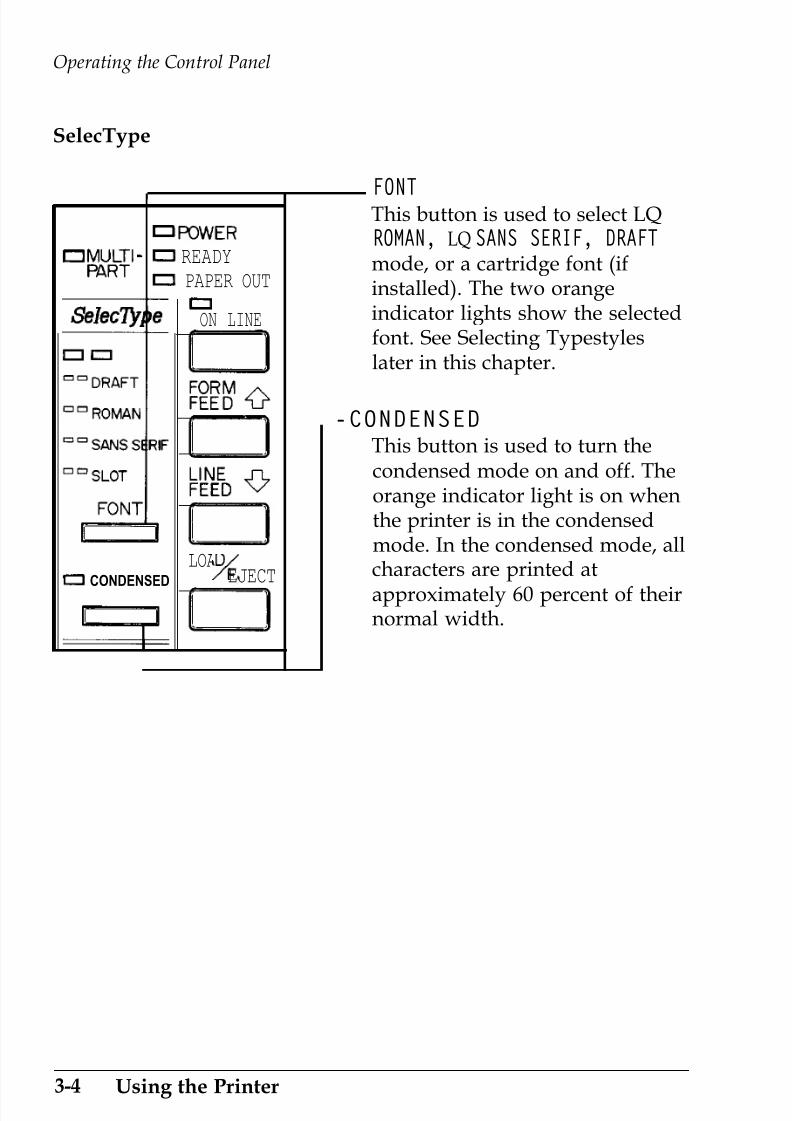
This button is used to select LQROMAN, LQ SANS SERIF, DRAFTmode, or a cartridge font (ifinstalled). The two orangeindicator lights show the selectedfont. See Selecting Typestyleslater in this chapter.
-CONDENSEDThis button is used to turn thecondensed mode on and off. Theorange indicator light is on whenthe printer is in the condensedmode. In the condensed mode, allcharacters are printed at
approximately 60 percent of theirnormal width.
3-4 Using the Printer
7/21/2019 Epson ActionPrinter 4000 User's Manual
http://slidepdf.com/reader/full/epson-actionprinter-4000-users-manual 70/290
Operating the Control Panel
Other control panel features
The control panel of your printer also gives you access to several
special functions.
Self test: Both a draft and Letter Quality self test functionare built into the printer. The self test printoutlets you check the current DIP switch settingsand operating status of the printer. You can startthe printer s self test by holding down the LINEFEED button or the FORM FEED button whileturning on the printer. See the section on the selftest in Chapter 1 for more information.
Micro-adjustment: By pressing the FORM FEED button immediatelyafter loading paper or when using short tear-off,you can make fine adjustments to the loadingand short tear-off positions. These positions canonly be adjusted while the MULTI-PART light isblinking. See the sections on adjusting the
loading position and using the short tear-offfunction later in this chapter.
Data dump: By holding down both the LINE FEED and FORMFEED buttons while you switch on the printer,you turn on the data dump mode. This featureallows advanced users to locate the source ofcommunications problems between the
computer and printer. See the section on usingthe data dump mode on page 3-24 for moreinformation.
Using the Printer 3-5
7/21/2019 Epson ActionPrinter 4000 User's Manual
http://slidepdf.com/reader/full/epson-actionprinter-4000-users-manual 71/290
Setting the DIP Switches
Your printer has two sets of DIP (Dual Inline Package) switcheslocated under a small cover above the control panel. By changingthe settings of these switches, you can control various printerfeatures, such as the character set and page length. The new settingsbecome effective when the printer is turned on, reset, or initialized.
DIP switch settings are shown in the DIP switch tables starting onpage 3-7. Descriptions of all the DIP switch functions begin onpage 3-9.
Changing a DIP Switch Setting
To change a DIP switch setting, first turn off the printer. Then openthe DIP switch cover and use a pointed object, such as a pen, tochange the DIP switch settings. A DIP switch is on when it is up,and off when it is down.
The new DIP switch settings take effect when the printer is turned on.
3-6 Using the Printer
7/21/2019 Epson ActionPrinter 4000 User's Manual
http://slidepdf.com/reader/full/epson-actionprinter-4000-users-manual 72/290
Setting the DIP Switches
The DIP Switch Tables
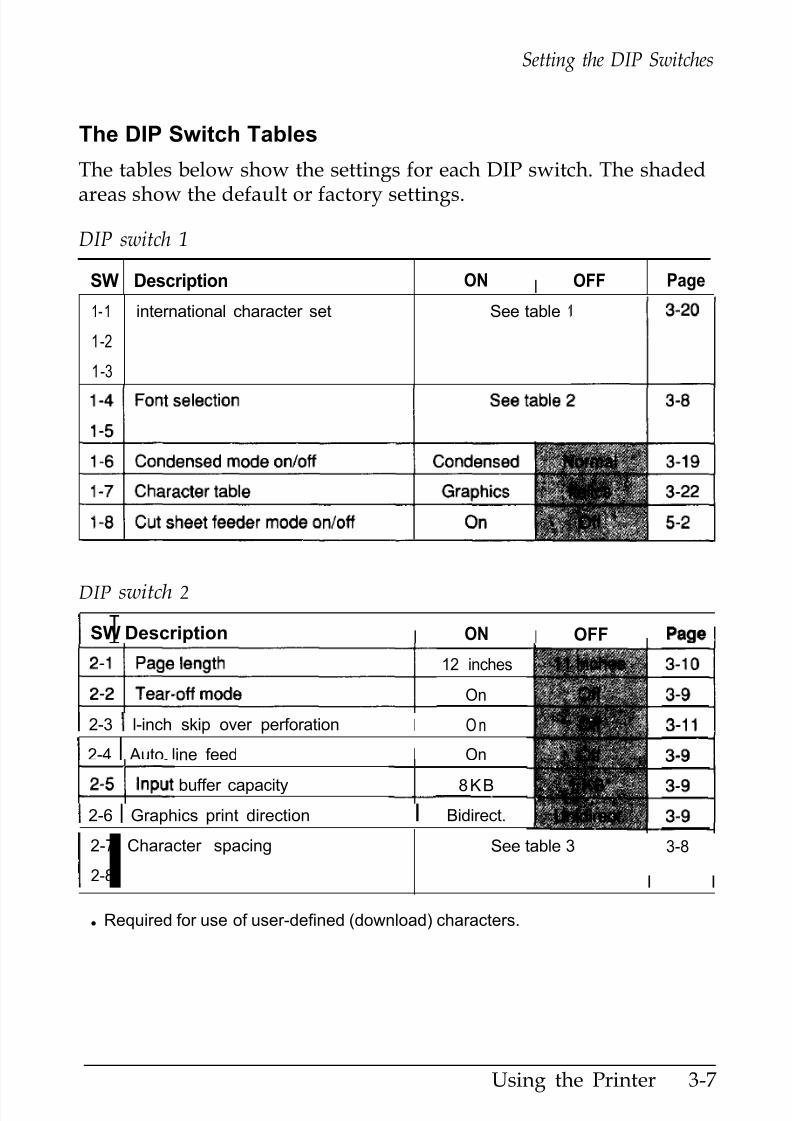
The tables below show the settings for each DIP switch. The shaded
areas show the default or factory settings.
DIP switch 1
SW Description ONI OFF Page
1-1 international character set See table 1 3-20
1-2
1-3 l
DIP switch 2
ISW Description I ON I OFF
12 inches
On
2-3 l-inch skip over perforation I O n
2-4 Auto line feed I On
buffer capacity 8KB-~
2-6 Graphics print direction I Bidirect.
2-7 Character spacing
I2-8
See table 3 3-8
I I
l Required for use of user-defined (download) characters.
Using the Printer 3-7

7/21/2019 Epson ActionPrinter 4000 User's Manual
http://slidepdf.com/reader/full/epson-actionprinter-4000-users-manual 73/290
Setting the DIP Switches
Table 1 International character sets
Country SW1-1 SW1-2 SW1-3
France ON ON OFF
Germany ON OFF ON
UK ON OFF OFF
Denmark OFF ON ON
Sweden OFF ON OFF
ItalySpain
OFF OFF ONOFF OFF OFF
Table 2 Font selection
Table 3 Character spacing
cpi: characters per inch.
3-8 Using the Printer

7/21/2019 Epson ActionPrinter 4000 User's Manual
http://slidepdf.com/reader/full/epson-actionprinter-4000-users-manual 74/290
Setting the DIP Switches
The DIP Switch Functions
Auto line feed
When auto line feed is on (DIP switch 2-4 on), each carriage returncode (CR) is automatically followed by a line feed code (LF).
Input buffer capacity
The input buffer stores data from your computer. If you want to freeyour computer for other tasks while the printer prints, change thesetting of switch 2-5 to 8 KB (on). Before using user-definedcharacters, however, be sure to set the input buffer to 1 KB (off).
Printing direction
With unidirectional printing, the print head prints in one directiononly. This allows for precise vertical alignment, making it ideal forprinting graphics such as lines and boxes. When DIP switch 2-6 isoff, the printer prints unidirectionally; when it is on, the printer
prints bidirectionally. Either setting can be overridden by a softwarecommand (ESC U). To achieve precise vertical alignment withoutthe slower printing speed caused by unidirectional printing, seeyour authorized service dealer for adjustment of your bidirectionalprint settings.
Tear-off mode
When DIP switch 2-2 is on, the short tear-off mode is on. Thisfeature automatically advances continuous paper to the tear-offposition, and then reverse-feeds the paper to the loading position.See the section on using short tear-off later in this chapter.
CAUTION: Do not use the short tear-off mode with labels.
Using the Printer 3-9

7/21/2019 Epson ActionPrinter 4000 User's Manual
http://slidepdf.com/reader/full/epson-actionprinter-4000-users-manual 75/290
Page Length
When the setting of DIP switch 2-1 is off, the page length is set to11 inches, or 27.94 cm. When it is on, the page length is 12 inches, or30.48 cm. Be sure to set the page length to match the paper you areusing.
Other page lengths can be set using the commands ESC C andESC C 0. See the Command Summary in Chapter 9 for details.
DIP SW2-1
Ol
Ol
OFF
11-inch page length
Ol
ON
12-inch page length
3-10 Using the Printer

7/21/2019 Epson ActionPrinter 4000 User's Manual
http://slidepdf.com/reader/full/epson-actionprinter-4000-users-manual 76/290
Skip Over Perforation
By changing the setting of DIP switch 2-3, you can set skip overperforation to on or off. If this feature is on when using continuouspaper, a one-inch margin is provided between the last printable lineon one page and the first printable line on the next page. Thisfeature is very convenient if your application program does notprovide for top and bottom margins.
If you adjust your loading position correctly, you can get half of themargin at the bottom of one page and half at the top of the nextpage, as shown in the following illustration.
DIP switch 2-3 ON (Skip over perforation ON)
l 23456789:;<=>?@ABCDEFGHIJKLMNOPQRSTUVWXYZ[\]'3456789: ;<=>?@ABCDEFGHIJKLMNOPQRSTUVWXYZ[\]^-
456789: ;l 56789:;
<=>?@ABCDEFGHIJKLMNOPQRSTUVWXYZ[\]^-'<=>?@ABCDEFGHIJKLMNOPQRSTUVWXYZ[\]^-'z
6789 : ;<=>?@ABCDEFGHIJKLMNOPQRSTUVWXYZ[\]^-'a1
Using the Printer 3-11

7/21/2019 Epson ActionPrinter 4000 User's Manual
http://slidepdf.com/reader/full/epson-actionprinter-4000-users-manual 77/290
Adjusting the Loading Position
The Loading Position
The loading position is the position of the paper when it has beenautomatically loaded by the printer.
This position is important because it determines where the printingbegins on the page. If the printing is too high or too low on the page,change the loading position using the micro-adjustment feature
described in the next section.
0l
CAUTION: Never use the platen knob to feed paper exceptin case of a paper jam or other paper feeding problem. (Ifyou need to use the platen knob, make sure the power isoff.) If you need to adjust the loading position, always usethe micro-adjustment feature.
Until the loading position is reset, the printer remembers thisposition even if it is turned off, and uses it as a reference point forfeeding paper.
The micro-adjustment feature moves the paper in 1/180-inchincrements to make fine adjustments to the loading position. Onceyou have used micro-adjustment to change the loading position ofcontinuous paper, the printer remembers that position even after it
is turned off.
However, when you use micro-adjustment to change the loadingposition of single-sheet paper, the printer does not remember thisposition after the power is turned off. When the power is turnedback on, the loading position returns to its factory setting.
3-12 Using the Printer

7/21/2019 Epson ActionPrinter 4000 User's Manual
http://slidepdf.com/reader/full/epson-actionprinter-4000-users-manual 78/290
Adjusting the Loading Position
Using Micro-adjustment
1. Make sure that the printer is turned on and that either a single
sheet or continuous paper is ready to be loaded.2. Press the LOAD/EJECT button to feed paper to the loading
position. Then press the ON LINE button; the MULTI-PART lightbegins to blink.
I:::: MULTI -
PARTNote: You can use the FORM FEED and LINE FEED buttons formicro-adjustment only while the MULTI-PART light is blinking.
3. Press the FORM FEED button to feed the paper forward or theLINE FEED button to feed the paper backward.
Note: When the paper reaches the factory-set loadingposition, the printer beeps and micro-adjustment feedingpauses for a moment before continuing. You can use thisfactory setting as a reference point when adjusting theprinter s loading position. When the paper reaches either theminimum or maximum top margin, the printer beeps and thepaper stops moving.
Using the Printer 3-13

7/21/2019 Epson ActionPrinter 4000 User's Manual
http://slidepdf.com/reader/full/epson-actionprinter-4000-users-manual 79/290
Using Short Tear-Off
When you are finished printing, the short tear-off featureautomatically feeds the perforation of the continuous paper to thetear-off edge of the printer cover so that you can tear off the lastsheet. When you resume printing, the paper feeds backward to theloading position. This feature lets you save the paper normally lostbetween documents.
To use this feature, set DIP switch 2-2 to on. Then load continuouspaper in the normal way.
You can leave the short tear-off feature turned on (DIP switch 2-2on) even when you are using single sheets. When you move thepaper release lever to the single-sheet position, the short tear-offfeature is disabled.
WARNING: Never use short tear-off with labels.Otherwise, labels may come off their backing and jam theprinter.
When you have finished printing, and if the perforation is at the topof form position, the printer automatically feeds the perforation ofthe continuous paper to the tear-off edge of the printer cover. Youcan then tear off the page using the tear-off edge as shown on thenext page.
3-14 Using the Printer

7/21/2019 Epson ActionPrinter 4000 User's Manual
http://slidepdf.com/reader/full/epson-actionprinter-4000-users-manual 80/290
Using Short Tear-Off
If the page perforation is not properly aligned with the tear-off edge,you can adjust the tear-off position using micro-adjustment, asdescribed below.
Note: Short tear-off is not performed unless printing of a page iscompleted and the paper has advanced to the top of the nextpage. If the paper has not advanced to the top of the next page,press the ON LINE button to put the printer off line and press theFORM FEED button to advance the paper. Then put the printer backon line and paper will feed to the tear-off position.
When you resume printing after tearing off the sheet, the paper
automatically feeds backward to the loading position beforeprinting begins.
Adjusting the Tear-off Position
If the paper s perforation does not meet the tear-off edge, you canadjust the tear-off position using the micro-adjustment feature.
Using the Printer 3-15

7/21/2019 Epson ActionPrinter 4000 User's Manual
http://slidepdf.com/reader/full/epson-actionprinter-4000-users-manual 81/290
Using Short Tear-Of
1. Make sure the printer feeds the paper to the tear-off positionafter printing the document.
2. The MULTI-PART light should begin blinking, indicating that youcan now use the micro-adjustment feature to make fineadjustments to the tear-off position.
3. To make fine adjustments to the tear-off position, press theFORM FEED button to feed the paper forward or the LINE FEEDbutton to feed it backward.
You can now tear off your document from the perforation andresume printing. The printer remembers this new tear-off position
even after the printer is turned off and on again.
3-16 Using the Printer
7/21/2019 Epson ActionPrinter 4000 User's Manual
http://slidepdf.com/reader/full/epson-actionprinter-4000-users-manual 82/290
Selecting Typestyles
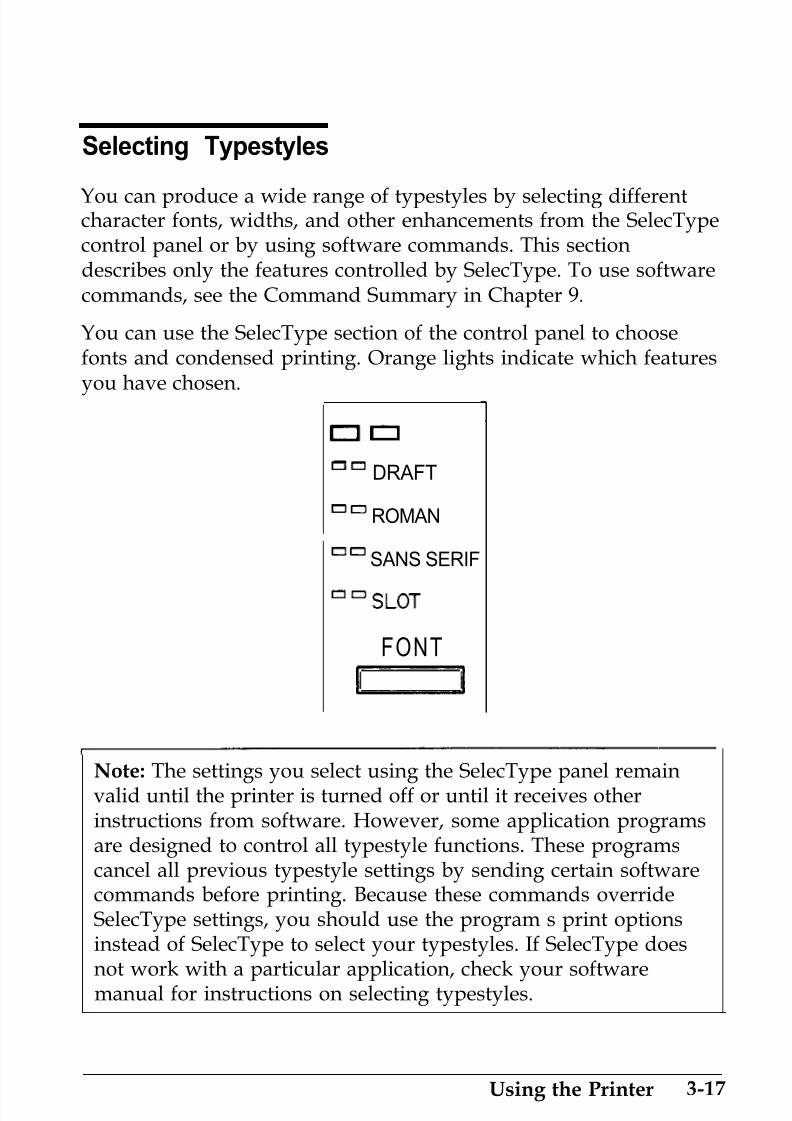
You can produce a wide range of typestyles by selecting differentcharacter fonts, widths, and other enhancements from the SelecTypecontrol panel or by using software commands. This sectiondescribes only the features controlled by SelecType. To use softwarecommands, see the Command Summary in Chapter 9.
You can use the SelecType section of the control panel to choosefonts and condensed printing. Orange lights indicate which features
you have chosen.
On
DRAFT
= o ROMAN
= o SANS SERIF
=‘OSLOT
FONT
Note: The settings you select using the SelecType panel remainvalid until the printer is turned off or until it receives otherinstructions from software. However, some application programsare designed to control all typestyle functions. These programscancel all previous typestyle settings by sending certain softwarecommands before printing. Because these commands overrideSelecType settings, you should use the program s print optionsinstead of SelecType to select your typestyles. If SelecType doesnot work with a particular application, check your softwaremanual for instructions on selecting typestyles.
Using the Printer 3-17
7/21/2019 Epson ActionPrinter 4000 User's Manual
http://slidepdf.com/reader/full/epson-actionprinter-4000-users-manual 83/290
Selecting Typestyles
Character Fonts
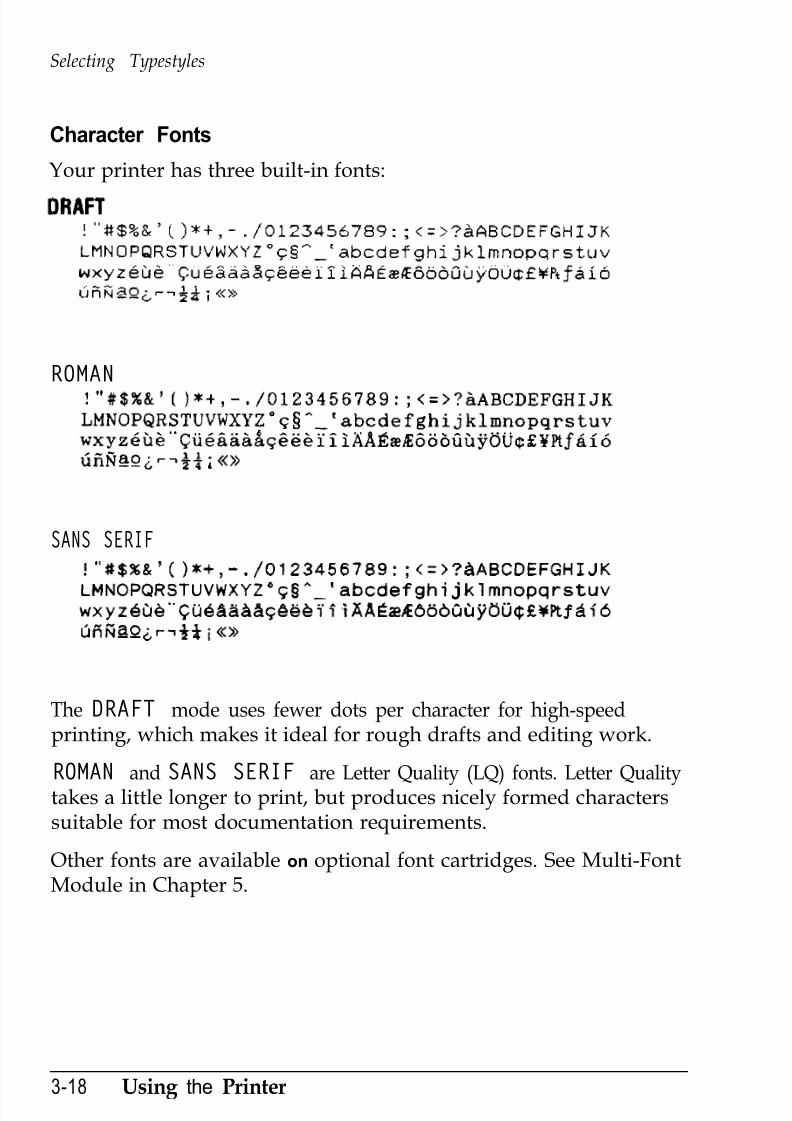
Your printer has three built-in fonts:
ROMAN #$%&'()*t,-./0123456789:;<=>?BABCDEFGHIJK
LMNOPQRSTUVWXYZ'C§^-'abcdefghijklmnopqrstuv
. . , . . .
wxyzg~~ Cueaaaa~~~~~~~~~~~~~~~~~~~~~~~~~~~~
iififi~Qir f
>>
SANS SERIF
The DRAFT mode uses fewer dots per character for high-speedprinting, which makes it ideal for rough drafts and editing work.
ROMAN and SANS SERIF are Letter Quality (LQ) fonts. Letter Qualitytakes a little longer to print, but produces nicely formed characterssuitable for most documentation requirements.
Other fonts are available on optional font cartridges. See Multi-FontModule in Chapter 5.
3-18 Using the Printer

7/21/2019 Epson ActionPrinter 4000 User's Manual
http://slidepdf.com/reader/full/epson-actionprinter-4000-users-manual 84/290
Selecting Typestyles
Condensed Mode
You can use the condensed mode to change the size of printed
characters. In the condensed mode, characters are approximately60 percent of the width of normal characters. Hence, condensedprinting is very useful for spreadsheets and other applicationswhere you need to print the maximum amount of information on apage. You can combine the condensed mode with 10 and 12 cpiprinting, but not proportional and 15 cpi.
To select the condensed mode, simply press the CONDENSED button
so thatthe
orange indicator light comes on. To turn off thecondensed mode, press the button again.
The following printout compares normal 10 and 12 cpi withcondensed 10 and 12 cpi. The condensed 10 cpi is 17 cpi, and thecondensed 12 cpi is 20 cpi.
This is 10 CPI printing.
This is condensed 10 CPI printing,
This is 12 CPI printing.This is condensed 12 CPI printing,
Using the Printer 3-19

7/21/2019 Epson ActionPrinter 4000 User's Manual
http://slidepdf.com/reader/full/epson-actionprinter-4000-users-manual 85/290
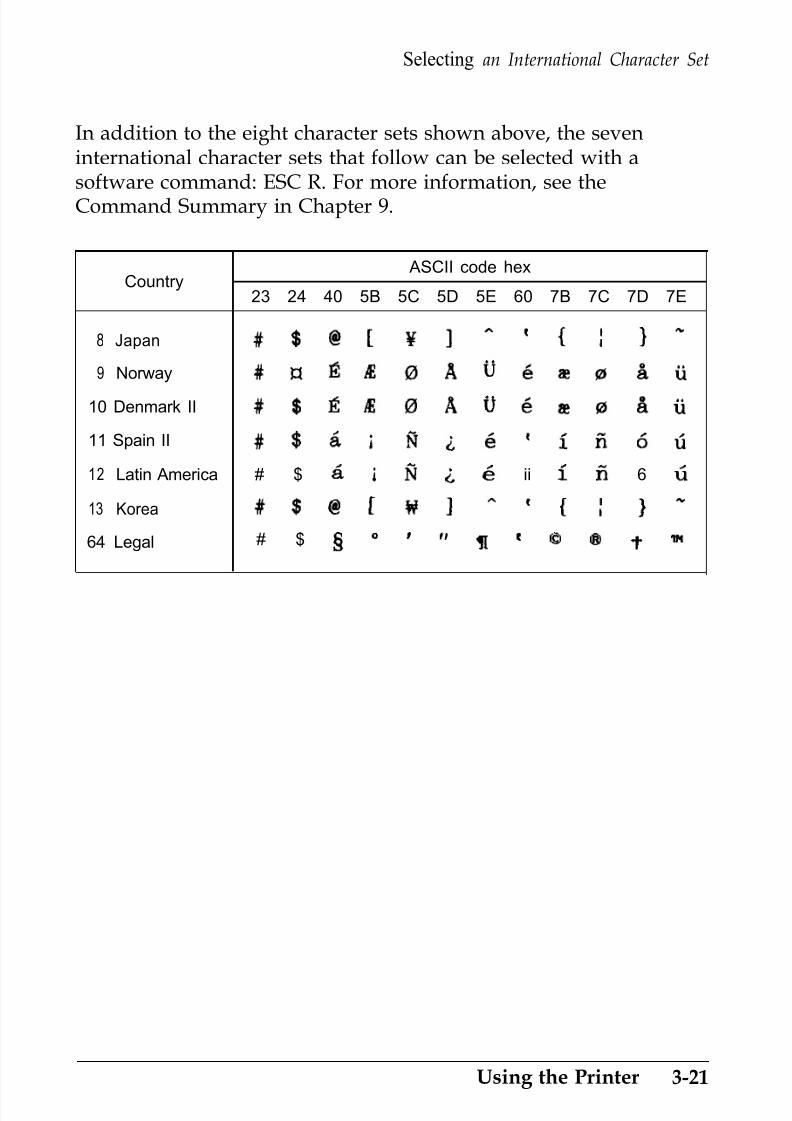
7/21/2019 Epson ActionPrinter 4000 User's Manual
http://slidepdf.com/reader/full/epson-actionprinter-4000-users-manual 86/290
Selecting an International Character Set
In addition to the eight character sets shown above, the seveninternational character sets that follow can be selected with asoftware command: ESC R. For more information, see theCommand Summary in Chapter 9.
Country ASCII code hex
23 24 40 5B 5C 5D 5E 60 7B 7C 7D 7E
8 Japan @[Yl^‘{11”
9 Norway r.lBA0A~iitle0Ati
10 Denmark II BfE0AUfa?0AB
11 Spain II &iRik’ifi6ti
12 Latin America # $ 6 i fi i 6 ii i fi 6 ti
13 Korea er I*‘rI}”
64 Legal # $ J ’ g 0 @ f m
Using the Printer 3-21
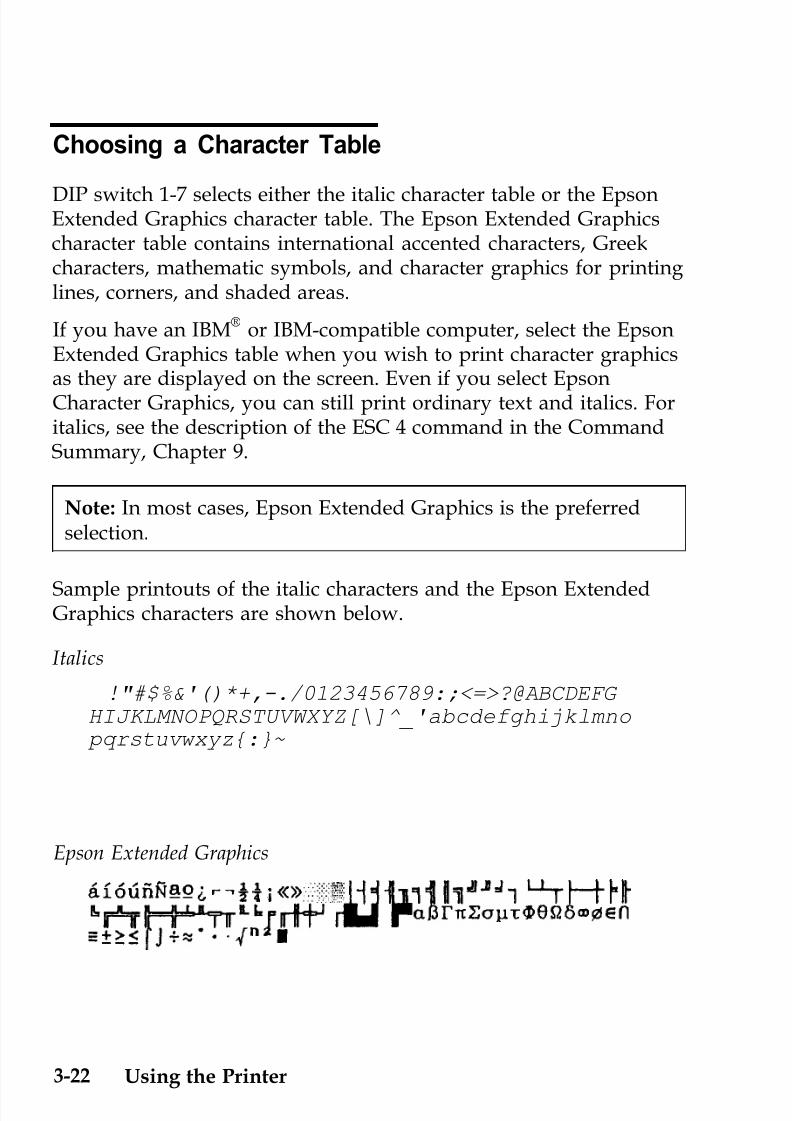
7/21/2019 Epson ActionPrinter 4000 User's Manual
http://slidepdf.com/reader/full/epson-actionprinter-4000-users-manual 87/290
Choosing a Character Table
DIP switch 1-7 selects either the italic character table or the EpsonExtended Graphics character table. The Epson Extended Graphicscharacter table contains international accented characters, Greekcharacters, mathematic symbols, and character graphics for printinglines, corners, and shaded areas.
If you have an IBM® or IBM-compatible computer, select the EpsonExtended Graphics table when you wish to print character graphicsas they are displayed on the screen. Even if you select EpsonCharacter Graphics, you can still print ordinary text and italics. Foritalics, see the description of the ESC 4 command in the CommandSummary, Chapter 9.
Note: In most cases, Epson Extended Graphics is the preferredselection.
Sample printouts of the italic characters and the Epson ExtendedGraphics characters are shown below.
Italics
!"#$%&'()*+,-./0123456789:;<=>?@ABCDEFG HIJKLMNOPQRSTUVWXYZ[\]^_'abcdefghijklmno pqrstuvwxyz{:}~
Epson Extended Graphics
Qi6 ifi Qi r7*+ <<>> ;:ij;:?g
3-22 Using the Printer

7/21/2019 Epson ActionPrinter 4000 User's Manual
http://slidepdf.com/reader/full/epson-actionprinter-4000-users-manual 88/290
Choosing a Character Table
To select a character table, set DIP switch 1-7 according to the tablebelow.
0CAUTION: To change the setting of a DIP switch, first turn
off the printer, change the DIP switch, and then turn theprinter back on.
Tables showing which characters are printed in each of the charactertables are listed in the Appendix.
Using the Printer 3-23
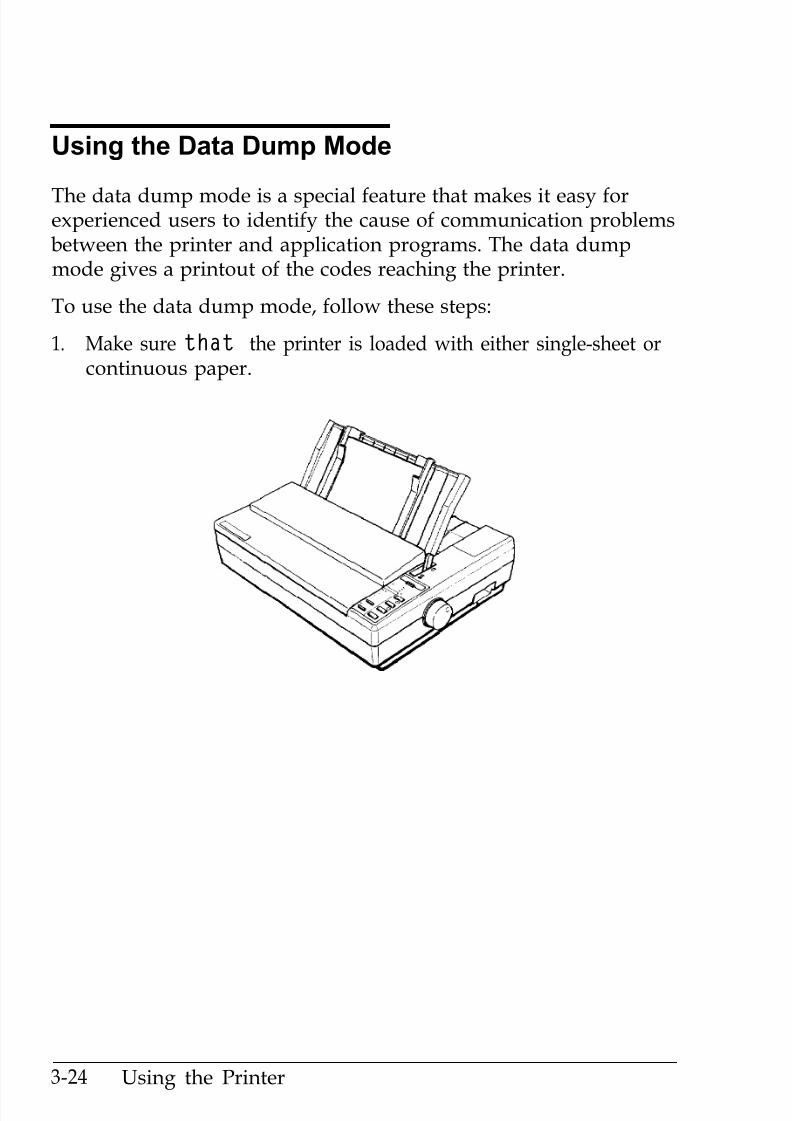
7/21/2019 Epson ActionPrinter 4000 User's Manual
http://slidepdf.com/reader/full/epson-actionprinter-4000-users-manual 89/290
Using the Data Dump Mode
The data dump mode is a special feature that makes it easy forexperienced users to identify the cause of communication problemsbetween the printer and application programs. The data dumpmode gives a printout of the codes reaching the printer.
To use the data dump mode, follow these steps:
1. Make sure that the printer is loaded with either single-sheet orcontinuous paper.
3-24 Using the Printer

7/21/2019 Epson ActionPrinter 4000 User's Manual
http://slidepdf.com/reader/full/epson-actionprinter-4000-users-manual 90/290
Using the Data Dump Mode
2. If the printer is on, switch it off, then hold down the FORM FEEDand LINE FEED buttons at the same time you turn on the printer.
3. Run any program that causes the printer to print (either anapplication program or one in any programming language).Your printer prints out all the codes sent to the printer, as shownbelow. (In order to print the last line, you will have to take theprinter off line.)
1B 4 0 1 B 5 2 0 0 1B 7 4 0 1 1B 5 0 1 B 7 0 0 0 . @ . R . . t . . 6 . . P . p .
2 0 2 0 5 4 6 8 6 9 7 3 2 0 6 ’ 6 E 2 0 6 5 7 8 6 1 T h i s i s a n e x a
6 D 7 0 6 C 6 5 2 0 6 F 6 6 6 1 7 4 6 1 2 0 6 4 m p l e o f a d a t a d
7 5 6 D 7 0 2 0 7 0 7 2 6 9 7 4 2 E 2 0 5 4 6 8 u m p p r i n t o u t . T h
6 9 7 3 2 0 6 6 6 5 6 1 7 4 5 2 0 6 D 6 1 6 B 6 5 7 3 i s f e a t u r e m a k e s
0 A 2 0 2 0 2 0 2 0 2 0 6 9 5 6 1 7 3 7 9 2 0 6 6 6 F it foe a s y
On the left side of the printout all the codes are printed inhexadecimal format. On the right side of the printout allprintable characters are printed, and others, such as controlcodes, are represented by dots.
Using the Printer 3-25

7/21/2019 Epson ActionPrinter 4000 User's Manual
http://slidepdf.com/reader/full/epson-actionprinter-4000-users-manual 91/290
Using the Data Dump Mode
4. To turn off the data dump mode after you have taken the printeroff line, turn off the printer.
By comparing the characters printed in the text field on the right
side of the data dump printout (see step 3) with the printout of hexcodes, you can check which codes are being sent to the printer.
To interpret the data dump printout, examine the first three hexcodes on the second line of the printout sample (20 20 54). Each hexcode 20 represents a space; hex code 54 represents the letter T.Check the second line of the text field on the right side of theprintout and you will find the letter T preceded by two spaces.
The chart below interprets the first eight codes.
Hex codes Command
1B 40 ESC
1B 52 00 ESC R 0
1B 74 01 ESC t1
Function
Initialize printer
Select USA character set
Select Epson Extended Graphics set
3-26 Using the Printer

7/21/2019 Epson ActionPrinter 4000 User's Manual
http://slidepdf.com/reader/full/epson-actionprinter-4000-users-manual 92/290
Chapter 4
Software and Graphics
Enhancing Your Printing . . . . . . . . . . . . . . . . . . . . . . . . . . . . 4-2
Character Spacing . . . . . . . . . . . . . . . . . . . . . . . . . . . . . . . . 4-2
Character Size . . . . . . . . . . . . . . . . . . . . . . . . . . . . . . . . . . . 4-3
Special Effects and Emphasis. . . . . . . . . . . . . . . . . . . . . . . 4-4
Selecting Typestyles With Master Select . . . . . . . . . . . . . 4-6
Graphics . . . . . . . . . . . . . . . . . . . . . . . . . . . . . . . . . . . . . . . . . . 4-9
The Print Head. . . . . . . . . . . . . . . . . . . . . . . . . . . . . . . . . . . 4-10
The Graphics Command . . . . . . . . . . . . . . . . . . . . . . . . . . 4-13
Column Reservation Numbers . . . . . . . . . . . . . . . . . . . . . 4-14
A Simple Graphics Program . . . . . . . . . . . . . . . . . . . . . . . 4-14
Designing Your Own Graphics. . . . . . . . . . . . . . . . . . . . . 4-15
User-defined Characters. . . . . . . . . . . . . . . . . . . . . . . . . . . . . 4-20
Designing Your Characters . . . . . . . . . . . . . . . . . . . . . . . . 4-20
Defining Your Characters. . . . . . . . . . . . . . . . . . . . . . . . . . 4-22
Sending Information to Your Printer . . . . . . . . . . . . . . . . 4-24
Printing User-defined Characters . . . . . . . . . . . . . . . . . . . 4-27
Copying ROM Characters to RAM. . . . . . . . . . . . . . . . . . 4-28
Letter Quality Characters. . . . . . . . . . . . . . . . . . . . . . . . . . 4-29
Mixing Print Styles . . . . . . . . . . . . . . . . . . . . . . . . . . . . . . . 4-30
Software and Graphics 4-1

7/21/2019 Epson ActionPrinter 4000 User's Manual
http://slidepdf.com/reader/full/epson-actionprinter-4000-users-manual 93/290
Enhancing Your Printing
You can obtain a wide variety of printing effects with your printer,from changing the number of characters per inch to using specialeffects on selected words and phrases. This section gives you asampling of the features you may select with your software.
For software control of these features, see the instructions for yourapplication programs or look up their specific commands in theCommand Summary in Chapter 9.
Character Spacing
To add greater variety to your documents, your printer has three cpispacings, as well as proportional spacing. Each one can be selectedwith a software command.
For each of the three built-in fonts, you can choose a characterspacing of 10, 12, or 15 characters per inch, or proportional spacing.The printout below compares the three spacings:
This is 10 cpi printing.This is 12 cpi printing.This is 15 cpi printing.
As shown above, 15 cpi characters are only about two-thirds the
height of 10 and 12 cpi characters. This makes 15 cpi particularlyuseful when you want to separate certain material from the maintext.
In fixed cpi spacing each character is given the same amount ofspace. The width of proportional characters, however, varies fromcharacter to character. For example, a narrow letter like i takes lessspace than a wide letter like W. The width of each proportionalcharacter is given in the Appendix.
4-2 Software and Graphics

7/21/2019 Epson ActionPrinter 4000 User's Manual
http://slidepdf.com/reader/full/epson-actionprinter-4000-users-manual 94/290
Enhancing Your Printing
The following printout compares 10 cpi spacing with proportionalspacing:
T h i s i s 1 0 c p i p r i n t i n g .This is proportional printing.
Note: Proportional spacing is not available in the draft mode.
Character Size
In addition to the basic cpi spacings and proportional spacing, yourprinter offers three other modes that can change the size of yourprinting. These modes are double-wide, double-high, andcondensed.
The double-wide mode doubles the width of any size character,while the double-high mode doubles the height of any sizecharacter. These modes are useful for emphasizing document titlesand headings in reports, but are usually not suitable for largeamounts of text. These modes can also be combined to obtain evenmore impressive printing results.
T h i s i s n o r m a l 1 0 c p i p r i n t i n g .
T h i s i s d o u b l e - w i d e ,
This is double-high,
T h i s i s d o u b l e - w i d e a n dd o u b l e - h i g h .
Software and Graphics 4-3

7/21/2019 Epson ActionPrinter 4000 User's Manual
http://slidepdf.com/reader/full/epson-actionprinter-4000-users-manual 95/290
Enhancing Your Printing
Both 10 and 12 cpi printing can be reduced to about 60 percent oftheir normal width using the condensed mode. This mode isparticularly useful for printing wide spreadsheets becausecondensed 12 cpi printing allows you to print up to 160 characterson an 8-inch line.
The condensed mode can be selected with a software command, orby using SelecType (See Chapter 3). Even if you turn the condensedmode on with SelecType, you can still turn it off with a softwarecommand.
Condensed 10 cpi gives you many characters on a line,
Condensed 12 cpi gives you even more characters on a line,
Widening or narrowing the characters also widens or narrows thespaces between words. Because word processors usually create a leftmargin by printing spaces, you may need to change the left marginand the number of characters on a line to keep the margins correct if
you change character widths.
Special Effects and Emphasis
Your printer offers two ways of emphasizing text and also allowsyou to use underlining, superscripts, subscripts, and italics. Thesefeatures can be controlled directly by software commands. Manyapplication programs can also produce some of these effects. See
your application program manual for details.
Emphasized and double-strike printing
Emphasized and double-strike printing can give words and phrasesadded prominence. In emphasized mode, each character is printedtwice as the print head moves across the paper, with the dots in thesecond pass printed slightly to the right of the first pass. Thisprocess produces darker, more fully formed characters.
4-4 Software and Graphics

7/21/2019 Epson ActionPrinter 4000 User's Manual
http://slidepdf.com/reader/full/epson-actionprinter-4000-users-manual 96/290
Enhancing Your Printing
In double-strike mode, the print head prints each line twice, makingthe text bolder. For even greater boldness, emphasized and double-
strike can be combined. The following samples show the differenteffects you can achieve using these modes alone and in combination.
This i s ROMAN pr int ing ,This is ROMAN, emphasized.This is ROMAN, double-strike.This is ROMAN, with both.
Italic printing You can print italics by using the ESC 4 software command. This istrue no matter how DIP switch 1-7 is set.
This is ROMAN printing.T h i s i s R O M A N i t a l i c s .
Underlining, strike-through, and overlining The underline, strike-through, and overline modes are useful for
highlighting selected text. This feature can be used to score spaces,subscripts, and superscripts without a break. You can choose from avariety of line styles, including single, double, broken, orcontinuous. See the ESC ( - command in Chapter 9 for moreinformation.
T h i s i s c o n t i n u o u s u n d e r l i n i n g .
Software and Graphics 4-5

7/21/2019 Epson ActionPrinter 4000 User's Manual
http://slidepdf.com/reader/full/epson-actionprinter-4000-users-manual 97/290
Enhancing Your Printing
Superscripts and subscripts
Superscripts and subscripts can be used for printing footnote
numbers and mathematical formulas. The example below showsunderlining and subscripts combined in a mathematical formula.
average = _(a1 + a2 + . . . . . . . . . . + an )
n
Outline and shadow
The outline and shadow features are useful for adding variation andemphasis to text that you wish to stand out, such as headings. Thefollowing samples show the outline and shadow featuresindividually, plus a combination of outline with shadow.
Selecting Typestyles With Master Select
Your printer has a special ESCape code called Master Select thatallows you to choose many combinations of these nine modes: 10cpi, 12 cpi, proportional spacing, condensed, emphasized, double-
strike, double-wide, italics, and underline. For more information onsending ESCape codes to your printer, see Chapter 9.
The format of the Master Select code is shown below:
ASCII: ESC ! nDecimal: 27 33 nHexadecimal: 1B 21 n
4-6 Software and Graphics
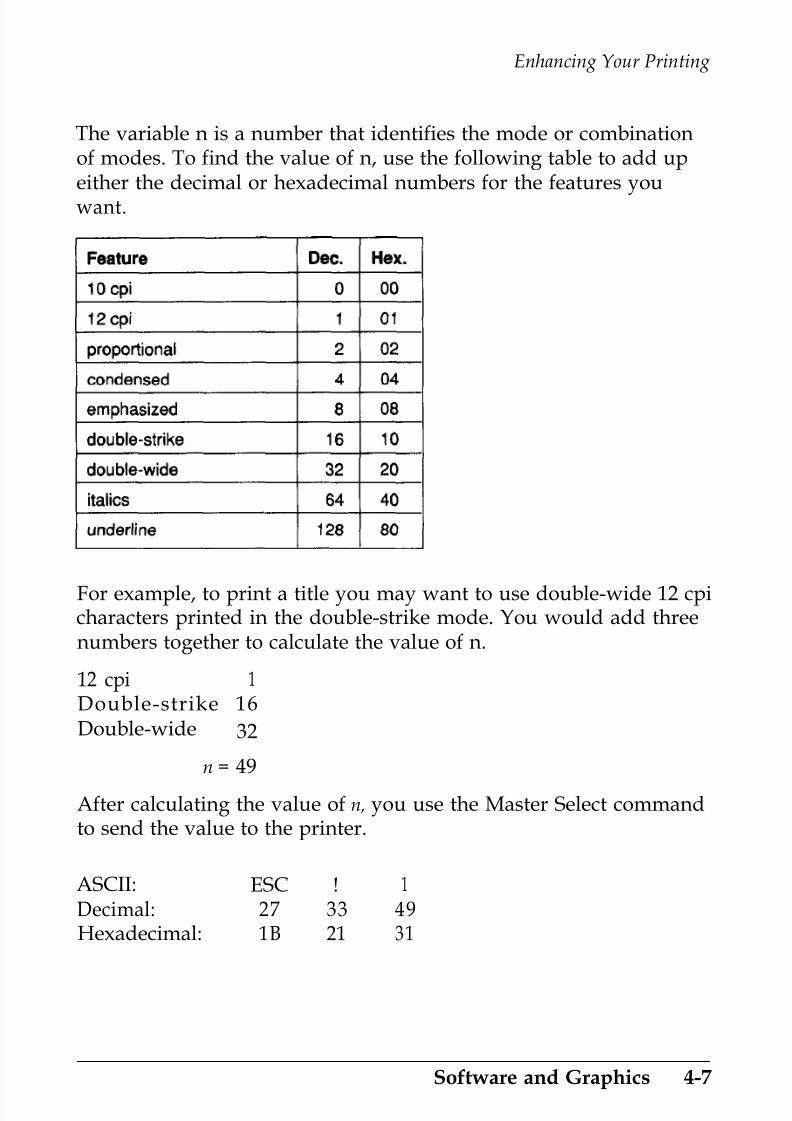
7/21/2019 Epson ActionPrinter 4000 User's Manual
http://slidepdf.com/reader/full/epson-actionprinter-4000-users-manual 98/290
Enhancing Your Printing
The variable n is a number that identifies the mode or combinationof modes. To find the value of n, use the following table to add upeither the decimal or hexadecimal numbers for the features youwant.
For example, to print a title you may want to use double-wide 12 cpicharacters printed in the double-strike mode. You would add threenumbers together to calculate the value of n.
12 cpi 1
Double-strike 16Double-wide 32
n = 49
After calculating the value of n, you use the Master Select commandto send the value to the printer.
ASCII: ESC ! 1
Decimal: 27 33 49Hexadecimal: 1B 21 31
Software and Graphics 4-7

7/21/2019 Epson ActionPrinter 4000 User's Manual
http://slidepdf.com/reader/full/epson-actionprinter-4000-users-manual 99/290
Enhancing Your Printing
The print quality and font must be set separately, using SelecTypeor the ESC x and ESC k commands. There are two more things toconsider when using the Master Select command:
l Master Select cancels any of the other listed features that you donot set. For example, if you have already set a different characterwidth and you use Master Select to set emphasized double-strike, the character width is reset to 10 cpi.
l Proportional spacing overrides 10, 12, and 15 cpi.
4-8 Software and Graphics
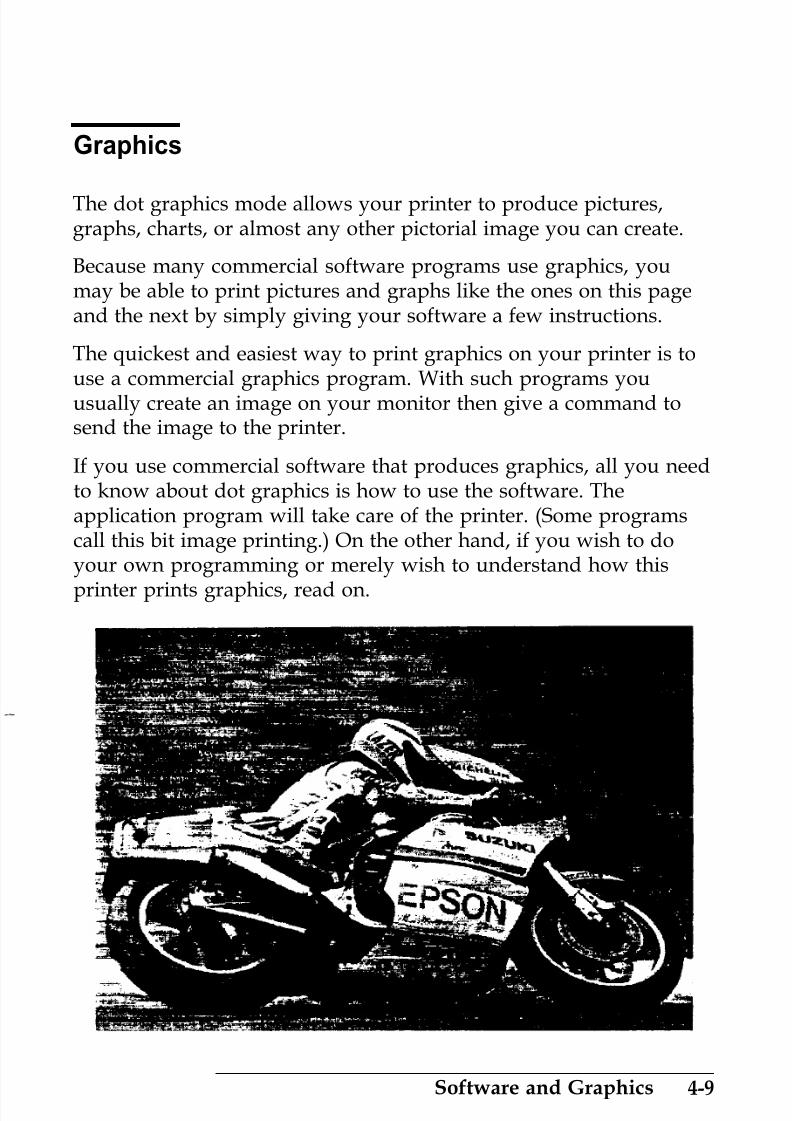
7/21/2019 Epson ActionPrinter 4000 User's Manual
http://slidepdf.com/reader/full/epson-actionprinter-4000-users-manual 100/290
Graphics
The dot graphics mode allows your printer to produce pictures,graphs, charts, or almost any other pictorial image you can create.
Because many commercial software programs use graphics, youmay be able to print pictures and graphs like the ones on this pageand the next by simply giving your software a few instructions.
The quickest and easiest way to print graphics on your printer is touse a commercial graphics program. With such programs youusually create an image on your monitor then give a command tosend the image to the printer.
If you use commercial software that produces graphics, all you needto know about dot graphics is how to use the software. Theapplication program will take care of the printer. (Some programscall this bit image printing.) On the other hand, if you wish to doyour own programming or merely wish to understand how this
printer prints graphics, read on.
Software and Graphics 4-9

7/21/2019 Epson ActionPrinter 4000 User's Manual
http://slidepdf.com/reader/full/epson-actionprinter-4000-users-manual 101/290
Graphics
I n c o m e B r e a k d o w n
P r o f i t
D e v e l o p m e n t
S a l a r i e s a n dP r o d u c t i o n
The Print Head
To understand dot graphics you need to know a little about howyour printer s print head works.
The print head has 24 pins. As the print head moves across the page,electrical impulses cause the pins to fire. Each time a pin fires, it
strikes the inked ribbon and presses it against the paper producing asmall dot. As the print head moves along, the pins fire time aftertime in different patterns forming letters, numbers, and symbols.
Because the dots overlap each other both horizontally and verticallyin Letter Quality mode, it is difficult to see the individual dots.Instead, the letters and symbols seem to be made up of unbrokenlines.
In order for the dots to overlap vertically, the pins in the print headare in more than one column, but the intelligence of the printerhandles the timing of pin firings so that the effect is that of 24 pinsarranged in a single vertical column.
Dot patterns
The print head is able to print graphics, as well as text becausegraphic images are formed on the printer in about the same waythat pictures in newspapers and magazines are printed. If you look
4-10 Software and Graphics

7/21/2019 Epson ActionPrinter 4000 User's Manual
http://slidepdf.com/reader/full/epson-actionprinter-4000-users-manual 102/290
Graphics
closely at a newspaper photograph, you will find that it is made upof thousands of small dots. Your printer also forms its images withpatterns of dots, as many as 360 dots per inch, horizontally and 360dots per inch, vertically. The images printed by this printer can,therefore, be as finely detailed as the ones at the beginning of thissection.
Twenty-four-pin graphics
The graphics mode that takes full advantage of this printer s printhead is 24-pin graphics. This mode has five densities, but for
simplicity this explanation deals with only one of them, triple-density.
Triple-density prints up to 180 dots per inch, horizontally. As theprint head moves across the paper, every 1/180th of an inch it mustreceive instructions about which of its 24 pins to fire. At eachposition it can fire any number of pins, from none to 24. This meansthat the printer must receive 24 bits of information for each columnit prints. Since the printer uses 8-bit bytes of information incommunicating with the computer, it needs three bytes ofinformation for each position.
Pin labels
To tell the printer which pins to fire in each column, you first divideeach of the vertical columns into three sections of eight pins eachand consider each section separately. Since there are 256 possible
combinations of the eight pins in each section, you need anumbering system that allows you to use a single number to specifywhich of the 256 possible patterns you want. This numberingsystem is shown below:
12 86 4321684
21
Software and Graphics 4-11
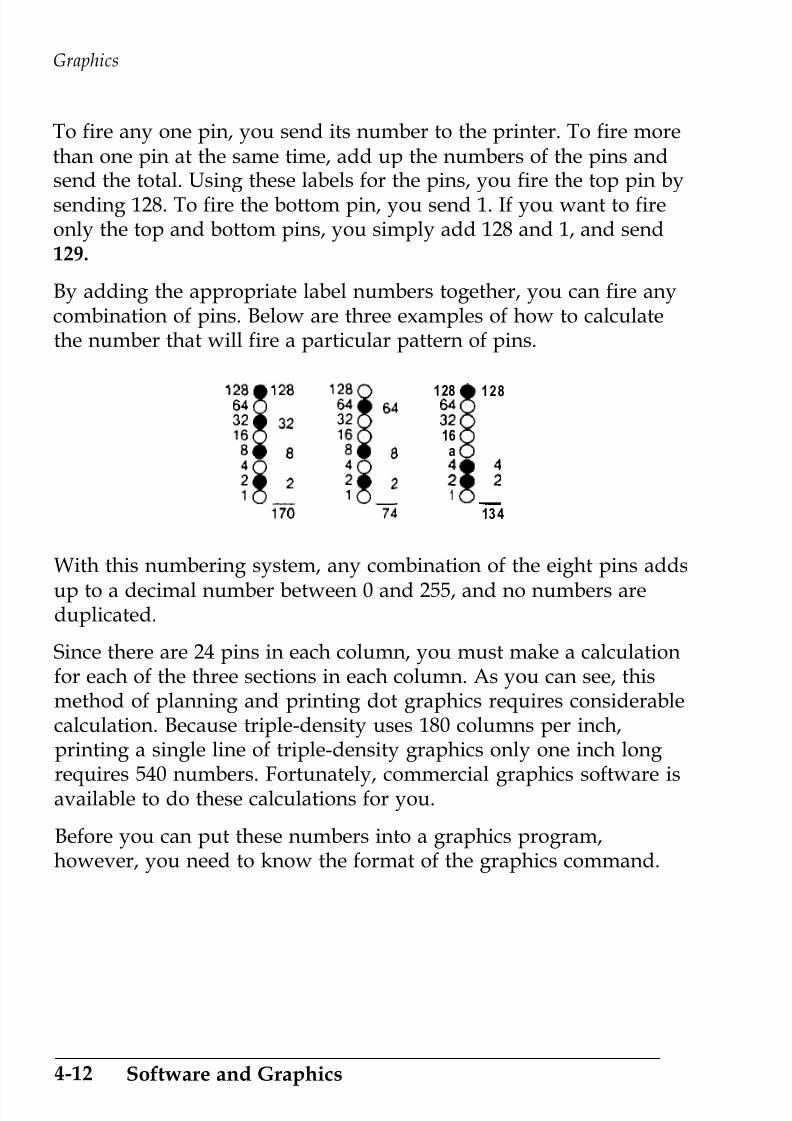
7/21/2019 Epson ActionPrinter 4000 User's Manual
http://slidepdf.com/reader/full/epson-actionprinter-4000-users-manual 103/290
Graphics
To fire any one pin, you send its number to the printer. To fire morethan one pin at the same time, add up the numbers of the pins andsend the total. Using these labels for the pins, you fire the top pin bysending 128. To fire the bottom pin, you send 1. If you want to fireonly the top and bottom pins, you simply add 128 and 1, and send129.
By adding the appropriate label numbers together, you can fire anycombination of pins. Below are three examples of how to calculatethe number that will fire a particular pattern of pins.
128 128
z
16a
1
134
With this numbering system, any combination of the eight pins adds
up to a decimal number between 0 and 255, and no numbers areduplicated.
Since there are 24 pins in each column, you must make a calculationfor each of the three sections in each column. As you can see, thismethod of planning and printing dot graphics requires considerablecalculation. Because triple-density uses 180 columns per inch,printing a single line of triple-density graphics only one inch long
requires 540 numbers. Fortunately, commercial graphics software isavailable to do these calculations for you.
Before you can put these numbers into a graphics program,however, you need to know the format of the graphics command.
4-12 Software and Graphics

7/21/2019 Epson ActionPrinter 4000 User's Manual
http://slidepdf.com/reader/full/epson-actionprinter-4000-users-manual 104/290
Graphics
The Graphics Command
The graphics mode command is quite different from the other
commands used by the printer. For most of the other printer modes,such as emphasized and double-wide, one ESC code turns the modeon and another turns it off. For graphics, the command is morecomplicated because the code that turns on a graphics mode alsospecifies how many columns it will use. After the printer receivesthis code, it interprets the numbers that follow as pin patterns andprints them on the paper.
Your printer has one command that allows you to use any of the 11graphics options. The format of the command is:
ESC * m n1 n2 data
In this command, m selects the graphics option and n1 and n2specify the number of columns to reserve for graphics. The availablegraphics options are listed below:
Option Pins
Single-density 8
m Horiz. densitydots/in.
0 60
Double-density 8 1 120
High-speed double-density* 8 2 120
Quadruple-density* 8 3 240
CRT I 8 4 80
CRT II 8 4 90
Single-density 2 4 31 60
Double-density 2 4 33 120I
CRT III 2 4 38 90I
Triple-density 2 4 39 180
Hex-density* 2 4 40 360
l Adjacent dots cannot be printed in this mode.
Software and Graphics 4-13

7/21/2019 Epson ActionPrinter 4000 User's Manual
http://slidepdf.com/reader/full/epson-actionprinter-4000-users-manual 105/290
Graphics
Column Reservation Numbers
The graphics command requires more than one number to specify
how many columns to reserve because one line can use thousands ofcolumns, but the printer does not use numbers larger than 255 indecimal. Therefore the graphics mode command uses two numbers,n1 and n2, for reserving columns.
To find n1 and n2, divide the total number of columns by 256. Theresult is n2; the remainder is n1. Since the command is set up for twonumbers, you must supply two even if you need only one. When
you need fewer than 256 columns, just make n1 the number ofcolumns you are reserving and make n2 a zero.
For example, if you wish to send 1632 columns of graphics data, n1
should be 96 and n2 should be 6 because 1632 = 96 + (6 x 256).
The printer interprets the number of bytes specified by n1 and n2 asgraphics data, no matter what codes they are. This means that youmust be sure to supply enough bytes of graphics data or the printer
will stop and wait for more data and will seem to be locked. If, onthe other hand, you supply too much graphics data, the excess willbe interpreted and printed as regular text.
A Simple Graphics Program
This first program is just a simple example to show you how thegraphics command, column reservation numbers, and data can be
used in a BASIC program.
4-14 Software and Graphics
7/21/2019 Epson ActionPrinter 4000 User's Manual
http://slidepdf.com/reader/full/epson-actionprinter-4000-users-manual 106/290
Graphics
Type in and run the following program. Be especially careful toinclude both semicolons. The program produces the printout you
see below:
10 WIDTH "LPT1:", 255
20 LPRINT CHR$(27)"*"CHR$(32)CHR$(40)CHR$(0);30 FOR X=1 TO 120
40 LPRINT CHR$(170);
50 NEXT X
Line 20 selects single-density 24-pin graphics mode (mode 32) andalso reserves 40 columns for graphics. Since 24-pin graphics requiresthree bytes of data for each column, line 30 begins a loop to supply120 bytes of data. Line 40 contains the number 170, which producesthe first pin pattern shown in the section on pin labels, and line 50ends the loop.
Designing Your Own Graphics
With what you know now, you can use the simplest application ofgraphics-calculating by hand the data to print the graphic image.While this method is the most tedious, it helps you understand dotgraphics. It is also useful for small graphic elements that are usedmany times.
Software and Graphics 4-15

7/21/2019 Epson ActionPrinter 4000 User's Manual
http://slidepdf.com/reader/full/epson-actionprinter-4000-users-manual 107/290
Graphics
The illustration below shows how you can use a grid on paper toplan where you want dots to be printed. This grid is for a single lineof graphics 42 columns long. Since each line of 24-pin graphics isapproximately 1/8th of an inch high and since triple-densitygraphics prints 180 dots per inch, horizontally, a design planned onthis grid will be about 1/8th of an inch high and less than 1/4th ofan inch wide.
The actual pattern that the printer prints on the paper is, of course,made up of dots that overlap each other both vertically andhorizontally. The reason the planning grid uses an x for each dot isthat using an accurate representation of the dots makes calculating
the data numbers difficult because they cover each other. Therefore,remember that each x represents the center of a dot, and the dotsactually overlap.
Write the assigned values of the pins next to your design, then totalthe values for each column of dots. These totals are the values thatyou send to the printer as graphics data to print the design.
4-16 Software and Graphics

7/21/2019 Epson ActionPrinter 4000 User's Manual
http://slidepdf.com/reader/full/epson-actionprinter-4000-users-manual 108/290
Graphics
Below is the same grid divided into three sections to make the datacalculation easier. At the bottom of each section of each column is
the total of the pin numbers for that section. This gives you the totalof 126 data numbers necessary to print this small figure.
Software and Graphics 4-17

7/21/2019 Epson ActionPrinter 4000 User's Manual
http://slidepdf.com/reader/full/epson-actionprinter-4000-users-manual 109/290
Graphics
Below is the BASIC program that prints the design shown on theprevious pages. Note that the data numbers in lines 80 through 140are the same numbers that are at the bottom of each section in thelast illustration. The WIDTH statement in line 10 is for IBM PCBASIC; the WIDTH statement format may be different for your
system.
10 WIDTH "LPT1:"
20 LPRINT HR$;Z$kHR$(39)CHR$(42)CHR$(0);
30 FOR X=1 TO 126
40 READ N
50 LPRINT CHR$(N);
60 NEXT X
70 LPRINT
80 DATA 0,0,63,0,0,127,0,0,255,0,3,255,0,15,255,0,31,255
90 DATA 0,127,255,0,255,255,1,255,255,3,255,255,7,255,255,15,
255,255100 DATA 31,255,254,31,255,252,31,255,240,31,255,240,31,255
224,31,255,192
110 DATA 31,255,0,31,252,0,31,240,0,31,224,0,31,128,0,31,240,0
120 DATA 1,255,192,28,255,22~,28,127,2~0,28,~5,2~~~3~~0~252~
31,0,126130 DATA 15,128,15,7,192,7,3,240,7,1,254,7,0,255,7,0,127,135
140 DATA 0,31,199,0,7,231,0,1,247,0,0,255,0,0,127,0,0,63
In this program, line 20 assigns the graphics option (24-pin triple-density) with code 39. Code 42 sets the number of pin columns at 42.Lines 80 through 140 contain 126 bytes of data (42-pin columns x 3bytes) for each pin column. Lines 30 through 60 print the design thatyou see below:
A
4-18 Software and Graphics

7/21/2019 Epson ActionPrinter 4000 User's Manual
http://slidepdf.com/reader/full/epson-actionprinter-4000-users-manual 110/290
Graphics
Notice that the dots overlap quite a bit. This design was printedusing the triple-density, 24-pin graphics option because the densityis the same (180 dots per inch) in both directions.
Adding the following lines to the preceding program causes thepattern to print 10 times in a row as shown below:
15 FOR C=1 TO 10: RESTORE65 NEXT C
Software and Graphics 4-19

7/21/2019 Epson ActionPrinter 4000 User's Manual
http://slidepdf.com/reader/full/epson-actionprinter-4000-users-manual 111/290
User-defined Characters
With this printer, it is possible to define and print characters of yourown design. You can design an entirely new alphabet or typeface,create special characters for use as mathematical or scientificsymbols, or create graphic patterns with user-defined characters toserve as building blocks for larger designs.
Below, you can see samples of typefaces created with the user-defined character function.
Note: To use user-defined characters, you must turn DIP switch2-5 off.
You can make the task of defining characters easier by using acommercial software program that assists you in creating charactersor simply supplies you with sets of characters already created. Also,some popular software programs make use of the printer s user-defined character function to enhance printouts. (These charactersare called download characters in some programs.)
The standard ASCII characters are stored in the printer s Read Only
Memory (ROM) or optional Multi-Font Module, and the user-defined characters are stored in the printer s Random AccessMemory (RAM).
Designing Your Characters
User-defined characters are like dot graphics because you send theprinter precise instructions on where you want each dot printed. In
fact, planning a user-defined character is like planning a small dotgraphics pattern.
4-20 Software and Graphics
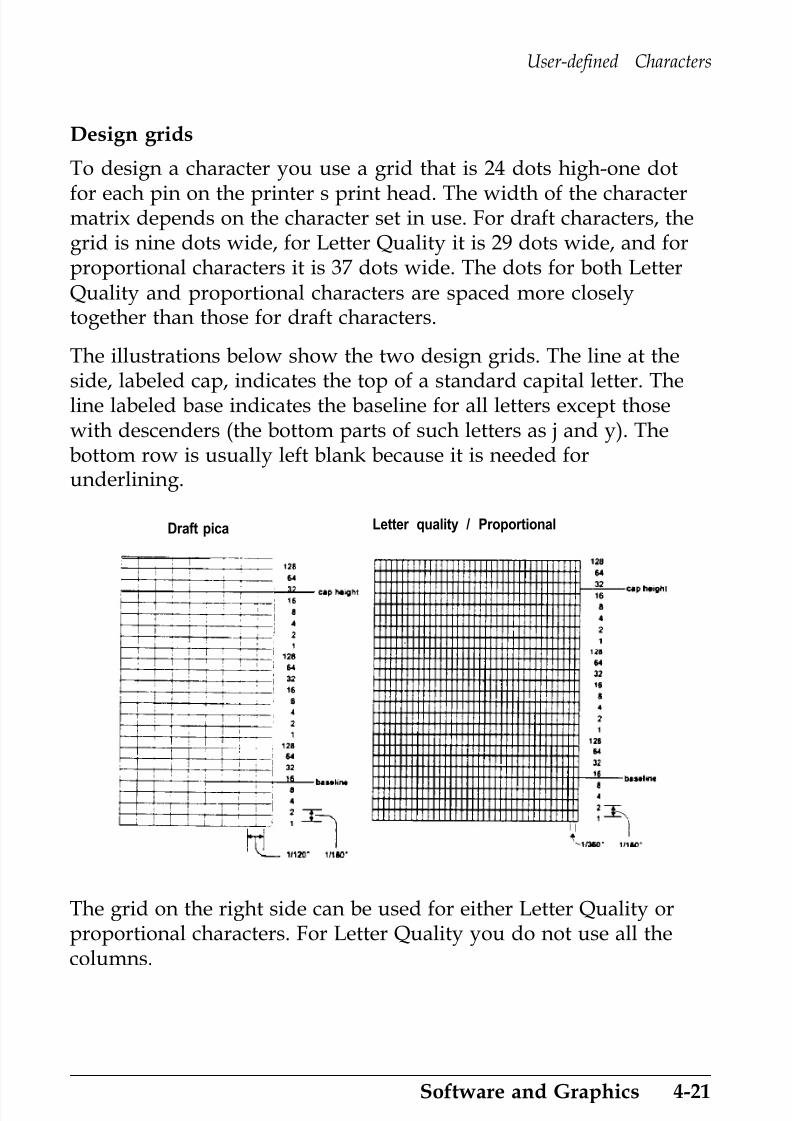
7/21/2019 Epson ActionPrinter 4000 User's Manual
http://slidepdf.com/reader/full/epson-actionprinter-4000-users-manual 112/290
User-defined Characters
Design grids
To design a character you use a grid that is 24 dots high-one dot
for each pin on the printer s print head. The width of the charactermatrix depends on the character set in use. For draft characters, thegrid is nine dots wide, for Letter Quality it is 29 dots wide, and forproportional characters it is 37 dots wide. The dots for both LetterQuality and proportional characters are spaced more closelytogether than those for draft characters.
The illustrations below show the two design grids. The line at the
side, labeled cap, indicates the top of a standard capital letter. Theline labeled base indicates the baseline for all letters except thosewith descenders (the bottom parts of such letters as j and y). Thebottom row is usually left blank because it is needed forunderlining.
Draft pica Letter quality / Proportional
The grid on the right side can be used for either Letter Quality orproportional characters. For Letter Quality you do not use all thecolumns.
Software and Graphics 4-21

7/21/2019 Epson ActionPrinter 4000 User's Manual
http://slidepdf.com/reader/full/epson-actionprinter-4000-users-manual 113/290
User-defined Characters
There is one restriction in designing characters. Dots in the samerow may not print in adjacent columns. This means that there must
be an empty dot position both to the left and right of each dot thatprints. This is true in draft, Letter Quality, and proportional mode.
Defining Your Characters
The first step in defining characters is to place the dots on a grid justas you want them to print. The examples shown here, like the onesin the graphics section, use an x to represent each dot.
In the illustration below, you see a draft grid with a simple user-defined character planned on it.
Now you translate the dot pattern you ve created on paper to anumeric format so you can send the data to your printer. Every dothas an assigned value. Each vertical column (which has a maximumof 24 dots) is first divided into three groups of eight dots. Eachgroup of eight dots is represented by one byte, which consists ofeight bits. Hence, one bit represents one dot.
4-22 Software and Graphics

7/21/2019 Epson ActionPrinter 4000 User's Manual
http://slidepdf.com/reader/full/epson-actionprinter-4000-users-manual 114/290
User-defined Characters
Data numbers
The bits within each byte have values of 1, 2, 4, 8, 16, 32, 64, and 128.
In the vertical column of dots, the bits are arranged so that the mostsignificant bit (with a value of 128) is at the top of the column andthe least significant bit (with a value of 1) is at the bottom.
The next illustration shows how to use this method to calculate thedata numbers for the character in this example. On the left side ofthe figure, the data numbers are calculated for the middle column.The value of each byte is calculated by adding the values of the rows
in which dots appear. The right side of the figure shows the wholecharacter with the three data numbers for each column indicated atthe bottom.
This manual uses decimal numbers because the program examplesare written in BASIC and everyone is familiar with decimals. Thedata you send to your printer, however, must be in the form (binary,decimal, hexadecimal) that you can use with your programminglanguage.
Software and Graphics 4-23

7/21/2019 Epson ActionPrinter 4000 User's Manual
http://slidepdf.com/reader/full/epson-actionprinter-4000-users-manual 115/290
User-defined Characters
You have seen how to design a character by placing dots on a gridand translating the dots to decimal equivalents. The last step in
defining a character is sending this information to your printer.
Sending Information to Your Printer
The printer loads characters in the print style (Letter Quality, draft,or proportional) that the printer is currently using. It also recordswhether italic, superscript, or subscript is turned on. This meansthat if you want to print a character in italics, for example, you must
have the italic mode turned on when you define the character.The command your printer uses to define characters is one of themost complex in its repertoire. The format of the command is this:
ESC & 0 n1 n2 d0 d1 d2 data
The ESC & is simple enough. The 0 (which is ASCII code 0, not thenumerical zero in quotation marks) allows for future enhancements.At this time, it is always ASCII 0.
You can define many characters with a single command. The valuesn1 and n2 are the ASCII codes of the first and last characters you aredefining. If you are defining only one character, n1 and n2 are thesame. You can use any codes between decimal 32 and 127 for n1 andn2, but it is best not to define decimal 32, which is the code for aspace. Also, you can use letters in quotation marks instead of ASCIIcodes for n1 and n2.
Note: Because user-defined characters require additionalmemory, you must set DIP switch 2-5 to 1 KB (off) beforedownloading these characters.
4-24 Software and Graphics

7/21/2019 Epson ActionPrinter 4000 User's Manual
http://slidepdf.com/reader/full/epson-actionprinter-4000-users-manual 116/290
User-defined Characters
An example will show how to specify n1 and n2. For instance, if youwanted to redefine the characters A through Z, n1 would be A (orASCII code 65) and n2 would be Z (or ASCII code 90). So thecommand ESC & 0 AZ (followed by the appropriate data) wouldreplace the entire alphabet of capital letters.
Following the specification of the range of characters to be definedin this command are three data bytes, d0, d1, and d2, that specify thewidth of the character and the space around it. The left space (in dotcolumns) is specified by d0, and the right space is specified by d2.The second byte, d1, specifies the number of columns of dots that
are printed to make up the character. By varying the width of thecharacter and the spaces around it, you can create proportional-width characters that print at draft speed. The table below showsthe maximum values for these bytes.
Mode d1 d 0 + d 1 + d 2
Draft 9 12
Letter Quality 10 cpi 29 36Letter Quality 12 cpi 23 30
Proportional 37 42
The last part of the command to define your characters is the actualdata that defines the dot patterns for each character. Since it takesthree bytes to specify all the dots in one vertical column, your
printer expects d1 x 3 bytes of data to follow d2.
Software and Graphics 4-25

7/21/2019 Epson ActionPrinter 4000 User's Manual
http://slidepdf.com/reader/full/epson-actionprinter-4000-users-manual 117/290
User-defined Characters
This example of a character definition program should make thisclear:
10 LPRINT CHR$(27)"x0"
20 LPRINT CHR$(27)"&"CHR$(0);
30 LPRINT "@@";
40 LPRINT CHR$(1)CHR$(9)CHR$(1);
50 FOR I=1 TO 27
60 READ A: LPRINT CHR$(A);
70 NEXT I
80 LPRINT "@@@@@"
90 LPRINT CHR$(27)"%"CHR$(1);100 LPRINT "@@@@@"
110 LPRINT CHR$(27)"%"CHR$(0);
120 LPRINT "@@@@@"
130 END
140 DATA 1,0,0,2,0,0,4,0,0
150 DATA 8,0,0,23,255,240,8,0,0
160 DATA 4,0,0,2,0,0,1,0,0
In line 10, the ESC x0 command selects draft printing.
The actual character definition starts in line 20. The two @ signs inline 30 represent n1 and n2, the range of characters being defined (inthis case, a range of 1). Line 40 contains d0, d1, and d2.
The information about the actual character design (which iscontained in the DATA statements at the end of the program) is sent
to the printer in the loop between lines 50 and 70.
Note: When defining Letter Quality or proportional characters,put a WIDTH statement in your program to prevent carriagereturn and line feed codes from interfering with your definitions.
4-26 Software and Graphics

7/21/2019 Epson ActionPrinter 4000 User's Manual
http://slidepdf.com/reader/full/epson-actionprinter-4000-users-manual 118/290
User-defined Characters
Printing User-defined Characters
If you entered the previous program example, you defined an arrow
and placed it in the RAM location for ASCII code 64 (replacing the @sign). You can now print out a three-line sample of your work. Thefirst and third lines (printed by lines 80 and 120) print the normal @sign. The second line (printed by line 100) prints out the arrow thatyou defined.
Run the program to see the printout below:
@@@@@
@@@@@
As you can see, both sets of characters (the @ from the originalcharacters in ROM that the printer normally uses and the alternativecharacter you defined) remain in the printer available for your use.The command to switch between the two sets is used in line 90 and
110. It is:ESC%n
If n is equal to 0, the normal ROM character set is selected (this is thedefault). If n is equal to 1, the user-defined character set is selected.If you select the user-defined character set before you have definedany characters, the command is ignored and the ROM charactersremain in use.
You may switch between character sets at any time-even in themiddle of a line. To try this, place semicolons at the end of lines 80and 100 in the program example.
Software and Graphics 4-27

7/21/2019 Epson ActionPrinter 4000 User's Manual
http://slidepdf.com/reader/full/epson-actionprinter-4000-users-manual 119/290
User-defined Characters
Copying ROM Characters to RAM
After running the program, if you select the user-defined character
set and try to print other characters, the only one that will print isyour arrow. Since no other characters are in the printer s user-defined RAM, there is nothing else to print. Other characters sent tothe printer do not even print as spaces; it s as if they were not sent atall.
In many cases, you will want to redefine only a few of the charactersto suit your needs-the rest of the alphabet will work fine as it is. As
you have seen, it is possible to switch back and forth, at will,between the normal character set and your user-defined characterset. It is, however, rather inconvenient.
Therefore, your printer has a command that allows you to copy allof the standard characters from ROM to the user-defined characterset.
The command format is as follows, where the value of n represents
the font family:E S C : 0 n 0
Note: This command cancels any user-defined characters youhave already created. You must send this command to the printerbefore you define characters.
If you use this command at the beginning of a program, then defineyour special characters and select the user-defined set, you can printwith the user-defined set as your normal character set. You neverneed to switch back and forth between sets.
4-28 Software and Graphics

7/21/2019 Epson ActionPrinter 4000 User's Manual
http://slidepdf.com/reader/full/epson-actionprinter-4000-users-manual 120/290
User-defined Characters
Letter Quality Characters
If you select Letter Quality printing with the ESC x1 command, you
can design user-defined characters using up to 29 columns of theLetter Quality/Proportional grid. The dot columns are spaced closertogether horizontally than draft dot columns (the horizontal dotspacing is 1/360th of an inch as opposed to 1/120th of an inch fordraft characters).
Proportional mode characters
Selecting the proportional character mode yields user-definedcharacters of the highest resolution. Characters can be designedusing all 37 columns of the Letter Quality/Proportional grid.
Remember that in Letter Quality and proportional modes, as indraft mode, you cannot place dots in adjacent columns. There mustbe an empty dot position both to the left and right of each dot thatprints.
Superscripts and subscripts
You can also create superscript and subscript user-definedcharacters. Just as Letter Quality characters are defined when theLetter Quality mode is selected, superscript and subscript charactersare created when either superscript or subscript is selected.
These characters can be used as either superscripts or subscripts.The characters are exactly the same; only their placement is
different. The difference between these characters and regularcharacters is that superscript and subscript characters are smaller.They are a maximum of 16 dots high. Their maximum width in dotcolumns is shown in the table below:
Software and Graphics 4-29

7/21/2019 Epson ActionPrinter 4000 User's Manual
http://slidepdf.com/reader/full/epson-actionprinter-4000-users-manual 121/290
User-defined Characters
Since superscript and subscript characters are smaller, when youdefine them you only need two bytes of data for each vertical row ofdots. Design grids for these characters are shown in the figurebelow:
Draft picaLetter Quality
and Proportional
Mixing Print Styles
Each of the three user-defined character modes (draft, LetterQuality, and proportional) can be used in combination with most ofyour printer s various print styles. For instance, emphasized modeworks with user-defined characters. The characters you design areenhanced to give this printing effect.
Mixing the three types of user-defined character sets is not possible.For example, if you select draft and define some characters, thenselect proportional and define some more, the first draft characterdefinitions are deleted. Only one type of character definition may bestored in RAM at any time.
4-30 Software and Graphics

7/21/2019 Epson ActionPrinter 4000 User's Manual
http://slidepdf.com/reader/full/epson-actionprinter-4000-users-manual 122/290
User-defined Characters
If you define characters in one mode, then switch to another modeand select the user-defined character set, the command is ignoredand nothing is printed. The user-defined character definitions,however, remain unaffected. If you switch back to the mode inwhich they were defined, you can then select and print them.
Keep in mind that user-defined characters are stored in RAM, whichis not permanent memory. When the printer power is turned off orthe printer is initialized with the INIT signal, the user-definedcharacters are lost. (Some computers do this each time BASIC isloaded.)
Software and Graphics 4-31

7/21/2019 Epson ActionPrinter 4000 User's Manual
http://slidepdf.com/reader/full/epson-actionprinter-4000-users-manual 123/290
Chapter 5
Using the Printer Options
The Cut Sheet Feeder . . . . . . . . . . . . . . . . . . . . . . . . . . . . . . . 5-2
Installation . . . . . . . . . . . . . . . . . . . . . . . . . . . . . . . . . . . . . . 5-2
Paper Handling . . . . . . . . . . . . . . . . . . . . . . . . . . . . . . . . . . 5-5
Testing the Printer in the Cut Sheet Feeder Mode . . . . . 5-9
Operating the Cut Sheet Feeder . . . . . . . . . . . . . . . . . . . . 5-11
Single-sheet Insertion . . . . . . . . . . . . . . . . . . . . . . . . . . . . . 5-11Removing the Cut Sheet Feeder . . . . . . . . . . . . . . . . . . . . 5-15
The Pull Tractor . . . . . . . . . . . . . . . . . . . . . . . . . . . . . . . . . . . . 5-17
Installation . . . . . . . . . . . . . . . . . . . . . . . . . . . . . . . . . . . . . . 5-17
Paper Handling . . . . . . . . . . . . . . . . . . . . . . . . . . . . . . . . . . 5-19
Removing the Pull Tractor. . . . . . . . . . . . . . . . . . . . . . . . . 5-24
The Multi-Font Module . . . . . . . . . . . . . . . . . . . . . . . . . . . . . 5-28
Installation . . . . . . . . . . . . . . . . . . . . . . . . . . . . . . . . . . . . . . 5-30
Selecting a Font . . . . . . . . . . . . . . . . . . . . . . . . . . . . . . . . . . 5-33
The Interface Boards . . . . . . . . . . . . . . . . . . . . . . . . . . . . . . . . 5-34
Choosing an Interface . . . . . . . . . . . . . . . . . . . . . . . . . . . . . 5-34
Compatible Interfaces. . . . . . . . . . . . . . . . . . . . . . . . . . . . . 5-35
Installation . . . . . . . . . . . . . . . . . . . . . . . . . . . . . . . . . . . . . . 5-35
#8143 New Serial Interface. . . . . . . . . . . . . . . . . . . . . . . . . 5-41
Using the Printer Options 5-1

7/21/2019 Epson ActionPrinter 4000 User's Manual
http://slidepdf.com/reader/full/epson-actionprinter-4000-users-manual 124/290
The Cut Sheet Feeder
The optional cut sheet feeder (C806121) makes it possible to handlesingle-sheet paper more easily and more efficiently. Up to 150 sheetsof standard bond paper can be fed automatically into the printerwithout reloading.
Installation
1.
2.
Make sure that the printer is turned off. Then remove the paper
guide and printer cover.
Replace the clear plastic part of the printer cover with the clearplastic part included with the cut sheet feeder.
5-2 Using the Printer Options

7/21/2019 Epson ActionPrinter 4000 User's Manual
http://slidepdf.com/reader/full/epson-actionprinter-4000-users-manual 125/290
The Cut Sheet Feeder
3. Make sure that the paper release lever is pushed all the way tothe rear.
Using the Printer Options 5-3

7/21/2019 Epson ActionPrinter 4000 User's Manual
http://slidepdf.com/reader/full/epson-actionprinter-4000-users-manual 126/290
The Cut Sheet Feeder
4. Insert the metal brackets into the cut sheet feeder. Then tilt thecut sheet feeder slightly forward to fit the notches at the base ofthe unit over the black pins inside the printer. Tilt the feederback until it rests on top of the printer.
5. Attach the printer cover as shown in the illustration below.
5-4 Using the Printer Options

7/21/2019 Epson ActionPrinter 4000 User's Manual
http://slidepdf.com/reader/full/epson-actionprinter-4000-users-manual 127/290
The Cut Sheet Feeder
6. Turn on the cut sheet feeder mode by setting DIP switch 1-8 toon.
7. Turn on the printer.
Paper Handling
1. Make sure that the cut sheet feeder mode is turned on with DIPswitch 1-8 and turn on the printer.
Using the Printer Options 5-5

7/21/2019 Epson ActionPrinter 4000 User's Manual
http://slidepdf.com/reader/full/epson-actionprinter-4000-users-manual 128/290
The Cut Sheet Feeder
2.
3.
Pull the paper set levers all the way forward until the papersupports retract and lock open to allow for paper loading.
Slide the left paper guide to where the fin on the edge guide isslightly left of the arrow on the panel. Next, slide the right paperguide so that it roughly matches the width of your paper.
5-6 Using the Printer Options

7/21/2019 Epson ActionPrinter 4000 User's Manual
http://slidepdf.com/reader/full/epson-actionprinter-4000-users-manual 129/290
The Cut Sheet Feeder
4. Take a stack of paper and fan it as shown. This keeps the paperfrom sticking and ensures that only one sheet feeds at a time.Tap the side and bottom of the paper on a flat surface to eventhe stack.
Note: For best results, use typewriter quality paper. If youplan to use paper with a glossy or textured surface, test itbefore using it to print documents. Do not use multi-partforms, carbon paper, envelopes, or labels in the cut sheet
feeder.
Using the Printer Options 5-7
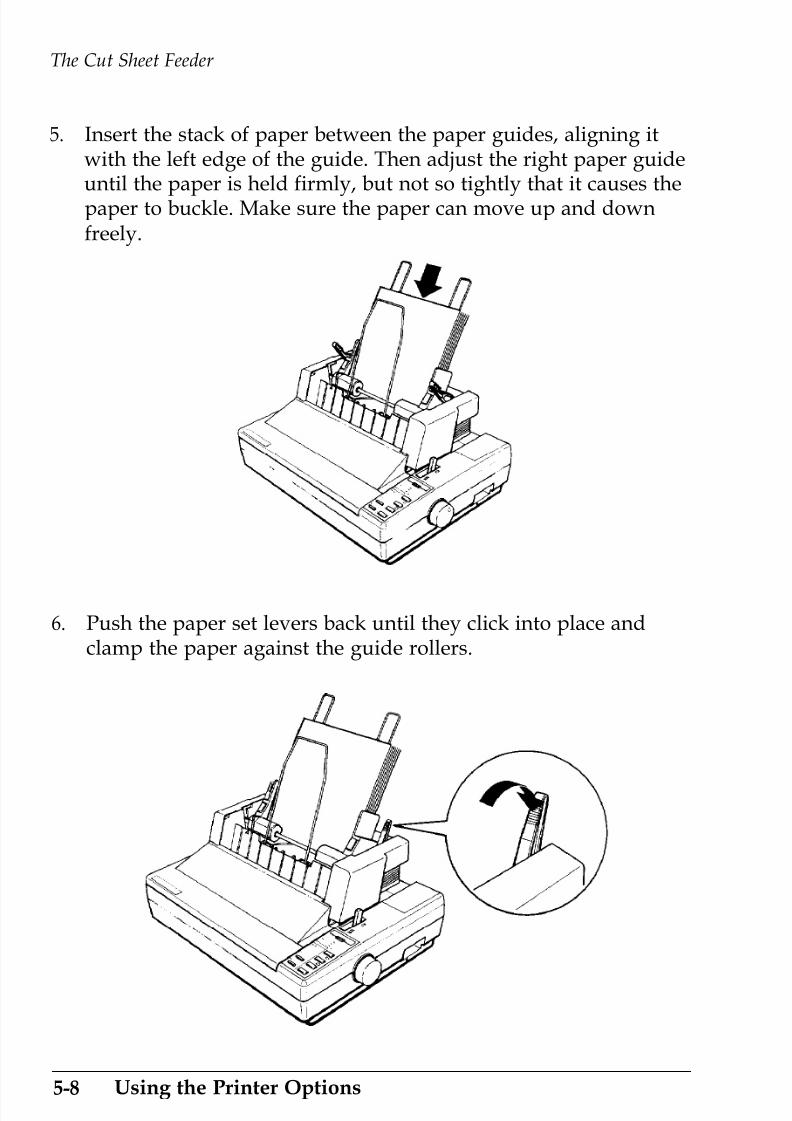
7/21/2019 Epson ActionPrinter 4000 User's Manual
http://slidepdf.com/reader/full/epson-actionprinter-4000-users-manual 130/290
The Cut Sheet Feeder
5. Insert the stack of paper between the paper guides, aligning itwith the left edge of the guide. Then adjust the right paper guideuntil the paper is held firmly, but not so tightly that it causes thepaper to buckle. Make sure the paper can move up and downfreely.
6. Push the paper set levers back until they click into place andclamp the paper against the guide rollers.
5-8 Using the Printer Options

7/21/2019 Epson ActionPrinter 4000 User's Manual
http://slidepdf.com/reader/full/epson-actionprinter-4000-users-manual 131/290
The Cut Sheet Feeder
Testing the Printer in the Cut Sheet Feeder Mode
When you perform the cut sheet feeder self test, the printer counts
the number of lines on the page. As shown on the following page,the number of lines counted is printed out at the bottom of the firsttest page. This number is the default page-length setting. Thissetting, however, can be overridden by software commands.
Running the self test is the same as when the cut sheet feeder modeis off. The steps below are for a self test in draft mode.
1. Make sure that the printer is turned off and a stack of paper is in
the bin. Check that the cut sheet feeder mode is selected and thepaper release lever is pushed to the rear.
2. While holding down the LINE FEED button, turn on the printer.(For LQ mode, press the FORM FEED button instead of the LINEFEED button.)
Using the Printer Options 5-9

7/21/2019 Epson ActionPrinter 4000 User's Manual
http://slidepdf.com/reader/full/epson-actionprinter-4000-users-manual 132/290
The Cut Sheet Feeder
A part of the printout of the first sheet is shown below. Theprintout of the second sheet is similar to the original self test
described in Chapter 1.
This is the first line.
This is line XX.
3. The self test continues until the paper runs out or until you pressthe ON LINE button. To stop the test, press the ON LINE button.
Note: To resume the test, press the ON LINE button once more.
4. To end the self test when paper is loaded, press the LOAD/EJECT
button to eject the paper. Then turn off the printer.
5-10 Using the Printer Options
7/21/2019 Epson ActionPrinter 4000 User's Manual
http://slidepdf.com/reader/full/epson-actionprinter-4000-users-manual 133/290
The Cut Sheet Feeder
Operating the Cut Sheet Feeder
After stacking paper in the cut sheet feeder, turn on the printer and
make sure that the ON LINE light is on. In on line status, a new sheetof paper loads automatically whenever a printable character or linefeed command is sent to the printer.
Paper out condition
When the printer is on line and receives print data from thecomputer, the first sheet loads automatically. Subsequent sheets
load automatically as necessary.l In the cut sheet feeder mode, the PAPER OUT light goes on while
a sheet of paper is being fed, but the printer remains on line.
l When the specified paper bin is empty, the printer automaticallygoes off line, the PAPER OUT light goes on, and the beepersounds. To resume printing, add more paper and press the ONLINE button.
Note: If you turn off your printer during the time the printerdetects a paper out or paper jam condition, any dataremaining in the printer s buffer is discarded.
Single-sheet Insertion
Your cut sheet feeder also has a single-sheet loading feature. Thisfeature is especially useful because it allows you to switch to adifferent type or size of paper (for one sheet only) without replacingthe stack of paper in your cut sheet feeder.
Using the Printer Options 5-11
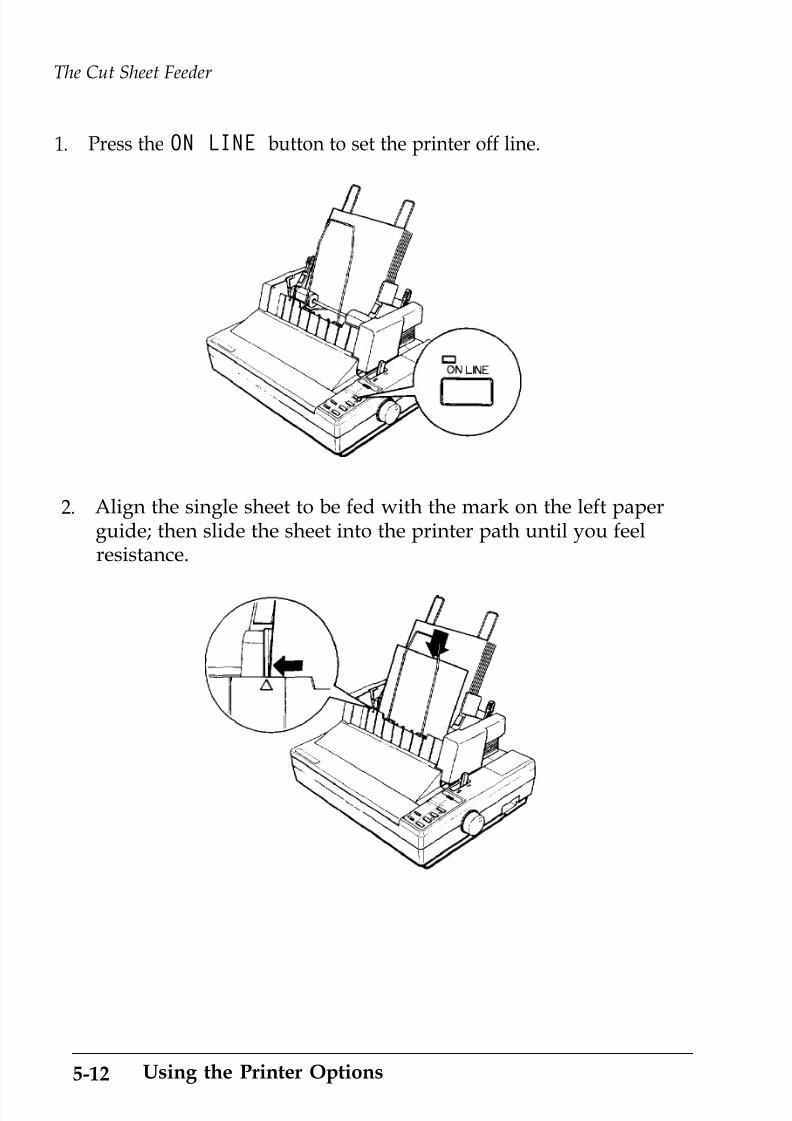
7/21/2019 Epson ActionPrinter 4000 User's Manual
http://slidepdf.com/reader/full/epson-actionprinter-4000-users-manual 134/290
The Cut Sheet Feeder
1. Press the ON LINE button to set the printer off line.
2. Align the single sheet to be fed with the mark on the left paperguide; then slide the sheet into the printer path until you feelresistance.
5-12 Using the Printer Options

7/21/2019 Epson ActionPrinter 4000 User's Manual
http://slidepdf.com/reader/full/epson-actionprinter-4000-users-manual 135/290
The Cut Sheet Feeder
3. Press the LOAD/EJECT button to load the sheet.
Control panel operation
To operate the cut sheet feeder manually from the control panelwhen the printer is in the cut sheet feeder mode, first make sure that
the printer is off line.
LINE FEED When there is paper in the printer, press thisbutton to feed the paper one line or hold it downto feed the paper continuously.
FORM FEED When there is no paper in the printer, press thisbutton to load the paper. When there is paper in
the printer, press this button to eject the sheet.
LOAD/EJECT When there is no paper in the printer, press thisbutton to load the paper. When there is paper inthe printer, press this button to eject the sheet.
Using the Printer Options 5-13

7/21/2019 Epson ActionPrinter 4000 User's Manual
http://slidepdf.com/reader/full/epson-actionprinter-4000-users-manual 136/290
The Cut Sheet Feeder
Software operation
The following commands cause the printer to eject the sheet in the
printer without loading the next sheet.
FF: Form Feed
ESC EM R: Ejects a sheet in the cut sheet feeder mode
Note: The ESC EM command is a software command used tocontrol the operation of the cut sheet feeder. For moreinformation about this command, see the Command Summary in
Chapter 9.
If the paper reaches the bottom of the print area when any of thefollowing line feed commands is used, the sheet in the printer isautomatically ejected and the next sheet is loaded.
LF:
VT:
Line Feed; advances the paper one line
Vertical Tab; advances the paper to the nextvertical tab position
ESC J: Line feed; advances the paper n/180th of an inch
Software is not effective while the printer is off line. Make sure thatthe printer is on line if you wish to control the cut sheet feeder usingsoftware commands.
5-14 Using the Printer Options

7/21/2019 Epson ActionPrinter 4000 User's Manual
http://slidepdf.com/reader/full/epson-actionprinter-4000-users-manual 137/290
The Cut Sheet Feeder
Removing the Cut Sheet Feeder
1. Turn off the printer and remove any paper remaining in the bin
and printer.
2. Remove the printer cover and tilt the cut sheet feeder back.
Release its notches from the printer s pins, and then lift up andremove the cut sheet feeder.
Using the Printer Options 5-15

7/21/2019 Epson ActionPrinter 4000 User's Manual
http://slidepdf.com/reader/full/epson-actionprinter-4000-users-manual 138/290
The Cut Sheet Feeder
3. Set DIP switch 1-8 to off (to turn off the cut sheet feeder mode).
4. Replace the clear plastic part of the printer cover with the clear
plastic part that was on it originally.
Removal of the cut sheet feeder is now completed. Be sure to storethe removed cut sheet feeder in its original box and packingmaterials.
5-16 Using the Printer Options

7/21/2019 Epson ActionPrinter 4000 User's Manual
http://slidepdf.com/reader/full/epson-actionprinter-4000-users-manual 139/290
The Pull Tractor
The optional pull tractor (C800061) provides optimum continuouspaper handling. The pull tractor is especially useful with continuousmulti-part forms and labels. For best results, use the pull tractoralong with the built-in push tractor as described in this section.
Installation
1. Turn off the printer and remove the printer cover and paper
guide.
2. Remove the paper tension unit cover.
Using the Printer Options 5-17

7/21/2019 Epson ActionPrinter 4000 User's Manual
http://slidepdf.com/reader/full/epson-actionprinter-4000-users-manual 140/290
The Pull Tractor
3. Fit the rear notches on the tractor over the rear mounting pins inthe printer. Then tilt the tractor unit toward you until the frontlatches click in place over the black front mounting pins. Pushdown on the front latches to be sure they are firmly seated.
4. Pull the paper release lever to the continuous paper position andturn on the printer.
5-18 Using the Printer Options
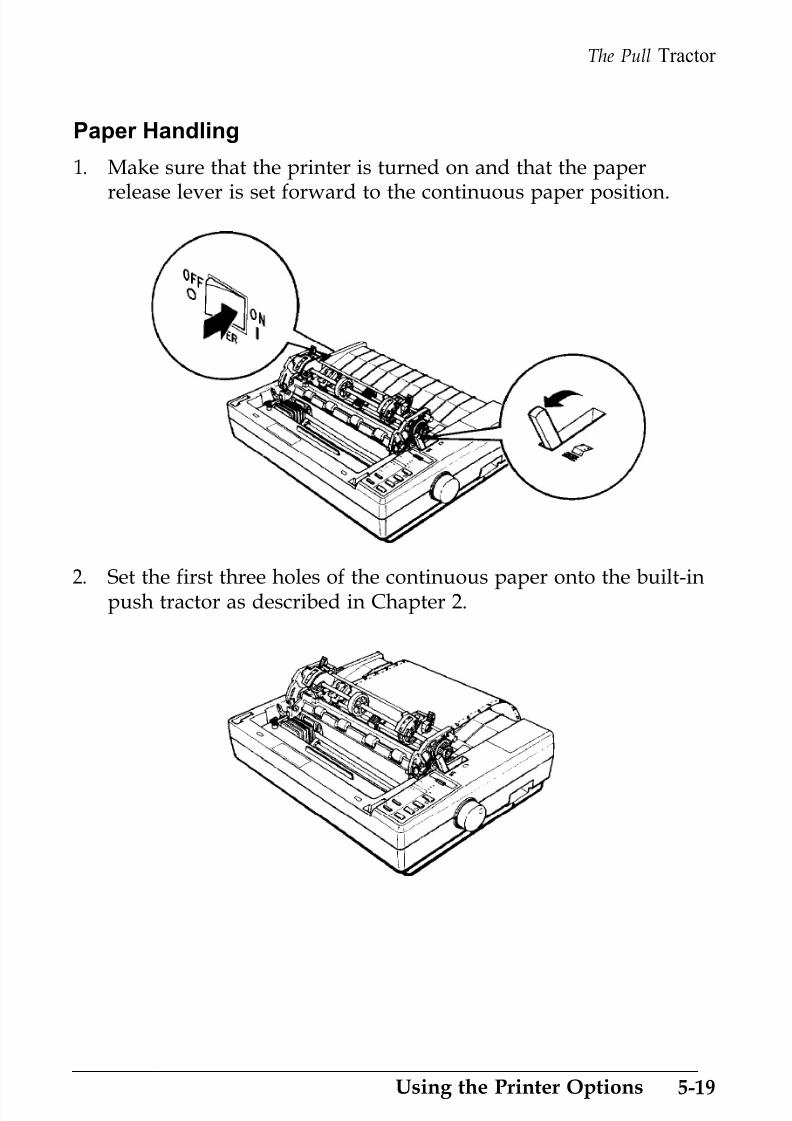
7/21/2019 Epson ActionPrinter 4000 User's Manual
http://slidepdf.com/reader/full/epson-actionprinter-4000-users-manual 141/290
The Pull Tractor
Paper Handling
1. Make sure that the printer is turned on and that the paper
release lever is set forward to the continuous paper position.
2.Set the first three holes of the continuous paper onto the built-inpush tractor as described in Chapter 2.
Using the Printer Options 5-19

7/21/2019 Epson ActionPrinter 4000 User's Manual
http://slidepdf.com/reader/full/epson-actionprinter-4000-users-manual 142/290
The Pull Tractor
3. Press the LOAD/EJECT button to load the continuous paper; thenpress the FORM FEED button. This advances the paper one pageso that you can fit the paper onto the pull tractor.
Note: After you press the FORM FEED button, be careful not totouch any of the buttons on the control panel until step 10.
0CAUTION:
Never use the platen knob while the printer is
turned on. To adjust the loading position, use the micro-adjustment feature described in Chapter 3.
4. Open the sprocket covers of the pull tractor and pull thesprocket lock levers toward you to release them.
5-20 Using the Printer Options

7/21/2019 Epson ActionPrinter 4000 User's Manual
http://slidepdf.com/reader/full/epson-actionprinter-4000-users-manual 143/290
The Pull Tractor
5. Adjust the sprocket units to match the width of the paper; thenadjust the paper support so that it is halfway between thesprocket units.
6. Fit the holes in the paper over the tractor pins on the sprocketunits and close the sprocket covers.
Using the Printer Options 5-21

7/21/2019 Epson ActionPrinter 4000 User's Manual
http://slidepdf.com/reader/full/epson-actionprinter-4000-users-manual 144/290
The Pull Tractor
7. If the paper does not fit exactly onto the tractor pins or if thepaper buckles, press in on the gray pull tractor knob and turn itin the desired direction until the paper fits properly.
8. See that the paper is not crooked or wrinkled and lock thesprocket units in place.
5-22 Using the Printer Options

7/21/2019 Epson ActionPrinter 4000 User's Manual
http://slidepdf.com/reader/full/epson-actionprinter-4000-users-manual 145/290
The Pull Tractor
9. Replace the clear plastic part of the printer cover with the clearplastic part included with the pull tractor.
10. Install the paper guide; then install the pull tractor cover as shown
below and press theON LINE
button to set the printer on line.
Although the pull tractor can be used in combination with the built-in push tractor as described above, the pull tractor can also be usedby itself. Instead of setting the paper on the pins of the push tractor,
simply insert it through the same paper path as you would use withsingle-sheet paper.
Using the Printer Options 5-23

7/21/2019 Epson ActionPrinter 4000 User's Manual
http://slidepdf.com/reader/full/epson-actionprinter-4000-users-manual 146/290
The Pull Tractor
Note: Do not use the short tear-off feature with the pull tractor.
Removing the Pull Tractor
1. Make sure to tear off the printed document and remove thetractor cover and paper guide. Then turn on the printer.
5-24 Using the Printer Options

7/21/2019 Epson ActionPrinter 4000 User's Manual
http://slidepdf.com/reader/full/epson-actionprinter-4000-users-manual 147/290
The Pull Tractor
2. Press the ON LINE button to set the printer off line. Then, pressthe LOAD/EJECT button until the continuous paper feeds
backward out of the paper path to the standby position. ThePAPER OUT light comes on when the paper is completely out ofthe paper path.
3. Remove the continuous paper from the push tractor unit.
Using the Printer Options 5-25

7/21/2019 Epson ActionPrinter 4000 User's Manual
http://slidepdf.com/reader/full/epson-actionprinter-4000-users-manual 148/290
The Pull Tractor
4. Hold the front latches between your thumb and index finger andgently lift them up, slowly tilting the unit back. Then push the
paper release lever to the rear.
5. Replace the paper tension unit cover as shown below.
5-26 Using the Printer Options

7/21/2019 Epson ActionPrinter 4000 User's Manual
http://slidepdf.com/reader/full/epson-actionprinter-4000-users-manual 149/290
The Pull Tractor
6. Remove the tractor cover from the printer cover and reassemblethe printer cover.
7. Install the paper guide and printer cover.
Using the Printer Options 5-27

7/21/2019 Epson ActionPrinter 4000 User's Manual
http://slidepdf.com/reader/full/epson-actionprinter-4000-users-manual 150/290
The Multi-Font Module
The optional Multi-Font Module gives you an easy way to haveaccess to seven more fonts for your printer. After you install theMulti-Font Module in its slot, you can use any one of the followingfonts as your default font when the printer is turned on and any of the others optionally by sending a command to the printer.
0CAUTION: Do not insert the Multi-Font Module when the
printer is turned on.
These are samples of the character sets of the Multi-Font Module sfonts:
Courier
I” %&‘( )*+,-. 0123456789:;<=>? ABCDEFGHIJK MNOPQRSTUVWXYZ’c§^ ‘abcdefghijklmnopqrstuv
wxyz~h~ Cii~d~iab~:g~~~i:4~~:aelEUijbQh~OttsfYPtf616
tififiBQ;~Y+ iC>
We ve just seen your exce l lent ad forminiature zebras in a recent back issue of Trader s Times. What is the price schedulefor quant i t ies over one gross?
Prestige
We ve just seen your exce l lent ad form i n i a t u r e z e b r a s i n a re ce n t b a ck i s s u e o f Trader s Times. What is the price schedule
for quant i t ies over one gross?
5-28 Using the Printer Options

7/21/2019 Epson ActionPrinter 4000 User's Manual
http://slidepdf.com/reader/full/epson-actionprinter-4000-users-manual 151/290
The Multi-Font Module
WQ’VQ A. t AQQn YOUA QXC QWt d 4OJt
. .
m.uu bm zebJt .aA - I a QcQ?d b a c k d .LQ 04
Tmzdwc’a
kneti Wh.a t -cd rthQ /X iCQ 6ChedLLeQ
fjO4 Q e OVQ4. OnQ g to ?
OCR-B
' $%&'O*+,-.
/0123456789:;<=>?gABCDEFGHIJK
;MNoPQRsTUVWXYZO~§A
'abcdefghijklmnopqrstuv
wxyzC~~ . C~e66~1CBC~~~~~~~~~~~~~~~~~~ f~ ~~~~~
lif iiGPj~ ~ +
i<o>
We've just seen your excellent ad for
miniature zebras in a recent back issue ofTrader's Times. What is the price schedule
for quantities over one gross?
We've just seen your excellent ad for
miniature zebras in a recent back issue ofTrader's Times. What is the price schedule
for quantities over one gross?
Using the Printer Options 5-29

7/21/2019 Epson ActionPrinter 4000 User's Manual
http://slidepdf.com/reader/full/epson-actionprinter-4000-users-manual 152/290
The Multi-Font Module
Orator
! “ %&’ )*+, .&12 456789:;(=,?AABCDEFGHIJK
LMNO~QF3STlJ~~J~< ~5 AB EFH~KLMNOPQRSTLJ~
~x~;;uE $YEAAAACEE~??~AiiRROOOUUYOU$EYP~~AIO
--&rl?zjiO
WE'VE JUST SEEN YOUR EXCELLENT AD FOR
MINIATURE ZEBRAS IN A RECENT BACK ISSUE OFTRADER'S TIMES. WHAT IS THE PRICE SCHEDULE
FOR QUANTITIES OVER ONE GROSS?
Orator-S
! “ s%& *+, ./ )12 4 6789:;<=)?tiABCDEFGHIJK
LMNO@ T~~~J~~ c§ab
ef ~~~~flow-s y
wyzeue
&eaaaaCeekfiiA12 aeRooouuyOU 5 tfaio
unNLQ,rlzqiO
We've just seen your excellent ad forminiature zebras in a recent back issue ofTrader's Times, What is the price schedulefor quantities over one gross?
Installation
1. Turn off the printer. See the font family table on page 5-33 anddial the rotary switch to the font of your choice.
5-30 Using the Printer Options

7/21/2019 Epson ActionPrinter 4000 User's Manual
http://slidepdf.com/reader/full/epson-actionprinter-4000-users-manual 153/290
The Multi-Font Module
2. Hold the module with the rotary switch on the top and plug itinto the slot.
Using the Printer Options 5-31
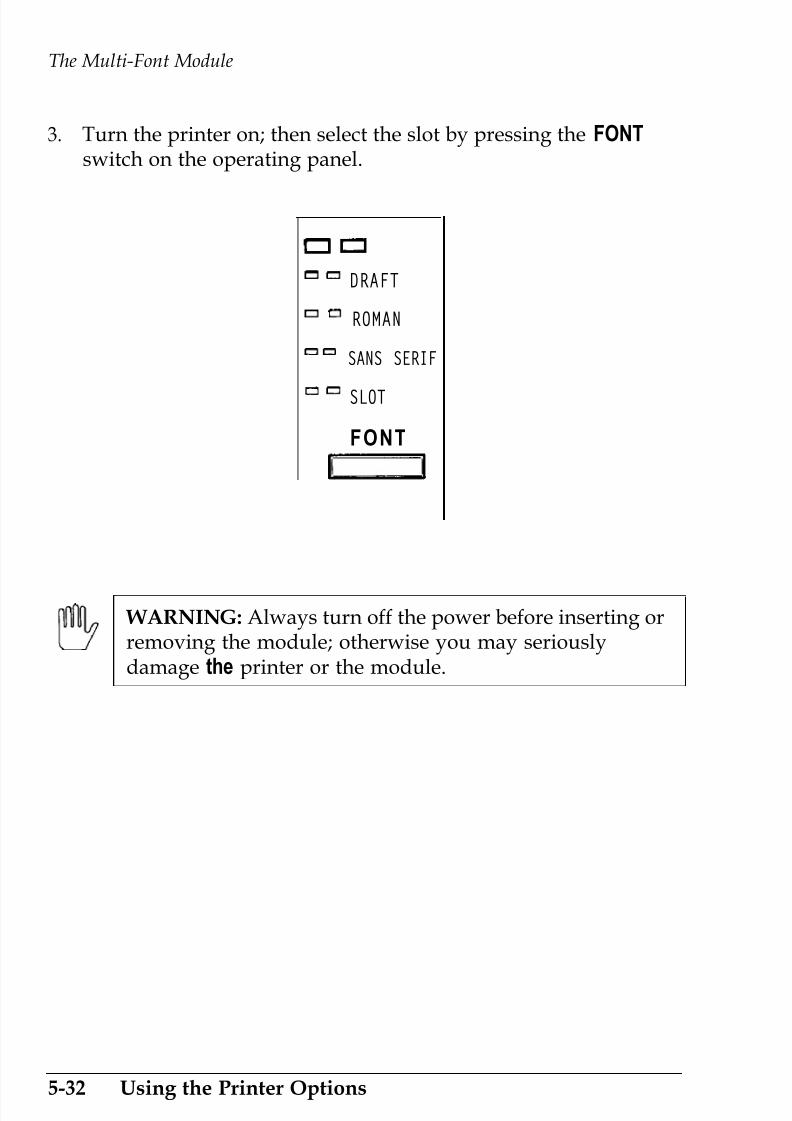
7/21/2019 Epson ActionPrinter 4000 User's Manual
http://slidepdf.com/reader/full/epson-actionprinter-4000-users-manual 154/290
The Multi-Font Module
3. Turn the printer on; then select the slot by pressing the FONTswitch on the operating panel.
n = DRAFT
= o ROMAN
nc3
SANS SERIF
o SLOT
FONT
WARNING: Always turn off the power before inserting orremoving the module; otherwise you may seriouslydamage the printer or the module.
5-32 Using the Printer Options

7/21/2019 Epson ActionPrinter 4000 User's Manual
http://slidepdf.com/reader/full/epson-actionprinter-4000-users-manual 155/290
The Multi-Font Module
Selecting a Font
This table shows the family numbers and characters per inch of the
fonts in the Multi-Font Module.
Font name Family number
Courier 2
Prestige 3
Script 4
OCR-B 5
OCR-A 6
Orator 7
Orator-S 8
Characters per inch
10, 12, 15
10, 12, 15
10, 12, 15
10
10
10
10
There are two ways to select a font from the module:
. With the printer turned off, dial the family number of the font
with the rotary switch on the module. When the printer isturned on, that font becomes the default font if the slot isselected with the DIP switch setting or by pressing the buttonon the control panel.
Send a software command, ESC k, to the printer to select thefamily number. See the Command Summary in Chapter 9 fordetails.
Proportional spacing is not effective when printing any font in thismodule.
Numbers 0, 1, and 9 are not used.
Using the Printer Options 5-33

7/21/2019 Epson ActionPrinter 4000 User's Manual
http://slidepdf.com/reader/full/epson-actionprinter-4000-users-manual 156/290
The Interface Boards
A number of optional interfaces are available in case your computeris either not provided with a parallel interface or you wish toincrease the memory capacity of your printer s buffer.
Choosing an Interface
Optional interfaces can be divided into three main categories whichare described briefly below.
IEEE-488 interfaces offer standardized connections, trouble-freeoperation, and the ability to connect computers, printers, andother devices on the same line so that they may share datafreely.
The buffered parallel interfaces also offer trouble-free operationand standardized connections. They provide the printer withmore memory to free the computer for other tasks when printing
large amounts of text or graphics. You can increase the printer sdata buffering capacity by an additional 32 KB (about 10 pages).
Serial interfaces are required if your computer is not equippedwith a parallel interface or if you need an interface that conformsto the Current Loop standard instead of RS-232C. Theseinterfaces also provide some combination of the followingfeatures: X-ON/X-OFF data communication protocol, loopbackself test modes, and data buffers that increase the printer s databuffering capacity by 8 KB.
5-34 Using the Printer Options

7/21/2019 Epson ActionPrinter 4000 User's Manual
http://slidepdf.com/reader/full/epson-actionprinter-4000-users-manual 157/290
The Interface Boards
Compatible Interfaces
The following is a list of Epson interfaces that are compatible with
your printer.
Interface number Name
#8143 New Serial Interface
#8148
#8165
#8172
Intelligent serial interface
Intelligent IEEE-488 interface
32 KB buffered parallel interface
All Epson interfaces have the Epson name printed on them. If theboard has an identification code printed on it, it is a four-digitnumber beginning with 8 and should correspond to one of thenumbers listed in the table above.
Also Coax and Twinax interfaces are available from third partyvendors. These interfaces allow connectivity to mainframes and
minicomputers and emulation of IBM printers. The Coax(EP-Connect) is available from Avatar Corporation (508) 435-6872, andthe Twinax (I-08300) is available from I-O Corporation (801) 973-6767.
Installation
1. Unplug the printer and remove the printer cover and paper guide.
WARNING: High voltages are present inside the printerwhen the power is on. Do not attempt to remove theupper case unless the printer is turned off and the powercord is unplugged. Also, try not to touch contacts on thecircuit board of the printer because many of thecomponents can be destroyed by the static electricitypresent in your body.
Do not change the settings of any DIP switches on themain board.
Using the Printer Options 5-35

7/21/2019 Epson ActionPrinter 4000 User's Manual
http://slidepdf.com/reader/full/epson-actionprinter-4000-users-manual 158/290
The Interface Boards
2. Remove the screw securing the interface board cover and lift offthe cover.
3. Remove the screw labeled CG from the main board.
5-36 Using the Printer Options
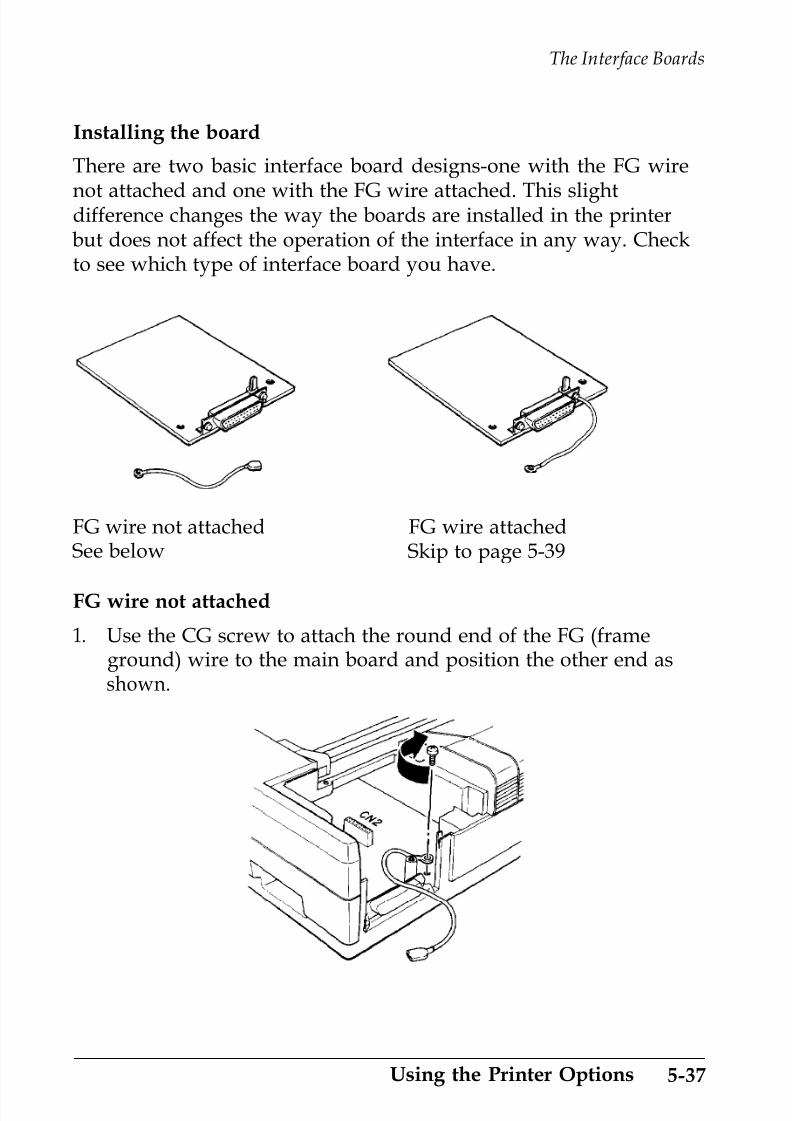
7/21/2019 Epson ActionPrinter 4000 User's Manual
http://slidepdf.com/reader/full/epson-actionprinter-4000-users-manual 159/290
The Interface Boards
Installing the board
There are two basic interface board designs-one with the FG wire
not attached and one with the FG wire attached. This slightdifference changes the way the boards are installed in the printerbut does not affect the operation of the interface in any way. Checkto see which type of interface board you have.
FG wire not attached FG wire attachedSee below Skip to page 5-39
FG wire not attached
1. Use the CG screw to attach the round end of the FG (frameground) wire to the main board and position the other end asshown.
Using the Printer Options 5-37
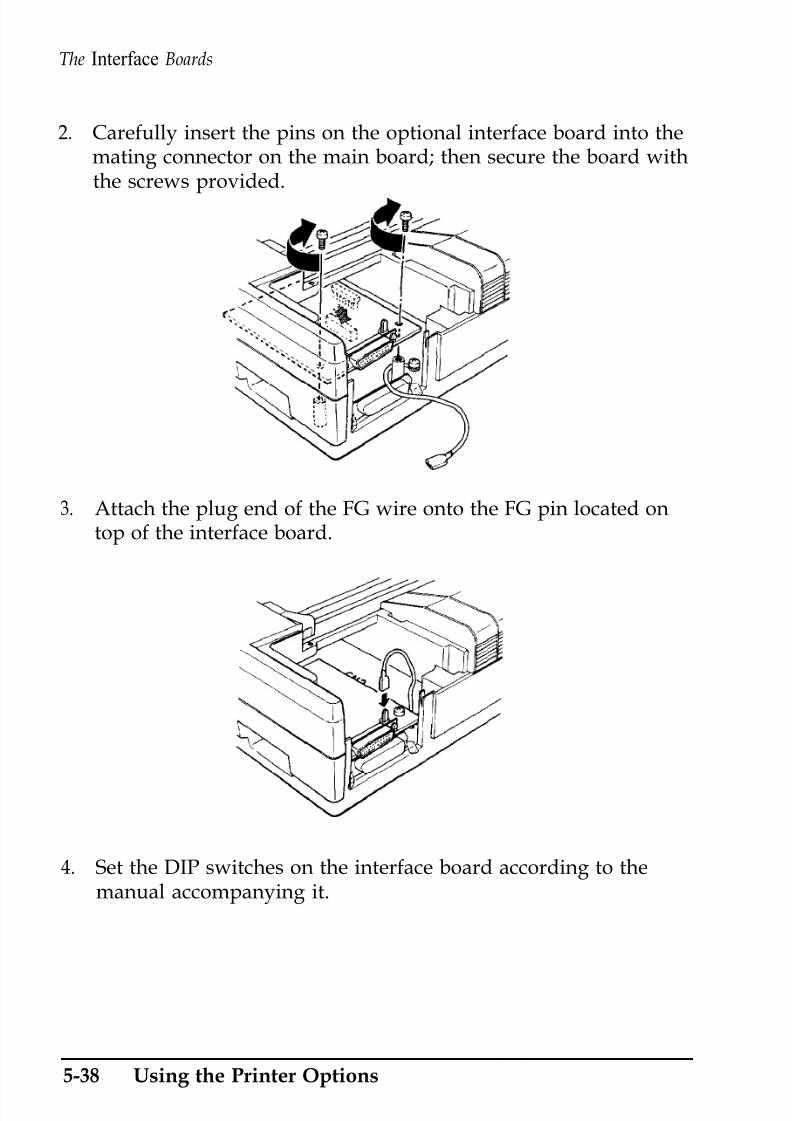
7/21/2019 Epson ActionPrinter 4000 User's Manual
http://slidepdf.com/reader/full/epson-actionprinter-4000-users-manual 160/290
The Interface Boards
2. Carefully insert the pins on the optional interface board into themating connector on the main board; then secure the board withthe screws provided.
3. Attach the plug end of the FG wire onto the FG pin located ontop of the interface board.
4. Set the DIP switches on the interface board according to themanual accompanying it.
5-38 Using the Printer Options

7/21/2019 Epson ActionPrinter 4000 User's Manual
http://slidepdf.com/reader/full/epson-actionprinter-4000-users-manual 161/290
The Interface Boards
FG wire attached
1. Carefully place the interface board next
below. Use the CG screw to connect the(frame ground) wire to the main board.
to the printer as shown
round end of the FG
2. Holding the interface board level, rotate it into position andattach it to the main board. Make sure that the connector pinsare properly inserted into the mating connector.
Using the Printer Options 5-39
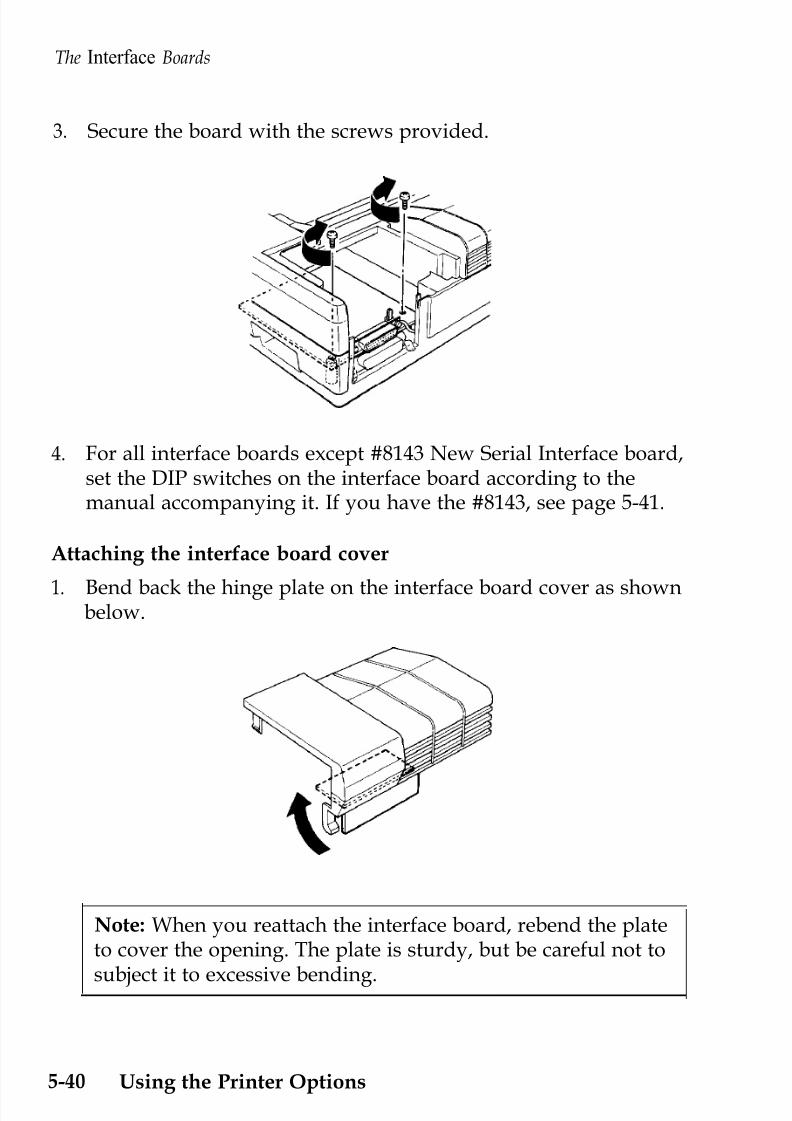
7/21/2019 Epson ActionPrinter 4000 User's Manual
http://slidepdf.com/reader/full/epson-actionprinter-4000-users-manual 162/290
The Interface Boards
3. Secure the board with the screws provided.
4. For all interface boards except #8143 New Serial Interface board,set the DIP switches on the interface board according to themanual accompanying it. If you have the #8143, see page 5-41.
Attaching the interface board cover
1. Bend back the hinge plate on the interface board cover as shownbelow.
Note: When you reattach the interface board, rebend the plateto cover the opening. The plate is sturdy, but be careful not to
subject it to excessive bending.
5-40 Using the Printer Options

7/21/2019 Epson ActionPrinter 4000 User's Manual
http://slidepdf.com/reader/full/epson-actionprinter-4000-users-manual 163/290
The Interface Boards
2. Reattach the board cover.
CAUTION: When an optional interface board is installed,be sure to disconnect the printer cable from the printer s
built-in parallel interface. Two interface cables must not beconnected at the same time.
#8143 New Serial Interface
If you are using an optional interface, it may be necessary for you toalter the communication protocol of the printer or the computer so
that they can communicate properly. In most cases, you should usethe information in your optional interface manual or yourcomputer s manual to match the computer with the interface.
If you are using the #8143 optional interface board, make sure thatyou read through the section below on baud rate selection. You mayalso want to see the sections on handshaking timing and errorhandling for interface information specific to your printer.
Using the Printer Options 5-41
7/21/2019 Epson ActionPrinter 4000 User's Manual
http://slidepdf.com/reader/full/epson-actionprinter-4000-users-manual 164/290
The Interface Boards
For all other data transfer conventions, such as word structure orcommunications protocol, use the information in the manual
supplied with your #8143 optional interface.
Baud rate selection
You can select baud rates from 75 to 19,200 BPS (Bits Per Second).When setting the baud rate, make sure you use the bit rate selectiontable for printers with buffers (in the #8143 interface manual).
For more information on your printer s input buffer settings, see the
section on DIP switch functions in Chapter 3 of this manual.
Handshaking timing
When the vacant area for data in the input buffer drops to 256 bytes,the printer outputs an X-OFF code or sets the DTR flag to “1”(MARK) indicating that it cannot receive data.
Error handling
When a parity error is detected, your printer prints an asterisk (*).All other errors, including framing and overrun, are ignored.
5-42 Using the Printer Options

7/21/2019 Epson ActionPrinter 4000 User's Manual
http://slidepdf.com/reader/full/epson-actionprinter-4000-users-manual 165/290
Chapter 6
Maintenance
Cleaning the Printer . . . . . . . . . . . . . . . . . . . . . . . . . . . . . . . . 6-2
Replacing the Ribbon . . . . . . . . . . . . . . . . . . . . . . . . . . . . . . . 6-4
Transporting the Printer. . . . . . . . . . . . . . . . . . . . . . . . . . . . . 6-10
Maintenance 6-1

7/21/2019 Epson ActionPrinter 4000 User's Manual
http://slidepdf.com/reader/full/epson-actionprinter-4000-users-manual 166/290
Cleaning the Printer
To keep your printer operating at its best, you should clean itthoroughly several times a year. Follow the steps below:
1. Make sure that the printer is turned off. Then remove the paperguide or the cut sheet feeder.
2. Using a soft brush, carefully remove all dust and dirt.
6-2 Maintenance
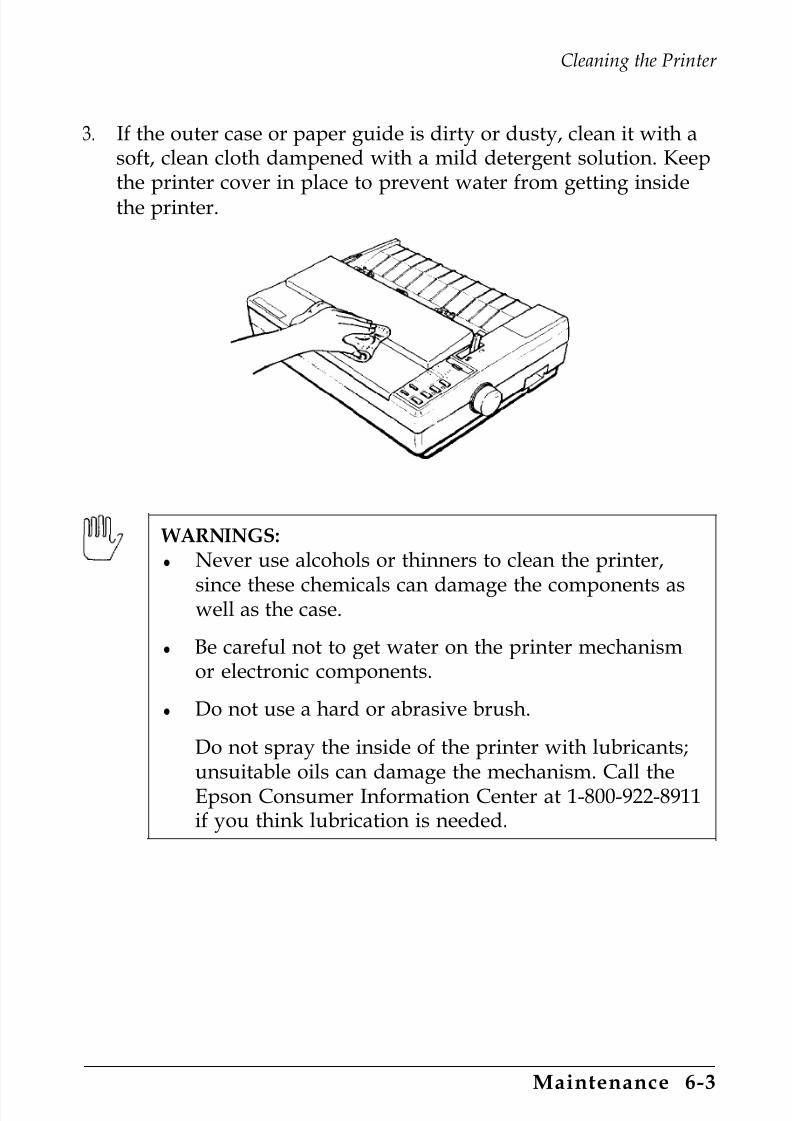
7/21/2019 Epson ActionPrinter 4000 User's Manual
http://slidepdf.com/reader/full/epson-actionprinter-4000-users-manual 167/290
Cleaning the Printer
3. If the outer case or paper guide is dirty or dusty, clean it with asoft, clean cloth dampened with a mild detergent solution. Keepthe printer cover in place to prevent water from getting insidethe printer.
WARNINGS:
l Never use alcohols or thinners to clean the printer,
since these chemicals can damage the components aswell as the case.
l Be careful not to get water on the printer mechanismor electronic components.
l Do not use a hard or abrasive brush.
Do not spray the inside of the printer with lubricants;unsuitable oils can damage the mechanism. Call theEpson Consumer Information Center at 1-800-922-8911if you think lubrication is needed.
Maintenance 6-3

7/21/2019 Epson ActionPrinter 4000 User's Manual
http://slidepdf.com/reader/full/epson-actionprinter-4000-users-manual 168/290
Replacing the Ribbon
Replace the ribbon when the printout becomes too faint. The #7753standard ribbon cartridge or #7768 film ribbon cartridge arerecommended for your printer. Do not use ribbons designed fornine-pin printers.
1. Make sure that the printer is turned off. Then remove the printercover.
6-4 Maintenance

7/21/2019 Epson ActionPrinter 4000 User's Manual
http://slidepdf.com/reader/full/epson-actionprinter-4000-users-manual 169/290
Replacing the Ribbon
2. Open the paper tension unit cover.
3. To remove the ribbon cartridge, grip it by the black plastic taband lift the cartridge straight up and out of the printer.
WARNING: If the printer has just been used, the printhead may be hot. Let it cool before attempting to replace
the ribbon.
Maintenance 6-5
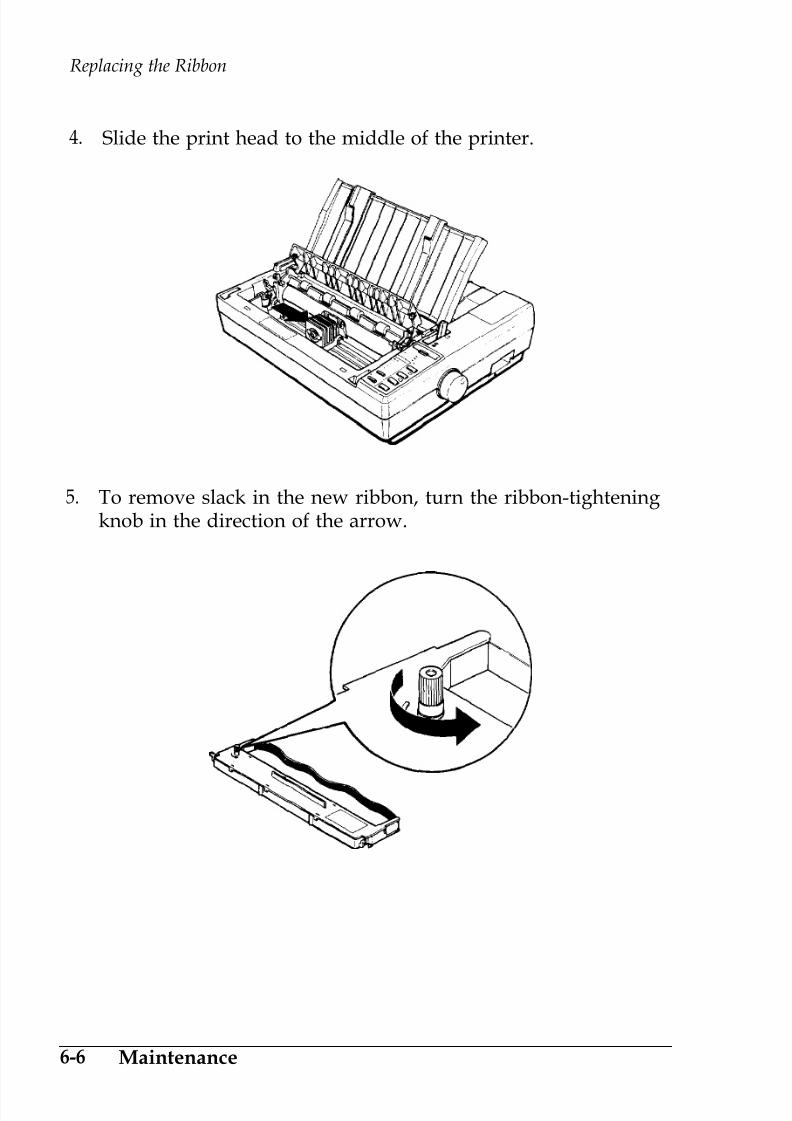
7/21/2019 Epson ActionPrinter 4000 User's Manual
http://slidepdf.com/reader/full/epson-actionprinter-4000-users-manual 170/290
Replacing the Ribbon
4. Slide the print head to the middle of the printer.
5. To remove slack in the new ribbon, turn the ribbon-tighteningknob in the direction of the arrow.
6-6 Maintenance

7/21/2019 Epson ActionPrinter 4000 User's Manual
http://slidepdf.com/reader/full/epson-actionprinter-4000-users-manual 171/290
Replacing the Ribbon
6. Push the new ribbon cartridge firmly into position, making surethe plastic hooks fit into the slots, as shown below.
Note: Press lightly on both sides of the cartridge to make surethe hooks are properly inserted.
Maintenance 6-7

7/21/2019 Epson ActionPrinter 4000 User's Manual
http://slidepdf.com/reader/full/epson-actionprinter-4000-users-manual 172/290
Replacing the Ribbon
7. Use a pointed object, such as a ball point pen, to guide theribbon between the print head and ribbon guide while you turnthe ribbon-tightening knob to help feed the ribbon into place. Becareful not to puncture the ribbon.
8. Slide the print head from side to side to make sure it movessmoothly. Also see that the ribbon is not twisted or creased.
6-8 Maintenance

7/21/2019 Epson ActionPrinter 4000 User's Manual
http://slidepdf.com/reader/full/epson-actionprinter-4000-users-manual 173/290
Replacing the Ribbon
9. Close the paper tension unit cover.
10. Insert the hooks on the printer cover unit into the printer, andthen tilt the printer cover back into place.
Maintenance 6-9

7/21/2019 Epson ActionPrinter 4000 User's Manual
http://slidepdf.com/reader/full/epson-actionprinter-4000-users-manual 174/290
Transporting the Printer
Before you transport your printer some distance, carefully repack itin the original box and packing materials according to the followinginstructions.
1. Make sure the printer is turned off. Then remove any installedoptions, as well as the paper guide and printer cover.
WARNING: Turn the printer off before unplugging the
power cable from the AC outlet.
2. Unplug the power cable from the electrical outlet. Coil the cableand tie it; then disconnect the interface cable from the printerand the computer.
3. Remove the ribbon cartridge and platen knob.
4. Replace the packing materials and put the printer in its box.
6-10 Maintenance

7/21/2019 Epson ActionPrinter 4000 User's Manual
http://slidepdf.com/reader/full/epson-actionprinter-4000-users-manual 175/290
Chapter 7
Troubleshooting
Problems and Solutions . . . . . . . . . . . . . . . . . . . . . . . . . . . . . 7-2
Power Supply. . . . . . . . . . . . . . . . . . . . . . . . . . . . . . . . . . . . . . 7-4
Printing.. . . . . . . . . . . . . . . . . . . . . . . . . . . . . . . . . . . . . . . . . . 7-5
Paper Handling . . . . . . . . . . . . . . . . . . . . . . . . . . . . . . . . . . . . 7-14
Options . . . . . . . . . . . . . . . . . . . . . . . . . . . . . . . . . . . . . . . . . . . 7-24
Troubleshooting 7-1

7/21/2019 Epson ActionPrinter 4000 User's Manual
http://slidepdf.com/reader/full/epson-actionprinter-4000-users-manual 176/290
Problems and Solutions
This chapter discusses problems you may encounter whileoperating your printer and their likely solutions. If you are havingdifficulty achieving the desired printing result, first locate theproblem in the table below and then see the appropriate page for thesolution.
Power supply
l
Power is not being supplied. See7-4
Printing
l The printer does not print.
l The print is faint or uneven.
l Dots are missing in the printed charactersor graphics.
l Printed characters are not what you expected.
l The print position is not what you expected.
See 7-5
See 7-6
See 7-7
See 7-8
See 7-11
Paper handling
l Single sheets do not feed properly. See 7-14
l Continuous paper does not feed properly. See 7-17
l Switching between single sheets and continuouspaper cannot be performed properly. See 7-21
l The short tear-off function does not operateproperly. See 7-23
7-2 Troubleshooting

7/21/2019 Epson ActionPrinter 4000 User's Manual
http://slidepdf.com/reader/full/epson-actionprinter-4000-users-manual 177/290
Problems and Solutions
Options
Using the cut sheet feeder, the paper does not
feed properly.Using the pull tractor with the push tractor,continuous paper does not feed properly.
Using the font module, the module s fontsdo not print.
Using an optional interface, the printer does
not operate properly.
See 7-24
See 7-28
See 7-32
See 7-32
Troubleshooting 7-3
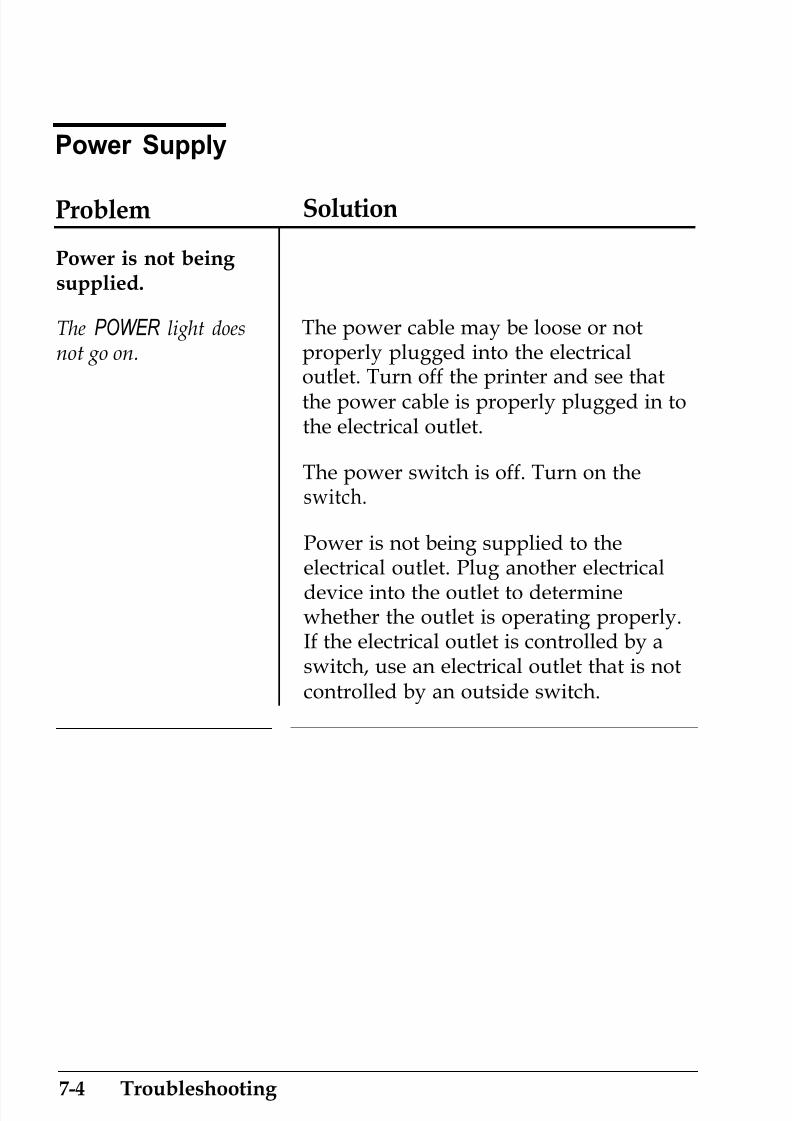
7/21/2019 Epson ActionPrinter 4000 User's Manual
http://slidepdf.com/reader/full/epson-actionprinter-4000-users-manual 178/290
Power Supply
Problem Solution
Power is not being supplied.
The POWER light doesnot go on.
The power cable may be loose or notproperly plugged into the electricaloutlet. Turn off the printer and see thatthe power cable is properly plugged in tothe electrical outlet.
The power switch is off. Turn on theswitch.
Power is not being supplied to theelectrical outlet. Plug another electrical
device into the outlet to determinewhether the outlet is operating properly.If the electrical outlet is controlled by aswitch, use an electrical outlet that is notcontrolled by an outside switch.
7-4 Troubleshooting
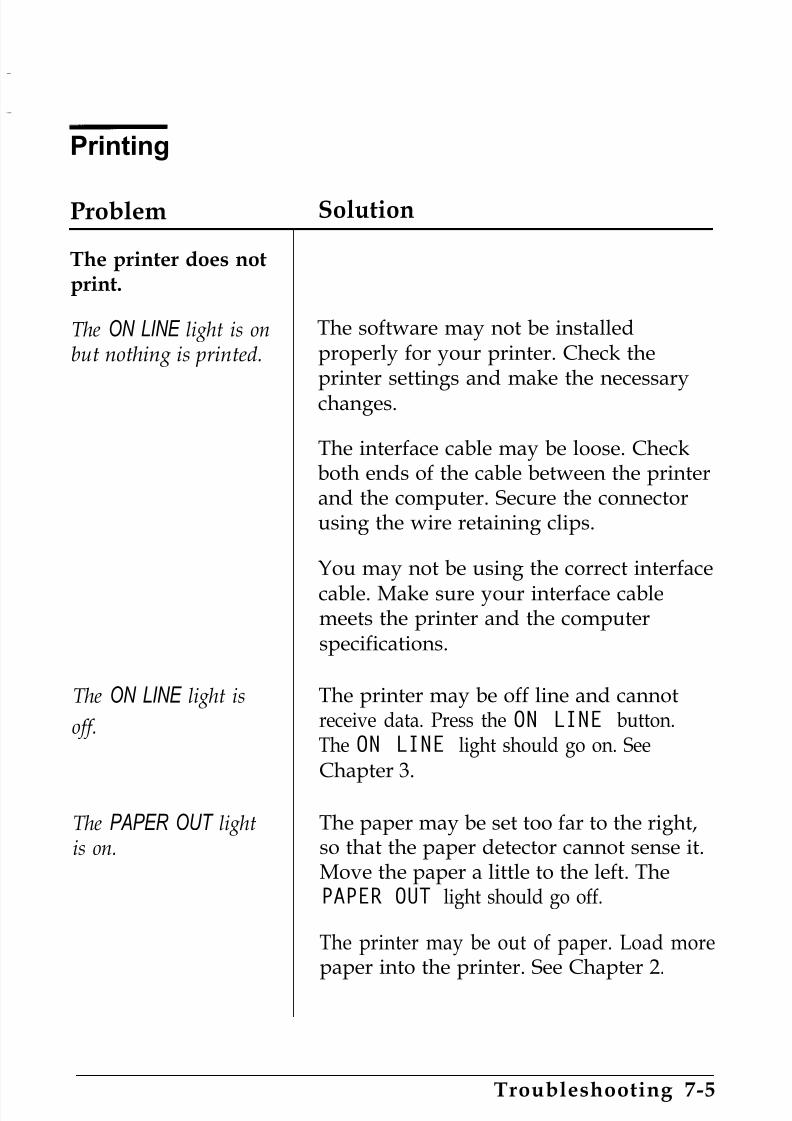
7/21/2019 Epson ActionPrinter 4000 User's Manual
http://slidepdf.com/reader/full/epson-actionprinter-4000-users-manual 179/290
Printing
Problem
The printer does notprint.
Solution
The ON LINE light is onbut nothing is printed.
The ON LINE light is
off.
The PAPER OUT lightis on.
The software may not be installedproperly for your printer. Check theprinter settings and make the necessarychanges.
The interface cable may be loose. Checkboth ends of the cable between the printerand the computer. Secure the connectorusing the wire retaining clips.
You may not be using the correct interface
cable. Make sure your interface cablemeets the printer and the computerspecifications.
The printer may be off line and cannotreceive data. Press the ON LINE button.The ON LINE light should go on. SeeChapter 3.
The paper may be set too far to the right,so that the paper detector cannot sense it.Move the paper a little to the left. ThePAPER OUT light should go off.
The printer may be out of paper. Load morepaper into the printer. See Chapter 2.
Troubleshooting 7-5

7/21/2019 Epson ActionPrinter 4000 User's Manual
http://slidepdf.com/reader/full/epson-actionprinter-4000-users-manual 180/290
Printing
Problem Solution
The printer does notprint (continued).
The printer sounds likeit is printing, butnothing is printed.
The printer makes astrange noise, thebuzzer sounds severaltimes, and the printer stops abruptly.
The ON LINE light is flickering but the printer does not print,or it stops printingabruptly.
The print is faint oruneven.
Printed characters have parts missing at thebottom as shown here.
A B C D
The ribbon cartridge may not be installedproperly. Turn off the printer, reinstall theribbon cartridge, and take up any slack inthe ribbon.
The ribbon may be worn. Replace theribbon cartridge. See Chapter 6.
This indicates an error in printeroperation. Turn off the printer, check forpaper jams or other problems, then turnthe printer back on. If the printer still doesnot print correctly, call the EpsonConsumer Information Center at 1-800-922-8911 to find out where to have theprinter repaired.
The print head is overheated. Wait a fewminutes; the printer resumes printingautomatically when the print head cools.
The ribbon cartridge may not be installedproperly. Remove the ribbon cartridgeand reinstall it. Make sure the cartridgehooks are inserted securely into the
printer. See Chapter 1.
7-6 Troubleshooting

7/21/2019 Epson ActionPrinter 4000 User's Manual
http://slidepdf.com/reader/full/epson-actionprinter-4000-users-manual 181/290
Printing
Problem
The print is faint oruneven (continued).
Solution
The printout is faint.
Dots are missing in the printedcharacters orgraphics.
A line of dots ismissing in the
printout.
ABCD
Dots are missing inrandom positions.
The ribbon may be worn out. A wornribbon can damage the print head andshould be replaced. Install a new ribboncartridge. See Chapter 6.
The paper thickness lever may not be set
correctly for the paper you are using. Setthe paper thickness lever to match thethickness of your paper. See Chapter 2.
The print head is damaged. Stop printingand call the Epson Consumer InformationCenter at 1-800-922-8911 to find outwhere to have the printer repaired.
There is either too much slack in theribbon or the ribbon has come loose andgotten caught on something. Stopprinting, turn off the printer, and reinstallthe ribbon cartridge. See Chapter 6.
Troubleshooting 7-7

7/21/2019 Epson ActionPrinter 4000 User's Manual
http://slidepdf.com/reader/full/epson-actionprinter-4000-users-manual 182/290
Printing
Problem Solution
Printed charactersare not what youexpected.
The typestyle or characters that are setby the software cannotbe printed.
The Roman, Sans Serif,or Draft font is selectedin your software, butthe characters are
printed in a different font.
Italic characters are printed instead of theselected graphic “line”characters.
The software may not be correctlyinstalled for your printer. Use theprogram s setup (or install) procedure tocheck the printer settings, and reset asneeded.
The wrong font is selected. If yourprogram accepts control codes, set thecodes to the values below to select thebuilt-in fonts:
Roman: ESC k 0Sans Serif: ESC k 1
Draft: ESC x 0
See Chapter 3.
The wrong character table is selected. Ifyour application program is capable ofsending control codes, specify the EpsonExtended Graphics character table usingESCt1.
You can also select the graphics charactertable by changing a DIP switch setting. Todo this, turn off the power, set DIP switch1-7 to on, then turn on the printer. SeeChapter 3.
7-8 Troubleshooting

7/21/2019 Epson ActionPrinter 4000 User's Manual
http://slidepdf.com/reader/full/epson-actionprinter-4000-users-manual 183/290
Printing
Problem Solution
Printed charactersare not what youexpected(continued).
Graphic characters or The wrong character table is selected. Iflines are being printed your application program is capable ofinstead of the selected sending control codes, specify the italicitalic characters. character table using ESC t 0.
The wronginternationalcharacters are being
printed.
You can also select the italic charactertable by changing a DIP switch setting. Todo this, turn off the power, set DIP switch1-7 to off; then turn on the power. SeeChapter 3.
The wrong international character set isselected. If your application program iscapable of sending control codes, specifythe desired international character setusing ESC R n. See the description ofESC R in Chapter 9.
You can also select the internationalcharacter table by changing DIP switch
settings. To do this, turn off the powerand set DIP switches 1-1, 1-2, and 1-3 tothe correct positions for the character setyou want. See Chapter 3.
Troubleshooting 7-9

7/21/2019 Epson ActionPrinter 4000 User's Manual
http://slidepdf.com/reader/full/epson-actionprinter-4000-users-manual 184/290
Printing
Problem Solution
Printed charactersare not what youexpected(continued).
The characters printedare smaller thanexpected.
The typestyle selectedby SelecType is not
printed.
Characters cannot be User-defined character mode may not bedefined using ESC & selected. When defining characters, makeand ESC : sure that DIP switch 2-5 is set to off.
The condensed mode may be set. Checkto see if the CONDENSED light on thecontrol panel is on. If it is lit, press theCONDENSED button to cancel the mode.
Also, if your application program iscapable of sending control codes, youcan cancel the condensed mode bysending the DC2 code to the printer. SeeChapter 9.
The software may not be properlyinstalled for your printer. Use theprogram s setup (or install) procedure tocheck the printer settings and reset asneeded.
Your software may be overriding yourSelecType setting. If your program allowsyou to change the printing style, softwarecontrol will override the SelecTypesettings. For these application programsuse the program, not SelecType, tochange typestyles.
7-10 Troubleshooting
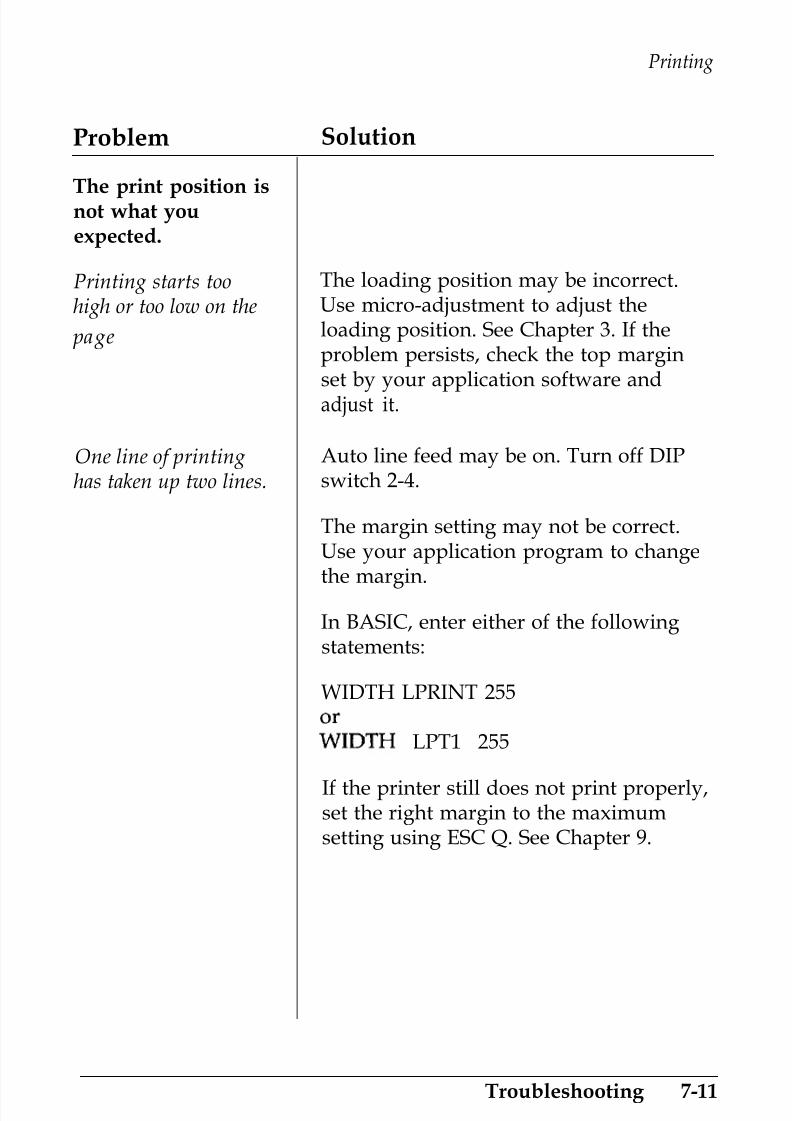
7/21/2019 Epson ActionPrinter 4000 User's Manual
http://slidepdf.com/reader/full/epson-actionprinter-4000-users-manual 185/290
Printing
Problem Solution
The print position isnot what youexpected.
Printing starts toohigh or too low on the
page
One line of printinghas taken up two lines.
The loading position may be incorrect.Use micro-adjustment to adjust theloading position. See Chapter 3. If theproblem persists, check the top marginset by your application software andadjust it.
Auto line feed may be on. Turn off DIPswitch 2-4.
The margin setting may not be correct.Use your application program to changethe margin.
In BASIC, enter either of the followingstatements:
WIDTH LPRINT 255
KIDTH
“LPT1” 255
If the printer still does not print properly,set the right margin to the maximumsetting using ESC Q. See Chapter 9.
Troubleshooting 7-11
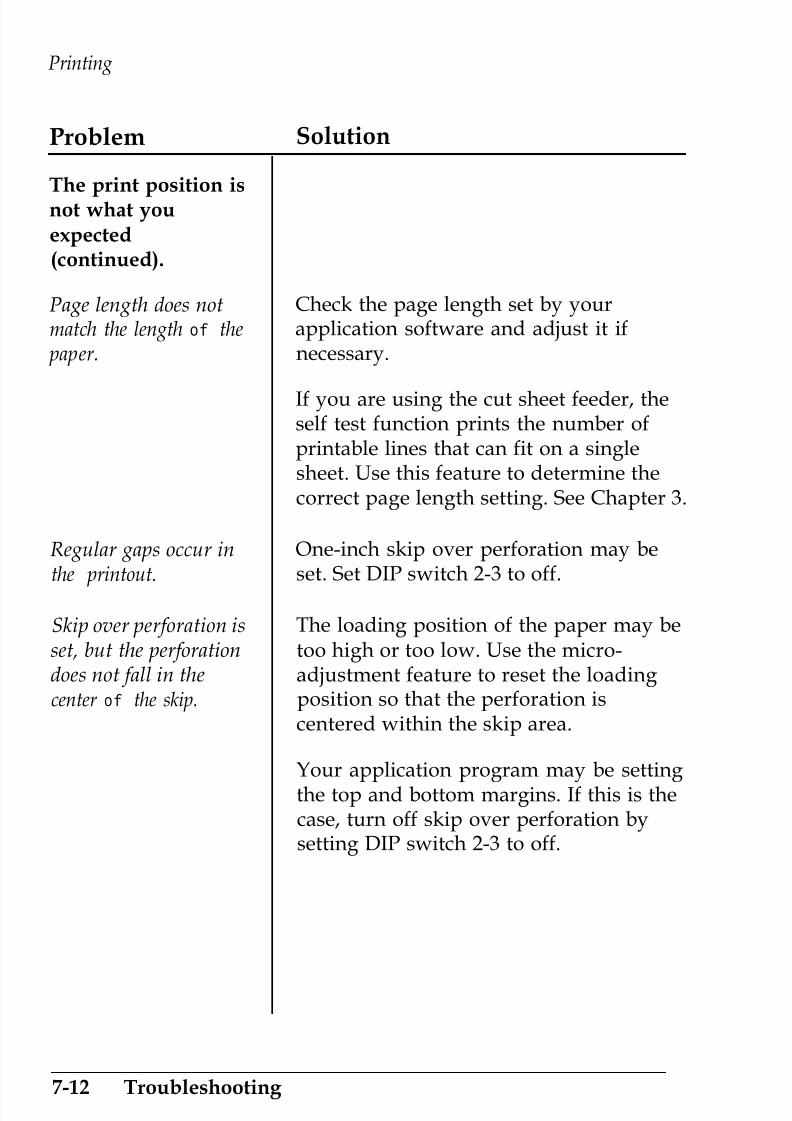
7/21/2019 Epson ActionPrinter 4000 User's Manual
http://slidepdf.com/reader/full/epson-actionprinter-4000-users-manual 186/290
Printing
Problem Solution
The print position isnot what youexpected(continued).
Page length does not Check the page length set by yourmatch the length of the application software and adjust it if
paper. necessary.
Regular gaps occur inthe printout.
Skip over perforation isset, but the perforationdoes not fall in thecenter of the skip.
If you are using the cut sheet feeder, theself test function prints the number ofprintable lines that can fit on a singlesheet. Use this feature to determine thecorrect page length setting. See Chapter 3.
One-inch skip over perforation may beset. Set DIP switch 2-3 to off.
The loading position of the paper may betoo high or too low. Use the micro-adjustment feature to reset the loadingposition so that the perforation iscentered within the skip area.
Your application program may be settingthe top and bottom margins. If this is thecase, turn off skip over perforation bysetting DIP switch 2-3 to off.
7-12 Troubleshooting

7/21/2019 Epson ActionPrinter 4000 User's Manual
http://slidepdf.com/reader/full/epson-actionprinter-4000-users-manual 187/290
Printing
Problem Solution
The print position isnot what youexpected(continued).
Vertical printed linesdo not align or gapsappear in lines or
graphics.
The printer is usually set for bidirectionalprinting. This can cause a slightmisalignment of graphics characters.When precise printing of vertical lines isnecessary, contact your service center tohave them perform the bidirectional printalignment adjustment or select theunidirectional print mode by sendingESC U or ESC < to the printer. You canalso select unidirectional printing bysetting DIP switch 2-6 to off.Unidirectional printing is slightly slower.See Chapter 9.
Note: Use the data dump mode to check data being sent fromthe computer. In the data dump mode, data is printed inhexadecimal format and in ASCII characters. See Data Dump
Mode in Chapter 3.
If the printer still does not print, try the self test described inChapter 1. If the self test works properly, the printer is all right, andthe problem probably lies in the computer, the software, or thecable. If the self test does not work, contact the store where youpurchased your printer or call the Epson toll-free number (1-800-922-8911).
Troubleshooting 7-13

7/21/2019 Epson ActionPrinter 4000 User's Manual
http://slidepdf.com/reader/full/epson-actionprinter-4000-users-manual 188/290
Paper Handling
The following section guides you through problems in handlingsingle sheets and continuous paper. If you are having problemsusing the optional cut sheet feeder or pull tractor, see the section onoptions later in this chapter.
Problem Solution
Single sheets do not
feed properly.
The LOAD/EJECT
button was pressed,but the platen did notmove and paper wasnot fed.
You may be trying to feed paper usingone of the control panel buttons while theprinter is on line (ON LINE light is on).Press the ON LINE button once to set theprinter off line; then feed the paper. Afterfeeding the paper, press the ON LINE
button again to set the printer on line. SeeChapter 3.
The left edge guide may be set too far tothe right so that the paper detector cannotsense it. Move the paper a little to the left.The PAPER OUT light should go off.
7-14 Troubleshooting

7/21/2019 Epson ActionPrinter 4000 User's Manual
http://slidepdf.com/reader/full/epson-actionprinter-4000-users-manual 189/290
Paper Handling
Problem Solution
Single sheets do not
feed properly(continued).
The LOAD/EJECT The paper release lever may be set in thebutton was pressed and wrong position. Push paper release leverthe platen rotated, but back to the single-sheet position. See
paper was not fed. Chapter 2.
When the LOAD/EJECT
button is pressed, the paper jams.
The left and right edge guides may be tooclose together, preventing the paper fromfeeding smoothly. Adjust the position ofthe edge guides so that the paper canmove up and down freely. See Chapter 2.
The paper may not be firmly inserted.When feeding thicker than normal paper,
press down lightly on the paper whilepressing the LOAD/EJECT button.
The cut sheet feeder mode may be turnedon (DIP switch 1-8 is on). When the cutsheet feeder is not in use, DIP switch 1-8should be off. See Chapter 3.
The edge guides may be too far apart.Adjust the edge guides to the width of thepaper.
The dimensions of the paper may exceedthe specified limitations. Use only papersizes that are within the specified range.Multi-part forms cannot be used with this
printer s single-sheet feeding system. SeeChapter 8.
Troubleshooting 7-15

7/21/2019 Epson ActionPrinter 4000 User's Manual
http://slidepdf.com/reader/full/epson-actionprinter-4000-users-manual 190/290
Paper Handling
Problem Solution
Single sheets do notfeed properly(continued).
When the LOAD/EJECT The paper may have been between thebutton is pressed, the edge guides before the printer was turned
paper feeds through on. When loading single sheets, be sureand then out of the that paper is not in the paper guide before printer. you turn the printer on.
The paper feed iscrooked.
The paper guide may not be attached, orit may not be in the correct position.When printing on single sheets, use thepaper guide in its upright position.
The paper does not fully eject.
The paper may be dog-eared. Use newpaper.
You may be trying to eject the paperusing the FORM FEED button. Alwayspress the LOAD/EJECT button to eject thepaper.
The page length setting may be wrong. Ifthe page length is incorrectly set by yoursoftware, the paper may not fully eject.Check your software settings.
7-16 Troubleshooting

7/21/2019 Epson ActionPrinter 4000 User's Manual
http://slidepdf.com/reader/full/epson-actionprinter-4000-users-manual 191/290
Paper Handling
Problem Solution
Continuous paper
does not feedproperly.
When the LOAD/EJECT
button is pressed, the platen does not rotateand paper does not
feed.
When the LOAD/EJECT
button is pressed, the platen rotates but paper does not feed.
You may be trying to feed paper using thecontrol panel buttons while the printer ison line (ON LINE light on). Press the ONLINE button once to set the printer off line,then try feeding paper. After feeding
paper, press the ON LINE button again toset the printer on line. See Chapter 3.
The paper release lever may be pushedback to the single-sheet position. Whenusing the tractor, be sure the paperrelease lever is pulled forward to thecontinuous paper position. See Chapter 2.
Continuous paper may have already beenin the paper path. (In this case, the paperfeeds backward to the standby position.)Press the LOAD/EJECT button again to loadthe paper.
Troubleshooting 7-17

7/21/2019 Epson ActionPrinter 4000 User's Manual
http://slidepdf.com/reader/full/epson-actionprinter-4000-users-manual 192/290
Paper Handling
Problem Solution
Continuous paperdoes not feedproperly(continued).
The paper feed iscrooked or the paper
jams.
The paper supply may be obstructed by acable or some other object. Make sure thatthe paper feeds smoothly into the printer.See Chapter 2.
Your supply of continuous paper may betoo far from the printer. Position yourpaper supply within 3 feet (1 meter) of theprinter. See Chapter 2.
The paper may be caught on the edgeguides. When using continuous paper,
make sure that the paper guide is loweredto the horizontal position and that theedge guides are positioned as far apart aspossible. See Chapter 2.
The holes on the sides of the paper may notbe aligned with each other. Reposition thepaper on the tractor pins. See Chapter 2.
The sprocket units are incorrectlypositioned for the paper width. Move theright sprocket unit to remove any slackacross the width of the paper. See Chapter 2.
The position of your paper supply may bepreventing it from feeding straight. See
Chapter 2.
7-18 Troubleshooting
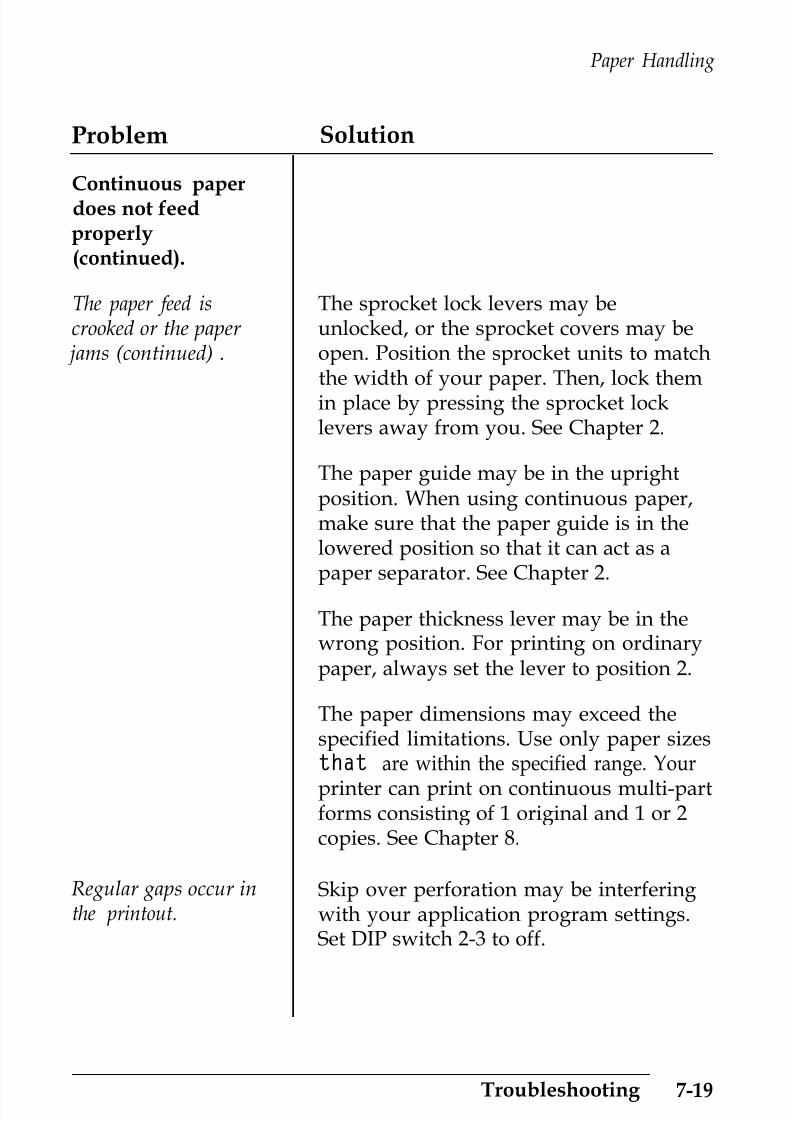
7/21/2019 Epson ActionPrinter 4000 User's Manual
http://slidepdf.com/reader/full/epson-actionprinter-4000-users-manual 193/290
Paper Handling
Problem Solution
Continuous paperdoes not feedproperly(continued).
The paper feed iscrooked or the paper
jams (continued) .
Regular gaps occur inthe printout.
The sprocket lock levers may beunlocked, or the sprocket covers may beopen. Position the sprocket units to matchthe width of your paper. Then, lock themin place by pressing the sprocket locklevers away from you. See Chapter 2.
The paper guide may be in the uprightposition. When using continuous paper,make sure that the paper guide is in thelowered position so that it can act as apaper separator. See Chapter 2.
The paper thickness lever may be in thewrong position. For printing on ordinarypaper, always set the lever to position 2.
The paper dimensions may exceed thespecified limitations. Use only paper sizesthat are within the specified range. Your
printer can print on continuous multi-partforms consisting of 1 original and 1 or 2copies. See Chapter 8.
Skip over perforation may be interferingwith your application program settings.Set DIP switch 2-3 to off.
Troubleshooting 7-19

7/21/2019 Epson ActionPrinter 4000 User's Manual
http://slidepdf.com/reader/full/epson-actionprinter-4000-users-manual 194/290
Paper Handling
Problem Solution
Continuous paperdoes not feedproperly(continued).
Skip over perforation isset, but the perforationdoes not fall in thecenter of the skip.
The loading position of
the paper shifts slightlywhile printing several pages.
After printing stops,the paper automatically feeds forward.
The short tear-off function is selected
(DIP switch 2-2 is on),but it does not work.
The loading position of the paper may betoo high or too low. Use the micro-adjustment to reset the loading position.
The paper you are trying to feed may betoo heavy for the built-in push tractor.When highly accurate paper feed isnecessary, such as when printing carboncopies, use the optional pull tractor.
The short tear-off function may beselected. When you resume printing, thepaper feeds backward to its loadingposition. If you do not need this function,set DIP switch 2-2 to off. See Chapter 3.
There may still be data in the print buffer.The short tear-off function works only if
the data in the print buffer is completelyprinted and the next print position is atthe top of the next page.
Your program may not be sending a formfeed command to the printer. At the endof your program or the page, send a formfeed (FF). If you are using BASIC, be sure
to add a semicolon (;) after the FF code toprevent any additional codes from beingsent to the printer.
7-20 Troubleshooting

7/21/2019 Epson ActionPrinter 4000 User's Manual
http://slidepdf.com/reader/full/epson-actionprinter-4000-users-manual 195/290
Paper Handling
Problem Solution
Continuous paperdoes not feedproperly(continued).
The LOAD/EJECT
button is pressed toeject the paper, the
paper feed stops, and paper does not fullyeject or it jams.
Switching betweensingle sheets andcontinuous papercannot beperformed properly.
When the LOAD/EJECT
button is pressed toload continuous paper,the platen does not
rotate and the paper isnot loaded.
You may have tried to back feed toomany pages. Before ejecting the paper,always tear off the last printed page. SeeChapter 3.
You may be trying to eject labels. Labelsmay jam when they are fed backward, soalways use the FORM FEED button andfeed labels forward to eject them.
Pull the paper release lever forward to thecontinuous paper position, set the paper,then press the LOAD/EJECT button.
Troubleshooting 7-21
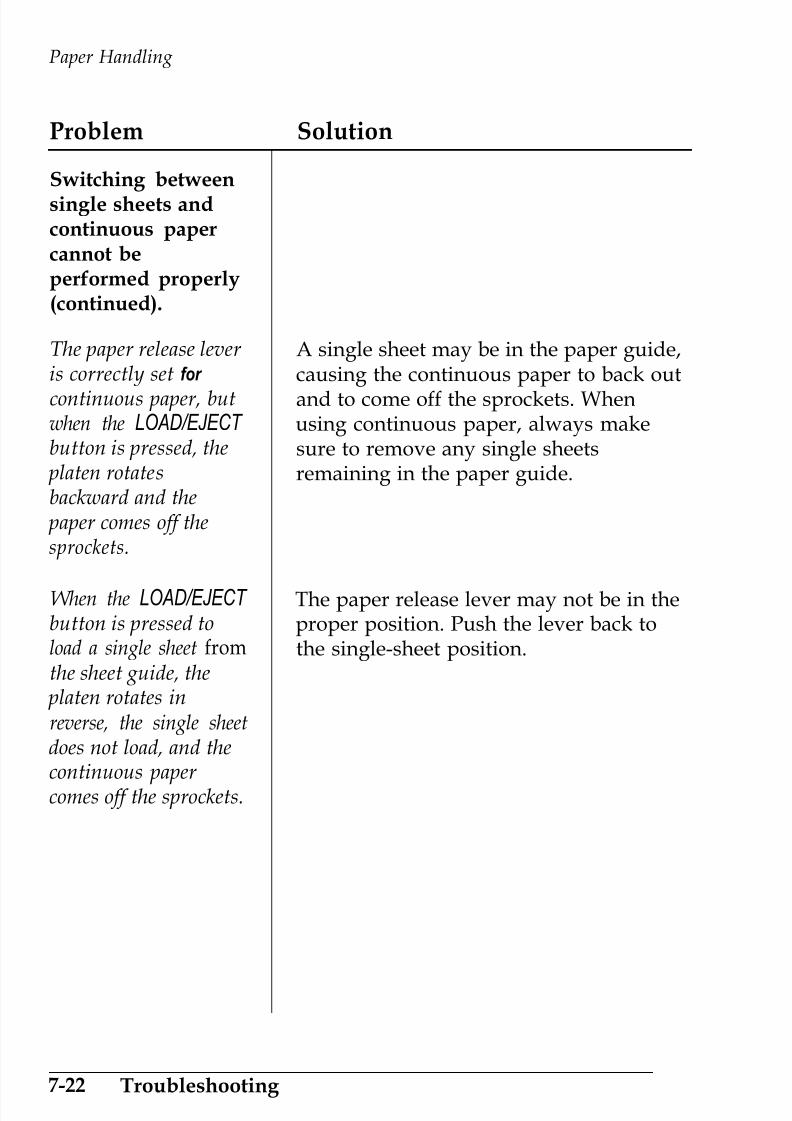
7/21/2019 Epson ActionPrinter 4000 User's Manual
http://slidepdf.com/reader/full/epson-actionprinter-4000-users-manual 196/290
Paper Handling
Problem Solution
Switching betweensingle sheets andcontinuous papercannot beperformed properly(continued).
The paper release lever is correctly set for
continuous paper, butwhen the LOAD/EJECT
button is pressed, the platen rotatesbackward and the
paper comes off thesprockets.
When the LOAD/EJECT
button is pressed toload a single sheet fromthe sheet guide, the
platen rotates inreverse, the single sheetdoes not load, and thecontinuous paper comes off the sprockets.
A single sheet may be in the paper guide,causing the continuous paper to back out
and to come off the sprockets. Whenusing continuous paper, always makesure to remove any single sheetsremaining in the paper guide.
The paper release lever may not be in theproper position. Push the lever back tothe single-sheet position.
7-22 Troubleshooting

7/21/2019 Epson ActionPrinter 4000 User's Manual
http://slidepdf.com/reader/full/epson-actionprinter-4000-users-manual 197/290
Paper Handling
Problem Solution
Switching betweensingle sheets andcontinuous papercannot beperformed properly(continued).
Even with the paper release lever setcorrectly to the single-sheet position, thesingle sheet andcontinuous paper feedtogether and jam.
The short tear-offfunction does notoperate properly.
One page is completely printed, but the paper does not feed.
Printing ended in themiddle of a page.
The continuous paper may not have fedbackward far enough to reach the standby
position before you changed the positionof the paper release lever. Remove the
jammed paper and try again. Also, checkthat the PAPER OUT light comes on beforechanging the position of the paper releaselever to make sure that the continuouspaper is completely ejected. When there ismore than one page to feed backward toeject, you must press the LOAD/EJECTbutton at least two times.
DIP switch 2-2, short tear-off mode, maybe set to off. Set DIP switch 2-2 to on toturn on the short tear-off mode.
One page of data may not have been sentto the printer. Finish the page by sendinga form feed code (FF) to the printer or bysending enough line feed codes (LF) to
advance the remainder of the page.
Troubleshooting 7-23

7/21/2019 Epson ActionPrinter 4000 User's Manual
http://slidepdf.com/reader/full/epson-actionprinter-4000-users-manual 198/290
Options
Problem
Using the cut sheetfeeder, the paperdoes not feedproperly.
Solution
The LOAD/EJECT
button is pressed, butthe platen does notmove and the paper does not feed.
After a print commandis sent from thecomputer, the platendoes not move and the
paper does not feed.
You may be pressing the LOAD/EJECT
button while the printer is on line.Always put the printer off line beforefeeding the paper. Paper feedsautomatically when the cut sheet feederreceives a print command from thecomputer (only while the printer is online).
The printer may be off line. Press the ONLINE button to put the printer on line.
The cut sheet feeder mode may be off. SetDIP switch 1-8 to on. If your programallows you to use control codes, use ESCEM 4 to set the cut sheet feeder mode. Theprinter must be ready with no paper out
condition to receive this command. Sendthe command with continuous paperloaded and with the paper select lever inthe continuous position.
7-24 Troubleshooting

7/21/2019 Epson ActionPrinter 4000 User's Manual
http://slidepdf.com/reader/full/epson-actionprinter-4000-users-manual 199/290
Options
Problem Solution
Using the cut sheetfeeder, the paperdoes not feedproperly(continued).
After a print commandis sent from thecomputer, the platen
rotates, but paper doesnot feed. The PAPER
OUT light is on.
DIP switch 1-8 is set to off. DIP switch 1-8must be set to on in order to use the cutsheet feeder. See Chapters 3 and 5.
The cut sheet feeder may be incorrectlyinstalled on the printer. Remove andreinstall the cut sheet feeder making surethat the mounting notches are properlymated with the pins on the printer. SeeChapter 5.
The cut sheet feeder may be out of paper.Load more paper in the cut sheet feeder sbin.
The paper release lever may not be in thesingle-sheet position. Push the lever backto the single-sheet position. See Chapter 5.
The paper set levers may be pulledforward. After loading a stack of paper inthe cut sheet feeder, push the paper setlevers backward. See Chapter 5.
The left and right paper guides may betoo close together, preventing smoothpaper feed. Adjust the position of the
paper guides so that the paper can moveup and down freely. See Chapter 5.
Troubleshooting 7-25

7/21/2019 Epson ActionPrinter 4000 User's Manual
http://slidepdf.com/reader/full/epson-actionprinter-4000-users-manual 200/290
Options
Problem Solution
Using the cut sheetfeeder, the paperdoes not feedproperly(continued).
After a print commandis sent from thecomputer, the platenrotates, but paper doesnot feed. The PAPER
OUT light is on(continued).
Two or more sheets feed at the same time.
Paper may be jammed near the printhead. Remove the paper jam (temporarilyremove the cut sheet feeder if necessary).
You may have loaded too many sheets inthe cut sheet feeder s bin. Remove thesheets. The bin can hold a maximum of150 sheets.
There may be only one sheet left in thebin. The last sheet in the bin may not feed,
so add more paper.
You may have loaded too many sheets inthe cut sheet feeder s bin. Remove thesheets. The bin can hold a maximum of150 sheets.
You may have forgotten to fan the stack
of paper before loading it into the bin.Remove the paper and fan it. Then alignthe edges of the stack. See Chapter 5.
7-26 Troubleshooting

7/21/2019 Epson ActionPrinter 4000 User's Manual
http://slidepdf.com/reader/full/epson-actionprinter-4000-users-manual 201/290
Options
Problem Solution
Using the cut sheetfeeder, the paperdoes not feedproperly(continued).
The paper feed is The paper may be old or creased. Discardcrooked. it and load new, clean sheets of paper.
You tried to manually
insert a single sheet,but instead paper was fed from the cut sheet feeder s bin.
The left and right paper guides may betoo far apart. Adjust the paper guides tothe width of the paper.
There may be too much outgoing paper.Never let more than 80 sheets of outgoingpaper accumulate while printing.
The weight of your paper may be tooheavy or too light for the cut sheet feeder.Refer to the specifications in Chapter 8and make sure that your paper is theproper size and quality.
The single sheet may have been inserted
in the wrong place. Check it and tryagain. See Chapter 5.
Paper may feed from the bin if you try toinsert several single sheets. To insertseveral single sheets, pull the paper setlever forward.
Troubleshooting 7-27

7/21/2019 Epson ActionPrinter 4000 User's Manual
http://slidepdf.com/reader/full/epson-actionprinter-4000-users-manual 202/290
Options
Problem Solution
Using the cut sheetfeeder, the paperdoes not feedproperly(continued).
One page of printinghas spread to two
pages.
Using the pull
tractor with thepush tractor,continuous paperdoes not feedproperly.
The FORM FEED or LINE FEED button was
pressed, but the paper does not feed at all.Platen does notrotate.)
The page length setting may be wrong.Run a self test in cut sheet feeder mode.The printer will automatically measure
the paper loaded and set the correct pagelength. See Chapter 5.
You may have to change the top orbottom margin or page length for yourapplication program.
The printer may be on line. Before usingthe control panel buttons to feed paper,
always put the printer off line (ON LINElight out).
7-28 Troubleshooting

7/21/2019 Epson ActionPrinter 4000 User's Manual
http://slidepdf.com/reader/full/epson-actionprinter-4000-users-manual 203/290
Options
Problem
Using the pulltractor with thepush tractor,continuous paperdoes not feedproperly(continued).
Solution
Paper feed is crooked or
the paper jams.
Something may be obstructing the paper
feed, like an object on top of the paperstack or a cable caught on the paper.Make sure that nothing prevents thesmooth flow of paper and position thepaper so that it feeds straight in line withthe sprockets.
The supply of paper may be too far from
the printer. Position the paper supply sothat it is less than three feet or one meteraway.
The paper may be caught on the edgeguides. When using continuous paper,make sure that the paper guide is foldedbackwards over the paper and that the
edge guides are moved to each edge ofthe paper guide. See Chapter 2.
The pull tractor and push tractorsprockets are not aligned correctly. Whenusing both tractors, be sure that thesprockets on both are positioned evenly.
Troubleshooting 7-29
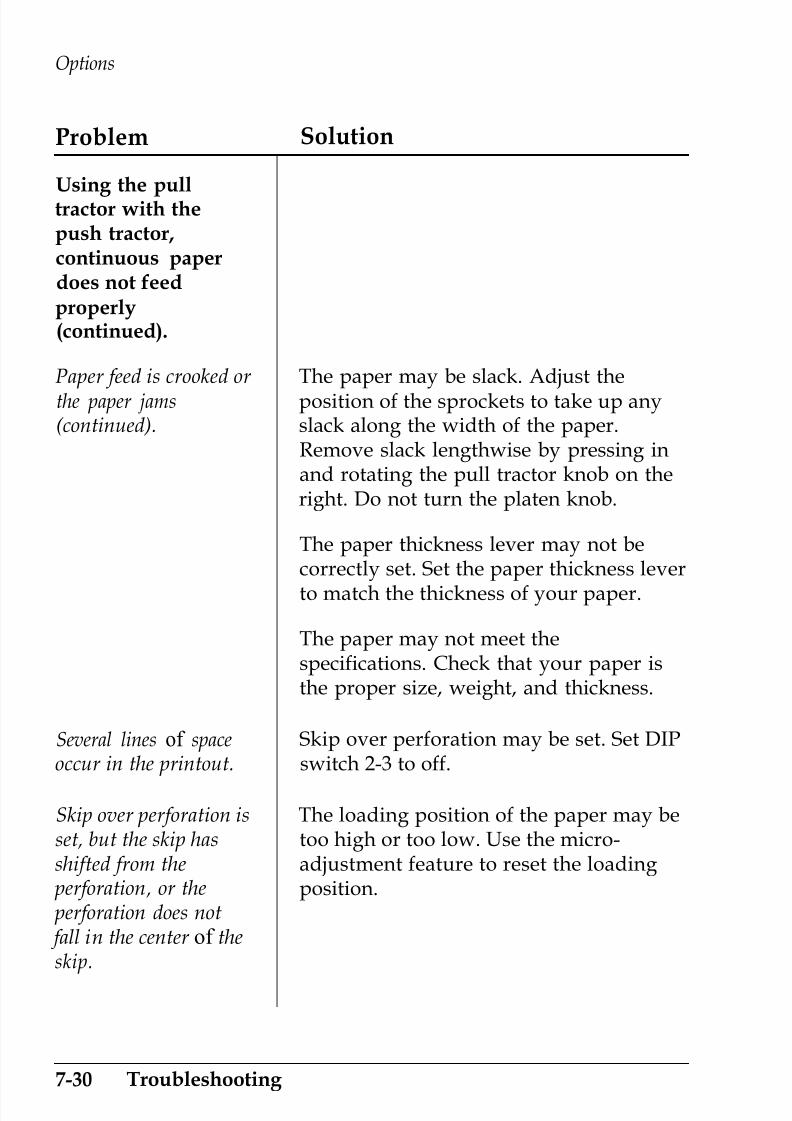
7/21/2019 Epson ActionPrinter 4000 User's Manual
http://slidepdf.com/reader/full/epson-actionprinter-4000-users-manual 204/290
Options
Problem Solution
Using the pulltractor with thepush tractor,continuous paperdoes not feedproperly(continued).
Paper feed is crooked or the paper jams(continued).
Several lines of space Skip over perforation may be set. Set DIPoccur in the printout. switch 2-3 to off.
Skip over perforation isset, but the skip hasshifted from the
perforation, or the perforation does not fall in the center of theskip.
The loading position of the paper may betoo high or too low. Use the micro-adjustment feature to reset the loadingposition.
The paper may be slack. Adjust theposition of the sprockets to take up anyslack along the width of the paper.Remove slack lengthwise by pressing inand rotating the pull tractor knob on theright. Do not turn the platen knob.
The paper thickness lever may not becorrectly set. Set the paper thickness lever
to match the thickness of your paper.
The paper may not meet thespecifications. Check that your paper isthe proper size, weight, and thickness.
7-30 Troubleshooting
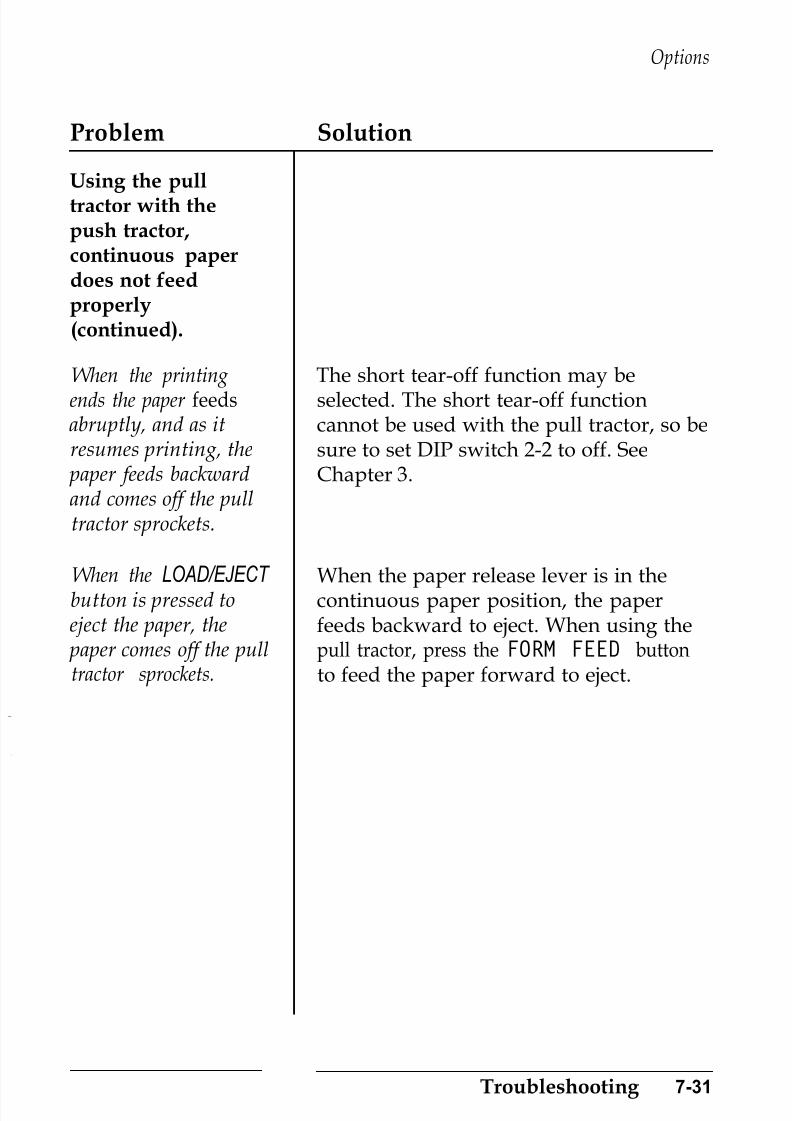
7/21/2019 Epson ActionPrinter 4000 User's Manual
http://slidepdf.com/reader/full/epson-actionprinter-4000-users-manual 205/290
Options
Problem
Using the pulltractor with thepush tractor,continuous paperdoes not feedproperly(continued).
Solution
When the printingends the paper feedsabruptly, and as itresumes printing, the
paper feeds backwardand comes off the pulltractor sprockets.
When the LOAD/EJECT
button is pressed toeject the paper, the
paper comes off the pulltractor sprockets.
The short tear-off function may beselected. The short tear-off functioncannot be used with the pull tractor, so besure to set DIP switch 2-2 to off. SeeChapter 3.
When the paper release lever is in thecontinuous paper position, the paperfeeds backward to eject. When using thepull tractor, press the FORM FEED buttonto feed the paper forward to eject.
Troubleshooting 7-31

7/21/2019 Epson ActionPrinter 4000 User's Manual
http://slidepdf.com/reader/full/epson-actionprinter-4000-users-manual 206/290
Options
Problem Solution
Using the fontmodule, themodule s fonts donot print.
The font module is set, The font module may not be fullybut the fonts in the inserted in the slot. Check it and insert themodule do not print. module properly if necessary.
Using an optionalinterface, the printer
does not operateproperly.
The printer does not print or the printout isnot what you expected.
The font module may be inserted thewrong way. Align the (>) marks on themodule and the slot and insert itproperly.
The font in the module may not becorrectly selected. Select the slot bypressing the FONT button on the control
panel.
If your program allows you to use controlcodes, use ESC k command to select thefont.
The interface board may be loose or notproperly connected. Check that theinterface board is correctly inserted intothe connector on the main board.
7-32 Troubleshooting

7/21/2019 Epson ActionPrinter 4000 User's Manual
http://slidepdf.com/reader/full/epson-actionprinter-4000-users-manual 207/290
Options
Problem Solution
Using an optionalinterface, the printerdoes not operateproperly(continued).
The printer does not You may be trying to use an interface print or the printout is with the wrong specification. Check thenot what you expected specifications to make sure that you can(continued). use the interface with this printer.
You may be trying to use a cable with thewrong specification. Make sure that thecable matches the specifications of theinterface.
The DIP switches or jumpers on the
interface board may be set wrong. See theinterface manual for the correct settings.
The interface settings on the computermay be wrong. See your computermanual for the correct settings.
The computer and interface settings may
not match. Match the settings for eachcondition.
Two cables may be installed on theprinter; only one cable may be attached atany time.
Troubleshooting 7-33
7/21/2019 Epson ActionPrinter 4000 User's Manual
http://slidepdf.com/reader/full/epson-actionprinter-4000-users-manual 208/290
Options
If the printer still does not operate properly after checking the abovepoints, run a self test of the interface to make sure that there are no
on-board defects. Ifany
abnormality is found, call the EpsonConsumer Information Center at 1-800-922-8911 for assistance.
7-34 Troubleshooting

7/21/2019 Epson ActionPrinter 4000 User's Manual
http://slidepdf.com/reader/full/epson-actionprinter-4000-users-manual 209/290
Chapter 8
Technical Specifications
Printer Specifications . . . . . . . . . . . . . . . . . . . . . . . . . . . . . . . 8-2
Printing.. . . . . . . . . . . . . . . . . . . . . . . . . . . . . . . . . . . . . . . . 8-2
Paper . . . . . . . . . . . . . . . . . . . . . . . . . . . . . . . . . . . . . . . . . . . 8-4
Mechanical . . . . . . . . . . . . . . . . . . . . . . . . . . . . . . . . . . . . . . 8-7
Electrical . . . . . . . . . . . . . . . . . . . . . . . . . . . . . . . . . . . . . . . . 8-8
Environment. . . . . . . . . . . . . . . . . . . . . . . . . . . . . . . . . . . . . 8-8
Interface Specifications . . . . . . . . . . . . . . . . . . . . . . . . . . . . . . 8-9
Pin Assignments for the Parallel Interface . . . . . . . . . . . 8-9
Interface Timing. . . . . . . . . . . . . . . . . . . . . . . . . . . . . . . . . . 8-11Printing Enabled /Disabled Signalsand Control Conditions . . . . . . . . . . . . . . . . . . . . . . . . . . . 8-12
Option Specifications . . . . . . . . . . . . . . . . . . . . . . . . . . . . . . . 8-13Single-bin Cut Sheet Feeder. . . . . . . . . . . . . . . . . . . . . . . . 8-13
Initialization . . . . . . . . . . . . . . . . . . . . . . . . . . . . . . . . . . . . . . . 8-15
Default Settings . . . . . . . . . . . . . . . . . . . . . . . . . . . . . . . . . . 8-15
Technical Specifications 8-1

7/21/2019 Epson ActionPrinter 4000 User's Manual
http://slidepdf.com/reader/full/epson-actionprinter-4000-users-manual 210/290
Printer Specifications
Printing
Print method:
Print speed:
24-pin impact dot matrix
Quality
Draft
Characters per inch Characters/second/line
10 15012 180
LQ 10 50
12 60
Printing direction: Bidirectional logic-seeking for textprinting. Unidirectional for graphics (can
also be switched to bidirectional by usingthe proper software command when DIPswitch 2-6 is on).
Line spacing: 1/6 inch or programmable in increments of1/360th of an inch
Paper feed speed:(continuous feed)
Single sheet: 2.2 inches per set(100 ms/line)
Continuous: 2.2 inches per set(100 ms/line)
8-2 Technical Specifications

7/21/2019 Epson ActionPrinter 4000 User's Manual
http://slidepdf.com/reader/full/epson-actionprinter-4000-users-manual 211/290
Printer Specifications
Printable columns:
Character spacingMaximum printed characters
10cpi 80
10 cpi condensed 137
12 cpi 96
12 cpi condensed 160
Input buffer: 8 KB/1KB
(DIP switch selectable)
Optional fonts: LQ Epson CourierLQ Epson PrestigeLQ Epson ScriptLQ Epson OCR-BLQ Epson OCR-ALQ Epson Orator
LQ Epson Orator-SCharacter fonts:
Font Available sizes(Characters per inch)
Epson Draft 10,12,15
Epson Roman I 10, 12, 15, Proportional I
Epson Sans Serif 10, 12, 15, Proportional
Characters: 96 standard ASCII character set (includingitalic characters)15 international character setsEpson Extended Graphics character set
Technical Specifications 8-3

7/21/2019 Epson ActionPrinter 4000 User's Manual
http://slidepdf.com/reader/full/epson-actionprinter-4000-users-manual 212/290
Printer Specifications
Paper
Paper width:
Paper Length:
Single sheet 7.2 to 10.1 inches
(182 to 257 mm)Continuous 4 to 10 inches
(101 to 254 mm)Envelope 6.5 or 9.5 inches
(166 or 240 mm)Labels 21/2xl5/16inches(continuous (minimum)only) (63.5 x 23.8 mm)
Single sheet 7.2 to 14.3 inches(182 to 364 mm)
Printable area: Single sheet
0.33 inches (8.5 mm) or more
0.22 inches (3 mm) _
or more
0.12 inches (3 mm)
or more
Printable area
t
t
0.53 inches (13.5 mm) or more
8-4 Technical Specifications

7/21/2019 Epson ActionPrinter 4000 User's Manual
http://slidepdf.com/reader/full/epson-actionprinter-4000-users-manual 213/290
Printer Specifications
Continuous paper
I
: Printable area :
t \
I
l
0.35 inches (9 mm)0.35 inches (9 mm) . +-------I+-------I
. .
l ;l ;
. , Printable area .. , Printable area .
II
IO
O
0.51 inches (13 mm) or more (both sides) when the 4 to 9.5 inch(101 mm to 242 mm) width paper is used.0.98 inches (25 mm) or more (both sides) when the 10 inch (254 mm)
width paper is used.Envelope
0.33 inches (8.5 mm)
,1,s 22mm
It
or more0.12 inches (3 mm)
or more
Note: Envelope printing is only available at normal temperature.Load the envelope with its long side horizontal.
Technical Specifications 8-5

7/21/2019 Epson ActionPrinter 4000 User's Manual
http://slidepdf.com/reader/full/epson-actionprinter-4000-users-manual 214/290
Printer Specifications
Paper weight:
Paper thickness:
Single SheetContinuousMulti-partformsEnvelope
Single Sheet
Continuous
14 lb to 24 lb14 lb to 22 lb12 lb to 15 lb per sheet.Maximum number sheets = 312 lb to 24 lb
Envelope
0.0025 to 0.0055 inches(0.065 to 0.14 mm)0.0025 to 0.01 inches(0.065 to 0.25 mm)0.0063 to 0.0197 inches
(0.16 to 0.52 mm)0.01 inches(Maximum 0.28 mm)
Copy capacity:
Label(withbacking)
Up to 3 sheets including the original.Total thickness must not exceed 0.01 inches(0.25 mm).
l 24 lb paper printing is only available at normal temperature.
l Labels with a pressure-sensitive paper joined by line or dotglue and with a total thickness less than or equal to 0.0118inches (0.3 mm) can be printed out under conditions of 40°F to95°F (5°C to 35°C) and 10% to 80% humidity.
8-6 Technical Specifications

7/21/2019 Epson ActionPrinter 4000 User's Manual
http://slidepdf.com/reader/full/epson-actionprinter-4000-users-manual 215/290
Printer Specifications
Mechanical
Paper feeding methods: Friction
Push tractorCut sheet feeder (optional)Pull tractor (optional)
Ribbon: Cartridge ribbon, available in black:#7753#7768 (film)
Life expectancy
of ribbon:
#7753: 2,000,000 characters
(in Letter Quality characters,at 48 dots/character)
#7768: 200,000 characters(in Letter Quality characters,at 48 dots/character)
MCBF: For all components excluding print head:3,000,000 lines
MTBF: 4000 power on hours (duty 25%)
Print head life: 200,000,000 strokes/wire
Dimensions and weight: (excluding knobs and paper guides)Height: 5.51 inches (139.9 mm)Width: 16.46 inches (418.0 mm)Depth: 13.66 inches (347.0 mm)
Weight: 13 lbs (6 kg approx.)
Technical Specifications 8-7

7/21/2019 Epson ActionPrinter 4000 User's Manual
http://slidepdf.com/reader/full/epson-actionprinter-4000-users-manual 216/290
Printer Specifications
Electrical
Voltage: 120 VAC ± 10%
Power consumption: 100 watts maximum
Frequency: 50 ± 0.5 Hz, 60 ± 0.5 Hz
Insulation resistance: 10 Mohms between AC power lineand chassis
Dielectric strength Can withstand 1.25 kV rms(between AC line and applied for one minute
chassis):
Environment
Temperature:
Humidity:
Shock:
Vibration:
Operation angle:
Operation: 40°F to 95°F (5°C to 35°C)Storage: -22°F to 140°F (-30°C to 60°C)
Operation: 10% to 80% (noncondensing)Storage: 5% to 85% (noncondensing)
Operation: Up to 1 G within 1 msStorage: Up to 2 G within 1 ms
Operation: Up to 0.25 G at up to 55 HzStorage: Up to 0.50 G at up to 55 Hz
Less than 15° (without cut sheet feeder)0° (with cut sheet feeder)
8-8 Technical Specifications

7/21/2019 Epson ActionPrinter 4000 User's Manual
http://slidepdf.com/reader/full/epson-actionprinter-4000-users-manual 217/290
Interface Specifications
Your printer is equipped with an 8-bit parallel interface. Forspecifications on optional interfaces, refer to their manuals.
Pin Assignments for the Parallel Interface
Connector pin assignments and a description of their respectiveinterface signals are shown in the following table.
Signal ReturnPin Pin Signal Direction Description
1 19 STROBE IN STROBE pulse to read data. Pulsewidth must be more than 0.5microseconds at the receiving terminal.
2 20 DATA 1 IN These signals represent information of
3 21 DATA 2 IN the 1st to 8th bits of parallel data,
4 22 DATA 3 IN respectively. Each signal is at HIGH
5 23 DATA 4 IN level when data is logical 1 and LOW6 24 DATA 5 IN when it is logical 0.
7 25 DATA 6 IN8 26 DATA 7 IN9 27 DATA 8 IN
10 28 ACKNLG OUT About an 11-microsecond pulse. LOWindicates that data has been receivedand that the printer is ready to acceptmore data.
11 29 BUSY OUT A HIGH signal indicates that the printer cannot receive data. The signal goesHIGH in the following cases:1) During data entry (ea. char. time)2) During printing3) When off line
12 30 PE OUT
4) During printer-error state
A HIGH signal indicates that the printer
is out of paper.
Technical Specifications 8-9

7/21/2019 Epson ActionPrinter 4000 User's Manual
http://slidepdf.com/reader/full/epson-actionprinter-4000-users-manual 218/290
Interface Specifications
printer controller is reset to its power-up
state and the print buffer is cleared. This
level is normally HIGH; its pulse width
must be more than 50 microseconds atthe receiving terminal.
32 - ERROR OUT This level becomes LOW when the
printer is:1) in paper out state.2) off line.
3) in error state.
33 - GND - Same as for Pins 19-30.
34 - NC - Not used.
35 - - OUT Pulled up to 5V through 3.3 Kohm
resistance.
36 - SLCT IN IN The DC1/DC3 code is valid only whenthis signal is HIGH. (Internal fixing can
be carried out with Jumper J10. Thelevel of this signal is factory-set to
, LOW.)
8-10 Technical Specifications

7/21/2019 Epson ActionPrinter 4000 User's Manual
http://slidepdf.com/reader/full/epson-actionprinter-4000-users-manual 219/290
Interface Specifications
The column heading “Direction” refers to the direction of signalflow as viewed from the printer.
“Return” denotes the twisted-pair return, to be connected atsignal ground level. For the interface wiring, be sure to use atwisted-pair cable for each signal and to complete the connectionon the return side. These cables should be shielded andconnected to the chassis of the host computer and the printer.
All interface conditions are based on TTL level. Both the rise andthe fall times of each signal must be less than 0.2 microseconds.
Data transfer must be carried out by observing the ACKNLG orBUSY signal. Data transfer to this printer can be carried out onlyafter receipt of the ACKNLG signal or when the level of theBUSY signal is LOW.
Interface Timing
The figure below shows the timing for the parallel interface.
BUSY ACKNLG
Technical Specifications 8-11

7/21/2019 Epson ActionPrinter 4000 User's Manual
http://slidepdf.com/reader/full/epson-actionprinter-4000-users-manual 220/290
Interface Specifications
Printing Enabled/Disabled Signals and Control Conditions
The table below shows the relationship between printing being
enabled or disabled, the on line/off line status, and the receipt of thedata on/off control characters, DC1 or DC3.
ON LINE(Indicator
on)
on line
F
on line
on line
off line
SLCTIN DC1/DC3 ERROR BUSY ACKNLG(Dataon/off control)
Low (J10 DC1/DC3 High High/Low Pulsed
interface) (no effect) ea. char.
High DC1 High High/Low PulsedRecv’d ea. char.
High D C3 High High/Low PulsedRecv’d ea. char.
High/Low DC1/DC3 Low High Not
(no effect) (no effect) generated
Printing(Disabled/enabled)
Enabled
(normalcond.)
Enabled
Disabled*
Disabled
* While printing is disabled, character data is being received andacknowledged so that the printer can look for another DC1character, which would allow it to resume printing.
8-12 Technical Specifications

7/21/2019 Epson ActionPrinter 4000 User's Manual
http://slidepdf.com/reader/full/epson-actionprinter-4000-users-manual 221/290
Option Specifications
Single-bin Cut Sheet Feeder (Optional)
Dimensions and weight: 17.5 in (W) x 17.1 in (D) x 16.7 in (H)(444 mm (W) x 434 mm (D) x 423 mm (H))(mounted on the printer)approx. 2.4 lb (1.1 kg)
Bin capacity: Single sheet: Up to 150 sheets of 22 lbUp to 100 sheets of 17 lbUp to 100 sheets of 24 lb
(Total thickness should not exceed9/32 inches or 15 mm)
Stacker capacity: Single sheet: Up to 80 sheets of 22 lbUp to 100 sheets of 17 lbUp to 55 sheets of 24 lb
MCBF:
Environmentalcondition:
100,000 cycles
TemperatureOperation: 40°F to 95°F (5°C to 35°C)Storage: -22°F to 140°F (-30°C to 60°C)
Humidity
Operation: 15% to 80% (noncondensing)Storage: 5% to 85% (noncondensing)
Technical Specifications 8-13

7/21/2019 Epson ActionPrinter 4000 User's Manual
http://slidepdf.com/reader/full/epson-actionprinter-4000-users-manual 222/290
Option Specifications
Paper:
0.12 inches (3 mm)
or more
Width 7.17 to 8.50 inches(182 to 216 mm)
Length 8.27 to 14.30 inches(257 to 364 mm)
Thickness 0.0028 to 0.0055 inches(0.07 to 0.14 mm)
Weight 17 lb to 24 lb(64 g/m2 to 90 g/m2)
Printable area0.33 inches (8.5 mm) or more
Printable area
_ 0.12 inches (3 mm)
or more
0.53 inches (13.5 mm) or more
l 24 lb paper printing is only available at normal temperature.
Paper feed accuracy cannot be assured within 0.9” (22 mm) fromeither the top or bottom edges of the paper.
Storage condition: Temperature 65°F to 70°F(18°C to 22°C)
Humidity 40% to 60%
8-14 Technical Specifications

7/21/2019 Epson ActionPrinter 4000 User's Manual
http://slidepdf.com/reader/full/epson-actionprinter-4000-users-manual 223/290
Initialization
There are two ways that the printer can be initialized (returned tothe default settings) through the hardware and one way through thesoftware. These are described in the following table:
Hardware initialization l The power is turned on.l The printer receives an INIT signal at th
parallel interface (pin 31 goes LOW).
Software initialization l The software sends the ESC @(initialize the printer) command.
Default Settings
The table below shows the default conditions that become validwhen the printer is initialized.
Item
Top of form position
Left and right margins
Line spacing
Vertical tab position
Horizontal tab positions
VFU channelFont selection
Condensed mode
Character spacing
Justification
Special printing effectsGraphic mode assignment
Reset to:
Current paper position
Cancelled
16-inch line spacing
Cleared
Every eight characters
Channel 0Hardware: The current DIP switch settingSoftware: The current SelecType setting
Hardware: The current DIP switch settingSoftware: The current SelecType setting
The current DIP switch setting
Left justification
Cancelled (except condensed printing)ESCK=ESC*0 ,ESCL=ESC*1 ,ESCY=ESC*2 ,ESCZ=ESC*3
Technical Specifications 8-15

7/21/2019 Epson ActionPrinter 4000 User's Manual
http://slidepdf.com/reader/full/epson-actionprinter-4000-users-manual 224/290
Initialization
Also, the data buffer is cleared when the printer is initialized byturning on the power or by an INIT signal.
Note: The user-defined character set is not cleared when theprinter is initialized with the software command (ESC @).
8-16 Technical Specifications
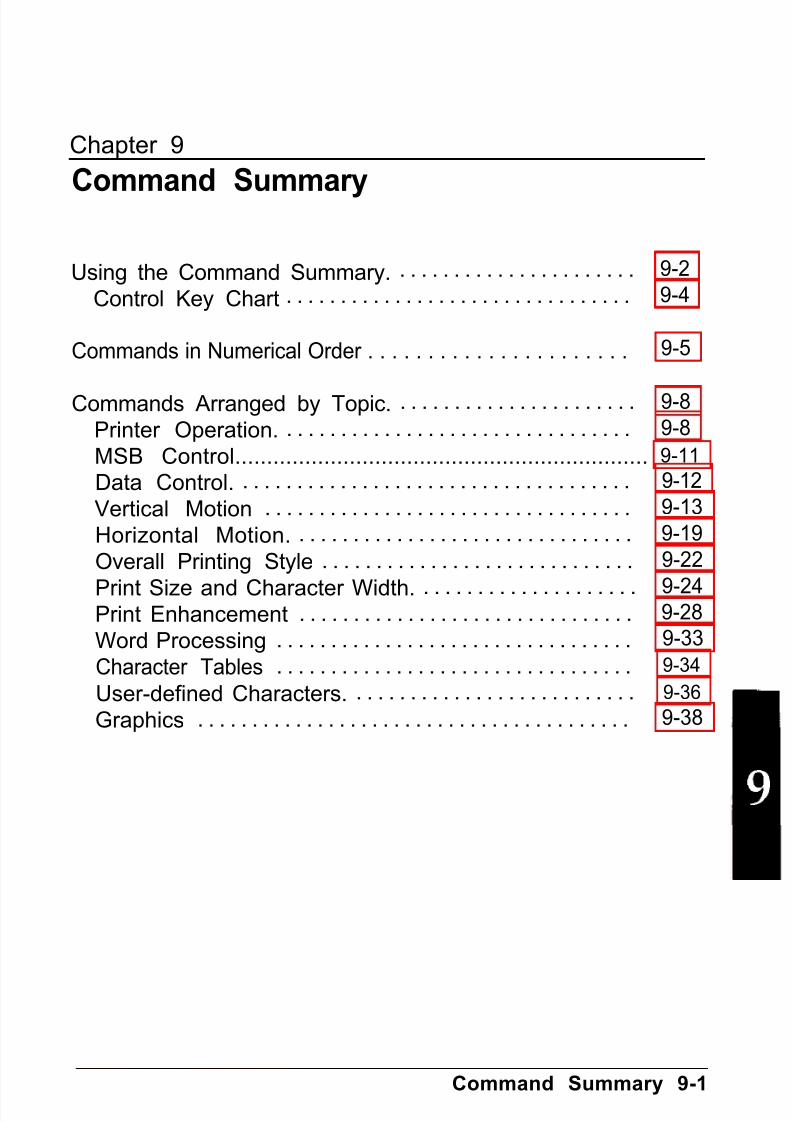
7/21/2019 Epson ActionPrinter 4000 User's Manual
http://slidepdf.com/reader/full/epson-actionprinter-4000-users-manual 225/290
Chapter 9
Command Summary
Using the Command Summary. . . . . . . . . . . . . . . . . . . . . . . 9-2
Control Key Chart . . . . . . . . . . . . . . . . . . . . . . . . . . . . . . . . 9-4
Commands in Numerical Order . . . . . . . . . . . . . . . . . . . . . . 9-5
Commands Arranged by Topic. . . . . . . . . . . . . . . . . . . . . . . 9-8
Printer Operation. . . . . . . . . . . . . . . . . . . . . . . . . . . . . . . . . 9-8
MSB Control................................................................. 9-11
Data Control. . . . . . . . . . . . . . . . . . . . . . . . . . . . . . . . . . . . . 9-12
Vertical Motion . . . . . . . . . . . . . . . . . . . . . . . . . . . . . . . . . . 9-13
Horizontal Motion. . . . . . . . . . . . . . . . . . . . . . . . . . . . . . . . 9-19
Overall Printing Style . . . . . . . . . . . . . . . . . . . . . . . . . . . . . 9-22
Print Size and Character Width. . . . . . . . . . . . . . . . . . . . . 9-24Print Enhancement . . . . . . . . . . . . . . . . . . . . . . . . . . . . . . . 9-28
Word Processing . . . . . . . . . . . . . . . . . . . . . . . . . . . . . . . . . 9-33
Character Tables . . . . . . . . . . . . . . . . . . . . . . . . . . . . . . . . . 9-34
User-defined Characters. . . . . . . . . . . . . . . . . . . . . . . . . . . 9-36
Graphics . . . . . . . . . . . . . . . . . . . . . . . . . . . . . . . . . . . . . . . . 9-38
Command Summary 9-1

7/21/2019 Epson ActionPrinter 4000 User's Manual
http://slidepdf.com/reader/full/epson-actionprinter-4000-users-manual 226/290
Using the Command Summary
This chapter lists and describes all the commands available on yourprinter.
The first part of this chapter lists all commands in numerical orderand gives the number of the page where each is fully described. Ifyou know which command you are looking for, consult thenumerical list.
Note: The Quick Reference card at the end of the book alsocontains a list of the commands divided by topic, with pagenumber references that direct you to full explanations of thecommands.
The second part of this chapter lists and describes each commandseparately; the commands are divided into the following subjects:
Printer operation Print size and character widthMSB control Print enhancementData control Word processingVertical motion Character setsHorizontal motion User-defined charactersOverall printing style Graphics
Each command description has a format section and a comment
section. The format section gives the ASCII, decimal, andhexadecimal values for the command. These three formats areequivalent, and it should be easy to pick the one most suited to yourpurpose. The comment section describes the effect of the commandand gives any additional information necessary for using it.
Note: Some application programs use control key sequences. Seethe Control Key chart on page 9-4.
9-2 Command Summary

7/21/2019 Epson ActionPrinter 4000 User's Manual
http://slidepdf.com/reader/full/epson-actionprinter-4000-users-manual 227/290
Using the Command Summa y
The simplest type of command consists of a single character to besent to the printer. For instance, to print in condensed mode, thecode format is:
ASCII code: SIDecimal: 15H e x a d e c i m a l : 0 F
This code can be sent from a program by sending the code 15directly.
More complex commands consist of two or more character codes.
For example, to print in double-wide mode, the code format is thefollowing:
ASCII code: ESC W nDecimal: 27 87 n
Hexadecimal: 1B 57 n
In this case n can be either 1 (on) or 0 (off), to begin or end double-wide printing. You can use either of the following commands to
turn on double-wide print from BASIC:
LPRINT CHR$(27);CHR$(87);CHR$(1)LPRINT CHR$(27);"W";CHR$(1)
For the following commands that use only 0 or 1 for the variable,either the decimal or hexadecimal values 1 and 0 or the ASCIIcharacters 1 and 0 can be used:
ESC U, ESC x, ESC p, ESC W, ESC S, ESC-, and ESC %
For example, in BASIC you can turn on proportional spacing witheither of these statements:
LPRINT CHR$(27);"p";CHR$(1)
LPRINT CHR$(27);"p";"1"
Command Summary 9-3

7/21/2019 Epson ActionPrinter 4000 User's Manual
http://slidepdf.com/reader/full/epson-actionprinter-4000-users-manual 228/290
Using the Command Summa y
Control Key Chart
Some application programs use control key codes for decimal values
0-27. The table below gives you the proper values. The Control Keycolumn indicates that you press the control key at the same timeyou press the key for the letter or symbol in that column. Forexample, you press the control key and A at the same time to sendthe value 1.
Some application programs that use this system cannot useControl-@, and many programs use the control keys for otherpurposes.
Dec. Hex. Ctrl. Key
0 001 01
2 023 034 045 05
6 067 07
8 089 09
10 0 A11 0 B12 0C
13 0D
@ A
BCDE
FGHI
JKLM
Dec. Hex. Ctrl. Key
14 0 E15 0F16 1017 11
18 1219 13
2 0 1421 152 2 1623 1724 1825 1926 1A27 1B
NOP
QRS
TU
VWXYZ
[
9-4 Command Summary

7/21/2019 Epson ActionPrinter 4000 User's Manual
http://slidepdf.com/reader/full/epson-actionprinter-4000-users-manual 229/290
Commands in Numerical Order
The following list shows control codes and ESC sequences withtheir decimal and hexadecimal values, and the page where thedescription of the command can be found.
ASCII Dec. Hex. Description Page
BEL 7 07BS 8 08HT 9 09LF 10 0AVT 11 0BFF 12 0CCR 13 0Ds o 14 0E
SI
DC1DC2DC3DC4
15 0F
17 1118 1219 1320 14
CANDELESC SO
24 18127 7F14 0E
ESC SI 15 0FESC EM 25 19ESC SP 32 20ESC ! 33 21ESC # 35 23ESC $ 36 24ESC % 37 25
ESC & 38 26ESC ( - 40 28
Beeper . . . . . . . . . . . . . . . . . . . . . . 9-12Backspace . . . . . . . . . . . . . . . . . . . 9-20Tab Horizontally . . . . . . . . . . . . . 9-21Line Feed . . . . . . . . . . . . . . . . . . . . 9-14Tab Vertically . . . . . . . . . . . . . . . . 9-17Form Feed.. . . . . . . . . . . . . . . . . . 9-13Carriage Return . . . . . . . . . . . . . . 9-12Select Double-wide Mode(one line) . . . . . . . . . . . . . . . . . . . . 9-26Select Condensed Mode . . . . . . . 9-25
Select Printer . . . . . . . . . . . . . . . . . 9-8Cancel Condensed Mode . . . . . . 9-26Deselect Printer . . . . . . . . . . . . . . 9-9Cancel Double-wide Mode(one line) . . . . . . . . . . . . . . . . . . . . 9-27Cancel Line . . . . . . . . . . . . . . . . . . 9-12Delete Character. . . . . . . . . . . . . . 9-9Select Double-wide Mode
(one line) . . . . . . . . . . . . . . . . . . . . 9-27Select Condensed Mode . . . . . . . 9-26Control Cut Sheet Feeder . . . . . . 9-10Set Intercharacter Space . . . . . . . 9-33Master Select. . . . . . . . . . . . . . . . . 9-23Cancel MSB Control. . . . . . . . . . . 9-11Set Absolute Print Position. . . . . 9-20Select User-defined Set . . . . . . . . 9-37
Define User-defined Characters 9-36Select Score . . . . . . . . . . . . . . . . . . 9-31
Command Summary 9-5

7/21/2019 Epson ActionPrinter 4000 User's Manual
http://slidepdf.com/reader/full/epson-actionprinter-4000-users-manual 230/290
Commands in Numerical Order
ASCII Dec. Hex. Description Page
ESC * 42 2A
ESC + 43 2BESC - 45 2D
ESC / 47 2FESC 0 48 30ESC 2 50 32ESC 3 51 33ESC 4 52 34
ESC 5 53 35ESC 6 54 36ESC 7 55 37ESC : 58 3AESC< 60 3C
ESC= 61 3DESC> 62 3E
ESC? 63 3FESC@ 64 40ESC A 65 41ESCB 66 42ESC C 67 43ESC C0 67 43ESC D 68 44ESC E 69 45
ESCF 70 46ESCG 71 47ESCH 72 48
ESC J 74 4AESCK 75 4B
ESCL 76 4C
ESCM 77 4D
Select Graphics Mode . . . . . . . . . 9-39
Set n/360-inch Line Spacing. . . . 9-15Turn Underline ModeOn/Off. . . . . . . . . . . . . . . . . . . . . . 9-32Select Vertical Tab Channel . . . . 9-18Select 1/8-inch Line Spacing . . . 9-15Select 1/6-inch Line Spacing . . . 9-15Set n/180-inch Line Spacing. . . . 9-16Select Italic Mode . . . . . . . . . . . . . 9-34
Cancel Italic Mode . . . . . . . . . . . . 9-35Enable Printable Characters . . . . 9-37Enable Upper Control Codes . . . 9-37Copy ROM to RAM . . . . . . . . . . . 9-36Select Unidirectional Mode(one line) . . . . . . . . . . . . . . . . . . . . 9-9Set MSB to 0 . . . . . . . . . . . . . . . . . 9-11
Set MSB to 1 . . . . . . . . . . . . . . . . . 9-11
Reassign Graphics Mode . . . . . . 9-40Initialize Printer . . . . . . . . . . . . . . 9-8Set n/60-inch Line Spacing. . . . . 9-16Set Vertical Tabs . . . . . . . . . . . . . . 9-17Set Page Length in Lines. . . . . . . 9-13Set Page Length in Inches. . . . . . 9-13Set Horizontal Tabs . . . . . . . . . . . 9-22Select Emphasized Mode . . . . . . 9-28
Cancel Emphasized Mode . . . . . 9-28Select Double-strike Mode . . . . . 9-29Cancel Double-strike Mode . . . . 9-29Perform n/180-inch Line Feed. . 9-16Select Single-density GraphicsMode . . . . . . . . . . . . . . . . . . . . . . . 9-38Select Double-density GraphicsMode . . . . . . . . . . . . . . . . . . . . . . . 9-38
Select 12 CPI . . . . . . . . . . . . . . . . . 9-24
9-6 Command Summary

7/21/2019 Epson ActionPrinter 4000 User's Manual
http://slidepdf.com/reader/full/epson-actionprinter-4000-users-manual 231/290
Commands in Numerical Order
ASCII Dec. Hex. Description Page
ESC N 78 4E
ESC O 79 4FESC P 80 50ESC Q 81 51ESC R 82 52
ESC S0 83 53ESC S1 83 53ESCT 84 54
ESC U 85 55
ESC W 87 57
ESC Y 89 59
ESC Z 90 5A
ESC \ 92 5CESC a 97 61
ESC b 98 62
ESC g 103 67ESCk 107 6BESC1 108 6C
ESCp 112 70
ESC q 113 71ESC t 116 74ESC w 119 77
ESC x 120 78
Set Skip Over Perforation . . . . . . 9-14
Cancel Skip Over Perforation. . . 9-14Select 10 CPI . . . . . . . . . . . . . . . . . 9-24Set Right Margin . . . . . . . . . . . . . 9-19Select an InternationalCharacter Set. . . . . . . . . . . . . . . . . 9-35Select Superscript Mode . . . . . . . 9-29Select Subscript Mode . . . . . . . . . 9-30Cancel Superscript/Subscript
Mode . . . . . . . . . . . . . . . . . . . . . . . 9-30Turn Unidirectional ModeOn/Off . . . . . . . . . . . . . . . . . . . . . . 9-10Turn Double-wide ModeOn/Off. . . . . . . . . . . . . . . . . . . . . . 9-27Select High-speed Double-densityGraphics Mode. . . . . . . . . . . . . . . 9-38Select Quadruple-density
Graphics Mode . . . . . . . . . . . . . . . 9-39Set Relative Print Position . . . . . 9-21Select Justification . . . . . . . . . . . . 9-33Set Vertical Tabs in Channels. . . 9-18Select 15 CPI . . . . . . . . . . . . . . . . . 9-24Select Typestyle Family. . . . . . . . 9-23Set Left Margin. . . . . . . . . . . . . . . 9-19Turn Proportional Mode
On/Off. . . . . . . . . . . . . . . . . . . . . . 9-25Select Character Style . . . . . . . . . 9-32Select Character Table . . . . . . . . . 9-34Turn Double-high ModeOn/Off. . . . . . . . . . . . . . . . . . . . . . 9-28Select Letter Quality or Draft . . . 9-22
Command Summary 9-7

7/21/2019 Epson ActionPrinter 4000 User's Manual
http://slidepdf.com/reader/full/epson-actionprinter-4000-users-manual 232/290
Commands Arranged by Topic
This following section lists and describes all the commands by topic.See the Quick Reference card at the back of this book for a handy listof commands by topic.
Printer Operation
ESC @ Initialize Printer
Format:ASCII code: ESC @Decimal: 27 64Hexadecimal: 1B 40
Comments:Resets the printer mode and clears the current print linepreceding the command.
DC1 Select Printer
Format:ASCII code: DC1Decimal: 17H e x a d e c i m a l : 1 1
Comments:
Returns the printer to the selected state if it has been deselectedby the printer deselect code (DC3). It does not select the printer ifit has been switched off line by the ON LINE button.
9-8 Command Summary

7/21/2019 Epson ActionPrinter 4000 User's Manual
http://slidepdf.com/reader/full/epson-actionprinter-4000-users-manual 233/290
Commands Arranged by Topic
DC3 Deselect Printer
Format:
ASCII code: DC3Decimal: 19H e x a d e c i m a l : 1 3
Comments:Puts the printer into the deselected state until the select printercode @C1) is received. The printer cannot be reselected with theON LINE button.
DEL Delete Character
Format:ASCII code: DELDecimal: 127H e x a d e c i m a l : 7 F
Comments:
Removes the last text character on the print line but does notaffect control codes.
ESC < Select Unidirectional Mode (one line)
Format:ASCII code: ESCDecimal: 27
6’
Hexadecimal: 1B 3C
Comments:Printing is normally bidirectional. This command selectsunidirectional printing for one line only. (It is cancelled by acarriage return.) The print head moves to the extreme left (home)position and printing takes place from left to right. Overrides theDIP switch setting.
Command Summary 9-9

7/21/2019 Epson ActionPrinter 4000 User's Manual
http://slidepdf.com/reader/full/epson-actionprinter-4000-users-manual 234/290
Commands Arranged by Topic
ESC U Turn Unidirectional Mode On/Off
Format:
ASCII code: ESC U nDecimal: 27 85 nHexadecimal: 1B 55 n
Comments:The following values can be used for n:1: Turns the mode on0: Turns the mode off
Printing is normally bidirectional. This command selectsunidirectional printing for more accurate positioning. This settingcan also be performed by SelecType.
ESC EM Control Cut Sheet Feeder
Format:ASCII code: ESC EM n
Decimal: 27 25 nHexadecimal: 1B 19 n
Comments:The following values can be used for n:0: Turns mode off4: Turns mode onR: Ejects a sheet. (No paper is loaded.)
The command should not be used unless the cut sheet feeder isinstalled. It is ignored if any value other than 0, 4, or R is usedfor n.
The cut sheet feeder mode can also be turned on and off bysetting DIP switch 1-8.
9-10 Command Summary

7/21/2019 Epson ActionPrinter 4000 User's Manual
http://slidepdf.com/reader/full/epson-actionprinter-4000-users-manual 235/290
Commands Arranged by Topic
MSB Control
MSB means the Most Significant Bit. MSB control (ESC =, ESC >,
and ESC #) does not work for graphics or user-defined characters.
ESC = Set MSB to 0
Format:ASCII code: ESCDecimal: 27 61Hexadecimal: 1B 3D
Comments:Sets the MSB of all incoming data to 0. Some computers alwayssend data with the MSB set to 1, which means that italics orcharacter graphics are always printed. ESC = can overcome thisproblem.
ESC > Set MSB to 1
Format:ASCII code: ESCDecimal: 27 >
Hexadecimal: 1B 3E
Comments:Sets the MSB bit of all incoming data as 1.
ESC #Format:
ASCII code: ESC #Decimal: 27 35Hexadecimal: 1B 23
Cancel MSB Control
Comments:Cancels the MSB control set by ESC = or ESC >.
Command Summary 9-11

7/21/2019 Epson ActionPrinter 4000 User's Manual
http://slidepdf.com/reader/full/epson-actionprinter-4000-users-manual 236/290
Commands Arranged by Topic
BEL
Format:
ASCII code: BELDecimal: 7H e x a d e c i m a l : 0 7
Beeper
Comments:Sounds the printer s beeper.
Data ControlCR
Format:ASCII code: CRDecimal: 13H e x a d e c i m a l : 0 D
Carriage Return
Comments:
Prints the data in the print buffer and returns the print position tothe left margin. A line feed is added if the AUTO FEED XT line onthe parallel interface is held LOW.
CAN Cancel Line
Format:ASCII code: CAN
Decimal: 24H e x a d e c i m a l : 1 8
Comments:Clears all text on the print line, but does not affect control codes.
9-12 Command Summary
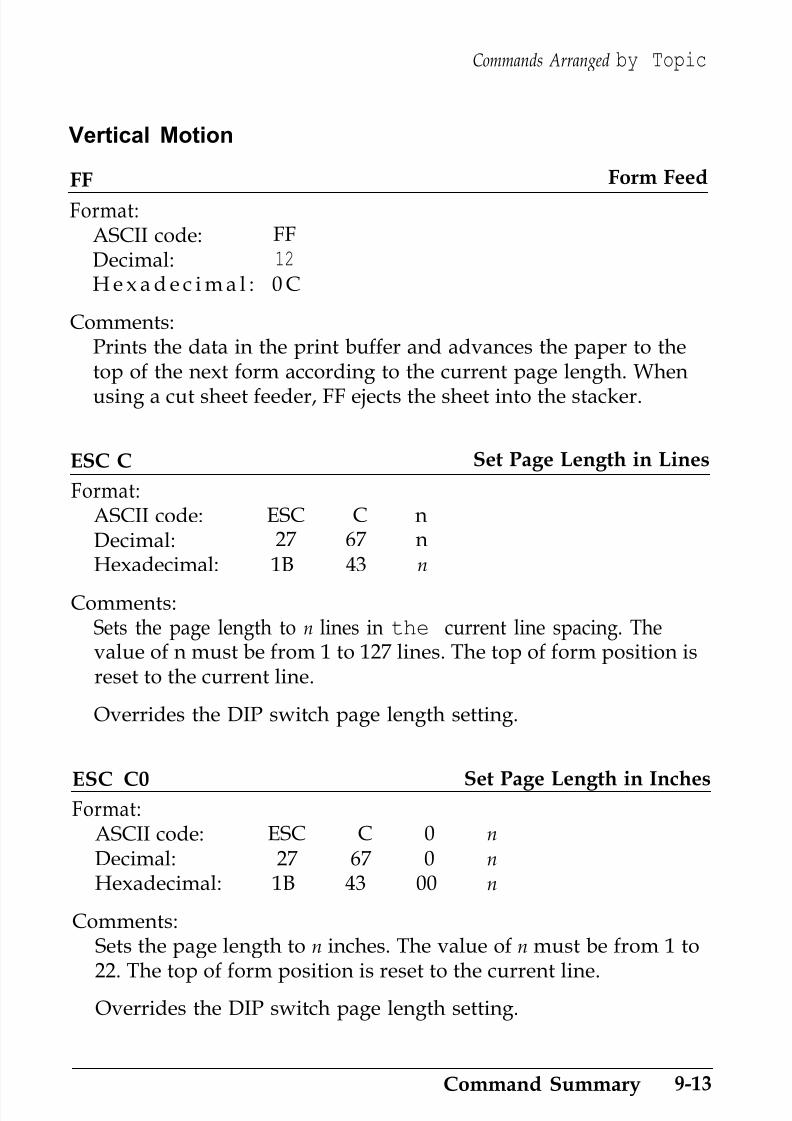
7/21/2019 Epson ActionPrinter 4000 User's Manual
http://slidepdf.com/reader/full/epson-actionprinter-4000-users-manual 237/290
Commands Arranged by Topic
Vertical Motion
FF Form Feed
Format:ASCII code: FFDecimal: 12
H e x a d e c i m a l : 0 C
Comments:Prints the data in the print buffer and advances the paper to thetop of the next form according to the current page length. When
using a cut sheet feeder, FF ejects the sheet into the stacker.
ESC C Set Page Length in Lines
Format:ASCII code: ESC C nDecimal: 27 67 nHexadecimal: 1B 43 n
Comments:Sets the page length to n lines in the current line spacing. Thevalue of n must be from 1 to 127 lines. The top of form position isreset to the current line.
Overrides the DIP switch page length setting.
ESC C0 Set Page Length in InchesFormat:
ASCII code: ESC C 0 n
Decimal: 27 67 0 n
Hexadecimal: 1B 43 00 n
Comments:Sets the page length to n inches. The value of n must be from 1 to
22. The top of form position is reset to the current line.Overrides the DIP switch page length setting.
Command Summary 9-13

7/21/2019 Epson ActionPrinter 4000 User's Manual
http://slidepdf.com/reader/full/epson-actionprinter-4000-users-manual 238/290
Commands Arranged by Topic
ESC N Set Skip Over Perforation
Format:
ASCII code: ESC N nDecimal: 27 78 nHexadecimal: 1B 4E n
Comments:The variable n is the number of lines skipped between the last lineprinted on one page and the first line to print on the next page.For example, with the standard setting for line spacing (1/6-inch),and page length (66 lines), ESC N 6 prints 60 lines and then skips6. This setting is cancelled by ESC O, ESC C, or ESC C 0. Thevalue of n must be from 1 to 127.
Overrides the DIP switch setting for l-inch skip over perforation.
ESC O Cancel Skip Over Perforation
Format:
ASCII code: E S C ODecimal: 27 79Hexadecimal: 1B 4F
Comments:Cancels the skip over perforation set by ESC N. Overrides the DIPswitch setting for l-inch skip over perforation.
LF Line FeedFormat:
ASCII code: LFDecimal: 10H e x a d e c i m a l : 0 A
Comments:When this command is received, the data in the print buffer is
printed and the paper advances one line in the current linespacing.
9-14 Command Summary

7/21/2019 Epson ActionPrinter 4000 User's Manual
http://slidepdf.com/reader/full/epson-actionprinter-4000-users-manual 239/290
Commands Arranged by Topic
ESC 0 Select 1/8-inch Line Spacing
Format:
ASCII code: ESC 0Decimal: 27 48Hexadecimal: 1B 30
Comments:Sets the line spacing to 1/8 of an inch for subsequent line feedcommands. The 0 is the digit zero and not ASCII code 0.
ESC 2Format:
ASCII code: ESC 2Decimal: 27 50Hexadecimal: 1B 32
Select 1/64-inch Line Spacing
Comments:Sets the line spacing to 1/6 of an inch for subsequent line feed
commands. The 2 is the digit two and not ASCII code 2. This linespacing is the default at power on.
ESC + Set n/360-inch Line Spacing
Format:ASCII code: ESC + nDecimal: 27 43 n
Hexadecimal: 1B 2B nComments:
Sets line spacing to n/360 of an inch for subsequent line feedcommands. The value of n must be from 0 to 255.
Command Summary 9-15

7/21/2019 Epson ActionPrinter 4000 User's Manual
http://slidepdf.com/reader/full/epson-actionprinter-4000-users-manual 240/290
Commands Arranged by Topic
ESC 3 Set n/180-inch Line Spacing
Format:
ASCII code: ESC 3 nDecimal: 27 51 n
H e x a d e c i m a l : 1 B 3 3 n
Comments:Sets the line spacing to n/180 of an inch for subsequent line feedcommands. The 3 is the digit three and not ASCII code 3. Thevalue of n must be from 0 to 255.
ESC A Set n/60-inch Line Spacing
Format:ASCII code: ESC A n
Decimal: 27 65 n
Hexadecimal: 1B 41 n
Comments:
Sets the line spacing to n/60 of an inch for subsequent line feedcommands. The value of n must be from 0 to 85.
ESC J Perform n/180-inch Line Feed
Format:ASCII code: ESC J n
Decimal: 27 74 n
Hexadecimal: 1B 4A nComments:
Advances the paper n/180 of an inch. The value of n must befrom 0 to 255. This command produces an immediate line feedbut does not affect subsequent line spacing and does not producea carriage return.
9-16 Command Summary

7/21/2019 Epson ActionPrinter 4000 User's Manual
http://slidepdf.com/reader/full/epson-actionprinter-4000-users-manual 241/290
Commands Arranged by Topic
VT Tab Vertically
Format:
ASCII code: VTDecimal: 11H e x a d e c i m a l : 0 B
Comments:Advances the paper to the next vertical tab position in the channelselected by ESC /. If no channel has been selected, channel 0 isused. If no vertical tabs have been set, the paper advances oneline.
ESC B Set Vertical Tabs
Format:ASCII code: ESC B n1 n2 . . . 0Decimal: 27 66 n1 n2 . . . 0Hexadecimal: 1B 42 n1 n2 . . . 00
Comments:Sets up to 16 vertical tabs in the current line spacing. Tab settingsare not affected by subsequent changes in line spacing. The tabsettings are entered as n1, n2, etc.-all from 1 to 225, in ascendingorder. The 0 value (null) indicates the end of the command. Allsettings are stored in channel 0 (see ESC b). ESC B 0 clears the tabsettings.
Command Summary 9-17
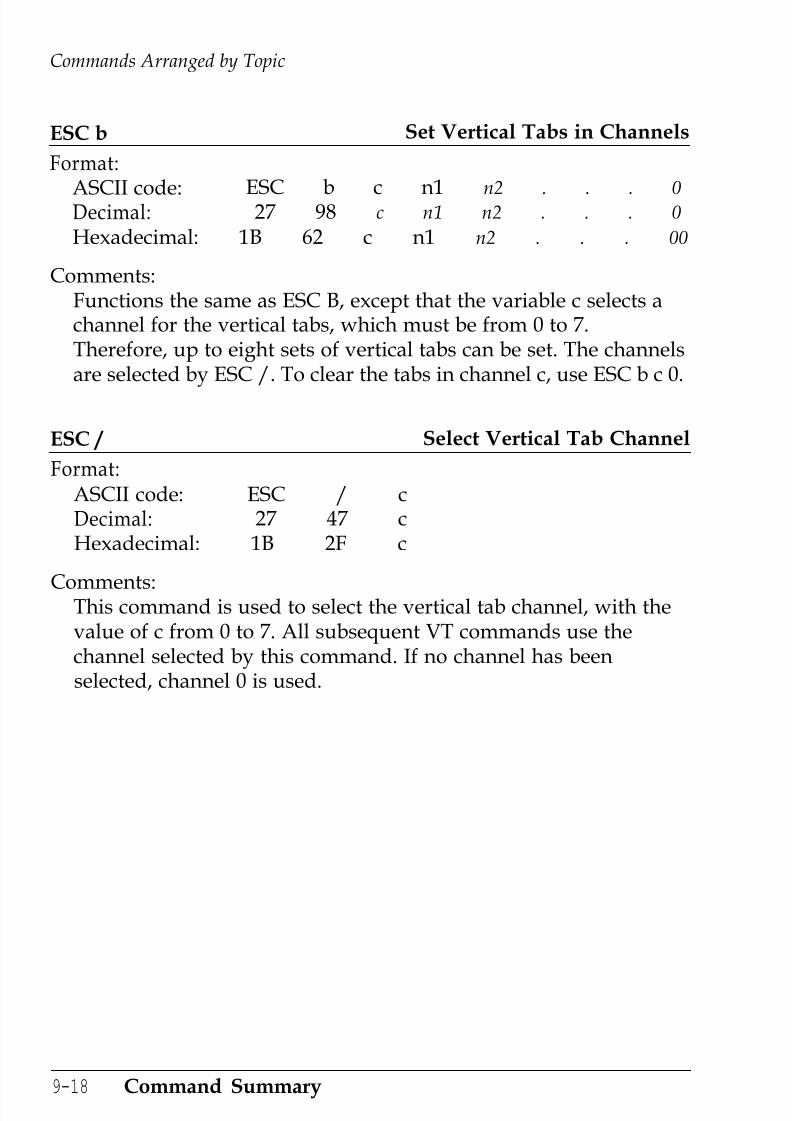
7/21/2019 Epson ActionPrinter 4000 User's Manual
http://slidepdf.com/reader/full/epson-actionprinter-4000-users-manual 242/290
Commands Arranged by Topic
ESC b Set Vertical Tabs in Channels
Format:
ASCII code: ESC b c n1 n2 . . . 0Decimal: 27 98 c n1 n2 . . . 0
Hexadecimal: 1B 62 c n1 n2 . . . 00
Comments:Functions the same as ESC B, except that the variable c selects achannel for the vertical tabs, which must be from 0 to 7.Therefore, up to eight sets of vertical tabs can be set. The channelsare selected by ESC /. To clear the tabs in channel c, use ESC b c 0.
ESC / Select Vertical Tab Channel
Format:ASCII code: ESC / cDecimal: 27 47 cHexadecimal: 1B 2F c
Comments:This command is used to select the vertical tab channel, with thevalue of c from 0 to 7. All subsequent VT commands use thechannel selected by this command. If no channel has beenselected, channel 0 is used.
9-18 Command Summary
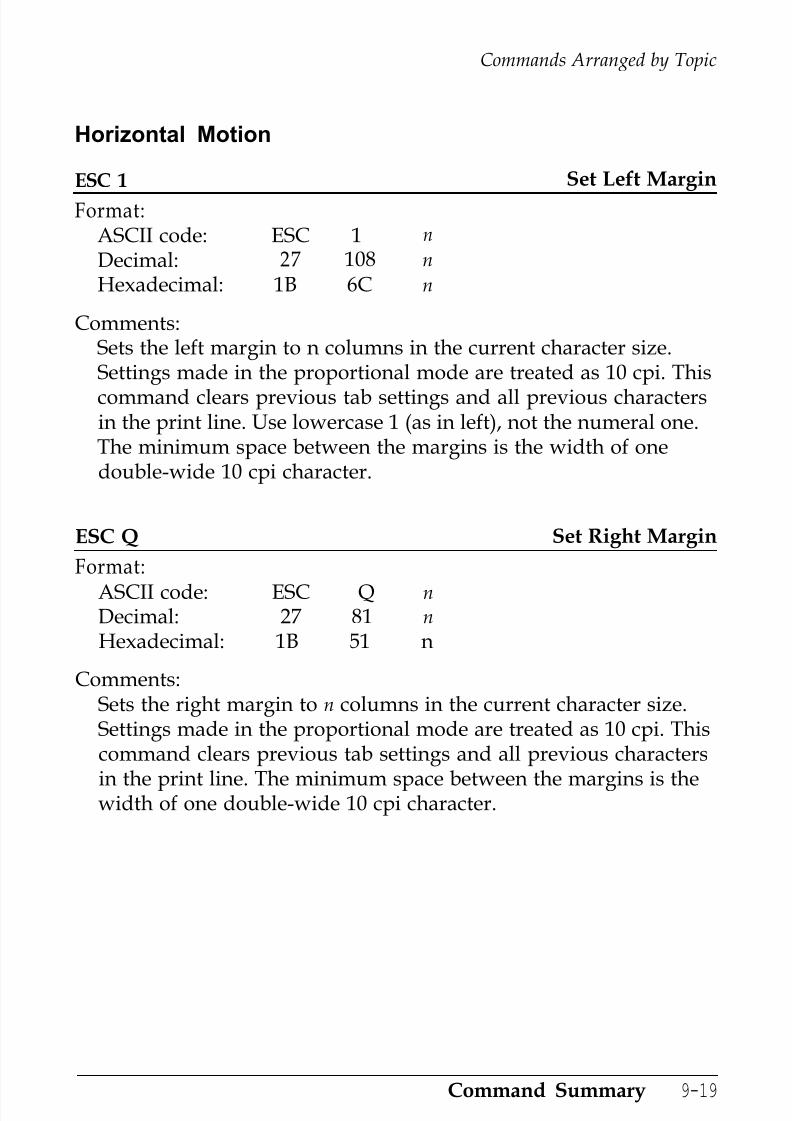
7/21/2019 Epson ActionPrinter 4000 User's Manual
http://slidepdf.com/reader/full/epson-actionprinter-4000-users-manual 243/290
Commands Arranged by Topic
Horizontal Motion
ESC 1 Set Left Margin
Format:ASCII code: ESC 1 n
Decimal: 27 108 n
Hexadecimal: 1B 6C n
Comments:Sets the left margin to n columns in the current character size.Settings made in the proportional mode are treated as 10 cpi. This
command clears previous tab settings and all previous charactersin the print line. Use lowercase 1 (as in left), not the numeral one.The minimum space between the margins is the width of onedouble-wide 10 cpi character.
ESC Q Set Right Margin
Format:
ASCII code: ESC Q nDecimal: 27 81 n
Hexadecimal: 1B 51 n
Comments:Sets the right margin to n columns in the current character size.Settings made in the proportional mode are treated as 10 cpi. Thiscommand clears previous tab settings and all previous characters
in the print line. The minimum space between the margins is thewidth of one double-wide 10 cpi character.
Command Summary 9-19

7/21/2019 Epson ActionPrinter 4000 User's Manual
http://slidepdf.com/reader/full/epson-actionprinter-4000-users-manual 244/290
Commands Arranged by Topic
BS Backspace
Format:
ASCII code: BSDecimal: 8H e x a d e c i m a l : 0 8
Comments:Prints out data in the print buffer, then moves the print positionone space to the left. Backspacing is possible up to, but notbeyond, the left margin setting. The BS code is ignored if ESC a2or ESC a3 has been sent.
ESC $ Set Absolute Print Position
Format:ASCII code: ESC $ n1 n2
Decimal: 27 36 n1 n2
Hexadecimal: 1B 24 n1 n2
Comments:This sequence specifies the distance from the current left marginthat subsequent characters are to be printed, using this formula:total number of dots = n1 + (n2 x 256). Each unit equals 1/60th ofan inch. The sequence is ignored and the previous setting remainseffective if the position specified is beyond the right margin.
9-20 Command Summary

7/21/2019 Epson ActionPrinter 4000 User's Manual
http://slidepdf.com/reader/full/epson-actionprinter-4000-users-manual 245/290
Commands Arranged by Topic
ESC \ Set Relative Print Position
Format:
ASCII code: ESC \ n1 n2Decimal: 27 92 n1 n2
Hexadecimal: 1B 5C n1 n2
Comments:Determines the position (relative to the current position) at whichprinting of subsequent data will start. To find n1 and n2, firstcalculate the displacement required in dots. If the displacement isto the left, subtract it from 65536. Send the resulting number
using this formula: total number of dots = n1 + (256 x n2). Thecommand is ignored if it would move the print position outsidethe current margins. A unit is 1/120th of an inch in draft, and1/180th of an inch in Letter Quality or proportional modes.
HT
Format:
ASCII code: HTDecimal: 9H e x a d e c i m a l : 0 9
Tab Horizontally
Comments:Advances the print position to the next horizontal tab setting. Thedefault tabs are at 8-character intervals in the currently set pitch.Tab positions are not affected by subsequent changes in cpi.
Command Summary 9-21

7/21/2019 Epson ActionPrinter 4000 User's Manual
http://slidepdf.com/reader/full/epson-actionprinter-4000-users-manual 246/290
Commands Arranged by Topic
ESC D Set Horizontal Tabs
Format:
ASCII code: ESC D n1 n2 . . . 0Decimal: 27 68 n1 n2 . . . 0Hexadecimal: 1 B 44 n1 n2 . . . 00
Comments:This command allows setting of up to 32 horizontal tabs, whichare entered as n1, n2, n3, etc., (from 1 to 255) with the number 0character terminating the command. The tab settings must beentered in ascending order. ESC D 0 clears all tabs. The default
settings, when power is turned on or after an ESC @ command,are at every eight characters. The tab settings are not affected bychanges in cpi. The tab positions in proportional printing aredetermined by the 10 cpi character size.
Overall Printing Style
ESC x Select Letter Quality or Draft
Format:ASCII code: ESC nDecimal: 27 120 nHexadecimal: 1B 78 n
Comments:The following values can be used for n:
0: Selects draft mode.1: Selects Letter Quality (LQ) mode.
Overrides the SelecType panel setting.
9-22 Command Summary

7/21/2019 Epson ActionPrinter 4000 User's Manual
http://slidepdf.com/reader/full/epson-actionprinter-4000-users-manual 247/290
Commands Arranged by Topic
ESC k
Format:
ASCII code: ESC k nDecimal: 27 107 n
Hexadecimal: 1B 6B n
Select Typestyle Family
Comments:This command affects only the Letter Quality typestyle, not draft.If n = 0, typestyle in the printer is used. To select one of the othertypestyles, use the family number of the font as shown below. Forexample, to choose the Prestige font, use 3 for the value of n. The
following values can be used for n:0: Roman 5: OCR-B1: Sans Serif 6: OCR-A2: Courier 7: Orator3: Prestige 8: Orator-S4: Script
Typestyle families 2 to 8 are available only if the appropriate font
module is installed, such as the Multi-Font Module.Overrides the SelecType panel setting and DIP switch fontsetting.
ESC ! Master Select
Format:ASCII code: ESC ! n
Decimal: 27 33 nHexadecimal: 1B 21 n
Comments:Selects any valid combination of the following modes: 10 cpi, 12cpi, proportional, condensed, emphasized, double-strike, double-wide, italic, and underline. For details on how to set n, see theSelecting Typestyles With Master Select section in Chapter 4.
Command Summary 9-23
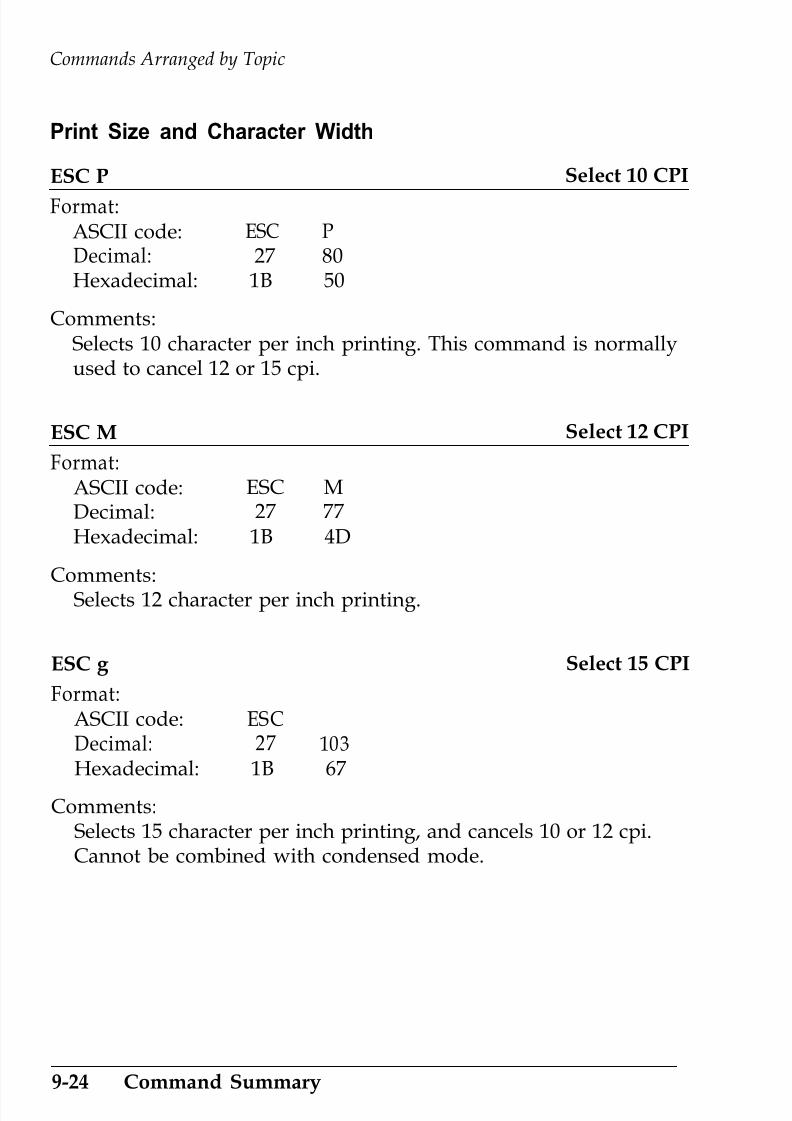
7/21/2019 Epson ActionPrinter 4000 User's Manual
http://slidepdf.com/reader/full/epson-actionprinter-4000-users-manual 248/290
Commands Arranged by Topic
Print Size and Character Width
ESC P
Format:ASCII code: ESC PDecimal: 27 80Hexadecimal: 1B 50
Select 10 CPI
Comments:Selects 10 character per inch printing. This command is normallyused to cancel 12 or 15 cpi.
ESC M
Format:ASCII code: ESC MDecimal: 27 77Hexadecimal: 1B 4D
Select 12 CPI
Comments:Selects 12 character per inch printing.
ESC g
Format:ASCII code: ESCDecimal: 27 103Hexadecimal: 1B 67
Select 15 CPI
Comments:Selects 15 character per inch printing, and cancels 10 or 12 cpi.Cannot be combined with condensed mode.
9-24 Command Summary

7/21/2019 Epson ActionPrinter 4000 User's Manual
http://slidepdf.com/reader/full/epson-actionprinter-4000-users-manual 249/290
Commands Arranged by Topic
ESC p Turn Proportional Mode On/Off
Format:
ASCII code: ESC nDecimal: 27 1 1 2 nHexadecimal: 1B 70 n
Comments:Turns proportional mode on and off.The following values can be used for n:1: Turns mode on.0: Turns mode off.
The width of proportional characters varies from character tocharacter. Therefore, a narrow letter like i receives less space thana wide letter like W. Proportional character widths are given inthe Appendix. This command overrides the condensed mode andfixed cpi fonts. When proportional is cancelled, the previouslyselected font is used. Graphic characters are printed in fixed cpionly; proportional mode is only available in Roman and Sans
Serif fonts.
SI Select Condensed Mode
Format:ASCII code: SIDecimal: 15H e x a d e c i m a l : O F
Comments:Prints characters at about 60 percent of their normal width. Forexample, the condensed 10 cpi mode has 17 characters per inch.Proportional characters override the condensed mode.Condensed mode cannot be combined with 15 cpi. Condensedcan be turned on and off by SelecType, the SI command, or DIPswitch 1-6.
Command Summary 9-25

7/21/2019 Epson ActionPrinter 4000 User's Manual
http://slidepdf.com/reader/full/epson-actionprinter-4000-users-manual 250/290
Commands Arranged by Topic
ESC SI Select Condensed Mode
Format:
ASCII code: ESC SIDecimal: 27 15Hexadecimal: 1B 0F
Comments:Duplicates the SI command and the function of the condensedbutton on the control panel.
DC2 Cancel Condensed ModeFormat:
ASCII code: DC2Decimal: 18H e x a d e c i m a l : 1 2
Comments:Cancels condensed mode set by SI, ESC SI, or SelecType and
returns printing to normal.
soFormat:
ASCII code: SODecimal: 14H e x a d e c i m a l : 0 E
Select Double-wide Mode (one line)
Comments:Doubles the width of all characters on one line. This mode iscancelled by LF, FF, VT, or DC4.
9-26 Command Summary

7/21/2019 Epson ActionPrinter 4000 User's Manual
http://slidepdf.com/reader/full/epson-actionprinter-4000-users-manual 251/290
Commands Arranged by Topic
ESC SO Select Double-wide Mode (one line)
Format:
ASCII code: ESC SODecimal: 27 14Hexadecimal: 1B 0E
Comments:Duplicates the SO command.
ESC W Turn Double-wide Mode On/Off
Format:ASCII code: ESC W n
Decimal: 27 87 n
Hexadecimal: 1B 57 n
Comments:Doubles the width of all characters.The following values can be used for n:
1: Turns mode on.0: Turns mode off.
DC4
Format:ASCII code: DC4Decimal: 20
H e x a d e c i m a l : 1 4
Cancel Double-wide Mode (one line)
Comments:Cancels double-wide mode selected by SO or ESC SO, but notdouble-wide mode selected by ESC W or ESC !.
Command Summary 9-27
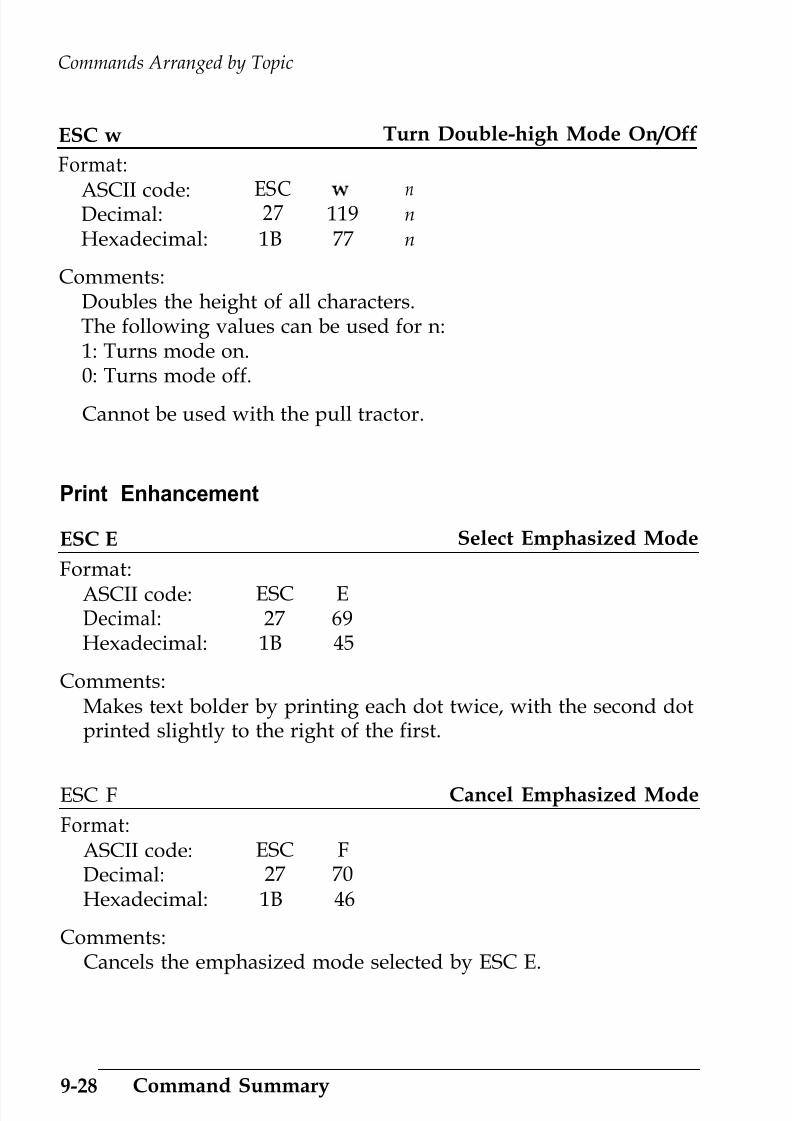
7/21/2019 Epson ActionPrinter 4000 User's Manual
http://slidepdf.com/reader/full/epson-actionprinter-4000-users-manual 252/290
Commands Arranged by Topic
ESC w Turn Double-high Mode On/Off
Format:
ASCII code: ESC nDecimal: 27 119 n
Hexadecimal: 1B 77 n
Comments:Doubles the height of all characters.The following values can be used for n:1: Turns mode on.0: Turns mode off.
Cannot be used with the pull tractor.
Print Enhancement
ESC E
Format:
ASCII code: ESC EDecimal: 27 69Hexadecimal: 1B 45
Select Emphasized Mode
Comments:Makes text bolder by printing each dot twice, with the second dotprinted slightly to the right of the first.
ESC F
Format:ASCII code: ESC FDecimal: 27 70Hexadecimal: 1B 46
Cancel Emphasized Mode
Comments:Cancels the emphasized mode selected by ESC E.
9-28 Command Summary

7/21/2019 Epson ActionPrinter 4000 User's Manual
http://slidepdf.com/reader/full/epson-actionprinter-4000-users-manual 253/290
Commands Arranged by Topic
ESC G Select Double-strike Mode
Format:
ASCII code: ESC GDecimal: 27 71Hexadecimal: 1B 47
Comments:Makes text bolder by printing each line twice, with the secondprinting slightly below the first.
ESC H Cancel Double-strike ModeFormat:
ASCII code: ESC HDecimal: 27 72Hexadecimal: 1B 48
Comments:Cancels the double-strike mode selected by ESC G.
ESC S0 Select Superscript Mode
Format:ASCII code:Decimal:Hexadecimal:
ESC S 027 83 01B 53 00
Comments:
Prints characters about two-thirds of the normal character heightin the upper part of the character space.
Command Summary 9-29

7/21/2019 Epson ActionPrinter 4000 User's Manual
http://slidepdf.com/reader/full/epson-actionprinter-4000-users-manual 254/290
Commands Arranged by Topic
ESC S1 Select Subscript Mode
Format:
ASCII code: ESC S 1Decimal: 27 83 1Hexadecimal: 1B 53 01
Comments:Prints characters about two-thirds of the normal character heightin the lower part of the character space.
ESC T Cancel Superscript/Subscript ModeFormat:
ASCII code: ESC TDecimal: 27 84Hexadecimal: 1B 54
Comments:Cancels either superscript or subscript.
9-30 Command Summary

7/21/2019 Epson ActionPrinter 4000 User's Manual
http://slidepdf.com/reader/full/epson-actionprinter-4000-users-manual 255/290
Commands Arranged by Topic
ESC(- Select Score
Format:
ASCII code: ESC ( - n1 n2 m d1 d2Decimal: 27 40 45 n1 n2 m d1 d2
H e x a d e c i m a l : 1 B 28 2D n1 n2 m d1 d2
Comments:Use decimal or hexadecimal values for all variables, not ASCIIcharacters.Use the following values for the first 3 variables:n1 must be 3.n2 must be 0.m must be 1.
The value of d1 determines the location of the score:d1 = 1 for underline.d1 = 2 for strike-through.d1 = 3 for overscore.
The value of d2 determines whether the score line is single,double, broken, or continuous:d2 = 0 Cancel the score line selected by d1.
d2 = 1 Single continuous line.d2 = 2 Double continuous line.d2 = 5 Single broken line.d2 = 6 Double broken line.
Command Summary 9-31

7/21/2019 Epson ActionPrinter 4000 User's Manual
http://slidepdf.com/reader/full/epson-actionprinter-4000-users-manual 256/290
Commands Arranged by Topic
ESC - Turn Underline Mode On/Off
Format:
ASCII code: ESC - nDecimal: 27 45 nHexadecimal: 1B 2D n
Comments:This mode provides continuous underlining including spaces.The following values can be used for n:1: Turns mode on.0: Turns mode off.
Areas skipped with HT or ESC $ are not underlined.
ESC q
Format:ASCII code: ESC n
Decimal: 27 113 n
Hexadecimal: 1B 71 n
Select Character Style
Comments:The following values can be used for n:
0: Selects normal.1: Selects outline.2: Selects shadow.3: Selects outline with shadow.
This command is valid for all characters, with the exception ofcharacter codes B0H to DFH, F4H, and F5H (176 to 223, 244, and245 decimal) in the Epson Extended Graphics character table.
9-32 Command Summary

7/21/2019 Epson ActionPrinter 4000 User's Manual
http://slidepdf.com/reader/full/epson-actionprinter-4000-users-manual 257/290
Commands Arranged by Topic
Word Processing
ESC a Select Justification
Format:ASCII code: ESC n
Decimal: 27 97 n
Hexadecimal: 1B 61 n
Comments:Sets the type of justification.The following values can be used for n:
0: Selects left justification.1: Selects centering.2: Selects right justification.3: Selects full justification.
The default setting is n = 0. Full justification (n = 3) is performedwhen the buffer becomes full; HT and BS are invalid except inn = 0 mode. For n = 3 there must be no carriage returns within a
paragraph.
ESC SP (space)
Format:ASCII code: ESC SP n
Decimal: 27 32 n
Hexadecimal: 1B 20 n
Set Intercharacter Space
Comments:Sets the amount of space added to the right of each character, inaddition to the space already allowed in the design of thecharacter. The number of dots is determined by n, which shouldbe from 0 to 127. Each unit of space is 1/120th of an inch in draftmode and 1/180th of an inch in Letter Quality and proportionalmodes.
Command Summary 9-33

7/21/2019 Epson ActionPrinter 4000 User's Manual
http://slidepdf.com/reader/full/epson-actionprinter-4000-users-manual 258/290
Commands Arranged by Topic
Character Tables
ESC t Select Character Table
Format:ASCII code: ESC t nDecimal: 27 116 nHexadecimal: 1B 74 n
Comments:Selects the character table used by codes 128 to 255. SelectingEpson Extended Graphics characters does not disable italic
printing. Italic printing can still be selected by ESC 4. Thefollowing values can be used for n:0: Selects italics character table.1: Selects Epson Extended Graphics character table.2: Selects user-defined character table and remaps user-defined0-127 to 128-255.
Overrides the function of DIP switch 1-7. Note that the value of n
must equal 00 hex, 01 hex, or 02 hex.
ESC 4 Select Italic Mode
Format:ASCII code: ESC 4Decimal: 27 52Hexadecimal: 1B 34
Comments:Causes characters from the italic character table to be printed.This command is valid even if the Epson Extended Graphicscharacter set has been selected by ESC t or by DIP switch 1-7, butthe character graphics are not italicized.
9-34 Command Summary

7/21/2019 Epson ActionPrinter 4000 User's Manual
http://slidepdf.com/reader/full/epson-actionprinter-4000-users-manual 259/290
Commands Arranged by Topic
ESC 5
Format:
ASCII code: ESC 5Decimal: 27 53Hexadecimal: 1B 35
Comments:Cancels the mode selected by ESC 4.
Cancel Italic Mode
ESC R Select an International Character Set
Format:ASCII code: ESC R nDecimal: 27 82 nHexadecimal: 1B 52 n
Comments:Selects one of the international character sets.The following values can be used for n:
0 = U S A 8 = Japan1 = France 9 = Norway2 = Germany 10 = Denmark II3 = England 11 = Spain II4 = Denmark I 12 = Latin America5 = Sweden 13 = Korea6 = Italy 64 = Legal7 = Spain I
Overrides the DIP switch settings of the international character set.
Command Summary 9-35

7/21/2019 Epson ActionPrinter 4000 User's Manual
http://slidepdf.com/reader/full/epson-actionprinter-4000-users-manual 260/290
Commands Arranged by Topic
User-defined Characters
See Chapter 4 for sample programs and full information on this
topic.
ESC & Define User-defined Characters
Format:ASCII code: ESC & 0 n1 n2 d1
Decimal: 27 38 0 n1 n2 d1
H e x a d e c i m a l : 1 B 26 00 n1 n2 d1
Comments:
d2 datad2 datad2 data
This command allows characters to be redefined in the currentlyselected mode.
When defining characters, DIP switch 2-5 must be set to off.
ESC : Copy ROM to RAM
Format:
ASCII code: ESC : 0 n 0Decimal: 27 58 0 n 0Hexadecimal: 1B 3A 00 n 00
Comments:This sequence copies the characters in ROM to RAM so thatspecific characters can be redefined. The variable n representsthe font family. Fonts in font cartridges (except Orator and
Orator-S) can also be copied. Your printer cannot select fonts2 to 6 if you do not have the multi-font cartridge.0: Roman 4: Script1: Sans Serif 5: OCR-B2: Courier 6: OCR-A3: Prestige
9-36 Command Summary

7/21/2019 Epson ActionPrinter 4000 User's Manual
http://slidepdf.com/reader/full/epson-actionprinter-4000-users-manual 261/290
Commands Arranged by Topic
ESC % Select User-defined Set
Format:
ASCII code: ESC % nDecimal: 27 37 n
Hexadecimal: 1B 25 n
Comments:This sequence is used to print the user-defined (download)character set. ESC & is required to define the character set. Thefollowing values can be used for n:0: Selects the normal set.1: Selects the user-defined set.
ESC 6 Enable Printable Characters
Format:ASCII code: ESC 6Decimal: 27 54Hexadecimal: 1B 36
Comments:When the Epson Extended Graphics character table is selected,ESC 6 enables the printing of codes 128 through 159 (decimal) ascharacters, not control codes. See the Appendix for charactersprinted.
ESC 7
Format:ASCII code: ESC 7Decimal: 27 55Hexadecimal: 1B 37
Enable Upper Control Codes
Comments:When the Epson Extended Graphics character table is selected,ESC 7 causes codes 128 through 159 to be treated as control codes.
This is the default.
Command Summary 9-37

7/21/2019 Epson ActionPrinter 4000 User's Manual
http://slidepdf.com/reader/full/epson-actionprinter-4000-users-manual 262/290
Commands Arranged by Topic
Graphics
See Chapter 4 for sample graphics programs. See the table under
ESC * for graphics modes.
ESC K Select Single-density Graphics Mode
Format:ASCII code: ESC K n1 n2
Decimal: 27 75 n1 n2
Hexadecimal: 1B 4B n1 n2
Comments:Turns on 8-pin, single-density graphics mode. The total numberof columns = n1 + (n2 x 256).
ESC L Select Double-density Graphics Mode
Format:ASCII code: ESC L n1 n2
Decimal: 27 76 n1 n2Hexadecimal: 1B 4C n1 n2
Comments:Turns on 8-pin, low-speed, double-density graphics mode. Thetotal number of columns = n1 + (n2 x 256).
ESC Y Select High-speed Double-density Graphics Mode
Format:ASCII code: ESC Y n1 n2Decimal: 27 89 n1 n2Hexadecimal: 1B 59 n1 n2
Comments:Turns on 8-pin, high-speed, double-density graphics mode. Thetotal number of columns = n1 + (n2 x 256).
9-38 Command Summary
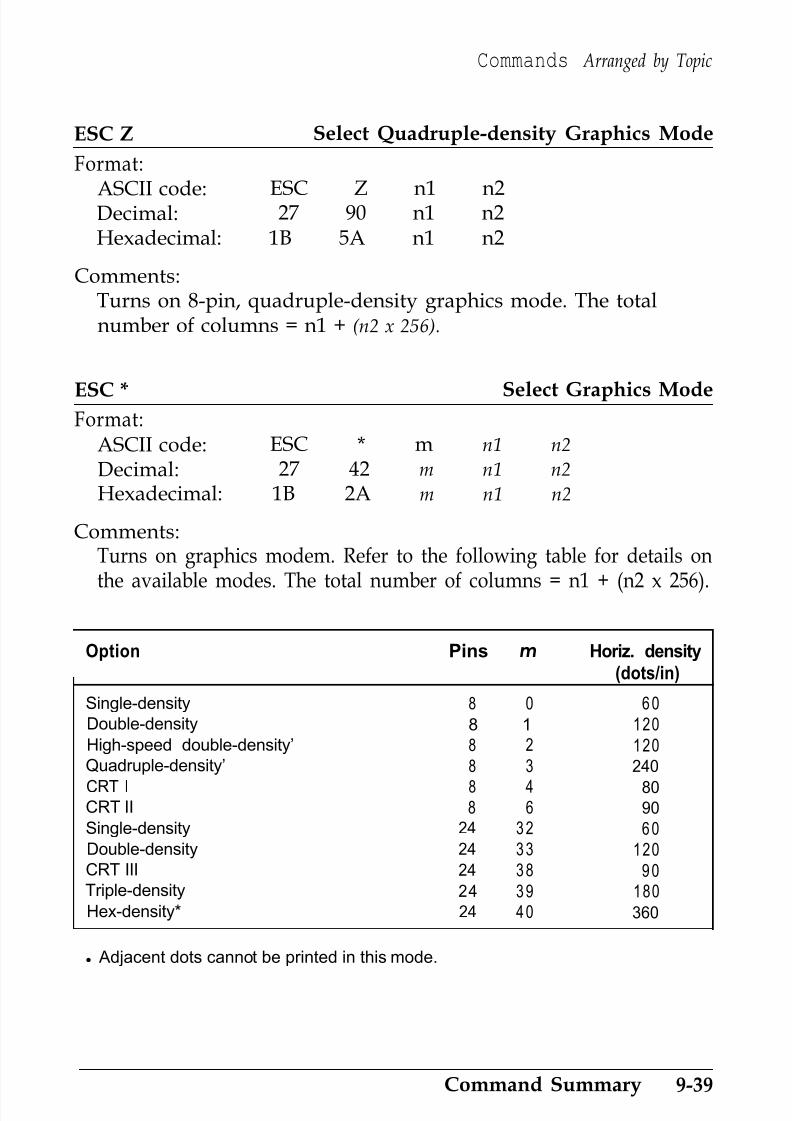
7/21/2019 Epson ActionPrinter 4000 User's Manual
http://slidepdf.com/reader/full/epson-actionprinter-4000-users-manual 263/290
Commands Arranged by Topic
ESC Z Select Quadruple-density Graphics Mode
Format:
ASCII code: ESC Z n1 n2Decimal: 27 90 n1 n2Hexadecimal: 1B 5A n1 n2
Comments:Turns on 8-pin, quadruple-density graphics mode. The totalnumber of columns = n1 + (n2 x 256).
Select Graphics ModeESC *Format:
ASCII code: ESC * m n1 n2
Decimal: 27 42 m n1 n2
Hexadecimal: 1B 2A m n1 n2
Comments:Turns on graphics modem. Refer to the following table for details on
the available modes. The total number of columns = n1 + (n2 x 256).
Option Pins m Horiz. density
(dots/in)
Single-densityDouble-densityHigh-speed double-density’Quadruple-density’
CRT ICRT IISingle-densityDouble-densityCRT IIITriple-densityHex-density*
8 0 608 1 1208 2 1208 3 240
8 4 808 6 90
24 32 6024 33 12024 38 9024 39 18024 40 360
l Adjacent dots cannot be printed in this mode.
Command Summary 9-39

7/21/2019 Epson ActionPrinter 4000 User's Manual
http://slidepdf.com/reader/full/epson-actionprinter-4000-users-manual 264/290
Commands Arranged by Topic
ESC ? Reassign Graphics Mode
Format:
ASCII code: ESC ? S mDecimal: 27 63 s mHexadecimal: 1B 3F s m
Comments:Changes from one graphics mode to another. The variable s is acharacter (K, L, Y or Z).
The variable m corresponds to the mode m in the ESC * command.
9-40 Command Summary
7/21/2019 Epson ActionPrinter 4000 User's Manual
http://slidepdf.com/reader/full/epson-actionprinter-4000-users-manual 265/290
Appendix
Proportional Width Table . . . . . . . . . . . . . . . . . . . . . . . . . . . A-2
Character Tables . . . . . . . . . . . . . . . . . . . . . . . . . . . . . . . . . . . A-6
A- l

7/21/2019 Epson ActionPrinter 4000 User's Manual
http://slidepdf.com/reader/full/epson-actionprinter-4000-users-manual 266/290
Proportional Width Table
This table lists the widths of your printers proportional characters.The values given are in 360ths of an inch. (For example, a value of36 is 36/360ths of an inch.) You may need to enter these widths intoa special table for your processing program so it can calculate thenumber of proportional characters that will fit on a line.
The characters with no code indicated are international characters orgraphics. See the table in Chapter 3 for the relevant codes for the
international characters. Also, see the descriptions of the ESC R andESC t commands in Chapter 10 for information on how to use thesecharacters.
The following width table shows each character, its ASCII code(hexadecimal), and its width. If there are two numbers in the widthcolumn, the second one is for the superscript/subscript version ofthe character.
Code
20
21
22
23
24
25
26
27
28
29
2A
2B
2C
2D
2E
2F
CHR
1
11
#
$%
&
;
)*
+
,
i
Width Code
30/20 30
18/12 31
30/20 32
30/20 33
30/20 34
36/24 35
36/24 36
18/12 37
24/16 38
24/16 39
30/20 3A
30/20 3B
18/12 3C
30/20 3D
18/12 3E
30/20 3F
CHR
01
23456789...
=
>
?
Width
30/20
30/20
30/20
30/20
30/20
30/20
30/20
30/20
30/20
30/20
18/12
18/12
30/20
30/20
30/20
30/20
A-2
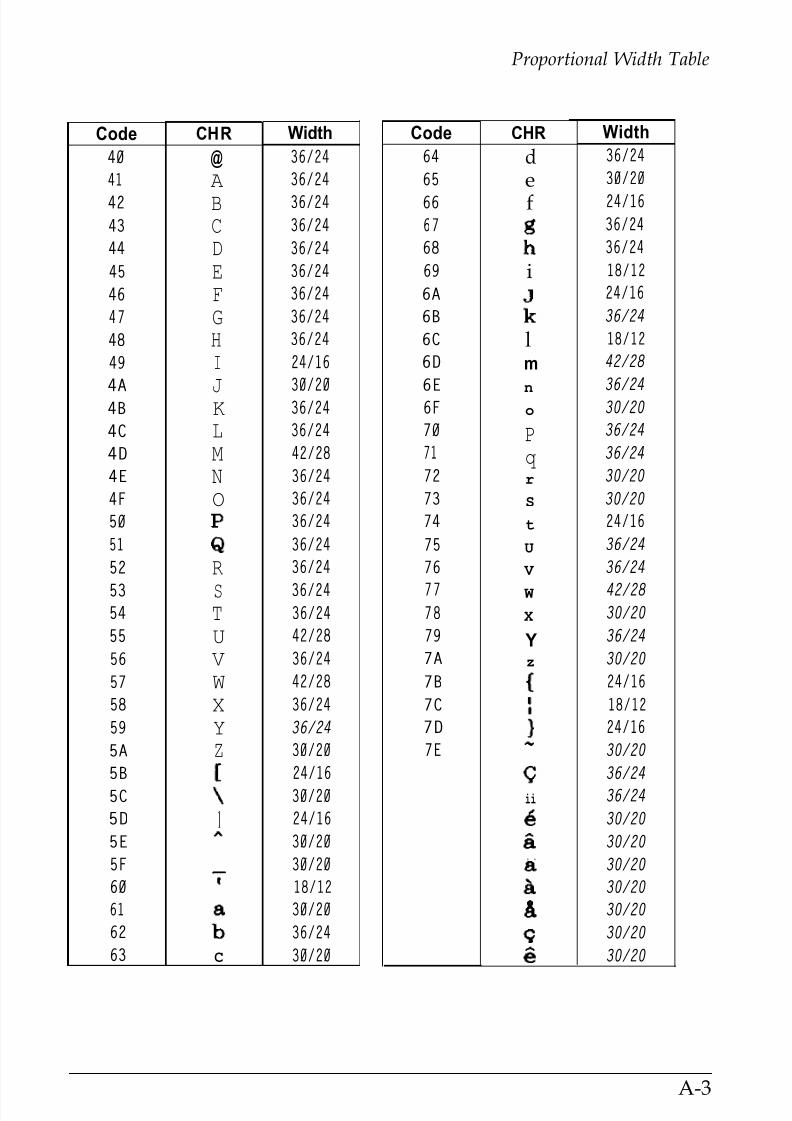
7/21/2019 Epson ActionPrinter 4000 User's Manual
http://slidepdf.com/reader/full/epson-actionprinter-4000-users-manual 267/290
Proportional Width Table
Code
40
41
42
43
44
45
46
47
48
49
4A4B
4C
4D
4E
4F
50
51
52
53
54
55
56
57
58
59
5A
5B
5C
5D
5E
5F
60
61
62
63
CHR
@
A
BCDEFGHI
JKLMNO
:
R
STUVWXYZ
:
1
C
Width
36/24
36/24
36/24
36/24
36/24
36/24
36/24
36/24
36/24
24/16
30/20
36/24
36/24
42/28
36/24
36/24
36/24
36/24
36/24
36/24
36/24
42/28
36/24
42/28
36/24
36/24
30/20
24/16
30/20
24/16
30/20
30/20
18/12
30/20
36/24
30/20
Code
64
65
66
67
68
69
6A
6B
6C
6D
6E6F
70
71
72
73
74
75
76
77
78
79
7A
7B
7C
7D
7E
CHR
def
i
lm
no
Pqr
S
t
U
V
W
X
Yz
G
ii
6
d
. .
Q
F
Q
Width
36/24
30/20
24/16
36/24
36/24
18/12
24/16
36/24
18/12
42/28
36/24
30/20
36/24
36/24
30/20
30/20
24/16
36/24
36/24
42/28
30/20
36/24
30/20
24/16
18/12
24/16
30/20
36/24
36/24
30/20
30/20
30/20
30/20
30/20
30/20
30/20
A-3
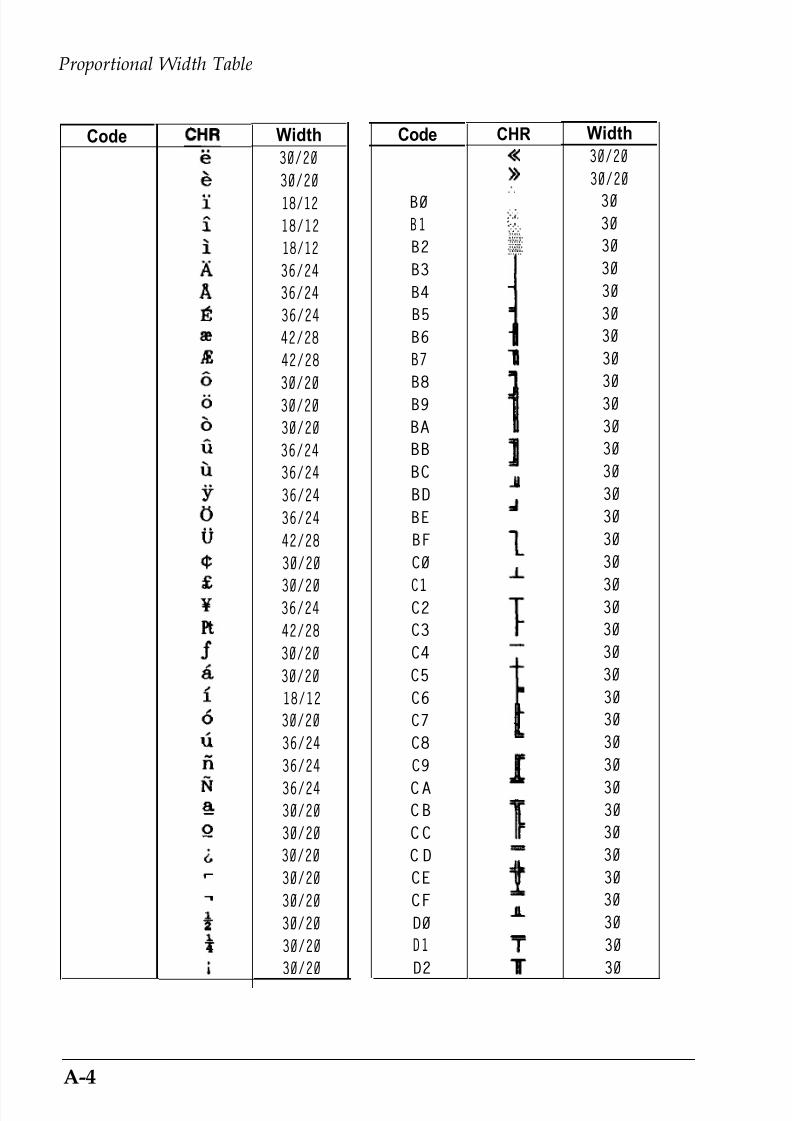
7/21/2019 Epson ActionPrinter 4000 User's Manual
http://slidepdf.com/reader/full/epson-actionprinter-4000-users-manual 268/290
Proportional Width Table
Code Width
30/20
30/20
18/12
18/12
18/12
36/24
36/24
36/24
42/28
42/28
30/20
30/20
30/20
36/24
36/24
36/24
36/24
42/28
30/20
30/2036/24
42/28
30/20
30/20
18/12
30/20
36/24
36/24
36/24
30/20
30/20
30/20
30/20
30/20
30/20
30/20
30/20
Code
B0
B1
B2
B3
B4
B5
B6
B7
B8
B9
BA
BB
BC
BD
BE
BF
C0
C1C2
C3
C4
C5
C6
C7
C8
C9
CACB
CC
CD
CE
CF
D0
D1
D2
CHR
>
:
:..:.
. :; :: : :
iv:.:.
.: zi:
:.x:
I
II
J
;
i
f
n
f
lr
Width
30/20
30/20
30
30
30
30
30
30
30
30
30
30
30
30
30
30
30
30
30
3030
30
30
30
30
30
30
30
30
30
30
30
30
30
30
30
30
A-4

7/21/2019 Epson ActionPrinter 4000 User's Manual
http://slidepdf.com/reader/full/epson-actionprinter-4000-users-manual 269/290
Proportional Width Table
- -CodeD3
D4
D5
D6
D7
D8
D9
DA
DB
DC
DD
DE
DF
E0
E1
E2
E3
E4
E5
E6E7
E8
E9
EA
EB
EC
ED
EE
EF
F0
F1
F2
F3
F4
F5
F6
F7
Width30
30
30
30
30
30
30
30
30
30
30
30
30
30/20
30/20
30/20
30/20
30/20
30/20
30/2030/20
30/20
30/20
30/20
30/20
30/20
30/20
30/20
30/20
30
30
30
30
30
30
30
30
Code
F8
F9
FA
FB
FC
FD
FE
CHR0
.
a
2
I
13
00. .
8
Width30
30
30
30
30
30
30
24/16
30/20
36/24
36/24
30/20
30/20
30/20
A-5

7/21/2019 Epson ActionPrinter 4000 User's Manual
http://slidepdf.com/reader/full/epson-actionprinter-4000-users-manual 270/290
Character Tables
These character tables are selected by DIP switch 1-7 or the ESC tsoftware command. For the Epson Extended Graphics charactertable, use of the ESC 6 or ESC 7 software command lets you selectwhether to print hex codes 80 to 9F as characters (ESC 6) or controlcodes (ESC 7).
Italic Character Table
CODE 0 1 2 3 4 5 6 7 8 9 A B C D E F
0 0 @ P ' p p tp
1 1.lAQaq ! 1 A Q a q
2 " 2 B R b r " 2 B R b r
3 # 3 C S c s # 3 C S c s
4 $ 4 D T d t $ 4 D T d t
5 % 5 E U e u % 5 E U e u
6 & 6 F V f v & G F V f v
7 ,
7 G W g w 7 G W g w
8 ( 8 H X h x ( 8 H X h x
9 ) 9 I Y i y ) 9 I Y i y
A * : J Z j z * : J Z j z
B+ ; K [ k {
+ ; K [ k {C ,
CL\11 , < L \ 1
D -=Mlm)
-=M]m)
E . > N ^ n ~ , > N ^ n ~
F
TO 0
?O 0
A-6

7/21/2019 Epson ActionPrinter 4000 User's Manual
http://slidepdf.com/reader/full/epson-actionprinter-4000-users-manual 271/290

7/21/2019 Epson ActionPrinter 4000 User's Manual
http://slidepdf.com/reader/full/epson-actionprinter-4000-users-manual 272/290
Glossary
Note that these definitions apply specifically to printers. If a word isitalicized, see that topic for more information.
application programA software program that helps you carry out a particular task, suchas word processing or financial planning.
ASCIIAcronym for the American Standard Code for InformationInterchange. A standardized coding system for assigning numericalcodes to letters and symbols.
auto line feedWhen this feature is enabled using a DIP switch or external controlthrough the parallel connector, the printer will automatically feedthe paper one line after receiving a CR code.
baud rateA measure of the speed of data transmission. Usually expressed inbits per second or bps.
bidirectional printing Printing in which the print head alternates printing a line left toright then the next line right to left, and so on. Because the head
prints in both directions, the overall printing speed increases byeliminating wasted (non-printing) movement.
binarySee number systems.
bitA binary digit (0 or 1), which is the smallest unit of informationused by a printer or computer. See also number systems.
bufferSee input buffer and memory.
Glossary 1

7/21/2019 Epson ActionPrinter 4000 User's Manual
http://slidepdf.com/reader/full/epson-actionprinter-4000-users-manual 273/290
byteA unit of information consisting of eight bits.
carriage return (CR)The control code that returns the print position to the left margin.When issued together with a line feed, the print position moves tothe left margin of the next line. In bidirectional printing, the printhead may not physically move to the left margin.
character setA collection of letters, numbers, and symbols that provides you with
the characters used in a particular language.condensedPrinting in which each character is approximately 60 percent of thewidth of standard characters. For example, condensed 10 charactersper inch (cpi) has 17 characters per inch. Useful for fitting widetables or spreadsheets onto the paper.
continuous paper
Paper which has sprocket-feed holes on both long edges, isperforated between pages, and is supplied in a folded stack. Alsocalled fanfold paper.
control codeIn addition to the codes for printable characters, the ASCII standardalso includes 33 other codes which are called control codes. Thesecontrol codes perform such functions as sounding the beeper andperforming a carriage return or line feed.
cut sheet feeder (CSF)An optional, detachable device which automatically feeds singlesheets of paper into the printer.
data dumpSometimes called hex dump. A troubleshooting feature. When theprinter is in the data dump mode, each code that it receives isprinted in hexadecimal notation.
2 Glossary

7/21/2019 Epson ActionPrinter 4000 User's Manual
http://slidepdf.com/reader/full/epson-actionprinter-4000-users-manual 274/290
decimalSee number systems.
defaultA value or setting that takes effect when the equipment is turned on,reset, or initialized.
DIP switchesSmall switches in a printer that control various printer functions andset the default status of the printer when it is turned on orinitialized. DIP stands for Dual In-line Package.
dot graphicsA graphic design formed by patterns of dots. Also called bit imagegraphics.
dot matrixA method of printing in which each letter or symbol is formed by apattern (matrix) of individual dots.
double-high printing
Printing in which each character is twice as tall as normal.
double-strike printing A way of producing bolder characters. Each character is printedtwice; the second time, the dots are printed slightly below theoriginal dots. Can only be used in draft mode.
double-wide printing A print width in which each character is twice as wide as normalcharacters. (The cpi is halved.)
draft modeOne of two print qualities available on your printer. Draft usesfewer dots per character for high-speed printing. See also Letter Quality.
emphasized printing A way of producing darker characters. In a single pass of the printhead, characters receive twice the number of dots.
Glossary 3

7/21/2019 Epson ActionPrinter 4000 User's Manual
http://slidepdf.com/reader/full/epson-actionprinter-4000-users-manual 275/290
Epson Extended Graphics character tableThe Epson Extended Graphics character table contains international
accented characters, Greek characters, and character graphics forprinting lines, corners, and shaded areas.
ESC (escape) codeA special control code used to begin most printer commands.
ESC/PAbbreviation for Epson Standard Code for Printers. The system ofcommands lets you perform software control of your printer from
your computer. It is standard for all Epson printers and supportedby most application software for personal computers.
fontA font is a style of type designated by a family name.
formIn printer terminology, a form normally refers to a page.
form feedRefers to both a control code and a panel button that advances thepaper to the top of the next page.
hexadecimal (hex)See number systems.
initializeTo establish the initial default status of the printer by turning theprinter on or by sending an INIT signal or code.
input bufferThe memory in the printer in which data sent from the computer isstored while waiting to be printed.
interfaceThe means of connection between the computer and printer. Seealso parallel interface and serial interface.
italicA typestyle in which the characters slant. This sentence is italicized.
4 Glossary

7/21/2019 Epson ActionPrinter 4000 User's Manual
http://slidepdf.com/reader/full/epson-actionprinter-4000-users-manual 276/290
Letter QualityOne of two print qualities available on your printer. Letter Qualityprovides better readability and appearance at a reduced print speed.See also draft mode.
line feedBoth a control code and a panel button that advances the paper oneline space.
loading positionThe position to which the paper is automatically loaded. It can be
adjusted by using the micro-adjustment feature.memoryThe printer, like a computer, has a memory. When you print a filefrom a computer, the contents of the file are transferred quicklyfrom the computer s memory to the printer s memory. The printerthen prints information from its own memory at a much slower rate.This way of printing frees the computer to do other work while theprinter is still working. The printer memory is sometimes called the
buffer memory or input buffer.
micro-adjustmentA feature that adjusts the paper loading and short tear-off positionsby the smallest possible increments.
number systemsThree number systems are commonly used with printers:
decimal is base 10 and uses the digits 0, 1,2,3,4,5,6,7,8, and 9.(This is the most familiar system.)
hexadecimal (hex) is base 16 and uses the digits 0, 1,2,3,4,5,6,7,8,9, A, B, C, D, E, and F. This is frequently used by programmers.Any decimal number between 0 and 255 can be expressed by atwo-digit hex number.
G l o s s a r y 5
7/21/2019 Epson ActionPrinter 4000 User's Manual
http://slidepdf.com/reader/full/epson-actionprinter-4000-users-manual 277/290
binary is base 2 and uses only the digits 0 and 1. All informationin computer systems is handled in binary form represented byelectrical signals that are on or off. A binary digit is often called abit; any decimal number between 0 and 255 can be expressed byan eight-bit binary number.
on lineWhen the printer is on line, it is able to communicate with thecomputer connected to it.
paper-out sensor
A small switch behind the platen that sends a signal when it is notin contact with paper, informing the printer and remote computerthat there is no paper loaded, and causing the PAPER OUT light to goon.
paper tension unitThe part of the printer that fits above the platen to assure properpaper tension in the printing area.
parallel interfaceAn interface that connects the computer and the printer. A parallelinterface transmits data one character or code at a time. See alsoserial interface.
platenThe black roller that provides the backing for the paper duringprinting.
print qualityYour printer has two types of print quality; draft and Letter Quality.Draft is for high-speed, draft quality jobs; Letter Quality is used toproduce more polished documents.
proportional printing Printing in which the character width varies from character tocharacter. For example, a capital W receives much more space than a
lowercase i. The result looks more like a typeset book than atypewritten draft.
6 Glossary

7/21/2019 Epson ActionPrinter 4000 User's Manual
http://slidepdf.com/reader/full/epson-actionprinter-4000-users-manual 278/290
pull tractor unitAn optional device that feeds continuous paper and multi-partforms through the printer.
push tractorA built-in device that feeds continuous paper through the printer.
R A M
Acronym for Random Access Memory. The portion of the printer smemory used as a buffer and as a place for storing user-definedcharacters. All data stored in RAM is lost when the printer is turned
off.resetTo return a printer to its defaults, either by a command, an INITsignal, code, or by turning the printer off and on.
self testA method of checking the operation of the printer. When the selftest is run, the printer prints out its current DIP switch settings and
the characters that are stored in its ROM (Read Only Memory).serial interfaceA serial interface transmits data one bit at a time. See also parallelinterface.
short tear-offA feature that automatically feeds the perforation of continuouspaper to the tear-off position to be removed by the operator, and
then draws the paper back to the loading position. These positionscan be adjusted using the micro-adjustment feature. See also micro-adjustment and loading position.
10 cpiA character spacing of 10 characters per inch. This is often thestandard or default pitch. Also referred to as pica.
tractor
The part of the printer that moves continuous paper through theprinter by its sprockets gripping the holes in continuous paper.
G l o s s a r y 7

7/21/2019 Epson ActionPrinter 4000 User's Manual
http://slidepdf.com/reader/full/epson-actionprinter-4000-users-manual 279/290
12 cpiA character spacing in which each character is slightly narrower
than normal, so that there are 12 characters per inch. Also referredto as elite.
unidirectional printing Printing in one direction only. Allows more precise verticalalignment than bidirectional printing. Often used for printinggraphics.
user-defined characters
Characters that are defined and stored in the printer by the user.Also known as download characters.
8 Glossary

7/21/2019 Epson ActionPrinter 4000 User's Manual
http://slidepdf.com/reader/full/epson-actionprinter-4000-users-manual 280/290
Index
Command descriptions are not indexed here. To locate the pagenumber of a specific command, see Chapter 9 or the QuickReference card.
A
Accented characters, 3-22, -23
Accessories, see Options
Application software, 1-25 Assembling printer, 1-6, -12 Auto line feed, 3-9
B
Buffer capacity, 3-9Buttons, 2-14, 3-3
C
Character designing, 4-20, -31downloading, 4-22, -26fonts, 3-185, -33graphics, 3-22, -23printing, 4-27, -28
sets, international, 3-20, -21size, 3-19, 4-3 -4
software control, 9-22, -40spacing, 4-2, -3, 4-6, -8,
9-24, -25tables, 3-22, -23
Cleaning printer, 6-2, -3Column reservation numbers,
4-14
Command summary, 9-1, -40
Condensed button, 3-4Condensed mode, 3-19, 4-6, -8Configuring application
software, 1-25
Connecting printer, 1-22, -24Continuous paper,
maximum width, 2-6loading, 2-6, -12
Control key table, 9-4Control panel, 3-2, -5
buttons, 3-3, -5lights, 3-2
Cut sheet feeder, 5-2, -16capacity, 8-13installing, 5-24loading paper, 5-5, -7mode, 5-5
removing, 5-15, -16software control, 5-14specifications, 8-13, -14
testing, 5-9, -10using, 5-11, -14
D
Data dump mode, 3-24, -26Default settings, 8-15, -16Diagnostics, printer, 1-13, -21,
3-24, -26, 7-1, -24
Index 1
7/21/2019 Epson ActionPrinter 4000 User's Manual
http://slidepdf.com/reader/full/epson-actionprinter-4000-users-manual 281/290
DIP switches,function descriptions,
3-9, -11, 3-14, 3-20 -23function tables, 3-7, -8setting, 3-6, -9
Dot graphics mode, 4-9, -19,9-38, -40
Double-high mode, 4-3 --4, 9-28Double-strike mode, 4-4, -5,
4-6,-8, 9-29Double-wide mode, 4-3, -4,
4-6, -8, 9-26, -27Downloading user-defined
characters, 4-24 -26, 9-36Draft font, 3-18
E
Emphasized mode, 4-4, -5,
4-6, -8, 9-28Envelopes, 2-26, -27Epson Extended Graphics,
3-22, -23, A-7
F
Font button, 3-4Fonts, see also Multi-Font
Moduledesigning, 4-20, -31downloading, 4-22, -26draft, 3-18letter quality, 3-18selecting, 3-8, 3-17
user-defined, 4-20, -31Form-feed button, 3-18
G
Graphics mode, 4-9, -19
Greek characters, 3-22, -23
H
Help, where to get, Intro-6
I
Indicator lights, 3-2
Initialization, 8-15Input buffer capacity, 3-9Interface boards, 5-3 -2
compatibility, 5-35installation, 5-35, -41interface descriptions,
5-34, -35new serial interface #8143,
5-41, -42International character sets,
3-20, -21Italic character table, 3-22, -23Italic mode, 4-5, 4-6, -8
L
Labels, 2-24, -25Lights, 3-2
Line feed button, 3-3Line feed mode, 3-9
Loading position, 3-12, -13Load/eject button, 2-14, 3-3LQ fonts, 3-18
2 Index

7/21/2019 Epson ActionPrinter 4000 User's Manual
http://slidepdf.com/reader/full/epson-actionprinter-4000-users-manual 282/290
M
Master select, 4-6, -8
Mathematic symbols, 3-22, -23Micro-adjustment, 3-13Moving
printer, 6-10print head, 1-8
Multi-Font Module, 5-28, -33font descriptions, 5-28, -30installation, 5-30, -32
selecting fonts, 5-33Multi-part forms, 2-23Multi-part light, 3-2
O
On line button, 3-3On line light, 3-2Options
see Cut-sheet feeder
see Interface boards
see Multi-Font Modulesee Pull tractor
Outline mode, 4-6, 9-32Overline mode, 4-5, 9-31
PPage length, 3-10Paper
copy capacity, 8-6
length, 8-4, 8-14loading, 2-1, -27printable area, 8-4, -5, 8-14thickness, 8-6, 8-14
weight, 8-6, 8-14width, 8-4, 8-14
Paper guidesingle-sheet paper, 1-10,
2-2, -5, 2-15continuous paper, 2-11
Paper loading position,3-12, -13
Paper release lever, 2-7
Paper thickness lever, 2-20, -23Paper thickness table, 2-22
Paper out light, 3-2Parallel interface, see also
Interface boardsconnecting, 1-22, -24specifications, 8-9, -12
Pin labels, 4-11, -12Platen knob, 1-6, -7Power light, 3-2Printable area,
continuous paper, 8-5envelopes, 2-2, 8-5
labels, 8-4
single-sheet paper, 8-4
Printable columns, 8-3Printer
assembling, 1-6, -12cleaning, 6-2, -3
connecting to computer,1-22, -24connecting to power source,
1-4location for, 1-4, -5software control, 9-8, -22specifications, 8-2, -8testing, 1-13, -21
transporting, 6-10unpacking, 1-2, -3
Index 3

7/21/2019 Epson ActionPrinter 4000 User's Manual
http://slidepdf.com/reader/full/epson-actionprinter-4000-users-manual 283/290
Printer cover, 1-12
Printer stand, 1-5
Print head, 1-8, 4-10 -12Printing direction, 3-9Problems, see Troubleshooting
Proportional spacing, 4-2, -3,4-6, -8, 9-25, A-2 -5
Pull tractor, 5-17, -27installing, 5-17, -18loading paper, 5-19, -23
removing, 5-24, -27Push tractor , 2-6, -18
R
Ready light, 3-2Ribbon cartridge
installing, 1-7 -9replacing, 6-4 -9
specifications, 8-7Roman font, 3-18
S
Sans serif font, 3-18
SelecType options, 3-17, -19,
5-33
Self test, printer, 1-14, -21,
5-9, -10
Serial interface, see Interface
boardsSetting up printer , 1-1, -25Shadow mode, 4-6, 9-32
Short tear-off, 3-14, -16
Single-sheet paper
minimum/maximum width,2-2
loading, 2-2, -5, 2-13, -19
Size, character, 3-19, 4-3, -4Skip over perforation, 3-11Software
configuring, 1-25controlling printer features,
9-1, -40
Spacingcharacters per inch, 4-2, -3
proportional, 4-2, -3, 4-6, -8Special paper, 2-20, -27
Special printing effects, 4-4, -8Specifications, 8-1, -16
cut sheet feeder , 8-13, -14
default settings, 8-15, -16parallel interface, 8-9, -12printer, 8-2, -8
Strike-through mode, 4-5, 9-31Subscript mode, 4-6, 9-29, -30
Superscript mode, 4-6, 9-29, -30
Switches, see DIP switches
T
Tear-off mode, 3-9Technical specifications, see
SpecificationsTesting printer, 1-13, -21,
5-9, -10
Toll-free number, Intro-6
4 Index
7/21/2019 Epson ActionPrinter 4000 User's Manual
http://slidepdf.com/reader/full/epson-actionprinter-4000-users-manual 284/290
Tractor see Pull tractor
see Push tractor
Transporting printer, 6-10Troubleshooting, 7-1, -34
optional accessories,
7-24, -34
paper handling, 7-14, -23power supply, 7-4printing, 7-5, -13
Typestyles, 3-17, -19, 4-6, -8,4-20, -31, see also Fonts
U
Underline mode, 4-5, 4-6 -8,9-31
Unpacking printer, 1-2, -3
V
Ventilation, 1-4
Index 5

7/21/2019 Epson ActionPrinter 4000 User's Manual
http://slidepdf.com/reader/full/epson-actionprinter-4000-users-manual 285/290
EPSON@ qmd-
4 0 0 0
Quick Reference

7/21/2019 Epson ActionPrinter 4000 User's Manual
http://slidepdf.com/reader/full/epson-actionprinter-4000-users-manual 286/290
I
I Control and ESCape Codes by Function
I The following control codes are listed briefly for quick reference. For a more detailedI
explanation, see the page reference in Chapter 9. Variables are not included in this quickreference due to their complexity. For those codes that contain variables, such as
I ESC Q n for setting the right margin, see Chapter 9.
I Printer Operation
Data Control
I ASCII Dec. Hex. Description P g
I CR 13 0D Carriage Return 9-12
I CAN 24 18 Cancel Line 9-12

7/21/2019 Epson ActionPrinter 4000 User's Manual
http://slidepdf.com/reader/full/epson-actionprinter-4000-users-manual 287/290
Horizontal Motion
ASCII Dec.
ESC I 108
Q 81
8
$ 36
Hex.
6C
51
08
24
Description PgSet Left Margin 9-19
Set Right Margin 9-19
Backspace 9-20
Set Absolute Print Position 9-20
9-21ESC \
92
5C
Set Relative Print Position
H T I 9 I 09 Tab Horizontally I 9-21 II I
ESC D
68
44
Set Horizontal Tabs
9-22
Overall Printing Style
ASCII Dec.
ESC x 12 0
ESC k 10 7ESC ! 33
Hex. Description Pg78 Select Letter Quality or Draft 9-22
6B Select Typestyle Family 9 - 2 321 Master Select 9-23
Print Size and Character Width
Print Enhancement
ASCII 1 Dec. Hex. I Description 1 P gESC E
69
45 Select Emphasized Mode
9-28
ESC F 70 46 Cancel Emphasized Mode 9-28
ESC G 71 47 Select Double-strike Mode 9-29
ESC H 72 48 Cancel Double-strike Mode 9-29
ESCS0 83 53 Select Superscript Mode 9-29
ESCS1 83 53 Select Subscript Mode 9-30
ESC T 84 54 Cancel Superscript/Subscript Mode 9-30
ESC ( - 40 28 Select Score 9-31
ESC - 45 2D Turn Underline Mode On/Off 9-32
ESC q 113 71 Select Character Style 9-32
Word Processing
ASCII Dec.
ESC a 97
ESC SP 32
Hex. Description Pg
61 Select Justification 9-33
20 Set Intercharacter Space 9-33

7/21/2019 Epson ActionPrinter 4000 User's Manual
http://slidepdf.com/reader/full/epson-actionprinter-4000-users-manual 288/290
Character Tables
ASCII Dec. Hex. Description PgESCt 116 74 Select Character Tables 9-34
ESC 4 52 34 Select Italic Mode 9-34
ESC 5 53 35 Cancel Italic Mode 9-35
ESC R 82 52 Select an International Character Set
9-35
User-defined Characters
ASCII
ESC &
ESC :
Dec. Hex. Description Pg38 26 Define User-defined Characters 9-36
58 3A Copy ROM to RAM 9-36
Graphics
DIP switch settings
DIP Switch 1
SW
1-1
1-2
1-3
1-4
Description ON OFFInternational character set See page 3-8
Font selection See page 3-8
1-6 Condensed mode on/off
1-7 Character table
1-8 Cut sheet feeder mode on/oft
Condensed
Graphics
On
Normal
Italics
Off
DIP Switch 2
I SW Description ON I OFF I
2-4 Auto line feed I On I Off I2-5 Input buffer capacity
2-6 Graphics print direction
2-7 Character spacing
8 KS 1 KB*
Bidirect. Unidirect.
See page 3-8
2-8
* Required for use of user-defined (download) characters.

7/21/2019 Epson ActionPrinter 4000 User's Manual
http://slidepdf.com/reader/full/epson-actionprinter-4000-users-manual 289/290
printe
edge guides
DIP s&itch
paper tension unit cover
power switch

7/21/2019 Epson ActionPrinter 4000 User's Manual
http://slidepdf.com/reader/full/epson-actionprinter-4000-users-manual 290/290
EPSON AMERICA, INC.
2780 Lomita Boulevard