ePort Seller User Guide - Strataeport.gotostrata.com/Images/ePort_User_Guide.pdf · 30 W. Monroe...
33
30 W. Monroe Street Suite 1900 Chicago, IL 60603 312-222-1555 www.gotostrata.com Client Support: 800-9 STRATA ePort Seller User Guide
Transcript of ePort Seller User Guide - Strataeport.gotostrata.com/Images/ePort_User_Guide.pdf · 30 W. Monroe...

30 W. Monroe StreetSuite 1900 Chicago, IL 60603312-222-1555www.gotostrata.com
Client Support: 800-9 STRATA
ePortSeller User Guide

Updated 12/1/11
Page 1 of 32
Page 1 of 32
Proprietary Information 2011 Strata Marketing, Inc. All Rights Reserved
Need Help? Call 1-800-9STRATA or send an email to [email protected]
Seller User Guide to
REGISTER FOR THE SERVICE 2
FIRST LOGIN 3
OVERVIEW OF THE INTERFACE 4
OPENING AN ORDER 5
CONFIRMING AN ORDER 7
REJECTING AN ORDER 9
VIEW TRANSACTION HISTORY 11
VIEW AUDIT TRAIL 12
PRINTING AN ORDER 13
EXPORT TO MICROSOFT® EXCEL® 15
EXPORT TO XML 16
MAKEGOODS 18
SEARCHING 25
QUICK SEARCH 28
STORE & FORWARD CONSIDERATIONS 29
ADMINISTRATION 31

SELLER USER GUIDE TO ePORT Updated 12/1/11
Page 2 of 32
Proprietary Information 2011 Strata Marketing, Inc. All Rights Reserved
Need Help? Call 1-800-9STRATA or send an email to [email protected]
Register for the Service Step 1: Open your web browser and go to http://eport.gotostrata.com Step 2: Click on the link that says “Need to Register for ePort?”
Step 3: On the registration page, please fill in all fields.
Step 4: Once you enter the registration information and click “Submit” your information will be received by ePort. Within 24 hours you will be notified by ePort to complete the registration process.
Step 5: The email you receive from ePort will ask you to confirm your username and password.
After you confirm, you can go to the website and log in for the first time.

SELLER USER GUIDE TO ePORT Updated 12/1/11
Page 3 of 32
Proprietary Information 2011 Strata Marketing, Inc. All Rights Reserved
Need Help? Call 1-800-9STRATA or send an email to [email protected]
FIRST LOGIN Step 1: Open your web browser and go to http://eport.gotostrata.com Step 2: Log in to your account. Step 3: Click on the links as shown below to read the ePort Terms of Use and ePort Privacy Policy.
Step 4: If you accept the terms of the Service Agreement, click “I ACCEPT.” You will be logged in.
You only need to accept the Service Agreement upon the initial login.
If you do not accept the terms of the Service Agreement click “I DO NOT ACCEPT.” You will be declined access to the ePort site. The next time you login to the site, you will be prompted with the Service Agreement again. Successful login will only occur after the EULA is accepted.

SELLER USER GUIDE TO ePORT Updated 12/1/11
Page 4 of 32
Proprietary Information 2011 Strata Marketing, Inc. All Rights Reserved
Need Help? Call 1-800-9STRATA or send an email to [email protected]
OVERVIEW OF THE INTERFACE The main ePort screen has 4 tabs: (1) Inbox (2) Pending (3) Drafts and (4) Completed. Each main tab has one or more related sub-tabs. The number of unread documents within each sub-tab is displayed in parentheses. A summary of the order contents is displayed in a list for each main tab.
TABS: Inbox – Transactions (orders, revisions, makegoods) which require action. Pending – Transactions (makegoods) that do not require action at the current time because a reply on the makegood is necessary from the trading partner. Drafts – Transactions (makegoods) that have been saved, but not yet sent. Completed – Confirmed or rejected transactions (orders, revisions, makegoods) which do not require any further processing by the seller.
ACTION LIST:
Within the summary listing page, a list of actions is available in the “What do you want to do?” drop-down field, depending on the status of the order. You can Accept a Cancellation, Confirm or Reject an order, Create a Makegood, or Print or Export an Order/Revision. Additionally, you have Admin and Search capability, which are described in detail later in this document.
Action List
Sub-Tabs
Tabs

SELLER USER GUIDE TO ePORT Updated 12/1/11
Page 5 of 32
Proprietary Information 2011 Strata Marketing, Inc. All Rights Reserved
Need Help? Call 1-800-9STRATA or send an email to [email protected]
OPENING AN ORDER Step 1: On the selected summary screen click on the station call letters to open the order and view
the spot placement.
Step 2: The Order Details screen displays the full schedule including the header, dayparts and
spots.
Click on the station call letters here to view the schedule

SELLER USER GUIDE TO ePORT Updated 12/1/11
Page 6 of 32
Proprietary Information 2011 Strata Marketing, Inc. All Rights Reserved
Need Help? Call 1-800-9STRATA or send an email to [email protected]
Step 3: An expandable section lists all comments for the order. Expanding the Comments section displays a grid with the date created and the comment text.

SELLER USER GUIDE TO ePORT Updated 12/1/11
Page 7 of 32
Proprietary Information 2011 Strata Marketing, Inc. All Rights Reserved
Need Help? Call 1-800-9STRATA or send an email to [email protected]
CONFIRMING AN ORDER Step 1: Within your Inbox tab, select an order from your Orders sub-tab or select a revised order
on your Revisions sub-tab.
Step 2: From the “What do you want to do?” drop-down list select “Confirm.”
Select “Confirm”
Click here to select the order

SELLER USER GUIDE TO ePORT Updated 12/1/11
Page 8 of 32
Proprietary Information 2011 Strata Marketing, Inc. All Rights Reserved
Need Help? Call 1-800-9STRATA or send an email to [email protected]
Step 3: Enter a confirmation note to be sent back to the agency.
Step 4: Click “Perform” to complete the action. Click “Cancel” to cancel the action.
.

SELLER USER GUIDE TO ePORT Updated 12/1/11
Page 9 of 32
Proprietary Information 2011 Strata Marketing, Inc. All Rights Reserved
Need Help? Call 1-800-9STRATA or send an email to [email protected]
REJECTING AN ORDER Step 1: Within your Inbox tab, select an order from your Orders sub-tab or select a revised
order on your Revisions sub-tab to reject.
Step 2: From the “What do you want to do?” drop-down list select “Reject.”
Select “Reject”
Click here to select the order

SELLER USER GUIDE TO ePORT Updated 12/1/11
Page 10 of 32
Proprietary Information 2011 Strata Marketing, Inc. All Rights Reserved
Need Help? Call 1-800-9STRATA or send an email to [email protected]
Step 3: Enter a rejection note (required) to be sent back to the agency.
Step 4: Click “Perform” to complete the action. Click “Cancel” to cancel the action.

SELLER USER GUIDE TO ePORT Updated 12/1/11
Page 11 of 32
Proprietary Information 2011 Strata Marketing, Inc. All Rights Reserved
Need Help? Call 1-800-9STRATA or send an email to [email protected]
VIEW TRANSACTION HISTORY
Step 1: Click the icon in the TRANSACTIONS column for the desired order.
Step 2: The Related Transactions will appear.

SELLER USER GUIDE TO ePORT Updated 12/1/11
Page 12 of 32
Proprietary Information 2011 Strata Marketing, Inc. All Rights Reserved
Need Help? Call 1-800-9STRATA or send an email to [email protected]
VIEW AUDIT TRAIL Step 1: Navigate to the Related Transaction screen. Step 2: Click on the Last Action of the transaction. The audit trail for that transaction will appear.
Step 3: You may also view a transaction’s audit trail by navigating to the Order or Makegood
Details screen.
Step 4: Click on the Status link. The audit trail will appear.

SELLER USER GUIDE TO ePORT Updated 12/1/11
Page 13 of 32
Proprietary Information 2011 Strata Marketing, Inc. All Rights Reserved
Need Help? Call 1-800-9STRATA or send an email to [email protected]
PRINTING AN ORDER Step 1: Select the order you wish to print.
Step 2: From the “What do you want to do?” drop-down list select “Print.”
Select “Print” in the dropdown box.
Check the box(es) of the order(s) to print.

SELLER USER GUIDE TO ePORT Updated 12/1/11
Page 14 of 32
Proprietary Information 2011 Strata Marketing, Inc. All Rights Reserved
Need Help? Call 1-800-9STRATA or send an email to [email protected]
Step 3: You will be prompted to “Open,” “Save” or “Cancel.”
Step 4: If you click the “Open” button, your orders will open in a viewable/printable format in
Adobe® Acrobat®. Click the print button to print your orders.
Click here to print your orders

SELLER USER GUIDE TO ePORT Updated 12/1/11
Page 15 of 32
Proprietary Information 2011 Strata Marketing, Inc. All Rights Reserved
Need Help? Call 1-800-9STRATA or send an email to [email protected]
EXPORT TO MICROSOFT® EXCEL® Step 1: Select the order you wish to export.
Step 2: From the “What do you want to do?” drop-down list select “Export to Excel.”
Click here to select
Select “Export to Excel”

SELLER USER GUIDE TO ePORT Updated 12/1/11
Page 16 of 32
Proprietary Information 2011 Strata Marketing, Inc. All Rights Reserved
Need Help? Call 1-800-9STRATA or send an email to [email protected]
Step 3: You will be prompted to “Open,” “Save” or “Cancel.”
EXPORT TO XML Step 1: Select the order you wish to export to XML.
Click here to select the order

SELLER USER GUIDE TO ePORT Updated 12/1/11
Page 17 of 32
Proprietary Information 2011 Strata Marketing, Inc. All Rights Reserved
Need Help? Call 1-800-9STRATA or send an email to [email protected]
Step 2: From the “What do you want to do?” drop-down list select “Export to XML.”
Step 3: You will be prompted to “Open,” “Save” or “Cancel.”
Select “Export to XML”

SELLER USER GUIDE TO ePORT Updated 12/1/11
Page 18 of 32
Proprietary Information 2011 Strata Marketing, Inc. All Rights Reserved
Need Help? Call 1-800-9STRATA or send an email to [email protected]
MAKEGOODS Step 1: Navigate to the Completed tab or use Quick Search to locate the latest confirmed version of
your order. Step 2: Select the Confirmed Order or Revised Order for which you wish to enter a makegood.
Step 3: From the “What do you want to do?” drop-down list select “Enter Makegood.”
Select “Enter Makegood”
Click here to select the order
SELLER USER GUIDE TO ePORT Updated 12/1/11
Page 19 of 32
Proprietary Information 2011 Strata Marketing, Inc. All Rights Reserved
Need Help? Call 1-800-9STRATA or send an email to [email protected]
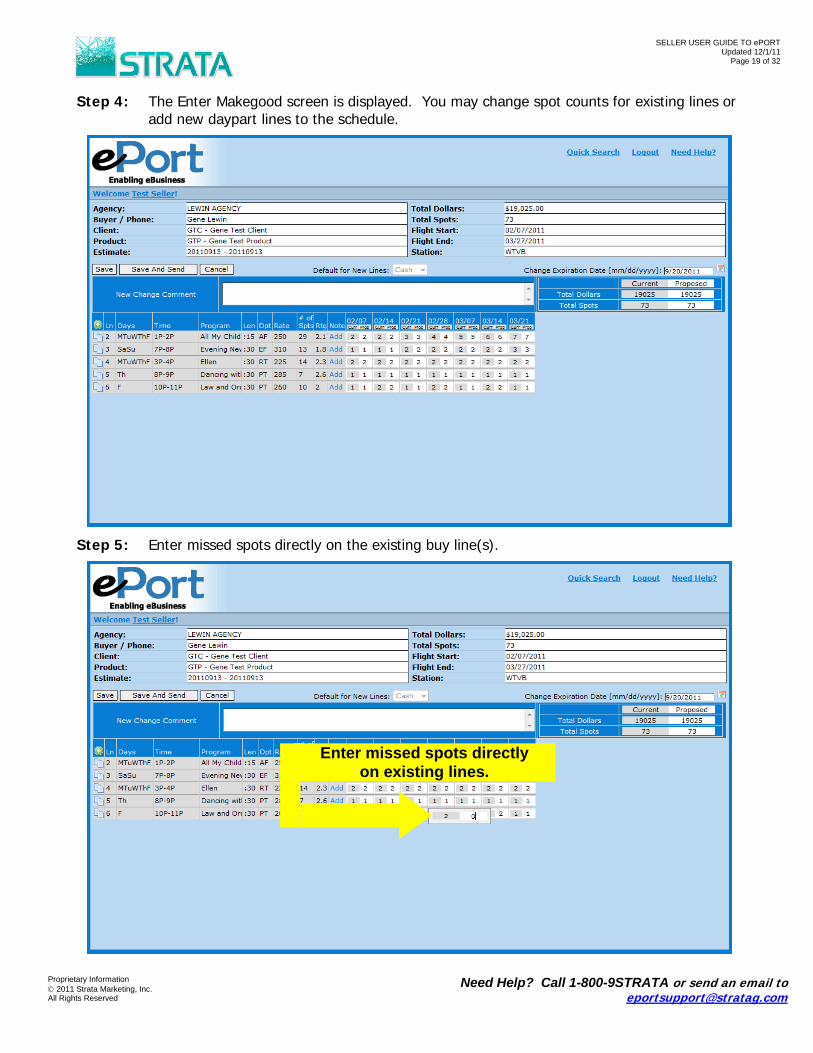
Step 4: The Enter Makegood screen is displayed. You may change spot counts for existing lines or add new daypart lines to the schedule.
Step 5: Enter missed spots directly on the existing buy line(s).
Enter missed spots directly on existing lines.

SELLER USER GUIDE TO ePORT Updated 12/1/11
Page 20 of 32
Proprietary Information 2011 Strata Marketing, Inc. All Rights Reserved
Need Help? Call 1-800-9STRATA or send an email to [email protected]
Step 6: Add a new line by clicking the icon.
Step 7: Copy an existing line by clicking the icon on the line you wish to copy, and select the type of copy you want to perform.
Click to add a new line
Click to copy line

SELLER USER GUIDE TO ePORT Updated 12/1/11
Page 21 of 32
Proprietary Information 2011 Strata Marketing, Inc. All Rights Reserved
Need Help? Call 1-800-9STRATA or send an email to [email protected]
Copy: If you select this option a new line will be created, all program information
will be copied (program name, daypart, rate, etc.). There will be no change to spot counts on the line being copied, and spot counts on the newly created line will all be 0.
Program Change: If you select this option, a new line will be created, all program information
will be copied *except program name*, all spots will be copied to the newly created line, and all spots will be zeroed out on the line being copied.

SELLER USER GUIDE TO ePORT Updated 12/1/11
Page 22 of 32
Proprietary Information 2011 Strata Marketing, Inc. All Rights Reserved
Need Help? Call 1-800-9STRATA or send an email to [email protected]
Step 8: Enter the program name, day(s) and time, daypart, rate, rating, spots and any other relevant information for the new lines added and/or copied.
Step 9: Optionally add line-level comments with a description for the buyer of what is being
changed on the line(s).
Click “Add” to enter line-level comment

SELLER USER GUIDE TO ePORT Updated 12/1/11
Page 23 of 32
Proprietary Information 2011 Strata Marketing, Inc. All Rights Reserved
Need Help? Call 1-800-9STRATA or send an email to [email protected]
Step 10: After your changes have been made, enter an optional “Makegood Comment” that describes the makegood to the buyer.
Step 11: Enter the Makegood Expiration Date.
Enter Makegood Comment
Enter Change Expiration Date

SELLER USER GUIDE TO ePORT Updated 12/1/11
Page 24 of 32
Proprietary Information 2011 Strata Marketing, Inc. All Rights Reserved
Need Help? Call 1-800-9STRATA or send an email to [email protected]
Step 12: When you are ready to send your makegood to the buyer click “Save and Send.”
Click Save and Send
SELLER USER GUIDE TO ePORT Updated 12/1/11
Page 25 of 32
Proprietary Information 2011 Strata Marketing, Inc. All Rights Reserved
Need Help? Call 1-800-9STRATA or send an email to [email protected]
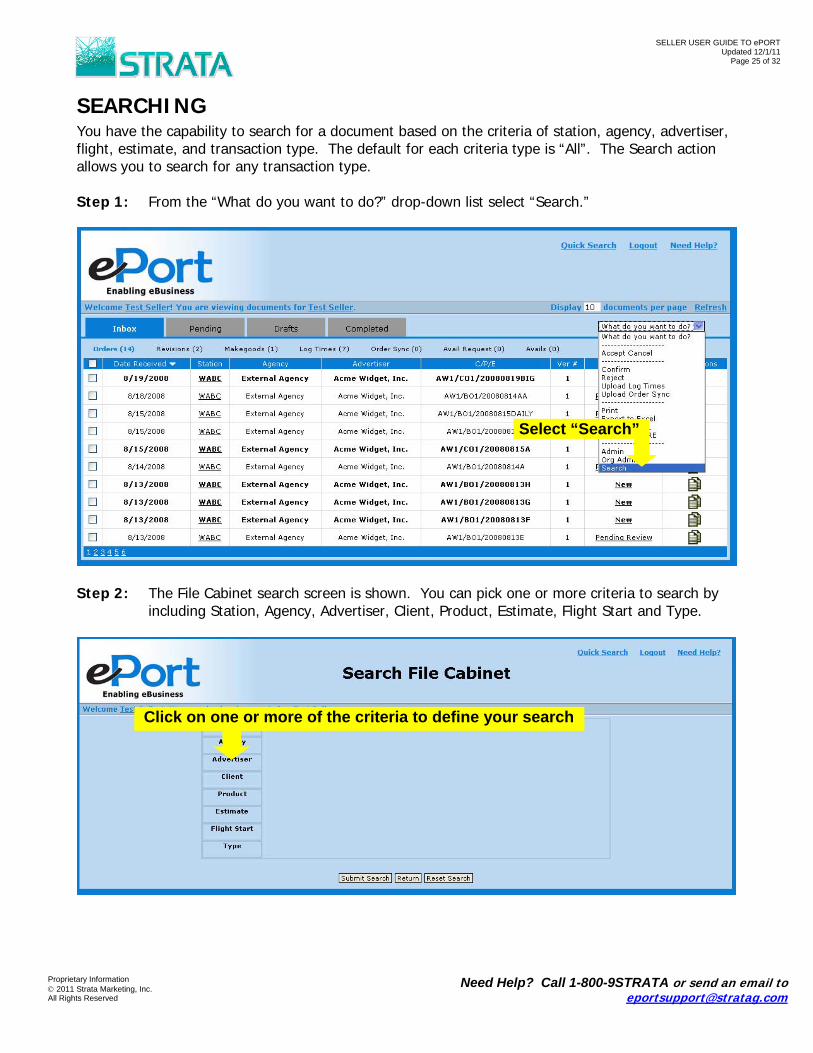
SEARCHING You have the capability to search for a document based on the criteria of station, agency, advertiser, flight, estimate, and transaction type. The default for each criteria type is “All”. The Search action allows you to search for any transaction type. Step 1: From the “What do you want to do?” drop-down list select “Search.”
Step 2: The File Cabinet search screen is shown. You can pick one or more criteria to search by
including Station, Agency, Advertiser, Client, Product, Estimate, Flight Start and Type.
Select “Search”
Click on one or more of the criteria to define your search

SELLER USER GUIDE TO ePORT Updated 12/1/11
Page 26 of 32
Proprietary Information 2011 Strata Marketing, Inc. All Rights Reserved
Need Help? Call 1-800-9STRATA or send an email to [email protected]
Step 3: Once you click on the criteria you want to use to search (e.g., Advertiser) you will see a box with the available selections. The values listed are limited to those contained within your documents. Click or Ctrl-Click in the list to make your selections.
Step 4: Select additional search criteria.
The Search screen shows you the items you’ve already selected
When you choose a criteria type, a box displays the available selections

SELLER USER GUIDE TO ePORT Updated 12/1/11
Page 27 of 32
Proprietary Information 2011 Strata Marketing, Inc. All Rights Reserved
Need Help? Call 1-800-9STRATA or send an email to [email protected]
Step 5: When you have selected all of your search criteria, click “Submit Search.”
Step 6: Your search results will be returned.
Click “Submit Search”

SELLER USER GUIDE TO ePORT Updated 12/1/11
Page 28 of 32
Proprietary Information 2011 Strata Marketing, Inc. All Rights Reserved
Need Help? Call 1-800-9STRATA or send an email to [email protected]
QUICK SEARCH Quick Search allows you to easily search all transactions or search for the latest confirmed version of an order, which is especially useful when entering makegoods.
Step 1: Click the Quick Search link at the top of the page.
Step 2: Fill out at least one of the criteria fields. Under “What do you want to include in the search results?” click “All Transactions” to display all related transactions based on the search criteria. Click “Only the latest confirmed version of the order” to display only the most recent confirmed version of an order.
Step 3: Click “Submit Search” and your search results will be returned.
Click the “Quick Search” link

SELLER USER GUIDE TO ePORT Updated 12/1/11
Page 29 of 32
Proprietary Information 2011 Strata Marketing, Inc. All Rights Reserved
Need Help? Call 1-800-9STRATA or send an email to [email protected]
STORE & FORWARD CONSIDERATIONS
What is Store & Forward?
When an agency sends out an order, it passes through ePort and gets “Forwarded” directly to the station’s recipient system (e.g. the station’s order management and/or traffic system).
What is different if I’m getting my orders via Store & Forward?
AEs will not need to log in to ePort to process an order. All responses come from the station’s recipient system.
When a new Forwarded order is received, the station’s recipient system is responsible for notifying the AE; ePort will not send out email notification to the AE.
ePort will still display each transaction so that the AE can do subsequent non-integrated workflows on those transactions (e.g. makegoods or revisions) from within the ePort interface.
A Forwarded order will appear in the Completed tab of the ePort interface. Currently, most Store & Forward orders are not setup to process makegoods and
revisions, only the initial version of the order. This is true for OSi™ and DDS Reppak™. Wide Orbit™ and Harris Medialine™, however, are able to handle order, revisions and makegoods that are sent through ePort.
How do I confirm a Store & Forward Order?
Forwarded orders are confirmed from within the station’s recipient system. A Forwarded order that’s been confirmed will appear in the Completed tab of the ePort
interface.
Can I still send a makegood in ePort if I’m receiving my orders via Store & Forward?
Makegoods for a Forwarded order can still be created in the ePort interface and sent to the agency.
If Store & Forward is turned on for Orders, Revisions, & Makegoods, will I need the ePort
website interface (or this manual) at all?
In this scenario, you would not need to use the ePort interface. The processing of the initial order, revisions, & makegoods are all performed in the
station’s recipient system. Stations that have Wide Orbit™ or Harris Medialine™ will be able to process orders, revisions and makegoods without using the ePort interface. Stations with OSi™ or DDS Reppak™ would have to use the ePort interface for revisions and makegoods.

SELLER USER GUIDE TO ePORT Updated 12/1/11
Page 30 of 32
Proprietary Information 2011 Strata Marketing, Inc. All Rights Reserved
Need Help? Call 1-800-9STRATA or send an email to [email protected]
What are the ePort statuses that a Forwarded order, revision, or cancellation can have?
Forwarding in Progress: The order is currently in transit, on its way to the station’s recipient system.
Forwarded: The order has been successfully forwarded into the station’s recipient system.
Forwarded Confirmed: The order has been confirmed by the station’s recipient system. Revision Forwarded: A revision to an order has been successfully forwarded into the
station’s recipient system. Revision Forwarded Confirmed: A revision forwarded to the station’s recipient system
has been confirmed by the station’s recipient system. Forwarded Cancel Requested: A cancel request has been sent for a confirmed order.
The AE has to select Accept Cancel in the ePort interface to change the status to Forwarded Canceled.
Forwarded Canceled: A cancel request has been sent for a Forwarded order that has not yet been confirmed. It can be marked as complete in the ePort interface and no additional steps are required, but the cancellation would still need to be processed manually in the station’s recipient system.

SELLER USER GUIDE TO ePORT Updated 12/1/11
Page 31 of 32
Proprietary Information 2011 Strata Marketing, Inc. All Rights Reserved
Need Help? Call 1-800-9STRATA or send an email to [email protected]
ADMINISTRATION The Admin section allows you to set your personal account settings including: (1) delegating user access (2) changing your password and (3) defining which email notifications you would like to receive.
Step 1: From the “What do you want to do?” drop-down list select “Admin.”
Step 2: Delegate user access rights. All sellers assigned to the same organization(s) are listed and
can be assigned access. Access Descriptions:
View Only – allows user to view your documents but not process any actions. View and Edit – allows user to view your documents and process actions. View, Edit and Email Notify – allows user to view your documents and process
actions. Additionally, they will receive the same email notifications that you receive.
Select “Admin”
User Delegate Settings

SELLER USER GUIDE TO ePORT Updated 12/1/11
Page 32 of 32
Proprietary Information 2011 Strata Marketing, Inc. All Rights Reserved
Need Help? Call 1-800-9STRATA or send an email to [email protected]
Step 3: Change password. Type your existing password, enter a new password and re-enter your new password for confirmation.
Step 4: Select events for which you would like to receive email notifications.
Step 5: Click “Save” to save all user settings or “Close” to cancel and return to your Inbox.
Password Settings
Email Notification Settings