ePM Quick Reference Guide #132 Earned Value Management
37
ePM Quick Reference Guide #132 Earned Value Management WHAT IS EARNED VALUE? SUMMARY GSA is required to establish and validate performance measurement baselines with clear cost, schedule and performance goals, and to manage and measure construction projects to within +/- 10% of baseline goals through use of a compliant Earned Value Management System (EVMS). To accomplish this goal, GSA uses an EVMS integrated in ePM to track construction schedule and budget performance. This document provides an overview of the ePM EVMS, reporting frequency, and system requirements. MEASUREMENT The Project Delivery Measure encompasses all active new construction (BA51), repair and alteration (BA55), and reimbursable (BA80) projects with prospectus-level and above contracts. All contract types, including CMc, design/build, access roads, bridge construction, demolition, and abatement contracts. Design/Build projects in the measure track the entire contract including both design and construction phases. Projects with multiple contracts that are each below prospectus level are not required to be measured. If a region wishes to remove a contract from the measure, the project team must submit an explanation to the Central Office Measures Lead who will render a decision. The adjudication committee will render a decision at its monthly meeting. A project is considered as on schedule when the duration does not exceed the baseline construction duration plus 10% of the planned construction period. A project is considered to be on budget when it does not exceed the baseline project allowance plus contingency. For more information on the PBS earned value measures, visit FY20 Capital Program Reporting, Measure & KPI Requirements. WHO USES EARNED VALUE? GSA Project Manager and Staff GSA Contracting Officer GSA Contracting Officer Rep Construction Manager ePM Regional System Administrator GSA EV Measures Manager ePM 7.2 1
Transcript of ePM Quick Reference Guide #132 Earned Value Management

ePM Quick Reference Guide #132
Earned Value Management
WHAT IS EARNED VALUE?
SUMMARY
GSA is required to establish and validate performance measurement baselines with clear cost, schedule and performance goals, and to manage and measure construction projects to within +/- 10% of baseline goals through use of a compliant Earned Value Management System (EVMS). To accomplish this goal, GSA uses an EVMS integrated in ePM to track construction schedule and budget performance. This document provides an overview of the ePM EVMS, reporting frequency, and system requirements.
MEASUREMENT
The Project Delivery Measure encompasses all active new construction (BA51), repair and alteration (BA55), and reimbursable (BA80) projects with prospectus-level and above contracts. All contract types, including CMc, design/build, access roads, bridge construction, demolition, and abatement contracts. Design/Build projects in the measure track the entire contract including both design and construction phases. Projects with multiple contracts that are each below prospectus level are not required to be measured. If a region wishes to remove a contract from the measure, the project team must submit an explanation to the Central Office Measures Lead who will render a decision. The adjudication committee will render a decision at its monthly meeting.
A project is considered as on schedule when the duration does not exceed the baseline construction duration plus 10% of the planned construction period. A project is considered to be on budget when it does not exceed the baseline project allowance plus contingency.
For more information on the PBS earned value measures, visit FY20 Capital Program Reporting, Measure & KPI Requirements.
WHO USES EARNED VALUE?
GSA Project Manager and Staff GSA Contracting Officer GSA Contracting Officer Rep Construction Manager ePM Regional System Administrator GSA EV Measures Manager
ePM 7.2 1
ePM Quick Reference Guide #132
Earned Value Management
HOW TO USE EARNED VALUE
A. USING EPM TO TRACK EARNED VALUE
The ePM Earned Value Data Entry and Update Utility (EV Utility) works in combination with the ePM project cost documents to perform the following tasks:
Set up and maintain the Spend Plan Enter the estimated and actual substantial completion dates. View the Earned Value performance graphs.
This document provides the steps and reference documents you will need to: Prepare your project to track earned value View the On Budget and On Schedule Graphs and monitor your progress Keep your data current Prepare adjudications Complete your project when it reaches Substantial Completion
B. PREPARING
You will need the Budget & Cost Management (BCM) documents listed below to begin setting up your contract and entering invoices:
Contracts and Modifications: provide the obligation amounts, start and finish dates Invoices: provide work progress (Work In Place)
C. CONTRACT CREATION
The EV Utility reads data from cost documents (contracts, modifications and invoices) in ePM. At a minimum, there must be a contract record with a Schedule of Values and required fields present before the project will be available in the EV Utility.
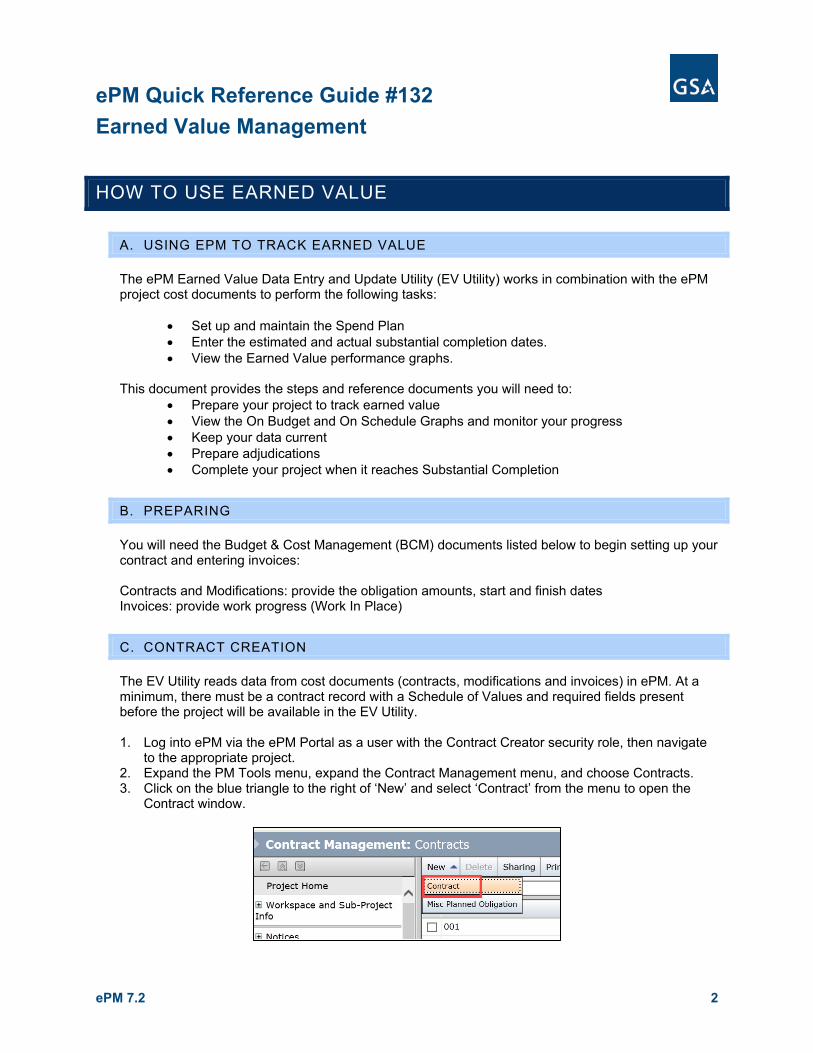
1. Log into ePM via the ePM Portal as a user with the Contract Creator security role, then navigate to the appropriate project.
2. Expand the PM Tools menu, expand the Contract Management menu, and choose Contracts. 3. Click on the blue triangle to the right of ‘New’ and select ‘Contract’ from the menu to open the
Contract window.
ePM 7.2 2

ePM Quick Reference Guide #132
Earned Value Management
4. On the ‘Main’ tab, enter information for the following fields in the Details section:
Title: use the naming convention: Contractor Type – Primary – Type of Services – Phase (if applicable) (e.g. GC – Primary – Construction –Phase 1). Primary is intended to identify the main contractor.
Contract Number: GSA contract number from EASi Contract Classification: 02: Contract Description Cost Period: Select a Cost Period that matches the time frame the contract was awarded.
Please contact your Regional System Administrator (RSA) if this lookup list is not populated. Include in EV Measure: put a check mark in this box Contractor Type: select CC, CMc, or D/B
5. In the Contract Dates section, enter the Award Date, NTP/Start Date, and Finish Date. 6. In the Other Dates section, enter the Estimated Substantial Completion Date. 7. In the Contract Parties section, enter the Procuring Office company and contact (typically the
Contracting Officer’s region) and Vendor company and contact. These fields are required to approve the contract.
8. In the EV Mode section, click the magnifying glass to open the EV Mode window. Expand the EV Mode 1 menu and choose the appropriate project type: New Construction or R&A. Then select one of the sub options: Courthouse, Office, or Other.
9. Go to the Schedule of Values tab at the top of the window to set up the contract line items with the associated cost accounts. You can reference and use the CLINs from EASi.
10. Click ‘Add’ to add a new row. Note: Create only one Cost Account Allocation line item for each CLIN line item
11. On the SOV Line, enter a Description and Scheduled Amount. 12. On the Cost Account Allocation line, enter an Item Description. Then using the drop down icon,
select a Cost Account. Use similar lookups to select values in the Building ID, CSI Code, Shell/TI, and Linked Funding Line Item fields.
13. Set up the SOV line items to match the CLINs in the contract document. Note: For design/build contracts, enter the entire contract value to track for the measure,
including design. 14. Click ‘Workflow’ and choose Pending SOV for review. 15. A contract must be in a Pending SOV state with all required fields before the EV Utility can
display and open that contract. 16. The SOV must be approved by the GSA team before invoices can be submitted against a
contract. Once approved it can only be reopened for editing by a system administrator.’ 17. When the contract is ready to move forward, click ‘Workflow’ and choose ‘Approve SOV’. 18. Enter modifications if necessary following the steps in Section K.
D. CREATE THE SPEND PLAN IN THE EV UTILITY
After creating the contract, the next step is to use EV Utility.
The Spend Plan is a breakdown of the amount of expected work progress, as measured by invoiced work on a monthly basis. The EV Utility will chart the monthly cumulative amounts from the spend plan grid in the EV Utility. This utility reads the SOV line items from the contract and modification documents.
ePM 7.2 3
ePM Quick Reference Guide #132
Earned Value Management
Initialize the Spend Plan
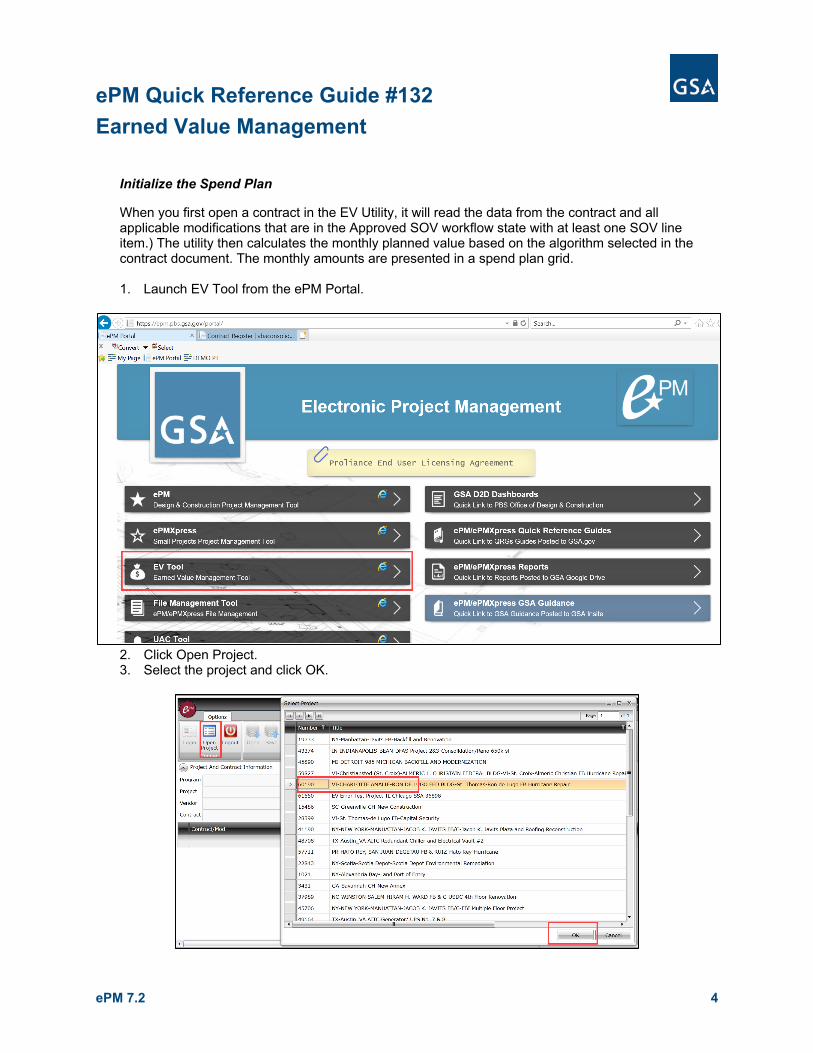
When you first open a contract in the EV Utility, it will read the data from the contract and all applicable modifications that are in the Approved SOV workflow state with at least one SOV line item.) The utility then calculates the monthly planned value based on the algorithm selected in the contract document. The monthly amounts are presented in a spend plan grid.
1. Launch EV Tool from the ePM Portal.
2. Click Open Project. 3. Select the project and click OK.
ePM 7.2 4

ePM Quick Reference Guide #132
Earned Value Management
4. Select the appropriate contract and click ‘OK’.
5. The EV Utility displays the Spend Plan based on the obligation (contracts and modifications) Start and Finish Dates and distributes the dollars based on calculated business rules derived by the EV Mode Lookup (3 level) value designated for that contract document. The contract is in the first row with all modifications listed below it.
6. Click ‘Save’.
ePM 7.2 5

ePM Quick Reference Guide #132
Earned Value Management
Customize the Spend Plan
The spend plan should be customized so that the monthly total projected spend plan is consistent with the values in the cost loaded schedule provided by the contractor.
1. Edit the values (use only whole dollars) in each cell of the Spend Plan grid based on the values provided in the contractor’s schedule of values. The Variance column must be no greater than $1 in order to successfully save the Spend Plan. Variances will appear in red as dollars are subtracted or added from one month to the other.
If there are any errors in a row, a red stop sign icon with a white exclamation point is displayed in the first column, and the row will be highlighted in red. Errors may include:
A variance other than $0 in the Variance column: As you change numbers in the monthly cells, the variance is tracked in the Variance column on the left. The total of the monthly numbers must equal the exact contract value.
Missing Start or Finish Dates: you must correct incorrect dates in the modification document in ePM
A Finish Date that is earlier than the Start Date: you must correct incorrect dates in the modification document in ePM.
Errors must be resolved before the ‘Save’ and ‘View’ buttons are enabled.
2. Click ‘Save’. 3. Verify the Estimated Substantial Completion Date. Edit as necessary, then click ‘OK’ at the
bottom of the window. 4. Once the spend plan has been saved, click ‘View’ to view the graph of the projected monthly
spend plan on the Current Projection and On Schedule Measure tabs plotted as the ‘Current Projection’ curve and the Proposed Baseline’ curve (purple curve) respectively.
Note: The On Schedule and On Budget Measure tabs will not display any data until the Earned Value Baseline is set.
ePM 7.2 6

ePM Quick Reference Guide #132
Earned Value Management
E. VIEWING THE EARNED VALUE CHARTS
In the EV Utility, click ‘View’ in the EV Measures section of the toolbar. This will launch the EV Measures window containing the following information to view measurable performance:
A chart showing the current cumulative Projection and Actual Work In place (WIP) amounts by month.
A chart showing the Contract Performance with respect to baseline schedule and current projection.
A chart showing the Contract Performance with respect to current Adjudicated Modification contract status.
Indicators displaying the ‘On Schedule’ and ‘On Budget’ performance of a schedule. Contingency for the contract.
Note: When the spend plan is first baselined, the current projection and your approved baseline will overlap exactly. You can see both curves by hovering your mouse over one of the dots in the legend at the bottom. For example, hovering over the Approved Baseline blue dot at the bottom fades the Current Projection and WIP lines and highlights just the blue Baseline curve.
ePM 7.2 7
ePM Quick Reference Guide #132
Earned Value Management
1. Current Projection - The Current Projection tab plots 3 graphs: a. Current Projection - Total projected monthly amount (cumulative) of contract plus all approved modifications. b. Approved Baseline - Baseline Total monthly amount (cumulative) of contract plus adjudicated modifications. c. Actuals (All WIP) - Total monthly amount (cumulative) of approved invoices.
Note: When your spend plan is first baselined, your current projection and your approved baseline will overlap exactly. You can see both curves by floating over one of the dots in the legend at the bottom. For example, floating over the Approved Baseline blue dot at the bottom fades the Current Projection and WIP lines and highlights just the blue Baseline curve.
Current Projection tab
ePM 7.2 8

ePM Quick Reference Guide #132
Earned Value Management
Baseline: A baseline is set by the Measures Manager in Central Office once the Spend Plan has been saved by the project team. Additionally, the Measures Manager has the ability to edit the Planned Substantial Completion Date.
Red Horizontal Line: [ (Base Contract + Adjudicated Mods) * Contingency % entered by Measures Manager ]
Green Horizontal Line: Approved Base Contract + Adjudicated MODs
Red Vertical Line: Approved Base Contract Finish Date + Adjudicated Time + 10% Contingency
Green Vertical Line: Approved Base Contract Finish Date + Adjudicated Finish Final Date (with “Adjudicated Changed Days” extensions)
Approved Baseline: S-curve of the most recent approved baseline performed by Central Office “Measures Manager” with the Planned Substantial Completion Date identified. Note: Approved Base line is stacked over projection on this chart.
Current Projection: S-curves calculated and spread between the Start & Finish dates of Obligations. Calculations vary based on the value of the 3 level “EV MODE 1” Lookup on the Main page (or updated projection plan).
Actuals (All WIP): Approved Invoices for Base Contract + All Mods
ePM 7.2 9

ePM Quick Reference Guide #132
Earned Value Management
Approved Baseline: S-curve of the most recent approved baseline performed by Central Office “Measures Manager” with the Planned Substantial Completion Date identified.
Current Projection: S-curves calculated and spread between the Start & Finish dates of Obligations. Calculations vary based on the value of the 3 level “EV MODE 1” Lookup on the Main page (or updated projection plan).
Actuals (All WIP):Approved Invoices for Base Contract + All Mods
ePM 7.2 10

ePM Quick Reference Guide #132
Earned Value Management
OnSchedule Measure
2. On Schedule - On Schedule Measure graphs are similar to the Current Projection, except that it displays contingency curves, and only plots projected spend and work-in-place against adjudicated modifications:
a. Current Projection - Total projected monthly amount (cumulative) of base contract plus adjudicated modifications. b. Approved Baseline - Baseline total monthly amount (cumulative) of contract plus adjudicated modifications. c. Actuals (Incl. Adjudicated Changes) - Total monthly amount (cumulative) of approved invoices, but only includes work against adjudicated line items.
Note: Typically the Actuals (black line) in the On Schedule tab will be lower than the Actuals in the Current Projection tab, due to the fact that the On Schedule Measure only reports work in place against adjudicated line items.
ePM 7.2 11

ePM Quick Reference Guide #132
Earned Value Management
Approved Baseline: A Baseline is set by the Measures Manager in Central Office once the Spend Plan has been saved by the project team. Additionally, the Measures Manager has the ability to edit the Planned Substantial Completion Date.
Actuals (incl. Adj. Changes): Approved Invoices for Base Contract + All Adjudicated MODs included with each Invoice.
ePM 7.2 12

ePM Quick Reference Guide #132
Earned Value Management
Approved Baseline: A Baseline is set by the Measures Manager in Central Office once the Spend Plan has been saved by the project team. Additionally, the Measures Manager has the ability to edit the Planned Substantial Completion Date.
Incremental Contingency: (Yellow)
Full Contingency: (Red)
Actuals (incl. Adj. Changes): Approved Invoices for Base Contract + All Adjudicated MODs included with each Invoice.
ePM 7.2 13

ePM Quick Reference Guide #132
Earned Value Management
OnBudget Measure
3. On Budget - The On Budget graph plot is driven by the total approved contract value plus all adjudicated contract modifications. The approved baseline is depicted by the blue line, the red depicts baseline with contingency value and the black is the actual invoiced amounts on a monthly basis. To display budget value, hover on one of the plot lines directly above the month of choice and the cumulative value will display.
ePM 7.2 14

ePM Quick Reference Guide #132
Earned Value Management
Approved Budget: The Original Contract Award Amount + Adj Mods.
Approved Budget + (XX%): The Original Contract Award Amount + Adj Mods + Contingency % entered by end user with saved Spend Plan
Current Contract Amount: The Original Contract Value + All Modifications
ePM 7.2 15

ePM Quick Reference Guide #132
Earned Value Management
Approved Budget: The Original Contract Award Amount + Adj Mods.
Approved Budget + (XX%): The Original Contract Award Amount + Adj Mods + Contingency % entered by end user with saved Spend Plan
Current Contract Amount: The Original Contract Value + All Modifications
ePM 7.2 16

ePM Quick Reference Guide #132
Earned Value Management
F. EV MEASURES: ON BUDGET AND ON SCHEDULE
On Schedule:
o If Actual (Incl Adj Changes) is above Incremental Contingency (Yellow Line), then = Green
o If Actual (Incl Adj Changes) is between Incremental Contingency (Yellow Line) and Full Contingency (Red Line), then = Yellow
o If Actual (Incl Adj Changes) is below Full Contingency (Red Line), then = Red o Has there been any invoice in last 90 days? If no invoice, then = Red o Where does the Estimated Substantial Completion Date fall.
o If Left of Adjudicated + 10% Contingency (Red Line), then = Green o If Right of Adjudicated + 10% Contingency (Red Line), then = Red
On Budget: o If Base Contract + All mods is within a GSA set percentage rule of base contract
+ adj mods + contingency, then o If less than 50% of Full Contingency, then = Green o If greater than 50% but less than Full Contingency, then = Yellow o If greater than Full Contingency, then = Red o Has there been any invoice in last 45 days? If no invoice, then = Yellow o Has there been any invoice in last 63 days? If no invoice, then = Red
ePM 7.2 17

ePM Quick Reference Guide #132
Earned Value Management
G. EV MEASURES: CONTINGENCY
Setting Contingency Percent: The Contingency % and Planned Completion Date is editable when the Measures Manager user elects to ‘Save’ the Spend Plan.
Contingency:Entered by the Measures Manager in the baselining section of the Save Spend Plan as “Contingency”
NOTE: Full Contingency (Red Horizontal Line) is displayed by the following formula [ (Base Contract + Adjudicated Mods) * Contingency % entered by Measures Manager ]
Available Contingency:[Contract Amount + Adjudicated Mods + Allowed Contingency – (Contract amount + All Mods amounts)].
ePM 7.2 18

ePM Quick Reference Guide #132
Earned Value Management
H. UPDATE THE PM SCHEDULE WITH THE ESTIMATED SUBSTANTIAL COMPLETION DATE
1. Log into ePM via the ePM Portal as a user with the Contract Creator security role, then navigate to the appropriate project.
2. Expand the PM Tools menu, expand the Schedules menu, and choose PM Schedule. 3. From the register, check the box next to the schedule (or schedules) you wish to view, then click
‘Tools’ and select to either open in Collaborative or CPM Gantt view. 4. In the register, in the ‘Open As’ drop down list, select Collaborative or CPM Gantt, then simply
click on the schedule number or title link. Simply click on the schedule number or title link. 5. Double-click the Substantial Completion milestone to open the milestone window. 6. In the Dates section update the Early Finish field with the estimated substantial completion date
that was entered in the contract 7. Click ‘OK’ to return to the Gantt chart. 8. Close the Gantt chart window.
I. SUBMIT A BASELINE REQUEST
1. Once the required information has been entered in ePM, it is recommended that you review the spend plan with your supervisor and regional measures Point of Contact before you submit a baseline request.
2. The PM sends a message to the Central Office Measures Manager a request to set the baseline. 3. The Measures Manager verifies Funding, Contract and Spend Plan data. 4. The Measures Manager sends a message to the Regional Coordinator and Zone Director and
copies the Project Manager and ePM Zonal System Administrator to review and comment on the spend plan with a screencap of the proposed curve.
5. The Regional Coordinator and Zone Director review the curve and provide feedback to the Measures Manager. The Project Manager updates the spend plan as necessary and notifies the Measures Manager once changes are complete.
6. Upon final agreement between the Regional Coordinator, Zone Director, and Project Manager, the Measures Manager sets the new baseline.
J. SETTING THE BASELINE (MEASURES MANAGER ONLY)
1. Launch the EV Tool from the ePM Portal. 2. Click ‘Open Project’. 3. Select the project and click OK. 4. Select the appropriate contract and click ‘OK’. 5. In the EV Utility click the ‘Baseline’.
ePM 7.2 19

ePM Quick Reference Guide #132
Earned Value Management
6. Enter the Estimated Substantial Completion Date and the contingency percentage. Repair and Alteration Contingency: 7% New Construction Contingency: 10%
7. Click OK to process the baseline. 8. Check the EV curve to make sure that the baseline has adjusted properly. 9. Send a screenshot of the adjusted curve to the Project Manager, Regional Coordinator, and Zone
Director letting them know that the adjudication has been processed.
K. MONTHLY MAINTENANCE: CONTRACT MODIFICATIONS
Keeping the data current for reporting through the ePM EV tool requires data entry of contract modifications, invoices, adjudication requests, and actual substantial completion dates.
1. Log into ePM via the ePM Portal as a user with the Change Order Creator security role, then navigate to the appropriate project.
2. Expand the PM Tools menu, expand the Contract Management menu, and choose Contract Modifications.
3. Click ‘New’ in the toolbar. 4. Select the base contract and click ‘Next’.
ePM 7.2 20

ePM Quick Reference Guide #132
Earned Value Management
5. Select ‘Modification’ in the Contract Modification Setup window and click ‘Finish’.
6. On the Main page, fill in the fields in the Details section: Title Number Modification Type Contractor Days Requested Cost Period: month in which the modification was approved.
7. Fill in the fields in the Dates section:
ePM 7.2 21

ePM Quick Reference Guide #132
Earned Value Management
Approved Date: Date the contracting officer signs the modification NTP/Start Date: Date the work is to commence Finish Date: This should be the date that the work identified in the modifications scope is
expected to be complete. When modifications enter an SOV workflow state, they will appear on the spend plan, and the total cost of the modification will be spread out in the Spend Plan following the standard curve from the month indicated in the NTP date, to the month indicated in the Finish Date. When the work is performed and billed, the Work in Place curve should be reasonably close to the actual amount of work that is performed.
8. In the Completion Dates section, complete the ‘This Change Days’ field if the modification is extending the Contract Finish Date.
9. In the ‘Contract Parties’ section, all parties from parent contract are automatically linked and displayed.
10. Go to the Schedule of Values tab at the top of the window to set up the modification line items with the associated cost accounts.
11. Click ‘Add’ to add a new row. Note: Create only one Cost Account Allocation line item for each SOV line item
12. On the SOV Line, enter a Description and Scheduled Amount.
ePM 7.2 22

ePM Quick Reference Guide #132
Earned Value Management
13. On the Cost Account Allocation line, enter an Item Description. Then using the drop down icon, select a Cost Account. Use similar lookups to select values in the Building ID, CSI Code, Shell/TI, and Linked Funding Line Item fields.
14. Break out the SOV line items the same way they are listed on the contractor’s invoice (Construction Progress Report form 184A). Be sure the contractor has identified work related to environmental costs in the SOV. Do not add multiple cost allocation lines under a single SOV line. Line items default to being linked to Line 1 of a funding document.
15. Ensure all required fields and Cost Accounts are selected before the document enters the Pending SOV state. These same fields are required at the Pending SOV Approval and Approved SOV states. If there are Cost Account Allocation Line Items that need to be submitted for Adjudication, then enter additional required fields at the Cost Account Allocation Line Items grid and workflow the document to the Pending Adjudication state. The Measures Manager will review the modification and eventually will workflow to the Adjudicated workflow state.
16. Click ‘Workflow’ and choose ‘Pending SOV’ for review. 17. When the contract is ready to move forward, click ‘Workflow’ and choose ‘Approve’. 18. Workflow the modification to the Approved SOV state.
L. MONTHLY MAINTENANCE: INVOICES
Invoices need to be entered on a monthly basis. Only the values for ‘This Invoice General Amount’ are used to calculate Earned Value. There may be values for retainage or stored materials, but these do not alter the Earned Value calculation.
1. Log into ePM via the ePM Portal and navigate to the appropriate project. 2. Expand the PM Tools menu, expand the Contract Management menu, and choose Invoices. 3. Click ‘New’ in the toolbar. This opens the Invoice Setup window. 4. Click the magnifying glass to select the original contract to which this invoice is associated.
5. Select a contract by clicking ‘Add’ next to the contract, then click ‘OK’.
ePM 7.2 23

ePM Quick Reference Guide #132
Earned Value Management
6. The Invoice Setup screen will display the chosen contract. Click ‘Next’. 7. The last Invoice Setup screen is displayed, and it highlights the Invoice document template which
will be used to create the new Invoice. Click ‘Finish.’ 8. On the ‘Main’ page, enter the following information:
Vendor Invoice Number Title (as Contractor Type-Type of Services-Phase-Month Year) Cost Period: Matches the billing period Draft Invoice Date: Date the Invoice is created Billing Start Date: Start date of work being invoiced Billing End Date: End date of work being invoiced. This is the date that is used to calculate
the Work in Place Received Date: Date invoice received Due Date: Date by which invoice must be paid
9. Go to the Line Items page. Although the page has a large amount of data, all that needs to be entered is either a percent in the ‘This Invoice General Pct’ field or a dollar amount in the ‘This Invoice General Amt’ field.
ePM 7.2 24

ePM Quick Reference Guide #132
Earned Value Management
10. If a modification needs to be added to the invoice, on the line items page click ‘Add Modifications.’
11. A dialog box will pop up, then click ‘Add’ for each modification that needs to be added to the invoice.
12. Enter an amount as either a percent in the ‘This Invoice General Pct’ field or a dollar amount in the ‘This Invoice General Amt’ field for each line displayed.
13. Attach a copy of supporting documentation. Click ‘Attach’ (paperclip) for the prompt to find and select the file(s) to attach. Multiple files can be selected.
ePM 7.2 25

ePM Quick Reference Guide #132
Earned Value Management
14. Click ‘Workflow’ at the top of the screen and select ‘Submit for Review’. An ‘Execute Workflow’ dialog box displays, showing who will receive a notice to approve the document (the ‘To’ box), who will be copied (the ‘Cc’ box), what action the recipient should take, the message the recipient will see when notified, the priority of this process, and the date the subsequent action is due. Since these fields are editable, additional users can be notified or copied, a custom message can be added, and priority and the due date can be changed.
ePM 7.2 26

ePM Quick Reference Guide #132
Earned Value Management
15. Click ‘Execute’. If successful, ePM displays an ‘Action Complete’ message showing to whom the notification has been sent. You now have the choice of returning to the invoice document itself or to the Register which shows all Invoice documents on this project.
Note: Invoices in Pending workflow state will not appear as Actual (WIP) in the ‘EV Measures’ charts
M. MONTHLY MAINTENANCE: NARRATIVES
The ODC Capital Program Reporting Requirements that projects that are ‘Red’ for either Budget or Schedule must create a narrative and post it in the project. The narratives are shared on the Potential for Improvement with Narratives Report and shared with ODC and PBS leadership at the monthly ODC Stat meetings. Projects that are ‘Red’ for both Budget and Schedule must create and complete a separate ‘On Budget’ and ‘On Schedule’ Project Narrative write-up.
1. Navigate to ‘PM Tools’ in the left-hand menu, expand the ‘Project Management’ menu, and choose ‘Issue.’
2. Click ‘New’ to create a new Issue.
3. Enter the following information: Title: Type in the name of the Project Narrative using the naming convention, ‘FY## Q#
EV On[Budget or Schedule] Narrative’. Example: FY20 Q1 EV On Budget Narrative Full Description: Input the following information about your project:
o Indicate the likelihood (Likely, Possible, or Unlikely) of recovering from a ‘Red’ rating and becoming ‘Yellow’ or ‘Green’.
o Explain why the project is ‘Red’. In other words, identify the root cause(s) that led to the project falling behind schedule or going over budget. Below are some examples for acceptable and unacceptable reasons for a project being ‘Red’:
ePM 7.2 27

ePM Quick Reference Guide #132
Earned Value Management
Acceptable Reasons Unacceptable Reasons Late invoicing payments The project team missed the
deadline Unforeseen site conditions An adjudication was submitted, but
did not get approved Unexpected weather-related delays The project team plans on
requesting an extension Poor planning that led to inaccurate milestone projections
o The purpose of this section of the write-up is to get a better understanding of the status of the project. To that note, stating that a project is ‘Red’ because adjudication was not approved does not explain why the project needed an adjudication in the first place.
o If the project has not yet achieved Substantial Completion, describe how the team plans on improving the status of the project. For example, what controls are being put in place? Is the team working to input its invoices into ePM? Does the team plan on submitting an adjudication? How does the team plan on preventing the problem from happening again in the future?
Initiating Party Section o Confirm that the correct name is auto-populated in the ‘Reported By’ field (should
auto-populate with the name of the person creating the Project Narrative write-up) o Confirm that the ‘Date Reported’ date auto-populates with today's date
Responsible Party Section Escalate/Promote to Fact Sheet: Select ‘Yes’ so that the narrative write-up will be
included on the monthly Detailed Project Fact Sheet Category: Select either ‘EV OnSchedule Issue’ or ‘EV OnBudget Issue’
ePM 7.2 28

ePM Quick Reference Guide #132
Earned Value Management
4. Click ‘Workflow’ in the top toolbar and select ‘Activate’ to transition the document to the ‘Active’ state.
N. ADJUDICATIONS
Adjudication is the process by which the contract baseline budget and substantial completion dates can be adjusted. The adjudication process involves preparing an Adjudication Fact Sheet, preparing contract mods in ePM, uploading the adjudication fact sheet to ePM, submitting a request to the Adjudication Committee, uploading the adjudication request decision to ePM, and adjusting the spend plan.
The Adjudication Process Document outlines the specific steps, contacts, timeline, and templates for the adjudication process.
Prepare an Adjudication Fact Sheet
The Adjudication Fact Sheet is a document sent to the Adjudication Committee that details the specific contract modifications, amounts, change days, and reasons for the request. A template of the Adjudication Fact Sheet can be found in attachment 1 of the Adjudication Process Document.
Prepare Contract Mods in ePM
All of the mods referenced in the Adjudication Fact Sheet must be prepared and workflowed to the ‘Pending Adjudication’ state prior to submitting the request.
ePM 7.2 29

ePM Quick Reference Guide #132
Earned Value Management
1. Log into ePM via the ePM Portal as a user with the Change Order Creator security role, then navigate to the appropriate project.
2. Expand the PM Tools menu, expand the Contract Management menu, and choose Contract Modifications.
3. Click ‘New’ in the toolbar. 4. Select the base contract and click ‘OK’.
5. Select ‘Modification’ in the Contract Modification Setup window and click ‘Finish’.
ePM 7.2 30

ePM Quick Reference Guide #132
Earned Value Management
6. On the Main page, fill in the fields in the Details section: Title Number Modification Type Contractor Days Requested Cost Period: month in which the modification was approved
7. Fill in the fields in the Dates section: Approved Date: Date the contracting officer signs the modification NTP/Start Date: Date the work is to commence Finish Date: This should be the date that the work identified in the modifications scope is
expected to be complete. When modifications enter an SOV workflow state, they will appear on the spend plan, and the total cost of the modification will be spread out in the Spend Plan following the standard curve from the month indicated in the NTP date, to the month indicated in the Finish Date. When the work is performed and billed, the Work in Place curve should be reasonably close to the actual amount of work that is performed.
8. In the Completion Dates section, complete the ‘This Change Days’ field if the modification is extending the Contract Finish Date.
9. In the ‘Contract Parties’ section, all parties from parent contract are automatically linked and displayed.
10. Go to the Schedule of Values tab at the top of the window to set up the modification line items with the associated cost accounts.
11. Click ‘Add’ to add a new row. Note: Create only one Cost Account Allocation line item for each SOV line item
12. On the SOV Line, enter a Description and Scheduled Amount.
ePM 7.2 31

ePM Quick Reference Guide #132
Earned Value Management
13. On the Cost Account Allocation line, enter an Item Description. Then using the drop down icon, select a Cost Account. Use similar lookups to select values in the Building ID, CSI Code, Shell/TI, and Linked Funding Line Item fields.
14. Break out the SOV line items the same way they are listed on the contractor’s invoice (Construction Progress Report form 184A). Be sure the contractor has identified work related to environmental costs in the SOV. Do not add multiple cost allocation lines under a single SOV line. Line items default to being linked to Line 1 of a funding document.
Note: For mods where not all line items require adjudicated, all schedule of value line items need to have the request adjudication field populated (yes or no) before the modification can be placed in Pending Adjudication workflow state.
15. Fill in the remaining fields: Adjudication Changed Days: The number of days that are being added to the baseline
schedule Request Adjudication (Yes/No) Lookup: The Project Manager decides which Cost
Allocations will be submitted to the Central Office Measures Manager as (Yes/No) for ‘Request Adjudication’. This is a required field when entering the Pending Adjudication workflow state.
*Is Adjudicated (Yes/No) Lookup: The Central Office Measures Manager will finalize which Cost Allocations are truly adjudicated and enter a Yes/No value for the ‘Is Adjudicated’ Lookup. This is a required field when entering the Adjudication workflow state.
Adjudication Changed Days: Either the Project Manager or Central Office Measures Manager can enter the changed days to the Contract Finish Date relevant to only this Cost Account Allocation line item.
Adjudication Number: This is a required field for the Modification ‘Adjudicated’ workflow state. Upon request for Modification items pending Adjudication, the PM will enter the Adjudication Number.
Adjudication Notes: This is a free text field to describe any further details regarding this adjudicated modification and is editable by either the PM or Measures Manager. This field is optional.
16. Ensure all required fields and Cost Accounts are selected before the document enters the Pending SOV state. These same fields are required at the Pending SOV Approval and Approved SOV states. If there are Cost Account Allocation Line Items that need to be submitted for Adjudication, then enter additional required fields at the Cost Account Allocation Line Items grid and workflow the document to the Pending Adjudication state. The Measures Manager will review the modification and eventually will workflow to the Adjudicated workflow state.
17. Click ‘Workflow’ and choose ‘Pending SOV’ for review. 18. When the mod is ready to move forward, click ‘Workflow’ and choose ‘Approve’. 19. Workflow the modification to the ‘Pending Adjudication’ state.
Upload the Adjudication Fact Sheet to the Catalog Card
After the adjudication request is finalized and ready for submission, upload the adjudication request as a source file to the Execution Catalog Card.
1. Log into ePM via the ePM Portal and navigate to the appropriate project. 2. Expand the File Management menu, and click Catalog Cards.
ePM 7.2 32

ePM Quick Reference Guide #132
Earned Value Management
3. Click on the blue triangle to the right of New and then click 3.0 Execution. This opens the Catalog Card window.
4. In the File/URL Information section of the Catalog Card window, click the arrow button to upload the Source File/URL. Browse to locate the appropriate file attachment.
5. Click ‘Attach’. 6. Enter the document’s Name. 7. Click ‘Workflow’ and choose Submit. 8. Click the Attachments tab and click ‘Add Line’ in the Attached Proliance Documents section. 9. In the Select Documents window, navigate to the ePM modifications module. Click the ‘Add’ link
next to the appropriate file.
10. Click ‘OK.’
ePM 7.2 33

ePM Quick Reference Guide #132
Earned Value Management
11. Click ‘Save’ on the Catalog Card window.
Submit Adjudication Request
1. Regional ODC Director sends an email to [email protected]. 2. Attach the signed Adjudication Fact Sheet pdf with the Regional Commissioner’s concurrence 3. Enter the ePM project name and project number in the email subject line.
Upload the Adjudication Request Decision to ePM
When the adjudication request decision is returned to the Project Manager, it should be uploaded to ePM in the Execution catalog card and attached to the modification(s). Use the instructions in the Upload the Adjudication Fact Sheet to Catalog Cards to upload the adjudication request decision.
Adjusting the Spend Plan
1. Send a request to the Measures Manager requesting that the mods are workflowed to ‘Adjudicated’.
2. Once the mods have been workflowed to ‘Adjudicated,’ you have the opportunity to adjust the spend plan as needed. Follow the instructions in Section D: Create the Spend Plan in the EV Utility to adjust the spend plan.
3. Notify the Measures Manager that the spend plan has been updated so that the spend contract can be re-baselined.
O. SUBSTANTIAL COMPLETION
When your project has reached substantial completion, you must enter the actual Substantial Completion date in the EV Utility, PM schedule. The first step is entering the substantial completion date in the Spend Plan using the EV Utility. This action will turn off the measure, freezing the On Schedule and On Budget Measure statuses. Then you will also update the PM Schedule with the actual substantial completion date, and a construction progress of 100%
Enter the Substantial Completion Date in the EV Utility
1. Launch EV Tool from the ePM Portal. 2. Click ‘Open Project’. 3. Select the project and click ‘OK’. 4. Select the appropriate contract and click ‘OK’. 5. Click ‘Save’ to open the Save Spend Plan dialog. Put a check mark in the ‘Contract work is
substantially complete’ box. Enter the substantial completion date and click ‘OK’. Saving this date updates the Actual Substantial Completion Date in the contract module.
ePM 7.2 34

ePM Quick Reference Guide #132
Earned Value Management
Update the PM Schedule with the Actual Substantial Completion Date
Update the PM Schedule by marking the Milestone task as ‘Completed’ and with the actual date. Also adjust the Construction Progress Task to 100%.
Follow the instructions in QRG 42: Creating and Managing CPM Schedules to update the Substantial Completion milestone with an actual date.
Once the Actual Substantial Completion date has been entered and saved, the contract will be frozen in time. Modifications and invoices entered after the actual substantial completion date has been entered will not be calculated in the measure.
P. TROUBLESHOOTING
1. Issue: Contract does not appear in the EV Utility Resolution: Contracts must specify the following in order for them to function with the EV Utility:
‘02: Contract’ for the Contract Classification EV Mode 1 Lookup specified Start/Finish Dates identified Contractor Type: CC, CMc, or D/B Project must be in the Execution state Contract Parties fields must be complete with contacts and companies for the Procuring
Office, Vendor, and Manager
2. Issue: Spend Plan cannot be saved Resolution: Verify the Start and Finish dates. Start dates must be before the Finish dates.
3. Issue: The Save and/or View buttons are grayed out (inactive) Resolution: There is an error in the spend plan. Look down all the rows for the error warning.
ePM 7.2 35

ePM Quick Reference Guide #132
Earned Value Management
4. Issue: When trying to open a project in the EV Utility, user gets a message stating ‘an error has occurred, please contact support.’ Resolution: The login has timed out. Click the ‘Login’ to log back in.
REPORTING
The ODC Capital Projects Contract Value Performance (CVP) Report can be run at any time via Cognos. The report is located in the ‘Measure Reports’ folder. If you do not have Cognos access, please request your GSA RSA or ZSA to run the report for you.
1. Click ‘Analytics’ on the ‘ePM Workspace’ page. 2. Click the ‘My Home’ link. 3. Click the ‘Measure Reports’ folder. Then click the ‘ODC Measures Reports’ folder. 4. Choose the ‘ODC Capital Projects Contract Value Performance (CVP) Report’. 5. Select the report parameters. 6. Click ‘Next.’ 7. Select the projects to include in the report results. 8. Click ‘Run Report’.
9. The report opens in a new window. Alternatively, you can have the report emailed to you when it has been prepared.
ePM 7.2 36
ePM Quick Reference Guide #132
Earned Value Management
REFERENCES
Reference the following ePM Quick Reference Guides (QRGs) for additional information. QRGs can be accessed through the ePM Portal.
QRG 01 - Navigating ePM QRG 20 - Contract Creation QRG 21 - Contract Approval QRG 22 - Contract Modification Creation QRG 23 - Contract Modification Approval QRG 24 - Invoice Creation QRG 25 - Invoice Approval QRG 42 - Creating and Managing CPM Schedules QRG 83 - Contract Value Performance Report FY20 Capital Program Reporting, Measure & KPI Requirements Adjudication Process Document
ePM 7.2 37