EpiData for data entry and documentationepidata.dk/downloads/epidataguideziad.pdf · ·...
87
EpiData for data entry and documentation (November 2004) The first and simplest methods of data entry ”punch cards”, 1960s’ Developed by: Ziad El-Khatib, MSc Reviewed by: Erik Onelöv, MSc (Statistician) Arna Hauksdóttir, BA, psychologist (PhD student) Clinical Cancer Epidemiology Z5:U1: Karolinska Institutet - Solna Stockholm - Sweden Email: [email protected] ; [email protected]
Transcript of EpiData for data entry and documentationepidata.dk/downloads/epidataguideziad.pdf · ·...

EpiData
for data entry and documentation (November 2004)
The first and simplest methods of data entry ”punch cards”, 1960s’
Developed by:
Ziad El-Khatib, MSc
Reviewed by:
Erik Onelöv, MSc (Statistician)
Arna Hauksdóttir, BA, psychologist (PhD student)
Clinical Cancer Epidemiology
Z5:U1: Karolinska Institutet - Solna
Stockholm - Sweden
Email: [email protected] ; [email protected]

2
Foreword:
In 1990, Anne Cartwright and Clive Seale considered coding and data entry as the
Cinderella of survey method. Unfortunately, they had little academic attraction,
interest or concern compared with sampling, interviewing and tests of significance. If
enough care, thought and time are not dedicated to these sides of the study; the
validity, strength, usefulness and efficacy of the whole operation are endangered. “To
do it well you need to be obsessional”.
This guideline is written to serve researchers interested to work on data
documentation, where they can use EpiData. Many guidelines have been written
about EpiData, data management. Some explained in graphs but with short
information and descriptions, and some explained with detailed information but
without so many graphs.
The aim of this guideline was to help using EpiData through text and pictures
together; the intention is to help you to get into EpiData in easy, straight and clear
way.
The content of this guideline is based on information downloaded from EpiData
homepage: www.epidata.dk.

3
Index
1. General information about EpiData (definition and history)
1.1. What is EpiData
1.2. What is special in EpiData
2. The progress of a questionnaire
3. Data cycle
4. Data file structure
5. How to download EpiData setup file from the internet
6. How to install EpiData on the computer
7. How to start EpiData for the first time
8. How to set EpiData options before start making a questionnaire
9. How to start a ‘questionnaire form’ from scratch
10. How to reduce errors in data entry
10.1. Error occurring during data entry
10.2. How to detect errors in data
10.3. How EpiData can check data entry errors
11. How to check the questionnaire options
12. How to check the questionnaire structure
12.1. How to print a questionnaire structure
12.2. How to save a data file structure
13. How to start data entry
14. How to export data to a data analysis programme, like SPSS for example
Figures
Figure 1. The ten steps of data processing
Figure 2. Description of what is variable and case
Figure 3. Description of what is a data file
Figure 4. Types of variables supported by EpiData
References are downloaded from EpiData homepage: www.epidata.dk

4
1. General information about EpiData:
1.1. What is EpiData
The initiative to make EpiData was taken by a doctor, at Funen county - Denmark,
called Jens M.Lauritsen. It started for an epidemiological research, as part of the
“Initiative for Accident Prevention” .
1.2. What is special in EpiData
There has been previous programs to do data entry and statistics work, like EpiInfo
program released by the World Health Organisation (WHO), or other commercially
available programs but are not focused on documentation, simplicity of use and
validation of double entered data .
The idea behind EpiData was to create simple, user friendly and free data entry
software where you can enter your data in a simple text form and the program will
convert them into data form.
Briefly, EpiData can be described in five points:
1. It is developed specially for research studies usage, and oriented for data
management process (i.e. data entry and documentation).
2. User friendly; although it might have less technical options then similar
software, its simplicity lets all people use it in very easy way, specially
beginners!
3. Free of charge.
4. It can run on any computer, and on any Microsoft Windows or Macintosh’s
version, or Macintosh.
5. It can export data to many different statistical or database files’ formats.

5
2. The progress of a questionnaire:
The usual and general process of collecting and analysing questionnaire’s data is a
long one. It can be formulated in ten steps: (figure 1)
1. Interviewer collects data.
2. Interviewer checks questionnaire, and corrects any errors, returning to
verify data with the respondent if necessary.
3. Supervisor checks questionnaires, re-interviewing a sample of
respondents.
4. A data entry cle rk enters the data into the computer.
5. A different data entry clerk enters the data into the computer a second
time.
6. The two data files are compared to find any typing errors, which are
corrected.
7. Either at the time of data entry, or afterwards, data are checked. The
checks ensure that data are within allowable ranges (e.g. sex must be
either male or female). Checks also ensure that data are consistent from
one question to another (e.g. if respondent is pregnant then sex must be
female!). Any errors found are corrected.
8. When the data are clean, there will usually be a need to create new
variable or manipulate existing ones (e.g. calculation of latency periods,
grouping age in five year bands etc…).
9. Data will need to be linked (or related) to data from other forms and
questionnaires (e.g . Linking interview data with laboratory data).
10. Data may be exported for analysis by statistical, database, or spreadsheet
package.

6
Step 5
Steps 1 -> 3
Step 4
Step 6 -> 9
Step 10
Figure 1. The ten steps of data processing.
7
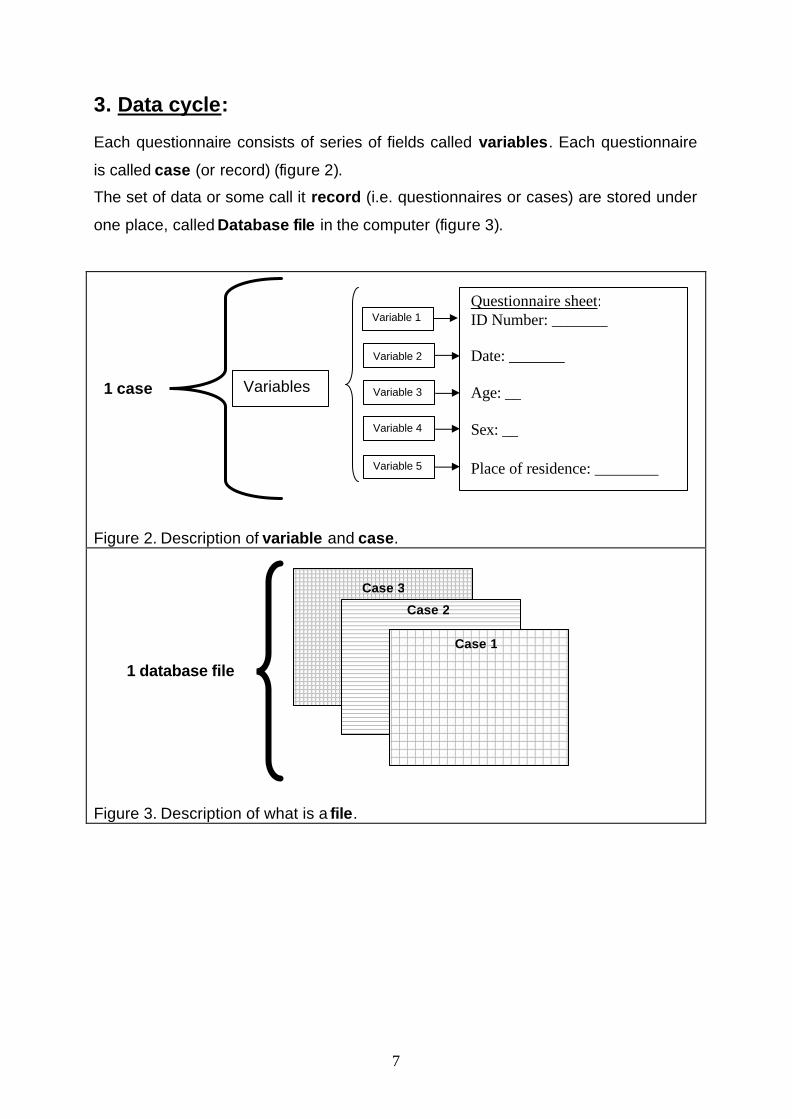
3. Data cycle:
Each questionnaire consists of series of fields called variables. Each questionnaire
is called case (or record) (figure 2).
The set of data or some call it record (i.e. questionnaires or cases) are stored under
one place, called Database file in the computer (figure 3).
Figure 2. Description of variable and case. Figure 3. Description of what is a file.
Questionnaire sheet: ID Number: _______ Date: _______ Age: __ Sex: __ Place of residence: ________
Variables 1 case
1 database file
Case 1
Case 3
Case 2
Variable 1
Variable 2
Variable 3
Variable 4
Variable 5

8
Here is an example: Case – ID Number
Date Age Sex Place of residence
1001 10/11/2003 56 M Stockholm 1002 10/11/2003 49 F Gothenburg 1003 10/11/2003 30 M Stockholm 1004 12/11/2003 32 M Stockholm
Different variables are available in this table: Case-ID Number; Date; Age; Sex and
Place of residence. All of them make a database file.
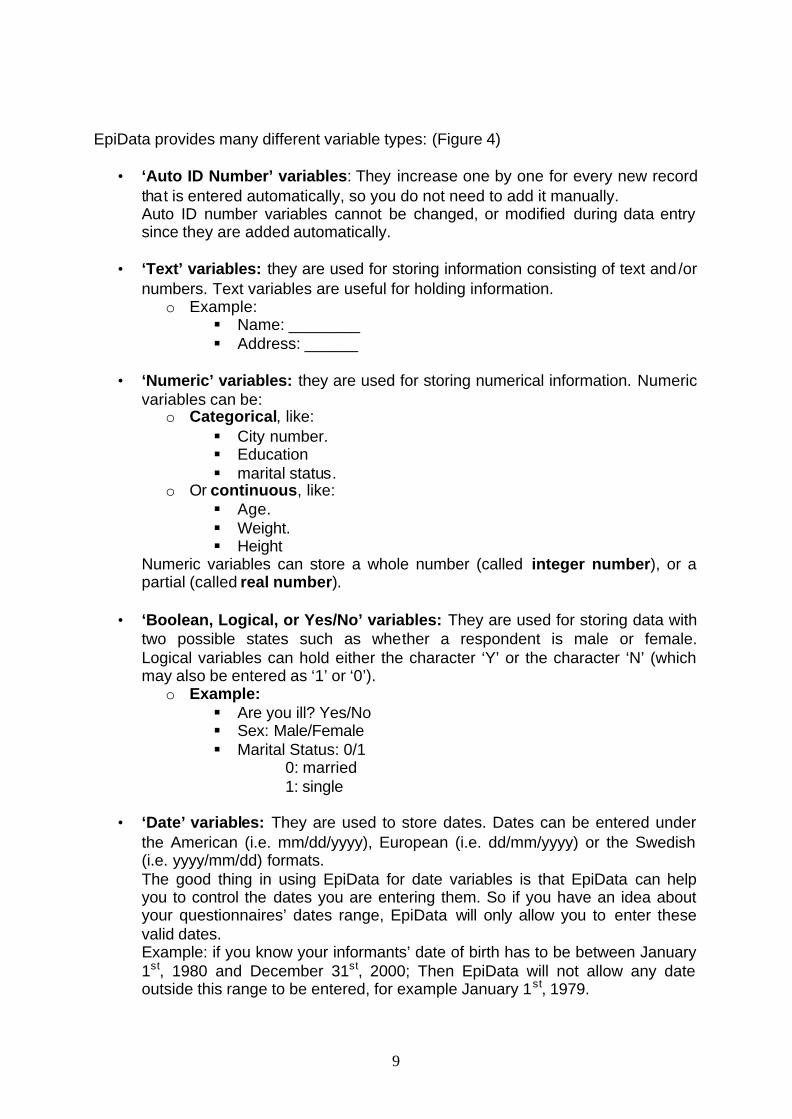
4. Data file structure:
As mentioned previously, a database file is made of different cases that are made up
in their turn of different variables.
Variables have different types (figure 4). Working on EpiData, you need to define the
type of each variable. So you assign a type depending on the type of data you wish it
have.
Figure 4. Types of variables supported by EpiData.
Variable
types
Text
Numeric
Boolean, Logical, or
Yes/no
Date
Auto ID Number
Soundex
9
EpiData provides many different variable types: (Figure 4)
• ‘Auto ID Number’ variables: They increase one by one for every new record that is entered automatically, so you do not need to add it manually. Auto ID number variables cannot be changed, or modified during data entry since they are added automatically.
• ‘Text’ variables: they are used for storing information consisting of text and/or
numbers. Text variables are useful for holding information. o Example:
§ Name: ________ § Address: ______
• ‘Numeric’ variables: they are used for storing numerical information. Numeric
variables can be: o Categorical, like:
§ City number. § Education § marital status.
o Or continuous, like: § Age. § Weight. § Height
Numeric variables can store a whole number (called integer number), or a partial (called real number).
• ‘Boolean, Logical, or Yes/No’ variables: They are used for storing data with
two possible states such as whether a respondent is male or female. Logical variables can hold either the character ‘Y’ or the character ‘N’ (which may also be entered as ‘1’ or ‘0’).
o Example: § Are you ill? Yes/No § Sex: Male/Female § Marital Status: 0/1
0: married 1: single
• ‘Date’ variables: They are used to store dates. Dates can be entered under
the American (i.e. mm/dd/yyyy), European (i.e. dd/mm/yyyy) or the Swedish (i.e. yyyy/mm/dd) formats. The good thing in using EpiData for date variables is that EpiData can help you to control the dates you are entering them. So if you have an idea about your questionnaires’ dates range, EpiData will only allow you to enter these valid dates. Example: if you know your informants’ date of birth has to be between January 1st, 1980 and December 31st, 2000; Then EpiData will not allow any date outside this range to be entered, for example January 1st, 1979.
10
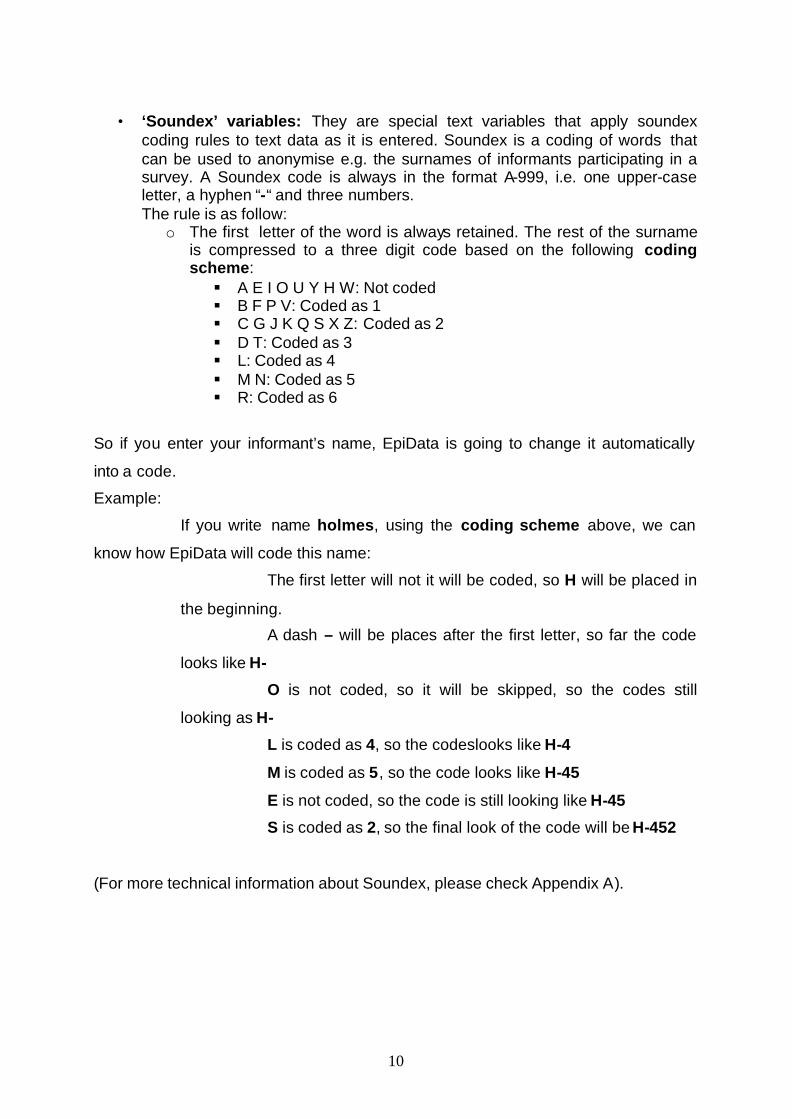
• ‘Soundex’ variables: They are special text variables that apply soundex
coding rules to text data as it is entered. Soundex is a coding of words that can be used to anonymise e.g. the surnames of informants participating in a survey. A Soundex code is always in the format A-999, i.e. one upper-case letter, a hyphen “-“ and three numbers. The rule is as follow:
o The first letter of the word is always retained. The rest of the surname is compressed to a three digit code based on the following coding scheme: § A E I O U Y H W: Not coded § B F P V: Coded as 1 § C G J K Q S X Z: Coded as 2 § D T: Coded as 3 § L: Coded as 4 § M N: Coded as 5 § R: Coded as 6
So if you enter your informant’s name, EpiData is going to change it automatically
into a code.
Example:
If you write name holmes, using the coding scheme above, we can
know how EpiData will code this name:
The first letter will not it will be coded, so H will be placed in
the beginning.
A dash – will be places after the first letter, so far the code
looks like H-
O is not coded, so it will be skipped, so the codes still
looking as H-
L is coded as 4, so the codeslooks like H-4
M is coded as 5, so the code looks like H-45
E is not coded, so the code is still looking like H-45
S is coded as 2, so the final look of the code will be H-452
(For more technical information about Soundex, please check Appendix A).

11
5. How to download EpiData setup file from the internet
• Open your internet browser window (i.e. Internet explorer or Netscape explorer).
• Go to EpiData homepage: www.epidata.dk
• When the whole page is loaded, it should look like the picture below:
• On the top of this page there is an option called Download latest here like the
picture below:
• This link will lead you to the page with the latest versions of EpiData, click over
latest here link.

12
• A new page will open, called EpiData - freeware like the picture below:
• This page contains EpiData setup file under different languages. You can find
help files and other statistical programs as well. For this guideline, we will explain
how to download EpiData, setup file, in English language.
• You will find a section called English (like the picture below) with three options:
Flowchart, 4 page Intro, Complete Setup, and Extended help (pdf):
13
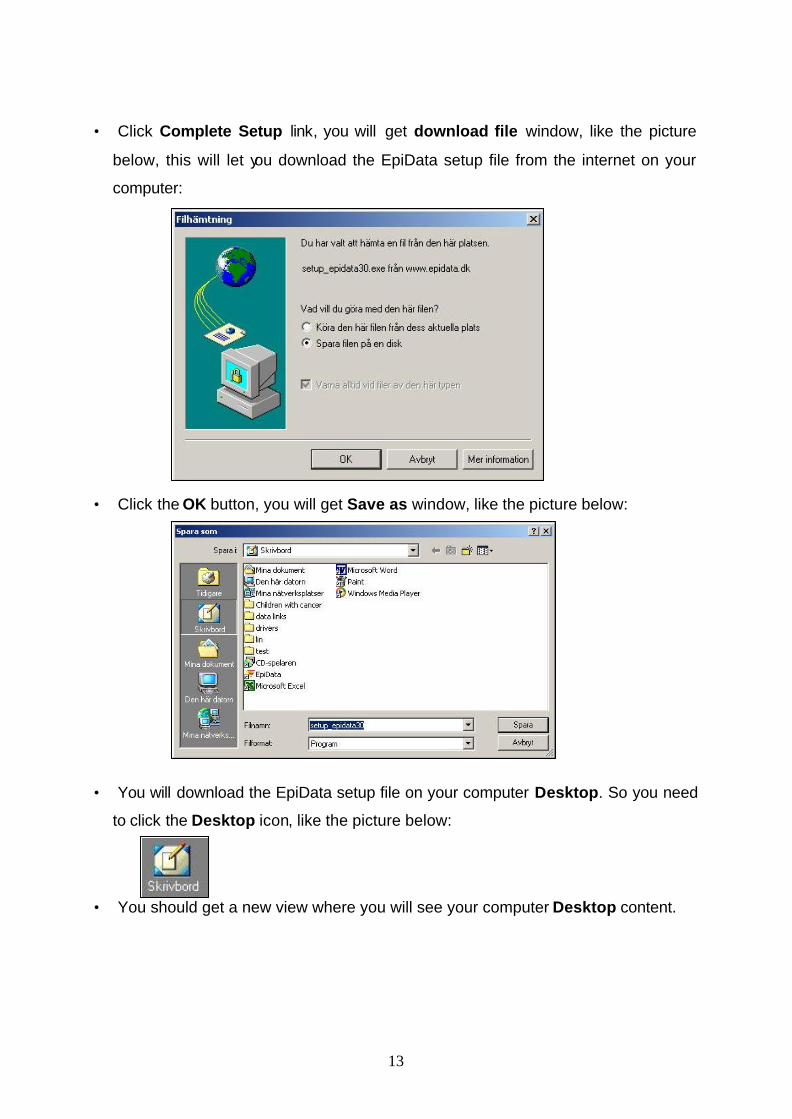
• Click Complete Setup link, you will get download file window, like the picture
below, this will let you download the EpiData setup file from the internet on your
computer:
• Click the OK button, you will get Save as window, like the picture below:
• You will download the EpiData setup file on your computer Desktop. So you need
to click the Desktop icon, like the picture below:
• You should get a new view where you will see your computer Desktop content.
14
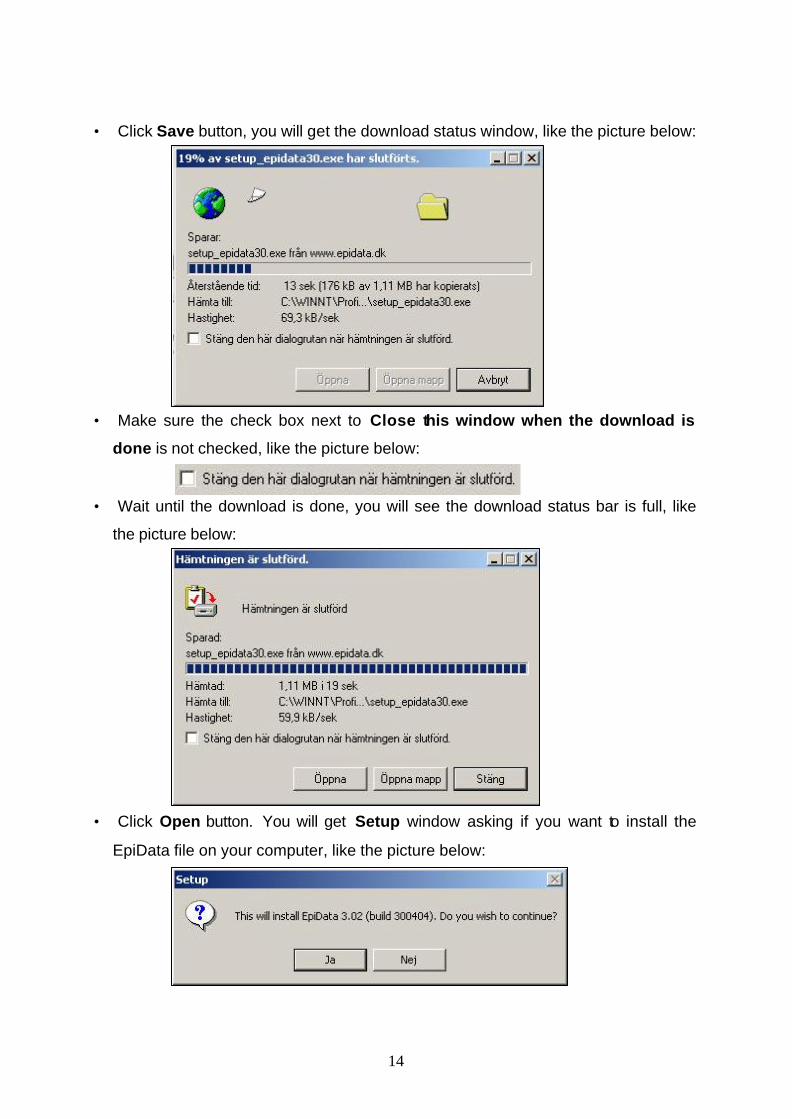
• Click Save button, you will get the download status window, like the picture below:
• Make sure the check box next to Close this window when the download is
done is not checked, like the picture below:
• Wait until the download is done, you will see the download status bar is full, like
the picture below:
• Click Open button. You will get Setup window asking if you want to install the
EpiData file on your computer, like the picture below:
15
• Now the EpiData Setup file has been downloaded on your computer.
• Click the Yes button, to be able to run this file in your computer system.
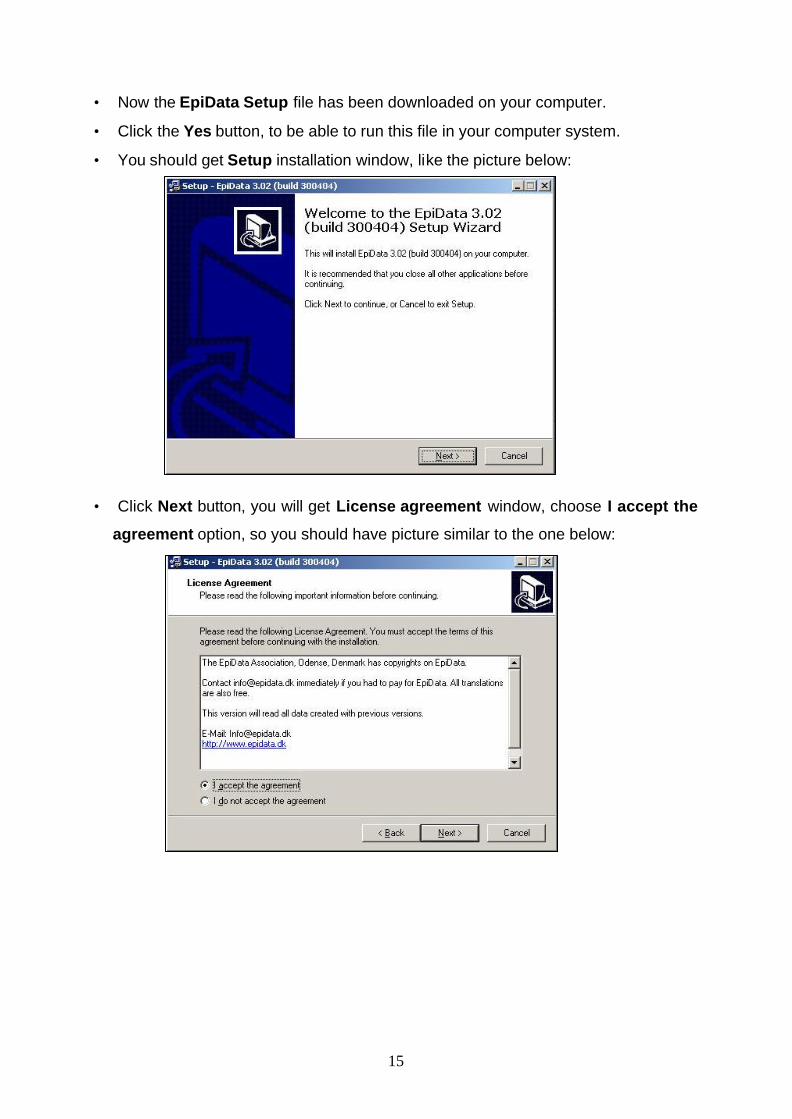
• You should get Setup installation window, like the picture below:
• Click Next button, you will get License agreement window, choose I accept the
agreement option, so you should have picture similar to the one below:

16
• Click Next button, you will come over Select destination directory window, like
the picture below:
• Click Next button, you will get Select Start Menu Folder window, like the picture
below:
17
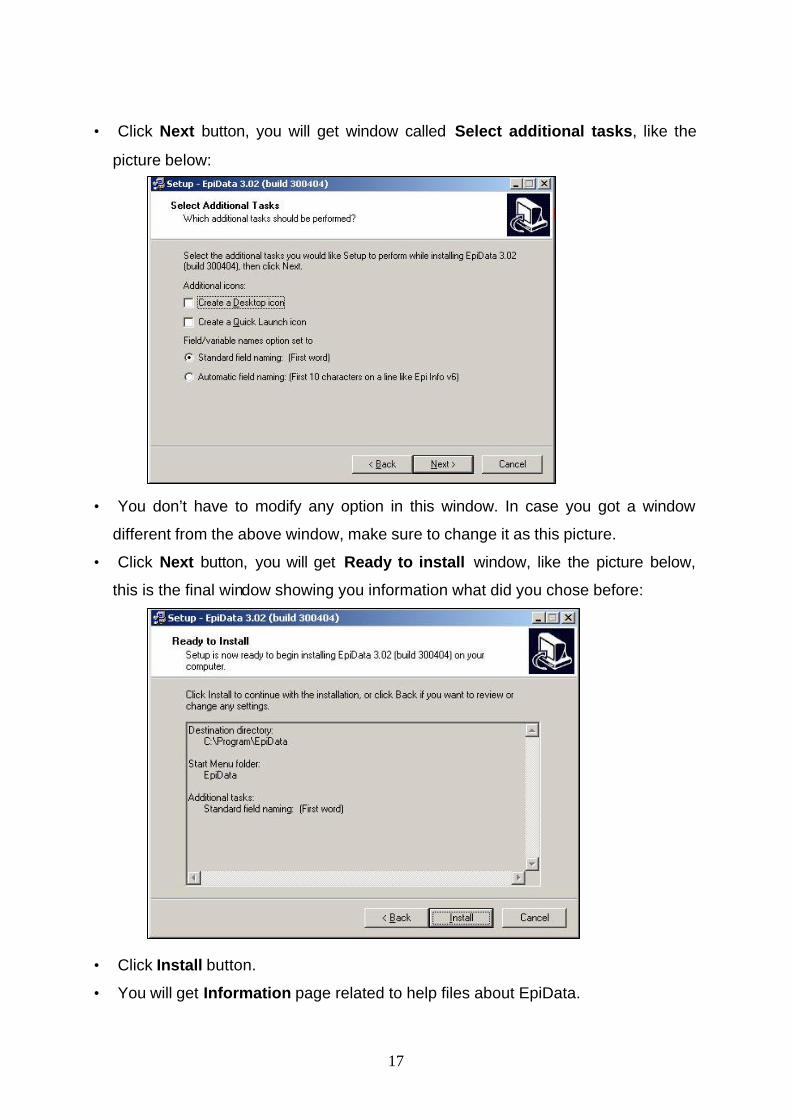
• Click Next button, you will get window called Select additional tasks, like the
picture below:
• You don’t have to modify any option in this window. In case you got a window
different from the above window, make sure to change it as this picture.
• Click Next button, you will get Ready to install window, like the picture below,
this is the final window showing you information what did you chose before:
• Click Install button.
• You will get Information page related to help files about EpiData.

18
• Click Next button, you will get new window confirming you finished installing
EpiData software, like the picture below:
• Click Finish button. The window will disappear. Now EpiData has been
successfully installed and you can start using it!

19
7. How to open EpiData
• You will learn how to build-up a questionnaire by working on an example exercise.
• Please try to follow the same example as below, and you will be learning EpiData
by practicing it.
• Before starting your questionnaire, create a folder on your computer desktop. In
this guideline we take the folder name as Children with cancer.
• Make sure you have everything minimized in front of you, so you can see your
computer desktop window, like the picture below:
• Then do one mouse left click on the Start button at the bottom-left of your screen.
You will get the start windows list. Like the picture below:

20
• When you get the list, highlight the word Program so you will get a sublist
showing all programs installed on your computer, like the picture below:
Try to find EpiData name. Once you find it, highlight it with the mouse cursor,
then you will get a sublist where it has the program’s name, as the picture below:

21
• You will get the list of options under EpiData choice, select EpiData 3.0 and do
one mouse left-click:
• EpiData program will be launched and it will shows you Welcome to EpiData
window, like the picture below:

22
• Click the close button to close the welcome window and to be back to EpiData
main screen, like the picture below:
• You need to specify where you will write your variable name. There are two ways
to do it in EpiData. We will introduce one method in this guideline. It’s the first word
in the question, so we need to activate this option in EpiData to let the program
takes the first word of each question as the variable name.

23
8. How to set EpiData options before starting a questionnaire:
• Click File option in the Menu bar, you will get a sublist, like the picture below:
• Highlight the word Options, like the picture below:
• Click the Options selection, you will get Options window like the picture below:
• This window includes six tags:
§ Editor
§ Show data form
§ Create data file
§ Documentation
§ Advanced
§ File associations

24
• In this guideline, we will deal mainly with two tags: Create data file and
Advanced.
§ Click Create data file tag, you will get a new window like the picture below:
§ In this tag, you will find How to generate field name selection area. Make
sure the first choice First word in question in field name is selected.
§ The small circle located before it has to be selected.
§ It should look like the look like the picture below:

25
• Then click Advanced tag, you will get a picture like the one below:
• We need to let the questionnaire starts with number 1001 instead o f 1.
• In this tag, you can do that. Under ID number fields area, you have First ID
number in new data file option. By default you will get number 1 as it is in the
above picture. Write 1001 instead of 1, so it has to look like the picture below:
The reason to start with number 1001 instead of 1 is to make the number of digits of ”ID Number stays consistently the same during the data entry process. So, do not start with number 1, then you continue as 2, 3, 4, ….10, 11, 12, 13,…100, etc… But Start with number 1001, and you continue as 1002, 1003, 1004, 1005, …1100, 1101, 1102, ….2000, ….etc…
• Then you click the OK button. So you will be back to EpiData main screen.
EpiData will save the new options automatically, so you do not need to save your
changes.

26
9. How to start a questionnaire from scratch:
• Now EpiData is ready to start building your new questionnaire!
• Click Define Data button, you will get a sublist with two options, like the picture
below:
• Click New .QES file option to start-up new questionnaire sheet.
• You will get a blank sheet, like the picture below:
• In this section, you need to write down your questions. We will introduce here a
sample of questions, which contains different types of data.

27
• The following questions represent a part of a questionnaire of a population-based
study done on “parents who lost their child due to cancer” in Sweden.
ID Number: ____________________
Question 1. Is it true that you lost your child to cancer?
O Yes
O No
Question 2. Are you male or female?
O I am a male
O I am a female
Question 3. At the onset of your child’s illness, were you …
O employed? State occupation: ______________________
O on maternity/paternity leave?
O unemployed?
O on sick-leave/early retirement?
O studying?
O a home maker?
Note: if you have been unemployed, please skip the question below and go to
question number 5.
Question 4. How much did you earn (per month) when your child was sick?
______ SEK
Question 5. When was the child you lost born?
___________________ (year / month / day)

28
• Start writing these questions into EpiData, exactly as they look like on paper. So,
you can practice gradually how to build-up a questionnaire in EpiData.
• After writing your questions, you should get on your screen a screen window
similar to the picture below:
• Save your work after finishing typing the questions. To do that, click over the
Save disk icon .
• After clicking on Save button, you will get Save as window, like the picture below:

29
• Click the small arrow sign you will get list of places where to save your work.
Chose Desktop like the picture below:
You will see the content of your Desktop. Among them there is the folder Children
with cancer you have created at the beginning of the work.
• Double click on this folder, to open it, you will get a picture like the one below:
• Under the text box File name take out the default name Untitled 1 and write
questionnaire. You should have a picture similar to the one below:
• Then click Save button.

30
§ You will be back to EpiData main screen. Please notice in the Title bar of EpiData
screen you will see your file name there, you will read questionnaire.qes like in
the picture below:
In real case, when you have your own questionnaire written in Word file, you can use it as well in EpiData, by using copy from Word, and paste into EpiData file, and you continue the work as suggested below.

31
• Each field in your questionnaire makes a variable. Fields might look like each
other but in fact they can differ when you want to enter them as data. In this
example, you had five questions, but they would not make five fields, but would be
much more. Now you will see below how EpiData will read them:
The above information describes the variables’ types theoretically. Later on you will
see how you can tell EpiData to read their types technically/officially.
This is field 1, its type is Auto-ID number.
This is field 2, its type is Boolean (yes/no).
This is field 3, its type is Boolean (male/female).
This is field 4, its type is number.
This is field 5, its type is text.
This is not a field, but a condition that you can apply in EpiData later on.
This is field 6, its type is number. This is field 7, its type is date.

32
• You can always preview your questionnaire form in EpiData, to see how it looks
like when you will start doing data entry. Use the Preview data form button
• When you click the Preview data form you will notice one light blue text box and
two yellow text boxes.
You can enter data in these boxes. But we will not do it for the moment because this
is a preview form where you can never enter data. As you see, in some questions
there are no textboxes or places to enter data in. The form is still incomplete. The
intention here was to show you gradually how the form will look like!.
• To go back to your questionnaire, click File in the menu bar, you will get a list, like
the following picture:

33
• Bring the mouse cursor over the option Close form and do one mouse left-click,
like the picture below.
• This will close the Preview form and takes you back to your questionnaire.
• Although the questionnaire has five questions, but it contains seven variables,
which are: Auto-ID number, Boolean (yes/no), Boolean (male/female), number,
text, and date.
34
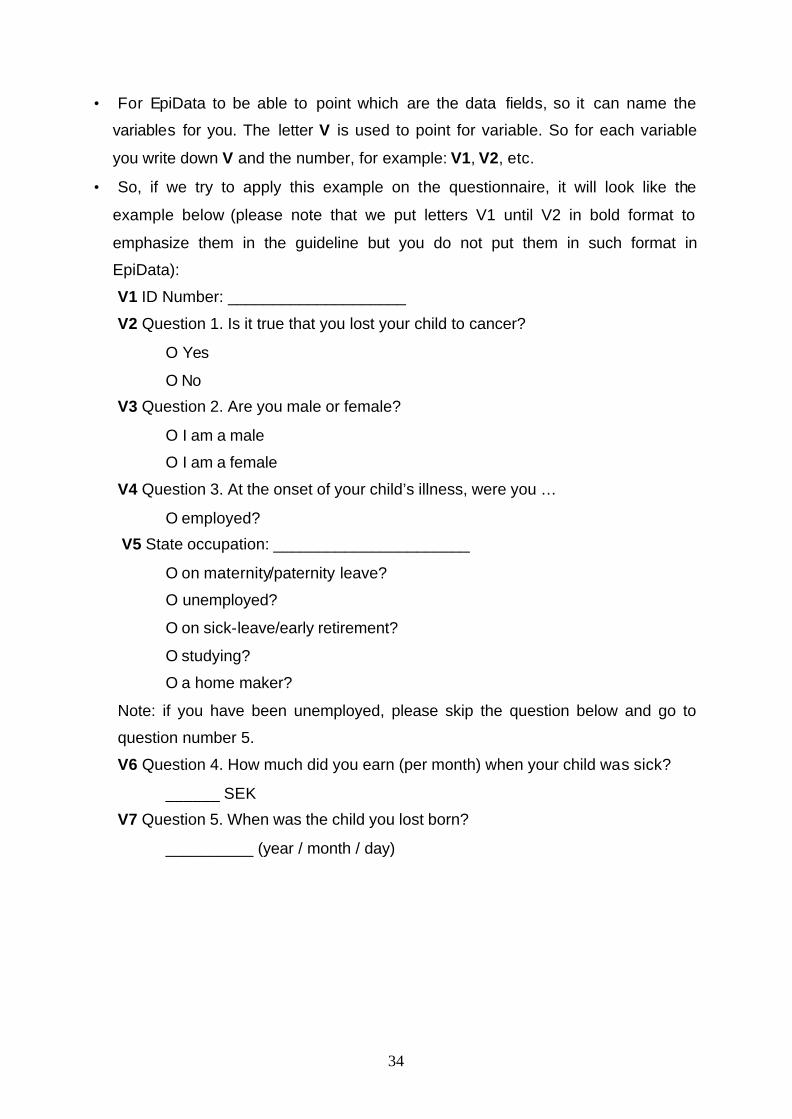
• For EpiData to be able to point which are the data fields, so it can name the
variables for you. The letter V is used to point for variable. So for each variable
you write down V and the number, for example: V1, V2, etc.
• So, if we try to apply this example on the questionnaire, it will look like the
example below (please note that we put letters V1 until V2 in bold format to
emphasize them in the guideline but you do not put them in such format in
EpiData):
V1 ID Number: ____________________
V2 Question 1. Is it true that you lost your child to cancer?
O Yes
O No
V3 Question 2. Are you male or female?
O I am a male
O I am a female
V4 Question 3. At the onset of your child’s illness, were you …
O employed?
V5 State occupation: ______________________
O on maternity/paternity leave?
O unemployed?
O on sick-leave/early retirement?
O studying?
O a home maker?
Note: if you have been unemployed, please skip the question below and go to
question number 5.
V6 Question 4. How much did you earn (per month) when your child was sick?
______ SEK
V7 Question 5. When was the child you lost born?
__________ (year / month / day)

35
• You will get on your computer screen a picture similar to the one below:
• If you try to preview your questionnaire, you would get a picture similar to the one
below:
• Your questionnaire form is not complete yet. To close the Preview form you click
File and then you click Close Form option.

36
• As mentioned previously, each variable has different type. We need to specify this
when we write in EpiData. So each variable is expressed in different way:
§ Auto-ID Number variable is expressed as <IDNUM>
§ Boolean (yes/no, male/female) variable is expressed as <Y>
§ Number variable is expressed as #. So each digit is one #.
Text variable can be written in two ways:
• Either using the underscore character_ which each one of them represents one
letter. The number of underscore characters defines the length of the field. Text
fields accept all characters. The maximum field length is 80 characters.
• If you want to write down your variable in capital letter you can use the variable
type <A>. The number of characters allowed would be how many character’s
space you put between the sign < and the sign >.
EpiData can accept up-to 80 characters.
• Note: Soundex variable will not be covered in this guideline. For further
information you can check www.epidata.dk site.

37
So modify your questionnaire in EpiData as follow:
V1 ID Number: <IDNUM>
V2 Question 1. Is it true that you lost your child to cancer? <Y>
Y Yes
N No
V3 Question 2. Are you male or female? #
1 I am a male
2 I am a female
9 Unknown
V4 Question 3. At the onset of your child’s illness, were you #
1. employed?
V5 state occupation: <A >
2. on maternity/paternity leave?
3. unemployed?
4. on sick-leave/early retirement?
5. studying?
6. A home maker?
9. Unknown
Note: You can write <A > or underscore character _ sign after the sentence V5
state occupation. We will assume here that you want your data to be in capital
letters so we used <A > instead of underscore _ character.
To specify how many letters to fit in, you can use the code writer option.
• After typing the sentence “V5 state occupation”, click over the code writer
icon ; it will turn into light grey background and nothing new will happen
just after you click it.
Replace the symbol O by numbers for the choices. This will help you for Data entry.
This sentence will be used in data entry, if you will get a questionnaire where sex is not mentioned.

38
• Then place the mouse cursor after the word occupation then type <A you
should get a window exactly after you type this letter, like the picture below:
• This option will helps you to specify the length of the text field you want to
write. Which means how many letters you want to let the person doing data
entry to write in. You can write up to 80 characters. In our case here we will
choose 20.
• So type 20 and press OK button.
• The window should disappear and you will be back to your questionnaire form,
like the picture below:
V6 Question 4. How much did you earn (per month) when your child was sick?
##### SEK
V7 Question 5. When was the child you lost born?
<yyyy/mm/dd> (which represents year / month / day)
• The person is expected to chose one out of four options, so we put one #, since it represents one digit.
• In this example, there are two variables in the same question. EpiData will be able to identify each variable using the variable type (i.e. # and <A > signs) and will identify the variable name using the V4 and V5 codes.

39
• After modifying your questionnaire, you are supposed to have a picture similar
to the one below:
• Save your work after finishing typing the questions. To do that, click over the
save disk icon .

40
• Try to preview your questionnaire form now, click over the Preview data form
button, you should get a picture similar to the one below:
• The form looks ready to enter data in, but you can’t do this here, because it is
a preview form.
• To be able to use this questionnaire, you need to create a file called Data file
which will be the form through which you will enter your data into EpiData.
• Close now the preview form. And go back to your questionnaire form. You
should get a picture similar to the one below:

41
• Use the Make Data File button
• Do one mouse left-click on it, you will get a list with two options, like the picture
below:
• Select the first option New .QES file option, like the picture below:
• Do one mouse left-click on it. You should get a window called create a data
file from .QES file, like the picture below:
• This will confirm that EpiData will create your questionnaire data entry file in
the folder you have created in the beginning, which is children with cancer in
this case.
• Press the OK button
• You will get another window called data file label for questionnaire.rec, like
the picture below.
• You can enter here a short text (up to 50 characters). The data file label is
saved as part of the data file (.REC file). The data file label is shown as part of
Document data file and is exported when data files are exported to STATA
software format (STATA is a statistical analysis software, similar to SPSS, and
SAS). We will not cover this option in our guideline. We will assume that you
will export your data into SPSS.

42
• Press the OK button
• You will get an Information window confirming that your file questionnaire.rec
has been successfully created, like the picture below:
• Click OK button. EpiData will close your questionnaire form and give you a
picture similar to the one below:
• At this point no file is open.
• As a third step Next, is to use Checks option.
• So far, the questionnaire is ready to start data entry, but you need to put
conditions for your data entry to avoid any errors related to data entry
operation. We will discuss first the errors that can result from data entry.

43
9. How to reduce errors in data entry
9.1 Errors occurring during data entry • So far we have seen how EpiData reads the questionnaire. There is still
another part which we did not explain yet. While entering a questionnaire,
errors can happen. There are six main types of error that might occur:
a. Transposition: They are usually typing or keyboard errors. (Example:
39 becomes 93).
b. Copying errors: They are another type of keyboard error. (Example: to
enter number 1 as number 7, or letter O as number 0).
c. Consistency errors: When two or more responses are contradictory.
Example: the informant sex is answered as female, and the person had
prostate cancer.
d. Range errors: When answers lie outside of possible values. (Example:
having a 30 years old mother to a 28 years old child!).
e. Coding errors: Sometimes data are coded after collection. This
involves adding a coding stage to the survey which can introduce error.
Questionnaires should be piloted so that groups, treatments etc. can be
coded directly onto the data collection form at the interview. Errors can
also be minimised by using a consistent coding scheme.
f. Routing errors: The interviewer asks the wrong questions or asks
questions in the wrong order. This is usually caused by a poorly
designed questionnaire or badly trained data collection staff.
44
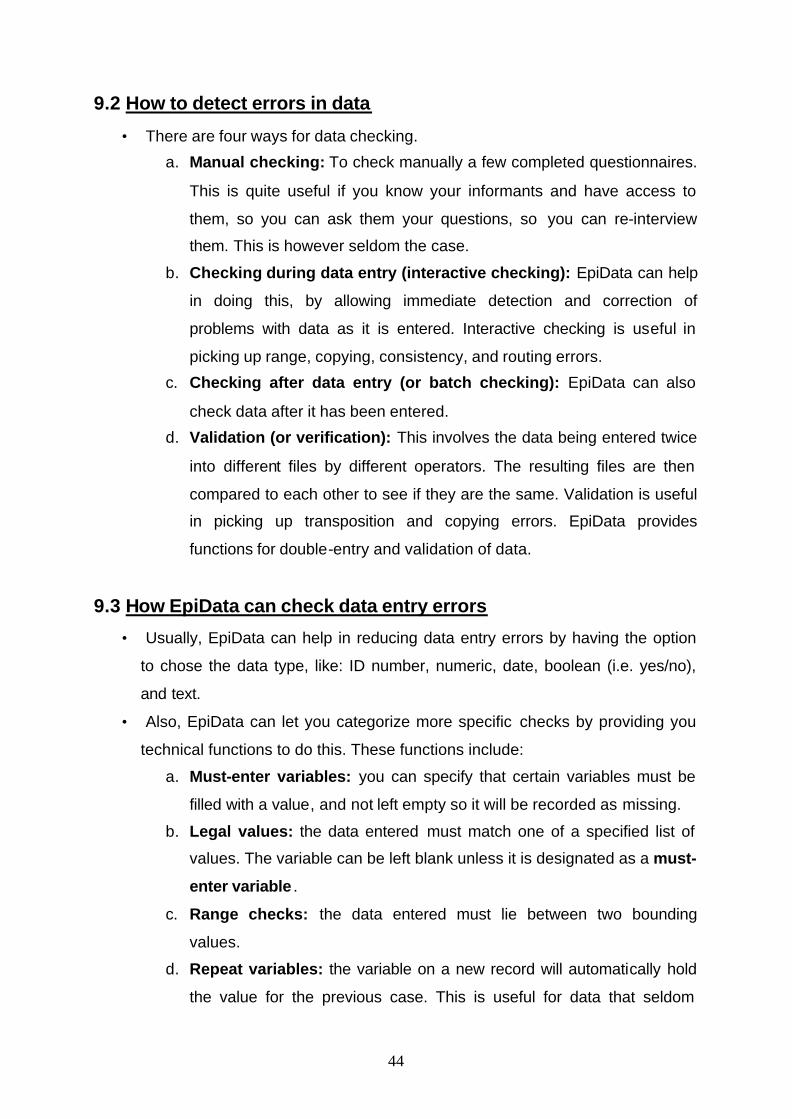
9.2 How to detect errors in data
• There are four ways for data checking.
a. Manual checking: To check manually a few completed questionnaires.
This is quite useful if you know your informants and have access to
them, so you can ask them your questions, so you can re-interview
them. This is however seldom the case.
b. Checking during data entry (interactive checking): EpiData can help
in doing this, by allowing immediate detection and correction of
problems with data as it is entered. Interactive checking is useful in
picking up range, copying, consistency, and routing errors.
c. Checking after data entry (or batch checking): EpiData can also
check data after it has been entered.
d. Validation (or verification): This involves the data being entered twice
into different files by different operators. The resulting files are then
compared to each other to see if they are the same. Validation is useful
in picking up transposition and copying errors. EpiData provides
functions for double-entry and validation of data.
9.3 How EpiData can check data entry errors
• Usually, EpiData can help in reducing data entry errors by having the option
to chose the data type, like: ID number, numeric, date, boolean (i.e. yes/no),
and text.
• Also, EpiData can let you categorize more specific checks by providing you
technical functions to do this. These functions include:
a. Must-enter variables: you can specify that certain variables must be
filled with a value, and not left empty so it will be recorded as missing.
b. Legal values: the data entered must match one of a specified list of
values. The variable can be left blank unless it is designated as a must-
enter variable .
c. Range checks: the data entered must lie between two bounding
values.
d. Repeat variables: the variable on a new record will automatically hold
the value for the previous case. This is useful for data that seldom

45
changes (example: location codes). This option will not be discussed in
this guideline, so we recommend you not to use it before checking other
guidelines, which you can find under EpiData home page
(www.epidata.dk).
e. Conditional jumps: you can check a variable for values that if entered
will cause the cursor to jump to a specified variable. Otherwise the
cursor will move to the next variable. Conditional jumps are used to
implement questionnaire routing during data entry.
f. Programmed checks: EpiData also provides an easy-to-use block-
structured programming language that allows you to program more
complex checking procedures (example: consistency checks).
• The checks function provides one type of data checking called interactive
checking (i.e. the data is checked as it is entered). The Validate file function
allows for Batch (i.e. all cases at once) checking of data that has been double-
entered.

46
10. How to check a questionnaire
• Make sure your EpiData screen is open and no file is there, like the picture below:
• Click the Checks button , you will get a window called Select data file for
checks, like the picture below:
• By default, EpiData would take you to the last folder you were working, in this
case it is Children with cancer.

47
• Select the file questionnaire.rec so you would see it in Filename text box, like
the picture below:
• Once you see the filename questionnaire has been selected, click Open button.
• You will get your questionnaire in Data form with window inside, called
questionnaire.chk like the picture below:
• When you have active variable’s cell, you can see at the bottom of your screen
(where you have the circle in the above picture) the variable’s name, type,
conditions allowed and length.

48
• You will see a preview of your questionnaire in data entry form. The first sentence
starting with V1 has the ID number and it shows number 0, this will shows only
here, but later on when you start your data entry it will be 1001, as it has been set
in the options at the beginning of this guideline.
• You can not do data entry at this level. You need to adjust the conditions for data
entry, for each variable. You can do that using the questionnaire.chk window that
is showing in your EpiData screen, like the one below:
• Now, we will explain each part of this window:
§ The first line is the window name, which is here questionnaire.chk.
§ Then comes a list box starting with V2, like the picture below:
§ The list box showing which variable is active, where changes will take place in.
§ The line below list box, here in this example starts with Question 1… shows
little of the beginning of your question corresponding to the above active
variable.
§ Range, Legal text box: this is where you put the conditions/restrictions for
data entry, Later on will be explained with more details.
49
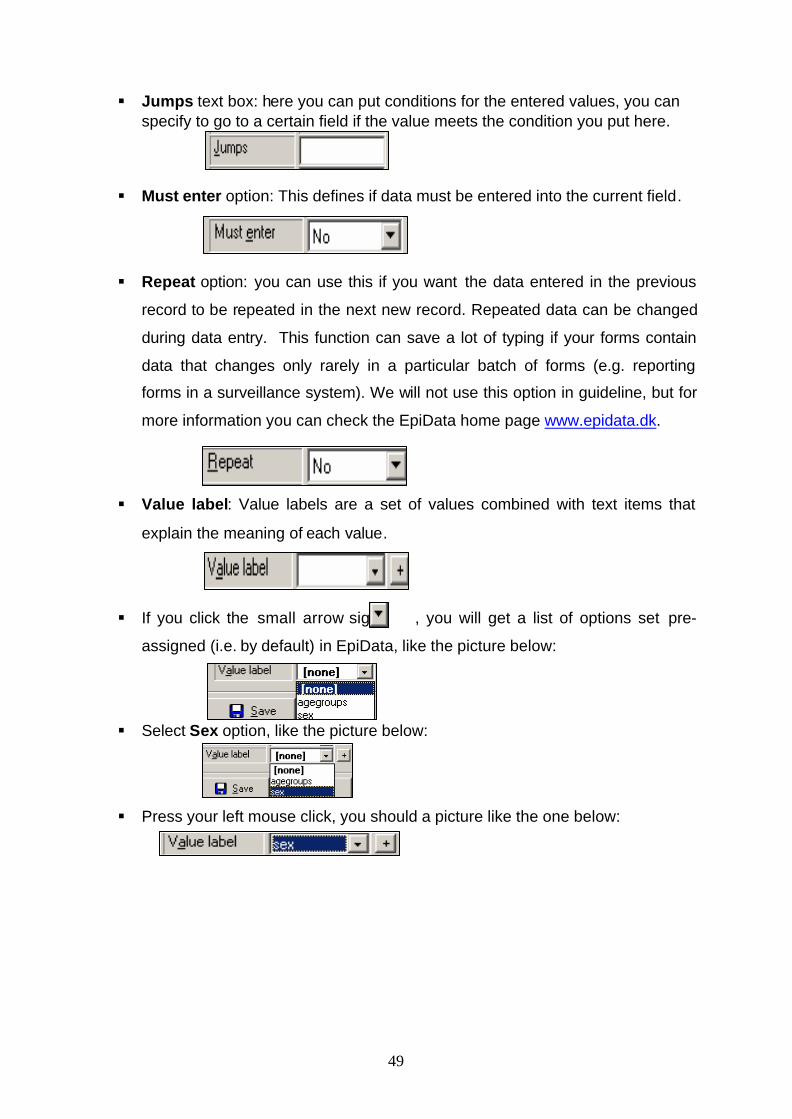
§ Jumps text box: here you can put conditions for the entered values, you can specify to go to a certain field if the value meets the condition you put here.
§ Must enter option: This defines if data must be entered into the current field.
§ Repeat option: you can use this if you want the data entered in the previous
record to be repeated in the next new record. Repeated data can be changed
during data entry. This function can save a lot of typing if your forms contain
data that changes only rarely in a particular batch of forms (e.g. reporting
forms in a surveillance system). We will not use this option in guideline, but for
more information you can check the EpiData home page www.epidata.dk.
§ Value label: Value labels are a set of values combined with text items that
explain the meaning of each value.
§ If you click the small arrow sign , you will get a list of options set pre-
assigned (i.e. by default) in EpiData, like the picture below:
§ Select Sex option, like the picture below:
§ Press your left mouse click, you should a picture like the one below:

50
§ If you press the sign, you will get a new window called Edit value labels,
like the one below:
• This was an example of value label option. Press Cancel option, you should
return back to the previous screen, like the picture below:
51
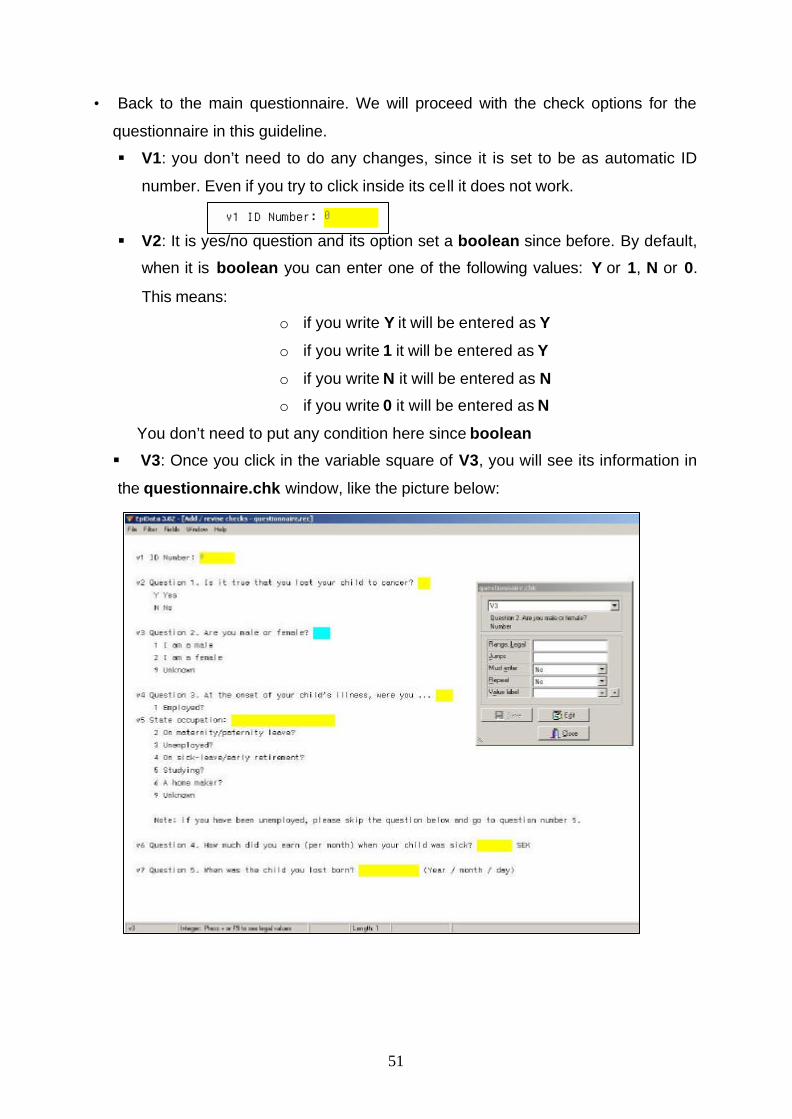
• Back to the main questionnaire. We will proceed with the check options for the
questionnaire in this guideline.
§ V1: you don’t need to do any changes, since it is set to be as automatic ID
number. Even if you try to click inside its cell it does not work.
§ V2: It is yes/no question and its option set a boolean since before. By default,
when it is boolean you can enter one of the following values: Y or 1, N or 0.
This means:
o if you write Y it will be entered as Y
o if you write 1 it will be entered as Y
o if you write N it will be entered as N
o if you write 0 it will be entered as N
You don’t need to put any condition here since boolean
§ V3: Once you click in the variable square of V3, you will see its information in
the questionnaire.chk window, like the picture below:

52
• This variable is about the informant’s sex, EpiData provides you a default label
for sex. In questionnaire.chk window, click the small arrow next to Value
label, you should get a list box containing default options (i.e. they have been
installed once you installed EpiData):
§ None in case you don’t want to select any option.
§ Agegroups in case you want to enter age categories for your informants.
§ Sex: for gender, which is applicable in our case now.
§ Select the option sex, like the picture below (so you see the blue background
behind the word sex):
§ When sex option is selected, click the plus sign in the same row as value
label.
§ You should get a new window called Edit value labels like the picture below:
§ The value labels you see under Sex is set by default when you use EpiData.
§ Click Accept and Close option in the menu bar of this window.
§ You will be back to EpiData main screen.
§ Click Save button
§ Once you click the Save button you will it changing into grey colour like this
picture:
§ Now you are done with variable V3, click in the cell of variable V4 which is
located at the end of V4 row.

53
§ Once you click inside this cell, you will see the changes in the list box of
questionnaire.chk window, where you can read V4 name, like the picture
below where they are surrounded in circles:
• Now you need to add the value labels for these options. To do that, you use
Value label field:
• If you click the small arrow inside this field, like the picture below, you will find
that this field contains agegroups and sex fields:

54
• You need to add new field for the label V4 which is related to parents’
employment status. Click the plus sign button , you will get Edit value
labels window like the picture below:
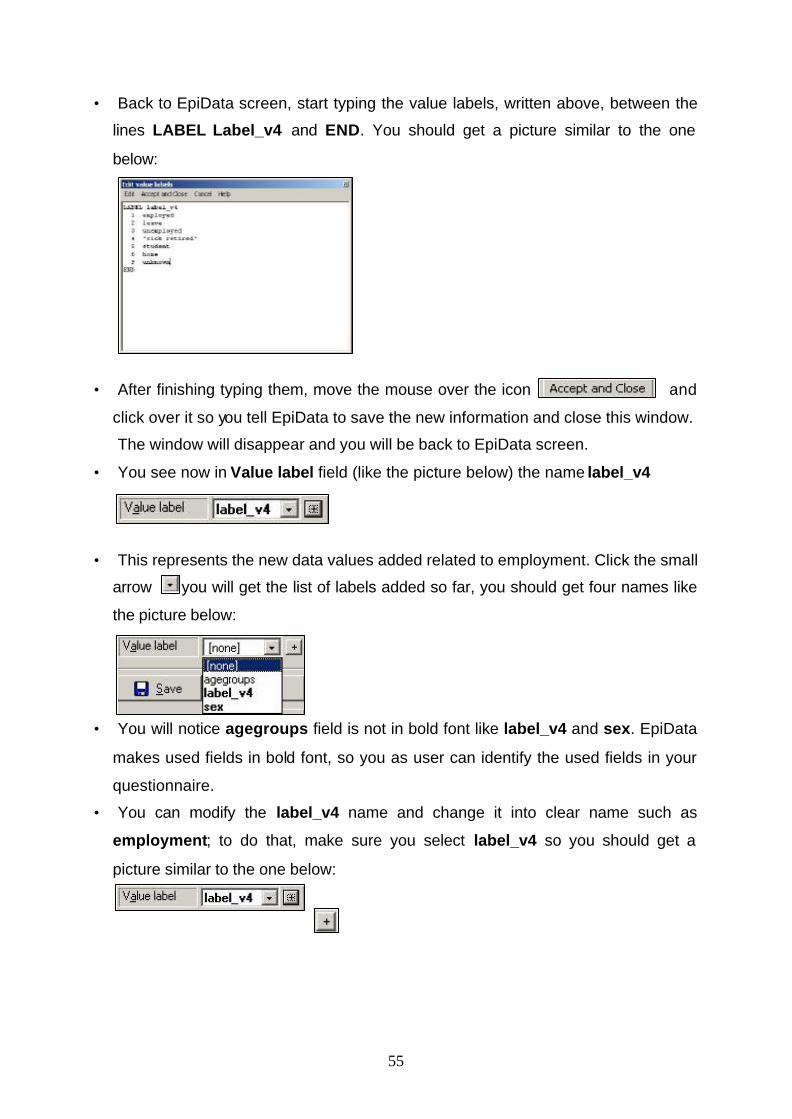
• You need to write down the labels you want to add and their values, in this
example, the labels are related to the nine options in your questionnaire:
employed, leave, unemployed, sick leave/early retirement, student, home, or
unknown. Each of these options will be given a value which is a number, so
they will be as follow:
1 employed
2 leave
3 unemployed
4 “sick retired”
5 student
6 home
9 unknown
Note:
- You can write your labels as keywords, but if you want to write more
then one word per keyword, then you need to put it between quotations,
like in number 4: “sick retired”.
- Assign unknown variables numbers like 9, or 99 to keep them
distinguished in data entry.
55
• Back to EpiData screen, start typing the value labels, written above, between the
lines LABEL Label_v4 and END. You should get a picture similar to the one
below:
• After finishing typing them, move the mouse over the icon and
click over it so you tell EpiData to save the new information and close this window.
The window will disappear and you will be back to EpiData screen.
• You see now in Value label field (like the picture below) the name label_v4
• This represents the new data values added related to employment. Click the small
arrow , you will get the list of labels added so far, you should get four names like
the picture below:
• You will notice agegroups field is not in bold font like label_v4 and sex. EpiData
makes used fields in bold font, so you as user can identify the used fields in your
questionnaire.
• You can modify the label_v4 name and change it into clear name such as
employment; to do that, make sure you select label_v4 so you should get a
picture similar to the one below:
56
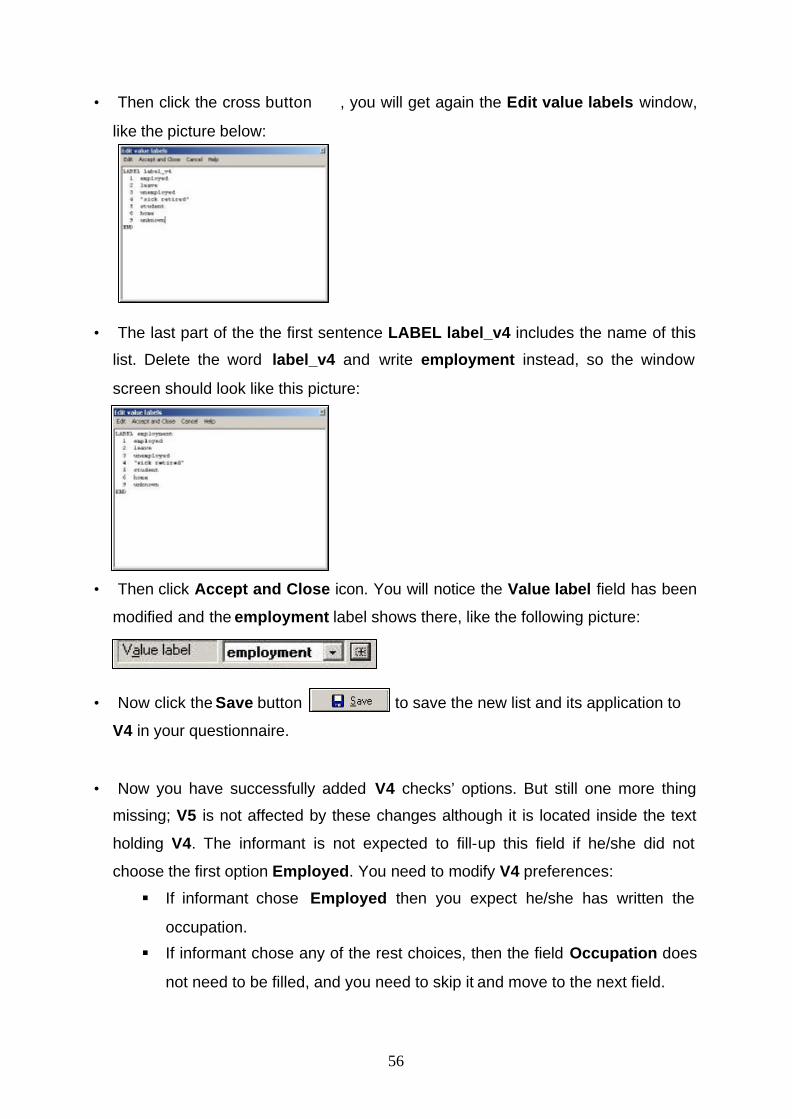
• Then click the cross button , you will get again the Edit value labels window,
like the picture below:
• The last part of the the first sentence LABEL label_v4 includes the name of this
list. Delete the word label_v4 and write employment instead, so the window
screen should look like this picture:
• Then click Accept and Close icon. You will notice the Value label field has been
modified and the employment label shows there, like the following picture:
• Now click the Save button to save the new list and its application to
V4 in your questionnaire.
• Now you have successfully added V4 checks’ options. But still one more thing
missing; V5 is not affected by these changes although it is located inside the text
holding V4. The informant is not expected to fill-up this field if he/she did not
choose the first option Employed. You need to modify V4 preferences:
§ If informant chose Employed then you expect he/she has written the
occupation.
§ If informant chose any of the rest choices, then the field Occupation does
not need to be filled, and you need to skip it and move to the next field.
57
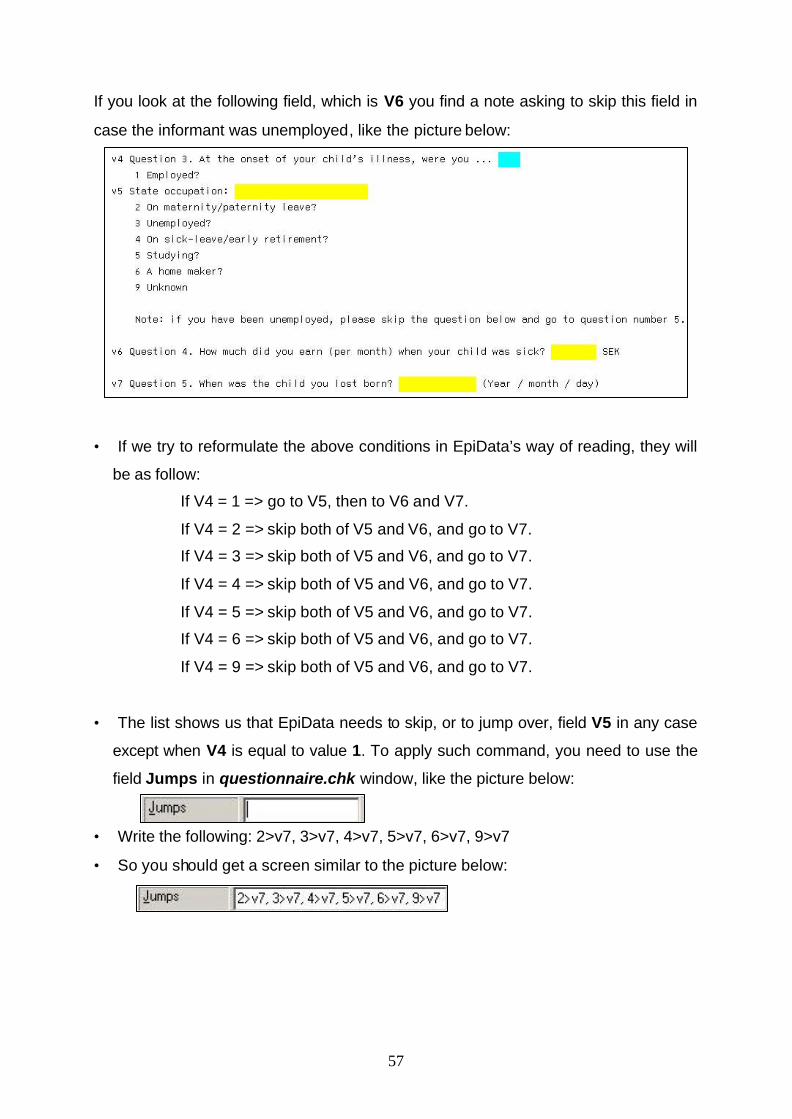
If you look at the following field, which is V6 you find a note asking to skip this field in
case the informant was unemployed, like the picture below:
• If we try to reformulate the above conditions in EpiData’s way of reading, they will
be as follow:
If V4 = 1 => go to V5, then to V6 and V7.
If V4 = 2 => skip both of V5 and V6, and go to V7.
If V4 = 3 => skip both of V5 and V6, and go to V7.
If V4 = 4 => skip both of V5 and V6, and go to V7.
If V4 = 5 => skip both of V5 and V6, and go to V7.
If V4 = 6 => skip both of V5 and V6, and go to V7.
If V4 = 9 => skip both of V5 and V6, and go to V7.
• The list shows us that EpiData needs to skip, or to jump over, field V5 in any case
except when V4 is equal to value 1. To apply such command, you need to use the
field Jumps in questionnaire.chk window, like the picture below:
• Write the following: 2>v7, 3>v7, 4>v7, 5>v7, 6>v7, 9>v7
• So you should get a screen similar to the picture below:

58
• Explanation for the code: the number 2 points at value two. The character >
points at jumping to another field. The word v7 points at the field where you want
the cursor to jump to while entering data. So in one sentence, you are telling
EpiData to jump to field v7 if you enter value 2. The same goes to the rest of the
sentence.
• Then click Save button to apply the new rules.
• Now you have finished entering V4 checks’ options.
• You can move to the next field V5. Do one mouse left-click inside the cell of V5.
• No special options to add for this field, since it is text field.
• Move to the second field, V6, it is related to the person’s salary. In Define Data
step, you already specified this field as number field so the person can not write
text in it. There is no specific condition for this, so you do not need to put any
checks options for it.
• Move the mouse cursor to the the last field V7 which is Date field, make sure to
have V7 as the set value in the questionnaire.chk like the picture below:
• You will notice the option Date (ymd) is written in this window, like in the picture
below:
• This means the field has been already defined as date, but you need to define the
intervals you are expecting, so to reduce data entry errors.
• In this example it is between the beginning of year 1995 (which means the first of
January year 1995) until the end of year 2000 (which means the 31st of December
year 2000).

59
• You write in the window questionnaire.chk in the field Range, Legal the dates
interval condition in the sequence (Year/Month/Day) which is:
1995/01/01–2000/12/31
• Make sure not to make a space character before and after the dash sign -, so
you should get on your screen a picture similar to the one below:
• Click Save button to memorize the new option in EpiData.
• Now, you finished setting up your questionnaire’s options. Click Close button

60
• You will be back to EpiData main page, like the picture below:
• Now EpiData has closed the Checks page here and returned back to its main
screen.
Questionnaire – data structure:
• EpiData is ready now to start entering the data. Before going into this step, try to
double check your file structure. This will let you check the questionnaire variables
and properties before starting data entry.
• Click Documents button in your work process toolbar
• You will get a sub-list, like the picture below:
• Select the first option File Structure, like the picture below:

61
• Now you can start entering data into the program. Here below there is a table for
virtual cases that you can enter them:
V1 ID Number
V2 Question 1.
Is it true that you lost your child to cancer?
V3 Question 2.
Are you male or female?
V4 Question 3. At the onset
of your child’s
illness, were you …
V5 If employed,
state occupation
V6 Question 4. How much
did you earn (per month) when your child was
sick?
V7 Question 5. When was
the child you lost born?
1001 Y 2 1 Teacher 20000 1995/01/12 1002 Y 1 3 1996/02/19 1003 Y 2 6 1998/10/09 1004 Y 2 1 Nurse 19000 1997/04/25 1005 Y 1999/03/13 1006 Y 1 5 1998/09/10 1007 Y 1 1 Driver 15000 2000/04/01 1008 Y 2 1 Under nurse 16000 1999/05/22 1009 Y 1 1998/11/11 1010 Y 1 1 Under nurse 16500 1998/07/15
• The first columns contains the ID number which is V1 in EpiData sheet. This is
automatically generated so you do not need to enter it by yourself. Therefore, we
made this column with a grey colour background.
• Back to EpiData window, click Enter Data button
• You should get now a new window called Open Window. Like the picture below:
• It will take you by default to your folder where you saved the questionnaire form,
which is Children with cancer.
• Select the questionnaire filename, and click Open button.
62
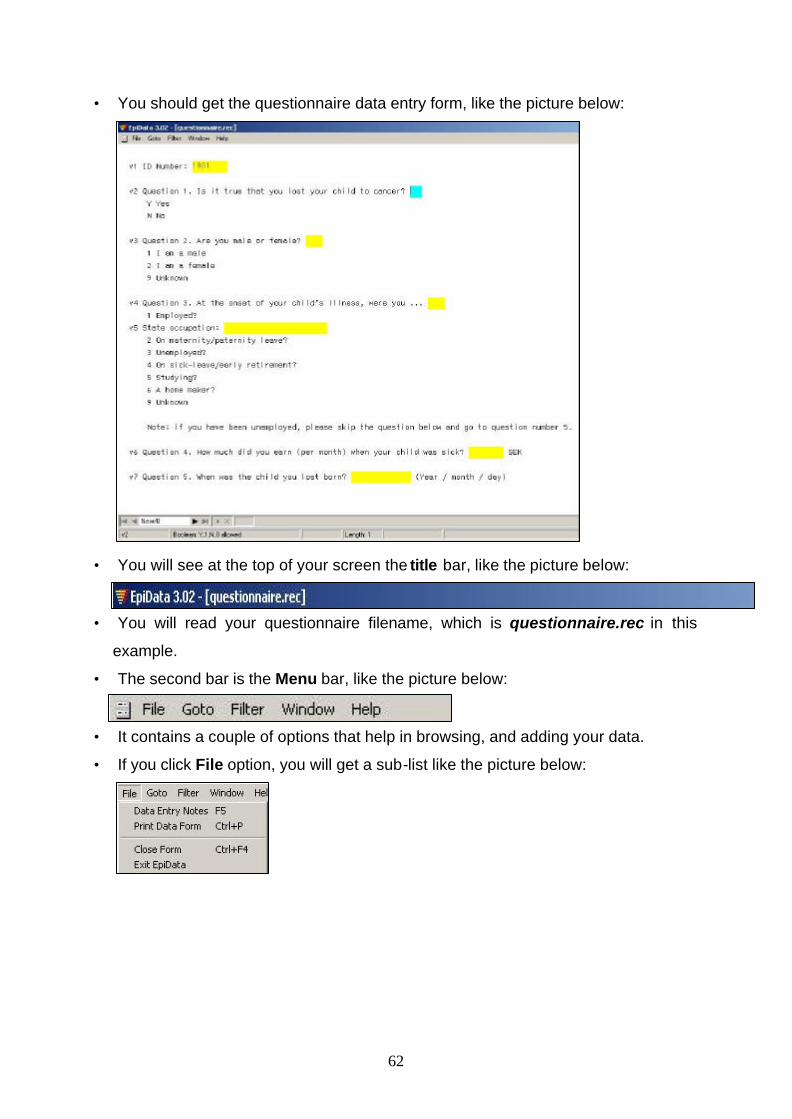
• You should get the questionnaire data entry form, like the picture below:
• You will see at the top of your screen the title bar, like the picture below:
• You will read your questionnaire filename, which is questionnaire.rec in this
example.
• The second bar is the Menu bar, like the picture below:
• It contains a couple of options that help in browsing, and adding your data.
• If you click File option, you will get a sub-list like the picture below:

63
• This list has four options:
§ Data Entry Notes: you can use it to enter notes for certain fields while
doing your data entry. These notes can not be added to the main data file,
they will be saved aside of your data file.
§ Print Data Form: is to print the current questionnaire form on paper.
§ Close Form: is to close your current questionnaire form and to return back
to your EpiData main window screen.
§ Exit EpiData: is to close your questionnaire form and EpiData as well, and
you will be back to your Windows desktop.
• The other options have other usage, but they will not be covered in this guideline.
You will be introduced to alternatives ways to do what these options can do for
you.
• Below the Menu bar, you have the questionnaire form, like the picture below:
• It looks like the preview form that you used to see before. Here you can enter your
questionnaires into EpiData.
• The first line, starting with v1 shows you the file ID number, like the picture below:

64
• It starts with number 1001; it’s automatic counting number, so you do not need to
enter number here.
• EpiData marks it with light grey color cell, and can not let you write inside this cell.
This reduces data entry mistakes risk.
• Below your questionnaire form you will see the Navigation panel, like the picture
below:
• This panel consists of seven parts:
§ Goto first record button.
§ Goto previous record button.
§ Navigation panel, it shows how many records you
have entered out of the total number. In this example, it is first
record out of zero, i.e. no records are entered yet!
§ Goto next record button: to add new record, or to go to the
next record when you want to browse your data later.
§ Goto last record button.
§ Enter new record.
§ Delete a record. When you try to delete a record, EpiData
will make sign in this record that has been deleted, but it will not
totally disappear, so you can always press the same button
which will have an undelete a record function then.
• At the bottom of the screen, you will see a bar, similar to the following picture:
• The first part v2 shows you the name of the field variable, and in this case it is
v2.
• The second part, showing the field type, and values allowed to be entered, like
this picture:
• The third part shows you how many character you can write in this specific field
cell:

65
11. How to check the data file structure:
• Before starting data entry, EpiData helps you to check your questionnaire
variables options. So through a summary you can review your questions and the
variables they represent.
• Select the button labelled Document
• You will get a sub-list, like the picture below:
• Select the first option File Structure, like the picture below:
• Do one mouse left-click on it, you will get an Open window where it will takes you
to the folder Children with cancer, like in the picture below:
• You will see the file name questionnaire selected already, do one mouse left-
click on the Open button.

66
• You will get new screen showing the file structure, like the picture below:
• The file structure will show information related to the questionnaire. They are
divided into two parts on the same screen.
• The most important information of the first part are:
§ Number of fields, which means the number of variables and in
this example they are seven, and it should look in your screen
like this picture:
§ Number of records, so far you did not start yet doing your data
entry, so you will see it as zero record. Later on when you do
data entry and if you check it you will find the number of
records has changed. You should see in your screen this
picture:

67
• The second part, starts with a sentence Fields with data file , and it has six
headings:
§ No.: the field number according to its sequence position in the
questionnaire.
§ Name: the field variable name as it is written in the
questionnaire.
§ Variable label: the label of each field, so later on when you
export the database file to an analysis programme, the Variable
label will be shown in the data analysis table.
§ Field type: to show the type of each variable in your
questionnaire, as ID Number, Boolean, Number, Text, Date
(with its format style), or soundex.
§ Width: to show the number of character allowed to be written in
each field.
§ Checks: it shows conditions, if they were written in side the
jumps option when you did checks to the questionnaire form.
§ Value labels: in case you had variables with certain labels, this
column shows description of the different values each variable
can have.

68
11.1 How to print a data file structure
• You can have a paper copy of this page.
• Click File option in the menu bar, you will get the File list like the picture
below:
• You have Print command among the options you have in this list, select it, like
the picture below:
• Do one mouse left-click on it, you will get the Print window, like picture below:
• Press OK button.

69
11.2 How to save a data file structure
• Click File option in the menu bar, you will get the File list like the picture below:
• You have Save As command among the options you have in this list, select it, like
the picture below:
• Do one mouse left-click on it, you should get a Save As window, like the picture
below:

70
• By default you will get a filename as Untitled 1. Highlight this name, delete it and
write File structure instead. Your screen should be similar to the picture below:
• Now you can click Save button.
• After saving your file structure, check the top and bottom of your screen, you will
notice the label File Structure there, as you see them marked in the picture
below:

71
• You need to close this file to start doing your data entry. Click File option. When
you get the file list, select option Close like in the picture below:
• Now you should be back to EpiData main screen, like the picture below:

72
12. How to start data entry
• You will be doing data entry using the following virtual example:
V1 ID Number
V2 Question 1.
Is it true that you lost your child to cancer?
V3 Question 2.
Are you male or female?
V4 Question 3. At the onset
of your child’s
illness, were you …
V5 If employed,
state occupation
V6 Question 4. How much
did you earn (per month) when your child was
sick?
V7 Question 5. When was
the child you lost born?
1001 Y 2 1 Teacher 20000 1995/01/12 1002 Y 1 3 1996/02/19 1003 Y 2 6 1998/10/09 1004 Y 2 1 Nurse 19000 1997/04/25 1005 Y 1999/03/13 1006 Y 1 5 1998/09/10 1007 Y 1 1 Driver 15000 2000/04/01 1008 Y 2 1 Under nurse 16000 1999/05/22 1009 Y 1 1998/11/11 1010 Y 1 1 Under nurse 16500 1998/07/15
• Click Enter Data button
• You will get a new window called Open window, like the picture below:
• Select questionnaire file name.
• Open it.
73
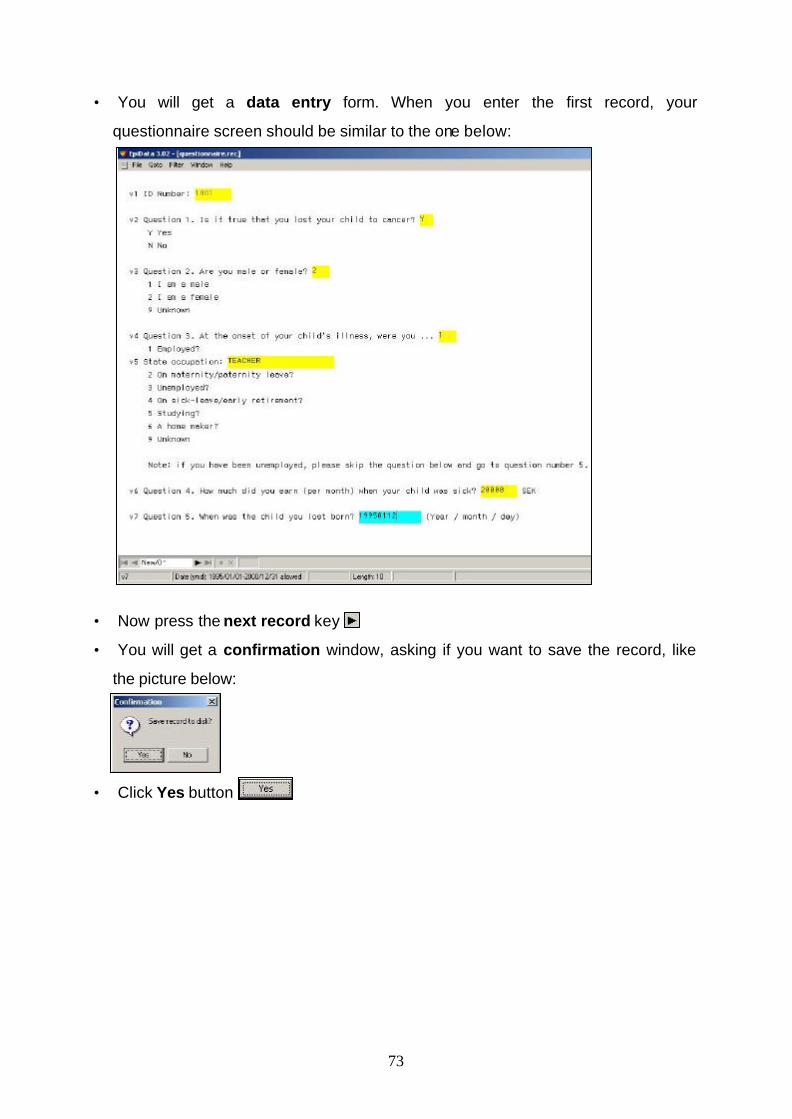
• You will get a data entry form. When you enter the first record, your
questionnaire screen should be similar to the one below:
• Now press the next record key
• You will get a confirmation window, asking if you want to save the record, like
the picture below:
• Click Yes button
74
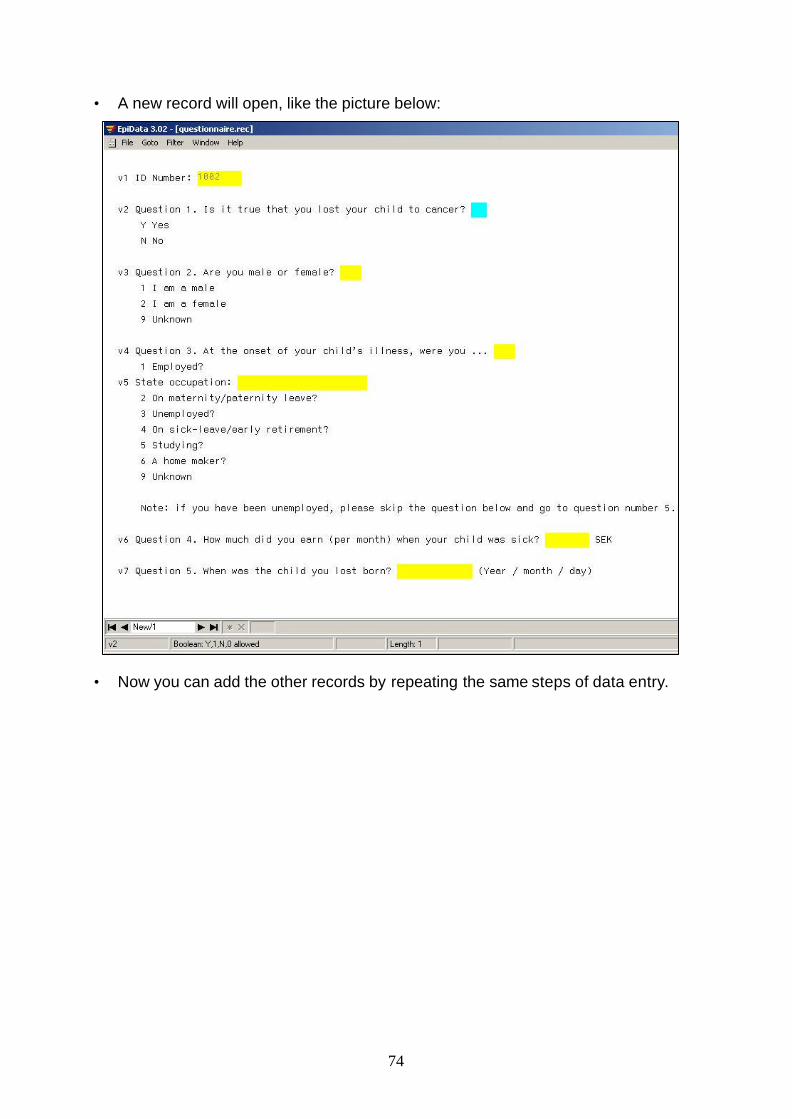
• A new record will open, like the picture below:
• Now you can add the other records by repeating the same steps of data entry.

75
• When you finish entering all your records, your screen should look like the picture
below:
• While doing data entry, EpiData will save your work, so you do not need to select
any save command. You need to close your data entry form. To do that, select
File option in Menu bar, you will get a sub-list menu, like the picture below:
• Select Close Form option, like the picture below:

76
• Do one mouse left-click on it, and you should be back to EpiData main screen,
like the picture below:

77
13. How to analyse EpiData file
• You can export your EpiData file to different types of data analysis programmes.
• EpiData helps you to backup your work, and/or to save your database file under
seven files types/formats:
o Text
o dBaseIII
o Excel
o Stata
o SPSS
o SAS
o Or to EpiData (in case you want to send the file to someone else using
EpiData programme).
• In this guideline, you will be introduced on how to export your EpiData database
file to SPSS file format.
• To start exporting your data, click on Export Data button
• Once you click it, you should get a menu list like the picture below:
• You have eight options, select SPSS option, like in the picture below:

78
• You will get the Open window, like the picture below:
• It will takes you to the last folder you have been working in, and here in this case
it is Children with cancer folder.
• Select the file questionnaire and click Open button.
• You should get a new window called Export Data, like the picture below:
• This window has different parts to ask you what and how you want to export your
data into SPSS.
• By default, it gives you standard way of exporting data.
• You do not need to change any setting.
• Click OK button.

79
• You should get a new window called Information.
• It is to confirm EpiData has exported your data file, and how many records have
been exported, like the picture below:
• Click OK button
• You will be back to EpiData main screen then, like the picture below:
• Close the whole EpiData programme by clicking X button on the top-right of
EpiData screen.
80
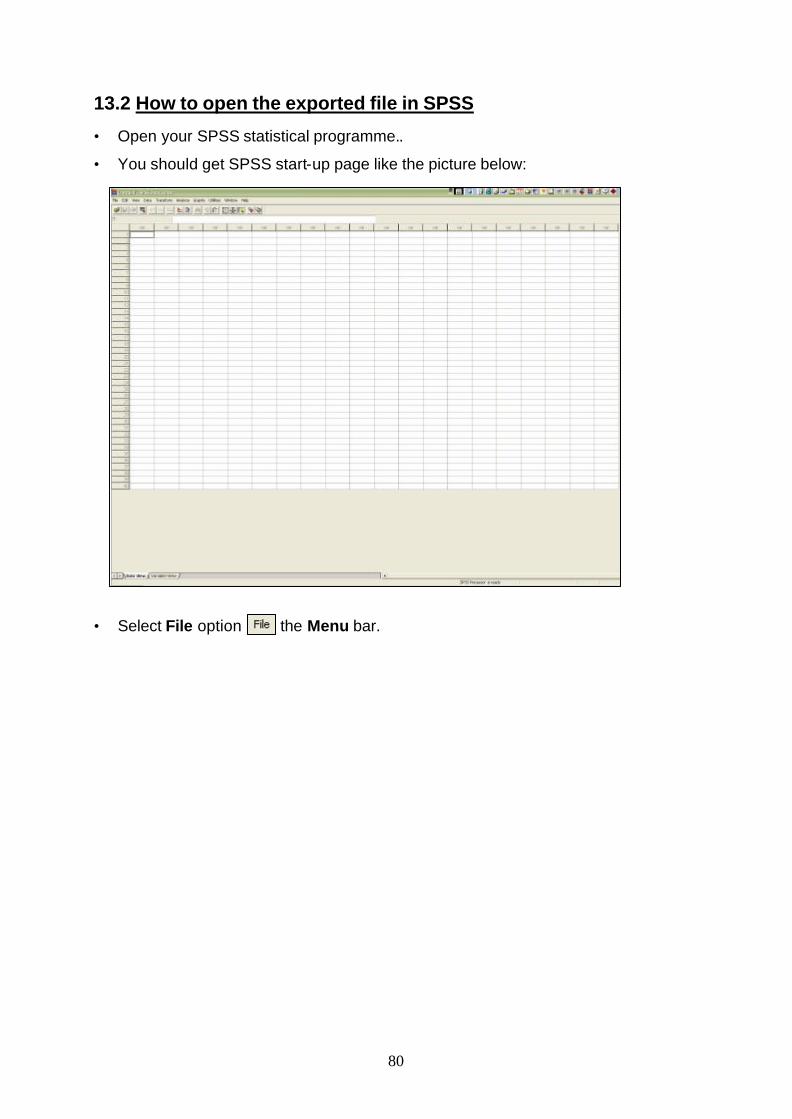
13.2 How to open the exported file in SPSS
• Open your SPSS statistical programme..
• You should get SPSS start-up page like the picture below:
• Select File option in the Menu bar.
81
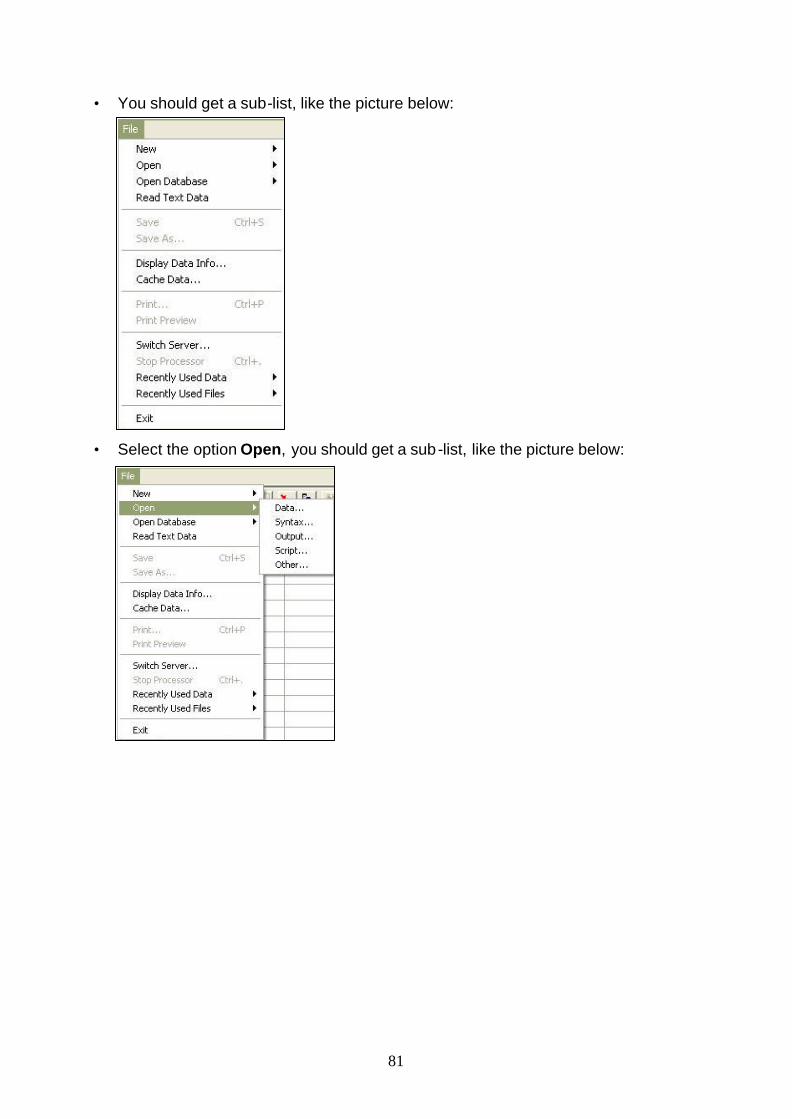
• You should get a sub-list, like the picture below:
• Select the option Open, you should get a sub-list, like the picture below:
82
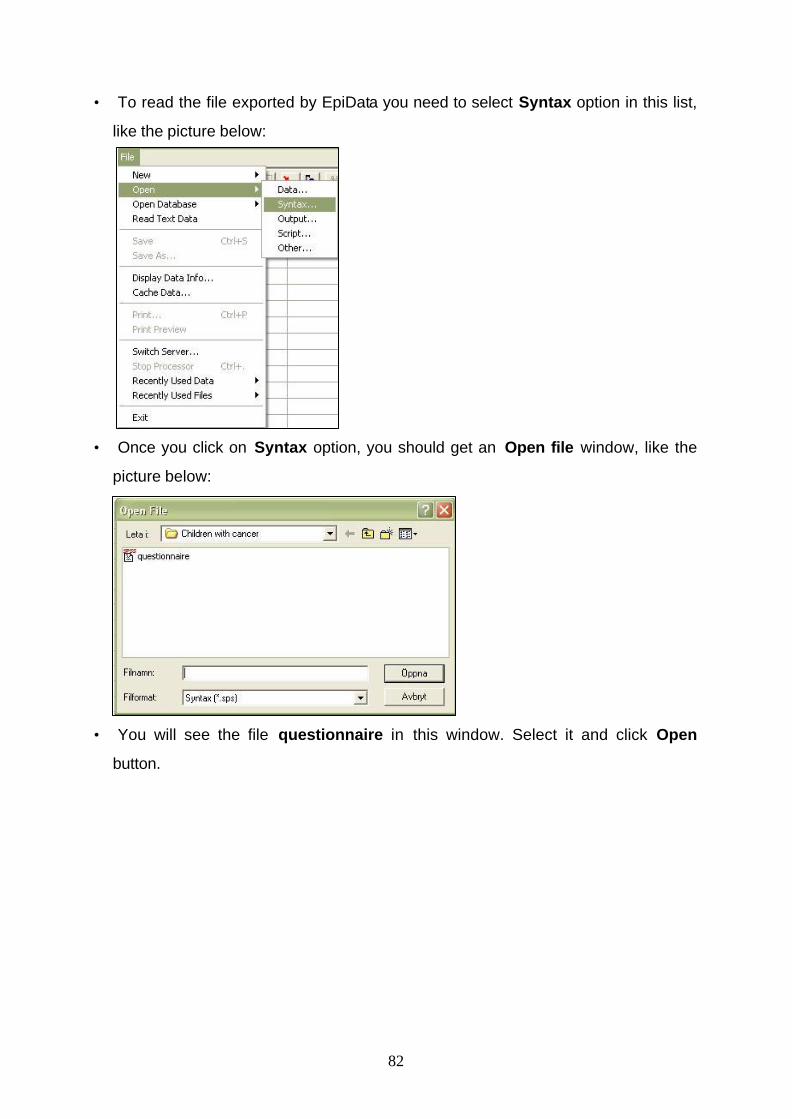
• To read the file exported by EpiData you need to select Syntax option in this list,
like the picture below:
• Once you click on Syntax option, you should get an Open file window, like the
picture below:
• You will see the file questionnaire in this window. Select it and click Open
button.
83
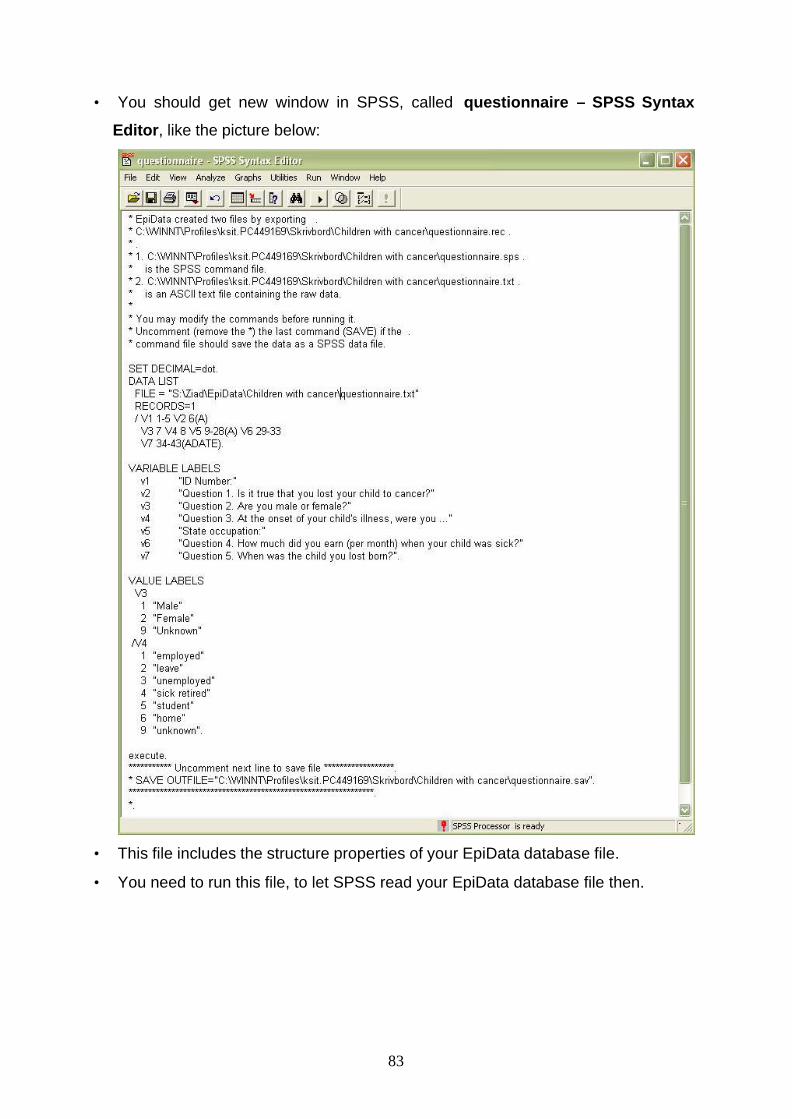
• You should get new window in SPSS, called questionnaire – SPSS Syntax
Editor, like the picture below:
• This file includes the structure properties of your EpiData database file.
• You need to run this file, to let SPSS read your EpiData database file then.
84
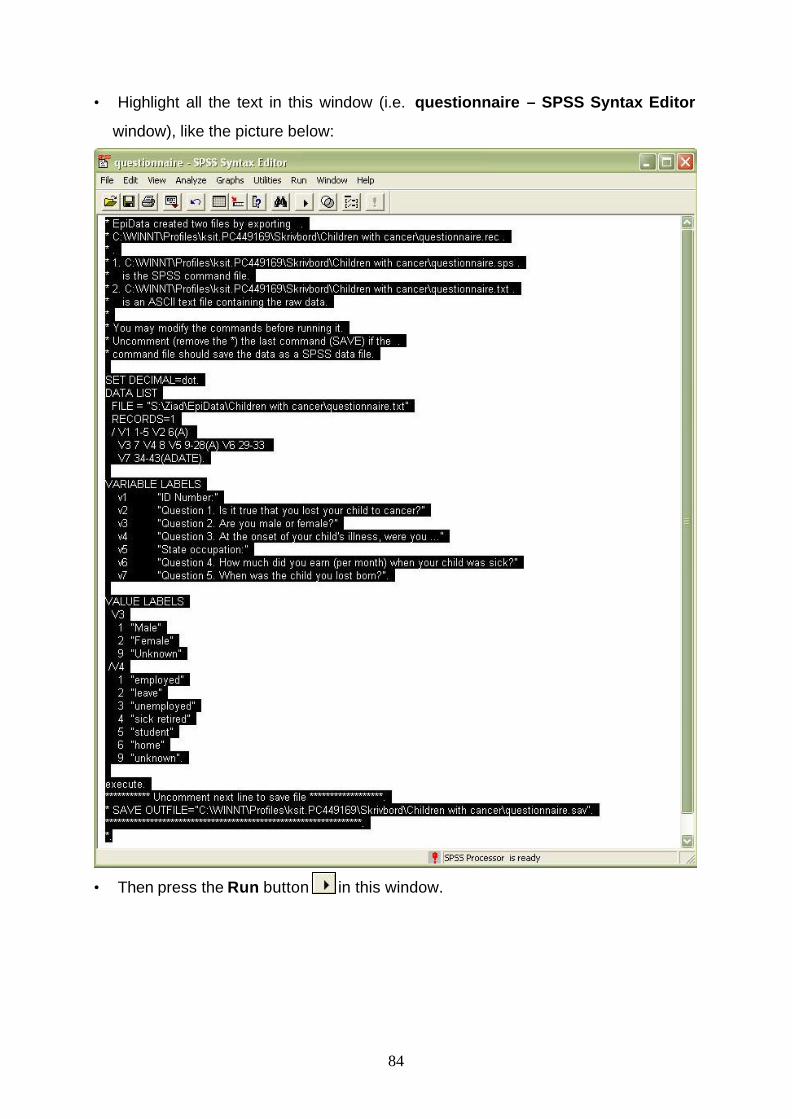
• Highlight all the text in this window (i.e. questionnaire – SPSS Syntax Editor
window), like the picture below:
• Then press the Run button in this window.
85
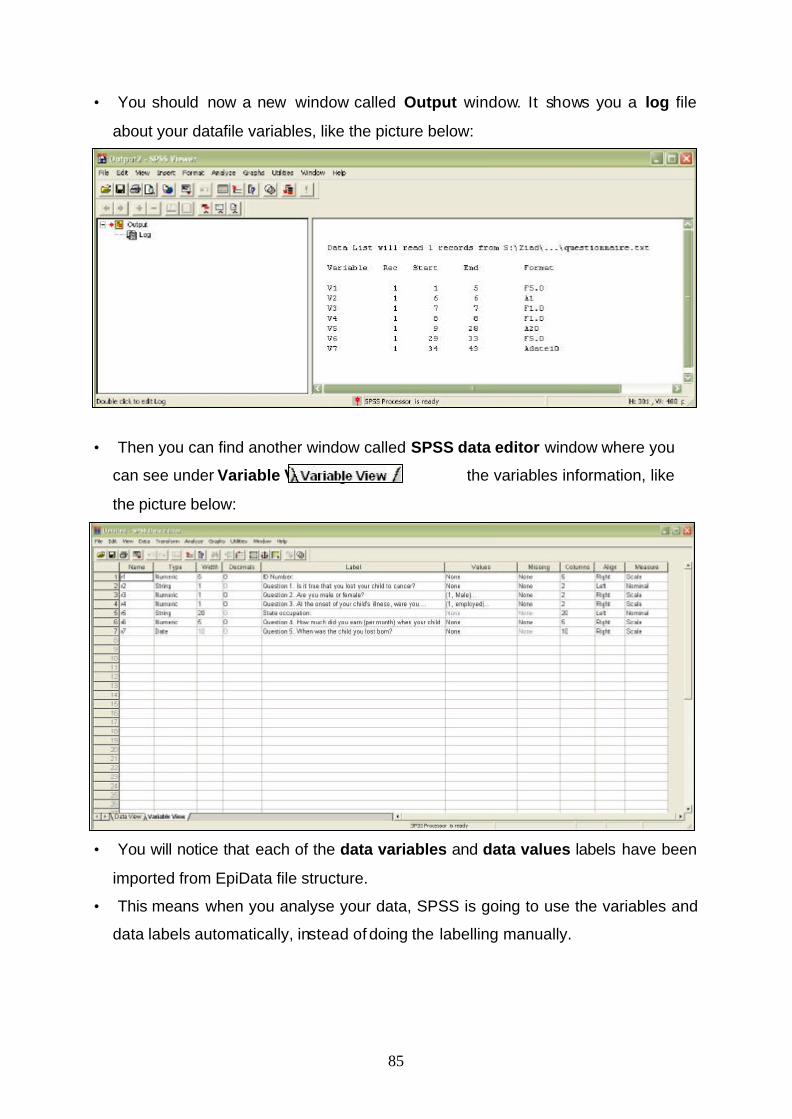
• You should now a new window called Output window. It shows you a log file
about your datafile variables, like the picture below:
• Then you can find another window called SPSS data editor window where you
can see under Variable View tag the variables information, like
the picture below:
• You will notice that each of the data variables and data values labels have been
imported from EpiData file structure.
• This means when you analyse your data, SPSS is going to use the variables and
data labels automatically, instead of doing the labelling manually.

86
• Next to the tab Variable View, you will find another tab called Data View , like
this picture
• Click on it, you should get a new window screen called Data View like the picture
below:
• You will find your data arranged in order as they have been entered in EpiData.
• The columns are called by the variables names V1, V2, etc.

87
Appendix A
The soundex part is not going to be covered in details in this guideline, but
encryption rules used by EpiData, are cited below with examples:
• Consonants after the initial letter are coded in the order they occur:
o Example:
• HOLMES = H-452
• ADOMOMI = A-355
• The code always uses the initial letter plus three digits. Further consonants in
long words are ignored:
o Example:
• VONDERLEHR = V-536
• Zeros are used to pad out shorter names:
o Example:
• BALL = B-400
• SHAW = S-000
• Double consonants are treated as one:
o Example:
BALL = B-400