Entry 1: Turtle graphics 1 - | Algorithms · PDF file · 2014-04-2525/4/2014 Entry...
19
25/4/2014 Entry 1: Turtle graphics 1.8 | ispython.com http://ispython.com/wp/?page_id=9 1/19 ispython.com a new skin by dave white Entry 1: Turtle graphics 1.8 Preface to Worksheet 1 1. What we cover in this Worksheet: Introduction to elements of Computational Thinking: Algorithms ‘unplugged’ and ‘plugged in’ to Python 3, Experimentation, Discovery, Pattern recognition, Symmetry, Generalizing. Programming Control Structures in Python 3: Sequence, Repetition — Simple for-loop Some important geometric shapes: a square, Φ (phi) the golden ratio, a golden rectangle and a golden spiral, regular polygons, symmetric stars, and circles. 2. When you have completed this worksheet you will be able to: Start to think and play in terms of algorithms Understand that there may be different algorithms to achieve the same result, and that the implementation of an algorithm is dependent on the toolbox you use Understand that Computational Thinking can be used to illustrate and explore elements of a host of different subjects including geometric shapes, architecture, art, botany, biology, aesthetics, mathematics, the sciences and engineering in a unique way 3. And learn how to implement a simple algorithm on a computer when you: WRITE, SAVE and RUN a simple python program which directs the movement of a turtle on the screen write sequential code and use a simple for-loop in your programs generalize your results by experimenting with the values (parameters) in your program instructions (functions) (This worksheet can be used ‘stand alone’ or in combination with Power.py, a
Transcript of Entry 1: Turtle graphics 1 - | Algorithms · PDF file · 2014-04-2525/4/2014 Entry...

25/4/2014 Entry 1: Turtle graphics 1.8 | ispython.com
http://ispython.com/wp/?page_id=9 1/19
ispython.com
a new skin by dave white
Entry 1: Turtle graphics 1.8
Preface to Worksheet 1
1. What we cover in this Worksheet:
Introduction to elements of Computational Thinking: Algorithms ‘unplugged’ and
‘plugged in’ to Python 3, Experimentation, Discovery, Pattern recognition,
Symmetry, Generalizing.
Programming Control Structures in Python 3: Sequence, Repetition — Simple
for-loop
Some important geometric shapes: a square, Φ (phi) the golden ratio, a golden
rectangle and a golden spiral, regular polygons, symmetric stars, and circles.
2. When you have completed this worksheet you will be able to:
Start to think and play in terms of algorithms
Understand that there may be different algorithms to achieve the same result,
and that the implementation of an algorithm is dependent on the toolbox you
use
Understand that Computational Thinking can be used to illustrate and explore
elements of a host of different subjects including geometric shapes, architecture,
art, botany, biology, aesthetics, mathematics, the sciences and engineering in a
unique way
3. And learn how to implement a simple algorithm on a computer when you:
WRITE, SAVE and RUN a simple python program which directs the movement of
a turtle on the screen
write sequential code and use a simple for-loop in your programs
generalize your results by experimenting with the values (parameters) in your
program instructions (functions)
(T his worksheet can be used ‘stand alone’ or in combination with Power.py, a

25/4/2014 Entry 1: Turtle graphics 1.8 | ispython.com
http://ispython.com/wp/?page_id=9 2/19
computational thinking
program adapted for use on an overhead projector, and which illustrates in slow
motion the dynamic flow of the program execution for the examples which follow.)
Overview
T he principles and process of this worksheet can (and will) be easily adapted for
starting with Scratch and Blockly programming environments. T his worksheet
focusses on the introductory essential concepts of programming, which are
common to all programming environments.
Worksheet 1
Exercise 1. Work in pairs: An Algorithm or Two to Start
1. T hink of a way you would
describe or demonstrate to
someone how to draw or make
or explain one or more of the
following: (in your mind, you are
free to use in your tool box any
tools that would help : sand,
stick, straight edge, piece of
string, …, paper, pencil, ruler,
compass, protractor, set-square,
stencil, a £2, 50p/20p coin …,
computer). For this example you will need a pencil and paper, a straight edge
and a piece of string to draw
a circle
a square
an equilateral triangle (a triangle with sides of equal length.)
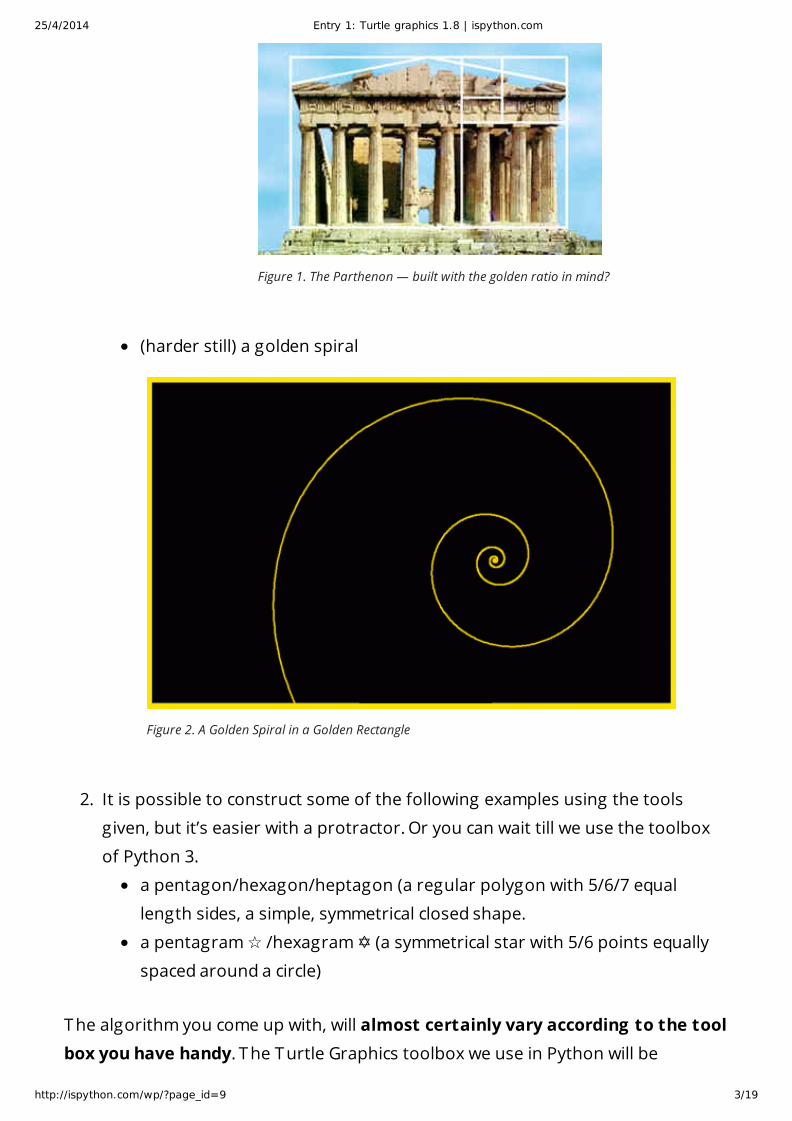
(harder) a golden rectangle
25/4/2014 Entry 1: Turtle graphics 1.8 | ispython.com
http://ispython.com/wp/?page_id=9 3/19
Figure 1. The Parthenon — built with the golden ratio in mind?
(harder still) a golden spiral
Figure 2. A Golden Spiral in a Golden Rectangle
2. It is possible to construct some of the following examples using the tools
given, but it’s easier with a protractor. Or you can wait till we use the toolbox
of Python 3.
a pentagon/hexagon/heptagon (a regular polygon with 5/6/7 equal
length sides, a simple, symmetrical closed shape.
a pentagram ☆ /hexagram ✡ (a symmetrical star with 5/6 points equally
spaced around a circle)
T he algorithm you come up with, will almost certainly vary according to the toolbox you have handy. T he T urtle Graphics toolbox we use in Python will be
25/4/2014 Entry 1: Turtle graphics 1.8 | ispython.com
http://ispython.com/wp/?page_id=9 4/19
equivalent to a ruler, and a protractor but easier and quicker to operate! Later we
may add another tool to the Python tool box by designing our own computer
‘compass’.
Where are we going?
In Computer Science we are looking to discover how things work, how to complete
a task using the capabilities of a computer. We are skilling ourselves to write the
programs (code) for algorithms, which we devise/discover, to draw a lot of different
shapes including a triangle, square, a golden rectangle, a golden spiral, regular
polygons, symmetric stars and circles. We will find, in a number of examples, that
the ‘computer toolbox’ makes it easier to tackle and generalize solutions to the
problems. We are going to use the Python toolbox, which includes a T urtle-
graphics toolbox. Later on, we may be able to use what we have learned to develop
an app or two for our computer.
Exercise 2. Plugged in: WRITE a Python 3 Program, SAVE it, and RUN it
(We are assuming that you are in front of a computer with Python 3 set up. If not
use this link SET T ING UP PYT HON 3: WORKSHEET to help you set up Python 3.
A few practical pointers:
When you want to work in Screen 2, which is where you type in your program,
you need to CLICK ON Screen 2 before typing
When you have completed typing, you need to SAVE your program by clicking
on ‘File’ at the top of Screen 2, and then clicking on ‘Save’ half way down the
drop-down menu. (Alternatively you can use Ctrl+S). You will be asked to name
your program file the first time you try to save it.
T hen RUN your program by clicking on ‘Run’ at top of Screen 2, and then
clicking on ‘Run Module’ at the bottom of the the drop-down menu (or press
the F5 key to RUN it)
See Figures 3 and 4 above

25/4/2014 Entry 1: Turtle graphics 1.8 | ispython.com
http://ispython.com/wp/?page_id=9 5/19
Figure 3. Screen 2: Save your program with a name ending in .py
Figure 4. Screen 2: RUN your program
Turtle Graphics and Variations on the 2-instruction program
25/4/2014 Entry 1: Turtle graphics 1.8 | ispython.com
http://ispython.com/wp/?page_id=9 6/19
computational thinking
T he T urtle module consists of a turtle moving and drawing on a canvas; we shall
use just two instructions (functions) from our T urtle toolbox to operate the turtle
and write several programs using these two instructions. We shall start with just
one tool from our Python 3 toolbox.
The Turtle Toolbox
1. fd(50):fd(50) is short for forward(50); and the turtle moves forward 50 pixels. A pixel is
a very small distance on a screen. (72 pixels to an inch.)
2. lt(90):lt(90) is short for left(90) and the turtle turns left through 90 degrees.
The Python 3 Toolbox
1. Sequence:T he computer, we’ll call her Py3, obeys each instruction in the program one at
a time, from top to bottom in order, line by line — unless told to do differently.
In search of an algorithm
T hat’s enough tools, let’s get started
on the project to draw some of those
shapes we met earlier. We need to
know what sort of tools are available
to us in Python 3 and what they do,
before we can start to formulate an
algorithm for a program to draw one
of those shapes. So here goes:
Move the mouse and click on Screen
2. T ype in the following in Screen 2 as
your starting program making sure that every new instruction starts against the
side on the left:

25/4/2014 Entry 1: Turtle graphics 1.8 | ispython.com
http://ispython.com/wp/?page_id=9 7/19
Figure 5. Screen 1: Interactive Shell for Python 3. Screen 2:
Program File — First program ‘Two instructions’
T hen SAVE and name your first program, and RUN as follows: (See figures 3 and 4)
SAVE your program by clicking on ‘File’ on top of Screen 2, and then
‘Save’ on the drop-down menu. (You will be asked to name your program file
the first time you make and try to SAVE it, call it hap.py — it has to end in ‘.py’
to be recognised as a python program). If you are using idle to build your
program, it will add the .py to your program name automatically
T hen RUN your program by clicking on ‘Run’ at top of Screen 2, and then
clicking on ‘Run Module’ on the drop-down menu.
Discussion
T he first line of the program in Example 1 sets up the facilities of the turtle
module for us
T he second line is a comment beginning with a # sign which signifies a
comment describing the program, and is ignored by the computer.
T he first executable command in our ‘two instruction’ program is fd(100),
which sets the turtle up as an arrow tip, and moves 100 pixels in the direction
the arrow is pointing in. ( the turtle always starts facing the same way). T his is
our Python 3 ‘straight edge ruler’.
In the next instruction, lt(90), you tell the turtle to turn left through 90
degrees. T his is the Python 3 ‘protractor’
T he final instruction allows you to click your mouse on the turtle screen
(Screen 3) to close it
so you can continue to build your program in Screen 2.
25/4/2014 Entry 1: Turtle graphics 1.8 | ispython.com
http://ispython.com/wp/?page_id=9 8/19
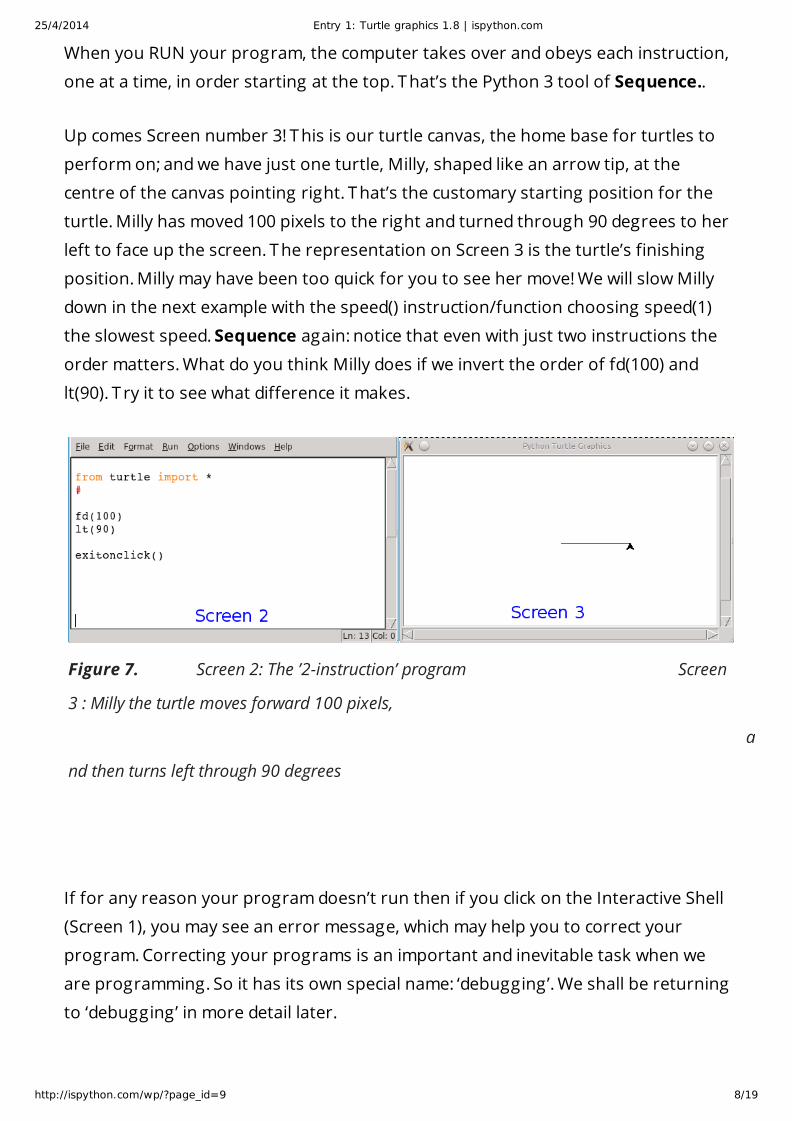
When you RUN your program, the computer takes over and obeys each instruction,
one at a time, in order starting at the top. T hat’s the Python 3 tool of Sequence..
Up comes Screen number 3! T his is our turtle canvas, the home base for turtles to
perform on; and we have just one turtle, Milly, shaped like an arrow tip, at the
centre of the canvas pointing right. T hat’s the customary starting position for the
turtle. Milly has moved 100 pixels to the right and turned through 90 degrees to her
left to face up the screen. T he representation on Screen 3 is the turtle’s finishing
position. Milly may have been too quick for you to see her move! We will slow Milly
down in the next example with the speed() instruction/function choosing speed(1)
the slowest speed. Sequence again: notice that even with just two instructions the
order matters. What do you think Milly does if we invert the order of fd(100) and
lt(90). T ry it to see what difference it makes.
Figure 7. Screen 2: The ’2-instruction’ program Screen
3 : Milly the turtle moves forward 100 pixels,
a
nd then turns left through 90 degrees
If for any reason your program doesn’t run then if you click on the Interactive Shell
(Screen 1), you may see an error message, which may help you to correct your
program. Correcting your programs is an important and inevitable task when we
are programming. So it has its own special name: ‘debugging’. We shall be returning
to ‘debugging’ in more detail later.

25/4/2014 Entry 1: Turtle graphics 1.8 | ispython.com
http://ispython.com/wp/?page_id=9 9/19
Exercise 3. Extending your program
Suppose we repeat those two instructions [fd(100) and lt(90)].
What do you think Milly will draw?
Click in Screen 2 again. Now use your mouse to highlight the two instructions, leave
a line, copy and paste them. (Using the keyboard: copy(Ctrl+C) them, leave a line and
press (Ctrl+V) to paste them) or just type in the extra lines of code. SAVE and RUN
your program.
Figure 9. Screen 2: extending our program, slowing MillyScreen 3: Milly the turtle goes-
forward-and-turns-left
and goes-forward-and-
turns-left again
Did you have an idea of what was going to happen. Is this starting to look like an
algorithm for drawing one of the shapes we looked at earlier?
Exercise 4 : Repeating Patterns
What is happening here? Is there a pattern in the program? What action exactly is
being repeated?
What if we now highlight and copy the 4 instructions that drive Milly the turtle in
your previous program and add to them a copy of the 4 instructions as in Figure
10? What do you think Milly will draw now?

25/4/2014 Entry 1: Turtle graphics 1.8 | ispython.com
http://ispython.com/wp/?page_id=9 10/19
computational thinking
Figure 10. Screen 3:
What does Milly the turtle draw this time?
SAVE and RUN and see.
So if your program worked, we ended up with a square, and Milly the turtle in her
original position facing right. And we did it by taking two instructions and repeating
them four times. We now have now converted/adapted an unplugged algorithm for
drawing a square into an algorithm as the basis for a computer to draw a square.
Exercise 5. Functions: changing the parameters
lt() and fd() as well as being instructions are also functions, with a
parameter/argument inside the brackets which you can alter when you use it. A
function used in this way names a program which is executed using the value of the
25/4/2014 Entry 1: Turtle graphics 1.8 | ispython.com
http://ispython.com/wp/?page_id=9 11/19
Computational Thinking
parameter. Changing the angle in the lt() instruction from lt(90) to lt(45) means that
Milly will now turn left through 45 degrees.
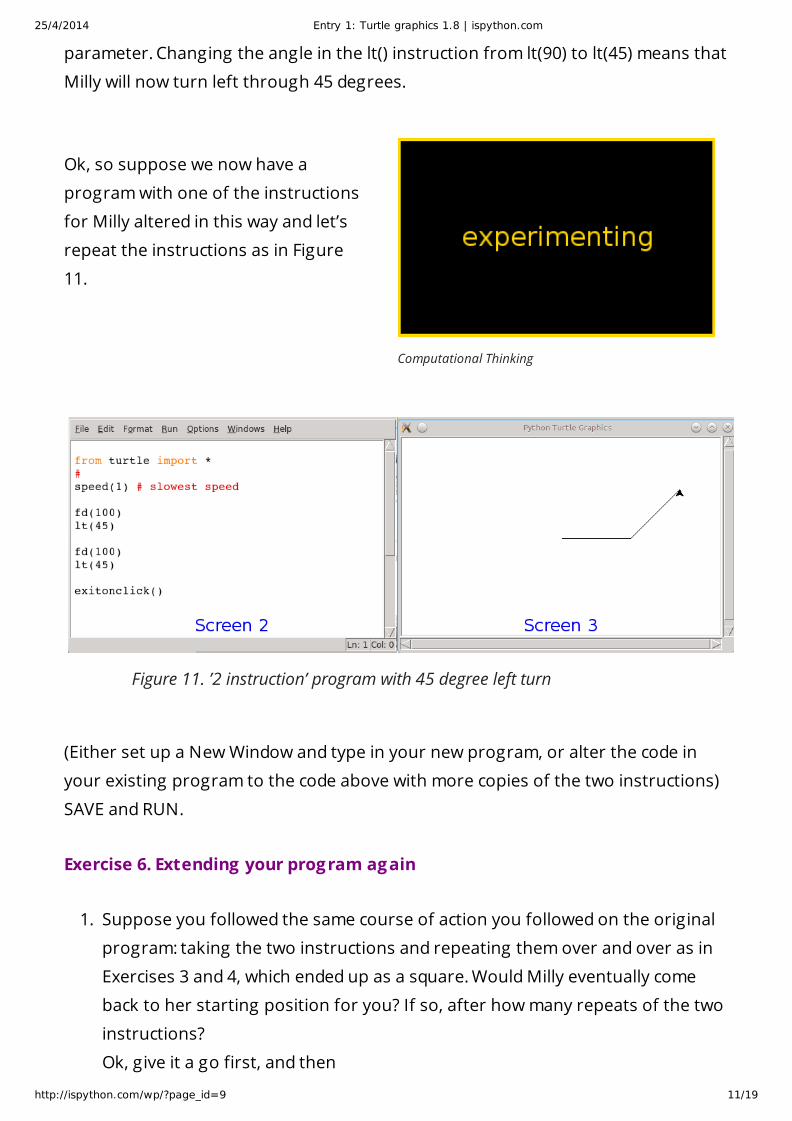
Ok, so suppose we now have a
program with one of the instructions
for Milly altered in this way and let’s
repeat the instructions as in Figure
11.
Figure 11. ’2 instruction’ program with 45 degree left turn
(Either set up a New Window and type in your new program, or alter the code in
your existing program to the code above with more copies of the two instructions)
SAVE and RUN.
Exercise 6. Extending your program again
1. Suppose you followed the same course of action you followed on the original
program: taking the two instructions and repeating them over and over as in
Exercises 3 and 4, which ended up as a square. Would Milly eventually come
back to her starting position for you? If so, after how many repeats of the two
instructions?
Ok, give it a go first, and then

25/4/2014 Entry 1: Turtle graphics 1.8 | ispython.com
http://ispython.com/wp/?page_id=9 12/19
Computational Thinking
compare your efforts with some
results in the tables below.
Discussion
Whatever conclusion you came to in the last example, the program starts to get a
lot longer as you repeat those 2 instructions over and over.
Fortunately, in the Python 3 toolbox, there is a tool to help us to deal with repetitive
coding, whenever it occurs, in a concise and effective way. T his one is called a for-loop.
The Python 3 Toolbox: Control Structures
1. Sequence:T he computer, we’ll call her Py3, obeys each instruction in the program one at
a time, from top to bottom in order, line by line — unless told to do differently.
2. ‘A Simple for-loop’ When we know how many times we want Py3 to obey a
series of instructions we put those instructions into the body of a simple for-
loop. It is written in a special way with its own syntax, so that it is clear to us
what it means, and equally importantly, to the computer, Py3. In Python 3, it
looks like this:

25/4/2014 Entry 1: Turtle graphics 1.8 | ispython.com
http://ispython.com/wp/?page_id=9 13/19
Figure 12. Experimenting with a for loop
Let’s move again:
Change your program to look like the program in Fig. 12.
SAVE and RUN your program.
(Or open a new file for your program. T ype this program exactly as it is in Figure 12.
SAVE it, with a name you choose(ending in .py) and RUN it.)
Either way, we will talk about it after you have RUN it.
Discussion
If your program worked, great. We are going to talk about this program now, so if
it didn’t work, or crashed as we say, we may be able to see why. And determination
to see why — sometimes difficult — sometimes sitting right under our noses — is
very important in learning to code.
In this for-loop, the computer executes the indented instructions 4 times.
Each time through the for-loop, the variable ‘steps’ takes the values 0,1,2,3. steps is
a variable name that I have chosen; it could be any variable name e.g. count, or i.
T he for-loop is equivalent to the program in Figure 10 ,where we copied the two
instructions 4 times into the program.
Getting the syntax right in a ‘for-loop’
T he first line:
for steps in range(4):
must be in this format:
‘for’, ‘in’, are known as keywords in Python3. (Coloured differently by
Idle to indicate that they are key words.)
‘range()’ is an example of a special built-in function (or method) and the
4 is a parameter for the function which means that the body of the loop
is executed 4 times. We can change it in our program to another value,
25/4/2014 Entry 1: Turtle graphics 1.8 | ispython.com
http://ispython.com/wp/?page_id=9 14/19
say 6, if we wanted to execute the body (the indented instructions) of
the ‘for loop’ 6 times. T o indicate which instructions belong to, and are
repeated by the for loop, they are indented by four spaces. (achieved by
tapping the space bar 4 times).
However, when you correctly type in the first line, including the ‘:’, Idle
will automatically indent 4 spaces for you on the next and subsequent
lines. When you have finished entering the instructions to be included in
the looping, leave a blank line and start the next line of your program (if
there is one) vertically beneath the f of the ‘for’ statement. (T o illustrate
this last requirement, I have included the finishing statement
exitonclick(), which enables the turtle screen (3) to be removed by
clicking on it.
T he indented body instructions (hit the space bar 4 times if there is no
indent, before typing the instruction) are to make it clear which
instructions following the ‘for-loop’ first line are to be included in the
repetition.
1. DON’T FORGET T HE ‘:’ AT T HE END OF T HE FIRST LINE OF T HE FOR
LOOP
2. DON’T FORGET T HE 4-SPACE INDENT AT ION FOR EACH INST RUCT ION
IN T HE BODY OF T HE LOOP
3. IT ’S WORT H REMEMBERING T HIS, BECAUSE MOST OF T HE CONT ROL
ST RUCT URE T OOLS IN PYT HON 3 USE T HE FORMAT IN 1 AND 2 ABOVE
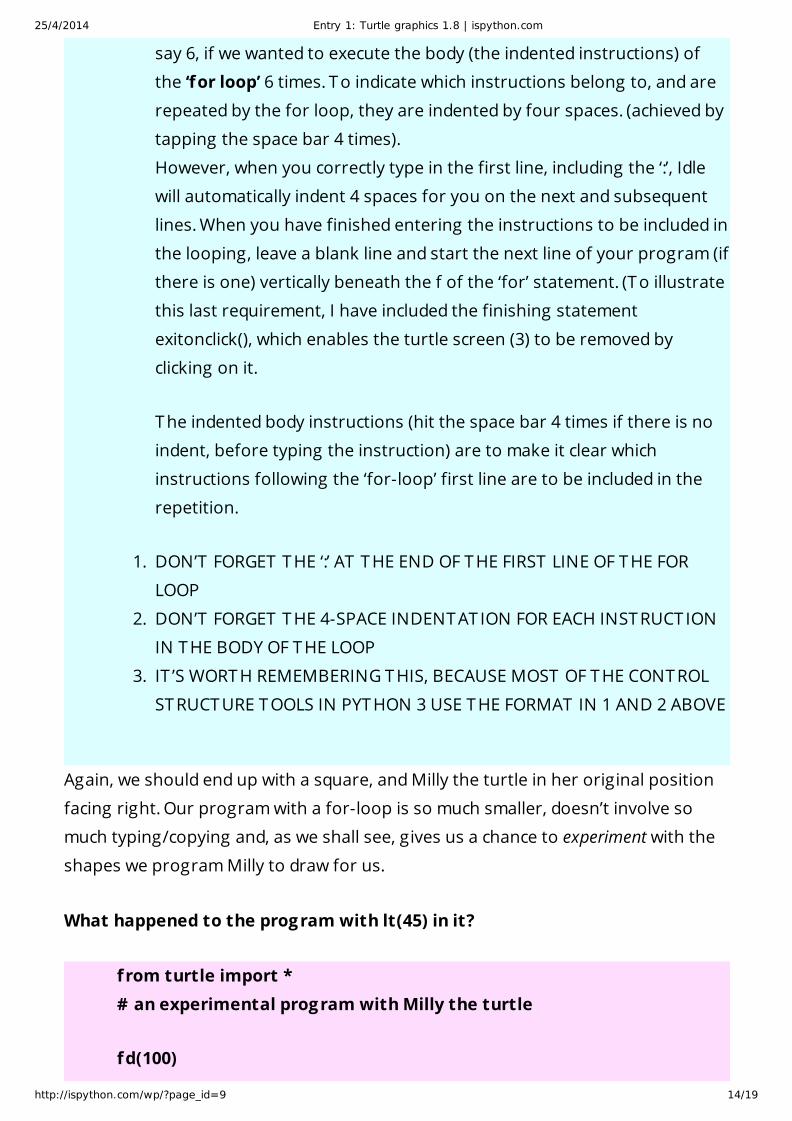
Again, we should end up with a square, and Milly the turtle in her original position
facing right. Our program with a for-loop is so much smaller, doesn’t involve so
much typing/copying and, as we shall see, gives us a chance to experiment with the
shapes we program Milly to draw for us.
What happened to the program with lt(45) in it?
from turtle import *# an experimental program with Milly the turtle
fd(100)
25/4/2014 Entry 1: Turtle graphics 1.8 | ispython.com
http://ispython.com/wp/?page_id=9 15/19
lt(45)
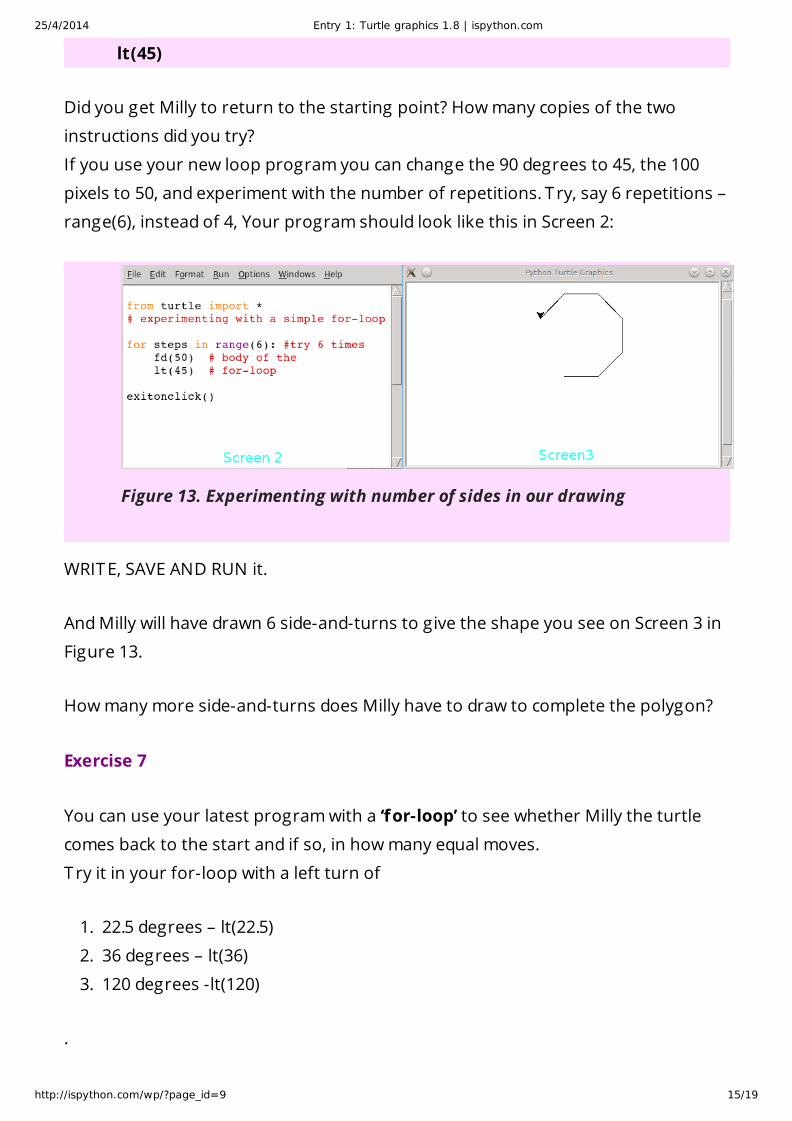
Did you get Milly to return to the starting point? How many copies of the two
instructions did you try?
If you use your new loop program you can change the 90 degrees to 45, the 100
pixels to 50, and experiment with the number of repetitions. T ry, say 6 repetitions –
range(6), instead of 4, Your program should look like this in Screen 2:
Figure 13. Experimenting with number of sides in our drawing
WRIT E, SAVE AND RUN it.
And Milly will have drawn 6 side-and-turns to give the shape you see on Screen 3 in
Figure 13.
How many more side-and-turns does Milly have to draw to complete the polygon?
Exercise 7
You can use your latest program with a ‘for-loop’ to see whether Milly the turtle
comes back to the start and if so, in how many equal moves.
T ry it in your for-loop with a left turn of
1. 22.5 degrees – lt(22.5)
2. 36 degrees – lt(36)
3. 120 degrees -lt(120)
.

25/4/2014 Entry 1: Turtle graphics 1.8 | ispython.com
http://ispython.com/wp/?page_id=9 16/19
Let’s publish our results so far:
Polygon Table 1
T OT AL T URN (DEGREES) ANGLE (DEGREES) NUMBER OF SIDES LENGT H OF SIDE (PIXELS)
DW
SQUARE 360 90 4 100
OCT AGON 360 45 8 100
Exercise 8: Complete Table 2
1. Can you fill in the blanks in T able 2?
Hint:
square: 4 x 90 = 360;
octagon: 8 x 45 = 360
hexagon: 6 x ? = 360
? x 36 = 360
T ake a copy of your latest program and enter it in a new file, say exp.py.
T hen in your new program, change the angle for Milly the turtle to one
taken from T able 2 ( lt(60), say) and experiment with the number of sides,
say 5. (try a smaller distance, fd(50), when the number of sides increases. )
SAVE and RUN your program.
Polygon Table 2
T OT AL T URN (DEGREES) ANGLE (DEGREES) NUMBER OF SIDES LENGT H OF SIDE (PIXELS)
SQUARE 360 90 4 100
OCT AGON 360 45 8 100
——360 22.5 ? 30
—— 360 36 ? 100

25/4/2014 Entry 1: Turtle graphics 1.8 | ispython.com
http://ispython.com/wp/?page_id=9 17/19
DW
—— 360 120 (polygon?) ? 150
Exercise 9: Complete Table 3
1. Can you fill in the blanks in T able 3?
2. If you take your ‘for-loop’ and by experimenting with entries in the ‘left turn
angle’, lt(?) can you find if there is a regular polygon when you turn repeatedly
through that angle with an increasing number of sides?
3. Can you find the angle to turn through (by experimenting with your for-loop)
for a regular polygon with:
1. 10 sides
2. 5 sides
3. 20 sides
You may have to shorten the length of the sides of polygons with many sides to
prevent Milly the turtle disappearing off the screen. Say from 100 pixels down to 30
pixels.
What does the example with 1 degree and 360 sides in table 3 look like? Each
side is only 3 pixels. T ry it and see.
(Hard)Can you draw a regular polygon with any number of sides? T ry a 17-side
regular polygon. Hint: ?*17=360
(Harder) Does any angle work to make a regular polygon? If not which angles
do? Hint: for a hexagon (6-sided polygon) angle=360/6
In the examples (simple regular polygons) that we have explored so far, Milly has
gone round the centre of the polygon just once. For example, in completing a
hexagon (6-sided polygon), Milly has turned through a total of
60+60+60+60+60+60 =360 degrees to return to the starting point. Suppose, in our
for-loop, we chose a turning left angle of 144 degrees (lt(144)) and tried a different
number of moves, say range(4) or more, with fd(150).
What happens?
Will Milly return to the starting point again?

25/4/2014 Entry 1: Turtle graphics 1.8 | ispython.com
http://ispython.com/wp/?page_id=9 18/19
And what will be the total number of degrees that Milly turns through?
144+144+144+144+…
And how many times will Milly go round the centre?
T ry some of the values in your for-loop from T able 3.
Polygon Table 3
T OT AL T URN (DEGREES) ANGLE (DEGREES) NUMBER OF SIDES LENGT H OF SIDE (PIXELS)
—— 360 ? 10 50
—— 360 ? 5 100
—— 360 ? 20 30
—— 360 1 360 3
——720 144 (polygon?) ? 150
——1080 1080/7 (polygon?) ? 150
(Harder still) Can you draw symmetric stars with more than 7 points?
Exercise 10 : WRITE, SAVE and RUN your own “2 instruction” program
Write a program that draws a line of 50 pixels and puts a dot at the end of it.
(T he turtle instruction to make a dot: dot() ).
Repeat the commands twice and then again as you did in Exercises 3 and 4. You
should then be looking at evenly spaced marks along a straight line: an axis.
(You may need to shorten the 50 pixels to 30 if you want more than a couple of
dots.)
Now make a for-loop for your “2 instruction” program and try different values
in range().
Conclusion
In all the “experimenting”, “trial and error” that we have done, we have been able to
25/4/2014 Entry 1: Turtle graphics 1.8 | ispython.com
http://ispython.com/wp/?page_id=9 19/19
employ more computational thinking this time to “generalize” our results: to go
from drawing a square to an octagon and then on to any simple regular polygon to
a circle and then to stars.
We are able to do this in Python 3 by “experimenting” with the parameters in
instructions like fd(100), lt(45), range(4) where functions are involved. T hat is
because these instructions happen to be functions /(methods) too.
Functions(methods) are the building blocks of programming and each function is
the name of a program which performs the operation we associate with that
function/instruction.
T he values we altered are called arguments or parameters for the function. In the
next worksheet we will be meeting more functions and writing our own as building
blocks for our developing programs.
In Worksheet 2, we get to meet more tools in Python 3, to help with drawing new
shapes and colouring.


![Turtle Geometry in Computer Graphics and Computer Aided ...taoju/research/TurtlesforCADRevised.pdfpolygonal shapes [Sederberg et al, 1993]. Here we are going to show how to use turtle](https://static.fdocuments.us/doc/165x107/5ed0326e940df508d7494275/turtle-geometry-in-computer-graphics-and-computer-aided-taojuresearch-polygonal.jpg)