Entrust Certificate Services Certificate Management Service 9.7 ...
126
Entrust Certificate Services Certificate Management Service 9.7 User Guide Document issue: 1.0 Date of issue: October 2010
Transcript of Entrust Certificate Services Certificate Management Service 9.7 ...

Entrust Certificate Services
Certificate Management Service 9.7
User Guide
Document issue: 1.0
Date of issue: October 2010

2
Copyright © 2008-2010 Entrust. All rights reserved.
Entrust is a trademark or a registered trademark of Entrust, Inc. in certain countries. All Entrust product names and logos are trademarks or registered trademarks of Entrust, Inc. in certain countries. All other company and product names and logos are trademarks or registered trademarks of their respective owners in certain countries.
This information is subject to change as Entrust reserves the right to, without notice, make changes to its products as progress in engineering or manufacturing methods or circumstances may warrant.
Export and/or import of cryptographic products may be restricted by various regulations in various countries. Export and/or import permits may be required.
Certificate Management Service 9.7 User Guide

TOCTOC
About this guide . . . . . . . . . . . . . . . . . . . . . . . . . . . . . . . . . . . . . . . . . . . . . .7
Documentation conventions . . . . . . . . . . . . . . . . . . . . . . . . . . . . . . . . . . . . 8
Note and Attention text . . . . . . . . . . . . . . . . . . . . . . . . . . . . . . . . . . . 8
Obtaining additional documentation . . . . . . . . . . . . . . . . . . . . . . . . . . . . . 10
Documentation feedback . . . . . . . . . . . . . . . . . . . . . . . . . . . . . . . . . 10
Related documentation . . . . . . . . . . . . . . . . . . . . . . . . . . . . . . . . . . 10
Obtaining technical assistance . . . . . . . . . . . . . . . . . . . . . . . . . . . . . . . . . . 11
Technical support . . . . . . . . . . . . . . . . . . . . . . . . . . . . . . . . . . . . . . . 11
Telephone numbers . . . . . . . . . . . . . . . . . . . . . . . . . . . . . . . . . . 11
Email address . . . . . . . . . . . . . . . . . . . . . . . . . . . . . . . . . . . . . . . 11
Mailing Address . . . . . . . . . . . . . . . . . . . . . . . . . . . . . . . . . . . . . 11
Getting started. . . . . . . . . . . . . . . . . . . . . . . . . . . . . . . . . . . . . . . . . . . . . . .13
About the Entrust Certificate Management Service . . . . . . . . . . . . . . . . . . 14
Using the Certificate Management Service. . . . . . . . . . . . . . . . . 14
Differences between pooling and non-pooling management models
15
Entrust Discovery . . . . . . . . . . . . . . . . . . . . . . . . . . . . . . . . . . . . 16
Certificate types . . . . . . . . . . . . . . . . . . . . . . . . . . . . . . . . . . . . . . . . . . . . . 18
SSL server certificates and SANs . . . . . . . . . . . . . . . . . . . . . . . . . . . . 18
Standard SSL certificates . . . . . . . . . . . . . . . . . . . . . . . . . . . . . . 18
Advantage SSL certificates . . . . . . . . . . . . . . . . . . . . . . . . . . . . . 18
Extended Validation Multi-Domain SSL certificates . . . . . . . . . . 19
Unified Communication Multi-Domain SSL Certificates . . . . . . . 19
Wildcard certificates. . . . . . . . . . . . . . . . . . . . . . . . . . . . . . . . . . 19
Additional SubjectAltName extensions (SANs) . . . . . . . . . . . . . . 20
CDS certificates . . . . . . . . . . . . . . . . . . . . . . . . . . . . . . . . . . . . . . . . 20
Adobe CDS Individual . . . . . . . . . . . . . . . . . . . . . . . . . . . . . . . . 20
Adobe CDS Group . . . . . . . . . . . . . . . . . . . . . . . . . . . . . . . . . . . 20
Adobe CDS Enterprise Lite . . . . . . . . . . . . . . . . . . . . . . . . . . . . . 20

4
Adobe CDS Enterprise Pro . . . . . . . . . . . . . . . . . . . . . . . . . . . . . 21
Code signing certificates . . . . . . . . . . . . . . . . . . . . . . . . . . . . . . . . . 21
Sun® Java™ Object signing certificates . . . . . . . . . . . . . . . . . . . 21
Microsoft® Office/Visual Basic for Applications signing certificates
21
Microsoft® Authenticode signing certificates . . . . . . . . . . . . . . . 21
Secure Email certificates . . . . . . . . . . . . . . . . . . . . . . . . . . . . . . . . . . 21
Enterprise Secure Email certificates. . . . . . . . . . . . . . . . . . . . . . . 22
Individual Secure Email certificates . . . . . . . . . . . . . . . . . . . . . . . 22
Administrator types, roles and permissions . . . . . . . . . . . . . . . . . . . . . . . . . 23
Super administrators . . . . . . . . . . . . . . . . . . . . . . . . . . . . . . . . . . . . 23
Sub-administrators . . . . . . . . . . . . . . . . . . . . . . . . . . . . . . . . . . . . . . 23
Logging in to the Entrust Certificate Management Service . . . . . . . . . . . . . 25
Logging in to the Entrust Certificate Management Service using an Entrust
IdentityGuard grid . . . . . . . . . . . . . . . . . . . . . . . . . . . . . . . . . . . . . . 29
Using Entrust IdentityGuard Self-Service . . . . . . . . . . . . . . . . . . . . . 30
The super and sub-administrator dashboard views . . . . . . . . . . . . . . . . . . . 32
The super administrator view . . . . . . . . . . . . . . . . . . . . . . . . . . . . . . 32
Menu bar functionality . . . . . . . . . . . . . . . . . . . . . . . . . . . . . . . 33
The sub-administrator view . . . . . . . . . . . . . . . . . . . . . . . . . . . . . . . 35
Adjusting your view . . . . . . . . . . . . . . . . . . . . . . . . . . . . . . . . . . . . . 35
Removing a column. . . . . . . . . . . . . . . . . . . . . . . . . . . . . . . . . . 35
Filtering information . . . . . . . . . . . . . . . . . . . . . . . . . . . . . . . . . 36
Saving your changes . . . . . . . . . . . . . . . . . . . . . . . . . . . . . . . . . 37
Purchasing additional services . . . . . . . . . . . . . . . . . . . . . . . . . . . . . . . . . . 38
Using Entrust Discovery from the CMS . . . . . . . . . . . . . . . . . . . . . . . . . . . 42
Managing administrators . . . . . . . . . . . . . . . . . . . . . . . . . . . . . . . . . . . . . . .43
Adding an administrator . . . . . . . . . . . . . . . . . . . . . . . . . . . . . . . . . . . . . . 44
Managing super administrators . . . . . . . . . . . . . . . . . . . . . . . . . . . . . . . . . 46
Demoting a super administrator . . . . . . . . . . . . . . . . . . . . . . . . . . . . 46
Managing sub-administrators . . . . . . . . . . . . . . . . . . . . . . . . . . . . . . . . . . 47
Viewing and editing sub-administrator accounts . . . . . . . . . . . . . . . 47
Promoting a sub-administrator to super administrator . . . . . . . . . . . 48
Deactivating and reactivating a sub-administrator . . . . . . . . . . . . . . 49
Certificate Management Service 9.7 User Guide Document issue: 1.0

Managing clients . . . . . . . . . . . . . . . . . . . . . . . . . . . . . . . . . . . . . . . . . . . . 51
Adding a new client . . . . . . . . . . . . . . . . . . . . . . . . . . . . . . . . . . . . . . . . . 52
If you plan on using Extended Validation (EV) certificates or Code
Signing certificates in your client domains . . . . . . . . . . . . . . . . . 52
Viewing or altering client accounts . . . . . . . . . . . . . . . . . . . . . . . . . . . . . . 58
Viewing Clients . . . . . . . . . . . . . . . . . . . . . . . . . . . . . . . . . . . . . . . . 58
Modifying client domain or organization information . . . . . . . . . . . . 59
Deactivating a client . . . . . . . . . . . . . . . . . . . . . . . . . . . . . . . . . . . . . . . . . 63
The client verification process . . . . . . . . . . . . . . . . . . . . . . . . . . . . . . . . . . 64
Creating and managing certificates . . . . . . . . . . . . . . . . . . . . . . . . . . . . . . . 65
An introduction to creating and managing certificates . . . . . . . . . . . . . . . . 66
Monitoring certificate use . . . . . . . . . . . . . . . . . . . . . . . . . . . . . . . . 66
Monitoring certificates from the Inventory Information page. . . 66
Monitoring certificates from the Management dashboard . . . . . 67
Requesting a code-signing certificate using the CMS interface . . . . . . . . . 70
Requesting a CDS certificate using the CMS interface . . . . . . . . . . . . . . . . 73
Requesting an SSL Certificate using the CMS interface . . . . . . . . . . . . . . . 76
Requesting a certificate using the Certificate Request E-Form . . . . . . . . . . 81
Enrolling for E-forms . . . . . . . . . . . . . . . . . . . . . . . . . . . . . . . . . . . . 81
Disabling the E-Form . . . . . . . . . . . . . . . . . . . . . . . . . . . . . . . . . . . . 83
Using the Certificate Request E-Form . . . . . . . . . . . . . . . . . . . . . . . 83
Requesting and administering Secure Email certificates . . . . . . . . . . . . . . . 93
To approve and obtain the certificate . . . . . . . . . . . . . . . . . . . . 95
Administering Secure Email Enterprise certificates . . . . . . . . . . . . . . 98
Retrieving an Entrust SSL certificate . . . . . . . . . . . . . . . . . . . . . . . . . . . . . 100
Reissuing a certificate . . . . . . . . . . . . . . . . . . . . . . . . . . . . . . . . . . . . . . . 102
Renewing a certificate . . . . . . . . . . . . . . . . . . . . . . . . . . . . . . . . . . . . . . . 104
Revoking or deactivating a Certificate . . . . . . . . . . . . . . . . . . . . . . . . . . . 106
Managing certificates from a different vendor . . . . . . . . . . . . . . . . . . . . . 108
Monitoring the Entrust Certificate Management Service . . . . . . . . . . . . . . . 111
Using the Contract Information pages . . . . . . . . . . . . . . . . . . . . . . . . . . . 112
Opening the Contract Information pages . . . . . . . . . . . . . . . . . . . 112
Contract Information pages . . . . . . . . . . . . . . . . . . . . . . . . . . . . . . 112
5

6
Tracking Fields . . . . . . . . . . . . . . . . . . . . . . . . . . . . . . . . . . . . . . . . . . . . . 118
Using the Log History page . . . . . . . . . . . . . . . . . . . . . . . . . . . . . . . . . . . 121
Expiry Notifications . . . . . . . . . . . . . . . . . . . . . . . . . . . . . . . . . . . . . . . . . 123
Additional information . . . . . . . . . . . . . . . . . . . . . . . . . . . . . . . . . . 124
Certificate Management Service 9.7 User Guide Document issue: 1.0

About
About this guide
This guide contains procedures outlining how to use the Entrust Certificate Management Service (CMS). The Certificate Management Service allows you to create certificate requests and monitor certificate use for your internal devices and those used by your customers.
Topics in this chapter include:
• “Documentation conventions” on page 8
• “Obtaining additional documentation” on page 10
• “Obtaining technical assistance” on page 11
7

8
Documentation conventionsThe following documentation conventions are used in Entrust guides:
Note and Attention textThroughout this guide, there are paragraphs set off by ruled lines above and below the text. These paragraphs provide key information with two levels of importance, as shown below.
Note:Information to help you maximize the benefits of your Entrust product.
Table 1: Typographic conventions
Convention Purpose Example
Bold text (other than headings)
Indicates graphical user interface elements and wizards.
Click Next.
Italicized text Used for book or document titles.
Entrust Certificate Services Certficate Management Service 9.2 User Guide
Blue text Used for hyperlinks to other sections in the document.
Entrust supports the use of many types of certificates.
Underlined blue text
Used for links to Web sites.
For more information, visit our Web site at www.entrust.net.
Courier type Indicates installation paths, file names, Windows registry keys, commands, and text you must enter.
Use the entrust-configuration.xml file to change certain Verification Server options.
Angle brackets
< >
Indicates variables (text you must replace with your organization’s correct values).
By default, the entrust.ini file is located in <install_path>/conf/security/entrust.ini.
Square brackets
[courier type]
Indicates optional parameters.
dsa passwd [-ldap]
Certificate Management Service 9.7 User Guide Document issue: 1.0Report any errors or omissions

Attention:Issues that, if ignored, may seriously affect performance, security, or the operation of your Entrust product.
9About this guideReport any errors or omissions

10
Obtaining additional documentationEntrust product documentation, white papers, technical notes, and a comprehensive knowledge base are available from our Web site:
http://www.entrust.net/
Documentation feedbackYou can rate and provide feedback about Entrust product documentation by completing the online feedback form. Any information that you provide goes directly to the documentation team and is used to improve and correct the information in our guides. You can access this form by:
• clicking the Report any errors or omissions link located in the footer of Entrust’s PDF documents (see bottom of this page).
• following this link: http://www.entrust.com/products/feedback/index.cfm
Feedback concerning documentation can also be directed to the Customer Support email address.
Related documentationOther documents relating to the Entrust Certificate Management Service that you may find helpful are:
• Entrust Certificate Management Service Enrollment Guide
• Entrust Certificate Management Service release information (available from the Certificate Management Service “What’s New” menu)
• Entrust certificate Services Guide to Code Signing for Authenticode
• Entrust certificate Services Guide to Code Signing for Java
• Entrust certificate Services Guide to code Signing for Windows Macros and Visual Basic
• Entrust Discovery Agent Administration Guide
• Entrust Discovery Administration Guide
Certificate Management Service 9.7 User Guide Document issue: 1.0Report any errors or omissions

Obtaining technical assistanceEntrust recognizes the importance of providing quick and easy access to our support resources. The following subsections provide details about the technical support and professional services available to you.
Technical supportFor Entrust technical support services, visit our Web site at:
http://www.entrust.net/ssl-technical/index.htm
For technical resources including a comprehensive Knowledge Base visit:
http://www.entrust.net/knowledge-base/index.cfm
Telephone numbersFor support assistance by telephone or Fax, call one of the numbers below between 8:00 AM and 8:00 PM Eastern:
• North America (toll free)
– Phone 1 (866) 267-9297– Fax 1 (877) 839-3538
• Outside of North America
– Phone 1 (613) 270-2680– Fax 1 (613) 270-3260
Email addressThe email address for Customer Support is:
Mailing AddressEntrust Inc.
1000 Innovation Drive
Ottawa, Ontario
K2K 3E7
Canada
11About this guideReport any errors or omissions

12
Certificate Management Service 9.7 User Guide Document issue: 1.0Report any errors or omissions
1
1Getting started
This chapter provides information about features of the Entrust Certificate Management Service (CMS) and how to begin using it.
Topics in this chapter include:
• “About the Entrust Certificate Management Service” on page 14
• “Certificate types” on page 18
• “Administrator types, roles and permissions” on page 23
• “Logging in to the Entrust Certificate Management Service” on page 25
• “The super and sub-administrator dashboard views” on page 32
• “Purchasing additional services” on page 38
• “Using Entrust Discovery from the CMS” on page 42
13

14
About the Entrust Certificate Management Service
The Entrust Certificate Management Service is a self-service administration tool for buying and managing certificates. The tool acts as a centrally managed, self-service point-of-purchase, that reduces administrative overhead and decreases your risk of accidental certificate expiry. Self-service allows customers to synchronize and control the timing of certificate expiry as well as to pool or re-use certificates (depending on the type of account) for maximum usage.
Information in this introduction includes:
• “Using the Certificate Management Service” on page 14
• “Differences between pooling and non-pooling management models” on page 15
• “Entrust Discovery” on page 16
Using the Certificate Management ServiceThe service allows you to purchase and maintain an inventory of different types of certificates according to your needs. As your network grows and changes you can use these certificates to establish and maintain secure communication between devices, sign code, secure Adobe Acrobat or LiveCycle documents and forms, or secure email by signing and encrypting messages.
The Certificate Management Service makes it easy for you to:
• know how many certificates of each type are available for use
• create and assign certificates
• keep track of certificates used by client accounts
• purchase or renew certificates
• add or remove client domains
• add or remove administrator accounts
• delegate certificate request approval
• approve certificate requests
• use Entrust Discovery to obtain detailed information about certificates in your network
Administrator accounts
The Certificate Management Service (CMS) uses two types of administrator accounts with different degrees of access to management and auditing tools. This allows you to delegate aspects of certificate management for specific domains or clients while
Certificate Management Service 9.7 User Guide Document issue: 1.0Report any errors or omissions

maintaining control and accountability. Super Administrators—accounts with full privileges—can also audit events for ease of management and create reports that tailor information about certificates to their specific requirements. For example, all certificates in domains A, B, and C could be assigned to one sub-administrator and certificates in domains D, E, and F to another.
Differences between pooling and non-pooling management modelsYour organization chose either the pooling or non-pooling model when you became a CMS user. In simplest terms, the non-pooling model is based in the number of certificates purchased, and the pooling model is based on the amount of certificate lifetime purchased. The model being used determines how administrators perform some tasks in the CMS.
Certificates
• CMS administrators for accounts where pooling or non-pooling models are used, can reissue certificates (depending on certificate type). However:
– In non-pooling accounts, certificates can only be reissued within 30 days of their creation date. The exception is Secure Email certificates, which can be reissued at any time during their lifetime.
– In pooling accounts Standard, Advantage, EV, UCC and Secure Email certificates can be re-issued at any time. CDS and Code Signing certificates can only be re-issued within 30 days of their creation date.
• Administrators for accounts using either model can renew certificates.
• Only CMS administrators for accounts using the pooling model can reuse and repurpose certificates. However, only Standard, Advantage, EV, and UCC certificates are returned to inventory and can be reused and repurposed. CDS, Code Signing, and Secure Email certificates are never returned to inventory after being deactivated.
SANs (for additional domains)
• In accounts using the pooling model, any SANs that were added to EV Multi-Domain certificates or UC Multi-Domain certificates from your SAN inventory are returned to the SAN inventory, if the certificate is revoked. The SANs that you get by default with the certificate are not returned to inventory.
For example, if you are using the pooling model and you revoke a UC Multi-Domain certificate with eight SANs, five SANs would be returned to your SAN inventory. This is because when you purchase a UC Multi-Domain certificate, the common name and two additional SANs come with the certificate by default and not from your inventory of additional SANs.
15Getting startedReport any errors or omissions

16
• In accounts using the non-pooling model SANs are not returned to your inventory if you revoke a certificate.
• In accounts using the pooling model additional domains (SANs) are not multiplied by the number of years in the certificate’s life span.
• In accounts using the non-pooling model, the number of SANs required to add more domains than the default number that comes with the certificate is multiplied by the life span of the certificate.
For example, if you create UC Multi-Domain certificate with a three year life span for four domains (the common name in the CSR plus three additional domains). Three domains can be used before additional SANs are required because they are purchased with a UC Multi-Domain certificate by default. The fourth domain requires one additional SAN per year of the certificate’s life span—three SANs.
• In accounts using either model, the number of SANs used from inventory is multiplied by the number of servers that the certificate is licensed for.
For example, if you create a UC Multi-Domain certificate and license it for two servers, the number of SANs used by the certificate is doubled.
For a complete explanation of the advantages of each of these models, talk to an Entrust Sales representative.
Entrust DiscoveryEntrust Discovery is composed of one or more Entrust Discovery Agents and the Entrust Discovery Manager. The Entrust Discovery Agent allows an administrator to scan their network or specific portions of their network for certificates. The Agent records pertinent information about each certificate found, including:
• the certificate issuer
• subject DN of the certificate
• key algorithm and length
• creation and expiry date
• host and port (or hosts and ports if it is installed in more than one place)
• the port state
• host names
Discovery Agents can be obtained free-of-charge from Entrust and used without a Discovery Manager to perform scans, however only a summary of the data can be viewed from the Agent.
Detailed information about certificates and certificate management capability is available from the Discovery Manager. The Discovery Manager allows you to choose which certificates to manage and, for each managed certificate:
Certificate Management Service 9.7 User Guide Document issue: 1.0Report any errors or omissions

• to see all of the collected information
• assign an owner
• set up an notification schedule to track expiring certificates, license use, and other administrative details
To use the Discovery Manager, you must purchase certificate licenses from Entrust. Contact your Entrust representative for information about purchasing licenses.
Three types of licenses are available from Entrust:
• cloud subscription, for use with a Discovery Manager hosted by Entrust Certificate Management Service
• premises subscription, for use with a Discovery Manager hosted by you. The license includes an expiry date based on your subscription. Software support for Entrust Discovery is included.
• premises perpetual, for use with a Discovery Manager hosted by you. The licence contains no expiry date. Software support is extra.
Entrust Discovery can be used as stand-alone application or with the Entrust Certificate Management Service.
17Getting startedReport any errors or omissions

18
Certificate typesEntrust offers SSL, CDS, Code Signing, and Secure Email certificates, all of which you can manage using the Entrust Certificate Management Service (CMS). Topics in this section include:
• “SSL server certificates and SANs” on page 18
• “CDS certificates” on page 20
• “Code signing certificates” on page 21
• “Secure Email certificates” on page 21
SSL server certificates and SANsEntrust offers several types of SSL certificates. SSL certificates that can be licensed for one or more servers. Each additional server requires a license from your certificate inventory.
The following sections describe these certificates:
• “Standard SSL certificates” on page 18
• “Advantage SSL certificates” on page 18
• “Extended Validation Multi-Domain SSL certificates” on page 19
• “Unified Communication Multi-Domain SSL Certificates” on page 19
• “Wildcard certificates” on page 19
• “Additional SubjectAltName extensions (SANs)” on page 20
Standard SSL certificates These certificates (referred to as Standard in the Certificate Management Service interface) create a secure, confidential communications pipe between the Web server and browser. Communication secured with this certificate supports identification of the Web server, letting the client’s browser know the identity of the site being accessed.
Advantage SSL certificates These certificates (referred to as Advantage in the Certificate Management Service interface) create a secure, confidential communications pipe between the Web server and the browser or between servers. Use this type of certificate where identification of both the Web server and the browser is required.
Advantage SSL certificates are allowed one additional SubjectAltName (SAN) extension plus the common name for a total of two SANs.
Certificate Management Service 9.7 User Guide Document issue: 1.0Report any errors or omissions

Extended Validation Multi-Domain SSL certificatesExtended Validation certificates (referred to as EV Multi-Domain certificates in the Certificate Management Service interface) are defined by the CA/Browser Forum in response to the growing threat of phishing attacks. The goal of this type of certificate is to increase consumer confidence in online transactions.
EV certificates are issued only after rigorous validation of the authentication information supplied by the purchaser. These certificates provide all the features of the advantage certificate plus:
• adhere to the standards for verification determined by the CA/Browser forum and outlined in Guidelines for the Issuance and Management of Extended Validation Certificates (available from the CA/Browser forum Web site)
• Web browsers reflect this higher level of identity assurance with prominent trust indicators, such as:
– the green Web address bar, indicating a secure site– the gold padlock at the top of the Web page, indicating that the Web
server is recognized as authentic– alternating display of issuer and organization name and country
Extended validation certificates are allowed one additional SubjectAltName (SAN) by default( for a total of two domains), but an unlimited number of additional SANs can be added if additional SAN inventory is available.
Unified Communication Multi-Domain SSL CertificatesThese certificates (referred to as UC Multi-Domain certificates in the Certificate Management Service interface) provide all the features of the Advantage certificate. Unified Communication certificates are allowed two additional SubjectAltName (SAN) extensions plus the common name by default, for a total of three SANs. An unlimited number of additional SANs can be added, if additional SAN inventory is available.
These certificates are designed to support powerful communications products like Microsoft® Exchange Server and Microsoft® Office Communications Server.
Wildcard certificatesThese certificates (referred to as Wildcard in the Certificate Management Service interface) provide all the features of the Standard certificate and allow you to secure multiple Web sites with a single SSL certificate.
19Getting startedReport any errors or omissions

20
Additional SubjectAltName extensions (SANs)Additional EV Multi-Domain SANs and UC Multi-Domain SANs can be purchased and added to your CMS inventory. You are given the opportunity to add additional domains when you create a an EV or UC Multi-Domain certificate. Each domain added above the default number of SANs associated with the type of certificate uses one of the SANs from your inventory. If the certificate is used on more than one server the number of SANs used from your inventory is multiplied by the number of servers the certificate is licences for. See “SANs (for additional domains)” on page 15 for more information.
SANs can be purchased from the Buy More page of the CMS or through your Entrust representative.
CDS certificatesEntrust offers the following types of certificates for use with Adobe Certified Document Services (CDS):
• “Adobe CDS Individual” on page 20
• “Adobe CDS Group” on page 20
• “Adobe CDS Enterprise Lite” on page 20
• “Adobe CDS Enterprise Pro” on page 21
Adobe CDS IndividualAdobe CDS Individual certificates are purchased with a token. Individuals can use these certificates to sign and certify documents, as needed. For example, individuals might use them to sign workflow approvals, legal documents, contracts, and letters. These certificates are assigned to an individual. The individual’s first and last name and email address appear in the signature.
Adobe CDS GroupAdobe CDS Group certificates are purchased with a token. Individuals in a group can use these certificates to sign and certify documents on behalf of a group. Individuals are still required to have their own certificate, however the organizational group name is included in the certificate. The organizational group name and email address is displayed in signatures from these certificates. A sales department might use these certificates to sign proposals or RFP responses, for example.
Adobe CDS Enterprise LiteLike manual CDS Group certificates, these certificates display the organizational group name and email address in the signature. These certificates, however, are intended for use in an automated process, to sign and certify documents. For
Certificate Management Service 9.7 User Guide Document issue: 1.0Report any errors or omissions

example, these certificates could be used to sign invoices, account statements, transcript requests, and confirmations. Each of these certificates can be used for a maximum of 40,000 signatures. These certificates are designed to reside on an hardware security module (HSM). HSMs are available from Entrust.
Adobe CDS Enterprise ProThese certificates have the same features as Adobe CDS Enterprise Lite but can be used for an unlimited number of signatures.
Code signing certificatesThese certificates are used to sign code. The signature provided by these types of certificates is checked against the list of legitimate root certificates. The end-user can then proceed with confidence that the code is from a legitimate source and is free of tampering. Entrust offers the following types of code signing certificate:
• “Sun® Java™ Object signing certificates” on page 21
• “Microsoft® Office/Visual Basic for Applications signing certificates” on page 21
• “Microsoft® Authenticode signing certificates” on page 21
Sun® Java™ Object signing certificatesUse Entrust certificates for Java object signing to sign JAR (Java Archive) files.
Microsoft® Office/Visual Basic for Applications signing certificatesUse Entrust certificates for Microsoft® Office and Visual Basic Applications (VBA) to sign DOC, DOT, XLS, XLT, XLA, PPT, PPS, and PPA files. Entrust offers PKCS#12 (Public Key Cryptography Standard #12) certificates for use with Microsoft® Office and VBA files.
Microsoft® Authenticode signing certificatesUse Entrust certificates for Microsoft® Authenticode to sign CAB, CAT, CTL, DLL, EXE, and OCX files. Entrust offers PKCS#7 (Public Key Cryptography Standard #7) certificates for use with Authenticode.
Secure Email certificatesSecure Email certificates can be used with email applications that support S\MIME format to encrypt, sign, or encrypt and sign messages. They can also be used to
21Getting startedReport any errors or omissions

22
authenticate SSL VPNs, or to sign Microsoft Office documents, or authenticate to a service on desktops or mobile devices.
Enterprise Secure Email certificatesThese certificates are designed to be purchased by businesses or organizations through the CMS and used by employees to sign and secure email messages or authenticate Microsoft Office documents. To purchase Secure Email certificates, use the Certificate Request E-form (see “Using the Certificate Request E-Form” on page 83 for more information).
These certificates offer automated key backup to ensure that you always have access to encrypted historical information.
Individual Secure Email certificatesThese certificates are designed to be purchased and used by individuals to sign and secure their personal or business email messages or authenticate Microsoft Office documents. These certificates are not available through the CMS. Individual Secure Email certificates can be purchased directly from the Entrust Web site.
Certificate Management Service 9.7 User Guide Document issue: 1.0Report any errors or omissions

Administrator types, roles and permissionsAll administrators must be assigned an administrator type. The Entrust Certificate Management Service provides two types of administrative accounts; the super administrator and the sub-administrator—each with their own set of roles and permissions. Sub-administrators can be assigned certificates and clients to manage. The default assignment is super administrator. Administrator types are discussed in the sections:
• “Super administrators” on page 23
• “Sub-administrators” on page 23
Super administratorsSuper administrators can access all features, resources, and services of the Certificate Management System (CMS) and perform all management tasks. They are also responsible for delegating administrative privileges to sub-administrators and approving requests made using the E-form (see “Requesting a certificate using the Certificate Request E-Form” on page 81 for more information about the E-form).
Sub-administratorsAll sub-administrators have access to a subset of management features. Specific resources such as certificates, client domain names, and client company names can be assigned to each sub-administrator.
The following table lists the default sub-administrator roles and describes the associated permissions for those roles.
Table 2: Sub-administrator permissions
Management feature Permission
create or renew certificates can create certificates or renew certificates assigned to them (if the certificates are renewable)
SubjectAltName (SAN) can create certificates with multiple SubjectAltName (SAN) extensions if there are sufficient SubjectAltNames in the sub-administrator’s inventory and multiple SANs are supported for that type of certificate
management dashboard view
Sub-administrators can view and manage the certificates assigned to them
deactivate certificates Sub-administrators can deactivate certificates, domains and organizational names, client domain names and client company names assigned to them
23Getting startedReport any errors or omissions

24
contract information can view the SSL certificates, domains and organizational names, client domain names and client company names assigned to them
certificate expiry messages can view Certificate Expiry Messages for SSL certificates assigned to them
event logs can view events that they performed but not events associated with super administrators or other sub-administrators
user preferences can customize their own view
reports can view reports concerning certificates assigned to them
Table 2: Sub-administrator permissions (continued)
Management feature Permission
Certificate Management Service 9.7 User Guide Document issue: 1.0Report any errors or omissions

Logging in to the Entrust Certificate Management Service
The Entrust Management System (CMS) supports second-factor authentication using Entrust IdentityGuard grid or Question and Answer (Q and A) authentication. You can choose to use this system when you register for CMS. Super administrators can add IdentityGuard authentication to an existing account from sign up here link on the Preferences page of the Certificate Management Service. Grids are provided by Entrust by mail and are valid for two years. Entrust automatically sends a replacement grid when the existing grid approaches its expiry date.
Note:Second-factor authentication is provided for the entire CMS account, not on a user-by-user basis. If you choose to adopt second-factor authentication, all users will be required to use second-factor authentication to access the CMS.
First-time users receive an email from Entrust with a one time password providing access to the CMS. When the new user uses the password to log in to the Web site, they are required to create and change the password.
To log in to the Entrust Certificate Management Service using a password for the first time
1 You will have received an email from Entrust containing your username and a link. Click the link in the email.
The log in page for Entrust IdentityGuard Self Service opens and a second email containing a temporary password is sent to the email address you provided in the enrollment application.
25Getting startedReport any errors or omissions

26
2 Log in to Entrust IdentityGuard Self Service using your temporary password.
The Password Change page appears.
3 In the Password Change page, type the one-time password that was sent to you by Entrust, into the Current Password field. Enter a new password that conforms to the Password Rules into the Password field and again, into the Confirm Password field.
4 Click Submit.
Note:Passwords expire after one year. After your password expires, you must create a new password the next time you log in.
Certificate Management Service 9.7 User Guide Document issue: 1.0Report any errors or omissions

If you are setting up the account, the license agreement page appears. This page does not appear if you adding a user to an existing account.
5 Read through the license agreement and click Accept to agree and continue. If you Decline the agreement, you cannot log into the CMS.
27Getting startedReport any errors or omissions

28
6 Select questions from the pull down menu and type your answers into the Answer field below.
Note:Select questions and answers that are easy to remember. You will have to answer these questions correctly before you can perform some administrative tasks (changing your password, for example).
7 Click OK.
Use your new password the next time you log into the Certificate Management Service. To change your password or question and answer pairings, use the Click here for IdentityGuard Self-Service link on the Preferences page as shown in Figure 2 on page 30.
Certificate Management Service 9.7 User Guide Document issue: 1.0Report any errors or omissions

Note:If you forget your password, use the Recover my password link to have a temporary password sent to you. You will be asked to change the temporary password when you log in to CMS.
Logging in to the Entrust Certificate Management Service using an Entrust IdentityGuard grid
Users registered for Entrust IdentityGuard grid authentication are issued a Entrust IdentityGuard grid card similar to the one shown in Figure 1 on page 29.
Figure 1: Entrust IdentityGuard grid card
29Getting startedReport any errors or omissions

30
During the log in process, the interface displays sets of column and row coordinates that correspond to positions in the grid. Enter the letter or number in that position on your grid card.
For example, if you are using the card shown in Figure 1 on page 29 and given the coordinates [B4], [D4], [F3] you would respond with 5, T, 6. If you have not yet received a grid, you can use a one time password to log in.
If you decide to use second-factor authentication at a later date, super administrators can apply for grid cards from the Sign up here link on the Preferences page of the Certificate Management Service.
Figure 2: Preferences menu
Using Entrust IdentityGuard Self-ServiceThe Entrust IdentityGuard self-service menu (available from the Click here for IdentityGuard Self-Service link on the Preferences and the log in page) can be used to:
• authenticate with a temporary password if you have temporarily misplaced your grid
• request a new grid if yours is lost or compromised
• change your question and answer pairings
• change your password
Certificate Management Service 9.7 User Guide Document issue: 1.0Report any errors or omissions

Figure 3: Entrust IdentityGuard Self-Service menu
Select your intended action from the list.
If you have temporarily forgotten your card a temporary pin will be sent to you by email and your card will be disabled. To use your card again use the I’ve found my grid and would like to start using it again link when you log in.
Grid cards are temporarily disabled for a maximum of 30 days, after which they are considered lost.
If you change your card because it has been lost or compromised, your card is permanently de-activated. Entrust issues a new card. Until you receive your new card, use your user name and password to log in to CMS.
31Getting startedReport any errors or omissions

32
The super and sub-administrator dashboard views
The Management Dashboard page is displayed when the Entrust Certificate Management Service opens or can be accessed through the Management Dashboard tab. The dashboard is designed to simplify monitoring certificate and service item use with easy access to management tools appropriate to the user’s type of account. Options available from the dashboard are different for super administrators and sub-administrators.
The super administrator view
Figure 4: Super Administrator view of the dashboard
The dashboard offers super administrators immediate access to information about:
• expiring certificates
• pending and ready certificate requests
• existing Entrust and non-Entrust certificates
• service items (administrators, domains, clients, and organizations)
In addition, super administrators can:
• create certificates and manage existing Entrust certificates
Certificate Management Service 9.7 User Guide Document issue: 1.0Report any errors or omissions

• add or view service items
• download Entrust Discovery Agents
• open the Entrust Discovery Manager (if you have enrolled for the Discovery Manager)
Menu bar functionalityThe super administrator view displays the following menu bar items:
Create Certificate
This menu item opens a page allowing he administrator to create certificate requests. See “Modifying client domain or organization information” on page 59 for information about adding and deleting client domains.
Management dashboard
This page displays a current view of the certificates and service items that the owner of the account can manage. Tools for managing these certificates and items are accessible from the dashboard.
E-Form
This menu contains the item Settings.
If you have not enrolled for the E-Forms, a link allowing you to enroll appears. If you have enrolled for the E-Forms, the Settings page contains links to them.
Admin Tools
This menu contains the following items:
• Add Domain
creates a request to add a domain to a client and submit the request to Entrust or a subcontractor.
• Contract Information
displays information about the service or account. See the “Using the Contract Information pages” on page 112 section for further details.
• Log History
opens a log of transactions for the account (for example, log in and create request).
• Tracking Fields
opens a page that enables a super administrator to establish additional tracking information fields for the Certificate Request E-Form or the Create
33Getting startedReport any errors or omissions

34
page within the Interface. See“Tracking Fields” on page 118 for further details.
• Purchase Additional Services
opens a page that enables the super administrator to purchase additional services (additional certificates, administrators, client domain names, and client company names). See “Purchasing additional services” on page 38 section for further details.
• Client Management
enables the super administrator to manage the client list (add, edit and deactivate). See“Managing clients” on page 51 section for further details
• Admin Management
opens a page that enables the super administrator to manage the administrators (add super or sub-administrators and edit-assign resources and deactivate sub-administrators). See the“Managing administrators” on page 43 section for further details.
• Certificate Import
imports certificates not currently managed by CMS for ease of management.
Reports
The menu item opens a page displaying tabs for:
• System Reports
displays links to pre-created system reports
• Custom Reports
opens a report generation wizard enabling an administrator to select the fields and criteria for a custom report. The report can be saved for future use.
Help
The help menu contains the following items:
• User Guide
opens this guide in Adobe PDF format
• Knowledge Base
opens the Entrust Certificate Services Support Knowledge Base with links and information pertinent to Certificate Management
• Web Server FAQs
opens a page with links to information about Web servers that can be used with Entrust SSL certificates and a link to the Entrust Certificate Services Support Knowledge Base
Certificate Management Service 9.7 User Guide Document issue: 1.0Report any errors or omissions

• Other FAQs
opens a page with links to frequently asked questions about Entrust SSL certificates and links to the Entrust Certificate Services Support Knowledge Base and other pertinent information
What’s New
opens a page containing information about the current release of the Certificate Management System.
Preferences
opens a page enabling a super administrator to customize the CMS interface view, sign up for Entrust IdentityGuard multifactor authentication, or adjust your Entrust IdentityGuard log in options.
BUY MORE
opens a page from which you can purchase certificates and services.
Logout
opens a log out page.
The sub-administrator viewSub-administrators have a simplified view, allowing them to create, deactivate, and manage the SSL certificates and service items for which they have authorization. See “Sub-administrators” on page 23 for information about sub-administrator permissions.
If sub-administrators attempt to access and use tools for which they do not have permission, an error message is displayed.
Adjusting your viewSome pages in the CMS interface can potentially display a great deal of information. You can tailor the content of many pages to help you to find details more easily.
Removing a columnTo temporarily remove unneeded columns from pages, select any column on the page, open the pull down menu, and deselect the check box associated with the column. To restore the column, open the pull down menu and select the check box again.
35Getting startedReport any errors or omissions

36
Figure 5: Removing or restoring a column
Filtering informationAs shown in Figure 6 and Figure 7, you can also filter information in a specific column. For example, in the Status column of the Client Management page the possible entries are Active, Ready, Pending, Expired and Deactivated. If you select Active, no pending, ready, expired or deactivated client names are displayed in the list.
Figure 6: Filtering standard entries in a column
Certificate Management Service 9.7 User Guide Document issue: 1.0Report any errors or omissions

FIltering columns without a standard set of filters
If the column does not have a standard set of filters, you can type the information into the filter. For example, typing an administrator ID into the Administrator column in the Log Histories page limits the entries to actions performed by a particular administrator.
Figure 7: Filtering entries in a column (non-standard information)
Similarly, use Group By This Field to group entries by the type of information in the column. Show in Groups creates a tree view with information from other columns in the entry row branching from the information in that column. For example, select this option in the Requester column and all other information in each entry row is grouped under the requester. Select + beside the requester to expand the tree view and reveal the other information.
To turn off any of these features (except Group By This Field) deselect them in the pull-down menu.
Saving your changesTo save your changes, select Save Filter from the menu at the bottom of the page. To return to the default view, use Clear Filter.
37Getting startedReport any errors or omissions

38
Purchasing additional servicesSuper administrators can use the CMS interface purchase the following additional items:
• certificates
• EV and UC SANs
• administrators
• organization names
• domain names
• client names
You can purchase additional items by credit card or by purchase order. Follow the steps below to purchase any of these additional services.
Note:After additional certificates, administration options, or renewal changes are processed by Entrust, the resulting agreement (Entrust Certificate Management Service Agreement) is presented to the next super or sub-administrator logging in to the CMS interface. The agreement must be accepted before the requested item can be used.
For information about contacting Entrust, see “Obtaining technical assistance” on page 11.
To purchase additional services
1 From the top menu bar, select Admin Tools > Purchase Additional Services or select Buy More from the top menu bar.
The Purchase Additional Services page appears.
2 Enter the quantity in the applicable field for each certificate type and administration option. For pooling account users, the Price listed is calculated
Certificate Management Service 9.7 User Guide Document issue: 1.0Report any errors or omissions

using your expiry date and the lifetime of your account. For non-pooling account users the price is based on number of certificates..
Note:The prices depicted in the illustration may be out-of-date. The most recent prices are listed on the Purchase Additional Services page in the CMS.
39Getting startedReport any errors or omissions

40
3 Under Payment Type, select either the PO or Credit Card radio buttons.
Note:Only use the Purchase Order (PO) option for orders above $1,000.00 USD in value. An Entrust sales representative will contact you for more information after you order using this option.
4 If you select the Credit Card radio button, enter the card type (MasterCard®, VISA or American Express®), card number, card expiry date, and the billing name
Certificate Management Service 9.7 User Guide Document issue: 1.0Report any errors or omissions

and address for the credit card holder. The address provided must match the billing address of the credit card.
5 Click Submit (or click Reset to clear the form).
If you select the PO (purchase order) payment option, an Entrust Sales representative will contact you for more information.
If you select the Credit Card payment option, the specified credit card is billed and a receipt emailed to the billing contact for the account. Your inventory is updated immediately after the transaction is approved.
41Getting startedReport any errors or omissions

42
Using Entrust Discovery from the CMSEntrust Discovery Manager can be opened and used from Entrust CMS however, it is separate Entrust product. You can download Discovery agents free-of-charge from the Discovery tab on the CMS dashboard.
The Entrust Discovery Manager and certificate licenses can be ordered by clicking Open Manager in the Entrust Discovery page. The Entrust Discovery Administration Guide contains information about deploying the Discovery Manager and Agent solution. The Entrust Discovery Agent Administration Guide contains information about deploying Discovery Agents without a Discovery Manager. The guides are available from their respective Click here links on the Entrust Discovery page of the CMS dashboard.
For more information about Entrust Discovery, see the administration guide for your deployment.
Certificate Management Service 9.7 User Guide Document issue: 1.0Report any errors or omissions

2
2Managing administrators
Your initial Entrust Certificate Management Service view has a default inventory of two administrator accounts. Use one of these administrator accounts to start using the Entrust Certificate Management Service. Your first administrator must be a super administrator, since you need access to all of the CMS tools.
Super administrator is the default administrator account type and has full privileges. If there are unused administrator accounts in inventory, super administrators can create sub-administrators. By assigning sub-administrator accounts, a super administrator can delegate responsibility for specific certificates, domains and clients. Sub-administrators are established by either demoting an existing super administrator account or creating a new administrator account with the sub-administrator role.
To add more administrator accounts to your inventory, contact Entrust or order directly using the Certificate Management Service interface (see “Purchasing additional services” on page 38).
If a request for an additional administrator account is rejected by Entrust the account is not displayed in the Admin Management pages.
This chapter discusses the following topics:
• “Adding an administrator” on page 44
• “Managing super administrators” on page 46
• “Managing sub-administrators” on page 47
43

44
Adding an administratorFollow the procedure in this section to add either a super or sub-administrator.
Note:Never add a sub-administrator account that has been deactivated. Use the re-activate icon instead.
To add an administrator
1 As a super administrator, select Admin Tools > Admin Management from the top menu bar.
The Admin Management page appears.
2 Type the name of the new administrator in the Administrator Name text box.
3 From the pull-down list beside the Administrator Type field, select either Super Administrator or Sub-administrator.
4 Click Submit.
The Add Another Administrator page appears.
Certificate Management Service 9.7 User Guide Document issue: 1.0Report any errors or omissions
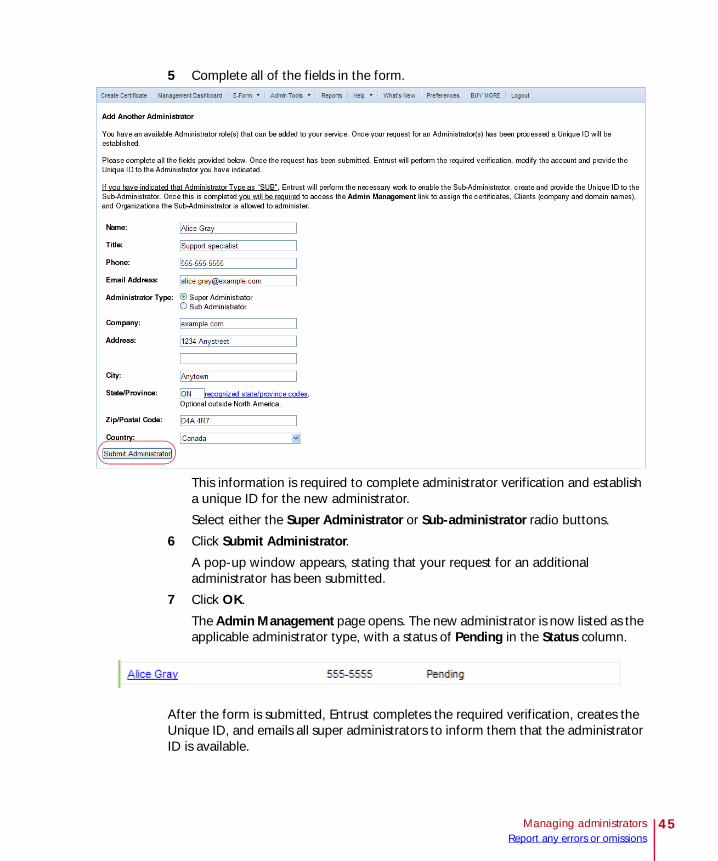
5 Complete all of the fields in the form.
This information is required to complete administrator verification and establish a unique ID for the new administrator.
Select either the Super Administrator or Sub-administrator radio buttons.
6 Click Submit Administrator.
A pop-up window appears, stating that your request for an additional administrator has been submitted.
7 Click OK.
The Admin Management page opens. The new administrator is now listed as the applicable administrator type, with a status of Pending in the Status column.
After the form is submitted, Entrust completes the required verification, creates the Unique ID, and emails all super administrators to inform them that the administrator ID is available.
45Managing administratorsReport any errors or omissions

46
Managing super administratorsTo view the details of a super administrator account, from the Admin Tools menu, select Admin Management. In the Admin Management page, click the name of the super administrator account.
Super administrator accounts can be can be downgraded to sub-administrator.
Demoting a super administratorYou cannot use the Certificate Management Service to demote a super administrator to sub-administrator. To demote a super administrator, the service Authorization Contact must send an email to Entrust at [email protected]. In this email, the service Authorization Contact must provide the account name and the name of the existing super administrator being demoted.
Once Entrust completes the request, an email is sent to the service Authorization Contact and the service administrators (Super and Sub) informing them of the change.
When existing super administrator accounts are demoted to sub-administrator, only the certificates created by that account a super administrator appear in their Management Dashboard. By default, the sub-administrator account will not have access to any client names. These can be assigned to the account by a super administrator.
Certificate Management Service 9.7 User Guide Document issue: 1.0Report any errors or omissions

Managing sub-administratorsFrom the Admin Management page a super administrator can manage sub-administrators using the view , edit , deactivate or activate icons.
Sub-administrators cannot access any certificates or clients until those certificates or clients have been delegated to them by a super administrator. Accelerator licenses cannot be assigned to sub-administrators.
The following sub-administrator management tasks are discussed:
• “Viewing and editing sub-administrator accounts” on page 47
• “Promoting a sub-administrator to super administrator” on page 48
• “Deactivating and reactivating a sub-administrator” on page 49
Viewing and editing sub-administrator accountsSuper administrators can view and edit all sub-administrator accounts. They can access and edit contact information as well as what clients, certificates, and principle clients are assigned to a sub-administrator.
To view sub-administrators
1 As a super administrator, from the top menu bar select Admin Tools > Admin Management.
The Admin Management page appears.
2 Select the Sub-administrators tab. The Sub-administrators pane provides a list of all sub-administrators.
3 In the Action column, click (view) for the sub-administrator.
47Managing administratorsReport any errors or omissions

48
The Administrator Details page appears. This page shows the contact information for the sub-administrator as well as the certificates, clients and primary client that are assigned to the sub-administrator.
To edit sub-administrators
1 As super administrator, from the top menu bar select Admin Tools > Admin Management.
2 Click (edit) for the applicable sub-administrator.
The Administrator Details page displays. This page shows the contact information for the sub-administrator and the resources are assigned to the account.
3 Modify the information, as required.
4 Click Submit.
The Administrator Details page displays all of the certificates assigned to the sub-administrator in the Certificate Assignment section. Click Client/Organization Names to see associated clients.
Promoting a sub-administrator to super administratorOnly super administrators can promote sub-administrators.
To promote a sub-administrator to super administrator
1 As super administrator, from the top menu bar select Admin Tools > Admin Management.
2 Select the sub-administrators tab.
3 Click (edit) for the applicable sub-administrator.
The Administrator Details page displays.
4 Click the Promote sub-administrator: check box at the bottom of the page.
5 Click Submit.
A pop-up message opens, stating that the sub-administrator promotion is complete.
6 Click OK.
The administrator type is updated and an email is sent to the Authorization Contact and the service administrators, informing them of the change.
See “Sub-administrators” on page 23 for further details on the role and permissions granted to sub-administrators.
Certificate Management Service 9.7 User Guide Document issue: 1.0Report any errors or omissions

Deactivating and reactivating a sub-administratorSub-administrator accounts can be deactivated. After an account has been deactivated it cannot be used or edited until it is reactivated. When a sub-administrator is removed from the service, their certificate inventory is returned to the general account inventory.
After you deactivate a sub-administrator, a reactivate icon appears in the entry for that sub-administrator account. Use the reactivate icon to start using the account again.
Note:To reactivate an administrator, you must have unused administrator accounts in your inventory .
To deactivate a sub-administrator
1 As a super administrator, from the top menu bar select Admin Tools > Admin Management.
2 Select the Sub Administrators tab.
3 Click (deactivate) for the applicable sub-administrator.
A pop-up window opens, stating that this action will completely remove the administrator from the system. Click Ok to continue.
The Status column shows the sub-administrator as Deactivated.
To reactivate a sub-administrator
1 As a super administrator, from the top menu bar select Admin Tools > Admin Management.
2 Select the Sub Administrators tab.
3 Click (reactivate).
A pop-up window opens, asking you to confirm.
4 Click OK to reactivate.
The sub-administrator is reactivated.
49Managing administratorsReport any errors or omissions

50
Certificate Management Service 9.7 User Guide Document issue: 1.0Report any errors or omissions
3
3Managing clients
This section contains the following topics:
• “Adding a new client” on page 52
• “Viewing or altering client accounts” on page 58
• “Deactivating a client” on page 63
• “The client verification process” on page 64
51

52
Adding a new clientUse either the Client Management page or the Client Request E-Form to request additional clients (company and domain names). To use the Client Request E-Form you must enroll for the form with Entrust.
Be sure that all information used in a client transaction is correct. Entrust uses this information to contact the company and complete the required verification.
If you plan on using Extended Validation (EV) certificates or Code Signing certificates in your client domainsUse of EV and Code Signing certificates requires more rigorous verification of the client domains. To use these certificates, more information about the client and domains is requested by the CMS and a longer time period is required to verify the information. See “Before adding the client (company and domain name), Entrust or a third party verifies the following information:” on page 64 for more information about the validation process. If you add domains at a later date and choose to use them with EV or Code Signing certificates, they will also require validation.
To add a new Client using the CMS interface
1 From the top menu bar, select Admin Tools > Client Management.
The Client Management page appears.
2 Type the new client company name in the Client Company Name: field (click the ? icon for information about the format of the company name). You must type the client's registered business name. Do not use abbreviations.
Note:You must have remaining unused Client company and Client domain names in your inventory. See the Contract Information pages, Inventory page for inventory information.
Certificate Management Service 9.7 User Guide Document issue: 1.0Report any errors or omissions

3 Click the Add this client button.
The Management View page appears.
4 Read the Add Client section of the page. This information is required to successfully request a new client.
5 Complete the Client Company Information pane. The DUNS Number is the nine digit number that uniquely identifies the client company. DUNS stands for data universal numbering system. The system was originally created by the Dun and Bradstreet Corporation. The Address should be the legal business address of the client company
53Managing clientsReport any errors or omissions

54
6 Type the requested information into the fields in the Client Contact Information tab. This is the person acting as the contact for the client company
7 Type the requested domain name into the Domain Name field Client Domain Information tab. If you are adding another domain to the Client information click Add Domain and type the domain name into the new field.
If you are requesting an EV or code-signing certificate select EV/Code signing for the appropriate domain. Tabs for entering the additional information required to obtain EV and code-signing certificates appear.
For more information about EV certificates see“Certificate types” on page 18.
If you make an EV request, fill out the Business Headquarters, Jurisdiction of Incorporation, Higher Authority and Contract Signer pages.
A higher authority can be a corporate executive, legal counsel, company director or the direct manager of the contract signer or authorization contact. The person acting as the higher authority cannot also be the contract signer.
The contract signer is the individual who signs the subscription agreement on behalf of the company. The subscription agreement is sent to that person. The agreement must be accepted before the order can be processed.
The persons listed must respond if contacted by Entrust or a third party representative of Entrust. If they fail to do so, the certificate will be delayed or canceled.
8 Click Submit Request.
Required for extended validation
Certificate Management Service 9.7 User Guide Document issue: 1.0Report any errors or omissions

A confirmation page opens. Be sure that the information on the page is correct. Click Confirm to submit the request or Edit to change any information.
After the request is sent to Entrust, the client will be listed in the Clients list on the Client Management page with a status of Pending in the Client Status column.
Entrust performs the required verification (see the“Before adding the client (company and domain name), Entrust or a third party verifies the following information:” on page 64 for details of the verification process) and, if successful, adds the client (company and domain names) to the approved lists.
To add a new Client using the Client Request E-Form
1 From your browser, enter the URL of the Client Request E-Form Web page. For more information about the E-Forms see “Disabling the E-Form” on page 83.
2 If a password has been established for the E-Form, you must enter it before the request can be submitted.
3 Type in the applicable information in all of the fields in all the sections on the page. “Requesting a certificate using the Certificate Request E-Form” on page 81 for details).
The form has the following sections:
• Submitter Information
The submitter’s Name and Email Address you enter in the Submitter Information section is the address used for the email acceptance or rejection notification (if email notification is enabled).
• Domain Information (check the Setup as EV check box if you want Extended Validation) additional pane appear to
• Client Company Information
55Managing clientsReport any errors or omissions

56
The DUNS Number is the nine digit number that uniquely identifies the client company. DUNS stands for data universal numbering system..
Note:The company information must be accurate and reflect the legal identity of the client being requested.
• Client Contact Information
Information that can be used to contact someone in the company requesting the client who has knowledge of the transaction.
If you make an EV request, fill out the Business Headquarters, Jurisdiction of Incorporation, Higher Authority and Contract Signer pages.
A higher authority can be a corporate executive, legal counsel, company director or the direct manager of the contract signer or authorization contact. The person acting as the higher authority cannot also be the contract signer.
Certificate Management Service 9.7 User Guide Document issue: 1.0Report any errors or omissions

The contract signer is the individual who signs the subscription agreement on behalf of the company. The subscription agreement is sent to that person. The agreement must be accepted before the order can be processed.
The persons listed must respond if contacted by Entrust or a third party representative of Entrust. If they fail to do so, the certificate will be delayed or canceled.
Note:The information in this form is sent to Entrust. Entrust or a third party representative will contact the client to complete an Authorization Letter. The contact must complete and return the Authorization Letter before the transaction can proceed.
4 Click the Submit Request button. Or click the Reset button to clear the information on the form and start again.
Once the request is sent to Entrust, the client will be listed in the Clients list on the Client Management page with a status of Pending (Awaiting Consent) in the Client Status column.
Entrust performs the required verification (see “Before adding the client (company and domain name), Entrust or a third party verifies the following information:” on page 64 for details of the verification process). If verification is successful, Entrust adds the client company and domain names to the approved lists.
57Managing clientsReport any errors or omissions

58
Viewing or altering client accountsYou can view client accounts and add or remove domains. Client information can only be changed by Entrust. The following topics are discussed in this section:
• “Viewing Clients” on page 58
• “Modifying client domain or organization information” on page 59
To view client accounts select Admin Tools > Client Management, from the top menu bar.
The Client Management page displays icons (see Figure 8) beside every Client Company Name. These icons are linked to actions that allow you to view clients and add or remove domains. If you specify EV certificate use for an additional domain, it will
Note:Clicking any icon beside a deactivated client opens a pop-up window, stating This client is deactivated.
Figure 8: Client Management Page.
Viewing ClientsClick the “view” icon to open the Edit Client page. The Client Company Information tab displays the existing information (Company Name, Address, DUNS number) about this client. Click the appropriate tab to view the contact information,
Certificate Management Service 9.7 User Guide Document issue: 1.0Report any errors or omissions

associated domains. The Business Headquarters, Jurisdiction of Incorporation, Higher Authority, and Contract Signer tabs will be present if EV has been selected.
Modifying client domain or organization informationSuper administrators can request changes to the list of domains and organizations. Client domains and organizations can be added or removed. Extended validation can be added to existing domains. Other information about clients can be viewed but not modified.
Note:Only a super administrator can submit a request to add or remove additional Domain Names.
To edit client domain information
1 From the menu bar, select Admin Tools > Client Management.
59Managing clientsReport any errors or omissions
60
The Client Management page appears.
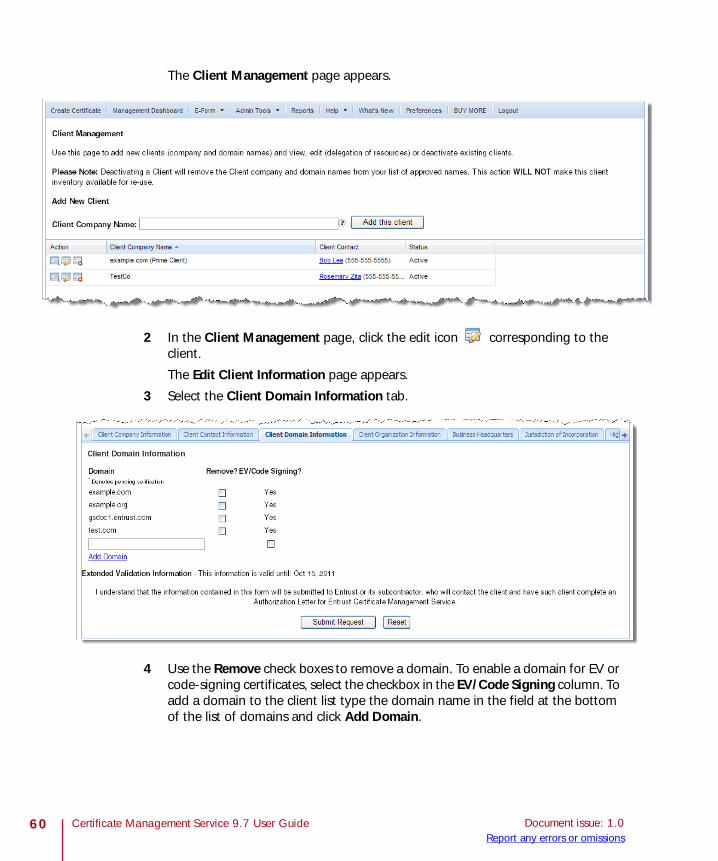
2 In the Client Management page, click the edit icon corresponding to the client.
The Edit Client Information page appears.
3 Select the Client Domain Information tab.
4 Use the Remove check boxes to remove a domain. To enable a domain for EV or code-signing certificates, select the checkbox in the EV/Code Signing column. To add a domain to the client list type the domain name in the field at the bottom of the list of domains and click Add Domain.
Certificate Management Service 9.7 User Guide Document issue: 1.0Report any errors or omissions

Note:Entrust cannot remove a domain that is in use by an active certificate. Before removing a domain, deactivate any active certificates using it.
5 Click Submit Request to send the information to Entrust or Reset to start over.
Note:Removing a domain does not make the domain available to use again without validation. Domains require validation before being added to an account.
To edit client organization information
1 From the menu bar, select Admin Tools > Client Management.
The Client Management page appears.
2 In the Client Management page, click the edit icon corresponding to the client.
The Edit Client Information page appears.
61Managing clientsReport any errors or omissions

62
3 Select the Client Organization Information tab.
4 Use the Remove check box to remove an organization. To add an organization to the client list type the name in the organization field.
Note:Entrust cannot remove an organization that is in use by an active certificate. Before removing a domain, deactivate any active certificates in the domain.
5 Click Submit Request to send the information to Entrust or Reset to start over.
Certificate Management Service 9.7 User Guide Document issue: 1.0Report any errors or omissions

Deactivating a clientYou can deactivate a client from the Client Management pane .
To deactivate a client
1 From the menu bar, select Admin Tools > Client Management.
The Client Management page appears.
2 In the Client Management page, click the “deactivate” icon for the client.
3 If you click the deactivate icon for a client with the status Active or Pending, a confirmation window, stating Deactivating this client will mean you will no longer be able to create certificates for them appears.
4 Click OK to proceed or the Cancel button to stop the deactivation.
5 Click OK to deactivate the client (company and domain name) from your list of approved Client company and client domain names.
After the client has been deactivated, it appears in the client list with deactivated as its Client Status.
Note:Removing a client does not add it to the list of unused inventory. Full verification is required to add a client. The name can only be added once.
63Managing clientsReport any errors or omissions
64
The client verification processBefore adding the client (company and domain name), Entrust or a third party verifies the following information:
• That client has the legal right to conduct business under the client company name specified.
• That the client company or organization is the registered owner of the client domain name(s) provided.
• That the client company name matches the legally registered name, trade name, or majority owned (51% or more) subsidiary (Entrust can only issue certificates if the client company name matches the organization name provided in the CSRs submitted within the account).
• That the client contact is employed by the company (conducted utilizing a third party directory).
The authorization letter is sent to the client contact and must be accepted before Entrust can approve the addition of the client. This letter provides Entrust with the legal consent for the owner of the account to issue certificates on behalf of the client.
Note:If the information that you provide in the Add Client request page or Client Request E-Form is correct and complete, the verification and addition of the Client (company and domain name) typically takes 3-5 business days, or if EV/Code Signing is specified, 5-10 business days. If any issues arise, Entrust will contact you immediately.
After Entrust has completed the verification process, the client appears in the clients list on the Client Management page, with a status of Active in the Client Status column.
Refer to the CA/Browser forum Web site for further details about the validation process: http://www.cabforum.org/index.html.
Certificate Management Service 9.7 User Guide Document issue: 1.0Report any errors or omissions

4
4Creating and managing certificates
This chapter describes how to create and manage certificates using the Entrust Certificate Management Service. Topics in this chapter include:
• “An introduction to creating and managing certificates” on page 66
• “Requesting a code-signing certificate using the CMS interface” on page 70
• “Requesting a CDS certificate using the CMS interface” on page 73
• “Requesting an SSL Certificate using the CMS interface” on page 76
• “Requesting a certificate using the Certificate Request E-Form” on page 81
• “Requesting and administering Secure Email certificates” on page 93
• “Retrieving an Entrust SSL certificate” on page 100
• “Reissuing a certificate” on page 102
• “Renewing a certificate” on page 104
• “Revoking or deactivating a Certificate” on page 106
• “Managing certificates from a different vendor” on page 108
65

66
An introduction to creating and managing certificates
The certificates that you ordered when you enrolled for the CMS are the initial inventory that you draw on to install certificates on machines in your network. As your certificate needs grow, you can purchase additional certificates from Entrust directly through the CMS interface and add them to your inventory.
Certificate requests are created using either the Certificate Management Service interface, or the Certificate Request E-Form. Super administrators can create certificates for all devices or users that are managed by their CMS account, regardless of the domain, client, or organization. Sub-administrators can only create and manage certificates for devices belonging to domains, clients, or organizations that have been assigned to them.
Other staff (for example, IT personnel at other locations) can be given the authority to create certificate requests using the Certificate Request E-Form. E-form requests require approval from an administrator.
If you are using a pooling inventory model, certificates can be recovered from devices where they are no longer needed, and reused.
Monitoring certificate useThe number, type, and state of your certificates can be monitored from the Certificate Information or Management dashboard pages.
Monitoring certificates from the Inventory Information pageOnce purchased, you can monitor the number and type of certificates in your inventory.
To open the Certificate Information page
1 Select Admin Tools > Contract Information from the menu bar.
2 Click the Certificate Information tab (for more information about this page, see “Monitoring the Entrust Certificate Management Service” on page 111).
Columns in the Certificate Information pane list the number of each type of certificate and its current state (see Figure 9).
Certificate Management Service 9.7 User Guide Document issue: 1.0Report any errors or omissions

Figure 9: Certificate Information page
• Active certificates are those that are currently being used.
• Ready certificates are those certificates that were created and are ready to be installed.
• Pending certificates have been requested but have not yet been approved. Pending certificate requests can be approved from the Management dashboard.
• Deactivated or Revoked certificates are those that were assigned but that you have taken out of service. For example, if you want to deactivate a client or domain you would first deactivate the certificates being used by that client or domain.
• Expired certificates are those that are past their lifetime and have not renewed.
• Declined Requests are certificate requests that have been rejected by the Administrator.
Monitoring certificates from the Management dashboardCertificate information also appears in the Management dashboard.
Change tabs to display:
• Certificates expiring in the next 30 days
• Pending/Ready Certificate Requests
67Creating and managing certificatesReport any errors or omissions

68
• All Certificates
• Non-Entrust Certificate Inventories
• Service Items (administrators, domains, clients, and organizations)
Figure 10: Management dashboard showing the All Certificates tab)
• Active indicates that the certificate has been deployed and is usable.
• Ordered indicates that the certificate has been requested.
• Used indicates certificates that have been deployed, regardless of their current state.
• Pending indicates certificate requests awaiting approval.
• Expired indicates that the certificate has exceeded its life span.
• Deactivated indicates that an administrator has taken the certificate out-of-service.
In the Actions column, select:
to reissue a certificate. Some certificates can be reissued if the file has become corrupted, or they are lost due to machine failure, or there is a mistake in the certificate information. Reissuing a certificate follows strict guidelines. See “Reissuing a certificate” on page 102 for more information.
to renew a certificate. Certificates are usually renewed if they have expired or are about to expire (see “Renewing a certificate” on page 104).
to deactivate or revoke a certificate. S/MIME certificates are revoked. (see “Revoking or deactivating a Certificate” on page 106).
to send a pickup notification
Certificate Management Service 9.7 User Guide Document issue: 1.0Report any errors or omissions

A notification is sent automatically when a certificate is approved, however this icon allows you to send a second message (as a reminder, for example).
to view additional information about a certificate
The Action pull down menu gives you the option of approving or rejecting Pending certificate requests.
69Creating and managing certificatesReport any errors or omissions

70
Requesting a code-signing certificate using the CMS interface
In order to create a code-signing certificate, there must be an unused certificate of this type in your inventory. If you have no certificate inventory of this type, you can purchase certificate inventory using the CMS interface (see “Purchasing additional services” on page 38).
Be sure that the client receiving the certificate is in the client list before requesting the certificate (see “Adding a new client” on page 52).
Note:Clients requesting code-signing certificates must provide the same information as clients requesting extended validation (EV) certificates. See “To add a new Client using the CMS interface” on page 52.
To request a code-signing certificate
1 In the menu bar click Create Certificate.
The Create a Certificate page appears.
2 From the pull-down menu, select Code Signing. For information about code-signing certificates see “Code signing certificates” on page 21.
3 Specify the life span of the certificate. Code-signing certificates can have a life span of up to three years. .
Certificate Management Service 9.7 User Guide Document issue: 1.0Report any errors or omissions

4 Add a tracking information and any additional email addresses.
5 Assign the certificate to a client. Only clients that have qualified for extended validation appear in the pull-down menu.
6 Click Submit Request.
7 CMS presents you with a link to the certificate retrieval pages. Be sure to use the link from the computer where you want to install the certificate.
8 In the Certificate Retrieval page, specify the type of code-signing certificate. For information about code-signing certificates see “Code signing certificates” on page 21.i
9 Click Continue.
10 Click Create Certificate to install the certificate on your computer..
11 If a scripting violation warning appears, click Yes to continue downloading the certificate.
71Creating and managing certificatesReport any errors or omissions

72
12 The Web site installs the certificate on your computer and displays a message indicating that the certificate has been successfully created.
Certificate Management Service 9.7 User Guide Document issue: 1.0Report any errors or omissions

Requesting a CDS certificate using the CMS interface
Use the CMS interface to request certificates for use with Adobe CDS. In order to create a certificate there must be an unused certificate of the type that you require in inventory. If you do not have any certificates of this type, you can purchase certificates using the CMS (see “Purchasing additional services” on page 38).
Certificates are issued to a client. Be sure that your client is in the client list before requesting the certificate (see “Adding a new client” on page 52).
To request a CDS certificate
1 In the top menu bar, click Create Certificate.
The Create a Certificate page appears.
2 From the pull-down menu, select the type of certificate. For information about CDS certificates see “CDS certificates” on page 20.
Figure 11: Select a certificate type
73Creating and managing certificatesReport any errors or omissions

74
3 Fill in the CDS certificate creation information.
Note:The information on this page differs slightly for different certificate types.
• Subscriber Information
Fill in the requested subscriber information for the certificate. The email address must use a domain listed in CMS as belonging to the client selected from the pull down menu. For example, if the client is listed as having the domain example.com, the email address of the subscriber must contain the
Certificate Management Service 9.7 User Guide Document issue: 1.0Report any errors or omissions

domain example.com. For information about creating clients in CMS see “Adding a new client” on page 52.
• Certificate Information
Fill in the requested certificate information. Any email addresses listed in the Additional Emails field will be notified when the certificate approaches expiry.
Create and confirm a password to use with the certificate. A strong password is required. The red x icons will turn to green check marks as you complete the requirements of a strong password.
• DN Builder
Select the type of value that want to appear as the Common Name in the certificate’s DN. For example, if you select Bob Lee, CN=Bob Lee will appear in the DN. Similarly select the value that you want to appear as the Organizational Unit in the DN, for example if you select Marketing, OU=Marketing will appear in the DN.
4 Click Submit Request.
5 If the information the you provided is correct, a confirmation page appears. If the information provided does not match the client information, an error message is displayed.
Note:For information about installing and using a CDS signing certificate see the Entrust Certificate Services using Entrust Signing Certificates with Adobe CDS User Guide. Information about installing and using each type of code-signing certificate can be found in the user guide.
75Creating and managing certificatesReport any errors or omissions

76
Requesting an SSL Certificate using the CMS interface
You can request certificates from either the CMS interface or the Certificate Request E-Form. This section explains how to request a certificate from the interface.
Note:Before starting this procedure, generate a CSR (Certificate Signing Request) from the Web server where you plan to install the certificate
To create a new Standard, Advantage, EV Multi-Domain, UC Multi-Domain, or Wildcard SSL Certificate
1 In the top menu bar, click Create Certificate.
2 In the Create a Certificate page, select the type of certificate from the pull-down menu.
The Create Web Server Certificate page appears.
Note:Required fields are indicated by an asterisk (*).
3 In the Tracking Info field enter any relevant tracking information for the certificate being issued. For example, you can enter information to help identify which server the certificate is installed on, such as an asset tag or a host name.
Certificate Management Service 9.7 User Guide Document issue: 1.0Report any errors or omissions
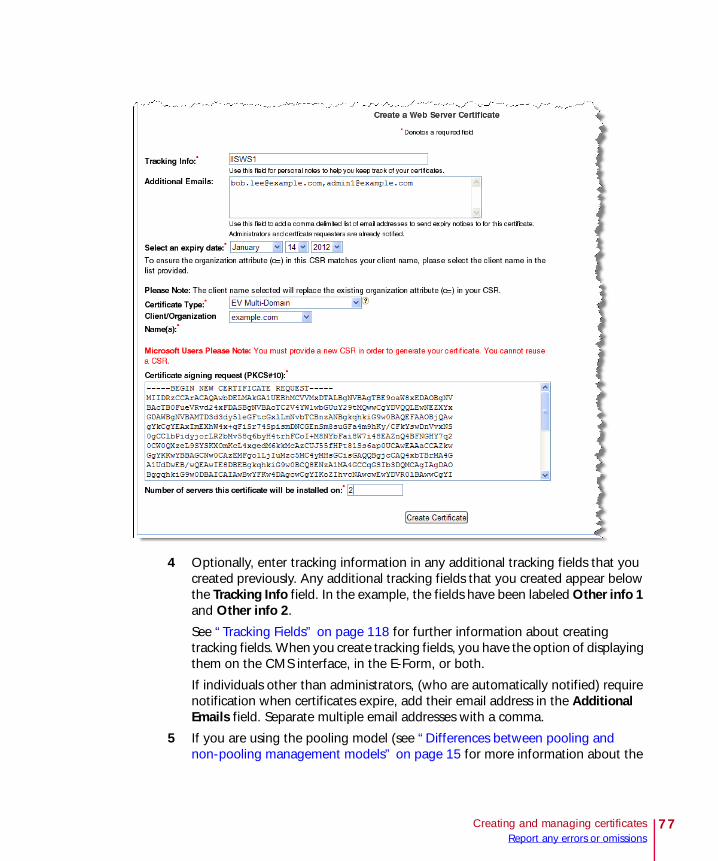
4 Optionally, enter tracking information in any additional tracking fields that you created previously. Any additional tracking fields that you created appear below the Tracking Info field. In the example, the fields have been labeled Other info 1 and Other info 2.
See “Tracking Fields” on page 118 for further information about creating tracking fields. When you create tracking fields, you have the option of displaying them on the CMS interface, in the E-Form, or both.
If individuals other than administrators, (who are automatically notified) require notification when certificates expire, add their email address in the Additional Emails field. Separate multiple email addresses with a comma.
5 If you are using the pooling model (see “Differences between pooling and non-pooling management models” on page 15 for more information about the
77Creating and managing certificatesReport any errors or omissions

78
pooling and non-pooling models), use the Select an expiry date drop-down list to enter the expiry date of the certificate.
If you are using the non-pooling model, use the radio buttons to set the expiry date.
Attention:A large number of certificates expiring on the same day may create maintenance delays.
6 Select the appropriate certificate type from the Certificate Type drop-down list. For more information about certificate types, see “Certificate types” on page 18. Only the certificate types for which you have unused inventory appear in the drop-down list.
7 In the Client/Organization Name drop-down list, select the name of the client or organization to which the certificate is assigned.
The name selected from the list is used in the organization attribute (o=<name>) of the distinguished name (DN) that appears in the certificate. The names in the list are the legally registered name, trade name, or a majority owned (51% or more) subsidiary, and must have been confirmed as such by Entrust or a third party representative of Entrust. Client names can be added to the list using the client page (see “Managing clients” on page 51) or Client Request E-Form.
8 In the Certificate signing request (PKCS#10) field, paste the contents of the CSR file that was generated by the Web server when you created the PKCS#10 certificate request. If the CMS does not recognize the domain in the CSR as belonging to the client that you selected it will reject the request.
The Certification Authority uses this information to create a unique certificate for the Web server. For information about how to create a CSR for a specific type of Web server, visit the Entrust knowledge base at: http://www.entrust.net/ssl-technical/webserver.cfm/ (on the Web site select the type of server and follow the link to Certificate Signing Requests).
Note:When the certificate is generated, the client and organization name that you selected in Step 7 replaces the existing organization name in the CSR.
9 Enter the number of servers where you plan to install this certificate. This number is used to determine the number of licenses used by the certificate. Each licence used removes a certificate of that type from your unused certificate inventory.
Certificate Management Service 9.7 User Guide Document issue: 1.0Report any errors or omissions

If you are creating an EV Multi-Domain certificate or a UC Multi-Domain certificate, and will be using SANs from your SAN inventory to add domains to the certificate, this will affect the number of SANs used. See “SANs (for additional domains)” on page 15 for more information.
10 Click Create Certificate.
A confirmation screen appears. If you are using UC Multi-Domain certificates or EV Multi-Domain certificates continue to Step 11; if not, go to Step 12.
11 In the Request confirmation page, use the SubjectAltNames (SANs) field to enter additional domains. If you added these to the CSR when you created it, you can skip this step.
Any domain that you add must be valid, and the required number of SANs must exist in your inventory. Be sure to correctly calculate the number of SANs required. See “SANs (for additional domains)” on page 15 for information about SAN administration.
12 Check that the information is correct and click Confirm.
79Creating and managing certificatesReport any errors or omissions

80
The certificate is subtracted from your unused certificate inventory total when you confirm the request.
The certificate appears in the certificate management view as Ready. In the Dashboard view, click Ready to retrieve the certificate. For more information about retrieving an SSL certificate see “Retrieving an Entrust SSL certificate” on page 100.
Certificate Management Service 9.7 User Guide Document issue: 1.0Report any errors or omissions

Requesting a certificate using the Certificate Request E-Form
The Certificate Request E-Form is a Web page that enables an organization’s technical support personnel to request certificates even if they are not super or sub-administrators, and do not have access to the Certificate Management Service (CMS) Interface.
Tasks discussed in this section include:
• “Enrolling for E-forms” on page 81
• “Disabling the E-Form” on page 83
• “Using the Certificate Request E-Form” on page 83
Enrolling for E-formsBefore the Certificate Request E-Form can be used, a super administrator must enroll for the service. You can enroll using the Certificate Management Service Interface. After you provide the enrollment information to Entrust, Entrust sends your organization’s administrator a customized URL and a notification that the E-Form is available for use.
After the URL has been created, it can be used to open the E-forms and create certificate requests. Any certificate request made using the E-Form must be approved by a super administrator or by a sub-administrator authorized to administer to that client, organization, and domain.
To enroll for E-Forms
1 As the super administrator, select E-Form > Settings link.
The Certificate and Client Request E-Form Application appears.
2 Enter the following information:
81Creating and managing certificatesReport any errors or omissions

82
• Password (optional)
The E-Forms can be password protected if required. If a password is required, all users of the forms will have to enter the password to submit a certificate or client request. The password must be 4-8 alphanumeric characters.
Select Yes or No.
• Provide your company graphic (company logo) (optional)
To display the organization’s logo as the header on the E-Form you must provide a graphic of the logo. Follow these guidelines:
– format must be GIF or JPEG– maximum dimensions are 108(W) X 65(H) (pixels)– 2 megabyte file size limitUse Browse to select the graphic file or type the path to the graphic into the field provided.
If no graphic is provided, the Entrust logo is displayed.
• Footer (optional)
Provide text to appear as a footer on the E-Form. Use this footer to display the organization’s technical support email address, telephone number, or other information.
Enter the pertinent technical support contact information in the text box provided.
• Requester notification email
• You can set the E-Form to send an email to the requester to notify them when a client has been accepted or rejected.
Certificate Management Service 9.7 User Guide Document issue: 1.0Report any errors or omissions

Select Yes if you choose to set the E-Form to send acceptance or rejection notification emails to the requester.
3 Click Submit Request.
After the enrollment process is complete, Entrust verifies the information you provided and sends both the notification that the E-Forms are available and the customized URLs. These URLs will also be displayed in the E-Form settings and Contract Information page to enable administrators to view the E-Forms and provide the URLs to their end-users.
The administrator is responsible for providing the URL used to open the E-Form page to the individuals using the Certificate Request E-Form.
Note:You can change your customization settings at any time from the E-Form > Settings page.
Disabling the E-FormOnly Entrust can disable the E-Form. Contact Entrust Customer Support to disable the E-Forms if they are no longer required.
See “Technical support” on page 11 for information on how to contact Entrust Technical Support.
Using the Certificate Request E-FormWhen you enroll for the Certificate Request E-Form, a customized URL is created for the administrator. The customized URL is displayed on the Contract Information and E-Form Settings page of the CMS. The Administrator can send this link to technical staff so they can submit certificate requests by E-Form. The following process occurs:
• An employee requests a certificate using a certificate request E-Form.
• The certificate request appears as Pending in both the Inventory information page and the Management dashboard.
• The certificate request is confirmed by a super administrator (or a sub-administrator with permission to manage that client, organization, or domain).
• If the certificate request is confirmed, its status changes from Pending to Ready and the certificate can be used.
• A certificate retrieval link is sent to the person who requested the certificate.
The E-Form behaves as follows:
83Creating and managing certificatesReport any errors or omissions

84
• If all available certificates of the type requested have been issued (nothing is available in inventory) a message that no certificates are available is displayed instead of the E-Form.
• The Certificate Type field is not displayed on the E-Form if only one type of certificate is available.
• Once submitted, the requested item is removed from the general account inventory. For example, the number of certificates of that type in inventory is decreased by one when an administrator approves the certificate request and the certificate is used.
To use the Certificate Request E-Form for a CDS or code-signing certificate request
1 Browse to the customized URL for the Certificate Request E-Form that was provided to you by your account administrator.
Note:The information on the Web page may vary slightly for different types of certificates.
2 Select the type of certificate.
Certificate Management Service 9.7 User Guide Document issue: 1.0Report any errors or omissions

The Certificate Request E-Form page displays.:
3 Complete the information for all the fields on the page, as follows:
• First Name
The first name of the person submitting the certificate request.
• Last Name
The last name of the person submitting the certificate request.
• Email Address
A notification address (for example, the address of the person requesting the certificate) the domain in the email address must match the domain of the client requesting the certificate. If the address is [email protected], CMS must recognize example.com as a registered domain of the client that appears in the Client Name field.
• Phone number
The telephone number of the person submitting the certificate request.
• Department
The name of the department requesting the certificate.
• Role/Position/Title
The role of the person requesting the certificate (appears as part of the DN in the certificate).
• Client Name
Select the approved client company name from the drop-down menu (this will appear as part of the DN in the certificate). This list is populated from the list of approved clients in the CMS.
85Creating and managing certificatesReport any errors or omissions

86
4 Fill in the Certificate Information pane as follows:
• Certificate Type
This field is filled in automatically.
• Tracking fields
Add any additional tracking information to these fields.
• Additional Emails
Add a comma delimited list of the email addresses of any other individuals who should be notified when this certificate is close to its expiry date.
• Expiry Date
Certificate Management Service 9.7 User Guide Document issue: 1.0Report any errors or omissions

Select the number of years until the certificate expires.
Note:Administrators can override the expiry date of certificates when they approve the request form.
• Password
Enter the password used to protect the form.
• Confirm Password
Enter the password again to confirm that there were no errors.
5 The DN builder uses information from the request to create the DN that appears in the certificate. Using the DN builder you can control the information appearing in the CN and OU of the certificate’s DN. Fill out the DN builder pane as follows:
• Common Name
Select the common name (CN) to use in the DN from the pull-down menu. For example, this could be the role of the person requesting the certificate. This information in this menu is populated from the role/position/title field.
• Organizational Name
Select the organizational name (ou) to use in the DN from the pull-down menu. For example this could be the information in the Department field. The information in this menu is populated from either the department or the role/position/title fields.
6 Click the Next button.
A confirmation page is displayed.
An email is sent to the administrator to inform them that a request is waiting for approval. To continue creating the certificate, an administrator must verify and approve the certificate from the CMS.
If the administrator declines the request, the CMS sends an email to the E-Form user, stating that the request has been declined and the reason.
To use the Certificate Request E-Form to create an SSL certificate request
1 Browse to the customized URL for the Certificate Request E-Form that was provided by your administrator.
87Creating and managing certificatesReport any errors or omissions

88
2 Select the type of certificate to request.
The Certificate Request E-Form page opens:
3 Complete the information for all the fields on the page, as follows:
Full Name
The full name of the person submitting the certificate request.
• Additional tracking fields
These appear if additional tracking fields are configured. Enter any additional tracking information.
Certificate Management Service 9.7 User Guide Document issue: 1.0Report any errors or omissions

Enter the email address of the person submitting the request. If you are submitting an EV request, the domain in the email address must be recognized by CMS as the one of the domains registered to the client.
• Phone
Enter the telephone number of the person submitting the request into this field.
• Certificate Type
This field is filled automatically.
• Organization Name
Select the approved client company name (o=) from the drop-down menu.
• Expiry Date
Select the life span of the certificate.
If you are creating a code-signing certificate, go to Step 6 on page 90.
• Password and Confirm Password
89Creating and managing certificatesReport any errors or omissions

90
Create and confirm a password to use with the certificate. A strong password is required. The red x icons will turn to green check marks as you complete the requirements of a strong password.
4 If a password is required, enter it in the Password field (if you do not know the password contact your administrator). The password is the same for everyone using the E-Form.
5 Copy the certificate signing request (created on the machine where the certificate will be installed) into the field provided. If you do not know how to generate a CSR, click How to generate a CSR. Be sure to include the Begin new certificate request and End new certificate request lines including the leading and trailing dashes.
6 Click Next.
A confirmation screen appears. If you are creating UC Multi-Domain certificates or EV Multi-Domain certificates continue to Step 7; if not go to Step 8.
Certificate Management Service 9.7 User Guide Document issue: 1.0Report any errors or omissions

7 In the Request confirmation page, use the SubjectAltNames (SANs) field to enter additional domains. If you added these domains as SANs to the CSR when you created it, you can skip this step.
All domains must be valid. Be sure that you have a sufficient number of SANs in inventory. See “SANs (for additional domains)” on page 15 for information about SAN administration.
8 Check the information. If it is correct, click Accept. If not click Edit or Decline.
After you click Accept, the CMS sends an email message to the administrator that a request requires administrator approval. The administrator must complete the approval process to create the certificate.
91Creating and managing certificatesReport any errors or omissions

92
Attention:It is essential that the administrator verifies the certificate request before approval. Ensure that all information provided is correct.
If the administrator approves the request, the CMS sends an email message to the E-form user containing a retrieval link.
If you have configured the Client request e-form notification option, and the administrator declines the request an email stating that the request has been declined and explaining why is sent to the E-Form user.
Certificate Management Service 9.7 User Guide Document issue: 1.0Report any errors or omissions

Requesting and administering Secure Email certificates
Secure Email certificates can only be obtained using the Secure E-mail certificate request E-form. For general information about Secure Email Enterprise certificates see “Secure Email certificates” on page 21.
This form should be used by the person who will be using the certificate not the administrator. The administrator should email this link to the user or post the link in an accessible location. The password for the user’s private key is created during this procedure.
To request a Secure E-mail certificate
1 From the menu, select E-Form > Settings.
2 Click the link in the Secure Email Enterprise Request URL pane.
The Secure Email Enterprise Request form opens.
3 Type the user’s information into the appropriate fields in the form. The domain in the email address must be a domain recognized by CMS as belonging to the
Secure Email Enterprise pane
93Creating and managing certificatesReport any errors or omissions

94
client. Until an email address with a recognized domain is entered into the Email field, the list of organization names remains blank .
4 Click Next.
The confirmation page opens.
Certificate Management Service 9.7 User Guide Document issue: 1.0Report any errors or omissions

5 Check the information in the confirmation page.
6 Click Accept if the information is correct and you want to submit the request. Click Edit to change the information. Click Decline to cancel the transaction.
If you click Accept, a success message opens, telling you that the request has been forwarded for administrator approval.
To approve and obtain the certificate• An entry for the certificate appears in the CMS Management dashboard and
an email notification is sent to the administrator. The administrator must read over the request and approve (or decline) it before the user can download the certificate.
Approve or Decline request
95Creating and managing certificatesReport any errors or omissions

96
• Administrators can override the expiry date specified in the E-form when confirming the request.
• The CMS sends an email message containing a link to the certificate download page to the person who made the certificate request.
• The recipient of the certificate follows the link to open the certificate download page.
If the recipient is using Microsoft® Internet Explorer, the browser downloads and installs the certificate when they accept the license agreement on the certificate download page.
Certificate Management Service 9.7 User Guide Document issue: 1.0Report any errors or omissions

For instructions about using a different browser, see the Installation Guide link on the Web page that appears after you click I Accept.
• The recipient should always back-up the certificate to a secure location. For information about backing-up the certificate, click the Installation Guide link.
97Creating and managing certificatesReport any errors or omissions

98
Administering Secure Email Enterprise certificatesUse the following guidelines when administering to users with Secure Email Enterprise certificates.
The following functions use a certificate from inventory or require you to purchase a certificate if no unused Secure Email Enterprise certificates are available:
• new enrollment
• renewing a certificate
Table 3: Administration procedures
if do this New Certificate?(Yes/No)
removes a certificate from inventory?
a certificate user forgets their password
Use the re-issue function to provide a new certificate and automatically revoke the old certificate. The certificate’s history is retained.
Yes (with certificate history)
No
a certificate user loses their private key (for example the machine requires re-imaging).
If the user knows their password, use the Re-Send Pickup Pages function. The certificate link is resent. The certificate’s history is retained.
If the user has lost their password use the lost password procedure instead.
Same certificate and password (unless the password is lost)
No
a certificate user suspects that their private key is compromised
Re-issue the certificate (the old certificate is revoked automatically). The certificate’s history is retained.
New certificate (with certificate history)
No
a certificate user leaves the company or otherwise
Revoke the certificate. N/A N/A
an employee changes their name
Create a new certificate for the employee.
Yes Yes
a cross certificate is lost Check the Help menu for information about picking up a cross certificate.
N/A No
Certificate Management Service 9.7 User Guide Document issue: 1.0Report any errors or omissions

• employee name change
99Creating and managing certificatesReport any errors or omissions

100
Retrieving an Entrust SSL certificateAfter you create an SSL certificate, it is available for you to retrieve from the Entrust certificate retrieval Web pages. The Web pages display slightly different information according to the type of SSL certificate you requested.
To retrieve a Standard, Advantage, EV multi-domain, UC multi-domain, or Wildcard certificate
1 From the Management dashboard page, select a page listing the certificate (All Certificates, for example).
2 In the Status column, click READY.
The Installation selection web page appears.
3 Click Select server type and choose the make and model of Web server on which the certificate will be installed.
4 Use the Next button to proceed through the download pages. Follow the instructions on the each page. Download all of the certificates.
5 To obtain the Entrust seal from the Site Seal page.
a Select the Entrust seal that you want to use. The appropriate html code appears in the scrolling field below the examples.
Certificate Management Service 9.7 User Guide Document issue: 1.0Report any errors or omissions

b Cut and paste the HTML into your Web site.
Note:This Web page has been designed to support a range of browser versions. If the page does not appear properly in your browser and a bar appears above the Web page, select the bar and follow the instructions to adjust the browser options.
For information about how to install the certificates on specific Web servers, visit the Entrust Web site at: http://www.entrust.net/ssl-technical/webserver.cfm.)
101Creating and managing certificatesReport any errors or omissions

102
Reissuing a certificateReissuing a certificate is not the same as renewing it. For information about renewing a certificate see “Renewing a certificate” on page 104.
Under some circumstances you may need to reissue a certificate. For example, if a the certificate is corrupted or the machine on which it is installed experiences catastrophic technical problems.
Be aware of the guidelines for reissuing certificates. CMS administrators for accounts where pooling or non-pooling models are used, can reissue certificates (depending on certificate type). However:
– In non-pooling accounts, a certificate cannot be reissued if it is more than 30 days past its creation date. The exception to this is a Secure Email certificate, which can be reissued at any time.
– In pooling accounts, Standard, Advantage, EV, UCC and Secure Email certificates can be re-issued at any time. CDS and code-signing certificates cannot be re-issued if more than 30 days have passed since their creation date.
For information about pooling and non-pooling models, see “Differences between pooling and non-pooling management models” on page 15.
There are no restrictions on the number of times S/MIME certificates can be reissued.
To reissue a certificate
1 Select Management dashboard from the top menu bar.
2 Select the All Certificates tab.
3 In the Actions column for the certificate to be reissued, select (reissue).
4 The Reissue Certificates page appears.
Certificate Management Service 9.7 User Guide Document issue: 1.0Report any errors or omissions

The Reissue Certificates page varies slightly, according to the type of certificate being reissued. This example uses the reissue information for Web server certificates.
Enter your tracking information in the Tracking info field and, optionally, any other tracking fields that you have created.
5 In the Additional Emails field type a comma delimited list of the email addresses of any other individuals who should be notified when this certificate is close to its expiry date.
6 From the Client/Organization Names pull down menu, select the client name for this certificate.
7 Enter the certificate signing request created for the certificate in to the Certificate Signing Request field.
8 Click Create certificate.
103Creating and managing certificatesReport any errors or omissions

104
Renewing a certificateThe Entrust Certificate Management Service account does not automatically replace a certificate that is about to expire with a new certificate. The administrator must request a renewal. CMS users can view a list of certificates that are about to expire from the Management dashboard.
Two options are available for replacing expiring certificates if your account uses the pooled model:
• Deactivate the certificate being replaced. Once selected for deactivation, the certificate will automatically be revoked and added back to the inventory.
Note:Deactivated certificates are only returned to inventory if you are using the pooling model. CDS, Code Signing or Secure Email certificates are never returned to inventory after deactivation for any account model.
• Do not deactivate the certificate being replaced and let this certificate expire normally; after the certificate expires, it is added back into the inventory.
Note:If you are using the non-pooled model, certificates are not returned to your inventory after they expire.
To renew a certificate
1 Select Management dashboard from the top menu bar.
2 Select the Certificates expiring in the next 30 days tab.
3 In the Actions column select renew.
4 The Renew Web Server Certificates page appears.
The Renew page varies slightly, according to the type of certificate being renewed. This example uses the renewal information for EV SSL certificates.
The Subscriber Information pane displays information used in the existing certificate. This can be edited. If the email address is changed, CMS must be able to recognize the domain of the new email address as registered to the client.
Certificate Management Service 9.7 User Guide Document issue: 1.0Report any errors or omissions

5 Type the tracking information that you use in the Tracking Info field and enter information for any additional tracking fields that you use.
6 Select a new expiry date for the certificate.
7 Select the certificate type and Client/Organization.
8 Specify the number of servers that the certificate will be installed on.
9 Click Submit Request.
After the certificate has been generated, the administrator can retrieve it and replace the existing certificate.
105Creating and managing certificatesReport any errors or omissions

106
Revoking or deactivating a CertificateThere are times when you need to revoke or deactivate a certificate (for example, if you created a test certificate that you no longer require or if an employee leaves the company). Super administrators can deactivate any certificate within the service. Sub-administrators can only deactivate certificates that they have created and those assigned to them.
Attention:Deactivated Standard, Advantage, SSL, or UCC certificates are only returned to inventory if you are using the pooling model. CDS, Code Signing or Secure Email certificates are never returned to inventory after deactivation for any account model.
To deactivate or revoke a certificate
1 Go to the Management dashboard > All Certificates
2 Select the check box for the certificate you are deactivating.
3 In the Action column, select the Deactivate icon.
Certificate Management Service 9.7 User Guide Document issue: 1.0Report any errors or omissions

Note:If you are deactivating several certificates, select them using the check box at the beginning of the entry and click Deactivate Selected Certificates at the bottom of the page.
The Deactivate Confirmation screen appears.
4 Check the information displayed on the page to be sure that you want to deactivate this certificate.
5 Select a reason for revoking the certificate from the Reason for Revocation drop-down list. If you choose Unspecified, you must enter a comment in the Revocation Comments field. Otherwise the Revocation Comments field is optional.
6 Click Confirm to permanently revoke the displayed certificate, or click Cancel to exit the Deactivate Confirmation screen without deactivating the certificate.
107Creating and managing certificatesReport any errors or omissions

108
Managing certificates from a different vendorIf you have existing certificates from another vendor in your network, you can import them into the Entrust Certificate Management Service and keep track of them along with your Entrust certificates. By doing this, you do not have to use separate tools to keep track of legacy certificates from a different vendor.
To import the certificate, you can either enter the information in separate fields using the CMS interface or import a comma separated value (CSV) file containing the information about the certificate. Instructions for creating the CSV file are available from the CMS interface. The information in the CSV file parallels the information entered through the fields in the CMS interface.
Note:Although the file type is CSV, | (the pipe symbol) is used as a separator in the file. Commas cannot be used as separators. See the instructions in the Click here link in CMS interface for more information.
Certificate signing request (CSR) and user tracking data are not required, using either the file or CMS interface method. All other data requested in the CMS interface must be provided.
To import certificates from a different vendor
1 In the top menu bar, select Admin Tools > Certificate Import.
The Certificate Import page appears.
2 Follow the instructions in the table below.
If you are using a CSV file to import the certificate information, do this.
If you are entering the information directly into the CMS interface, do this.
a Select the Click here for CSV format instructions link.
Go to Step 3.
b Construct the CSV formatted file according to the information in the pop-up.
c Click Browse and select the CSV formatted file.
d Click Import File.
Certificate Management Service 9.7 User Guide Document issue: 1.0Report any errors or omissions

3 Enter the information requested
The CSR and User Data fields are optional.
4 Click Save.
Certificates purchased from other vendors are listed in the Management dashboard under the Non-Entrust Certificate Inventories tab.
109Creating and managing certificatesReport any errors or omissions

110
Certificate Management Service 9.7 User Guide Document issue: 1.0Report any errors or omissions
5
5Monitoring the Entrust Certificate Management Service
The Entrust Certificate Management Service provides tools enabling you to monitor your organization’s use of the Entrust Certificate Management Service.
For example, using the Contract Information pages, you can access information about certificate use, clients, and domain information.
Topics in this chapter include:
• “Using the Contract Information pages” on page 112
• “Tracking Fields” on page 118
• “Using the Log History page” on page 121
• “Expiry Notifications” on page 123
111

112
Using the Contract Information pagesThe Entrust Certificate Management Service allows the administrators to view account and inventory information.
There is a separate contract information page for super and sub-administrators. The super administrators’ page contains all of the service information, whereas the sub-administrators’ page contains the service information for clients and domains that they manage.
The following sections describe the information each administrator type (Super and Sub) can view.
Opening the Contract Information pagesThe Contract information page is available from the Admin Tools menu in the top tool bar.
To open the Contract information page
1 From the tool bar near the top of the page select Admin Tools > Contract Information.
The Contract Information pages appear.
Contract Information pagesThe information under the different Contract Information page tabs are explained in this section.
• Inventory Information provides a breakdown of the current number of:
Certificate Management Service 9.7 User Guide Document issue: 1.0Report any errors or omissions

– Certificates– Wildcard Units (if any exist for the account)– Account Administrators– unused Organizations– unused Client Company Names – unused Domain Names
Figure 12: The Inventory Information page
• Certificate Information
The Certificate Information table displays the number and type of certificates and the current status of each (Active, Ready, Pending, Deactivated, Expired or Declined Requests).
113Monitoring the Entrust Certificate Management ServiceReport any errors or omissions

114
Figure 13: The Certificate Information table
• Client Company Names displays client names (links to the Contract Information page; select a client in the Client Company Names list to obtain to obtain additional information about the client)
– client company names that are pending verification or active
Figure 14: The Client Company Names page
• Client Domain Names provides the list of the available domain names.
Certificate Management Service 9.7 User Guide Document issue: 1.0Report any errors or omissions

– domain names that have been established for Extended Validation are identified in the EV Status column
– the status of the domain shown in the Status column– click the Remove link to remove the domain from the client’s list
Figure 15: The Client Domain Names page
• Organization Information page
– provides the list of organization names – The status of the domain names is identified in the Status column (Active
or Pending, for example).
115Monitoring the Entrust Certificate Management ServiceReport any errors or omissions

116
Figure 16: The Organization Information page
• E-form links
– contains links to the E-forms (see “Requesting a certificate using the Certificate Request E-Form” on page 81 and “Adding a new client” on page 52 for information about these forms.
• Contract Information page
– identifies the start and end date of the CMS contract– contains a link to more detailed contract information– identifies the expiry date for EV verification information– identifies expired EV information
Certificate Management Service 9.7 User Guide Document issue: 1.0Report any errors or omissions

Figure 17: The Contract information page
117Monitoring the Entrust Certificate Management ServiceReport any errors or omissions

118
Tracking FieldsYou can use multiple criteria to track certificates and certificate requests.
When you create a request, the Entrust Certificate Management Service allows a super administrator to establish up to ten additional tracking fields. The fields can appear on the Certificate Request E-Form, in the CMS interface or in both places.
Some or all of these fields can be specified as mandatory.
You can create certificates the do not have additional tracking fields.
To create additional Tracking Fields
1 In the top menu bar, select Admin Tools > Tracking Fields. The Tracking Fields page displays.
2 Under the Add Field heading, enter a name (in alphanumeric characters) to use as the display or label of the field.
3 Under the Display Field On heading, click the applicable radio button to select on which screen the field should display (E-Form, Interface or Both).
Certificate Management Service 9.7 User Guide Document issue: 1.0Report any errors or omissions

4 Under the Require Field On heading, click the applicable radio button to indicate on which screen the field is mandatory (E-Form, Interface, Both or Neither).
5 Click Submit.
To change the Display Name, where the field is displayed or where the field is required
1 In the top menu bar, select Admin Tools > Tracking Fields. The Tracking Fields page displays.
2 Select the Edit icon next to the field you wish to update. The screen will highlight the fields, displaying the existing values.
3 Make your desired changes and click Submit.
To remove a tracking field
1 In the top menu bar, select Admin Tools > Tracking Fields. The Tracking Fields page displays.
2 Locate the tracking field you wish to delete and select the Delete icon next to that field. A confirmation pop-up window appears.
3 Click OK.
Attention:When you remove a tracking field, you delete all the values stored in this field.
Tracking field information can be added or updated for existing certificates that were created before the tracking fields were established.
To update tracking fields
1 In the Management dashboard > All Certificates page, in the Tracking Info column for the desired certificate entry, select the link for the tracking field.
2 A Tracking Information window appears, displaying the following information:
• Tracking Information (the display name of the tracking information for that certificate.)
• Additional Tracking fields (with a * denoting which are required fields)
• text stating where the certificate was created (Certificate Request E-Form or within the Interface)
• the tracking information fields for that certificate (only fields with values appear)
119Monitoring the Entrust Certificate Management ServiceReport any errors or omissions

120
3 Make the desired changes and click the Update button.
Certificate Management Service 9.7 User Guide Document issue: 1.0Report any errors or omissions

Using the Log History pageThe Log History page displays a list of Certificate Management Service administrator actions. The events recorded include:
• administrator log in
• certificate creation and approval
• sub-administrator role modifications such as domain and certificate assignments
• additional tracking field creation, modification, and deletion
• modifications to a client (such as removal of client domain names and deactivation of clients)
This page provides administrators with a history of Certificate Management Service administrator actions, the time that an action occurs, the administrator that performed the action, and a description of the action. Figure 18 shows a sample Log History.
Figure 18: The Log History page
To access and use the Log History page
1 From the top menu bar select Admin Tools > Log History.
The Log History for the current date displays. You can display the log history for either the Last 30 Days or All (all activity since the creation of the account).
121Monitoring the Entrust Certificate Management ServiceReport any errors or omissions

122
Using the column heading you can:
• Sort the list by Event Date, Activity and Administrator in ascending or descending order.
• control which columns are displayed on the page
• filter the entries by Event Date, Administrator, or Activity.
Certificate Management Service 9.7 User Guide Document issue: 1.0Report any errors or omissions

Expiry NotificationsEntrust has implemented an automatic service expiry notification feature for the Entrust Certificate Management Service.
This notification is provided using e-mail and pop-up messages in the CMS interface.
The email is sent to the super administrators and Authorization Contacts two months and one month before the service is due to expire.
Figure 19: Sample e-mail:
Note:If the service is not renewed within 30 days after the service expires, Entrust reserves the right to revoke all active certificates. The service Authorization Contact and Administrator(s) will be notified when the certificates have been revoked.
The pop-up message appears at 30 days, 15 days, and then every day for the remaining 7 days before the service expires.
The pop-up message contains the following options:
123Monitoring the Entrust Certificate Management ServiceReport any errors or omissions

124
• IGNORE
Click this button to stop receiving pop-up notifications.
• OK
Click this button to continue receiving notifications.
• I would like a Sales Representative to contact me
Select this option to have an Entrust Sales Representative contact you about renewing the Entrust Certificate Management Service.
Figure 20: Sample pop-up screen:
Additional information• Certificate expiry notices are emailed to the super administrator and the
sub-administrator with authorization for the client names (domain and company names) concerned.
• Service expiry notices are emailed to the super administrator and authorization contacts.
• If you have exceeded the amount of Accelerator Licenses you purchased, the pop-up message will state this and tell you to correct it either by updating the license usage on existing SSL Standard or Advantage Certificates or purchasing additional licenses.
Certificate Management Service 9.7 User Guide Document issue: 1.0Report any errors or omissions

Index
A B C D E F G H I J K L M N O P Q R S T U V W X Y Z- -
Aadministratorsadding 44overview 23
advantage SSL certificates 18
CCDS certificates
requesting 73, 87types 20
Certificate Management Servicedashboard 32expiry notifications 123logging in 25monitoring 111overview 14purchasing additional services 38
Certificate Request E-Formdisabling 83enrolling 81using 83
Certificate types 18CDS types 20code signing types 20SSL types 18
certificatescertificates from a different vendor 108deactivating 106installing 100monitoring 66renewing 104requesting using the E-Form 81
Client Request E-Formdisabling 83enrolling 81
clientsadding using the E-Form 55adding using the interface 52managing 51modifying domain and organization information 59
verifying 64viewing 58
Code signing certificatesrequesting 73, 87types 20
contract information pagesopening 112using 112
Ddashboard 32deactivating
certificates 106sub-administrators 49
EE-Form
See Certificate Request E-Formsee Client Request E-Form
Entrust Discoveryabout 16obtaining 42
Extended Validation SSL certificates 19
GGetting help
Technical Support 11Group HSM certificates 21Group signing certificates (automatic 20Group signing certificates (manual) 20
IIndividual signing certificates (manual) 20
Llog history 121
125

126
B C D E F G H I J K L M N O P Q R S T U V W X Y Z- -A
logging in 25
Mmanaging
administrators 43clients 51sub-administrators 47super administrators 46
Microsoft® Authenticode Signing 21Microsoft® Office/Visual Basic for Applications signing 21
Ppurchasing services 38
Rreactivating
sub-administrators 49
SService 59, 124SSL certificates
advantage SSL certificates 18EV SSL certificates 19requesting using the interface 76standard SSL certificates 18Unified Communications SSL certificates 19
standard SSL certificates 18Sub-administrators
editing 48promoting 48viewing 47
sub-administrators 23deactivating 49managing 47reactivating 49
Sun® Java™ Object signing 21super administrators 23
demoting 46managing 46
TTechnical Support 11
tracking fieldschanging 119creating 118overview 118removing 119updating 119
typographic conventions 8
UUnified Communications SSL certificates 19
Vverifying client information 64
Wwildcard certificates 19
Certificate Management Service 9.7 User Guide Document issue: 1.0