EnterpriseOne Engineering Project Management 8.9 ... - … · EnterpriseOne Engineering Project...
123
EnterpriseOne Engineering Project Management 8.9 PeopleBook September 2003
Transcript of EnterpriseOne Engineering Project Management 8.9 ... - … · EnterpriseOne Engineering Project...
EnterpriseOneEngineering Project Management 8.9 PeopleBook
September 2003


EnterpriseOne Engineering Project Management 8.9 PeopleBook SKU REL9EEP0309 Copyright© 2003 PeopleSoft, Inc. All rights reserved. All material contained in this documentation is proprietary and confidential to PeopleSoft, Inc. ("PeopleSoft"), protected by copyright laws and subject to the nondisclosure provisions of the applicable PeopleSoft agreement. No part of this documentation may be reproduced, stored in a retrieval system, or transmitted in any form or by any means, including, but not limited to, electronic, graphic, mechanical, photocopying, recording, or otherwise without the prior written permission of PeopleSoft. This documentation is subject to change without notice, and PeopleSoft does not warrant that the material contained in this documentation is free of errors. Any errors found in this document should be reported to PeopleSoft in writing. The copyrighted software that accompanies this document is licensed for use only in strict accordance with the applicable license agreement which should be read carefully as it governs the terms of use of the software and this document, including the disclosure thereof. PeopleSoft, PeopleTools, PS/nVision, PeopleCode, PeopleBooks, PeopleTalk, and Vantive are registered trademarks, and Pure Internet Architecture, Intelligent Context Manager, and The Real-Time Enterprise are trademarks of PeopleSoft, Inc. All other company and product names may be trademarks of their respective owners. The information contained herein is subject to change without notice. Open Source Disclosure This product includes software developed by the Apache Software Foundation (http://www.apache.org/). Copyright (c) 1999-2000 The Apache Software Foundation. All rights reserved. THIS SOFTWARE IS PROVIDED “AS IS’’ AND ANY EXPRESSED OR IMPLIED WARRANTIES, INCLUDING, BUT NOT LIMITED TO, THE IMPLIED WARRANTIES OF MERCHANTABILITY AND FITNESS FOR A PARTICULAR PURPOSE ARE DISCLAIMED. IN NO EVENT SHALL THE APACHE SOFTWARE FOUNDATION OR ITS CONTRIBUTORS BE LIABLE FOR ANY DIRECT, INDIRECT, INCIDENTAL, SPECIAL, EXEMPLARY, OR CONSEQUENTIAL DAMAGES (INCLUDING, BUT NOT LIMITED TO, PROCUREMENT OF SUBSTITUTE GOODS OR SERVICES; LOSS OF USE, DATA, OR PROFITS; OR BUSINESS INTERRUPTION) HOWEVER CAUSED AND ON ANY THEORY OF LIABILITY, WHETHER IN CONTRACT, STRICT LIABILITY, OR TORT (INCLUDING NEGLIGENCE OR OTHERWISE) ARISING IN ANY WAY OUT OF THE USE OF THIS SOFTWARE, EVEN IF ADVISED OF THE POSSIBILITY OF SUCH DAMAGE. PeopleSoft takes no responsibility for its use or distribution of any open source or shareware software or documentation and disclaims any and all liability or damages resulting from use of said software or documentation.

Table of Contents
Engineering Project Management Overview 1 Project Life Cycle ............................................................................................2 Engineering Project Management System Features.......................................3 System Integration ..........................................................................................3 Engineering Project Management Tables .......................................................5 Setting Up Engineering Project Management .................................................6
Defining Document Type Constants for Work Orders ............................................. 6 Task Types for Engineering Projects....................................................................... 21 Defining Project-Specific Material............................................................................ 22 Setting Up Line Type and Line Type Constants for EPM........................................ 22 Setting up the Cost Classification for EPM Project Workbench .............................. 23 User Defined Codes for Engineering Project Management .................................... 25 Setting Up Job Cost Integration............................................................................... 26 Integration with Microsoft Project.......................................................................... 28
Project Initiation 31 Creating Projects.............................................................................................31
Processing Options for EPM Project Workbench (P31P001).................................. 37 Working with Projects......................................................................................57
Adding Project Tasks............................................................................................... 57 Scheduling Project Tasks ........................................................................................ 61 Assigning Resources to Tasks ................................................................................ 64 Assigning Estimated and Planned Costs ................................................................ 64
Generating Quotes and Proposals ..................................................................67 Working with Quotes................................................................................................ 68 Working with Online Proposals................................................................................ 77
Project Planning 78 Loading Project Budgets to the Job Cost Budget............................................79
Processing Options for Upload Job Cost Budgets (R31P800)................................ 79 Project Requirements Planning (PRP) ............................................................80
Setup Considerations for Project Requirements Planning (PRP) ........................... 80 Project Requirements Planning Generation ............................................................ 81 Project Requirements Planning Output ................................................................... 82 Planning and Scheduling......................................................................................... 83
Creating Orders for a Project ..........................................................................83 Purchasing Project Material..................................................................................... 83 Purchasing Project Items for Resale ....................................................................... 85 Attaching Existing Work Orders to a Project ........................................................... 91
Project Commitments ......................................................................................91

Creating Inventory Commitments ............................................................................ 92 Creating Financial Commitments ............................................................................ 93
Project Execution and Control 97 Issues and Completions for Project Work Orders ...........................................97 Net Change .....................................................................................................98 Project Accounting Considerations .................................................................99 Revaluing Work in Process .............................................................................100
Processing Options for WIP Revaluation (R30837) ................................................ 101 Rolling Up Actual Costs to the EPM Workbench.............................................104 Project Reports and Alerts ..............................................................................104
Project Schedule Report.......................................................................................... 105 Project Cost Report ................................................................................................. 109 Project Inventory Report.......................................................................................... 113
Project Close 117 Project Close Analyzer ....................................................................................117
1
Engineering Project Management Overview
J.D. Edwards Engineering Project Management (EPM) enables companies whose business consists of engineer-to-order and make-to-order projects to increase the profitability of the projects that they run, improve efficiency, and leverage relevant data that they already possess. The EPM system accomplishes these goals by allowing you to perform the following tasks:
• Review and track project detail information
• Schedule project tasks
• Review up-to-date costing information
In addition, EPM is fully integrated with the supply chain execution applications for efficient project execution.
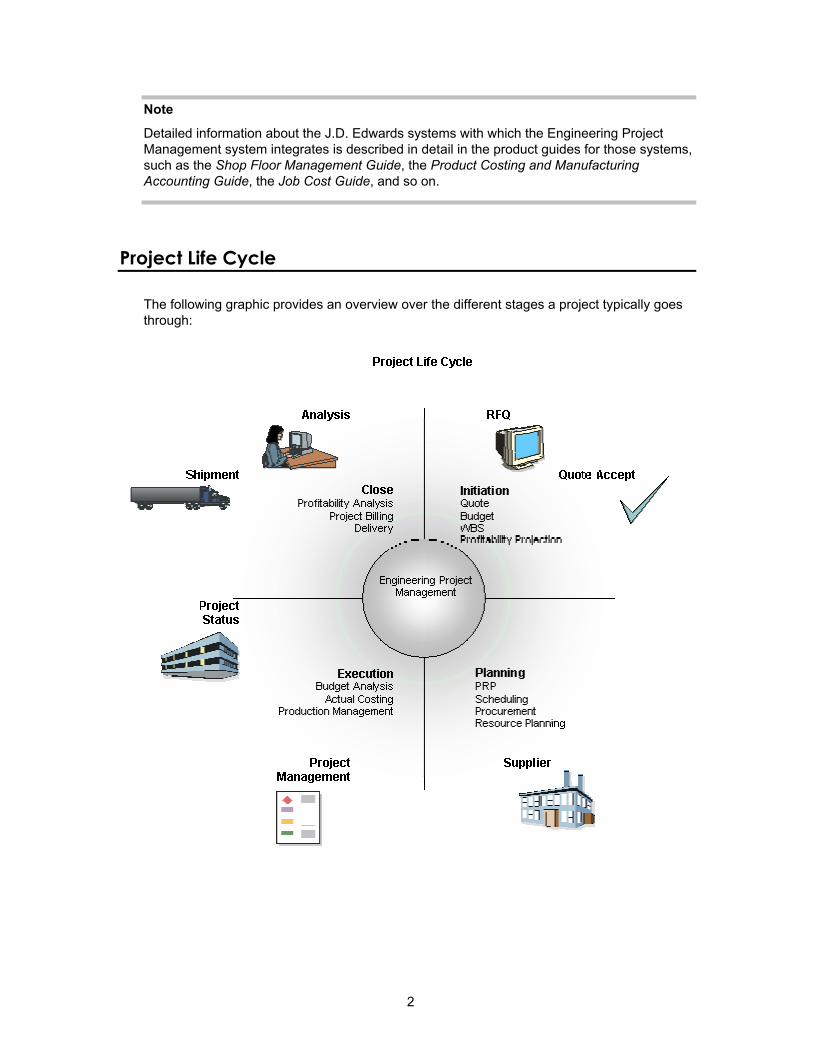
EPM functions in the context of generally accepted project management practices and strategies. The system provides information and mechanisms to move a project through the following four phases that are commonly associated with projects:
• Project initiation
• Project planning
• Project execution
• Project close
During the project initiation phase, you analyze the request for a quote sent in by the customer, estimate the scope of the project, and define project information, such as work break-down structure, task schedules, estimated cost, and so on, that is sufficient to provide the customer with a quote.
During the project planning phase, which begins after the customer accepts the quote, you refine the project scope, as well as the task, schedule, resource, and financial information that is associated with the project. For example, you assign resources to tasks and perform financial and inventory commitments to fulfill work order requirements. At the end of the planning phase, you establish the project baseline. After this phase, any changes to the project are implemented using change management.
After you complete the planning and freeze the work break-down structure, as well as the budgeted amounts, the project moves into the execution and control phase. In this phase, you complete the scheduled project tasks and measure project progress and performance in order to be able to take corrective action if the project does not progress as planned.
The project close phase consists of close-out activities that are related to tasks and product shipments, asset capitalization, and final reporting.
To complete all of the tasks and activities that are associated with a make-to-order or engineer-to-order project, the EPM system integrates with a number of J.D. Edwards products that execute and manage those activities.
2
Note
Detailed information about the J.D. Edwards systems with which the Engineering Project Management system integrates is described in detail in the product guides for those systems, such as the Shop Floor Management Guide, the Product Costing and Manufacturing Accounting Guide, the Job Cost Guide, and so on.
Project Life Cycle
The following graphic provides an overview over the different stages a project typically goes through:
3
Engineering Project Management System Features
To help you create and execute large-scale projects, the Engineering Project Management system provides the following features, which allow you to complete the different tasks involved in managing a project:
Project costing and budgeting You can create and maintain cost amounts for projects that are created and initiated. Cost estimates are uploaded to the budgeted amount for a project when a quote is accepted. You can also set up budgets for projects to track cost overages.
Project quotes You can formulate a quote to send to prospective customers, providing an estimate of the price for the item or series of items for which the customer has requested a quote.
Project proposals You can create documentation pertaining to the product that has been requested, and the customer can review the documentation.
Project materials plans You can suggest ordering requirements for project materials and give visibility to the supply and demand created by the project’s activities.
Project schedules and reports You can develop and maintain a timeline within which all project activities can be tracked for on-time delivery of the project’s end item.
Project alerts You can provide alerts to the project manager when a project is not meeting scheduling requirements.
System Integration
The information in the following table provides an overview of the features from other J.D. Edwards systems that support Engineering Project Management:
Inventory Management Use the Inventory Management system to define inventory items. This information allows you to work with inventory throughout the supply chain. You can define items as project-specific to distinguish them from general inventory.
Product Data Management Use the Product Data Management system to set up manufacturing information that you need for completing manufacturing project tasks. Examples of this information include:
• Bills of material • Work centers • Routings • Product costing information • Engineering change management
Product Data Management is also the system that you use to
4
manage critical information for capacity and material planning.
Shop Floor Management Use the Shop Floor Management system to process the manufacturing work orders that you created for the project, issue material, complete work orders, and report the time and effort required to produce a project item.
Requirement Planning Use these systems to determine information about on-hand inventory quantities and demand that is current and forecast for the following:
• Product sales or replacement parts • Interbranch inventory needs • Parts requirements for equipment and plant
maintenance • Incoming item availability from purchase orders or shop
floor production Job Cost Use the Job Cost system to manage your project and jobs,
and to monitor the costs and revenues that are associated with them. You can use the Job Cost system to perform the following tasks:
• Create and maintain cost code structures for all of your jobs
• Create a cost breakdown structure (CBS) to match the work breakdown structure
• Establish budgets for your jobs • Set up time schedules for the tasks in your jobs • Track and manage the costs and revenues that are
associated with your projects and jobs • Perform profitability analysis • Use contract and service billing • Use change management
Enterprise Asset Management Use the Enterprise Asset Management system to maintain and service equipment. This system helps you reduce downtime and repair costs, increase productivity, and improve product quality. You can track the revenue, cost, and utilization of your assets, and you can use workflow alerts to plan and resolve issues before they become emergencies.
Quality Management Use the Quality Management system to enter and manage data that relates to the material quality of the items that you produce as part of the project. You can record quality test results in a consistent, controlled manner and monitor production processes to ensure product quality.
Sales Order Management Use the Sales Order Management system to track the following information:
• Extensive user-defined information • Recurring orders and order templates • Customer and item preference profiles • Online inventory availability and available-to-promise
5
information • Comprehensive tracking information about orders and
line status Procurement Use the Procurement system to track a diverse range of
purchasing activities for the following:
• Replenishing inventory • Acquiring materials used to complete projects • Charging purchased goods and services to specific
departments, jobs, or cost centers Contract Billing, Service Billing If you use the Job Cost system for Engineering Project
Management, you can also use the Contract Billing and Service Billing systems to bill customers for services and goods rendered as part of the project. Both systems offer a suite of features to accommodate interdivisional and customer billing.
You can use the Contract and Service Billing systems to do the following:
• Account for the costs of goods and services • Mark up the costs to account for profit • Bill for the services and goods that you provide • Provide written proof that justifies the charges • Create accounting entries for the services and goods
Note
To ensure that you use Engineering Project Management effectively, J.D. Edwards recommends that you thoroughly understanding the features provided by the systems listed in the previous table.
Engineering Project Management Tables
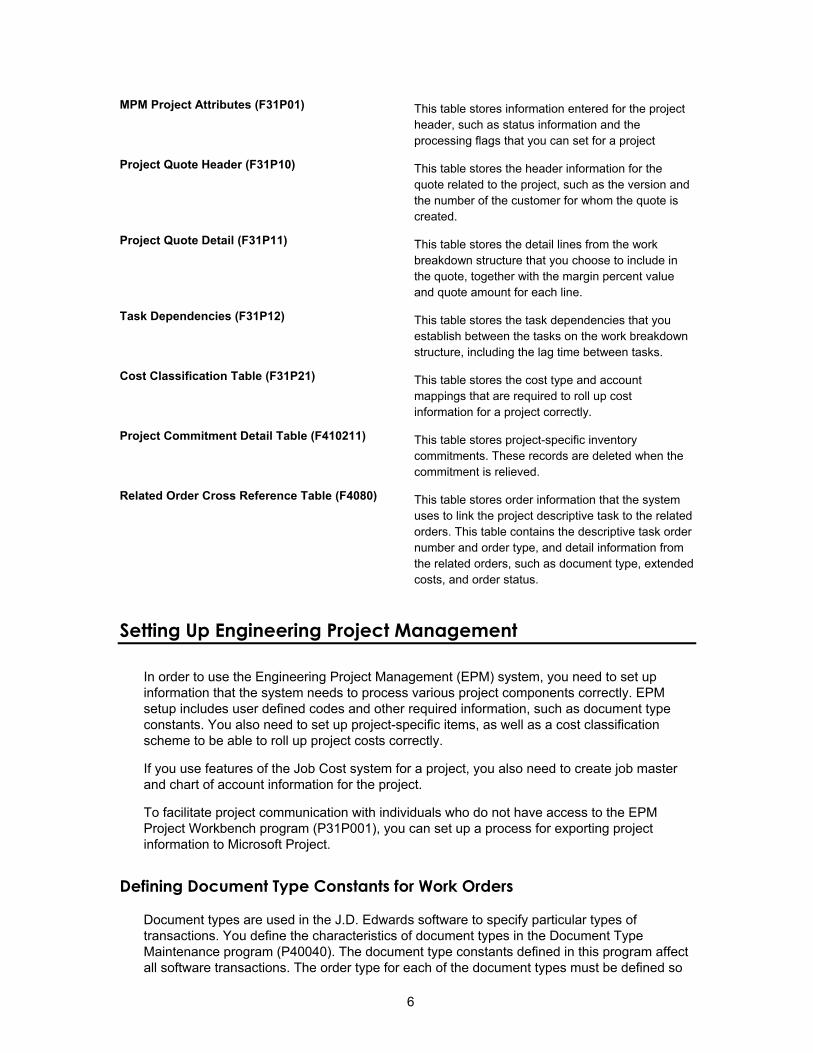
Because Engineering Project Management integrates with many J.D. Edwards systems, you use the tables in these other systems when you create and work with a project in Engineering Project Management. For example, you use the Work Order Master File table (F4801) to store project header and task information. In addition, you also store project information in the following tables, which are specific to the Engineering Project Management system:
6
MPM Project Attributes (F31P01) This table stores information entered for the project header, such as status information and the processing flags that you can set for a project
Project Quote Header (F31P10) This table stores the header information for the quote related to the project, such as the version and the number of the customer for whom the quote is created.
Project Quote Detail (F31P11) This table stores the detail lines from the work breakdown structure that you choose to include in the quote, together with the margin percent value and quote amount for each line.
Task Dependencies (F31P12) This table stores the task dependencies that you establish between the tasks on the work breakdown structure, including the lag time between tasks.
Cost Classification Table (F31P21) This table stores the cost type and account mappings that are required to roll up cost information for a project correctly.
Project Commitment Detail Table (F410211) This table stores project-specific inventory commitments. These records are deleted when the commitment is relieved.
Related Order Cross Reference Table (F4080) This table stores order information that the system uses to link the project descriptive task to the related orders. This table contains the descriptive task order number and order type, and detail information from the related orders, such as document type, extended costs, and order status.
Setting Up Engineering Project Management
In order to use the Engineering Project Management (EPM) system, you need to set up information that the system needs to process various project components correctly. EPM setup includes user defined codes and other required information, such as document type constants. You also need to set up project-specific items, as well as a cost classification scheme to be able to roll up project costs correctly.
If you use features of the Job Cost system for a project, you also need to create job master and chart of account information for the project.
To facilitate project communication with individuals who do not have access to the EPM Project Workbench program (P31P001), you can set up a process for exporting project information to Microsoft Project.
Defining Document Type Constants for Work Orders
Document types are used in the J.D. Edwards software to specify particular types of transactions. You define the characteristics of document types in the Document Type Maintenance program (P40040). The document type constants defined in this program affect all software transactions. The order type for each of the document types must be defined so
7
that the system knows how to process the activity for it. For example, the document type for a manufacturing work order can be set to WO for the correct transactions that relate to the processing of a manufacturing work order.
To differentiate the various work order document types from each other, you assign a specific order type to each work order document type. For example, a manufacturing work order is associated with order type 02.
The following order type values for work order processing are stored in the UDC table 48/OT (Order Type) and are hard-coded:
Document Type Order Type
Manufacturing Work Order 02
Manufacturing Rework Work Order 03
Equipment Work Order 04
Service Order 05
Warranty Claim Order 06
Supplier Recovery Order 07
Engineering Change Order 08
Engineering Change Request Order 09
Real Estate Management 10
EPM Summary Order 11
Rate Schedule 12
See Also Setting up Document Type Information in the Inventory Management Guide
Converting Existing Document Types
From the Upgrade Conversions menu (GH9619A), choose Convert F40039 to ERP 9.0.
In J.D. Edwards ERP 9.0 software, each type of work order is designated by a specific work order type (A201). If you have existing records in the Document Type Master records (F40039), these records now require a specific value in the Work Order Type field (A201). You run the Convert F40039 to ERP 9.0 program (R31P40039) only once to enter the desired values into this field. You determine the values entered in the processing options. Depending on which systems you use, you complete the fields on the appropriate tabs. For example, you complete the fields on the Manufacturing tab for manufacturing work orders. You can run this program in either proof mode or final mode.
8
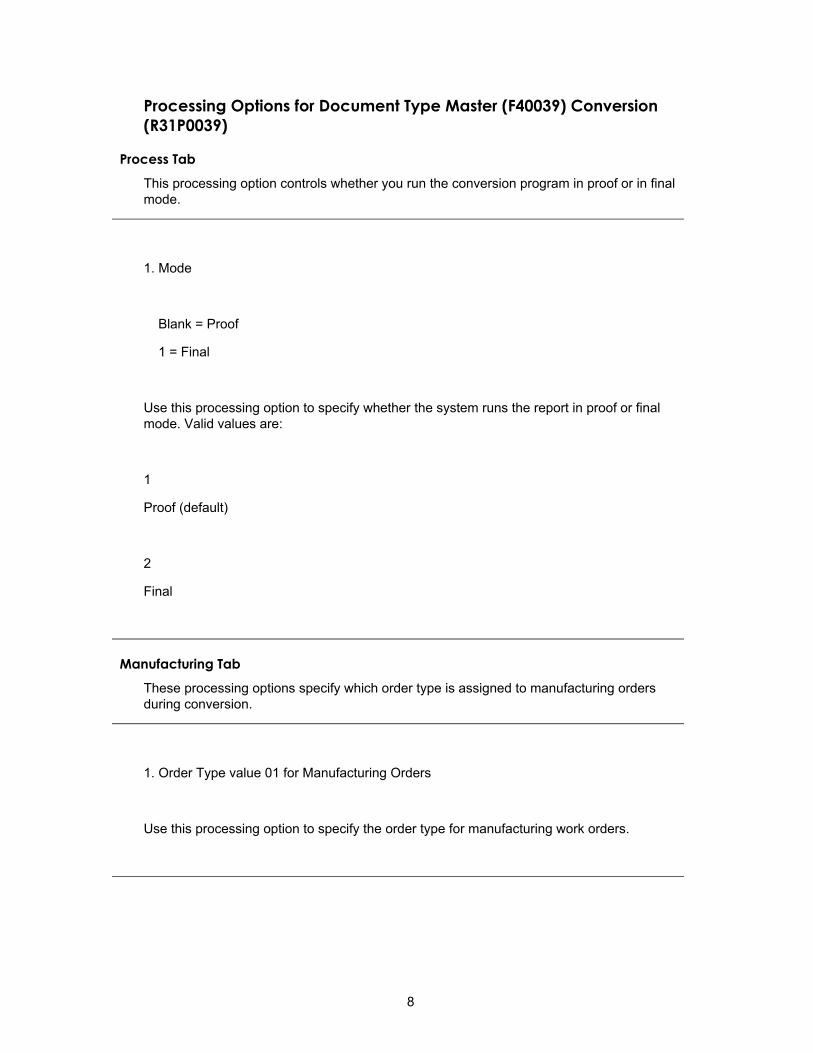
Processing Options for Document Type Master (F40039) Conversion (R31P0039)
Process Tab
This processing option controls whether you run the conversion program in proof or in final mode.
1. Mode
Blank = Proof
1 = Final
Use this processing option to specify whether the system runs the report in proof or final mode. Valid values are:
1
Proof (default)
2
Final
Manufacturing Tab
These processing options specify which order type is assigned to manufacturing orders during conversion.
1. Order Type value 01 for Manufacturing Orders
Use this processing option to specify the order type for manufacturing work orders.
9
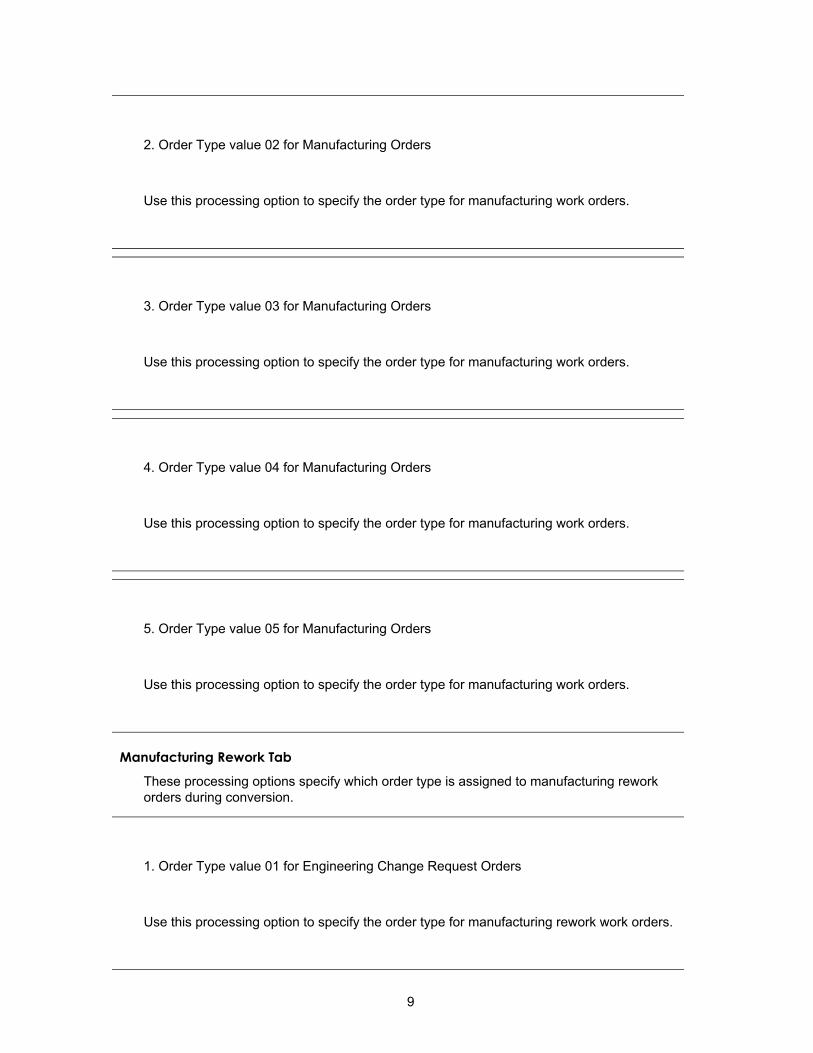
2. Order Type value 02 for Manufacturing Orders
Use this processing option to specify the order type for manufacturing work orders.
3. Order Type value 03 for Manufacturing Orders
Use this processing option to specify the order type for manufacturing work orders.
4. Order Type value 04 for Manufacturing Orders
Use this processing option to specify the order type for manufacturing work orders.
5. Order Type value 05 for Manufacturing Orders
Use this processing option to specify the order type for manufacturing work orders.
Manufacturing Rework Tab
These processing options specify which order type is assigned to manufacturing rework orders during conversion.
1. Order Type value 01 for Engineering Change Request Orders
Use this processing option to specify the order type for manufacturing rework work orders.
10
2. Order Type value 02 for Engineering Change Request Orders
Use this processing option to specify the order type for manufacturing rework work orders.
3. Order Type value 03 for Engineering Change Request Orders
Use this processing option to specify the order type for manufacturing rework work orders.
4. Order Type value 04 for Engineering Change Request Orders
Use this processing option to specify the order type for manufacturing rework work orders.
5. Order Type value 05 for Engineering Change Request Orders
Use this processing option to specify the order type for manufacturing rework work orders.
Equipment Tab
These processing options specify which order type is assigned to equipment orders during conversion.
1. Order Type value 01 for Equipment Orders
Use this processing option to specify the order type for service work orders.
11
2. Order Type value 02 for Equipment Orders
Use this processing option to specify the order type for service work orders.
3. Order Type value 03 for Equipment Orders
Use this processing option to specify the order type for service work orders.
4. Order Type value 04 for Equipment Orders
Use this processing option to specify the order type for service work orders.
5. Order Type value 05 for Equipment Orders
Use this processing option to specify the order type for service work orders.
S/WM Tab
These processing options specify which order type is assigned to service during conversion.
1. Order Type value 01 for Service Orders
Use this processing option to specify the order type for service work orders.
12
2. Order Type value 02 for Service Orders
Use this processing option to specify the order type for service work orders.
3. Order Type value 03 for Service Orders
Use this processing option to specify the order type for service work orders.
4. Order Type value 04 for Service Orders
Use this processing option to specify the order type for service work orders.
5. Order Type value 05 for Service Orders
Use this processing option to specify the order type for service work orders.
Warranty Claim Tab
These processing options specify which order type is assigned to warranty claim orders during conversion.
1. Order Type value 01 for Warranty Claim Orders
Use this processing option to specify the order type for warranty claim orders.
13
2. Order Type value 02 for Warranty Claim Orders
Use this processing option to specify the order type for warranty claim orders.
3. Order Type value 03 for Warranty Claim Orders
Use this processing option to specify the order type for warranty claim orders.
4.Order Type value 04 for Warranty Claim Orders
Use this processing option to specify the order type for warranty claim orders.
5. Order Type value 05 for Warranty Claim Orders
Use this processing option to specify the order type for warranty claim orders.
Supplier Recovery Tab
These processing options specify which order type is assigned to supplier recovery orders during conversion.
1. Order Type value 01 for Supplier Recovery Orders
Use this processing option to specify the order type for supplier recovery orders.
14
2. Order Type value 02 for Supplier Recovery Orders
3. Order Type value 03 for Supplier Recovery Orders
Use this processing option to specify the order type for supplier recovery orders.
4. Order Type value 04 for Supplier Recovery Orders
Use this processing option to specify the order type for supplier recovery orders.
5. Order Type value 05 for Supplier Recovery orders
Use this processing option to specify the order type for supplier recovery orders.
ECO Tab
These processing options specify which order type is assigned to engineering change orders during conversion.
1. Order Type value 01 for Engineering Change Orders
Use this processing option to specify the order type for engineering change orders.
15
2. Order Type value 02 for Engineering Change Orders
Use this processing option to specify the order type for engineering change orders.
3. Order Type value 03 for Engineering Change Orders
Use this processing option to specify the order type for engineering change orders.
4. Order Type value 04 for Engineering Change Orders
Use this processing option to specify the order type for engineering change orders.
5. Order Type value 05 for Engineering Change Orders
Use this processing option to specify the order type for engineering change orders.
ECO Request Tab
These processing options specify which order type is assigned to engineering change request orders during conversion.

16
1. Order Type value 01 for Engineering Change Request Orders
Use this processing option to specify the order type for engineering change request orders.
2. Order Type value 02 for Engineering Change Request Orders
Use this processing option to specify the order type for engineering change request orders.
3. Order Type value 03 for Engineering Change Request Orders
Use this processing option to specify the order type for engineering change request orders.
4. Order Type value 04 for Engineering Change Request Orders
Use this processing option to specify the order type for engineering change request orders.
17
5. Order Type value 05 for Engineering Change Request Orders
Use this processing option to specify the order type for engineering change request orders.
Real Estate Management Tab
These processing options specify which order type is assigned to Real Estate Management orders during conversion.
1. Order Type value 01 for Real Estate Management Orders
Use this processing option to specify the order type for property management orders.
2. Order Type value 02 for Real Estate Management Orders
Use this processing option to specify the order type for property management orders.
3. Order Type value 03 for Real Estate Management Orders
Use this processing option to specify the order type for property management orders.
18
4. Order Type value 04 for Real Estate Management Orders
Use this processing option to specify the order type for property management orders.
5. Order Type value 05 for Real Estate Management Orders
Use this processing option to specify the order type for property management orders.
Rate Schedule Tab
These processing options specify which order type is assigned to rate schedules during conversion.
1. Order Type value 01 for Rate Schedule Orders
Use this processing option to specify the order type for rate schedules.
2. Order Type value 02 for Rate Schedule Orders
Use this processing option to specify the order type for rate schedules.
3. Order Type value 03 for Rate Schedule Orders
Use this processing option to specify the order type for rate schedules.
19
4. Order Type value 04 for Rate Schedule Orders
Use this processing option to specify the order type for rate schedules.
5. Order Type value 05 for Rate Schedule Orders
Use this processing option to specify the order type for rate schedules.
EPM Summary Order Tab
These processing options specify which order type is assigned to EPM summary orders during conversion.
1. Order Type value 01 for EPM Summary Orders
2. Order Type value 02 for EPM Summary Orders
3. Order Type value 03 for EPM Summary Orders
4. Order Type value 04 for EPM Summary Orders
20
5. Order Type value 05 for EPM Summary Orders
Converting Order Types
In the J.D. Edwards Windows environment, choose Batch Versions from the System Administration Tools menu (GH9011).
In J.D. Edwards ERP 9.0 software, different work orders have to be designated by different document types. For example, if manufacturing work orders have document type WO, equipment orders have to be assigned a different document type. To ensure that the different types of work orders have unique document types, you run the Order Type Conversion program (R31P802). You use the data selection to define which orders in the Work Order Master File table (F4801) need to be converted. The program assigns new document types to work orders based on the definition in the processing options.
Processing Options for Order Type Conversion (R31P802)
Default Tab
This processing option defines the new order type to which the selected work orders should be converted.
1. Order Type (to be converted to)
Use this processing option to specify the new order type to which orders are converted. The order type that you specify here will be the default order type for the selected records.
Process Tab
This processing option controls whether the conversion program runs in proof or final mode.

21
1. Mode
1 = Final
Blank = Proof
Use this processing option to specify whether the program runs in proof mode or final mode. When you run the program in proof mode, the system generates a report but does not update data. When you run the program in final mode, the system updates the order type in the Work Order Master File table (F4801) and all related tables that store the document number (DOCO) and order type (DCTO) related to work orders. Valid values are:
Blank
Proof mode
1
Final mode
Task Types for Engineering Projects
Engineering Project Management allows you to use several different tasks types as part of the work breakdown structure. Each task type represents a different type of activity related to the project that might require different actions on the part of the project manager and responsible project employees. You can use only task types that are set up in the Document Type Maintenance program (P40040).
EPM includes two categories of tasks, production and nonproduction tasks. Nonproduction tasks include summary or detail tasks, equipment orders, and service orders. Production tasks consist of manufacturing work orders that you use to build, service, or maintain something. Production tasks are always associated with an item, whereas item numbers are optional for nonproduction tasks. All tasks in a work breakdown structure are work order master records that are stored in the Work Order Master File table (F4801).
The task type also determines how the cost roll-up is set up and performed. For production tasks, costs are mapped by cost type and are stored in the Production Cost table (F3102).

22
For nonproduction tasks, costs are mapped by account and are stored in the Account Ledger table (F0911).
Defining Project-Specific Material
When you work with EPM projects, you must be able to distinguish the material that you purchase or produce for the project from your general inventory. If you do not define the items that you use for the project as project-specific, you might experience difficulties in terms of project supplies. Defining project-specific material allows you to do the following:
• Maintain project-specific inventory commitments
• Recognize end-items as project-specific at completion
• Perform project-specific financial commitments
You define project-specific items by assigning them one of two codes from the Stocking Type Code UDC table (41/I) when you set up the item in the Item Branch/Plant program (P41026). The system currently provides two predefined codes: G (for items manufactured for a project) and H (for items purchased for a project). Both codes include a special handling code of P to indicate that items that are set up with these two stocking types are treated as project-specific by the system. For planning purposes, the Description 2 field contains the code that indicates whether the item should be purchased or manufactured.
Setting Up Line Type and Line Type Constants for EPM
In addition to defining items as project-specific by assigning them a specific stocking type, you also set up project-specific items with a line type that allows you to maintain financial commitments for items that are used in projects. When you set up project-specific items in the Item Branch/Plant program (P41026), you assign them a line type that is defined with an inventory interface of C. You set up the inventory interface along with other line type constants for the line type in the Line Type Constants program (P40205).
This inventory interface allows you to make financial commitments for stock items. Inventory Interface C combines the features of inventory interface Y (Inventory) with A (G/L Account and B (G/L Account and Non-Stock). The ability to create financial commitments allows the project manager to calculate projected final cost by using the Job Cost system.
Note
To make financial commitments, you must define commitment document types in the Commitment Document Type UDC table (40/CT).
You can also activate the Call Materials Issue option for the line type to enable the system to automatically issue material purchased for a work order upon receipt of the material.
See Also Setting Up Order Line Types in the Procurement Guide for further information about
setting up line type constants
23
Setting up the Cost Classification for EPM Project Workbench
One of the most important priorities for a project manager is the ability to control the costs associated with a project. In order to maintain control of the budget, the project manager needs to be able to review the actual costs reported for any project task at any point in time throughout the project life-cycle. The actual costs need to be associated with the same cost buckets that are available for the estimated costs so that the project manager can compare the estimated, budgeted, or planned costs with the actual costs at any stage of the project. In addition, mapping costs to the correct cost buckets enables the system to roll up costs for each level of detail to the next parent level in the work breakdown structure and to the project level. Examples of cost buckets that are used in the EPM Project Workbench program are labor, material, other, and special. You set up these cost buckets as user defined codes in the Cost Classification UDC table (31P/CC).
The Cost Classification program (P31P301) allows you to map costs to cost buckets either by cost type or by account number. These options accommodate the fact that a project can contain two types of tasks, production tasks, such as manufacturing work orders, and nonproduction tasks, such as project management tasks, travel, and so on. You can retrieve the actual costs that are associated with production tasks from the Production Cost table (F3102), where they are stored by cost type. The costs associated with nonproduction tasks are stored in the Account Ledger table (F0911). Therefore, you need to associate the appropriate accounts with the user defined cost buckets to make costs for nonproduction tasks visible to a project manager and roll them up to higher levels in the project structure.
You can define cost type and account mappings for one of the following combinations:
• Branch/plant and project number of a particular project
• Branch/plant of a project, where the project number is blank
• All branch/plants and projects (both fields remain blank)
The previous list defines the hierarchy that the system uses to retrieve the correct categories for displaying costs in the EPM Project Workbench program (P31P001) and for rolling up actual costs. This information is stored in the Cost Classification Table (F31P21).
Note
You use the processing option for the Cost Classification program to determine whether you are going to map cost types or account numbers.
► To set up the cost type classification
From the Advanced Engineering Project Management menu (G31P30), choose Cost Classification.
1. On Work with Cost Types, complete the following fields and click Add:
• Branch/Plant
• Project Number
2. On Revise Cost Types, complete the following fields in the detail area for each cost type that you want to map to a cost bucket:
• Cost Type
24
• Cost Classification
3. When you complete the classification of all your cost types, click OK.
► To set up the account classification
From the Advanced Engineering Project Management menu (G31P30), choose Cost Classification.
1. On Work with Account Numbers, complete the following fields and click Add:
• Branch/Plant
• Project Number
Note To display the Work with Account Numbers form, you must set the processing option to display the program by account, rather than cost type.
2. On Revise Account Numbers, complete the following fields in the detail area for each account number that you want to map to a cost bucket:
• Account Number
• Cost Classification
3. When you complete the classification of all of your account numbers, click OK.
Processing Options for Cost Classification (P31P301)
Defaults Tab
This processing option controls whether you can work work with cost types or with account numbers when using this program.
1. Default View
Blank = View by Cost Type
1 = View by Cost Type
2 = View by Account Number
Use this processing option to specify how the system displays the program. Valid values are:
Blank or 1
25
View by Cost Type.
2
View by Account Number.
User Defined Codes for Engineering Project Management
J.D. Edwards provides the following user defined code tables, which allow you to define engineering project management processes according to specifications derived from your business environment:
Order Type (48/OT) This table allows you to distinguish each work order record in the Work Order Master File table (F4801) from other records with different work order types. For example you do not use the same document type and work order type to represent both an equipment work order and a manufacturing work order.
Cost Classification (31P/CC) This table lists the cost buckets used in the EPM Workbench program (P31P001) to categorize the costs stored in the Production Cost (F3102) and Account Ledger (F0911) tables for visibility and roll-up in the work breakdown structure for a project.
Project Quote Status (31P/QP) This table provides the definitions of the statuses that the system uses to track the progress of the different quote versions that you create when you generate a proposal for a customer. The system provides five quote statuses that are hard-coded.
Project Quote Inactive Reason Code (31P/RC) This table lists reasons why quotes are set to an inactive status.
Task Dependency Type (31P/DT) This table lists the standard task dependency types that you can use to establish dependencies between the tasks on the work breakdown structure.
Stocking Type Code (41/I) This table lists the stocking types you assign to items in the Item Master program (P4101). You use the stocking type code to designate an item as project-specific.
Commitment Document Types (40/CT) This table lists the document types that are considered for financial commitments.
EPM Project Accounting (31P/AI) This table lists the automatic accounting instructions
26
that are set to enable project accounting.
Project Billing Method (31P/PB) This table lists the available project billing methods that you can select for the project on the Add/Revise Project form.
Distribution Requirements Planning (34/DR)
This table lists project-specific quantity types for DRP.
DRP Unadjusted (34/DU) This table lists project-specific quantity types for unadjusted DRP.
Electronic Mail Boxes (02/MB) This table includes electronic mailboxes for project notifications.
Inventory Interface (H40/IV) This table includes inventory interface C to enable financial commitments for projects with a Job Cost interface.
Maintenance Material Planning (34/MM) This table lists project-specific quantity types for material maintenance planning.
Master Production Schedule (34/MS) This table lists project-specific quantity types for MPS.
Plant Maintenance Management (34/PM) This table lists project-specific quantity types for plant maintenance management.
Material Requirements Planning (34/MR) This table lists project-specific quantity types for MRP in this table.
Quantity Type (34/QT) This table lists project-specific quantity types for supply and demand in this table.
Resource Assignment Level (48/RL) This table specifies whether resource assignments are at the level of the work order or the work order labor detail, based on the work order document type. To make assignments at the labor detail level, you must use this UDC table to specify the work order document type.
Text Substitution Based on Table (42/01) This table lists user defined codes that are required for the Generated Documents program (P00391).
Text Substitution Code (42/02) This table lists user defined codes that are required for the Generated Documents program (P00391).
Setting Up Job Cost Integration
Depending on your company’s business requirements, you can choose to integrate the J.D. Edwards Job Cost system with EPM. You can use the features of Job Cost to perform profitability analysis and to use the service and contract billing features that you can access from the Job Cost system. Using the Job Cost and EPM systems together might be particularly beneficial in a complex manufacturing environment that includes long-term projects.
27
You need Job Cost integration if you want to perform financial commitments for manufacturing work orders. To make financial commitments for manufacturing work orders, you must set up the manufacturing work order document type in the Commitment Document Types UDC table (40/CT).
To enable project-specific accounting, you use the Special Handling Code field in the EPM Project Accounting UDC table (31P/AI) to set up the following AAIs to include project-specific accounts:
• 3110 (Inventory/Raw Material)
• 3120 (Work in Process)
• 3130 (Subassembly/Finished Goods)
• 3140 (Project Contra)
• 4310 (Inventory
• 4315 (Non-Inventory)
You activate the Job Cost system when you set up the attributes for a project by activating the Interface to Job Cost option. To use the features of the Job Cost system, you must define a G/L class code. Next, you have to create a record in the Extended Job Master table (F5108). The business unit from the extended job master record becomes the default business unit for the project header and tasks. You need to add a chart of accounts that provides the subsidiary accounts that you assign to the project and the tasks. If job cost integration is activated, each task in the work breakdown structure requires a subsidiary.
To create an extended job master record, you can access the Job Cost Master Revisions program (P51006) from the EPM Project Workbench program (P31P001).
Note
If you set the processing option for creating a job master record, the system automatically calls the Job Cost Master Revisions program as you are adding or copying a project.
To add a chart of accounts, you access the Job Cost Code Structures program (P51091) from the Job Cost menu or from the EPM Project Workbench program. Instead of adding the chart of accounts interactively, you can also set a processing option to copy the chart of accounts from another record. In this case, you must specify the source (chart of accounts or job) and the name of the chart or job from which to copy the chart of account information.
After you add the chart of accounts, you assign subsidiary accounts to the EPM project and tasks. You can use the Subsidiary field to enter the desired subsidiary account for a task. You can also set a processing option to copy subsidiaries from a parent task to all its child tasks.
Before You Begin Ensure that you activated the Interface to Job Cost option in the project attributes.
See Also Entering Job Master Information in the Job Cost Guide for details about setting up a
job master record
28
► To add a chart of accounts for a project
From the Project Workbench menu (G31P12), choose EPM Project Workbench.
1. On Work with Projects, choose the project for which you want add a chart of accounts, and then choose Attributes from the Row menu.
2. On Add/Revise Project, choose Copy Chart of Accounts from the Form menu.
3. On Copy Cost Codes complete the following field to determine the jobs to copy from and to:
• Job
Note If you specify in the processing options that the copy source is a chart of accounts, you enter a chart type instead of a job.
4. Complete the following fields:
• Cost Code From
• Cost Type From
• Cost Code Thru
• Cost Type Thru
• Level of Detail
5. Click OK.
Integration with Microsoft Project
From the MS Project Integration menu (G31P13), choose Export to MS-Project or Import from MS-Project.
When working with the J.D. Edwards EPM system, you can use Microsoft Project to take advantage of some of the features of that program that complement EPM features. You can export the work breakdown structure (WBS) that you created in the EPM Project Workbench program (P31P001) to a Microsoft Project file. After you export your WBS, you can use the graphical features provided by Microsoft Project, such as Gantt charts, PERT diagrams, and so on, to represent project information in a more visual format. You can make changes to the Microsoft Project file to perform "what if" analyses without affecting your original WBS. Finally, you can also share the exported project information with an audience that might not have access to the project information in the EPM Project Workbench program.
When you export project information, the system creates a comma-delimited flat file (.csv) that contains all of the fields in the Work Order Master File table (F4801) for all of the task records in the WBS. The system saves the flat file to the location that you specified in the processing options for the Export to MS-Project program (R31P404).
When you open the flat file in Microsoft Project, the system prompts you to map flat file fields to corresponding fields in the Project file that you want to create. In order for the integration to
29
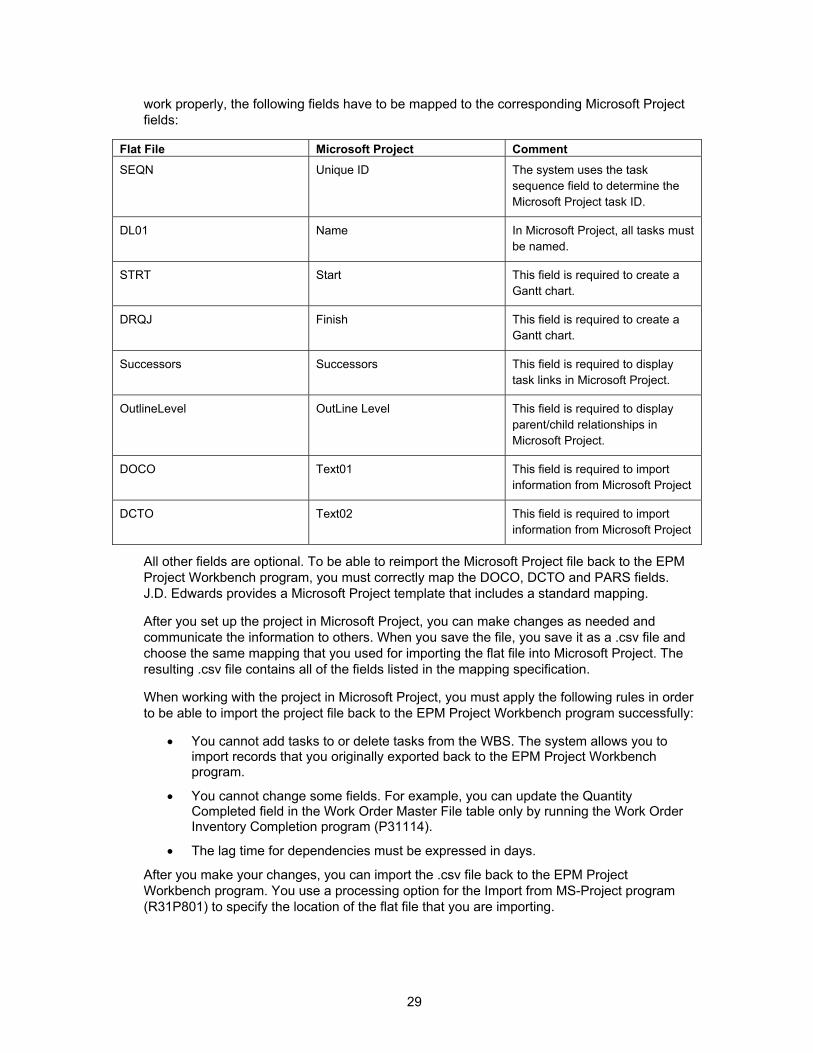
work properly, the following fields have to be mapped to the corresponding Microsoft Project fields:
Flat File Microsoft Project Comment SEQN Unique ID The system uses the task
sequence field to determine the Microsoft Project task ID.
DL01 Name In Microsoft Project, all tasks must be named.
STRT Start This field is required to create a Gantt chart.
DRQJ Finish This field is required to create a Gantt chart.
Successors Successors This field is required to display task links in Microsoft Project.
OutlineLevel OutLine Level This field is required to display parent/child relationships in Microsoft Project.
DOCO Text01 This field is required to import information from Microsoft Project
DCTO Text02 This field is required to import information from Microsoft Project
All other fields are optional. To be able to reimport the Microsoft Project file back to the EPM Project Workbench program, you must correctly map the DOCO, DCTO and PARS fields. J.D. Edwards provides a Microsoft Project template that includes a standard mapping.
After you set up the project in Microsoft Project, you can make changes as needed and communicate the information to others. When you save the file, you save it as a .csv file and choose the same mapping that you used for importing the flat file into Microsoft Project. The resulting .csv file contains all of the fields listed in the mapping specification.
When working with the project in Microsoft Project, you must apply the following rules in order to be able to import the project file back to the EPM Project Workbench program successfully:
• You cannot add tasks to or delete tasks from the WBS. The system allows you to import records that you originally exported back to the EPM Project Workbench program.
• You cannot change some fields. For example, you can update the Quantity Completed field in the Work Order Master File table only by running the Work Order Inventory Completion program (P31114).
• The lag time for dependencies must be expressed in days.
After you make your changes, you can import the .csv file back to the EPM Project Workbench program. You use a processing option for the Import from MS-Project program (R31P801) to specify the location of the flat file that you are importing.
30
Note
When you export project information to a flat file to be read by Microsoft Project, you must specify the location of the flat file. Depending on the operating system and server, you can specify the location of a file in various ways. For example, in a UNIX environment, the flat file will be a binary file, and the directory structure should be different than the directory structure in a Windows environment. The following recommendations provide some guidelines for running the export/import process smoothly.
• Map the business functions B31P0240 and B31P0250 to run locally, at least for the user or user group that attempts to run the export or import process.
• Run the Export to MS-Project and Import from MS-Project programs locally. This can be achieved through OCM mapping or by overriding the location when you submit the job.
• Use a Windows-based file system to specify the path and the file name, mainly because Microsoft Project works best in Windows.
Other setup might include setting the date format on the workstation to be consistent with the processing options for the Export to MS-Project and Import from MS-Project programs.
After you reimport the project information back to the EPM Project Workbench program, make sure that you click OK to save any changes before you close the program.
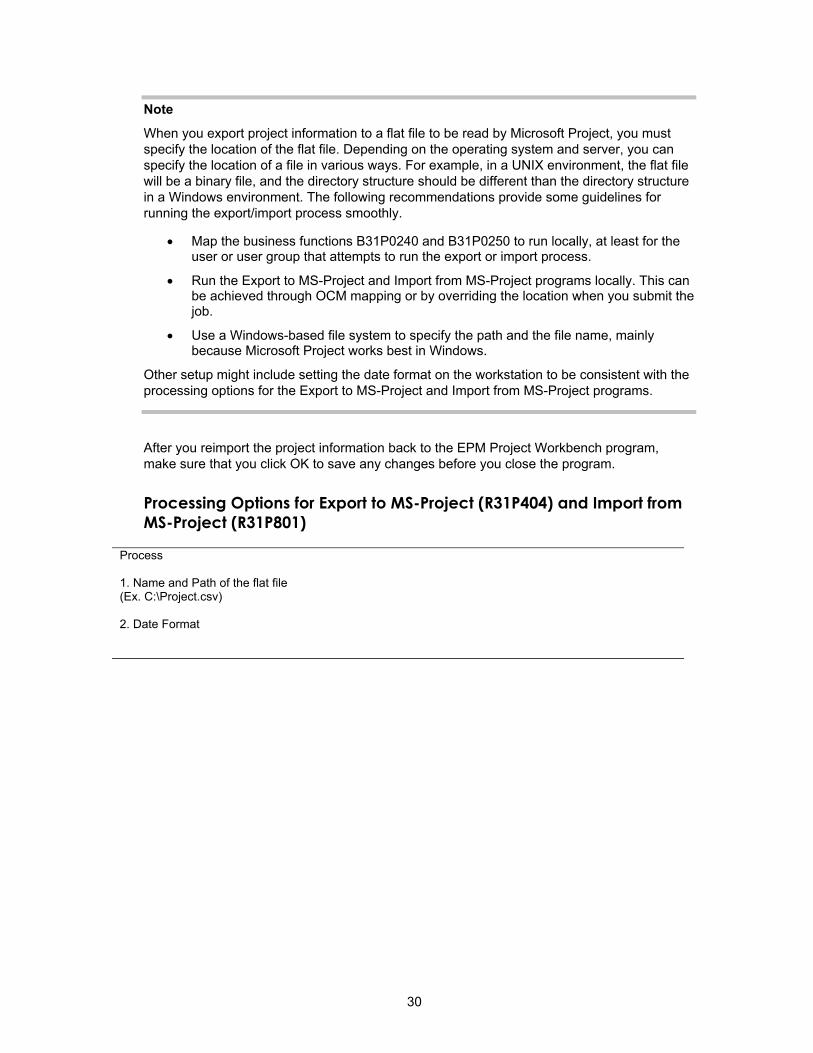
Processing Options for Export to MS-Project (R31P404) and Import from MS-Project (R31P801)
Process 1. Name and Path of the flat file (Ex. C:\Project.csv) 2. Date Format
31
Project Initiation
Project initiation is the beginning phase for large-scale engineer-to-order or make-to-order activities. Industries that make products according to very specific customer requirements rely on project management practices to ensure that all customer requirements are met in the final product. Projects of this nature can have a life cycle of a year or more; therefore, during the project initiation phase, you must comprehensively and accurately enter all of the information that is required for a project.
If you operate in an engineer-to-order business environment, you typically initiate a project only when a customer requests a quote for a specific product. After the customer transmits the request for a quote, you complete the following activities that yield the information that is required for a quote:
• Create a project
• Define high-level phases and tasks
• Determine an estimated schedule
• Calculate estimated costs
• Determine a price and generate a proposal
The goal of these activities is to provide the customer with sufficient information to make an informed decision about accepting or rejecting the quote. Some of the project initiation activities might be iterative, in response to additional customer questions and requirements. The project initiation phase concludes when the customer accepts the quote and you actually start planning for and working on the project tasks.
Creating Projects
When a customer requests quote information for the product that you propose to produce for the customer, your first step is to set up a project. You have several options for creating a project. You can create a new project using the Add/Revise Project program (P31P011), or you can copy an existing project and change the project header information, as appropriate. After you define all the global project information, you can add task and schedule information, as well as financial estimates. This essential information helps you understand the activities that are required for a project and the costs that you will incur when you execute these activities. Without this information, you might have difficultly providing the customer with a realistic quote that allows you to complete the project at a profit.
Note
When you copy a project for the purpose of creating a new project, the system copies the task information that is associated with this project, but not the task dependencies.
Projects are stored as records in the Work Order Master File table (F4801). When you set up a new project, you need to provide the following required information:
• Project Description
• Branch/Plant
• Order Type
32
• Planned Start Date
• Planned End Date
The Add/Revise Project form allows you to add additional information, such as a business unit and a customer number on the Project Information tab. The branch/plant provides the default value for the business unit, if you do no enter a business unit. If you use the Job Cost system with Engineering Project Management, you can enter a business unit that is different from the branch/plant. If you enter a business unit that does not exist in the system, and you have activated the Job Cost interface, you can add a new record to the Extended Job Master table (F5108). You need to provide a customer number in order to generate a sales quote from the Project Quotes program (P31P100). You can also use the customer number to retrieve cost information, such as tax rates.
On the People tab, you can provide information about some of the people involved with the project, such as the manager and supervisor, and specify an e-mail distribution list for status change notifications and project alerts.
The Project Attributes tab contain important processing information. You can determine whether the system commits inventory before or after the Quote Accept stage of the project. You can avoid allocating inventory and making financial commitments until you have assurance that the project will actually proceed. You can also specify whether the system overrides the originally entered estimated costs with the planned costs after you attach the parts list and routing instructions to a task.
If you are planning to use Job Cost feature of Engineering Project Management, you need to activate the Job Cost Interface option on the Job Cost tab and enter a G/L class code. A subsidiary is required for every task. The Job Cost system uses only planned costs, and the project must be moved to the Quote Accept status before Job Cost can be used.
The Project Status tab on the Add/Revise Project form displays information about the stages of a project. When you complete each stage, the system turns on the corresponding option, such as Quote Is Accepted. The options on this tab are locked from user input and are for information only.
On the Order Information tab, you can specify order information, such as item number, quantity, and unit of measure. On the Sales Order tab you can specify a billing method for the project. The program also provides a number of category codes that you can use for reporting.
Technical Considerations for Storing Project Information
When you work with the EPM Project Workbench program (P31P001), the system allows you to add and change project information. If you close the Project Workbench program without clicking OK, the information you added or changed is not saved. The information is stored in cache to improve system performance. As long as the information resides only in cache, it is not stored in the appropriate tables. In order to save the project information, you must click OK in the Project Workbench program before you close the program.
Before You Begin For integration with the Job Cost system, ensure that the processing option is set to
create a record in the Extended Job Master table (F5108).
If you want to create a project by copying a previous project, set the processing option for copying cost information appropriately.
33
► To add a new project
From the Project Workbench menu (G31P12), choose EPM Project Workbench.
1. On Work with Projects, click Add.
2. On Add/Revise Project, complete the following header field:
• Description
3. Choose the Project Information tab and complete the following fields:
• Branch
• Business Unit
• Customer
• Status
• Order Type
Note The branch/plant provides the default value for the business unit. If you use the Job Cost system, you enter the job number in the Business Unit field.
4. Choose the Dates tab and complete the following fields:
• Planned Start
• Planned End
Note The Actual Start and Actual End date fields on the project header will be updated later from the project as the actual start and end dates for tasks are combined into the actual start and end dates for the project. The other date fields are user defined. For example, the user can enter baseline dates for the project.
5. Choose the People tab and complete the following optional fields:
• Manager
• Supervisor
• Assigned To
• Distribution List
• Organization Structure Type
6. Choose the Project Attributes tab and turn on the following options, as needed:
34
• Commit After Quote Accept
• Override Estimates Flag
7. Choose the Estimated Costs tab, and enter optional cost information in the following fields:
• Material
• Labor
• Other
• Special Units
• Special Amount
The system calculates the sum of the costs that you enter in these fields and stores it in the Total field.
Caution If you enter estimated costs for the project, these costs are stored in the project header record and appear on the first line of the work breakdown structure (WBS). The summarization fields at the bottom of the Project Workbench form show that the costs entered on the project header level are automatically added to the other project costs from the WBS. They are not overwritten when the other project costs are combined.
8. If you want to use the Job Cost system with EPM, choose the Job Cost tab and turn on the following option:
• Interface to Job Cost
9. Complete the following optional fields for Job Cost accounting with this project:
• Require Activity Code
• Project G/L Class Code
• Subsidiary
10. Choose the Order Information tab and complete the following optional fields:
• Item Number
• Quantity
• U/M
• Type
• Priority
• Freeze Code
35
• Ship This Phase
Note The Ship This Phase field contains a code that indicates whether the system can generate a sales order line. This code is used in project requirements planning to explode project-specific requirements.
11. Choose the Categories tab and enter categorization information for the project:
• Phase
• Category 02
• Category 03
• Category 04
• Category 05
• Status
• Service Type
• Skill Type
• Experience Level
• Category 10
12. Choose the Sales Order tab and complete the following field:
• Billing Method
Note The order number, order type, and order company information are provided by the Sales Order Management system.
13. Click OK.
The Project Workbench form appears.
14. On Project Workbench, click OK to save the new project.
If you choose to add new tasks to this project, you can do so before closing the Project Workbench form.
► To copy an existing project
From the Project Workbench menu (G31P12), choose EPM Project Workbench.
1. On Work with Projects, complete any of the filter fields and click Find.
2. Choose a project and click Copy.
36
3. On Add/Revise Project, complete the following header field for the new project:
• Description
4. Choose the Project Information tab, and complete the following required fields for the new project:
• Branch
• Status
• Order Type
5. Choose the Dates tab, and complete the following required fields:
• Planned Start
• Planned End
6. Review the information that was copied from the original project and either revise the information as needed or enter new information.
Note When the system copies the information from an existing project, it leaves key fields, such as Planned Start and Planned End, blank, and you must complete these fields with information that is specific to the new project.
The system does not copy the task dependencies of the previous project.
7. Click OK.
The Project Workbench form appears.
8. On Project Workbench, click OK to save the new project.
► To revise a project
From the Project Workbench menu (G31P12), choose EPM Project Workbench.
1. On Work with Projects, complete any of the filter fields and click Find.
2. To revise a project, choose a project and choose Attributes from the Row menu
3. On Add/Revise Project, revise the information you want to change.
4. Click OK.
► To review a project
From the Project Workbench menu (G31P12), choose EPM Project Workbench.
1. On Work with Projects, complete any of the filter fields and click Find.
• Project Number
• Branch/Plant
37
2. Choose a project and choose Project Inquiry from the Row menu.
3. On Project Inquiry, review the work breakdown structure of the project.
The system displays the project as a hierarchical tree structure that includes all of the tasks that have been entered for the project. When you choose a project task in the tree structure, the corresponding record in the detail area is also highlighted.
The information in this view is primarily intended for review. However, you can move tasks if you have set the processing options accordingly. You can also choose Resources from the Row menu to access the Resource Assignment program (P48331), which you can use to revise resource information.
4. Click Close.
Processing Options for EPM Project Workbench (P31P001)
Defaults Tab
These processing options control the default values for order type, as well as task and project status.
1. Enter the Default Order Type.
Use this processing option to specify the order type that is used as the default value when you create new tasks on the EPM Workbench.
2. Enter the beginning Status for new Tasks.
Use this processing option to specify the beginning status that is used as the default value when you create new tasks for non-configured items.
38
3. Enter the beginning Status for Configured Tasks.
Use this processing option to specify the beginning status that is used as the default value when you create new tasks for configured orders.
4. Enter the Default 'From Status' of Projects to display.
Use this processing option to specify the default value for the From Status filter field on the Work With Projects form.
5. Enter the Default 'Thru Status' of Projects to display.
Use this processing option to specify the default value for the Thru Status filter field on the Work With Projects form.
Versions Tab
These processing options control which version of the following programs the system uses when you call these programs from the EPM Project Workbench program.
39
1. Manufacturing Work Order Entry (P48013)
Blank = ZJDE0001
Use this processing option to specify which version of the Manufacturing Work Order Processing program (P48013)the system calls. If you leave this processing option blank, the system uses version ZJDE0001.
2. Equipment Work Order Entry (P17714)
Blank = ZJDE0003
Use this processing option to specify which version of the Work Order Revisions program (P17714) the system calls. If you leave this processing option blank, the system uses version ZJDE0001.
3. Service Work Order Entry (P17714)
Blank = ZJDE0001
Use this processing option to specify which version of the Work Order Revisions program (P17714) the system calls. If you leave this processing option blank, the system uses version ZJDE0001.
40
4. Configurator (P32942)
Blank = ZJDE0001
Use this processing option to specify which version of the Configured Item Specifications program (P32942) the system calls. If you leave this processing option blank, the system uses version ZJDE0001.
5. Manufacturing Work Order Parts List (P3111)
Blank = ZJDE0001
Use this processing option to specify which version of the Work Order Parts List program (P3111) the system calls. If you leave this processing option blank, the system uses version ZJDE0001.
6. Manufacturing Work Order Routings (P3112)
Blank = ZJDE0001
Use this processing option to specify which version of the Work Order Routing program (P3112) the system calls. If you leave this processing option blank, the system uses version ZJDE0001.
41
7. Equipment Work Order Parts List (P17730)
Blank = ZJDE0002
Use this processing option to specify which version of the Work Order Parts Detail program (P17730) the system calls. If you leave this processing option blank, the system uses version ZJDE0002.
8. Equipment Work Order Routings (P17732)
Blank = ZJDE0002
Use this processing option to specify which version of the Work Order Labor Detail program (P17732) the system calls. If you leave this processing option blank, the system uses version ZJDE0002.
9. Service Work Order Parts List (P17730)
Blank = ZJDE0001
Use this processing option to specify which version of the Work Order Parts Detail program (P17730) the system calls. If you leave this processing option blank, the system uses version ZJDE0001.
10. Service Work Order Routings (P17732)
Blank = ZJDE0001
Use this processing option to specify which version of the Work Order Labor Detail

42
program (P17732) the system calls. If you leave this processing option blank, the system uses version ZJDE0001.
11. Cost Components (P30026)
Blank = ZJDE0001
Use this processing option to specify which version of the Cost Components program (P30026) the system calls. If you leave this processing option blank, the system uses version ZJDE0001.
12. EPM Project Quotes (P31P100)
Blank = ZJDE0001
Use this processing option to specify which version of the EPM Project Quotes program (P31P100) the system calls. If you leave this processing option blank, the system uses version ZJDE0001.
13. Job Cost Master Revisions (P51006)
Blank = ZJDE0002
Use this processing option to specify which version of the Job Cost Master program (P51006) the system calls. If you leave this processing option blank, the system uses version ZJDE0001.
43
14. Upload Job Cost Budget (R31P800)
Blank = ZJDE0001
Use this processing option to specify which version of the Upload Job Cost Budget program (R31P800) the system calls. If you leave this processing option blank, the system uses version ZJDE0001.
15. Sales Order Entry (P4210)
Blank = ZJDE0001
Use this processing option to specify which version of the Sales Order Entry program (P4210) the system calls. If you leave this processing option blank, the system uses version ZJDE0001.
16. Work Order Processing (R31410)
Blank = XJDE0001
Use this processing option to specify which version of the Order Processing program (R31410) the system calls. If you leave this processing option blank, the system uses version ZJDE0001.
17. Project Close Analyzer (R31P403)
Blank = ZJDE0001
Use this processing option to specify which version of the Project Close Analyzer program (R31P403) the system calls. If you leave this processing option blank, the system uses version ZJDE0001.

44
18. Work Order Inventory Issues (P31113)
Blank = ZJDE0001
Use this processing option to specify which version of the Work Order Inventory Issues program (P31113) the system calls. If you leave this processing option blank, the system uses version ZJDE0001.
19. Work Order Hours and Quantities (P311221)
Blank = ZJDE0001
Use this processing option to specify which version of the Work Order Time Entry program (P311221) the system calls. If you leave this processing option blank, the system uses version ZJDE0001.
20. Work Order Completions (P31114)
Blank = ZJDE0001
Use this processing option to specify which version of the Work Order Completions program (P31114) the system calls. If you leave this processing option blank, the system uses version ZJDE0001.
21. Resource Assignment (P48331)
45
Blank = ZJDE0001
Use this processing option to specify which version of the Resource Assignment program (P48331) the system calls. If you leave this processing option blank, the system uses version ZJDE0001.
22. Export Project Information (R31P404)
Blank = ZJDE0001
Use this processing option to specify which version of the Export Project Information program (R31P404) the system calls. If you leave this processing option blank, the system uses version ZJDE0001.
23. Import Project Information (R31P801)
Blank = ZJDE0001
Use this processing option to specify which version of the Import Project Information program (R31P801) the system calls. If you leave this processing option blank, the system uses version ZJDE0001.
24. Net Change (R31430)
Blank = XJDE0001
Use this processing option to specify which version of the Net Change Processing program (R31430) the system calls. If you leave this processing option blank, the system uses version XJDE0001.
46
25. EPM Related Orders (P31P204)
Blank = ZJDE0001
Use this processing option to specify which version of the EPM Related Orders program (P31P204) the system calls. If you leave this processing option blank, the system uses version ZJDE0001.
Process Tab
These processing options control settings that affect processing in the EPM Project Workbench program, such as whether you can move a task on the Project Inquiry form and at what status tasks are considered cancelled or closed.
1. Allow task moves in Project Inquiry
1 = Allow Moves
Blank = Do not allow moves
Use this processing option to specify whether the user can move tasks to a different parent task by using the drag-and-drop feature on the Project Inquiry form. Valid values are:
Blank
Tasks cannot be moved.
1
Tasks can be moved.
47
2. Enter the cancelled status for tasks.
Blank = 91
Use this processing option to enter the status for cancelled tasks. When you choose the Cancel Task row exit, the system moves the selected task to this status. Tasks at this status appear crossed out.
3. Enter the closed status for tasks.
Blank = 99
Use this processing option to enter the status for closed tasks. When you choose the Close Task row exit, the system moves the selected task to this status. Tasks at this status appear crossed out.
48
4. Net Change
1 = Net Change will be performed when Workbench is exited.
Blank = Net Change will not be performed.
Use this processing option to specify whether net change processing is performed when you exit the EPM Project Workbench program (P31P001). You may want to run net change processing when you have changed information, such as dates, quantity, or unit of measure, on a work order which has a parts list and routing attached to it. The Net Change Processing program (R31430) can be launched when you click OK on the Project Workbench form. Valid values are:
1
Perform net change processing when you exit the EPM Project Workbench.
Blank
Do not perform net change processing when you exit the EPM Project Workbench.
Note:
The Quantities and Dates processing option in the specified version of Manufacturing Work Order Entry program(P48013) must be set to recalculate parts list and routing information.
Copy Tab
These processing options control copy functions within the EPM Workbench program. For example, you can specify whether the system creates a job master record when you set up a project, whether to copy the chart of accounts blindly, and the chart or job from which the system copies the information.
49
1. Create Job Master
1 = Create Job Master
Blank = Do Not Create Job Master
Use this processing option to specify whether the system should create a Job Master record when you add or copy a project. Valid values are:
1
Create a Job Master record.
Blank
Do not create a Job Master record.
2. Amount Ledger Type
Blank = JA
Use this processing option to specify the amount ledger type that you want to update. If you leave this processing option blank, the JA ledger will be updated. The budget unit ledger type to be updated is determined automatically, based on the amount ledger type. For example, the corresponding budget unit ledger type for JA is JU.
50
3. Copy Blindly
1 = Copy Chart of Accounts Blindly
Blank = Copy Interactively
Use this processing option to specify whether the system copies the chart of accounts automatically or interactively. If you choose to copy the chart of accounts interactively, you do so via a form exit. If you specify that the sytem copy the chart of accounts automatically , it does so after the job master record is created. You must define the source of the data to copy to the job. Valid values are:
Blank
Do not automatically copy the chart of accounts.
1
Copy the chart of accounts automatically.
51
4. Job Copy Source
1 = Copy Chart to Job
Blank = Copy Job to Job
Use this processing option to specify the data source for the job that you want to copy. If you copy the data from an existing chart of accounts, you must enter the name of the chart of accounts into the Chart To Copy From processing option. If you copy the data from an existing job, you must enter the name of the job into the Job To Copy From processing option. Valid values are:
1
Copy job data from an existing chart of accounts.
Blank
Copy job data from an existing job.

52
5. Job to copy from.
Use this processing option to specify the data source for the job that you want to copy. If you copy the data from an existing chart of accounts, you must enter the name of the chart of accounts into the Chart To Copy From processing option. If you copy the data from an existing job, you must enter the name of the job into the Job To Copy From processing option. Valid values are:
1
Copy job data from an existing chart of accounts.
Blank
Copy job data from an existing job.
6. Chart to copy from
Use this processing option to specify the data source for the job that you want to copy. If you copy the data from an existing chart of accounts, you must enter the name of the chart of accounts into the Chart To Copy From processing option. If you copy the data from an existing job, you must enter the name of the job into the Job To Copy From processing option. Valid values are:
1
Copy job data from an existing chart of accounts.
Blank
Copy job data from an existing job.
53
7. Copy Budget
1 = Copy Revised Budgets
2 = Copy Original Budgets
3 = Copy Revised Budgets into Original
Blank = Do not copy budgets
Use this processing option to specify whether you want to copy budgets while blindly copying the chart of accounts. Valid values are:
Blank
Do not copy budgets.
1
Copy revised budgets.
2
Copy original budgets.
3
Copy revised budgets into original budgets.
54
8. Upload Original Budgets
1 = Upload budget
Blank = Budget will not be uploaded
Use this processing option to specify whether to upload original budgets automatically when you select the Lock Job Cost Budget option. Valid values are:
Blank
Upload the original budget manually.
1
Upload the original budget automatically.
55
9. Assign Subsidiary
1 = Assign Subsidiary
Blank = Do not assign subsidiary
Use this processing option to assign the subsidiary account from the parent task to all of the child tasks automatically. The automatic assignment is possible only if the Subsidiary field in the child task line is blank. Valid values are:
Blank
Do not assign a subsidiary account automatically.
1
Assign a subsidiary account automatically.
10. Copying Cost for New Project
1 = Copy Actual to Estimate
Blank = Copy Estimate to Estimate
Use this processing option to specify whether costs are copied from actuals or estimates when you create a new project by copying an existing project. The copied costs populate the estimated cost fields for the new project.
Scheduling Tab
These processing options control scheduling for projects and determine whether you can modify frozen work order dates.
56
1. Enter the real time scheduling mode.
0 = No real time scheduling will be performed
1 = Forward schedule the project in real time
2 = Back schedule the project in real time
Use this processing option to activate real-time scheduling for tasks or subtasks that you are adding to or are moving within a project. You can use forward scheduling when the successor task schedule depends on the predecessor task schedule. You can also use backward scheduling when the predecessor task schedule depends on the successor task schedule. Valid values are:
0
Do not activate real-time scheduling.
1
Activate forward scheduling.
2
Activate backward scheduling.
2. Modify Frozen Work Order dates
0 = Do not Modify
1 = Modify
Use this processing option to specify whether you want to allow the dates on a frozen work order to be modified. Valid values are:
Blank
The scheduling feature does not adjust the work order dates.
57
1
The scheduling feature reschedules the frozen work order dates when appropriate.
Working with Projects
After you have set up a project, you create a work breakdown structure (WBS) that provides a hierarchy of tasks and subtasks that need to be completed for the project. You can also add all of the detail information that will enable you to plan for and run the project, such as the project schedule. You can also enter resource information that the system does not use for processing, but that you use for reference only. Finally, you can add cost estimates that will enable you to generate a quote for the customer.
Adding Project Tasks
After setting up a project header record with information such as project description, branch/plant, planned start and end dates, and so on, you can add to the project individual tasks that represent the steps required to complete the project. The set of tasks that make up the project is referred to as the work breakdown structure (WBS). You can add tasks to the work breakdown structure, provided that it is not yet locked. If you lock the WBS, the Lock WBS option on the Project Status tab in the Add/Revise Project program (P31P011) is turned on.
When you set up a project for the purpose of preparing a quote for a customer, you might want to add only high-level or summary tasks to enable you to identify the steps that are required to complete a project and to enter the costs associated with a task. By using this approach, you can determine a quote amount without having to expend more effort than necessary to develop a project before you actually receive an order from a customer. However, the business requirements and practices of your company determine the stage at which you add tasks and the level of detailed for the task structure. The procedure for adding tasks to projects remains the same regardless of when you do it. The system allows you to develop a work breakdown structure with an unlimited number of subordination levels. When you enter tasks, the system creates a record in the Work Order Master File table (F4801) for each task and assigns the project number as parent work order number. You can create new tasks by copying tasks from an existing project or by entering new task information. You can also move tasks within the WBS or cancel tasks.
When you add tasks to the detail area of the workbench, you must specify the order type. If you add an equipment maintenance or service order task to the project, this task becomes the model work order. From the model work order, the system generates the assigned maintenance or service order and loads it to the EPM Project Workbench program (P31P011). If you add a task that contains a configured item work order, which is identified by its stocking type (C), the EMP Project Workbench program calls the Configured Item Specifications program (P32942) to complete the item configuration. Subsequently, the system creates all new work orders that are required by the configuration and adds them to the configured item task as child tasks.

58
You can use the processing options to set default values for tasks that you add to the WBS. For example, you can use processing options to set default values for the order type and the beginning status for new tasks. You can also specify whether the system automatically expands the project tree to show the task hierarchy.
► To add a new project task
From the Project Workbench menu (G31P12), choose EPM Project Workbench.
1. On Work with Projects, complete any of the filter fields and click Find.
2. Choose a project and click Select.
On Project Workbench, the project number and description appear on the header and in the first record in the detail area.
3. On Project Workbench, click the first empty record in the detail area and complete the following fields:
• Description
• Or Ty
After you add a record and click a new one, the system adds the record that you just added to the tree structure to the left of the detail area.
Note These two fields represent the minimum information that is required to create a project task. Complete the remaining steps to enter more detailed task information.
4. If you use job cost, complete the following field:
• Sub
Note If you use Job Cost, use the subsidiary field information to correctly map costs from the EPM Project Workbench to the Job Cost system. The subsidiary information you enter on the work breakdown structure relates to the job cost chart of account’s cost codes.
5. Complete the following optional fields for each task:
• Branch Plant
• Business Unit
• Customer Number
• Duration
• Manager
• Supervisor
59
• Assigned To
Note If the project header contains information for any of these fields, the system uses it to provide default values. For work order tasks, the system uses the item’s level lead time to calculate the duration. For summary tasks, you must manually enter a duration.
If you use job cost, the default value for the business unit is the job from the job master record.
6. Complete the following fields if the task consists of a manufacturing work order:
• Item Number
• Quantity Ordered
• UM
7. Complete any of the remaining optional fields, such as:
• Estimated Material
• Estimated Labor
• Estimated Other
• Estimated Special Units
• Estimated Special Amount
Note You obtain planned cost information by running the Order Processing program (R31410) for work orders.
8. To add category code information, choose Other and then Additional Info from the Row menu.
9. On Additional Task Information, complete the following fields, and then click OK:
• Phase
• Category 02
• Category 03
• Category 04
• Category 05
• Status
60
• Service Type
• Skill Type
• Experience Level
• Category 10
10. On Project Workbench, click OK.
The Work with Projects form appears. When you clicked OK, the system generated work order numbers for the tasks. When you return to the Project Workbench form, you can review the work order numbers that the system created for each task.
See Also Assigning Estimated Costs in the Engineering Project Management Guide for more
detailed information about entering cost information into the work breakdown structure
Working with Orders for Configured Items in Engineering Project Management in the Base Configurator Guide for information about adding configured work orders to the work breakdown structure
► To copy a project task
From the Project Workbench menu (G31P12), choose EPM Project Workbench.
1. On Work with Projects, complete any of the filter fields and click Find.
2. Choose the project that you want to work with and click Select.
3. On Project Workbench, click in the first blank record in the detail area and choose Copy Task from the Form menu.
The Search & Select form of the Task Search and Select program (P31P202) appears.
4. On Search & Select, complete the following field and click Find:
• Project Number
The tree structure for the selected project appears.
5. Choose the task that you want to copy to the new project and click Select.
6. The system copies the task into the selected blank record on the work breakdown structure.
7. Click OK.
► To move a project task
From the Project Workbench menu (G31P12), choose EPM Project Workbench.
1. On Work with Projects, complete any of the filter fields and click Find.
2. Choose a record in the detail area, and click Select.
3. On Project Workbench, choose a task in the detail area that you want to move, and then choose Move Task from the Form menu.
61
The Search & Select form of the Task Search & Select program (P31P202) appears. The project number on the form is the number of the project with which you are working.
Note You can move a manufacturing subassembly task to a new parent work order only if the subassembly task item is part of the parent work order’s parts list.
4. On Search & Select, choose the new parent task for the task that you want to move and click Select.
5. On Project Workbench, review the change in the detail area.
Note
You can also move project tasks on the Project Inquiry form by using the drag-and-drop feature. To save the change, choose Save from the Form menu.
► To delete a project task
From the Project Workbench menu (G31P12), choose EPM Project Workbench.
1. On Work with Projects, complete any of the filter fields and click Find.
2. Choose a project and click Select.
3. On Project Workbench, choose the task in the detail area that you want to delete.
4. Click Delete.
5. On Confirm Delete, click OK.
6. On Project Workbench click Find.
The task line is now blank.
7. Click OK.
Scheduling Project Tasks
In order to manage a project successfully over a period of time, the project manager needs to be able to create a project schedule that accurately reflects the time required to purchase and manufacture products needed to complete the project, as well as the limitations imposed by the availability of resources with the requisite skills. Effective time and resource management is a high priority in today’s business environment. Accordingly, Engineering Project Management helps you do the following:
• Schedule projects using standard project constraints, such as task dependencies, critical paths, and resource availability
• Use Microsoft Project to manage changes to project task information, such as durations and dependencies, for existing tasks
As you add tasks to the work breakdown structure (WBS) for the project, you need to indicate how much time is required to complete each task. For summary tasks, you need to enter durations manually. For work orders, the system retrieves the duration from the level lead
62
time that is defined for the item in the Item Branch program (P41026). It calculates the start and end dates for the task by using the duration and the system’s scheduling function. When you activate the scheduling function, the durations of subtasks roll up into the duration of the parent.
You can set a processing option to automatically forward or backward schedule tasks in real time, or you can use the options on the Form menu for forward and backward scheduling. If you change the dates or duration of a task, the system reschedules all tasks that are dependent on this task.
You use task dependencies to specify the sequence in which the project tasks need to be performed. The types of available task dependencies allow you to schedule overlapping tasks; that is, the earlier task (predecessor) can still be incomplete when the next task (successor) starts. You can use lag time in addition to the dependencies to structure the sequence of tasks. The following four types of task dependencies are available:
• Finish to Start (FS). The predecessor task must be completed before the successor task can start. For example, you might use this dependency type if the material produced by the predecessor task is needed for the successor task’s manufacturing process.
• Finish to Finish (FF). The predecessor task must be completed before the successor task can be completed. For example, you might use this dependency type if the material produced by the predecessor task is needed only later in the successor task’s manufacturing process.
• Start to Start (SS). The predecessor task must start before the successor task can start. For example, you might use this dependency type if you might need to make ongoing changes in the engineering and manufacturing process. In this case, recent changes in the engineering specifications of the predecessor task cause changes in the successor task.
• Start to Finish (SF). The predecessor task must start before the successor task can be completed.
When defining task dependencies in Engineering Project Management, you need to observe the following rules:
• You can establish dependency links between parent tasks, but not between parent and related child tasks.
• You can create a dependency between a parent task and a child task that is not related to the parent task.
• You cannot create a reverse link between tasks that are already linked. This rule helps you avoid creating a circular relationship.
You define task dependencies for subtasks that are on the same level. In this case, the planned start and end dates depend completely on the defined task dependencies.
After you set up project information in the EPM Project Workbench program (P31P001), you can export the WBS to a third-party software program, such as Microsoft Project. You can use Microsoft Project to work with task durations and dependencies. You can then import task revisions back into the Project Workbench program. If you add or delete tasks in Microsoft Project, you cannot import these changes into the Project Workbench program.
See Also Backscheduling a Work Order in the Shop Floor Management Guide for more
detailed information about the rules the system uses for backward scheduling
63
Integration with Microsoft Project in the Engineering Project Management Guide for more detailed information about exporting projects to Microsoft Project and importing changes back into the EPM Project Workbench program (P31P001)
Before You Begin Ensure that the WBS includes all of the tasks that you want to schedule and that all
tasks have durations assigned to them.
Ensure that you have the processing option set to the type of scheduling that you want to take place automatically. If you do not set this processing option, you need to use the scheduling function in the EMP Project Workbench program (P31P001) in order to get the durations for parent work orders.
► To define task dependencies
From the Project Workbench menu (G31P12), choose EPM Project Workbench.
1. On Work with Projects, click Find.
2. Choose a record in the detail area and click Select.
3. On Project Workbench, choose Dependencies from the Form menu.
4. On Task Dependencies, complete the following fields:
• Predecessor Number
• Successor Number
• Dependency Type
• Lag Time
5. Click OK.
6. On Project Workbench, review the following field for each task, and then click OK:
• Successors
This field now contains the work order number of the successor task.
► To schedule tasks
From the Project Workbench menu (G31P12), choose EPM Project Workbench.
1. On Work with Projects, click Find.
2. Choose a project and click Select.
Note You can forward or backward schedule tasks in the WBS. If you set the scheduling processing option to forward or backward schedule tasks in real time, the planned start and end dates of any affected tasks are adjusted automatically as soon as you change a date or duration.
3. On Project Workbench, choose Scheduling and then either Forward Schedule or Backward Schedule from the Form menu.
64
In the detail area, you can review the adjusted planned start and planned end dates. The date adjustment depends on the task dependencies that you defined, as well as the duration of each task.
Caution If you use forward scheduling, the system might move the original planned end date to accommodate the task durations. If you switch to backward scheduling, you need to reset the original planned end date; otherwise, the system back schedules tasks using the new planned end date.
Assigning Resources to Tasks
The EPM Project Workbench program (P31P001) allows the project manager to enter resources for tasks on the WBS. This capability allows the project manager to view the resources that are assigned to manufacturing tasks and projects and to track the availability of resources. Employees, in turn, can see their assignments, as well as the start and end dates for their tasks. You can assign multiple resources to a task, if necessary, to accommodate the amount of time required to complete the task.
You set up resource assignment information and perform resources assignments in the Resource Assignments program (P48331). After you assign resources there, you can review them on the project or the task level by choosing the Resources option from the Row menu on the Project Workbench form. For manufacturing work orders, you access the Resource Assignments program from the work order routing for the work order.
See Also Resource Assignments in the Enterprise Asset Management Guide for more detailed
information about assigning resources
Assigning Estimated and Planned Costs
A significant aspect of building a work breakdown structure for a project is to assign estimated costs to each project task to be able to calculate the total cost of the project. Obtaining accurate cost information is a prerequisite for creating a good project budget and providing a price quote to the customer.
The EPM system tracks four types of cost: estimated, planned, budgeted and actual costs. The system stores all these costs in the Work Order Master File table (F4801) as well as the Work Order Master Tag File table (F4801T). The user cannot enter or change actual costs on the EPM Workbench. The system updates actual costs from the cost data that you provide as the project progresses, such as when you enter labor costs in the Hours and Quantities program (P311221). Budgeted cost is represented as a single Budgeted Cost column. When you accept the quote in the EMP Project Workbench program (P31P001), the system copies the total estimated cost into this field. During the initiation phase of the project, you work with estimated and planned costs to determine the project budget and quote.
Estimated Costs
You can use various methods to enter estimated costs into the WBS. When entering estimated costs, you must also know whether you are entering them for descriptive tasks or

65
manufacturing work order tasks. To obtain estimated costs, you can use the following methods:
• Enter costs manually in the EPM Project Workbench program. You can use this method for any task in the project, but it might be most useful for assigning costs to summary tasks because no production costs exist for this task type.
• Allow the system to enter standard costs. You can use this method only when the task is a work order task for a standard cost item (cost method 07) and standard costs exist for this item. When you enter the work order task into the WBS, the system automatically enters the standard costs in the appropriate fields in the detail area. The system assigns costs to the cost fields based on the cost classification scheme that is defined for the project.
The system summarizes the costs you enter on the parent level in the Estimated field under the Summarized Cost heading the bottom of the form.
Planned Costs
To obtain planned costs for a manufacturing task, you need to attach a parts list and routing instructions to the work order. In the project attributes, you can specify that the system will allow you to obtain the cost information for the WBS by running this process without allocating inventory to the project at this point. You can also choose to override previously entered estimated costs with planned costs in order to get the most up-to-date cost information. This step is necessary if you choose to build your quote from the information in the estimated cost, not the planned cost, columns. To override estimated costs with planned costs, you can either use a setting in the project attributes or you can choose an option from the Row menu on the Project Workbench form. To obtain planned costs, you can use the following methods:
• Enter costs manually on the Project Workbench. After you attach the parts list and routing to a work order, the resulting cost information overwrites the planned cost information that you entered on the Project Workbench form.
• Attach the parts list and routing to the work order to retrieve the current unit costs, as well as labor, setup, and machine rates, rolled up into the planned cost fields on the Project Workbench form. You can override these unit costs and rates manually in the Parts List (P3111) and Work Order Routing Instructions (P3112) programs. When you make changes to the costs, the system updates the planned costs.
• Update the planned cost fields from the estimated cost fields, if, at the time of quote acceptance, the planned cost fields are still blank.
The costs that you enter or retrieve from various sources roll up to parent order levels, regardless of whether the parent is a manufacturing work order or a descriptive task. The system summarizes the costs that you enter on the parent level in the Planned field under the Summarized Cost heading.
Before You Begin Ensure that you have set up cost classification information for the project that allows
the cost that you enter to be stored in the correct cost fields.
Turn on the Commit After Quote Accept option in the project attributes so that you can run the Order Processing program (R31410) without making inventory commitments.
66
► To enter estimated costs
From the Project Workbench menu (G31P12), choose EPM Project Workbench.
1. On Work with Projects, click Find.
2. Choose a project and click Select.
3. On Project Workbench, complete the following fields for each task:
• Estimated Material
• Estimated Labor
• Estimated Other
• Estimated Special Units
• Estimated Special Amount
The system calculates the sum of the estimated amounts that you entered for each record and displays the total in the Total Estimated field.
Note If you enter work orders for items that have standard cost information, the system adds these standard costs to the task as estimated costs.
4. Click OK.
► To process orders for tasks
From the Project Workbench menu (G31P12), choose EPM Project Workbench
1. On Work with Projects, click Find.
2. Choose a project in the detail area, and then click Select.
3. On Project Workbench, choose a work order in the detail area for which you want to run the Order Processing program (R31410).
4. From the Row menu, choose Process Task.
When the Order Processing program has finished running, the system updates the planned cost fields with the planned cost.
Note
To process orders for the entire project at once, you can start the Order Processing program by choosing Process Project from the Form menu.
5. Click OK.
67
► To override estimated cost with planned costs
From the Project Workbench menu (G31P12), choose EPM Project Workbench.
1. On Work with Projects, click Find.
2. Choose a project in the detail area, and then click Select.
3. On the WBS, choose the task for which you want to override the estimated costs with planned costs.
4. From the Row menu, choose Other and then Override Estimate.
The system replaces the original values in the estimated cost fields with the values from the planned cost fields.
5. Click OK.
Generating Quotes and Proposals
After you create a project in the EPM Project Workbench program (P31P001) and add task and cost information, you can use the Project Quotes program (P31P100) to develop a detailed and structured quote that you can present to the customer for approval. If the customer accepts the quote, your company can begin work on the project. If the customer requests changes, the system allows you to revise the quote information multiple times. You can also send multiple versions of the quote to the customer. For example, you can revise cost amounts or specify whether certain lines are included in the calculation. You can then resubmit the quote version to the customer until all requirements are satisfied and the customer grants the final approval to continue with the project. If the requested changes involve adding or deleting tasks from the project, you need to make these changes on the Project Workbench form and generate a new quote from the WBS.
By using the EPM quote generation programs, you can create a quote based on the estimated or planned costs that are associated with each task in the WBS of the project. The system enables you to import the WBS from the EPM Project Workbench program into the quote program. The goal is to build a quote that communicates sufficient information to enable the customer to make an informed decision. Typically, the cost information in the EPM Project Workbench program varies in its level of detail; in some cases, it contains too much detail information, and in other cases, it does not contain enough detail information for an effective quote. You can choose the task information from the WBS that you want to appear on the customer proposal. You can simplify the quote by omitting detail information that is more relevant to the actual work to be performed than to the cost estimates. On the other hand, you might need to provide a detailed production cost breakdown, as well as margins that are applied to each line item. The quote program also allows you to combine individual task quote amounts into subtotals and totals, thus further enhancing the customer’s ability to understand the cost of undertaking the project.
The quote process might consist of several iterations between your company and your customer. Each time that you incorporate changes into the quote, whether they are engineering-related or price-related, you create a new version of the quote to be able to track the changes to the quote. Finally, you use the quote information to generate a quote document that can be transmitted to the customer. If you use e-business processes, you can use the Online Proposals program (P31P101) to communicate with the customer via the Web.

68
When the customer accepts the quote, you also need to register this event in the EPM Project Workbench program. By choosing Accept Quote from the Form menu on the Project Workbench form, you manually move the project to a Quote Accept status. After you accept the quote in the EPM Project Workbench program, you can begin the planning phase of the project.
Working with Quotes
You can access the Project Quotes program (P31P100) from either a Form menu option in the EPM Project Workbench form or directly from the Quotes & Proposal menu (G31P11). You use this program to create multiple versions of quotes for a particular project, if needed. These quote versions are stored in the Project Quote Detail table (F31P11). J.D. Edwards provides the following project status codes (UDC table 31P/QP) that allow you to track the progress of various quote versions:
Pending The default status when the quote is generated. At this stage, the sales person, for example, can change and refine the quote as often as needed because the quote has not been forwarded to the customer. The sales person can create a new version of a quote at this stage. Several quote versions for one project can have the Pending status. When the sales person creates a proposal from the quote and sends it to the prospective customer, the quote is advanced to an Active status to allow the customer to access the proposal document.
Active The status that indicates that a quote has been sent to the customer for review. To distinguish between changes to the original quote, you can assign this status to several versions of the quote. When you make changes to an active quote rather than creating a new version, changes might become difficult to track. You can have multiple active quote versions that you can send to the customer. You must assign a different name to each version of the quote that has the same status so that the customer can identify them. This status means that the customer is reviewing the quote and negotiations are still ongoing. If the customer rejects the quote, the quote author can change the status of the quote to inactive.
Inactive The status that indicates that the quote is no longer in effect. You cannot change inactive quotes. They exist only to be archived. You might want to enter a reason for inactivating the quote.
Current The status that indicates that the customer has accepted a quote. Only one quote per project can have this status. When a quote has this status, you can create new quotes if the project needs to be renegotiated. In this case, you must change the status of the current quote to inactive, provide a reason for inactivating a quote, generate a new quote, and activate it.
Complete The status that indicates that the project is completed or abandoned and subsequently closed. When a quote has this status, you can no longer create new quotes for the project or change the quote. Only one quote per project can have this status.
When you consider the quote information to be sufficient for preparing a sales proposal for your customer, you can change the status of the quote to Active. This status allows you to generate a sales quote that you can send to the customer.
The system provides e-mail communication mechanisms for information about quote status. You can set a processing option to automatically notify the manager when a quote status
69
changes. You can also define an e-mail distribution list for the project that would, for example, allow you to communicate with the customer about the quote.
Before You Begin Ensure that you have completed the WBS with required tasks, estimates, and
schedule information
Configure an e-mail distribution list by using the Structure Revisions program (P0150) in the Address Book system, if you want to take advantage of the notification capabilities of the Project Quotes program (P31P100). See Working with Parent/Child Relationships in the Address Book Guide for further information about setting up an e-mail distribution list in the J.D. Edwards software.
► To create a quote for a project
From the Quotes & Proposal menu (P31P11) choose Project Quotes.
1. On Work With EPM Project Quote, complete the following field:
• Project Number
2. Click Add
3. On Add EPM Quote, click one of the following options to indicate the type of costs on which the quote will be based:
• Estimates
• Planned
4. On EPM Project Quote Revisions, choose the Quote Info tab and complete the following fields:
• Quote Version
• Order Description
• Quote Effective From
• Quote Effective Thru
5. Choose the People tab and review the information in the following fields:
• Customer Number
• Manager
• Originator
Typically, you have a customer number for a quote. You enter the customer when you define the project header information.
6. Review the information in the detail area and enter or change information as needed, such as the information in the following fields:
• Estimated Override
70
• Margin Percent
You use the Estimated Override field to enter a quote amount that is different from the original estimate. In this case, the system uses this information, rather than the original estimate, for the calculation. The system uses the margin percentage that you enter to calculate a markup for the estimated amount.
7. For each quote record, use the following field to specify whether you want to include the record in the quote total calculation:
• Selected Calc
8. For each quote record, use the following field to specify whether the system creates a sales quote record from this record:
• Selected Display
9. When you are satisfied with the quote information, choose the Project Info tab and click the following option to calculate the quote total:
• Display Calculated Total
The Total Quote Amount field for the project header displays the calculated quote total.
10. To update the quote status, choose the Quote Info tab and update the value in the following field:
• Quote Status
Note If you choose to assign an Inactive status to the quote, the Reason Code tab becomes active to enable you to provide a reason for inactivating the quote.
11. Click OK.
► To generate a sales quote
From the Quotes & Proposal menu (G31P11) choose Project Quotes.
1. On Work With EPM Project Quote, complete any of the filter field and click Find.
2. Choose the quote version you want to work with and click Select.
Note
Verify that the quote version that you choose has an Active status; if it is still in Pending status, you cannot generate a sales quote.
3. On EPM Project Quote Revisions, choose Generate Quote from the Form menu.
The system generates a sales quote number.
4. Click OK.
5. Choose Sales Quote from the Form menu.
71
6. On Customer Service Inquiry, click Find.
The sales quote that you generated from the Project Quotes program (P31P100) appears in the detail area of the Sales Order Entry program (P4210) with all of the records from the EPM quote. The system generates the sales quote records based on the line types that are assigned in the Project Quotes program.
Caution
Even though it is possible to make changes to the quote in the Sales Order Entry program, J.D. Edwards recommends that you limit such changes. In order for the quote information in both programs to be consistent, changes should be made in the Project Quotes program only. The quote amount from the Project Quotes program always overrides the quote price on the sales quote detail record.
7. Click Close.
See Also Working with Quote Orders in the Sales Order Management Guide for more detailed
information about working with sales quotes
Generating a Proposal During Order Entry in the Sales Order Management Guide for more detailed information about using the Generated Document Media Object Definition program (P0039).
Processing Options for EPM Project Quotes (P31P100)
Display Tab
These processing options control whether the system automatically includes quote records in the quote calculation and appearance, and whether you can override quote amounts on parent tasks.
1. Selected for Quote Calculation
Blank = Do not select the detail lines
1 = Default selected value as 1 for all quote detail lines
Use this processing option to specify whether the system enters the selection value 1 in the Selected Calc column on the EPM Project Quote Revisions form for all quote detail lines in the detail area. You can then deselect lines that you do not want to include in the quote. If you leave this processing option blank, the system does not automatically select the detail lines to appear on the quote.
72
2. Selected For Quote Display
Blank = Do not select the detail lines
1 = Default selected value as 1 for all quote detail lines
Use this processing option to specify whether the system enters a selection value of 1 in the Selected Display column on the EPM Project Quote Revisions form for all quote detail lines in the detail area. You can then deselect any line that you do not want to include. The system displays each selected line for which a calculated price exists in the EPM-Online Proposals program (P31P101) and creates a sales quote line for each row. If the Display Calculated Totals option is activated, the system calculates the total quote amount.
Note: You cannot override any price for parent task rows.
If you leave this processing option blank, you must enter the selection value for each line that you want to include. When doing so, you can override the price for any task on any level, but bear in mind that the system will not calculate the total quote amount.
73
3. Allow Override of Quote Amount on Parent
Blank = Do not allow overrides to the Quote Amount
1 = Allow overrides to the Quote Amount.
Use this processing option to specify whether you can override the Quote Amount on the parent task level. Valid values are:
Blank
Do not override the Quote Amount.
1
You can override the Quote Amount.
Default Tab
This processing option specifies the currency that the system uses as the base currency.
1. Base Currency
Use this processing option to specify the base currency to use as a default value for a project that is not associated with a business unit.
Process Tab
These processing options control whom the system notifies regarding the status of a quote.
74
1. Notify Manager on Quote Status
Change to Active
Use this processing option to specify whether the manager should be notified when the quote status changes. Valid values are:
Blank
Do not notify the manager.
1
Notify the manager.
2. Notify Manager on Quote Status
Change to Inactive
Use this processing option to specify whether the manager should be notified when the quote status changes. Valid values are:
Blank
Do not notify the manager.
1
Notify the manager.
75
3. Notify Manager on Quote Status
Change to Current
Use this processing option to specify whether the manager should be notified when the quote status changes. Valid values are:
Blank
Do not notify the manager.
1
Notify the manager.
4. Notify Customer on Quote Status
Change to Active
Use this processing option to specify whether the customer should be notified when the quote status changes to active. Valid values are:
0
Do not notify the customer.
1
Notify the customer.
76
5. E-mail Distribution List
Use this processing option to specify the distribution list for the project alert.
6. Organization Structure Type
Use this processing option to specify the distribution list for the project alert.
Versions Tab
These processing options control which versions the system uses when you call the following programs from the Project Quotes program (P31P100).
1. Sales Quotes Entry (P4210)
Blank = ZJDE0018
Use this processing option to specify the version of the Sales Order Entry program (P4210) to run to generate the sales quote. If you leave this processing option blank, the system uses version ZJDE00018.
2. Document Generator (P00391)
Blank = ZJDE0001
Use this processing option to specify which version of the Generated Documents Revisions program (P00391) to use for generating proposals. If you leave this processing option blank, the system uses version ZJDE0001.
77
Working with Online Proposals
The EPM quote system also allows you to communicate and send quotes online directly to the customer, thus bypassing the step of generating paper proposals. You can send quotes that have an active status. You need to set up the customer with a level of security that allows the customer to sign on to the J.D. Edwards portal to access the Online Proposals program (P31P101).
When the customer calls the program, the system displays all quote records, but not all of the fields in each record. For example, the original estimates from the EPM Project Workbench program (P31P001) are not visible. The customer can respond to the quote by either accepting or rejecting it. The system uses the workflow system to communicate the customer’s response to designated individuals, such as the project manager. The system also notifies the customer that you received the customer's response. This process can be iterative, which allows you to enter all required changes until the customer is satisfied and accepts the quote. When the customer communicates quote acceptance, you advance the status of the quote to Current and move the project in the EPM Project Workbench program to a Quote Accept status.

78
Project Planning
Typically, the project planning phase begins after the customer accepts the project quote and you run the Accept Quote process for the project. To run the Accept Quote process, you choose the Accept Quote option from the Form menu on the Project Workbench form. As a result, the system turns on the Quote Is Accepted option on the Project Status tab on the Add/Revise Project form.
The project planning phase consists of all of the activities that are required to convert the project information collected and defined as the basis for the quote to the customer into a plan that can be executed during the project execution and control phase. During the initiation phase of a project, you might not need or be able to provide all of the detail information for tasks, work orders, schedules, resources, and budgets. During the planning phase of a project, the project manager can refine the project information. You can enter transactions for the project tasks and make financial and inventory commitments either before or after you run the Accept Quote process. If you turn on the Commit After Quote Accept option, no commitments are made before you run the Accept Quote process.
Note
The system automatically creates financial commitments for purchase items, provided that the line type is set up to do so and the document type is included in UDC table 40/CT.
To create financial commitments for a manufacturing work order, you must turn on the Interface to Job Cost option for the project.
If you turn on the Interface to Job Cost option in the project attributes, the system uploads the project planned costs from the Project Workbench form to the job cost original budget during the Accept Quote process.
You can run the Project Requirements Planning program (R3482), based on the task information on the work breakdown structure, to generate the detail messages that the system uses to generate purchase orders and work orders for replenishment. You can create purchase orders manually for items on a parts list. You can also create purchase orders for items that are not consumed by a manufacturing work order on the project but that are sold to the customer as part of the project.
If you turn on the Interface to Job Cost option in the project attributes and then run the Accept Quote process, you can continue to refine and plan the project information. You can proceed to the next project stage by choosing the Freeze JC Budget option from the Form menu. As a result, the planned amounts from the work breakout structure are loaded into the original budget one last time, and the budget total is frozen.
Note
Project activities are frequently iterative and do not necessarily proceed in the sequence documented here.
79
Before You Begin Turn on the Interface to Job Cost option for the project if you want to use the features
of the Job Cost system and create financial commitments for manufacturing work orders.
Loading Project Budgets to the Job Cost Budget
From the Periodic Processing menu (G31P20), choose Upload Job Cost Budgets.
You use this program to upload planned costs from the EPM Project Workbench program (P31P001) to the Job Cost system. You can activate the program from the menu any time after the quote is accepted to synchronize the Job Cost budget information with the cost information from the project. During two phases of the life of the project, the EPM Project Workbench program runs this program automatically. At the Quote Accept phase, the planned costs for the project are uploaded as the original budget. At the Freeze Cost Budget phase, the original budget is uploaded one final time, if you have set the processing option to upload the original budget. When the job cost budget is locked, you can use the Upload Job Cost Budgets program (R31P800) only to upload revisions.
To load and update job cost budgets, you use AAI 3130 (Subassembly/Finished Goods). This AAI maps the planned costs from the EPM Project Workbench program to the Job Cost system.
Note
The document type that you specify in the processing options must match the document type in the AAI.
To run this batch program, you must turn on the Interface to Job Cost flag in the project attributes; otherwise, the system issues an error message. You can run this program in proof mode to compare the job cost budget to the changes that you applied to the EPM project. When you run the program in final mode, the system updates the Job Cost tables with the budget changes.
Processing Options for Upload Job Cost Budgets (R31P800)
Display 1. Display Inactive Acounts Blank = Do not display inactive accounts 1 = Display inactive accounts Edits 1. Default Cost Code Range From Cost Code Thru Cost Code 2. Default Cost Type Range From Cost Type Thru Cost Type
80
3. Specify Lowest Account Level of Detail (3 - 9) Process 1. Mode 1 = Final Blank = Proof 2. Budget Amount Ledger Type Blank = JA 3. Job Cost Revisions Bypass GL Date Editing 4. Job Cost Original Budget Update 1 = Update current year only 2 = Update all years Blank = Update current and future years 5. Document Type Audit Trail The options on this tab will only apply when uploading budget revisions. 1. Document Type 2. Job Cost Budget Audit Trail Creation 3. Reference Number 4. Override Explanation
Project Requirements Planning (PRP)
Project Requirements Planning (PRP) is an option within the MRP/MPS Requirements Planning program (R3482) that you use to generate replenishment schedules for production orders and components for an end item that are used in a project.
PRP recognizes the shippable items from the project as the supply of the end item and uses this supply to drive the demand for its components. Thus, the project supplies its own demand.
The dependent demand is generated by the bill of material (BOM) structure or by the work order parts list that is associated with the end items. Inventory that is acquired either by purchase order receipts or work order completions for these project-specific items should be used only for meeting the project’s demand.
Project demand and supply is regarded as standalone or independent so that any additional demand or supply from forecasts, sales orders, work orders, or purchase orders on that end item does not interfere with the requirement from the project.
Setup Considerations for Project Requirements Planning (PRP)
To successfully plan a project by running the Project Requirements Planning (PRP) option of the MRP/MPS Requirements Planning program (R3482), you must verify certain system setup information.
81
In the Item Master program (P4101), the stocking type for project-specific items is defined with a special handling code of P for project. PRP uses the stocking type to denote that the item is specific to a project.
Caution
An item cannot be identified as both a project-specific and a standard item within the same branch/plant.
For multilevel bills of material, when an item is identified as a project-specific item, all parent items in the hierarchy, including the end item, should also be project-specific items. Otherwise, the originating order requirements (pegging records) cannot be linked.
PRP uses the low-level code to identify the lowest level at which an item resides in a bill of material structure. The low-level code is assigned to an item when it is added to a manufacturing bill of material (BOM). An item can reside on a manufacturing BOM, the project work breakdown structure, or both. Because the work breakdown structure is similar to a BOM structure but is not a BOM, the system requires a way to assign an item’s low-level code when you use it on a given project. To assign correct low-level codes, run the Bill of Material Structure Analysis program (R30601) with the processing option set to consider items in projects.
PRP identifies the supply for project-specific end items on the work breakdown structure when the Shipment field contains the value 1.
Note
Initially, when you add an end item to the work breakdown structure, do not add any subassembly items to the work breakdown structure. PRP uses the parent end item’s supply work order to explode demand to the subassembly and component items. After processing a work order message, the system updates project-specific subassembly items on the work breakdown structure.
You can also set up supply and demand inclusion rules for PRP. Consider the statuses of the manufacturing work orders on the work breakdown structure when you use supply and demand inclusion rules for PRP.
Project Requirements Planning Generation
When you run the Project Requirements Planning (PRP) option of MRP/MPS Requirements Planning (R3482), the system generates a replenishment schedule for a project.
Demands for projects are given preference when the system distributes on-hand inventory. The Project Commitment Detail Table (F410211) stores the detail records for project specific inventory items. PRP uses this table to determine what project specific inventory to allocate to a given project.
The project supply or availability for an end item is stored in the Work Order Master Tag File table (F4801T) like a typical work order, but with the project number populated.
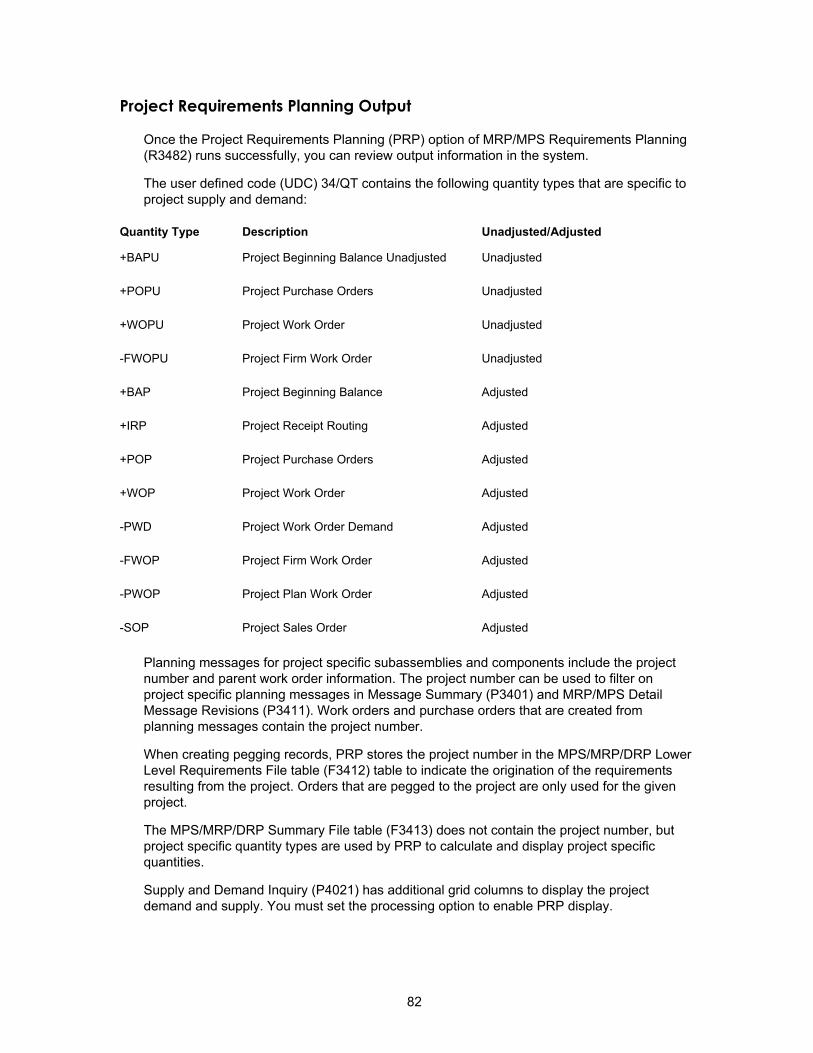
82
Project Requirements Planning Output
Once the Project Requirements Planning (PRP) option of MRP/MPS Requirements Planning (R3482) runs successfully, you can review output information in the system.
The user defined code (UDC) 34/QT contains the following quantity types that are specific to project supply and demand:
Quantity Type Description Unadjusted/Adjusted
+BAPU Project Beginning Balance Unadjusted Unadjusted
+POPU Project Purchase Orders Unadjusted
+WOPU Project Work Order Unadjusted
-FWOPU Project Firm Work Order Unadjusted
+BAP Project Beginning Balance Adjusted
+IRP Project Receipt Routing Adjusted
+POP Project Purchase Orders Adjusted
+WOP Project Work Order Adjusted
-PWD Project Work Order Demand Adjusted
-FWOP Project Firm Work Order Adjusted
-PWOP Project Plan Work Order Adjusted
-SOP Project Sales Order Adjusted
Planning messages for project specific subassemblies and components include the project number and parent work order information. The project number can be used to filter on project specific planning messages in Message Summary (P3401) and MRP/MPS Detail Message Revisions (P3411). Work orders and purchase orders that are created from planning messages contain the project number.
When creating pegging records, PRP stores the project number in the MPS/MRP/DRP Lower Level Requirements File table (F3412) table to indicate the origination of the requirements resulting from the project. Orders that are pegged to the project are only used for the given project.
The MPS/MRP/DRP Summary File table (F3413) does not contain the project number, but project specific quantity types are used by PRP to calculate and display project specific quantities.
Supply and Demand Inquiry (P4021) has additional grid columns to display the project demand and supply. You must set the processing option to enable PRP display.
83
Planning and Scheduling
After you set task durations and task dependencies, you can use the EPM Project Workbench program (P31P001) to backward and forward schedule the tasks on the work breakdown structure.
Forward scheduling allows the project manager to schedule tasks from a given start date. With forward scheduling, tasks are scheduled according to their duration and dependencies so that each task begins on its earliest possible start date. Because each task begins on its earliest start date, situations known as project float can be created. Project float is a situation in which the project manager has the authority to decide, based upon project conditions, when the task should begin.
Requirements Planning, which generates messages that recommend work order start dates based on backward scheduling, usually agrees with dates that are created by the backward scheduling function of the EPM Project Workbench program. With backward scheduling, a project manager can enter an absolute date by which the project must finish and schedule backward to determine the start date on which it must begin.
For both forward and backward scheduling, the EPM Project Workbench program uses the task dependencies that you establish for each task to suggest correct start and end dates.
Creating Orders for a Project
In response to planning messages, you can generate replenishment orders (purchase orders and work orders) for project-specific items. Subassembly work orders created for a project-specific item are automatically placed on the work breakdown structure. You can also attach existing work orders to a project task.
Depending on your business processes, you can create project-specific purchase orders from the parts list line for a particular item. You can also create a purchase order in the Enter Purchase Orders program (P4310) and then use the Work Order Parts List program (P31P201) to search for the item that requires a purchase order.
In addition to purchasing material for project work orders, you can procure items that are not consumed by work orders but are resold directly to the customer as part of the project deliverables.
Purchasing Project Material
As part of the manufacturing process, you have to purchase the raw materials that are used to produce the end item. Engineering Project Management offers several methods for creating purchase orders for raw material. In addition to generating work orders from planning messages, you can also enter purchase orders manually, either from the parts list for the work order or directly from the Enter Purchase Orders program (P4310).
When you enter a purchase order for a project-specific stock item, the system creates a financial commitment for the purchase order by updating the Account Balances table (F0902) with the committed amount. At the same time, it removes the manufacturing encumbrance, if such an encumbrance exists at the time that you enter the purchase order. The system creates only manufacturing encumbrances, provided that you have turned on the Interface to Job Cost option for the project. Finally, the system records the purchase order transaction in the P.O. Detail Ledger File - Flexible Version table (F43199).
84
If the quote has already been accepted, you can call the Work Order Parts List program (P3111) for a particular work order from the Project Workbench form and access the Enter Purchase Orders program from it. Before you run the Accept Quote process, you can enter the purchase directly in the Enter Purchase Orders program and access the Work Order Parts List program (P31P201) to select the item for the purchase order.
► To enter a purchase order for project material
From the Purchase Order Processing menu (G43A11), choose Enter Purchase Orders.
1. On Work With Order Headers, click Add.
2. On Order Header, complete the following fields:
• Supplier
• Branch/Plant
• Order Date
• Requested
• Scheduled Pick
3. Click OK.
4. On Order Detail, complete the following fields in the detail area:
• Item Number
• Quantity Ordered
• Ln Ty
5. Choose Parts List from the Row menu.
6. On Work With Work Order Parts List, complete the following fields and click Find:
• Project Number
• Order Number
• Or Ty
Note Optionally, you can also search by item and branch/plant.
7. Choose the record that contains the work order for your parent item and click Select.
On Order Detail, the project number from the work order now appears in the project number field for the purchase order detail line.
8. Click OK.
85
► To enter a purchase order for project material from the Project Workbench
From the Project Workbench menu (G31P12), choose EPM Project Workbench.
1. On Work with Projects, complete any of the filter fields and click Find.
2. Choose a project and click Select.
3. On Project Workbench, choose a work order and choose Manufacturing Task and then Mfg Parts List from the Row menu.
4. On Work Order Parts List, choose the project-specific part for which you want to create a purchase order and choose Create PO from the Row menu.
Note A supplier record must exist before you can create a purchase order.
The purchase order information (order number, order type and line number) appears in the parts list line for the item.
Purchasing Project Items for Resale
Project deliverables can include items that your company does not manufacture. In this case, you purchase them from another source and resell them to the customer for your project. The items that you buy are not component items that are consumed in a manufacturing work order. You typically have them shipped directly from the supplier to the customer. You can also purchase these items from another branch and transfer them to the project branch. Alternatively, you can purchase and stock these items as project-specific inventory until you send them to the customer together with other project deliverables.
In the EPM Project Workbench program (P31P001), you use descriptive (or summary tasks) to create and track project-specific purchased items. You can track all related orders, such as direct ship, transfer, sales, or purchase orders.
To link a descriptive task in the project to its related orders, the system stores order information in the Related Order Cross Reference Table (F4080). This table contains the descriptive task order number and order type and detail information from the related orders, such as document type, extended costs, and order status (for information only).
You use the EPM Related Order program (P31P204) to create and track related orders for a project’s descriptive task. You can access this program from the EPM Project Workbench program or from the menu.
To create a related order, the header of the Work with Related Orders form must contain a valid project number, a descriptive task order number, and an order type. You use the Form menu to access versions of the order entry programs for direct shipping, transferring orders, creating sales orders, creating credit orders, or creating purchase orders. The system passes the project number to the sales order and purchase order programs.
If you want to review or revise a related order, you can access the order information by choosing an order entry program from the Row menu. On the Work With Related Orders form, a tree structure displays the unique items on all the related orders The individual orders are displayed in the detail area.
The following graphic illustrates the cycle flow for the different types of orders that are created in the EPM Related Orders program:
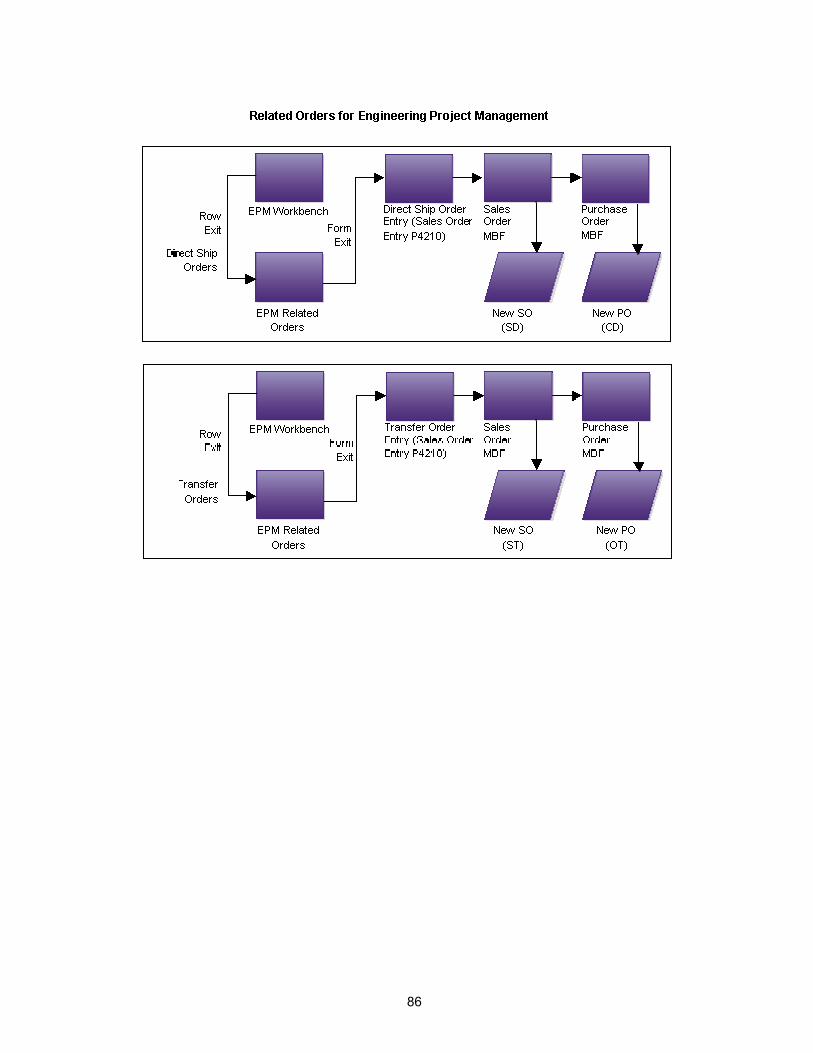
86
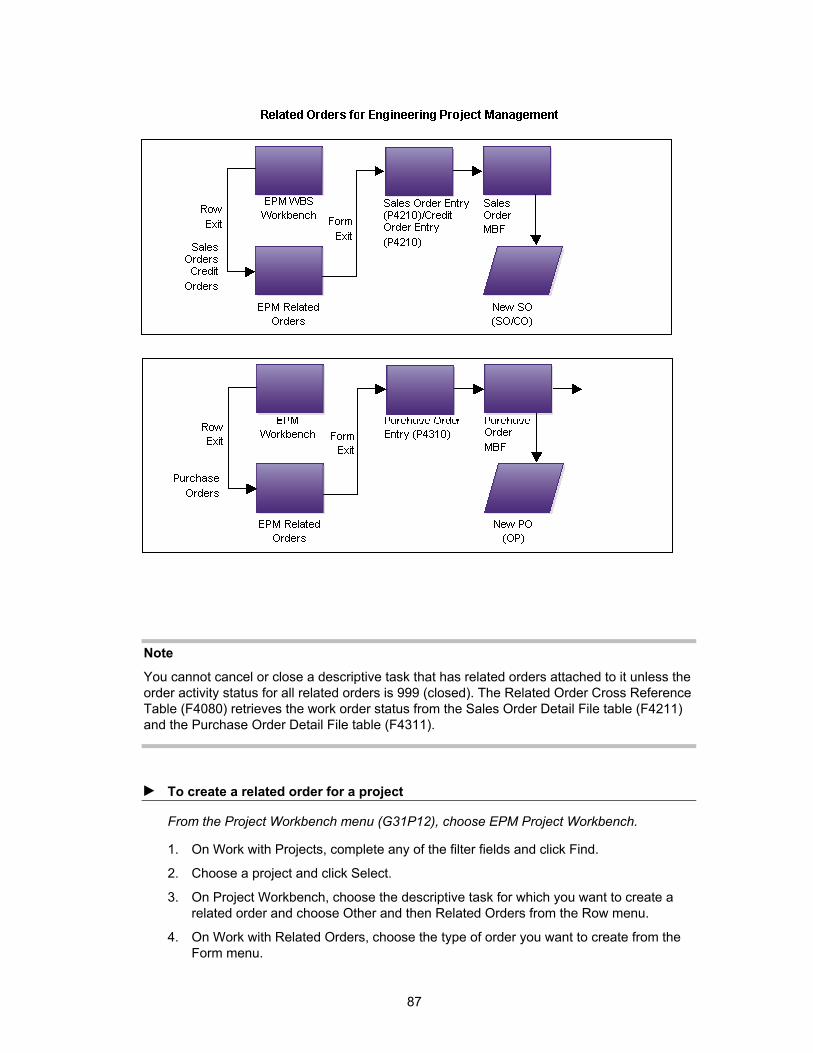
87
Note
You cannot cancel or close a descriptive task that has related orders attached to it unless the order activity status for all related orders is 999 (closed). The Related Order Cross Reference Table (F4080) retrieves the work order status from the Sales Order Detail File table (F4211) and the Purchase Order Detail File table (F4311).
► To create a related order for a project
From the Project Workbench menu (G31P12), choose EPM Project Workbench.
1. On Work with Projects, complete any of the filter fields and click Find.
2. Choose a project and click Select.
3. On Project Workbench, choose the descriptive task for which you want to create a related order and choose Other and then Related Orders from the Row menu.
4. On Work with Related Orders, choose the type of order you want to create from the Form menu.
88
5. Complete the order information fields in the order entry program you selected.
6. Click OK to save the order information.
7. Click Cancel to return to the Work with Related Orders form.
8. On Work with Related Orders, click Find to view the order you added.
9. Click Cancel to return to Project Workbench.
10. Click OK.
► To revise a related order for a project
From the Project Workbench menu (G31P12), choose EPM Project Workbench.
1. On Work with Projects, complete any of the filter fields and click Find.
2. Choose a project and click Select.
3. On Project Workbench, choose the descriptive task for which you want to revise a related order and choose Other and then Related Orders from the Row menu.
4. On Work with Related Orders, choose the order line that you want to revise, and then choose an order entry program from the Row menu.
5. Revise the order information fields in the order entry program that you selected.
6. Click OK to save the order information.
7. Click Cancel to return to the Work with Related Orders form.
8. On Work with Related Orders, click Find to view your changes.
9. Click Cancel to return to Project Workbench.
10. Click OK.
Processing Options for EPM Related Orders (P31P204)
Versions Tab
These processing options control which version of the following order entry programs the system uses when you call them from the Work with Related Orders form.
89
1. Direct Ship Order (P4210)
Blank = ZJDE0005
Use this processing option to specify which version of the Sales Order Entry program (P4210) the system uses when you choose the Direct Ship row exit on the Work with Related Orders form. If you leave this processing option blank, the system uses version ZJDE0005, which controls how the program displays information.
2. Transfer Order (P4210)
Blank = ZJDE0007
Use this processing option to specify which version of the Sales Order Entry program (P4210) the system uses when you choose the Transfer Order row exit on the Work with Related Orders form. If you leave this processing option blank, the system uses version ZJDE0007, which controls how the program displays information.
3. Sales Order (P4210)
Blank = ZJDE0001
Use this processing option to specify which version of the Sales Order Entry program (P4210) the system uses when you choose the Sales Order row exit on the Work with Related Orders form. If you leave this processing option blank, the system uses version ZJDE0001, which controls how the program displays information.
4. Purchase Order (P4310)
Blank = ZJDE0030
90
Use this processing option to specify which version of the Purchase Orders program (P4310) the system uses when you choose the Purchase Order row exit on the Work with Related Orders form. If you leave this processing option blank, the system uses version ZJDE0030, which controls how the program displays information.
5. Credit Order (P4210)
Blank = ZJDE0002
Use this processing option to specify which version of the Sales Order Entry program (P4210) the system uses when you choose the Credit Order row exit on the Work with Related Orders form. If you leave this processing option blank, the system uses version ZJDE0002, which controls how the program displays information.
Updating Accumulated Related Order Costs
From the Project Workbench menu (G31P12), choose Update EPM Related Costs (R31P405).
You can use this batch program to update the planned and actual costs for a project's related orders and post them to the Work Order Master Tag File table (F4801T).
This report includes project information from the MPM Project Attributes table (F31P01), as well as task information and the planned and actual costs that are being uploaded to the work breakdown structure. You print only the task and cost information, if planned and actual costs were accumulated for the descriptive task.
To accumulate planned and actual costs for a particular descriptive task, you use the Accumulate Costs option from the Form menu on the Work with Related Orders form. Using the Related Order Cross Reference Table (F4080), the system selects the costs for the order using the following tables and calculations:
Table Field Planned Cost Purchase Order Detail File
(F4311) Extended Amount (AEXP) from the purchase order detail line
Actual Cost Purchase Order Receiver File (F43121)
Amount Paid to Date (APTD) from purchase order detail lines with match type 2 (after voucher match)
The calculated planned and actual costs are stored in the Work Order Master Tag File table as the purchased item's material costs.
91
Attaching Existing Work Orders to a Project
Engineering Project Management allows you to attach existing work orders to a project. You can initiate a search for existing work orders from the Project Workbench form in the EOM Project Workbench program (P31P001). Any work order that you want to attach to a project must meet the following conditions:
• It is not part of another project.
• No issues have been performed for any item on the work order's part list.
• No hours and quantities have been posted for the work order.
• If the work order is a configured work order, it must be a top-level work order. All the children of the work order will also be attached.
► To attach an existing work order to a project
From the Project Workbench menu (G31P12), choose EPM Project Workbench.
1. On Work with Projects, complete any of the filter fields and click Find.
2. Choose a project and click Select.
3. On Project Workbench, use the tree structure to choose the parent task to which you want to attach an existing work order.
4. From the Row menu, choose Work Order and then Attach Work Order.
5. On Work Order Search, complete the following field to search for the work order that you want to attach to the project:
• Order Number
6. Choose the work order and click Select.
The selected work order appears in the detail area of the Project Workbench form under its parent task.
7. Click OK to save the work order to work breakdown structure.
See Also Working with Orders for Configured Items in Engineering Project Management in the
Base Configurator Guide for more information about attaching configured work orders
Project Commitments
During the planning phase, you run the processes that create inventory and financial commitments for work orders and purchase orders, if these commitments have not been created previously. Engineering Project Management allows you to postpone making these commitments until after the customer accepts the quote. You can turn on the Commit After Quote Accept option in the project attributes to enable you to run the Order Processing program (R31410) to obtain estimated costs without making inventory and financial commitments at that point. If you bypassed commitments before you ran the Accept Quote process, commitments are made when the system runs the Order Processing program automatically as part of the Accept Quote process.
92
Creating Inventory Commitments
When you run the Order Processing program (R31410), the system attaches the parts list and routing to the work orders being processed and creates inventory commitments for the parts on the parts list based on the commitment control setting in the Manufacturing Constants program (P3009). To allow you to reserve component items and other material for a particular project, you can set up items as project-specific material by assigning them a project-related stocking type with a special handling code of P. When items are associated with a project, you cannot issue this material to a work order that is outside of the project, unless the hard-commitment for the project is cleared.
When the system initiates order processing for the work orders on the work breakdown structure when you run the Accept Quote process, the system creates hard commitments for all component quantities based on the commitment method specified in the record in the Item Branch File table (F4102). The program processes all work orders in the work breakdown structure in descending order and creates project-specific commitments in the Project Commitment Detail Table (F410211).
For project-specific items on purchase orders, the system creates hard commitments to a specific location and lot when you receive the purchase using the Purchase Order Receipts program (P4312). The inventory commitment is relieved when you issue the material. You can set a processing option to call the Inventory Issues program (P4112) automatically for items for which the Call Materials Issue option is turned on in the line type constants.
Note
If you reverse a receipt, most of the tables are updated automatically, but you have to update the Work Order Parts List table (F3111) manually. When you perform the reversal, the system issues a warning because the reversal does not cancel the hard commitments that the system created for stock components on manufacturing work orders.
You can review project-specific inventory commitments by using the Project Commitment Detail Inquiry program (P410211). This program displays component quantities that are hard-committed for project work orders in the primary unit of measure, as well as the location and lot or serial number. The total quantity of inventory committed to projects is summarized in the Item Location File table (F41021) in the Project Hard Committed Quantity column. You can review this information in the Summary Availability program (P41202).
See Also Commitments in the Shop Floor Management Guide for more detailed information
about commitment processsing
► To review inventory commitments for project work orders
From the Inventory Inquiries menu (G41112), choose Project Commitment Detail Inquiry.
1. On Work With Project Commitment Detail, complete the following field and then click Find:
• Project Number
2. Review the following fields to verify project commitments:
• Business Unit
93
• Work Order Number
• Item Number
• Location
• Lot Serial Number
• Project Hard Commit
Creating Financial Commitments
If you use the Job Cost system, you can create financial commitments for project tasks. A financial commitment represents recognition of a future payment obligation. Creating financial commitments allows you to do the following:
• Review the budget and remaining amounts. By comparing the projected final cost to the actual cost-to-date, you can calculate a percentage complete. This percentage complete facilitates profit recognition because it allows you to avoid variances in the costs that you incur and in the revenue that you record for different periods.
• Calculate final project costs.
• Facilitate the execution of change orders.
• Provide information as a basis for recouping losses that are associated with committed inventory when a project is cancelled.
In addition to creating encumbrances for purchasing, you can create financial commitments for stock components on manufacturing work orders. The financial commitment occurs when the material is hard-committed. You do not create commitments for labor costs that are associated with work orders.
Note
You must set up the following information to perform financial commitments for manufacturing work orders:
• AAI 3120 (Work in Process) must be set up for use in projects in the EPM Project Accounting UDC table (31P/AI).
• The manufacturing work order must be included in the Commitment Document Type UDC table (40/CT).
When you attach the parts list and routing to the work order either interactively or by running the Order Processing program (R31410), the system creates a financial commitment for a work order by calculating the total amount that is committed for inventory. It updates the PA/PU ledger amounts in the related record in the Account Balances table (F0902) and enters the transaction in the P.O. Detail Ledger File - Flexible Version table (F43199). It also maintains the original and remaining committed amounts in the Work Order Master Tag File table (F4801T).
94
Note
To avoid doubling financial commitments for subassembly items, the system removes committed amounts from the parent work order when you attach a parts list to the subassembly work order. When you attach components to a parent work order, the system determines whether subassembly work orders already exist for the components. In this case, their cost is included in the calculation of the total financial commitment.
Financial commitments for stock components on manufacturing work orders will be relieved when you perform work order completions. The system decommits financial commitments when the issue transactions for project-related work orders are posted, and it updates the committed amount in the Work Order Master Tag File table, the Account Balances table, and the P.O. Detail Ledger File table. Then, the system posts actual amounts with ledger type AA.
Run the Commitment Integrity Report (R40910) to determine whether the open order amounts match the committed amounts and the amounts in the Accounts Balances table. If these amounts do not match, you can purge and then recreate an audit trail using the EPM Commitment Rebuild program (R31P993).
When needed, you can use the Post Committed Costs to Jobs program (R00932) to repost PA ledger commitments in the Account Balances table, including values from manufacturing-related records in the P.O. Detail Ledger File table.
When you create a purchase order for a component on a manufacturing work order, the system relieves the financial commitment for the work order. From this point forward, the financial commitment is created and maintained within the Procurement system.
When you post material transactions to the general ledger by running the Post General Journal program (R09801), the system relieves the related financial commitments. When the work order number in the subledger field in the Account Ledger table (F0911) identifies the work order as a project work order, the system relieves the financial commitment for the work order. Relieving the financial commitment updates the following tables:
• Work Order Master Tag File table
• Account Balances table
• P.O. Detail Ledger File table
If you need to roll over financial commitments that still exist at the end of a fiscal period, you can use the Encumbrance Rollover program (R4317) to relieve committed lines on purchase orders and work orders for the previous year and recommit them with the current year's G/L date. You must set a processing option for the program to include financial commitments for manufacturing work orders.
Rebuilding the Audit Trail for Financial Commitments
From the Periodic Processing menu (G31P20), choose EPM Commitment Rebuild.
If you have purged financial commitments manually, you can use the EPM Commitment Rebuild program (R31P993) to recreate an audit trail for a project's financial commitments that are related to manufacturing work orders or purchase orders. This program is based on the information from the Work Order Master File table (F4801), the Work Order Parts List table (F3111), and the Purchase Order Detail File table (F4311).
95
The program processes all open purchase orders and work orders for an active project. It creates a record in the P.O. Detail Ledger File - Flexible Version table (F43199) for the total amount committed to the parts list of each order, and it calls the Create Commitment Audit Trail program (R00993) to create a record in the P.O. Detail Ledger File - Flexible Version table for each line on a purchase order that is related to a specific project or account number.
Processing Options for EPM Commitment Rebuild (R31P993)
Process Tab
These processing options control which records are included in the report.
1. Work Order Close Status
Use this processing option to specify the status of a closed work order . The system processes only those work orders whose status is less than the closed work order status specified. If you leave this processing option blank, the system uses a default status of 99 for closed work orders.
96
2. Include Purchase Orders / Sub-Contracts
Blank = Do not include Purchase Orders / Sub-Contracts
1 = Include only Purchase Orders / Sub-Contracts related to a Project
2 = Include only Purchase Orders / Sub-Contracts related to an Account
3 = Include all Purchase Orders / Sub-Contracts
Use this processing option to specify whether the system runs the Create F43199 Commitment Audit Trail program (R00993) to create records in the P.O. Detail Ledger File table (F43199) for purchase orders and subcontracts related to a project. Valid values are:
Blank
Do not run the program.
1
Run the program.
97
Project Execution and Control
After you freeze the budget, you begin the execution and control phase of the project. During the execution stage, you complete your work orders on the shop floor and collect the actual material, labor, and machine costs that you incurred in producing the project end-items. Your project accounting depends on whether the project has an interface with the Job Cost system.
You can also revalue work-in-process inventory for the actual costed items in your project. You can use the Rollup of Actual Cost to Workbench program (R31P301) to roll up the actual cost reported to the corresponding cost buckets on the workbench, based on the cost classification scheme that you set up for the project. The rollup keeps the actual cost information in the EPM Project Workbench program (P31P001) current, which allows you to track any variances between budgeted and actual costs.
You receive and pay for the items that you purchased as components or resale items. If you use the Job Cost system and you use services and contracts for your project, you can take advantage of that system's integration with the Service Billing and Contract Billing systems.
Engineering Project Management also provides a number of reports, such as the Project Schedule Report (R31P400) and the Project Cost Report (R31P401), that you can use to manage project information. If you are using the Job Cost system together with Engineering Project Management, you can also use Job Cost reports to track budget information and analyze profitability.
Issues and Completions for Project Work Orders
When you issue project-specific components for a work order using the Inventory Issues program (P31113), the system reviews availability to verify that this component is not already reserved for another project. If the inventory belongs to another project, you cannot issue the material, and you must specify another location with available inventory.
When you need more material for a project than you originally allocated, you can issue material from another location that has available quantity, provided that the material is not already allocated to another project. When the total demand for a particular item is satisfied, the system removes the related record from the Project Commitment Detail Table (F410211).
Should you need to transfer project-specific inventory, the system calls the Project Commitment Detail Window program (P410211W), and you must select the project number and quantity for the transfer. You can transfer quantities that are hard-committed to projects only between locations in the same business unit, but not between business units.
When you complete a subassembly for a project work order, the system updates the parts list of the parent work order with the location and lot or serial number that you specified in the Work Order Completions program (P31114). This update associates the inventory directly with the parent work order and the project to which the work order belongs.
If the subassembly work order is only partially completed, the parts list line on the parent work order splits. The original component line contains the remaining quantity, and the system inserts a new line with the completion information.
In the event of an overcompletion, the system updates the related parts list line with the completion location and lot or serial number. The related project commitment record, however, represents only the original component quantity.
98
When you close a project work order without completing it, the project-specific component quantities remain committed. You can resolve this discrepancy by performing a repost. You can run the Repost Open Work Orders program (R3190) to synchronize the quantities on open manufacturing work orders with the project-specific commitment quantities in the Item Location File table (F41021) and the Project Commitment Detail Table (F410211).
See Also The following topics in the Shop Floor Management Guide:
• Issues, Material Movement, and Kanbans for more detailed information about issuing inventory
• Completions for more detailed information about completing work orders and rate schedules
• Hours and Quantities for information about capturing actual labor and machine cost information
Net Change
You can set a processing option to determine whether the system performs a net change (updates a manufacturing work order's parts list and routing when the order quantity, unit of measure, or dates of the work order were changed). The system calls the Net Change Processing program (R31430) to process the net change. If you set this processing option, the system processes the net change when you click OK on the Project Workbench form.
Note
The system does not process net change for service orders, equipment orders, and configured work orders. If any of the component parts for a manufacturing work order have a material status of In Warehouse, the system cannot perform the net change.
When you change a manufacturing work order's quantity, unit of measure, or dates on the Project Workbench form, the changed work order record is stored in the Net Change Transaction table (F3115). If a parts list and routing is attached to the manufacturing work order, the system calls the Net Change Processing program to update the parts list and routing.
Net change processing includes the following steps:
• Recalculate the component quantities on the parts list using a quantity per value
• Process inventory commitments
• Recalculate the labor and machine hours for each routing operation using an hours per value
• Recalculate the standard and current production cost using a net change factor
• Retrieve, classify, and roll up cost estimates
• Adjust financial commitments for work orders on projects that are interfaced with the Job Cost system
• Issue a warning if activities, such as issues and time entry transactions, have been recorded for the work order
99
Before You Begin Ensure that the processing options for the Enter/Change Order (P48013) and
Enter/Change Rate Schedule (P3109) programs are set to recalculate and update parts list and routing information for the changed work order.
Project Accounting Considerations
To perform financial analysis and determine profitability for a specific project, you must complete the following tasks:
• Distinguish between project accounts and general accounts
• Maintain an EPM project as a stand-alone cost or profit center
• Transfer account information seamlessly from project-specific accounts to general accounts
• Integrate other systems, such as Sales Order Management, with project-specific accounts
If you do not use the Job Cost system, you can either create a business unit specifically for the project or you can use the project branch/plant as the default business unit. If you create a business unit for the project, reported costs are transparent only for the project as a whole. Actual costs are reported by task, but are not visible on a task detail level, based on the account number.
If you use the branch/plant as the default business unit, any transaction journal entries that you create are not project-specific. Even though you report costs in the EPM Project Workbench program (P31P001) and they are, in this sense, project-specific, no project-specific account structure identifies project costs for financial analysis.
For project-specific accounting without Job Cost, you can define a project G/L class code on the Job Cost tab of the Add/Revise Project form. The AAIs use this G/L class code to determine which accounts can be used for a specific project.
If you turn on the Interface to Job Cost option for the project, you use the job business unit and the associated chart of accounts as the business unit for the project. This account structure is project-specific.
When you issue material, such as a project-specific subassembly or a purchased item, you debit a project-specific WIP and credit a project-specific inventory account. In the case of a subassembly, the system creates journal entries by cost type instead of summing up all costs into cost type A1 or A2. When completing top-level items for a project, you complete them to project-specific accounts, not general inventory accounts.
When the Sales Order Management system determines whether inventory for an item is available to be sold, it searches general inventory accounts first. To enable the Sales Order Management system to access inventory that is produced in a project, you can create duplicate journal entries crediting a contra account (AAI 3140) and debiting the general inventory account, in addition to project inventory and project WIP accounts.
Note
The contra account AAI (3140) must be activated for project accounting in the EPM Project Accounting UDC table (31P/AI).
100
See Also Creating Journal Entries in the Product Costing and Manufacturing Accounting Guide
for more detailed information about creating journal entries and variance accounting
Revaluing Work in Process
From the Product Costing menu (G3014), choose WIP Revaluation.
Whether you use standard costing or an actual costing method, your business must be able to revalue work in process inventory whenever material or labor costs change. Whenever the costs for an item change, the Cost Changed Flag field (CCFL) for this item is set to 1 in the Item Cost File table (F4105). This cost change might be caused by a company's decision to update costs to reflect changed circumstances and to maintain realistic pricing.
The WIP Revaluation program (R30837) can be run for standard costed items in discrete, process and configured work orders. For actual costing, you can run the WIP Revaluation program only for material cost changes in discrete work orders.
The purpose of work in process revaluation is to revalue the production costs for all open work orders in the Production Cost table (F3102, based on the latest item cost, as well as unaccounted completed and scrapped amounts for actual costing. The report displays any differences between the original WIP values and the new WIP values. You can set a processing option to create WIP Revaluation journal entries in the Account Ledger table (F0911) for differences between the old and the new WIP values. You can choose to let the system supply the default work order number in the Subledger field in the Account Ledger table. The WIP Revaluation program does not revalue on-hand inventory and cannot be performed for closed work orders. Closed work orders are characterized by a value of 3 for the Variance Flag field (PPFG) in the Work Order Master File table (F4801).
If you use standard costing, performing an automated WIP revaluation ensures that work in process inventory always reflects any updates to component and labor costs and eliminates artificial variances that are generated by cost changes in the middle of a work order life-cycle. It also makes manual journal entries for WIP revaluation unnecessary.
For actual costing, WIP revaluation accounts for a situation in which subassembly work order costs are reported after the actual cost subassembly item was already issued to the parent item. Without WIP revaluation, the true costs of the subassembly work order are not reflected in the parent work order.
You can access the WIP Revaluation program in three different ways to revalue work in process. For standard costing, you can call the WIP Revaluation program from the Frozen Update program (R30835) by setting a processing option and specifying the desired program version. In this case, the system runs WIP Revaluation for all items that are processed through the Frozen Update program. If any item is flagged for cost change, any open work order that contains this item is revalued, along with any work orders to which the parent item was issued. This logic is carried through to the highest-level parent item. All cost types in the Production Cost table (F3102) are included in the data selection.
For actual costing, you can call the WIP Revaluation program either from the Work Order Inventory Completion (P31114) or the Variances program (R31804) by setting the appropriate processing option and specifying the desired program version. Running WIP Revaluation updates the parent item's production cost based on the subassembly item's latest production cost. If you call the WIP Revaluation program from the Work Order Inventory Completion program, the system revalues the work orders with the completed item,
101
as well as their parent work orders. Only the material cost types in the Production Cost table are included in the data selection.
Note
If an actual costed item is defined with a cost level of 3 (item, branch, location, and lot), the costs for this item have to be tracked at the lot or location level in order to accurately calculate and revalue the costs. Completing work orders to and issuing them from a lot or location allows the system to associate the item unit costs that are calculated for the lot or location at the time of completion to any orders to which the item is issued.
When WIP Revaluation is initiated from the Variances program, it revalues all open work orders with items that are flagged for cost change in the Item Cost File table, as well as their parent work orders. When work in process in revalued, the system clears the cost change flag. All cost types in the Production Cost table are included in the data selection for standard costed units. For actual costing, only the material costs are considered.
You can also call the program as a standalone batch program from the menu. This choice allows you to perform WIP revaluation without having to change existing processes. It also enables you to rerun WIP revaluation if the revaluation process was terminated abnormally when another program called it. You can run the program for actual and standard costed items. All cost types in the Production Cost table are included in the data selection.
You can set a processing option to run the WIP Revaluation program in proof or final mode. If you call WIP Revaluation from another program, however, the mode of the calling program overrides this setting.
Processing Options for WIP Revaluation (R30837)
Defaults Tab
These processing options control the default setting for performing WIP revaluations, such as which document type the system uses and whether it updates costs.
1. Document Type
Blank = 'IB'
Use this processing option to specify the document type (UDC 00/DT) that the system uses. If you leave this processing option blank, the system uses IB (item cost changes).

102
2. G/L Transactions
Blank = No G/L Transactions
1 = Write Detailed G/L Transactions
2 = Write Summarized G/L Transactions
Use this processing option to specify whether the system updates costs. If you leave this processing option blank, the system creates exception reports and error messages, but does not update costs. Valid values are:
Blank
Do not update costs.
1
Update costs.
103
3. Default to Sub-Ledger
Blank = Do not default the Production Document Number to the Sub-Ledger field.
1 = Default the Production Document Number to the Sub-Ledger field.
Use this processing option to specify whether the system uses the production document number as the default subledger number. Valid values are:
Blank
Use the production document number as the default subledger number.
1
Do not use the production document number as the default subledger number.
4. Proof Or Final
Blank = Proof Mode
1 = Final Mode
Use this processing option to specify whether to run the WIP Revaluation program (R30837) in proof or in final mode. In proof mode, the system performs all calculations and displays the results on the report. In final mode, the program also updates the Production Cost table (F3102) and creates journal entries for changes in work-in-process costs in the Account Ledger table (F0911).
Note: When the WIP Revalution program is launched from another program, the mode (proof or final) of that program overrides this processing option.
104
Rolling Up Actual Costs to the EPM Workbench
From the Cost Classification menu (G31P31), choose Rollup of Actual Costs to Workbench.
Project managers can roll up costs to the project workbench to review, at any point in time, the actual costs reported for any individual task in the project. For example, when material issues, labor or completions are reported for a production task, the rollup collects the actual costs of these activities. A roll-up of actual costs also enables project managers to compare the estimated costs to the actual costs reported, and then analyze the cost variances, if any occur.
Use the Rollup of Actual Costs to Workbench program (R31P301) to roll up the actual cost information, which you collect for work orders in the course of the production process, to the following cost fields in the EPM Project Workbench program (P31P001):
• Actual Material
• Actual Labor
• Actual Other
• Actual Special Units
• Actual Special Amounts
Because a project consists of two different types of tasks, production tasks and nonproduction tasks, the system must retrieve costs from two different sources. Costs that are associated with production tasks are tracked through manufacturing accounting. These costs are stored in the Production Cost table (F3102). Manufacturing accounting, however, is not run for nonproduction tasks. The costs related to those tasks are stored in the Account Ledger table (F0911).
Note
Nonproduction tasks are posted to the Account Ledger with a batch type that is not a manufacturing batch type. However, to track those costs, you need to complete the Subledger field with the task or work order number for which the costs are incurred.
Based on the cost classification for cost types and the accounts that are set up in the Cost Classification program (P31P301), the system evaluates all of the tasks in the project, retrieves their costs from either the Production Cost or the Account Ledger table, depending on the type of task, and populates them in the actual cost bucket fields. The information in the cost fields is stored in the Work Order Master Tag File table (F4801T).
Before You Begin Set up the cost classification table that maps cost types and accounts to the cost
buckets in the EPM Project Workbench program (P31P001).
Project Reports and Alerts
Engineering Project Management provides a number of batch programs that enable you to manage project information during the execution and control phase of the project. They provide status and exception information. For tasks that are identified as alert-sensitive on
105
the Project Workbench form of the EPM Project Workbench program (P31P001), the system sends alerts to the individuals who are assigned to those tasks. Each task can identify three responsible persons, the manager, the supervisor, and the person who is assigned to the task. You can set up each report to send an alert to any combination of the responsible people for each task.
The Engineering Project Management system provides the following reports:
• Project Schedule Report (R31P400)
• Project Cost Report (R31P401)
• Project Inventory Report (R31P402)
Project Schedule Report
From the Project Reports menu (G31P14), choose Project Schedule Report.
Use the Project Schedule Report (R31P400) to print planned and actual start and end dates. Based on the Work Order Master File table (F4801), you can print the information for the tasks of one project or multiple projects.
If tasks have attached purchase orders or subcontracts, information for these orders is included in the report as well. For example, you can include promised and receipt dates, quantity ordered, and quantity received.
For tasks that are identified as alert-sensitive, the system can send a schedule exception message if the actual end date is later than the planned end date by the number of days that you specify in the processing options. If the task has attached purchase orders or subcontracts, the system sends the alert message if the receipt date is later than the promised date by the specified number of days.
The report also compares completed work order quantities and received purchase order quantities with the order quantity. If the completed or received quantity is less than the order quantity by the threshold value that you specified in the processing options and the order is closed or canceled, the system can send a quantity exception messages.
The exception messages appear on the report even if you decide not to send alert messages.
Processing Options for Project Schedule Report (R31P400)
Process Tab
These processing options control to whom the system sends an alert and the circumstances under which the system sends an alert when you run this report.

106
1. Send alert to Manager assigned to task.
Blank = Do not send alert
1 = Send alert
Use this processing option to specify whether the system sends a project alert to the manager who is associated with a task. Valid values are:
Blank
Do not send an alert.
1
Send an alert.
2. Send alert to Supervisor assigned to task.
Blank = Do not send alert
1 = Send alert
Use this processing option to specify whether the system sends a project alert to the supervisor who is associated with a task. Valid values are:
Blank
Do not send an alert.
1
Send an alert.
107
3. Send alert to 'Assigned To' assigned to task.
Blank = Do not send alert
1 = Send alert
Use this processing option to specify whether the system sends a project alert to the address book number that is specified in the Assigned To field for a task. Valid values are:
Blank
Do not send an alert.
1
Send an alert.
4. Email Distribution List
Use this processing option to specify the distribution list for the project alert.
108
5. Threshold (in days) for late receipt or completion of orders from the planned end or promised date.
Use this processing option to specify the number of days after the planned end date or promised date that orders can still be received or completed. If the threshold for late receipt or completion is exceeded, the system sends a schedule exception message for work orders to the responsible parties for work orders, and a schedule exception message for purchase orders to the appropriate personnel.
6. Threshold (in percentage) of shortage from the order quantity of a Work Order or Purchase Order.
Use this processing option to specify the allowable percentage of shortage for a work order or purchase order. If the threshold is exceeded, the system sends a work order quantity exception message to the responsible parties for a work order task, and a purchase order quantity exception message for a purchase order task.
Defaults Tab
These processing options specify the status at which a work order or a purchase order line is considered closed.
1. Closed Work Order Status
Blank = 99
Use this processing option to specify the status that is used to close a Work Order. If you leave this processing option blank, the system uses status code 99.
109
2. Closed Purchase Order Line Status
Blank = 999
Use this processing option to specify the next status of the order after the system closes or fully receives the detail line. If you leave this processing option blank, the system uses a status code of 999.
Project Cost Report
From the Project Reports menu (G31P14), choose Project Cost Report.
Use the Project Cost Report (R31P401) to print a list of tasks and display the WIP amount; planned and estimated material, labor, other and special costs; actual costs-to-date; as well as committed amounts from parts lists and purchase orders. Based on the Work Order Master File table (F4801), you can print the information for the tasks of one project or multiple projects.
The system calculates the WIP amount by subtracting the sum of all unaccounted completed and unaccounted scrapped amounts in the Production Cost table (F3102) for all cost types from the sum of actual amounts for all cost types from the Production Cost table. If the result equals zero, no exception exists, and the system does not print the WIP amount. If the WIP amount is greater than zero, the report indicates that not all of the activities for the completed amount have been reported. If the value is less than zero, the exception report states that an overcompletion exists.
The system retrieves the estimated, planned, and actual amounts for the report from the corresponding cost fields in the Work Order Master File table (F4801). The system calculates the committed amount from the open commitment amounts in the Work Order Parts List table (F3111) and the P.O. Ledger Detail Ledger File table - Flexible Version (F43199).
If the total actual cost-to-date exceeds the total budgeted cost by the percentage that you specified in the processing options, the system creates a budget exception message for alert-sensitive tasks.
When a task has a related purchase order or subcontract and the amount received exceeds the extended cost by the percentage that you specified in the processing options, the system sends an over-payment exception message.
The exception messages appear on the report even if you decide not to send alert messages.
110
Processing Options for Project Cost Report (R31P401)
Process Tab
These processing options control when and under what circumstances the system sends an alert when you print this report. You can also specify whether the system includes the WIP amount when it calculates budget exceptions.
1. Print Budgeted costs from:
1 - Estimated Costs
2 - Planned Costs
Blank = Estimated Costs
Use this processing option to specify the source for the budgeted cost on the report. If you leave this processing option blank, the system uses the estimated cost as a source. Valid values:
1
Estimated cost
2
Planned cost
111
2. Send alert to Manager assigned to task.
Blank = Do not send alert
1 = Send alert
Use this processing option to specify whether the system sends a project alert to the manager associated with a task. Valid values are:
Blank
Do not send an alert.
1
Send an alert.
3. Send alert to Supervisor assigned to task.
Blank = Do not send alert
1 = Send alert
Use this processing option to specify whether the system sends a project alert to the supervisor associated with a task. Valid values are:
Blank
Do not send an alert.
1
Send an alert.
112
4. Send alert to 'Assigned To' assigned to task.
Blank = Do not send alert
1 = Send alert
Use this processing option to specify whether the system sends a project alert to the address book number specified in the Assigned To field for a task. Valid values are:
Blank
Do not send an alert.
1
Send an alert.
5. Email Distribution List
Use this processing option to specify a distribution list for sending the project alert.
6. Threshold (in percentage) of Budget vs. Actual Cost variance.
Use this processing option to specify the allowed variance percentage between budgeted and actual costs. If the threshold is exceeded, the system sends a budget exception message to the responsible parties.
113
7. Threshold (in percentage) of Over-Receipts from the cost of the Purchase Order.
Use this processing option to specify the allowed percentage of over-receipts relative to the cost of the purchase order. If the percentage threshold is exceeded, the system sends an overpayment exception message to the responsible parties.
8. Include WIP value as part of the calculation of Actual costs for calculating the Budget Exception.
Blank = Do not include WIP
1 = Include WIP
Use this processing option to specify whether the WIP amount should be included in the actual cost when the system calculates the budget exception. Valid values are:
Blank
Do not include the WIP amount.
1
Include the WIP amount.
Project Inventory Report
From the Project Reports menu (G31P14), choose Project Inventory Report.
Use the Project Inventory report (R31P402) to print the parts lists for tasks, if any are available. Based on the Work Order Master File table (F4801) and the MPM Project Attributes table (F31P01), you can print the information for the tasks of one project or multiple projects. For each component on the parts list, the system calculates and prints the open quantity; that is, the order quantity minus the issue quantity up to the order quantity. For each component, the system searches the Item Location File table (F41021) to determine the available quantity.
114
When a task is alert-sensitive, the available quantity is negative by the threshold value that you specified in the processing options, and the open quantity is greater than zero, the system can send an item availability exception message.
The exception messages appear on the report even if you decide not to send alert messages.
Processing Options for Project Inventory Report (R31P402)
Process Tab
These processing options control when and under what circumstances the system sends an alert when you print this report.
1. Send alert to Manager assigned to task.
Blank = Do not send alert
1 = Send alert
Use this processing option to specify whether the system sends a project alert to the manager associated with a task. Valid values are:
Blank
Do not send an alert.
1
Send an alert.
115
2. Send alert to Supervisor assigned to task.
Blank = Do not send alert
1 = Send alert
Use this processing option to specify whether the system sends a project alert to the supervisor associated with a task. Valid values are:
Blank
Do not send an alert.
1
Send an alert.
3. Send alert to 'Assigned To' assigned to task.
Blank = Do not send alert
1 = Send alert
Use this processing option to specify whether the system sends a project alert to the address book number specified in the Assigned To field for a task. Valid values are:
Blank
Do not send an alert.
1
Send an alert.
116
4. Email Distribution List
Use this processing option to specify a distribution list for sending the project alert.
5. Threshold (absolute value) for negative availability.
Use this processing option to specify the threshold for negative availability. If the threshold is exceeded, the system sends a message to the responsible parties, alerting them to the condition.
117
Project Close
As the project approaches its scheduled completion date, you need to review the project information to identify activities that still need to be performed for the project. Ensure that all manufacturing and purchasing activities have been either completed or cancelled, and that all products that need to be delivered to the customer have been shipped.
If your project has an interface with the Job Cost system, you can use Job Cost reports and batch programs to create financial reports for analysis and profit recognition.
To close a project formally, you use the Close Project option on the Form menu of the Project Workbench form. Choosing the Close Project option automatically starts the Project Close Analyzer program (R31P403), which determines whether the system has all of the information that it needs to close the project. After you close the project, the project status changes to closed. You can verify this information on the Project Status tab of the Add/Revise Project program (P31P011).
See Also Job Cost Reports and Profit Recognition in the Job Cost Guide for more details about
financial reports and profit analysis
Project Close Analyzer
From the Project Reports menu (G31P14), choose Project Close Analyzer.
Use the Project Close Analyzer program (R31P403) to analyze the WBS to determine whether a project can be closed. The system also calls this program when you attempt to close the project from the Project Workbench form of the EPM Project Workbench program (P31P001). You can run this batch program for only one project at a time. When the program finishes running, it returns a value that indicates whether the project can be closed.
The program reviews every task to determine whether any of the following issues exist:
• Manufacturing work orders that have not been cancelled or closed
• Parts lists with open inventory commitments
• Purchase orders that are still open
If any of these issues exist for any task in the project, you cannot close the project until you resolve the issues.