Ensure Correct Output with the Print-Cut Adjustment...
6
Print & Cut Adjustment Ensure Correct Output with the Print-Cut Adjustment Know Before You Print
-
Upload
duongkhanh -
Category
Documents
-
view
228 -
download
6
Transcript of Ensure Correct Output with the Print-Cut Adjustment...

Print & Cut AdjustmentEnsure Correct Output with the
Print-Cut AdjustmentKnow Before You Print
Roland Support Document Date: 06/05/09 Revision 1.0
Print-Cut Adjustment - Know Before You Print
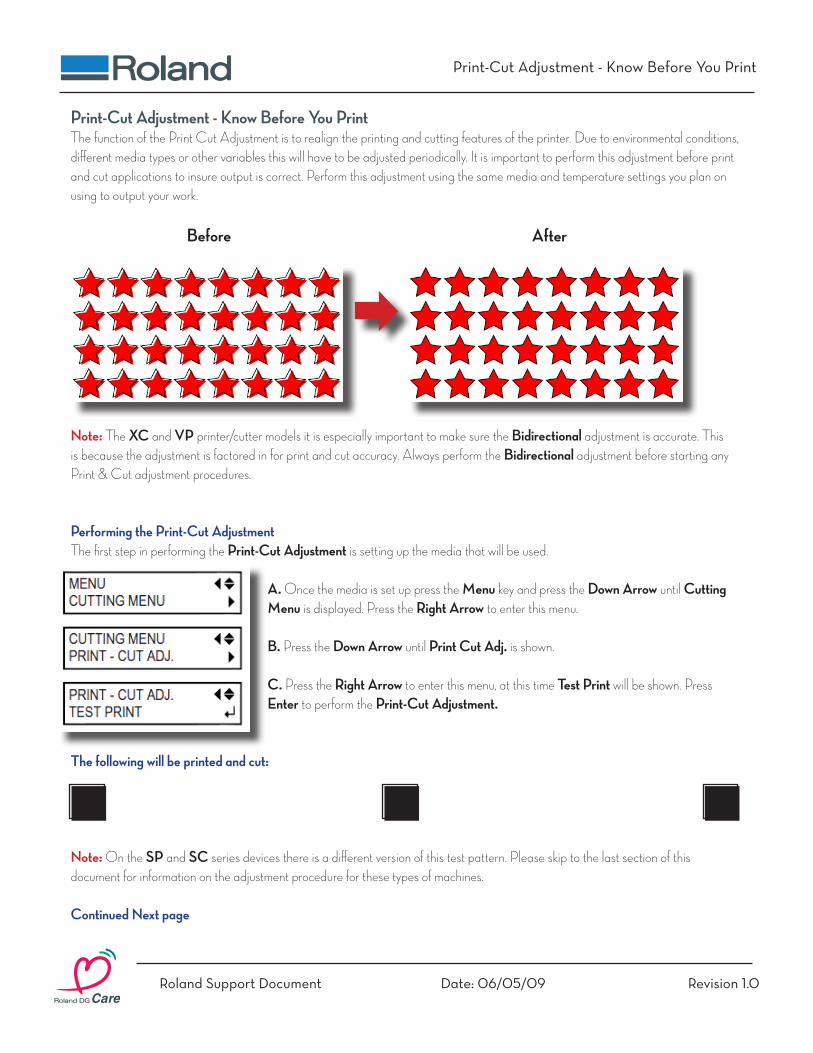
Print-Cut Adjustment - Know Before You PrintThe function of the Print Cut Adjustment is to realign the printing and cutting features of the printer. Due to environmental conditions, different media types or other variables this will have to be adjusted periodically. It is important to perform this adjustment before print and cut applications to insure output is correct. Perform this adjustment using the same media and temperature settings you plan on using to output your work.
Before After
Note: The XC and VP printer/cutter models it is especially important to make sure the Bidirectional adjustment is accurate. This is because the adjustment is factored in for print and cut accuracy. Always perform the Bidirectional adjustment before starting any Print & Cut adjustment procedures.
Performing the Print-Cut AdjustmentThe first step in performing the Print-Cut Adjustment is setting up the media that will be used.
A. Once the media is set up press the Menu key and press the Down Arrow until Cutting Menu is displayed. Press the Right Arrow to enter this menu.
B. Press the Down Arrow until Print Cut Adj. is shown.
C. Press the Right Arrow to enter this menu, at this time Test Print will be shown. Press Enter to perform the Print-Cut Adjustment.
The following will be printed and cut:
Note: On the SP and SC series devices there is a different version of this test pattern. Please skip to the last section of this document for information on the adjustment procedure for these types of machines.
Continued Next page

Roland Support Document Date: 06/05/09 Revision 1.0
Print-Cut Adjustment - Know Before You Print
Print-Cut Adjustment - Know Before You PrintReviewing the Print-Cut Test Pattern
Three boxes are printed then cut across the width of the media. To review the Print-Cut test results remove the cut portion of the graphic from the media in all three positions. Once the cut area is removed from the test pattern if there is an offset area an adjustment needs to be performed.
Figure 1On the sample shown above the test pattern sample with the cut area removed would appear this way. This would indicate that the cut lines need to be adjusted down and to the right.
Print-Cut Adjustment - Know Before You PrintAdjusting the Print-Cut Test Pattern
If an adjustment needs to be made to correct the Print-Cut Alignment perform the following steps:
A. Press the Down Arrow until Print-Cut Adj - Setting is shown.
B. Press the Right Arrow to enter the Print-Cut Adj, - Setting menu.
C. Press the Arrow keys to adjust the setting according to the results from the test print. The distance shown is the movement of the Cut Line.
Hint: The distance shown is what the Cut Line will move in mm. On the sample shown in Figure 1 the Down and Right Arrow would need to be pressed several times to correct the output.
Tech Tip: In the Setting screen there are two letters, F and S. The F stands for Feed Direction. This is the direction the material feeds and is adjusted with pressing the Up or Down key moving the cut line toward the back or front of the machine respectively. The S stands for Scan Direction. This is the movement of the Cutting Carriage to the Left or Right and is adjusted by pressing the Left or Right arrow keys to move the cut line to the Left or Right respectively.
D. Press Enter to save the value chosen. Once Enter is selected the value on the New side will jump over to the Current side.
E. To exit this screen press the Menu key.
F. To check the results perform another Print-Cut Adjustment Test Print as highlighted earlier in the document. Readjust if needed.
Continued Next Page
Current > New
Roland Support Document Date: 06/05/09 Revision 1.0
Print-Cut Adjustment - Know Before You Print
Print-Cut Adjustment - Know Before You PrintAdjusting the Print-Cut Test Pattern
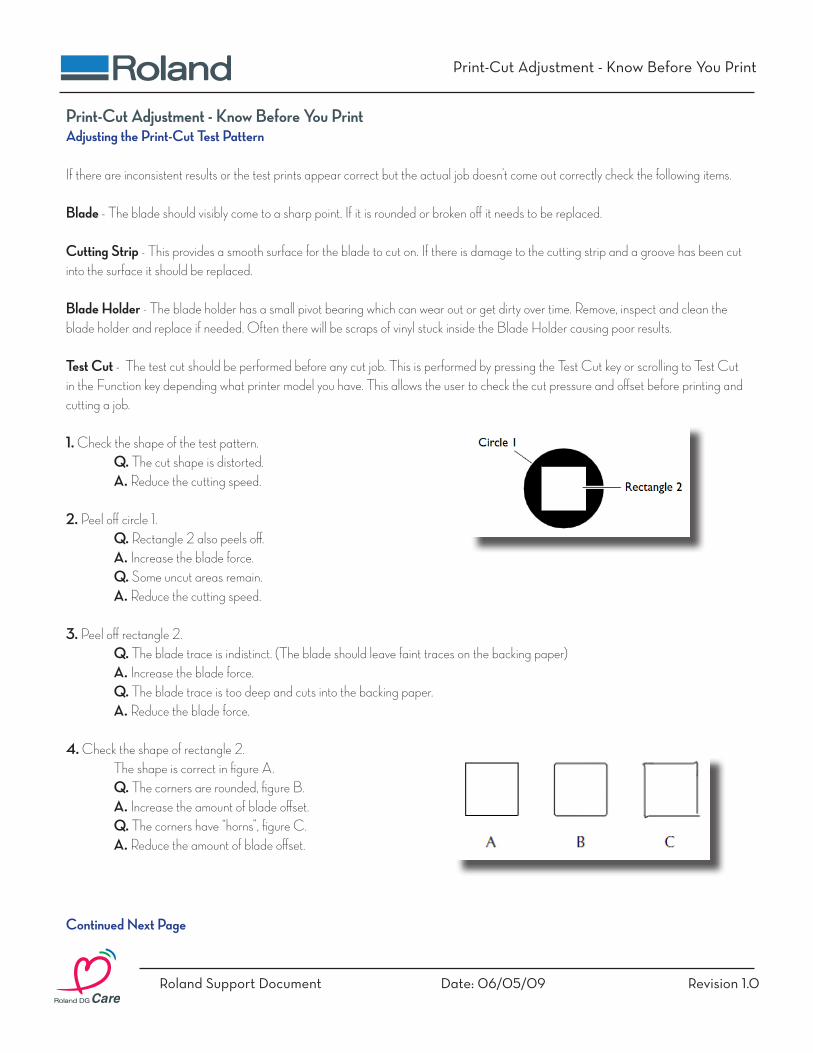
If there are inconsistent results or the test prints appear correct but the actual job doesn’t come out correctly check the following items.
Blade - The blade should visibly come to a sharp point. If it is rounded or broken off it needs to be replaced.
Cutting Strip - This provides a smooth surface for the blade to cut on. If there is damage to the cutting strip and a groove has been cut into the surface it should be replaced.
Blade Holder - The blade holder has a small pivot bearing which can wear out or get dirty over time. Remove, inspect and clean the blade holder and replace if needed. Often there will be scraps of vinyl stuck inside the Blade Holder causing poor results.
Test Cut - The test cut should be performed before any cut job. This is performed by pressing the Test Cut key or scrolling to Test Cut in the Function key depending what printer model you have. This allows the user to check the cut pressure and offset before printing and cutting a job.
1. Check the shape of the test pattern. Q. The cut shape is distorted. A. Reduce the cutting speed.
2. Peel off circle 1. Q. Rectangle 2 also peels off. A. Increase the blade force. Q. Some uncut areas remain. A. Reduce the cutting speed.
3. Peel off rectangle 2. Q. The blade trace is indistinct. (The blade should leave faint traces on the backing paper) A. Increase the blade force. Q. The blade trace is too deep and cuts into the backing paper. A. Reduce the blade force.
4. Check the shape of rectangle 2. The shape is correct in figure A. Q. The corners are rounded, figure B. A. Increase the amount of blade offset. Q. The corners have “horns”, figure C. A. Reduce the amount of blade offset.
Continued Next Page
Roland Support Document Date: 06/05/09 Revision 1.0
Print-Cut Adjustment - Know Before You Print
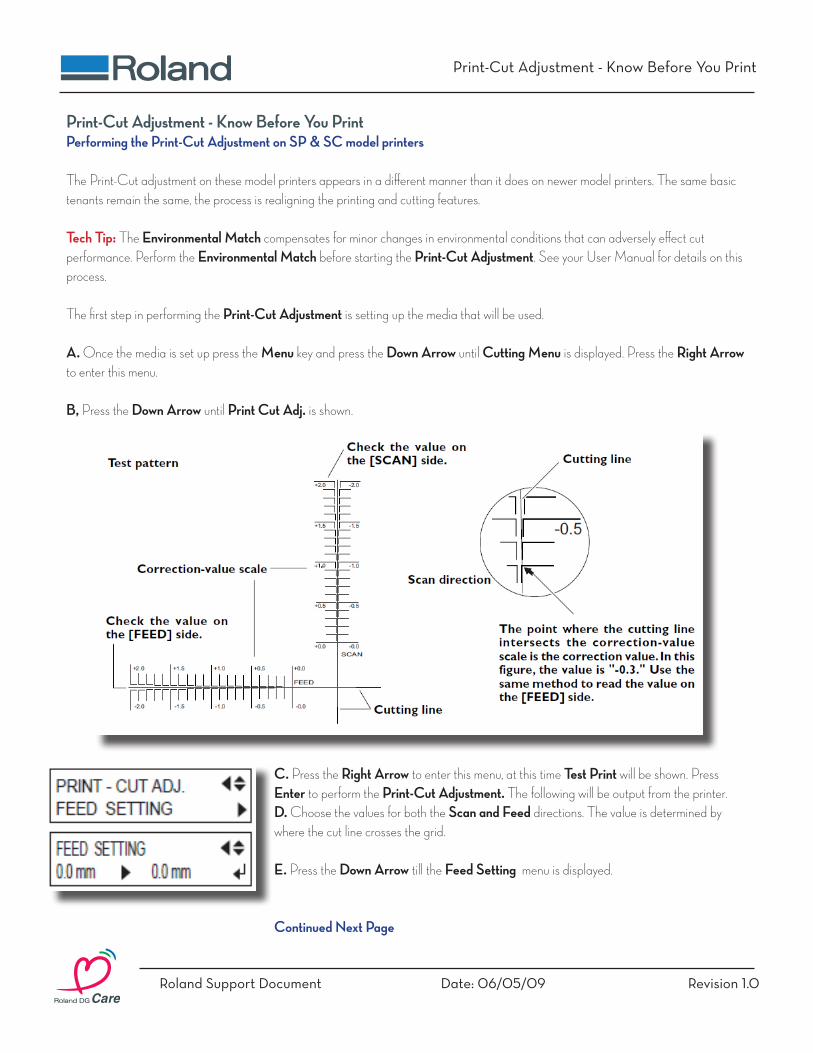
Print-Cut Adjustment - Know Before You PrintPerforming the Print-Cut Adjustment on SP & SC model printers
The Print-Cut adjustment on these model printers appears in a different manner than it does on newer model printers. The same basic tenants remain the same, the process is realigning the printing and cutting features.
Tech Tip: The Environmental Match compensates for minor changes in environmental conditions that can adversely effect cut performance. Perform the Environmental Match before starting the Print-Cut Adjustment. See your User Manual for details on this process.
The first step in performing the Print-Cut Adjustment is setting up the media that will be used.
A. Once the media is set up press the Menu key and press the Down Arrow until Cutting Menu is displayed. Press the Right Arrow to enter this menu.
B, Press the Down Arrow until Print Cut Adj. is shown.
C. Press the Right Arrow to enter this menu, at this time Test Print will be shown. Press Enter to perform the Print-Cut Adjustment. The following will be output from the printer.D. Choose the values for both the Scan and Feed directions. The value is determined by where the cut line crosses the grid.
E. Press the Down Arrow till the Feed Setting menu is displayed.
Continued Next Page
Roland Support Document Date: 06/05/09 Revision 1.0
Print-Cut Adjustment - Know Before You Print
Print-Cut Adjustment - Know Before You PrintPerforming the Print-Cut Adjustment on SP & SC model printers
F. Press the Right Arrow to enter the Feed Setting menu.
G. Press the Up or Down Arrow to change the value to match the setting shown on the grid and press Enter to save the value.
H. Press the Down Arrow to Scan Setting and Press the Right Arrow to enter the Scan Setting menu.
I. Press the Up or Down Arrow to change the value to match the setting shown on the grid and press Enter to save the value.
Tech Tip: There is no need to run the Print-Cut Adjustment after you have made the changes. If you do run the pattern again it will appear exactly the same as it previously did. The cut line on the grid does not move after a change is made to the settings. When you change the settings the machine is offsetting the cut shown to the adjustments you have made when out putting an actual job. Therefore an actual job will need to be printed and cut to test the adjustments that have been made.
Further SupportPlease see the Print Cut Accuracy document for more hints for increasing print and cut quality. Should further support be needed or any additional questions arise about the processes in this document please contact your local supporting dealer. As always, thank you for choosing Roland.