Enhanced Log-in Authentication Options
17
Release Date 07.09.20 Enhanced Login Options July 2020 © 2020 MediSked, LLC. All Rights Reserved. Page 1 of 17 Enhanced Log-in Authentication Options Additional authentication options can be added to the login experience to increase the security of Connect. Connect users with administrator access will be able to customize and enforce the level of multilevel security users experience when logging into Connect. Based on which options are configured for each end user access level, users will be prompted to address/answer additional authentication options before logging in. Additional authentication options are: • Google CAPTCHA • A user-defined favorite picture • Answering user-defined security questions • Phone validation access code via SMS or voice call Login Profiles A login profile dictates which enhanced authentication options will be applied when logging into Connect. A login profile is then assigned to an access level. Note: A login profile can be associated with multiple access levels. However, each access level can only have 1 login profile. Configure a Login Profile 1. Click the Admin tab 2. In the Setup Parameters module, click the Manage Login Profiles link 3. Click the CREATE LOGIN PROFILE button
Transcript of Enhanced Log-in Authentication Options
Release Date 07.09.20 Enhanced Login Options
July 2020 © 2020 MediSked, LLC. All Rights Reserved. Page 1 of 17
Enhanced Log-in Authentication Options Additional authentication options can be added to the login experience to increase the security of Connect. Connect users with administrator access will be able to customize and enforce the level of multilevel security users experience when logging into Connect. Based on which options are configured for each end user access level, users will be prompted to address/answer additional authentication options before logging in. Additional authentication options are:
• Google CAPTCHA • A user-defined favorite picture • Answering user-defined security questions • Phone validation access code via SMS or voice call
Login Profiles
A login profile dictates which enhanced authentication options will be applied when logging into Connect. A login profile is then assigned to an access level. Note: A login profile can be associated with multiple access levels. However, each access level can only have 1 login profile. Configure a Login Profile
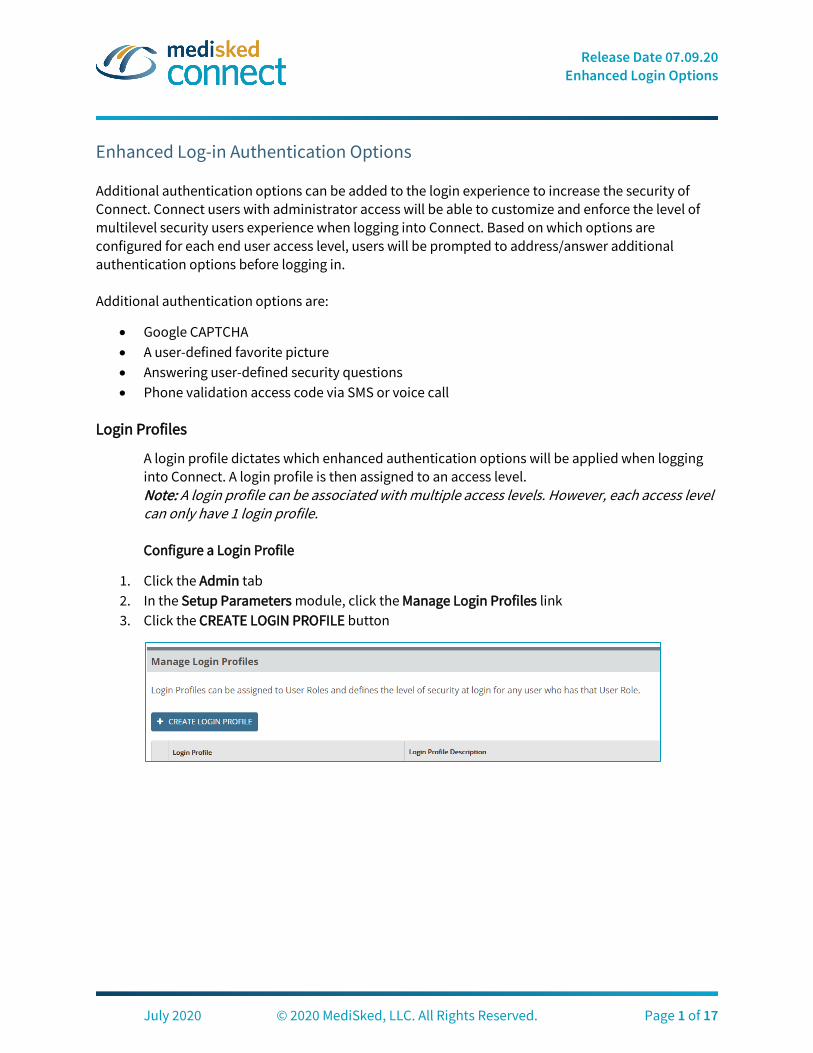
1. Click the Admin tab 2. In the Setup Parameters module, click the Manage Login Profiles link 3. Click the CREATE LOGIN PROFILE button

Release Date 07.09.20 Enhanced Login Options
July 2020 © 2020 MediSked, LLC. All Rights Reserved. Page 2 of 17
4. Enter a Login Profile Name and Login Profile Description
5. Check mark the desired Authentication Settings 6. Click the DONE button to save the login profile
Edit/Delete a Login Profile
1. Click the Admin tab 2. In the Setup Parameters module, click the Manage Login Profiles link 3. Click the hyperlink name of the Login Profile to make edits or delete
4. Check/Uncheck mark the desired authentication settings. 5. Click DONE 6. To delete, click DELETE LOGIN PROFILE.
Release Date 07.09.20 Enhanced Login Options
July 2020 © 2020 MediSked, LLC. All Rights Reserved. Page 3 of 17
Assigning a Login Profile to an Access Level
Once a login profile has been created, it should be assigned to the appropriate access level(s). Users with these access level will encounter the enhanced authentication options configured when logging into Connect. Note: A user must have Admin set to YES within their access level to create login profiles.
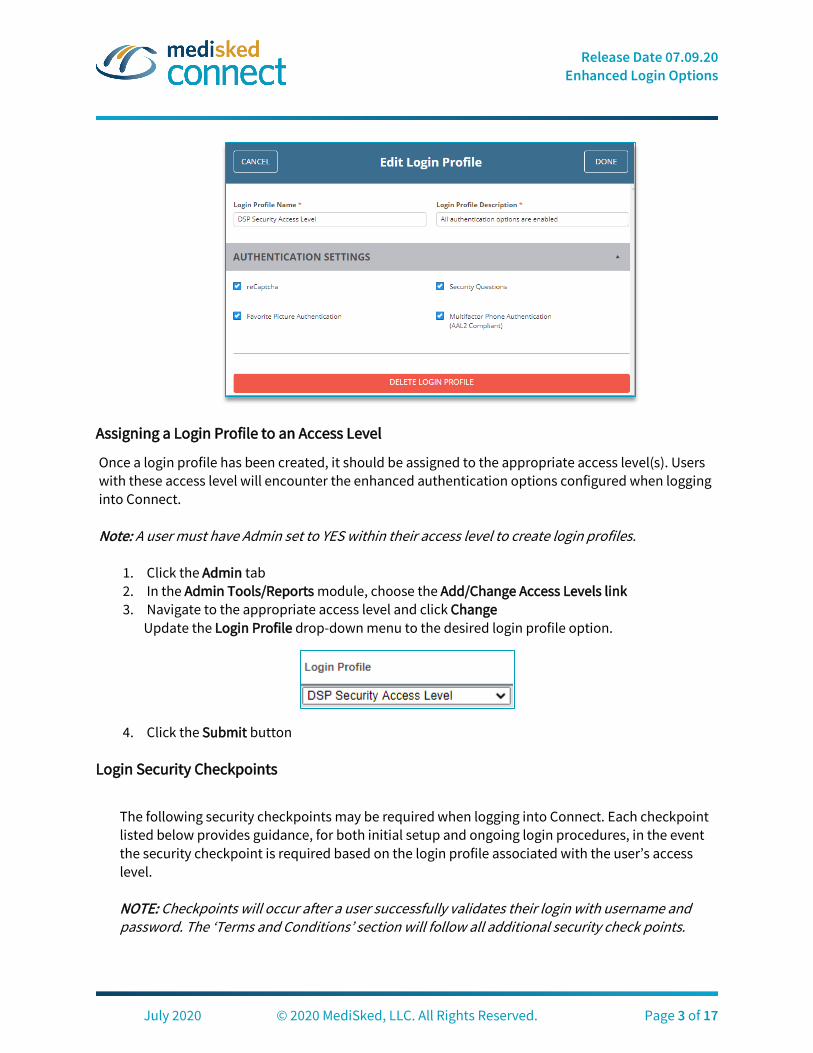
1. Click the Admin tab 2. In the Admin Tools/Reports module, choose the Add/Change Access Levels link 3. Navigate to the appropriate access level and click Change
Update the Login Profile drop-down menu to the desired login profile option.
4. Click the Submit button
Login Security Checkpoints
The following security checkpoints may be required when logging into Connect. Each checkpoint listed below provides guidance, for both initial setup and ongoing login procedures, in the event the security checkpoint is required based on the login profile associated with the user’s access level. NOTE: Checkpoints will occur after a user successfully validates their login with username and password. The ‘Terms and Conditions’ section will follow all additional security check points.
Release Date 07.09.20 Enhanced Login Options
July 2020 © 2020 MediSked, LLC. All Rights Reserved. Page 4 of 17
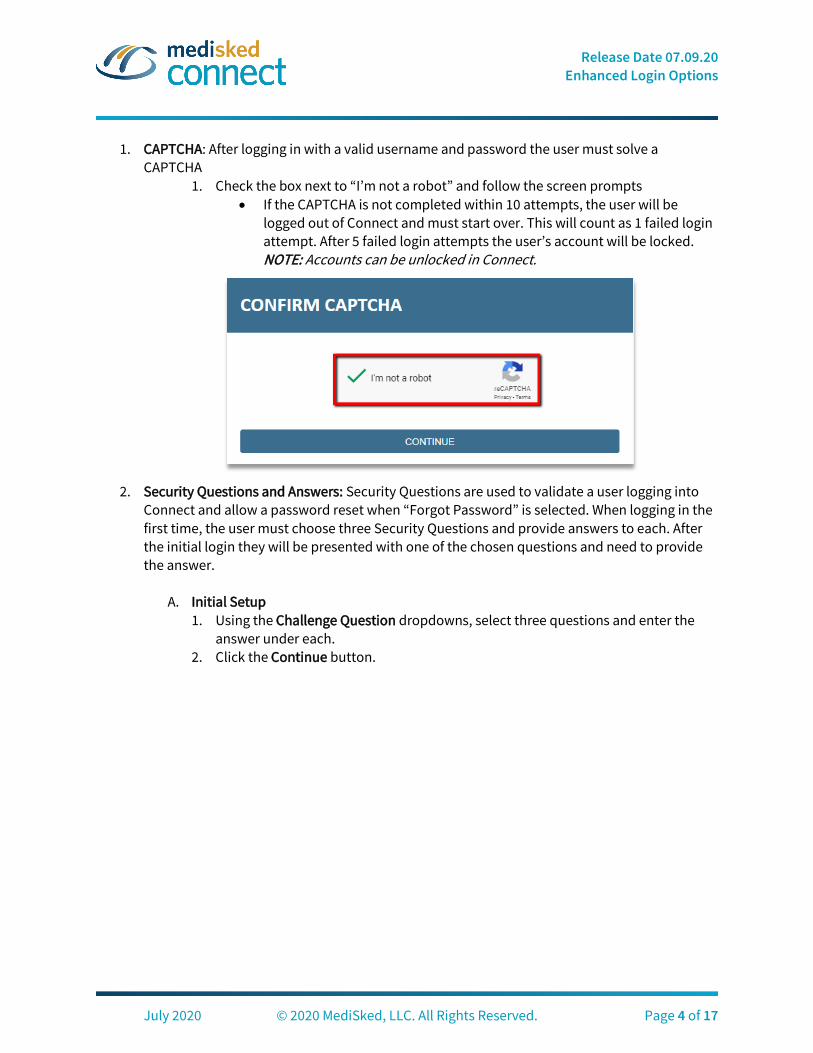
1. CAPTCHA: After logging in with a valid username and password the user must solve a CAPTCHA
1. Check the box next to “I’m not a robot” and follow the screen prompts • If the CAPTCHA is not completed within 10 attempts, the user will be
logged out of Connect and must start over. This will count as 1 failed login attempt. After 5 failed login attempts the user’s account will be locked. NOTE: Accounts can be unlocked in Connect.
2. Security Questions and Answers: Security Questions are used to validate a user logging into
Connect and allow a password reset when “Forgot Password” is selected. When logging in the first time, the user must choose three Security Questions and provide answers to each. After the initial login they will be presented with one of the chosen questions and need to provide the answer.
A. Initial Setup
1. Using the Challenge Question dropdowns, select three questions and enter the answer under each.
2. Click the Continue button.

Release Date 07.09.20 Enhanced Login Options
July 2020 © 2020 MediSked, LLC. All Rights Reserved. Page 5 of 17
B. Normal Login Experience
1. After entering a valid username and password, provide the answer to the Challenge Question presented.
2. Click the Continue button.

Release Date 07.09.20 Enhanced Login Options
July 2020 © 2020 MediSked, LLC. All Rights Reserved. Page 6 of 17
• If the provided answer is incorrect, the application will inform the user the attempt has failed and display the number of attempts remaining. Note: Security Questions can be configured to reset in Connect
• If the question is not answered within 10 attempts, the user will be logged
out of Connect and must start over. This will count as 1 failed login attempt. After 5 failed login attempts the user’s account will be locked. Note: Accounts can be unlocked in Connect
3. Favorite Picture: Associates a picture selected by the user to their Connect user account. When
logging in the first time, the user must select the picture. After the initial login they will be presented with a selection of pictures, including the one they have chosen, and must identify the correct picture to validate login.
A. Initial Setup 1. Select one picture from the available list by clicking on the radio button next to
the image • The Image Category dropdown will provide additional pictures from
another category. The available categories are Animals, Food and Landmarks.
2. Click the Save Picture button.

Release Date 07.09.20 Enhanced Login Options
July 2020 © 2020 MediSked, LLC. All Rights Reserved. Page 7 of 17
B. Normal Login Experience
1. Select the pre-defined favorite picture from the grid by clicking on the radio button next to the image.
2. Click the Confirm button.

Release Date 07.09.20 Enhanced Login Options
July 2020 © 2020 MediSked, LLC. All Rights Reserved. Page 8 of 17
• In the event a picture is selected which is incorrect and the user clicks
Confirm, the application will inform the user the selection is invalid. Note: Favorite Pictures can be configured to reset in Connect.
• The user has 3 attempts to select the previously chosen favorite picture
before their account is locked. Note: Accounts can be unlocked in Connect.
4. Multi Factor Authentication (MFA): MFA requires Connect users to enter a one-time access
code, which is delivered via SMS Text Message or Phone call. When logging in the first time, the user must confirm/enter the correct phone number and delivery method (phone call or text message) to be used. After the initial login, the user will request a code be sent to the phone number on file, using the pre-selected delivery method.
A. Initial Setup 1. Confirm the Security Phone Number is correct. This is the number the code will be
sent to. If it is incorrect or blank, click within the field and type in the phone number.

Release Date 07.09.20 Enhanced Login Options
July 2020 © 2020 MediSked, LLC. All Rights Reserved. Page 9 of 17
2. Select a Delivery Method. This is how the access code will be sent to the user. The default is SMS Text Message. If the user wishes to receive the access code from a Phone Call, they may click the Phone Call radio button. Note: An extension can be included if Phone Call is selected.
3. Click the Submit button to confirm all entered information is correct and request a six (6) digit code be sent.
4. The page will refresh to display the Confirm Code popup. 5. The user will receive a six (6) digit code at the phone number and delivery method
requested • The user will have 10 minutes to type the code in and click Confirm on the
new screen. A Confirmation Code will expire at: timer is displayed on this page informing the user of when the code will expire. Note: Attempting to submit an expired code will inform the user that the attempt is invalid.
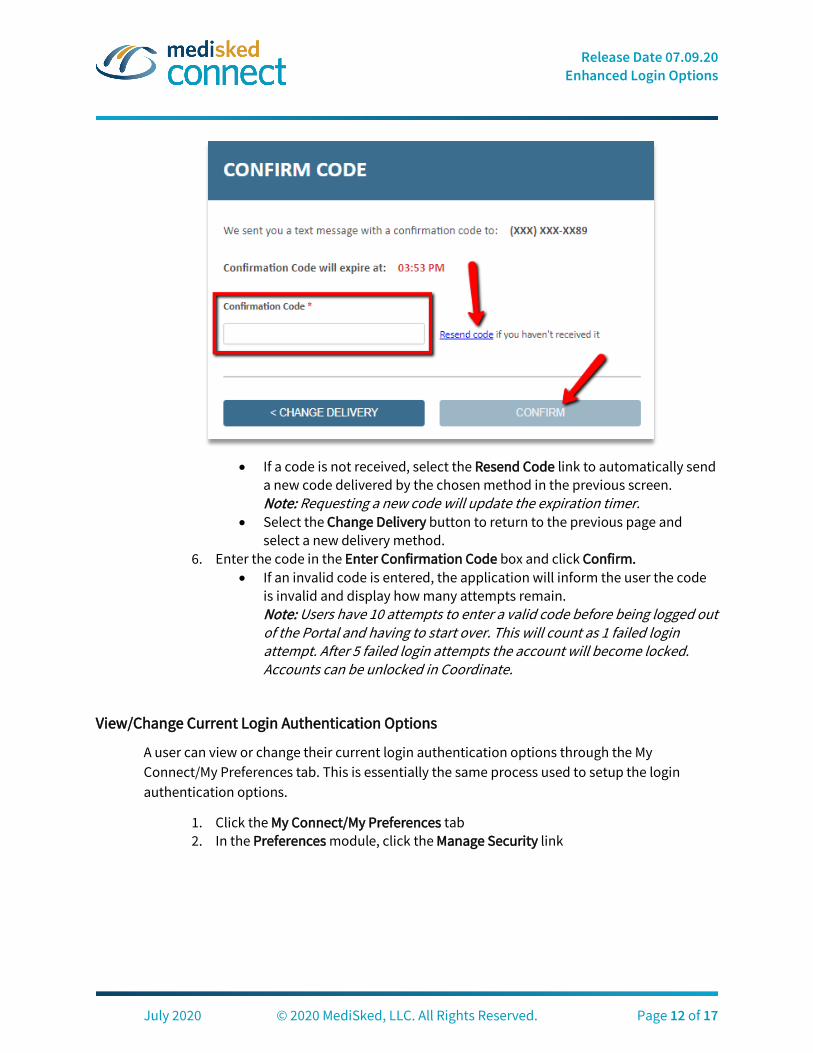
• If a code is not received, select the Resend Code link to automatically send a new code delivered by the chosen method in the previous screen. Note: Requesting a new code will update the expiration timer.
• Select the Change Delivery button to return to the previous page and select a new delivery method.
6. Enter the code in the Enter Confirmation Code box and click Confirm.

Release Date 07.09.20 Enhanced Login Options
July 2020 © 2020 MediSked, LLC. All Rights Reserved. Page 10 of 17
• The user will be informed that their security phone number has been
successfully confirmed and will save to their account.
• If an invalid code is entered, the application will inform the user the code
is invalid and display the number of attempts remaining. Note: Users have 10 attempts to enter a valid code before being logged out of Connect and having to start over. This will count as 1 failed login attempt. After 5 failed login attempts the account will become locked. Accounts can be unlocked in Connect.

Release Date 07.09.20 Enhanced Login Options
July 2020 © 2020 MediSked, LLC. All Rights Reserved. Page 11 of 17
B. Normal Login experience 1. The user must validate their login by entering a six (6) digit access code delivered
to their phone, via SMS or Voice Call. • Security Phone Number: Will display only the last two digits of the phone
number to the user for reference. Note: This phone number cannot be changed during this process. Security Phone Numbers can be configured to reset in Connect.
2. Select the Delivery Method: Allows the user to select their preferred delivery of the access code. The default is SMS Text Message. To change the method, simply click Phone Call. Note: An extension can be included if Phone Call is selected.
3. Click the Send button.
4. The page will refresh to display the Confirm Code popup 5. The user will receive a six (6) digit code at the phone number and delivery method
requested • The user will have 10 minutes to type the code in and click Confirm on the
new screen. A Confirmation Code will expire at: timer is displayed on this page informing the user of when the code will expire.
Release Date 07.09.20 Enhanced Login Options
July 2020 © 2020 MediSked, LLC. All Rights Reserved. Page 12 of 17
• If a code is not received, select the Resend Code link to automatically send
a new code delivered by the chosen method in the previous screen. Note: Requesting a new code will update the expiration timer.
• Select the Change Delivery button to return to the previous page and select a new delivery method.
6. Enter the code in the Enter Confirmation Code box and click Confirm. • If an invalid code is entered, the application will inform the user the code
is invalid and display how many attempts remain. Note: Users have 10 attempts to enter a valid code before being logged out of the Portal and having to start over. This will count as 1 failed login attempt. After 5 failed login attempts the account will become locked. Accounts can be unlocked in Coordinate.
View/Change Current Login Authentication Options
A user can view or change their current login authentication options through the My Connect/My Preferences tab. This is essentially the same process used to setup the login authentication options.
1. Click the My Connect/My Preferences tab 2. In the Preferences module, click the Manage Security link

Release Date 07.09.20 Enhanced Login Options
July 2020 © 2020 MediSked, LLC. All Rights Reserved. Page 13 of 17
Change Password
If desired, a user can change their password. The user must enter the new desired password twice, ensuring the new password meets the criteria. Click CHANGE PASSWORD to update the password.
The user will receive an error message if the passwords do not match.
Change Security Phone Number
To change the security phone number, the method, or both to which the security code is sent, click CHANGE NUMBER.
Release Date 07.09.20 Enhanced Login Options
July 2020 © 2020 MediSked, LLC. All Rights Reserved. Page 14 of 17
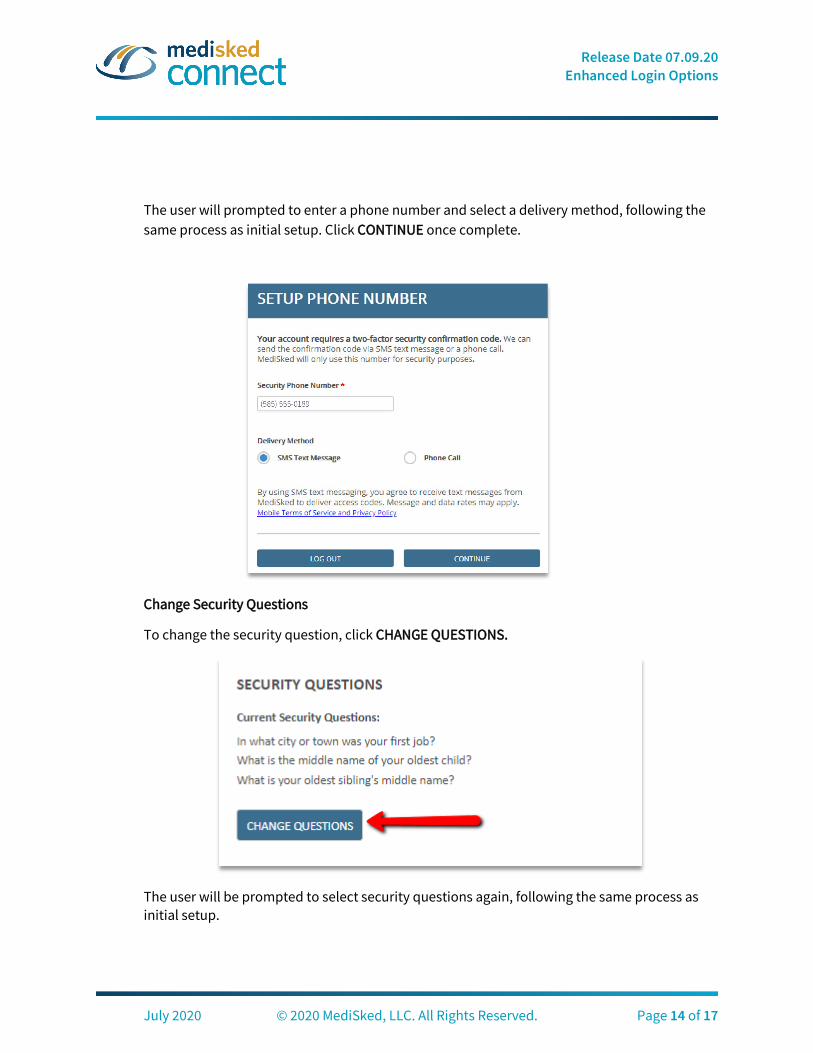
The user will prompted to enter a phone number and select a delivery method, following the same process as initial setup. Click CONTINUE once complete.
Change Security Questions
To change the security question, click CHANGE QUESTIONS.
The user will be prompted to select security questions again, following the same process as initial setup.

Release Date 07.09.20 Enhanced Login Options
July 2020 © 2020 MediSked, LLC. All Rights Reserved. Page 15 of 17

Release Date 07.09.20 Enhanced Login Options
July 2020 © 2020 MediSked, LLC. All Rights Reserved. Page 16 of 17
Change Favorite Picture To change the favorite picture, select CHANGE PICTURE.
The user will be prompted to select a picture, following the same process as initial setup. Click SAVE PICTURE to save the new picture.

Release Date 07.09.20 Enhanced Login Options
July 2020 © 2020 MediSked, LLC. All Rights Reserved. Page 17 of 17