ENGLISH Welcome to your Nobel 1.0. Please read …HD23L10X0L1...Welcome to your Nobel 1.0. Please...
2
Unpacking Product Overview & Accessories Nobel 1.0 is shipped with the following parts and accessories. After unpacking, please inspect the interior and exterior of the printer and accessories for damage. Please contact support for any missing or defective parts and accessories. ③Select “UTILITIES” > “MOVE PLATFORM”>“TO TOP”>“YES” to raise the platform. ④Remove the protective foam. *Keep original packaging material in the event of sending your unit back for repair Setting Up Install and prepare the following parts before printing: ①Install the resin tank by pushing the tank all the way into its slot. ③Shake the resin cartridge for about 10 seconds. ④Assemble the nozzle cap and the inner tube, and replace the bottle cap with the assembled nozzle cap. ⑤Install the filling tubes by first connecting the black tube to the thick nozzle. Then attach the transparent tube to the thin nozzle and push the tube all the way down. After installing the filling tubes, cover the lid. ②Calibrate the platform by selecting "UTILITIES" > " HORIZON CALIB" and follow the instructions on the screen. After removing prints from the platform, loosen 4 small screws over the platform. When the platform has descended, press down on the platform with your hands 3 times. Then, after 5 seconds tighten the four screws with your fingers. (sequence: F1->F2->B1-B2). Finally tighten the screws with a coin or other tools (sequence: F1->B1->F2->B2). Quick Start Guide Welcome to your Nobel 1.0. Please read this guide carefully for tips on unpacking, setting up, printing, and post processing to ensure an excellent 3D printing experi- ence! Platform Filling Tubes Cartridge Slot Tank Slot Operation Panel Lid Resin Tank Rinse Basket Gloves Scraper USB Flash Drive Inner Tube Nozzle cap Power Cable Power Adapter Starter Resin USB Wire Power Jack USB Wire Port USB Drive Port (Back View) Power Switch Quick Start Guide Warranty Card ①Upon receiving your printer, remove the packaging materials, plastic bag, orange tapes, and the accessory tray from under the lid. Then, remove the protective foam from under the platform according to the procedure below: -1- (US) XYZprinting, Inc. Email Support: [email protected] Website: http://us.xyzprinting.com (EU) XYZprinting Netherlands B.V. Email Support: [email protected] Website http://eu.xyzprinting.com ENGLISH F1 F2 B1 B2 ②To remove the protective foam, connect the printer to a power source and turn on the printer. Initialization will take approximately 10 min to complete.
Transcript of ENGLISH Welcome to your Nobel 1.0. Please read …HD23L10X0L1...Welcome to your Nobel 1.0. Please...
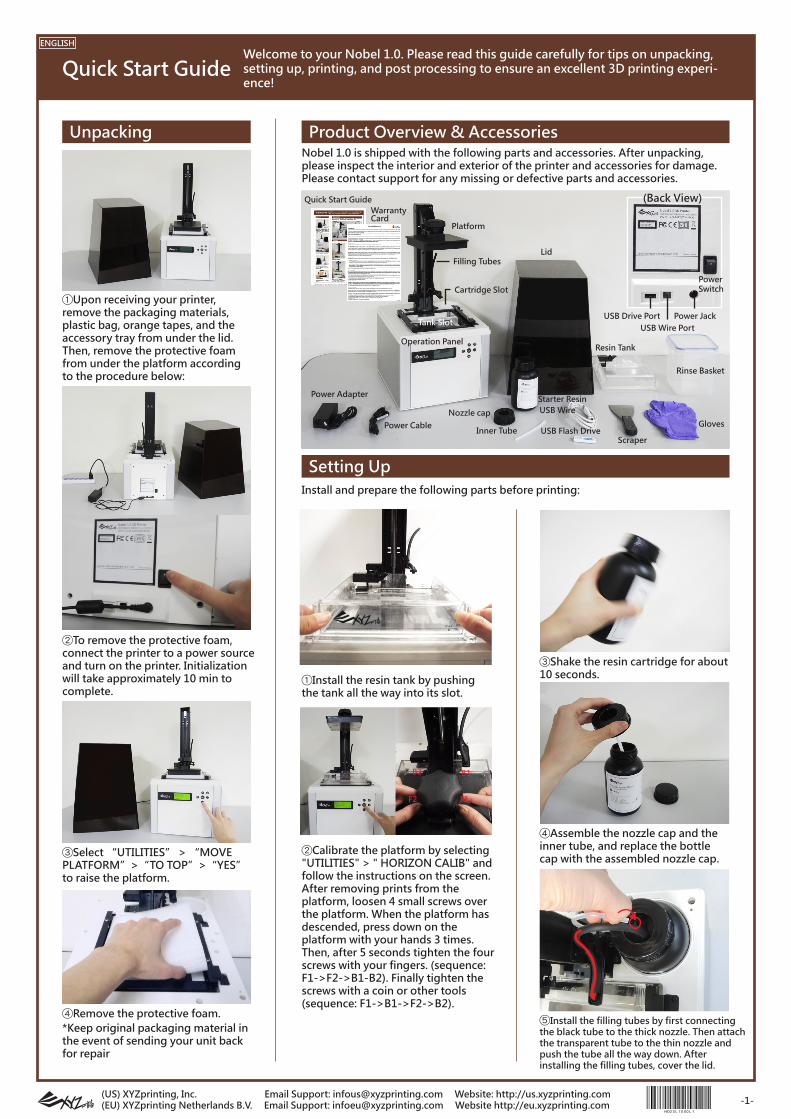
Unpacking Product Overview & AccessoriesNobel 1.0 is shipped with the following parts and accessories. After unpacking, please inspect the interior and exterior of the printer and accessories for damage. Please contact support for any missing or defective parts and accessories.
③Select “UTILITIES” > “MOVE PLATFORM”>“TO TOP”>“YES” to raise the platform.
④Remove the protective foam.*Keep original packaging material in the event of sending your unit back for repair
Setting UpInstall and prepare the following parts before printing:
①Install the resin tank by pushing the tank all the way into its slot.
③Shake the resin cartridge for about 10 seconds.
④Assemble the nozzle cap and the inner tube, and replace the bottle cap with the assembled nozzle cap.
⑤Install the filling tubes by first connecting the black tube to the thick nozzle. Then attach the transparent tube to the thin nozzle and push the tube all the way down. After installing the filling tubes, cover the lid.
②Calibrate the platform by selecting "UTILITIES" > " HORIZON CALIB" and follow the instructions on the screen. After removing prints from the platform, loosen 4 small screws over the platform. When the platform has descended, press down on the platform with your hands 3 times. Then, after 5 seconds tighten the four screws with your fingers. (sequence: F1->F2->B1-B2). Finally tighten the screws with a coin or other tools (sequence: F1->B1->F2->B2).
Quick Start GuideWelcome to your Nobel 1.0. Please read this guide carefully for tips on unpacking, setting up, printing, and post processing to ensure an excellent 3D printing experi-ence!
Platform
Filling Tubes
Cartridge Slot
Tank Slot
Operation Panel
Lid
Resin Tank
Rinse Basket
Gloves
ScraperUSB Flash DriveInner Tube
Nozzle cap
Power Cable
Power Adapter Starter ResinUSB Wire
Power JackUSB Wire Port
USB Drive Port
(Back View)
PowerSwitch
Quick Start GuideWarranty Card
①Upon receiving your printer, remove the packaging materials, plastic bag, orange tapes, and the accessory tray from under the lid. Then, remove the protective foam from under the platform according to the procedure below:
-1-(US) XYZprinting, Inc. Email Support: [email protected] Website: http://us.xyzprinting.com(EU) XYZprinting Netherlands B.V. Email Support: [email protected] Website http://eu.xyzprinting.com
ENGLISH
F1F2
B1B2
②To remove the protective foam, connect the printer to a power source and turn on the printer. Initialization will take approximately 10 min to complete.
Printing
Resources
Nobel 1.0 is both a PC compatible and a standalone 3D printer. You can print from the following sources:
Install XYZware_Nobel onto your PC (Installer is included in bundled USB drive) and send the file to print.
⑥Enable “Auto-Fill” by selecting “SETTINGS” > “AUTO-FILL” > “YES” so the printer will automati-cally re-fill the resin tank before printing or when tank level is low.Or you can fill the resin tank manually by selecting “UTILITIES” > “INSTALL RESIN”. (Remember to fill the tank manually when “Auto-Fill” is off.)
⑦Connect the printer to your PC via USB wire (for PC-link printing; optional).
And you are ready to go!
Export 3D models in .3wn format with XYZware_Nobel and save the file to USB flash drive.
Insert USB flash drive to the USB drive port at the back of the printer.
Select “PRINT FROM USB” in main menu to proceed.
* Remember to place the lid over the printer before printing.
* Sample files are provided in the bundled USB drive. To print the sample, please select the file based on the color of the resin installed.
When removing prints from the printer, perform the following post-processing procedure for your printed object and printer maintenance
①-A Turn the platform locker counter-clock-wise until it stops.①-B Grasp the locker and pull the platform out.
*Connect your PC to the printer before installing the software, or the installation may not complete.*Apply printer firmware and XYZware_Nobel updates when prompted by the software for stable printing performance.
1
Print from USB2
Print from PC
②Scrape off the print.
* Always wear gloves before coming into contact uncured resin or cleaning prints.*Operate gently to avoid scratching the surface.* Avoid dripping resin onto anything other than the platform or the resin tank, or the printer may malfunction.
For complete instructions and troubleshooting, please refer to the product manual. You can find the product manual in the bundled USB flash drive or download the latest version from:http://support.xyzprinting.com/global_en/Support/documentFor tutorial videos, please go to:http://support.xyzprinting.com/global_en/Support/tutorial
Important NoticeWear safety goggles before using the printer. Do not let children operate this device without adult supervision. Moving parts may cause seriousinjury.
Please place and use the printer in a well ventilated area. The process of printing will produce a small amount of non-toxic odor. Having a well ventilated area will ensure a more comfortable environment.For a complete guide on precautions, clean-up procedures, handling procedures, storage procedures, and suggestions on protection, see the "Resin Care" section in your product manual.
If unused for more than a week, pigments in the resin may settle at the bottom of the cartridge or the tank. Shake/stir well before using.
For the best printing performance, resin should be used up within 3 months after purchasing and within 1 month of opening. Resin should preferably be stored at temperatures between 10-32°C (50-89.6°F).
Due to the nature of the printing technology and material, the resin tank may develop cloudy regions overtime where the UV laser cures the resin and may lead to print fails. Moving the print location around the platform can help prolong the life of the tank.
Change to a new tank when over 2/3 of the surface gets cloudy.
Use separate resin tanks for resins of different color. Mixing resins of different color may affect printing quality.
Always perform “Horizon Calibration” after changing to a new tank or a tank different the oneused for last print.
③Pour alcohol (≧75% alcohol) into the rinse basket, and shake the print for 10 minutes. (* Alcohol is not supplied.)④Remove any residue from the resin tank with the scraper gently.⑤-A Reinstall the platform⑤-B turn the locker clockwise until it stops.
Printed Object Removal and Cleaning
*Always remove the platform before removing the resin tank to avoid dripping leftover material onto the tank slot.
①-A①-B
-2-(Global) XYZprinting, Inc. Email support: [email protected] Website: http://global.xyzprinting.com/


![Piazza How I Treat DVT UCSF Vasc Symp 1.0 [Read-Only]](https://static.fdocuments.us/doc/165x107/61f776142f546939306fcecf/piazza-how-i-treat-dvt-ucsf-vasc-symp-10-read-only.jpg)