ENGLISH DEUTSCH FRANÇAIS ESPAÑOL...
31
ENGLISH DEUTSCH FRANÇAIS ESPAÑOL ITALIANO 日本語 03 31 59 87 115 143 Index
Transcript of ENGLISH DEUTSCH FRANÇAIS ESPAÑOL...

ENGLISH
DEUTSCH
FRANÇAIS
ESPAÑOL
ITALIANO
日本語
03
31
59
87
115
143
Index

3
INDEX INTRODUCTIONIMPORTANTA GUIDE TO YOUR BIKE AND ITS COMPONENTS IMPORTANT RULES FOR BICYCLE AND ROAD SAFETYBEFORE YOU RIDE - IMPORTANT INFORMATION YOU MUST BE AWARE OF
BEFORE EVERY JOURNEYMAINTAINING YOUR BIKEASSEMBLING YOUR BIKEUSING THE QUICK-RELEASE MECHANISMHOW TO MOUNT THE WHEEL SECURELYTHE PEDAL SYSTEMELECTRONIC GEAR SYSTEM COMPATIBILITYBAYAMO DI2 COMPATIBLE INSERTSNAZARE DI2 COMPATIBLE PARTS & ACCESSORIESASSEMBLING THE FRAME SETCUTTING AND INSTALLING THE FORKGRIP TAPE INSTALLATIONADJUSTING THE BIKE FOR YOUR SPECIFIC SETTINGS NEEDSSETTINGSTHE HEADSETADJUSTING THE BRAKE LEVERS AND HANDLEBARSTHE GEARSTHE WHEELSNOTES ON WEAR AND TEARRIMS AND RIM BRAKESSPOKE TENSION AND RIM TRUENESSCHARACTERISTICS OF CARBON FIBERCARBON FIBER MAINTENANCENOTES ON THE PROPER CARE AND INSPECTION OF YOUR BIKERECOMMENDED TORQUE REQUIRMENTSRIDING ON PUBLIC ROADS - LEGAL REQUIREMENTSIMPORTANT - PRODUCT WARRANTY REGISTRATION - EXTEND YOUR WARRANTY PERIODLIMITED WARRANTY
03040506070809101113131415151618191920212425262728282829293030313131
EnglishDeutsch
FrançaisEspañol
Italiano 日本語
English
0
EnglishDeutsch
FrançaisEspañol
Italiano 日本語
4
INTRODUCTIONCongratulations on your purchase of a brand new NEILPRYDE bike. We want to take this opportunity to thank you for your new acquisition and wish you many hours of enjoyment with it. We have designed this user manual in order to assist you in the better understanding your NEILPRYDE bike, so that you can achieve a high level of performance from it.
This manual will cover basic instructions for the maintenance and care of your bike, comprehensive information regarding the bike’s components, general health and safety advice, as well as some useful tips on how to get more from your new bike. We recommend that you carefully read this manual, even if you are a seasoned cyclist. The development and technology of bicycles has changed in recent years, so it is important for cyclists to keep themselves informed.
Please be aware that depending on certain factors, for example the skill and experience of the person riding the bike, the instructions and advice contained within this manual may require more detailed explanation. Certain kinds of jobs and upgrades will need extra or customized parts that are not mentioned here. We will attempt to point out the most important things that you need to be aware of, but please note that we cannot teach you everything about bicycle technology with this manual.
Cycling is a potentially hazardous activity, and so we hope that you will pay due care and attention to yourself, and anyone around you. You need to be responsible and stay in control at all times while riding your bicycle. As with any sport or recreational activity, accidents can and do happen. There is a risk of damage and injury – to yourself and to others. You assume the responsibility of these risks when you choose to ride a bicycle. Therefore, it is wise to always take care when riding, being mindful of other cyclists, pedestrians, stationary objects and moving vehicles. Common sense says that you do not ride after consuming alcohol or when under the influence of drugs. Not only is this illegal in some countries, it is very dangerous as you will suffer from slower reactions. Do not ride when you are tired. Never carry passengers on your bike; it is designed for one person only. Finally, you should always wear a properly fitted helmet and always make sure you have your hands on the handlebars when riding.
0
EnglishDeutsch
FrançaisEspañol
Italiano 日本語
5
IMPORTANT IMPORTANT WARNINGS AND CAUTIONS FOR YOUR BIKE ARE INCLUDED IN THIS USER MANUAL, ALONG WITH INFORMATION REGARDING THE CORRECT WAY TO SET UP YOUR BIKE. IT ALSO INCLUDES GUIDELINES ON SPECIFIC MAINTENANCE OF YOUR BIKE AND WARRANTY INFORMATION FOR YOUR NEILPRYDE FRAMESET. FOR USERS WHO HAVE PURCHASED A COMPLETE BIKE, MAKE SURE THAT ALL THE WARNINGS, CAUTIONS, INSTRUCTIONS AND WARRANTY INFORMATION FROM THE COMPONENT SUPPLIERS ARE ALSO CAREFULLY READ. THESE IMPORTANT INSTRUCTIONS AND WARNINGS COMPRISE PART OF THE INSTRUCTION MANUAL THAT COMES ALONG WITH YOUR NEILPRYDE BIKE.
This manual is subject to European legislation and conforms to all the requirements of CE-standard EN 14781. The manufacturer is legally required to attach additional manuals upon delivery of the bike. For further information, please visit www.neilprydebikes.com. For personal safety reasons, it is advisable that you do not assemble or make any adjustments to your bike, unless you are absolutely sure of what you are doing. For any concerns or questions you may have, or if you require further information, please send us an email at: [email protected]
0
EnglishDeutsch
FrançaisEspañol
Italiano 日本語
6
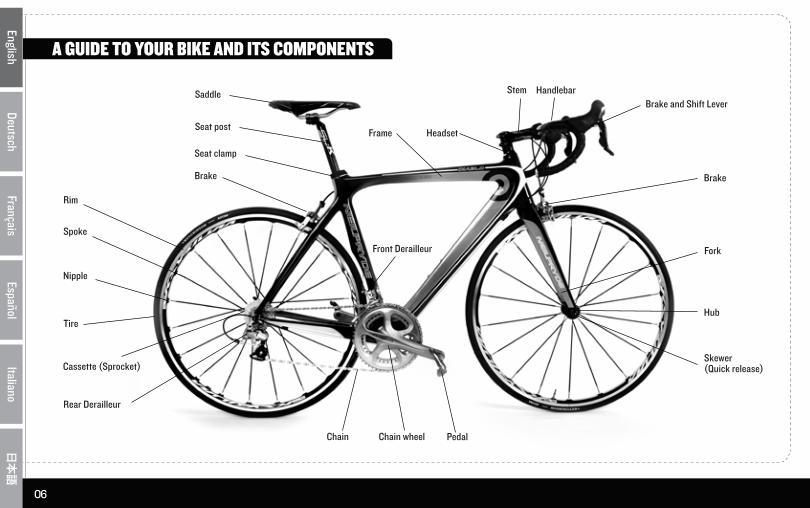
A GUIDE TO YOUR BIKE AND ITS COMPONENTS
0
Tire
Rim
Spoke
Nipple
Cassette (Sprocket)
Rear Derailleur
Chain Chain wheel Pedal
Skewer(Quick release)
Hub
Fork
BrakeBrake
Brake and Shift Lever Handlebar
Frame
Front Derailleur
HeadsetSeat post
Seat clamp
Saddle Stem
EnglishDeutsch
FrançaisEspañol
Italiano 日本語
7
1. Local traffic laws must be obeyed at all times.2. Before you commence riding, make sure that the bike is the correct size for you, and check that you can reach the brake levers easily.3. Check that the brakes are working properly, make sure the tires are pumped up to the proper level and that everything else is working perfectly before you start riding.4. When riding at night, you should always have a light turned on. Also, make sure that you have reflectors on the bike and that they are installed properly.5. Never travel with more than one person on a bike that is designed for only one rider.6. Do not attempt to hitch a ride on another moving vehicle whilst you are cycling. 7. Never race or weave in and out of moving traffic on public roads.8. When cycling, be aware of parked cars (someone could open a door at anytime) and watch for cars that suddenly swerve or pull out of traffic lanes. 9. Use correct signaling to indicate to other road users when turning left or right.10. Any loads being carried should be securely mounted onto the rear of the bike. Never carry anything that can obscure your vision, interfere with your brakes or impede your
control of the bike.11. A properly fitted helmet should be worn at all times when cycling, along with any other protective equipment deemed necessary such as gloves. 12. Correct shoes (shoes that have stiff soles) should be worn at all times in order to provide support for your feet on the pedals.13. Before riding, be sure to double check that the brakes are in good working order. Also, check that the handlebars are tight.14. Be aware of the limitations of your riding skills, especially if you are partaking in more extreme styles of riding. If you receive proper instruction and training, this can help you to reduce a lot of the potential risks involved in cycling.15. Please enjoy your riding experience, but make sure to be aware of your surroundings at all times, and most of all, keep safe!
IMPORTANT RULES FOR BICYCLE AND ROAD SAFETY
0
EnglishDeutsch
FrançaisEspañol
Italiano 日本語
8
1. How does the braking system on my bike work?
On the standard NEILPRYDE bike, the left brake lever will operate the front brake. It is important that you check that the brake levers are in the positions which you are used to. If they are not in the correct positions, then it is advisable that you practice in a safe environment (for example an empty car park) until you become familiar with the new configuration. Be aware that you can be thrown from the bike if you inadvertently use only the front brake. If you cannot get used to the new configuration, have an expert change the lever-to-brake assignment. Your new NEILPRYDE bike comes equipped with a modern braking system that is possibly more powerful than whatever you have used before. We recommend that you practice using the bike away from busy roads if it is possible, away from traffic and pedestrians, in order to get a feel for your new bike and its braking system. Take care to accelerate and de-accelerate gradually.
2. Are you familiar with the type and functions of the gears?
If you are not, then you should practice using them in a place that is clear of any traffic, until you are comfortable using them. Do not shift gears on the front and rear derailleur at the same time, as this could cause the chain to be displaced. Also, do not pedal too hard when shifting gears.
3. How do I adjust the bikes frame, handlebars and saddle correctly?
To check that the frame size is correct for your size, stand over the top tube of the bike’s frame and check the distance between it and your crotch. There should be a clearance of between 2 and 3 fingers between yourself and the top tube. If you ride with a frame that is too big, there is a chance you may cause injury to yourself when you dismount from the bike quickly. The saddle must also be adjusted to suit you. It should be set so that when you are sitting on it, you can just reach the pedal at its lowest position with the heel of your foot. Also check to see if your toes can reach the floor when you are sitting on the saddle. If they can, then the saddle is set too low. Lastly, the handlebars should be set to the most comfortable height for yourself.
4. Using clip-less or step-in pedals correctly
PEDALS ARE NOT SUPPLIED WITH THIS BICYCLE. YOU MUST OBTAIN PEDALS AND PROPERLY AFFIX BEFORE USING THIS BICYCLE FOR ANY PURPOSE. BE CERTAIN TO CAREFULLY READ ANY INSTRUCTIONS / WARNINGS SUPPLIED BY THE PEDAL MANUFACTURER.
If you haven’t used them previously, then before you attempt to ride with clip-less or step–in pedals you should practice carefully locking your shoe onto the pedal and then disengaging it. Do this while the bike is stationary, until you are completely comfortable and familiar with the procedure. If you lean against a wall while doing so, then it will not topple over. You can then adjust the locking and release mechanism if needed.
5. You must only use your bike for the purpose it is intended for
Learn and understand the distinction between different kinds of bikes. Road and triathlon bikes are not the same as a BMX. They are intended for use on smooth surfaces only; for example, tarred or paved roads and lanes. Meanwhile, off road bikes are built to be used off the road.
BEFORE YOU RIDE - IMPORTANT INFORMATION YOU MUST BE AWARE OF
0

EnglishDeutsch
FrançaisEspañol
Italiano 日本語
9
KEY CHECKS YOU MUST MAKE1. Check that the quick-release levers for the front and rear wheels, the seat
post, and any other removable components are closed properly. Failure to do this could result in a serious accident and injuries to any part of your body or death.
2. Are the tires in roadworthy condition? Is the air pressure sufficient?
You can check the tires by spinning the wheels around to see if the rims are true. Also check for any ruptured sides on the tires. Lastly, look out for any broken spokes or axles on the wheels.
3. Check that the brakes are in good working order.
You can test the brakes while stationary by simply squeezing the brake levers firmly. Ideally, you will reach a pressure point quickly; the lever should only travel a short distance before you feel this pressure. If this happens, then your brakes are in good condition. The brake lever must not come into contact with the handlebars; if it does then you need to have your brakes adjusted or serviced. Also look at the brake pads, and see where they contact when pressure on the lever is applied. The pads should only connect with the rim, and the entire surface of the pad should hit it. The pads should not touch the tires at all.
4. If your intention is to ride on public roads, be sure that you know all the
legal requirements for doing so. 5. Install a good quality light on your bike if you are going to ride at night. Do
not ride in the dark without lights. Wear reflective clothing and stay visible to other road users.
Fully Closed Lever/ Lever not fully closed
Check Air Pressure
Check Brakes
Good Lighting
BEFORE EVERY JOURNEY
0

EnglishDeutsch
FrançaisEspañol
Italiano 日本語
10
MAINTAINING YOUR BIKEBikes need to be maintained on a regular basis in order to ensure that you can get the optimum performance out of your bike. You will need to start regular maintenance of your NEILPRYDE bike after around 100 to 300 kilometers of use, which would probably be within 6 weeks of you first buying your bike. Typical early problems involved with ‘bedding-in’ your bike may include spokes losing their tension, gears slipping out of adjustment, stretching of cables and the bearings settling.
1. Cleaning and lubricating your NEILPRYDE bike
It is advised to make a habit of cleaning your NEILPRYDE bike after every ride. When doing so, we recommend you avoid the use of high pressure washers and chemical based agents. If you must use a pressure washer, do not spray water directly onto the joints and bearings, as this could damage or alter them.
After cleaning, you should dry your bike straight away using a soft cloth, as this will help to prevent rust and corrosion of the metal components. As you are doing this, you can also inspect the different parts of your bike and try to locate any possible problems or wear and tear that need attention.
Once your bike is dry, before storing it away in a dry, clean place, you should lubricate the chain, cogs and any other drive train parts. Be sure to use appropriate lubricating oil that won’t damage your bike. Other checks that you can perform during this time include checking the brakes and seeing if the wheels are beginning to deform.
2. Wear and tear
Regularly check the individual components of your NEILPRYDE bike, particularly any parts that receive lots of wear and tear. If you are concerned about any part, then you should check that component manufacturer’s manual, or else check with an expert. Never wait till the last minute, as prevention is usually easier than the cure.
3. Maximum weight for riders
Please note that NEILPRYDE bikes are only designed for carrying persons weighing up to a maximum of 110kg (242lbs). Anybody who exceeds this limit could be violating the terms of the guarantee.
EnglishDeutsch
FrançaisEspañol
Italiano 日本語
11
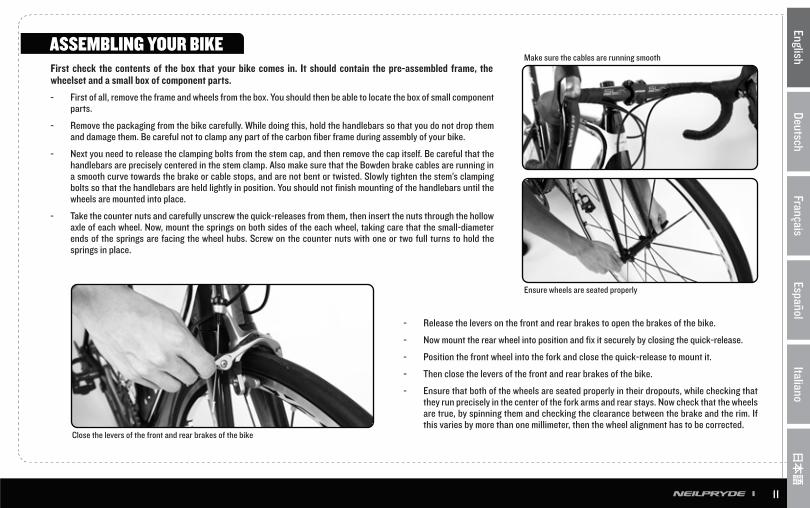
- First of all, remove the frame and wheels from the box. You should then be able to locate the box of small component parts.
- Remove the packaging from the bike carefully. While doing this, hold the handlebars so that you do not drop them and damage them. Be careful not to clamp any part of the carbon fiber frame during assembly of your bike.
- Next you need to release the clamping bolts from the stem cap, and then remove the cap itself. Be careful that the handlebars are precisely centered in the stem clamp. Also make sure that the Bowden brake cables are running in a smooth curve towards the brake or cable stops, and are not bent or twisted. Slowly tighten the stem’s clamping bolts so that the handlebars are held lightly in position. You should not finish mounting of the handlebars until the wheels are mounted into place.
- Take the counter nuts and carefully unscrew the quick-releases from them, then insert the nuts through the hollow axle of each wheel. Now, mount the springs on both sides of the each wheel, taking care that the small-diameter ends of the springs are facing the wheel hubs. Screw on the counter nuts with one or two full turns to hold the springs in place.
- Release the levers on the front and rear brakes to open the brakes of the bike.
- Now mount the rear wheel into position and fix it securely by closing the quick-release.
- Position the front wheel into the fork and close the quick-release to mount it.
- Then close the levers of the front and rear brakes of the bike.
- Ensure that both of the wheels are seated properly in their dropouts, while checking that they run precisely in the center of the fork arms and rear stays. Now check that the wheels are true, by spinning them and checking the clearance between the brake and the rim. If this varies by more than one millimeter, then the wheel alignment has to be corrected.
ASSEMBLING YOUR BIKEFirst check the contents of the box that your bike comes in. It should contain the pre-assembled frame, the wheelset and a small box of component parts.
Make sure the cables are running smooth
Ensure wheels are seated properly
Close the levers of the front and rear brakes of the bike

EnglishDeutsch
FrançaisEspañol
Italiano 日本語
12
- Read the markings on the axles before mounting the pedals. “R” is the right pedal and “L” is the left pedal. You will notice that the left pedal tightens anti-clockwise, not clockwise as you are used to because it is has a left-handed thread. Screw each pedal two or three turns into the thread of its crank by hand, before using a pedal spanner to tighten them firmly.
- Place the seat post into its tube and orient it so the saddle is correctly aligned with the top tube. Tighten the seat clamp using the correct torque.
- Make final adjustments as to the position of the saddle and handlebars, and then make sure that the handlebars, grips and seat post are fastened securely in place with the specified torque.
- Check that the rear wheel can spin freely and then check the gears are functioning correctly. To do this, you should switch through each gear one by one, making sure that when the chain is running on the largest sprocket the rear derailleur does not impact with the spokes.
- Now inflate the tires according to the pressure level that is indicated on the side of each tire.
- Finally, complete the assembly of your bike by carrying out the tests mentioned previously in this manual.
Closed brake lever
Check the saddle to see if the saddle is tight
Make sure rear derailleur is not colliding with the spokes
EnglishDeutsch
FrançaisEspañol
Italiano 日本語
13
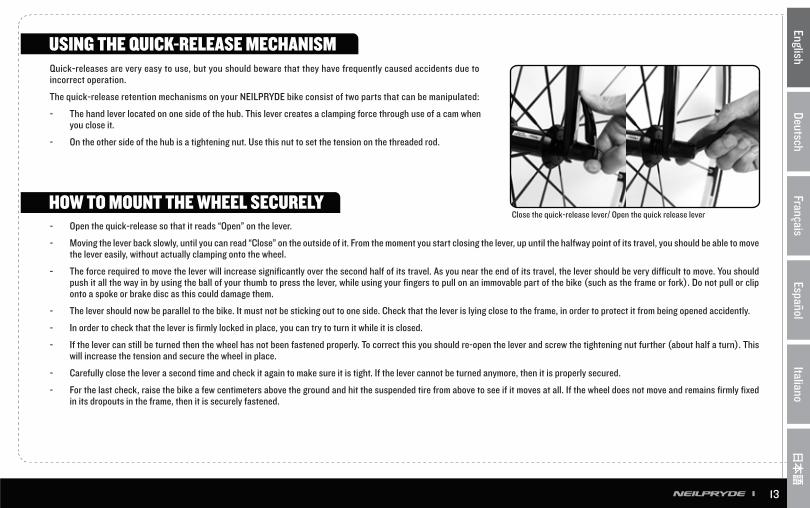
Quick-releases are very easy to use, but you should beware that they have frequently caused accidents due to incorrect operation.
The quick-release retention mechanisms on your NEILPRYDE bike consist of two parts that can be manipulated:
- The hand lever located on one side of the hub. This lever creates a clamping force through use of a cam when you close it.
- On the other side of the hub is a tightening nut. Use this nut to set the tension on the threaded rod.
- Open the quick-release so that it reads “Open” on the lever.
- Moving the lever back slowly, until you can read “Close” on the outside of it. From the moment you start closing the lever, up until the halfway point of its travel, you should be able to move the lever easily, without actually clamping onto the wheel.
- The force required to move the lever will increase significantly over the second half of its travel. As you near the end of its travel, the lever should be very difficult to move. You should push it all the way in by using the ball of your thumb to press the lever, while using your fingers to pull on an immovable part of the bike (such as the frame or fork). Do not pull or clip onto a spoke or brake disc as this could damage them.
- The lever should now be parallel to the bike. It must not be sticking out to one side. Check that the lever is lying close to the frame, in order to protect it from being opened accidently.
- In order to check that the lever is firmly locked in place, you can try to turn it while it is closed.
- If the lever can still be turned then the wheel has not been fastened properly. To correct this you should re-open the lever and screw the tightening nut further (about half a turn). This will increase the tension and secure the wheel in place.
- Carefully close the lever a second time and check it again to make sure it is tight. If the lever cannot be turned anymore, then it is properly secured.
- For the last check, raise the bike a few centimeters above the ground and hit the suspended tire from above to see if it moves at all. If the wheel does not move and remains firmly fixed in its dropouts in the frame, then it is securely fastened.
Close the quick-release lever/ Open the quick release lever
USING THE QUICK-RELEASE MECHANISM
HOW TO MOUNT THE WHEEL SECURELY

EnglishDeutsch
FrançaisEspañol
Italiano 日本語
14
Available pedal systems often show considerable variations in shape and design. Despite this, these general guidelines for adjusting and maintaining pedal systems apply to them all.- Make sure that the cleat of the shoe is fastened to it so that when you place your foot in the pedal, the ball of your foot rests directly on the pedal spindle itself.- Ensure that your feet are comfortable and resting in a natural position while pedaling. With most people, the best natural position is to have your heels pointing slightly inwards and the
toes of your feet turned slightly outwards. - Tighten the fastening bolts into place properly. If this is not done and the plate is slightly loose, it will be almost impossible to disengage your shoe and could result in a serious injury/
accident.- The releasing force should be adjusted before you begin cycling. For beginners it is recommended that you set the release force low. Use a suitable tool to turn the bolt slightly, and then
examine the difference in the releasing force when you engage and disengage from the pedals with your shoes. Find the releasing force that you are most comfortable with before you begin cycling.
- You will need to regularly check the springs and other exposed components of the pedal system. These should be cleaned often, and grease should be applied after each cleaning. - To silence any creaking or squeaking from the cleats, apply a small amount of grease to the point of contact between the pedal and the cleat. - You should examine the cleats regularly for any signs of wear and tear. If you notice any lateral play on the pedal while cycling, this could mean that the cleats or the shoe soles are worn
out and need replacing.
PLEASE REFER TO THE SPECIFIC PEDAL AND SHOE INSTRUCTION/WARNING MANUALS FOR INSTALLATION AND SET UP PROCEDURES.
Please note that some kinds of shoes are not suitable for cycling purposes. Cycling shoes should ideally have a stiff sole that provides firm support. If your shoe soles are too soft, it is possible that the pedals could press through them and cause discomfort, pain or injury to your feet. Another consideration to be aware of is that the soles of your shoes are not too broad, especially near the heels, as this could impede your pedaling. Having too broad soles on your shoes can also cause knee pain in the future, as it prevents you from placing your feet in a natural position on the pedals.
Pedals that have a lock and release mechanism for your shoes are the best kind. These kinds of pedals are known as clip-less or step-in pedals. These pedals provide a firm connection between the sole of your shoe and the pedal, and help to prevent your feet from slipping off while you are riding on rough ground, or while you are pedaling rapidly. As well as this, they allow you to pull the pedals, as well as push them. This serves to make your pedaling much more fluid and less arduous. Another great feature that clip-less pedals provide is that they allow you to rest the balls of your feet in the correct positions on the pedal spindles. The advantage of this is that your feet will not get in the way of front wheel while you are steering.
All clip-less or step-in pedals come together with specially designed cycling shoes that can lock onto the pedal in a similar fashion to a ski binding. In order to engage the shoe with the pedal and lock it firmly into position, you need turn the pedal so that it is horizontal, using the cleat, or the sole plate of the shoe, then place your foot onto it. You will hear and feel the shoe clearly click into place; this tells you that the shoe is now engaged.
To disengage the shoe from the pedal, twist the heel outward. When you do this for the first time, it is advisable that you lean against a wall or get someone to hold you so you don’t fall down. After several attempts you should be comfortable with the procedure.
Some differences between the functions of different pedal systems can include the shape of the cleat on the shoes, the release angles when disengaging and also the rigidness of the connection itself. If you are a cyclist that has suffered from knee problems before, it is recommended that you select a pedal system that has some give in it. This means that the heel of the shoe can move from side to side slightly while it is engaged with the pedal.
ADJUSTING AND MAINTAINING YOUR PEDAL SYSTEM
THE PEDAL SYSTEM
ABOUT CLIP-LESS OR STEP-IN PEDALS
EnglishDeutsch
FrançaisEspañol
Italiano 日本語
15
If you plan to assemble your NEILPRYDE bicycle with Shimano electronic gear system, please note that a qualified bicycle mechanic should always do the assembly.
NEILPRYDE bicycles have been designed to work with Shimano mechanical groupsets for road and time trial bicycles as well as Shimano Dura Ace 9070 (Di2) and Shimano Ultegra 6770 (Di2) & 6870 (Di2).
NEILPRYDE frames are not designed to be compatible with Shimano Dura Ace 7970 (Di2) system or Campagnolo EPS system.
Any modifications to the frame to suit installation of groupsets not compatible with Shimano Dura Ace 9070 (Di2) and Shimano Ultegra 6770 (Di2) & 6870 (Di2) will void the warranty.
ELECTRONIC GEAR SYSTEM COMPATIBILITY
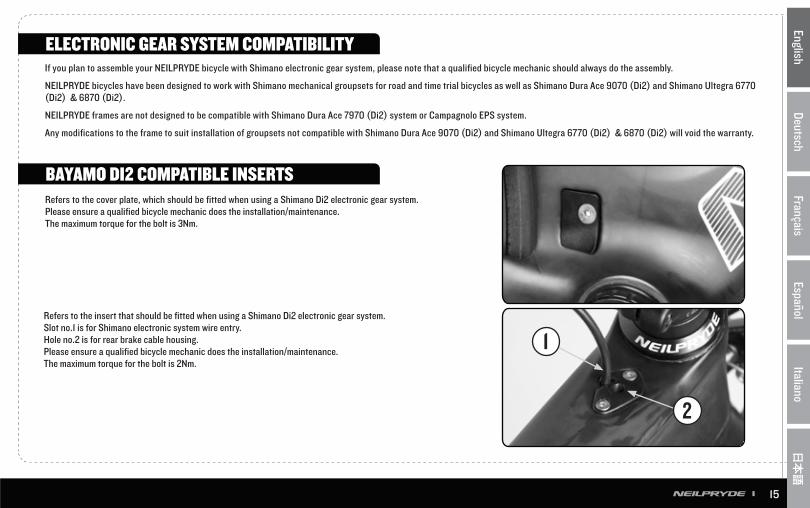
BAYAMO DI2 COMPATIBLE INSERTSRefers to the cover plate, which should be fitted when using a Shimano Di2 electronic gear system. Please ensure a qualified bicycle mechanic does the installation/maintenance.The maximum torque for the bolt is 3Nm.
Refers to the insert that should be fitted when using a Shimano Di2 electronic gear system.Slot no.1 is for Shimano electronic system wire entry.Hole no.2 is for rear brake cable housing.Please ensure a qualified bicycle mechanic does the installation/maintenance.The maximum torque for the bolt is 2Nm.

EnglishDeutsch
FrançaisEspañol
Italiano 日本語
16
Refers to the insert that should be fitted when using Shimano Di2 electronic shifting system. Slot no.1 is for Shimano electronic wire entry. Hole no.2 is for rear brake cable housing. The maximum torque for the bolt(s) is 3Nm.
Refers to the Shimano SM-BTR2 battery holder. Slot no.1 provides the cable routing for the rear brake. The maximum torque for the bolt(s) is 3Nm.
Refers to the internal cable guide as originally installed on your frameset or bicycle. The guide is clearly marked RB, FD and RD for correct routing of Rear Brake (RB), Front Derailleur (FD) and Rear Derailleur (RD). The maximum torque for the bolt(s) is 3Nm.
NAZARE Di2 COMPATIBLE PARTS & ACCESSORIES
EnglishDeutsch
FrançaisEspañol
Italiano 日本語
17
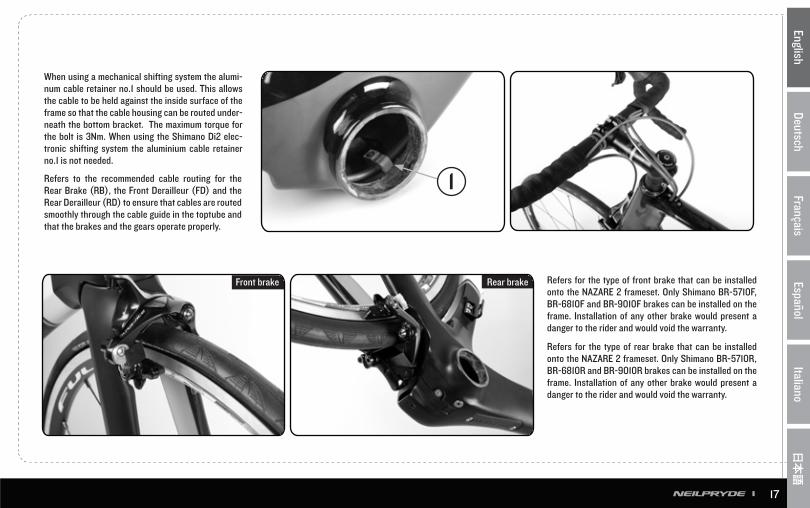
When using a mechanical shifting system the alumi-num cable retainer no.1 should be used. This allows the cable to be held against the inside surface of the frame so that the cable housing can be routed under-neath the bottom bracket. The maximum torque for the bolt is 3Nm. When using the Shimano Di2 elec-tronic shifting system the aluminium cable retainer no.1 is not needed.
Refers to the recommended cable routing for the Rear Brake (RB), the Front Derailleur (FD) and the Rear Derailleur (RD) to ensure that cables are routed smoothly through the cable guide in the toptube and that the brakes and the gears operate properly.
Refers for the type of front brake that can be installed onto the NAZARE 2 frameset. Only Shimano BR-5710F, BR-6810F and BR-9010F brakes can be installed on the frame. Installation of any other brake would present a danger to the rider and would void the warranty.
Refers for the type of rear brake that can be installed onto the NAZARE 2 frameset. Only Shimano BR-5710R, BR-6810R and BR-9010R brakes can be installed on the frame. Installation of any other brake would present a danger to the rider and would void the warranty.
Front brake Rear brake
EnglishDeutsch
FrançaisEspañol
Italiano 日本語
18
For custom fittings, NEILPRYDE offer a selection of high-quality carbon fiber frames which can be built up into a complete bike with the addition of add-on components.
The person who decides on what add-on parts are needed is responsible for making sure that all of the components are thoroughly compatible and mounted properly. The sheer number of different add-on parts means that it is impossible for NEILPRYDE to discuss every set up combination in this user manual. Also please note that NEILPRYDE do not accept any responsibility for the functioning and compatibility of any add-ons or components that you choose to use. You must read carefully the instruction manual for each component or add-on that you decide to mount on your NEILPRYDE bike. You should also go online for any updated instructions from the component manufacturers. You can also check with a skilled bicycle mechanic in relation to any component parts.
ASSEMBLING THE FRAME SET
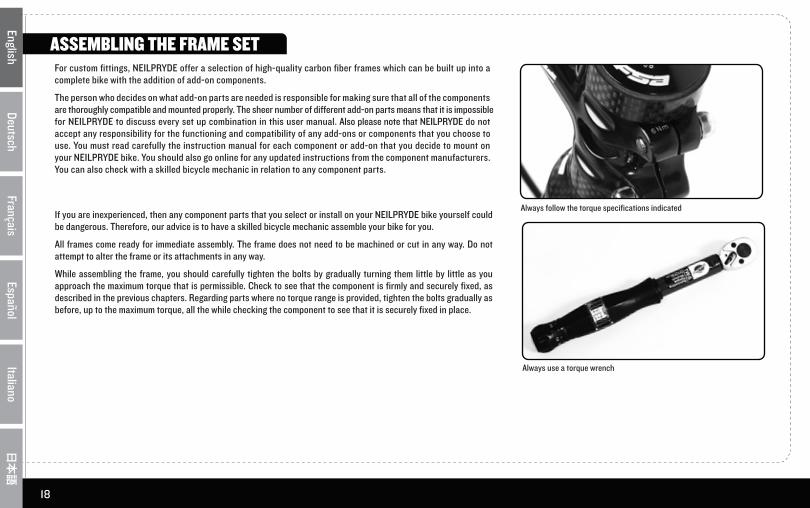
Always follow the torque specifications indicated If you are inexperienced, then any component parts that you select or install on your NEILPRYDE bike yourself could be dangerous. Therefore, our advice is to have a skilled bicycle mechanic assemble your bike for you.
All frames come ready for immediate assembly. The frame does not need to be machined or cut in any way. Do not attempt to alter the frame or its attachments in any way.
While assembling the frame, you should carefully tighten the bolts by gradually turning them little by little as you approach the maximum torque that is permissible. Check to see that the component is firmly and securely fixed, as described in the previous chapters. Regarding parts where no torque range is provided, tighten the bolts gradually as before, up to the maximum torque, all the while checking the component to see that it is securely fixed in place.
Always use a torque wrench
EnglishDeutsch
FrançaisEspañol
Italiano 日本語
19
Your NEILPRYDE bicycle or frameset is supplied with the fork uncut. Cutting the fork should only be done by a qualified bicycle mechanic.
The fork should be cut to a length so that is no more than 30mm distance between the top of the headset cover and the underside of the stem clamping structure.
1. Wear a face mask and safety glasses to prevent inhalation of the dust caused by cutting the steerer tube;2. Use a saw with a suitable blade for cutting carbon (carbon specific blade or a fine tooth blade greater than 32 teeth per inch);3. Use a cutting guide tool made for fork steerers to ensure the cut is square to the tube;4. Before cutting wrap the steerer tube with masking tape immediately below the lower final cut mark, this will reduce the amount of fraying of fibres resulting a cleaner cut;5. Use light pressure on the saw when cutting carbon and do not force the blade to speed up the process;6. Once the steerer tube is cut, round off the top edge by using fine grit sandpaper, then wipe off excess dust.
Your NEILPRYDE bike is assembled without the grip tape installed. Please consult your dealer to adjust the handlebar angle, brake and shift lever position before installing the grip tape. Always refer to the torque requirements shown on the stem and/or provided stem manufacturers owner’s manual to ensure that the specified torque is used to install the handlebar.Always refer to the shift lever manufacturers owner’s manual to ensure that the specified torque is used to install the shift lever.
CUTTING AND INSTALLING THE FORK
GRIP TAPE INSTALLATION
NOTES ON CUTTING THE FORK
EnglishDeutsch
FrançaisEspañol
Italiano 日本語
20
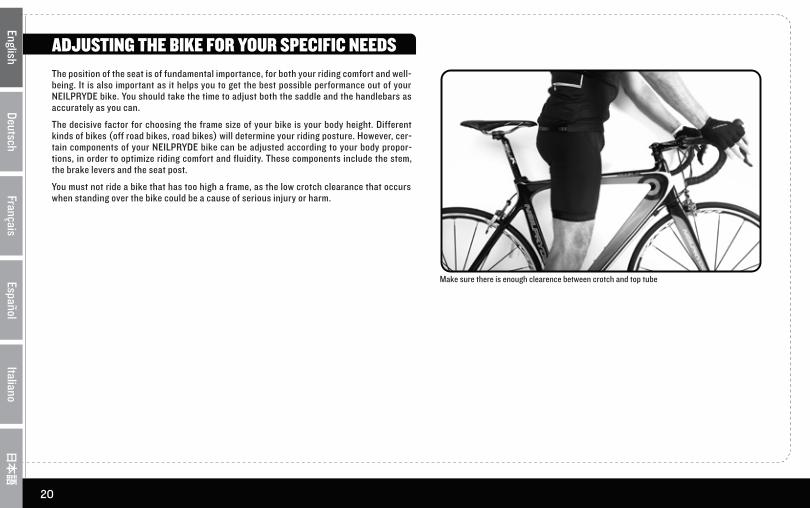
The position of the seat is of fundamental importance, for both your riding comfort and well-being. It is also important as it helps you to get the best possible performance out of your NEILPRYDE bike. You should take the time to adjust both the saddle and the handlebars as accurately as you can.
The decisive factor for choosing the frame size of your bike is your body height. Different kinds of bikes (off road bikes, road bikes) will determine your riding posture. However, cer-tain components of your NEILPRYDE bike can be adjusted according to your body propor-tions, in order to optimize riding comfort and fluidity. These components include the stem, the brake levers and the seat post.
You must not ride a bike that has too high a frame, as the low crotch clearance that occurs when standing over the bike could be a cause of serious injury or harm.
ADJUSTING THE BIKE FOR YOUR SPECIFIC NEEDS
Make sure there is enough clearence between crotch and top tube

EnglishDeutsch
FrançaisEspañol
Italiano 日本語
21
Certain settings on your new bike should be adjusted before you start riding, so that you can achieve the bikes optimum performances. This will also guarantee the safest and most comfortable riding experience.
The saddle should be set to the correct height according to your body proportions, in order to make pedaling easy and comfortable.
The ball of your foot should be directly over the centre of the pedal spindle while you are pedaling. If your feet are in this position, you will not be able to fully extend your legs when the pedal is at the lowest point of its cycle. This is the optimum position for pedaling. You will have difficulty in passing through the lowest point of the pedal cycle if your saddle is set too high, and this will result in awkward pedaling. Moreover, if the saddle is set too low, it could cause your knee joints to ache after a while. The following procedure explains how to set the saddle to its correct height. Note that this procedure is best performed while wearing flat-soled shoes.
- While you are sitting on the saddle, place the heel of your foot on the pedal while its at its lowest point. Your leg should be fully extended in this position, and your hips should not be tilted to the side at all.
- Adjust the saddle to the desired height. If the seat post does not move easily, do not try to force it.
- The saddle should be aligned with the frame. You can use the saddle nose and the top tube or the bottom bracket as reference points to do this.
- Once the saddle is set in position, you must clamp the seat post tightly. Do this by turning the seat post bolt in a clockwise direction, up to the prescribed torque. This should not require too much strength. If too much force is required, then the seat post could be of the wrong size.
- Take hold of the saddle with both hands and attempt to turn it while it is in the seat tube. If you can still move it, then the seat clamp is not sufficiently tight.
- Check that you are able to balance on your bike by sitting on the saddle, and stretching out your feet to the floor. If you cannot balance safely then you should lower the saddle a fraction more.
SETTINGS
SETTING THE SADDLE HEIGHT
The leg is fully stretched with the heel on the pedal at the lowest point
Try twisting the saddle to check if it is tight
To adjust the saddle height, losen the seat clamp screw
Check saddle alignment along the top tube
EnglishDeutsch
FrançaisEspañol
Italiano 日本語
22
Please note that all seat posts supplied with your NeilPryde bicycle has a minimum insertion depth clearly marked on the lower section of the post. Never adjust the saddle height to the extent that the minimum insertion height is visible above the seat clamp.
For insertion depth of seat posts supplied by other manufacturers, please refer to specific manufacturer’s owner’s manual for more information.
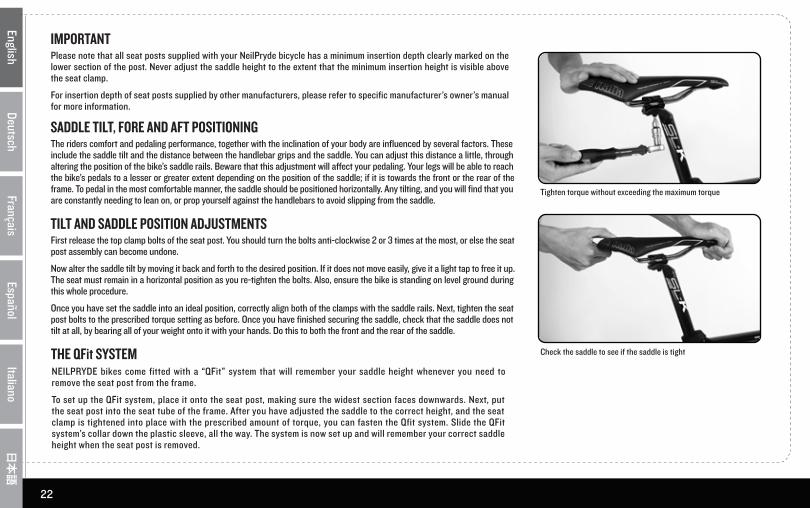
The riders comfort and pedaling performance, together with the inclination of your body are influenced by several factors. These include the saddle tilt and the distance between the handlebar grips and the saddle. You can adjust this distance a little, through altering the position of the bike’s saddle rails. Beware that this adjustment will affect your pedaling. Your legs will be able to reach the bike’s pedals to a lesser or greater extent depending on the position of the saddle; if it is towards the front or the rear of the frame. To pedal in the most comfortable manner, the saddle should be positioned horizontally. Any tilting, and you will find that you are constantly needing to lean on, or prop yourself against the handlebars to avoid slipping from the saddle.
First release the top clamp bolts of the seat post. You should turn the bolts anti-clockwise 2 or 3 times at the most, or else the seat post assembly can become undone.
Now alter the saddle tilt by moving it back and forth to the desired position. If it does not move easily, give it a light tap to free it up. The seat must remain in a horizontal position as you re-tighten the bolts. Also, ensure the bike is standing on level ground during this whole procedure.
Once you have set the saddle into an ideal position, correctly align both of the clamps with the saddle rails. Next, tighten the seat post bolts to the prescribed torque setting as before. Once you have finished securing the saddle, check that the saddle does not tilt at all, by bearing all of your weight onto it with your hands. Do this to both the front and the rear of the saddle.
NEILPRYDE bikes come fitted with a “QFit” system that will remember your saddle height whenever you need to remove the seat post from the frame.
To set up the QFit system, place it onto the seat post, making sure the widest section faces downwards. Next, put the seat post into the seat tube of the frame. After you have adjusted the saddle to the correct height, and the seat clamp is tightened into place with the prescribed amount of torque, you can fasten the Qfit system. Slide the QFit system’s collar down the plastic sleeve, all the way. The system is now set up and will remember your correct saddle height when the seat post is removed.
THE QFit SYSTEM
Tighten torque without exceeding the maximum torque
Check the saddle to see if the saddle is tight
SADDLE TILT, FORE AND AFT POSITIONING
IMPORTANT
TILT AND SADDLE POSITION ADJUSTMENTS
EnglishDeutsch
FrançaisEspañol
Italiano 日本語
23
Please review the stem supplier instruction manual for specific procedures, instructions and warnings.
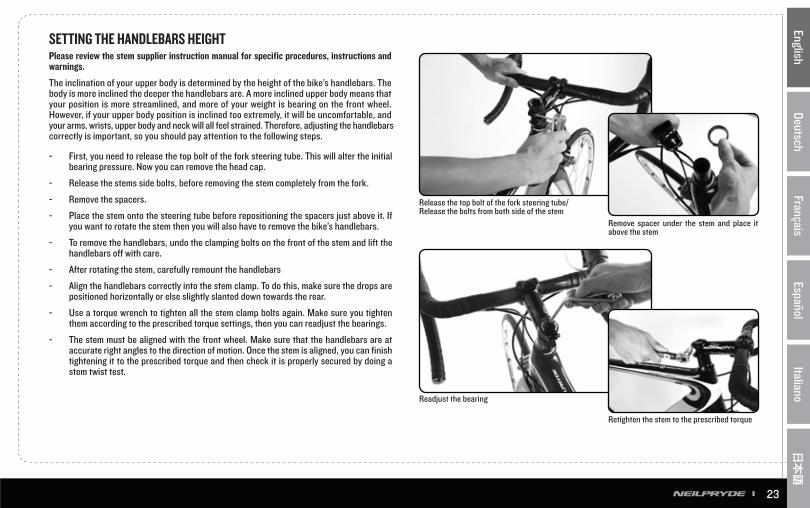
The inclination of your upper body is determined by the height of the bike’s handlebars. The body is more inclined the deeper the handlebars are. A more inclined upper body means that your position is more streamlined, and more of your weight is bearing on the front wheel. However, if your upper body position is inclined too extremely, it will be uncomfortable, and your arms, wrists, upper body and neck will all feel strained. Therefore, adjusting the handlebars correctly is important, so you should pay attention to the following steps.
- First, you need to release the top bolt of the fork steering tube. This will alter the initial bearing pressure. Now you can remove the head cap.
- Release the stems side bolts, before removing the stem completely from the fork.
- Remove the spacers.
- Place the stem onto the steering tube before repositioning the spacers just above it. If you want to rotate the stem then you will also have to remove the bike’s handlebars.
- To remove the handlebars, undo the clamping bolts on the front of the stem and lift the handlebars off with care.
- After rotating the stem, carefully remount the handlebars
- Align the handlebars correctly into the stem clamp. To do this, make sure the drops are positioned horizontally or else slightly slanted down towards the rear.
- Use a torque wrench to tighten all the stem clamp bolts again. Make sure you tighten them according to the prescribed torque settings, then you can readjust the bearings.
- The stem must be aligned with the front wheel. Make sure that the handlebars are at accurate right angles to the direction of motion. Once the stem is aligned, you can finish tightening it to the prescribed torque and then check it is properly secured by doing a stem twist test.
SETTING THE HANDLEBARS HEIGHT
Release the top bolt of the fork steering tube/ Release the bolts from both side of the stem
Readjust the bearing
Remove spacer under the stem and place it above the stem
Retighten the stem to the prescribed torque

EnglishDeutsch
FrançaisEspañol
Italiano 日本語
24
Please review the headset supplier instruction manual/website for specific procedures, instructions and warnings.
The headset is a vital component that connects the frame with the handlebars, fork, stem and front wheel, while allowing them to move together as a complete unit. If your bike is to travel in a straight line, the headset should afford no resistance to being turned. Please note that the headset is susceptible to loosening and coming out of position, as it undergoes quite considerable stress, caused by riding on uneven surfaces.
- You can test the headset for play any time by placing your hand around the upper head cup.
- Activate the front brakes then push the bike back and forth vigorously.
- You will notice that the upper head cap will move noticeably compared to the lower one if tere is any play in the bearings.
- You can also check the headset by lifting the front wheel off the ground slightly and then drop it back down. If there is any play in the bearings, you will be able to hear a distinct rattling noise coming from the headset area.
- Check the bearing to ascertain ease of running by lifting the frame so that the front wheel is not touching the ground. If you move the handlebars from right to left, it should move easily and should not catch anywhere. If there is any resistance then the bearings need adjustment. You should be able to move the handlebars with just a light tap on them.
MAINTAINING AND RE-ADJUSTING THE HEADSET
THE HEADSET
EnglishDeutsch
FrançaisEspañol
Italiano 日本語
25
ADJUSTING THE BRAKE LEVERS AND HANDLEBARS
- Undo the Allen bolts at the front or bottom of the stem.
- Move the handlebars into the correct position.
- Check that the handlebars are centered in the stem accurately.
- Tighten the bolts up again to the prescribed amount of torque.
Check that the handlebars are sitting firmly in place by taking hold of both brake levers. If the handlebars are able to withstand tight jerks of the brake levers they are correctly set. If not, you should retighten the bolts gently until they are secure and can withstand hard jerks of the brake levers.
TURNING THE HANDLEBARS TO ADJUST THEIR POSITION
Please review the brake and handlebar supplier instruction manuals for specific procedures, instructions and warnings.
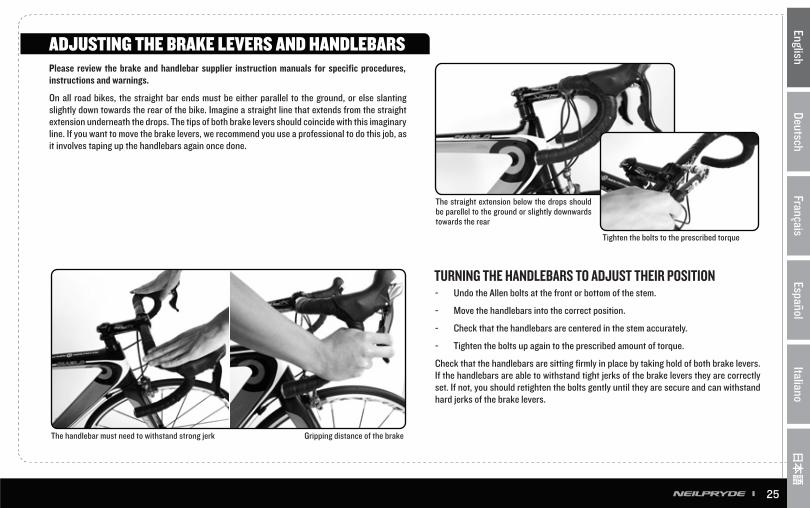
On all road bikes, the straight bar ends must be either parallel to the ground, or else slanting slightly down towards the rear of the bike. Imagine a straight line that extends from the straight extension underneath the drops. The tips of both brake levers should coincide with this imaginary line. If you want to move the brake levers, we recommend you use a professional to do this job, as it involves taping up the handlebars again once done.
The straight extension below the drops should be parellel to the ground or slightly downwards towards the rear
Tighten the bolts to the prescribed torque
The handlebar must need to withstand strong jerk Gripping distance of the brake
EnglishDeutsch
FrançaisEspañol
Italiano 日本語
26
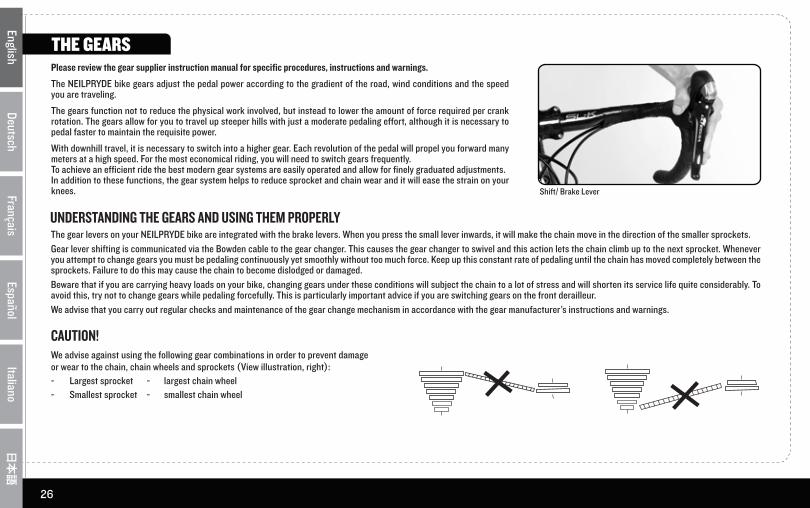
Please review the gear supplier instruction manual for specific procedures, instructions and warnings.
The NEILPRYDE bike gears adjust the pedal power according to the gradient of the road, wind conditions and the speed you are traveling.
The gears function not to reduce the physical work involved, but instead to lower the amount of force required per crank rotation. The gears allow for you to travel up steeper hills with just a moderate pedaling effort, although it is necessary to pedal faster to maintain the requisite power.
With downhill travel, it is necessary to switch into a higher gear. Each revolution of the pedal will propel you forward many meters at a high speed. For the most economical riding, you will need to switch gears frequently. To achieve an efficient ride the best modern gear systems are easily operated and allow for finely graduated adjustments. In addition to these functions, the gear system helps to reduce sprocket and chain wear and it will ease the strain on your knees.
The gear levers on your NEILPRYDE bike are integrated with the brake levers. When you press the small lever inwards, it will make the chain move in the direction of the smaller sprockets. Gear lever shifting is communicated via the Bowden cable to the gear changer. This causes the gear changer to swivel and this action lets the chain climb up to the next sprocket. Whenever you attempt to change gears you must be pedaling continuously yet smoothly without too much force. Keep up this constant rate of pedaling until the chain has moved completely between the sprockets. Failure to do this may cause the chain to become dislodged or damaged. Beware that if you are carrying heavy loads on your bike, changing gears under these conditions will subject the chain to a lot of stress and will shorten its service life quite considerably. To avoid this, try not to change gears while pedaling forcefully. This is particularly important advice if you are switching gears on the front derailleur.We advise that you carry out regular checks and maintenance of the gear change mechanism in accordance with the gear manufacturer’s instructions and warnings.
THE GEARS
UNDERSTANDING THE GEARS AND USING THEM PROPERLY
Shift/ Brake Lever
CAUTION!We advise against using the following gear combinations in order to prevent damage or wear to the chain, chain wheels and sprockets (View illustration, right):- Largest sprocket - largest chain wheel- Smallest sprocket - smallest chain wheel

EnglishDeutsch
FrançaisEspañol
Italiano 日本語
27
THE WHEELSPlease review the wheel supplier instruction manual for specific procedures, instructions and warnings.
Due to the bumpy surfaces of the road, the weight of the cyclist and any additional baggage mounted onto your NEIL PRYDE bike, the wheels are subjected to constant stress throughout their lifetime. Although great care and attention is paid to the manufacture and delivery of the wheels they are still susceptible to minor wear during the first few kilometers of use, even when used properly. Components such as the spokes and nipples can lose a slight amount of tension early on. Because of this, you may be required to true the wheels properly after they have been worn in over 100 to 200 kilometers of use.
You should check the wheels after they have been worn in in accordance with the wheel manufacturer’s instructions and warnings. Particular areas that should be checked are the hub, rim and spokes of the wheels. You should not need to tighten the spokes too often. The tire encases the inner tube by fitting onto the rim of the wheel. The inner tube is very sensitive, and so it is protected by a rim tape that runs around the rims base. This offers some protection against the sharp spoke nipples and rim edges.
In order to replace and fit a new tire onto your NEILPRYDE bike, you must know what the dimensions of the old tire are. These dimensions can be found marked on the edge of the tire. You must mount a new tire that has dimensions that match the old one. If you fit a bigger tire, there is a risk that the new tire could drag along the rear frame or the fork, and this can be damaging for your bike and tires.
In order for the tires to work properly and most efficiently, they must be correctly inflated to the recommended air pressure. Doing so will also make the tires more resistant to deflation while you cycle. Under-inflated tires run the risk of getting pinched, or snake-bitten, when traveling over sharp objects. You can locate the recommended air pressure on the side of the tire, or on its label. You should see two different specifications. The highest specification is the one that is most suitable for road use (smooth surfaces). The lower specification is more suited for off-road riding. This is because it offers better cushioning against any lumps and bumps. With an increase in pressure, rolling resistance is lowered, but so is the level of comfort afforded to the rider.
Many tires are designed to travel in one specific direction only. This will differ according to the tire model. Therefore, in order to get the most out of your tires, always check and fit them correctly, so the tires will revolve in the correct direction. You can find this information indicated on the side of the tire.
Race Valve
Dimension and Air pressure range of tire

EnglishDeutsch
FrançaisEspañol
Italiano 日本語
28
Your bike and its components are subject to natural wear and tear while you are out cycling. The amount of wear and tear will depend on how you use your bike (distance traveled, the type of surface ridden over), as well as the attention you pay to the care and maintenance of your bike. When not in use, you should store your bike in a dry place; otherwise it can suffer further wear and tear through weathering.
Regardless of this, all of the components of your bike will eventually need to be replaced.
This includes the following components: Handlebar grips and tape, chain and chain rings, chain rollers, sprockets, tires, wheels, brake pads, saddle cover and gear cables. Please review the supplier instruction manuals for specific procedures, instructions and warnings. Using your bike for competitive sports or in difficult, rough terrain will necessitate more frequent replacement of these parts. The brake pads need to be checked regularly and should be replaced by a professional bicycle mechanic when they are worn out. .
Not only are the brake pads worn through braking, but also the wheel rim. The rim must be checked regularly, for example, whenever you pump up the tires. Some rims are fitted with wear indicators and so a gap or a ring will appear when it reaches the end of its service life. Note down the rim specifications, as you will need an identical size rim to replace the old one. Other signs that the rim is reaching its limit regarding wear and tear include fine cracks in the side, or noticeable deformation or warping of the rim. If you notice any of these signs then the rim will need to be replaced as soon as possible.
The rim of the wheel is connected to the hub by the spokes. In order for the wheel to run true, an even spoke tension is required. If the spoke tension alters, the wheel will no longer run truly, because the tensile forces that act on the wheel rim will become unbalanced. This loss of spoke tension may occur when spokes break, or if you ride too fast over any lumps and bumps. The bikes general functioning may be affected by wobbling even before you notice that the wheel is untrue. A wheel that is not true can result in a major loss of brake power. This is because the rims serve as the braking surface for rim brakes.
NOTES ON WEAR AND TEAR
RIMS AND RIM BRAKES
SPOKE TENSION AND RIM TRUENESS
Check wheel trueness with brake pads
EnglishDeutsch
FrançaisEspañol
Italiano 日本語
29
Known as carbon fiber reinforced plastic, the material that comprises the main body of your bike frame has many useful characteristics that make it superior to other lightweight materials. It is important to be aware of these characteristics so that you can get full enjoyment out of your high quality NEILPRYDE bike and have confidence in it.
However, one drawback of carbon fiber is the fact that it is quite brittle. It does not suffer from permanent deformation or warping when placed under stress, even though there may be sustained damage to the frame or fork inner structure. The fibers may even separate in more extreme cases, causing something called de-lamination. This damage will reduce the overall strength of the component quite considerably. Unlike aluminum or steel, carbon fiber components that suffer sustained damage and wear will not show any noticeably visible signs of deformation. Be aware that any carbon fiber components that have been damaged due to stress or wear may be at risk of failure during use. This could result in an accident. We recommend that after any incident involving your bike, you should have it checked by a professional bike mechanic to ascertain if there is any damage.
Carbon fiber components on your bike should be washed regularly with water, using a soft cloth to do so. You may add a little washing up liquid if you think it necessary. To remove tougher stains like grease or oil, use petroleum-based agents to clean it. Do not use any kind of degreasing agent that contains trichloroethylene, methyl chloride, acetone, or any solvent or chemical that can damage the carbon fiber surface.
To protect the surface of the carbon fiber and make it shiny, you can use normal car wax. Other types of polish or varnish could damage the surface as they contain corrosive solid constituents. Never use any cleaning agents or lubricants on carbon fiber braking surfaces as this will reduce the effectiveness of your braking.
CHARACTERISTICS OF CARBON FIBER
CARBON FIBER MAINTENANCE
EnglishDeutsch
FrançaisEspañol
Italiano 日本語
30
NOTES ON THE PROPER CARE AND INSPECTION OF YOUR BIKESTORAGE AND SAFEKEEPING OF YOUR BIKEWe advise that you store your bike in a dry place that can be locked securely. Ensure that the storage place has sufficient air circulation as well. Please consider the following tips on storage:
NEILPRYDE Frame:
Bottle cage bolts 4.5 Nm
Replaceable derailleur dropout 2 Nm
NEILPRYDE seat post clamp Diablo 8 Nm
Nazaré 10 Nm
Burasl 6 Nm
Zephyr 6 Nm
NEILPRYDE Nazaré Seatpost 6 Nm
Unless a different specification is marked on the seat post or stem, or specified in the manual by the manufacturer, you should use the following torque settings:
Stem
M5 bolts 4.5 – 5.5 Nm
M6 bolts 8 – 9.6 Nm
Adjusting bolts with Ahead stems 0.5 – 2 Nm
Seat post
Clamping the saddle at seat post head:
Seat posts with single bolt 20 – 24 Nm
Seat posts with two bolts in line 6 – 9 Nm
Seat posts with two bolts side-by-side in direction of motion 2 – 14 Nm
- Inner tubes will slowly lose air pressure over time, even if the bike is not used for a long time. A bike that is left standing on deflated tires for extended periods will suffer damage to its tire structure. Therefore, if you do not plan to use your bike for any extended period, you should hang the bike on a wall when you store it. If you cannot do this then you must be sure to check the tire pressure often and re-inflate them when necessary.
- Clean your bike before you store it, and take steps to prevent corrosion.
- Allow any moisture that could have gotten into the tube to evaporate. To do this, you should dismount the saddle, and then spray a small amount of atomized oil inside the seat tube. Do not do this if the tube is made from carbon fiber.
- Set the gears so that they are on the lowest setting, i.e. on the smallest sprocket and chain ring. This will help to relax the springs and cables.
RECOMMENDED TORQUE REQUIRMENTS
EnglishDeutsch
FrançaisEspañol
Italiano 日本語
31
RIDING ON PUBLIC ROADS - LEGAL REQUIREMENTS
LIMITED WARRANTY
IMPORTANT - PRODUCT WARRANTY REGISTRATION - EXTEND YOUR WARRANTY PERIOD
Your NEILPRYDE bike must be fully equipped in order to conform with road cycling regulations of your respective country/region if your intention is to use the bike on public roads and highways. Pay special attention to the rules regarding lights and reflectors. Please make yourself aware of all the road traffic and cycling regulations in your country before setting off on your new bike.
• Please register your bike within 14 days of purchase to extend the warranty for your NeilPryde bike frame and forks for a period of 5 years.• NeilPryde will retain all product warranty registration information as reference for any possible future warranty claims.• No warranty claim will be processed unless the product warranty registration is completed with NeilPryde (this does not affect your statutory rights).• Please register your bike online at www.neilprydebikes.com.• For further information please refer to your NeilPryde owner’s manual.
Thank you for choosing NEILPRYDE bike. NEILPRYDE grants a LIMITED WARRANTY for every new and qualified product. Below are the conditions and exclusions that may apply to you.
NEILPRYDE warrants that your NEILPRYDE bike frame and fork when purchased from an authorized NEILPRYDE dealer by a retail customer will be free from defects in materials and workmanship for a period of two (2) years, and paint finish and decals for a period of two (2) years from the date of purchase by the original retail customer. To enjoy a three-year (3) warranty extension for frame and fork, please register you bike online at www.neilprydebikes.com within 14 days from the date of original purchase.
NEILPRYDE branded components, excluding the consumable parts, installed onto the bike are covered under the standard warranty. Products other than NEILPRYDE branded parts are not covered by this warranty, but are separately covered by the stated warranty of their manufacturer.
Limited Warranty does not cover damage to the frame, forks or seatpost due to the use with stationary indoor trainers where the rear wheel is restrained.
This warranty is solely for the benefit of the original retail purchaser and may not be assigned.
All claims must be made through the authorized NEILPRYDE dealer who supplied the frame. It is the purchaser’s responsibility to have his or her bicycle inspected and verified by an authorized NEILPRYDE dealer to process a warranty claim. You must present the proof of purchase along with the bikes unique serial number in order to process your claims smoothly. The unique serial number can be found on the frame. Absence of either the proof of purchase or the serial number would void your warranty claims. The original owner shall pay all labor charges connected with the repair or replacement of the frame or the complete bike. Cost of shipment or transportation to an authorized NEILPRYDE dealer or NEILPRYDE are excluded and not covered by this warranty.
We reserve full rights to replace defective forks or frames with the closest available match or a relevant successor model at our discretion or else carry out repairs to them. NEILPRYDE will not warrant any product that have been previously covered or replaced by NEILPRYDE. A warranty product, in all circumstances, does not prolong the warranty period neither initialize a new warranty period. These benefits constitute the Limited Warranty’s entire scope.

EnglishDeutsch
FrançaisEspañol
Italiano 日本語
32
Use your NEILPRYDE bike only for its intended purpose in order to ensure the durability and a long service life of your bike. You should also pay attention to the specifications regarding loads to be carried on the bike, as well as the instructions for transporting children and baggage. Assembly instructions and recommended maintenance guidelines must also be followed strictly. Take note of the tests and methods to do so that are described in this manual, or any other components manual.
Please note that the Limited Warranty coverage does not include any damage or defects that come about as a result of negligence (including poor maintenance, storage and care), ordinary wear and tear, including scratches or paint chipping, use in commercial, rental or teaching environments, accidents, overloading or for any damage caused by misuse, abuse or any damage caused by adaptations or alterations made to the fork or frame or from mounting any other components on to the bike, heat, any blow or impact with a hard object or any other irresponsible care, maintenance or use. Damage suffered as a result of jumping or any other kind of overstress also does not come under the Limited Warranty’s coverage.
If you have any questions about the NEILPRYDE Limited Warranty or procedures for making claims, please contact NEILPRYDE at [email protected]. The NEILPRYDE War-ranty Center will determine if a product is covered under this Limited Warranty. If covered, NEILPRYDE will, at NEILPRYDE’s sole option, replace or reimburse the product in question.
THE FOREGOING LIMITED WARRANTY IS EXCLUSIVE AND IN LIEU OF ALL OTHER WARRANTIES OF QUALITY AND PERFORMANCE, WRITTEN, ORAL, OR IMPLIED. ALL OTHER WARRANTIES, INCLUDING ANY IMPLIED WARRANTIES OF MERCHANTABILITY OR FITNESS FOR A PARTICULAR PURPOSE ARE HEREBY DISCLAIMED. IN NO EVENT SHALL NEILPRYDE BE LIABLE FOR SPECIAL, INDIRECT, INCIDEN-TAL, CONSEQUENTIAL, STATUTORY OR EXEMPLARY DAMAGES, WHETHER IN CONTRACT, TORT, NEG-LIGENCE, STRICT LIABILITY OR OTHERWISE including, without limitation, loss to property other than this product, loss of use of said product, or other property, or other economic losses. NEILPRYDE shall not be liable for contribution or indemnification, whatever the cause.
Some jurisdictions do not allow limitations on how long an implied warranty lasts and/or the exclusion or limitation of incidental or consequential damages, so the above limitation and exclusion may not apply to particular customers. NEILPRYDE’s obligations under any warranty shall be limited, to the greatest extent allowed by law, as provided in NEILPRYDE Limited Warranty. This Limited Warranty gives you specific legal rights; you may also have other rights, which vary from one jurisdiction to another.
We thank you again for reading this manual and we hope that you will have many hours of enjoyment with your new NEILPRYDE bike.