EnergyU Administrator Guide - energyuniversity.org a User ... Update a User’s Profile ... Home...
56
Revised April 25, 2017 EnergyU Administrator Guide v9.1
Transcript of EnergyU Administrator Guide - energyuniversity.org a User ... Update a User’s Profile ... Home...

Revised April 25, 2017
EnergyU
Administrator Guidev9.1

Revised April 25, 2017
EnergyU Implementation
Welcome to EnergyU, the learning portal used to access the energy industry's most comprehensive
online training courses, assessment tests, and performance evaluations.
How the EnergyU online system helps you ascertain an individual’s knowledge, skill and ability (KSA) to
perform a task and recognize and react to AOCs:
Training (Knowledge) Testing (Skill) Performance (Ability)
e-TNG online course KNT online course Print Performance Evaluation Forms
View 80% content to pass 80% correct to pass Field evaluation by MEA trained evaluator
Pre-test for user practice Track attempts, failed and passed
Manually enter results in EnergyU
Operator Qualification – General Guidance
EnergyU is a service of Midwest ENERGY Association (MEA). The training, testing and evaluation
materials provided via EnergyU are intended to meet the regulatory requirements for Operator
Qualification (OQ). In order to maintain credibility and effectiveness of the materials provided, we
recommend you document your processes in the written OQ plan, and use the best practices outline
below when implementing your online training program.
Training Testing Performance
Available 24x7 via Internet Available 24x7 via Internet Select evaluators based on technical knowledge and capabilities
Not intended for distribution via printed form
Proctor to verify user identity and login access
Evaluations are a one-to-one activity (do not conduct as a group)
Customize to incorporate Company specific information
Access to printed materials, photographs, or other Internet sites prohibited
Evaluations require two signatures: evaluator and individual being evaluated
Training Records
MEA is authorized to transfer your online OQ records to ISNetworld®. To ensure integrity of manually
entered data, MEA reserves the right to audit evaluator/administrator records in order to validate data
credibility.

i
Revised April 25, 2017
Contents EnergyU Implementation .......................................................................................................................... 2
Operator Qualification – General Guidance ............................................................................................. 2
Training Records ....................................................................................................................................... 2
Introduction & Administrator Overview ....................................................................................................... 4
Administrator Hardware Requirements ................................................................................................... 4
System Requirements ............................................................................................................................... 4
Administrator Software Requirements ..................................................................................................... 4
EnergyU Login Page ...................................................................................................................................... 5
Home Page .................................................................................................................................................... 6
Administrator Interface ................................................................................................................................ 7
The Categories Bar .................................................................................................................................... 8
The Hierarchy ............................................................................................................................................ 9
The Tab Bar ............................................................................................................................................... 9
Filter Buttons ............................................................................................................................................ 9
Content Area ........................................................................................................................................... 10
Other Options ......................................................................................................................................... 10
Managing Users – Rights and Permissions ................................................................................................. 11
Add a New User to EnergyU ................................................................................................................... 11
Remove a User ........................................................................................................................................ 13
Adding System Administrators ............................................................................................................... 14
Edit Administrative Rights ................................................................................................................... 15
Adding User Managers ............................................................................................................................ 16

ii
Revised April 25, 2017
Adding Users to User Managers ......................................................................................................... 17
View Users Assigned to a User Manager ............................................................................................ 18
Managing Levels ......................................................................................................................................... 19
Adding Levels .......................................................................................................................................... 20
Edit Level Properties ............................................................................................................................... 20
Remove Level .......................................................................................................................................... 20
Add Existing User(s) to Another Level(s) ................................................................................................ 21
Add Existing Course(s) to Another Level(s) ............................................................................................. 21
Add Existing Certification Program(s) to Another Level(s) ..................................................................... 22
Update a User’s Profile ........................................................................................................................... 23
View User Levels ..................................................................................................................................... 23
Reset Password ....................................................................................................................................... 24
Log User Out ........................................................................................................................................... 26
Managing Users – Courses .......................................................................................................................... 26
View Courses ........................................................................................................................................... 27
Assign Courses ........................................................................................................................................ 28
Remove Courses ..................................................................................................................................... 29
Remove Certificates ................................................................................................................................ 30
Resetting Courses ................................................................................................................................... 31
Resetting a Single User ....................................................................................................................... 31
Resetting Multiple Users ..................................................................................................................... 32
Managing Users - Certification Programs ................................................................................................... 32
Enroll a User in a Certification Program(s) ............................................................................................. 33
Adding User(s) to a Certification Program .............................................................................................. 34

iii
Revised April 25, 2017
Remove a User from a Certification Program(s) ..................................................................................... 36
Remove a Certification Program from a User(s) ..................................................................................... 37
View Certification Program Users ........................................................................................................... 38
Manage Certification Program Completion ............................................................................................ 39
Manage Certification Program Completion ............................................................................................ 40
View Achieved Certification Programs ................................................................................................... 41
Resetting a Certification Program ........................................................................................................... 42
Print Users Certificates ........................................................................................................................... 44
Print Users Certificates – Not Printing Properly ..................................................................................... 45
Adding Prerequisites to a Course ................................................................................................................ 46
Resources .................................................................................................................................................... 47
Accessing Resources ............................................................................................................................... 47
Assigning Resources ................................................................................................................................ 48
Distribution Rules ........................................................................................................................................ 48
Reporting .................................................................................................................................................... 51
Standard reports ..................................................................................................................................... 51
Dynamic Reports ..................................................................................................................................... 51
Ad Hoc Reports ....................................................................................................................................... 52
Glossary of Terms ....................................................................................................................................... 53

4 | P a g e
Introduction & Administrator Overview
VLS Administrator is a powerful web-based application used to
administer EnergyU. Use Administrator to manage every aspect of your
online learning efforts.
Users must be given administrative rights in order to access VLS
Administrator. Administrators can create and remove users, courses,
curricula, and certification programs; they can give other users special
rights, and design reports.
System Requirements
NOTE: Administrator hardware and software requirements are different
from EnergyU user hardware and software requirements.
Administrator Software Requirements
Operating System: ......... Microsoft Windows 7, Windows 8, Windows
8.1, Windows 10, Mac OS X 10.9 “Mavericks”,
Mac OS X 10.10 “Yosemite”, Mac OS X 10.11
“El Capitan”
Browser: ........................ Microsoft Internet Explorer 10 or 11, Mozilla
Firefox (Extended Support Release (ESR)
version), Apple Safari (6.2 and above)
IMPORTANT NOTE ........ GOOGLE CHROME AND MICROSOFT EDGE WILL
NOT WORK FOR ADMINISTRATORS. Chrome
and Edge do not support Silverlight.
Plug-ins: ......................... Microsoft Silverlight Runtime 5.0 or above
(Download Silverlight from:
http://www.microsoft.com/silverlight/)
NOTE: Verify which version Internet Explorer you are using.
Open Internet Explorer, Click on Help, Click About Internet
Explorer.
Make sure to un-check the box - Install new versions automatically. This will help to ensure you will not be updated to a
different version without your knowledge.
Administrator Hardware Requirements
CPU: ............................... 2.0 GHz or higher
Memory: ....................... 4 GB minimum, 8 GB recommended
Display: .......................... 1280 x 10x24 or above
Connectivity: ................. LAN connection to a TCP/IP network
with 512 Kbps connection or above

5 | P a g e
EnergyU Login Page
The EnergyU Login Page has links to useful information
1. Administrative Services –
a. Course Catalogs – Links to Course Catalogs for all
Courses offered by MEA
b. EnergyU Support -
i. EnergyU Administrators – Links to EnergyU
Admin Training info & recordings, Certification
List as well as Webinar Recordings
ii. EnergyU Users – Link to EnergyU User Guide
iii. Get Custom Training Info – Will send email to
MEA regarding Custom Training requests
c. Training/Events – Link to MEA Events Page
2. Pay Center – Links to ISN Transfer Requests, EnergyU Renewal
Payments & Partner in Education Payments.
3. Contact Us – Links to MEA personnel contact info.
4. News & Updates – Any info that needs to be viewed by
everyone accessing EnergyU will be placed here.
5. Login Name – Enter Login Name here.
6. Password – Enter Password here.
7. Forgot Password – Will sent temporary password to
whatever email address is entered in the Users Profile.
The User will be locked out until the password is entered
or changed by an Administrator.
6 | P a g e
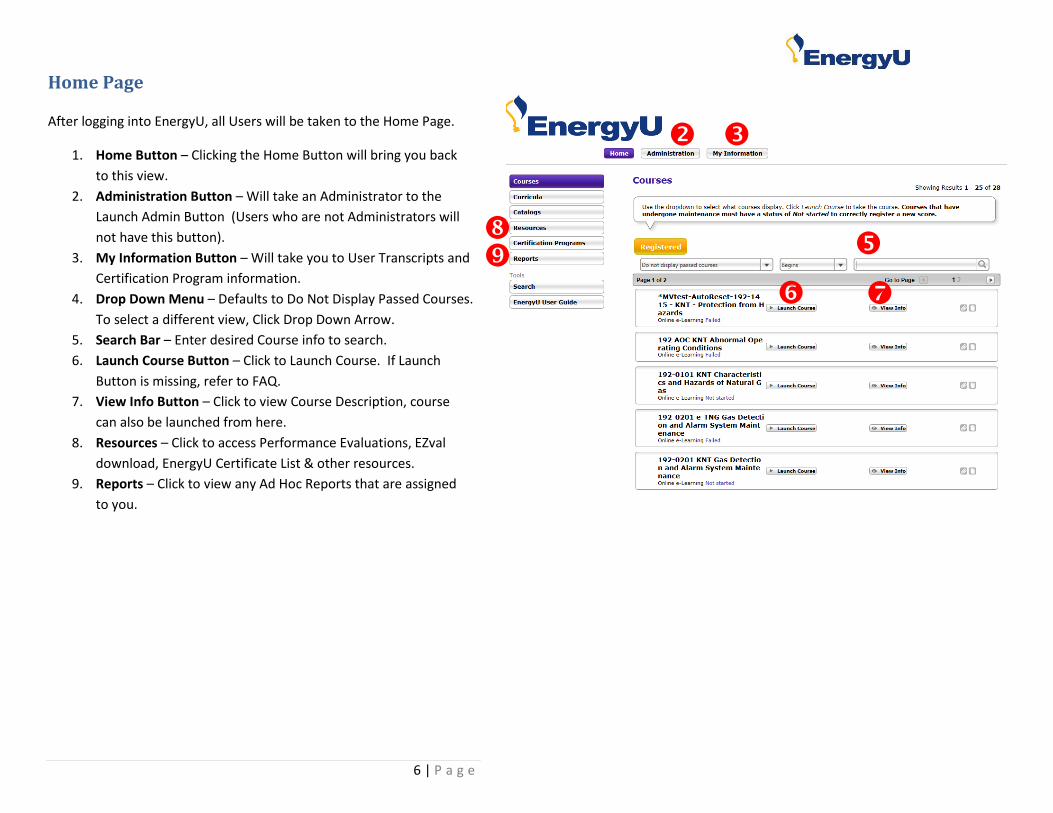
Home Page
After logging into EnergyU, all Users will be taken to the Home Page.
1. Home Button – Clicking the Home Button will bring you back
to this view.
2. Administration Button – Will take an Administrator to the
Launch Admin Button (Users who are not Administrators will
not have this button).
3. My Information Button – Will take you to User Transcripts and
Certification Program information.
4. Drop Down Menu – Defaults to Do Not Display Passed Courses.
To select a different view, Click Drop Down Arrow.
5. Search Bar – Enter desired Course info to search.
6. Launch Course Button – Click to Launch Course. If Launch
Button is missing, refer to FAQ.
7. View Info Button – Click to view Course Description, course
can also be launched from here.
8. Resources – Click to access Performance Evaluations, EZval
download, EnergyU Certificate List & other resources.
9. Reports – Click to view any Ad Hoc Reports that are assigned
to you.

7 | P a g e
Administrator Interface
Login to EnergyU. Click the Administration button under the EnergyU
logo. On the left, click the Launch Admin Portal button. The
Administrator portal will open in a new browser window.
The VLS Administrator interface contains six main sections:
1. Categories Bar - The Categories Bar links to the categories
and options that you will need to perform administrative
activities in VLS Administrator.
2. Hierarchy – The Hierarchy contains a tree view of the levels
within your organization.
3. Tabs Bar – The Tabs Bar allows you to work in multiple areas
of VLS Administrator simultaneously. If you see a # in
parenthesis on the tab, that is how many instances of that tab
are open. Having multiple instances open can get confusing.
To close down to 1 tab, click the X on the tab.
4. Filter Buttons - Filter buttons allow you to quickly access
specific groups of users or courses relevant to the level selected.
5. Content Area - The Content Area is the where you actually
select what you’re going to work on.
i.e., users/courses/certificates.
6. Other Options - Other Options lists contain commonly
used high-level options that are relevant to the currently
selected Category.

8 | P a g e
The Categories Bar
The Categories Bar, located on the left side of the screen, provides
access to the nine main areas of functionality in VLS Administrator.
Users Perform actions on specific users or groups of users; manage user
permissions, profiles, courses, curricula, and certifications.
Courses Manage courses and events and perform relevant operations on
the users assigned to them.
Curricula Manage curricula and their assigned courses, certifications, and
users.
Resources Manage resources. Access Performance Evaluations,
EZval Download, EnergyU Certificate list and more.
Certification Programs Manage certification programs and certification documents.
Reports Generate simple or dynamic reports.
System View system information, add/edit/remove levels.

9 | P a g e
The Hierarchy
You can choose to display or hide the Hierarchy by clicking the arrow in
the vertical Hierarchy tab to the right of the Categories Bar.
The Hierarchy is a visual representation of your organization’s structure.
Your company may choose level divisions according to location, branch,
department, course library, etc. Your users, courses, curricula, and
certifications can be assigned to a particular level or a group of levels.
The Tab Bar
The Tab Bar, allows you to work in multiple areas simultaneously. As
you navigate through categories and their associated options, new tabs
will appear separately.
The currently selected tab is highlighted for easy identification. Close
any tab by clicking the × on the tab, or click the refresh arrow to refresh
the Content Area. Pay close attention to what level you’re on if you’re going between tabs. You can jump to the previous level you were at by clicking on the tab.
Filter Buttons
Filter buttons display at the top of the Content Area when Users or Courses is selected from the categories. The filter buttons are also associated with the Other Options located on the right side of the screen. The Other Options selections will change depending on which filter button is selected.

10 | P a g e
Content Area
The Content Area displays information and options relevant to your category and menu option selections. You will use this area to perform your selected tasks. Above the Content Area, on the left side, is a bread crumb trail indicating the currently selected Hierarchy level and the path to it. The Option List on the left side of the Content Area contains a set of options relevant to the currently selected Category, Sub-Category, or Filter Button. The options contained in an Option List are generally high level options used to perform tasks such as:
• Modifying level structure
Other Options
The Other Options list displays on the right side of the Content Area. It contains a set of options relevant to the currently selected Category, Sub-Category, or Filter Button. The options contained in an Other Options list are generally high level options used to perform tasks such as:
• Adding or removing users, courses, etc. from the current level or the system
• Assigning or removing roles
• Making changes to multiple items instead of a single specific item

11 | P a g e
Managing Users – Rights and Permissions
Adding users to the system will be one of the very first things you
need to do. Select Users from the Categories Bar to create and
manage user information.
User management options include:
• Manually adding new users to the system
• Removing users from the system
• Enrolling users in certificate programs (automatically assigns
courses to users)
• Assigning courses (not recommended) and curricula to users
• Assigning User Manager and System Administrator roles
to users
Add a New User to EnergyU
An EnergyU license subscription is required for each User, including
Administrators. If required, contact MEA Technical Support to purchase
additional licenses.
Login to EnergyU, Click Administration and Launch Admin. Follow the
steps below to use the Add a New User option.
1. If you have more than one level, select the appropriate level
in the Hierarchy.
2. Select Users from the Categories Bar.
3. Select All Users from the row of Filter Buttons.
4. Select Add a New User from the Other Options list on the
right side of the screen.

12 | P a g e
5. In the Login Name field, enter the username you are assigning
to the user. This name must be unique to the system (not just
unique to your company).
6. In the Password field, enter the password the user must provide
to access the system.
7. Enter the password again in the Confirm Password field.
8. Enter the user's given name in the First Name field.
9. Enter the user's surname in the Last Name field.
10. Enter the user's email address in the Email field.
NOTE: This must be a correct email address in order for the user
to receive reset password instructions and notifications if
activated for your level.
11. If you want to force the user to select a new password the first
time they log in, check the Change password at next login
check box.
12. Leave the selected user's language from the Interface Language
drop down list as the default - English.
13. Leave the selected user's locale from the Regional Locale
Preference drop down list (affects dates, calendars and
currency) as the default - English.
14. Enter Employee ID (this field is used for ISN Transfers)
15. Enter Company ID (this field is used for ISN Transfers).
This is a Required Field. (Your Company ID can be found in
parenthesis behind your Company Name in the Hierarchy.)
16. Distribution Rule – This field is used for distribution rules.
Distribution Rules are level specific and will be added by MEA
Technical Support on an as needed basis.
17. Enter Company ID – This is a Required Field. (Your Company ID
can be found in parenthesis behind your Company Name in
the Hierarchy.)
18. Evaluator ID field will be filled in by MEA if necessary.
19. Click the Insert button to save the new user or the Reset button
to clear all fields so that you may start again.
11
13
14
15 16
17
18
19
12

13 | P a g e
Remove a User
Companies are required to keep employee qualification records for five
years after their last qualification expiration. Before removing a user,
make sure to export a copy of the user’s records for your files. To save
records, refer to Ad Hoc Reporting – Employee Record Backup –
Certificates & Employee Record Backup – Courses.
Follow the steps below to use the Remove Users option.
1. Select the appropriate level in the Hierarchy.
2. Select Users from the Categories Bar.
3. Select All Users from the row of Filter Buttons.
4. Select Remove Users from the Other Options list on the right
side of the screen.
5. Use the Search options to locate one or more users or click the
Show All button to display all users.
6. Check the check box next to each user you wish to remove from
the level.
7. Click Remove.
8. Click Yes in the popup that says, “Are you sure you want to
remove the user from this level? Ensure you have backed up
employee records prior to removal from company level.”
OR
Simply click the Trash Can next to the Users name.
THIS ACTION IS IRREVERSIBLE. REMOVING A USER WILL REMOVE
THE USER ALONG WITH ALL OF THEIR RECORDS.
5
6
7 8

14 | P a g e
Adding System Administrators
A system administrator can assign the administration role to other
users. There is no limit to the number of administrators you can have.
Once a user is designated as an administrator, you will need to assign
them administrative rights. Each Administrator must understand the
Administrator Role and Responsibility Agreement. You can find this
document by clicking on Administrator Support, then clicking on the
link at the right.
Follow the steps below to use the Assign the System Administrator
Role to Users option.
1. Select the appropriate level in the Hierarchy.
2. Select Users from the Categories Bar.
3. Select System Administrators from the row of Filter Buttons.
4. Select Assign the System Administrator Role to Users from
the Other Options list on the right side of the screen.
5. To locate one or more users that you wish to assign this role,
use the Search options or click the Show All button to display
all users.
6. Click OK.
7. Check the check box next to each user that you wish to make an
administrator.
8. Click the Add button to complete the process.

15 | P a g e
Edit Administrative Rights
Once a user has been given administrator status you need to use the
Edit Administrative Rights option to grant them administrative rights.
You can grant an administrator all of the rights available, or you can
grant them select rights depending on their role.
Follow the steps below to use the Edit Administrative Rights option.
1. Select the appropriate level in the Hierarchy.
2. Select Users from the Categories Bar.
3. Select System Administrators from the row of Filter Buttons.
4. Click on the user.
5. Select Edit Administrative Rights.
6. Expand the categories to select the desired rights.
a. NOTE: You will only be able to assign the same
or less permissions than you have.
7. Check the box next to the desired permissions.
8. Under Permission Groups, you will only have the option
currently assigned to you.
9. If you desire permission different from the permission
group(s), check or uncheck the desired settings under
General Permissions.
10. Click the Update button to complete the process.

16 | P a g e
Adding User Managers
A User Manager forms a relationship between a user and their
supervisor. User managers are level independent but will need to first
be assigned EnergyU Administrator rights. After you have made the
User a System Administrator and granted Administrator Rights, use
the Assign the User Manager Role to Users option to add a user as a
user manager. This will give the user access to perform certain functions
within the system and to receive notifications regarding users who are
assigned to them.
Follow the steps below to use the Assign the User Manager Role to
Users option.
1. Select the appropriate level in the Hierarchy.
2. Select Users from the Categories Bar.
3. Select User Managers from the row of Filter Buttons.
4. Select Assign the User Manager Role to Users from the Other
Options list on the right side of the screen.
5. To locate one or more users that you wish to assign this role,
use the Search options or click the Show All button to display
all users.
6. Click OK.
7. Check the check box next to each user that you wish to make a
user manager.
8. Click the Add button to complete the process.

17 | P a g e
Once the User Manager role has been assigned to the User,
you need to limit their rights to that of the User Manager Role.
1. Select the appropriate level in the Hierarchy.
2. Select Users from the Categories Bar.
3. Select System Administrators from the row of Filter Buttons.
4. Click on the user.
5. Select Edit Administrative Rights.
6. Click box next to Limit rights according to User Manager Role.
7. Click Update.
NOTE: You will only be able to assign User Managers the same
or less permissions than you have.
18 | P a g e
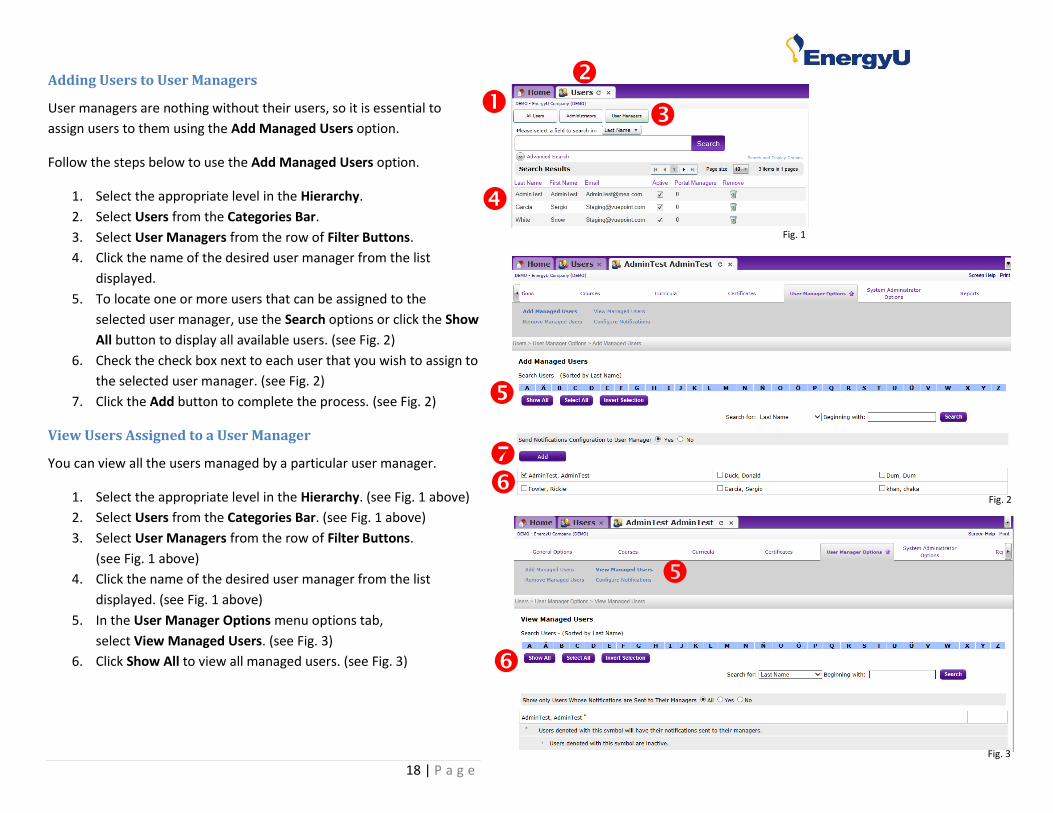
Adding Users to User Managers
User managers are nothing without their users, so it is essential to
assign users to them using the Add Managed Users option.
Follow the steps below to use the Add Managed Users option.
1. Select the appropriate level in the Hierarchy.
2. Select Users from the Categories Bar.
3. Select User Managers from the row of Filter Buttons.
4. Click the name of the desired user manager from the list
displayed.
5. To locate one or more users that can be assigned to the
selected user manager, use the Search options or click the Show
All button to display all available users. (see Fig. 2)
6. Check the check box next to each user that you wish to assign to
the selected user manager. (see Fig. 2)
7. Click the Add button to complete the process. (see Fig. 2)
View Users Assigned to a User Manager
You can view all the users managed by a particular user manager.
1. Select the appropriate level in the Hierarchy. (see Fig. 1 above)
2. Select Users from the Categories Bar. (see Fig. 1 above)
3. Select User Managers from the row of Filter Buttons.
(see Fig. 1 above)
4. Click the name of the desired user manager from the list
displayed. (see Fig. 1 above)
5. In the User Manager Options menu options tab,
select View Managed Users. (see Fig. 3)
6. Click Show All to view all managed users. (see Fig. 3)
Fig. 1
Fig. 2
Fig. 3

19 | P a g e
Managing Levels
Using the Hierarchy, you can divide your organizational structure into
different levels. This makes the management of your organization a
simpler process.
The division of your Hierarchy can be based on geographic location,
branch, department, job site, job title, etc. You can assign users, courses,
curricula, and certifications on a level basis. Your users, courses,
curricula, and certifications can be assigned to a particular level or a
group of levels. Every Level of your hierarchy MUST have your Company
ID included in the Level Name. Your Company ID can be found in
parenthesis behind your Company Name in the hierarchy (i.e., DEMO).
Three primary purposes for level hierarchy:
Course Distribution – Assign courses to users via the Hierarchy. You can
assign the same course(s) and certification program(s) to all of the users
in a specific level and the levels below it by making a course default at
that level (contact MEA Technical Support to request courses and
certification programs to be defaulted). The layout of your Hierarchy
can directly impact the ease of distributing courses to multiple divisions
of your organization.
Delegated Administration – Administrators have access to specific
rights and levels in the system, and are able to interact with the objects
(users, courses, curricula, certifications, etc.) in the levels they are
permitted to access. For example, you may want to grant access to a
manager only for his or her division. When that manager logs into VLS
Administrator, he or she will only see the level that they have been
assigned to and those below it; they will not see the entire Hierarchy.
Reporting – Reports are run against selected levels. The levels you
select determine which users and courses will be visible on the report.
The higher the level in which you run the report, the larger the pool of
data being reported on.
Example Hierarchy

20 | P a g e
Adding Levels
Follow the steps below to use the Add Level option.
1. Select the appropriate level from the Hierarchy.
NOTE: The level you select will be the parent of your new level.
2. Select System from the Categories Bar.
3. Select Level Structure from the Configuration Settings menu
options group.
4. Select the Add Level option from the Option List on the left side
of the screen.
5. Enter the name of the level in the Name field. Your Company ID
MUST be entered in parenthesis behind your new Level Name
(i.e., DEMO). Do not enter anything in the Password or IMS
Unique Level ID fields.
6. Click Add.
Edit Level Properties
Select the Edit Level Properties option from the Option List on the left
side of the screen to change the name of your level.
Remove Level
Select the Remove Level option from the Option List on the left side
of the screen to remove that level from your hierarchy. This is an
irreversible function. All Users, Courses, and Certification Programs will
also be removed from this level. However, any courses and certificates
that were assigned to a user at this level will remain assigned to the user.
If you want to remove courses and certificates assigned to the user at this
level, you need to (in this order):
1. Remove the certificates from the user.
2. Remove the courses from the user.
3. Remove the user from the level.
4. Remove the level.

21 | P a g e
Add Existing User(s) to Another Level(s)
Once you create an initial user account, that user can be added to other
levels in your hierarchy without reentering the profile information. This
saves time and allows users to belong to multiple levels using the same
profile information. You can also add a new user directly to the new
level by selecting the level and adding a new user.
Follow the steps below to use the Add Existing Users to the
Current Level option.
1. Select the appropriate level in the Hierarchy.
2. Select Users from the Categories Bar.
3. Select Add Existing Users to the Current Level from the
Other Options list on the right side of the screen.
4. To locate one or more users that you wish to add to the
current level, use the Search options or click the Show All
button to display all users. (Click OK).
5. Check the check box next to each user that you wish
to add to the current level.
6. Click the Add button.

22 | P a g e
Add Existing Course(s) to Another Level(s)
Courses can easily be added to other levels in your hierarchy.
Follow the steps below to use the Add Existing Course(s) to
the Current Level option.
1. Select the appropriate level in the Hierarchy.
2. Select Courses from the Categories Bar.
3. Select Add Existing Courses to the Current Level from
the Other Options list on the right side of the screen.
4. To locate one or more courses that you wish to add to
the current level, use the Search options or click the
Show All button to display all users.
5. Check the check box next to each course that you wish
to add to the current level.
6. Click the Submit button.
7. You will receive a confirmation that the Courses were
Added Successfully.
8. An Event MUST be selected in order for the courses to launch.
Select the box next to MEA default for EACH course(s). Never
select an event that has a “_” in front of the name.
9. Click Submit.
10. Default the events by selecting the System icon, clicking on
Utilities, then Default All Events. Click Submit (a confirmation
message is displayed, then OK.
Add Existing Certification Program(s) to Another Level(s)
This is a function that must be done by MEA Technical Support. Please contact MEA after Courses have been added to the New Level.

23 | P a g e
Update a User’s Profile
When user information changes you must update the user's
account accordingly.
In addition to updating basic information such as First Name, Last
Name, and Email, the Update Profile option allows an administrator to:
• Set a user's Active status (clicking the check box toggles a user
between active and inactive, changing a user’s status to inactive
will deactivate the employee, they will still show on your user
list, they will still occupy a license, but they won’t be able to log
into the system.)
• Leave Date will automatically populate when the user is
made inactive
• Change a user’s Login Name
• Change a user’s Password
• Force the user to change their password next time they login
NOTE: The Regional Locale Preference drop down list allows you to
select a locale for the user’s profile. Changing the Regional Locale
Preference affects dates, calendars, and currency within VLS
Administrator and the Portal. Do NOT make any changes to this field
or to the Interface Language field.
Follow the steps below to use the Update Profile option.
1. Select the appropriate level in the Hierarchy.
2. Select Users from the Categories Bar.
3. Use the Filter Buttons and Search functions to find
the desired user.
4. Select the desired user
5. In the General Options tab, click Update Profile.
6. Update information fields as needed.
7. Click Update.

24 | P a g e
View User Levels
The View Levels option allows you to view all of the levels to which a
user belongs. There are times that you may need to know the specific
levels a user resides in so that you can perform a function on that user,
such as assigning a course to them. This can also help you decide the
levels to which you want to assign particular courses.
Follow the steps below to use the View Levels option.
1. Select the appropriate level in the Hierarchy.
2. Select Users from the Categories Bar.
3. Use the Filter Buttons and Search functions to find
the desired user.
4. Select the desired user.
5. In the General Options menu options tab, select View Levels.
7 8

25 | P a g e
Reset Password
The Reset Password option allows you to change a user's password in
the event that a user forgets their password or if it needs to be changed
as a security measure.
Once you reset the user’s password, the user can login with the new
password and then change it to a more secure password if you have
selected the Change Password at Next Login button.
Users can also request forgotten passwords on the EnergyU login page.
NOTE: Users must have a valid email address in their profile in order to
request help using this feature.
Follow the steps below to use the Reset Password option.
1. Select the appropriate level in the Hierarchy.
2. Select Users from the Categories Bar.
3. Use the Filter Buttons and Search functions to find the
desired user.
4. Select the desired user.
5. In the General Options menu options tab, select
Reset Password.
6. Enter a new password for the account in the Password field.
7. Re-enter the same password for the account in the Confirm
Password field.
8. Click the Update button to complete the process.

26 | P a g e
Log User Out
In the event that you need to force a currently logged in user to exit
EnergyU, the Log User Out option allows you to immediately terminate
the user’s current session.
Follow the steps below to use the Log User Out option.
1. Select the appropriate level in the Hierarchy.
2. Select Users from the Categories Bar.
3. Use the Filter Buttons and Search functions to find and the
desired user.
4. Select the desired user.
5. In the General Options menu options tab, select Log User Out.
6. Click the Logout button.
7. Click OK on the confirmation dialog box.

27 | P a g e
Managing Users – Courses
View Courses
The View Courses option displays the courses and events to which the
user has been assigned within a level.
Follow the steps below to use the View Courses option.
1. Select the appropriate level in the Hierarchy.
2. Select Users from the Categories Bar.
3. Use the Filter Buttons and Search functions to find
the desired user.
4. Select the desired user.
5. Click the Courses menu options tab to expand it.
6. Select View Courses from the menu options list.

28 | P a g e
Assign Courses
The Assign Courses option allows you to directly assign courses and
events to a user.
THIS IS NOT THE RECOMMENDED WAY TO ASSIGN COURSES. REFER TO ENROLL IN CERTIFICATION PROGRAM FOR THE CORRECT INSTRUCTIONS FOR ASSIGNING COURSES. A prerequisite check is performed when assigning a course.
If a prerequisite for the course exists then the requirement
will be displayed.
To overwrite the prerequisite requirement and add the user to
the course or event, check the check box to the left of the course or
event name.
Follow the steps below to use the Assign Courses option.
1. Select the appropriate level in the Hierarchy.
2. Select Users from the Categories Bar.
3. Use the Filter Buttons and Search functions to find the
desired user.
4. Select the desired user.
5. Click the Courses menu options tab to expand it.
6. Select Assign Courses (w/o cert) from the menu options list.
7. Check the check box next to each course or event that you want
to assign to the user. NOTE: Selecting an event will
automatically select its associated course.
8. Click the Add button to complete the process.
The event must be assigned
in order for the user to
launch the course. Checking
the event box will also check
the course box.

29 | P a g e
Remove Courses
Use the Remove Courses option to remove one or more courses or
events from the list of those assigned to a user. This option does not
delete the course from your company’s level, it simply makes it
unavailable to the user. NOTE: Certificates need to be removed from
the user before the course is removed. See Remove a User from a
Certification Program(s) for instructions.
Courses marked with a “cu” symbol (cu) are part of a curriculum to which the user has been assigned. To remove the user from one of these courses, you must first remove the user from the curricula that contains the course. Courses marked with an asterisk (*) have been defaulted at this level. Contact EnergyU technical support for assistance in removing that course. If a user has a Distribution Rule assigned in their profile, you will need to remove the Distribution Rule from the user prior to removing the course.
Follow the steps below to use the Remove Courses option.
1. Select the appropriate level in the Hierarchy.
2. Select Users from the Categories Bar.
3. Use the Filter Buttons and Search functions to find the
desired user.
4. Select the desired user
5. Click the Courses menu options tab to expand it.
6. Select Remove Courses from the menu options list.
7. Check the check box next to one or more courses or events that
you want to remove from the user. NOTE: Selecting a course will
automatically select its associated event.
8. Click the Remove button.
9. Click OK on the confirmation dialog box.
NOTE: Remember to remove the certificates from
the user BEFORE removing the course.

30 | P a g e
Remove Certificates
Before removing a course from a user, the associated certificates must
also be removed.
Follow the steps below to use the Remove Certificates option.
1. Select the appropriate level in the Hierarchy.
2. Select Users from the Categories Bar.
3. Use the Filter Buttons and Search functions to find the
desired user.
4. Select the desired user
5. Click the Certificates menu options tab to expand it.
6. Select Enroll/Remove Certificates from the menu options list.
7. In the Assigned Certification programs column on the right,
check the box next to one or more certificates that you want
to remove from the user.
8. Click the Remove button.
9. Click OK on the confirmation dialog box.

31 | P a g e
Resetting Courses
To allow a user to retake a Training Course (e-TNG) or a Knowledge Test
(KNT), use the Reset Course Tracking Data option. Course scores, visited
pages, and question pools can be included among the data that is reset.
While this information is reset, the users' historical scores and event
credit information are retained by the system. This function is to be
used ONLY when a User does not pass a course. For requalification
purposes, refer to Resetting a Certification Program.
Resetting a Single User
Follow the steps below to use the Reset Course Tracking Data option.
1. Select the appropriate level in the Hierarchy.
2. Select Users from the Categories Bar.
3. Use the Filter Buttons and Search functions to find the
desired user.
4. Select the desired user.
5. Click the Courses menu options tab to expand it.
6. Select Reset Course Tracking Data from the menu options list.
7. To locate one or more courses that you wish to reset for a user,
use the Search options.
8. Click the Box next to the Courses to Reset.
9. To reset the user's scores, assessment answers and visited pages
associated with courses, check the Reset Course check box.
10. To reset the question pool for a user check the Reset question
pool check box.
11. DO NOT check the Permanently Delete all Course History.
This is irreversible.
12. NOTE: EnergyU assessments do not use a timer, so checking
Reset timer for assessment modules is not required.
13. Click the Submit button to complete the process.
13
DO NOT check Permanently Delete all Course History.
NOTE: If a course is grayed out, it means
the certificate has already been granted
and it cannot be reset through the
course. To reset a certificate for
requalification, please refer to Resetting
a Certification Program.

32 | P a g e
Resetting Multiple Users
Follow the steps below to use the Reset Course User Data option. This
function is to be used ONLY when a User does not pass a course. For
requalification purposes, refer to Resetting a Certification Program.
1. Select the appropriate level in the Hierarchy.
2. Select Courses from the Categories Bar.
3. Use the Filter Buttons and Search functions to find the
desired course.
4. Select the desired course.
5. Click the Users menu options tab to expand it.
6. Select Reset Course User Data from the menu options list.
7. Use the Search options to locate the desired user(s).
8. Check the check box next to each user for whom you want to
reset or delete course data.
9. To reset the course scores, assessment answers and visited
pages associated with courses, check the Reset Course
check box.
10. To reset the question pool, check the Reset question pool
check box
11. DO NOT check the Permanently Delete all Course History.
This is irreversible.
12. NOTE: EnergyU assessments do not use a timer, so checking
Reset timer for assessment modules is not required.
13. Click Submit.
13
DO NOT check Permanently Delete all Course History.
NOTE: If a course is grayed out, it means the certificate has already
been granted and it cannot be reset through the course. To reset a
certificate for requalification, please refer to Resetting a
Certification Program.

33 | P a g e
Managing Users - Certification Programs
Certifications Programs are a means of assigning courses and tracking
Operator Qualification requirements for courses.
Enroll a User in a Certification Program(s)
Follow the steps below to Enroll a User in one or multiple
Certification Program(s).
1. Select the appropriate level in the Hierarchy.
2. Select Users from the Categories Bar.
3. Use the Filter Buttons and Search functions to find the
desired user.
4. Select the desired user.
5. Click the Certificates menu options tab to expand it.
6. Select Enroll/Remove Certificates from the menu options list.
7. Refer to the Certification List* to find the appropriate
certification programs in relation to the courses the user needs
to complete. For Example, if your User is required to complete
qualifications for 192-0302, you will enroll them in certification
programs MEA1409, MEA1132, MEA16 & MEA17.
8. To locate one or more certificate programs that you wish to add
to a user, scroll down the list or use the Search options to find a
specific certificate program.
9. Click the box next to the desired certification program.
10. Click Enroll before advancing to the next page.
THIS FUNCTION WILL AUTOMATICALLY ENROLL THE USER
IN THE CORRESPONDING COURSES. For example, if you enroll your
user in MEA1409, your user will be assigned course 192-0302 e-TNG.
The user is now ready to begin taking their courses.
*Certification List can be found at www.energyu.org Click Administrative Services>EnergyU Support>EnergyU Administrators

34 | P a g e
Adding User(s) to a Certification Program
Follow the steps below to Enroll one or multiple User(s) in one
Certification Program.
1. Select the appropriate level in the Hierarchy.
2. Select Certification Programs from the Categories Bar.
3. Select Manage Certification Programs.
4. Refer to the Certification List* to find the appropriate
certification programs in relation to the courses the user needs
to complete. For Example, if your User is required to complete
qualifications for 192-0302, you will enroll them in certification
programs MEA1409, MEA1132, MEA16 & MEA17.
5. Select the desired Certificate Program.
*Certification List can be found at www.energyu.org Click Administrative Services>EnergyU Support>EnergyU Administrators

35 | P a g e
6. Click Manage Users.
7. Select Add Program Users from the menu options list.
8. Click Show All to locate one or more Users that you wish to add
to a Certificate Program, or use the Search options to find a
specific certificate program. (Click OK if using Show All option.)
9. Click the box next to the desired Users.
10. Click Add.
THIS FUNCTION WILL AUTOMATICALLY ENROLL THE USER
IN THE CORRESPONDING COURSES. For example, if you
enroll your user in MEA1409, your user will be assigned
course 192-0302 e-TNG. The user is now ready to begin
taking their courses.

36 | P a g e
Remove a User from a Certification Program(s)
Follow the steps below to Remove a User from one or multiple
Certification Program(s).
1. Select the appropriate level in the Hierarchy.
2. Select Users from the Categories Bar.
3. Use the Filter Buttons and Search functions to find the
desired user.
4. Select the desired user.
5. Click the Certificates menu options tab to expand it.
6. Select Enroll/Remove Certificates from the menu options list.
7. Locate one or more certificate programs that you wish to
remove from a user or use the Search options to find a specific
certificate program.
8. Click the box next to the desired certification program.
9. Click Remove before advancing to the next page.
THIS FUNCTION WILL REMOVE THE USER FROM THE CERTIFICATION
PROGRAM(S), BUT NOT FROM THE CORRESPONDING COURSE(S).
To remove the User from the Course(s), refer to Remove User from
a Course(s).

37 | P a g e
Remove a Certification Program from a User(s)
Follow the steps below to Remove a Certification Program from one or
multiple User(s).
1. Select the appropriate level in the Hierarchy.
2. Select Certification Programs from the Categories Bar.
3. Click Manage Certification Programs.
4. Select the desired Certification Program.
5. Click the Manage Users menu options tab to expand it.
6. Select Remove Program Users from the menu options list.
7. To locate one or more certificate programs that you wish to
remove from a user, Click Show All or use the Search options
to find a specific certificate program.
8. Click the box next to the desired Users.
9. Click Remove.
THIS FUNCTION WILL REMOVE THE USER FROM THE CERTIFICATION
PROGRAM(S), BUT NOT FROM THE CORRESPONDING COURSE(S).
To remove the User from the Course(s), refer to Remove User from
a Course(s).

38 | P a g e
View Certification Program Users
Follow the steps below to View Users Enrolled in a
Certification Program.
1. Select the appropriate level in the Hierarchy.
2. Select Certification Programs from the Categories Bar.
3. Click Manage Certification Programs.
4. Select the desired Certification Program.
5. Click the Manage Users menu options tab to expand it.
6. Select View Program Users from the menu options list.
7. To locate one or more certificate user, Click Show All or
use the Search options. You can then View all Users
Enrolled in Selected Certification Program.
8. To view certificate information, click on the desired user.
Shows incomplete certificate Shows complete certificate with completion and expiration dates

39 | P a g e
Manage Certification Program Completion
Once a User is Enrolled in a Certification Program, EnergyU will
automatically grant the certificates for any courses completed online.
Performance Evaluations, however, because they are done in the field,
need to be manually granted. Follow the steps below to Manage
Certification Program Completion. This method can be used for
granting certificates to one or more users for one certificate program.
1. Select the appropriate level in the Hierarchy.
2. Select Certification Programs from the Categories Bar.
3. Click Manage Certification Programs.
4. Select the desired Certification Program.
5. Click the Manage Users menu options tab to expand it.
6. Select Completion Management from the menu options list.
7. To locate one or more Users to Grant the selected Certification
Program, scroll through list or use the Search options.
8. Click the arrow of the User to whom you wish to Grant the
Certification Program.
9. Change the Status from Incomplete to Complete.
10. Enter the Completion Date for the PEF
(Performance Evaluation).
11. Click Apply.
REMEMBER – This Function is ONLY to be used for Performance
Evaluations (PEF’s), NEVER for KNT Courses. e-TNG courses may
only be manually granted if completed in a classroom setting with
a signed course roster (contact EnergyU Support for a copy of
the roster).
11

40 | P a g e
Manage Certification Program Completion
Once a User is Enrolled in a Certification Program, EnergyU will
automatically grant the certificates for any courses completed online.
Performance Evaluations, however, because they are done in the field,
need to be manually granted. Follow the steps below to Grant Users
Certificates. This method can be used for granting multiple certificates
for a single user.
1. Select the appropriate level in the Hierarchy.
2. Select Users from the Categories Bar.
3. Use the Filter Buttons and Search functions to find the
desired user.
4. Select the desired User.
5. Click on the Certificates tab.
6. Click on Grant Certificates.
7. Check the box next to the desired Certification Program.
8. Change the date to the date the Performance Evaluation
was completed.
9. Click Update.
REMEMBER – This Function is ONLY to be used for Performance
Evaluations (PEF’s), NEVER for KNT Courses. e-TNG courses may only
be manually granted if completed in a classroom setting with a signed
course roster (contact EnergyU Support for a copy of the roster).

41 | P a g e
View Achieved Certification Programs
Follow the steps below to View Certification Programs a User
has Achieved.
1. Select the appropriate level in the Hierarchy.
2. Select Users from the Categories Bar.
3. Use the Filter Buttons and Search functions to find the
desired user.
4. Select the desired user.
5. Click the Certificates menu options tab to expand it.
6. Select View Achieved Certificates from the menu options list.
7. All Certificates the User has achieved will appear.
NOTE: If a User is NOT Enrolled in a Certification Program, it will
not show here. You can Enroll the User in the Program after the
course has been completed, however, it can take up to 2 hours
before the Certificate will appear as Achieved.

42 | P a g e
Resetting a Certification Program
Follow the steps below to Reset Certification Programs a
User has Achieved.
• Procedure #1 will allow you to reset multiple certificates for a single user
• Procedure #2 will allow you to reset multiple users within a single certificates
ENERGYU WILL AUTOMATICALLY RESET THE CERTIFICATION PROGRAM
60 DAYS BEFORE EXPIRATION, YOU DO NOT NEED TO DO THESE
PROCEDURES UNLESS THE USER IS REQUALIFYING EARLY. THESE
PROCEDURES MUST BE COMPLETED ONLY FOR RECERTIFICATION, NOT
IF A USER HAS FAILED A COURSE. THESE PROCEDURES WILL ALSO
RESET THE ASSOCIATED COURSE.
Procedure #1 – Reset multiple certificates for a single user 1. Select the appropriate level in the Hierarchy.
2. Select Users from the Categories Bar. 3. Use the Filter Buttons and Search functions to find the
desired user.
4. Select the desired user.
5. Click the Certificates menu options tab to expand it.
6. Select Reset Certification Programs from the menu options list.
7. To locate one or more Certificates, Click Show All or use the
Search options to find a specific certificate program.
8. Click the Box next to the desired Certificate Program.
9. Click Update.
This will Reset the Certification Program and the Associated
Course. The User can now go into their Course and Requalify.
NOTE: If a User is NOT Enrolled in a Certification Program, it will not
show here. You can Enroll the User in the Program after the course
has been completed, however, it can take up to 2 hours before the
Certificate will appear as Achieved and available to reset.

43 | P a g e
Procedure #2 – reset multiple users within a single certificate 1. Select the appropriate level in the Hierarchy.
2. Select Certificates from the Categories Bar. 3. Select Manage Certification Programs.
4. Select the desired Certificate.
5. In the Manage Users tab, select the
Reset Program Users option.
6. Click Show All.
7. Click OK.
8. Click Select All or check the boxes next to the Users to reset.
9. Click Reset.
This will Reset the Certification Program and the Associated
Course. The User can now go into their Course and Requalify.
NOTE: If a User is NOT Enrolled in a Certification Program,
it will not show here. You can Enroll the User in the Program
after the course has been completed, however, it can take up
to 2 hours before the Certificate will appear as Achieved and
available to reset.

44 | P a g e
Print Users Certificates
Once a User has achieved their Certificate, you have the ability to print a
certificate. Follow the steps below to Print a Certification Program
Certificate.
1. Select the appropriate level in the Hierarchy.
2. Select Certification Programs from the Categories Bar.
3. Click Manage Certification Programs.
4. Select the desired Certification Program.
5. Click the Manage Users menu options tab to expand it.
6. Select Print Program Certificates from the menu options list.
7. To locate one or more Users to Print a Certificate, Click Show All
or use the Search options to find a specific certificate program.
8. Click the Box next to the User to whom you wish to Print a
Certificate.
9. Click Print.

45 | P a g e
Print Users Certificates – Not Printing Properly
Occasionally, the Certificate border will not print – this is a printer
setting for your browser. You will need to go into the browser print
settings and check the box to allow printing of background graphics.
Internet Explorer Mozilla Firefox (ESR)

46 | P a g e
Adding Prerequisites to a Course
Prerequisites can be set up so that a user is required to take and pass a
specified course before they can take another course. For example, you
may want the User to take the Training prior to taking the Knowledge
Test. This is a requirement for some Operators. Follow the steps below
to add a Prerequisite to a Course.
1. Select the appropriate level from the Hierarchy to which you
would like to create the prerequisite for a particular course.
2. Select the Courses button.
3. Select the course to which you would like to ADD
the prerequisite. (i.e., if a user needs to complete
the TNG before taking the KNT, the KNT would be
the course you would add the prerequisite and the
TNG would be the prerequisite.)
4. Click on Add Prerequisites.
5. Click the box next to the Course you wish to BE
the prerequisite.
6. Click Add.
NOTE: This Procedure can only be completed at
your main Company Level.

47 | P a g e
Resources
Accessing Resources
There are a number of different Resources available to you in EnergyU:
• EnergyU Certificate List
• EnergyU Role & Responsibility Agreement
• EZval Resource Folder
• MEA Evaluator Application
• MEA OQ Program Usage and Review
• MEA PEFs 192 Library
• MEA PEFs 195 Library
• MEA PEFs ASME Library
• MEA PEFs ELEC Library
Follow the steps below to Access available Resources.
1. Log in to EnergyU.
2. Click on the Resources tab.
3. To select the Resource you’d like to view, Click View File.
Follow the steps below to Download EZval onto a Windows platform.
1. Click on View File.
2. Click the dropdown for Save and select Save and open.
3. Select EZval_Setup.exe.
4. Follow instructions in Setup.
To Download EZval using an IOS application:
For iPad users, visit the Apple Store to download the app, then contact
MEA Technical Support for the product key required to download the
actual forms into the iOS version of the app.

48 | P a g e
Assigning Resources
As the Administrator, you have the ability to assign Resources to your
users. For example, and Evaluator that needs Performance Evaluations
or EZval.
Follow the steps below to Assign a Resource to a User.
1. Select the appropriate level in the Hierarchy.
2. Select Resources from the Categories Bar.
3. Click on the Resource you wish to Assign.
4. Click on Assign Users.
5. Click on the purple Spyglass – Click Yes.
6. Click the box next to the desired User.
7. Click Enroll.

49 | P a g e
Distribution Rules
By utilizing EnergyU’s Distribution Rules function, you will have the
ability to automatically enroll users in certification programs, which will
automatically assign the associated courses to users. By doing this, the
users will then be able to start taking courses the following morning.
Distribution Rules come in very useful when you have a number of
Users that all need to take the same courses. For example, you have a
group of Fuser needs to have a total of 22 courses and you have 15
Fusers. You would simply enter “ABCD-Fuser” in the distribution field of
their profile (a specific custom field given to you by EnergyU tech
support) and the following morning, they would have their courses and
certificate programs showing upon logging into the system.
Benefits of utilizing “Distribution Rules”:
• By simply entering a Distribution Rule name in the Users profile,
they will be automatically enrolled in a group of Certification
Programs. This will, in turn, automatically assign the associated
courses to the User.
• Users can have multiple Distribution Rules assigned to
their profile.
• Courses will be available to the User the following morning.
• Upon course completion, the system will automatically grant
the certificates for the “passed” course.
• 60 days before the certification program expires, the system will
automatically reset the certification program, which will in turn,
reset the course for requalification.
• Certificates for Performance Evaluations will have been
automatically enrolled and will be available to grant upon
completion of the evaluation.
• Reports can be filtered on a Distribution Rule, thereby showing
only users in a specific area/job description.
Distribution Rule Example

50 | P a g e
EnergyU Technical Support will notify you that your Distribution Rules
have been set up and give you the list of Distribution Rule names.
You can then assign them to your Users.
Please follow these steps to assign the Distribution Rule:
1. Select the appropriate level in the Hierarchy.
2. Click on the Users icon.
3. Select the User.
4. Select Update Profile.
5. In the Distribution Rule field, enter the distribution rule name
for the desired position (i.e., DEMO-Golfer). Please note, the
name MUST be entered exactly how it is listed in the
information provided to you. This name is specific to your
company. If it is not entered exactly, the process will not work
and your Users will not get their courses.
6. If the User requires multiple distribution rules, you may enter
additional distribution rules in the distribution field. Separate
the distribution rules by a comma with no spaces
(i.e., DEMO-Golfer,DEMO-Fitter).
7. Click Update.
The distribution rule process runs nightly. The courses will be available
to your users the following morning.

51 | P a g e
Reporting
There are 3 types of reports in EnergyU. All reports can be exported
in a variety of formats.
Standard reports
These are static and cannot be changed. They are typically “real time”
reports, meaning, you don’t have to wait for the database to update for
accurate information.
The most widely used standard report is the Credits by User report.
This is available under Reports>Users>Credits by User or in the Users
profile under Reports>Credits by User.
Dynamic Reports
These are reports that are already designed. The basic information it is
pulling cannot be changed. You can however choose the fields you
would like to see in the reports, how you would like it sorted and with
some reports filter, such as a date range, etc. Dynamic reports require
the database to update before data will be available. The database
updates every 2 hours.
To access click on the desired report: 1. Click Show/Hide. 2. Check the desired fields. 3. Choose Add to Sort or Remove for Sorting Columns. 4. Click Submit.
Dynamic Reports have a small blue icon in front of the report name.

52 | P a g e
Ad Hoc Reports
These are Custom reports that have been built by EnergyU Technical
Support. Ad Hoc reports can be run from the home page of the User
Portal – Click on Reports. They require the database to update before
data will be available. The database updates every 2 hours. Contact
EnergyU Technical Support to request specific reports, including
backup reports.
The graphic at the right shows access to Ad Hoc reports from the User
Portal. Click on the report name and it will run.
Note: If you do not have any Ad Hoc Reports showing here, you have not
been assigned any Ad Hoc Reports.
The report runs based on the filters which are preset. Click the Filters
button to display the filters. This will allow you to change the filter. To
update the results after changing the filters, simply click Update Results

53 | P a g e
Glossary of Terms
Ad Hoc Reports
Reports that are designed by technical support and assigned to users. These
reports differ from Dynamic Reports in administrators' ability to select the
data on which reports are based and include charts and gauges in the
reports.
Administrators
Users who have rights in VLS Administrator. Administrators are able to
manage users, courses, curricula, certifications, competencies, credits,
instructors, facilities, and VLS options.
Authors
VLS users who can create and edit VLS courses in Content Creator. An
author must be given rights to retrieve and publish other authors’ courses.
Catalog
A catalog is a group of curricula or resources.
Certificates
Documents that are given to individuals who have completed certification
programs.
Certification Programs
Tracks the activities that individuals are required to complete in order to
earn a certification. Certification Programs consist of courses and
performance evaluations.
Content Creator
The VLS authoring tool included with EnergyU. Contact MEA Technical
Support for instructions on downloading and installing Content Creator.
Courses are authored and uploaded to the edit server for testing. Final
versions are transferred to EnergyU to be accessed by your company’s
users.
Course
A learning program that is used to train users in skills, product knowledge,
and brand knowledge.
Course Short Name/Short Name
Identification code or name for a course. This is the MEA Certificate Number
associated with the course; used for internal and ISNetworld®
recordkeeping purposes.
Curriculum
A collection of courses. Users must pass all of the courses in a curriculum in
order to pass the curriculum.
Distribution Rules
Use distribution rules to automatically distribute certificates or curricula. A
curricula may be comprised of catalogs and/or courses. The rules
determine how the distribution is handled.
Edit Server
The server used to develop, edit, and review courses authored with Content
Creator. Contact MEA Technical Support to transfer finished courses to the
EnergyU view server.
Event
The set of scheduled dates, times, and other parameters that administrators
attach to a course. An event is required to view a course. Generally, the
default MEA event is sufficient for users of all companies.

54 | P a g e
Event Type
The sort of event that is associated with a particular course. A VLS event
applies to courses authored in Content Creator. An online event applies to
AICC or SCORM courses (e.g., courses authored in Lectora). Classroom
events can also be set up.
Hierarchy
A tree view that displays the levels of your organization in Administrator.
Menu Filter
A list that allows management of information in Administrator. The menu
filter is broken into nine categories, which are broken down even further.
Notifications
Emails sent out to users to inform them about recertification for courses
and certifications. Notification options are managed by EnergyU Technical
Support. Contact EnergyU Technical Support if you would like to utilize the
notifications feature.
Online Course vs. VLS Course
An Online Course is an eLearning course not authored in Content Creator.
These courses are AICC and SCORM compliant (e.g., MEA Lectora authored
courses). A VLS Course is an eLearning course authored in Content Creator,
the free VLS authoring tool included with EnergyU.
Passing Score
The minimum score a user must earn to satisfy the requirements of a course
or assessment.
Permission Groups
Groups of rights, which can be assigned to groups of administrators.
Assigning rights in groups speeds up the process of assigning rights to
administrators, and helps keep the process of assigning rights more
consistent.
Portal
The web page through which users access Administrator or Learn. From the
portal users can access transcripts and launch courses.
Resource
A resource can be a course, or an uploaded file. Resources can be grouped
into a catalog.
Short Name
Identification code or name for a course that is not visible to the users. This
is the MEA Certificate Number associated with the course; used for internal
and ISNetworld® recordkeeping purposes.
Transcript
Record of a user’s learning data. When a user has logged in the transcript
can be accessed in the Portal.
User Managers
A role that is created to form a relationship between a user and his or her
manager. User Managers have rights to perform certain functions and
receive notifications within the system for the users assigned to them. User
Managers are level independent and need to also be an administrator in the
system.
View Server
The server that users access: EnergyU.org.
VLS Course vs. Online Course
An eLearning course authored in Content Creator, the free VLS authoring
tool included with EnergyU.