ENERGY USAGE DATA SYSTEM (EUDS) - Powering … USAGE DATA SYSTEM BUILDING MANAGER USER GUIDE CALICO...
44
ENERGY USAGE DATA SYSTEM (EUDS) Energy Efficiency Program Provider This program is offered by Calico Energy Services and is funded by ComEd customers in compliance with Illinois law. BUILDING MANAGER USER GUIDE v.1.4 Copyright © 2013, Calico Energy Services, Inc. or its affiliates. The names, logos, taglines, and icons identifying Calico Energy Services products and services, including, but not limited to, Calico®, Energy Intelligence Suite, and the Calico logo are registered trademarks or trademarks of Calico Energy Services, Inc. or its affiliates. All other trademarks are the property of their respective owners. All rights reserved. P/N: Calico-2.0-Title Acro-DATE in numbers-R#
-
Upload
nguyenthuy -
Category
Documents
-
view
217 -
download
1
Transcript of ENERGY USAGE DATA SYSTEM (EUDS) - Powering … USAGE DATA SYSTEM BUILDING MANAGER USER GUIDE CALICO...

ENERGY USAGE DATA SYSTEM (EUDS)
Energy Efficiency Program Provider
This program is offered by Calico Energy Services and is funded by ComEd customers in compliance with Illinois law.
buIldIng managEr uSEr guIdEv.1.4
Copyright © 2013, Calico Energy Services, Inc. or its affiliates. The names, logos, taglines, and icons identifying Calico Energy Services products and services, including, but not limited to, Calico®, Energy Intelligence Suite, and the Calico logo are registered trademarks or trademarks of Calico Energy Services, Inc. or its affiliates. all other trademarks are the property of their respective owners. all rights reserved. P/n: Calico-2.0-Title acro-daTE in numbers-r#

ENERGY USAGE DATA SYSTEM BUILDING MANAGER USER GUIDE
2 CALICO ENERGY SERVICES, INC.

ENERGY USAGE DATA SYSTEM BUILDING MANAGER USER GUIDE
CALICO ENERGY SERVICES, INC. 3
TABLE OF CONTENTS
1. INTRODUCTION .......................................................................................................................... 5
2. GETTING STARTED ..................................................................................................................... 5
2.1 THE USER AUTHENTICATION PAGE .............................................................................................................. 5
2.2 THE EUDS DASHBOARD ................................................................................................................................. 6
3. SYSTEM FUNCTIONALITY ........................................................................................................... 7
3.1 USER MANAGEMENT ....................................................................................................................................... 7
3.1.1 View My User Profile ............................................................................................................................................. 7
3.1.2 Edit My User Profile ............................................................................................................................................... 8
3.1.3 Change My Password ............................................................................................................................................ 9
3.2 BUILDING MANAGEMENT ............................................................................................................................. 10
3.2.1 Create A New Building ....................................................................................................................................... 10
3.2.2 View Building Details .......................................................................................................................................... 11
3.2.3 Edit Building Details ............................................................................................................................................ 12
3.2.4 Delete an Existing Building .............................................................................................................................. 13
3.2.5 Secondary Addresses .......................................................................................................................................... 14
3.3 USAGE DATA REQUEST MANAGEMENT ..................................................................................................... 19
3.3.1 Make a New Usage Data Request ................................................................................................................... 19
3.3.2 Manage Recurring or Scheduled Usage Data Requests ....................................................................... 20
3.3.3 Manage Usage Data Requests .......................................................................................................................... 23
3.3.4 Verify Tenant Lists ........................................................................................................................................... 25
3.3.5 View Usage Report Details ................................................................................................................................ 26
3.4 SUBMIT BUILDING USAGE TO ENERGY STAR PORTFOLIO MANAGER ............................................... 28
3.4.1 Register with ENERGY STAR Portfolio Manager .................................................................................... 28
3.4.2 Select Your Energy Service Provider ............................................................................................................ 29
3.4.3 Set up Data Sharing ............................................................................................................................................... 31
3.4.2 EUDS Building Linking Data ............................................................................................................................ 42
3.4.3 Submitting Data to Portfolio Manager ........................................................................................................ 42
3.5 SUPPLEMENTARY REPORTS ......................................................................................................................... 43

ENERGY USAGE DATA SYSTEM BUILDING MANAGER USER GUIDE
4 CALICO ENERGY SERVICES, INC.

ENERGY USAGE DATA SYSTEM BUILDING MANAGER USER GUIDE
CALICO ENERGY SERVICES, INC. 5
THE ENERGY USAGE DATA SYSTEM (EUDS)
1. INTRODUCTION The EUDS system was developed to aggregate multi-tenant commercial building energy usage. This system has automated Building Energy Usage Data retrieval, resulting in reduced data request fulfillment.
The EUDS system gives Building Managers the opportunity to request energy usage data online as well as schedule requests and create recurring requests.
2. GETTING STARTED We’ll begin by logging in and accessing the EUDS Dashboard. The Dashboard provides quick access to the features and information within the system.
2.1 THE USER AUTHENTICATION PAGE
To log on:
1. Launch the portal from http://energyusagedata.com/login.aspx
2. The User Authentication page appears:
3. Enter your Username and Password into the fields.

ENERGY USAGE DATA SYSTEM BUILDING MANAGER USER GUIDE
6 CALICO ENERGY SERVICES, INC.
The EUDS Dashboard appears. A user will be able to login as a Building Manager only if he/she is registered under the user type Building Manager.
2.2 THE EUDS DASHBOARD
The Dashboard is the screen that greets the user upon logging in.
Request Summary Guide:
1. This Year – The total count of usage requests that have been processed to completion within this year.
2. This Month – The total count of usage requests that have been processed to completion within this month.
3. Previous Month – The total count of usage requests that have been processed to completion within the previous month.
4. Pending – The total count of usage requests that have been submitted and currently awaiting processing.
5. Awaiting Verification – The total count of usage requests that are awaiting verification of the tenant list.
6. Completed – The total count of usage requests that have been processed and verified. The usage data is available in the system. This is a running count of all completed requests to date. This number will be equal to or higher than the “Sent to Portfolio Manager” count.
7. Sent to Portfolio Manager – The total count of usage submissions to ENERGY STAR Portfolio Manager. This is a running count of all submissions to date.

ENERGY USAGE DATA SYSTEM BUILDING MANAGER USER GUIDE
CALICO ENERGY SERVICES, INC. 7
3. SYSTEM FUNCTIONALITY
This section describes the role the Building Manager plays in the EUDS system. An overview of the activities a Building Manager can perform is given below. Details of each activity are outlined in the following subsections.
User Management
View/Edit User Profile Change Password
Building Management
Create New Building View/ Edit/ Delete Building Details Add Secondary Addresses Edit/Delete Secondary Addresses
Request Management
Make New Usage Data Requests View/Edit/Delete Recurring or Scheduled Usage Data Requests View/Delete Usage Data Requests View Raw Usage Report Details Verify Tenant List
Building Managers can only modify their own user profile information.
A Building Manager can only view buildings that he/she created or that were created by another user on the Building Manager’s behalf. Building Managers cannot view the buildings of other Building Managers.
Building Managers can only view requests and reports associated with requests that they created and submitted themselves.
3.1 USER MANAGEMENT
As a user in the system, you can view and edit information in your user profile and change your password.
3.1.1 View My User Profile
To view your user profile:
1. On the upper right of the Dashboard, click on the My Profile link.
The My Profile page appears.

ENERGY USAGE DATA SYSTEM BUILDING MANAGER USER GUIDE
8 CALICO ENERGY SERVICES, INC.
3.1.2 Edit My User Profile
To edit your user profile:
1. On the upper right of the Dashboard, click on the My Profile link.
The My Profile page appears.
2. Click the Edit button.
The Edit User page appears.

ENERGY USAGE DATA SYSTEM BUILDING MANAGER USER GUIDE
CALICO ENERGY SERVICES, INC. 9
3. Make the desired modifications.
4. When finished, click the Update button to save the changes.
A confirmation message is displayed.
3.1.3 Change My Password
To change your user password:
1. On the upper right of the Dashboard, click on the My Profile link.
The My Profile page appears.
2. Click the Change Password button.
The Change Password popup appears.
3. Enter the required details and click Submit.

ENERGY USAGE DATA SYSTEM BUILDING MANAGER USER GUIDE
10 CALICO ENERGY SERVICES, INC.
A confirmation message is displayed and an email containing the new password is sent automatically to the email account provided in your user profile.
3.2 BUILDING MANAGEMENT
As a Building Manager, you can create new buildings; view, edit and delete existing buildings; and provide and edit secondary addresses for these buildings.
3.2.1 Create A New Building
To create a new building:
1. From the Dashboard, click on the Add New Building icon in the Building Summary section.
The Add New Building page is displayed.
2. Enter the required details for the new building.
Street Number: Enter only the number preceding the street name, not the full street address.
Example: 108 (not 108 Brown Street)
Street Name: Enter only the name of the street (do not include the street number or suite/unit numbers or other designations such as Ave, St, Blvd).

ENERGY USAGE DATA SYSTEM BUILDING MANAGER USER GUIDE
CALICO ENERGY SERVICES, INC. 11
The tool searches only under street name and anything in addition to this will
invalidate the search.
Example: Brown (not Brown Street, Suite 200)
Street Direction: The drop down box provides these values to select from: North, South, East, West or None. For addresses that do not have a direction, select None. If the address contains an intermediate compass direction (e.g., Northeast, Southeast, Southwest, Northwest), it can be entered into the system but requires special programming not available through the user interface. Please contact your system administrator for further assistance.
3. When finished, click on the Save button.
A confirmation message is displayed.
3.2.2 View Building Details
To view the details of a building:
1. From the Dashboard, click on the Building Summary link in the Building Summary section.
The Building Management page is displayed.
2. Click on the hyperlink in the Building Name column for the desired building.
The Building Details page is displayed.

ENERGY USAGE DATA SYSTEM BUILDING MANAGER USER GUIDE
12 CALICO ENERGY SERVICES, INC.
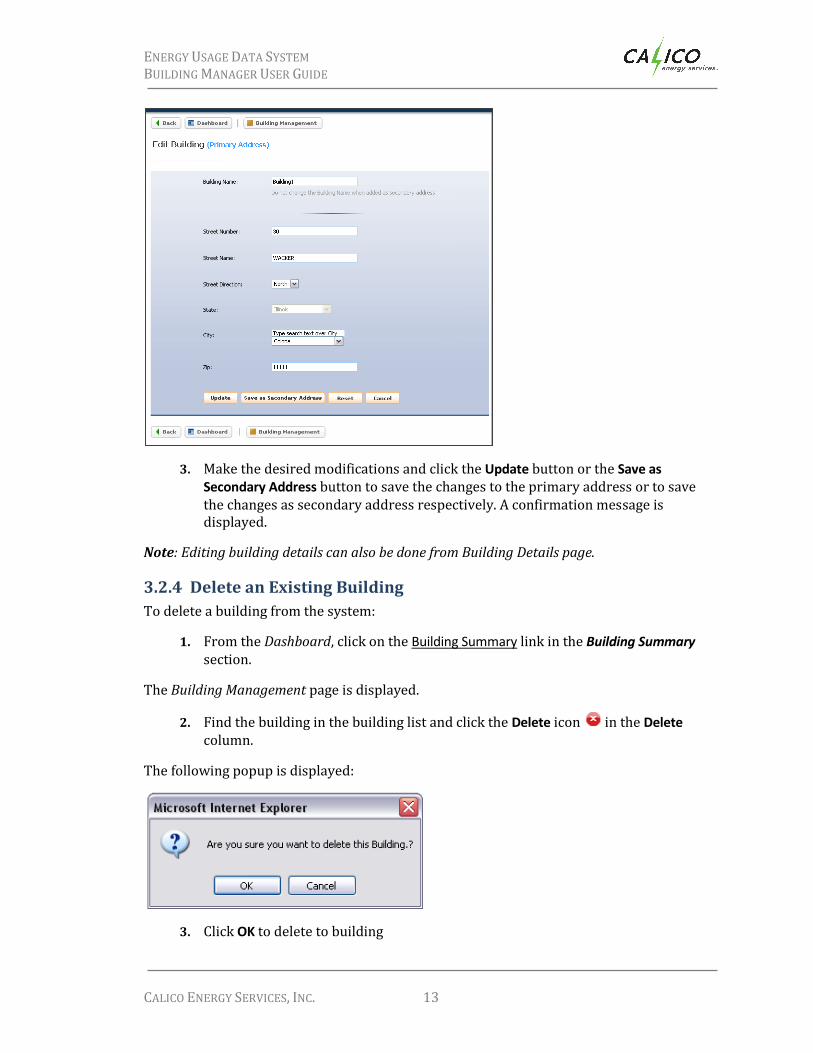
3.2.3 Edit Building Details
To edit the details for a building:
1. From the Dashboard, click on the Building Summary link in the Building Summary section.
The Building Management page is displayed.
2. Choose the particular building from the list and click the Edit icon in the Edit column.
The Edit Building page is displayed with editable fields.
ENERGY USAGE DATA SYSTEM BUILDING MANAGER USER GUIDE
CALICO ENERGY SERVICES, INC. 13
3. Make the desired modifications and click the Update button or the Save as Secondary Address button to save the changes to the primary address or to save the changes as secondary address respectively. A confirmation message is displayed.
Note: Editing building details can also be done from Building Details page.
3.2.4 Delete an Existing Building
To delete a building from the system:
1. From the Dashboard, click on the Building Summary link in the Building Summary section.
The Building Management page is displayed.
2. Find the building in the building list and click the Delete icon in the Delete column.
The following popup is displayed:
3. Click OK to delete to building

ENERGY USAGE DATA SYSTEM BUILDING MANAGER USER GUIDE
14 CALICO ENERGY SERVICES, INC.
Note: Deleting an existing building can also be done from within Building Details page.
3.2.5 Secondary Addresses
There may be instances in which a secondary address for a building is needed.
3.2.5.1 Add a Secondary Address for a New Building:
If you are creating a new building and would like to add a secondary address to it:
1. From the Dashboard, click on the Add New Building icon in the Building Summary section.
The Add New Building page is displayed.
2. Enter the required details for the new building.
3. When finished, click on the Save & Add Secondary Address button.
A confirmation message is displayed.
Along with a confirmation message, the Add New Address (Secondary Address) page is displayed.

ENERGY USAGE DATA SYSTEM BUILDING MANAGER USER GUIDE
CALICO ENERGY SERVICES, INC. 15
4. Enter the appropriate secondary address information.
5. Click on the Save button or the Save & Add Another button if you wish to add another secondary address.
A confirmation message is displayed.
3.2.5.2 Add a Secondary Address for an Existing Building
If the building for which you would like to add a secondary address already exists in the system, then:
1. From the Dashboard, click on the Building Summary link in the Building Summary section.
The Building Management page is displayed.
2. Click on the hyperlink in the Building Name column for the desired building.
The Building Details page is displayed.

ENERGY USAGE DATA SYSTEM BUILDING MANAGER USER GUIDE
16 CALICO ENERGY SERVICES, INC.
3. Click on the + New Secondary Address button.
The Add New Address (Secondary Address) page is displayed.
4. Enter the appropriate secondary address information.
5. Click on the Save button or the Save & Add Another button if you wish to add another secondary address.
A confirmation message is displayed.
3.2.5.3 Edit a Secondary Address
To edit a secondary address:
1. From the Dashboard, click on the Building Summary link in the Building Summary section.
The Building Management page is displayed.
2. Click on the hyperlink in the Building Name column for the desired building.
The Building Details page is displayed.

ENERGY USAGE DATA SYSTEM BUILDING MANAGER USER GUIDE
CALICO ENERGY SERVICES, INC. 17
3. On the bottom of the page, choose the secondary address of the building from the
list and click the Edit icon in Edit column.
The Edit Address (Secondary Address) page is displayed.
4. Make the desired modifications and click Update button to save the changes.
A confirmation message is displayed.

ENERGY USAGE DATA SYSTEM BUILDING MANAGER USER GUIDE
18 CALICO ENERGY SERVICES, INC.
3.2.5.4 Delete a Secondary Address
1. From the Dashboard, click on the Building Summary link in the Building Summary section.
The Building Management page is displayed.
2. Click on the hyperlink in the Building Name column for the building with the secondary address you would like to delete.
The Building Details page is displayed.
3. Choose the desired secondary address from the list and click the Delete icon in the Delete column.
The following message is displayed:
4. Click OK to delete to the secondary address.
A confirmation message is displayed.

ENERGY USAGE DATA SYSTEM BUILDING MANAGER USER GUIDE
CALICO ENERGY SERVICES, INC. 19
3.3 USAGE DATA REQUEST MANAGEMENT
As Building Manager, within the EUDS application, you can make new usage data requests; view, edit and delete recurring or scheduled usage data requests; access and delete usage data requests; access raw usage report details, and verify tenants.
3.3.1 Make a New Usage Data Request
To make a new usage data request:
1. From the Dashboard, click on the Create New Request icon in the Request Summary section.
The Building Management page is displayed.
2. Choose the desired building from the list and click the Create Request icon in the Create Request column.
The Make New Request page is displayed:

ENERGY USAGE DATA SYSTEM BUILDING MANAGER USER GUIDE
20 CALICO ENERGY SERVICES, INC.
3. Enter the request information. Your request should have a start date at least 60 days prior to today’s date.
4. (Optional) You can place a request for a scheduled date by selecting the Scheduled Date option and entering the desired date.
Note: To create a recurring request, the Recurring checkbox must be selected. A recurring request should have a start date at least 60 days prior to today’s date. The end date box will be gray because a recurring request is ongoing. The Auto Confirm checkbox should be selected when entering a recurring request.
5. When finished, click Submit.
A confirmation message is displayed. An email is sent to the requestor when the processing is finished, and the data is ready to be viewed.
3.3.2 Manage Recurring or Scheduled Usage Data Requests
As a Building Manager, you can view, edit and delete recurring or scheduled usage data requests.
3.3.2.1 View Recurring or Scheduled Usage Data Request
To view a recurring or scheduled usage data request:
1. From the Dashboard, click on the Request Summary link in the Request Summary section.
The Request Management page appears.
2. Click the Show Scheduled Request button at the bottom right of the page.
The following page is displayed.

ENERGY USAGE DATA SYSTEM BUILDING MANAGER USER GUIDE
CALICO ENERGY SERVICES, INC. 21
3. Click on the numerical hyperlink in the Scheduling ID column for the request to be viewed.
The Scheduling Details page is displayed.
3.3.2.2 Edit Recurring or Scheduled Usage Data Request
To edit a recurring or scheduled usage data request.
1. From the Dashboard, click on the Request Summary link in the Request Summary section.
The Request Management page appears.
2. Click the Show Scheduled Request button at the bottom right of the page.
The following page is displayed.

ENERGY USAGE DATA SYSTEM BUILDING MANAGER USER GUIDE
22 CALICO ENERGY SERVICES, INC.
3. Click on the Edit icon in the Edit column for the request you would like to edit.
The Scheduling Details page is displayed with editable fields.
4. Make the desired modifications and click the Update button to save the changes.
A confirmation message is displayed.
3.3.2.3 Delete Recurring or Scheduled Usage Data Request
To delete a recurring or scheduled usage data request.
1. From the Dashboard, click on the Request Summary link in the Request Summary section.
The Request Management page appears.
2. Click the Show Scheduled Request button on the bottom right of the page.

ENERGY USAGE DATA SYSTEM BUILDING MANAGER USER GUIDE
CALICO ENERGY SERVICES, INC. 23
The following page is displayed.
3. Click on the Delete icon in the Delete column for the request you would like to delete.
The following message is displayed:
4. Click OK to delete to request.
3.3.3 Manage Usage Data Requests
As a Building Manager, you can view or delete usage data requests.
3.3.3.1 View Usage Data Request
To view a usage data request:
1. From the Dashboard, click the Request Summary link.
The Request Management page is displayed.
ENERGY USAGE DATA SYSTEM BUILDING MANAGER USER GUIDE
24 CALICO ENERGY SERVICES, INC.
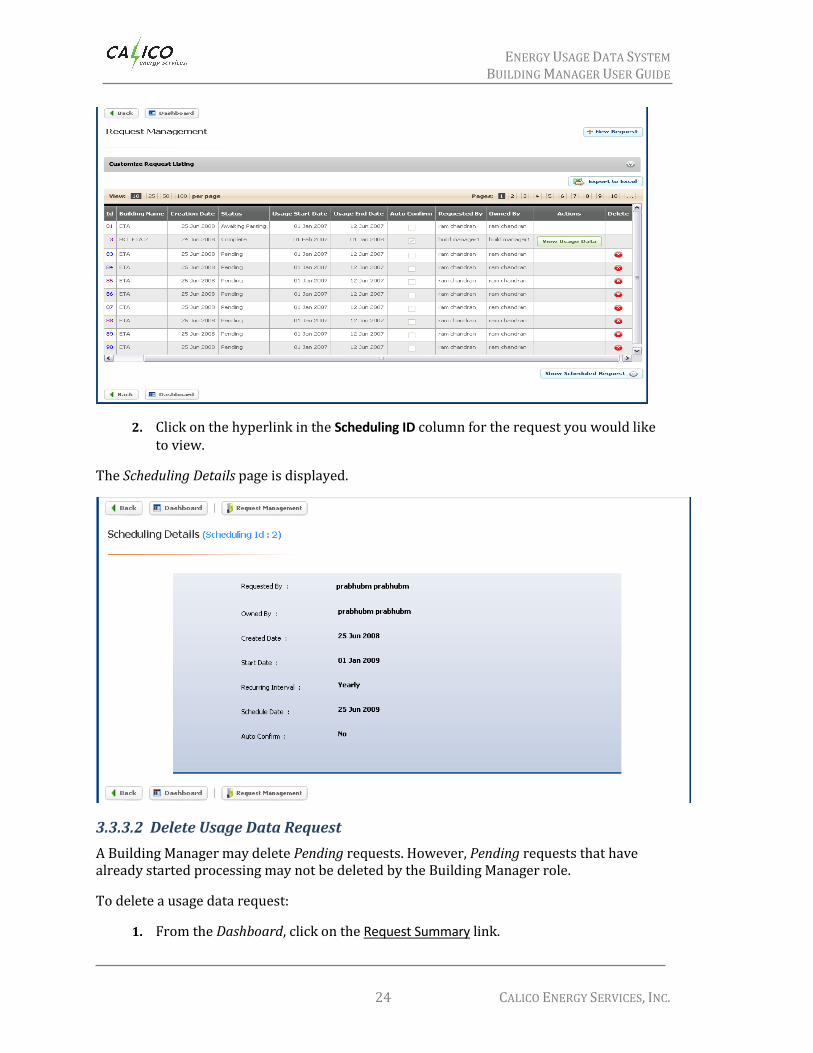
2. Click on the hyperlink in the Scheduling ID column for the request you would like to view.
The Scheduling Details page is displayed.
3.3.3.2 Delete Usage Data Request
A Building Manager may delete Pending requests. However, Pending requests that have already started processing may not be deleted by the Building Manager role.
To delete a usage data request:
1. From the Dashboard, click on the Request Summary link.

ENERGY USAGE DATA SYSTEM BUILDING MANAGER USER GUIDE
CALICO ENERGY SERVICES, INC. 25
The Request Management page is displayed.
2. Choose the particular request from the list and click on the Delete icon in the Delete column.
The following message is displayed:
3. Click OK to delete to request.
3.3.4 Verify Tenant Lists
After the usage request has been processed, the tenants for the building must be verified before the usage data is displayed.
To verify a tenant list:
1. From the Dashboard, click on the Request Summary link.
The Request Management page appears.

ENERGY USAGE DATA SYSTEM BUILDING MANAGER USER GUIDE
26 CALICO ENERGY SERVICES, INC.
2. Click on the Verify button in the Actions column for the request you would like to verify. (Note: Only requests with statuses of Awaiting Verification will have Verify buttons.)
The Tenant Verification page appears.
3. Select either the Confirm or Deny radio button as appropriate for the tenant in the Confirm/Deny column. (To confirm all tenants, click the Confirm All button.)
4. To submit the tenant list and obtain your usage data, click Submit Tenant List button.
3.3.5 View Usage Report Details
To view usage report details:
1. From the Dashboard, click the Request Summary link on the right of the page.
The Request Management page is displayed.

ENERGY USAGE DATA SYSTEM BUILDING MANAGER USER GUIDE
CALICO ENERGY SERVICES, INC. 27
2. Click on the View Usage Data button in the Actions column for the desired request. (Note: The View Usage Data button will only be available for requests with Complete statuses.)
The Usage Details page is displayed.
3. Click the Customize View icon.

ENERGY USAGE DATA SYSTEM BUILDING MANAGER USER GUIDE
28 CALICO ENERGY SERVICES, INC.
3.4 SUBMIT BUILDING USAGE TO ENERGY STAR PORTFOLIO MANAGER
Portfolio Manager is the EPA ENERGY STAR application with which to enter your building’s energy usage to benchmark your building. With Portfolio Manager, you provide complete details about your building, including energy use, in order to receive your benchmarking score.
Monthly energy usage data for the building is made available through EUDS and can be submitted to the ENERGY STAR Portfolio Manager from within the EUDS software. The high level steps are as follows, with detailed instructions provided further below:
Register with ENERGY STAR Portfolio Manager
Select your Energy Service Provider (COMED) as your contact
Set up Data Sharing o Add a property to your account o Create/share a virtual meter o Link the building data between EUDS and Portfolio Manager
After successfully completing the ENERGY STAR steps, login to EUDS, add the request for usage, then submit usage to Portfolio Manager.
3.4.1 Register with ENERGY STAR Portfolio Manager
Follow these easy steps to Register or Login:
4. Login to ENERGY STAR Portfolio Manager at https://www.energystar.gov/istar/pmpam/index.cfm?fuseaction=login.login
If you do not have a login, the self-registration process is quick and easy- click on the green SIGN UP button and follow the registration process. Otherwise, login as shown below:

ENERGY USAGE DATA SYSTEM BUILDING MANAGER USER GUIDE
CALICO ENERGY SERVICES, INC. 29
3.4.2 Select Your Energy Service Provider
Once signed in, you will want to begin the process of sharing your data. First, click on the hyperlink located on the upper right side of the page, “Contacts”:
Next, use the Search box to search for your Energy Service Provider. You can search for COMED (or any existing contact you wish to search for):
In this case, you will find the ESP, “Data Exchange COMED” on the list below. Click the Connect button:

ENERGY USAGE DATA SYSTEM BUILDING MANAGER USER GUIDE
30 CALICO ENERGY SERVICES, INC.
ENERGY USAGE DATA SYSTEM BUILDING MANAGER USER GUIDE
CALICO ENERGY SERVICES, INC. 31
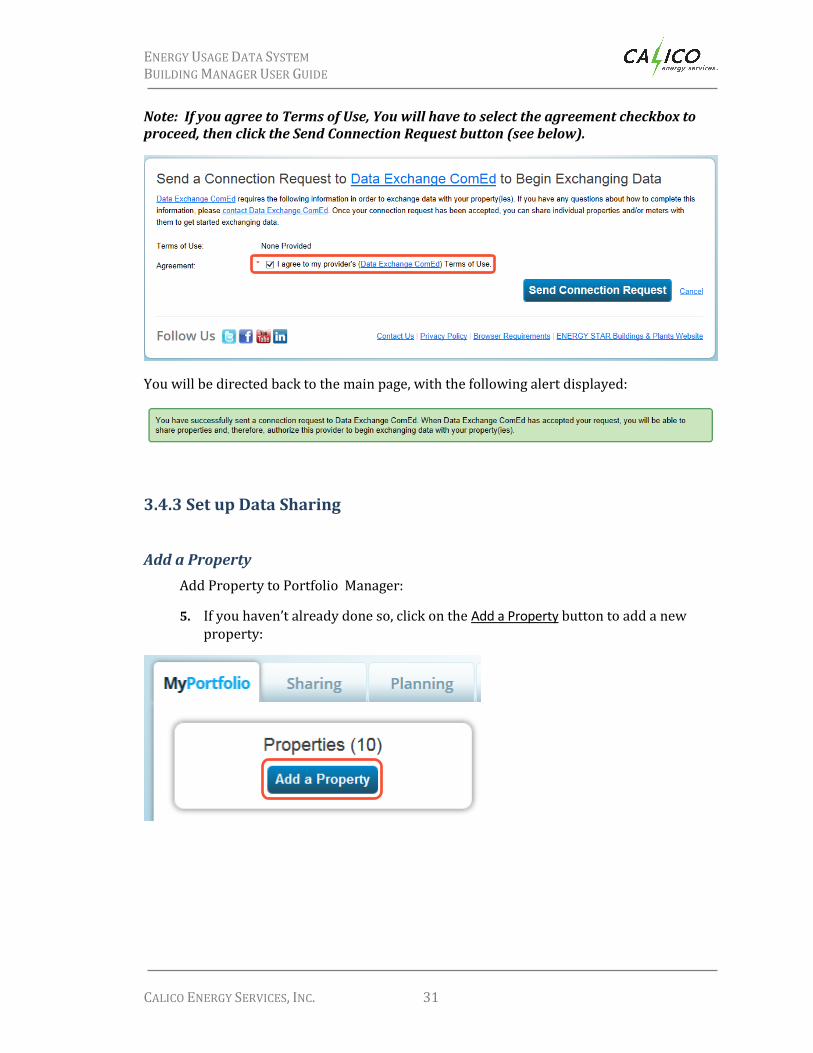
Note: If you agree to Terms of Use, You will have to select the agreement checkbox to
proceed, then click the Send Connection Request button (see below).
You will be directed back to the main page, with the following alert displayed:
3.4.3 Set up Data Sharing
Add a Property
Add Property to Portfolio Manager:
5. If you haven’t already done so, click on the Add a Property button to add a new property:

ENERGY USAGE DATA SYSTEM BUILDING MANAGER USER GUIDE
32 CALICO ENERGY SERVICES, INC.
You will be required to enter additional information about your property:

ENERGY USAGE DATA SYSTEM BUILDING MANAGER USER GUIDE
CALICO ENERGY SERVICES, INC. 33
The next screen is where you specify the type of property you are benchmarking (use the
dropdown to specify your building function, then use the radio buttons to specify how many buildings are on your property, and whether it is new construction or existing):

ENERGY USAGE DATA SYSTEM BUILDING MANAGER USER GUIDE
34 CALICO ENERGY SERVICES, INC.
You are now presented with a new screen (optional for now) where you can put in more detail about your building. Please contact the EPA if you are having issues with the details surrounding how to fill these fields out. If you like, skip through and fill this information out later. This information is not required to share your building’s meter data.
Once you click “Add Property”, you have created your building.

ENERGY USAGE DATA SYSTEM BUILDING MANAGER USER GUIDE
CALICO ENERGY SERVICES, INC. 35
Create/share a virtual meter
You will the Congratulations Message (shown in green). Next, create a meter. This will be a virtual meter that you will be creating and you can use this for your aggregated data. Go to the Meters tab:
Here you will click on the button “Add Another Meter”. This will allow you to add your virtual electricity meter.

ENERGY USAGE DATA SYSTEM BUILDING MANAGER USER GUIDE
36 CALICO ENERGY SERVICES, INC.
As you click through the boxes below, more selections appear that are associated to your choices. First click on the Electric checkbox. You will then select a new box that appears directly below it, purchased from the grid. Then specify one and only one meter (regardless of how many meters are actually physically in the building – remember, the data that we provide up to this meter will be aggregated and at the whole building level):
Click on the Get Started! button:
Next give your meter a name, the default is Electric Grid Meter. Now you will click on the meter checkbox, and use the dropdown to specify Units (in kWh) and the first bill date. We are showing you the first bill date of 1/1/11 below, although you may put in any date you wish:
Click the Continue button:

ENERGY USAGE DATA SYSTEM BUILDING MANAGER USER GUIDE
CALICO ENERGY SERVICES, INC. 37
Now the tool will ask you to enter in your energy usage data. You will skip this screen,
because our Data Sharing will send it up automatically. Click on the Finish Meter Set Up button:
Here you still need to click the check box shown below.
To affirm the default value, “These meter(s) account for the total energy consumption for this property”, Apply Selections:

ENERGY USAGE DATA SYSTEM BUILDING MANAGER USER GUIDE
38 CALICO ENERGY SERVICES, INC.
Sharing the Property
You will now need to share this property, in order to get data over to Energy Star. You will see a button “Share” in the “Sharing This Property” box. Click on it:
Here you have a choice to share one property, or many. Chose your property, then select your Data Exchange Energy Service Provider:

ENERGY USAGE DATA SYSTEM BUILDING MANAGER USER GUIDE
CALICO ENERGY SERVICES, INC. 39
Next, you will select permission levels for your meter. Click on the Exchange Data button to
bring up a popup box:
Popup shown below. Enter your access permissions for the meter – select Full Access, and enter in your Building ID and Building Manager ID (See Section 3.4.2 EUDS Linking Data):

ENERGY USAGE DATA SYSTEM BUILDING MANAGER USER GUIDE
40 CALICO ENERGY SERVICES, INC.
After clicking on the following button:
You are now brought back to the original screen (popup closes). Finally, Share Property(ies):
Which brings up a success message:
Within a half of an hour to an hour, please check your property in EUDS (navigate to Building Summary and find your building). The ENERGY STAR Authorized checkbox should be checked, and the Stop Submission to ENERGY STAR button should show:
Your building is now linked in Energy Star Portfolio Manager.

ENERGY USAGE DATA SYSTEM BUILDING MANAGER USER GUIDE
CALICO ENERGY SERVICES, INC. 41
You can now enter a recurring usage data request in the EUDS. In EUDS, please note, for recurring requests: You should enter a one month request for the month 60 days prior to today’s date, and use the Recurring Request checkboxes as well as the Auto Submit and Auto Verify checkboxes.
This request will repeat each month and populate Portfolio Manager with your whole building data from two months ago. Congratulations! You have completed the process for this building.

ENERGY USAGE DATA SYSTEM BUILDING MANAGER USER GUIDE
42 CALICO ENERGY SERVICES, INC.
3.4.2 EUDS Building Linking Data
These steps describe the process to obtain two fields in EUDS that you will input back into Portfolio Manager. Inputting these two fields in Portfolio Manager establishes the link that sets up the relationship between EUDS and Portfolio Manager. To do this:
1. Get the Building Manager ID and Building ID.
2. Find the specific building on the list shown, and click on its hyperlink.
3. You will find the Building Manager Id and Building Id as shown below.
3.4.3 Submitting Data to Portfolio Manager
This section describes the process that you would use to have your data from EUDS sent directly into Portfolio Manager. By performing this step, you avoid having to copy and paste potentially many multiple months or years of energy requests. By requesting your data and then clicking one button, you can send twelve months of energy data directly to Portfolio Manager. To do this:
1. Request data for the Building. (See section 3.3.1.)

ENERGY USAGE DATA SYSTEM BUILDING MANAGER USER GUIDE
CALICO ENERGY SERVICES, INC. 43
(Note: Request no more than one year of data at a time; break several years of
data requests into individual yearly intervals. When setting up recurring requests, do your yearly requests first, following the process outlined below. Then set up your monthly recurring request (with auto confirm) last).
2. Verify the Tenants. (See section 3.3.5.)
3. Click the Submit to Energy Star button.
(Note: For every year that you request data, you will submit the data using the Submit to Energy Star button. Once you do the final/recurring request, you will not have to perform this action, and the data will auto-populate Portfolio Manager on a monthly basis).
3.5 SUPPLEMENTARY REPORTS
Additional administrative reports are available on the Dashboard. A list of these reports is shown in the figure below.
1. To download a particular report, click on the corresponding icon. The following page is displayed.

ENERGY USAGE DATA SYSTEM BUILDING MANAGER USER GUIDE
44 CALICO ENERGY SERVICES, INC.
2. Enter the details.
3. Click the Download button. The following popup appears:
4. Select the desired option by clicking the appropriate button.
Note: The above steps are applicable for generation of all reports.