ENYou can expect the remote to operate for about six months (using Sony SUM-3 (NS) batteries) before...
32
EN Sony Corporation Printed in Malaysia
Transcript of ENYou can expect the remote to operate for about six months (using Sony SUM-3 (NS) batteries) before...

EN
2Sony Corporation Printed in Malaysia

EN
3
3-810-989-51(1)
ENOperating Instructions
Mini Hi-FiComponent System
MHC-771
f
©1996 by Sony Corporation

EN
2
WARNING
To prevent fire or shock hazard, do notexpose the unit to rain or moisture.
To avoid electrical shock, do not open the cabinet. Refer servicing toqualified personnel only.
Do not install the appliance in a confined space, such as a bookcaseor built-in cabinet.
NOTICE FOR THE CUSTOMERS IN THE U. S. A.
CAUTIONRISK OF ELECTRIC SHOCK
DO NOT OPEN
CAUTION : TO REDUCE THE RISK OF ELECTRIC SHOCK,
DO NOT REMOVE COVER (OR BACK).
NO USER-SERVICEABLE PARTS INSIDE.
REFER SERVICING TO QUALIFIED SERVICE PERSONNEL.
Note on CATV system installer:This reminder is provided to call CATV system installer’s attentionto Article 820–40 of the NEC that provides guidelines for propergrounding and, in particular, specifies that the cable ground shall beconnected to the grounding system of the building, as close to thepoint of cable entry as practical.
CAUTIONThe use of optical instruments with this product will increase eyehazard.
NOTICE FOR THE CUSTOMERS IN CANADA
CAUTION:TO PREVENT ELECTRIC SHOCK, DO NOT USE THISPOLARIZED AC PLUG WITH AN EXTENSION CORD,RECEPTACLE OR OTHER OUTLET UNLESS THE BLADES CANBE FULLY INSERTED TO PREVENT BLADE EXPOSURE.
This symbol is intended to alert the user to thepresence of uninsulated “dangerous voltage”within the product’s enclosure that may be ofsufficient magnitude to constitute a risk ofelectric shock to persons.
This symbol is intended to alert the user to thepresence of important operating andmaintenance (servicing) instructions in theliterature accompanying the appliance.
Owner’s RecordThe model and serial numbers are located on the rear panel.Record the serial number in the space provided below. Refer to themwhenever you call upon your Sony dealer regarding this product.Model No. MHC-771 Serial No. ____________________________
INFORMATIONThis equipment has been tested and found to comply with the limitsfor a Class B digital device, pursuant to Part 15 of the FCC Rules.These limits are designed to provide reasonable protection againstharmful interference in a residential installation. This equipmentgenerates, uses, and can radiate radio frequency energy and, if notinstalled and used in accordance with the instructions, may causeharmful interference to radio communications. However, there is noguarantee that interference will not occur in a particular installation.If this equipment does cause harmful interference to radio ortelevision reception, which can be determined by turning theequipment off and on, the user is encouraged to try to correct theinterference by one or more of the following measures:
— Reorient or relocate the receiving antenna.— Increase the separation between the equipment and receiver.— Connect the equipment into an outlet on a circuit different from
that to which the receiver is connected.— Consult the dealer or an experienced radio/TV technician for
help.
CAUTIONYou are cautioned that any changes or modifications not expresslyapproved in this manual could void your authority to operate thisequipment.
Welcome!
Thank you for purchasing the Sony Mini Hi-Fi Component System.This series is packed with fun features. Here are just a few:•DBFB (Dynamic Bass Feedback) system that boosts low frequency
range audio provide deep, powerful bass sound•A preset feature that lets you store and recall up to 30 of your
favorite radio stations•An amplifier that lets you adjust the audio quality to fit a variety of
music types and environments•A timer that lets you set the CD player, tape player or radio to turn
on and off whenever you want•A dual tape deck that lets you record from the radio, CD player or
from the other tape deck and relay play from both decks•A CD player that lets you play up to three CDs in a row and
seamlessly advance (or reverse) through all the tracks on all thediscs on the CD tray
•A music clip feature that lets you create groups of favorite tracksfrom your CDs
•A remote that lets you control your system from your seat•A loop play feature that lets you play a CD with sound effect like
sampler play•The MHC-771 consists of following things:
— Main unit: HCD-H771— Speaker system: SS-H771

EN
3
Chapter 1: Setting UpConnecting the Stereo 4Inserting the Batteries 6Setting the Clock 6
Chapter 2: the CD PlayerPlaying CDs (normal play) 7Playing Tracks in Random Order (shuffle play) 8Playing Tracks in the Desired Order (program play) 9Playing Tracks Repeatedly (repeat play) 9Grouping Tracks (music clip) 10Playing Tracks: Repeating a Specified Portion (loop play) 10
Chapter 3: the RadioListening to the Radio 12Presetting Radio Stations 13Playing Preset Radio Stations 13
Chapter 4: the Tape PlayerPlaying a Tape 14Recording a CD 15Recording a CD: Selecting Tape Length Automatically (tape select edit) 15Recording a CD: Specifying Tape Length (time edit) 16Recording a CD: Specifying Track Order (program edit) 17Recording From the Radio 17Recording From Another Tape (dubbing) 18
Chapter 5: Sound AdjustmentAdjusting the Sound 19Selecting the Audio Emphasis 19Adjusting the Audio Emphasis 20Making a Personal Audio Emphasis File (personal file) 21
Chapter 6: Additional FeaturesFalling Asleep to Music 22Waking Up to Music 22Timer-Recording Radio Programs 23Microphone Mixing 24Karaoke: Singing Along 24Connecting Optional Equipment 25
For Your InformationPrecautions 27Troubleshooting Guide 27Maintenance 28Specifications 29Index to Parts and Controls 30
Index 31
Table ofContents

EN
Chapter 1: Setting Up4
Connecting theAntennas
AM loop antenna connectionConnect the supplied loop antenna to theAM and the y terminals.
To improve the FM receptionConnect an external FM antenna to the FM75Ω and y terminals, using a 75-ohmcoaxial cable.
ImportantGround the external antenna from yterminal against lightning with the screwclamp. To prevent a gas explosion, do notconnect the ground wire to a gas pipe.
Connecting theStereo
Use the illustrations below to connect yourstereo.If you want to connect any optionalcomponents to the stereo, see “ConnectingOptional Equipment” in Chapter 6.
Connecting theSpeakers
To connect the speakersConnect the right speaker to the SPEAKERR connectors and the left speaker to theSPEAKER L connectors with the red cordsto ‘ and the black cords to ’.
‘R
L
’‘
’
STEP 2
STEP 1
FM 75ΩAM
FM lead antenna* (supplied)
* Note: Extend it horizontally
AM loop antenna (supplied)
Screw clamp
FM 75ΩAM
y
Ground wire(not supplied)
75-ohm coaxial cable(not supplied)
Chapter 1:
SettingUp
Connecting the Stereo
Inserting the Batteries
Setting the Clock

EN
Chapter 1: Setting Up 5
Connecting thePower
Connect the AC power cord to a wall outletafter you have made all the aboveconnections.
To improve the AM receptionAfter you connect the AM antenna, connecta 6- to 15-meter (20- to 50-feet) insulatedwire to the AM terminal. Connect the yterminal to earth.
ImportantGround the external antenna againstlightning from the y terminal. To prevent agas explosion, do not connect the groundwire to a gas pipe.
STEP 3 Demo modeThe demo mode appears in the displaywhen you connect the AC power cord toa wall outlet.To deactivate the demo mode, pressDISPLAY/DEMO with the systempower turned off.
FM 75ΩAM
y
Ground wire(not supplied)
Screw clamp
Insulated wire(not supplied)
to a wall outlet
STEP 1
STEP 2
STEP 3
Left speaker
Right speaker
!Do this connection last!
to a wall outlet
AM loop antenna(supplied)
FM lead antenna(supplied)

EN
Chapter 1: Setting Up6
Setting the Clock
The built-in clock shows the time in thedisplay even if the power is off. You needto set the clock to utilize the timer-activatedfeatures of your stereo system.Use the buttons on the unit to do thisoperation.
1 Press TIMER.
2 Press CLOCK SET.The “AM” and hour indication beginflashing.
3 Set the current hour by turning the JOGdial until the correct hour appears.
4 Press ENTER/NEXT.The minutes indication begins flashing.
5 Set the current minute by turning theJOG dial until the correct minuteappears.
Inserting theBatteries
Install two R6 (size AA) batteries in thesupplied remote for remote control.
1 Open the lid.
2 Insert two R6 (size AA) batteries.Match the + and – indications to thediagram in the battery compartment.
3 Close the lid.
Battery lifeYou can expect the remote to operate forabout six months (using Sony SUM-3 (NS)batteries) before the batteries run down.When the batteries no longer operate theremote, replace all the batteries with newones.
To avoid battery leakageIf you are not going to use the remote for along time, remove the batteries to avoiddamage caused by corrosion from batteryleakage.
6 Press ENTER/NEXT.The clock starts running and the upperdot flashes. Use the time signal to set theclock accurately.The upper dot flashes for the first half ofa minute (0 to 29 seconds), and thelower dot flashes for the last half of aminute (30 to 59 seconds).
To check the timePress DISPLAY/DEMO a few times.The current time is displayed for eightseconds.
To correct the clock settingRepeat steps 1 through 6.
flashing
flashing
flashing
flashing
flashing
4,6
3,5
1
2
DISPLAY/DEMO
]]

EN
Chapter 2: the CD Player 7
Playing CDs (normalplay)
You can play all the tracks on up to threediscs consecutively in their original order(normal play).You can play 12 cm and 8 cm CDs. If theCD is supplied with an adaptor, remove itbefore playing the CD.Before you play the CD, decrease the soundlevel by turning the VOLUME controlcounterclockwise, to prevent damage to thespeakers.Use the buttons both on the unit and theremote to do this operation.
1 Press § OPEN/CLOSE and place up totwo CDs (with the label side facing up)on the disc tray.
Playing CDs (normal play)
Playing Tracks in RandomOrder (shuffle play)
Playing Tracks in theDesired Order (programplay)
Playing Tracks Repeatedly(repeat play)
Grouping Tracks(music clip)
Playing Tracks: Repeating aSpecified Portion (loopplay)
2 Press DISC SKIP EX-CHANGE to inserta third disc, if necessary.The disc tray rotates so that you canplace another CD.
3 Press § OPEN/CLOSE again to closethe disc tray.
4 Press 1/ALL DISCS to choose “1 DISC”or “ALL DISCS”.
5 Press one of the DISC 1 – 3 buttons toselect the disc tray.Play starts from the CD loaded on thetray whose button is lit green.
To
Stop play
Pause
Resume play
Go forward toanother track
Go back to aprevious track
Select a particularCD directly
Remove the CD
Exchange otherCDs while playing
Press
π ( *1)
fl ( *1)
fl (CD *1 or*1)
During play or pause,rotate the JOG dialclockwise. Releasewhen you reach thetrack you desire.*2
Or use AMS*3 onthe remote.
During play or pause,rotate the JOG dialcounterclockwise.Release when youreach the track youdesire.*2
Or use AMS*3 onthe remote.
Corresponding DISC1 – 3 button*4 or pressDISC SKIPEX-CHANGErepeatedly in stopmode
§ OPEN/CLOSE
DISC SKIPEX-CHANGE
To play
Only the CD you haveselected.
All CDs consecutivelyin order of disc number.Empty disc trays areskipped.
Choose
1 DISC
ALL DISCS
12563 250 500 1k 2k 4k 8k 16k(Hz)
DOLBY NR OFF
CD
ALLCLIP 1DISC
1 2 3 4 56 7 8
VOLUME
12563 250 500 1k 2k 4k 8k 16k(Hz)
DOLBY NR OFF
CD
ALLCLIP 1DISC
1 2 3 4 56 7 8
VOLUME
Music calendar
Playing timeTrack number
continue to next page
Chapter 2:
the CDPlayer
25
/
/
POWERnON
1,352
4
πfl
JOG dial
EN
Chapter 2: the CD Player8
To
Go forwardquickly in a track
Go backwardsquickly in a track
Search quicklywithout listening
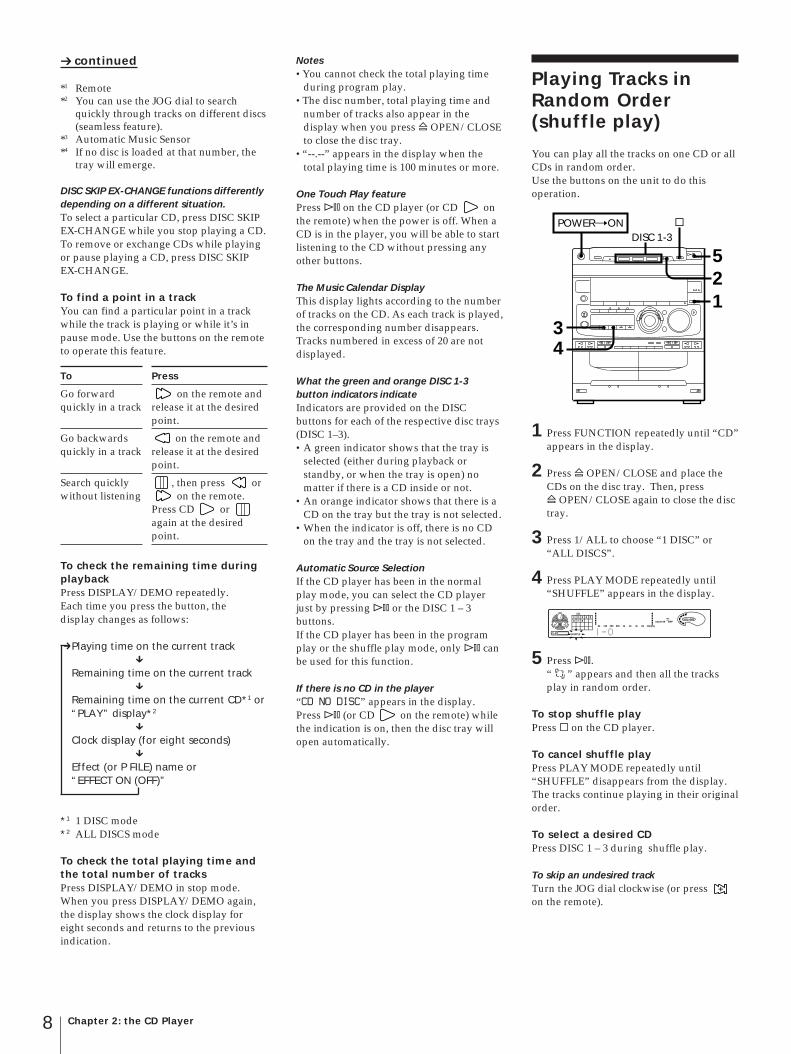
Playing Tracks inRandom Order(shuffle play)
You can play all the tracks on one CD or allCDs in random order.Use the buttons on the unit to do thisoperation.
1 Press FUNCTION repeatedly until “CD”appears in the display.
2 Press § OPEN/CLOSE and place theCDs on the disc tray. Then, press§ OPEN/CLOSE again to close the disctray.
3 Press 1/ALL to choose “1 DISC” or“ALL DISCS”.
4 Press PLAY MODE repeatedly until“SHUFFLE” appears in the display.
5 Press fl.“ J ” appears and then all the tracksplay in random order.
To stop shuffle playPress π on the CD player.
To cancel shuffle playPress PLAY MODE repeatedly until“SHUFFLE” disappears from the display.The tracks continue playing in their originalorder.
To select a desired CDPress DISC 1 – 3 during shuffle play.
To skip an undesired trackTurn the JOG dial clockwise (or press on the remote).
continued
*1 Remote*2 You can use the JOG dial to search
quickly through tracks on different discs(seamless feature).
*3 Automatic Music Sensor*4 If no disc is loaded at that number, the
tray will emerge.
DISC SKIP EX-CHANGE functions differentlydepending on a different situation.To select a particular CD, press DISC SKIPEX-CHANGE while you stop playing a CD.To remove or exchange CDs while playingor pause playing a CD, press DISC SKIPEX-CHANGE.
To find a point in a trackYou can find a particular point in a trackwhile the track is playing or while it’s inpause mode. Use the buttons on the remoteto operate this feature.
To check the remaining time duringplaybackPress DISPLAY/DEMO repeatedly.Each time you press the button, thedisplay changes as follows:
mPlaying time on the current trackµ
Remaining time on the current trackµ
Remaining time on the current CD*1 or“PLAY” display*2
µClock display (for eight seconds)
µEffect (or P FILE) name or“EFFECT ON (OFF)”
*1 1 DISC mode*2 ALL DISCS mode
To check the total playing time andthe total number of tracksPress DISPLAY/DEMO in stop mode.When you press DISPLAY/DEMO again,the display shows the clock display foreight seconds and returns to the previousindication.
Notes•You cannot check the total playing time
during program play.•The disc number, total playing time and
number of tracks also appear in thedisplay when you press § OPEN/CLOSEto close the disc tray.
•“--.--” appears in the display when thetotal playing time is 100 minutes or more.
One Touch Play featurePress fl on the CD player (or CD onthe remote) when the power is off. When aCD is in the player, you will be able to startlistening to the CD without pressing anyother buttons.
The Music Calendar DisplayThis display lights according to the numberof tracks on the CD. As each track is played,the corresponding number disappears.Tracks numbered in excess of 20 are notdisplayed.
What the green and orange DISC 1-3button indicators indicateIndicators are provided on the DISCbuttons for each of the respective disc trays(DISC 1–3).•A green indicator shows that the tray is
selected (either during playback orstandby, or when the tray is open) nomatter if there is a CD inside or not.
•An orange indicator shows that there is aCD on the tray but the tray is not selected.
•When the indicator is off, there is no CDon the tray and the tray is not selected.
Automatic Source SelectionIf the CD player has been in the normalplay mode, you can select the CD playerjust by pressing fl or the DISC 1 – 3buttons.If the CD player has been in the programplay or the shuffle play mode, only fl canbe used for this function.
If there is no CD in the player“CD NO DISC” appears in the display.Press fl (or CD on the remote) whilethe indication is on, then the disc tray willopen automatically.
12563 250 500 1k 2k 4k 8k 16k(Hz)
DOLBY NR OFF
CD
CLIP SHUFFLE
1 2 3 4 56 7 8
VOLUME
Press
on the remote andrelease it at the desiredpoint.
on the remote andrelease it at the desiredpoint.
, then press or on the remote.
Press CD or again at the desiredpoint.
POWERnON
25
34
1
πDISC 1-3

EN
Chapter 2: the CD Player 9
Playing Tracks in theDesired Order(program play)
You can make a program of up to32 tracks from all the CDs in the order youwant them to be played.
1 Press FUNCTION repeatedly until “CD”appears in the display.
2 Press § OPEN/CLOSE and place theCDs on the disc tray. Then, press§ OPEN/CLOSE again to close the disctray.
3 Press PLAY MODE repeatedly until“PROGRAM” and “DISC” appear in thedisplay.
4 Press DISC 1 – 3 to choose a CD.
Playing TracksRepeatedly(repeat play)
The repeat play function repeats a singleCD or all CDs in normal play, shuffle playand program play.Use the buttons on the unit to do thisoperation.
Repeating all the tracks1 Press REPEAT a few times until
“REPEAT” appears in the display.
2 Press fl.
To cancel repeat playPress REPEAT so that “REPEAT” or“REPEAT 1” disappears from the display.
5 Turn the JOG dial to choose a track.The track number and the total playingtime appear.
6 Press ENTER/NEXT.The chosen track number lights up inthemusic calendar. If the track numberand the total playing time disappearbefore you press ENTER/NEXT, goback to step 5.
7 Repeat steps 5 and 6 to programadditional tracks from the same CD.Repeat steps 4 to 6 to programadditional tracks from another CD.
8 Press fl.All the tracks play in the order youchoose.
*1 After the last track appeared “CHECKEND” appears in the display.
*2 “P” appears and the total playing time isreset to 0.00.
*3 The program is erased.
To change the order ofprogrammed tracksTo change the order, erase the entireprogram and create a new one.
Notes•The program you made remains in the CD
player even after it has been played back.Press fl to play the same program again.
•If “--.--” appears instead of the totalplaying time during programming, thismeans:– you have programmed a track number
which exceeds 20, or– the total playing time has exceeded 100
minutes.
Track number
Total playing time
To
Repeat all thetracks on thecurrent CD
Repeat all thetracks on all CDs
Repeat only onetrack (in normalplay only)
Press
1/ALL DISCSrepeatedly until “1DISC” appears in thedisplay.
1/ALL DISCSrepeatedly until “ALLDISCS” appears in thedisplay.
REPEAT repeatedlyuntil “REPEAT 1”appears in the displaywhile playing the trackyou want to repeat.
12563 250 500 1k 2k 4k 8k 16k(Hz)
DOLBY NR OFF
CD
DISC PROGRAM
8VOLUME
12563 250 500 1k 2k 4k 8k 16k(Hz)
DOLBY NR OFF
CD
CLIP REPEAT1
1 2 3 4 56 7 8
VOLUME
POWERnON
28
4
5
6
3
1
π
POWERnON
2
1
1/ALL DISCS
12563 250 500 1k 2k 4k 8k 16k(Hz)
DOLBY NR OFF
CD
CLIP DISC PROGRAM
VOLUME
To
Check theprogram
Program a pause
Stop play
Cancel programplay
Erase a trackfrom the end
Erase a specifictrack
Erase the entireprogram
Press
CHECK on the remoterepeatedly*1
on the remote*2
π ( on the remote)
PLAY MODE*3
repeatedly until“PROGRAM” or“SHUFFLE” disappears
CLEAR on the remote instop mode
CHECK on the remoterepeatedly so that thenumber of the tracklights up, and pressCLEAR on the remote
π ( on the remote)once in stop mode ortwice while playing
1
CHECK
CLEAR

EN
Chapter 2: the CD Player10
Playing tracks in a clip(CLIP PLAY)
CLIP indicator(s) light in the display to letyou know when clips are stored for a disc.
1 Press CLIP PLAY.
2 Press CLIP button (A, B or C).“CLIP PLAY” appears in the displayand the selected CLIP indicator lights.The player starts playing tracks from theselected clip.
To cancel clip playPress π on the CD player.
Notes•In 1 DISC mode, the tracks stored for the
selected disc are played back once, thenclip play is released.
•In ALL DISCS mode, all the tracks storedfor the currently loaded discs are playedback once, then clip play is released.
•You cannot start CLIP play if“PROGRAM” is displayed.
Erasing Tracks from a Clip
Erasing one track1 Press CLIP PLAY.2 Press CLIP button (A, B or C) for the clip
containing the track you want to erase.3 Use the JOG dial to select the track you
want to erase.4 Press CLIP ERASE.
“ERASE A - C” and “TRACK” appearalternately in the display.
5 Press CLIP button (A, B or C) youpressed on step 2. “ERASE CLIP” appears in the display.
Erasing all the tracks in a CLIP A (B orC)1 In stop mode, press CLIP ERASE.
“ERASE A - C” and “ALL A-C” appearalternately in the display.
2 Press CLIP button (A, B or C) to specifythe clip you want to erase. “PUSH A (Bor C)” appears in the display.
3 Press CLIP button you pressed on step 2again. “ERASE ALL” appears in thedisplay and CLIP indicator disappears.
Playing Tracks:Repeating aSpecified Portion(loop play)
You can use the loop function to recordfrom a CD to a tape with the sampler play.Use the buttons both on the unit andremote to do this operation.
EXAMPLE
Original song:“Hey, come on everybody!”
When you use the loop function:“Hey, come come come come come oneverybody!”
Grouping Tracks(music clip)
The music clip function is an easy way toproduce up to three groups of tracks fromyour CDs. For example, you could storetracks for the morning in CLIP A, tracks toplay for your friends in CLIP B, and tracksfor relaxing in CLIP C.Once you store one or more tracks in amusic clip(s), the player recalls those trackswhenever you play the respective disc.
Storing Tracks in a Clip
1 Press FUNCTION repeatedly until “CD”appears in the display.
2 Play the track you want to store, or (instop mode) use the JOG dial to select thetrack you want.
3 Press CLIP button (A, B or C).“CLIP FILE” appears and the selectedCLIP indicator (A, B or C) appears in thedisplay. Normal playback continues.
4 Repeat steps 2 and 3 to store other tracksinto the same or a different clip.
If the memory becomes fullYou can store tracks from up to tendifferent CDs (one or more tracks per CD)to each clip data.The clip data for the oldest clip is erased tomake room for a new clip.
Note•Only tracks numbered 1 – 20 can be
stored in music clips so you cannot storetracks numbered 21 or more.
•In stop mode, you cannot store tracks if“SHUFFLE” or “PROGRAM” isdisplayed.
12563 250 500 1k 2k 4k 8k 16k(Hz)
DOLBY NR OFF
CD
ALLACLIP DISC S
3VOLUME
POWERnON
3
2
1
POWERnON
21
π
POWERnON
CLIP ERASECLIP PLAY
CLIP A-CJOG dial
12563 250 500 1k 2k 4k 8k 16k(Hz)
DOLBY NR OFF
CD
ALLACLIP DISC
1 2 3 4 56 7 8
VOLUME
POWERnON
24
1
DISC SKIP EX-CHANGE
3,5

EN
Chapter 2: the CD Player 11
1 Press FUNCTION repeatedly until “CD”appears in the display.
2 Press § OPEN/CLOSE and place a CD.Then, press § OPEN/CLOSE again toclose the disc tray.If the button for the disc tray containingthe CD you want to record on is not litgreen, press DISC SKIP EX-CHANGErepeatedly so that it lights green.
3 Press LOOP repeatedly to selectNORMAL or RHYTHM (as forNORMAL and RHYTHM, see “What isthe difference between NORMAL andRHYTHM?” for details).NORMAL or RHYTHM has five modesrespectively, depending on the intervalyou want. The display changes asfollows:
The interval (about 0.25 to 1.00 second)is longer as the number is bigger.
4 Press fl.
5 Press and hold down LOOP when aportion you want to repeat is playedand release when until you want to stoprepeating it.
What is the difference betweenNORMAL and RHYTHM?There is a difference between NORMALand RHYTHM in restarting point of normalplay when the loop effect ends.Select NORMAL or RHYTHM while Stopplaying or pause playing.
NORMAL:Normal CD play resumes from the samepoint as you have started the loop playwhen you release LOOP button.
RHYTHM:The portion over-ridden by the loop effectwill be skipped and then normal playresumes.
NORMAL1.....NORMAL5
RHYTHM5.....RHYTHM1
EN
Chapter 3: the Radio12
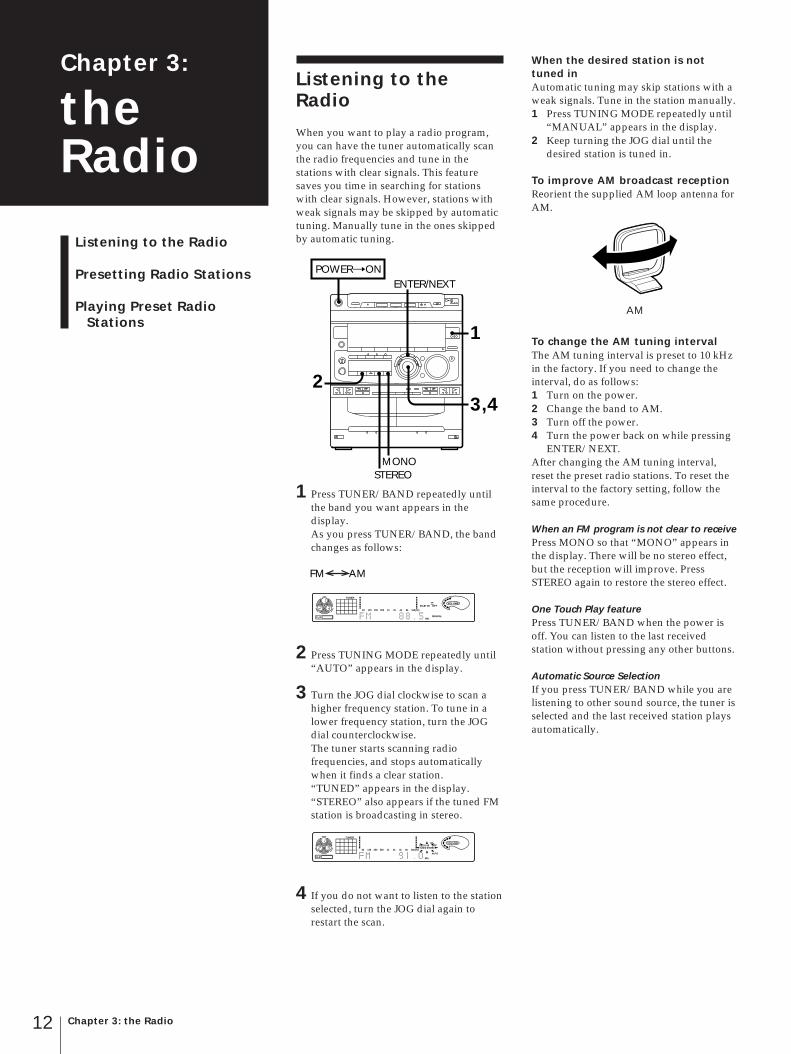
Listening to theRadio
When you want to play a radio program,you can have the tuner automatically scanthe radio frequencies and tune in thestations with clear signals. This featuresaves you time in searching for stationswith clear signals. However, stations withweak signals may be skipped by automatictuning. Manually tune in the ones skippedby automatic tuning.
1 Press TUNER/BAND repeatedly untilthe band you want appears in thedisplay.As you press TUNER/BAND, the bandchanges as follows:
2 Press TUNING MODE repeatedly until“AUTO” appears in the display.
3 Turn the JOG dial clockwise to scan ahigher frequency station. To tune in alower frequency station, turn the JOGdial counterclockwise.The tuner starts scanning radiofrequencies, and stops automaticallywhen it finds a clear station.“TUNED” appears in the display.“STEREO” also appears if the tuned FMstation is broadcasting in stereo.
4 If you do not want to listen to the stationselected, turn the JOG dial again torestart the scan.
When the desired station is nottuned inAutomatic tuning may skip stations with aweak signals. Tune in the station manually.1 Press TUNING MODE repeatedly until
“MANUAL” appears in the display.2 Keep turning the JOG dial until the
desired station is tuned in.
To improve AM broadcast receptionReorient the supplied AM loop antenna forAM.
To change the AM tuning intervalThe AM tuning interval is preset to 10 kHzin the factory. If you need to change theinterval, do as follows:1 Turn on the power.2 Change the band to AM.3 Turn off the power.4 Turn the power back on while pressing
ENTER/NEXT.After changing the AM tuning interval,reset the preset radio stations. To reset theinterval to the factory setting, follow thesame procedure.
When an FM program is not clear to receivePress MONO so that “MONO” appears inthe display. There will be no stereo effect,but the reception will improve. PressSTEREO again to restore the stereo effect.
One Touch Play featurePress TUNER/BAND when the power isoff. You can listen to the last receivedstation without pressing any other buttons.
Automatic Source SelectionIf you press TUNER/BAND while you arelistening to other sound source, the tuner isselected and the last received station playsautomatically.
AM
POWERnON
3,4
1
2
MONOSTEREO
ENTER/NEXT
12563 250 500 1k 2k 4k 8k 16k(Hz)
DOLBY NR OFF
TUNER
CLIP
TUNED STEREO
AUTO
MHz
VOLUME
FM AM
Chapter 3:
theRadio
Listening to the Radio
Presetting Radio Stations
Playing Preset RadioStations
12563 250 500 1k 2k 4k 8k 16k(Hz)
DOLBY NR OFF
TUNER
CLIP MANUALMHz
VOLUME

EN
Chapter 3: the Radio 13
Presetting RadioStations
You can store radio frequencies in thetuner’s memory to tune in your favoritestations quickly. You can preset up to20 FM stations and 10 AM stations.Use the buttons on the unit for presettingstations.
1 Tune in a station you want to store inthe preset memory.
2 Press TUNER MEMORY.“MEMORY” and the preset channelnumber appear in the display.
3 Turn the JOG dial to select a presetchannel number.
4 Press ENTER/NEXT.The station is stored at the presetchannel number you have decided on.
5 Repeat steps 1 to 4 for each station youwant to store.
To erase a stored stationStore a new station at a previously usedpreset channel number. It will erase the oldstation and replace it with the new station.
If you have trouble storing a station or ifyou made a mistakeMake sure “MEMORY” is lit in the display.If not, press TUNER MEMORY again sothat “MEMORY” appears (for about eightseconds) in the display, and then proceedwith steps 3 and 4.
Playing Preset RadioStations
Once you have preset the stations, use theJOG dial to quickly tune in your favoritestations.
1 Press TUNER/BAND repeatedly toselect the band you want.
2 Press TUNING MODE so that“PRESET” appears in the display.
3 Turn the JOG dial (or press or on the remote) to tune in a presetstation.The station frequency appears and thestation begins broadcasting.
12563 250 500 1k 2k 4k 8k 16k(Hz)
DOLBY NR OFF
TUNER
CLIP MHz
VOLUME
12563 250 500 1k 2k 4k 8k 16k(Hz)
TUNER
CLIP MHz PRESET
VOLUME
POWERnON
3
42
Preset channel number
12563 250 500 1k 2k 4k 8k 16k(Hz)
TUNER
CLIP
1
TUNED STEREO
AUTO
VOLUME
FM AM
POWERnON
3
1
2

EN
Chapter 4: the Tape Player14
To
Stop play
Pause
Resumeplay afterpause
Fast forward
Rewind
Remove thecassette
Playing a Tape
You can use TYPE I (normal), TYPE II(CrO2) and TYPE IV (metal) tapes. Whenyou insert a tape, the deck detects the tapetype automatically.
1 Press § EJECT to open tapecompartment.Insert a recorded tape in deck A or Bwith the tape side down and the sideyou want to play facing forward. Pushto close the compartment. The tape willstart playing from the front side.
2 Press · (to play the front side) or ª(to play the reverse side).The tape starts playing.
*1 The deck stops automatically afterrepeating the sequence five times.
*2 See “To play both decks in succession(relay play)”.
* Remote
To control with the remote1 Press DECK A or DECK B to
play the front side and press DECKA or DECK B again to play thereverse.
2 Press the desired operation button.
To play both decks in succession(relay play)Relay play always follows the followingsequence. When the reverse side of the tapein deck B finishes playing, the followingsequence continues four more times.
Deck A Deck A(Front side) (Reverse side)
Deck B Deck B(Reverse side) (Front side)
1 Press § EJECT and insert recordedtapes in both decks.
2 Press DIRECTION repeatedly until“RELAY” appears in the display.
3 Press ª or · on either deck.To stop relay play, press π.
To cancel relay playPress DIRECTION repeatedly until “A”or “ß” appears in the display.
When listening to a tape recorded with theDolby* B-type noise reduction systemPress DOLBY NR button so that “DOLBYNR B” appears in the display.The setting affects both decks. Dolby noisereduction system reduces tape hiss noise inlow-level high-frequency signals.
* Dolby noise reduction manufacturedunder license from Dolby LaboratoriesLicensing Corporation.“DOLBY” and the double-D symbol aare trademarks of Dolby LaboratoriesLicensing Corporation.
One Touch Play featurePress · or ª when the power is off.You can listen to the tape without pressingany other buttons when a tape is in thedeck. When a tape is not in the deck, thesystem will just turn on.
Automatic Source SelectionIf you press · or ª (or DECK A orDECK B on the remote) while you arelistening to other sound source, the tapedeck is selected and the play startsautomatically.
Playing a Tape
Recording a CD
Recording a CD: SelectingTape LengthAutomatically (tapeselect edit)
Recording a CD: SpecifyingTape Length (time edit)
Recording a CD: SpecifyingTrack Order (programedit)
Recording From the Radio
Recording From AnotherTape (dubbing)
Chapter 4:
the TapePlayer
n
n
n
N
To play
One side of the tape
Both sides*1
Both decks insuccession*2
Press DIRECTION toselect
A
ß
RELAY
Press
π ( *)
∏ ( *) (deck B only)PAUSE
∏ ( *) (deck B only)PAUSE , ª or · (DECKA or DECK B *)
‚ ( *) for front sideº ( *) for reverse side
º ( *) for front side‚ ( *) for reverse side
§ EJECT
POWERnON
1
DIRECTIONDOLBY NR
2
π
1
2
º/‚ º/‚
π
PAUSE∏

EN
Chapter 4: the Tape Player 15
Recording a CD
You can record from a CD to a tape.Use TYPE I (normal) or TYPE II (CrO2)tapes. Do not use TYPE IV (metal) tapes forrecording.To listen to other sources while recording,you must stop recording.
Recording a CDAutomatically
By using CD SYNCHRO, you can recordfrom a CD to a tape quickly.Use the buttons on the unit to do thisoperation.
1 Press § EJECT and insert a blank tapeinto deck B with the side you want torecord on facing forward.Recording will start from the front sideof the tape, unless you have changed theplaying direction before recording.Make sure the tabs on the cassette havenot been removed.
2 Press § OPEN/CLOSE and place a CD.Then, press § OPEN/CLOSE again toclose the disc tray.If the indicator for the disc traycontaining the CD you want to record isnot lit green, press DISC SKIPEX-CHANGE repeatedly so that it lightsgreen.
3 Select dual or single-sided recording.
* Recording always stops at the end of thereverse side. Be sure to start from thefront side.
4 Press CD SYNCHRO.Deck B stands by for recording.
5 Press ∏ PAUSE to release recordingpause.Recording starts.After about 10 seconds, the CD startsplaying.
To stop recordingPress π on deck or the CD player.
To add the surround effectPress SURROUND so that “SUR ”appears.You can record the sound with surroundeffect.The equalizer you adjusted will not berecorded.
To activate DOLBY NRWhen you want to reduce the hiss noise inlow-level high-frequency signals, pressDOLBY NR so that “DOLBY NR B” appearsin the display after step 3.
Recording a CD Manually
You can record a CD as you like, forinstance, record just the songs you want orrecord from the middle of the tape.
1 Press § EJECT and insert a blank tapeinto deck B with the side you want torecord on facing forward.Recording will start from the front sideof the tape, unless you have changed theplaying direction before recording.Make sure the tabs on the cassette havenot been removed.
2 Press § OPEN/CLOSE and place a CD.Then, press § OPEN/CLOSE again toclose the disc tray.If the button for the disc tray containingthe CD you want to record is not litgreen, press DISC SKIP EX-CHANGErepeatedly so that it lights green.
3 Press FUNCTION to select the CDplayer.
4 Select dual or single-sided recording.
* Recording always stops at the end of thereverse side. Be sure to start from thefront side.
5 When you want to reduce the hiss noisein low-level high-frequency signals,press DOLBY NR so that “DOLBY NRB” appears in the display.
6 Press ® REC.Deck B stands by for recording.
7 Press ∏ PAUSE to release recordingpause.Recording starts.
8 Press fl on the CD player.The CD starts playing.
Recording a CD:Selecting TapeLengthAutomatically (tapeselect edit)
You can have the stereo system select andindicate the most suitable tape length forrecording each disc automatically.You cannot use Tape Select Edit for discswhich contain 21 tracks or more.
To record
One side of the tape
Both sides*
Press DIRECTION toselect
A
ß or RELAY
continue to next page
To
Stop recording
Pause recording
Stop CD play
Pause CD play
Press
π on deck
∏ PAUSE
π on the CD player
fl on the CD player
To record
One side of the tape
Both sides*
Press DIRECTIONto select
A
ß or RELAY
POWERnON
DOLBY NR
1
53
4
π
SURROUND
2
DISC SKIP EX-CHANGE
POWERnON
456 1
7
8
3
π
π
2
DISC SKIP EX-CHANGE
POWERnON
3
56
4
7
1
2
DISC SKIP EX-CHANGE

EN
Chapter 4: the Tape Player16
1 Press FUNCTION repeatedly until “CD”appears in the display.
2 Press § OPEN/CLOSE and place a CD.Then, press § OPEN/CLOSE again toclose the disc tray.If the button for the disc tray containingthe CD you want to record is not litgreen, press DISC SKIP EX-CHANGErepeatedly so that it lights green.
3 Press EDIT.“TAPE SELECT” appears and the playerdivides the selections automatically.Then the display changes as follows:
4 Insert a blank tape of the indicatedlength (or longer) into deck B.
5 Select dual or single-sided recording.
* Recording always stops at the end of thereverse side. Be sure to start from thefront side.
6 Press CD SYNCHRO.Deck B stands by for recording.
7 Press ∏ PAUSE to release recordingpause.Recording starts.After about 10 seconds, the CD startsplaying.
Recording a CD:Specifying TapeLength (time edit)
You can have the stereo system createprograms based on the tape length. The CDplayer makes programs that will fit the tapelength. For example, if you use a 40-minutetape to record a 46-minute CD, the CDplayer will automatically choose tracks thatwill fit within the 40-minutes, filling asmuch of the tape as possible. The playerwill not program those tracks beyond track
NoteYou cannot select “HALF” when youwant to record CD which has more than20 tracks.
5 Press EDIT.The CD player determines the tracks tobe recorded on side A automatically.
6 When you want to record on both sides,press EDIT again.The CD player determines the tracks tobe recorded on side B.When you want to record only on sideA, press π on the CD player to stop theindication from flashing.
7 Press § EJECT and insert a blank tapeinto deck B with the side you want torecord on facing forward.Recording will start from the front sideof the tape, unless you have changed theplaying direction before recording.Make sure the tabs on the cassette havenot been removed.
8 Select dual or single-sided recording.
* Recording always stops at the end of thereverse side. Be sure to start from thefront side.
9 Press CD SYNCHRO.Deck B stands by for recording.
10 Press ∏ PAUSE to release recordingpause.Recording starts.After about 10 seconds, the CD startsplaying.
To stop recordingPress π on deck or the CD player.
To check the orderPress CHECK on the remote repeatedly.Each time you press CHECK, the numberof the programmed tracks appear in thedisplay.
To cancel time editPress π on the CD player and then pressPLAY MODE.
number 20. Use the buttons on both theunit and the remote to do this operation.
1 Press FUNCTION repeatedly until “CD”appears in the display.
2 Press § OPEN/CLOSE and place a CD.Then, press § OPEN/CLOSE again toclose the disc tray.If the button for the disc tray containingthe CD you want to record is not litgreen, press DISC SKIP EX-CHANGErepeatedly so that it lights green.
3 Press EDIT twice.“TIME EDIT” appears in the display.Then “SELECT” and “TIME” appearalternately in the display.
4 Turn the JOG dial (or press or on the remote) to designate the tapelength.Choose the indication for tapes of acorresponding minute length. Choose“HALF” if you want the CD player toplay just half the total playing time ofthe CD without changing the order ofthe track.As you turn the JOG dial or press the
or on the remote, the indicationchanges as follows:
continued
Tape length required
12563
DOLBY NR OFF
CD
ALLCLIP DISC S
1 2 3 4 56 7 8
VOLUME
12563 250 500 1k 2k 4k 8k 16k(Hz)
DOLBY NR OFF
CD
ALLCLIP DISC S
1 2 3 4 56 7 8
VOLUME
Press DIRECTION toselect
A
ß or RELAY
To record
One side of the tape
Both sides*
Tracks to be recorded on side A
12563 250 500 1k 2k 4k 8k 16k(Hz)
DOLBY NR OFF
CD
CLIP DISC PROGRAM
1 2 3 4 56
VOLUME
Total playing time on side A
To record
One side of the tape
Both sides*
Press DIRECTION toselect
A
ß or RELAY
(23:00) (27:00)
(30:00)(37:00)(45:00)
POWERnON
2
4
3,5,6
91081
7
π
π
PLAY MODE
DOLBY NR
DISC SKIP EX-CHANGE
12563 250 500 1k 2k 4k 8k 16k(Hz)
DOLBY NR OFF
CD
CLIP DISC PROGRAM
1 2 3 4 56 7 8 9 10
11
VOLUME
3,5,6
10
4
CHECK
1
2

EN
Chapter 4: the Tape Player 17
To select the desired tracksbeforehandYou can place priority on some tracks to berecorded by selecting them beforeprogramming (only up to 20 tracks). See“Playing Tracks in the Desired Order(program play)”.
To activate DOLBY NRWhen you want to reduce the hiss noise inlow-level high-frequency signals, pressDOLBY NR so that “DOLBY NR B” appearsin the display after step 8.
Recording a CD:Specifying TrackOrder (program edit)
You can adjust the total recording time tothe tape length while making a program.Use the buttons on both the unit and theremote to do this operation.
1 Press FUNCTION repeatedly until “CD”appears in the display.
2 Press § OPEN/CLOSE and place a CD.Then, press § OPEN/CLOSE again toclose the disc tray.If the button for the disc tray containingthe CD you want to record is not litgreen, press DISC SKIP EX-CHANGErepeatedly so that it lights green.
3 Press PLAY MODE repeatedly until“PROGRAM” appears in the display.
4 Press DISC 1 – 3 to choose a CD.
5 Turn the JOG dial (or press or on the remote) to choose a track.
6 Press ENTER/NEXT.The chosen track number lights up inthe music calendar and is memorized. Ifthe track number disappears before youpress ENTER/NEXT, go back to step 5.
7 Repeat steps 5 and 6 from the same CDand 4 to 6 from another CD to programthe remaining tracks you want to recordon side A in the order you want them tobe recorded.
8 Press on the remote to pauserecording at the end of side A.“P” appears in the display. The totalplaying time “0.00” is displayed.
9 Repeat steps 5 and 6 from the same CDand 4 to 6 from another CD to programthe remaining tracks you want to recordon side B in the order you want them tobe recorded.
10 Press § EJECT and insert a blanktape into deck B with the side you wantto record on facing forward.Recording will start from the front sideof the tape, unless you have changed theplaying direction before recording.Make sure the tabs on the cassette havenot been removed.
11 Select dual or single-sided recording.
* Recording always stops at the end of thereverse side. Be sure to start from thefront side.
12 Press CD SYNCHRO.Deck B stands by for recording.
13 Press ∏ PAUSE to release recordingpause.Recording starts.After about 10 seconds, the CD startsplaying.
To stop recordingPress π on deck or the CD player.
To check the orderPress CHECK on the remote repeatedly.Each time you press CHECK, the numberof the programmed tracks appear in thedisplay.
To cancel program editPress PLAY MODE repeatedly until“PROGRAM” disappears from the display.
To activate DOLBY NRWhen you want to reduce the hiss noise inlow-level high-frequency signals, pressDOLBY NR so that “DOLBY NR B” appearsin the display after step 11.
Recording From theRadio
You can record from the tuner onto a tape.Use TYPE I (normal) or TYPE II (CrO2)tape.
1 Press § EJECT and insert a blank tapeinto deck B with the side you want torecord on facing forward.Recording will start from the front sideof the tape, unless you have changed theplaying direction before recording.Make sure the tabs on the cassette havenot been removed.
2 Press TUNER/BAND several times untilthe desired radio band appears.
3 Tune in the radio station you want torecord. (See “Listening to the Radio”, or“Playing Preset Radio Stations” fordetails.)
4 Select dual or single-sided recording.
* Recording always stops at the end of thereverse side. Be sure to start from thefront side.
To record
One side of the tape
Both sides*
Press DIRECTION toselect
A
ß or RELAY
POWERnON
64
5
1
2
πDOLBY NR
To record
One side of the tape
Both sides*
Press DIRECTION toselect
A
ß or RELAY
continue to next page
POWERnON
24
5
1213
1136 1
10
π
DOLBY NR
DISC SKIP EX-CHANGE
25
8,13
CHECK
1

EN
Chapter 4: the Tape Player18
1 Press § EJECT and insert a recordedtape in deck A with the side you want toplay facing forward.Also, insert a blank tape in deck B withthe side you want to record on facingforward.Recording and playback will start fromthe front side of the tape, unless youhave changed the playing directionbefore recording.Make sure the tabs on the cassette havenot been removed.
2 Choose how you want the tape to recordand press DIRECTION.
3 Press HIGH SPEED DUBBING.Deck B stands by for recording.
4 Press ∏ PAUSE.The tape starts dubbing at high speed.When the tape has started dubbing fromthe reverse side in RELAY and ßmode, dubbing will stop at the end ofthe reverse side.
To stop dubbingPress π on deck B.
You do not have to press DOLBY NR at highspeed dubbingThe tape in deck B is automaticallyrecorded in the same state as the tape indeck A.
Dubbing Another TapeManually
When you want to dub only part of thetape, dub manually at normal speed. UseTYPE I (normal) or TYPE II (CrO2) tape forrecording.
5 Press ® REC.
Deck B stands by for recording.
6 Press ∏ PAUSE to release recordingpause.Recording starts.
To stop recordingPress π on deck.
To reduce noise during AM recordingIf a whistling noise is heard whilerecording, reorient the AM loop antenna foroptimum reception.
To activate DOLBY NRWhen you want to reduce the hiss noise inlow-level high-frequency signals, pressDOLBY NR so that “DOLBY NR B” appearsin the display after step 4.
Recording FromAnother Tape(dubbing)
Dubbing Another TapeAutomatically
You can record the whole tape onto anotherautomatically by using high speed dubbing.Use the buttons on the unit to do thisoperation and TYPE I (normal) or TYPE II(CrO2) tape for dubbing.
1 Press § EJECT and insert a recordedtape in deck A with the side you want toplay facing forward.Also, insert a blank tape in deck B withthe side you want to record on facingforward.Recording and playback will start fromthe front side of the tape, unless youhave changed the playing directionbefore recording.Make sure the tabs on the cassette havenot been removed.
2 Press FUNCTION repeatedly until“TAPE” appears in the display.
3 Select dual or single-sided recording.
* Recording always stops at the end of thereverse side. Be sure to start from thefront side.
4 Press ® REC.Deck B stands by for recording.
5 Press ∏ PAUSE to release recordingpause.Recording starts.
6 Press · or ª on deck A to startplayback.
To stop recordingPress π on deck A and B.
Notes•When dubbing tapes originally recorded
with Dolby NR B, the dubbed tape isautomatically recorded with Dolby NR B.
•When you want to record a tape recordedwithout Dolby NR B onto another tapeusing Dolby NR B, press DOLBY NR sothat “DOLBY NR B” appears in thedisplay before recording.
continued
Indication
A
ß
RELAY
Operation
Dubbing stops at the end ofone side.
When the tape in one deckcomes to the end of the frontside, it reverses immediatelyregardless of the tapeposition in the other deck.
When the tape in one deckreaches its end of the frontside, it stops until the othertape come to its end, andthen both tapes reversetogether.
POWERnON
DOLBY NRπ π
5
1
236
1
4
To record
One side of the tape
Both sides*
Press DIRECTION toselect
A
ß or RELAY
POWERnON
42
1
3
1π

EN
Chapter 5: Sound Adjustment 19
To listen through the headphonesConnect the headphones to PHONES jack.No sound will come from the speakers.
Selecting The AudioEmphasis
Your stereo system is provided with 15different preset effects (music menu)created from different graphic equalizerand surround effect settings.With the press of a single button, you canchoose between a variety of effectsaccording to musical genre or use. Thepersonal file function (see page 21) lets youstore your own effects.
1 Press one of the MENU buttons (orMUSIC MENU / on theremote) repeatedly to select MENU.See the chart “Music menu options” onthe following page. The last effectchosen from that menu appears in thedisplay.
2 Use the JOG dial (or press MUSICMENU / on the remoterepeatedly) to select the preset youdesire.The preset name appears in the display.
3 Press ENTER/NEXT.
To cancel the effectPress EFFECT ON/OFF (or MUSIC MENUON/OFF on the remote) so that “EFFECTOFF” appears in the display.
Adjusting the SoundTo fully enjoy the sound coming from yourstereo system, make the following audioadjustments. See the following sections foradditional sound adjustments.
To adjust the volumeTurn VOLUME on the unit or pressVOL (+/–) on the remote.
To reinforce bassPress DBFB* repeatedly until “DBFB ”or “DBFB ” appears in the display.“DBFB ” is more effective than “DBFB ”.
display off n DBFB n DBFB
* DBFB = Dynamic Bass Feedback
If you use the DBFB System with thegraphic equalizerIf the bass is too strong, the music willsound distorted. Adjust the bass slowlywhile listening to music so that you canmonitor the effect of the adjustment.
To get a powerful sound (GROOVE)Press GROOVE.The volume switches to power mode, DBFBis automatically set to full strength, theequalizer curve changes and the“GROOVE” button lights up. PressGROOVE again to return to the previousvolume.
Notes•Cancelling GROOVE does not cancel theDBFB level or equalizer curve.To cancel the DBFB level, press DBFBrepeatedly until “DBFB ” or“DBFB ” disappears from the display.Adjust the equalization to obtain the effectyou desire.•The sound may be distorted with DBFB orGROOVE activated when connecting anoptional super woofer (Sony SA-W10, etc.)to the unit.In this case, set DBFB off and adjust thesound of a super woofer.
POWERnON
PHONES GROOVE
DBFBVOLUME
Chapter 5:
SoundAdjustment
Adjusting the Sound
Selecting the AudioEmphasis
Adjusting the AudioEmphasis
Making a Personal AudioEmphasis File (personalfile)
n
POWERnON
2
13
EFFECT ON/OFF
DISPLAY/DEMO
continue to next page

GB
Chapter 5: Sound Adjustment20
continued
Music menu options“SUR ” appears if you select an effectwith surround effects.
To change the equalizer displayEach time you keep pressing DISPLAY/DEMO for a few seconds, the equalizerdisplay changes to show one of the fourdisplays below.
Adjusting the AudioEmphasis
You can adjust the audio emphasis usingthe following two functions:•Graphic Equalizer•Surround Effect
Adjusting the Sound(graphic equalizer)
You can adjust the sound by raising orlowering the levels of specific frequencyranges.Before operation, first select the audioemphasis you want for your basic sound.
1 Press FREQUENCY + or – to select afrequency band.
2 Turn the JOG dial to adjust level.
3 Repeat steps 1 and 2.
4 Press ENTER/NEXT when finished.The equalizer disappears from thedisplay but you can hear the effect of theadjustments.
NoteIf you choose another menu audioemphasis (other than “EFFECT OFF”) theadjusted sound effect is lost. To retain theadjusted sound effect for future use, store itin a personal file. (See “Making a PersonalAudio Emphasis File (personal file)”.)
Activating the Sound Field(surround effect)
You can use the surround effect withoutconnecting surround speakers.Before operation, first select the audioemphasis you want for your basic sound.
To turn on the surround effectPress SURROUND.“SUR ” appears in the display.
To turn off the surround effectPress SURROUND.“SUR ” disappears from the display.
MENUbutton
MENU 1
MENU 2
MENU 3
Effect
ROCKPOPSJAZZCLASSICDANCE
SALSAREGGAEBALLADEOLDIESSOUL
MORNINGDAYEVENINGNIGHTRELAX
For
standardmusic sources
listeningsituations
POWERnON
2
1
4
EFFECT ON/OFF
12563 250 500 1k 2k 4k 8k 16k(Hz)
12563 250 500 1k 2k 4k 8k 16k(Hz)
12563 250 500 1k 2k 4k 8k 16k(Hz)
12563 250 500 1k 2k 4k 8k 16k(Hz)
Spectrum analyzer 1
Spectrum analyzer 2
Spectrum analyzer 3
Graphic equalizer curve
POWERnON
SURROUND
12563 250 500 1k 2k 4k 8k 16k(Hz)
DOLBY NR OFF
CD
CLIP 1DISCMHz
VOLUME
12563 250 500 1k 2k 4k 8k 16k(Hz)
DOLBY NR OFF
CD
CLIP 1DISCMHz
VOLUME
EN
Chapter 5: Sound Adjustment 21
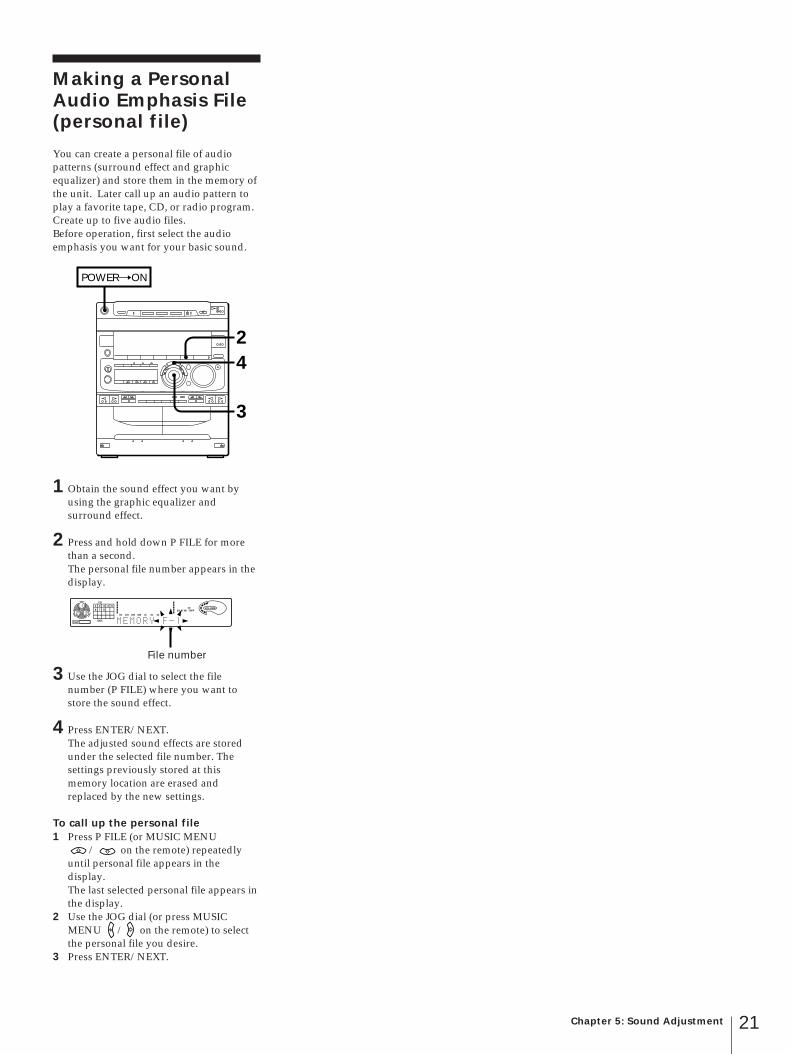
Making a PersonalAudio Emphasis File(personal file)
You can create a personal file of audiopatterns (surround effect and graphicequalizer) and store them in the memory ofthe unit. Later call up an audio pattern toplay a favorite tape, CD, or radio program.Create up to five audio files.Before operation, first select the audioemphasis you want for your basic sound.
1 Obtain the sound effect you want byusing the graphic equalizer andsurround effect.
2 Press and hold down P FILE for morethan a second.The personal file number appears in thedisplay.
3 Use the JOG dial to select the filenumber (P FILE) where you want tostore the sound effect.
4 Press ENTER/NEXT.The adjusted sound effects are storedunder the selected file number. Thesettings previously stored at thismemory location are erased andreplaced by the new settings.
To call up the personal file1 Press P FILE (or MUSIC MENU
/ on the remote) repeatedlyuntil personal file appears in thedisplay.The last selected personal file appears inthe display.
2 Use the JOG dial (or press MUSICMENU / on the remote) to selectthe personal file you desire.
3 Press ENTER/NEXT.
POWERnON
2
3
4
12563 250 500 1k 2k 4k
DOLBY NR OFF
CD
CLIP 1DISC
1 2 3 4 56 7 8
VOLUME
File number
EN
Chapter 6: Additional Features22
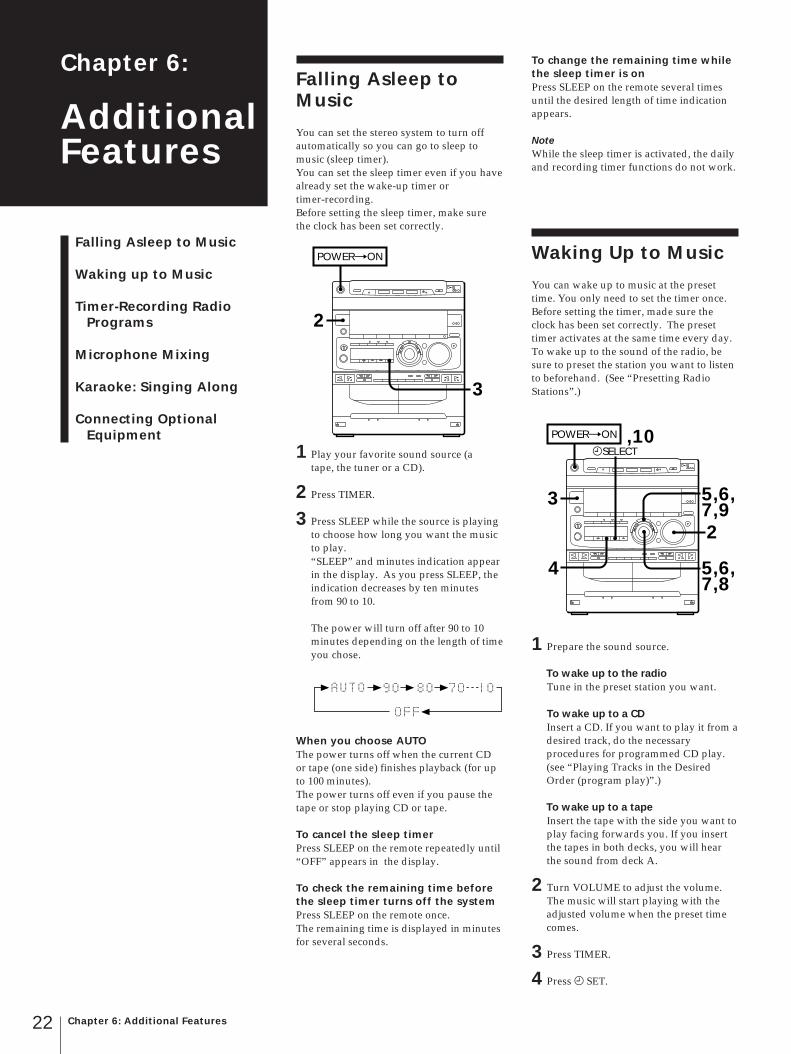
Falling Asleep toMusic
You can set the stereo system to turn offautomatically so you can go to sleep tomusic (sleep timer).You can set the sleep timer even if you havealready set the wake-up timer ortimer-recording.Before setting the sleep timer, make surethe clock has been set correctly.
1 Play your favorite sound source (atape, the tuner or a CD).
2 Press TIMER.
3 Press SLEEP while the source is playingto choose how long you want the musicto play.“SLEEP” and minutes indication appearin the display. As you press SLEEP, theindication decreases by ten minutesfrom 90 to 10.
The power will turn off after 90 to 10minutes depending on the length of timeyou chose.
When you choose AUTOThe power turns off when the current CDor tape (one side) finishes playback (for upto 100 minutes).The power turns off even if you pause thetape or stop playing CD or tape.
To cancel the sleep timerPress SLEEP on the remote repeatedly until“OFF” appears in the display.
To check the remaining time beforethe sleep timer turns off the systemPress SLEEP on the remote once.The remaining time is displayed in minutesfor several seconds.
To change the remaining time whilethe sleep timer is onPress SLEEP on the remote several timesuntil the desired length of time indicationappears.
NoteWhile the sleep timer is activated, the dailyand recording timer functions do not work.
Waking Up to Music
You can wake up to music at the presettime. You only need to set the timer once.Before setting the timer, made sure theclock has been set correctly. The presettimer activates at the same time every day.To wake up to the sound of the radio, besure to preset the station you want to listento beforehand. (See “Presetting RadioStations”.)
1 Prepare the sound source.
To wake up to the radioTune in the preset station you want.
To wake up to a CDInsert a CD. If you want to play it from adesired track, do the necessaryprocedures for programmed CD play.(see “Playing Tracks in the DesiredOrder (program play)”.)
To wake up to a tapeInsert the tape with the side you want toplay facing forwards you. If you insertthe tapes in both decks, you will hearthe sound from deck A.
2 Turn VOLUME to adjust the volume.The music will start playing with theadjusted volume when the preset timecomes.
3 Press TIMER.
4 Press t SET.
Chapter 6:
AdditionalFeatures
Falling Asleep to Music
Waking up to Music
Timer-Recording RadioPrograms
Microphone Mixing
Karaoke: Singing Along
Connecting OptionalEquipment
2
3
POWERnON
POWERnON
5,6,7,9
5,6,7,8
3
,10
4
tSELECT
2

EN
Chapter 6: Additional Features 23
5 Use the JOG dial to select either DAILY1 or 2 and press ENTER/NEXT.“ON” appears and the hour digits flashin the display.
6 Use the JOG dial to set the hour youwant the system to turn on and pressENTER/NEXT.Set the minutes in the same way. “OFF”appears and the hour digits flash in thedisplay.
7 Use the JOG dial to set the hour youwant the system to turn off and pressENTER/NEXT.Set the minutes in the same way.
8 Use the JOG dial to select a soundsource.The display changes as follows:
9 Press ENTER/NEXT.The preset items appear in the displaysequentially.
10 Press POWER to turn off the system.The power will go on at the preset timeand the music will play with the volumeyou have adjusted. At the turn-off time,the power will go off again.
To change the preset timer settingsStart over from step 1.
To check the preset timer settings1 Press TIMER.2 Press t SELECT and use the JOG dial to
choose the mode you want to check.3 Press ENTER/NEXT.
The preset items appear in the displaysequentially, then the original displayreturns.
To change the timerSelect the timer display you desire in step 2of “To check the preset timer settings”.
To cancel the timer1 Press TIMER.2 Press t SELECT and use the JOG dial to
choose “TIMER OFF.”3 Press ENTER/NEXT.
The next time you want to use the timer,select the timer display you used in step2 (DAILY1 or DAILY 2) and pressENTER/NEXT.
Notes•You cannot set the timer if the timer ON
and OFF times are the same.•You cannot activate wake-up timer and
timer-recording at the same time.
Timer-RecordingRadio Programs
You can set the timer to record from theradio at a certain time. This timer worksonly once for each setting.Make sure the clock has been set correctly.
1 Press § EJECT and insert a blank tape indeck B with the side you want to recordon facing forward.
2 Select dual or single-sided recording.
* Recording always stops at the end of thereverse side. Be sure to start from thefront side.
3 Tune in a station you want to record.
4 Press TIMER.
5 Press t SET.
6 Use the JOG dial to select REC and pressENTER/NEXT.“ON” appears and the hour digits flashin the display.
7 Use the JOG dial to set the hour youwant the system to turn on and pressENTER/NEXT.Set the minutes in the same way. “OFF”appears and the hour digits flash in thedisplay.
8 Use the JOG dial to set the hour youwant the system to turn off and pressENTER/NEXT.Set the minutes in the same way.
9 Press ENTER/NEXT.The preset items appear in the displaysequentially.
10 Press POWER to turn off the system.The power comes 15 seconds before thepreset time on and the volume level isautomatically set to the minimum.
To check the preset times settings1 Press TIMER.2 Press t SELECT and use the JOG dial to
select “REC”.3 Press ENTER/NEXT.
The preset items appear in the displaysequentially, then the original displayreturns.
To change the preset timer settingsStart over from step 1.
To cancel the timer1 Press TIMER.2 Press t SELECT and use the JOG dial to
choose “TIMER OFF.”3 Press ENTER/NEXT.
The timer indicators disappear from thedisplay.
12563 500 1k 2k 4k 8k 16k(Hz)
TIMER
CLIP
DAILY11 2 3 4 56 7 8
VOLUME
flashing
12563 250 500 1k 2k 4k 8k 16k(Hz)
TIMER
CLIP
DAILY11 2 3 4 56 7 8
VOLUME
flashing
12563 500 1k 2k 4k 8k 16k(Hz)
TIMER
CLIP
1 2 3 4 56 7 8
RECVOLUME
flashing
12563 250 500 1k 2k 4k 8k 16k(Hz)
TIMER
CLIP
1 2 3 4 56 7 8
RECVOLUME
flashing
12563 250 500 1k 2k 4k 8k 16k(Hz)
TIMER
CLIP
DAILY11 2 3 4 56 7 8
VOLUME
flashing
TUNER CD
TAPE
12563 250 500 1k 2k 4k 8k 16k(Hz)
TIMER
CLIP
DAILY11 2 3 4 56 7 8
VOLUME
To record
One side of the tape
Both sides*
Press DIRECTIONto select
A
ß or RELAY
POWERnON
6,7,8,9
6,7,81
4
,10
52
tSELECT
12563 250 500 1k 2k 4k 8k 16k(Hz)
TIMER
CLIP
1 2 3 4 56 7 8
RECVOLUME
flashing
continue to next page

EN
Chapter 6: Additional Features24
If the power is on at the preset timeThe sound source will automaticallychange to the tuner, but tuner recordingwill not start.
Notes•You cannot set the timer if the timer ON
and OFF times are the same.•You cannot activate timer-recording and
wake-up timer at the same time.
Microphone Mixing
You can “mix” sounds by playing one ofthe components and singing or speakinginto a microphone (not supplied). Themixed sounds can then be recorded on atape.
1 Turn MIC LEVEL to MIN to turn downthe microphone control level.
2 Connect a microphone at the MIX MICjack.
3 Press FUNCTION several times to selecta sound source and play it.
4 Adjust VOLUME.If you hear acoustic feedback, move themicrophone away from the speakers orchange the direction of the microphone.
5 Sing or speak into the microphone.
6 Adjust MIC LEVEL.
7 If you want to record mixed sound,insert a tape in deck B and startrecording.
To record from the microphone only1 Press FUNCTION repeatedly until “CD”
appears in the display. If a CD is beingplayed, press π on the CD player tostop playing.
2 Start recording.3 Sing or speak into the microphone.
When you finish mixingTurn the MIC LEVEL control to MIN anddisconnect the microphone.
NoteWhen howling occurs, decrease soundlevel, keep a microphone away from thespeakers or turn it in the other direction.
Karaoke: SingingAlong
To Reduce the Vocals(Karaoke pon)
You can minimize the singer’s voice, “vocalreduction,” so you can sing along with anystereo CD or tape. When you want torecord the sound of the CD or tape andyour voice, operate steps below.
To reduce the vocalsPress KARAOKE PON/MPX so that“h PON” appears in the display.To cancel vocal reduction, press KARAOKEPON/MPX repeatedly so that “h PON”,“h MPX R” or “h MPX L” disappearsfrom the display.
If you press EFFECT ON/OFF or recall asound effect with the MENU buttonsThe karaoke mode is cancelled.
Notes on vocal reductionThe singer’s voice may not be reducedcompletely for the following reasons:•Monaural recorded source (Instruments
may also be reduced.)•Only a few instruments are playing in the
stereo recorded source•A duet is being played•The source has strong echoes or chorus•The singer’s voice on the source deviates
from the center•The voice on the source is singing in high
soprano or tenor
To Sing Along withMultiplex CDs or Tapes
You can sing along using the microphonewhile playing a multiplex CD or tape.
Press KARAOKE PON/MPX repeatedlyuntil “h MPX R” or “h MPX L” appearsin the display (choose right (R) or left (L)according to the encoding on your MPXsoftware).Then, you can hear your voice through themicrophone and the instruments.
To hear both channels (theinstruments and the recordedsinger’s voice)Press KARAOKE PON/MPX repeatedly sothat “h PON”, “h MPX R” or “h MPX L”disappears from the display.
If you press EFFECT ON/OFF or recall asound effect with the MENU buttonsThe karaoke mode is cancelled.
continued
POWERnON
21,6
7
43
π
POWERnON
KARAOKE PON/MPX
EFFECT ON/OFF
EN
Chapter 6: Additional Features 25
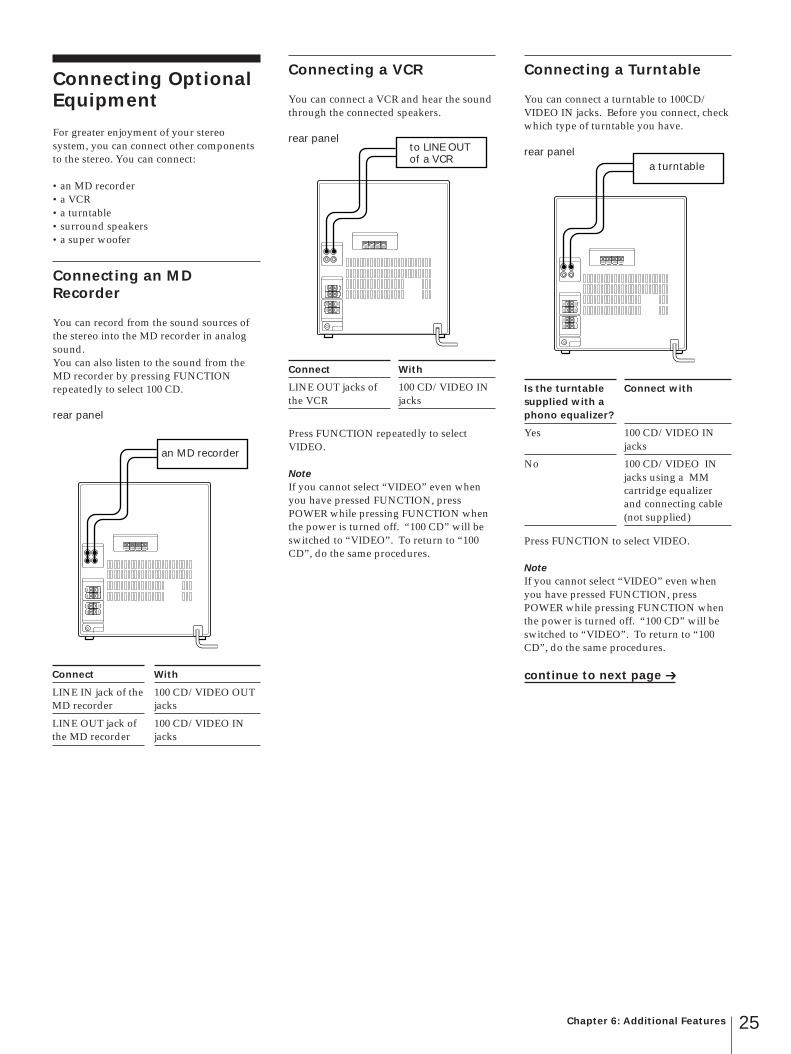
Connecting OptionalEquipment
For greater enjoyment of your stereosystem, you can connect other componentsto the stereo. You can connect:
•an MD recorder•a VCR•a turntable•surround speakers•a super woofer
Connecting an MDRecorder
You can record from the sound sources ofthe stereo into the MD recorder in analogsound.You can also listen to the sound from theMD recorder by pressing FUNCTIONrepeatedly to select 100 CD.
rear panel
Connecting a VCR
You can connect a VCR and hear the soundthrough the connected speakers.
rear panel
Press FUNCTION repeatedly to selectVIDEO.
NoteIf you cannot select “VIDEO” even whenyou have pressed FUNCTION, pressPOWER while pressing FUNCTION whenthe power is turned off. “100 CD” will beswitched to “VIDEO”. To return to “100CD”, do the same procedures.
Connecting a Turntable
You can connect a turntable to 100CD/VIDEO IN jacks. Before you connect, checkwhich type of turntable you have.
rear panel
Press FUNCTION to select VIDEO.
NoteIf you cannot select “VIDEO” even whenyou have pressed FUNCTION, pressPOWER while pressing FUNCTION whenthe power is turned off. “100 CD” will beswitched to “VIDEO”. To return to “100CD”, do the same procedures.
Connect
LINE IN jack of theMD recorder
LINE OUT jack ofthe MD recorder
With
100 CD/VIDEO OUTjacks
100 CD/VIDEO INjacks
an MD recorder
Connect
LINE OUT jacks ofthe VCR
With
100 CD/VIDEO INjacks
to LINE OUTof a VCR
continue to next page
a turntable
Is the turntablesupplied with aphono equalizer?
Yes
No
Connect with
100 CD/VIDEO INjacks
100 CD/VIDEO INjacks using a MMcartridge equalizerand connecting cable(not supplied)

EN
Chapter 6: Additional Features26
Connecting SurroundSpeakers
You can connect surround speakers toSURROUND SPEAKER connectors.Connect the right rear speaker to theSURROUND SPEAKER R connectors andthe left rear speaker to the SURROUNDSPEAKER L connectors.
rear panel
Connecting a Super Woofer
You can connect a super woofer to SUPERWOOFER jack.
rear panel
continued
surroundspeakers
a super woofer

EN
For Your Information 27
TroubleshootingGuide
If you run into any problem using thisstereo system, use the following check list.And first check the following points:•The power cord is connected firmly.•The speakers are connected correctly and
firmly.Should any problem persist after you havemade the checks below, consult yournearest Sony dealer.
Tuner
“TUNED” flashes in the display. Adjust the antenna.
“STEREO” flashes in the display. Adjust the antenna.
Severe hum or noise. Adjust the antenna. The signal strength is too weak.
Connect the external antenna. Connect the ground wire.
A stereo FM program cannot bereceived in stereo.
Press STEREO so that “STEREO”appears.
Tape Player
The tape does not record. No tape in the cassette holder. The tab has been removed from the
cassette. The tape has reeled to the end.
The tape does not record norplayback or there is a decrease insound level.
The heads are dirty. Clean them.* Magnetic deposits have built-up on
the record/playback heads.*
There is excessive wow or flutter, orthe sound drops out.
The capstans or pinch rollers arecontaminated.*
The tape does not erase completely. Magnetic deposits have built-up on
the record/playback heads.*
Noise increases or the highfrequencies are erased.
Magnetic deposits have built-up onthe record/playback heads.*
* See “Maintenance.”
On safety•The unit is not disconnected from the AC
power source (mains) as long as it isconnected to the wall outlet, even if theunit itself has been turned off.
•Unplug the system from the AC poweroutlet if it is not to be used for anextended period of time. To disconnectthe AC power cord, pull it out by theplug. Never pull the cord itself.
•Should any solid object or liquid fall intothe component, unplug the stereo systemand have the component checked byqualified personnel before operating itany further.
•AC power cord must be changed only atthe qualified service shop.
On installationPlace the stereo system in a location withadequate ventilation to prevent heat build-up in the stereo system.Do not place the unit in an inclinedposition.Do not place the unit in locations whereit is:- Extremely hot or cold- Dusty or dirty- Very humid- Vibrating- Subject to direct sunlight
On condensation in the CD playercomponentIf the system is brought directly from a coldto a warm location, or is placed in a verydamp room, moisture may condense on thelens inside the CD player. Should thisoccur, the CD player will not operate.Remove the CD and leave the systemturned on for about an hour until themoisture evaporates.
To save a tape permanentlyTo prevent a tape from being accidentallyrecorded over, break off the cassette tabfrom side A or B as illustrated. If you laterwant to reuse the tape for recording, coverthe broken tab with adhesive tape.
When you are using a TYPE II (CrO2) orTYPE IV (metal) cassette, be careful not tocover the detector slots which allow thetape player to automatically detect the typeof tape.
For YourInformation
Precautions
Troubleshooting Guide
Maintenance
Specifications
Index to Parts andControls
Index
continue to next page
Precautions
If you have any questions or problemsconcerning your stereo system, pleaseconsult your nearest Sony dealer.
•
•
•
Side A
Tab of side ATab ofside B
Detector slots
TYPE II
EN
For Your Information28
Demo mode appears in the displayafter deactivating the demo mode.
When a power interruption occursfor longer than half a day, set musicclips, timer settings and tunerpresetting again.
The remote does not function. The batteries have run down.
Replace both batteries. There is an obstacle between the
remote and the system. Remove theobstacle.
Restoring the FactorySettings
Hold down DISPLAY/DEMO,TUNER/BAND and MENU 3 at the sametime.
Deck A
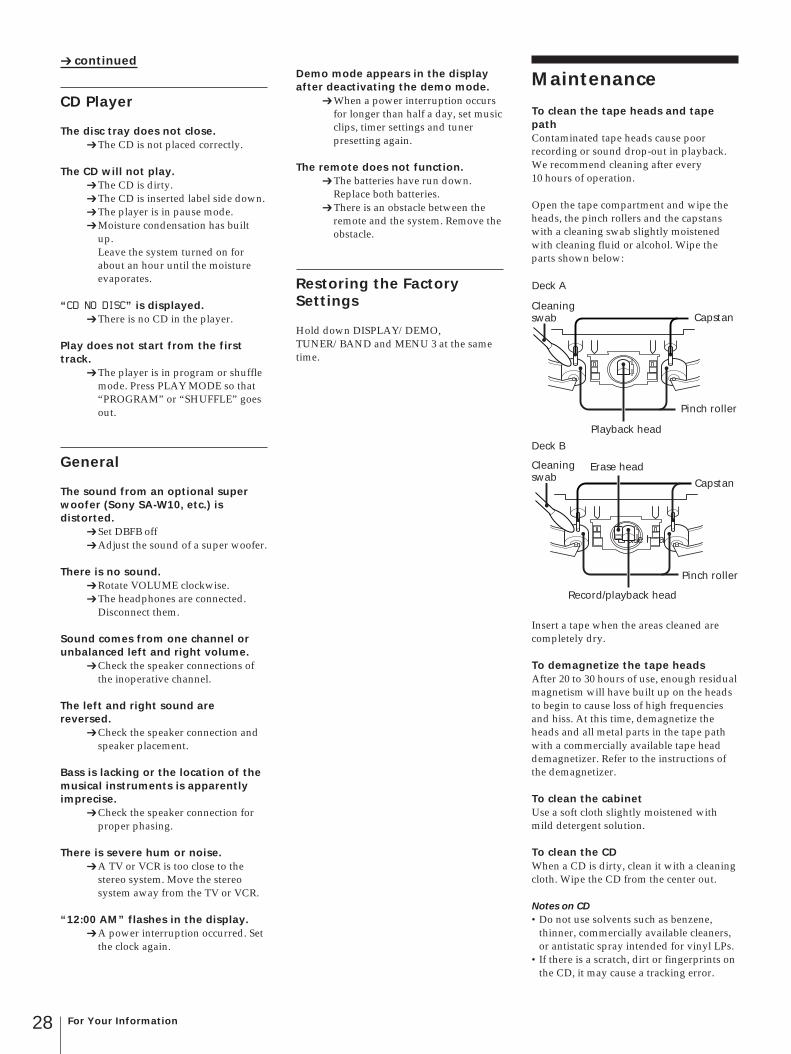
Maintenance
To clean the tape heads and tapepathContaminated tape heads cause poorrecording or sound drop-out in playback.We recommend cleaning after every10 hours of operation.
Open the tape compartment and wipe theheads, the pinch rollers and the capstanswith a cleaning swab slightly moistenedwith cleaning fluid or alcohol. Wipe theparts shown below:
Insert a tape when the areas cleaned arecompletely dry.
To demagnetize the tape headsAfter 20 to 30 hours of use, enough residualmagnetism will have built up on the headsto begin to cause loss of high frequenciesand hiss. At this time, demagnetize theheads and all metal parts in the tape pathwith a commercially available tape headdemagnetizer. Refer to the instructions ofthe demagnetizer.
To clean the cabinetUse a soft cloth slightly moistened withmild detergent solution.
To clean the CDWhen a CD is dirty, clean it with a cleaningcloth. Wipe the CD from the center out.
Notes on CD•Do not use solvents such as benzene,
thinner, commercially available cleaners,or antistatic spray intended for vinyl LPs.
•If there is a scratch, dirt or fingerprints onthe CD, it may cause a tracking error.
Cleaningswab Capstan
Pinch roller
Playback head
Erase head
Deck B
Pinch roller
Capstan
Record/playback head
Cleaningswab
Erase head
continued
CD Player
The disc tray does not close. The CD is not placed correctly.
The CD will not play. The CD is dirty. The CD is inserted label side down. The player is in pause mode. Moisture condensation has built
up.Leave the system turned on forabout an hour until the moistureevaporates.
“CD NO DISC” is displayed. There is no CD in the player.
Play does not start from the firsttrack.
The player is in program or shufflemode. Press PLAY MODE so that“PROGRAM” or “SHUFFLE” goesout.
General
The sound from an optional superwoofer (Sony SA-W10, etc.) isdistorted.
Set DBFB off Adjust the sound of a super woofer.
There is no sound. Rotate VOLUME clockwise. The headphones are connected.
Disconnect them.
Sound comes from one channel orunbalanced left and right volume.
Check the speaker connections ofthe inoperative channel.
The left and right sound arereversed.
Check the speaker connection andspeaker placement.
Bass is lacking or the location of themusical instruments is apparentlyimprecise.
Check the speaker connection forproper phasing.
There is severe hum or noise. A TV or VCR is too close to the
stereo system. Move the stereosystem away from the TV or VCR.
“12:00 AM” flashes in the display. A power interruption occurred. Set
the clock again.

EN
For Your Information 29
Amplifier sectionContinuous RMS power output
U.S. model: 50 W + 50 W(6 ohms at 40 – 20,000Hz,0.8 % THD)Canadian model: 50 W +50 W (8 ohms at 1 kHz, 5%THD)
Inputs100 CD/VIDEO IN (phono jacks):
voltage 450 mV,impedance 47 kilohms
MIX MIC (phone jacks):sensitivity 1 mV,impedance 10 kilohms
Outputs100 CD/VIDEO OUT (phono jacks):
voltage 250 mVimpedance 1 kilohms
PHONES (stereo phone jack):accepts headphones of8 ohms or more.
SPEAKER:accepts impedance of6 to 16 ohms.
SURROUND SPEAKER:accepts impedance of16 ohms.
SUPER WOOFER:Voltage 1 V, impedance1 kilo ohms.
Tape player sectionRecording system
4-track 2-channel stereoFrequency response
(DOLBY NR OFF)40 – 13,000 Hz (±3 dB),using Sony TYPE I cassette40 – 14,000 Hz (±3 dB),using Sony TYPE II cassette
Wow and flutter±0.15% W.Peak (IEC)0.1% W.RMS (NAB)±0.2% W.Peak (DIN)
SpeakerSS-H771Speaker system 3-way speaker systemSpeaker units
Woofer: 15 cm, cone typeTweeter: 5 cm, cone typeSuper Tweeter:
2 cm, dome typeEucloser type Bass reflexRated impedance
6 ohmsDimensions Approx. 205 × 325 ×
275 mm(8 1/8 × 12 7/8 × 10 7/8 in)(w/h/d)
Mass Approx. 4 kg (8 lb 13 oz)net per speaker
Specifications
For the U.S. modelAUDIO POWERSPECIFICATIONSPOWER OUTPUT ANDTOTAL HARMONICDISTORTION:With 6 ohm loads, bothchannels driven, from 40 –20,000 Hz; rated 50 watts perchannel minimum RMSpower, with no more than0.9 % total harmonicdistortion from 250milliwatts to rated output.
CD player sectionSystem Compact disc and digital
audio systemLaser Semiconductor laser
(λ=780 nm)Emission duration:continuous
Laser output Max. 44.6 µW** This output is the value
measured at a distance of200 mm from theobjective lens surface onthe Optical Pick-up Blockwith 7 mm aperture.
Frequency response2 Hz – 20 kHz (±0.5 dB)
Wavelength 780 – 790 nmSignal-to-noise ratio
More than 90 dBDynamic range More than 90 dB
Tuner sectionFM stereo, FM/AM superheterodynetuner
FM tuner sectionTuning range 87.5 – 108.0 MHz
(100 kHz step)Antenna FM lead antennaAntenna terminals
75 ohm unbalancedIntermediate frequency
10.7 MHz
AM tuner sectionTuning range 531 – 1,710 kHz (with the
tuning interval set at 9 kHz)530 – 1,710 kHz(with the tuning interval setat 10 kHz)
Antenna AM loop antenna,External antenna terminals
Intermediate frequency450 kHz
Supplied accessoriesAM loop antenna (1)Remote RM-SD50 (1)Sony SUM-3 (NS) batteries (2)FM lead antenna (1)Speaker cords (2)
GeneralPower requirements
120 V AC, 60 HzPower consumption
U.S. model: 110 WCanadian model: 150 W
Dimensions Approx. 280 x 325 x360 mm(11 1/8 x 12 7/8 x 14 1/4 in)(w/h/d)incl. projecting parts andcontrols
Mass Approx. 8.2 kg(18 lb 1 oz)
Optional accessorySurround speaker SS-SR10PSpeaker system Full rangeSpeaker units 10 cm dia., cone typeEnclosure type ClosedRated impedance
16 ohmsDimensions Approx. 125 x 160 x 110 mm
(5 x 63/8 x 43/8 in) (w/h/d/)Mass Approx. 700 g (1 lb 8 oz) per
speaker
Design and specifications are subject to changewithout notice.

EN
For Your Information30
@¢ ENTER/NEXT button (9)@∞GROOVE button* (19)@§DBFB button (19)@¶VOLUME control* (19)@•KARAOKE PON/MPX button (24)@ª JOG dial (7)#º FREQUENCY +/– buttons (20)#¡HIGH SPEED DUBBING button (18)#™DIRECTION button (14)#£DOLBY NR button (14)#¢º/‚ (rewind/fast forward) button
(14)#∞ ª/· reverse side play/front side
play button* (14)#§π (stop) button (14)#¶Deck A (14)#•§ EJECT button (14)#ªCD SYNCHRO button (15)$º® REC button* (15)$¡∏ PAUSE button* (15)$™Deck B (14)
MULTI FUNCTION CONTROLButtons
The buttons you can operate the CD player,tuner and the timer light up.
CD player
Tuner
Timer
Rear Panel
1 100 CD/VIDEO IN/OUT jacks (25)2 SPEAKER L/R connectors (4)3 SURROUND SPEAKER L/R connectors
(4)4 SUPER WOOFER jack (26)5ANTENNA terminals (4)
Display Window
1Disc tray indicator2Music calendar (7)3CD/TUNER indicator (7, 12)4Graphic Equalizer indicator (20)5CLIP indicators (10)6CD playback indicators (8, 9)7Multi display8 Tuning indicator (12)9DOLBY NR indicator (14)!ºDirection mode indicators (14)!¡ Timer indicators (22, 23)!™VOLUME indicators!£ Tuner indicators (12, 13)!¢ SYNC REC indicator!∞ SUR indicator (20)!§DBFB indicator (19)!¶Karaoke PON/MPX indicators (24)
Index to Parts andControls
Refer to the pages indicated in parenthesesfor details on how to use the controls.Controls with an asterisk have indicatorson themselves.
Front Panel
1DISC SKIP EX-CHANGE button (7)2 LOOP button (10)3 POWER switch (7)4Disc tray (7)5 TIMER button (22)6 SURROUND button (20)7 PHONES jack (19)8DISPLAY/DEMO button (5)9CLIP ERASE button (10)!ºCLIP PLAY button (10)!¡MIC LEVEL knob (24)!™MIX MIC jack (24)!£MULTI FUNCTION CONTROL buttons
(30)!¢CLIP A – C buttons (10)!∞DISC 1 – 3 buttons (7)!§§ OPEN/CLOSE button (7)!¶π (stop) button (7)!•fl (play/pause) button* (7)!ªMENU 1 – 3 buttons (19)@º P FILE button (21)@¡ EFFECT ON/OFF button* (19)@™ TUNER/BAND button* (12)@£ FUNCTION button (8, 24)
1
2
5
4
31234567890!`!“!£!¢
!!⁄!ƒ!¥!»@…@`@“@£@¢@@⁄@ƒ@¥@»#…
1/ALL DISCSC D PLAY MODE REPEAT EDIT
TUNINGMODETUNER
TUNERMEMORY STEREO MONO
CLOCK SETTIMER tSET tSELECT SLEEP
#¡#™#£#¢
#∞#§
#¶
#•
$¡#¢
#ª$º
#∞
$™
#•
#§
12563 250 500 1k 2k 4k 8k 16k(Hz)
CD TUNER
ALLA B CCLIP 1DISC S PROGRAMSHUFFLE REPEAT1
1 2 3 4 56 7 8 9 10
15141312112019181716
KHzMHz
765
1 42 3
250 500 1k 2k 4k 8k 16k(Hz)
RELAYDOLBY NRB OFF
TIMER
DBFB SURPONLR
MPX
DAILY12 REC SLEEP
TUNED STEREO MONO
STEP AUTOKHz MANUALSYNC
RECMHz PRESET
213
VOLUME
!¢ !§ !¶!∞!£
!¡8 !™90

EN
For Your Information 31
Remote
1 SLEEP button (22)2 LOOP button (10)3CD button (7)4 TUNER/BAND button (12)5DECK A /DECK B button (14)6 FUNCTION button (8, 24)7MUSIC MENU / buttons (19)8MUSIC MENU ON/OFF button (19)9MUSIC MENU / buttons (19)!º POWER switch (7)!¡ (pause) button (7)!™ (stop) button (7)!£ / AMS* button (7)!¢ / (rewind/fast forward)
button (8)!∞ EDIT button (16)!§CHECK button (9)!¶DISC SKIP button!•CLEAR button (9)!ªVOL (+/–) button (19)
* AMS=Automatic Music Sensor
Index
Adjustingthe audio emphasis 19the sound 19the volume 19
AMS 7Antennas 4Batteries 6CD player 7CD synchro recording 15CLIP play 10Clock setting 6Connecting
optional equipment 25the antennnas 4the power 5the speakers 4the stereo 4
Dolby NR (noise reduction) 14Dubbing
another tape automatically 18another tape manually 18
Graphic equalizer 20Karaoke 24Maintenance 28Microphone mixing 24Multiplex 24Music calendar 7, 8Normal play 7One touch play 8, 12, 14Parts identification 30Playing
a tape 14CDs (clip play) 10CDs (normal play) 7preset radio stations 13tracks in random order
(shuffle play) 8tracks in the desired order
(program play) 9tracks repeatedly (repeat play) 9tracks: repeating aspecified portion
(loop play) 10Precautions 27Program play 9Radio stations
presetting 13tuning in 12
Recordinga CD (loop play) 11a CD (program edit) 17a CD (time edit) 16a CD automatically 15a CD manually 15a radio 17another tape (dubbing) 18timer recording 23
Relay play 14Repeat play 9Restoring the factory settings 28Saving a recording 27Shuffle play 8Sound adjusting 19Speakers 4Specifications 29Supplied accessories 29Tape player 14
Timerfalling asleep to music 22timer recording 23waking up to music 22
Troubleshooting guide 27Tuner 122
1
3
4
5
6
7
!º
!£
!¢
!™
!¡
!§
!∞
!•
!ª
!¶8
9