En Route Claim (Traveler) Route Claim (Traveler) 1. ... not have your receipt you will be allowed to...
23
Modified 10/2/2013 En Route Claim (Traveler) 1. Login to Portal. 2. You will automatically be sent to your “Workload” screen. The “Portal Workload” should only display documents that are currently pending your action, Authorizing Official (AO) approval, Budget Official (BO) review or an action from the Financial Services Center (FSC). You will be able to create a claim and view documents from the “My Folder” tab. Click on “My Folder”. 3. “My Folder” will have a list of all your documents regardless of the status, even those completed. Click on the pencil to the right of the folder you would like to create an en route claim for.
-
Upload
truongnhan -
Category
Documents
-
view
218 -
download
1
Transcript of En Route Claim (Traveler) Route Claim (Traveler) 1. ... not have your receipt you will be allowed to...

Modified 10/2/2013
En Route Claim (Traveler)
1. Login to Portal.
2. You will automatically be sent to your “Workload” screen. The “Portal Workload” should only
display documents that are currently pending your action, Authorizing Official (AO) approval,
Budget Official (BO) review or an action from the Financial Services Center (FSC). You will be
able to create a claim and view documents from the “My Folder” tab. Click on “My Folder”.
3. “My Folder” will have a list of all your documents regardless of the status, even those
completed. Click on the pencil to the right of the folder you would like to create an en route
claim for.
Modified 10/2/2013
4. You will be routed to the “Folder Home” page, where you will see five tabs, “Home”, “Claims”,
“Documents”, “Attachments” and “Decline/Restore Claims”. The “Home” tab will allow you to
view documents, create new claims and view attachments. The “Claims” tab will show a list of
all claims you are eligible to submit a claim for. The “Documents” tab will allow you to view all
forms including 3918, 3036, advance and 1012 forms. The “Attachment” tab will allow you to
view attachments related to this folder. The “Decline/Restore” tab will allow you to decline your
option to submit a claim or restore your option if you have already declined. You are
automatically defaulted to the “Home” tab.
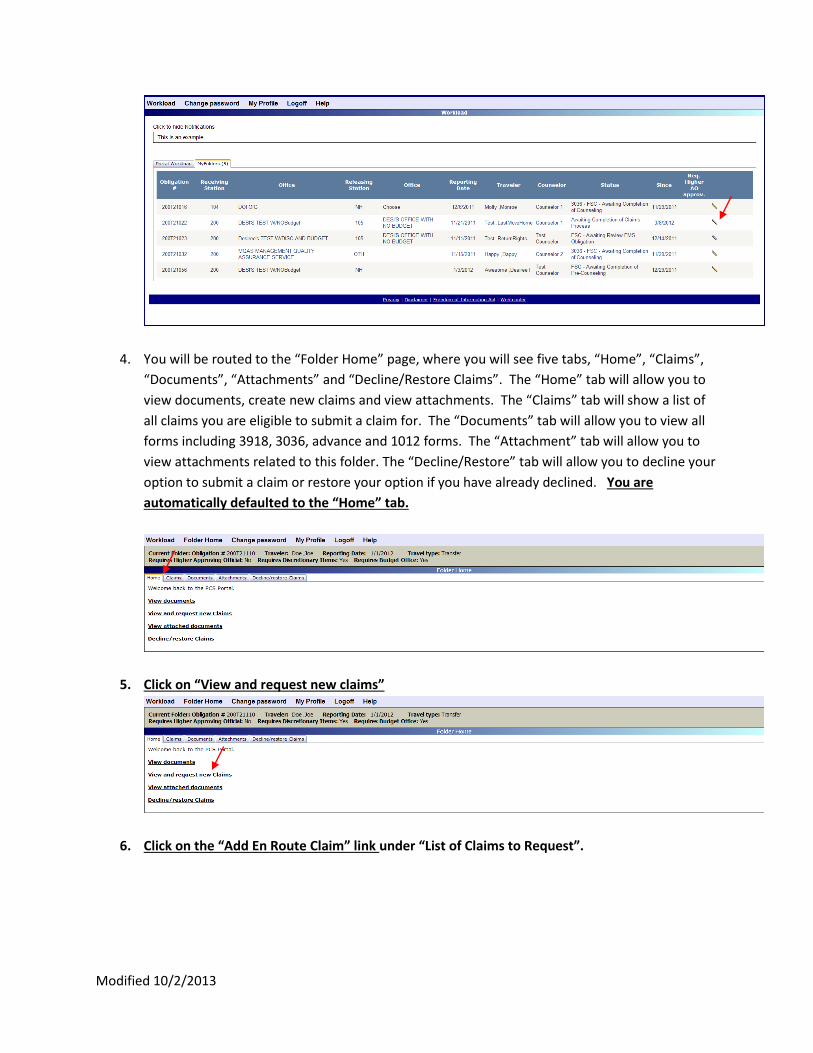
5. Click on “View and request new claims”
6. Click on the “Add En Route Claim” link under “List of Claims to Request”.

Modified 10/2/2013
You will be taken to a new screen to begin entering information for your en route claim.
7. At the top of the page there is a link that says “Click here for FTR Guidance”. This link will take
you directly to the GSA site to provide information on what is reimbursable.
8. Begin submitting your en route claim by answering the following questions:

Modified 10/2/2013
A “Who traveled? Check the box to the right of the individual who completed their en
route to the new duty station for this particular claim. If you and your dependents
traveled separately (on separate days) create one claim for each trip.
B “What date did you begin your trip?” Enter the date you left to begin your en route to
the new duty station.
C “What city and state did you depart from?” Enter the city and state where you
departed to begin your en route trip to the new duty station.

Modified 10/2/2013
D “What date did you arrive at your new duty station?” Enter the date you arrived at the
new duty station.
E “What city and state did you arrive at?” Enter the city and state of the location you
arrived at the new duty station.
F “Was your trip 12 hours or less?” You have two options to choose from, “Yes” or “No”.

Modified 10/2/2013
i. If you select “Yes”, you can move forward to the next question. Please note,
per diem (lodging and meals) are not allowed for trips 12 hours or less.
ii. If you select “No”, you can move forward to the next question.
G “What mode of transportation did you use for your trip?” Enter the method of
transportation you used to get to the new duty station. You have four options to
choose from, “Air”, “Rail”, “Privately Owned Conveyance” and “Other”.
i. If you select “Air ” or “Rail” you will be required to answer the following
questions:
1. “Do you have receipts for your Airline/Rail ticket?” You have the
option to select “Yes” “No” or “Not Applicable”.
1. If you select “Yes” move forward to the next question.
2. If you select “No” you will receive a message stating that
airline/rail tickets are required for reimbursement. If you do
not have your receipt you will be allowed to move forward with
the rest of the claim, however, the amount of your ticket will be
deducted for your amount claimed.
3. Only select “Not applicable” if your station purchased your
ticket with their centrally billed account. This means, you did
not purchase the ticket on either your personal credit card or
personal government issued credit card and should not receive
reimbursement of the airline/rail ticket.
2. “How much did you pay for your airline/rail ticket(s)?” Enter the total
amount paid for your airline ticket including taxes, even if your station

Modified 10/2/2013
paid for the ticket on their centrally billed account. Include the total of
all tickets for you and your dependents that completed their en route.
3. “Did someone drop you off at the airport?” You have the option to
select “Yes” or “No”.
1. If you select “Yes” answer the following questions:
i. “How many miles did they drive?” Enter the number
of miles driven to the airport.
2. If you select “No” answer the following questions:
i. “Did you take a taxi to the airport?” You have the
option to select “Yes” or “No”.
1. If you select “Yes” answer the following
questions:
a. “How much did you pay for your taxi
ride?” Enter the amount paid in total
not including a tip.
b. “Do you have receipts for your taxi
ride?” You have the option to select
“Yes” or “No”.
i. If you select “Yes” move
forward to the next question.
ii. If you select “No” you will
move forward to the next
questions but will receive a
message that receipts are
required. The amount entered
will be deducted from your
total amount claimed.
2. If you select “No” move forward to the next
question.
4. “Did you incur charges for baggage?” You have the option to select
“Yes” or “No”.
1. If you select “Yes” answer the following questions:
i. “How much?” Enter the total amount paid for baggage.
ii. “Do you have receipts for your baggage charges?” You
have the option to select “Yes” or “No”.
1. If you select “Yes” move forward to the next
question.
2. If you select “No” you will receive a message
that receipts are required. The amount
entered will be deducted from the total amount
claimed.

Modified 10/2/2013
5. “Did you purchase your ticket(s) through Duluth Travel, VA’s Travel
Management Company (TMC)? You have two options, either “Yes” or
“No I purchased my ticket(s) on my own, without using Duluth.
1. If you select “Yes” move forward to the next question.
2. If you select “No, I purchased my ticket(s) on my own, without
using Duluth” move forward to the next question, however,
please note, you will only be reimbursed up to what it would
have cost if you used VA’s TMC.
ii. If you select “Privately Owned Conveyance”, this mean you used your own
personal means of transportation to get to the new duty station. You will be
required to answer the following question.
1. “Do you have your paid in full itemized lodging receipts? You have
three options to choose from, “Yes”, “No” and “Not Applicable”
1. If you select “Yes” move forward.
2. If you select “No” you will be allowed to move forward,
however, you will receive a message that lodging receipts are
required. The amount entered for lodging will be deducted
from your total amount claimed.
3. Only select “Not Applicable” if you choose not to claim
reimbursement for your lodging, or if you did not incur any
lodging expenses. For example, maybe you stayed with family
or your trip did not exceed a full day. If you select “Not
Applicable” you will be required to provide a justification.

Modified 10/2/2013
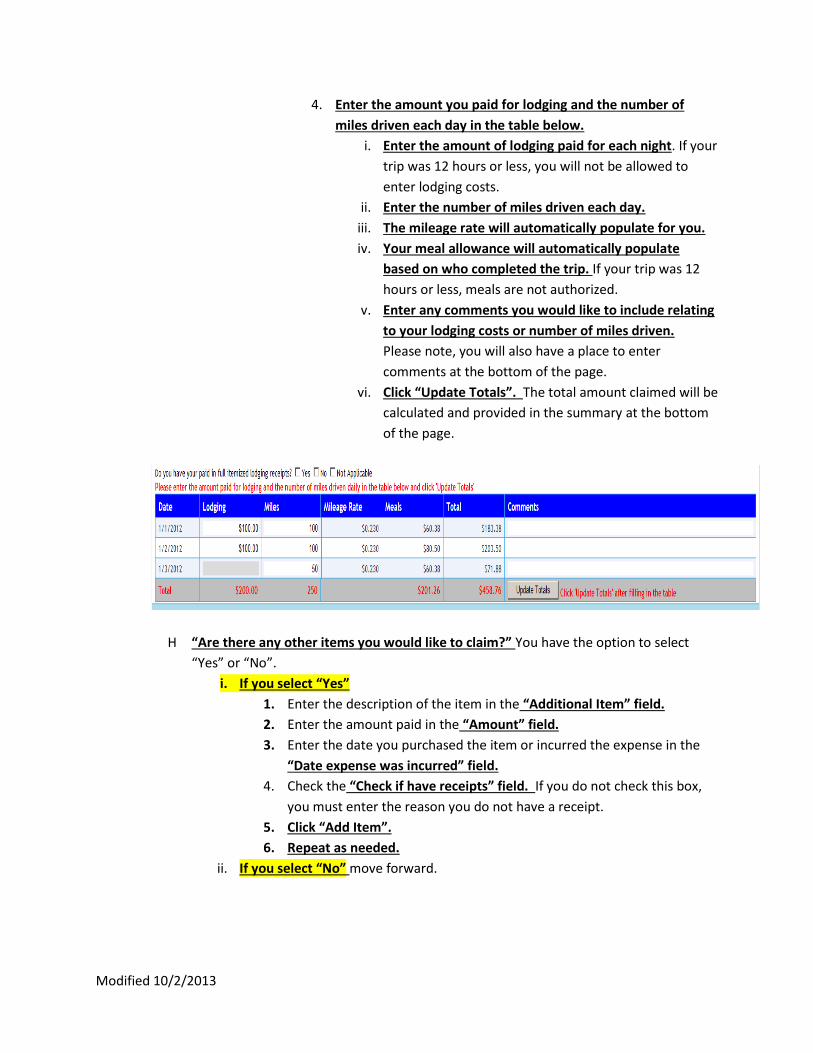
4. Enter the amount you paid for lodging and the number of
miles driven each day in the table below.
i. Enter the amount of lodging paid for each night. If your
trip was 12 hours or less, you will not be allowed to
enter lodging costs.
ii. Enter the number of miles driven each day.
iii. The mileage rate will automatically populate for you.
iv. Your meal allowance will automatically populate
based on who completed the trip. If your trip was 12
hours or less, meals are not authorized.
v. Enter any comments you would like to include relating
to your lodging costs or number of miles driven.
Please note, you will also have a place to enter
comments at the bottom of the page.
vi. Click “Update Totals”. The total amount claimed will be
calculated and provided in the summary at the bottom
of the page.
iii. If you select “Other”, you will be required to specify what other mode of
transportation you used and will be required to answer the following question.
1. “Do you have your paid in full itemized lodging receipts? You have
three options to choose from, “Yes”, “No” and “Not Applicable”
1. If you select “Yes” move forward.
2. If you select “No” you will be allowed to move forward,
however, you will receive a message that lodging receipts are
required. The amount entered for lodging will be deducted
from your total amount claimed.
3. Only select “Not Applicable” if you choose not to claim
reimbursement for your lodging, or if you did not incur any
lodging expenses. For example, maybe you stayed with family
or your trip did not exceed a full day. If you select “Not
Applicable” you will be required to provide a justification.
Modified 10/2/2013
4. Enter the amount you paid for lodging and the number of
miles driven each day in the table below.
i. Enter the amount of lodging paid for each night. If your
trip was 12 hours or less, you will not be allowed to
enter lodging costs.
ii. Enter the number of miles driven each day.
iii. The mileage rate will automatically populate for you.
iv. Your meal allowance will automatically populate
based on who completed the trip. If your trip was 12
hours or less, meals are not authorized.
v. Enter any comments you would like to include relating
to your lodging costs or number of miles driven.
Please note, you will also have a place to enter
comments at the bottom of the page.
vi. Click “Update Totals”. The total amount claimed will be
calculated and provided in the summary at the bottom
of the page.
H “Are there any other items you would like to claim?” You have the option to select
“Yes” or “No”.
i. If you select “Yes”
1. Enter the description of the item in the “Additional Item” field.
2. Enter the amount paid in the “Amount” field.
3. Enter the date you purchased the item or incurred the expense in the
“Date expense was incurred” field.
4. Check the “Check if have receipts” field. If you do not check this box,
you must enter the reason you do not have a receipt.
5. Click “Add Item”.
6. Repeat as needed.
ii. If you select “No” move forward.

Modified 10/2/2013
9. Once you have entered all of the items you would like to claim, enter any comments you would
like to include in your claim either for your own documentation, or that you think the FSC claims
processors/auditors may need to know in order to process your claim. Please note everything
you enter under comments can be viewed by the FSC and your Authorizing Official at your
gaining station.
10. Below the “Additional Comments” box, you can view the summary of your claim. The system
will provide you with the total amount you have entered as well as a detailed list of each item.
The total amount claimed is not guaranteed to be the amount reimbursed to you. Your claim
will be reviewed, audited and reimbursed in accordance with the Federal Travel Regulations and
VA Travel Policy. Once your claim is submitted for payment, you will receive a recap of your
payment showing any suspended amounts.
11. Once you have entered all of your items, you will want to either attach your documentation and
or print off a fax cover sheet to fax in your documentation. You can both fax and attach
documents if needed.
A If you choose to attach your documentation, do the following:
i. Click on the “Click here to add/view attachments link at the top of the page.

Modified 10/2/2013
ii. Click on “Browse”
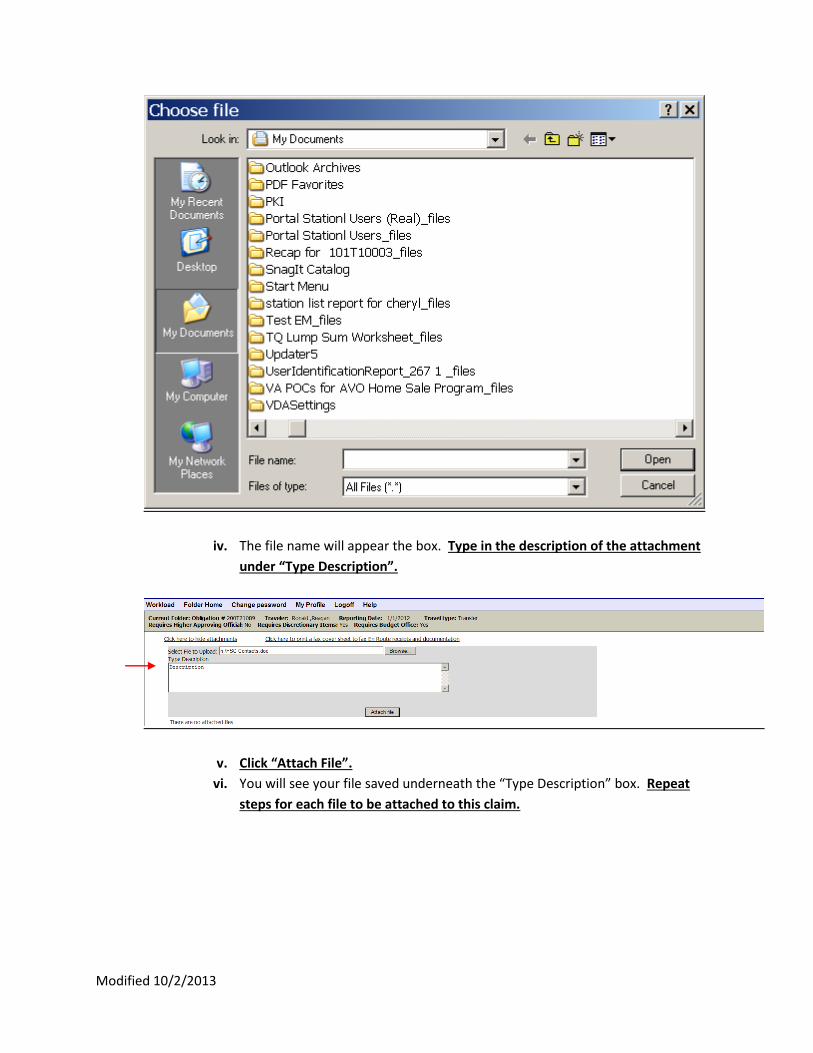
iii. Select the file to be attached.
Modified 10/2/2013
iv. The file name will appear the box. Type in the description of the attachment
under “Type Description”.
v. Click “Attach File”.
vi. You will see your file saved underneath the “Type Description” box. Repeat
steps for each file to be attached to this claim.

Modified 10/2/2013
B If you choose to fax in your required documentation, do the following:
i. Click on “Click here to print a fax cover sheet to fax En Route receipts and
documentation.”
ii. A fax coversheet will appear. Right click on your mouse to print the
coversheet.
iii. Write in the number of pages in the top right hand corner of the coversheet.
iv. Write in the date you are faxing the claim in the top right hand corner of the
coversheet.
Modified 10/2/2013
v. Fax in all documentation with this coversheet to the number listed in the top
left hand corner of the coversheet. If the coversheet is not attached, we will
not know what claim your fax belongs to which will delay your reimbursement.
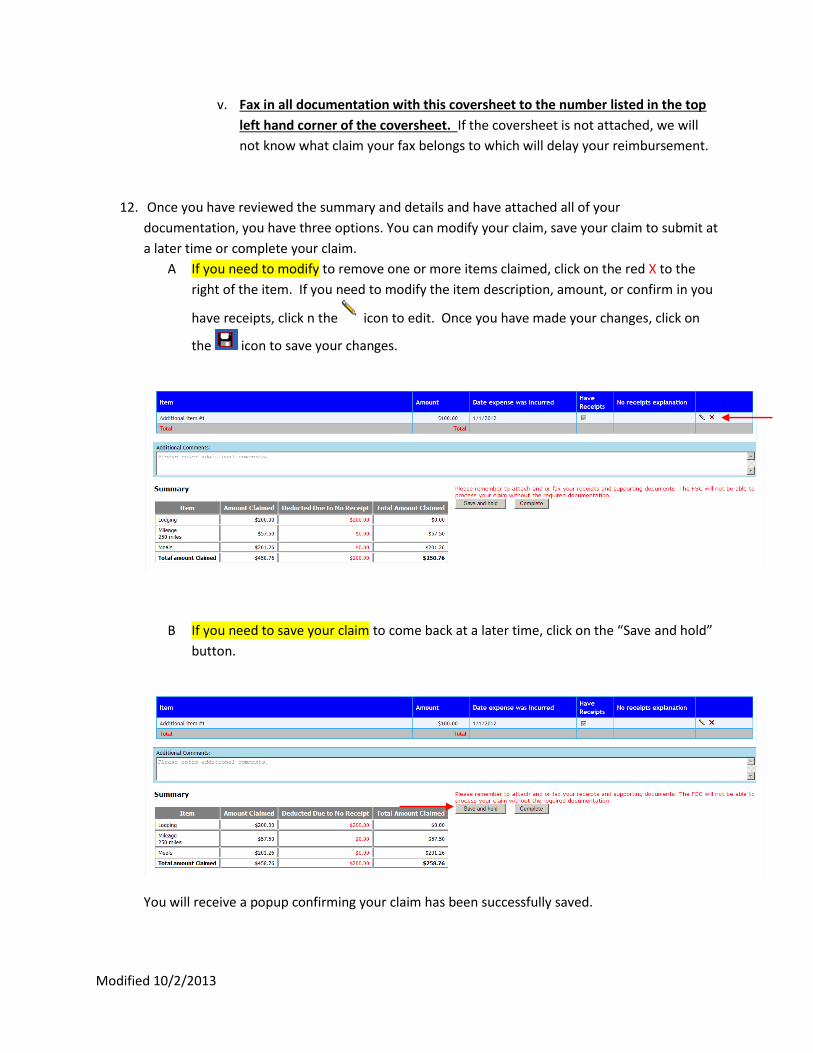
12. Once you have reviewed the summary and details and have attached all of your
documentation, you have three options. You can modify your claim, save your claim to submit at
a later time or complete your claim.
A If you need to modify to remove one or more items claimed, click on the red X to the
right of the item. If you need to modify the item description, amount, or confirm in you
have receipts, click n the icon to edit. Once you have made your changes, click on
the icon to save your changes.
B If you need to save your claim to come back at a later time, click on the “Save and hold”
button.
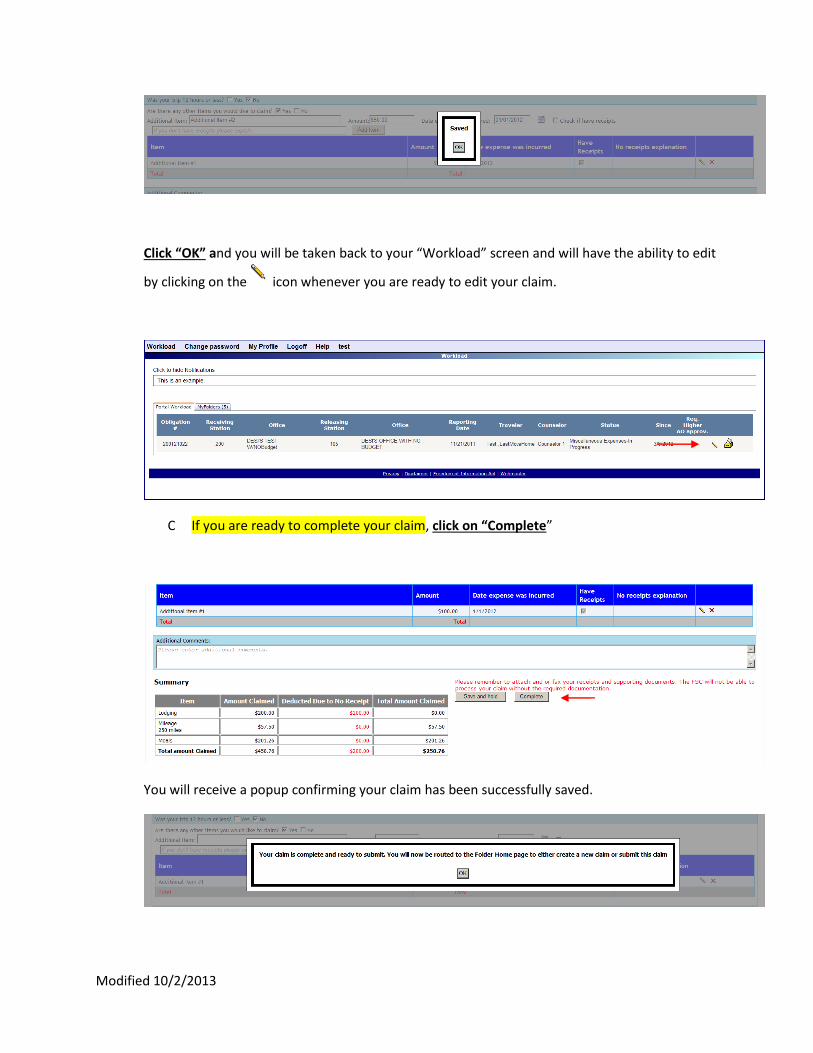
You will receive a popup confirming your claim has been successfully saved.
Modified 10/2/2013
Click “OK” and you will be taken back to your “Workload” screen and will have the ability to edit
by clicking on the icon whenever you are ready to edit your claim.
C If you are ready to complete your claim, click on “Complete”
You will receive a popup confirming your claim has been successfully saved.
Modified 10/2/2013
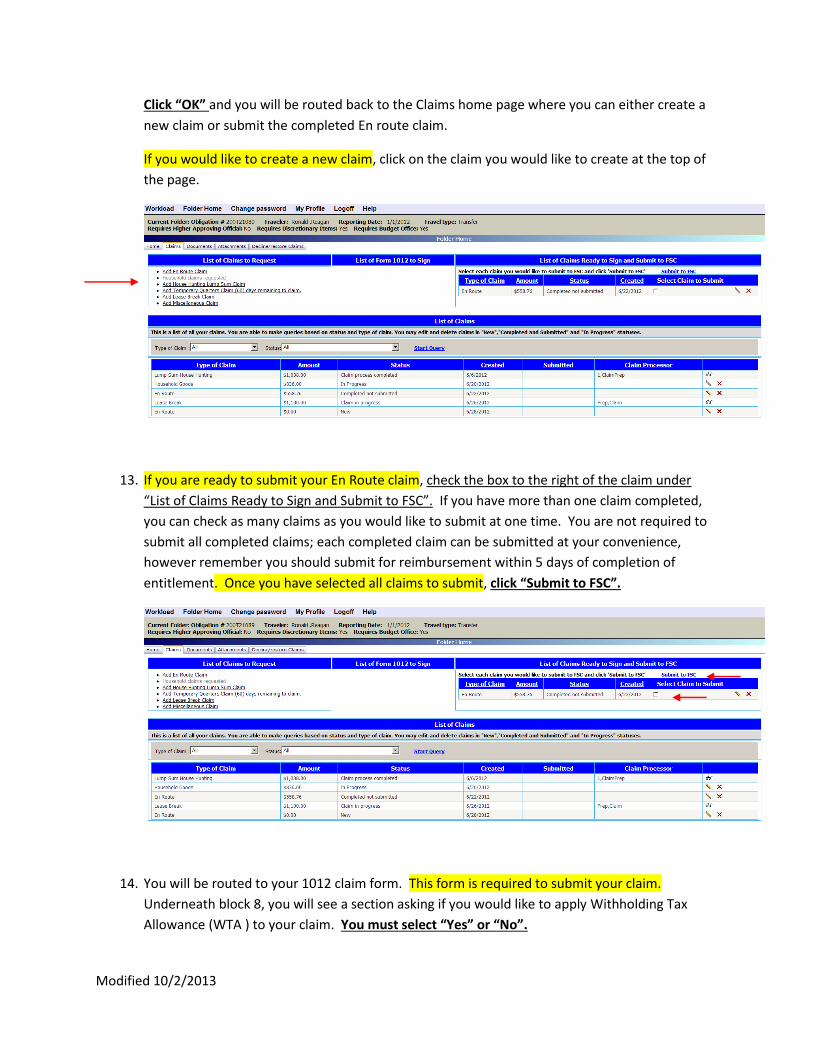
Click “OK” and you will be routed back to the Claims home page where you can either create a
new claim or submit the completed En route claim.
If you would like to create a new claim, click on the claim you would like to create at the top of
the page.
13. If you are ready to submit your En Route claim, check the box to the right of the claim under
“List of Claims Ready to Sign and Submit to FSC”. If you have more than one claim completed,
you can check as many claims as you would like to submit at one time. You are not required to
submit all completed claims; each completed claim can be submitted at your convenience,
however remember you should submit for reimbursement within 5 days of completion of
entitlement. Once you have selected all claims to submit, click “Submit to FSC”.
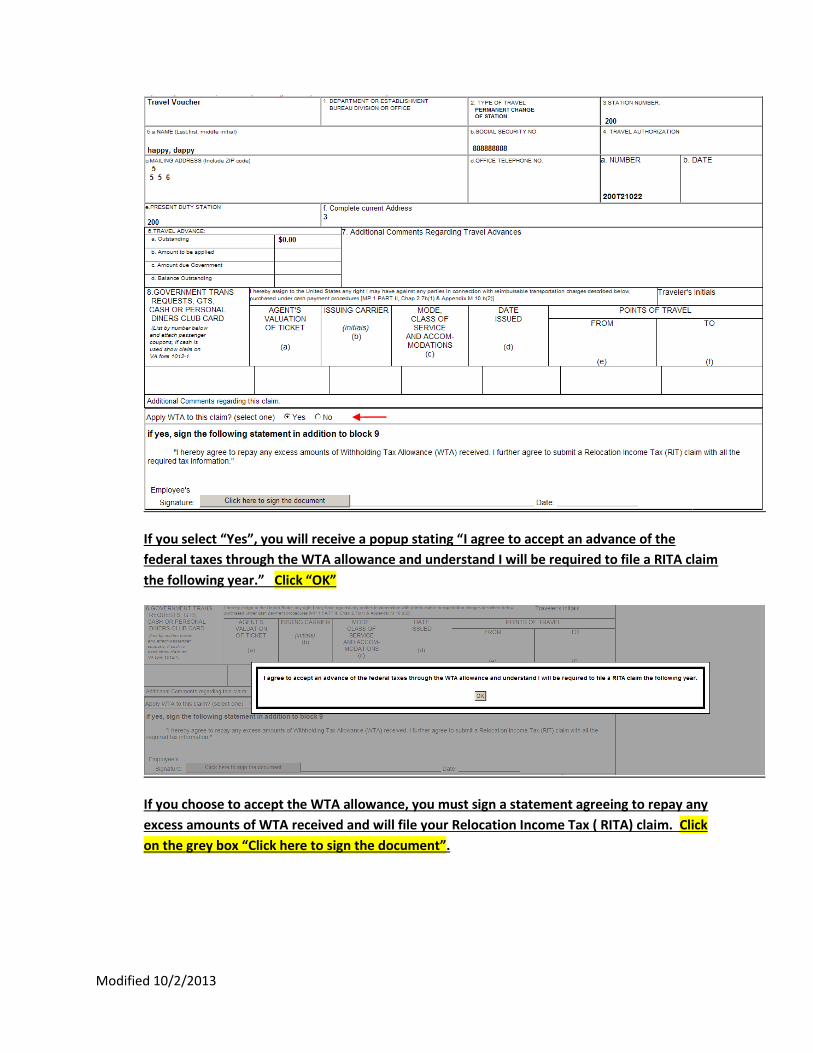
14. You will be routed to your 1012 claim form. This form is required to submit your claim.
Underneath block 8, you will see a section asking if you would like to apply Withholding Tax
Allowance (WTA ) to your claim. You must select “Yes” or “No”.
Modified 10/2/2013
If you select “Yes”, you will receive a popup stating “I agree to accept an advance of the
federal taxes through the WTA allowance and understand I will be required to file a RITA claim
the following year.” Click “OK”
If you choose to accept the WTA allowance, you must sign a statement agreeing to repay any
excess amounts of WTA received and will file your Relocation Income Tax ( RITA) claim. Click
on the grey box “Click here to sign the document”.

Modified 10/2/2013
Type in your password and click “Authenticate”
You will receive a popup confirming you have successfully signed the WTA statement. Click
“OK”

Modified 10/2/2013
If you select “No”, you will receive a popup stating “I understand I will not be receiving an
advance of the federal taxes through the WTA allowance; however I am still required to file a
RITA claim the following year.” Click “OK”
15. After you have made your WTA selection, sign block 9 certifying the voucher you are submitting
is correct to the best of your knowledge and belief. Click on the grey button “Click here to sign
the document”.

Modified 10/2/2013
Type in your password and click “Authenticate”

Modified 10/2/2013
You will receive confirmation that you have successfully signed your 1012 Claim Form. Click
“OK”.
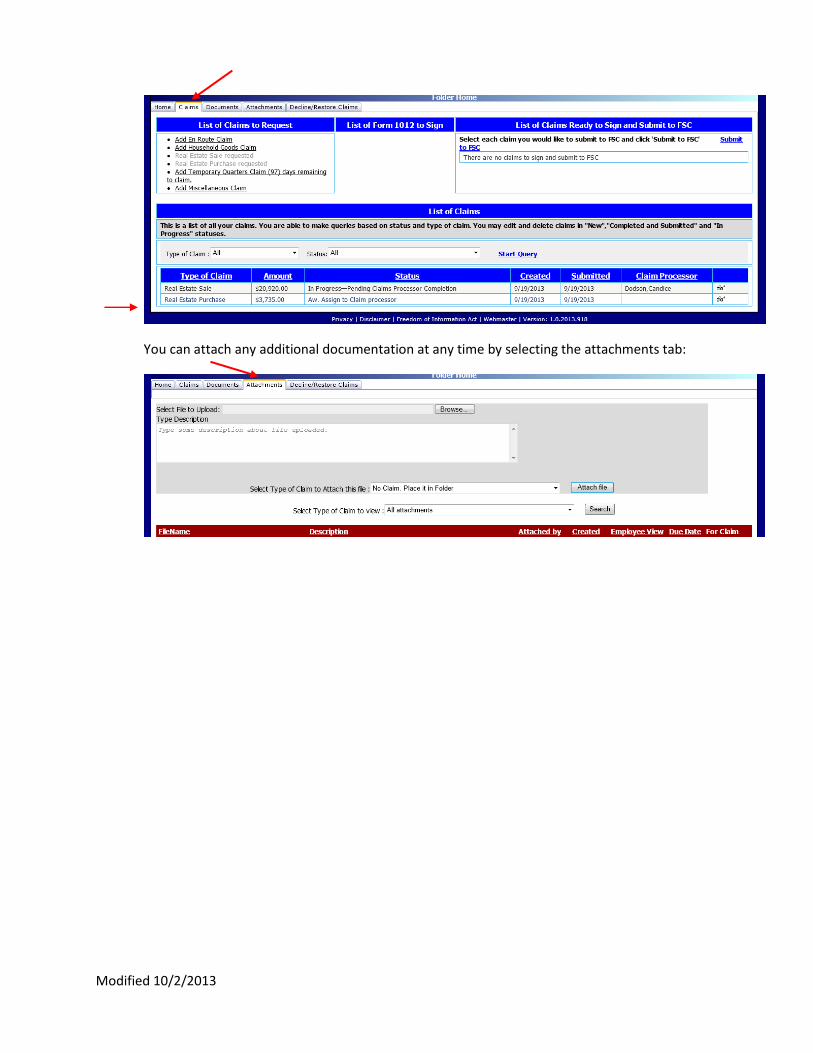
16. You will be returned to your Portal Workload screen. Click on “My Folders” tab; the folder you
submitted the real estate claim will have the status “Awaiting Completion of Claims Process”.
You will receive an e-mail each time your claim is forwarded to the next step. However, you can
always login to the Portal to view the status of your document under the claims tab, list of
claims:
Modified 10/2/2013
You can attach any additional documentation at any time by selecting the attachments tab: