
EMS/HOOP TECH - Embroidery Supplies.com · Application – Lunch Bag EMS/HOOP TECH SLIM LINE...
32
EMS/HOOP TECH SLIM LINE CLAMPING SYSTEM for BROTHER PR-600 THE NEW DIRECTION OF EMBROIDERY TODAY, IS NOW AVAILABLE FOR THE PR-600 SETUP INSTRUCTIONS
-
Upload
truongxuyen -
Category
Documents
-
view
217 -
download
1
Transcript of EMS/HOOP TECH - Embroidery Supplies.com · Application – Lunch Bag EMS/HOOP TECH SLIM LINE...

EMS/HOOP TECHSLIM LINE CLAMPING SYSTEM for BROTHER PR-600
THE NEW DIRECTION OF EMBROIDERY TODAY, IS NOW AVAILABLE FOR THE PR-600
SETUPINSTRUCTIONS

EMS/HOOP TECHSLIM LINE CLAMPING SYSTEM for BROTHER PR-600
YOUR CLAMPINGSYSTEM IS SHIPPED TO YOU ASSEMBLED EXCEPT FOR ATTACHING THE SEWING WINDOW & UPPER CLAMPING FRAME TO THE CLAMP CHASSIS.
A SIMPLE MOUNTING BRACKET ADJUSTMENT TO FIT THE CLAMP TO YOUR MACHINE AND YOU’RE READY TO SEW.
CHASSIS
SEWING WINDOW
CLAMPINGFRAME
MOUNTINGBRACKET
CLAMPINGARMS
OPEN & CLOSE LEVER
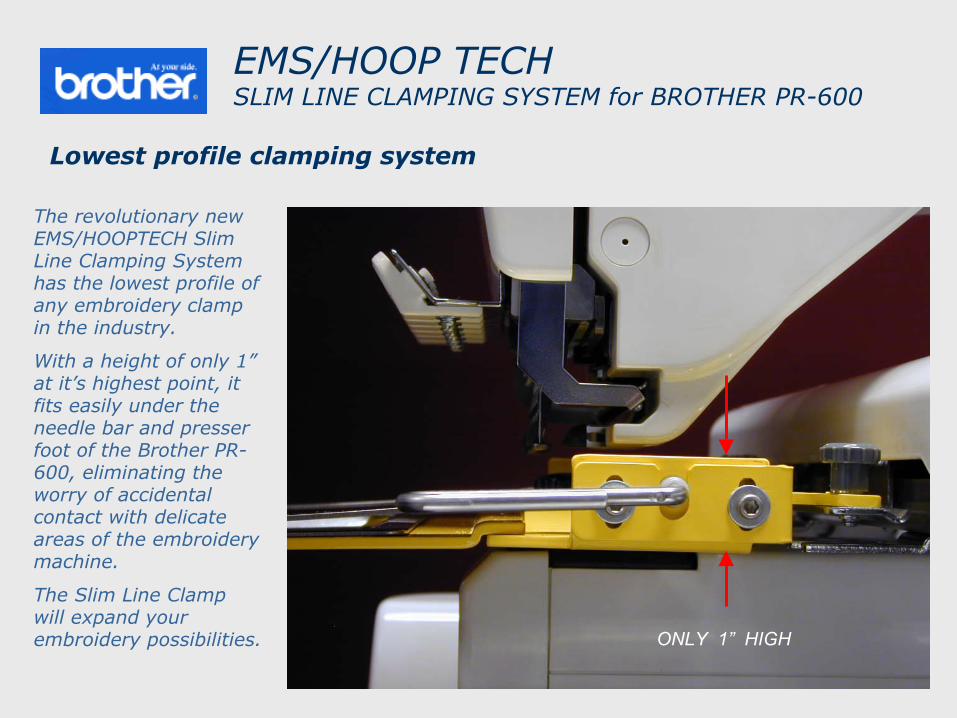
Lowest profile clamping system
EMS/HOOP TECHSLIM LINE CLAMPING SYSTEM for BROTHER PR-600
The revolutionary new EMS/HOOPTECH Slim Line Clamping System has the lowest profile of any embroidery clamp in the industry.
With a height of only 1” at it’s highest point, it fits easily under the needle bar and presser foot of the Brother PR-600, eliminating the worry of accidental contact with delicate areas of the embroidery machine.
The Slim Line Clamp will expand your embroidery possibilities. ONLY 1” HIGH

Set Up Overview
EMS/HOOP TECHSLIM LINE CLAMPING SYSTEM for BROTHER PR-600
To insure maximum performance from your Slim Line clamping system, the underside of the clamp body it is designed to “ride” on a UHMW wear strip on top of the sewing arm.
The mounting bracket at the back of the clamp body must be adjusted so that the clamp is properly supported during sewing. This is a one time adjustment that is done when you first install the clamp on your machine.
UHMW WEAR STRIP
MOUNTINGBRACKET
MOUNTINGBRACKET
ADJUSTING SCREWS
ATTACHNGSCREWS
SEWING ARM

Safety First
EMS/HOOP TECHSLIM LINE CLAMPING SYSTEM for BROTHER PR-600
Before beginning any installation or set up procedures for the Slim Line Clamping System, make sure that the power to the PR-600 machine is turned off and that the power cord is unplugged.

Installation / Adjustment / Function
EMS/HOOP TECHSLIM LINE CLAMPING SYSTEM for BROTHER PR-600
INSTALLING THE UHMW WEAR STRIP
DRIVE BAR - REMOVING THE HOOP SUPPORT ARM
DRIVE BAR – READY FOR CLAMP INSTALLATION
CLAMP MOUNTING BRACKET – INTRODUCTION
BRACKET / DRIVE BAR INTERFACE
MOUNTING SCREWS
MOUNTING BRACKET ADJUSTMENT SCREWS
CLAMP POSITION ADJUSTMENT
SECURING THE MOUNTING BRACKET
CHECKING THE FIT
INSTALLING THE LOWER SEWING WINDOW
INSTALLING THE UPPER CLAMP WINDOW
OPENING & CLOSING
LOADING AT THE MACHINE
READY TO SEW
APPLICATIONS
WARNING
The PR-600 does not recognize the sewing area of non-standard frames. Be sure to use the trial sewing function to check that the pattern fits within the sewing area.

Installing the UHMW wear strip
EMS/HOOP TECHSLIM LINE CLAMPING SYSTEM for BROTHER PR-600
The UHMW wear strip is a thin flexible, peel & stick product that acts as a bearing surface for the clamp to ride on.To install, remove the blue protective film and position the tape so that it is centered on the top of the sewing arm. The front edge of the tape should be positioned to start at the back of the needle plate and run toward the back of the machine.Press the tape down so that it adheres to the top of the sewing arm. Properly installed, the tape will not interfere with normal sewing operations.
UHMW WEAR STRIP WITH
PROTECTIVE BACKING
UHMW WEAR STRIP SHOWN INSTALLED ON SEWING ARMBACK EDGE
OF NEEDLE PLATE

Drive Bar - removing the hoop support arms
EMS/HOOP TECHSLIM LINE CLAMPING SYSTEM for BROTHER PR-600
To install the clamp on the PR600, the hoop support arm assembly must first be removed.
Loosen and remove both of the gray threaded knobs and lift off the metal arm support.
GRAY THREADED KNOBS
HOOP SUPPORT ARM ASSEMBLY

Drive Bar ready for clamp installation
EMS/HOOP TECHSLIM LINE CLAMPING SYSTEM for BROTHER PR-600
ALIGNMENT PINS
DRIVE BAR
This photo shows the drive bar, the alignment pins and the threaded holes for the gray plastic threaded knobs.
THREADED HOLES FOR
KNOBS

Clamp Mounting Bracket - Introduction
EMS/HOOP TECHSLIM LINE CLAMPING SYSTEM for BROTHER PR-600
CLAMP MOUNTING BRACKET
ALIGNMENT PIN HOLES
HOLES FOR THE THREADED KNOBS
The Slim Line Clamp uses the existing mounting holes and the two alignment pins to locate and secure the clamp assembly to the PR600 drive bar.
(Note: there is one hole and one slot that is used for the alignment pins.)
The clamp mounting bracket is made adjustable by loosening (4) screws, (2) on either side of the base. MOUNTING BRACKET
ADJUSTING SCREWS
MOUNTING BRACKET ADJUSTING SCREWS

Bracket / Drive Bar Interface
EMS/HOOP TECHSLIM LINE CLAMPING SYSTEM for BROTHER PR-600
DRIVE BAR ALIGNMENT PINS
Position the clamp mounting bracket over the two drive bar alignment pins so that one pin is in the round hole and one is in the slot.

Mounting Screws
EMS/HOOP TECHSLIM LINE CLAMPING SYSTEM for BROTHER PR-600
Use the (2) existing gray plastic mounting screws to attach the mounting bracket to the drive bar of the PR600 machine.
Tighten to secure the clamp assembly to the machine.
The underside of the mounting bracket should rest on top of the PR600 drive bar
GRAY PLASTIC MOUNTING SCREWS

Mounting Bracket Adjusting Screws
EMS/HOOP TECHSLIM LINE CLAMPING SYSTEM for BROTHER PR-600
With an allen wrench, loosen, (but do not remove), all (4) of the mounting bracket adjusting screws. This will allow the clamp & window set to “float” between the two sides of the mounting bracket.
MOUNTING BRACKET ADJUSTING SCREWS
ALLEN WRENCH

Clamp Position Adjustment
EMS/HOOP TECHSLIM LINE CLAMPING SYSTEM for BROTHER PR-600
Center the clamp body over the sewing arm and move it by hand toward the back of the machine.
With the assembled clamp in the “OPEN” position and all (4) mounting bracket screws well loosened, push down on the black window holding knob in the center of the clamp base unit. This will locate the clamp on top of the sewing arm.
The front edge of the bottom sewing window should not be down against the sewing arm at this time.
BRACKET ADJUSTING SCREWS (EACH SIDE)
CLAMP IN THE “OPEN” POSITION PUSH DOWN AT THIS
POINT
CLAMP MOVED TOWARD BACK OF
MACHINECLAMP CENTERED
ON THE SEWING ARM

Clamp Position Adjustment
EMS/HOOP TECHSLIM LINE CLAMPING SYSTEM for BROTHER PR-600
While holding down on the black knob, loosely tighten the (4) mounting bracket screws enough to hold the clamp in position. Check to see that the area directly under the window mounting knob is touching the top of the UHMW wear strip and that the front edge of the sewing window is still above the top of the sewing arm as shown.
CLAMP IN OPEN POSITION
HOLD DOWN AT THIS POINT
BASE SHOULD BE RESTING ON THE UHMW STRIP IN
THIS AREA
LOOSELY TIGHTEN MOUNTING SCREWS
BOTH SIDES
BOTTOM OF WINDOW ABOVE TOP OF SEWING ARM

Securing the Mounting Bracket
EMS/HOOP TECHSLIM LINE CLAMPING SYSTEM for BROTHER PR-600
With the clamp in the proper position, tighten all (4) of the mounting screws and check alignment again.
Re-adjust if necessary.
TEMPLATE
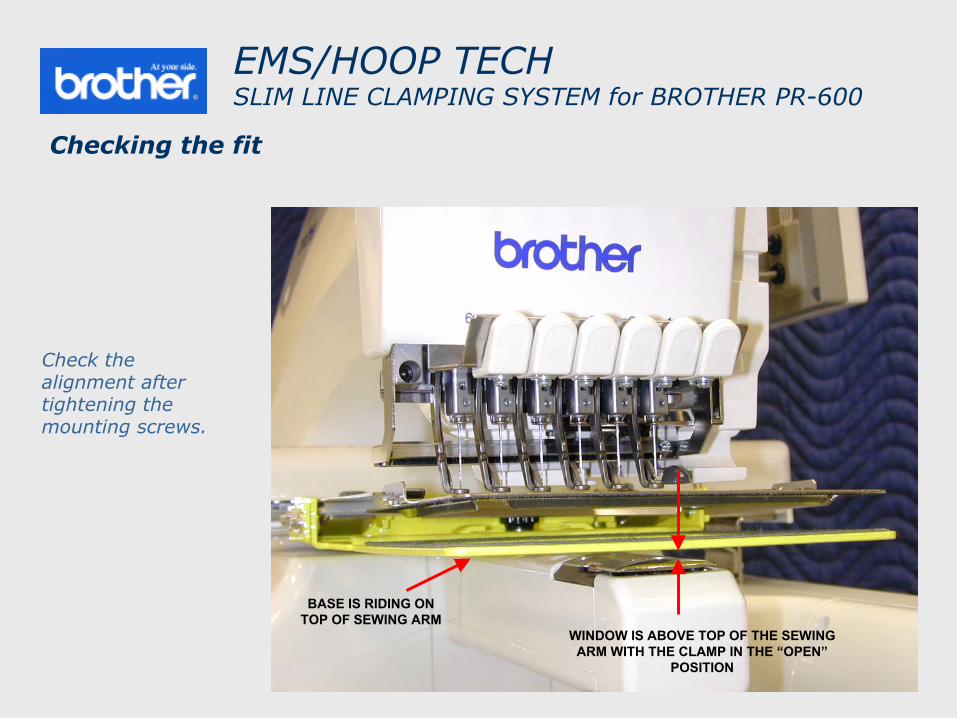
Checking the fit
EMS/HOOP TECHSLIM LINE CLAMPING SYSTEM for BROTHER PR-600
Check the alignment after tightening the mounting screws.
WINDOW IS ABOVE TOP OF THE SEWING ARM WITH THE CLAMP IN THE “OPEN”
POSITION
BASE IS RIDING ON TOP OF SEWING ARM

Checking the fit
EMS/HOOP TECHSLIM LINE CLAMPING SYSTEM for BROTHER PR-600
With the clamp in the “CLOSED” position, the bottom sewing window should be horizontal and parallel with the top of the sewing arm as shown.
FLAT AND IN LINE WITH THE SEWING
ARMHORIZONTAL AND PARALLEL

Checking the fit
EMS/HOOP TECHSLIM LINE CLAMPING SYSTEM for BROTHER PR-600
With the clamp in the “CLOSED” position, the bottom sewing window should be in line with the top of the sewing arm as shown.
The Slim Line clamp is now ready to sew.
FLAT AND IN LINE WITH THE SEWING
ARM

Installing the lower sewing window
EMS/HOOP TECHSLIM LINE CLAMPING SYSTEM for BROTHER PR-600
After sliding the window into place tighten the black holding knob.
The lower sewing window installs by loosening the black window holding knob and sliding the mounting tab under the (2) formed hooks & the black knob.
HOLDING KNOB
MOUNTING TAB
NOTE: Upper & lower window installation is easier with the Slim Line clamping system not installed on the machine.

Installing the upper clamp window
EMS/HOOP TECHSLIM LINE CLAMPING SYSTEM for BROTHER PR-600
With clamp in the “open” position, slide the upper clamp plate under the (2) spring arms and engage one of the “pivot lugs” in the center slot of the clamp plate. While holding the clamp plate on the lug, flex the other arm toward the middle of the clamp and engage the other side.
CLAMP PLATE SLOT
SPRING ARM LUG

Opening & Closing
EMS/HOOP TECHSLIM LINE CLAMPING SYSTEM for BROTHER PR-600
To operate the clamp, rotate the “open & close” lever, back and up to open, forward and down to close.
CLAMP OPEN
CLAMP CLOSED & LOCKED
LEVER IN THE “OPEN” POSITION
LEVER ROTATED INTO “CLOSED” POSITION
The lever arm should be rotated down only as far as necessary to clamp and lock the fabric. Rotating the handle too far past parallel with the bottom of the clamp body will eventually cause damage to the clamping mechanism.
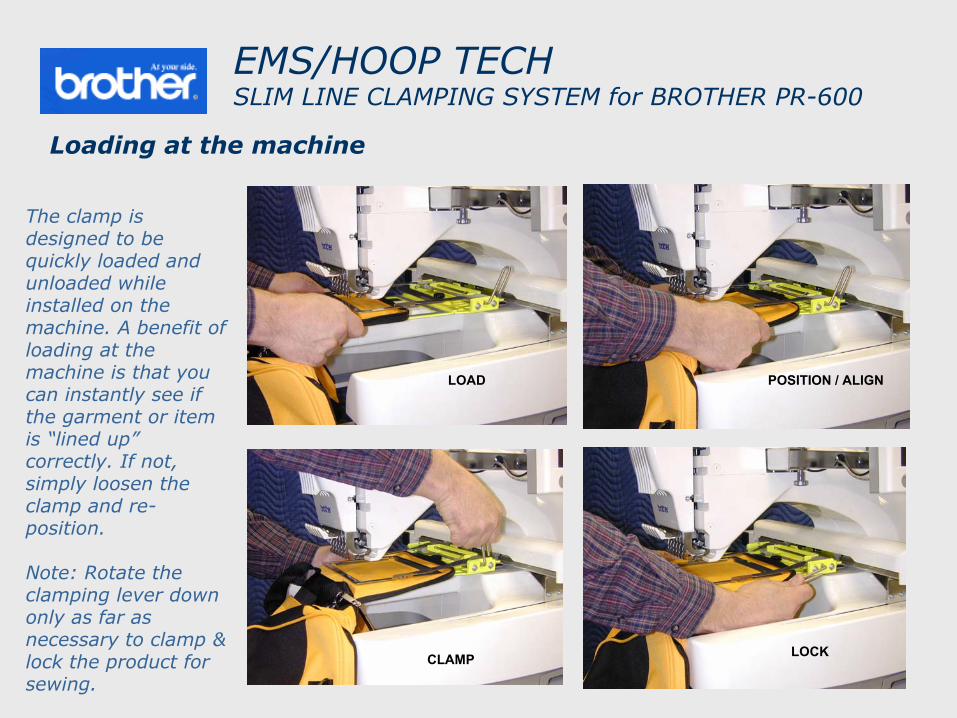
Loading at the machine
EMS/HOOP TECHSLIM LINE CLAMPING SYSTEM for BROTHER PR-600
The clamp is designed to be quickly loaded and unloaded while installed on the machine. A benefit of loading at the machine is that you can instantly see if the garment or item is “lined up” correctly. If not, simply loosen the clamp and re-position.
Note: Rotate the clamping lever down only as far as necessary to clamp & lock the product for sewing.
LOAD POSITION / ALIGN
CLAMP LOCK

Loaded and ready to sew
EMS/HOOP TECHSLIM LINE CLAMPING SYSTEM for BROTHER PR-600
Slim Line Clamp shown loaded and ready to embroider.
TEMPLATE

Sewing Window Sizes
EMS/HOOP TECHSLIM LINE CLAMPING SYSTEM for BROTHER PR-600
There are (4) window sets available for the Slim Line Clamping System at this time, with new sizes to be released when they become available.
The upper and lower frame surfaces are covered with a high friction coating to hold the fabric in place during sewing.
4” x 4” 3” x 5”
6” x 5” 5” round

Application – Lunch Bag
EMS/HOOP TECHSLIM LINE CLAMPING SYSTEM for BROTHER PR-600
Loading an insulated lunch bag on the PR-600 with the Slim Line clamp installed
6x5 window set.
Sewing on the top flap.

Application – Lunch Bag
EMS/HOOP TECHSLIM LINE CLAMPING SYSTEM for BROTHER PR-600
An insulated lunch bag shown loaded and ready to embroider on the top flap.

Application – Lunch Bag
EMS/HOOP TECHSLIM LINE CLAMPING SYSTEM for BROTHER PR-600
Close up of clamp & sewing field.

Application – Back of Cap
EMS/HOOP TECHSLIM LINE CLAMPING SYSTEM for BROTHER PR-600
A cap back shown loaded and ready to embroider.
5” round window set.
Notice the large sewing field.

Application – Back of Cap
EMS/HOOP TECHSLIM LINE CLAMPING SYSTEM for BROTHER PR-600
Close up of clamp & sewing field.

Application – ID Holder
EMS/HOOP TECHSLIM LINE CLAMPING SYSTEM for BROTHER PR-600
An ID / badge holder shown loaded and ready to embroider on the top edge.

EMS/HOOP TECHSLIM LINE CLAMPING SYSTEM for BROTHER PR-600
The Slim Line Clamping System for the Brother PR-600.
New technology designed for embroiderers to help increase production and maximize the sewing locations available for embroidery designs.


![Easter Egg Bag - Embroidery Library · Easter Egg Bag file:///fileserver/Files/Source/ELProjects/html/PR2089.html[3/21/2017 3:34:40 PM] Hoop the stabilizer and felt together, aligning](https://static.fdocuments.us/doc/165x107/6038eb73bb5f21777f702ca6/easter-egg-bag-embroidery-library-easter-egg-bag-filefileserverfilessourceelprojectshtmlpr2089html3212017.jpg)


