eMS Manual based on version 3_1.0
278
Manual, based on eMS v. 3_1.0
Transcript of eMS Manual based on version 3_1.0

Manua
l, b
ased o
n e
MS
v.
3_
1.0

2
Notes on this document
This draft manual is based on version 3_1.0 of eMS. Most of the chapters where
updated to the current version, nevertheless some chapters might reflect previous
versions.
All features of eMS released in later versions are not yet covered by this manual.
Interact does not warrant or assume any legal liability or responsibility for the
accuracy, completeness or usefulness of any information, product or process disclosed
in or connected to this document.
Interact is co-financed by the European Regional Development Fund (ERDF). It supports
territorial cooperation between regions of the EU and is the hub for exchanging
information and best practices among Interreg programmes. Interact also supports
cooperation programmes at EU external borders.
Copyright notice
You are permitted to print or download extracts from this material for your personal
use. This material can be used for public use, provided the source is acknowledged
and the publisher ([email protected]) is given a prior notice. None of this material
may be used for commercial purposes.
Publisher: Interact Programme
All questions and comments regarding the eMS should be sent to one of the following
email addresses:
Website: www.interact-eu.net

3
Table of contents
Background 5
The eMS 6
eMS License 12
Security in eMS 13
Technical requirements for the productive environment 16
Installation of eMS 19
Custom funds 22
User Creation 24
User Self-Management 26
User roles 27
Message Portal 30
Programme setup 32
Call setup 36
Application Form 41
Additional textfields 50
Bookmarking projects 51
Project Idea 53
Checklists 55
Eligibility decision, recommendation and MC decision 63
Handover application to the lead partner 72
Contracting 76
Supplementary information 78
Partner Report 85
FLC Assignment 102
Management verification – national controls (FLC) 106
Project Report 124
Project report monitoring (JS) 134
Assigning Officers 146
Assigning external experts for quality assessment 148
MA Project Report Monitoring 150
Certifying Authority 161
Financial Corrections 182
Modification Request 193
Reverting 204
Rounding 210

4
Project History 216
Categories of intervention 218
Technical assistance (deprecated) 221
Translations 222
Form configuration 226
Help System 228
Automatic messages 231
PDF templates 237
Global and local column selector 240
Cube 242
Audit log 245
Upload of documents 246
Import of data 247
Export of data 248
KEEP 254
Backup of eMS 255
Search functionalities 256
Adaptations and plugins 257
File upload for login page 258
Performance fine-tuning 259
Supported Characters 262
Abbreviations 264
Annex 1: User privileges 265
Annex 2: Call options 269
Annex 3: Properties 272

ABOUT EMS
5
Background Every Interreg programme is obliged to set up a computerised monitoring system in
order to collect all information on project and programme progress (art. 125(d) of the
Regulation 1303/2013).
Additionally, as outlined in the Article 122(3) of the Regulation 1303/2013,
programmes should provide their beneficiaries with a system to allow submission of
information in electronic form. All exchanges of information between beneficiaries
and managing authorities, certifying authorities, audit authorities and intermediate
bodies should be carried out via an electronic data exchange system.
In the past, most programmes invested time and money in developing similar but
slightly different electronic monitoring systems. There are hundreds of Structural
Funds monitoring systems in Europe and each one of these needs to be designed,
developed, maintained and improved over time.
Interreg programmes decided that it was time to kick-start a change. With the help of
Interact, they joined forces to co-develop a monitoring system that is based on the
expertise of many and covers everything a programme needs to run smoothly in
different regions in Europe.
The eMS is a monitoring system with communication portal to support submission,
approval, management and administration of projects in the context of Interreg
programmes. The system supports collection of all information on submitted and
approved projects, their implementation and achievements, modifications and
closure. Additionally aggregated data on the progress of projects and the programme
level are recorded in the system. All programme bodies are able to communicate with
beneficiaries via the system and re-use the data already collected. The eMS is built to
support programme authorities in day-to-day programme management and should fulfil
all legal requirements.
For Interreg programmes and Interact, co-developing the eMS meant putting the best
approaches and ideas on the table and finding a common vision for a simplified,
harmonised and inclusive tool for all stakeholders. The eMS was designed together
with four ETC programmes and can be used free of charge by any ETC programme. The
system is delivered in milestones and first modules can be used by programmes before
the full system is built. eMS is currently used in productive environment by 5
programmes and is being tested and prepared for calls for proposals by another 15
programmes. Additionally more than 10 programmes declared their intention to use
the eMS.

ABOUT EMS
6
The eMS eMS is a web application built by the Interact Programme for the benefit of all Interreg
Programmes.
All that programmes need is some IT expertise and a server to host the system.
Programmes enter their programme intervention logic and financial data and configure
the system choosing from a range of options.
How eMS was created
Just a year ago, the story of the eMS was one that few would have thought
possible.
Many people saw the Interreg world as much too complex to even consider developing
a common electronic monitoring system. After all, co-developing a monitoring system
meant risk: programmes putting resources in a very uncertain pot, trying to satisfy
even more stakeholders than usual, adapting programme rules and habits for the sake
of common procedures, and facing the possibility of severe delays in programme
implementation in case the system should fail.
So why did Interreg programmes decide to take those risks?
Their vision was, and still is, that cooperation programmes need to live cooperation
themselves in order to be credible hosts for successful cooperation projects. After the
joint development of Interreg harmonised implementation tools (HIT) proved to be
possible and led to very good results, cooperation programmes wanted to continue on
this path. They were confident that there could be more examples of how cooperation
saves millions of euros, leads to superb results, and can even be fun!
Developing a monitoring system for Interreg programmes is a major effort.
It requires knowledge of the legal framework and programme procedures within
Interreg, as well as the skills and experience needed to procure and develop IT
tools. Before the joint eMS project, each programme invested time and money in its
own system. This led to many similar but slightly different monitoring systems, which
caused confusion among beneficiaries and led to duplication of work across
programmes. The eMS combines programme resources in a common effort and uses
harmonised templates and guidelines drawn from HIT for project applicants, project
partners and first level controllers. This makes it easier for them to switch between
programmes, and overall saves programmes significant time and money. The eMS also
has the added benefit of simplifying collection of data, which paves the way for future
thematic studies and other types of reports and evaluations.

ABOUT EMS
7
The eMS provides features, functionalities and user interfaces that far exceed most
of the existing monitoring systems in user friendliness and scope.
For Interreg programmes and Interact, co-developing the eMS meant putting the best
approaches and ideas on the table and making joint decisions. It required finding a
common vision for a simplified, harmonised and inclusive tool for all
stakeholders. Here are just a few of the many innovative features of the eMS:
It can handle up to four different funds simultaneously;
It allows for multi-lingual project applications, contracts and monitoring interfaces;
It creates an online audit trail that stores and provides all required information;
It creates a content trail from project application to project reports to online publications of outputs and results;
It features customisable user interfaces and functionalities for all Interreg stakeholders, including project applicants, first level controllers, joint secretariats, managing authorities, certifying authorities, audit authorities, monitoring committees, evaluation experts and contact points.
Interreg programmes can obtain the eMS for free and go online with an open call
within a week!
All they need is some IT expertise and a server to host the system. Programmes enter
their programme intervention logic and financial data and configure the system
choosing from a range of options. As of March 2015, two programmes have already
opened calls for applications with the eMS, saying that these timely online calls would
have been difficult without the eMS. About 20 Interreg programmes plan to use the
eMS and there could even be more. The more programmes use it, the more other
programmes will trust in it and adopt it as well. The total savings of tax payers’ money
is estimated to amount to anything between 10 and 30 million Euros, depending on the
number of programmes using the system.
The development of the eMS would not have been possible without prior
harmonisation of implementation tools.
This harmonisation effort started in 2010, when Interact, together with Interreg
programmes, decided to develop HIT (harmonised implementation tools) for Interreg
programmes. In 2013, when it became clear that HIT laid the basis for a joint
monitoring system, interested programmes and Interact teamed up to take on this
project. By 2014 the IT support and expertise needed to begin development was
procured and the project took off.
A key element of the eMS is that the co-creation of the system does not stop after
deployment.
Interreg programmes using the system commit themselves to contribute relevant
improvements to the eMS to the community of programmes using eMS, creating a
snowball effect that multiplies benefits for everyone. For example, one programme
plans to develop online tools for project ideas, partner searches and a function for
ABOUT EMS
8
displaying cooperation projects and outputs on geographic maps. These features will
be added to the core eMS and made available to any programme that wants to use
them. It is easy to see that overtime the eMS will grow to become the best monitoring
system within the realm of Structural Funds as it continues to incorporate
functionalities. This is the central argument for cooperation: the co-creation of the
eMS will lead to a tool that no programme could ever have developed on its own.
The workflow
Data in eMS are structured in several layers of information and follows a strict
workflow. Some steps in the workflow are mandatory; others can be switched on and
off via configuration or options in the calls. Forms and user interfaces in the system
can only be accessed with corresponding user rights and privileges. Interact provides a
default configuration for the main stakeholders of the system (types of users). These
configurations can be changed by Interreg programmes and allow them to configure
user rights according to their organisation and division of tasks.
The following elements are part of the standard work flow:
1. Enter programme data (information from Cooperation Programme) This section contains the basic information of the Interreg programme using the software. It is the information from the document called “Cooperation Programme”, which is approved by the European Commission. This section needs to be filled out once and contains the most basic layer of information in the application. Basic information on programme area (eligible NUTS regions that a programme covers), priority axis, co-financing rates, programme financial allocations, indicators, etc. are stored here. These data are the basis for all future steps in the workflow. This task is usually done by an administrator of the system.
2. Management of calls Interreg programmes finance projects based on application forms submitted within a defined timeslot and conditions. These timeslots are calls for proposals. Each call has a start and end date which determines the start and deadline for submitting applications. In the eMS, each call can contain different configurations (‘call options’), which change the application form visible to applicants. One Interreg programme can announce an unlimited number of calls throughout the programme lifecycle. The conditions applying to each call for proposals are usually approved by the Monitoring Committee and configured in the system by the system administrator.
3. Application Form Any person intending to submit an application within an open call for applications can register a user and fill out the application form directly in the eMS. It is possible to submit applications only within the timeslot and conditions defined in the call for applications. A user who first created an application is treated by the system as a lead user and can provide other users with read - or read/write access to the application form. The lead applicant is the only user who can submit the application.

ABOUT EMS
9
4. Assessment
All submitted applications need to go through a two-step assessment. The eMS contains a sequence of two checklists: “Admin- & Eligibility check” and “Quality Assessment”. Assessment of Applications is usually managed by the JS in cooperation with national contact points and/or external experts. The eMs supports 4-eye principle for the assessment and allows assigning specific applications and questions to specific users such as external experts.
5. Recommendation
The outcome of the assessment is a recommendation by the assessors to the Monitoring Committee. The project can be recommended for funding, not recommended or recommended under conditions. Recommendations to the MC are usually managed by the JS.
6. Funding decision (Monitoring Committee)
The Monitoring Committee decides which projects are approved by the programme or approved under conditions. The decision of the MC and its date need to be inserted into the system, which is usually a task of the JS. All projects which are approved under conditions need to go through a condition fulfilment procedure, which is, in practice, a modification of the application form based on some clear recommendations of the MC. Modifications are then verified by the JS, which subsequently changes the project status into approved or not approved. All projects which are not approved are archived in the system.
7. Handover and supplementary information
After the project is approved and before it can be contracted, the lead applicant needs to appoint an eMS user who will be the lead partner for the project. The JS checks the proposed user and approves or rejects the proposed lead partner. In case of rejection, the lead applicant needs to propose another user. This process is called handover in the eMS and can be switched off if not needed by the programme.
Additionally, some important information on project management structure and e.g. bank account are ready to be filled out at this stage in the section entitled ‘supplementary information’. This section is available from the moment of approval on but is not necessary a step in the workflow, i.e. if not filled out one may still continue the contracting process. There are many tabs in the ‘supplementary information’ section all of which can be accessed by users with the corresponding user rights (read/write)
8. Subsidy contract
The system supports the generation of a Subsidy Contract. It is template-based and uses data from the approved application form. The template for the subsidy contract is programme-specific and can be adjusted by programmes. Please note that some IT expertise is necessary to adjust templates in the eMS The Subsidy Contract –once generated - can be edited (if necessary) and then printed (downloaded as pdf document). Once the Subsidy Contract is marked as approved (eg by the JS), the system changes the status of a project into ‘contracted’ and allows for partner and project reporting. Basic data on the Subsidy Contract and all its amendments as well as the documents themselves are stored in the eMS in the section ‘project history’.
9. Partner reporting
Once the project is contracted, it enters the reporting phase, which will last until the project is finalised. Each project partner needs to report its activities and expenditure in a partner report. In order to do so, the Lead Partner needs to allocate at least one user per project partner. Thereafter, partners can fill out their reports and submit them to their national controllers (FLC).

ABOUT EMS
10
10. FLC
First level Controllers are national controllers who need to check every partner’s report. They have access to the eMS and see the relevant information. They have their working documents available in the system and can do the verification work online. As a result of the FLC check, an FLC certificate is generated and approved by the controller. The eMS also generates an FLC report which contains more detailed information on the FLC work as well as the FLC checklists. After FLC verification, the partner report is forwarded to the Lead Partner.
Project reporting
The Lead Partner collects all FLC certified partner reports (including its own) and creates a project report. The Lead Partner decides on which FLC certificates to include in the project report. The LP has the right to exclude partner reports from the project report and to reject expenditure approved by the FLC. As soon as the project report is ready, it is submitted to the JS.
11. JS verification
The JS receives a project report and verifies it accordingly; It has the possibility to make positive or negative corrections to individual expenditure items. Once approved, the report is submitted to the MA.
12. MA verification
MA receives a project report and verifies it accordingly; Also MA has the possibility to make positive or negative corrections to individual expenditure items. Once approved, the report is then submitted to the CA.
13. CA verification
CA verifies the report. Unlike JS and MA, CA can deduct some expenditure or exclude temporarily for further verification) and includes the report in the CA certificate. Once included in the certificate, the report may be paid.
14. Payment
CA performs the payment to the Lead Partner outside of the system and records date and amount paid. The payment can be done in full or in instalments.
15. CA reporting
CA is responsible for several reports to the European Commission. The eMS allows for inclusion of the CA certificates into the application for payment to the European Commission as well as annual accounts. eMS also allows for generation of the accounts for the accounting periods.
It is also possible to generate programme annual reports and financial statistics, which are required by the regulatory framework.
Horizontal functionalities (not part of the standard workflow)
Modifications
It must be possible to manage project modifications throughout the project lifecycle. The system allows the JS and the Lead Partner to initiate project modifications. The JS is allowed to initiate modifications at all times and the

ABOUT EMS
11
LP only after the project is in the status ‘contracted’. Once the modification is initiated and allowed by the JS, the LP can modify the application form. All modifications need to be verified and approved by the JS and/or the Monitoring Committee. After the modification is approved, a new version of the application form, which becomes the new valid application form. All the previous versions are stored and are accessible at all times in the project history section.
Automatic messages
The eMS automatically can send messages to different registered stakeholders. Mostly this feature is implemented for status changes (like approval of a project).

LICENSE
12
eMS License
Main points of the license agreement
One of the main goals of the eMS project is to give Interreg Programmes the possibility to
get a software solution free of license fees.
The license agreement was written by a lawyer specialised in IT and agreed with the IT-company PL.O.T., within the scope of license terms in the contract between INTERACT/City of Vienna and PL.O.T.
It provides Interreg MAs with the right to use and change the eMS – internally or by outsourcing to third parties.
It prohibits publishing the source code or using the software for purposes other than the intended use as a monitoring software tool, especially for commercial purposes by programmes (MAs), as well as any third parties.
It prohibits any claims on the side of programmes (MAs) against INTERACT/ City of Vienna.
It has to be signed in the legally binding version in German (the English translation is only a courtesy), as Austrian law and jurisdiction apply.
Please note also:
Interreg MAs have to sign the license agreement prior to receiving the eMS and starting to use the software.
Once they receive the eMS, Interreg MAs have to check if the software is suitable for them (e.g. own adaptations of the eMS might be needed).
MAs are requested to inform INTERACT of errors/bugs they detect in the software.
INTERACT will run a reference system on its own server and will maintain this up-to-date (corrected bugs, etc) in order to be able to provide the best updated version of the eMS to MAs. That way Interreg programmes benefit from the joint effort of all programmes using the eMS.
On the other hand INTERACT is not an IT-company, which can assure timely and 24-hours bug fixing. Therefore MAs should acquire additional IT-support for maintenance.
For the benefit of the eMS community, MAs are also requested to provide INTERACT with any developments (new plug-ins, new features etc.), which can be distributed for free to all other programmes, after certification/adaptation by INTERACT.

SECURITY
13
Security in eMS
Security in web applications can only be provided by securing the application and the
environment where the application is running. One of the most important goals of the
eMS project is to provide a secure application. Securing a web application is not a one-
time effort, security is an ongoing task. Therefore maintenance of the software tool
and the environment (e.g. updating the operating system, keeping the applied
technologies up to date) is necessary to keep the system secure.
This document describes the different security mechanisms implemented in the eMS
with consideration of Commission Implementing Regulation (EU) No 821/2014 Article 3.
Authentication & Authorization
User authentication in eMS is implemented using the widely used Spring Security
Framework (http://projects.spring.io/spring-security/).
Authorization is carried out using a detailed user roles and rights management system.
Due to this system, certain functionalities can only be executed by specific users,
certain views are only visible to privileged users.
Passwords have to follow minimum security standards. The password pattern can be
configured by the programme individually. Thus, programmes can control the
minimum security of their passwords.
Open Web Application Security Project (OWASP)
The security implemented in eMS follows guidelines developed by the “Open Web
Application Security Project” (OWASP, www.owasp.org). OWASP is a worldwide non-
profit organization focused on improving the security of software.
eMS follows the guidelines provided by OWASP. In the following section, the top ten
security threats named by OWASP
(https://www.owasp.org/index.php/Top10#OWASP_Top_10_for_2013) and the
implemented security in eMS will be discussed.
Injection
The eMS uses the Object-Relationship Mapper “Hibernate” (http://hibernate.org/). As
Hibernate uses prepared statements, the eMS is protected against SQL injection
attacks.
Broken Authentication and Session Management
User authentication and session management is implemented using the Spring Security
Framework. The session is only handled on the server side. Apart from the session
SECURITY
14
identifier, no session related information is used in parameters passed between client
and server.
To secure the user interface, the widely used user interface “primefaces” is used. To
enter passwords, a password input field is used – passwords are never shown in clear
text on the user interface.
User specific passwords are not stored in clear text – therefore intruders cannot grab
passwords from the database.
The user session times out in a configured time (with a feedback to the user before
invalidating the session).
To secure the connection between client and server, it is required to use HTTPS on a
production environment.
Cross-Site Scripting (XSS)
The use of Java Server Faces (JSF) has a built-in XSS prevention. Labels in eMS are
usually implemented by using the primefaces output text component. This component
escapes text by default. Some labels show formatted text using the output text
component without escaping. The text, which is displayed in these labels, can only be
changed by authorised persons. Thus, the risk of cross-site scripting is minimised.
Insecure Direct Object References
Direct references to objects (database objects or uploaded binaries) are not used in
eMS.
Security Misconfiguration
eMS is developed using state-of-the-art frameworks and components. Those
components, as well as e.g. operating systems, application servers and tools, have to
be maintained constantly in a productive scenario to keep the application secure.
Sensitive Data Exposure
To ensure secure data transport via the internet, the use of HTTPS has to be
configured. This cannot be implemented in the application itself, but needs to be set
as a configuration of the specific production environment. All data is stored in a
relational database. To access the database, the application (or the administrator) has
to authenticate itself with username and password.
Passwords are never stored in clear text but only as hash values.
Missing Function Level Access Control
eMS has a complex user role and user rights system. This system only grants access to
functionalities for users with the corresponding privileges.
Cross-Site Request Forgery (CSRF)
The version of JSF used in eMS has built-in a CSRF protection.

SECURITY
15
Using Components with Known Vulnerabilities
eMS is developed using state-of-the-art frameworks and components. To keep the
system secure, those components have to be checked and maintained regularly in a
productive scenario.
Non-validated Redirects and Forwards
eMS does not use non-validated redirects and forwards. The only forward implemented in eMS
forwards the user after validation of his e-mail address to the login screen. Afterwards the user
has to log into the system.
TECHNICAL REQUIREMENTS
16
Technical requirements for the productive environment
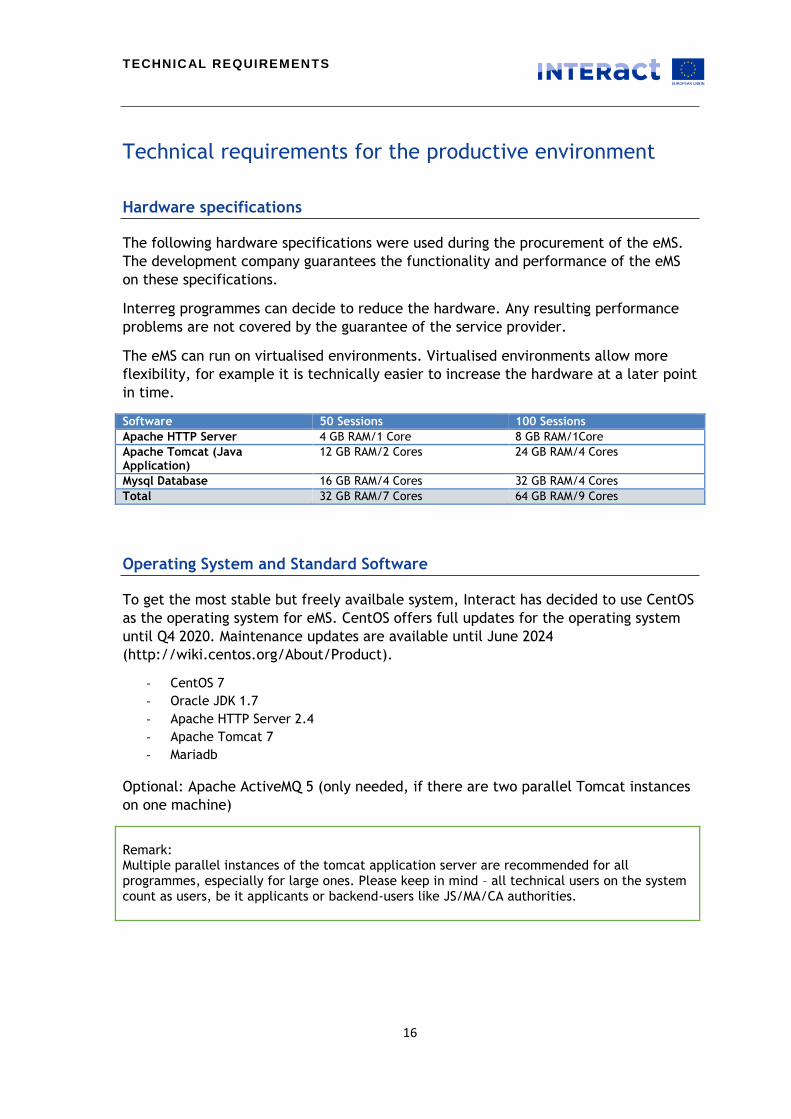
Hardware specifications
The following hardware specifications were used during the procurement of the eMS.
The development company guarantees the functionality and performance of the eMS
on these specifications.
Interreg programmes can decide to reduce the hardware. Any resulting performance
problems are not covered by the guarantee of the service provider.
The eMS can run on virtualised environments. Virtualised environments allow more
flexibility, for example it is technically easier to increase the hardware at a later point
in time.
Software 50 Sessions 100 Sessions
Apache HTTP Server 4 GB RAM/1 Core 8 GB RAM/1Core
Apache Tomcat (Java Application)
12 GB RAM/2 Cores 24 GB RAM/4 Cores
Mysql Database 16 GB RAM/4 Cores 32 GB RAM/4 Cores
Total 32 GB RAM/7 Cores 64 GB RAM/9 Cores
Operating System and Standard Software
To get the most stable but freely availbale system, Interact has decided to use CentOS
as the operating system for eMS. CentOS offers full updates for the operating system
until Q4 2020. Maintenance updates are available until June 2024
(http://wiki.centos.org/About/Product).
- CentOS 7
- Oracle JDK 1.7
- Apache HTTP Server 2.4
- Apache Tomcat 7
- Mariadb
Optional: Apache ActiveMQ 5 (only needed, if there are two parallel Tomcat instances
on one machine)
Remark: Multiple parallel instances of the tomcat application server are recommended for all programmes, especially for large ones. Please keep in mind – all technical users on the system count as users, be it applicants or backend-users like JS/MA/CA authorities.

TECHNICAL REQUIREMENTS
17
Maintenance for Hardware, Operating System, Standard Software, Certificates
The company providing the hardware (or virtual environment) often provides
maintenance for hardware, operating system and software. To ensure the uptime of
their server, they often monitor the server itself. In this case, they are responsible for
security updates, detection of special hacking attacks (like DDos-Attacks) etc. They
usually offer only services for their standard software and do not provide services for
the application itself.
For using encrypted connections to the eMS, the use of HTTPS is strongly
recommended. For such an encryption, the use of a trusted SSL-Certificate is
advisable, which can usually be ordered and maintained by the same company.
A good back-up of the system is very important. Normally this is done by the company
providing the server and should be part of the “service level agreement” (SLA).
Installation and Setup of the eMS
Some companies providing server-services, like the ones mentioned above, also
provide installation, setup and monitoring of the application and possible updates of
the application itself while others just run the server and the operating system.
Some Interreg programmes can order such services within their own organisation and
do not need to procure them separately.
It is recommended to find a person (e.g. own administrator or IT Manager) who will
take care of updating and maintaining the application itself.
Interact offers set-up support to individual Programmes. This setup support could be in
form of one training session or in for of a support during setup of the system. The
installation of the environment has to be done by your IT administrator.
In case of difficulties, our IT company PL.O.T. offers support in this matter especially
in the configuration and setup of the software. You can find more details about this in
the “eMS set-up support” thread in the Interact Observers group forum on basecamp.
Testing Environment
It is recommended to run a second installation of eMS for software and configuration
testing.
This environment can run on very limited hardware, since it is only used by the
administrator in order to test the configurations and the system.
The test-system could be included into the procurement for maintenance to ask the
maintenance providing company to run a very small environment to see and test bug
fixes and new features before installing them on a productive environment.

TECHNICAL REQUIREMENTS
18
Productive Environment
The experience of Programmes already using the eMS shows that an installation with
two parallel tomcat instances can handle up to 200 users at the same time and in case
of more parallel sessions, it might experience performance issues. All users, including
programme bodies (not only applicants), are covered by this number.
To avoid any performance problems, we recommend to change the server settings at
least during the peak periods, like in the end of the call for proposals. After about 200
sessions on Apache Tomcat and a heap size of 2GB for this process, problems with
garbage collection appear. It is strongly recommended to add parallel application
server instances to avoid performance risks.
Please check out the chapter about performance fine-tuning as well.
Modification, plug-ins, personalisation
Independently from running the software on a server, the software can be modified by
a software development company. Usually companies developing software do not run
the software and vice versa. Therefore, it is often necessary to order further
developments from a different company than the one running the system. Software
development could be carried out at an hourly rate or at a total price for a needed
functionality.
Which tools are needed for the user of eMS?
eMS is a web application and can therefore be used with any up-to-date web browser
like Internet Explorer, Firefox, Chrome or Safari. For technical reasons, eMS only
supports the latest version of these browsers and one version before.
INSTALLATION OF EMS
19
Installation of eMS
General remarks
eMS is a Java web application, which has been tested by Interact on the following
technologies:
CentOS 7
Oracle JDK v. 1.7
Mariadb
Apache Tomcat
Apache WS
Apache Activemq 5.10
Java is a platform-independent technology. Interact recommends to use the approved
and tested software configuration.
Setup support
Please get in touch with Interact to receive information on setup support.
Before installation
eMS is a highly configurable software. Parts of the flexibility are reflected in the User
interface of the application, other parts need to be adapted in a special part of the
setup script. The following points need to be specified by the ETC Programme before
installing eMS:
1. Which languages are used? Which ones are used as input languages, which ones are used as user interface languages?
2. How many parallel installations of eMS are running on one server/machine/vm? If there is more than one eMS instance necessary, the installation of Apache Activemq is required.
3. Which funds are used? Since version 3_0.1 custom funds can be defined in the database.
Interact can provide an up-to-date manual for installing eMS on your system. Please
get in touch with us or download the latest version in our forum on basecamp.
There are already translations of the user interface available for several languages.
Please get in touch with Interact to receive the latest updated versions.

INSTALLATION OF EMS
20
Installation of eMS
During installation of eMS, several modifications have to be applied to the installation
files. For an initial installation the main topics are:
Languages used in eMS (as content or as user interface translations)
Translations of certain elements can only be carried out in the database
Co-financing rates for NUTS regions can only be changed in the database
To install eMS, the following steps are needed (overview):
1. Install needed software landscape (operating system, application server, etc.)
2. Copy configuration files to server
3. Adapt paths in configuration files
4. Modify customizable sql-insert-script
5. Create database user and schema
6. Create database tables
7. Insert not-modifiable part of insert script
8. Insert customized sql-insert-script
9. (Optional) insert custom funds
10. Set environment variable EMS_HOME, pointing to configuration directory
11. Customization of programme logo in war file
12. Installation of war file in webserver
The following points are optional, but might be needed by many programmes:
13. Adaptation and configuration of templates for pdf extraction of different forms
14. Implementation and configuration of validation plugins
15. Import of translations
FAQ on installation
1. When using only one instance, the server shows an error output at startup:
org.apache.velocity.exception.VelocityException: Error initializing log: Failed to initialize an instance of org.apache.velocity.runtime.log.Log4JLogChute with the current runtime configuration….
Caused by: java.io.FileNotFoundException: velocity.log (Keine Berechtigung)
The problem arises when using the system to start a tomcat instance. It is by default using the root folder as current or working directory and velocity tries to write the log to the current directory. Please put in value like

INSTALLATION OF EMS
21
“WorkingDirectory=/opt/tomcat/logs” in the tomcat7.service file and make the directory writable for the user running the server.
2. After installation, the styling looks weird (see attached screenshot).
The configuration for the styling in TOMCAT_HOME/conf/web.xml is missing. Please add the needed context parameter.

CUSTOM FUNDS
22
Custom funds This functionality is only needed by Programmes having different funds than:
- ERDF
- IPAII
- ENI
- ERDF equivalent
or by Programmes who want to rename one of them (e.g. the ERDF equivalent fund).
By default the above mentioned funds are available in eMS. With this manual,
Programmes can add additional funds. Please note: the changes have to be done
directly in the relational database of eMS. Therefore the changes have to be done by a
technical administrator.
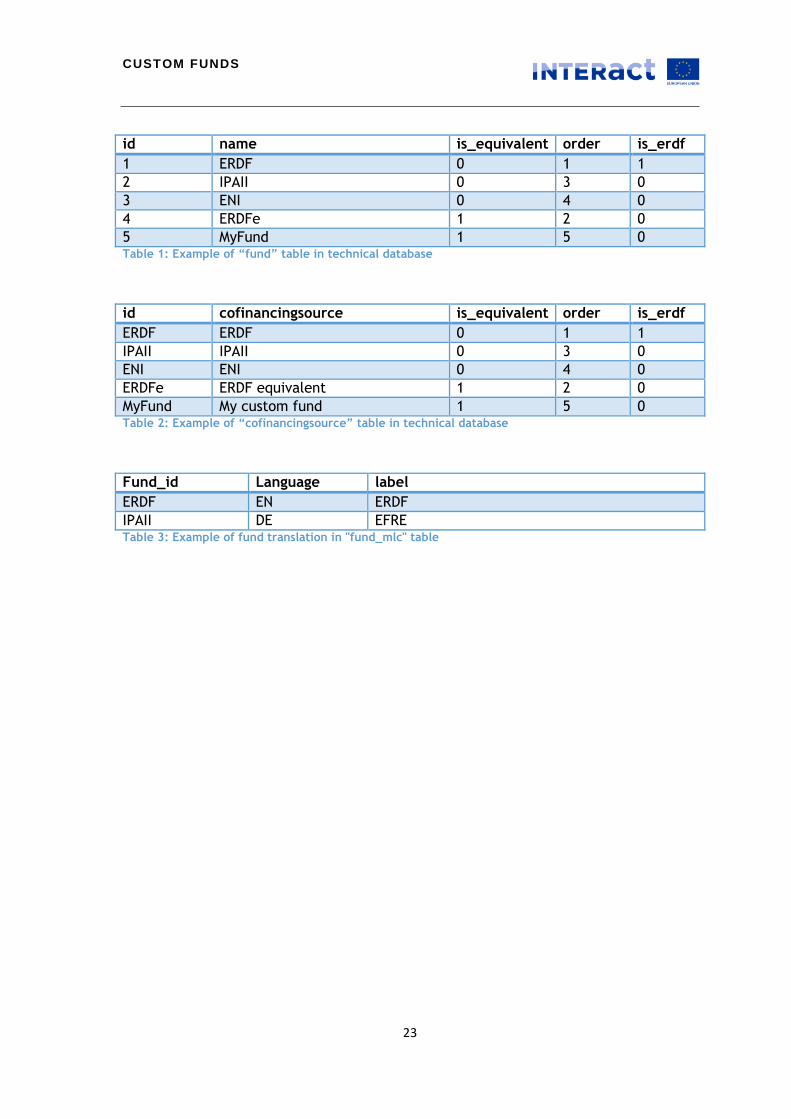
Fund database table
For historical technical reasons eMS contains two tables, both containing funds:
- fund
- cofinancingsource
For technical reasons both tables need to be filled. The "id" of the co-financing source should be equal to the name of the "fund"-element.
Remarks:
There are two flags and one "order" field, which should be set:
is_equivalent: (please set this to "1" if the fund should be treated in the system as ERDF equivalent
is_erdf: This should be set only for the ERDF. Please put additional funds to "0"
order: Please put a number, which follows the maximum number currently available in the funds. This number is used for sorting of Funds in the user interface.
To translate funds please use the fund_mlc table in the database
CUSTOM FUNDS
23
id name is_equivalent order is_erdf
1 ERDF 0 1 1
2 IPAII 0 3 0
3 ENI 0 4 0
4 ERDFe 1 2 0
5 MyFund 1 5 0 Table 1: Example of “fund” table in technical database
id cofinancingsource is_equivalent order is_erdf
ERDF ERDF 0 1 1
IPAII IPAII 0 3 0
ENI ENI 0 4 0
ERDFe ERDF equivalent 1 2 0
MyFund My custom fund 1 5 0 Table 2: Example of “cofinancingsource” table in technical database
Fund_id Language label
ERDF EN ERDF
IPAII DE EFRE Table 3: Example of fund translation in "fund_mlc" table

USER CREATION
24
User Creation User registration and activation can be done in two ways. In any case users in eMS are
applicants at first. It is possible to assign different user rights in a second step.
User self-registration via the publicly available registration form
Users can register themselves in the system. After clicking on the “Register” button,
the eMS sends a validation e-mail, which contains a validation link to the provided e-
mail address. Clicking on this link validates the e-mail address in eMS. Afterwards, the
user is able to log into the system.
Figure 1: Registration form
Validation email
After registration, the user receives an email to his registered email address. The
email contains a link and potentially a text before this link.
The text before, the text after and the subject of this message can be changed via
configuration in the translation tree in section “Configure eMS”.
Please check out the translation chapter of this manual on more information how the
general translations work.
The paths of the elements to change are the following:
Element Path
Subject mailbox.msgReceived.subject.label
Text before link mailbox.msgReceived.text.label

USER CREATION
25
User registration by an authorised person
Users with the assigned privilege “MG_USER” have the right to create, modify,
activate and lock users.
Creating a user has to be carried out in two steps – like the registration of a user in the
registration form. Firstly, a user has to be created; secondly, the user has to be
activated by clicking on the “Activate User” button.
Users can be locked as well. Locked users cannot log into eMS any more.
Figure 2: User management
Creating privileged users (JS, MA, CA, NCP,…)
After being created (either self-registered or registered by an authorised person), any user has
the role of applicant. In order to create privileged users, a privileged role needs to be assigned
to the user. User role represents a set of privileges and can be managed only by a user
having the almighty “ADMIN” privilege.
Detailed information on managing roles and privileges is included in the chapter
“Userroles” of the Manual.
Privileges for the most common authorities
Privileges for the most common authorities as they are installed on the INTERACT reference and
testing environment can be found in the annex of this manual.

USER SELF MANAGEMENT
26
User Self-Management
User Account
After clicking on “User Account” in the left side menu, users are able to modify the
information themselves.
Figure 3: User self-management
In this section, a user can:
change the password
change personal data
configure the mail signature, which will be added to outgoing messages in the message portal
choose the default language for the system
administer the Dashboard – For the dashboard administration, three checkboxes are offered, where users can define the items to be visible on their dashboard (“Show Projects”, “Show Mailbox”, “Show calendar”).

USER ROLES
27
User roles The eMS enables managing roles and rights based on privileges. It means that certain
functionalities are available only for certain users.
Every feature is dependent on a corresponding privilege. A privilege is directly
assigned to the function/workflow.
User role represents a set of privileges and can be assigned to a user.
How to manage roles
Needed user rights / privileges
The user who wants to manage the roles must have the “MG_ROLES” or the “ADMIN”
privilege.
How to enter Managing Roles & Privileges
After logging in as “ADMIN”, you can enter the “Roles & Privileges” section by clicking
on the left side menu item “Manage Roles”.
Figure 4 Manage Roles menu item
After entering the section, list of roles is displayed.

USER ROLES
28
Figure 5 List of roles
After a specific role is selected, the privileges can be added or removed. Privileges
can allow or deny the role to perform the selected action. A denial overrules a
permission of the privilege. So, if a user has more roles, and an action is permitted in
one role, and denied in another role, the user will not be able to perform the action.
Figure 6 Adding and removing the privileges
User management
Needed user rights / privileges
The user who wants to manage this section must have the “MG_USERS” or the “ADMIN”
privilege.
How to enter Managing Users
After logging in as “ADMIN”, you can enter the “Manage Users” section by clicking on
the left side menu item “Manage Users”.

USER ROLES
29
Figure 7 Manage Users menu item
After entering the section, the list of users is displayed.
Figure 8 List of users
After a specific user is selected, the roles can be assigned. More roles can be assigned
to a user. However, if a user has more roles, and an action is permitted in one role,
and denied in another role, the user will not be able to perform the action, as the
denying the privilege overrules its permission.

MESSAGE PORTAL
30
Message Portal eMS allows users to exchange messages within the system.
Message exchange
Needed user rights / privileges
For sending or receiving messages in eMS, no special user rights are needed. Any
registered user can send and receive messages.
Figure 9: Mail sending dialog
Messaging
eMS supports standard mailing functions such as sending, forwarding and replying the
mails. It enables sending messages to multiple recipients as well as sorting and
filtering messages based on different criteria.

MESSAGE PORTAL
31
Messaging out of project view
It is now possible to send messages to the users assigned to a project.
Figure 10: Project contacts

PROGRAMME SETUP
32
Programme setup After the eMS is set up and running and before any call is open, the Programme data
needs to be entered.
Programme basic information
The following information should be provided:
CCI – the CCI number of the programme
Title – the official programme title
Abbreviation – programme abbreviation
Version – the actual version of the CP
First year/Last year – the programme implementation period including n+3/2 rule
EC Decision Number – the number of the EC decision on programme approval
EC Decision Date – the date of the EC decision on programme approval
NUTS regions
A programme needs to indicate which NUTS regions are eligible for funding.
You can do it either by selecting the whole countries from the list of “Available NUTS”
(by default all available NUTS 0 are shown in this section) and adding them to the
“Selected NUTS”. All NUTS 3 from a selected country will be added to “Selected
NUTS” section. You may also remove single regions from the selected list.

PROGRAMME SETUP
33
Another way is to select single NUTS 3 regions. To do this, you should first select
relevant NUTS 0 and NUTS 2 region from a drop down menu (“Available NUTS” will
show only NUTS 3 relevant for the selected NUTS0/2) and adding single NUTS 3 regions
to the “Selected NUTS” section.
Repeat this until the “Selected NUTS” list reflects the programme area. Please
remember that the maximum co-financing rate per region is already set up (eMS setup
at the installation). Remember that applicants will be able to select any other region
from the full list of NUTS available in the system (for partners from outside of the
programme area).
Fund
Please select which funds are available for your programme. You may select one or
multiple funds.
Priority axes
After selecting funds, continue to select priority axes. Go into the section and click on
“Create a priority axis”. Give the axis a name, introduce a co-financing rate and select
applicable areas of intervention. Set up a financial allocation per area of intervention.

PROGRAMME SETUP
34
Repeat this to add all programme priority axes.
Calculation basis
In the next section please insert the calculation basis and the co-financing rate per
fund.
NOTE: Please do not forget to provide co-financing rates, as they will be used to
calculate overview tables.

PROGRAMME SETUP
35
Investment strategy
The investment strategy can be inserted in the following section.

CALL SETUP
36
Call setup
The call setup is a tool in eMS used to create and modify calls. This tool provides a
defined set of optical fields in the application form. It allows to focus on specific
priorities, subprogrammes,etc. and to select checklists for eligibility and evaluation.
Needed user rights / privileges
The user who wants to create and modify a call has to have either the “ADMIN”
privilege or the privilege to manage calls (“SHOW_CALLS”; “MG_CALLS”).
Basic information and timeslots
A call can be created in the section “eMS Management” “Calls”. After opening the
section, the user has to scroll down and click the button “Create New Call”.
In “Call Basic Data” the user can set the name, start- and end date of the call.
Figure 11 Setting the name and dates of the call
Besides the start and end date of the call, Call Timeslots can be also added, enabling
the call to be published repeatedly.
If timeslots are used, the start and end date above are not taken into account.
Timeslots determine when it is possible to apply for a call and to submit an application
form. With this feature, a call could be opened in repetitive timeslots without
changing the configuration. In times, when there is no “call timeslot” defined, it is not
possible to create or submit an application form.
Figure 12: Timeslots

CALL SETUP
37
Switch on/off configuration
Please find the configurations and their description in the Annex of this manual.
Thematic selection
The user is able to select the “Macroregional Strategy-”, “Priority Axis-”, “Specific
Objective-”, as well as the “Subprogramme-” sections.
Figure 13 Setting different sections
The application form will only be editable in the defined time range. Submission of
projects after the deadline will not be possible. After a call has been created, it has to
be published once with the “Publish” button.
After the call is published, the call setup can only be modified if the “ADMIN” unlocks
the call by clicking on “Unlock Call”.

CALL SETUP
38
Checklist Selection
In order to attach a checklist to the created call, the user has to select a created
checklist from the listed checklists.
Figure 14 Checklists for the call
Attachments
The programme can upload attachments to calls. These documents will be visible to
applicants eg. application manual, guidelines, Programme rules…
Manage Multilanguage for Call
“Manage Multilanguage for Call” has the same functionality as the tool “Translation”.
The difference is that all modifications made in “Manage Multilanguage for Call” are
only applicable for this specific call.

CALL SETUP
39
Management of a two-step call
A call gets configured as a two-step call by activating the corresponding checkbox.
Figure 15:Checkbox for two-step application
If this checkbox is ticked, a field for deadline of 1st phase appears.
Section visibility in a two-step call
eMS allows to show/hide sections from the application form in the first step of a two-
step procedure. To do this, you need to change a configuration file “af.properties”.
Changes in this configuration file are only taken into account after the restart of the
server.
af.menu.rendered.step1.partner=false
af.menu.rendered.step1.projectcescription=false
af.menu.rendered.step1.projectcescription.projectrelevance=false
af.menu.rendered.step1.projectcescription.projectfocus=false
af.menu.rendered.step1.projectcescription.projectcontext=false
af.menu.rendered.step1.projectcescription.horizontalprinciples=false
af.menu.rendered.step1.projectcescription.projectrisks=false
af.menu.rendered.step1.workplan=false
af.menu.rendered.step1.workplan.workpackagelist=false
af.menu.rendered.step1.workplan.targetgroups=false
af.menu.rendered.step1.workplan.defineperiods=false
af.menu.rendered.step1.projectbudget=false
af.menu.rendered.step1.projectbudget.partnerbudget=false
af.menu.rendered.step1.projectbudget.activitiesoutside=false
af.menu.rendered.step1.projectbudget.purchaseofland=false
af.menu.rendered.step1.projectbudgetoverview=false
af.menu.rendered.step1.attachments=false

CALL SETUP
40
Assigning fields to different steps
Assignment of fields to different phases of a call can be carried out by clicking the
“Manage Multilanguage for call” button. This section allows assignment of input fields
to different phases. Please navigate to the respective element you want to assign and
change the configuration there.
Three modes are available:
“Phase 1 and 2” makes the field editable in both phases
“Phase 2” makes the field editable in phase 2 only – it will be read only in phase 1
“Phase 1” makes the field editable in phase 1 only – it will be read only in phase 2. (could be used e.g. for acronym)
Changing call configurations after publishing
A user with the “admin” privilege can unlock an already published call, even if there are already
application forms linked to this configuration.
Please be careful in changing anything in the call setup after it is already published as it will
affect already submitted application forms and projects
Warning Please consider that changing configurations in published calls might lead to irreparable damage of data.
Please test any change in the configuration thoroughly in a testing environment, before applying them to a productive installation.
Damages due to configuration changes are a consequence of data processing they are not a lack
of software quality.

APPLICATION FORM
41
Application Form Most of the forms in the application form are mostly self-explaining. We want to highlight only a
few special forms and describe the implemented functionalities.
Calculation of the maximum co-financing rate
eMS calculates a maximum co-financing rate per partner, taking into account several different
configured co-financing rates. Some of the percentage values (like different co-financing rates
per NUTS region) can only be changed in the technical database.
Configuration can only be done on Programme level. Exact co-financing rate is stored by
partner, therefore a later change of the configured percentages does not affect already created
application forms – it only changes the maximum co-financing rate for new projects.
The algorithm always takes the lowest amount out of several configured co-financing rates.
•Each NUTS 0 region must have a co-financing rate (e.g. 85%).
•Other NUTS levels could have a co-financing rate configured
•Take the most precice co-financing rate from the NUTS regions, where there is a co-financing rate configured.
Co-financing per NUTS region
•Each combination of priority axes and fund needs to have a co-financing rate configured
•Compare this co-financing rate to the one from NUTS
•Take the lower value
Priority axes per Fund
•OPTIONAL: Only applies, if option "Generalblockexemptionforsme" is ticked in the call
•If organization is an SME (by selecting "Yes" in the related dropdown of the application form - co-financing rate is lowered to 50%
General block excemption for SMEs

APPLICATION FORM
42
Periods
Defined periods are a prerequisite of successful checking and submitting the AF. Periods can be
set in the Application Form ->Work Plan -> Define Periods section.
Depending on the call configuration, periods might be either generated automatically (based on
a plugin) or inserted manually by an applicant.
Applicants need to be very cautious about changing the Start / End date of a project, as this
change needs to be reflected also in the period definition. Therefore, it is recommended to
“Recreate periods” or manually adjust the periods in the “Define periods” section after every
change in these dates.
Budget
Budget belongs to the most important parts of the Application Form. Budget needs to be
inserted per partner. Therefore, partner information in the “Partner” section needs to be
inserted before Budget can be defined.
Partner Budget is usually inserted per Work package or per period. Hence, this information
should be also included before filling in the budget. If other order of filling in the AF is applied,
you need to be aware, that new cells in the budget will be created with an automatic value (0€)
for the additional period/Work package.
The individual budget items can be inserted in the Project Budget -> Partner Budget -> Define
Budget section.
Flat rates
Besides calculating using real expenditures, flat rates can be used for calculating certain budget
items, particularly for Staff costs ad Office & Administration costs.
Office & Administration costs are calculated as a percentage of Staff costs.
Staff costs (if flatrated) are calculated as a percentage of a sum of expenditures used for all the
items but Office & Administration and Net Revenues.
If a value in any cost is changed / added by the applicant, it is better to click the “recalculate”
button.
When applying Flat rates, it is important to bear in mind that all the previously inserted sums in
Staff costs and O&A Costs will be replaced by the calculated (flatrated) costs.

APPLICATION FORM
43
Partner contributions
Every partner must define the intended source and amount of the (national) contribution (i.e.
national funding to match ERDF, IPAII, etc.).
Figure 16 Clicking ‘define contributions’ leads to the interface for defining contributions
The eMS assumes that own contributions always are either public or private depending on the
legal status of the project partner. Every partner needs to have own contribution.
Own contributions of public partners are considered ‘public’. Own contributions of private
partners are considered ‘private’.
Every partner can have an unlimited number of additional contributions sources. Additional
contributions can be either public or private.
To add additional contributions, partners must tick the plus icon on the upper right corner (see
below). Then enter the source of the contribution and the legal status as public or private
contribution.
Figure 17 Contributions can either be public or private
Automatic public contribution
Automatic public contribution is a programme option, which can be set in the Manage
programme section. It means that a country, fund, etc. is automatically providing the
contribution in case a project is approved. One example would be the rotation fund in Italy in
previous years, which guaranteed national contribution for approved projects.

APPLICATION FORM
44
Many programmes do NOT have any automatic public contributions in their territory. If there is
no country in your programme area that automatically provide contributions to ERDF, you may
want to consider turning off ‘automatic contribution’ as it does provide no added value and
makes overview tables more complicated.
Figure 18 If your programme has automatic contributions you can turn on this options in the Manage Programme sections
If ‘automatic public contributions’ are possible, then they appear in the drop-down as well:
Figure 19 A programme allowing automatic public contribution
Submission without check
In certain cases, it is necessary to grant an exception and to allow an applicant to submit the
Application Form even if not all the requirements to check successfully have been met. These
cases need to be managed individually.
In such a case, a JTS user needs to open the project. The project even if not submitted can be
found using the Application Browser.

APPLICATION FORM
45
Figure 20 Allow Submit Without Check, Set Project State To Checked
After entering the project, in the left side menu -> Management, you can click either “Set
Project State To Checked” or “Allow Submit Without Check”. These settings might be applied
only on a particular project, not on multiple projects at once or on the whole call.
Attachment upload
After entering the project as JTS, in the left side menu -> Management, you can also see the
item “Attachment upload allowed”.
Figure 21 Attachment upload allowed
AF non-submitted: Using this button for a non-submitted (saved) project, you can prevent the applicant from uploading attachments.
AF submitted: Using this button for a submitted project, you can enable the applicant to attach additional documents to an already closed (submitted) Application Form.
These settings might be applied only on a particular project, not on multiple projects at once or
on the whole call.

APPLICATION FORM
46
Attachment JS
AF submitted: As a part of evaluation, JTS user may add an attachment to a submitted project by clicking the “Attachment JTS” in the upper menu bar.
AF non-submitted: Additionally, JTS user has also the possibility to add an attachment to a non-submitted project (only saved). In this case, the JTS user needs to find a project in the Browser, and enter the left side menu -> Management section. Clicking the “Attachment JS” item creates the “Attachment JS” section in the upper menu and redirects user to this section. Here, the attachments can be added.
Figure 22 Attachments JS
Documents
Templates for Pdf creation might be selected in the Documents section of the JTS view.
Figure 23 Documents
After entering the project as JTS, in the left side menu -> Management, “Documents” item needs
to be selected in order to get redirected to this section.

APPLICATION FORM
47
Project result indicator
The “project result indicator” section can be turned on in the call configuration via the
configuration “Use Project result indicators”. This feature was contributed by the Central Europe
Programme.
If turned on, a section “project result indicator” is visible in the menu of the application form.
Figure 24: Project result indicator menu entry
To use this section you need to introduce customized values into your technical database.
INSERT INTO `project_result_indicator_measurement_unit` (`id`,`label`) VALUES (1,'Institutions');
INSERT INTO `project_result_indicator_measurement_unit` (`id`,`label`) VALUES (2,'EUR');
INSERT INTO `project_result_indicator_measurement_unit` (`id`,`label`) VALUES (3,'FTE'); INSERT INTO `project_result_indicator_measurement_unit` (`id`,`label`) VALUES (4,'Persons');
INSERT INTO `project_result_indicator_measurement_unit` (`id`,`label`) VALUES (5,'Number of stakeholders reached');
INSERT INTO `project_result_indicator_measurement_unit` (`id`,`label`) VALUES (6,'Percentage of stakeholders satisfied'); INSERT INTO `project_result_indicator_measurement_unit` (`id`,`label`) VALUES (7,'Number of communication activities');
INSERT INTO `project_result_indicators` (`id`,`communicative`,`label`,`project_result_indicator_measurement_unit_id`) VALUES (1,1,'Visits to the project website',5);
INSERT INTO `project_result_indicators` (`id`,`communicative`,`label`,`project_result_indicator_measurement_unit_id`) VALUES
(2,1,'Participants at project events',5); INSERT INTO `project_result_indicators` (`id`,`communicative`,`label`,`project_result_indicator_measurement_unit_id`) VALUES
(3,1,'Event participants satisfied with information provided',6);
INSERT INTO `project_result_indicators` (`id`,`communicative`,`label`,`project_result_indicator_measurement_unit_id`) VALUES (4,1,'Joint communication activities implemented with external stakeholders',7);
INSERT INTO `project_result_indicators` (`id`,`communicative`,`label`,`project_result_indicator_measurement_unit_id`) VALUES
(5,0,'Number of institutions adopting new and/or improved strategies and action plans',1); INSERT INTO `project_result_indicators` (`id`,`communicative`,`label`,`project_result_indicator_measurement_unit_id`) VALUES
(6,0,'Number of institutions applying new and/or improved tools and services',1);
INSERT INTO `project_result_indicators` (`id`,`communicative`,`label`,`project_result_indicator_measurement_unit_id`) VALUES (7,0,'Amount of funds leveraged based on project achievements ',2);
INSERT INTO `project_result_indicators` (`id`,`communicative`,`label`,`project_result_indicator_measurement_unit_id`) VALUES
(8,0,'Number of jobs created (FTE) based on project achievements ',3); INSERT INTO `project_result_indicators` (`id`,`communicative`,`label`,`project_result_indicator_measurement_unit_id`) VALUES
(9,0,'Number of trained persons',4); Figure 25: Central Europe - project result indicators
Please customize this insert script to your needs.

APPLICATION FORM
48
If the values are available in the technical database, the following section appears in the
application form.
Figure 26:Project result indicators section

APPLICATION FORM
49
Output indicators of other specific objectives
eMS by default allows to select output indicators of one specific objective only. Programmes
might allow the selection of output indicators form other specific objectives of the same priority
axes.
Programmes can allow this selection by selecting the following option in the call management:
“Allow also Output indicators from other Specific Objectives of the selected Priority axes”
If this option is active, the eMS shows a “Show more” button in the “main outputs” section of an
“implementation” or “investment” workpackage.
Figure 27: Show more button for additional output indicators
By clicking this button all output indicators of the given priority axes can be selected.
Figure 28: Adding output indicators of other specific objectives to the selection
By selecting elements in the dialog, they become selectable in the dropdown.
Figure 29: Additional output indicators are selectable in dropdown

ADDITIONAL TEXTFIELDS
50
Additional textfields eMS allows to add additional text fields to many sections of the application form.
The configuration can be done either globally by adding text fields, which will then be
visible in all calls, or by adding call specific text fields.
The global configuration is done in the section “Configure eMS”.
Figure 30: Global configuration for additional text fields
The configuration for call specific text fields can be done in the call specific translation tree (in
the call management – “Manage Multilanguage for call”).
Figure 31: Call specific configuration for additional text fields

BOOKMARK PROJECTS
51
Bookmarking projects Every user is able to bookmark a project, i.e. mark it for easier and quicker access.
How to bookmark a project
Projects can be bookmarked by clicking on the corresponding item on the left side
menu in an opened application form. The same applies for removing a bookmark.
Figure 32 Bookmarking and Unbookmarking Projects

BOOKMARK PROJECTS
52
Browsing bookmarked projects
Bookmarked projects can be accessed by clicking the corresponding item on the left
side menu of the main page.
Figure 33 Bookmarked Applications
A list of the bookmarked projects will appear.
Figure 34 Browsing the Bookmarked Projects

PROJECT IDEA
53
Project Idea This module serves for posting and sharing project ideas with the purpose of finding
partners or provide inspiration for others.
How to insert a project idea
Needed user rights / privileges
In general, all the users could be able to see and share project ideas. However, they
need to be assigned the following privileges:
For viewing the list of project ideas, privilege SHOW_PROJECT_IDEAS is required.
The user who wants to post a new idea needs to be assigned the privilege CREATE_PROJECT_IDEAS.
Inserting Project Ideas
For viewing project ideas, you need to navigate to the left-side menu section “Project
Idea”.
Figure 35 Project idea menu item
After selecting the “Project Idea” menu item you will be redirected to the Project
Idea Overview where you can see other ideas and also insert your own ideas.
Figure 36 Project Idea Overview
When creating new project ideas you can fill in the name and description, specify whether you are looking for partner, describe partners and potential partners, etc.

PROJECT IDEA
54
Creating a project
Based on the idea, you can easily create a project by clicking the “Create Project”
button at the bottom of the Project Idea page.
Figure 37 Creating a project from a project idea
Afterwards, you are only required to select a call and all the information (including
details on partners) previously saved as project idea will be directly copied into the
new project.
Searching for partners
If the checkboxes “Publicated” and “Partners Needed” are ticked, the Programme can
publish the provided information on its website to allow potential partners to search.
There is currently no possibility in eMS to directly search for potential projects. A link
to an external website has to be implemented by the programme.
Figure 38: Searching for partners

CHECKLISTS
55
Checklists
How to create and manage a checklist
Needed user rights / privileges
The user who wants to manage the checklists must have the following three privileges
or the “ADMIN” privilege.
to manage calls (“SHOW_CALLS”, “MG_CALLS”)
to manage user roles (“MG_ROLES”)
to manage checklists (“MG_CHECKLIST”)
How to create a checklist
A checklist can be created in the section “Manage Checklists” by clicking the “Create
Checklist” button. This will create a new checklist initially containing no questions.
When creating the checklist you have to provide a name and a type.
These types define at which step in the workflow the checklist will be available (e.g.
evaluation of first step, eligibility check).
Currently (in version 2_0.11) the following types are available:
Type Description
Phase 1 Eligibility Admin and eligibility check of the first step in a two-step procedure
Phase 1 Evaluation Quality assessment of the first step in a two-step procedure. Follows “Phase 1 Eligibility” in the workflow.
Eligibility Check Either
- Admin and eligibility check of the second step in a two-step procedure
- Admin and eligibility check in a one-step procedure
Project Evaluation Either
- Quality assessment of the second step in a two-step procedure
- Quality assessment in a one-step procedure
First Level Control Check FLC checklist, linked to each partner progress report.
JTS Progress Report Check JTS checklist, linked to each project progress report.
Inherent Risk FLC assessment, linked to each partner progress report.
Control Risk FLC assessment, linked to each partner progress report.
MA MA checklist, linked to each project progress report.
CA CA checklist, linked to each project progress report.
It is possible to create several checklists of the same type.

CHECKLISTS
56
How to link a checklist to a call
Checklists are at first independent objects which are not linked to any call. Now, we
have to establish the link between the checklists and the calls. Checklists could be
used in no, one or several calls.
Checklists do not have to be in place, when the call is launched for applicants, but
they have to be in place the first time they are used. For example, for “Phase 1
Evaluation” checklists this means, the configuration has to be finished once you start
evaluating projects in Phase 1.
To establish the link, we have to enter the management of the call again. This is
carried out in the “Calls” section. At the bottom of the call configuration, there is a
section called “Checklist Selection”. Here you can choose which checklists should be
used in this call.
If you use a two-step call, you need to register a checklist of type “Phase 1
Evaluation”.
There are HIT-Templates available for “Eligibility check” and “Project Evaluation”.
You can select for a given type, one or several checklists or no checklist. If you use
none, the section later on will contain no questions. If you select one, during the
evaluation, only the questions from this checklist will be displayed. Choosing several
checklists will show the checklists one after the other in the evaluation.
How to manage the user rights for a checklist
Different checklists could be answered by different user groups. Therefore, the
checklist must be linked to one or more user groups.
To cover this feature, in addition to creating the checklist, the eMS creates a user
privilege to access this checklist. The name of the user privilege follows the pattern
“CHECKLIST_NAME_OF_THE_CHECKLIST_id”. If you create your first checklist and
name it for example “Formal and eligibility check”, the corresponding user privilege is
called “CHECKLIST_FORMAL_AND_ELIGIBILITY_CHECK_1”.
To allow for example your JTS to answer this checklist, you have to go to the “Manage
Roles” section and assign this privilege to the user role.

CHECKLISTS
57
Question types
In the “Manage checklists” section, you can click on the most right icon “Show
questions” to see the questions attached to one checklist.
In eMS, each question could be answered with a different type of answer.
Currently the following answer types are available:
Answer type Used component Description
Textinput – no calculation
this question has to be answered by writing text
Yes-No
Can be answered only by putting yes, or no.
Star-rating
For putting numeric values (equal to slider)
Slider
For putting numeric values (equal to rating)
Label – no calculation
Only text output, no input
Yes-No-Not Applicable
Three states: Yes, No, Non applicable
Number – 0,5 Steps
A control where numbers can be entered (limited to steps of 0.5)
Weighting of questions and checklists
Next to the question type, each question can be configured individually. Dependent on
the type of question, only some configurations are taken into account by the software.
All questions take the verification configuration into account. Here you can choose
how many different users have to answer this question.
Textinput – no calculation: uses only the verification configuration
Star-Rating & Slider: verification, min, max, steps, weight
The configuration of min configures the minimum value available, maximum
defines the maximum value. The steps define the granularity of the steps in
between:
- min = 1, max = 10, steps= 1 would make 10 stars, where each is selectable.
- min=0, max=10, steps=2 would make 5 stars, each counting for two points
- min=0, max=10, steps=5 would make 2 stars, each counting for five points
Weight Min Max Steps Score Evaluated Result
0 0
15 1 5 5 2 10
100 0 10 1 7 70
100 0 10 2 2 20
100 0 10 5 5 50
The weight defines how this question is weighted to the total evaluated result of the
checklist. It represents the importance of the question with regard to the total

CHECKLISTS
58
evaluation. The weight defines the maximum value, which can be achieved by putting
the maximum number of points.
Only the weight goes into the total. The evaluated result is defined by the weight and
the reached points.
- weight=0: this question will not go into the final result
- weight=1: this question has a weight of 1, both the reached points go into the sum of reached points, maximum 1 point (or accordingly less) goes into the total
- weight=10: same as weight=1, maximum 10 points go into the total
- weight=100: same as weight=1, maximum 100 points go into the total
There is no limit how to set the min, max or the weight or the steps. Dependent on
your decision, you are free to put any configuration you want.
Yes-No: verification, min, max, weight
Weight Value Evaluated Result
0 0
1 Yes 1
1 No 0
100 Yes 100
100 No 0
Table 4: Yes-No
Yes-No-Not Applicable: verification, min, max, weight
Weight Value Evaluated Result
Amount going into total
0 0 0
1 Yes 1 1
1 No 0 1
1 Not applicable 0 0
100 Yes 100 100
100 No 0 100
100 Not applicable 0 0
Table 5: Yes-No-Not applicable

CHECKLISTS
59
Figure 39: Example of a filled out checklist
Sorting of questions in a checklist
In Figure 1 you can see a list of questions. On the left of each question, there is a
small icon. With drag and drop you can rearrange the ordering of questions within a
checklist.
How to use a checklist
As previously stated, the different checklists are available in different steps in the
workflow. For example a checklist of type “Phase 1 Evaluation” is available in these
calls after the submission of the project whereas a checklist of type “Eligibility Check”
is available later on in the workflow.
In an opened project, the individual checklists appear as separate menu items (see
Figure 2).
User privileges needed for checklist evaluation:
- EVALUATE_PROJECT_PHASE1
- EVALUATE_PROJECT
- SUBMIT_EVALUATION
- ELIBILITY_CHECK
- ELIGIBILITY_CHECK_SUBMIT
After evaluating a question, the “DONE” checkbox needs to be clicked. This action is
necessary for each question.
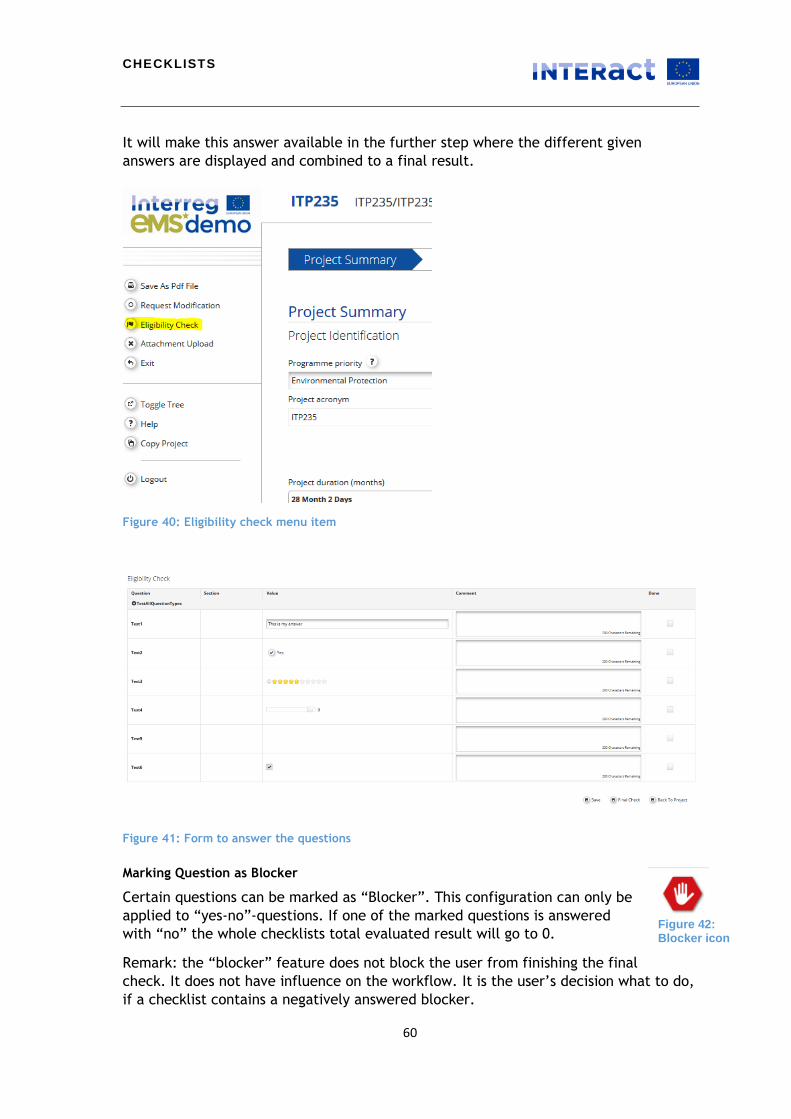
CHECKLISTS
60
It will make this answer available in the further step where the different given
answers are displayed and combined to a final result.
Figure 40: Eligibility check menu item
Figure 41: Form to answer the questions
Marking Question as Blocker
Certain questions can be marked as “Blocker”. This configuration can only be
applied to “yes-no”-questions. If one of the marked questions is answered
with “no” the whole checklists total evaluated result will go to 0.
Remark: the “blocker” feature does not block the user from finishing the final
check. It does not have influence on the workflow. It is the user’s decision what to do,
if a checklist contains a negatively answered blocker.
Figure 42: Blocker icon

CHECKLISTS
61
Consolidation of the given answers – Final Check
After each question has been answered by all evaluators, the given answers have to be
combined. This can be done by a user having the privilege
“EVALUATION_CONSOLIDATE”.
Here the user can see the given answers (in the light rows) and assign a final result.
Again, the user has to confirm completed evaluation by checking the checkbox on the
right.
After all questions have been answered by all evaluators and are treated in the
consolidation view (and after saving), a button appears to finish the answering of this
checklist.
Figure 43: Final check
Asking for another opinion
In the final check, eMS allows to ask users for their opinion. This can be carried out
clicking the “Add Answer” button. Here you can select the question to be asked and a
user required to answer this question.

CHECKLISTS
62
Checklist types
There are predefined steps in the workflow of eMS, where checklists can be defined.
Checklist type Description
Phase 1 Eligibility Check Only used in 2-step-call. Eligibility check of first step.
Phase 1 Evaluation Only used in 2-step-call. Project assessment of first step.
Eligibility Check Eligibility check (second step in 2-step call or first-and-only step in one step call)
Project Evaluation Project assessment (second step in 2-step call or first-and-only step in one step call)
First Level Control Check Checklist for First Level Control, can be answered for each partner report
JTS Progress Report Check Checklist for JTS, can be answered for each project report
Inherent Risk Checklist for FLC, linked to each partner report.
Control Risk Checklist for FLC, linked to each partner report.
MA checklist Checklist for the MA, linked with the project report.
CA checklist Checklist for the CA, linked with the project report.
Reset all answers
If the configuration of a checklist is wrong, the eMS allows to reset the given checklist.
Be aware: this removes all given answers and sets the checklist back to the
initial/empty state! No answers from any user who answered this checklist for this
project will be kept!
This feature can be used as well, if e.g. a wrong checklist was assigned to this call. In
this case, please change the configuration in the call setup and reset all answers
afterwards.
This feature is available to users, who can do the consolidation of this checklist.
Checklist export
In the consolidation view, eMS allows to export the result of an assessment. This
report is template based; it can be adapted to the needs of each ETC Programme.
Before exporting/printing the extracted data to pdf, a preview mode is available,
where changes in the report can be done.

ELIGIBILITY DECISION, RECOMMENDATION,
MC DECISION
63
Eligibility decision, recommendation and MC decision
Eligibility decision
After the eligibility check is finalised, the JS can assign the eligibility decision. The JS
can do it in a list of projects, which is accessible via the ‘Eligibility decision’ menu
item. This list is available separately for the first and for the second step of the 2-Step
call.
Figure 1 - Eligibility decision menu items
The decision is introduces directly on a list of all projects. It is possible to allocate eligibility
decisions for multiple projects at once. The decisions must be saved to be valid.

ELIGIBILITY DECISION, RECOMMENDATION,
MC DECISION
64
Figure 2 - Eligibility decision
If the project gets status ‘eligible’ it moves to the quality assessment list. If the project is ‘not
eligible’ it is archived and cannot be further assessed.
Recommendation
After the quality assessment if finalised, the JS needs to assign recommendations to
applications before they go to the monitoring committee decision stage.
The recommendations are not binding for MC. Recommended projects can be rejected
by the MC and not recommended ones approved, etc.
The recommendations are done in a list similar to the Eligibility decision (see above).
The list is accessible via a ‘Recommendation’ menu item and is separate for the 1st
and 2nd step of the 2-step call.

ELIGIBILITY DECISION, RECOMMENDATION,
MC DECISION
65
Figure 3 - Recommendation menu items
The JS should select from the drop down the relevant recommendation. It is possible to allocate
the recommendations for multiple projects at the same time. In order for the system to take the
allocation, it must be saved. Once saved, the projects will disappear from the list and will move
to the ‘Funding decision (MC)’ list.
Figure 44: First step recommendation

ELIGIBILITY DECISION, RECOMMENDATION,
MC DECISION
66
Needed user rights / privileges
Privilege
RECOMMENDATIONS

ELIGIBILITY DECISION, RECOMMENDATION,
MC DECISION
67
Monitoring Committee decision
Extraction of data for the monitoring committee meeting
eMS allows to export of data for the monitoring committee meeting to Microsoft Excel
format. All data visible in the decision table are exportable.
Figure 45: Export of overview
Next to this, the system allows to generate quality assessment reports for each
application individually. This report can be extracted in the consolidation view of the
quality assessment. The report is template based and can therefore be adapted to the
needs of the Programme.
Figure 46: Quality assessment report
Monitoring committee decision
The decision of the monitoring committee can be inserted into the eMS. Usually this is
done by the JS after the meeting.
The MC decision is recorded in a list ‘First step: Decision’ for the 1st step of the call
and ‘Funding decision (MC)’ for the 2nd step of the call.

ELIGIBILITY DECISION, RECOMMENDATION,
MC DECISION
68
Figure 4 - Funding decision menu items
Possible decisions are:
Approved
Approved under condition
Reserved
Rejected
Postponed (Optional)

ELIGIBILITY DECISION, RECOMMENDATION,
MC DECISION
69
Figure 5 - Funding decision
The values determine the future workflow of the applications. “Approved applications-
” are forwarded to the “handover” phase, “Approved under conditions” opens the
modification procedure of the application form, “Reserved” puts applications on hold
until further decision, “Rejected” closes the application procedure and puts projects
to archive and ‘Postponed’ allows Beneficiaries improving the application form and re-
submit with later call.
Approved under conditions
In many programmes the JS or external assessors assesses the quality of applications
and note conditions which - in their view - should be fulfilled prior to funding. During
the quality assessment of applications (menu item: ‘Quality assessment’) conditions
are first noted down in a specific section of the quality assessment checklist. These
conditions can be modified later (e.g. after the funding decision by the MC).
Figure 47 To add conditions to an application, the quality assessment checklist must first be finalised by pressing ‘Final Check’.

ELIGIBILITY DECISION, RECOMMENDATION,
MC DECISION
70
Figure 48 This opens the interface for entering conditions under which the JS wishes to recommend the project for funding to the MC.
After the assessment of an application has been finalized (menu item:
‘recommendation’), the JS can view again recommended conditions in a pop-up. The
JS can then set the application to be ‘recommended under conditions’.
Figure 49 The JS can choose to recommend applications under conditions and view conditions in a pop-up.
The final decision lies with the MC, which can decide that a project is ‘Approved under
conditions’ (menu item: ‘Funding decision (MC)’). Please note that the MC is free to
take any funding decisions regardless of the recommendations by the JS. Conditions
can be further edited after the MC meeting.
Figure 50 After the MC funding decision, final conditions can be further edited.
Saving the MC funding decision as ‘approved under conditions’ moves the application
to the menu item ‘approved under conditions’. The status of the application is
changed to show that a modification request is in progress.
Opening the application in this view will show details of the ongoing modification
request.

ELIGIBILITY DECISION, RECOMMENDATION,
MC DECISION
71
Figure 51: (JS view) Approving projects under conditions leads to a modification request from the programme to the LP
Caution! Please note that in the ‘Modification Requests Details’ view, the ‘decision status’ is set to ‘accepted’ because a modification request is initiated by the programme and therefore (i.e. by approving a project under conditions) is automatically accepted. This does not mean that the actual modification by the LP is automatically accepted. It just means that the LP can proceed to modify the application without further approvals on the side of the JS.
The LP can enter the application and will then see the same interface as the one
shown above and can access conditions via the interface.
Figure 52: (LP view) Approving applications under conditions leads to a modification request from the programme to the LP and reopens the application form for editing.
The LP then modifies the application and presses ‘check modification’ and ‘submit
modification’ to close the modification.
Check modification calls a validation plugin, which checks the modification according
to pre-defined rules. Via this plugin programmes can e.g. monitor the flexibility rules
and prevent changes which are not allowed by programme rules.
Figure 53: (LP View) To submit a modified AF, the LP must first check the modification and then press submit
The JS reviews the modified application form and sets the status to refused, accepted,
or handed back.

ELIGIBILITY DECISION, RECOMMENDATION,
MC DECISION
72
Refused: terminates the modification process and omits all modifications done by the LP. No new version of the AF is created. The project is rejected and archived.
Accepted: accepts the modifications introduced by the LP and generates a new version of the AF. The project status is changed to ‘approved’ and the project is moved from ‘approved under conditions’ to the ‘handover and contracting‘ section.
Handed back: reopens the AF for further modifications by the LP.
Please note that it is not possible to partially accept modifications (e.g. accept those
in the project summary section but not those in the budget). Modifications are instead
handed back to the LP and the process is repeated until all issues are solved.
Figure 54: (LP View) The JS can decide to refuse or accept modifications or to hand them back to the LP. The compare modification functions opens the track changes functionality
NOTE:
In order to access the messages via the ‘Modification request Details’ shown above, you need to click the small arrow to the right.
In order to access the drop-down and the messages interface you need to click somewhere in the green row.
Needed user rights / privileges
Privilege
PROJECT_DECISION
APPROVE_PROJECT
APPROVE_PROJECT_PHASE1
Handover application to the lead partner
Handover application to the lead partner
Lead applicant handover to the lead partner
After a project is approved and before it can be contracted the lead applicant needs
to hand the project over to the lead partner. This step in the workflow is optional and
can be turned off for the entire programme (cannot be turned off for single projects) –
for details please see below.
After the project is approved, the next time the lead applicant accesses the project,
he/she sees a notification ‘Please hand over the project to the future lead partner’. It
is displayed in the upper right corner of the page.

HANDOVER
73
Figure 1 - Handover notification
The lead applicant needs to access the Handover menu item, by clicking on the left
side on the section “lead partner”.
Figure 2 - lead partner menu
The lead applicant needs to indicate a user name of the future lead partner. The user
needs to be already registered in the eMS. It is possible to indicate his/her own user.
Figure 3 - Handover
The handover needs to be accepted by the JS, only then it is valid. If it is accepted,
the project changes its state to “Startup” and the lead partner can fill out the
Supplementary Information section.
Acceptance of lead partner by the JS
In order for the Handover to be valid, the JS needs to accept the proposed lead
partner. Any user having a privilege ‘JTS’ can access the list of handed over projects
waiting for approval under ‘Handing Over to LP’ menu item.

HANDOVER
74
Figure 4 - JS handover view
The JS can see who the lead applicant was and who is proposed as a lead partner user.
The JS can accept or reject the lead partner.
Figure 5 - Accepting the lead partner by JS
If the JS rejects the proposed lead partner, the entire Handover process needs to be
repeated. The lead applicant needs to propose a different user and request approval
by JS.
Figure 55: Acceptance by JS
After acceptance the lead applicant (if not appointed a lead partner) loses access to
most functionalities of the project. It only keeps read-only access to the version of the
Application Form valid at the moment of Handover. The lead applicant has no access
to the reporting dashboard, cannot see supplementary information and project history
or modification requests.

HANDOVER
75
Skipping Handover
Some Programmes want to skip the Handover as obligatory step in the workflow. It can
be deactivated for the entire programme, cannot be skipped for single projects.
The configuration file “programme.properties” contains a configuration
automaticHandoverToLeadPartner. If this is set to “true”, the handover is skipped for
the users. Technically the system automatically hands over the application form to the
same user as the lead applicant.

CONTRACTING
76
Contracting Logged in as “ADMIN” or as a user with the privilege “MG_CONTRACT”, you can enter
contracting in the section “Handover And Contracting” “Contracting”.
Then you have to choose a project to contract by clicking on it. On the left side there
will be the section “Application And Contract”. By clicking on “Subsidy Contract” you
will enter contracting.
How to manage contracting
In “Subsidy Contract” you will see an overview of the project identification, list of
partners and some important budget summary tables. You can also enter a comment in
the text box and in “Body Issuing The Subsidy Contract”.
It is also possible to print the subsidy contract. After clicking on “print” an html form
of the contract will show up. This form can still be modified before clicking on print
again and creating the contract as pdf.
By clicking “Approve Contract” and confirming it, the project receives the state
“Contracted”.
Projects which are contracted are listed in the section “Handover And Contracting”
“Contracted”

CONTRACTING
77
How to change/adapt the contract template
The contract template is (like any other template in eMS) based on Apache Velocity.
Please check out the “Adaptations” chapter for more details.

SUPPLEMENTARY INFORM ATION
78
Supplementary information Supplementary information represents a way of providing additional data by a lead
partner.
How to insert supplementary information
Needed user rights / privileges
The user who wants to add supplementary information needs the privilege
MG_STARTUP. The user might insert additional information after being approved as
lead partner.
How to insert supplementary information
Supplementary information may be filled in by a lead partner after LP is confirmed by
a JTS. For inserting supplementary information you need to navigate to the section
“Application And Contract” “Supplementary Information” in the left-side Menu.
Supplementary information enables inserting data concerning Project Management,
Bank Information, FLC, User Assignment and Documents.
Figure 56: Supplementary Information
The supplementary information section is not locked. The lead partner is free to
change the information at any time.

SUPPLEMENTARY INFORM ATION
79
How to see and approving changes done in the supplementary information
As the lead partner is always free to change the data in the supplementary
information, eMS allows seeing the changes.
In order to trace what was modified, the JTS can see in a comparing view, which
elements have been changed. Changes can be confirmed by the JTS directly in the
particular section.
Figure 57: Compare changes and confirm

SUPPLEMENTARY INFORM ATION
80
Hiding not used forms for lead partner in supplementary information
The eMS allows to configure, if the lead partner has access to certain sections of the
application form. This configuration hides the respective forms. For example this
might be useful in case your programme has a centralized FLC. You might not need the
FLC section then.
The configuration can be done in a configuration file “programme.properties” by
setting the following configuration elements:
#Project Management subLP_PM=true #Bank Information subLP_BI=true #FLC Requests subLP_FLC=true #User Assignment subLP_UA=true #Documents subLP_DC=true
Setting the properties to “true” makes the respective elemens visible for the lead
partner, “false” hides them. All other tabs are not ment to be used by the lead
partner – only privileged users should get access.
Access restrictions for privileged users
Each section in the supplementary information has read and read/write privileges,
which can be assigned to user roles.
SU_AI_R Additional Information read access
SU_AI_W Additional Information write access
SU_BI_R Bank information section read access
SU_BI_W Bank information section write access
SU_FLC_R FLC section read access
SU_FLC_W FLC section write access
SU_OU_R Output trail section read access
SU_OU_W Output trail section write access
SU_PM_R Project management section read access
SU_PM_W Project management section write access
SU_SA_R State aid section read access
SU_SA_W State aid section write access
SU_UA_R User assignment section read access
SU_UA_W User assignment section write access
SU_CO_R Codes section read access
SU_CO_W Code section write access

SUPPLEMENTARY INFORM ATION
81
Sections available to the lead partner
Project Management
Project Management includes information concerning Project Manager, Financial
Manager of the Project and Communication Manager of the Project. Details on partner
institution and accredited person responsible for the particular position are to be
provided in these sections.
Figure 58: Supplementary information concerning Project Manager
Bank Information
Bank information includes details on the Bank of the Lead Partner such as name and
full address. Further data involve specific bank connection data including Account
Number, IBAN, SWIFT, Nat Bank Code, Internal Reference and Holder of the account.
FLC
Supplementary information contains details on the contact person of the FLC
institution as well as the name and full address of the FLC.
User Assignment
The User Assignment section enables the Lead Partner to assign specific user(s) to all
project partners. Only users assigned to a PP are allowed to create and submit reports
for partner reports.
Documents
In the Documents section, the location of the official project documentation has to be
provided. This information can be entered by a partner.

SUPPLEMENTARY INFORM ATION
82
Sections available to the authorities
State aid
In case of state aid, the authorities can make notes and upload documents. These
notes can be added per partner.
Figure 59: State aid

SUPPLEMENTARY INFORM ATION
83
Outputs
The authorities (usually the JTS) can make notes on the outputs of a project. For
example, they can add the address of the output, upload attachments or mark the
output as available in the final version.
Here they can mark an output as being publishable. eMS does not publish outputs
automatically. But external systems could use this information and e.g. provide the
output on the programme website.
Figure 60: Outputs

SUPPLEMENTARY INFORM ATION
84
Codes
The codes section needs to be filled in by the authorities as well. Here the different
categories of intervention are visible. The different dimensions of codes are visible.
Only the codes are visible, which have been selected in “Manage Programme” under
the priority axes.
Figure 61: Codes

PARTNER PROGRESS REP ORT
85
Partner Report Once a project is contracted, the reporting section becomes available to project
partners. Partner reports cover activities and expenditure of individual project
partners and need to be verified by national controllers (called FLC in the eMS). All
partner reports need to be created for reporting periods as they are defined in the
application form.
Access a partner report
Needed user rights / privileges
Users do not need any special privilege to create and/or submit a partner report. The
access to a partner report is granted via assigning users as partners by the Lead
Partner in the “Supplementary Information” “User Assignment” section.
Lead Partners can access the ‘User assignment’ section of the Supplementary
Information and allocate users. For this, a person/institution needs first to become an
eMS user (for more information please see chapter ‘User creation’). Each partner can
have multiple users and they will all have the same access to the partner report.
Please note that it is possible to also allocate users to the Lead Partner and they will
have access to the Lead Partner report. Those users will not be able to create a
project report as currently only one user (the one accepted by JS in handover phase,
or in case of automatic handover the same as Lead Applicant) has the Lead Partner
role in the eMS.
Figure 62 Partner User assignment – Supplementary Information
User privileges that can be especially useful for reporting by project partners include:
R_FINANCE_REPORT_DETAILS_PROCESSING; gives access to the right-hand side of the financial
report (see below)
R_FLC_CERTIFICATE; allows viewing of the finalised FLC certificate
SU_XX_R; SU_XX_RW; provides write and/or read access to individual tabs of the supplementary
information. XX is a placeholder for abbreviations of supplementary information tabs such as
‘SU_PROCUREMENT_RW’, which provides read and write access to the public procurement tab.

PARTNER PROGRESS REP ORT
86
All privileges need to be assigned to the ‘applicant’ role.
Generating partner reports
Partner reporting technically starts with the signature of the subsidy contract. You can
immediately tell that the status of your project has changed into ‘contracted’ because
the Lead Partner and all other partners, when accessing their project, are
automatically directed to the overview of partner and project reports (‘Reporting
overview’). Previously, before signing, you were directed to the application form.
Figure 63 Reporting overview
It is of course still possible to see the project application form, which is accessible
from the left-side menu under a menu item ‘Project’. This menu item always leads to
the latest approved application form. Older versions of the application form are
available in the ‘project history’.
If a user has multiple roles in the system (e.g. Lead Partner and partner and/or
programme authority at the same time1), it is necessary to select the role from the
dropdown menu at the top of the interface called ‘Select role’.
Please note, Lead Partners must create their own partner reports as ‘PP’, not as ‘LP’. The LP role is exclusively for creating ‘Project progress reports’.
For creating a new partner report, you need to click “Create New Report” under the
table displaying an overview of partner reports. Afterwards, you are redirected to a
partner report corresponding to chosen reporting period.
1 This is a rare case but possible in test environments or in case of TA institutions (e.g. JS user is
a TA project partner and JS at the same time)

PARTNER PROGRESS REP ORT
87
Figure 64 ‘Select role’ drop-down and create new report
Each partner report is given a number that consists of a period number and a report
number.
Figure 65 - Partner report number showing reporting period and report number
Caution! By default, it is possible to create just one report per period, but the JS may allow additional reports for the same period.
It is possible to delete a partner progress report as long as it is not submitted to the
FLC. In order to delete the report, please click on ‘Delete report’ in the report menu
to the left. All users assigned to the partner are able to create and to delete a partner
report.

PARTNER PROGRESS REP ORT
88
Figure 66 Deleting partner reports
Lead partners can view reports of all project partners, once they have been created by
the partner. Lead partners can view also not submitted partner reports.
Figure 67 To view partner reports, lead partners need to select the role ‘lead partner’.
In case the lead partner wants the right to also edit and submit partner reports, the
lead partner user must be added to the partner as a user in the user assignment of the
supplementary information.
Figure 68 To edit partner reports, lead partners need to assign their user in the ‘user assignment’
Filling-in a partner report
Partner reports consist of several sections (i.e. ‘Partner report’, ‘List of expenditure’,
Contribution and forecast’ and ‘Attachments’), each of which must be filled with
information.
Fields in the partner report depend on the application form of the project and are in
line with call setup of the AF (see below for examples).
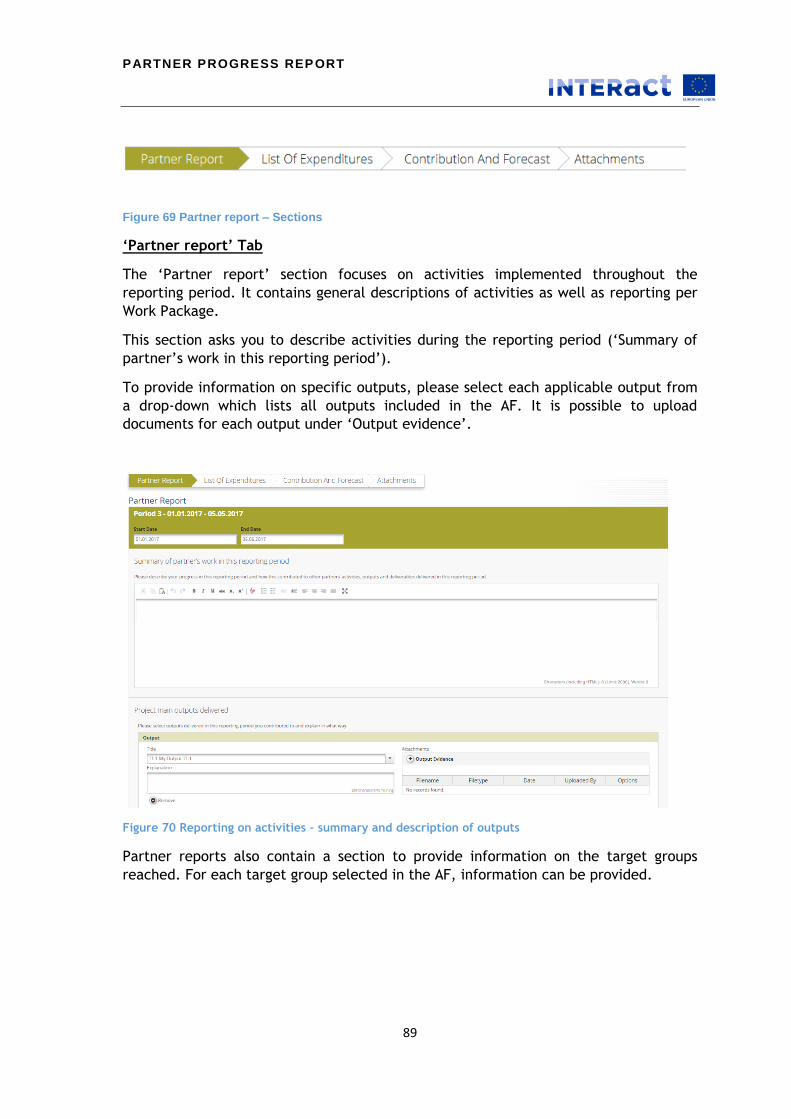
PARTNER PROGRESS REP ORT
89
Figure 69 Partner report – Sections
‘Partner report’ Tab
The ‘Partner report’ section focuses on activities implemented throughout the
reporting period. It contains general descriptions of activities as well as reporting per
Work Package.
This section asks you to describe activities during the reporting period (‘Summary of
partner’s work in this reporting period’).
To provide information on specific outputs, please select each applicable output from
a drop-down which lists all outputs included in the AF. It is possible to upload
documents for each output under ‘Output evidence’.
Figure 70 Reporting on activities – summary and description of outputs
Partner reports also contain a section to provide information on the target groups
reached. For each target group selected in the AF, information can be provided.

PARTNER PROGRESS REP ORT
90
Figure 71 Reporting on target groups – Open fields by pressing ’Add Targetgroup’
Below you can report on individual work packages. The list of work packages depends
on the work packages included in the approved application form. The example report
shown below has the work package management and one implementation work
package. You will see all work packages, even if you have not been assigned to a work
package in the AF.
Reports of individual work packages should contain descriptions of activities, problems
(if any) and information on individual deliverables with evidence in the form of an
attachment.
Deliverables are reported by clicking on ‘Add deliverable’ under the relevant work
package. The drop-down shows all deliverables listed in the AF.
Figure 72 Reporting per Work Package – add deliverable by pressing ‘Add deliverables’

PARTNER PROGRESS REP ORT
91
List of Expenditures (LoE)
Figure 73 Navigation bar – List of Expenditures
Financial reporting is done through the List of Expenditures (LoE) section. Every
programme can decide how detailed partner financial reporting in the eMS should be.
The minimum required by the system is reporting per partner/period/work package
and budget line. The system however supports also reporting on a single invoice level.
Partner and period are determined by the partner report itself (each report refers to
just one partner and one period), the work package and budget line must be selected
for every item in the LoE.
Functionalities of LoE depend on the call setup and application form. If in the call the
programme allows the use of flat rates, lumps sum and/or standard scales of unit
costs, related fields will be activated in the LoE.
Figure 74 Call setup – cost types
If the call options ‘Standard Scales of Unit Cost Invoices’ and/or ‘Lump Sum Invoices’
are activated in the call setup, the system will propose the appropriate input forms.
‘Real cost’ is always available.
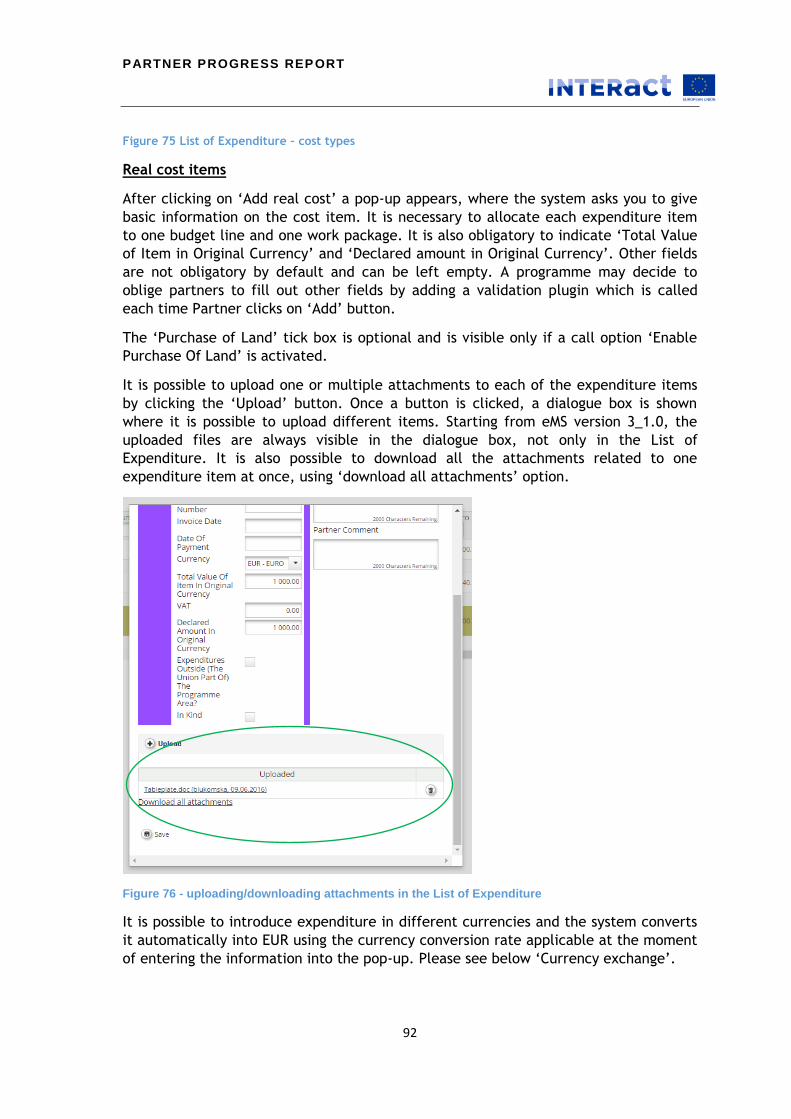
PARTNER PROGRESS REP ORT
92
Figure 75 List of Expenditure – cost types
Real cost items
After clicking on ‘Add real cost’ a pop-up appears, where the system asks you to give
basic information on the cost item. It is necessary to allocate each expenditure item
to one budget line and one work package. It is also obligatory to indicate ‘Total Value
of Item in Original Currency’ and ‘Declared amount in Original Currency’. Other fields
are not obligatory by default and can be left empty. A programme may decide to
oblige partners to fill out other fields by adding a validation plugin which is called
each time Partner clicks on ‘Add’ button.
The ‘Purchase of Land’ tick box is optional and is visible only if a call option ‘Enable
Purchase Of Land’ is activated.
It is possible to upload one or multiple attachments to each of the expenditure items
by clicking the ‘Upload’ button. Once a button is clicked, a dialogue box is shown
where it is possible to upload different items. Starting from eMS version 3_1.0, the
uploaded files are always visible in the dialogue box, not only in the List of
Expenditure. It is also possible to download all the attachments related to one
expenditure item at once, using ‘download all attachments’ option.
Figure 76 - uploading/downloading attachments in the List of Expenditure
It is possible to introduce expenditure in different currencies and the system converts
it automatically into EUR using the currency conversion rate applicable at the moment
of entering the information into the pop-up. Please see below ‘Currency exchange’.

PARTNER PROGRESS REP ORT
93
Figure 77 Adding Expenditures – Real Cost
Flat Rates
If you have Staff cost and/or Office and administration flat rates approved in the
application form, the system will automatically calculate flat rates based on relevant
inputs into the List of Expenditures.
Caution! It is not possible in the eMS to have flat rates for Staff Costs without also having flat rates for Office and administration! Staff cost flat rates should be based on project direct cost and in case Office and administration is reported on real cost basis it can include both direct and indirect cost and the system cannot calculate Staff costs flat rate.
Technically, the system adds artificial flat rate invoices per Work package, calculating
the flat rate percentage from inputs in other relevant budget lines.
Please note, it is not possible to add real cost invoices to budget lines covered by flat
rates. It is also not possible to modify the amount claimed based on flat rates (neither
by project partner nor by any of the authorities verifying the report).

PARTNER PROGRESS REP ORT
94
Figure 78 Adding Expenditures – Flat rates
Lump Sums
If lump sums are activated in the call setup, the ‘Add Lump Sum’ button is available in
the List of Expenditure. After clicking on it, a relevant pop-up appears. You need to
allocate the lump sum to a budget line and work package and indicate the declared
lump sum in EUR. Other fields are not obligatory to be filled out. Similarly to real cost
input form, there can be a validation plugin installed which is called when ‘Add’
button is clicked.
Figure 79 Adding Expenditures – Lump Sums

PARTNER PROGRESS REP ORT
95
Standard Scales of Unit Costs
If standard scales of unit costs are activated in the call setup, an ‘Add Standard Scales
of Unit Costs’ button is available in the List of Expenditure. After clicking on it, the
relevant pop-up appears. You need to allocate costs to a budget line and work package
and give the unit cost in EUR and number of units. Declared amount in EUR is
calculated automatically. Other fields are not obligatory to be filled out but there is
additional field ‘Definition of Unit’ applicable only to ‘Standard Scales of Unit Costs’.
Similarly to real cost input form, there can be a validation plugin installed which is
called when ‘Add’ button is clicked.
Figure 80 Adding Expenditures – Standard Scales of Unit Costs
Additional options
In the LoE you should mark any expenditure spent outside (the Union part of) the
programme area. These will be summed up in the appropriate report summary table
and taken over to project and programme statistics. Please note that it is possible to
change this checkbox also during management verifications, if FLC considers it was
checked incorrectly.
If the call option ‘Budget: Enable In-Kind Contribution’ is activated, the relevant
checkbox is available in the pop-up. In case any of the expenditure is financed as in-
kind contribution, it should be marked in the pop-up when adding the item.
If the programme allows for purchase of land to be eligible cost and the call option
‘Enable purchase of land’ is activated, additional checkbox ‘Purchase of land’ will be
available in all the input forms.

PARTNER PROGRESS REP ORT
96
Figure 81 - additional options in the List of Expenditure
Scrolling the LoE from left to right
The LoE can be scrolled by pressing the middle-mouse-button (press it and move around in the
table). This was already possible previously but feature is hard to detect.
Figure 82 – Scrolling the LoE
Currencies other than Euro
Amounts introduced into the eMS in currencies different than EUR will automatically
be re-calculated into EUR based on available exchange rates of the European
Commission
(http://ec.europa.eu/budget/contracts_grants/info_contracts/inforeuro/index_en.cfm).
The system recalculates the amounts several times – first time when the expenditure
item is created and each time it is modified before submission. The value is updated
when clicking on ‘check saved report’ and once more at the moment of submission of
the report to the FLC. It is not modified ever again, even if the report is reverted to

PARTNER PROGRESS REP ORT
97
the partner and re-submitted the exchange rate from the moment of submission is the
valid one.
Contribution and Forecast
Figure 83 Navigation bar – Contribution and Forecast
In the Contribution and Forecast section, you are asked to forecast spending for the
next partner report and you need to provide information on the financial contribution.
Moreover, in case of in-kind contribution, you are requested to specify the in-kind
contribution.
Figure 84 Spending Forecast
The system calculates the total In-kind contribution reported in the List of Expenditure
(summing up all invoices where the checkbox ‘in kind’ is selected), only the
description should be given by the partner here.
In-kind contribution fields are only visible if the programme allows for reporting in-
kind and the relevant call option is activated.
Figure 85 In-kind contribution
In this section you need to specify the source(s) of partner contribution matching the
ERDF (or other funds). The eMS gives the partner target amount (i.e. the total
contribution calculated by deducting the fund co-financing from total eligible
expenditure introduced in the List of Expenditures). The system proposes the same
sources of contribution as specified in the application form. New sources can also be
added by clicking on the ‘Add contribution’ button.
The total value of contribution from all sources needs to match the target value. The
exact information on sources of partner contribution is necessary to calculate the total
public expenditure at CA level.

PARTNER PROGRESS REP ORT
98
Figure 86 Follow-up of Partner Contribution
Caution! The system has a built-in check, which does not allow submitting a report where the sum of all sources of partner contribution does not match the target value.
Report Attachments
Figure 87 Navigation bar – Attachments
Partners are also allowed to upload additional attachments related to the entire
report. A list of all attachments uploaded in this section is shown here, including
information on who uploaded which document and when.
In order to upload a document, please click on the button ‘Upload’, the upload pop up
will appear.
Figure 88 Report attachments.
Partner Finance Report
Under the ‘Partner finance report’ menu item (left-side menu) you will find various
financial tables summing up the declared expenditure. The tables are updated live
with every new expenditure item.
Please note that ‘Currently reported’ column changes over time. Initially (when you
are preparing the report), it is ‘amount to be declared to FLC’. After submission to
FLC it becomes ‘amount declared to FLC’. It changes into ‘amount certified by FLC’
after the FLC certificate is issued and finally changes into ‘amount included in project
finance report’ once the Lead Partner submits the project progress report with the
relevant certificate to the JS.

PARTNER PROGRESS REP ORT
99
Figure 89 Partner finance report
Tables in the partner finance report have several columns on the right hand side that
require a special user privilege (R_FINANCE_REPORT_DETAILS_PROCESSING)_to view.
Users (e.g. project partners) with this privilege rights, can follow the processing of the
reports through JS, MA and CA.
Figure 90 Partner finance report. The left side is visible to project partners, the right side is only visible with the user privilege (R_FINANCE_REPORT_DETAILS_PROCESSING).
Submitting a Partner Report
Before submitting a partner report, the saved report needs to be checked (analogically
to checking the saved application form prior to submisison) by clicking ’Check Saved
Report‘ in the left-side menu.
Figure 91 Checking Saved Report
When clicking on ‘Check saved report’ a validation plugin is called, where programmes
can set different validation rules to make sure that the report follows the programme
rules. In case some of the rules are not fulfilled, an error message will appear and the
partner needs to correct information.

PARTNER PROGRESS REP ORT
100
Each time a report is saved, it needs to be checked again before submission. Only
after the check is successful, the system will allow for the report to be submitted. The
‘Checked saved report’ button will be replaced with the ‘Submit report’ button.
Figure 92 Submitting checked report
A submitted report is locked and the partner cannot modify it anymore. After
submission, the partner report is forwarded to the FLC of the partner in question. The
partner can see the status of the report on the reporting overview dashboard.
Figure 93 Reporting overview – partner reports in various stages
A new partner report can be opened once the previous one has been submitted. It is
currently not possible for the partner to open more than one report at the same time.
It is however possible that the JS opens another report for the partner, even if there is
already a report open.
Figure 94 Reporting overview – After certification of reports by FLC, a magnifying glass appears to the right of the reports to access the FLC certificate.
Partner living tables

PARTNER PROGRESS REP ORT
101
Partner living tables are financial tables at the partner level that summarise partner
expenditure processed through all partner reports. Like all other living tables (i.e.
project level and programme level), partner living tables grow over time as
expenditure is declared by the project partner and processed by the various
authorities.
You can use living tables to keep an overview on expenditure declared in partner
reports. To access partner living tables, press the button under the partner report
overview table.
Figure 95 Accessing partner living tables
Like financial table of the partner reports, the user privilege
R_FINANCE_REPORT_DETAILS_PROCESSING is needed to view the right hand side of the living
tables. Users (e.g. project partners) with this privilege rights, can follow the processing
of the reports through JS, MA and CA.
Figure 96 Partner living tables: the left side is visible to project partners, the right hand side is only visible with the user privilege (R_FINANCE_REPORT_DETAILS_PROCESSING).

FLC ASSIGNMENT
102
FLC Assignment
General remarks
Countries could have centralised and de-centralised approaches to national controls
(FLC). eMS concentrates on the de-centralised approach, but it can handle the
centralized approach as well.
‘FLC assignment’ in eMS means to assign an FLC Institution and connected FLC user(s)
to FLC Institutions and to project partners. In some programmes this is done by the JS
in others this is done by representatives of the member states or a mix of both. In the
eMS FLC assignment depends on the user privileges.
Currently, FLC assignment works at the level of countries. Therefore, there could be
several “FLC assigning units” in one installation of the eMS.
The general process of assigning FLC to project partners follows these steps:
1) Create a user with the user privilege to manage FLC for one or more countries (MG_FLC_XX).
2) Enter information on FLC institutions and assign FLC users to these institutions.
3) Assign FLC users(s) to project partners.
Create (country-specific) FLC assigning units
Needed user rights / privileges
For each selected NUTS 0 region in the setup of the programme (section “Manage
Programme”), the system generates a separate privilege that allows a user to assign
FLCs to project partners of this country.
Figure 97: Selected NUTS Regions in "Manage Programme"
The generated privileges follow the format “MG_FLC_NUTSID” where NUTSID is
replaced by the two letter country code (e.g. “MG_FLC_AT”, “MG_FLC_HU”). These
privileges can be assigned to different users (like e.g. JS or NCPs).

FLC ASSIGNMENT
103
Users with this privilege usually do not work as FLC so typically they do not get the
FLC role in the system. They only create and manage FLC units for their country.
Manage FLC institutions
FLC assignment users (below referred to as ‘you’) can create/edit/delete FLC
institutions for their country.
In the same interface (see below), you can assign FLC users to FLC institutions. To
assign an FLC user, the user needs to be available in the system first. To see how to
registering or create an eMS user, please see ‘User Creation’. Afterwards, the FLC user
can be assigned to the FLC institution.
Figure 98: Interface for adding FLC institutions and FLC users associated with this institution
Please note that in order to be able to actually fulfil the FLC tasks, the FLC user needs
to have the FLC role with a set of relevant privileges (e.g. FLC). For details, please see
the chapter ‘FLC’.
FLC assignment
This is the process of assigning FLC users to project partners. Each project partner
should have an FLC assigned to in the eMS before the first partner report is submitted
to FLC.
To do this, you can access a table, which shows all project partners from the country
for which this user has the right to assign FLC (i.e. Austria in the example below).

FLC ASSIGNMENT
104
Figure 99: Assigning FLC institutions and users to project partners
You first select an institution from the dropdown list ‘FLC institution’. Naturally only
institutions that were created in the previous step are available now in the drop-down.
When selecting an FLC Institution, all the users assigned to this institution are
automatically assigned to the partner.
If you wish to assign just some of the users, you need to de-select the non-relevant
ones in the ‘assign user’ view.
Figure 100: Assigning FLC users to project partners
FLC assignments are only stored when clicking the save button!

FLC ASSIGNMENT
105
Figure 101: FLC assignments must be saved.
FLC assignment – decentralized FLC systems
In some decentralised FLC systems, project partners can suggest their FLC body.
For this reason, the eMS offers the possibility to allow users (e.g. lead partners) with
the user privilege SU_FLC_W to enter information on the FLC body they suggest to
assign to each project partner. The corresponding interface then appears in the
supplementary information section (‘FLC’ tab). The user privilege needed to be able to
read this information is SU_FLC_R.
This section indicates a wish only and does not result in any direct assignment. To
support assigning FLC, the eMS also shows information on the ‘FLC requested by the
project partner’ in the ‘FLC Institution Assignment Table’.

FLC
106
Management verification – national controls (FLC)
Needed user rights / privileges
Initially FLC users (below referred to as ‘you’) do not need any special user privilege.
The access to a partner report is granted via the assignment performed by the FLC
assigning unit (see Chapter ‘FLC Assignment’). FLC users can only access reports of
project partners that have been assigned to them.
Additional user privileges for FLC can include:
DASHBOARD
SHOW_APPLICATIONS, to view project applications (only those to which the user is assigned)
FLC, to view overview tables and FLC documents
SUBMIT_EVALUATION, to finalise the FLC checklist
FLC_REVERT_REPORT, to re-open a partner report for editing by the project partner
ENABLE_ATTACHMENTS_PAPREPORT, to allow FLC to re-open the ‘attachment’ section of the partner report for uploading of additional attachments by the partner.
ENABLE_ATTACHMENTS_EXPENDITURE_LIST, to allow FLC to reopen the LoE of the partner report for uploading of additional documents by the partner.
More information on these user privileges is provided below.
In addition, programmes can consider providing (read-only access) for FLC to some of
the supplementary information. Read-only access to the ‘Partnership agreement’ and
‘procurements above threshold’ tabs is granted automatically when a user is assigned
to a porject partner as an FLC. For read-only access to other Tabs, the FLC role needs
additional privileges.
Figure 102: FLC can be given (read-only) access to some or all of the supplementary information
Currently the FLC role must be manually assigned to all FLC users.
FLC access to partner reports
After login, you see the FLC dashboard with a list of all projects which have at least
one project partner assigned to you. The dashboard also shows the mailbox and a
calendar. To view the dashboard, the user role needs the privilege DASHBOARD.

FLC
107
Figure 103: FLC users can use the dashboard to access projects
Alternatively, you can also access projects via the ‘my project
partners’ table under the ‘FLC’ item in the left-hand menu. To
view this list the FLC user role needs the privilege ‘FLC’.
A list of all open partner reports (i.e. all reports ready to be
verified) can be accessed via the ‘open FLC partner progress
reports’ menu item under ‘Reporting’. To view this list the user
role needs the privilege ‘FLC’.
Figure 104: FLC users can be given the privilege to see additional overview tables ‘My project partners’ and/or ‘Open FLC partner progress reports’
If you access the project from ‘My project partners’ list, you will be directed to the
partner report section and - where available- reports can be selected. In the example
below, two reports are already FLC certified and one has been submitted to FLC but
not yet FLC certified.
Figure 105: The report overview can be used to access partner reports
If you access the report from ‘Open FLC partner progress reports’, you will be immediately
directed to the report and not to the reporting dashboard of the partner.

FLC
108
Verification of a partner report – List of Expenditure
Selection of a partner report leads to the partner report view. Near the top, Tabs to
access the Partner Report (i.e. content section), the List of Expenditure, Contribution
and Forecasts and Attachments made by the project partner are available.
Figure 106: FLC view – partner report
List of Expenditure - Overview
You can directly access the list of expenditures and verify expenditure items. Items
ticked as ‘Verified by FLC’ are shown in orange.
Figure 107: FLC section of the List of expenditure - Items ticked as ‘Verified by FLC’ are highlighted.
In the ‘List of Expenditures’, you can view all expenditure items. By clicking on an
item, a pop- up window opens in which expenditure can be corrected. Expenditure
items can also be edited directly in the LoE.

FLC
109
Figure 108 FLC corrects expenditure items in a pop-up that can be accessed via the List of expenditure or directly in the LoE.
Both positive and negative corrections are possible in the ‘Difference by FLC’ field.
Since negative corrections are more frequent, the eMS assumes that a correction is
negative. If you want to make a positive correction, please enter the negative amount.
The corrected amount is shown as ‘Amount certified by FLC’.
Any supporting documents uploaded by the project partner can be accessed via the
‘Uploads’ section.
By ticking ‘Verified by FLC’, the item will be included into the FLC certificate.
Caution! If you want an expenditure item to be included into the FLC certificate, the item needs to be marked as ‘Verified by FLC’ (the corresponding checkbox needs to be checked).
For expenditure calculated using Flat rates (Staff costs, Office and Administration),
the difference and certified amount are calculated automatically. They also do not
need to be marked as ‘Verified by FLC’, as they are marked when any other
expenditure is checked as verified. Direct corrections on flat budget lines are not
possible via the List of Expenditure.
Please note that the in case a flat rate is based on multiple expenditure items and
only some of them are ticked as ‘verified by FLC’ the flat rate will split into multiple
items to make sure that only the part of the flat rate referring to the verified items is
included in the FLC certificate.
To make the FLC work easier a ‘Tick all as verified by FLC’ button is available, which
allows you to tick all expenditure items as ‘Verified by FLC’ with one tick.

FLC
110
Figure 109 FLC can tick all items as verified by ticking ‘Tick all as verified by FLC’.
Cuts in original currency
If any of the expenditure to be adjusted was declared in a currency different than
EUR, you may decide to cut it in EUR or cut it in original currency. In order to cut in
the original currency, you need to check the box ‘edit amount in original currency’.
Then you can enter the difference in the original currency and the system will
calculate the difference and the new eligible amount in EUR using the exchange rate
of the time when the item was submitted to the FLC.
Figure 110 FLC (and all subsequent authorities) can cut or increase amounts in original currency.
Caution!
Cuts in original currency are only possible in the single expenditure pop-up. All edits done directly in the
List of Expenditure are by default in EUR.

FLC
111
‘Column Select’ Feature of the List of Expenditure
The List of expenditure is very long as it contains many columns and you might find
one or the other column not to be necessary. Programmes can hide columns globally
(i.e. at the programme level – this option is available in the programme.properties).
You can hide columns locally (i.e. each user can hide columns as needed). For more
information please see the Section ‘Column Selector’).
Please note that some columns are especially useful for FLC to deal with left-over –
not yet verified - items from previous reports (‘Sitting ducks’ – see below) namely:
‘Report Number’ and ‘Date of Certificate’.
Figure 111 Column Selector feature – Date of Certificate
Scrolling the List of expenditure
It is possible to scroll the List of expenditure to the left or right by using the middle-mouse-button (press it and move around in the table). This feature can be used as an alternative to the existing scroll bar.
Uploading documents (LoE Attachments)
Attachments by the project partner are shown in the LoE and in the pop-up. A
‘download all attachments’ button is available to download all attachments associated
with one expenditure item.

FLC
112
Figure 112 Accessing attachments in the LoE
You can add attachments to individual expenditure items. It is clearly visible that it
was added by FLC (see below: user FLCAT added the last attachment).
Figure 113 FLC can upload attachments in the LoE
FLC Documents
The eMS handles the following FLC documents:
FLC expenditure
Partner information
FLC Checklist
FLC Report
Attachments
Risk assessments (inherent and control risks)

FLC
113
Figure 114 In the report view, the FLC documents section can be accessed through the menu to the left.
Checklists included in the FLC Section (i.e. ‘FLC checklist’, ‘Inherent Risk Assessment’
and ‘Control Risk Assessment’) can be defined by Programmes. Interact provided a
script to insert the HIT FLC checklists (i.e. FLC checklists and checklists for ‘inherent
risk assessment” and ‘control risk assessment”) with eMS version 3_0.6. Those
checklists are an optional step in the update and can be inserted with later versions as
well.
FLC Expenditure
This overview table shows – per budget line – how much was declared in the current
report and how much of this was already ticked as ‘verified by FLC’ in the LoE. It can
be used, e.g. to keep track of the FLC work. It can also be used to verify along cost
categories (budget lines) as expenditure items can be opened per cost category via
this view.
Figure 115: ‘FLC expenditures’ shows amounts declared by the partner and certified by FLC per cost category (budget line)
This view is also used to access any open expenditure items from other partner reports
(see Section ‘Sitting Ducks’ below).
Note: the column: ‘Total’ has no use and will be hidden for the default view, it only
makes sense for the ‘sitting ducks view’. It just repeats what is listed under ‘current
report’.
Partner Information
This interface can be used to enter important information about a project partner
such as VAT and bank account.

FLC
114
It is assumed that information entered here does not usually change over time and
information entered once in this section is shown in all subsequent reports as well.
If it does change, however, it can be updated. If updated, the new information will be
shown in all subsequent reports, but not in already submitted reports.
Some or all of this information entered here can be used in the printed versions of the
FLC report or certificate as needed.
Figure 116 ‘Partner information’ shows information that does not usually change over time
FLC Checklists
The FLC checklist is provided by the programme and lists all verifications expected
from national controllers.
The FLC checklist can be defined by Programmes. Interact provided a script to insert
the HIT FLC checklists with the eMS version 3_0.6. Those checklists are an optional
step in the update and can be inserted with later versions as well.
As the HIT FLC checklists contain controls for both real costs and simplified cost
options, programmes will need to delete the parts of the checklist that are not
needed. Programmes can either remove them from the script, so that they will not
appear in eMS, or delete the not needed checklists from eMS in the ‘Manage
Checklists” section.
After executing the script, the checklists appear in the ‘Manage Programme’ section.
The checklists behave like any other checklist – you can add/remove/change questions
or wordings and you need to assign the user privileges to user roles.

FLC
115
Figure 117 ‘FLC checklist’ shows the checklist to be filled in by controllers
In order for controllers to be able to see and edit the checklist, they need to have the
correct user role with associated user privileges:
To do this, administrators first create or import the Checklists in the section ‘eMs
Management’/‘Manage Checklists’. There are three types of Checklists:
FLC Checklist
Inherent Risk
Control Risk
In the section ‘eMs Management’/‘Manage Roles’, administrators define the role ‘FLC’
(or any other name for this role) and assign privileges to see and edit FLC checklists to
this role.
Figure 118 An FLC role must be created and associated with privileges to see and edit checklist(s)
Additionally, the checklists must be allocated to the call for proposals in which the
project applied for funding.
Then, in the section ‘eMS Management’/‘Manage Users’, the FLC role needs to be
assigned to the controllers.

FLC
116
All users with these checklist privileges, can view and edit the FLC checklist (and
checklists for ‘inherent risk assessment” and ‘control risk assessment”).
In order to finalise the FLC checklist, another user privilege (SUBMIT_EVALUATION) is
needed. Checklists on inherent and control risks can be finalised without this privilege.
Figure 119 Checklists should be finalised before submission of FLC work
The privilege to finalise checklists (SUBMIT_EVALUATION) can be assigned to all FLC
roles or just to a separate FLC supervisor role.
Country-specific Checklists
Through these features it is also possible to assign country-specific checklists if
needed. First administrators define the checklists (one for each country). Then - for
each country – they create user roles with privileges to see country-specific checklists
(e.g. FLC_XX, FLC_XY, etc). Then they assign the users to the country-specific roles.
Figure 120 The FLC role must be assigned to all FLC users
Caution! If administrators define country-specific FLC roles, administration of the eMS could become time consuming as each FLC user will need the correct country-specific user role. Also, if there is a separate FLC supervisor role (to finalise the FLC checklist) then management of FLC users will also require more administration.
FLC Report
The section ‘FLC Report’ contains information on the current report. It is assumed that
this information changes over time. The information to be provided in this section
includes Type of report, details on the designated project partner controller,

FLC
117
Methodology of the verification, Description of Findings, Conclusions and
recommendations and follow-up measures for the next partner report.
Figure 121 ‘FLC Report’
Similar to the ‘Partner Information’ section, information entered here is also shown in
subsequent reports in editable form.
Information under ‘Designated Project Partner Controller’ is pre-filled. The eMS
derives this information from the following sources:
FLC institution set-up (see ‘Manage FLC Institution’):
o FLC body responsible for verification
o FLC organization doing the verification
o Address
o Country
o Telephone number
User account of the logged-in user:
o Name of the controller
o Job Title
o Division Unit Department
o Email
It is always the logged-in FLC user shown in these fields. In the FLC certificate, the user that finalized FLC work (submitted) will be shown.
Caution! If you change information in the user account, you need to logout and login again to see these changes also in the FLC report.

FLC
118
After finalization of the FLC work (submission), information in these fields does no longer change.
Attachments
This is a section for FLC to upload documents. Additionally you can upload documents also for individual budget items in the LoE. Documents uploaded here cannot be seen or accessed by project partners.
Inherent risk assessment
This section is used to assess the risks inherent to a project type, a project partner or
types of activities/expenditures. Information entered here will be copied from one
report to the next, but can be changed in each report. Usually changes are only
needed, if something changed in the partnership, the organization, or the activities.
Information entered into this checklist is thus transferred to subsequent reports in
editable form.
The checklist for the Inherent risk assessment is a HIT tool that can be imported and
modified as needed.
Figure 122 Inherent risk assessment
The checklist can be finalized by pressing the button to the bottom left. After
finalization and before submission of the FLC work, it can still be unlocked and edited.
Control risk assessment
The Control risk assessment provides information on the quality of each report. It can
be used as a basis for sampling: If the quality of information in a budget line has been
good in the past, sampling can be justified.

FLC
119
The Control risk assessment is intended to be done with every verification of a report
(last step before submission of the FLC work).
Nevertheless information entered into this checklist is transferred to subsequent
reports in editable form. The purpose of this is to make it easier to view results of the
previous Control risk assessment.
Within the Control risk assessment, quality of the expenditures when originally
reported and quality of the expenditures after clarifications is evaluated and the
number of clarification rounds with the beneficiary are recorded.
The checklist for the control risk assessment is a HIT tool that can be imported and
modified as needed.
Figure 123 Control risk assessment
The checklist can be finalized by pressing the button to the bottom left. After
finalization and before submission of the FLC work, it can still be unlocked and edited.
Open Expenditure Items from Other Reports
Sitting Ducks (open items from previously certified reports)
You can choose NOT to verify an expenditure item (e.g. in case verification takes a
long time or needs further clarification). Any item that is NOT ticked ‘Verified by FLC’,
is NOT included in the current FLC certificate.
This means that – by not ticking ‘Verified by FLC’-, you generate an item that is
neither accepted not rejected and waits in the system to be verified (‘Sitting Duck’).
Sitting ducks can be verified with later reports.
Other open expenditure items (open items from not yet certified reports)
In the eMS it is possible to also access expenditure items from other open reports. If
you have more than one open reports (i.e. submitted to FLC but not yet finalized by
FLC) from the same partner and project, it is possible to see all expenditure items in
one view and certify all items in one Certificate.
To access all open items, go to ‘FLC documents’ and then ‘FLC expenditure’ and tick
‘show all waiting to be verified, including expenditure from other reports’.

FLC
120
Finding out if there are open expenditure items
To find out if there are sittings ducks or other open expenditure items, go to ‘FLC
documents’ and then ‘FLC expenditure’ and tick ‘show all waiting to be verified,
including expenditure from other reports’.
This view shows sums per budget lines:
‘Declared by Partner’ – ‘Current Report’: all items included in the current report.
‘Declared by Partner’ – ‘Other reports (open expenditure)’: all items currently open in other reports (i.e. reports previously finalised by FLC as well as not yet finalised).
‘Total’: Sum of the two above.
In the example below, there are open items from other reports of EUR 1000 in the
budget line ‘external expertise and services’ and of EUR 4000 in the budget line
‘equipment’.
Figure 124 FLC expenditure view – overview by budget line in the ‘show all waiting to be verified including expenditure from other reports’ view.
Accessing open expenditure items
It is possible to view all relevant expenditure items by pressing the magnifying glass at
the bottom left of the table shown above. Items shown in this view are:
Items of the CURRENT report – already verified. (orange)
Items of the CURRENT report – not yet verified. (white)
All not yet verified items from OTHER OPEN reports (i.e. reports submitted to FLC but not yet finalized by FLC). (white)
All not yet verified items from CLOSED reports (i.e. reports submitted to FLC and already finalized by FLC). Sitting ducks (pink)

FLC
121
This means that this view can be used to immediately see if there are any left-over
items from previously certified reports (marked in pink).
Figure 125 LoE accessed via the ‘FLC expenditures’ view - ‘show all waiting to be verified including expenditure from other reports’.
By ticking ‘Verified by FLC’, the item will be included into the FLC certificate.
Caution! Sitting ducks are shown in this view only. If you enter the LoE via the partner report, only items of this report are shown.
Caution! If you want an expenditure item from another report to be included into the FLC certificate, the item needs to be marked as ‘Verified by FLC’ (the corresponding checkbox needs to be checked) AND the button ‘Show all waiting to be verified, including open expenditure from other reports’ has to be ticked when pressing the button ‘Check FLC work’ and ‘Submit FLC work’.

FLC
122
Reopening the Partner Report or the Document Upload Section
Sometimes you might need to receive additional information from project partners for
verification of expenditure. The eMS currently handles three ways of reopening the
partner report for editing:
1) It is possible to re-open only the attachment section of the partner report by clicking on the ‘Attachment upload Closed’ button. As a result, the button turns to “Attachment Upload Allowed”. Now it is possible for the Partner to upload attachments. For this the FLC role needs the user privilege ENABLE_ATTACHMENTS_PAPREPORT.
2) It is possible to re-open only the attachment section of the LoE by clicking on ‘Expenditure attachment upload closed’. As a result, the button turns to “Expenditure attachment upload allowed”. Now it is possible for the Partner to upload attachments. For this the FLC role needs the user privilege ENABLE_ATTACHMENTS_EXPENDITURE_LIST.
3) The entire report can be re-opened for editing by pressing ‘Revert from FLC to PP’. In order to be able to do this, the FLC role needs the user privilege FLC_REVERT_REPORT.
When the entire report is reverted to the project partner, expenditure items already
ticked ‘verified by FLC’ in the LoE cannot be edited by the project partner. Only
expenditure items not yet ticked ‘verified by FLC’ can be edited.
FLC Certificate and Finalising FLC work
You see the pdf of the FLC certificate after pressing ‘Check FLC work’ and then
‘Finalise FLC work’. So there is no need to generate the FLC certificate manually. In
order to access the ‘Check FLC work’ button, you need be in the ‘FLC expenditure’
tab.
Figure 126 The ‘Check FLC work’ button is available in the ‘FLC expenditure’ tab
‘Check FLC work’ runs the error check plugin. Programmes can add error checks to
this plugin according to their needs (see below). eMS has no default error checks for
FLC.

FLC
123
Figure 127 The ‘Finalise FLC work’ button opens the FLC Certificate
The FLC certificate can be edited at this point. Edits will be saved when pressing
‘Finalize FLC work and Issue certificate’. FLC Certificates can also be generated and
printed. Some FLC systems require signing the FLC certificate. The signed FLC
certificate can be uploaded to the eMS in the ‘Attachments’ section.
In order to submit FLC work, you have to scroll down in the Certificate and press
‘Finalize FLC work and issue Certificate’.
Figure 128 The ‘Finalise FLC work and issue Certificate’ button is located at the bottom of the FLC
Error Checks for FLC
eMS has two validation plugins for checking FLC work against errors:
One when editing the LoE entries: The LoE ‘ save’ button triggers a plugin, which can (dependent of the role) include different validations for different users.
A second one at submission of the FLC work (check & submit)
eMS has no default error checks for FLC since requirements differ among programmes.
Depending on what your programmes expects from controllers, useful error checks
could include:
Has the Control Risk Assessment been updated?
Has the FLC Report been updated?
Has the FLC verified at least one item in the List of Expenditures?
…

PROJECT PROGRESS REPORT
124
Project Report Project reports are created by the Lead Partner based on partner reports previously
certified by FLC.
Needed user rights / privileges
Project reports can only be created by the Lead Partner of a project, starting from the
moment the project status is changed to ‘contracted’.
Caution! Currently only one user has the Lead Partner role. Even if more users are allocated to the Lead Partner in the ‘Supplementary information/User assignment’ they do not have the right to create and/or submit the project reports. Such users can only work with partner reports of the Lead Partner. The only user having Lead Partner role is the one accepted by the JS in the Handover procedure or in case of automatic handover the same as Lead Applicant. It is always possible to see which user is the Lead Partner for the project in the ‘Show more’ button at the top of the project/reporting view.
Please see the chapter ‘Handover’ for information on how a user becomes the Lead
Partner of a project.
Generating project reports
Only Lead partners can generate and submit project reports.
After the project has been contracted, the ‘Reports overview’ is the default view
when accessing the project. In order to generate a project report, the Lead Partner
needs to select the role ‘LP’ from the role dropdown. Each Lead Partner has two roles
to select from ‘PP’ for creating own partner reports and ‘LP’. The LP role allows to
see reports of all project partners and to create and submit the project report.
Figure 129 Reporting overview - Generating a project report

PROJECT PROGRESS REPORT
125
If the Lead Partner user is not assigned to other partners as a user in the
supplementary information, he/she can only see reports of other partners and cannot
create, modify, delete or submit them.
All partner reports have statuses from which users can find out if the report was
already certified by the FLC and if yes, whether it was included in the project report.
Lead Partner can access the reports and the certificates of all partners (See Chapter
Partner Report’)
Figure 130 - Partner progress reports overview
For creating a new project report, you need to click “Create Report For” and select a
period for which you wish to create a report. The system redirects you to the project
report corresponding to the selected reporting period.
Each project report is given a number which consists of the period number and the
report number (see example below).
Figure 131 Project Report showing reporting period and report number
Caution! It is currently not possible to have two open project reports at the same time. You can open another report only once the previous one has been submitted to the JS.
It is possible to delete the report only as long as it has not been submitted to the JS.
In order to do this, the Lead Partner needs to click on the ‘Delete Report’ button in
the left-side menu.

PROJECT PROGRESS REPORT
126
Figure 132 Project Report: deleting a report
Filling-in Project Reports
Project reports consist of a financial part and a content part. The financial part is
compiled automatically by the system based on available FLC certificates included in
the project report by the Lead Partner. The content part of the report needs to be
filled out manually by the Lead Partner. It is also possible to upload attachments to a
project report.
Some items in the project report depend on the call setup and approved application
form (e.g. which work packages are available).
Figure 133 Project Report: Sections of the report
‘Report’ Tab
The ‘Report’ section focuses on activities implemented throughout the reporting
period. It contains general descriptions of activities as well as reporting per Work
Package.
This section first asks you to describe activities during the reporting period (‘Highlights
of main achievements’) in this reporting period and to include FLC certificates of
project partners.
An overview of project main indicators (‘project main outputs achievement’) is also
provided (see framed in green below). This table is automatically generated from
information provided in the ‘Workpackages’ section of the report.

PROJECT PROGRESS REPORT
127
Figure 134 Project Report: Top part of the ‘Report’ Tab
You are then asked to provide information on the target groups reached as well as
problems encountered and solutions found.
Figure 135 Project Report: Middle part of the ‘Report’ Tab
At the bottom you will find an interface to provide information on horizontal principles
and a tick box which can be used to indicate that the project has been fully
implemented.
The section ‘reporting per workpackages overview’ can be used to access individual
work packages.

PROJECT PROGRESS REPORT
128
Figure 136 Project Report: Bottom part of the ‘Report’ Tab
Work packages
Reporting per work package is the second part of the project report.
Report sections of individual work packages can be accessed either from the
navigation bar ‘Work packages’ or from the table at the bottom of the page under the
section ‘Report’.
Figure 137 Navigation bar – Work packages
Figure 138 Reporting per Work package Overview table
In this section you can describe the implementation of each work package in detail,
incl. information on activities carried out and contributions by the project partners as
well as information on any problems or deviations from the initial plan.
Here you also provide information on project output indicators and activities and
deliveries. Reporting on deliverables, incl. upload of evidence of achievement is also
part of reporting on work packages.

PROJECT PROGRESS REPORT
129
Figure 139 Reporting on work packages
Adding FLC Certificates to the Project Report
Financial reporting is done based on FLC certificates. All FLC certificates of all project
partners, which were not yet included in any project report, are available to be
included in the project report.
You can decide which of the available FLC certificates to include in the project report
under ‘Include in project finance report’. Only the selected FLC certificates will be
taken into account for project report.
FLC certificates, which are not included in one project report, can be included in
another project report. The eMS does not check whether all the FLC certificates
included in a project report by the LP refer to the same reporting period. This means
that FLC certificates could originate from different reporting periods. It is possible for
programmes, however, to add error checks in the validation plugin.
Figure 140 - Including Partner FLC Certificates in a Project Report
Once the FLC certificates are selected to be added to the project report, they can be
accessed from two places in the project report: navigation toolbar tab ‘Certificates’ or
table ‘List of Partner FLC Certificates’ under ‘Reports’ tab. Under ‘Certificates’ only
those selected will be visible.

PROJECT PROGRESS REPORT
130
Figure 141 Navigation bar – FLC Certificates
You can access individual expenditure items of project partners in the List of
Expenditure (LoE) and decrease the amount of single items if necessary. The LP can
also decrease single expenditure items to zero, which means that the expenditure
claimed by the project partner for this items, will completely be excluded from the
project report.
Figure 142 Editing Expenditures by the Lead Partner
Expenditures can be edited by a Lead Partner directly in the item view form by setting
the difference in the corresponding field (see Figure 9). The values previously inserted
by a partner and by FLC (Budget Line, Work package, Internal Reference Number,
Invoice Number, Invoice Date, Date of Payment, Currency, VAT) cannot be modified
anymore.
Caution! The Lead Partner can only decrease items certified by FLC and cannot increase them.
Caution! If a programme does not allow the Lead Partner to decrease or exclude expenditure of other partners, it is necessary for a programme to implement a validation in the plugin which is called at saving time of the expenditure element or at the validation step before submission of a report.
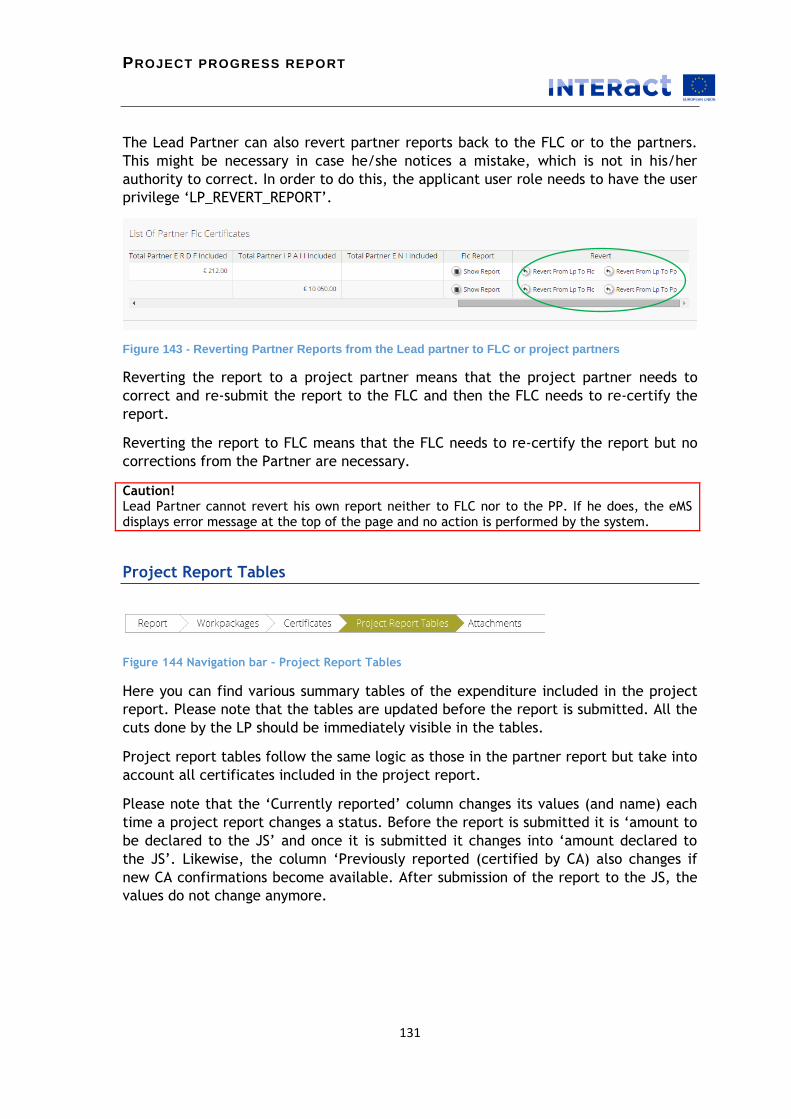
PROJECT PROGRESS REPORT
131
The Lead Partner can also revert partner reports back to the FLC or to the partners.
This might be necessary in case he/she notices a mistake, which is not in his/her
authority to correct. In order to do this, the applicant user role needs to have the user
privilege ‘LP_REVERT_REPORT’.
Figure 143 - Reverting Partner Reports from the Lead partner to FLC or project partners
Reverting the report to a project partner means that the project partner needs to
correct and re-submit the report to the FLC and then the FLC needs to re-certify the
report.
Reverting the report to FLC means that the FLC needs to re-certify the report but no
corrections from the Partner are necessary.
Caution! Lead Partner cannot revert his own report neither to FLC nor to the PP. If he does, the eMS displays error message at the top of the page and no action is performed by the system.
Project Report Tables
Figure 144 Navigation bar – Project Report Tables
Here you can find various summary tables of the expenditure included in the project
report. Please note that the tables are updated before the report is submitted. All the
cuts done by the LP should be immediately visible in the tables.
Project report tables follow the same logic as those in the partner report but take into
account all certificates included in the project report.
Please note that the ‘Currently reported’ column changes its values (and name) each
time a project report changes a status. Before the report is submitted it is ‘amount to
be declared to the JS’ and once it is submitted it changes into ‘amount declared to
the JS’. Likewise, the column ‘Previously reported (certified by CA) also changes if
new CA confirmations become available. After submission of the report to the JS, the
values do not change anymore.

PROJECT PROGRESS REPORT
132
Figure 145 - Project Report Tables
Attachments
Figure 146 Navigation bar – Attachments
It is possible to upload additional attachments relevant for the entire project report.
In order to do so, please use the ‘Attachments’ tab.
Submitting a Project Report
Before submitting a project report, the saved report needs to be checked (analogically
to checking saved projects when submitting the application form) by clicking “Check
Saved Report” in the left-side menu. When clicking this button, the system will call a
plugin where programmes can include validation rules for the project report.
Once the report is successfully checked, it can be submitted by clicking ‘Submit
Report’, which will appear instead of ‘Check Saved Report’ button.
Figure 147 - Checking and submitting project report
The project report is submitted to the JS. The report state is changed from In ’ into
‘Report Submitted’ and a submission date is displayed in the overview table.

PROJECT PROGRESS REPORT
133
Figure 148 - Report submitted
After submission, the Lead Partner can see the report but can’t modify it anymore.
A new project report can be opened once the previous one has been submitted to JS.
More than one project report can be submitted per period.

PROJECT PROGRESS REP ORT MONITORING
134
Project report monitoring (JS)
Access to reports
Needed user rights / privileges
The first authority to monitor the project report is the Joint Secretariat (JS). Typical
user privileges for the JS role during monitoring include:
JTS for accessing JS functionalities in the reporting phase
LP_REVERT_REPORT for reverting the project report to the LP and the FLC
JS_REVERT_REPORT_TO_PP for reverting the report to the PP
ENABLE_ATTACHMENTS_JTS for re-opening the attachment section for additional uploads by the LP.
JTS_ATTACHMENT for attaching internal JS documents
R_FINANCE_REPORT_DETAILS_PROCESSING; gives access to the right-hand side of the financial report (see below)
R_FLC_CERTIFICATE; allows viewing of the finalised FLC certificate
R_ FLC_XX; allows viewing of individual Tabs of the FLC section such as FLC checklist of FLC risk assessments.
SU_XX_R; SU_XX_RW; provides write and/or read access to individual tabs of the supplementary information. XX is a placeholder for abbreviations of supplementary information tabs such as ‘SU_PROCUREMENT_RW’, which provides read and write access to the public procurement tab.
Read/write to privilege for the JS Monitoring checklist.
SUBMIT_EVALUATION to consolidate and finalise the monitoring checklist. Can be used for supervisors for approval of the monitoring work and submission of the report to MA.
PROGRAMME_LIVING; shows the programme-level living table
LOEXP shows a list of all expenditure items of all projects
PROJECTFINANCE_CA; shows a programme-level list of all submitted project reports
How to access project reports
You can enter the project reports in the “Reporting” section of the left-side menu by
clicking on “Open JTS Project Progress Reports”.
All the project reports, which were submitted by Lead Partners and not yet processed
(i.e. finalized) by the JS, are listed here.
By clicking on magnifying glass under ‘View’ column, you will be redirected to the
project report in question.

PROJECT PROGRESS REP ORT MONITORING
135
Figure 149 – Accessing open project reports
Project report monitoring
You can see the report itself, including all the tabs and attachments as well as all the
attached FLC certificates of partners’ expenditure. You can access partner reports in
two places 1) in the Report Tab ‘Certificates’ and 2) as well in the ‘List of Partner FLC
Certificates’ table. You can access and edit the List of Expenditures (LoE) of each of
the partners. The content part of the report cannot be edited by the JS, only the List
of Expenditures can.

PROJECT PROGRESS REP ORT MONITORING
136
List of Expenditures (LoE)
Figure 150 Access to Partner FLC Certificates included in the project report.
When clicking on one of the certificates, you will be redirected to the List of
Expenditure in question.
Figure 151 - List of Expenditure, JS view
You can also open the generated FLC Certificate (pdf template, generated by the FLC
when approving the partner report), by clicking on the ‘Show FLC Certificate’ under
the ‘FLC Certificate’ column of the ‘Partner FLC Certificates’ table.

PROJECT PROGRESS REP ORT MONITORING
137
Figure 152 - Access to the printed FLC Certificate
Figure 153 - printed FLC certificate view
From the general view of the List of Expenditure, you can open any single item
verified by FLC and deduct or add amounts and make comments. It is also possible to
edit the item directly in the List of Expenditure table. You can see all the details of
declared amounts as well as all the cuts done by previous authorities (i.e. the FLC and
the Lead Partner). Only JS columns are editable at this point.

PROJECT PROGRESS REP ORT MONITORING
138
Figure 154 Cuts by previous authorities seen in the main List of Expenditure
Normally expenditure items will be framed in orange colour (see above), indicating
that the items have been verified by FLC. In some cases, an expenditure item can be
framed in pink colour, indicating that the item was originally submitted to FLC in a
different partner report. Please refer to the FLC chapter for more information on FLC
certification.
Figure 155 Pink rows indicate that expenditure items originates from a different partner report
The LoE is a very wide table with many columns. You can hide columns that you do not
need through the column selector feature (see below).

PROJECT PROGRESS REP ORT MONITORING
139
Figure 156 Hiding columns of the LoE
Figure 157 Cuts by previous authorities seen in the single expenditure pop-up
If you find an amount partially or completely ineligible, you can decrease it either in
the pop-up or in the List of Expenditure directly.
It is also possible to increase amounts by entering negative numbers into the
‘Difference JS’ field.

PROJECT PROGRESS REP ORT MONITORING
140
Figure 158 - JS can change amounts in the popup
Figure 159 - JS difference in the List of Expenditure
Please note that flat rates will be adjusted automatically. It is not possible to
manually cut the flat rates.
If any of the expenditure to be adjusted was declared in a currency different than
EUR, you may decide to cut it in EUR or cut it in original currency. In order to cut in
the original currency, you need to check the box ‘edit amount in original currency’.
Then you can enter the difference in the original currency and the system will
calculate the difference and the new eligible amount in EUR using the exchange rate
of the time when the item was submitted to the FLC.
Figure 160 - Cuts in original currency

PROJECT PROGRESS REP ORT MONITORING
141
Caution! Cuts in original currency are only possible in the single expenditure pop-up. All edits done directly in the List of Expenditure are by default in EUR.
Project report approval
Assessment
You can assess and approve the report by filling out a checklist. The checklist is
accessible from the left-side menu item ‘Checklist’.
Figure 161 Access to the JS checklist
The checklist needs to be pre-defined by the programme and have the ‘JTS progress
report’ type. It has to be assigned to a specific call for proposal as well as to the JS
user role. Only if all these conditions are fulfilled, the JS user can see and fill out the
checklist. Please see more information on the checklists in the chapter ‘Checklists’.
Figure 162 Example of a JS checklist
JS approval of Project Report
Once the JS checklist is filled out and all the questions are confirmed, it must be
consolidated by a privileged user (user privilege: SUBMIT_EVALUATION). For more
information please see the chapter ‘Checklists’. Only after consolitdation is done and

PROJECT PROGRESS REP ORT MONITORING
142
confirmed it is possible to finish the JS check. The user who does the consolidation
needs to click on ‘Finish JS check’ at the bottom of the consolidation view to submit
the report to MA.
Figure 163 JS checklist consolidation view with a possibility to finalise the JS check
Caution! The ‘Finish JS Check’ button is only visible if all the question in the consolidated view are confirmed and the checklist is saved.
Figure 164 Submitting the Project Report by JS to MA
After the project report is submitted by the JS (i.e. approved) it disappears from the
list of ‘Open project reports’ and moves to the similar list of the Managing Authority.
Reverting project reports to LP, FLC or PP
If you are not satisfied with the quality of the report, you can revert the report to the
LP, FLC or PP for further improvements. When reverting a report, information already
entered into the JS checklist is not lost, even if the checklist had not been
consolidated prior to reverting.

PROJECT PROGRESS REP ORT MONITORING
143
Reverting the Project Report to the Lead Partner
You can revert the project report to the Lead Partner by clicking the ‘Revert from JS
to LP’ button in the left-side menu. Please note that this menu item requires that the
user privilege ‘JS_REVERT_REPORT’ is allocated to the JS user role.
Figure 165 JS option to revert the entire Project Report to the LP
If a project report is reverted to the LP, it can be modified by the lead partner and re-
submitted to the JS.
Reverting FLC Certificates of single partners to the FLC of the partners or to the project Partner
If you are not satisfied with one or more FLC certificates and find it necessary to
correct the FLC job, you can revert individual FLC certificates to the FLC of the
corresponding project partner. In such a case the FLC needs to modify their certificate
and resubmit it to the Lead Partner. The Lead Partner subsequently needs to resubmit
the Project Report to the JS. You can revert the FLC Certificate to FLC by clicking
‘Revert from JS to FLC’ in the list of certificates (see below). Please note that this
type of reverting requires that the user privilege ‘JS_REVERT_REPORT’ is allocated to
the JS user role.
It is also possible to revert the certificate from the JS directly to the project partner.
In such a case, the partner needs to correct the partner report and resubmit it to the
FLC. The FLC subsequently needs to reissue the certificate and resubmit it to the Lead
Partner, who in turn needs to resubmit the project report to the JS.
You can revert the partner report to the project partner by clicking ‘Revert from JS to
PP’ in the list of certificates (see below). Please note that this type of reverting
requires that the user privilege ‘JS_REVERT_REPORT_TO_PP’. These options are available
in the ‘List Of Partner FLC Certificates’ table in the project report overview.
Figure 166 JS option to revert the Certificate of a project partner to the FLC or to the Project Partner

PROJECT PROGRESS REP ORT MONITORING
144
Reopening the attachment section for the LP
In case you require additional documents to be provided by the LP, but otherwise no
changes to the project report, you can simply re-open the attachment section of the
project report for the LP. For this the user privilege ‘ENABLE_ATTACHMENTS_JTS‘ is
necessary.
Figure 167 JS option to reopen the attachment section of the project report for the LP
Requesting additional project and partner reports
In general, each of the partners is able to generate just one partner report per period.
If needed, you can enable additional partner reports for any of the existing periods. In
order to do this, you open the report overview of the project in question, select the
relevant period and click on ‘Create report for’ in the reporting table of the relevant
partner. The partner is then able to modify and submit the report.
Figure 168 Requesting additional partner reports
Similarly, the Lead Partner is able to create just one Project Report per period. If
needed, the JS can enable additional project reports for any of the existing periods. In
order to do this, you open the report overview of the project in question and select

PROJECT PROGRESS REP ORT MONITORING
145
the relevant period and click on ‘Create report for’. The Lead Partner is able to
modify and submit such a report.
Figure 169 Requesting additional project report

ASSIGN OFFICER
146
Assigning Officers
Assigning an officer to a project
Needed user rights / privileges
For assigning officers to be in charge of individual projects, users (JS/MC/Admin) need
to have the privilege “OFFICER_IN_CHARGE”.
How to assign an officer
Assigning Officers can be entered after selecting the corresponding item in the left
side menu Applications.
Figure 170 Assign Officer Menu Item
Afterwards, you are redirected to the section “Assign Officer to a Project”. First, the
user to be assigned as officer has to be chosen. Afterwards the projects have to be
specified. The process needs to be confirmed by clicking the button “Save Assignment
Changes” on the left bottom of the page.
Only users with assigned “JTS” privilege show up in the dropdown for selection.
Figure 171 Assigning Officer to a Project

ASSIGN OFFICER
147
Browsing the assigned projects
Access to the assigned projects is via the left side menu Applications “My Officer
Applications”.
Figure 172 My Officer Applications - Menu Item
After clicking the corresponding item, you are redirected to the list of “My Assigned
Applications”, where you can see the applications assigned to you.

ASSIGNING EXTERNAL EXPERTS
148
Assigning external experts for quality assessment eMS contains currently no functionality for direct assignment of external experts to
quality assessment. Existing functionalities can be used as a workaround.
Used functionalities
The following functionalities are used in this workaround.
User management
User roles/privileges
JTS assignment
If you wish to read more about the different functionalities, please check out the
specific chapters of this manual.
User privileges needed for external experts
privilegekey Explanation
CHECKLIST_* Every checklist to which the external expert needs access should be assigned
DASHBOARD Access to the dashboard
EVALUATE_PROJECT Allows access to the quality assessment from the “in-project” view
OFFICER_LIST See all personally assigned application forms in “My officer applications”
Workflow to assign external experts
1. Set users “active” checkbox to “false” for users, who should be external expert – the user will not be able to login temporarily.
2. Assign the JTS user role to this user (only with assigned JTS privilege he will show up in the “Assign officer” user list.
3. Assign the relevant projects to this user in the “Assign officer list” section
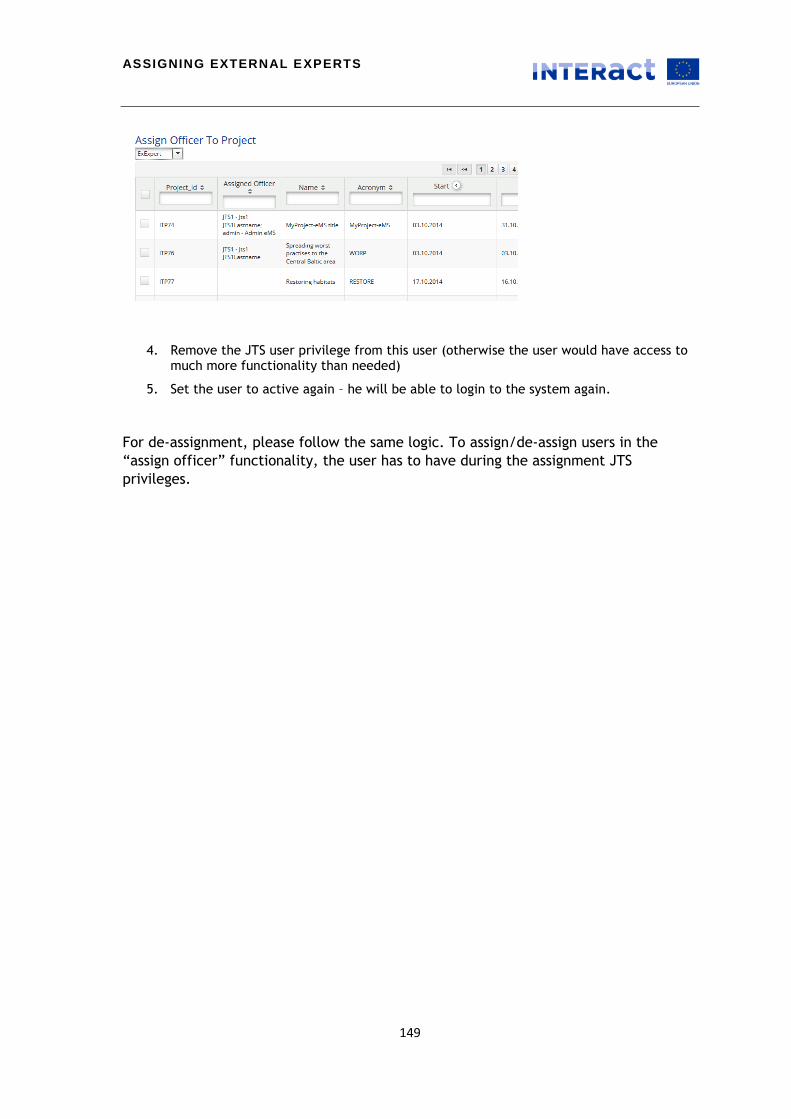
ASSIGNING EXTERNAL EXPERTS
149
4. Remove the JTS user privilege from this user (otherwise the user would have access to much more functionality than needed)
5. Set the user to active again – he will be able to login to the system again.
For de-assignment, please follow the same logic. To assign/de-assign users in the
“assign officer” functionality, the user has to have during the assignment JTS
privileges.

MANAGING AUTHORITY
150
MA Project Report Monitoring
Access to project reports
Needed user rights / privileges
The Managing Authority (MA) is a part of the obligatory monitoring workflow. The
following user privileges are typically used for the MA role during monitoring:
MA is the basic MA privilege
PROJECT FINANCE MA is needed to access to view the list of reports waiting for MA approvals as well as the list of reports already approved by MA. This privilege is also needed to submit reports to CA.
MA_REVERT_REPORT for reverting the report to the JS
R_FINANCE_REPORT_DETAILS_PROCESSING; gives access to the right-hand side of the financial report (see below)
R_FLC_CERTIFICATE; allows viewing of the finalised FLC certificate
R_ FLC_XX; allows viewing of individual Tabs of the FLC section such as FLC checklist of FLC risk assessments.
SU_XX_R; SU_XX_RW; provides write and/or read access to individual tabs of the supplementary information. XX is a placeholder for abbreviations of supplementary information tabs such as ‘SU_PROCUREMENT_RW’, which provides read and write access to the public procurement tab.
Read/write to privilege for the MA Monitoring checklist.
SUBMIT_EVALUATION to consolidate and finalise the MA monitoring checklist. Can be used for supervisors for approval of the MA monitoring checklist. If such a step is not needed, the privilege does not need to be assigned to any MA user.
PROGRAMME_LIVING; shows the programme-level living table
LOEXP shows a list of all expenditure items of all projects
PROJECTFINANCE_CA; shows a programme-level list of all submitted project reports
How to access project reports
You can enter project reports in the “MA Project Progress Reports” section of the left-
side menu by clicking on “MA approvals”. This list shows all project reports waiting for
approval by MA.

MANAGING AUTHORITY
151
Figure 173 MA Access to the Project Progress Reports
Project report monitoring
Under ‘MA Approvals’ all the reports approved by the JS are listed. You can use this
list to access reports, and attached FLC Certificates. You also use this list to approve
reports.
Figure 174 List of all Project Reports waiting for MA Approval
You can access project reports by clicking on magnifying glass in the ‘View’ column of
the overview table.

MANAGING AUTHORITY
152
Figure 175 Access to a Project Progress Report
By clicking on the magnifying glass under ‘View’ column, you will be redirected to the
project report in question. You can view the report itself, including all the tabs and
attachments as well as all the attached FLC Certificates of partners’ expenditure. Via
the FLC Certificates, you can also access and edit the List of Expenditure of individual
partners. The content part of the report cannot be edited by the MA, only the List of
Expenditures can.
Figure 176 MA view of the Project Progress Reports and Partners' FLC Certificates
List of Expenditures
You can access the partner reports and List of Expenditures of individual project
partners either via the tab ‘Certificates’ or a table ‘List of Partner FLC Certificates’.

MANAGING AUTHORITY
153
Figure 177 Access to the Partner FLC Certificates of the project progress report.
When clicking on one of the certificates available in the tab ‘Certificates’ or on any
place in the row listing the relevant certificate in the ‘List of Partner FLC Certificates’
you will be redirected to the List of Expenditure in question.
Figure 178 MA view of the List of Expenditure
You can also open the generated FLC Certificate (pdf template, generated by the FLC
when approving the partner progress report), by clicking on the ‘Show FLC Certificate’
under the ‘FLC Certificate’ column of the ‘Partner FLC Certificates’ table.

MANAGING AUTHORITY
154
Figure 179 - access to the printed FLC Certificate
Figure 180 printed FLC certificate view
In order to verify and possibly edit the expenditure, you need to access the List of
Expenditure of one of the partners. From the general view of the List of Expenditure,
you can open any single item verified by the FLC and approved by the JS and edit it. It
is also possible to edit the item directly in the List of Expenditure table. Only the
fields, which the MA can edit are editable.
You see all the details of declared amounts as well as all the cuts done by previous
authorities (i.e. the FLC, Lead Partner and JS).

MANAGING AUTHORITY
155
Figure 181 Cuts by previous authorities seen in the main List of Expenditure
Figure 182 Cuts by previous authorities seen in the single expenditure popup
If you find an amount to be completely or partially ineligible, you can decrease it
either in the popup or in the List of Expenditure directly.
Figure 183 - difference MA in the popup

MANAGING AUTHORITY
156
Figure 184 - MA difference in the List of Expenditure
Please note that in both cases, if the project has any flat rates they will be adjusted
automatically. It is not possible to manually cut the flat rates.
If any of the expenditures to be cut was declared in a currency different than EUR, you
may decide to cut it in EUR or cut it in original currency. In order to cut in the original
currency, you need to check the box ‘edit amount in original currency’. Then you can
write the difference in the original currency and the system will calculate the
difference in EUR and new eligible amount in EUR using the exchange rate of the time
when the item was submitted to the FLC.
Figure 185 - Cuts in original currency
Caution! Cuts in original currency are only possible in the single expenditure popup. All edits done directly in the List of Expenditure are by default in EUR.

MANAGING AUTHORITY
157
Project Report approval
Assessment
You can fill out a checklist for every Project Report you assess. The checklist however,
is not an obligatory step in the workflow and the report can be approved by the MA
without even opening the checklist.
In order to access the checklist, it needs to be pre-defined by the programme and
have the ‘MA checklist’ type. It has to be assigned to a specific call for proposal as
well as to the user role. Only if all these conditions are fulfilled, the MA user can see
and fill out the checklist. Please see more information on the checklists in the chapter
‘Checklists’.
The checklist is accessible through a pencil icon at the end of the ‘MA Approvals’
table.
Figure 186 Access to the MA checklist
Figure 187 MA checklist view
Once the MA checklist is filled out and all the questions are confirmed, it can be
consolidated by a privileged user (user privilege SUBMIT_EVALUATION) For more
information please see the chapter ‘Checklists’. As the checklist is not obligatory step
in the workflow, there is no need to finalise it and the consolidated view is only saved.

MANAGING AUTHORITY
158
Figure 188 Consolidated view of the MA checklist
Caution! Currently it is not possible to see which of the checklists are filled out, without opening them one by one. In the future, the filled out checklists will be marked with a colour code. Additionally, it will not be possible to modify the checklist after approval of a report.
MA approval of the Project report
In order to approve project reports, you need to check the box in the column ‘Approve
current report’ directly in the ‘MA Approvals’ table. You can approve one or multiple
reports at the same time. Once all the reports to be approved are marked, you need
to confirm the approval by clicking on ‘submit’ button.

MANAGING AUTHORITY
159
Figure 189 Approving Project Progress Reports by MA
Once the report is approved, it disappears from the ‘MA Approvals’ list and can be
found in the other list under ‘MA Project Progress Reports’ menu item, i.e. ‘MA
Approved’.
Figure 190 View of project progress reports approved by MA
Through this view (magnifying galss to the right), you can access the project reports
and relevant FLC Certificates but in read-only mode. Also the checklists are
accessible.
Reverting from MA to JS
If you are not satisfied with a Project Report, you can revert it to the JS by clicking
the corresponding item at the bottom of the left-side menu. In order to do this, the
MA role needs to have the user privilege ‘MA_REVERT_REPORT’.

MANAGING AUTHORITY
160
Figure 191 Reverting the Project Progress Report from MA to JS

CERTIFYING AUTHORITY
161
Certifying Authority Attention This section is currently being revised. Therefore a future version of eMS will contain more/changed functionality.
The Certifying Authority user role should have the following user privileges allocated in
order to be able to access the relevant sections of the eMS:
ARCHIVE
BROWSE_APPLICATIONS
CA
CAN_REVERT_PROJECTSTATE
CA_REVERT_REPORT
DASHBOARD
FINAL_CORRECTIONS
FLC_REVERT_REPORT
JS_REVERT_REPORT
LP_REVERT_REPORT
MAILBOX
MA_REVERT_REPORT
MG_STARTUP
PROGRAMME_LIVING
PROJECTFINANCE_CA
PROJECTFINANCE_PAYMENTCLAIM
REPORTING
SHOW_ALL_APPLICATIONS
SHOW_APPLICATIONS
SU_BI_R
SU_CO_R
SU_FLC_R
SU_OU_R
SU_PM_R
SU_PROCUREMENT_R
SU_SA_R
SU_UA_R

CERTIFYING AUTHORITY
162
CA certification (=CA approval)
CA certification in the eMS is meant as CA approval of reports and financial corrections. It
is NOT the certification in SFC2014! It is simply a step by CA to bundle reports into a
‘Certificate’ and forward them to the next step.
Figure 192 Generating CA Certificates – accessing CA checklists
Verification of a project report
In the section ‘generate CA certificate’ the CA will find a list of all the reports approved by
MA as well as a list of all financial corrections introduced in the eMS (including the closed
ones and the ones which are not closed). The CA can access the reports and financial
corrections from the lists and can fill out a checklist (per report) which is an optional step
in the workflow.
Many CAs use checklists for approving project reports. These checklists can be accessed
directly from the table by clicking the ‘Checklist’ button. They can be filled out and saved.
To see how to create a checklist and allocate it to the relevant user and step in the
workflow please see the chapter ‘Checklists’.
CA has access to the project report and to the List of Expenditure included in each of the
FLC certificates. CA can decide on deducting or increasing some costs. In order to do this,
the CA should open a relevant report and access the certificate in question. From the List
of Expenditure, the CA can open any item and introduce changes. The CA can also see
changes and approvals done by all the previous authorities.
Note on financial corrections by CA: The CA will typically correct reports that have not yet
been included into a CA certificate via the interface shown below (List of expenditure). At
later stages (e.g. expenditure already included in a payment application to EC), the CA
uses the financial corrections interface (for more information please see the chapter
‘Financial Corrections’).

CERTIFYING AUTHORITY
163
Figure 193 List of expenditure – Interface for financial corrections by CA
If necessary, the CA can also revert a report to MA or JS for further verification. In order to
do this a following user privileges need to be assigned to the CA user role:
JS_REVERT_REPORT and/or MA_REVERT_REPORT. You will see these options in the left-side
menu of a project report.
Figure 194 CA has the option to revert reports to MA or JS. This re-opens the report for these authorities.

CERTIFYING AUTHORITY
164
Closing Financial Correction/Control
In order to include a financial correction in the CA certificate, the CA needs to close the
control first. Please note that the entire control is included in the certificate and not
single findings. For more information on financial corrections, please see the relevant
chapter of the manual.
Only CA can close a control. The CA can access the financial correction module directly from the ‘Generate CA certificate’ view by clicking on ‘View control’ in the relevant row of the Financial corrections table.
Figure 195 Generating a CA certificate – Controls need to be ‘closed’ before the can be included in the certificate
CA should check the control and all relevant findings, fill out missing data and then click on ‘Close’ tick box in the control section. Closed corrections cannot be modified unless they are re-opened. It is possible to re-open the control only as long as it is not included further in the workflow, i.e. in the CA certificate.
Figure 196 Financial Corrections Interface – Closing Corrections

CERTIFYING AUTHORITY
165
Generation of a CA certificate
In order to include one or more project report(s) in the CA certificate, the CA user needs
to select the relevant report(s) from the list and click on the ‘submit’ button. The
report(s) will disappear from the current list. Please note that also financial corrections
need to be included in a CA certificate. CA certificates can therefore contain:
One or more project reports
One or more financial corrections
Project reports AND financial corrections
Figure 197 Generate CA certificate – Submission button
Please note that – in case of financial corrections via adjustment of subsequent payments
to projects (i.e. correcting sums to be paid to projects), CA certificates must contain a
report AND a correction of the SAME project partner.
Note on multi-fund: Please note that CA certificates are multi-fund so in case one report
contains partner reports of multiple funds (e.g. ERDF and IPA), ALL funds will be selected
at the same time to be included into one CA certificate. At later stages (‘Payment to
projects’, ‘Payment applications to EC’ and ‘Accounts for the accounting period’ as well as
all the tables related to irregularities) all figures are shown separately for each of the
funds. It is possible to decide at a later stage to e.g. payout one fund to the project but
not the other.
All the generated certificates can be accessed through the ‘CA certificates’ menu point.

CERTIFYING AUTHORITY
166
Figure 198 Overview of CA certificates – The table shows all CA certificates that exist in the system.
Existing CA certificates can be destroyed by clicking on ‘Destroy CA certificate’ button.
Please note that CA certificates can only be destroyed IF they are not included further in
the workflow. If the CA certificate is destroyed the reports and controls appear again in
the list under ‘Generate CA certificate’ section and can be included in a new CA
certificate.
Details of CA certificates can be displayed by clicking on ‘View CA certificate’ column.
All the checklists saved when generating a CA certificate are accessible here, by clicking
the ‘Checklist’ button next to the relevant project report.
Figure 199 Details of CA certificates – Accessed via the ‘Overview of CA certificates’ interface

CERTIFYING AUTHORITY
167
Payment to projects
After the generation of a CA certificate, the CA should introduce information on payments
to projects. The actual payment is carried out outside of the system (i.e. the eMS does not
handle payments like a banking software would) but basic information about payments
need to be entered in the eMS. The list of CA certificates paid/to be paid is available
under ‘payments to projects’ menu item.
Figure 200 Payments to Projects Overview – Table shows all reports already paid as well as to be paid
Note on Priority axes co-financing: The overview of payment to projects shows two values
for co-financing for each fund. In the case of ERDF this is:
‘ERDF partner co-financing’: The ERDF value calculated based on the actual co-financing
rates of the partners. This value is needed as it shows the actual amount to be paid to the
project.
‘ERDF priority axes co-financing’: The ERDF value calculated based on the co-financing rate
of the priority axes. This value is shown here for informational purposes as SCF calculates
reimbursements to programmes on the basis of priority axes.
In case a programme applies the priority axes co-financing rate to all projects in a CA
certificate, the two ERDF values mentioned above are the same for this CA certificate.
Each CA certificate is listed separately and in order to modify or view payment details
please click on ‘View payment details’ button.
In each ‘Payment to project’ interface all the project reports included in a Certificate are
listed separately and shown per partner. Payment information must be introduced per
partner even if programmes are usually paying the Lead Partner only.

CERTIFYING AUTHORITY
168
Figure 201 Payments to Projects – Table shows all reports included in the CA certificate per partner
It is possible to either pay in full the due amount (it is currently the default option) or to
pay in installments. If the project is paid in full, the CA needs to introduce a date of
payment and save the information.
Figure 202 Payments to Projects – Payment in full
In order to record data on payment in installments please unclick ‘paid in full’ and click on
‘add installment’ button.
Figure 203 Payments to Projects – Unclicking the ‘Paid in full’ button opens the option to pay in instalments

CERTIFYING AUTHORITY
169
The system proposes the full amount as the first installment, which can be modified. It is
possible to add installments as long as the full amount is not reached. Each time an
installment is added, the system proposes the remaining amount as the payment value.
Figure 204 Payments to Projects – Paying in instalments
Handling financial corrections in ‘Payments to projects’
If there are any financial corrections included in the CA certificate they will be handled
also in the ‘Payment to projects’ section. There are two ways to handle financial
corrections at the project level:
1. Adjustment in the next ERDF payment: This means that the error will be corrected by
adjusting a subsequent payment to the project partner.
2. Repayment by the project: This means that the amount to be corrected will be shown in the
‘payment to projects’ interface as a separate item. Negative amounts to be corrected will
not be automatically deducted from any positive amount.
Please note that financial corrections can be negative (and most frequently are) or positive
(e.g. in the case of advance payments to projects – see the chapter ‘Financial corrections).
So technically the ‘repayment by the project’ could also be a payment by the programme
to the project.

CERTIFYING AUTHORITY
170
The way the financial corrections are handled at the ‘Payments to projects’ module
depends on the action selected in the ‘Financial correction’ module as well as the way the
CA certificate is generated:
If ‘adjustment in the next ERDF payment’ is selected in the ‘financial corrections’
interface, the system will do the following:
1. The eMS will first check if the affected invoice(s) are included in the same CA certificate. If
it finds the relevant invoice(s) in the same certificate, it will decrease/increase the amount
to be paid to the partner accordingly. Please note that currently it is not marked that the
amount to be paid was adjusted, the system just shows an amount different to the one
claimed in the project report.
2. If there is/are no corresponding invoice(s) OR the financial correction does apply to a
project partner (and not to single invoice(s)), the system will check if there is a project
report included in the same CA certificate, which includes the affected project partner. If it
finds the partner in a project report, the amount to be paid to this partner will be adjusted
by the amount to be corrected. Please note that currently it is not marked that the amount
to be paid was adjusted, the system just shows amount different to the one claimed in the
project report.
3. If there is no corresponding invoice or corresponding partner in the same CA certificate, the
system will generate a separate negative (or positive) payment entry. This means that
technically a repayment situation is created even though the ‘adjustment in the next ERDF
payment’ option is ticked in the financial correction interface.
If ‘repayment by the project’ or any action other than ‘adjustment in the next ERDF
payment’ is selected in the ‘financial corrections’ interface, the system will generate a
separate negative (or positive) payment entry in all cases. This means it will do so even IF
it finds a matching invoice item or partner report in the same certificate.
Repayment similarly to all other payments can be done at once or in installments.
Figure 205 Payments to Projects – Financial corrections are shown separately in case ‘repayment by the project’ is ticked in the financial corrections interface OR in case ‘adjustment in the next ERDF payment’ is chosen but no partner report is found in the same certificate from which the amount could be deducted.
Once all reports and/or financial corrections from a certificate are paid / repaid, the CA
can close the payment by clicking the ‘Close ERDF’ button. In case a certificate contains
multiple funds, it is possible to close payments of each fund separately. In such a case a

CERTIFYING AUTHORITY
171
‘Close XXX-fund’ button appears for each of the funds in question. Once a payment is
marked as closed it is not possible to modify it anymore. However, the payment can be re-
opened for further modifications if needed by clicking ‘Reopen ERDF’ (or ‘Reopen XXX-
fund’ in case of multiple funds) as long as the CA certificate is not included further in the
workflow, i.e. is not in the payment application to EC.
Please note that if you do not close the payment, the CA certificate will not be shown as
fully paid later in the workflow.
Please note also that it is possible to include the CA certificate in the payment application
to EC regardless of the payment to project status. Many CAs first pay the project partner
and then include the amount in the payment application to EC. Since there could be
exceptions, the eMS does not require payments to projects prior to including the amount in
the payment application to EC.
Caution! Only full CA certificates are taken into account for the payment application to EC and therefore even if the project is paid just partially (e.g. in case of payments in installments or withholding of one partner share) the system will calculate the entire amount for the payment application to EC.
Generate Draft Payment application to EC
In the eMS the generation of payment applications is subdivided into two steps namely:
Generation of draft payment applications
Selection of final payment application
In the menu item ‘Generate Draft Payment Applications to EC’ the CA can select one or
more CA certificates to be included into draft payment applications to EC. It is possible to
generate multiple drafts: The CA certificates do not disappear from the list and can be
included in many drafts at the same time.
Figure 206 Generate Draft Payment Applications to EC – List of CA certificates waiting to be included
Note on multi-fund: In multi-fund programmes, CA certificates are divided per fund and
each fund is treated separately. For each fund a separate table is displayed.

CERTIFYING AUTHORITY
172
Please note that CA certificates contain also financial corrections and the CA needs to
decide on how to include them in the payment application to EC (withdrawal or recovery).
1. Withdrawal: If the payment application to EC contains project reports AND financial
corrections at the same time, the system deducts the total of all corrections from the total
of all reports and decreases the payment application to EC. In such a case the amount of
the financial correction is withdrawn.
2. Recovery: If the payment application to EC contains financial corrections only, the payment
claim to EC is negative and the programme needs to pay back the amount. In such a case a
financial correction is recovered.
The steps described above technically lead to a withdrawal or recovery. Whatever is
chosen does NOT automatically lead to correct reporting on ‘amounts withdrawn or
recovered during the accounting year’ according to Article 137(1)(b) of 1303/2013. In order
for amounts to be included in the tables on withdrawals or recoveries (see below) they
must be marked in the ‘financial corrections’ interface as ‘to be reported to EC’. For each
irregularity that must be reported to EC it is necessary to tick whether it is recovered, to
be recovered, withdrawn, recovered according to Article 71 or irrecoverable (see chapter
‘Financial corrections’).
Draft payment applications to EC
The ‘Draft payment application to EC’ menu item shows a list of all generated draft
payment applications to EC. CA can analyse different draft payment applications to EC and
choose one to accept and create the final payment application to EC (i.e. press: ’Create
payment application to EC’ below the selected draft).
Figure 207 Draft Payment Applications to EC – List of all available drafts, one of which is selected for further processing
Once a draft is accepted (and accordingly all included CA certificates), all included CA
certificates are removed from the list in ‘Generate draft payment application to EC’ and
can no longer be included in new drafts. Also, once a draft is accepted (and accordingly all

CERTIFYING AUTHORITY
173
included CA certificates), it is no longer possible to accept also other drafts that contain
overlapping CA certificates
After accepting one of the drafts, it is recommended to remove all other drafts by clicking
on ‘Remove all payment application drafts’.
Payment applications to EC
After the payment applications to EC are generated (i.e. at least one draft is accepted),
the Programme should transfer the information to the Commission via SFC2014.
Information on the SFC2014 transfer (date, number and comments) should be entered into
the eMS and saved. It is also very important to select in which accounting year the
payment application to EC was submitted to SFC2014.
Please note that if you do not select any of the available accounting years, the CA
certificate will not appear in the list ‘Generate draft accounts for the accounting period’
as the system will not be able to allocate it to any of the periods.
Figure 208 Payment Applications to EC – Some information from SFC as well as the accounting year concerned must be entered into the eMS
For information purposes the system shows all payment applications to EC also broken
down per type of cost (real cost/flat rates/lump sums/standard scales of unit cost). The
data is taken from project reports. In case programmes do not allow for some of the types
of costs or none of the projects is using simplified cost options, the corresponding columns
in the tables will remain 0 EUR.
Please note that all the figure reported to EC are total expenditure as SFC automatically
applies the priority axes co-financing rate to calculate the actual amounts to be
transferred to the programmes. Accordingly eMS tables also show total amounts.
In case a mistake was made, the CA can destroy the payment application to EC by clicking
the ‘Destroy’ button. The payment application to EC can be destroyed as long as it is not
included in the accounts for accounting period. Destroying always reverts the action by one
step; therefore destroyed payment applications will become drafts again.

CERTIFYING AUTHORITY
174
Generate draft accounts for accounting period
In the eMS the generation of accounts for the accounting period is subdivided into two
steps namely:
Generation of draft account for the accounting period
Selection of final account for the accounting period
In the screen shot below all payment applications are shown according to accounting year.
Please note that in case you did not allocate any accounting year to your CA certificate, it
will not be shown in any of the lists. The example below shows the accounting period
01.01.2014 to 30.06.2015. The CA selects one or more payment applications to EC from a
relevant accounting year and generates a draft account for the accounting period.
Figure 209 Generate draft accounts for the accounting year – All available payment applications to EC are shown per accounting year
It is possible to create multiple drafts including the same payment applications to EC. The
payment applications to EC are available for draft generation as long as they are not
included in a final account for the accounting period.
Please note that at this point in the workflow, it is also possible to add additional
financial corrections, which might be necessary prior to closing the account for the
accounting year. For this reason, the eMS shows a list of all financial corrections that were
not previously included in any CA certificate and payment application to EC. These
financial corrections are shown in a separate table. Similar to the ‘Generate CA
certificate’ interface, only corrections which are closed can be selected from the list.
Caution! Currently financial corrections added at the level of accounts for the accounting period are NOT linked to the payment application to EC or the payment to projects parts of the workflow nor are they reflected in the reports on withdrawals, recoveries, recoveries according to art. 71, amounts to be recovered or irrecoverable amounts. It is our understanding that there needs to be the option

CERTIFYING AUTHORITY
175
to include financial corrections prior to closure of the accounts but links to other parts of the workflow are presently unclear.
Draft accounts of the accounting period
In the ‘Draft accounts for the accounting period’ menu item a list of draft accounts is
shown. There could be several drafts including different applications of payment to EC and
different financial corrections. CA selects the draft which should become the final and
approves it by clicking ‘Generate Final Account for the Accounting Period’.
Figure 210 Draft accounts for the accounting year – A List of all available drafts, one of which is selected for further processing
It is possible to accept drafts only as long as the payment applications to EC are not yet
included in the final account for accounting period. Once a draft is accepted, the related
payment applications to EC are removed from the list in ‘Generate draft account for
accounting period’ list.
After accepting one or more of the drafts, it is recommended to remove all other drafts by
clicking on ‘Remove all accounts drafts’.

CERTIFYING AUTHORITY
176
Accounts for the accounting period
Under the ‘Accounts for the accounting period’ menu item, you will find a list of all
accounts generated. As there is no direct link to SFC2014, information from SFC2014 on the
date of submission of the accounts must be entered in the eMS manually.
Figure 211 Accounts for the accounting period – Some information from SFC must be entered into the eMS
In case a mistake was made, the CA can destroy existing accounts for the accounting
period by clicking the ‘Remove account’ button. Destroying always reverts the action by
one step, therefore removed accounts will become drafts again.

CERTIFYING AUTHORITY
177
Payments from EC
Under the ‘Payments from EC’ menu item, information on payments received from the
European Commission should be entered. The system is not linked to a programme banking
system so the transfers are executed outside of the eMS. The CA should just record
information about received funds.
Figure 212 Payments from EC – Interface to enters received payments
The payments from EC are stored separately for each of the funds. Once a payment from
the EC is received a CA should click on ‘Add payment from EC’ button and introduce
information about the payment.
There are several types of payments from European Commission and based on the type
selected more or less information can be introduced into the table.

CERTIFYING AUTHORITY
178
Figure 213 Payments from EC – Types of payments can be specified in a drop-down
If a type ‘interim payment’ is selected, additional fields appear in the form and you should
select a payment application to EC based on which the payment was made. The system will
automatically show the date of submission of the payment application to the SFC2014 and
requested amount.
Please note that currently the requested amount is a total amount of the payment
application to EC and not the fund amount so the actual payment will be lower. This will
be changed in the next release.
Figure 214 Payments from EC – Interim payments can be linked to payments applications to EC

CERTIFYING AUTHORITY
179
Accounting year overview reporting on withdrawals, recoveries, recoveries according to art. 71, amounts to be recovered and irrecoverable amounts.
Financial corrections marked as ‘To be reported to EC’ are allocated to one of the 4
reports covering 5 categories (withdrawals and recoveries, recoveries according to art.71,
amounts to be recovered and irrecoverable amounts). In order to do that the system needs
to know certain information from the financial correction input form.
In order to include an amount into one of the 4 reports on irregularities, the amount to be
corrected must have been included in a previous payment application to EC. If a correction
is for an invoice, the system suggests in which CA certificate the amount was previously
included. In case of flat rate cuts, the user needs to manually allocate the relevant
certificate.
Figure 215 Financial Corrections Interface – CA certificates that include the error need to be manually selected if the correction is not at an invoice level.
Once a certificate is selected, the system will display all relevant information and the tick
box ‘To be reported to EC’ will become active. When the tick box is selected, a drop down
menu with possible actions on programme level will appear (withdrawal, recovery,
recovery according to art.71, amount to be recovered, irrecoverable). The CA should
select whatever is applicable.
Figure 216 Financial Corrections Interface – Selecting the programme level table which will show the irregularity.
Once the CA certificate with the correction is included in annual accounts, the system will
automatically allocate the correction to the relevant report based on the action selected.

CERTIFYING AUTHORITY
180
The system will also know in relation to which year the correction occurred. All the reports
can be found in the left-side menu and are accessible per accounting year (see below).
Caution! As mentioned above, ticking a correction as ‘withdrawal’ does not automatically lead to a withdrawal. For a withdrawal to be enacted, the eMS must find a correction as well as a positive amount in the same payment application to EC. Otherwise there is no amount from which the system could withdraw the irregularity.
Figure 217 Withdrawals and Recoveries – Programme-level tables on withdrawals and recoveries per accounting year can be accessed via this interface

CERTIFYING AUTHORITY
181
Figure 218 Withdrawals and Recoveries – Programme-level tables for an accounting year
Currently additional information on amounts corrected as a result of audits on operations
needs to be filled out manually by the relevant authority. It is presently unclear if they
could be generated automatically.
List of all financial corrections
A list of all financial corrections that were entered via the financial corrections interface is
available under the ‘Financial corrections’ menu item. It is possible to view the details of a
financial correction as well as details of the CA certificate in which it the error was
included (if available). Financial corrections that are part of the normal reporting
workflow (cuts by different authorities using the List of expenditure) are not shown in this
table. They can be viewed in the List of expenditure.
Figure 219 Financial Corrections – Programme-level tables showing all financial corrections that were entered via the financial corrections interface

FINANCIAL CORRECTIONS
182
Financial Corrections
Attention This section is currently being revised. Therefore a future version of eMS will contain more/changed functionality.
The (financial) corrections module allows corrections to already submitted, processed
or paid project reports.
The financial corrections module can be used to:
Store data on different controls and audits with or without financial impact.
Store data on individual findings. Typically the JS will introduce information on
(financial) corrections into the eMS using the (financial) corrections module.
(Financial) corrections can be associated – for example - with audits or Commission
audits or many other reasons.
For each control/audit one or many ‘findings’ can be introduced into the system. The
total value to be corrected results from the sum of all findings.
Figure 220 Each control/audit is given a sequential number and can be associated with ‘findings’
Needed user rights / privileges
A user who wants to work with Financial Corrections currently must have the ‘JTS’,
‘MA’ or ‘CA’ user privilege.
It is possible to introduce financial corrections to a project, which was already
finalized. In order to do this, a programme authority (MA, JS or CA) needs to have tht
user privilege ‘Final corrections’ allocated.
Introducing a (Financial) Correction
Any user having the user privilege ‘JTS’, ‘MA’ or ‘CA’ can add a (financial) correction
to any project which is in the status ‘contracted’ or any later status. ‘Finalized’
projects can also be corrected (i.e. financial corrections are possible also after the
project is closed) but the user needs additional privilege to do this (see above).
Control/audit 1
Finding 1-1 Finding 1-2 Finding 1-3
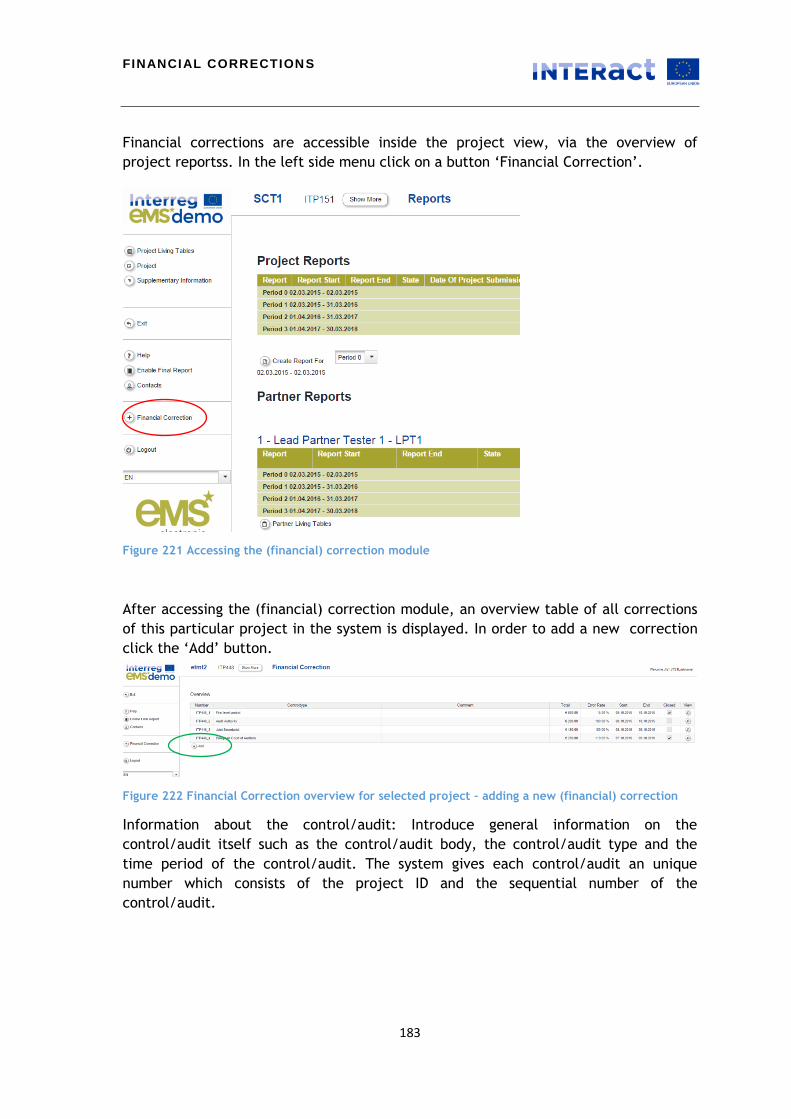
FINANCIAL CORRECTIONS
183
Financial corrections are accessible inside the project view, via the overview of
project reportss. In the left side menu click on a button ‘Financial Correction’.
Figure 221 Accessing the (financial) correction module
After accessing the (financial) correction module, an overview table of all corrections
of this particular project in the system is displayed. In order to add a new correction
click the ‘Add’ button.
Figure 222 Financial Correction overview for selected project – adding a new (financial) correction
Information about the control/audit: Introduce general information on the
control/audit itself such as the control/audit body, the control/audit type and the
time period of the control/audit. The system gives each control/audit an unique
number which consists of the project ID and the sequential number of the
control/audit.

FINANCIAL CORRECTIONS
184
Figure 223 (Financial) Correction Interface – Saving the control/audit
Please note that the ‘close’ tick box can be activated only by CA users and remains
inactive for JS and MA users. The fields ‘Total ineligible expenditure’ and ‘Error rate’
are calculated automatically based on information given in findings.
It is possible to upload attachments (e.g. control reports or letters sent to
beneficiary). In order to upload a file you need to save the control first by pressing the
‘Save’ button (see green circle).
Once the control is saved an upload function is activated and can be accessed through
the ‘Attachments’ hyperlink.
Figure 224 Financial Corrections Interface – Adding attachments
Clicking on the ‘Attachments’ button will activate the upload form. You may upload
multiple documents and see all the files uploaded before.

FINANCIAL CORRECTIONS
185
Figure 225 Financial Corrections Interface – Uploading files
Caution!
Attachments are only visible and accessible in the dialogue box ‘Attachments’. It is
not possible to see if there are any attachments for the control without clicking on
‘Attachments’ button.
Adding findings
Each control/audit can contain one or several finding(s). It is possible to add multiple
findings to one control and the system will sum up the total financial impact of a
control. Findings are added by clicking the ‘Add Finding’ button.
Findings usually have financial impact on the project. If you want to add a finding
without financial impact, we recommend to open a new control and do NOT add
findings.

FINANCIAL CORRECTIONS
186
Figure 226 Financial Corrections Interface – Add individual findings
The system gives each finding a unique number. The number consists of the project ID,
control number, partner number and sequential number of the finding.
A finding usually is recorded for a single invoice. Should it not be possible to assign a
finding to single invoice, a finding must at least be associated to the projectpartner,
budget line, work package and period. This information is necessary to make overview
tables of the eMS work (e.g. total spending per budget line).
Findings per invoice
If a finding affects one single invoice, please tick the box ‘For Invoice’. The system
then proposes a list of all invoices of the project in question. The list can be filtered
by the following criteria: Partner, Period, Work package and/or Budget line.
Figure 227 Financial Corrections Interface – Adding findings per invoice
Once the invoice in question is marked, the system will record the finding for this
particular invoice. The system will know whether the invoice in question was already
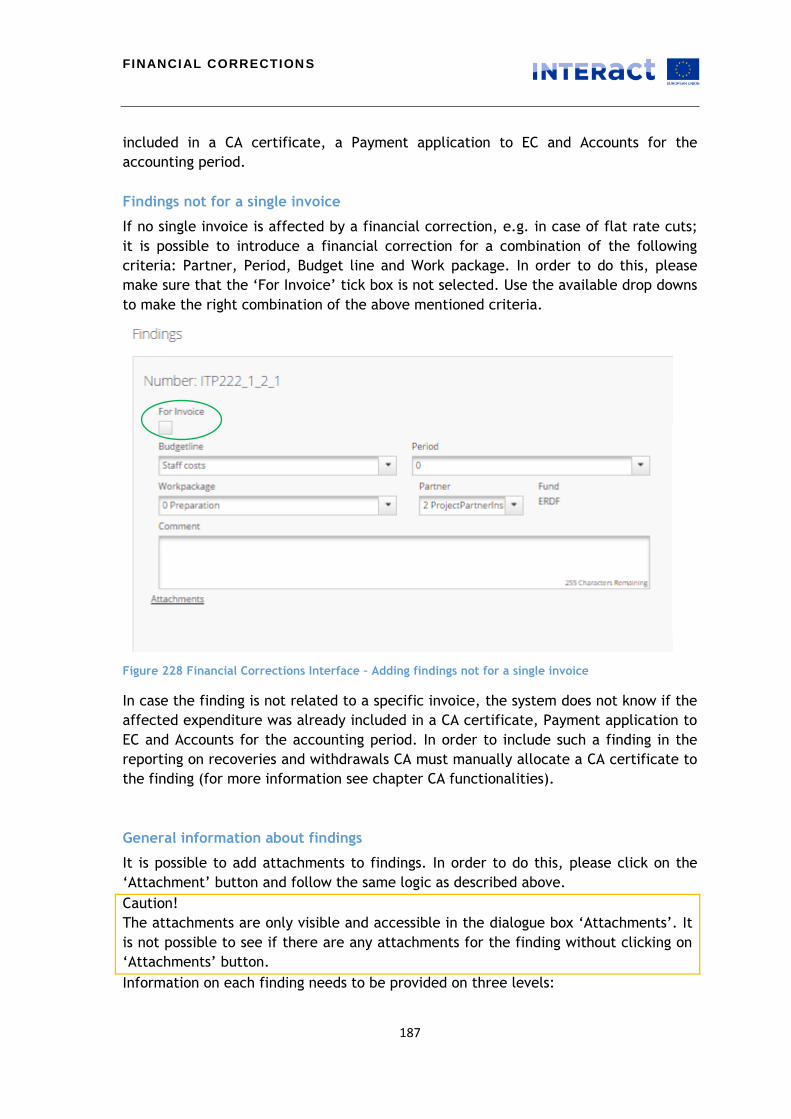
FINANCIAL CORRECTIONS
187
included in a CA certificate, a Payment application to EC and Accounts for the
accounting period.
Findings not for a single invoice
If no single invoice is affected by a financial correction, e.g. in case of flat rate cuts;
it is possible to introduce a financial correction for a combination of the following
criteria: Partner, Period, Budget line and Work package. In order to do this, please
make sure that the ‘For Invoice’ tick box is not selected. Use the available drop downs
to make the right combination of the above mentioned criteria.
Figure 228 Financial Corrections Interface – Adding findings not for a single invoice
In case the finding is not related to a specific invoice, the system does not know if the
affected expenditure was already included in a CA certificate, Payment application to
EC and Accounts for the accounting period. In order to include such a finding in the
reporting on recoveries and withdrawals CA must manually allocate a CA certificate to
the finding (for more information see chapter CA functionalities).
General information about findings
It is possible to add attachments to findings. In order to do this, please click on the
‘Attachment’ button and follow the same logic as described above.
Caution!
The attachments are only visible and accessible in the dialogue box ‘Attachments’. It
is not possible to see if there are any attachments for the finding without clicking on
‘Attachments’ button.
Information on each finding needs to be provided on three levels:

FINANCIAL CORRECTIONS
188
Partner,
Project and
Programme level.
Part of the information is foreseen to be introduced by the JS or MA and other can be
filled out by CA only. The JS/MA sees and can modify the partner level and part of the
project level information.
Figure 229 Financial Corrections Interface – JS view on findings
The remainder of the project level information and the entire programme level
information of the finding is only visible to users having CA privilege. CA users have
access to all fields of the financial correction form and can also close the control.

FINANCIAL CORRECTIONS
189
Figure 230 Financial Corrections Interface –additional fields in findings visible to CA only
CA should check the control and all relevant findings, fill out missing data and then
click on ‘Close’ tick box in the control section. Closed controls cannot be modified
unless they are re-opened. It is currently possible to re-open the control only as long
as it is not included further in the workflow, i.e. in the CA certificate.

FINANCIAL CORRECTIONS
190
Figure 231 Financial Corrections – Closing controls
Only closed controls can be included in the CA certificate and later on in the Payment
application to EC and Accounts for the accounting period. For more information,
please see the ‘CA functionalities’ chapter.
Some of the fields in the form influence the way the finding is treated later in the
workflow. The system will present the findings differently in the ‘Payments to
Projects’ module depending on ‘Action’ selected in the (financial) correction project
level section.
Figure 232 Financial Correction Project Level– Action
If ‘adjustment in the next ERDF payment’ is selected the system will do the following:
1. The eMS will first check if the affected invoice(s) are included in the same CA certificate. If it finds the relevant invoice(s) in the same certificate, it will decrease/increase the amount to be paid to the partner accordingly. Please note that currently it is not marked that the amount to be paid was adjusted,

FINANCIAL CORRECTIONS
191
the system just shows an amount different to the one claimed in the project report.
2. If there is/are no corresponding invoice(s) OR the financial correction does apply to a project partner (and not to single invoice(s)), the system will check if there is a project report included in the same CA certificate, which includes the affected project partner. If it finds the partner in a project report, the amount to be paid to this partner will be adjusted by the amount to be corrected. Please note that currently it is not marked that the amount to be paid was adjusted, the system just shows amount different to the one claimed in the project report.
3. If there is no corresponding invoice or corresponding partner in the same CA certificate, the system will generate a separate negative (or positive) payment entry. This means that technically a repayment situation is created even though the ‘adjustment in the next ERDF payment’ option is ticked in the financial correction interface.
If ‘repayment by the project’ or any action other than ‘adjustment in the next ERDF
payment’ is selected the system will generate a separate negative (or positive)
payment entry in all cases. This means it will do so even IF it finds a matching invoice
item or partner report in the same certificate.
For more information please see the chapter ‘CA functionalities’.
Only findings which concern expenditures already claimed from the European
Commission (i.e. included in a Payment application to EC) can be taken into account
for the Accounting year overview reporting on withdrawals, recoveries, recoveries
according to art. 71, amounts to be recovered and irrecoverable amounts.
In order to include the finding in the above mentioned reporting, please make sure
that the appropriate CA certificate is selected (in case of findings for an invoice, the
system will propose the right certificate; in case of other findings the certificate must
be selected manually from a dropdown list of all certificates already available for the
project in question).
If the certificate was already included in the Payment Application to EC, the tick box
‘To be reported to EC’ will become active.
Figure 233 Financial Corrections Programme level – selection of the CA certificate

FINANCIAL CORRECTIONS
192
When the ‘To be reported to EC’ is ticked additional actions are available. The CA can
decide to which category the finding should be allocated under drop down ‘Action’.
Figure 234 Financial Corrections Programme level - Action
Depending on which action is selected, the system allocates the amount in question to
the correct report table in the Accounting year overview reporting on withdrawals,
recoveries, recoveries according to art. 71, amounts to be recovered and irrecoverable
amounts.
Caution! Ticking a correction as ‘withdrawal’ does not automatically lead to a withdrawal at the programme level. For a withdrawal to be enacted, the eMS must find a correction as well as a positive amount in the same Payment application to EC. Otherwise there is no amount from which the system could withdraw the irregularity.
For more information, please see the chapter ‘CA functionalities’.

MODIFICATION REQUEST
193
Modification Request
Needed user rights / privileges
Monitoring Committee/JTS - MG_CHANGEREQUESTS is the privilege which enables
users to request modifications, approve modifications requests from LPs and to finalize
modifications. It also enables the user to see the Overview list of all modification
requests (see below).
Lead Partner – No special privilege needs to be assigned to ask for modification from
the side of a LP.
The eMS handles three different ways to reopen already submitted applications:
1) Via modification requests. This is the only way to generate a NEW VERSION of the application form and can be done at any stage of the programme implementation before the project status is set to ‘Finalised’. After the finalization of a modification, the old version of the AF is archived and a new one is created and becomes the valid application form. This process is described in detail below.
2) Via ‘revert to saved’ or ‘revert to saved2’ (in the case of a 2-step call). This simply reopens the application form for further editing. NO NEW VERSION of the application form is generated after the LP submits again the modified AF (for more details check out the chapter on reverting).
Caution! Re-submission of reopened application form creates a new submission with a new date! No trace of previous submission is kept in the eMS except for the audit log.
Figure 235 Revert to SAVED2 reopens an application form for further editing WITHOUT generating a new version of the Application Form.
3) Via reopening the attachment upload section. This opens the attachment upload section for further uploads by the LP. The rest of the application form remains closed. No new version of the Application form is generated but it is easily traceable which attachment was uploaded.

MODIFICATION REQUEST
194
Figure 236 ‘Attachment upload closed’ can be changed to ‘attachment upload open’ to allow the applicant to upload further documents
Who can initiate a modification?
Modifications can either be initiated by a programme authority (e.g. JS, MC) or by the
Lead Partner. Furthermore, modifications are initiated automatically if a project is
‘approved under conditions’ (after MC decision).
Approved under conditions: Applications approved under conditions in the ‘Funding Decision (MC)’ interface are automatically re-opened for modifications by the LP. The following workflows are initiated:
o Approval under conditions opens request for modification -> LP modifies AF -> JS approves modification -> new version of the AF is generated. OR
o Approval under conditions opens request for modification -> LP modifies AF -> JS requests further modifications -> LP modifies AF -> JS approves modification -> new version of the AF is generated. OR
o Approval under conditions opens request for modification -> LP modifies AF -> JS rejects modification -> project status is changed to Rejected and project is archived.
Programme Authorities: A user with the privilege to manage change requests (MG_CHANGEREQUESTS ) such as e.g. JS can initiate a modification by pressing the ‘request modification’ button in the project view. The JS user is then asked to enter information about the requested modification into a user interface. Saving directly opens the Application Form for the LP to be edited and informs the LP about the requested modification. The following workflow are initiated:
o JS requests modification -> LP modifies AF -> JS approves modification -> new version of the AF is generated. OR
o JS requests modification -> LP modifies AF-> JS requests further modifications -> LP modifies AF -> JS approves modification -> new version of the AF is generated. OR
o JS requests modification -> LP modifies AF -> JS rejects modification -> AF remains not changed and no new version of the AF is generated.
Lead Partner: Project Lead Partner can request a modification by pressing the ‘request modification’ button. The LP is then asked to enter information about the intended modification into a user interface. Saving informs the JS about the request. JS can then approve the modification request and open the Application

MODIFICATION REQUEST
195
Form for editing by the LP or reject the request. The following workflows are initiated:
o LP requests permission to modify -> JS approves request for modification -> LP modifies AF -> JS approves modification -> new version of the AF is generated.
o LP requests permission to modify -> JS approves request for modification -> LP modifies AF -> JS requests further modifications -> LP modifies AF-> JS approves modification -> new version of the AF is generated. OR
o LP requests permission to modify -> JS approves request for modification -> LP modifies AF -> JS rejects modification -> AF remains not changed and no new version of the AF is generated.
Figure 237 The menu item ‘Modification request’ leads to the overview list of all modifications for a project and related messages
When can a modification be requested?
A modification request is automatically opened after an application is ‘approved under conditions’
Programme authorities with the user right (MG_CHANGEREQUESTS ) can open modification requests at any time after submission of an Application form even BEFORE the application has been approved or contracted. This was requested by programmes that want to allow modifications prior to project approval e.g. during the assessment of applications. Other programmes are more likely to modify applications forms only after a project has been approved or approved under conditions.

MODIFICATION REQUEST
196
Lead Partners can requests modifications after the project has been handed over to a lead partner and the LP has been approved by the JS. Before that stage it is not possible for LPs to request modifications.
Caution! No authority can request modifications for projects which are finalized or archived.
Caution! It is always the last valid application form which is a subject to modification request, not the initial one!
Caution! It is not possible to initiate a modification request (neither by programme authorities nor by Lead Partner) if a previous modification is not finalized (i.e. approved or rejected by JS).
Approved under conditions
For information on modifications initiated when applications are approved under
conditions, please refer to the Chapter ‘Decision’.
Modifications initiated by the JS
The JS can initiate a modification any time after the application has been submitted
until the project is finalized. In the project view, the JS can initiate modification using
the left-side menu item ‘Application and Contract’ ‘Request Modification’.
Figure 238 (JS view) To request a LP to modify the AF, the JS enters the project view and requests a modification
A modification initiated by the JS, automatically opens the AF for modification by the
LP.

MODIFICATION REQUEST
197
Modifications requested by the LP
After the LP has been approved (see ‘handover’ chapter), he/she can ask for
permission to modify the AF using the left-side menu item ‘Application and Contract’
‘Request Modification’.
Figure 239 (LP view) Requesting the JS to open the AF for modifications
The LP then needs to wait for the approval by the JS to continue with the
modification. Once the JS approves the modification request, the AF will be unlocked
for editing.
The JS has the following options:
‘New’: The JS does not decide yet whether to refuse ort accept the request to modify the AF. Please note that the wording will be changed to ‘-‘ as ‘new’ is confusing.
‘Mr Refuse’: Modification request refused. The JS refuses the request to modify the AF. This closes the request and the AF remains locked. The LP can decide to open a new modification request.
‘Mr Accepted’: Modification request accepted. The JS accepts the request for modification and the AF is unlocked for editing by the LP.
Figure 240 (JS view): The JS can accept or decline a request by the LP to modify the AF

MODIFICATION REQUEST
198
JS choses the decision in the drop-down, enters a message text, presses ‘Save Mr
evaluation’ and ‘submit Mr evaluation’.
If ‘Mr accepted’ is chosen, the AF is now open for modifications and the LP can edit
the AF.
Figure 241 (LP view) After the programme allowed the LP to modify the application form, the Modification Request
section appears as default view when opening the project
The LP can now modify the AF and submit the modified AF to the JS for approval.
The JS can use the ‘Compare modifications’ function of the eMS to compare the old AF
with the modifications proposed by the LP (‘track changes’) (see below).
Figure 242: After the modification has been approved, the ‘decision date’ is added to the ‘modification request’ interface.
Compare Modifications - Track changes
There are two modes for the authorities to compare proposed modifications with the
presently valid version of the AF.
1) The first mode makes the changes visible in form of a tree. Modifications can be seen as separate elements in a table view.
Figure 243: Compare Modifications – Tree view

MODIFICATION REQUEST
199
2) The second mode uses the pdf extraction of an application form for comparison. This comparison is similar to the track changes function used by some office software. To access this mode, users need to press ‘Compare html’.
Figure 244: Compare Modifications - HTML view

MODIFICATION REQUEST
200
Keeping track of modifications, decisions and contract amendments
The eMS stores all versions of the Application Form in consecutive order under the
menu item ‘project history’.
Figure 245: To access the project history enter the project and press ‘project history’
The Project History gives an overview of the different versions of application forms.
Authorities can insert additional information about the different versions of the AF,
when and who decided etc. Additionally, contract amendments or other relevant
documents can be uploaded here. The date of signing the subsidy contract (or
amendments to the contract) is also entered here.
Different versions of application forms can always be compared via the comparison
function.
Figure 246: The project history shows important events in the lifetime of a project

MODIFICATION REQUEST
201
The eMS also shows all currently open modifications for all projects under the
‘modification request’ menu item at the programme level.
Figure 247: To access the overview of open modifications, press ‘Modification requests’.

MODIFICATION REQUEST
202
Project statuses during modifications
Modifications lead to changes in the status of a project as can be seen in the various
overview lists of projects and in the project history.
Status in ‘My Applications’
Status in ‘Application Browser’
Status in ‘Modification requests’ overview
Versions shown in Project History
LP requested permission to modify
Cr Cr Cr CR
JS granted permission to modify
Cr_in_process Cr_accepted (=old version) Cr_in_process (=version to be modified)
Cr_in_process CR_ACCEPTED CR_IN PROCESS
JS refused permission to modify
Contracted (=old version)
Contracted (=old version)
Contracted (=old version)
CONTRACTED
LP submitted modified AF
Cr_done Cr_accepted (=old version) Cr_done (=modified version)
Cr_done CR_ACCEPTED CR_DONE
JS approved modified AF
Contracted Archived (=old version) Contracted (=modified version)
not shown ARCHIVED CONTRACTED
JS rejected modified AF
Contracted (=old version)
Contracted (=old version) Archived_copy_cr (=archived version of the rejected modified AF)
not shown CONTRACTED ARCHIVED_COPY_CR
As can be seen, once the JS permits the LP to modify the AF, the application browser
shows the project twice. Cr_accepted is the old AF, Cr_in_process is the one, which is
undergoing the modification. Once the LP submitted the modified AF to the JS, there
will also be two versions: Cr_accepted is still the old AF, Cr_done is waiting for
approval by the JS. After the JS approved the modified AF, the old one will be
archived and the new one will be shown as ‘contracted'
Note: It is possible to translate or rename these statuses in your version of the eMS.

MODIFICATION REQUEST
203
Figure 248: (JS view) After the LP submitted the modified AF, the application browser shows the project twice.
After the JS approves the the Cr_done version, a new AF is generated and the old one
is archived.
Figure 249: After the JS accepts the modification, the application browser archives the old AF and shows the new version in the status ‘contracted’.
In the ‘my applications’ view only the latest version of the AF is shown.
Figure 250: (JS, LP) In the ‘my applications’ view only one version of the AF is show.

REVERTING
204
Reverting At different stages of the workflow, eMS enables reverting a project or a report to a
previous stage based on the privilleges.
Revert a project to SAVED
Needed user rights / privileges
The user (usually JTS) able to revert a project to “Saved” needs to be assigned a
privilege CAN_REVERT_PROJECTSTATE.
How to revert a project to SAVED
Logged in as JTS, you can revert the submitted projects (in the state SUBM or
PART_SUBM) to the SAVED state, thus enabling the applicants to reedit the project.
The corresponding button can be found in the left side menu under the General items.
Figure 251 Reverting a project to SAVED
Revert a project to SUBM/ PART_SUBM
Needed user rights / privileges
The user (usually JTS) able to revert a project to “SUBM” or “PART_SUBM “ (in the
first step of a two-step proceeding) needs to be assigned a privilege
CAN_REVERT_PROJECTSTATE.
How to revert a project to SUBM/ PART_SUBM
Logged in as JTS, you can revert an eligible or first-step eligible (state:
Eligible_phase1) project to the SUBM/PART_SUBM state, thus providing a possibility of
repeated eligibility evaluation or further reverting the project back to an applicant.
The corresponding button can be found in the left side menu under the General items.
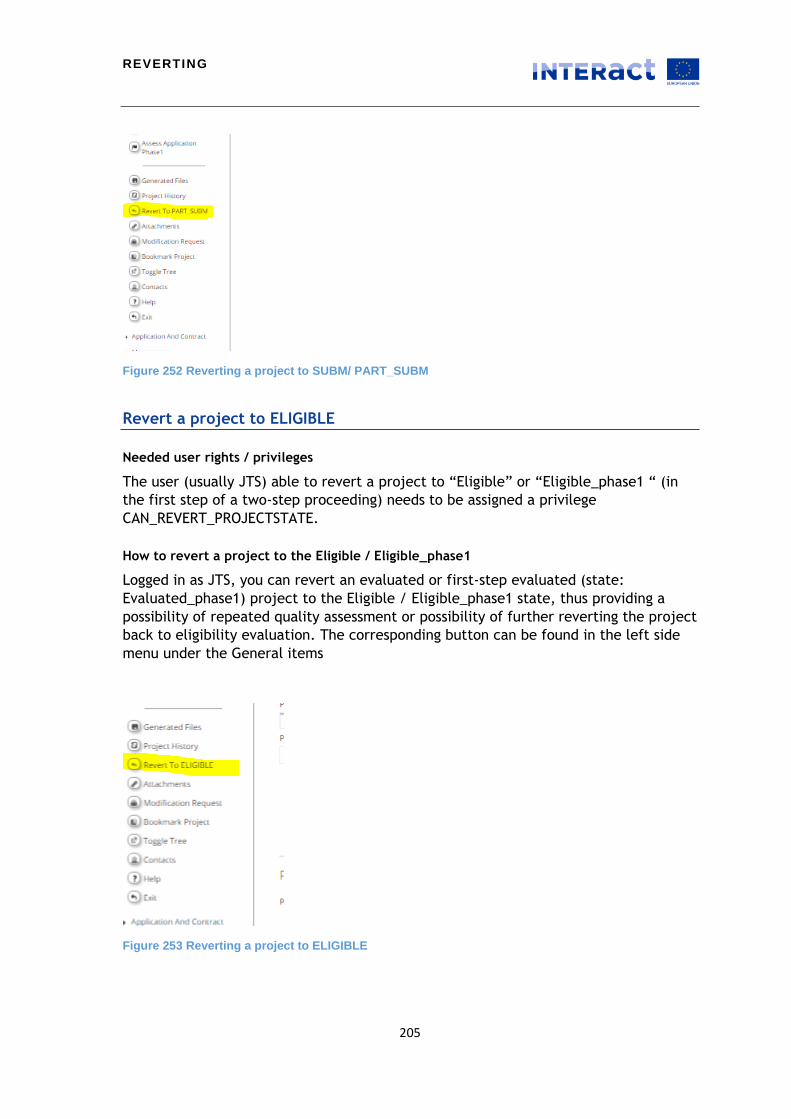
REVERTING
205
Figure 252 Reverting a project to SUBM/ PART_SUBM
Revert a project to ELIGIBLE
Needed user rights / privileges
The user (usually JTS) able to revert a project to “Eligible” or “Eligible_phase1 “ (in
the first step of a two-step proceeding) needs to be assigned a privilege
CAN_REVERT_PROJECTSTATE.
How to revert a project to the Eligible / Eligible_phase1
Logged in as JTS, you can revert an evaluated or first-step evaluated (state:
Evaluated_phase1) project to the Eligible / Eligible_phase1 state, thus providing a
possibility of repeated quality assessment or possibility of further reverting the project
back to eligibility evaluation. The corresponding button can be found in the left side
menu under the General items
Figure 253 Reverting a project to ELIGIBLE

REVERTING
206
Revert a project to EVALUATED
Needed user rights / privileges
The user (usually JTS) able to revert a project to “Evaluated” or “Evaluated_phase1 “
(in the first step of a two-step proceeding) needs to be assigned a privilege
CAN_REVERT_PROJECTSTATE.
How to revert a project to Evaluated / Evaluated_phase1
Logged in as JTS, you can revert a project after recommendation or first-step
recommendation (states: Recommended, Recommended_under_conditions, Not_recommended,
Recommended_p1, Recommended_under_conditions_p1, Not_recommended_p1) to the Evaluated /
Evaluated_phase1 state, thus providing a possibility of repeated recommendation or
possibility of further reverting the project back to quality assessment.
Similarly, the projects already approved, approved under condition, not
approved or projects in the handover state can be reverted to the Evaluated state.
The corresponding button can be found in the left side menu under the General
items.
Figure 254 Reverting a project to EVALUATED
Revert a project to Handover
Needed user rights / privileges
The user (usually JTS) able to revert a project to “Handover” needs to be assigned a
privilege CAN_REVERT_PROJECTSTATE.
How to revert a project to Startup
Logged in as JTS, you can revert a project to be contracted (state: Contracting ) to the
Handover state, thus providing a possibility of another trial for lead partner user
choice. The corresponding button can be found in the left side menu under the
General items.

REVERTING
207
Figure 255 Reverting a project to Handover
Revert a project to Startup
Needed user rights / privileges
The user (usually JTS) able to revert a project to “Startup” needs to be assigned a
privilege CAN_REVERT_PROJECTSTATE.
How to revert a project to Startup
Logged in as JTS, you can revert a contracted project to the state before contracting
(Startup) thus providing a possibility of editing the supplementary information. The
corresponding button can be found in the left side menu under the General items.
Figure 256 Reverting a project to Startup

REVERTING
208
Revert a report
Reverting a partner report
Partner report cannot be reverted to the applicant by an FLC user directly. The FLC
needs to contact a JTS and ask for opening an additional report for the particular user.
Further details can be specified via internal message.
Reverting a project progress report by JTS
If JTS is not satisfied with the provided Project Progress Report or its part, it can
revert it to the LP by clicking the corresponding item at the bottom of the left-side
menu.
Figure 257 Reverting the Project Progress Report to LP
If JTS is not satisfied with the FLC report and/or certificated expenditures, it can
revert it either to the FLC or to a project partner by clicking the corresponding button
in the “List Of Partner FLC Certificates” section of the Project Progress Report.
Figure 258 Revert Project Progress Report to FLC or PP
Reverting a project progress report by MA
If MA is not satisfied with the provided Project Progress Report or its part, it can
revert it to the JTS by clicking the corresponding item at the bottom of the left-side
menu.
Figure 259 Reverting the Project Progress Report to JTS

REVERTING
209
Reverting a project progress report by CA
If CA is not satisfied with the provided Project Progress Report or its part, it can revert
it to Ma or JTS by clicking the corresponding item at the bottom of the left-side menu.
,
Figure 260 Reverting the Project Progress Report to JTS or to MA

ROUNDING
210
Rounding
We faced some rounding issues in the eMS and had to look for a new solution. Our initial
specification of storing 10 digits after the comma (high precision) in the technical database and
showing two digits in the user interface has led to a situation where sums in the tables of the
user interface do not always match and fund values as well as flat rates sometimes exceed the %
limits. Rounding issues in the eMS are caused by all calculations that increase the number of
digits after the comma. Specifically in the eMS these are:
· Calculating fund amounts (i.e. applying the co-financing rate)
· Currency conversion (applying the currency conversion rate)
· Flat rates (e.g. 15% of a budget line value)
After any of these calculations, the eMS needs to know what to do with the digits after the
comma. Specifically it needs to know:
1) How many digits after the comma to keep in the technical database (24,8958754345 OR
24,89)
2) How to round (e.g. arithmetically, truncating, etc.) (24,90 OR 24,89)
3) How many digits after the comma show in the user interface and how to round the
amount to be shown.
In the new version of the eMS (3_1.0) a new solution was developed and now every eMS
programme will have to choose between one of two options for currency exchange and flat
rates.
This is what is implemented in the eMS:
Flat rate calculations
The result of the flat rate calculations can be configured in the programme properties. There
are two properties, which should be configured. First, the property flatrateCalculationPrecision
sets how many digits after the comma will be stored in the technical database after the
calculation of the flat rate. The system will always display only 2 digits, but if you set this
property to more than 2, the high precision amounts will be stored and used for calculations.

ROUNDING
211
The property flatrateCalculationRoundingMode sets the rounding mode for the result of the flat
rate calculation. If you decide to round it down the system will round down with selected
number of digits. So, if you set the flatrateCalculationPrecision at more than 2 digits (e.g. 5),
the rounding will be applied only at 5th digit after the comma.
For example, with the following configuration flatrateCalculationPrecision=5 and
flatrateCalculationRoundingMode=RoundingMode.DOWN the amount 2,345676898 will be stored
as 2,34567. If you change a rounding mode to UP or HALF_UP the same amount will be stored as
2,34568.
Please note, all amounts which are stored with more than 2 digits after the comma will be
displayed in the user interface as 2 digits after the comma, rounded down. In the already
mentioned example, if the result of flat rate calculations is stored with 5 digits after the comma
and rounded down the amount in the database is 2,34567 (it is used for all future calculations)
but the amount the user can see will be 2,34. User can see the actual amounts in the tables
exported to Excel.
Currency conversion
Similarly, the result of applying the currency exchange rate needs to be rounded and the
programmes can decide on the number of digits after the comma to be stored and the rounding
mode. The following properties can be configured in the programme properties file:
currencyExchangeCalculationPrecision and
currencyExchangeCalculationRoundingMode=RoundingMode.DOWN.
Single items are shown in the user interface with two digits after the comma. In case you choose
the two digit rounding option, what you see in the user interface and what is in the database
will be exactly the same. In case you choose 3-10 digits after the comma, the user interface will
show two digits (rounded down) while the database stores more digits.
The exporting of all the tables to Excel format will show the REAL values from the database (i.e.
if in the DB there are 10 digits then the export shows 10 digits).
Please see the two examples below and their consequences:
1) If you decide to go for higher precision and store item values with more than 2 digits after
the comma (max 10 digits) the mathematical precision will be high. BUT if you add up the sub-
totals or items displayed in the summary tables in the user interface, the total might differ by
few eurocents.

ROUNDING
212
eMS configured at 5 digits after the comma, rounding mode HALF_UP
Actual amount
Amount stored in the database
and used for calculations
Amount displayed in the
eMS
22.56458575 22.56459 22.56
1.256987411 1.25699 1.25
1.11111111 1.11111 1.11
75.12548963 75.12549 75.12
100.05817390 100.05818000 100.04000000
Total that will be
displayed in the eMS 100.05
2) If you decide to work with two digits after the comma only (setting properties for results of
currency exchange AND flat rates at 2 digits, no matter which rounding mode) all the overview
tables will always be correct (i.e. the sum of sub-totals and also sum of all displayed items will
add up to the totals) BUT there could be some differences when re-calculating the flat rates or
exchange rates at the total level. If every single expenditure item is converted, every item
needs to be rounded as well. If you do this to many items the rounding error adds up – a
potential disadvantage for the beneficiary. If you store only 2 digits after the comma the
calculations are less precise compared to using e.g. 10 digits after the comma. If you use 2 digits
after the comma only, what you see and what you get always match (all the totals and sub-
totals) but the calculation precision is lower.

ROUNDING
213
eMS configured at 2 digits after the comma, rounding mode DOWN
Actual amount
Amount stored in the database and
used for calculations
Amount displayed in the
eMS
22.56458575 22.56 22.56
1.256987411 1.25 1.25
1.11111111 1.11 1.11
75.12548963 75.12 75.12
100.05817390 100.04 100.04
Total that will be
displayed in the eMS 100.04
Please also remember about the cuts done by different authorities. They cut with precision of 2
digits after the comma and might not be aware that the real amounts behind contain more
digits.
We consulted with developers of banking software to find out how they solve rounding issues in
currency conversions and it turns out they always work with only two digits after the comma as
working with money implies the smallest amount possible is 0,01. They usually round
arithmetically HALF_UP. This means if the banking software converts many items into e.g. EURO,
the total of these values after conversion will possibly be slightly higher compared to what you
get when you apply the conversion rate to the unconverted total of all items. Of course, in the
case of the eMS, conversion rates can also be rounded down (truncated) and then the total of
the converted items will be slightly lower compared to converting the total.
For whichever option you as a programme decide to go, you should understand the consequences
and you might want to communicate them to your beneficiaries to avoid misunderstandings.

ROUNDING
214
As regards ERDF/IPA/ENI and other fund values, we implemented a solution that should make
sure that ERDF values never exceed maximum co-financing, regardless of which rounding method
you choose for flat rates and currency conversions. It is not possible to select neither precision
nor rounding mode for the fund amounts 2 digits and rounding mode DOWN is hardcoded and
cannot be changed.
The fund amounts are calculated in the following way:
Total (budget and expenditure) is calculated out of single items (no change to the previous
versions)
Fund amounts (ERDF/ENI/IPA, etc.) are NOT calculated out of single items (previously it was
calculated for each item, leading to rounding errors), they are calculated out of the total budget
Total is rounded down with two digits after the comma (applies when items are with more than
two digits)
ERDF is calculated as Total (i.e. the rounded total!) * co-financing rate and the result is rounded
down to two digits after the comma
Partner contribution is calculated as Total (i.e. the rounded total) minus ERDF (i.e. the rounded
ERDF) (previously partner contribution was also calculated for each item leading to rounding
issues)
In the summary tables, the total should be the same in all tables. This means that the sum of
subtotals might be different from the total (only in case of 3-10 digits after the comma used for
calculations, see above).
The following programme property is removed from the source code and can be removed from
your properties file: inputNumber.decimalPlaces is not used anymore. It is not possible to
configure financial inputs with more than 2 digits after the comma.
For more information on available rounding modes and their implications, please see
the documentation on rounding modes.

ROUNDING
215
Recommended rounding mode
We recommend Option 2 (to work with two digits after the comma only- setting properties for
results of currency exchange AND flat rates at 2 digits. Please note that Interact will also test
the eMS with 2 digits only.
For flat rates, we recommend using a rounding method DOWN that rounds down (truncates) to
avoid exceeding the maximum flat rate of e.g. 15%.
For currency exchange, rounding DOWN will lead to disadvantages for the project, rounding UP
will lead to advantages. There is no recommendation on our side what to do.
The funds amounts (e.g ERDF) are always rounded DOWN (see description above).

PROJECT HISTORY
216
Project History
Monitoring Project History
Actions like Submitting, changes after Modification Request, Generating Contract or
Adding Supplementary Information trigger saving the backup versions of the AF.
The previous versions of the project can be seen in the “Project History” section.
Needed privileges
For seeing the project history, no special rights are needed. For editing, the privilege
EDIT_PROJECT_HISTORY is necessary.
How to enter the Project History
Project History might be entered by clicking the “Project History” item in the
“General” section of the left side menu.
Figure 261 Entering the Project History
In the Project History section, the selected AF version might be seen, Modification
responsible for triggering its saving is described, as well as User responsible for the
decision is listed. Furthermore, the Project History enables selecting any two versions
and their comparing.
Comparing the Versions
Any pair of Versions listed in the Project History might be compared to each other and
the differences might be displayed in both Vertical and Horizontal tree, as well as
HTML Compare Projects Dialog.
Figure 262 Compare Projects

PROJECT HISTORY
217
Editing the History
Privileged users might edit the Project History View by filling in additional
information on the modifications:
Date Of Approval / Rejection
User responsible for the Decision
Date Of Signature Of Subsidy Contract
Number Of Contract Amendment
Comment
Attachment
Attachment Description (Attachment Upload Date & User Uploading the Attachment are filled in automatically)

CATEGORIES OF INTERVENTION
218
Categories of intervention eMS contains a management for categories of intervention. The system by default
includes the codes mentioned in the annex of regulation nr. 184/2014.
The system contains the selection of codes per project and the reporting of these
categories to the European Commission like mentioned in regulation nr. 1011/2014.
Selection of codes for the programme
The system allows selection of categories of intervention which apply to the
programme. This selection is a global selection, which has do be done by an
administrator or by a user having the userprivilege “MG_PROGRAMME”.
The codes can be selected per priority axes in the “Programme Data” section.
Figure 263:Selection of codes per priority axes

CATEGORIES OF INTERVENTION
219
Selection of codes for the project
After the handover, JS user, an admin or any user having the “MG_STARTUP”
userprivilege, can access the supplementary information section. This section contains
a tab “Codes” to access this section.
In the supplementary information section, it is possible to grant read or read/write
privileges to each of the different sections. To be able to access the “Codes” section,
the user needs to have the “SU_CO_W” userprivilege, for read access the “SU_CO_R”
is needed.
Figure 264: Supplementary information - codes section
The section “Codes” allows selection of all codes available under this priority axes.
Figure 265: Selection of codes for one project

CATEGORIES OF INTERVENTION
220
Reporting to EC
The reporting of the codes of intervention according to regulation 1011/2014 can be
accessed via the “Programme Report” section.
Figure 266: Reporting to EC

TECHNICAL ASSISTANCE
221
Technical assistance (deprecated) Please note: the TA module is discontinued. TA has to be handled as a priority. Please open a call for TA projects. The tables below are still available, but do not link to the Programme budget. Therefore their use is not recommended.
Technical assistance institutions
It is possible to add technical assistance institutions in eMS. These institutions have
their own data like fund, co-financing rate etc. eMS allows to set a planned budget for
each institution per year and Budgetline.
Figure 267: Budget forecast
Reporting/Monitoring
Monitoring and reporting of TA expenditures is not carried out inside eMS, but eMS
allows putting money per timespan and priority axes. These amounts go into the
programme overview tables.
Figure 268: TA monitoring

TRANSLATIONS
222
Translations Translations is a tool in eMS used to change and translate each label in the user
interface. Programmes are therefore free to change each text visible to the users of
the system.
Translation of the user interface
Needed user rights / privileges
The user who wants to manage the checklists must have the almighty “ADMIN”
privilege.
How to enter Translations
Logged in as “ADMIN” you can enter the Translations by clicking on the section on the
left-side menu “Configure EMS”.
Figure 269 Translations menu item
In the picture below, the sections of the application are shown which allow changes or
translations.
Figure 270 Sections of the Translations module

TRANSLATIONS
223
Importing and Exporting Translations
By clicking “Export Localization” the localization is saved to a csv-format file.
Importing can be performed by choosing “Override on import”, then by clicking on
“Import Localization”. This feature either overwrites an already existing file or
creates a new one.
How to identify the element in the user interface
To translate a label in eMS, at first the path in the translation tree has to be known.
This can be obtained using a special language, which is only available for admin users.
Figure 271 ADM language only available for admin users
Choosing this language shows all keys of all elements in the system.
Figure 272 Example of keys for system elements, displayed in “()”
Keys in the application form are shortened using the character “*” as abbreviation for
“application form”. This means for example if you want to change the text of
“Programme priority”, you can find this element in the tree on the path
“application/form/projectSummary/projectIdentification”.
You can find the translation of the respective element and the configuration for the
attached input field in this section.
Convenience feature for identifying the element in the user interface
As a convenience feature, eMS allows to select specific labels directly in the user
interface for translation. A user with admin user privilege can click on the pencil icon
to go to the corresponding element in the translation tree.
This feature is only for translations of global texts and is not yet implemented for all
user interface elements in eMS. Labels without a pencil icon have to be identified
manually in the translation tree.

TRANSLATIONS
224
This convenience feature can only be used for global texts. Texts specific for calls
have to be changed in the corresponding translation tree in the call configuration.
Figure 273: Label selection for translation in user interface
How to change and translate labels
By clicking on the desired node and modifying the global label, it is possible to change
or translate the label. Afterwards, the save button and “rebuild Localization” have to
be clicked.
Figure 274 Changing and translating a label
How to delete nodes
The desired node has to be selected. By clicking the button “delete selected node and
all subnodes”, the selected node and subnodes, if there are subnodes existing, will be
deleted.
Tooltip
Tooltips allow you to display the description of expected answer to a question. They
appear when hovering over the text box or a dropdown menu. You can activate a
tooltip by choosing the desired node and by entering an input in “Global tooltip”.

TRANSLATIONS
225
Help button
The help button will open a pop-up window that shows a description of the question.
You can activate a tooltip by choosing the desired node and by entering an input in
“Global help”.
Manage Multilanguage for Call
This is another option how to change and translate labels, but can be used only for a
specific call. Besides to the ADMIN, a user is also able to manage Multilanguage for a
call if the privilege “MG_MULTILANGUAGE” has been assigned to the user.
How to enter:
You have to choose a specific call, then scroll to the bottom and click “Manage
Multilanguage for Call”.
All modifications made will only be visible for the specific call.
Help system
The help system can be managed in the translation tree as well. The help buttons in
the AF are represented by questionmark icons, which are only visible if the
corresponding help text is not empty.

FORM CONFIGURATION
226
Form configuration eMS allows to enable/disable specific fields in the application form. Configuration can
be performed for
assignments of single fields to call phases
adding of additional text input fields
validation of fields (mandatory, optional)
maximum length of input text
The configuration is done in the same section as the translations. For call specific
configuration, the corresponding forms can be found in the call setup.
Configuration
Assignment of single fields to call phases
Has to be carried out in the management of the call.
Figure 275: Field assignment to phase
Additional TIF
For adding an additional question you have to click on “additionalTIF”. After choosing
the desired node you can enter the additional question. Afterwards, the save button
and “rebuild Localization” have to be clicked again.
Figure 276 Adding additional questions

FORM CONFIGURATION
227
Validation of fields (mandatory, optional) & Maximum length of input text
The maximum length can be specified. In addition, it is possible to mark the selected
field as mandatory or optional.
Figure 277: Validation settings
eMS allows to configure the maximum input length for text fields and editors. This can
be done in the translation tree, by changing the configuration of the maximum length.
Figure 278: Configuration for maximum length of user input
Text fields and text areas (text fields which automatically expand) can contain up to
2000 characters.
Editor elements can only have the following configuration:
100, 200, 300, 400, 500, 600, 700, 800, 900, 1000, 2000, 3000, 4000, 5000, 6000, 7000,
8000, 9000, 10000
All other configuration forces the system to take the nearest neighbor.

HELP SYSTEM
228
Help System Help system can be adjusted using the Translations tool in eMS. Each label of the Help
can be set in the user interface. Programmes are free to change each Help text visible
to the users of the system.
Help System of the user interface
Needed user rights / privileges
The user who wants to adjust the Help System must have the almighty “ADMIN”
privilege.
How to enter Help System
Logged in as “ADMIN” you can enter the Help System by redirecting to Translations
section. You nedd to click on the left-side menu “Configure EMS” item.
Figure 279 Translations menu item
In the picture below, the sections of the application are shown which allow changes or
translations.
Figure 280 Sections of the Translations module

HELP SYSTEM
229
How to change the help labels
By clicking on the desired node of the translations tree and modifying the Global
tooltip, it is possible to change or translate the label. Afterwards, the save button and
“rebuild Localization” have to be clicked for the change to be taken into account.
Figure 281 Adjusting Tooltip and Help labels
Tooltip
Tooltips allow you to display the description of expected answer to a question. They
appear when hovering over the text box or a dropdown menu. You can activate a
tooltip by choosing the desired node and by entering an input in “Global tooltip”.
Help button
The help buttons in the AF are represented by questionmark icons in the left side
menu, which are only visible if the corresponding help text is not empty. The help
button will open a pop-up window that shows a description of the question.
Figure 282 Help button
The help system can be managed in the Translations tree as well. You can
activate a tooltip by choosing the desired node and by entering an input in “Global
help”.

HELP SYSTEM
230
More information and tips on how to work with Translation tools might be found in the
chapter “Translations”.

AUTOMATIC MESSAGES
231
Automatic messages eMS contains multiple types of automatic messages. Some of them are triggered by the
user, some of them by changes of states of e.g. the application form.
Notifications to the registered email address of the user
eMS can send a notification to the registered email address of the user when receiving
an email. This email does not contain the text of the message; its purpose is to notify
the user about received messages in eMS.
Currently, there are the following email notifications possible:
Registration email
E-Mail to the contact person of the lead partner at submission of application form (phase 1 and/or phase 2)
E-Mail on Lead Partner confirmation (after handing the AF over to LP)

AUTOMATIC MESSAGES
232
Automatic messages sent within the Messaging Portal
eMS automatically sends messages at special points in the workflow. Most of them can be turned on/off via configuration.
The configuration needs to be done in a configuration file “message.properties”. The messages are sent via the internal message system.
The property file contains a global switch, to turn all messages off “automessage=off”. If this is turned to “off” the system will not send any
automatic notifications.
Please note: the system needs to be restarted to take changes in the configuration file into account.
The following configurations can be done:
Configuration element Recipient Step in workflow
automessage.submittedApplication Lead applicant Upon application form submission (2nd phase, or only phase in 1-step call
automessage.submittedApplicationP1 Lead applicant Upon application form submission for the first step in a two-step application
automessage.approvedApplication Lead applicant Upon assignment of MC decision “approved”
automessage.approvedApplicationP1 Lead applicant Upon assignment of first step decision “approved”
automessage.approvedUnderCondition Lead applicant Upon assignment of first step decision “approved under conditions”
automessage.handoverToLP Lead applicant Upon state change to “handover”. Lead applicant needs to name a lead partner now.
automessage.lpAccepted Lead applicant Upon acceptance of lead partner in handover
automessage.lpRejected Lead applicant Upon rejection of lead partner in handover
automessage.mrSubmitted Assigned officers or all JTS Upon submission of a modification request submit by the lead partner (submit of new version of the application form)
automessage.mrApproved Lead partner Upon acceptance of the modification request
automessage.mrRejected Lead partner Upon rejection of modification request
automessage.mrReset Lead partner Upon modification request refusing
automessage.mrRequested Assigned officers or all JTS Upon request of a modification request by the lead partner (prosa request)
automessage.contracted Lead partner Upon approval of subsidy contract
automessage.flcAssigned All assigned FLC users Upon assignment of FLC users
automessage.flcRemoved All disassigned FLC users Upon removal of FLC users from FLC assignment
automessage.partnerReportSubmitted Project partner, assigned FLC Upon submission of partner report
automessage.flcCertified All involved partners and lead Upon FLC certificate submission

AUTOMATIC MESSAGES
233
partner
automessage.projectReportSubmitted Assigned officers or all JTS and lead partner
Upon submission of project progress report
automessage.projectReportJSApproved Lead partner Upon submission of report by JS
automessage.maApproved Lead partner Upon submission of report by MA
automessage.caCertified To all assigned JTS officers and lead partner
Upon creation of CA certificate
automessage.projectClosed Lead partner Upon finalization of a project (close of project)
automessage.reopenForMa All MA users and lead partner Upon revert from MA to CA
automessage.reopenForJs All MA users and lead partner Upon reverting from MA to JS
All assigned JS officers, or all JS + lead partner
Upon reverting from CA to JS (skipping MA)
automessage.reopenForLp Lead partner Upon reverting from JS to FLC
Lead partner Upon reverting from JS to LP
Lead partner Upon reverting from JS to PP
automessage.reopenForFlc Lead partner Upon reverting from LP to FLC
automessage.reopenForPartner Lead partner Upon reverting from LP to PP
Configuration element Paths in translation tree
Subject Text
automessage.submittedApplication automessage.submittedApplication.subject automessage.submittedApplication.text
automessage.submittedApplicationP1 automessage.submittedApplicationP1.subject automessage.submittedApplicationP1.text
automessage.approvedApplication automessage.approvedApplication.subject automessage.approvedApplication.text
automessage.approvedApplicationP1 automessage.approvedApplicationP1.subject automessage.approvedApplicationP1.text
automessage.approvedUnderCondition automessage.approvedUnderCondition.subject automessage.approvedUnderCondition.text
automessage.handoverToLP automessage.handoverToLP.subject automessage.handoverToLP.text
automessage.lpAccepted automessage.lpAccepted.subject automessage.lpAccepted.text

AUTOMATIC MESSAGES
234
automessage.lpRejected automessage.lpRejected.subject automessage.lpRejected.text1
automessage.mrSubmitted automessage.mrSubmitted.subject automessage.mrSubmitted.text
automessage.mrApproved automessage.mrApproved.subject automessage.mrApproved.text
automessage.mrRejected automessage.mrRejected.subject automessage.mrRejected.text
automessage.mrReset automessage.mrReset.subject automessage.mrReset.text
automessage.mrRequested automessage.mrRequested.subject automessage.mrRequested.text
automessage.contracted automessage.contracted.subject automessage.contracted.text
automessage.flcAssigned automessage.flcAssigned.subject automessage.flcAssigned.text
automessage.flcRemoved
automessage.partnerReportSubmitted automessage.partnerReportSubmitted.subject automessage.partnerReportSubmitted.text
automessage.flcCertified automessage.flcCertified.subject automessage.flcCertified.text
automessage.projectReportSubmitted automessage.projectReportSubmitted.subject automessage.projectReportSubmitted.text
automessage.projectReportJSApproved automessage.projectReportJSApproved.subject automessage.projectReportJSApproved.text
automessage.maApproved automessage.maApproved.subject automessage.maApproved.text
automessage.caCertified automessage.caCertified.subject automessage.caCertified.text
automessage.projectClosed automessage.projectClosed.subject automessage.projectClosed.text
automessage.reopenForMa automessage.reopenForMa.subject automessage.reopenForMa.text
automessage.reopenForJs automessage.reopenForJs.subject automessage.reopenForJs.text
automessage.reopenForLp automessage.reopenForLp.subject automessage.reopenForLp.text
automessage.reopenForFlc automessage.reopenForFlc.subject automessage.reopenForFlc.text
automessage.reopenForPartner automessage.reopenForPartner.subject automessage.reopenForPartner.text

NOTIFICATIONS
235
Notification on MC decision
eMS can generate a notification upon MC decision. This notification is stored in the
system and is sent manually by a privileged user.
Needed privileges
User who wants to send a notification on MC decision needs to have the
APPROVE_NOTIFICATION or the almighty ADMIN privilege.
How to send the Notifications
The Notifications section might be entered in the user interface left side menu ->
Applications -> Saved/Sent Notifications.
Figure 283 Notification on MC Decision Menu Item
The default text of such a notification can be changed by the programme. After the
generation of the notification, it is visible in the “Saved Notifications” section.
Figure 284: Saved Notification section
Here a privileged user can change the text of each message manually.

NOTIFICATIONS
236
Figure 285: Editing view of the notification section
After approval (clicking on the corresponding button) and selection in the checkbox,
the system can send all selected notifications as in-application messages to the
applicants.
Each notification can as well be extracted to PDF with the “download” feature.
After sending, the notifications are still visible in the “Sent Notification” section.
Figure 286: Sending the approved message to the selected approved project

PDF TEMPLATES
237
PDF templates The application form is generated asynchronously, the user triggers the generation of
the pdf, the pdf gets generated and appears in the “Generated Files” section. This
allows the eMS to handle more users during peak times.
All other pdfs in the system are generated synchronously – they are available
immediately after clicking the button.
All pdfs are generated using templates. Default templates are provided in the
installation. These templates can be changed/adapted by ETC Programmes.
Adaptation of pdf template
In eMS, the extraction of data to pdf is implemented using Apache Velocity templates.
These templates can be adapted and translated by Programmes.
The templates in eMS are implemented using HTML-standards, enriched with Velocity
placeholders. When generating the pdf, the placeholders are replaced by text/values
stored in eMS.
Selecting a Template: Configuration
When using a two-step procedure, eMS allows us to insert different templates for the
two different steps. The templates to be used in the given step can be configured in
programme properties.
Different templates for different languages
eMS can handle various languages, both, in the user interface (as translations of the
user interface) and as content languages (for users to enter text in several languages).
The application can generate pdfs in each language configured as translation
languages for the user interface. To enable this feature, a template has to be
provided, where the name of the template follows the pattern:
“Two-letter-country-code”+”name of the template”.vm
Example:
Name of the template: templateS1.vm
Translation to german: DEtemplateS1.vm
Translation to Czech: CZtemplateS1.vm
eMS generates pdfs in the language selected in the user interface. If you see the
German translation at the time of pressing the “Save as pdf file” button, the pdf will
be generated in German.
If no special translation document is provided, eMS will use the general template.

PDF TEMPLATES
238
How to translate a template
The template files can be edited in any text editor (e.g. Notepad,…), however, for
more comfortable and clearer adjusting of the template, source code editors are
recommended.
The export to pdf does not take texts from the database or the translation tree in
account. The translations have to be done in the template files.
Please be aware: to be able to handle special characters the file encoding has to be
UTF-8.
Hints for better orientation in a template
Items marked with
## represent comments and descriptions
@ stand for the text
# stand for apache velocity code, therefore cannot be simply rewritten as text
strings
$ stand for variables drawn directly from the eMS, might misbehave if retyped
wrongly
If you do not plan to change the template and only want to translate the text, you can
simply retype the text strings starting with the @. You do not need to specify the
language inside the template. The information will be obtained from the system.
Multilanguage template
If required by a programme, a multilanguage (recommended 2-language) template
might be used. In this case, the desired languages of the output pdf need to be
specified in the template, as the system enables using more than two languages. For
creating a pdf however, more than two languages would be difficult to read and it
would be difficult to stay oriented.
The languages selected to be used for the template need to be specified in the file
“VM_global_library.vm” by modifying the code of the country in line 16:
#set($languages = ['AT','HU'])
The modification is needed in order to use the correct values (language versions) of
eMS variables.
Afterwards, you can simply retype the text strings, starting with the @ in order to
translate the template.
Add/remove/change order of elements in template
Creating pdfs is implemented using Apache Velocity templates. The template behaves
as any other HTML document. You can change the order of elements in the template,
remove or add elements if needed. In order to edit the generally available templates,

PDF TEMPLATES
239
at least basic understanding of HTML scripting is recommended. HTML has a very strict
syntax and semantics. Please change/add/remove carefully, not to destroy the syntax
of the document.
Styling of the pdf
As any other regular HTML application, the pdf template is styled using CSS styles.
Please check out the CSS documentation or ask your service provider if you want to
change the styles.

COLUMN SELECTOR
240
Global and local column selector Some overview tables in eMS allow two ways to select the visible columns. The
following tables offer this feature:
My Applications
List of expenditure
Application browser
This chapter will explain both.
User specific column selection
Very wide tables – like the list of expenditure – allow hiding columns based on the users
decision.
A user can click on the columns dropdown and select/deselect the columns she wants to see.
By clicking on the “Save columns” button, the selection will be stored. Next time the user opens
this section only the selected columns will appear.

COLUMN SELECTOR
241
Global column selection
Next to the user specific column selection, a programme can decide, which columns
should be visible in the list of expenditure. This configuration is done in the
“programme.properties” configuration file. Columns, which are deselected in this
configuration are not visible for the user and do not show up in the user specific
column selection.
Columns can be removed, by removing them from the configuration.
# configuration for My Applications myApplicationsColumns=project_id;subprogramme;name;acronym;start;end;leadPartner;lPNationality;call;specificObjective;submissionDate;project_state;funds;applicantOrLeadpartner;officerInCharge;viewProject;bookmarkProject # configuration for list of expenditure loExpColumns=budget Line;wp;intRefNo;invNo;invDate;paymDate;description1;partnerComment;currency;totalValItem;vat;declaredAmountOrgCurrency;conversionRate;conversionRateDate;declaredAmountEuro;expOutside;in Kind;declared;uploads;verifiedByCA;differenceCA;amountCertifiedCA;commentCA;verifiedByFLC;differenceFLC;amountCertifiedFLC;commentFLC;verifiedJS;differenceJS;amountCertifiedJS;commentJS;verifiedByLP;differenceLP;amountCertifiedLP;commentLP;verifiedByMA;differenceMA;amountCertifiedMA;commentMA;DIFFERENCE MA;Date of request for payment to EC;reimbursed # configuration for application browser applicationBrowserColumns=project_id;subprogramme;priorityAxis;name;acronym;start;end;leadPartner;lPNationality;call;specificObjective;submissionDate;project_state;funds;applicantOrLeadpartner;officerInCharge;viewProject Table 6: Column configuration in programme.properties

CUBE
242
Cube The cube is a general purpose tool, which can be used to aggregate data in eMS and to
do further statistics, which are not implemented in the core system of eMS.
Please be aware: generation of statistics could need a lot of resources. Using this tool
during the end of a call is therefore not recommended.
Technical description / adaptation
The cube is defined in a configuration file, which is stored in the eMS configuration (in
default installation, this can be found in “EMS_HOME/conf/common/eMS.xml”).
The cube is implemented using a Mondrian OLAP server and is integrated into eMS by
using OLAP4j. It is possible to add/change /remove dimensions from the cube by
adapting the eMS.xml.
Adaptation
The cube dimensions can be adapted by modifying the ems.xml file by rewriting
selected parts of the document. The document might be edited using a standard text
editor such as Notepad.
The XML definition of the eMS Budget Cube consists of the following components:
Measures
Dimensions
Hierarchies
Members
Levels
Measures
Measures define the quantity that you are interested in measuring. In our case, it is
“Total” standing for total amount of money corresponding to the selected axis.
Each measure (see <Measure>) has a name, a column in the fact table, and an aggregator.
Dimensions
Dimensions are attributes according to which the measures are divided into the
categories and sub-categories. They correspond to the row and column names.
Dimension is connected to a cube by two columns: one in the fact table and one in the
dimension table. Each <Dimension> element has a foreignKey attribute (matching the
name of the fact table column).

CUBE
243
Members
Dimensions consist of members. They are defined by a set of attributes. They can be
organized into levels.
Levels
Cubes are organized into dimensions and levels of data. The levels are then arranged
into hierarchies. A level is a collection of members (data) which have the same
distance from the root of the hierarchy.
Hierarchies
Hierarchy represents a systematic way of organizing the members into a logical
structure. Organizing members into hierarchies makes the analysis much more
convenient.
Hierarchies with the same fact table attribute are further grouped into dimensions.
Please check out the Mondrian documentation for more details.
Use of Cube
Needed Privilleges
For accessing the Cube section of eMS, the privilege REPORTING is necessary.
How to use Cube
Cube reporting can be accessed by clicking the corresponding item in the left side
menu, section Programme tables.
Figure 287: Cube menu item
At least one attribute from each, the Cube Budget Rows and Cube Budget Columns,
need to be selected for creating a report. After the attributes have been chosen, the
request might be submitted by clicking on the “Submit” button.

CUBE
244
Figure 288 Cube - Main Page
After a while, a table is generated containing the requested data.
Figure 289 Cube report - Partner/Period
When the report is ready, its axis can be swapped, the table can be exported to Excel or PDF or the Cube can be recalculated.
eMS also enables generating a graph (Pie, Bar or Line Chart) based on the cube report.
Figure 290 Example of a graph generated based on the cube calculations

AUDIT LOG
245
Audit log eMS traces every creation, modification and deletion of documents and data, which
happen in the system. The logs are written to a table in the technical database called
“auditlog”.
Especially all changes of states of the application form, certificates and reports are
logged there.
The audit log needs to be turned on in programme.properties with the property
“auditlog.active=yes”
Figure 291: Auditlog

UPLOAD OF DOCUMENTS
246
Upload of documents eMS allows the upload of documents at certain sections. None of the documents in eMS
is visible for public, only registered, logged in users with certain privileges or roles can
see those documents.
eMS does not transform/edit/modify any uploaded document. They are stored binary
identically to the uploaded file in the system. eMS does not allow to edit/modify those
documents in the application. Documents uploaded to the system can be downloaded
again, and shown in external third party applications (e.g. PDF Reader).
eMS does not modify any documents. Especially the modification of documents bearing
an electronic signature is not possible in the system.

IMPORT OF DATA
247
Import of data eMS currently only allows manual import of translations. Currently no other importing
functionalities are foreseen.
Import of translations
eMS allows the import of translations and texts from the user interface. This feature is
importing previously exported translations from CSV format to the system.
Figure 292: Import of translations
Automatic import of currency exchange rates
The eMS automatically imports the monthly currency exchange rates from the
European commission
(http://ec.europa.eu/budget/contracts_grants/info_contracts/inforeuro/inforeuro_en
.cfm).
This import can be configured in programme.properties
quartz.cronTrigger.interval=0 * * * * ? *
quartz.cronTriggerCSV.interval=0 0 4 1 * ?
quartz.cronTriggerCSV.receiveAllowed=true
quartz.cronTriggerCSV.url=http://ec.europa.eu/budget/inforeuro/index.cfm?f
useaction=dsp_html_monthly_rates&FileType=CSV&Language=en&Delim=c&
Period=#year#-#month#&Download=Yes

EXPORT OF DATA
248
Export of data eMS allows to export data on different levels and at different places in the
application.
Export of translations
eMS allows to export translations and texts from the user interface. This feature
exports to CSV format, which can be processed in any text editor. The exported
translations can be imported again in the same form of the user interface.
Figure 293: Export and import of translations
Export of budget in the application form
eMS allows the export of all data, which is used in the partner budget of the
application form. This feature exports data into Excel format, which can be processed
by proprietary tools like Microsoft Excel or free tools like Libre Office or Open Office.
Figure 294: Exporting of application form budget

EXPORT OF DATA
249
Export of overview tables
eMS contains a variety of overview tables at different sections of the software. This
feature exports all the visible content of the selected data table to Excel format.
Figure 295: Export of overview tables
Export of application form and project lists
All lists of an application form or project elements can be exported to Excel. Only the
attributes visible in the corresponding table will be exported.
Figure 296: Exporting of application form and project lists
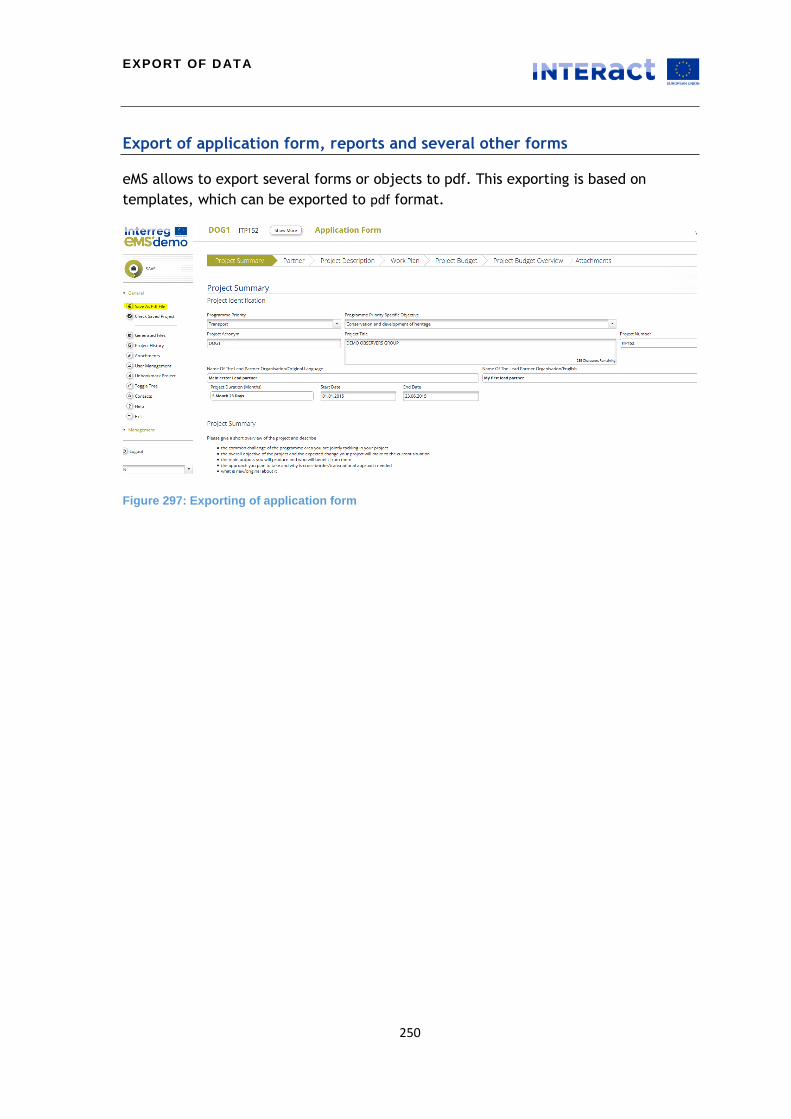
EXPORT OF DATA
250
Export of application form, reports and several other forms
eMS allows to export several forms or objects to pdf. This exporting is based on
templates, which can be exported to pdf format.
Figure 297: Exporting of application form

EXPORT OF DATA
251
Exporting of checklists
The system allows to export checklists and to generate reports based on this
information. For example, it is possible to create a report based on information from
the application form and the quality assessment, which can be provided to the
monitoring committee for decision.
The templates can be customized by ETC Programmes. The extracted document can
still be modified in an editor before transformation to PDF. Modifications in the
extracted document are not stored in eMS.
Figure 298: Report based on application form and checklist

EXPORT OF DATA
252
Cube
eMS contains an integrated OLAP cube based system. This system allows the export of
data to Excel or PDF.
Figure 299: OLAP Cube exporting
Export from Documents section
Users with the appropriate user privileges can access two different sections
(application form and report) in the eMS. In those sections, programmes can define
their own templates for the extraction of PDFs.
Figure 300: Export in Documents section
Exporting from technical database
The software uses standard SQL based RDMS. Therefore, any appropriate tool can be
used to export data from the technical database. For example, Mysql Studio can be
used to export data to different formats.
Interact recommends to install a third party reporting server, to extract data from the
technical database. Those tools usually support the extraction of any data available in
the database and allow generating a variety of different documents and formats.

EXPORT OF DATA
253
Export of files from the file system of the server
All uploaded documents in eMS are stored on the file system of the server. An
administrator of this server can export documents in any format like ZIP.

KEEP
254
KEEP KEEP (www.keep.eu) is the only source of aggregated information regarding projects
and beneficiaries of European Union programmes dedicated to cross-border,
transnational and interregional cooperation within the European Union and between
European Union Member States and neighbouring countries.
The Interact Programme, with the support of the European Commission and the
remaining Interreg and ENPI/ENI CBC programmes, built this database and maintains
it, as part of its mission.
Automatic export of data to KEEP
eMS allows automatic transmission of data to KEEP.
The link to KEEP can be configured in the configuration file “programme.properties”
by changing the following configurations
quartz.cronTriggerProgXML.enabled=true # <ss> <mm> <hh> <dd> <month> <day of week> quartz.cronTriggerProgXML.interval=0 01 05 * * ? quartz.cronTriggerProgXML.ftpServer=keep2.web.iway.sk quartz.cronTriggerProgXML.ftpPort=21 quartz.cronTriggerProgXML.ftpUsername=*** quartz.cronTriggerProgXML.ftpPassword=*** quartz.cronTriggerProgXML.ftpWorkingDirectory=/var/lib/ems1/keepXML/
Please make sure, that your server can access the KEEP server on the specified url and
port.
The export is done periodically in the specified interval (property
“quartz.cronTriggerProgXML.interval”). The link can be turned on/off by changing the
property “quartz.cronTriggerProgXML.enabled”.
eMS sends the information via FTP with explicit TLS to the KEEP server. To establish
the link, eMS creates an XML-file. Please find the specification of the submitted data
in the annex of this manual.

BACKUP AND RECOVERY
255
Backup of eMS eMS does not automatically backup any of the available data. Backup has to be done
by the environment the system is installed in.
There are two main possibilities to backup eMS. Both depend on the configuration and
the possibilities of the environment.
Backup of database (database dump) and backup of file system
Snapshot of the virtual machine(s)
Each programme has to take care of a backup and save storage of data.
Usually the backup is done periodically (e.g. once a day). Parallel synchronized storage
of data was not scope of this project, but could (maybe) be added by the
environment.
Restoring of data
Restoring depends on the selected backup possibility. Any of the above mentioned
backup scenarios allow restoring of data.

SEARCH FUNCTIONALITIES
256
Search functionalities Lists of application forms allow searching for all visible elements. For this reason, all
data tables contain a searching functionality.
Figure 301: Search functionality in lists
Easy retrieval of documents
Documents are always attached to elements like application forms or reports.
Therefore, these documents are easy to find. eMS does not process the content of
attached documents, therefore it is not possible to search for content of documents in
the application.
As the data retrieved by the system are stored using standard technologies (RDBMS,
file system) it is possible to search for specific documents. This has to be done in the
technical database or on the file system. Please contact your technical administrator
for support.

ADAPTATIONS AND PLUGI NS
257
Adaptations and plugins
Logo
The logo of the Programme is located in the provided .war file and can be changed by
the Programmes by replacing the provided “Interreg_Logo.png” with the programme
logo.
During the development procedure, Interact proposed to include the programme logos
into the application itself. Programmes who provided their logo do not have to replace
the image in every installation, but can show their logo upon configuration.
Styling
Styling in eMS is implemented using CSS, a standard technology used in web
applications. The CSS files are located inside of the provided ems.war file. To change
the styling, please get in touch with your service provider.
Plugins
eMS contains a variety of plugins. Depending on the technology they are implemented
with, Programmes either need a text editor to change them or an integrated
development environment (like Eclipse).
Figure 302 Plugin overview

FILE UPLOAD FOR LOGIN PAGE
258
File upload for login page eMS enables to provide users or possible users with certain information even before
registration. This feature is secured via posting the documents on the start / login
page.
Figure 303 Documents posted on the start / login page
Needed privileges
For uploading files For Login, the UPLOAD_FILES_FOR_LOGIN_PAGE or the almighty
ADMIN privilege is necessary.
How to post the documents to the login page
In order to post the documents to the login page, the documents need to be uploaded.
Figure 304 Upload Files For Login menu item
You can enter the corresponding section by navigating to the left side menu ->eMS
Management -> “Upload Files For Login” item.
Here, you can select and upload files to be posted to the login page.
Figure 305 Selecting Files To Be Posted To Login Page

PERFORMANCE FINE -TUNING
259
Performance fine-tuning As eMS is a brand new system and it potentially has to deal with a lot of concurrent users and
big data. eMS provides a number of possibilities how to improve the performance of the system
and how to deal with a high number of concurrent users.
As eMS now is in productive use, we already gained some experience on this topic which we
want to share in this chapter.
Application server load balancing
eMS allows to install several parallel application server instances.
Figure 306: Architecture of eMS
It is recommended to install at least a second instance of the application server. Please note: not
only applicant or partner users count in the system as concurrent users, also authority users like
JS or CA are technical users.
Standalone Apache ActiveMQ
To support the asynchronous generation of pdfs, eMS uses by default an embedded Apache
ActiveMQ instance.
eMS allows several other possibilities of how to run Apache ActiveMQ:
1. Embedded Apache Active MQ in one Tomcat only
2. Embedded Apache Active MQ in all (or some) parallel Tomcat instances
3. Standalone Apache Active MQ (here you need to install a standalone Apache ActiveMQ on one of your servers
4. Configure all or only some application servers as workers to generate pdfs
5. Configure one or several separate application servers, which are not available to end users to generate pdfs.
Webserver (Apache WS)
Application server
(Apache Tomcat)
Application server
(Apache Tomcat) … … Messaging server
(Apache ActiveMQ)
Relational Database (Mariadb) Filesystem

PERFORMANCE FINE -TUNING
260
The following configuration in “programme.properties” can be changed to call different
activemq instances:
# ActiveMQ Configuration # to start embedded server, # use "vm://localhost?create=false" as address for activeMQ.server # activeMQ.server=tcp://servername:port activeMQ.server=tcp://localhost:61616 #activeMQ.server=failover://tcp://localhost:61616 # Name of the print queue in ActiveMQ activeMQ.queueName=PDFprintQueue activeMQ.receiveAllowed=true #defines the path of the activeMQ-kahadb-data-folder #activeMQ.datadirectory=/path/to/data/directory activeMQ.datadirectory=/var/lib/ems/kahadb
Figure 307: Configuration for Apache ActiveMQ
Pdf Generation interval
The process to generate PDFs is triggered in certain intervals. The “programme.properties”
configuration file contains elements to configure the time periods, in which pdfs are generated.
The documentation for this configuration can be found here.
# QUARTZ Configuration for PDF printing # <ss> <mm> <hh> <dd> <month> <day of week> quartz.cronTrigger.interval=0 * * * * ? * Figure 308: Configuration for PDF generation interval
Avoiding Spring Webflow Serialization
The budget in eMS is built on several dimensions:
Partner
Budgetline
Workpackage
Period
Subbudgetline
Due to this number of dimensions, the number of existing budget figures could increase a lot.
Due to this and the use of Spring Webflows, performance issues could occur.

PERFORMANCE FINE -TUNING
261
Warning
In case of such large objects, Spring Webflows consumes all the CPU – the performance of eMS
tremendously decreases.
eMS contains a configuration in programme.properties, to not persist the budget data in the
Spring context, but reload the data from the database with each request. This puts more load on
the database.
First tests with big application forms show a tremendous increase in the performance of eMS.
CPU consumption decreased tremendously, while the load on the database was acceptable.
# true uses Spring Webflow Serialization, false disables # use false in case of CPU performance issues in the budget section keepFlowScopeBudget=false Figure 309: Flow scoped budget configuration

SUPPORTED CHARACTERS
262
Supported Characters eMS allows to use any character from the UTF-8 character set.
Recommended database configuration
We recommend to create the database schema with the “utf8_general_ci” collation.
The eMS furthermore contains configuration for the database connection in
db.properties:
db.url=jdbc\:mysql\://localhost\:3306/ems1?characterEncoding\=UTF-8 hibernate.connection.CharSet=utf8 hibernate.connection.characterEncoding=utf8 hibernate.connection.useUnicode=true Table 7: Section of db.properties to configure UTF-8 support
Recommended server/java configuration
The Tomcat Application server should be started with the following java parameter.
On some environments this missing java runtime parameter could cause problems with
the character encoding.
-Dfile.encoding=UTF-8 Table 8: Java runtime parameter
Character encoding of PDF templates
The PDF-template files should be saved with with UTF-8 encoding
<?xml version="1.0" encoding="UTF-8"?> Table 9: Heading of PDF template file
Therefore the files can contain all special characters from the UTF-8 charset.
Version 3_0.10 introduces a new element in programme.properties
vmCharacterEncoding=UTF-8
If this property is set to UTF-8 the generation of PDFs should support any character
needed in the EU.

SUPPORTED CHARACTERS
263
Characters that cannot be used in eMS
The eMS user interface supports all kind of characters. This seems to be a web browser
fallback behavior to use a fallback character set in case characters are not included in
the provided font.
Tests with Chinese characters showed, the font used to generate the PDFs does not
include all Chinese characters. Therefore Chinese texts entered into eMS might not
show up in generated PDF files.

ABBREVIATIONS
264
Abbreviations Abbreviaton Meaning
CA Certifying Authority
HIT Harmonised Implementation Tool – Interacts Project on the harmonisation of forms
JS / JTS Joint Technical Secretariat
LA Lead Applicant
LP Lead Partner
MA Managing Authority
NCP National Contact Point
PP Project Partner
AA Audit Authority
WP Workpackage
BL Budgetline
LoE List of expenditures

ANNEX
265
Annex 1: User privileges privilegekey label description
ADMIN ADMIN Admin Role - Access to all data
MG_TA MG_TA Manage Technical Assistance
MG_PROGRAM MG_PROGRAM Manage Programme, Access to OP data
MG_CALLS MG_CALLS Manage Calls (New Call, Modify)
SHOW_CALLS SHOW_CALLS Access to the list of Calls
SHOW_PROGRAM SHOW_PROGRAM Read only access to OP data
SHOW_TA SHOW_TA Read only access to TA Data
SHOW_APPLICATIONS SHOW_APPLICATIONS Show list of applications
CREATE_APPLICATIONS CREATE_APPLICATIONS Create new application
SHOW_ALL_APPLICATIONS SHOW_ALL_APPLICATIONS Show all applications (Access to Applicationbrowser)
MG_USER MG_USER Manage user accounts
MG_ROLES MG_ROLES Manage user roles
MG_MULTILANGUAGE MG_MULTILANGUAGE Manage translations of user interface
MAILBOX MAILBOX Access to messaging features
DASHBOARD DASHBOARD Access to the dashboard
CHECK_PROJECT CHECK_PROJECT Check project application (prerequisite to SUBMIT_PROJECT)
SUBMIT_PROJECT SUBMIT_PROJECT Submit project application
APPROVE_PROJECT_PHASE1 APPROVE_PROJECT_PHASE1 Approve project application phase 1 (in 2 phase call) as well as access to all the lists under "Assessment-First Step"
APPROVE_PROJECT APPROVE_PROJECT Approve project application after submission
DISABLE_PROJECTCHECK DISABLE_PROJECTCHECK Disable check-requirement in application form
BROWSE_APPLICATIONS BROWSE_APPLICATIONS BROWSE_APPLICATIONS
EVALUATE_PROJECT EVALUATE_PROJECT Access to "Quality Assessment" list and to the evaluation-section of applications
SUBMIT_EVALUATION SUBMIT_EVALUATION Access the consolidation-view of a checklist and right to finish the assessment

ANNEX
266
MG_CHECKLIST MG_CHECKLIST Access to 'Manage checklists' section
MG_CONTRACT MG_CONTRACT Access to "Contracting"-List and subsidy-contract-page for the contract creation and approval
MG_CHANGEREQUESTS MG_CHANGEREQUESTS Allows Modification-Requests already after submission of an Application. Access to "Modification Request"-List. Allows to approve of modification requests and the finished modifications
MG_RANKING MG_RANKING MG_RANKING
MG_PROMOTED_PROJECT MG_PROMOTED_PROJECT Access to the following lists: "Approved under Conditions", "Handover and Contracting", "Contracted"
MG_PARKED_PROJECT MG_PARKED_PROJECT Access to the "Reserve List"-List
MG_STARTUP MG_STARTUP Access to the "Start up data/Supplementary Information" sections
MG_HANDOVER MG_HANDOVER Access to the "Contracting"-List
FLC FLC
MA MA Allows user the MA-rights for the reporting
CA CA Allows user the CA-rights for the reporting
ELIGIBILITY_CHECK ELIGIBILITY_CHECK Access to the "Admin and Eligibility Check"-List and to the eligibility assessment
ELIGIBILITY_CHECK_SUBMIT ELIGIBILITY_CHECK_SUBMIT ELIGIBILITY_CHECK_SUBMIT
ENABLE_ATTACHMENTS_JTS ENABLE_ATTACHMENTS_JTS Acivation of the attachment-upload-functionality for submited applications
EVALUATION_CONSOLIDATE EVALUATION_CONSOLIDATE EVALUATION_CONSOLIDATE
RECOMMENDATIONS RECOMMENDATIONS Access to the "Recommendation"-List
PROJECT_DECISION PROJECT_DECISION Access to the "Funding Decision(MC)"-List
REPORTING REPORTING Access to the "Cube"-Seciton of the Programme-Tables
EVALUATE_PROJECT_PHASE1 EVALUATE_PROJECT_PHASE1 Access to the evaluation-check-section of the first phase of a two-phase call applications
JTS_ATTACHMENT JTS_ATTACHMENT Role to attach JTS internal documents to projects
CUSTOM_DOCUMENT CUSTOM_DOCUMENT Access to custom project document generation
JTS JTS Allows all the JTS-Functionality in the reporting-phase of a project
PROJECTFINANCE_MA PROJECTFINANCE_MA Access to the "MA Approval"-page

ANNEX
267
PROJECTFINANCE_CA PROJECTFINANCE_CA Access to the "Generate CA Certificate"- and "CA Certificates"-pages
ELIGIBILITY_DECISION ELIGIBILITY_DECISION ELIGIBILITY_DECISION
MG_FLC_AT MG_FLC_AT MG_FLC_** (Country code) - Manage FLC Assignment for Country **
MG_FLC MG_FLC Access to the "FLC Institution"-, "FLC Assignment"- and "My project partners"-page
SHOW_PROJECT_IDEAS SHOW_PROJECT_IDEAS Access to the List project ideas
CREATE_PROJECT_IDEAS CREATE_PROJECT_IDEAS Access to the Create project idea section
ELIGIBLE_PROJECT_PHASE1 ELIGIBLE_PROJECT_PHASE1 Access to the eligibility-check-section of the first phase of a two-phase-application
SU_PM_R SU_PM_R Additional Startup data project management section read access
SU_PM_W SU_PM_W Additional Startup data project management section write access
SU_BI_R SU_BI_R Additional Startup data bank information section read access
SU_BI_W SU_BI_W Additional Startup data bank information section write access
SU_FLC_R SU_FLC_R Additional Startup data FLC section read access
SU_FLC_W SU_FLC_W Additional Startup data FLC section write access
SU_SA_R SU_SA_R Additional Startup data state aid section read access
SU_SA_W SU_SA_W Additional Startup data state aid section write access
SU_UA_R SU_UA_R Additional Startup data user assignment section read access
SU_UA_W SU_UA_W Additional Startup data user assignment section write access
SU_OU_R SU_OU_R Additional Startup data output trail section read access
SU_OU_W SU_OU_W Additional Startup data output trail section write access
SU_CO_R SU_CO_R Additional Startup ‘datacode’ section read access
SU_CO_W SU_CO_W Additional Startup ‘datacode’ section write access
MG_FLC_OUTSIDE MG_FLC_OUTSIDE Manage FLC assignments for partners outside programme area
OFFICER_IN_CHARGE OFFICER_IN_CHARGE Assign officer in charge
CA_REVERT_REPORT CA_REVERT_REPORT Revert CA certificates
MA_REVERT_REPORT MA_REVERT_REPORT Revert MA reports
JS_REVERT_REPORT JS_REVERT_REPORT Revert JS reports

ANNEX
268
LP_REVERT_REPORT LP_REVERT_REPORT Revert project progress report
FLC_REVERT_REPORT FLC_REVERT_REPORT Revert FLC certificate

ANNEX
269
Annex 2: Call options Option Description
Application Form and Procedure Settings
Two-step Application Procedure Enables the 2 step application procedure for this call. All applicants have to fill in and submit all fields assigned to phase 1 and can go on with phase 2 after approval.
Partner Settings
Contact Details Fields Enables telephone and email input for partners section
Associated Partner Section Enables feature to add associated partners
Partnership Description Section Enables text Input fields for global partnership description
Subpartners Enables subpartner section in partner detail view
Partner Benefit Enables partner benefit input field in partner detail view
Partner Confirmation Enables drop down in partner section for partner confirmation (confirmed/ongoing discussion)
Use English Partnername Enables partner name in English in partner detail section
Use Partner Abbreviation Enables partner abbreviation in partner detail view
Project Description Settings
Cooperation Criteria Section Enables cooperation criteria input section (cmp. C.1.4 in HIT Applicationform)
Durability And Transferability Section Enables durability and transferability of project outputs and results (cmp. C.2.3/C.2.4 HIT AF)
Macroregional Strategy Section Enables the input for macroregional strategies and the projects contribution (cmp. C.3.1 AF HIT)
Risk Section Enables risk section (submenu) in project descrition
Cooperation Reason Enables input field for cooperation reason
Enhanced Cooperation Criteria Enables enhanced cooperation criteria
Knowledge Enables input field for knowledge
Resultindicator Enables result indicator section in project focus (C2)
Use Project Specific Objectives Enables specific objectives section in project focus (C2)
Workpackage Settings
Work Package Preparation Enables the workpackage type preparation for use in projects
Work Package Investment Enables the workpackage type investment for use in projects
Work Package Implementation Enables the workpackage type implementation for use in projects
Work Package Communication Enables the workpackage type communication for use in projects
Work Package Management- Activitiy Budget Enables the input field for budget value for activity in WP Mgmt.
Work Package Management- Activitiy Description Enables the input field for description for activity in WP Mgmt.
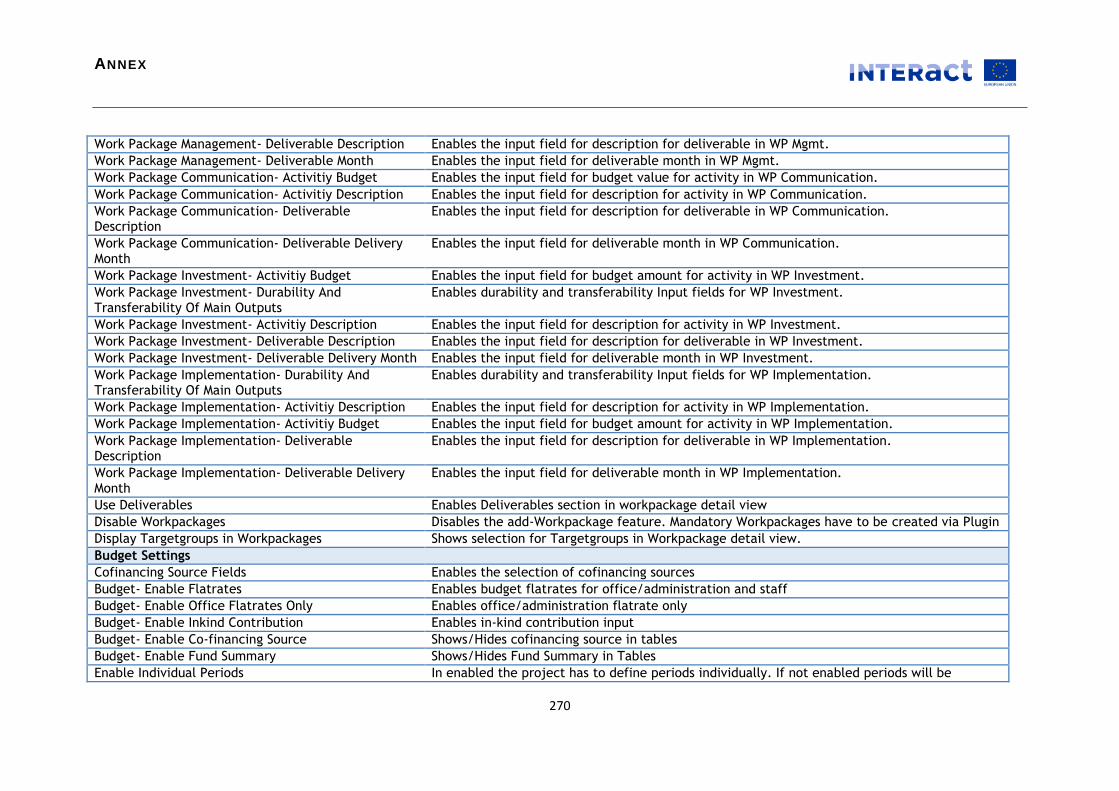
ANNEX
270
Work Package Management- Deliverable Description Enables the input field for description for deliverable in WP Mgmt.
Work Package Management- Deliverable Month Enables the input field for deliverable month in WP Mgmt.
Work Package Communication- Activitiy Budget Enables the input field for budget value for activity in WP Communication.
Work Package Communication- Activitiy Description Enables the input field for description for activity in WP Communication.
Work Package Communication- Deliverable Description
Enables the input field for description for deliverable in WP Communication.
Work Package Communication- Deliverable Delivery Month
Enables the input field for deliverable month in WP Communication.
Work Package Investment- Activitiy Budget Enables the input field for budget amount for activity in WP Investment.
Work Package Investment- Durability And Transferability Of Main Outputs
Enables durability and transferability Input fields for WP Investment.
Work Package Investment- Activitiy Description Enables the input field for description for activity in WP Investment.
Work Package Investment- Deliverable Description Enables the input field for description for deliverable in WP Investment.
Work Package Investment- Deliverable Delivery Month Enables the input field for deliverable month in WP Investment.
Work Package Implementation- Durability And Transferability Of Main Outputs
Enables durability and transferability Input fields for WP Implementation.
Work Package Implementation- Activitiy Description Enables the input field for description for activity in WP Implementation.
Work Package Implementation- Activitiy Budget Enables the input field for budget amount for activity in WP Implementation.
Work Package Implementation- Deliverable Description
Enables the input field for description for deliverable in WP Implementation.
Work Package Implementation- Deliverable Delivery Month
Enables the input field for deliverable month in WP Implementation.
Use Deliverables Enables Deliverables section in workpackage detail view
Disable Workpackages Disables the add-Workpackage feature. Mandatory Workpackages have to be created via Plugin
Display Targetgroups in Workpackages Shows selection for Targetgroups in Workpackage detail view.
Budget Settings
Cofinancing Source Fields Enables the selection of cofinancing sources
Budget- Enable Flatrates Enables budget flatrates for office/administration and staff
Budget- Enable Office Flatrates Only Enables office/administration flatrate only
Budget- Enable Inkind Contribution Enables in-kind contribution input
Budget- Enable Co-financing Source Shows/Hides cofinancing source in tables
Budget- Enable Fund Summary Shows/Hides Fund Summary in Tables
Enable Individual Periods In enabled the project has to define periods individually. If not enabled periods will be
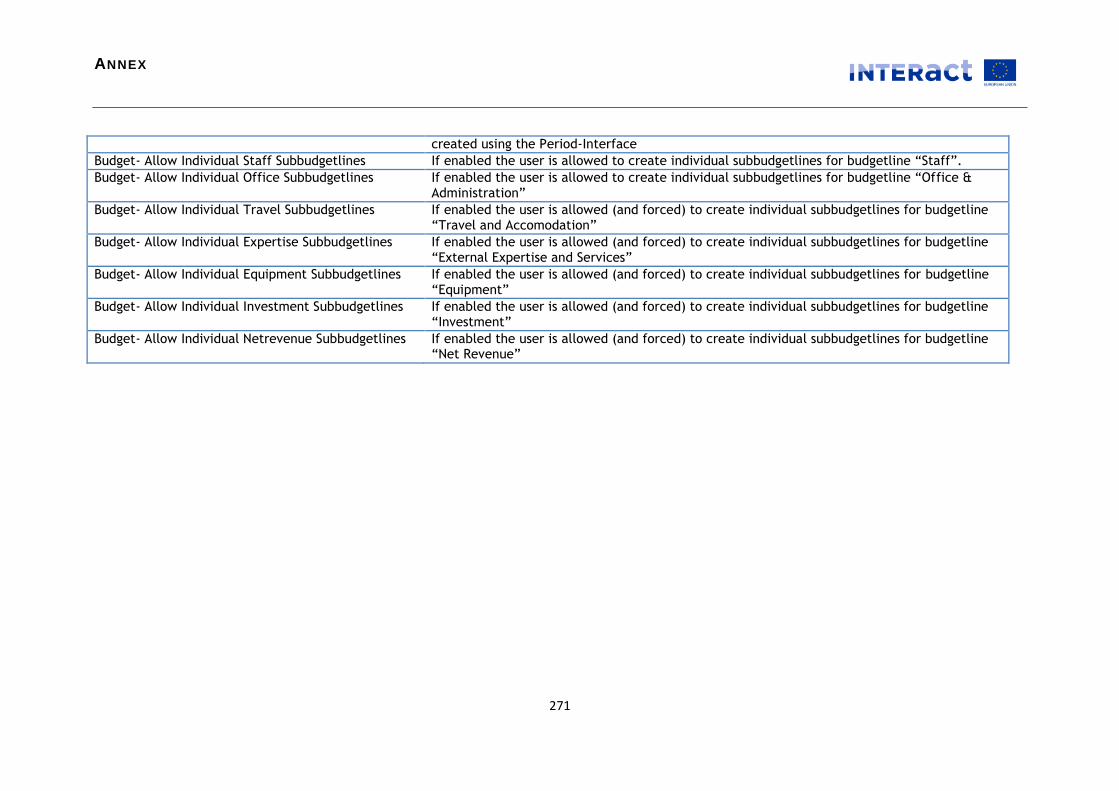
ANNEX
271
created using the Period-Interface
Budget- Allow Individual Staff Subbudgetlines If enabled the user is allowed to create individual subbudgetlines for budgetline “Staff”.
Budget- Allow Individual Office Subbudgetlines If enabled the user is allowed to create individual subbudgetlines for budgetline “Office & Administration”
Budget- Allow Individual Travel Subbudgetlines If enabled the user is allowed (and forced) to create individual subbudgetlines for budgetline “Travel and Accomodation”
Budget- Allow Individual Expertise Subbudgetlines If enabled the user is allowed (and forced) to create individual subbudgetlines for budgetline “External Expertise and Services”
Budget- Allow Individual Equipment Subbudgetlines If enabled the user is allowed (and forced) to create individual subbudgetlines for budgetline “Equipment”
Budget- Allow Individual Investment Subbudgetlines If enabled the user is allowed (and forced) to create individual subbudgetlines for budgetline “Investment”
Budget- Allow Individual Netrevenue Subbudgetlines If enabled the user is allowed (and forced) to create individual subbudgetlines for budgetline “Net Revenue”

ANNEX
272
Annex 3: Properties Remark: properties need to be changed in configuration files by the technical administrator. Most changes require a restart of eMS to be
taken into account.
Property Default Value
mail.properties mail.server Mailserver for SMTP Service
mail.senderadress Sender Adress to show in System mails
registration.defaultrole APPLICANT Users will have this Role after registration
registration.authenticationName
emsDB Default Authentication Mehtod for Users after registration
registration.passwordRegexp ((?\=.*[a-z]).{6,20}) Password Regexp Pattern for Security
login.attempts 3 After X failed login attempts the user has to wait “login.timeout” seconts
login.timeout 60 See obove
mail.uploadPath Path to uploaded mail attachments. eMS will create subfolders for each meassges
mail.adminUserId 1 User id of the admin user
mail.notifyLP true Lead partner will be notified via email about submission
registration.captchaEnabled false Enables Captcha in user Registration – see configuration notes
registration.usernameEnabled true If false, username cannot be choosen – email will be used
programme.properties programme.id 1 Id of the productive programme
project.loadLists yes Loads Lists in Application form immediately
publiclegalstatus.id 1 Id of the legal status for public (used as a default value)
initpartnertype.id 1 Id of the partner type as a default value
initcofinsource.id ERDF Default cofinancing source
initrecovervat.id yes Init value for recover vat
auditlog.active no Enables/disables auditlog
upload.(jts)path Paths to store uploaded files. Subfolders will be created automatic.
pdf.path Path to store created documents. Subfolders for Projects or Users will be created automatic.
intermediate.path Path to store intermediate files.
font.path Path to fonts

ANNEX
273
cssfont.name Font name of TTF to use in generated Pdfs. Has to support all expected characters.
cssfont.path Path in css readable format to the font (to be used in templates).
projectReport.prefix Prefix for PDF Output of Application Form.
template.path Path to *.vm Template documents.
template.cache false Enables caching for templates (velocity setting)
template.modificationCheckInterval
15 If cache is enabled, the interval In minutes to check for template modifications (velocity setting)
template.file Template to use for Project Report
contractTemplate.file Template for the contract pd
contractIntermediate.path Intermediate path
contractPdf.path Path to generated contracs (subfolders are created automatically)
fundingTemplate.file Template File for decision print
fundingIntermediate.path Intermediate path
fundingPdf.path Path to generated decision prints (subfolders are created automatically)
Funding.filename Funding Decision Print filename
flcReport.xxx flcCertificate.xxx partnerProgressReport.xxx projectProgressReport.xxx checklists_Phase1_Eligibility.xxx checklists_Phase1_Assessment.xxx checklists_Eligibility checklists_Assessment checklists_FLC.xxx checklists_JTS.xxx phase1Ineligible.xxx phase1Approved.xxx phase1Rejected.xxx phase2Ineligible.xxx phase2Approved.xxx phase2Rejected.xxx phase2ReferredBack.xxx finalReport.xxx

ANNEX
274
xxx.templateFile Template for Document
xxx.path Path to store generated document
xxx.pathIntermediate Path for Intermediate Result
xxx.filename Filename for pdf
inputNumber.thousandSeparator
. Settings for Number formatting/input
inputNumber.decimalSeparator
,
inputNumber.decimalPlaces 2
inputNumber.minValue -999999999999999.99
inputNumber.maxValue 999999999999999.99
paginatorRows.general
Paginator settings for different lists
paginatorRows.project
paginatorRows.workpackage
paginatorRows.partner
activeMQ.server vm://localhost?create=false
Queue settings for automatic tasks (active mq settings)
activeMQ.queueName vm://localhost?create=false
activeMQ.receiveAllowed true
quartz.cronTrigger.interval 0 * * * * ? *
quartz.conTriggerCSV.interval
Interval for currency fetching
quartz.cronTriggerCSV.receiveAllowed
Enables job for currency fetching
quartz.cronTriggerCSV.url URL to currency service
currency.defaultId EUR Default currency
showStacktraceInGui false Shows stack trace in user interface when true
logPerformance False Enables Performance Logging
logInformation False Enables Information Logging
writerErrorsToStandardOutput
Writes Errors to StandardOut
upload.sizelimit Filesize Limit for Upload

ANNEX
275
upload.filetypes Filetypes allowed for upload
financeReport.xxx progressReport.xxx flcInstitution.xxx
xxx.uploadPath Path for uploaded binaries in the corresponding report
customvm.path Path to template for custom documents
customvm.cache false Velocity cache mode
customvm.modificationCheckInterval
10 Cache interval
customvm.cssfont.nam Font name to use for costom documents
customvm.cssfont.path Font path to use for custom documents
dateformat dd.MM.yyyy Date Format for GUI
privatelegalstatus.id 1 Default private status – do not modify
copy.enabled Enables application form copy function
timeformat dd.MM.yyyy hh:mm:ss
Userinterface Time Format
checks.jarPath.phase1 Plugin for… .. check of phase 1
checks.jarPath.lastphase … check of AF submission
checks.jarPath.partnerreport …check of partnerreport
appCreation.jarPath.initCreation
… initialization of AF when creation
nuts1Enabled False Shows Nuts Level 1 in Nuts selector
useMcdates False Shows drop down in AF to select MC Date
phase1Print False Shows print button for Phase 1 Print
template.file1 Template for Phase 1 Print
autoPhase1Print False Prints when submitting Phase 1
autoSubmitPrint False Prints when submitting AF
activeMQ.datadirectory Directory to store Active MQ Data (per Instance) can be set as –D Environment for cluster
currencyCsvEncoding Encoding of currency csv
euroId EUR
mrReport Enables modification requests when reports already exist
mandant demo Specific settings

ANNEX
276
roundingPlaces Internal rounding behaviour
roundingMode
loExpColumns List of columns used in List of Expenditure
period.jarPath.autocreation Implementation of Interfaces
checks.jarPath.invoice
google.maps.apiUrl http://maps.google.com/maps/api/geocode/json
API Url for geocoding
google.maps.defaultLat 48.858222 Default Latitude
google.maps.defaultLng 2.2945 Default Longitude
google.maps.defaultZoom 15 Default zoom factor in map
usePartnerMap False User Map in Partner section
velogDir Logdir for Velocity (PDF Creation)
reports.path Location for autogenerated reports
google.maps.jsApiUrl JS API Url for Google Map
htmlInPdf false If true, generated intermediate html documents will also be provided to the user
checklists_Phase1_Eligibility.xxx checklists_Phase1_Assessment.xxx checklists_Eligibility.xxx checklists_Assessment.xxx checklists_FLC.xxx checklists_JTS.xxx
xxx.pathIntermediate Intermediate path for checklist print of defined type
xxx.path Path for pdf result of checklist print of defined type
xxx.filename Filename for result
phase1Ineligible.xxx phase1Approved.xxx phase1Rejected.xxx phase2Ineligible.xxx phase2Approved.xxx phase2Rejected.xxx phase2ReferredBack.xxx
xxx.file Template of notification document
xxx.path Path for resulting notification pdf

ANNEX
277
xxx.filename Filename for notification pdf
eligibilityCheckDecisionEnabled
true
checks.jarPath.mr Check implementation for modification request
checks.jarPath.flc … flc submission
checks.jarPathfinalReport … final report submission
xml.path Path for keep export
postponeEnabled Enables postponing of projects
applicationBrowserColumns Columns shown in application browser
myApplicationsColumns Columns shown in my applications
showCategorizedQualityAssessmentComments
false Quality assessment comments per category, if disables only 1 comment box will be shown
useStickyMenu False Menu to the left will stick on top and not scroll with the content section of the application
monthdateformat MMM.yyyy Format for date information on month level
automaticHandoverToLeadPartner
False Lead partner will automatically be assigned to the lead applicants user
reporting.properties
mondrian.connection Mondrian Connection string with path to the eMS.xml cube definition and connection settings to the relational database

ANNEX
278