Employee Expense reporting for Workday Processing · EMPLOYEE EXPENSE REPORTING FOR WORKDAY...
25
EMPLOYEE EXPENSE REPORTING FOR WORKDAY PROCESSING SF08282019 [email protected] Expenditures by employees are reported and tracked in Workday using the Expense Report functionality. This guide shows users how to create, track, and edit personal and credit card expenditures and includes the use of Spend Authorizations. Log in at www.workday.simmons May 2019: Workday release – new functionality for this release includes alerts for both line items and the report itself, allowing the user to immediately identify what line item is in error; see page 16. This document has been updated to reflect the changes. August 2019: Submission of cash expenditures in foreign countries
Transcript of Employee Expense reporting for Workday Processing · EMPLOYEE EXPENSE REPORTING FOR WORKDAY...
EMPLOYEE EXPENSE REPORTING FOR
WORKDAY PROCESSING
SF08282019 [email protected]
Expenditures by employees are reported and tracked in Workday using the Expense Report functionality. This guide shows users how to create, track, and edit personal
and credit card expenditures and includes the use of Spend Authorizations.
Log in at www.workday.simmons
May 2019: Workday release – new functionality for this release includes alerts for both line items and the report itself, allowing the user to immediately identify what line
item is in error; see page 16. This document has been updated to reflect the changes.
August 2019: Submission of cash expenditures in foreign countries
1
EMPLOYEE EXPENSE REPORTING FOR WORKDAY PROCESSING
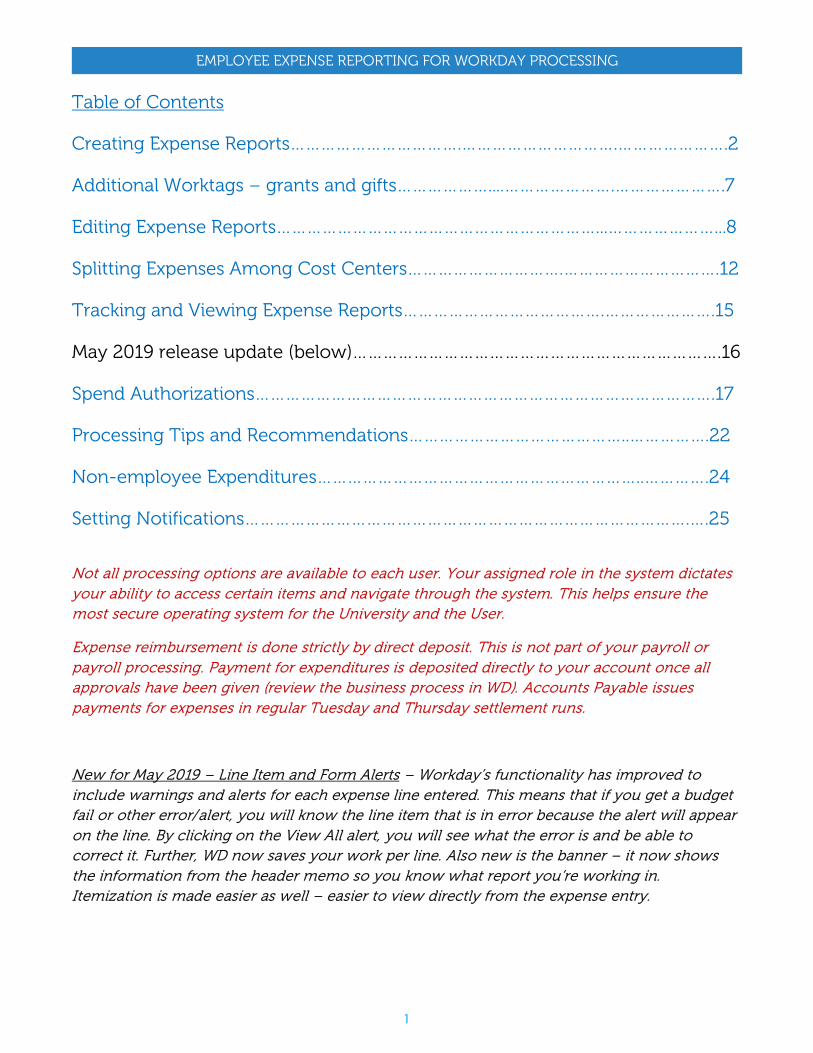
Table of Contents
Creating Expense Reports…………………………….………………………….………………….2
Additional Worktags – grants and gifts………………....………………….………………….7
Editing Expense Reports………………………………………………………...…………………...8
Splitting Expenses Among Cost Centers………………………….………………………….12
Tracking and Viewing Expense Reports………………………………….………………….15
May 2019 release update (below)……………………………………………………………….16
Spend Authorizations……………………………………………………………………………….17
Processing Tips and Recommendations……………………………………..…………….22
Non-employee Expenditures………………………………………………………..………….24
Setting Notifications…………………………………………………………………………….….25
Not all processing options are available to each user. Your assigned role in the system dictates your ability to access certain items and navigate through the system. This helps ensure the most secure operating system for the University and the User.
Expense reimbursement is done strictly by direct deposit. This is not part of your payroll or payroll processing. Payment for expenditures is deposited directly to your account once all approvals have been given (review the business process in WD). Accounts Payable issues payments for expenses in regular Tuesday and Thursday settlement runs.
New for May 2019 – Line Item and Form Alerts – Workday’s functionality has improved to include warnings and alerts for each expense line entered. This means that if you get a budget fail or other error/alert, you will know the line item that is in error because the alert will appear on the line. By clicking on the View All alert, you will see what the error is and be able to correct it. Further, WD now saves your work per line. Also new is the banner – it now shows the information from the header memo so you know what report you’re working in. Itemization is made easier as well – easier to view directly from the expense entry.
2
EMPLOYEE EXPENSE REPORTING FOR WORKDAY PROCESSING
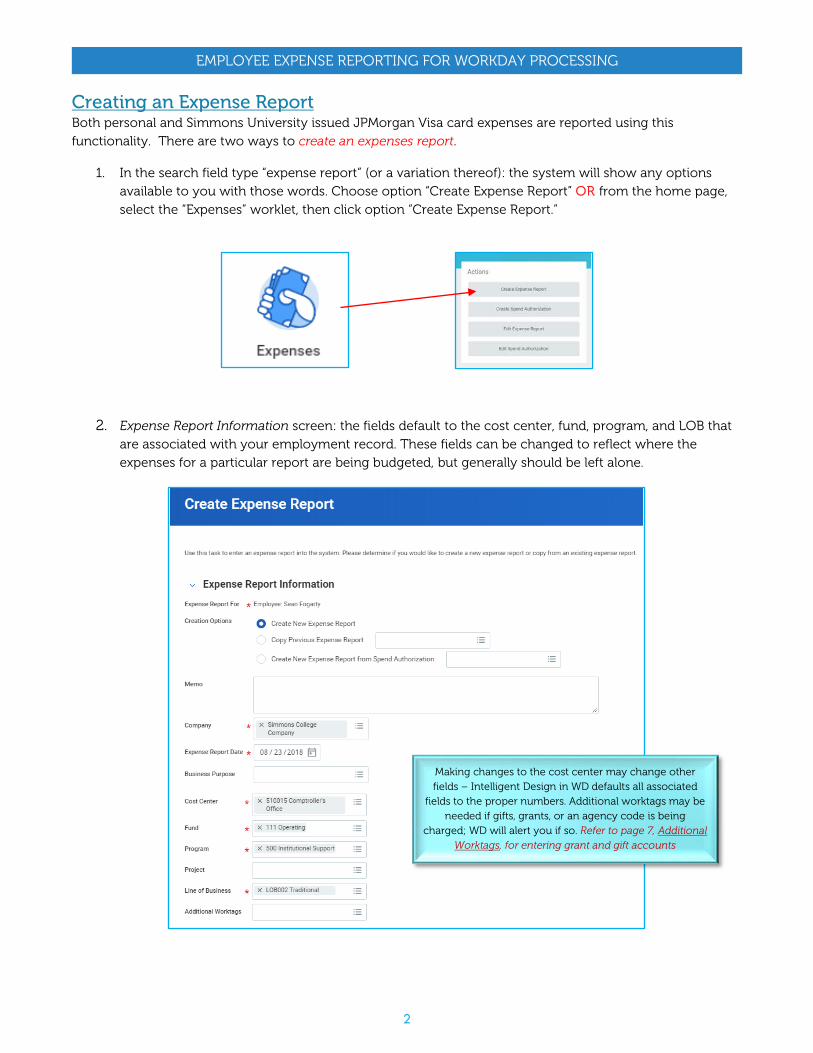
Creating an Expense Report Both personal and Simmons University issued JPMorgan Visa card expenses are reported using this functionality. There are two ways to create an expenses report.
1. In the search field type “expense report” (or a variation thereof): the system will show any options available to you with those words. Choose option “Create Expense Report” OR from the home page, select the “Expenses” worklet, then click option “Create Expense Report.”
2. Expense Report Information screen: the fields default to the cost center, fund, program, and LOB that are associated with your employment record. These fields can be changed to reflect where the expenses for a particular report are being budgeted, but generally should be left alone.
Making changes to the cost center may change other fields – Intelligent Design in WD defaults all associated
fields to the proper numbers. Additional worktags may be needed if gifts, grants, or an agency code is being
charged; WD will alert you if so. Refer to page 7, Additional
Worktags, for entering grant and gift accounts

3
EMPLOYEE EXPENSE REPORTING FOR WORKDAY PROCESSING
a. MEMO: use the memo field to explain the purpose of the expense b. BUSINESS PURPOSE: is a system requirement – WD will give an error alert if you fail to
complete this field. Click on the three bars and choose the option most closely associated with the expense
If you are a JPMorgan Simmons University issued Visa holder, your credit card transactions can be selected (bottom of screen) for reconciling. Select all or as many that pertain to the expense report you’re are creating - then click OK.
If you skip this step, you can still include any credit card charges on the next screen – see step 3a, page 5.
4
EMPLOYEE EXPENSE REPORTING FOR WORKDAY PROCESSING
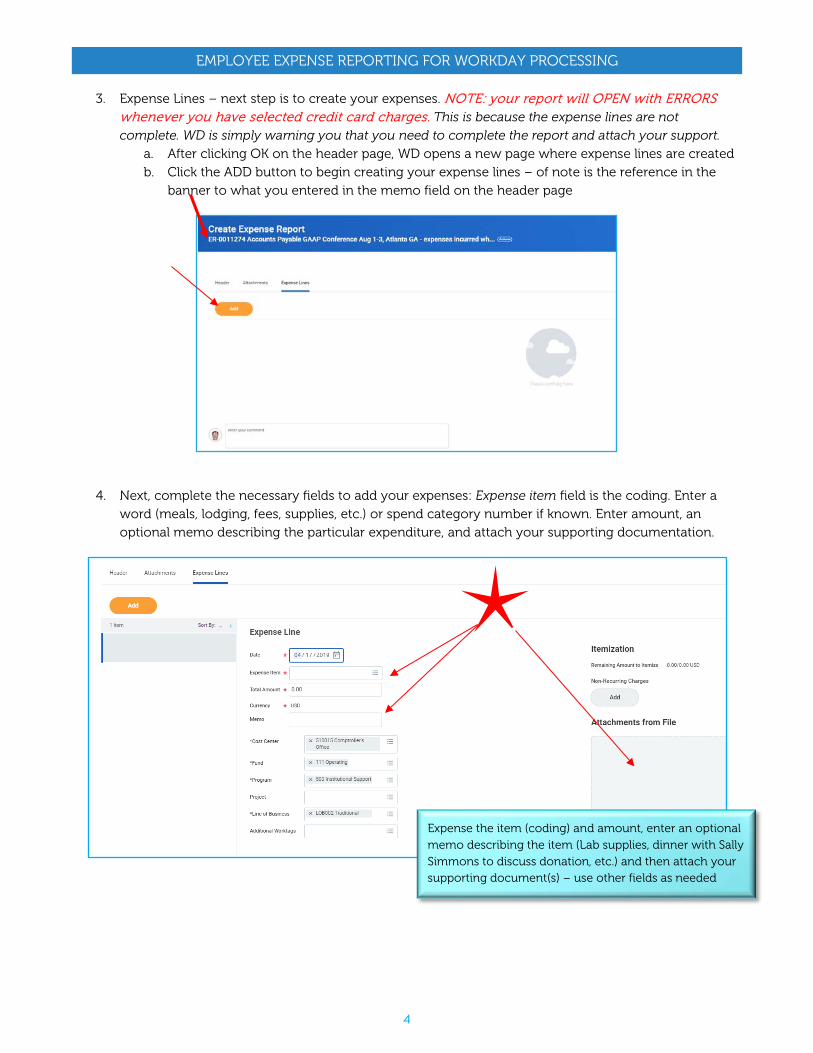
3. Expense Lines – next step is to create your expenses. NOTE: your report will OPEN with ERRORS whenever you have selected credit card charges. This is because the expense lines are not
complete. WD is simply warning you that you need to complete the report and attach your support. a. After clicking OK on the header page, WD opens a new page where expense lines are created b. Click the ADD button to begin creating your expense lines – of note is the reference in the
banner to what you entered in the memo field on the header page
4. Next, complete the necessary fields to add your expenses: Expense item field is the coding. Enter a
word (meals, lodging, fees, supplies, etc.) or spend category number if known. Enter amount, an optional memo describing the particular expenditure, and attach your supporting documentation.
Expense the item (coding) and amount, enter an optional memo describing the item (Lab supplies, dinner with Sally Simmons to discuss donation, etc.) and then attach your supporting document(s) – use other fields as needed
5
EMPLOYEE EXPENSE REPORTING FOR WORKDAY PROCESSING
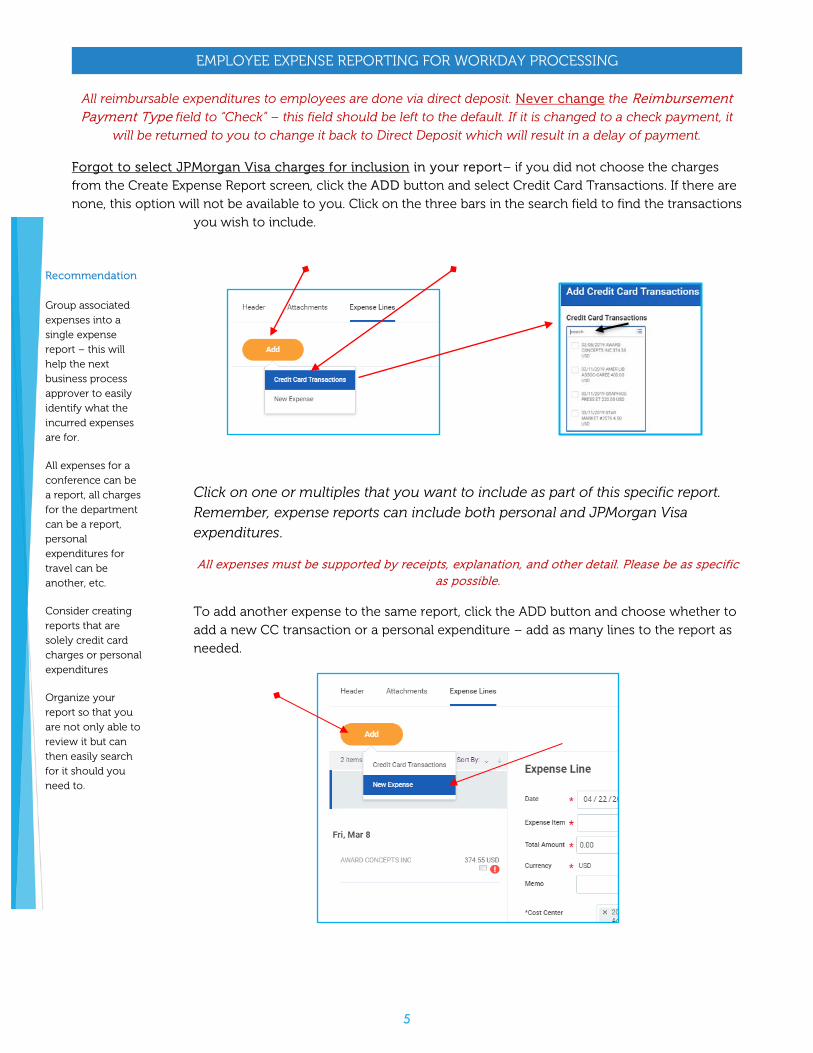
All reimbursable expenditures to employees are done via direct deposit. Never change the Reimbursement Payment Type field to “Check” – this field should be left to the default. If it is changed to a check payment, it
will be returned to you to change it back to Direct Deposit which will result in a delay of payment.
Forgot to select JPMorgan Visa charges for inclusion in your report– if you did not choose the charges from the Create Expense Report screen, click the ADD button and select Credit Card Transactions. If there are none, this option will not be available to you. Click on the three bars in the search field to find the transactions
you wish to include.
Click on one or multiples that you want to include as part of this specific report.
Remember, expense reports can include both personal and JPMorgan Visa expenditures.
All expenses must be supported by receipts, explanation, and other detail. Please be as specific as possible.
To add another expense to the same report, click the ADD button and choose whether to add a new CC transaction or a personal expenditure – add as many lines to the report as needed.
Recommendation
Group associated expenses into a single expense report – this will help the next business process approver to easily identify what the incurred expenses are for.
All expenses for a conference can be a report, all charges for the department can be a report, personal expenditures for travel can be another, etc.
Consider creating reports that are solely credit card charges or personal expenditures
Organize your report so that you are not only able to review it but can then easily search for it should you need to.
6
EMPLOYEE EXPENSE REPORTING FOR WORKDAY PROCESSING
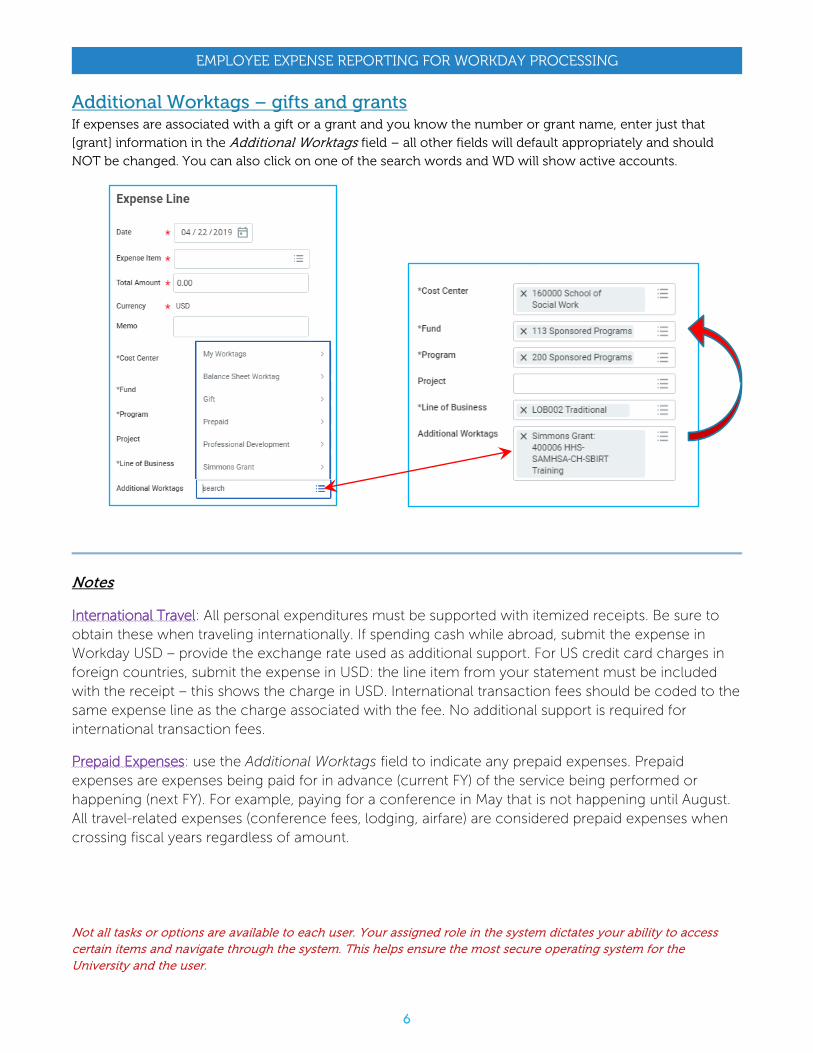
Additional Worktags – gifts and grants If expenses are associated with a gift or a grant and you know the number or grant name, enter just that [grant] information in the Additional Worktags field – all other fields will default appropriately and should NOT be changed. You can also click on one of the search words and WD will show active accounts.
Notes
International Travel: All personal expenditures must be supported with itemized receipts. Be sure to obtain these when traveling internationally. If spending cash while abroad, submit the expense in Workday USD – provide the exchange rate used as additional support. For US credit card charges in foreign countries, submit the expense in USD: the line item from your statement must be included with the receipt – this shows the charge in USD. International transaction fees should be coded to the same expense line as the charge associated with the fee. No additional support is required for international transaction fees.
Prepaid Expenses: use the Additional Worktags field to indicate any prepaid expenses. Prepaid expenses are expenses being paid for in advance (current FY) of the service being performed or happening (next FY). For example, paying for a conference in May that is not happening until August. All travel-related expenses (conference fees, lodging, airfare) are considered prepaid expenses when crossing fiscal years regardless of amount.
Not all tasks or options are available to each user. Your assigned role in the system dictates your ability to access certain items and navigate through the system. This helps ensure the most secure operating system for the University and the user.

7
EMPLOYEE EXPENSE REPORTING FOR WORKDAY PROCESSING
Editing an expense report Expense reports can be edited after submission but not after completion of the business process and payment.
If an expense report is sent back to you after submission will be in your WD inbox: review the reason(s) why, then make any corrections necessary from there, add a note if necessary, and re-submit.
Accessing an expense report: there are multiple ways to access expense reports, the two methods here are the most commonly used.
• In the search field, type “expense report” hit enter and choose the task My Expense Reports: note that the results in the figure below may be different than your results. You can also enter “my expense reports.”
OR
• Click the Expenses worklet, then click Edit Expense Report.
Preferred method – using this method provides the most data with the fewest data entry points.
Easy method if you have a limited amount of expense reports in WD to view
8
EMPLOYEE EXPENSE REPORTING FOR WORKDAY PROCESSING
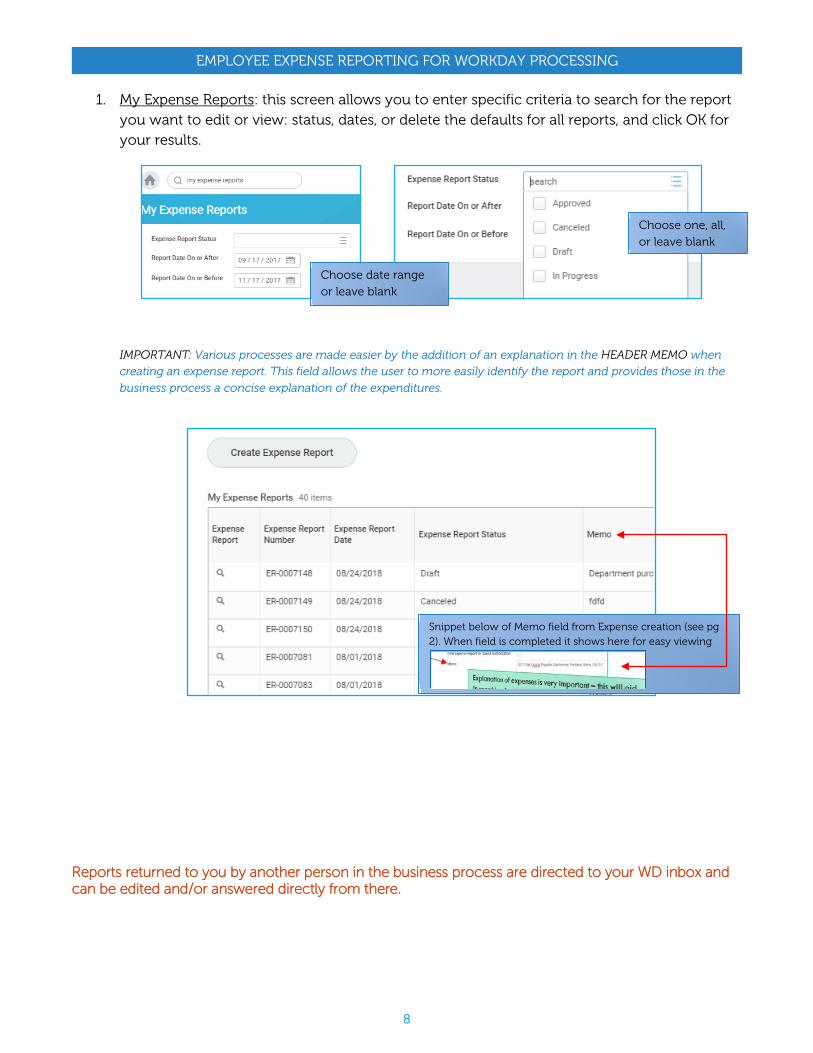
1. My Expense Reports: this screen allows you to enter specific criteria to search for the report you want to edit or view: status, dates, or delete the defaults for all reports, and click OK for your results.
IMPORTANT: Various processes are made easier by the addition of an explanation in the HEADER MEMO when
creating an expense report. This field allows the user to more easily identify the report and provides those in the
business process a concise explanation of the expenditures.
Reports returned to you by another person in the business process are directed to your WD inbox and can be edited and/or answered directly from there.
Choose one, all, or leave blank
Choose date range or leave blank
Snippet below of Memo field from Expense creation (see pg 2). When field is completed it shows here for easy viewing
9
EMPLOYEE EXPENSE REPORTING FOR WORKDAY PROCESSING
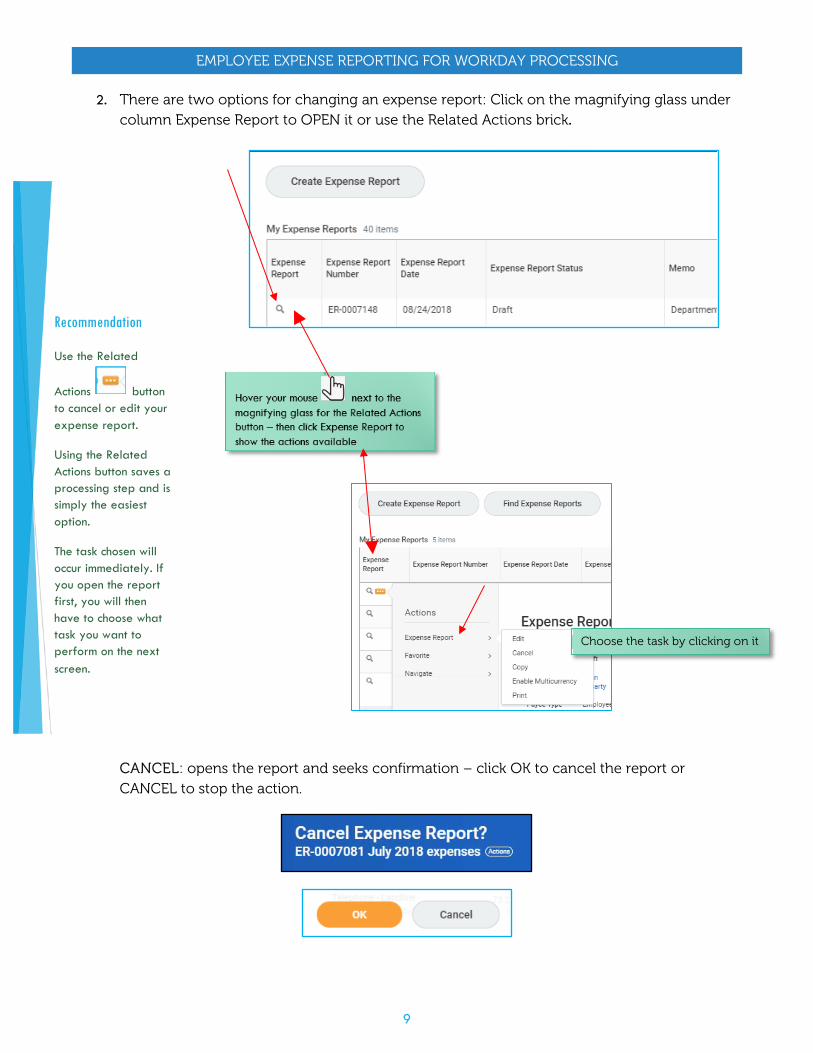
2. There are two options for changing an expense report: Click on the magnifying glass under column Expense Report to OPEN it or use the Related Actions brick.
CANCEL: opens the report and seeks confirmation – click OK to cancel the report or CANCEL to stop the action.
Recommendation
Use the Related
Actions button to cancel or edit your expense report.
Using the Related Actions button saves a processing step and is simply the easiest option.
The task chosen will occur immediately. If you open the report first, you will then have to choose what task you want to perform on the next screen.
Choose the task by clicking on it
10
EMPLOYEE EXPENSE REPORTING FOR WORKDAY PROCESSING
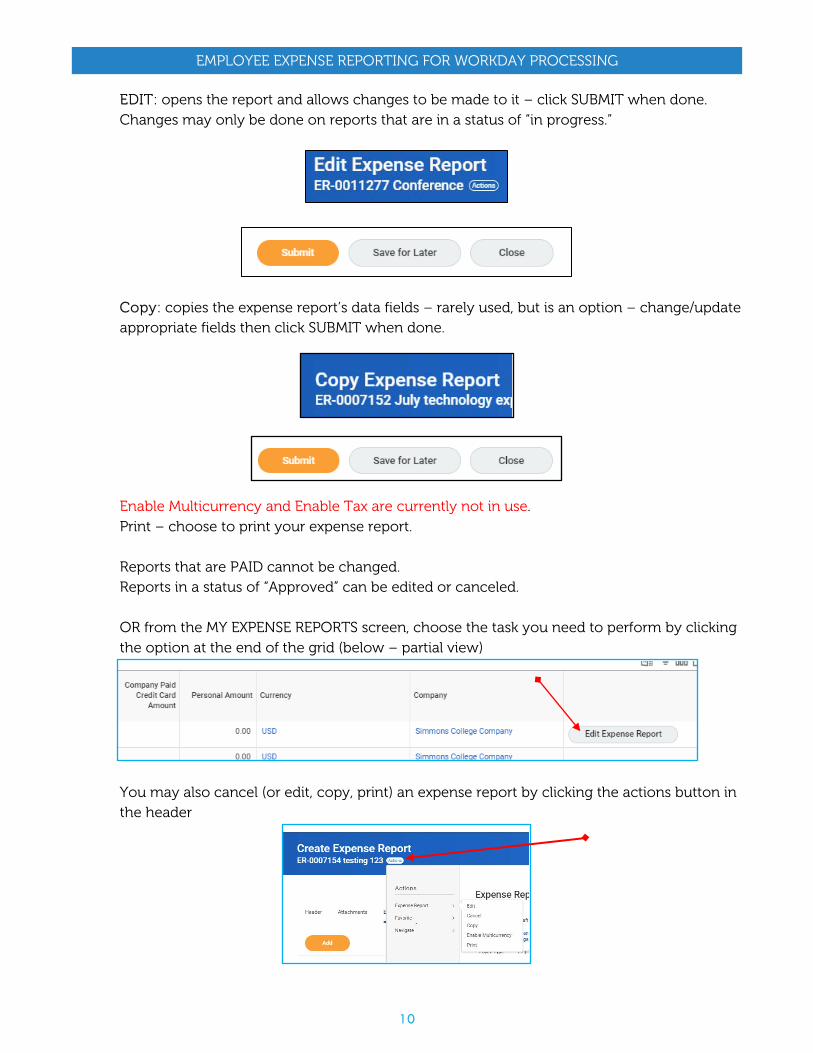
EDIT: opens the report and allows changes to be made to it – click SUBMIT when done. Changes may only be done on reports that are in a status of “in progress.”
Copy: copies the expense report’s data fields – rarely used, but is an option – change/update appropriate fields then click SUBMIT when done.
Enable Multicurrency and Enable Tax are currently not in use. Print – choose to print your expense report. Reports that are PAID cannot be changed. Reports in a status of “Approved” can be edited or canceled. OR from the MY EXPENSE REPORTS screen, choose the task you need to perform by clicking the option at the end of the grid (below – partial view)
You may also cancel (or edit, copy, print) an expense report by clicking the actions button in the header
11
EMPLOYEE EXPENSE REPORTING FOR WORKDAY PROCESSING
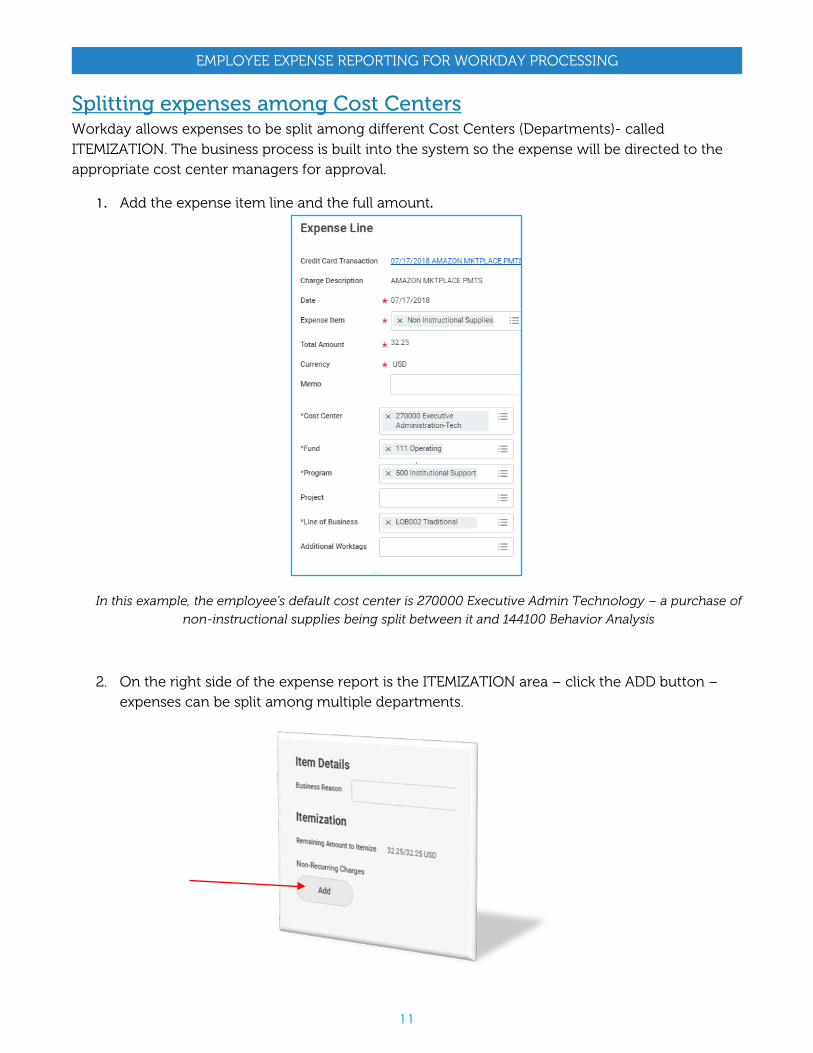
Splitting expenses among Cost Centers Workday allows expenses to be split among different Cost Centers (Departments)- called ITEMIZATION. The business process is built into the system so the expense will be directed to the appropriate cost center managers for approval.
1. Add the expense item line and the full amount.
In this example, the employee’s default cost center is 270000 Executive Admin Technology – a purchase of
non-instructional supplies being split between it and 144100 Behavior Analysis
2. On the right side of the expense report is the ITEMIZATION area – click the ADD button – expenses can be split among multiple departments.
12
EMPLOYEE EXPENSE REPORTING FOR WORKDAY PROCESSING
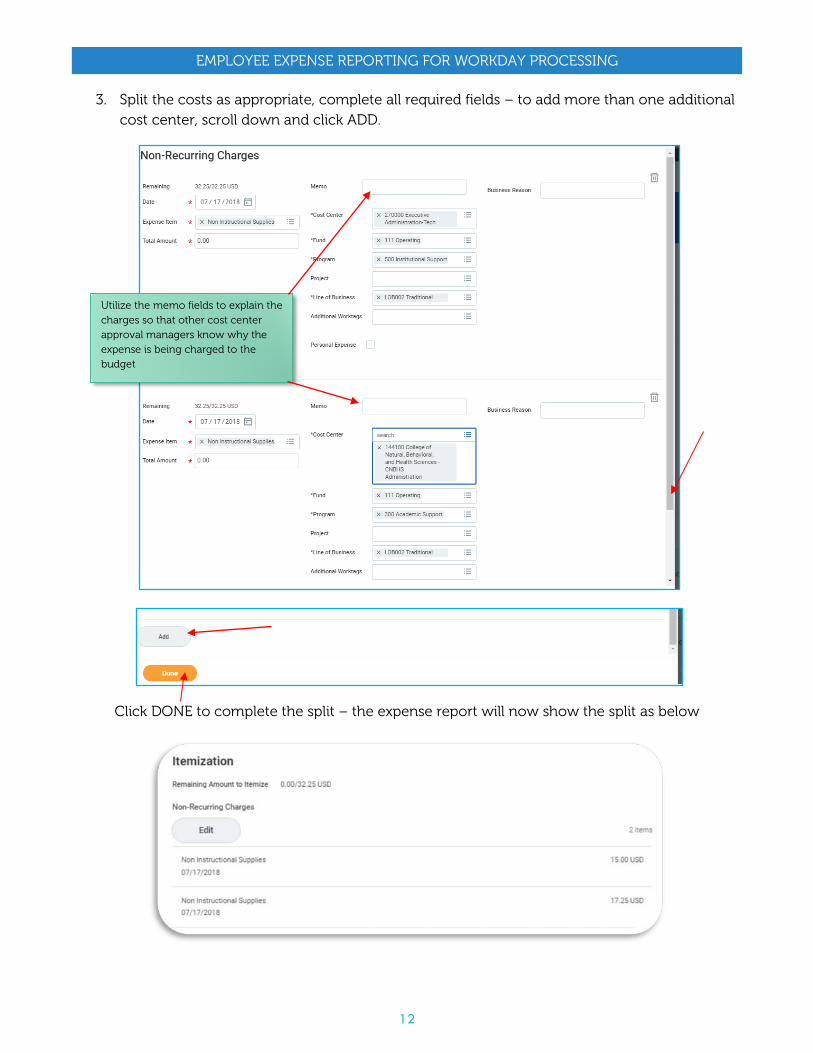
3. Split the costs as appropriate, complete all required fields – to add more than one additional cost center, scroll down and click ADD.
Click DONE to complete the split – the expense report will now show the split as below
Utilize the memo fields to explain the charges so that other cost center approval managers know why the expense is being charged to the budget
13
EMPLOYEE EXPENSE REPORTING FOR WORKDAY PROCESSING
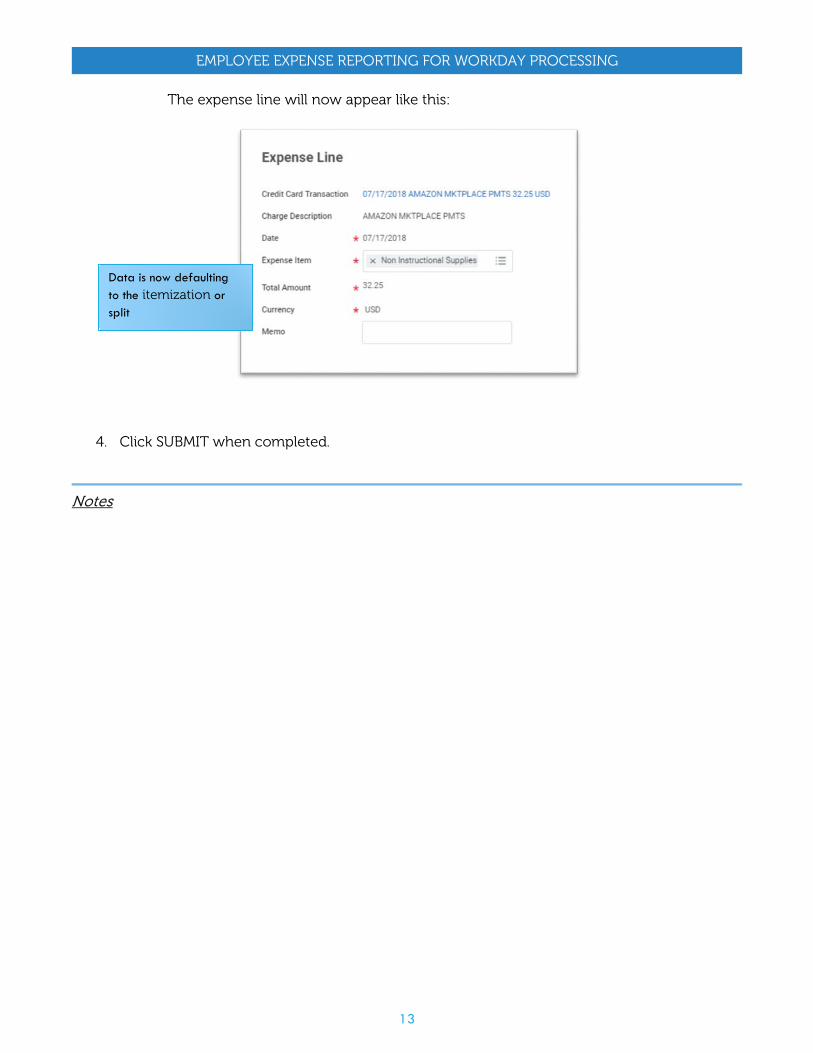
The expense line will now appear like this:
4. Click SUBMIT when completed.
Notes
Data is now defaulting to the itemization or split
14
EMPLOYEE EXPENSE REPORTING FOR WORKDAY PROCESSING
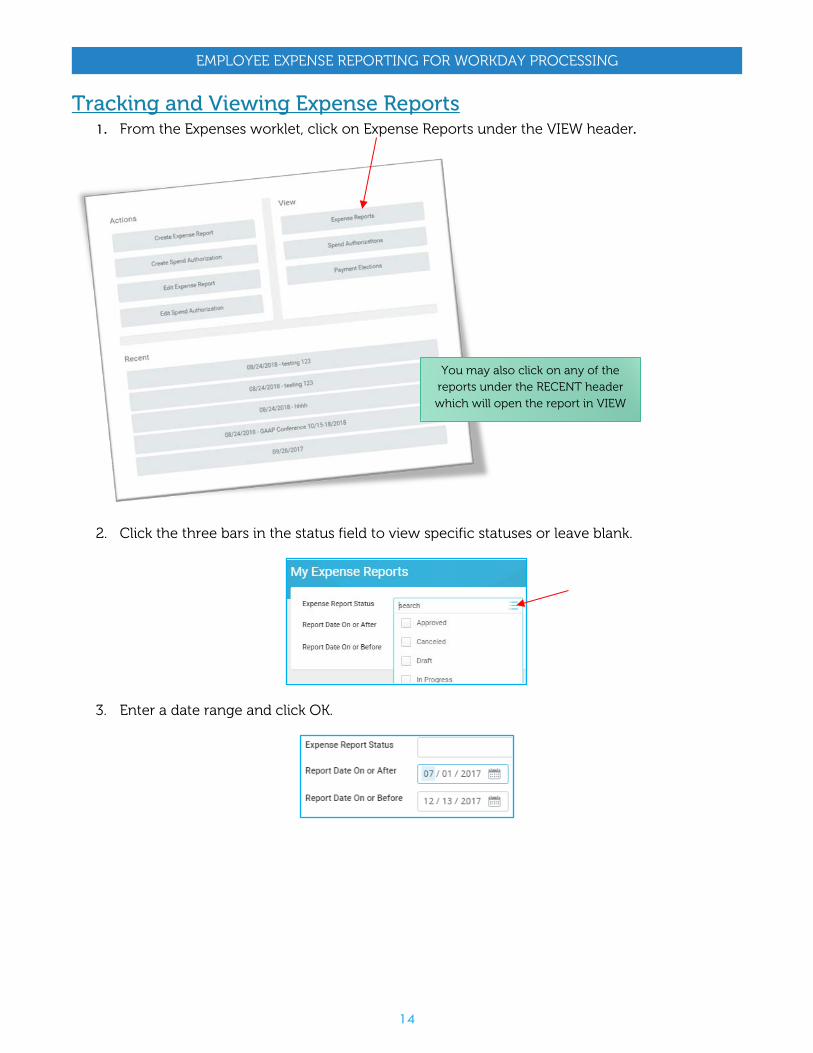
Tracking and Viewing Expense Reports 1. From the Expenses worklet, click on Expense Reports under the VIEW header.
2. Click the three bars in the status field to view specific statuses or leave blank.
3. Enter a date range and click OK.
You may also click on any of the reports under the RECENT header which will open the report in VIEW
15
EMPLOYEE EXPENSE REPORTING FOR WORKDAY PROCESSING
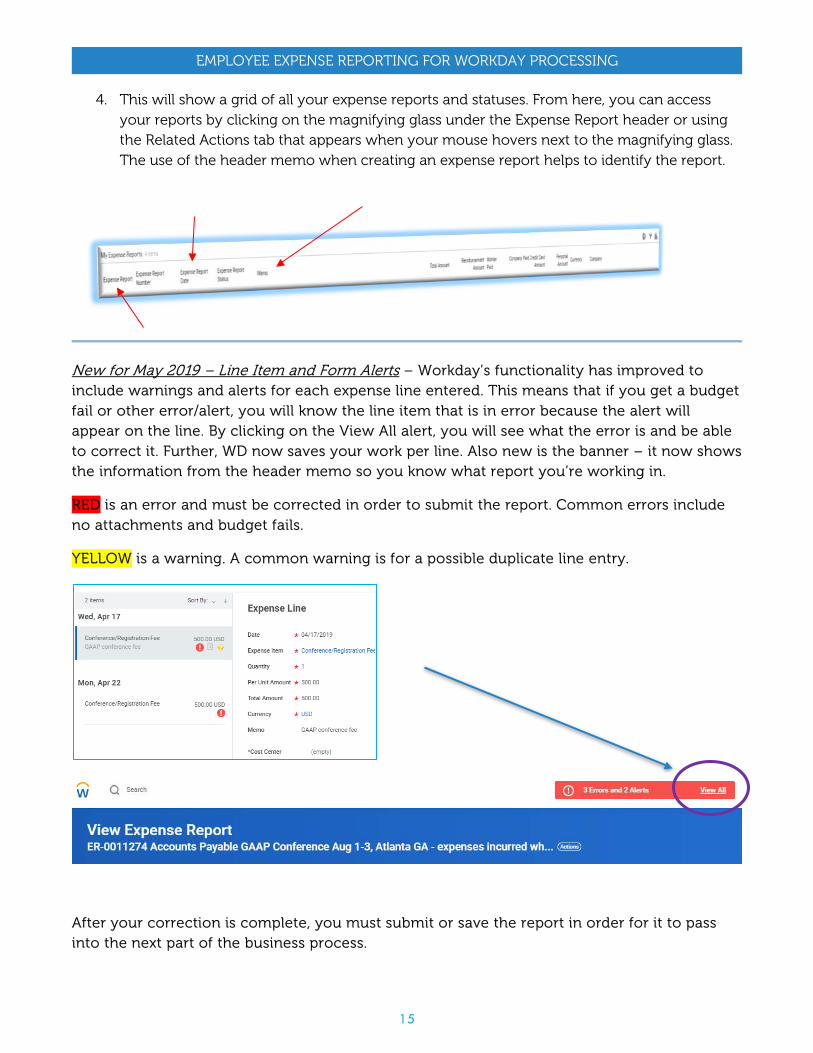
4. This will show a grid of all your expense reports and statuses. From here, you can access your reports by clicking on the magnifying glass under the Expense Report header or using the Related Actions tab that appears when your mouse hovers next to the magnifying glass. The use of the header memo when creating an expense report helps to identify the report.
New for May 2019 – Line Item and Form Alerts – Workday’s functionality has improved to include warnings and alerts for each expense line entered. This means that if you get a budget fail or other error/alert, you will know the line item that is in error because the alert will appear on the line. By clicking on the View All alert, you will see what the error is and be able to correct it. Further, WD now saves your work per line. Also new is the banner – it now shows the information from the header memo so you know what report you’re working in.
RED is an error and must be corrected in order to submit the report. Common errors include no attachments and budget fails.
YELLOW is a warning. A common warning is for a possible duplicate line entry.
After your correction is complete, you must submit or save the report in order for it to pass into the next part of the business process.
16
EMPLOYEE EXPENSE REPORTING FOR WORKDAY PROCESSING
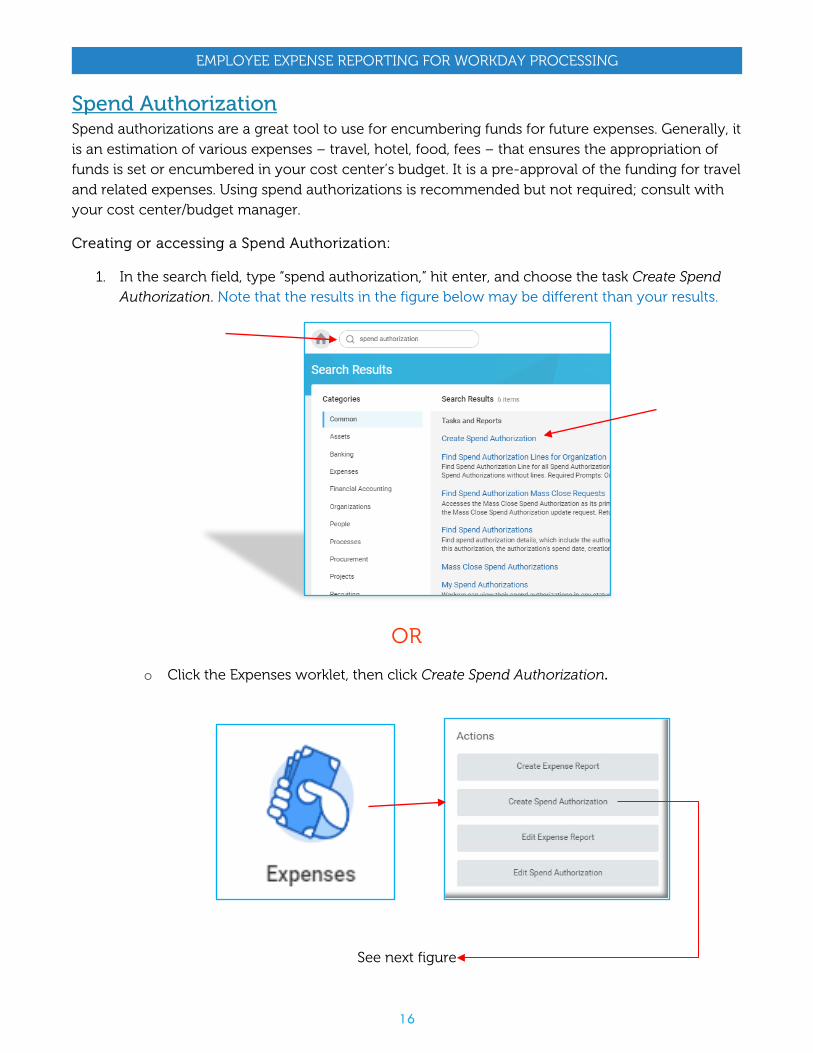
Spend Authorization Spend authorizations are a great tool to use for encumbering funds for future expenses. Generally, it is an estimation of various expenses – travel, hotel, food, fees – that ensures the appropriation of funds is set or encumbered in your cost center’s budget. It is a pre-approval of the funding for travel and related expenses. Using spend authorizations is recommended but not required; consult with your cost center/budget manager.
Creating or accessing a Spend Authorization:
1. In the search field, type “spend authorization,” hit enter, and choose the task Create Spend Authorization. Note that the results in the figure below may be different than your results.
OR
o Click the Expenses worklet, then click Create Spend Authorization.
See next figure
17
EMPLOYEE EXPENSE REPORTING FOR WORKDAY PROCESSING
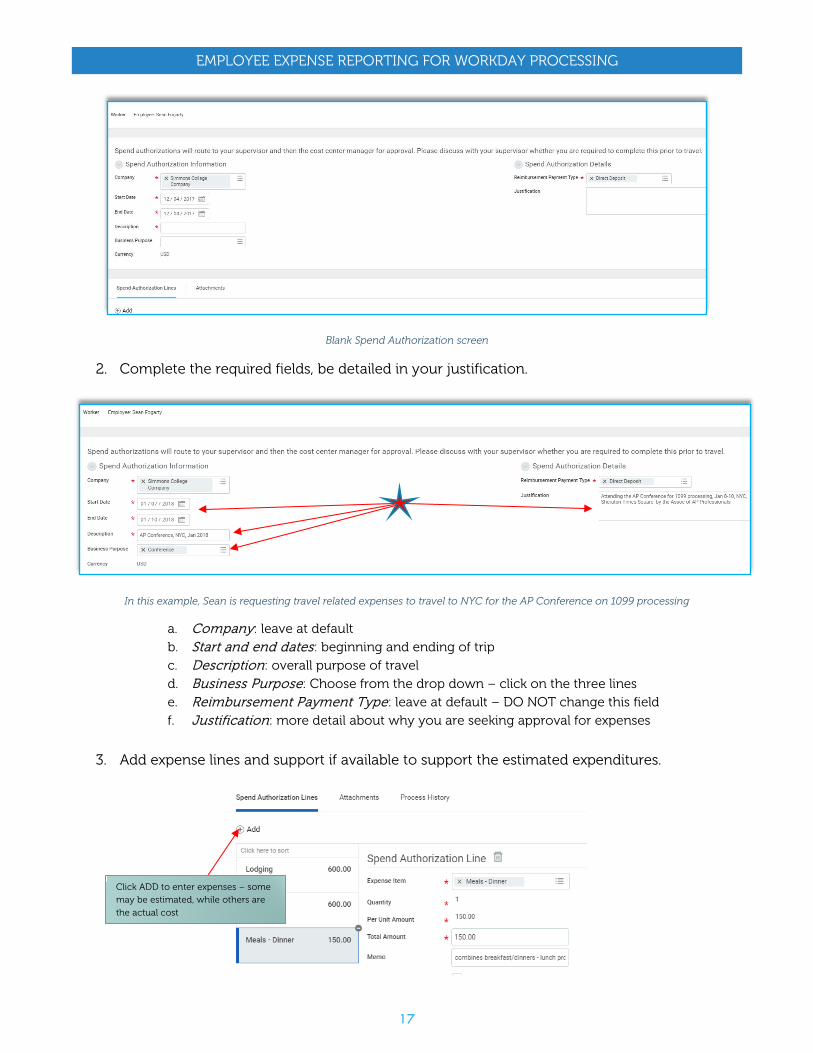
Blank Spend Authorization screen
2. Complete the required fields, be detailed in your justification.
In this example, Sean is requesting travel related expenses to travel to NYC for the AP Conference on 1099 processing
a. Company: leave at default b. Start and end dates: beginning and ending of trip c. Description: overall purpose of travel d. Business Purpose: Choose from the drop down – click on the three lines e. Reimbursement Payment Type: leave at default – DO NOT change this field f. Justification: more detail about why you are seeking approval for expenses
3. Add expense lines and support if available to support the estimated expenditures.
Click ADD to enter expenses – some may be estimated, while others are the actual cost
18
EMPLOYEE EXPENSE REPORTING FOR WORKDAY PROCESSING
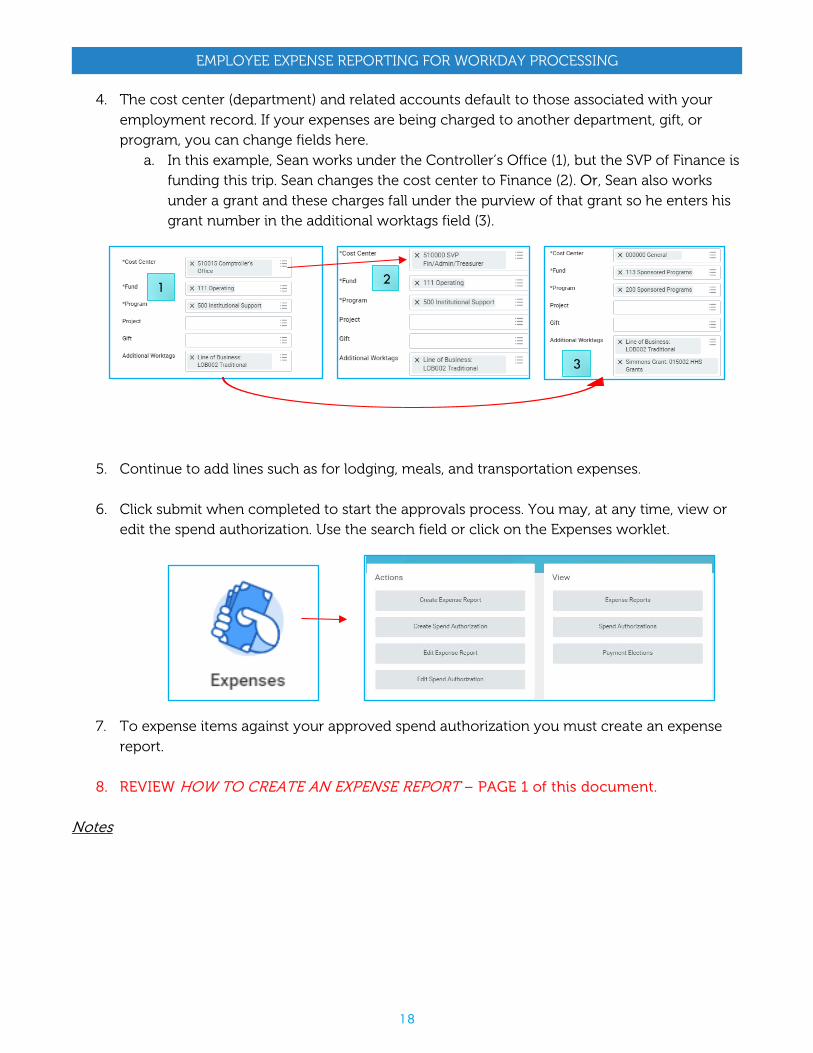
4. The cost center (department) and related accounts default to those associated with your employment record. If your expenses are being charged to another department, gift, or program, you can change fields here.
a. In this example, Sean works under the Controller’s Office (1), but the SVP of Finance is funding this trip. Sean changes the cost center to Finance (2). Or, Sean also works under a grant and these charges fall under the purview of that grant so he enters his grant number in the additional worktags field (3).
5. Continue to add lines such as for lodging, meals, and transportation expenses.
6. Click submit when completed to start the approvals process. You may, at any time, view or edit the spend authorization. Use the search field or click on the Expenses worklet.
7. To expense items against your approved spend authorization you must create an expense report.
8. REVIEW HOW TO CREATE AN EXPENSE REPORT – PAGE 1 of this document.
Notes
1 2
3
19
EMPLOYEE EXPENSE REPORTING FOR WORKDAY PROCESSING
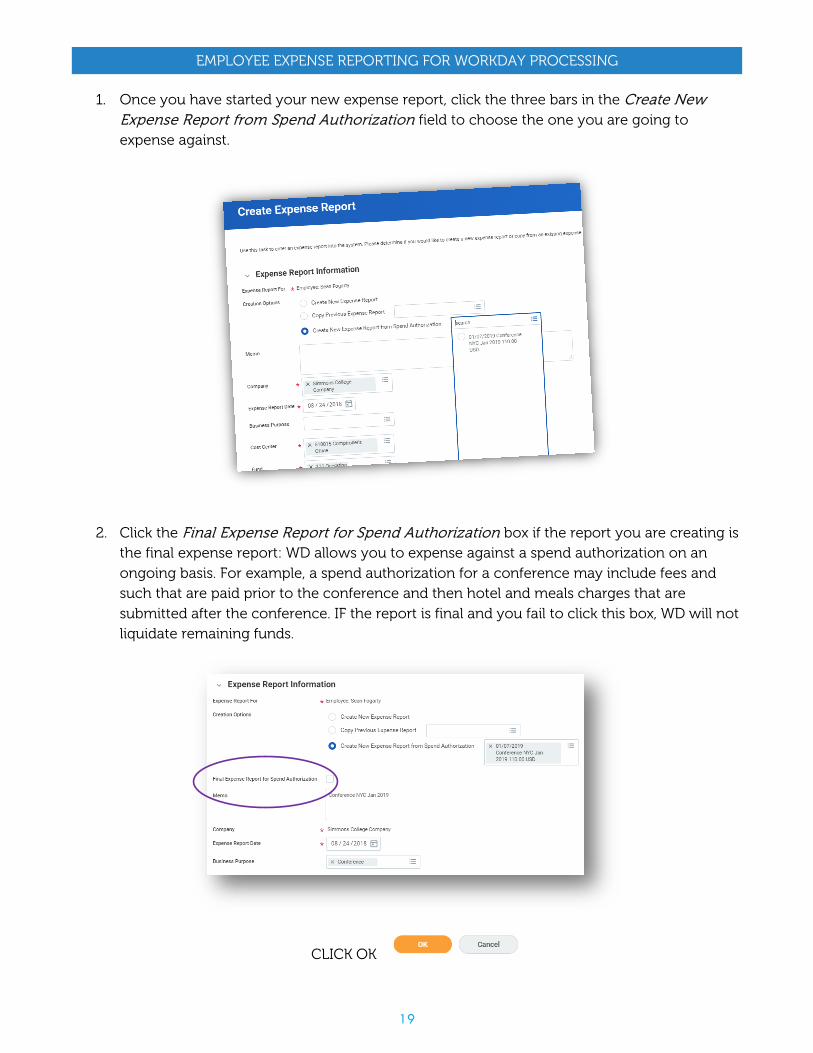
1. Once you have started your new expense report, click the three bars in the Create New Expense Report from Spend Authorization field to choose the one you are going to expense against.
2. Click the Final Expense Report for Spend Authorization box if the report you are creating is
the final expense report: WD allows you to expense against a spend authorization on an ongoing basis. For example, a spend authorization for a conference may include fees and such that are paid prior to the conference and then hotel and meals charges that are submitted after the conference. IF the report is final and you fail to click this box, WD will not liquidate remaining funds.
CLICK OK
20
EMPLOYEE EXPENSE REPORTING FOR WORKDAY PROCESSING
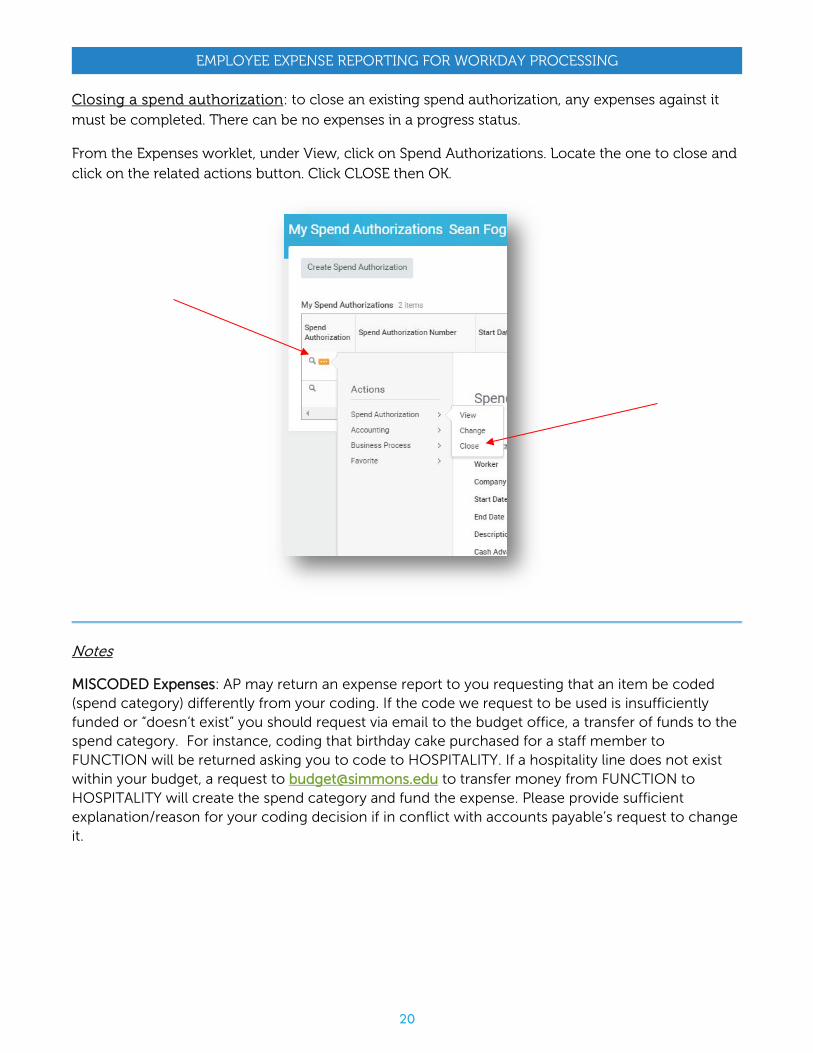
Closing a spend authorization: to close an existing spend authorization, any expenses against it must be completed. There can be no expenses in a progress status.
From the Expenses worklet, under View, click on Spend Authorizations. Locate the one to close and click on the related actions button. Click CLOSE then OK.
Notes
MISCODED Expenses: AP may return an expense report to you requesting that an item be coded (spend category) differently from your coding. If the code we request to be used is insufficiently funded or “doesn’t exist” you should request via email to the budget office, a transfer of funds to the spend category. For instance, coding that birthday cake purchased for a staff member to FUNCTION will be returned asking you to code to HOSPITALITY. If a hospitality line does not exist within your budget, a request to [email protected] to transfer money from FUNCTION to HOSPITALITY will create the spend category and fund the expense. Please provide sufficient explanation/reason for your coding decision if in conflict with accounts payable’s request to change it.
21
EMPLOYEE EXPENSE REPORTING FOR WORKDAY PROCESSING
Processing Tips and Recommendations
Group related expenses into one report Expenditures must be accompanied by an explanation/business purpose Simmons University is exempt from MA sales tax. It is YOUR responsibility to ensure that sales taxes
are not charged on your purchases. You will not be reimbursed if you are charged sales tax. Sales tax charged on purchases made on your Simmons issued JPMorgan Visa must be credited back to the card.
Utilize the HEADER MEMO field to explain what the report’s expenses are about: be concise 2017 Accounts Conference, Boston MA, November 2017 Eastern Conference on Women, Atlanta GA, October 2017 Various departmental purchases for semester start Student Conference fees paid for by the department Site Visit to Maine Medical/student Sally Simmons
Utilize the LINE ITEM memo to explain what the specific expenditure is Lunch at Mistral with Board Member Simmons Blah Hotel stay Uber to conference from hotel Uber from conference to hotel Note names of guests
ALL expenditures, regardless of amount, require support Itemized receipts are required – if you fail to obtain the itemization, you must note that or
the report will be sent back to you – include the name of and business purpose for any person you entertained or bought a meal for on the receipt or in the expense line memo
No receipt support requires the completion of the Missing Receipt Affidavit (this does not
relinquish or negate your responsibility to get the proper receipt. Contact with the
supplier/vendor may be necessary. Over use of the Missing Receipt Affidavit will result in
termination of your ability to spend on behalf of the University.) Mileage
Include a MapQuest or Google Map directions as “receipt” to support the mileage calculation Include a business reason and name of person visiting if appropriate (i.e. site visit to Oak
Hospital for Jane Student) Supporting documents should be attached using .pdf, .png, .jpeg, etc.; do not attach webpages such
as .html or .zip files Personal expenses while traveling internationally
Personal expenses from cash are entered in WD in the currency used along with the original receipt
Personal expenses on a non-Simmons issued credit card must include the line item from your credit card statement along with the original receipt
Periodically check on your expense reports to ensure they are completely through the process Check your Workday inbox to see if an item was returned to you – scroll down to VIEW COMMENTS
to assess the reason a report is returned Direct all BUDGET FAIL notifications to the budget office – budget fails indicate that a cost center’s
and/or spend category’s funds are insufficient to cover the expenditure
22
EMPLOYEE EXPENSE REPORTING FOR WORKDAY PROCESSING
OOPS! I used my Simmons University JPMorgan Visa for a personal expense – what do I do? Immediately go to the Cashier’s Window to reimburse the University for the unintended expenditure either by check or cash. You must provide the Cashier with the proper coding for the expense (cost center and spend category). Get a receipt from the Cashier and attach that to the expense in WD. Utilize the memo field to concisely explain the expense is an error/a personal charge.
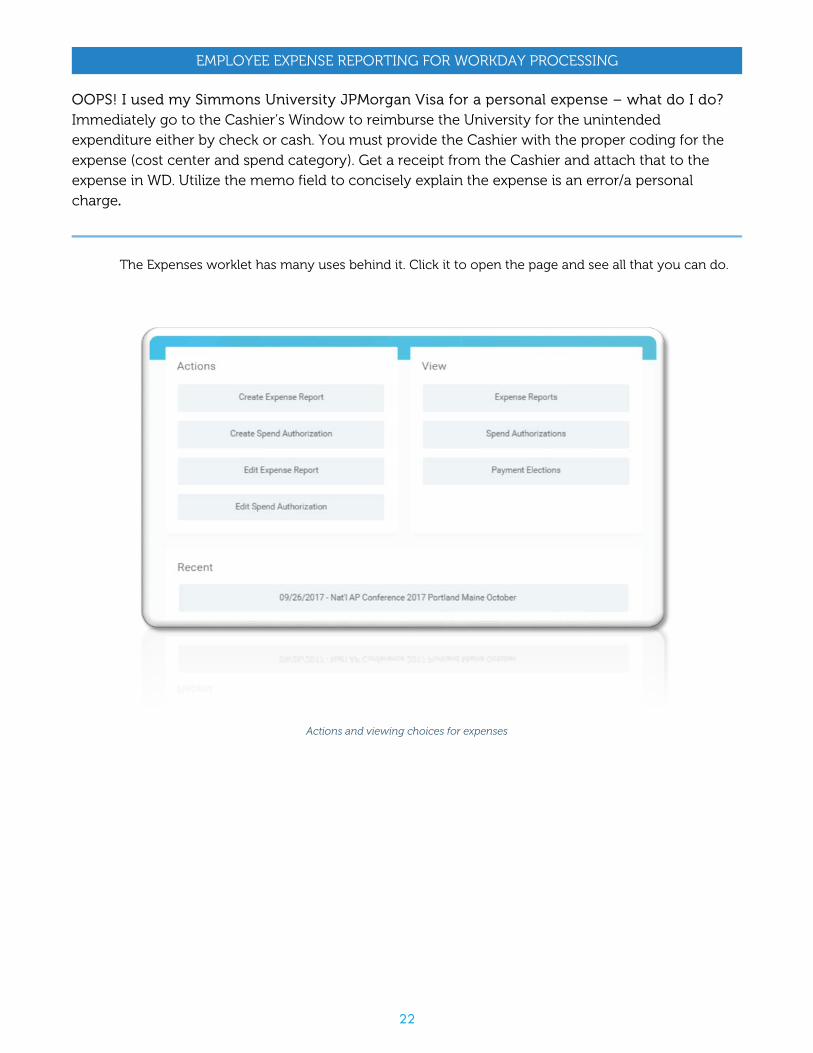
The Expenses worklet has many uses behind it. Click it to open the page and see all that you can do.
Actions and viewing choices for expenses

23
EMPLOYEE EXPENSE REPORTING FOR WORKDAY PROCESSING
Non-Employee Expenditures Students, visiting persons, and others are often reimbursed for approved expenditures. As non-employees, individual records are not in WD. Thus, the expenses are reimbursed using the paper forms: Travel Reimbursement and Non Travel Reimbursement Forms. Expenses less than $101 can be reimbursed at the Cashier’s Window. Requirements for STUDENT reimbursement: students employed in a work-study or general
employment capacity are NOT considered employees of the University; Please check with Payroll prior to
paying students honorariums for services.
Completed form: incomplete forms will be returned Student ID Student address (do not use Simmons University or dorm address – must be legal home
address) Signatures Original itemized receipts All checks are mailed – no holds permitted
Requirements for NON-STUDENT reimbursement: please call the accounts payable department to
determine if the individual should be set up as a supplier. Most non-employees, other than parents and students, are required to be set up as suppliers in Workday.
Completed form: incomplete forms will be returned Address Signatures Original itemized receipts Completed IRS Form W9 – though most expenses are not applicable for issuance of a 1099,
best practice procedure requires that Simmons obtain a completed W9 from any individual person being reimbursed by the University
All checks are mailed
Forms and support are sent to the Accounts Payable Office where it is entered into WD. Once entered, the internal business process is initiated. After final approval is done, payment is issued.
Suppliers are never reimbursed by expense report. All suppliers must be set up in WD and must issue Simmons University an invoice.
Any person or entity providing services to and being paid by the University is considered a Supplier and must be set up in WD as such. Completed Supplier Registration and W9 forms should be sent to Purchasing for set up in Workday.
24
EMPLOYEE EXPENSE REPORTING FOR WORKDAY PROCESSING
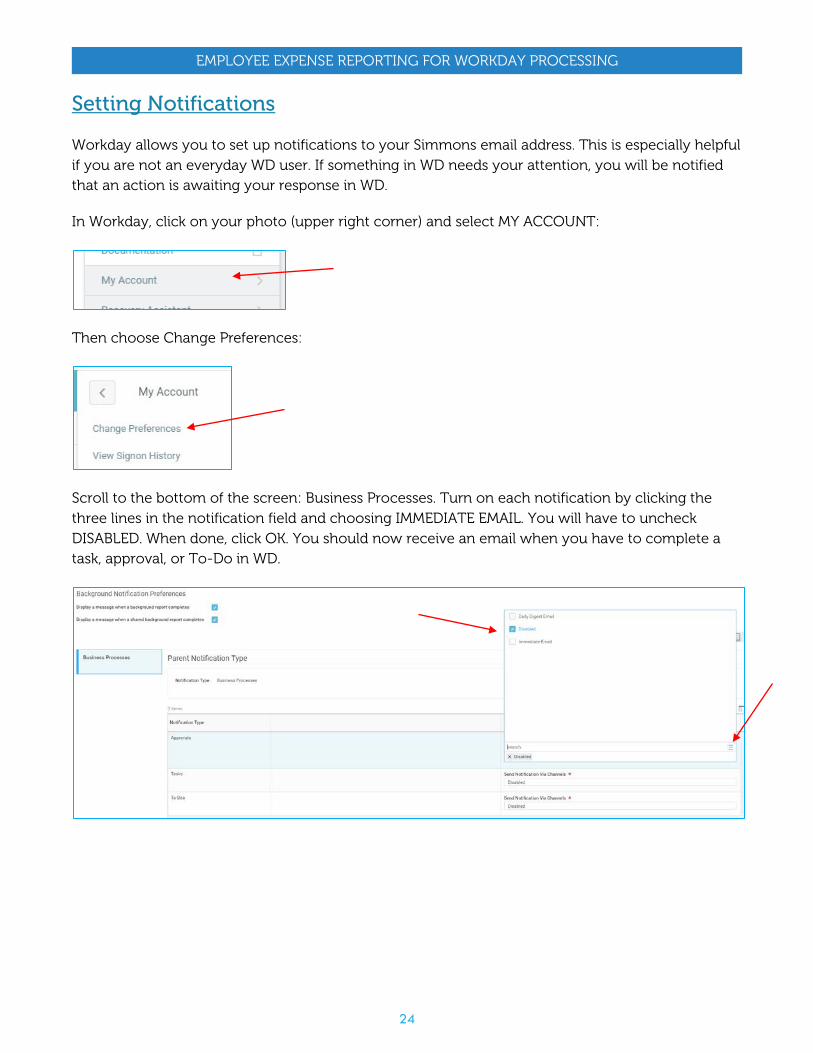
Setting Notifications
Workday allows you to set up notifications to your Simmons email address. This is especially helpful if you are not an everyday WD user. If something in WD needs your attention, you will be notified that an action is awaiting your response in WD.
In Workday, click on your photo (upper right corner) and select MY ACCOUNT:
Then choose Change Preferences:
Scroll to the bottom of the screen: Business Processes. Turn on each notification by clicking the three lines in the notification field and choosing IMMEDIATE EMAIL. You will have to uncheck DISABLED. When done, click OK. You should now receive an email when you have to complete a task, approval, or To-Do in WD.