EMC Avamar 6.1 Extended Retention · EMC® Avamar® 6.1 Extended Retention User Guide 7 PREFACE As...
160
EMC ® Avamar ® 6.1 Extended Retention User Guide P/N 300-013-366 REV 04
Transcript of EMC Avamar 6.1 Extended Retention · EMC® Avamar® 6.1 Extended Retention User Guide 7 PREFACE As...
EMC® Avamar® 6.1Extended Retention
User GuideP/N 300-013-366REV 04
EMC® Avamar® 6.1 Extended Retention User Guide2
Copyright © 2001- 2012 EMC Corporation. All rights reserved. Published in the USA.
Published December, 2012
EMC believes the information in this publication is accurate as of its publication date. The information is subject to change without notice.
The information in this publication is provided as is. EMC Corporation makes no representations or warranties of any kind with respect to the information in this publication, and specifically disclaims implied warranties of merchantability or fitness for a particular purpose. Use, copying, and distribution of any EMC software described in this publication requires an applicable software license.
EMC2, EMC, and the EMC logo are registered trademarks or trademarks of EMC Corporation in the United States and other countries. All other trademarks used herein are the property of their respective owners.
For the most up-to-date regulatory document for your product line, go to the technical documentation and advisories section on the EMC online support website.
CONTENTS
Preface
Chapter 1 Introduction Overview..................................................................................................... 14 Capabilities and limitations ........................................................................ 15
Avamar 6.1 is required .......................................................................... 15Avamar extended retention is intended for long-term retention ............. 15Partial imports are not supported.......................................................... 15Exports and imports can take a significant amount of time .................... 15A single physical or virtual tape library is supported.............................. 15Standalone tape drives are not supported............................................. 15
Important terms and definitions.................................................................. 16 Operational best practices .......................................................................... 17
Creating an administrative user account................................................ 17Exporting backups to tape..................................................................... 17Labeling tape volumes .......................................................................... 18Creating disaster recovery images ......................................................... 18Clearing the browser cache before logging in for the first time ............... 18
Chapter 2 Getting Started Supported browsers.................................................................................... 20 What to do the first time you use Avamar extended retention ...................... 20 Logging in for the first time.......................................................................... 20
Login failures ........................................................................................ 22Session timeouts .................................................................................. 23
The Administration workspace .................................................................... 23Accessing available workspaces ........................................................... 24Adding and removing springboards....................................................... 25Moving springboards within a workspace.............................................. 26Displaying springboards in a workspace ............................................... 26Hiding springboards in a workspace...................................................... 26
The Avamar Extended Retention workspace................................................. 27 Customizing My Workspace......................................................................... 27
Copying springboards from other workspaces to My Workspace............ 27Adding springboards to the Springboards list in My Workspace............. 28Removing springboards from the Springboards list in My Workspace .... 29
Using online help........................................................................................ 29Avamar Extended Retention online help ................................................ 29Springboard and page-level help........................................................... 30
Logging out................................................................................................. 30
Chapter 3 Using the Administration Workspace User management....................................................................................... 32
The User Management springboard....................................................... 32Searching for a user .............................................................................. 32Creating a user account......................................................................... 33Editing a user account........................................................................... 34Disabling a user account ....................................................................... 35Unlocking a user account ...................................................................... 35
EMC® Avamar® 6.1 Extended Retention User Guide 3
Contents
Role management ....................................................................................... 36The Role Management springboard ....................................................... 36Types of roles........................................................................................ 36Editing a user’s roles............................................................................. 37Generating a user role report ................................................................. 39
User profile management ............................................................................ 39The My Profile springboard.................................................................... 39Changing a user name or email address ................................................ 40Changing a password............................................................................ 40Changing email message settings ......................................................... 41
System configuration .................................................................................. 42The Framework Configuration springboard ............................................ 42Configuring system settings .................................................................. 42Enabling and disabling message settings.............................................. 43Enabling SNMP ..................................................................................... 44
System events ............................................................................................ 45The Event Summary springboard ........................................................... 45Viewing event details in the Event Viewer.............................................. 45
Tasks .......................................................................................................... 51The Task Summary springboard ............................................................ 51Viewing task details in the Task Viewer ................................................. 51
Security events ........................................................................................... 55The Security Events springboard ........................................................... 55Viewing event details in the Security Event Viewer................................. 56
Log information........................................................................................... 60The Log Information springboard........................................................... 60Viewing detailed log information in the Log Viewer................................ 61Saving log files...................................................................................... 62
Chapter 4 Using the Avamar Extended Retention Workspace Opening Avamar Extended Retention springboards ..................................... 64
The Media Management springboard .................................................... 65The Scheduled Exports springboard ...................................................... 65The Import & Restore springboard ......................................................... 65The Configuration springboard .............................................................. 66The Recent Events springboard ............................................................. 67The Task Monitoring springboard .......................................................... 68The Import & Export Job History springboard ......................................... 70
Managing library media .............................................................................. 71The Media Management page ............................................................... 71Working with custom tape pools ........................................................... 72Working with custom retention periods ................................................. 77Labeling volumes.................................................................................. 81Relabeling volumes to a different tape pool (not recommended) ........... 84Viewing library details........................................................................... 86Viewing the tape volumes in the library ................................................. 87Viewing the backups on a tape volume ................................................. 88Ejecting tape volumes ........................................................................... 89Inventorying the contents of the library ................................................. 90
Exporting Avamar backups to tape .............................................................. 91The Export Policy Management page ..................................................... 91Creating an export policy....................................................................... 93Editing an export policy....................................................................... 104Disabling an export policy ................................................................... 105Deleting an export policy..................................................................... 105
4 EMC® Avamar® 6.1 Extended Retention User Guide
Contents
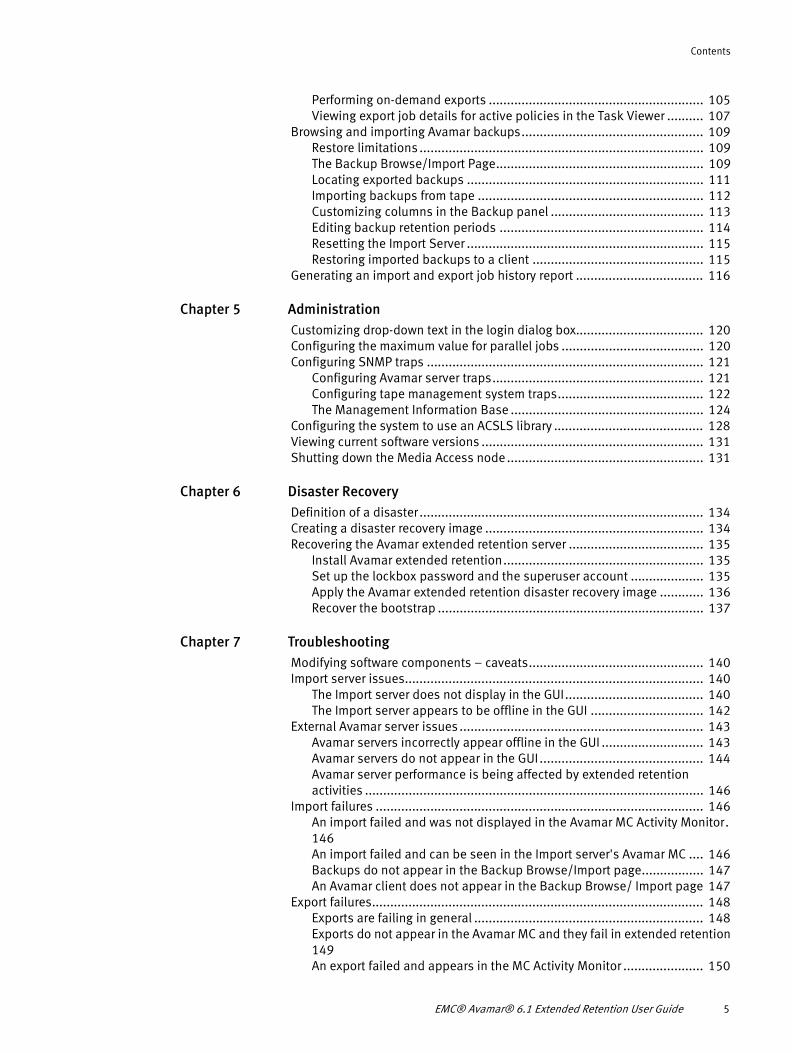
Performing on-demand exports ........................................................... 105Viewing export job details for active policies in the Task Viewer .......... 107
Browsing and importing Avamar backups.................................................. 109Restore limitations .............................................................................. 109The Backup Browse/Import Page......................................................... 109Locating exported backups ................................................................. 111Importing backups from tape .............................................................. 112Customizing columns in the Backup panel .......................................... 113Editing backup retention periods ........................................................ 114Resetting the Import Server ................................................................. 115Restoring imported backups to a client ............................................... 115
Generating an import and export job history report ................................... 116
Chapter 5 Administration Customizing drop-down text in the login dialog box................................... 120 Configuring the maximum value for parallel jobs ....................................... 120 Configuring SNMP traps ............................................................................ 121
Configuring Avamar server traps.......................................................... 121Configuring tape management system traps........................................ 122The Management Information Base ..................................................... 124
Configuring the system to use an ACSLS library ......................................... 128 Viewing current software versions ............................................................. 131 Shutting down the Media Access node ...................................................... 131
Chapter 6 Disaster Recovery Definition of a disaster .............................................................................. 134 Creating a disaster recovery image ............................................................ 134 Recovering the Avamar extended retention server ..................................... 135
Install Avamar extended retention....................................................... 135Set up the lockbox password and the superuser account .................... 135Apply the Avamar extended retention disaster recovery image ............ 136Recover the bootstrap ......................................................................... 137
Chapter 7 Troubleshooting Modifying software components – caveats................................................ 140 Import server issues.................................................................................. 140
The Import server does not display in the GUI...................................... 140The Import server appears to be offline in the GUI ............................... 142
External Avamar server issues ................................................................... 143Avamar servers incorrectly appear offline in the GUI ............................ 143Avamar servers do not appear in the GUI............................................. 144Avamar server performance is being affected by extended retention activities ............................................................................................. 146
Import failures .......................................................................................... 146An import failed and was not displayed in the Avamar MC Activity Monitor. 146An import failed and can be seen in the Import server's Avamar MC .... 146Backups do not appear in the Backup Browse/Import page................. 147An Avamar client does not appear in the Backup Browse/ Import page 147
Export failures........................................................................................... 148Exports are failing in general ............................................................... 148Exports do not appear in the Avamar MC and they fail in extended retention 149An export failed and appears in the MC Activity Monitor ...................... 150
EMC® Avamar® 6.1 Extended Retention User Guide 5
Contents
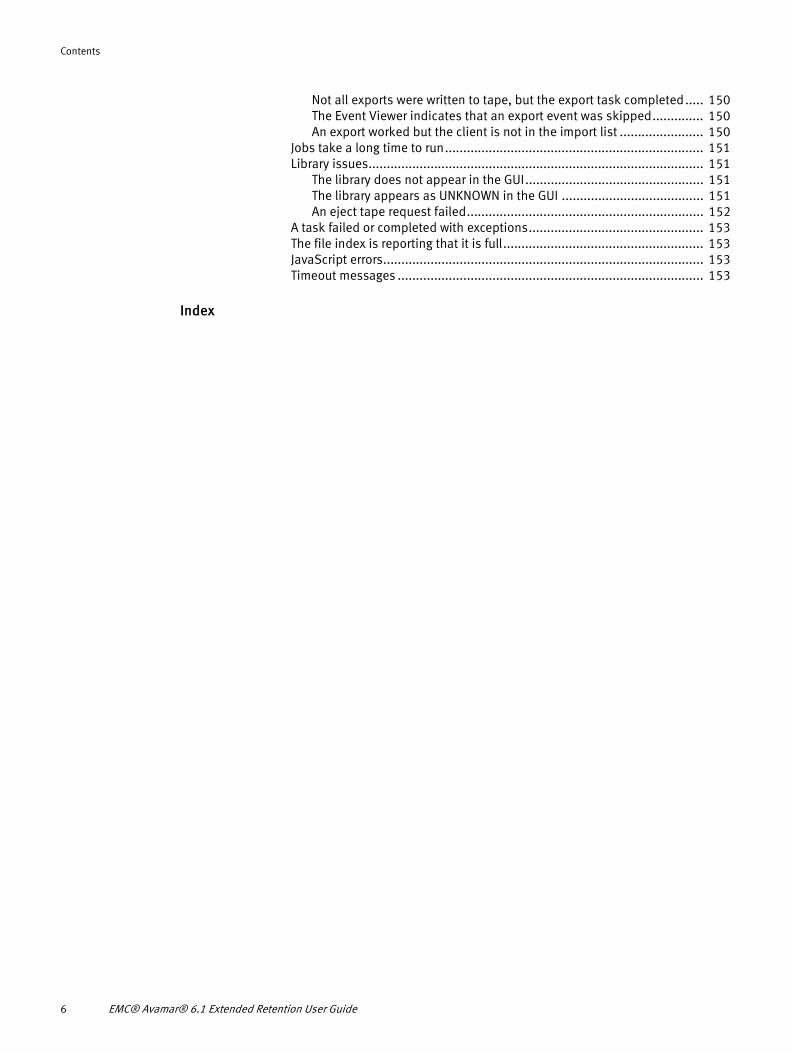
Not all exports were written to tape, but the export task completed..... 150The Event Viewer indicates that an export event was skipped.............. 150An export worked but the client is not in the import list ....................... 150
Jobs take a long time to run....................................................................... 151 Library issues............................................................................................ 151
The library does not appear in the GUI................................................. 151The library appears as UNKNOWN in the GUI ....................................... 151An eject tape request failed................................................................. 152
A task failed or completed with exceptions................................................ 153 The file index is reporting that it is full....................................................... 153 JavaScript errors........................................................................................ 153 Timeout messages .................................................................................... 153
Index
6 EMC® Avamar® 6.1 Extended Retention User Guide

PREFACE
As part of an effort to improve its product lines, EMC periodically releases revisions of its software and hardware. Therefore, some functions described in this document might not be supported by all versions of the software or hardware currently in use. The product release notes provide the most up-to-date information on product features.
Contact your EMC representative if a product does not function properly or does not function as described in this document.
Note: This document was accurate at publication time. New versions of this document might be released on the EMC online support website. Check the EMC online support website to ensure that you are using the latest version of this document.
PurposeThis document describes how to use the Avamar extended retention feature.
AudienceThis document is intended for system administrators who will be using the Avamar extended retention feature.
EMC® Avamar® 6.1 Extended Retention User Guide 7
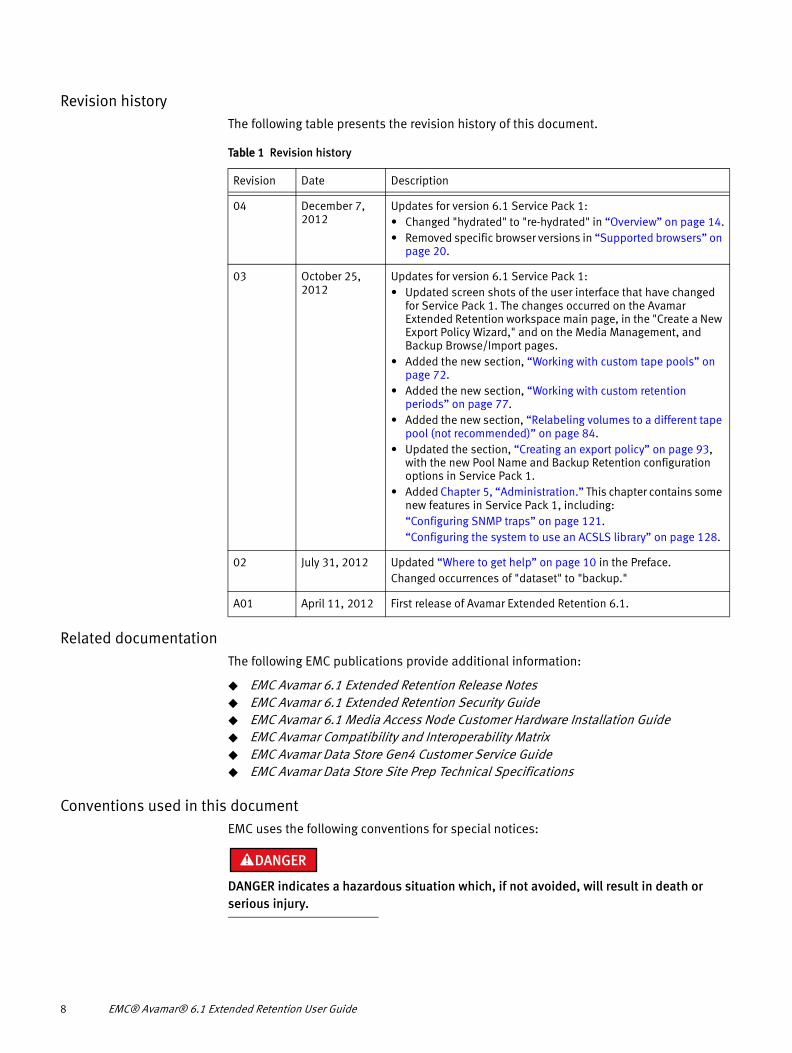
Revision historyThe following table presents the revision history of this document.
Related documentationThe following EMC publications provide additional information:
◆ EMC Avamar 6.1 Extended Retention Release Notes◆ EMC Avamar 6.1 Extended Retention Security Guide◆ EMC Avamar 6.1 Media Access Node Customer Hardware Installation Guide◆ EMC Avamar Compatibility and Interoperability Matrix◆ EMC Avamar Data Store Gen4 Customer Service Guide◆ EMC Avamar Data Store Site Prep Technical Specifications
Conventions used in this documentEMC uses the following conventions for special notices:
DANGER indicates a hazardous situation which, if not avoided, will result in death or serious injury.
Table 1 Revision history
Revision Date Description
04 December 7, 2012
Updates for version 6.1 Service Pack 1:• Changed "hydrated" to "re-hydrated" in “Overview” on page 14.• Removed specific browser versions in “Supported browsers” on
page 20.
03 October 25, 2012
Updates for version 6.1 Service Pack 1:• Updated screen shots of the user interface that have changed
for Service Pack 1. The changes occurred on the Avamar Extended Retention workspace main page, in the "Create a New Export Policy Wizard," and on the Media Management, and Backup Browse/Import pages.
• Added the new section, “Working with custom tape pools” on page 72.
• Added the new section, “Working with custom retention periods” on page 77.
• Added the new section, “Relabeling volumes to a different tape pool (not recommended)” on page 84.
• Updated the section, “Creating an export policy” on page 93, with the new Pool Name and Backup Retention configuration options in Service Pack 1.
• Added Chapter 5, “Administration.” This chapter contains some new features in Service Pack 1, including:“Configuring SNMP traps” on page 121.“Configuring the system to use an ACSLS library” on page 128.
02 July 31, 2012 Updated “Where to get help” on page 10 in the Preface.Changed occurrences of "dataset" to "backup."
A01 April 11, 2012 First release of Avamar Extended Retention 6.1.
8 EMC® Avamar® 6.1 Extended Retention User Guide
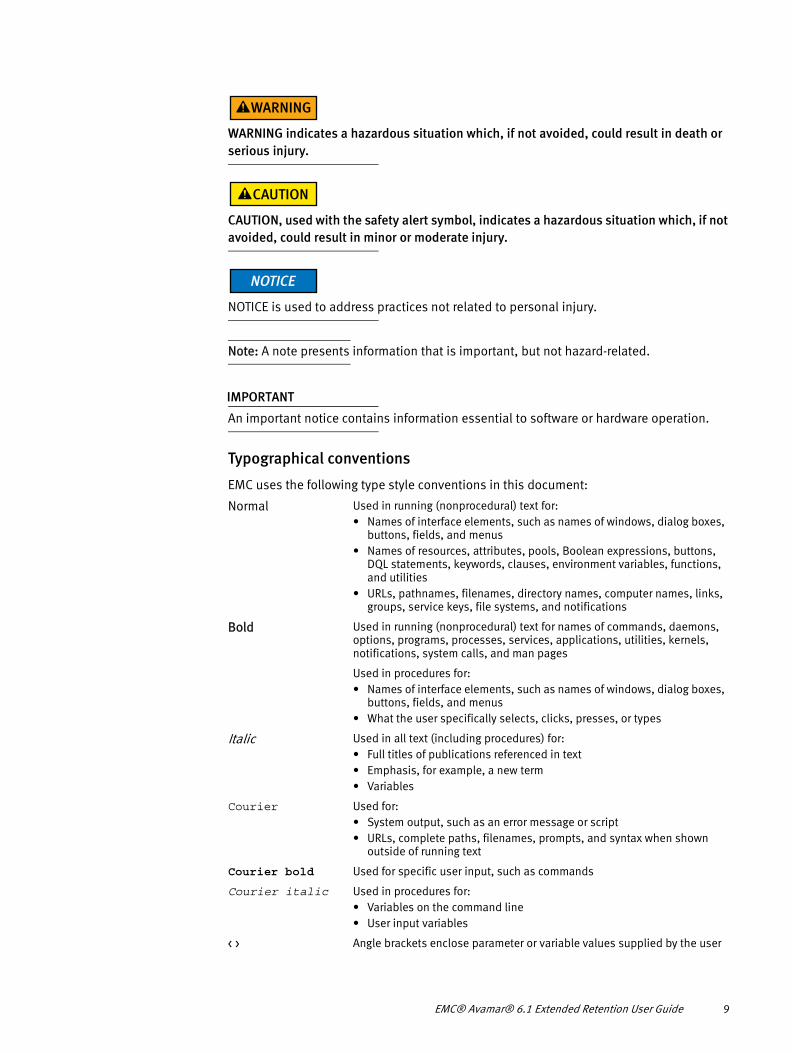
WARNING indicates a hazardous situation which, if not avoided, could result in death or serious injury.
CAUTION, used with the safety alert symbol, indicates a hazardous situation which, if not avoided, could result in minor or moderate injury.
NOTICE is used to address practices not related to personal injury.
Note: A note presents information that is important, but not hazard-related.
IMPORTANT
An important notice contains information essential to software or hardware operation.
Typographical conventions
EMC uses the following type style conventions in this document:
Normal Used in running (nonprocedural) text for:• Names of interface elements, such as names of windows, dialog boxes,
buttons, fields, and menus• Names of resources, attributes, pools, Boolean expressions, buttons,
DQL statements, keywords, clauses, environment variables, functions, and utilities
• URLs, pathnames, filenames, directory names, computer names, links, groups, service keys, file systems, and notifications
Bold Used in running (nonprocedural) text for names of commands, daemons, options, programs, processes, services, applications, utilities, kernels, notifications, system calls, and man pages
Used in procedures for:• Names of interface elements, such as names of windows, dialog boxes,
buttons, fields, and menus• What the user specifically selects, clicks, presses, or types
Italic Used in all text (including procedures) for:• Full titles of publications referenced in text• Emphasis, for example, a new term• Variables
Courier Used for:• System output, such as an error message or script• URLs, complete paths, filenames, prompts, and syntax when shown
outside of running text
Courier bold Used for specific user input, such as commands
Courier italic Used in procedures for:• Variables on the command line• User input variables
< > Angle brackets enclose parameter or variable values supplied by the user
EMC® Avamar® 6.1 Extended Retention User Guide 9
Where to get helpThe Avamar support page provides access to licensing information, product documentation, advisories, and downloads, as well as how-to and troubleshooting information. This information may enable you to resolve a product issue before you contact EMC Customer Service.
To access the Avamar support page:
1. Go to https://support.EMC.com/products.
2. Type a product name in the Find a Product box.
3. Select the product from the list that appears.
4. Click the arrow next to the Find a Product box.
5. (Optional) Add the product to the My Products list by clicking Add to my products in the top right corner of the Support by Product page.
Documentation
The Avamar product documentation provides a comprehensive set of feature overview, operational task, and technical reference information. Review the following documents in addition to product administration and user guides:
◆ Release notes provide an overview of new features and known limitations for a release.
◆ Technical notes provide technical details about specific product features, including step-by-step tasks, where necessary.
◆ White papers provide an in-depth technical perspective of a product or products as applied to critical business issues or requirements.
Knowledgebase
The EMC Knowledgebase contains applicable solutions that you can search for either by solution number (for example, esgxxxxxx) or by keyword.
To search the EMC Knowledgebase:
1. Click the Search link at the top of the page.
2. Type either the solution number or keywords in the search box.
3. (Optional) Limit the search to specific products by typing a product name in the Scope by product box and then selecting the product from the list that appears.
4. Select Knowledgebase from the Scope by resource list.
5. (Optional) Specify advanced options by clicking Advanced options and specifying values in the available fields.
6. Click the search button.
[ ] Square brackets enclose optional values
| Vertical bar indicates alternate selections; the bar means 'or'
{ } Braces enclose content that the user must specify, such as x or y or z
... Ellipses indicate nonessential information omitted from the example
10 EMC® Avamar® 6.1 Extended Retention User Guide
Live chat
To engage EMC Customer Service by using live interactive chat, click Join Live Chat on the Service Center panel of the Avamar support page.
Service Requests
For in-depth help from EMC Customer Service, submit a service request by clicking Create Service Requests on the Service Center panel of the Avamar support page.
Note: To open a service request, you must have a valid support agreement. Contact your EMC sales representative for details about obtaining a valid support agreement or with questions about your account.
To review an open service request, click the Service Center link on the Service Center panel, and then click View and manage service requests.
Facilitating support
EMC recommends that you enable ConnectEMC and Email Home on all Avamar systems:
◆ ConnectEMC automatically generates service requests for high priority events.
◆ Email Home emails configuration, capacity, and general system information to EMC Customer Service.
Your commentsYour suggestions help us to continue to improve the accuracy, organization, and overall quality of the user publications. Send your opinions of this document to:
Please include the following information:
◆ Product name and version
◆ Document name, part number, and revision (for example, 01)
◆ Page numbers
◆ Other details that will help us address the documentation issue
EMC® Avamar® 6.1 Extended Retention User Guide 11

12 EMC® Avamar® 6.1 Extended Retention User Guide
CHAPTER 1Introduction
The following topics provide a high-level overview of the Avamar extended retention feature, which is included in version 6.1 of the core Avamar software product. The extended retention feature is a long-term retention solution intended for exporting Avamar backup data to a physical or virtual tape library.
◆ Overview................................................................................................................. 14◆ Capabilities and limitations .................................................................................... 15◆ Important terms and definitions.............................................................................. 16◆ Operational best practices ...................................................................................... 17
Introduction 13
Introduction
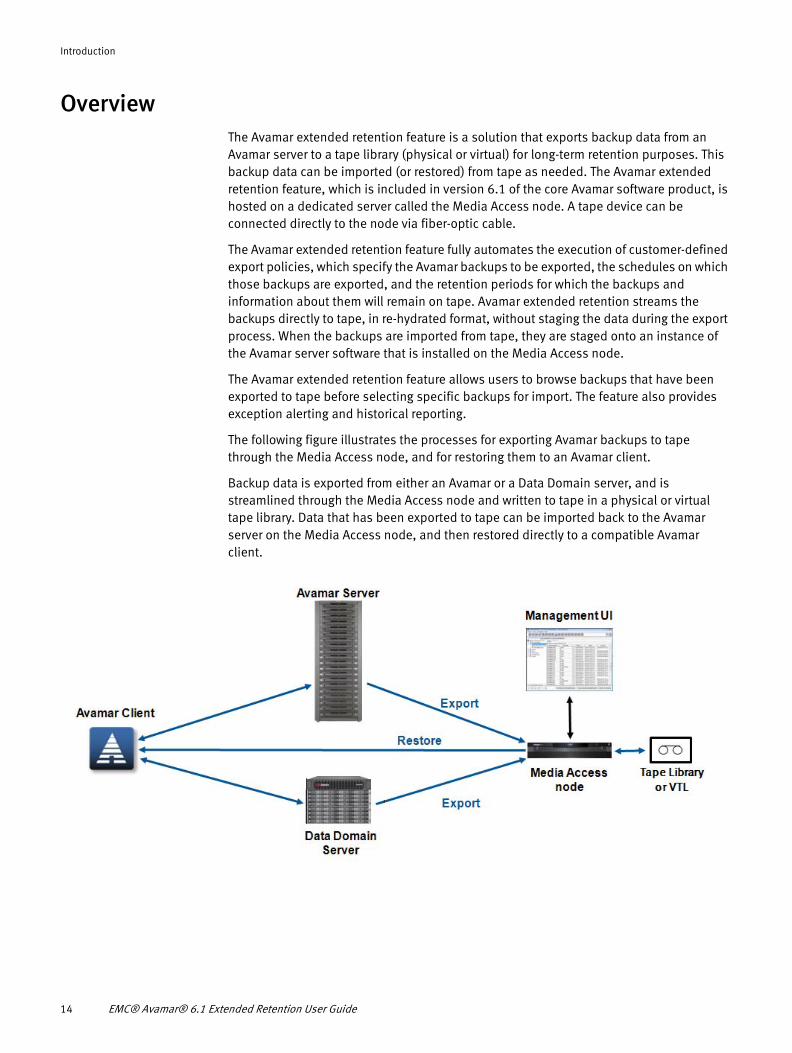
OverviewThe Avamar extended retention feature is a solution that exports backup data from an Avamar server to a tape library (physical or virtual) for long-term retention purposes. This backup data can be imported (or restored) from tape as needed. The Avamar extended retention feature, which is included in version 6.1 of the core Avamar software product, is hosted on a dedicated server called the Media Access node. A tape device can be connected directly to the node via fiber-optic cable.
The Avamar extended retention feature fully automates the execution of customer-defined export policies, which specify the Avamar backups to be exported, the schedules on which those backups are exported, and the retention periods for which the backups and information about them will remain on tape. Avamar extended retention streams the backups directly to tape, in re-hydrated format, without staging the data during the export process. When the backups are imported from tape, they are staged onto an instance of the Avamar server software that is installed on the Media Access node.
The Avamar extended retention feature allows users to browse backups that have been exported to tape before selecting specific backups for import. The feature also provides exception alerting and historical reporting.
The following figure illustrates the processes for exporting Avamar backups to tape through the Media Access node, and for restoring them to an Avamar client.
Backup data is exported from either an Avamar or a Data Domain server, and is streamlined through the Media Access node and written to tape in a physical or virtual tape library. Data that has been exported to tape can be imported back to the Avamar server on the Media Access node, and then restored directly to a compatible Avamar client.
14 EMC® Avamar® 6.1 Extended Retention User Guide
Introduction
Capabilities and limitationsThe Avamar extended retention feature provides a number of capabilities and benefits to customers, including:
◆ Allowing customers to put Avamar backups on tape◆ Lowering the cost of storage for Avamar long-term retention of backups◆ Producing transportable media for storing off-site◆ Producing transportable media for restoring at an alternative site
Limitations associated with the extended retention feature are described in the following topics.
Avamar 6.1 is required
The Avamar extended retention feature is included in the Avamar 6.1 release. Customers must also upgrade the Avamar grids that will be used by the extended retention feature to Avamar 6.1.
Avamar extended retention is intended for long-term retention
Avamar extended retention is to be used for long-term retention of data, and is not intended for operational recovery purposes. Administrators can use this feature to initiate the import of backups that have been exported to tape. However, the feature is not intended for end-users to perform their own imports. The feature is also not suitable for use as an alternative to replication or for use as a complete disaster recovery solution.
Partial imports are not supported
Avamar extended retention supports full imports of complete backups on a machine-by-machine basis. The feature does not support partial imports of directories, files, or any subset of a backup.
Exports and imports can take a significant amount of time
Exports and imports may take a long time depending upon the amount of data that is involved.
A single physical or virtual tape library is supported
Currently, Avamar extended retention can export Avamar backups to a single physical or virtual tape library. The use of multiple libraries is not supported.
Standalone tape drives are not supported
Avamar extended retention requires the use of a tape library with a robotic arm, or an equivalent virtual tape library. Standalone tape drives are not supported.
Avamar extended retention must also have exclusive control of the tape library and all drives that are allocated to it. The first release of the feature has not been designed to coordinate access with any other tape management implementation.
Capabilities and limitations 15
Introduction
Important terms and definitionsThe following terms are used throughout this guide.
Avamar extended retention agent The Avamar extended retention software component, which transforms a backup data stream from Avamar format into a proprietary format (during export) and vice versa (during restore). The agent is one of several distinct components that collectively make up the extended retention feature.
Avamar extended retention application The Avamar extended retention software component where the overall extended retention capability is administered. The Avamar extended retention application maintains schedules and policies, kicks off jobs accordingly and drives the extended retention user interface.
BackupAn object that contains all the data that an Avamar client or plug-in stores about a filesystem or application at the time a backup is created. The Avamar term is Dataset.
Backup metadataAttributes of the backups that have been exported by Avamar extended retention, such as the host machine it was taken from, the date/time it was taken, and the tape(s) it was exported to.
EjectThe action of unloading a tape from a tape drive or off-line storage slot (library) for the purpose of physically relocating the media to another location.
Export The action of transporting (extracting) a backup from an Avamar server and ultimately writing it onto long-term storage media.
External Avamar serversThe Avamar servers (also known as grids) whose backups will be exported to tape. In this guide, these servers are referred to as “external” to distinguish them from the import server.
Export policyDefines the schedule on which a group of client backups will be exported to tape by Avamar extended retention. The export policy defines the group of clients that share a common schedule and retention periods for backup metadata and file-level metadata.
ImportThe first phase of performing a restore operation, during which backups are transferred from tape to the internal Avamar server instance residing on the Media Access node.
Import serverThe Avamar server that is installed on the Media Access node. Backups are imported from tape to this server.
Media Access nodeA 7.8 TB, Gen4 node that has an HBA port, which allows a tape device to be connected directly to the node via fiber-optic cable. Avamar extended retention and an instance of Avamar run on this node.
16 EMC® Avamar® 6.1 Extended Retention User Guide
Introduction
RestoreThe action of recovering a backup from long-term storage media to a target client machine such that the data is returned to its original state at the time the backup was taken by the original Avamar server.
Retention periodsConfigurable options for backups and the files contained in the backups. The retention period specifies how long the backups and files can be browsed in the system.
SpringboardA control feature that displays in a workspace. Springboards allow you to view status and schedule information, to configure system settings, to view events, logs, and tasks, to manage users, and to open additional web pages in which you can perform key configuration and administrative tasks within Avamar extended retention.
Storage Management SystemThe Avamar extended retention software component that manages the library and tape media.
WorkspaceA web page in the Avamar extended retention user interface that contains springboards that are used to perform specific tasks. Currently, the user interface provides three workspaces: Administration, Avamar Extended Retention, and My Workspace.
Operational best practicesThe following best practices provide tips for helping to ensure the most efficient operation of the Avamar extended retention system.
Creating an administrative user account
The first time you log in to the Avamar Extended Retention application, you have to provide credentials for the super user account, suser. This account should be reserved for performing administrative activities only, such as dealing with emergencies and lockouts.
We recommend that, after you have logged in as suser, you immediately create a new user account and assign all available roles to the user with the exception of the EMC Support role, which is for internal purposes only. Instructions for creating user accounts and assigning roles are provided in “Creating a user account” on page 33 and in “Editing a user account” on page 34.
Exporting backups to tape
Make sure that the export policy schedules line up with the Avamar backups in such a way that exports to tape happen only once after a backup is executed. Instructions for creating export policies are provided in “Creating an export policy” on page 93.
After you create an export policy, run it once manually, and verify that the expected number of jobs are running.
Operational best practices 17
Introduction
To verify the expected number of jobs:
1. Open the Task Viewer.
2. When the export policy shows as being in Active state, click the information bubble icon next to it and make sure that the number of jobs running and waiting match what you expect.
If the number is not what you expect, one option is to increase the number of maximum jobs that can run in parallel. This setting is under System Properties in the Media Access node tab on the Configuration springboard. However, be aware that increasing this number directly impacts the performance of the external grids.
Do not run exports during maintenance or blackout windows that are scheduled on the external Avamar servers.
Always make sure that the library has labeled media available for exports.
Labeling tape volumes
Label at least two tape volumes as bootstrap tapes. Instructions for labeling bootstrap tapes are provided in “Labeling volumes” on page 81.
Labeling tapes can take time. After initiating a request to label a tape, verify that it has been labeled as follows:
1. Open the Event Viewer and wait for the “Successfully labeled volume xxx” event to appear.
2. In the Media Management page, make sure that the newly labeled tape shows as being labeled in the Volumes panel. (Volumes that have not been labeled have “unlabeled” in the Volume Name column.)
Creating disaster recovery images
Ask the administrator to set up a cron job to create a disaster recovery image automatically when the system is not busy with other tasks, such as exports and imports. Recovery images should be created regularly to ensure that the most current data possible can be recovered when needed. Instructions for creating a recovery image are provided in “Creating a disaster recovery image” on page 134.
Clearing the browser cache before logging in for the first time
If you have re-installed Avamar extended retention, delete the browser cache before logging in to the new installation for the first time.
18 EMC® Avamar® 6.1 Extended Retention User Guide
CHAPTER 2Getting Started
The following topics describe how to log in to the Avamar Extended Retention user interface. They also describe the workspaces that are available, what they are for, and how to access them:
◆ Supported browsers................................................................................................ 20◆ What to do the first time you use Avamar extended retention .................................. 20◆ Logging in for the first time...................................................................................... 20◆ The Administration workspace ................................................................................ 23◆ Customizing My Workspace..................................................................................... 27◆ The Avamar Extended Retention workspace............................................................. 27◆ Using online help.................................................................................................... 29◆ Logging out............................................................................................................. 30
Getting Started 19
Getting Started
Supported browsersThe Avamar extended retention application has been tested using the following web browsers:
◆ Windows Internet Explorer◆ Mozilla Firefox◆ Google Chrome
Refer to the EMC Avamar Compatibility and Interoperability Matrix for supported browser versions.
What to do the first time you use Avamar extended retentionThe first time you use the Avamar extended retention feature, perform the following tasks in the order shown below:
1. Create a disaster recovery image of the Avamar extended retention system as described in “Creating a disaster recovery image” on page 134.
2. Log in to the Avamar Extended Retention framework, and set up the lockbox password and the framework administrator account as described in “Logging in for the first time”.
3. In the Administration workspace, create at least one user and assign administrator roles to the user as described in “Creating a user account” on page 33 and in “Editing a user’s roles” on page 37.
4. Access the Avamar Extended Retention workspace, and open springboards as described in “The Avamar Extended Retention workspace” on page 27 and in “Opening Avamar Extended Retention springboards” on page 64.
5. Label volumes in the library as described in “Labeling volumes” on page 81.
6. Create an export policy as described in “Creating an export policy” on page 93.
After you have created export policies and the exports are running, you can begin monitoring events and tasks, and browsing and importing Avamar backups.
Logging in for the first timeTo log in to the Avamar extended retention:
1. Open a web browser and access the following URL:
https//:media_access_node_IP_address:7443/imf.action
where media_access_node_IP_address is the IP address of the Media Access node on which the Avamar extended retention feature is running.
The first time you log in to the extended retention feature, you must set up the lockbox password and create the framework administrator account.
20 EMC® Avamar® 6.1 Extended Retention User Guide
Getting Started
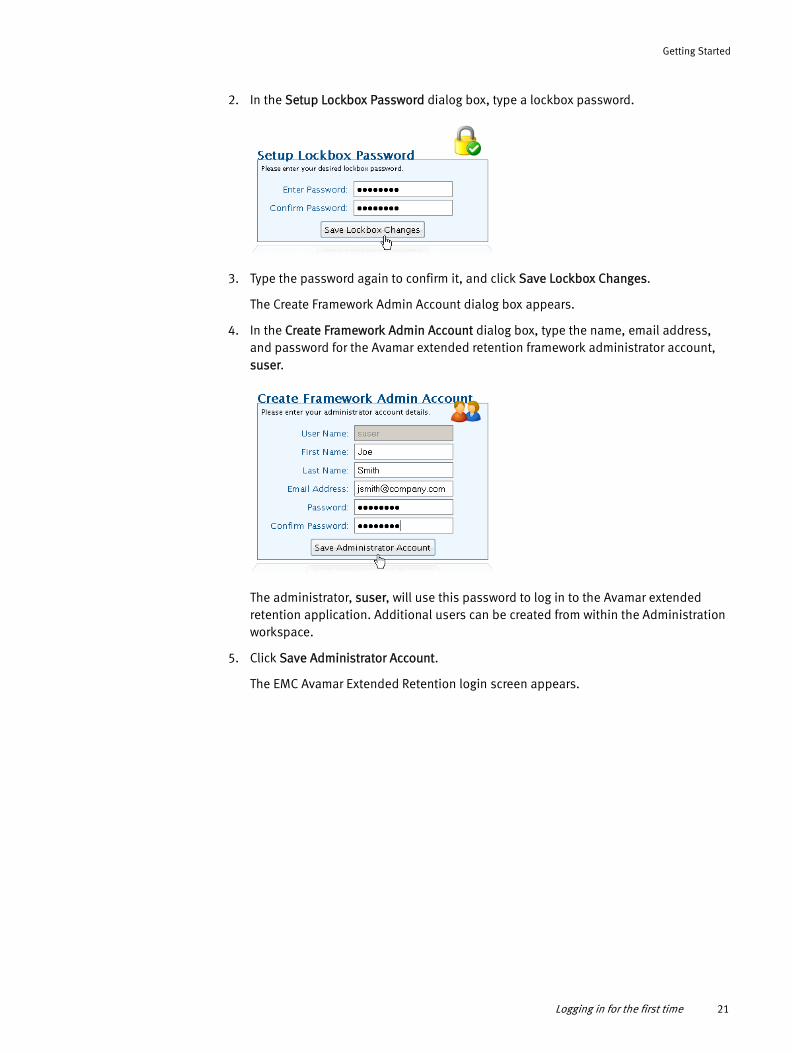
2. In the Setup Lockbox Password dialog box, type a lockbox password.
3. Type the password again to confirm it, and click Save Lockbox Changes.
The Create Framework Admin Account dialog box appears.
4. In the Create Framework Admin Account dialog box, type the name, email address, and password for the Avamar extended retention framework administrator account, suser.
The administrator, suser, will use this password to log in to the Avamar extended retention application. Additional users can be created from within the Administration workspace.
5. Click Save Administrator Account.
The EMC Avamar Extended Retention login screen appears.
Logging in for the first time 21
Getting Started
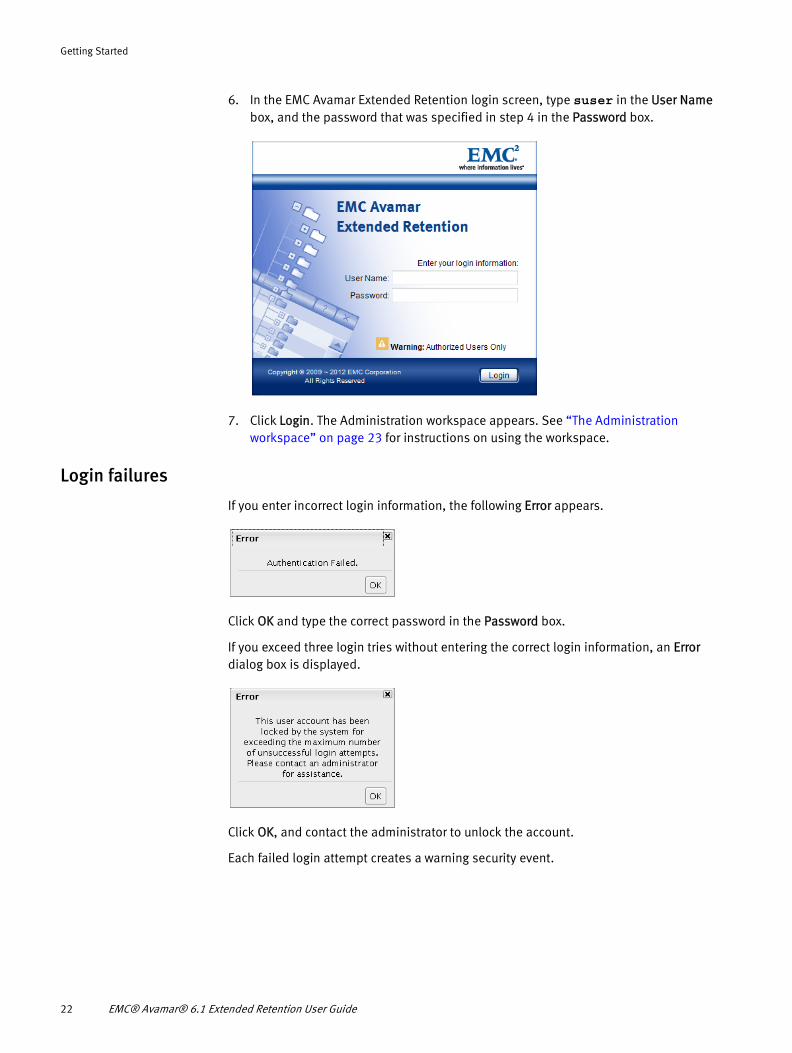
6. In the EMC Avamar Extended Retention login screen, type suser in the User Name box, and the password that was specified in step 4 in the Password box.
7. Click Login. The Administration workspace appears. See “The Administration workspace” on page 23 for instructions on using the workspace.
Login failures
If you enter incorrect login information, the following Error appears.
Click OK and type the correct password in the Password box.
If you exceed three login tries without entering the correct login information, an Error dialog box is displayed.
Click OK, and contact the administrator to unlock the account.
Each failed login attempt creates a warning security event.
22 EMC® Avamar® 6.1 Extended Retention User Guide
Getting Started
Session timeouts
The amount of time a logged-in session remains active depends upon the session timeout setting. (The default setting is 45 minutes.) No notification is displayed when a session times out; however, you will not be able to interact with the user interface after it has timed out. If the session times out, you must log back in to the Avamar extended retention application.
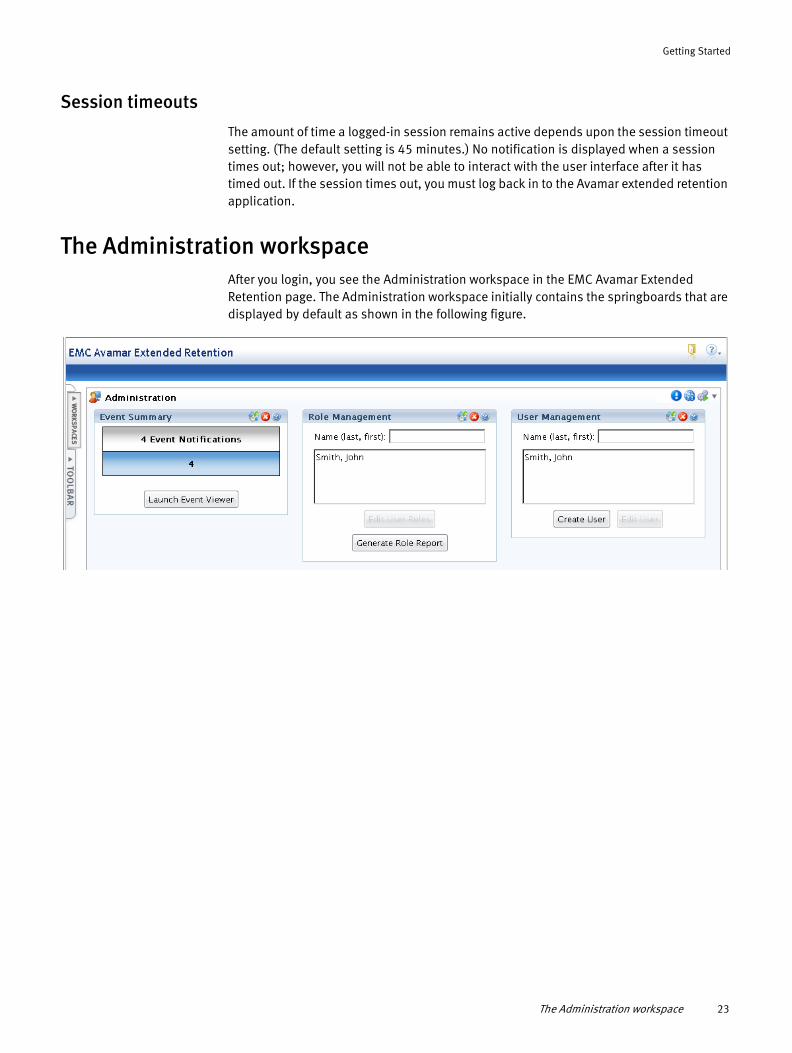
The Administration workspaceAfter you login, you see the Administration workspace in the EMC Avamar Extended Retention page. The Administration workspace initially contains the springboards that are displayed by default as shown in the following figure.
The Administration workspace 23
Getting Started
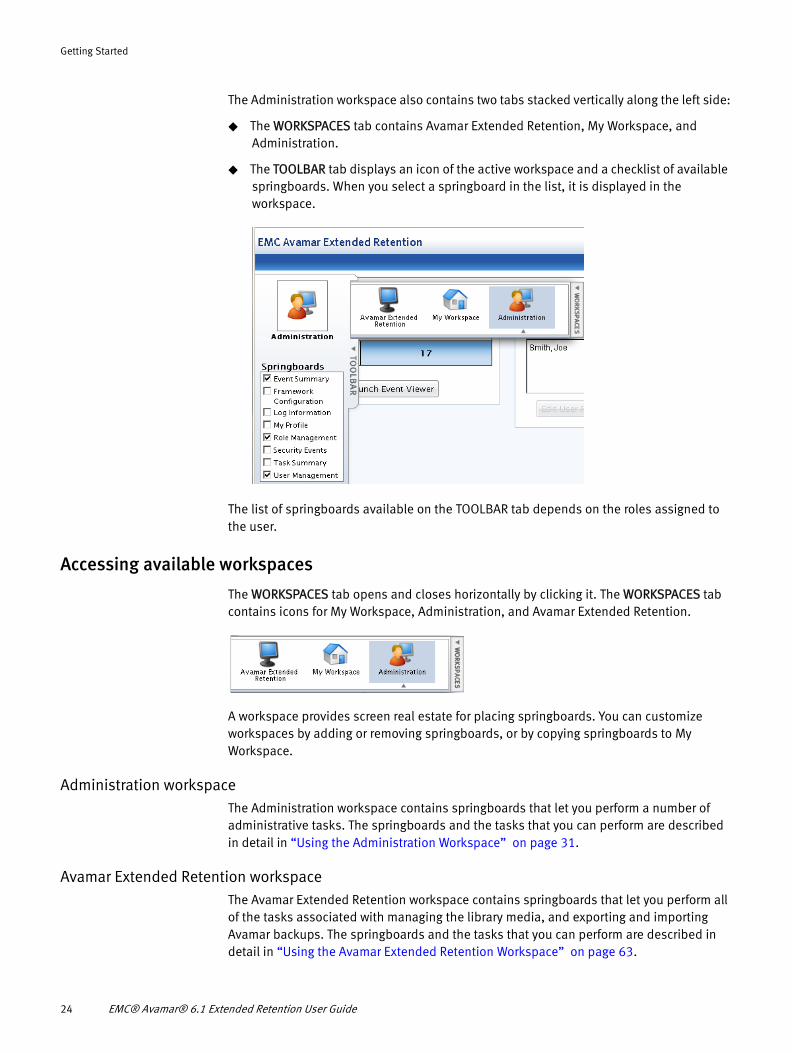
The Administration workspace also contains two tabs stacked vertically along the left side:
◆ The WORKSPACES tab contains Avamar Extended Retention, My Workspace, and Administration.
◆ The TOOLBAR tab displays an icon of the active workspace and a checklist of available springboards. When you select a springboard in the list, it is displayed in the workspace.
The list of springboards available on the TOOLBAR tab depends on the roles assigned to the user.
Accessing available workspaces
The WORKSPACES tab opens and closes horizontally by clicking it. The WORKSPACES tab contains icons for My Workspace, Administration, and Avamar Extended Retention.
A workspace provides screen real estate for placing springboards. You can customize workspaces by adding or removing springboards, or by copying springboards to My Workspace.
Administration workspaceThe Administration workspace contains springboards that let you perform a number of administrative tasks. The springboards and the tasks that you can perform are described in detail in “Using the Administration Workspace” on page 31.
Avamar Extended Retention workspaceThe Avamar Extended Retention workspace contains springboards that let you perform all of the tasks associated with managing the library media, and exporting and importing Avamar backups. The springboards and the tasks that you can perform are described in detail in “Using the Avamar Extended Retention Workspace” on page 63.
24 EMC® Avamar® 6.1 Extended Retention User Guide
Getting Started
My WorkspaceMy Workspace is a user-defined workspace. Initially, My Workspace contains three rectangles, which represent drop zones for springboards. My Workspace provides an area for you to organize frequently-used springboards for easy access.
Adding and removing springboards
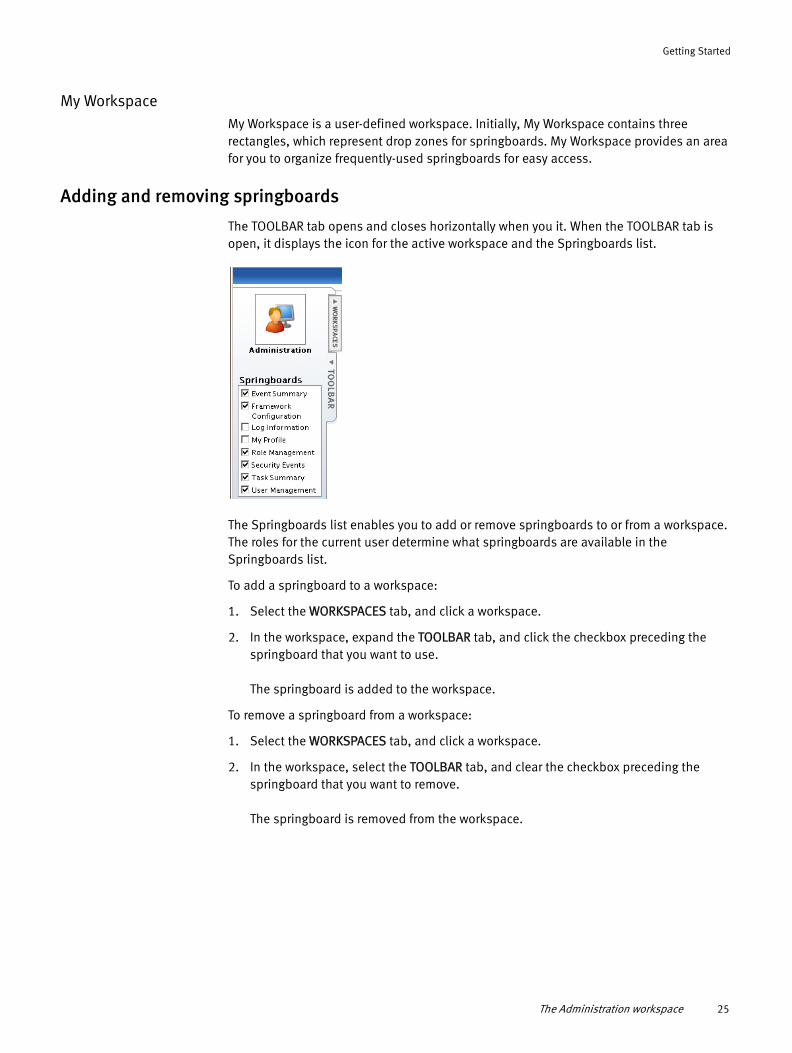
The TOOLBAR tab opens and closes horizontally when you it. When the TOOLBAR tab is open, it displays the icon for the active workspace and the Springboards list.
The Springboards list enables you to add or remove springboards to or from a workspace. The roles for the current user determine what springboards are available in the Springboards list.
To add a springboard to a workspace:
1. Select the WORKSPACES tab, and click a workspace.
2. In the workspace, expand the TOOLBAR tab, and click the checkbox preceding the springboard that you want to use.
The springboard is added to the workspace.
To remove a springboard from a workspace:
1. Select the WORKSPACES tab, and click a workspace.
2. In the workspace, select the TOOLBAR tab, and clear the checkbox preceding the springboard that you want to remove.
The springboard is removed from the workspace.
The Administration workspace 25
Getting Started
Moving springboards within a workspace
You can move a springboard to another location within a workspace by dragging and dropping it onto another springboard or onto a valid drop zone. (Drop zones are represented by dotted-line rectangles.)
To move a springboard:
1. Click and hold the mouse cursor on the springboard's title bar.
2. Drag the springboard to a valid drop zone and drop it by releasing the mouse button.
The springboard appears as a transparent rectangle as it is moved, and the mouse cursor changes to a icon to indicate an invalid drop zone.
Displaying springboards in a workspace
You can display any number of available springboards in a workspace. The list of available springboards is located in the TOOLBAR tab.
To add the springboard back to a workspace:
1. Click the TOOLBAR tab.
2. Click the checkbox next to the springboard that you want to display.
The springboard appears in the workspace.
Hiding springboards in a workspace
The springboards in each workspace contain a “hide from workspace” icon in the top right corner.
To hide a springboard in a workspace:
1. Open the workspace in which you want to hide a springboard.
2. Click the “hide from workspace” icon.
The springboard no longer displays in the workspace.
26 EMC® Avamar® 6.1 Extended Retention User Guide
Getting Started
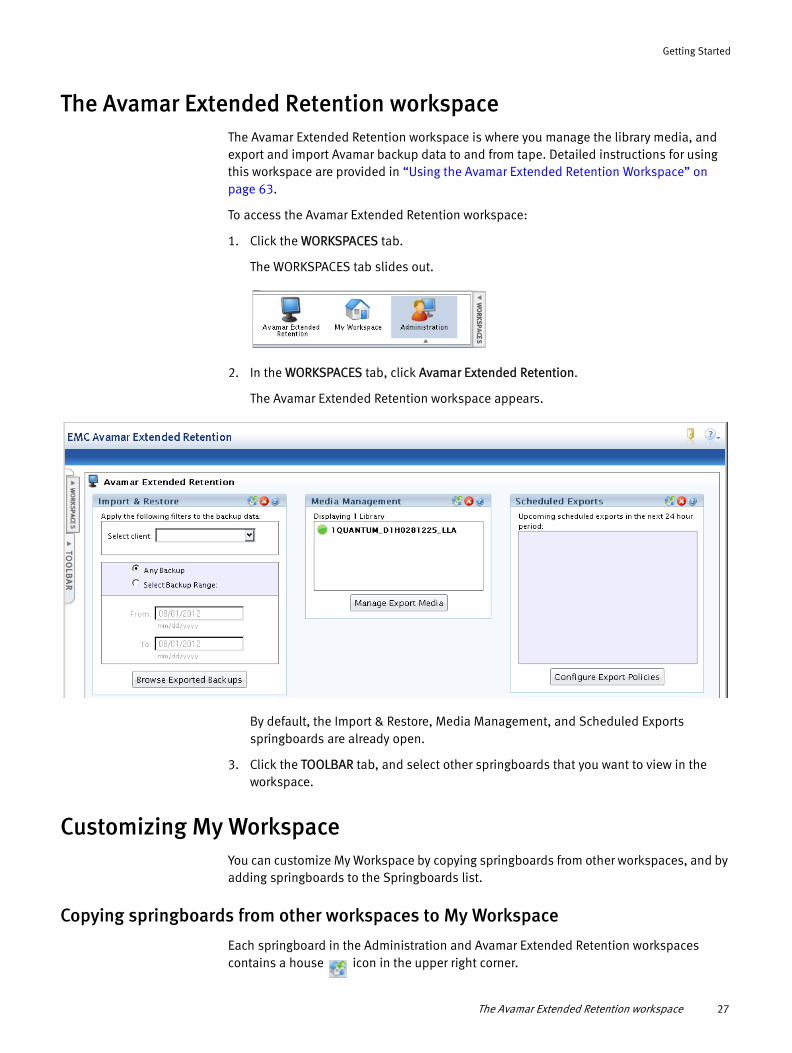
The Avamar Extended Retention workspaceThe Avamar Extended Retention workspace is where you manage the library media, and export and import Avamar backup data to and from tape. Detailed instructions for using this workspace are provided in “Using the Avamar Extended Retention Workspace” on page 63.
To access the Avamar Extended Retention workspace:
1. Click the WORKSPACES tab.
The WORKSPACES tab slides out.
2. In the WORKSPACES tab, click Avamar Extended Retention.
The Avamar Extended Retention workspace appears.
By default, the Import & Restore, Media Management, and Scheduled Exports springboards are already open.
3. Click the TOOLBAR tab, and select other springboards that you want to view in the workspace.
Customizing My WorkspaceYou can customize My Workspace by copying springboards from other workspaces, and by adding springboards to the Springboards list.
Copying springboards from other workspaces to My Workspace
Each springboard in the Administration and Avamar Extended Retention workspaces contains a house icon in the upper right corner.
The Avamar Extended Retention workspace 27
Getting Started
To copy a springboard to My Workspace, click the house icon on the springboard.
The springboard now appears in both my My Workspace and in the active workspace.
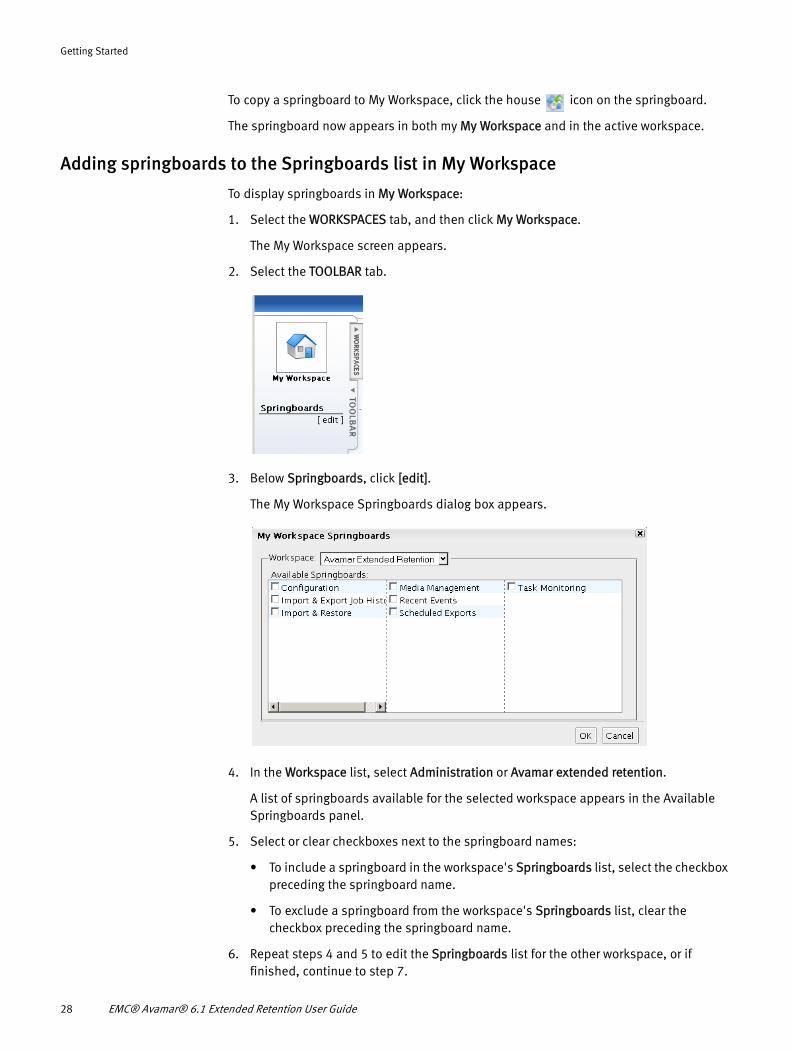
Adding springboards to the Springboards list in My Workspace
To display springboards in My Workspace:
1. Select the WORKSPACES tab, and then click My Workspace.
The My Workspace screen appears.
2. Select the TOOLBAR tab.
3. Below Springboards, click [edit].
The My Workspace Springboards dialog box appears.
4. In the Workspace list, select Administration or Avamar extended retention.
A list of springboards available for the selected workspace appears in the Available Springboards panel.
5. Select or clear checkboxes next to the springboard names:
• To include a springboard in the workspace's Springboards list, select the checkbox preceding the springboard name.
• To exclude a springboard from the workspace's Springboards list, clear the checkbox preceding the springboard name.
6. Repeat steps 4 and 5 to edit the Springboards list for the other workspace, or if finished, continue to step 7.
28 EMC® Avamar® 6.1 Extended Retention User Guide
Getting Started
7. Click OK to save the changes, or click Cancel to quit.
The Springboards list is updated accordingly.
Removing springboards from the Springboards list in My Workspace
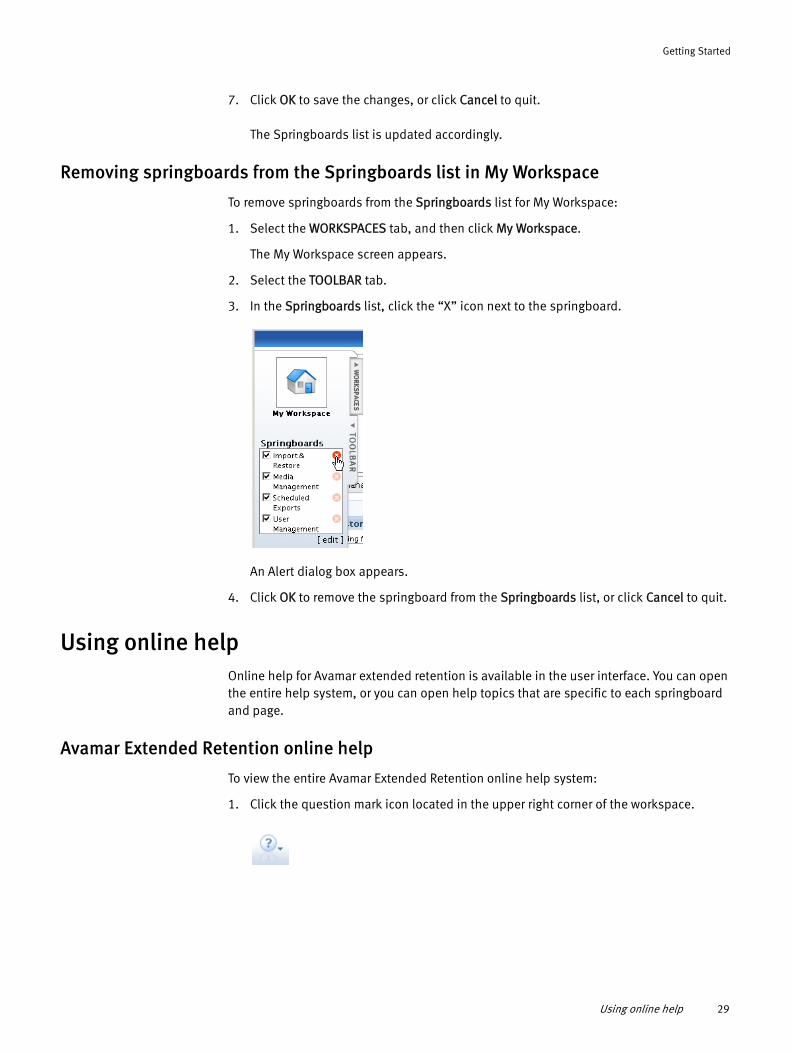
To remove springboards from the Springboards list for My Workspace:
1. Select the WORKSPACES tab, and then click My Workspace.
The My Workspace screen appears.
2. Select the TOOLBAR tab.
3. In the Springboards list, click the “X” icon next to the springboard.
An Alert dialog box appears.
4. Click OK to remove the springboard from the Springboards list, or click Cancel to quit.
Using online helpOnline help for Avamar extended retention is available in the user interface. You can open the entire help system, or you can open help topics that are specific to each springboard and page.
Avamar Extended Retention online help
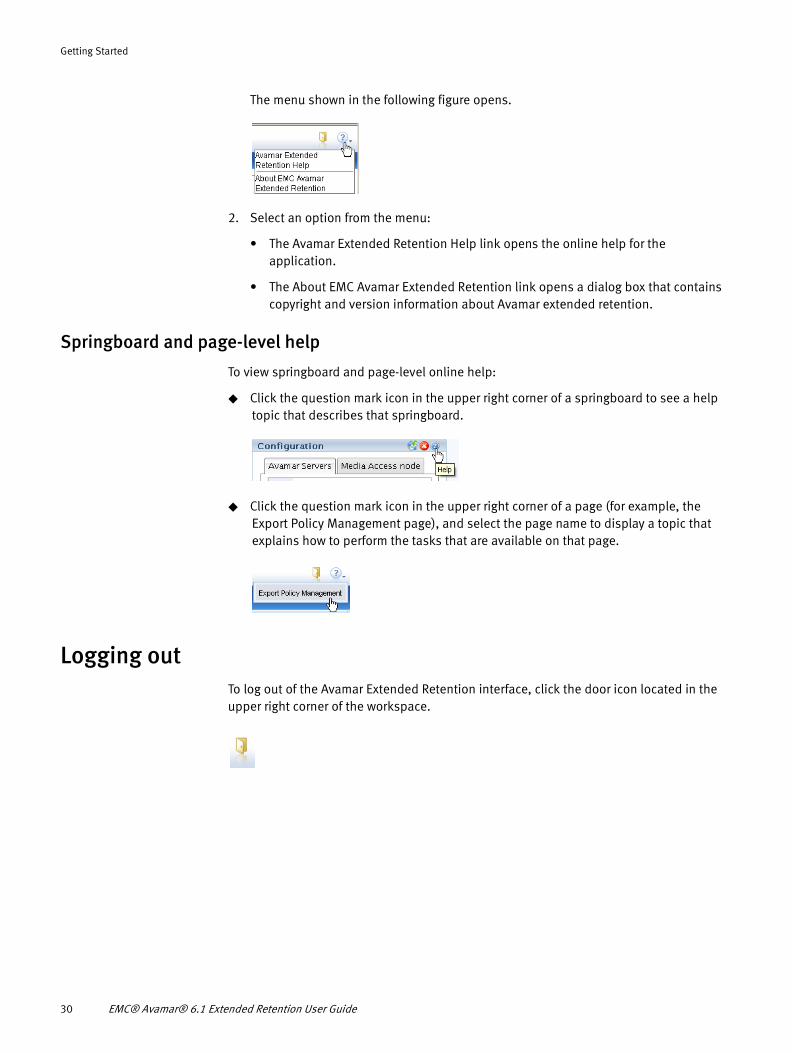
To view the entire Avamar Extended Retention online help system:
1. Click the question mark icon located in the upper right corner of the workspace.
Using online help 29
Getting Started
The menu shown in the following figure opens.
2. Select an option from the menu:
• The Avamar Extended Retention Help link opens the online help for the application.
• The About EMC Avamar Extended Retention link opens a dialog box that contains copyright and version information about Avamar extended retention.
Springboard and page-level help
To view springboard and page-level online help:
◆ Click the question mark icon in the upper right corner of a springboard to see a help topic that describes that springboard.
◆ Click the question mark icon in the upper right corner of a page (for example, the Export Policy Management page), and select the page name to display a topic that explains how to perform the tasks that are available on that page.
Logging outTo log out of the Avamar Extended Retention interface, click the door icon located in the upper right corner of the workspace.
30 EMC® Avamar® 6.1 Extended Retention User Guide
CHAPTER 3Using the Administration Workspace
The following topics describe the tasks that you can perform in the Administration workspace:
◆ User management................................................................................................... 32◆ Role management ................................................................................................... 36◆ User profile management ........................................................................................ 39◆ System configuration .............................................................................................. 42◆ System events ........................................................................................................ 45◆ Tasks ...................................................................................................................... 51◆ Security events ....................................................................................................... 55◆ Log information....................................................................................................... 60
Using the Administration Workspace 31
Using the Administration Workspace
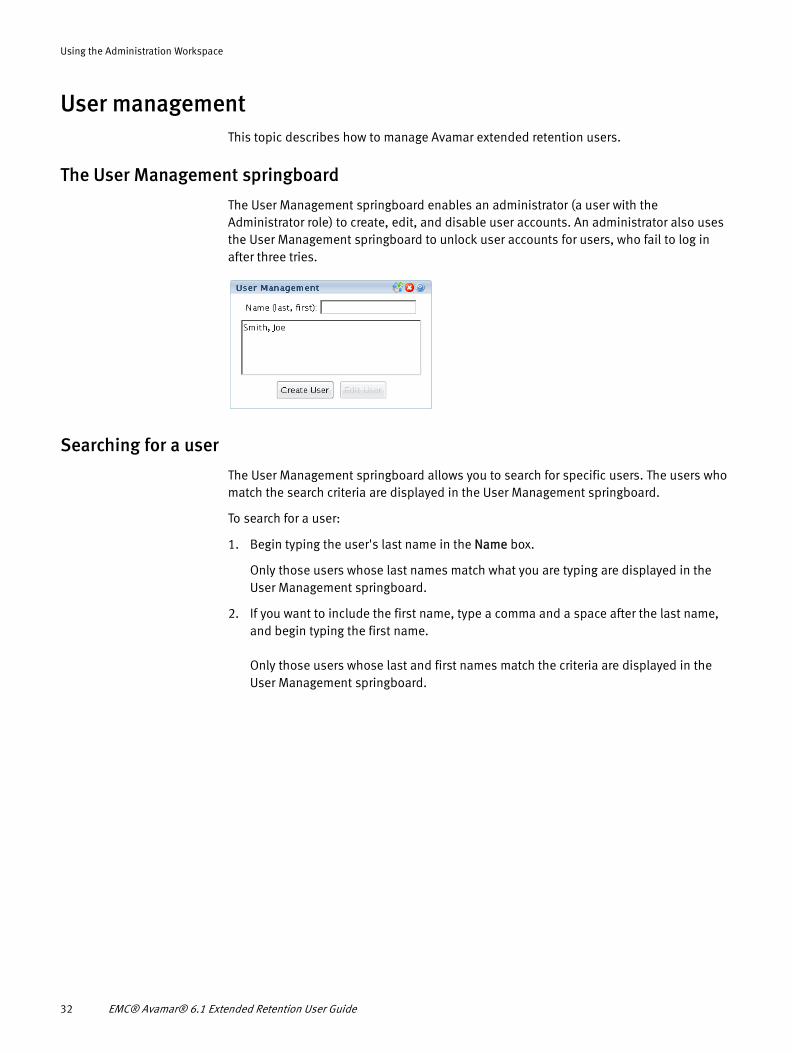
User managementThis topic describes how to manage Avamar extended retention users.
The User Management springboard
The User Management springboard enables an administrator (a user with the Administrator role) to create, edit, and disable user accounts. An administrator also uses the User Management springboard to unlock user accounts for users, who fail to log in after three tries.
Searching for a user
The User Management springboard allows you to search for specific users. The users who match the search criteria are displayed in the User Management springboard.
To search for a user:
1. Begin typing the user's last name in the Name box.
Only those users whose last names match what you are typing are displayed in the User Management springboard.
2. If you want to include the first name, type a comma and a space after the last name, and begin typing the first name.
Only those users whose last and first names match the criteria are displayed in the User Management springboard.
32 EMC® Avamar® 6.1 Extended Retention User Guide
Using the Administration Workspace
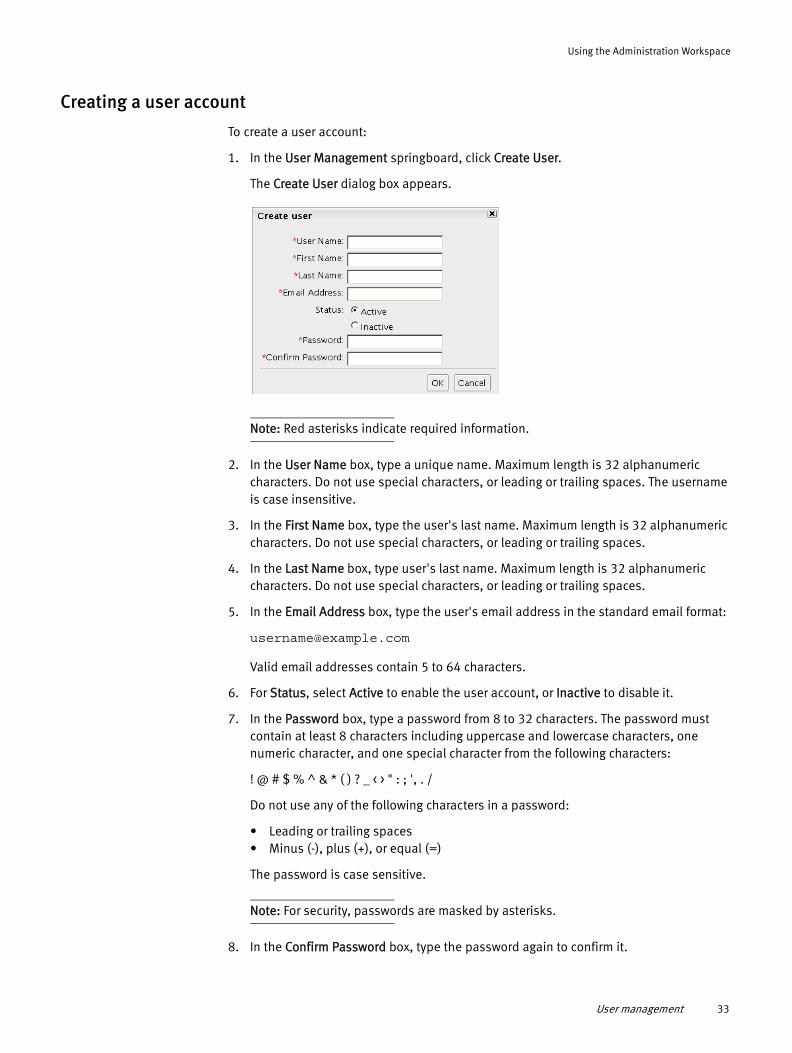
Creating a user account
To create a user account:
1. In the User Management springboard, click Create User.
The Create User dialog box appears.
Note: Red asterisks indicate required information.
2. In the User Name box, type a unique name. Maximum length is 32 alphanumeric characters. Do not use special characters, or leading or trailing spaces. The username is case insensitive.
3. In the First Name box, type the user's last name. Maximum length is 32 alphanumeric characters. Do not use special characters, or leading or trailing spaces.
4. In the Last Name box, type user's last name. Maximum length is 32 alphanumeric characters. Do not use special characters, or leading or trailing spaces.
5. In the Email Address box, type the user's email address in the standard email format:
Valid email addresses contain 5 to 64 characters.
6. For Status, select Active to enable the user account, or Inactive to disable it.
7. In the Password box, type a password from 8 to 32 characters. The password must contain at least 8 characters including uppercase and lowercase characters, one numeric character, and one special character from the following characters:
! @ # $ % ^ & * ( ) ? _ < > " : ; ', . /
Do not use any of the following characters in a password:
• Leading or trailing spaces• Minus (-), plus (+), or equal (=)
The password is case sensitive.
Note: For security, passwords are masked by asterisks.
8. In the Confirm Password box, type the password again to confirm it.
User management 33
Using the Administration Workspace
9. Click OK to create the user account, or Cancel to quit.
The new user account appears in the list box. By default, all new user accounts are assigned the User role.
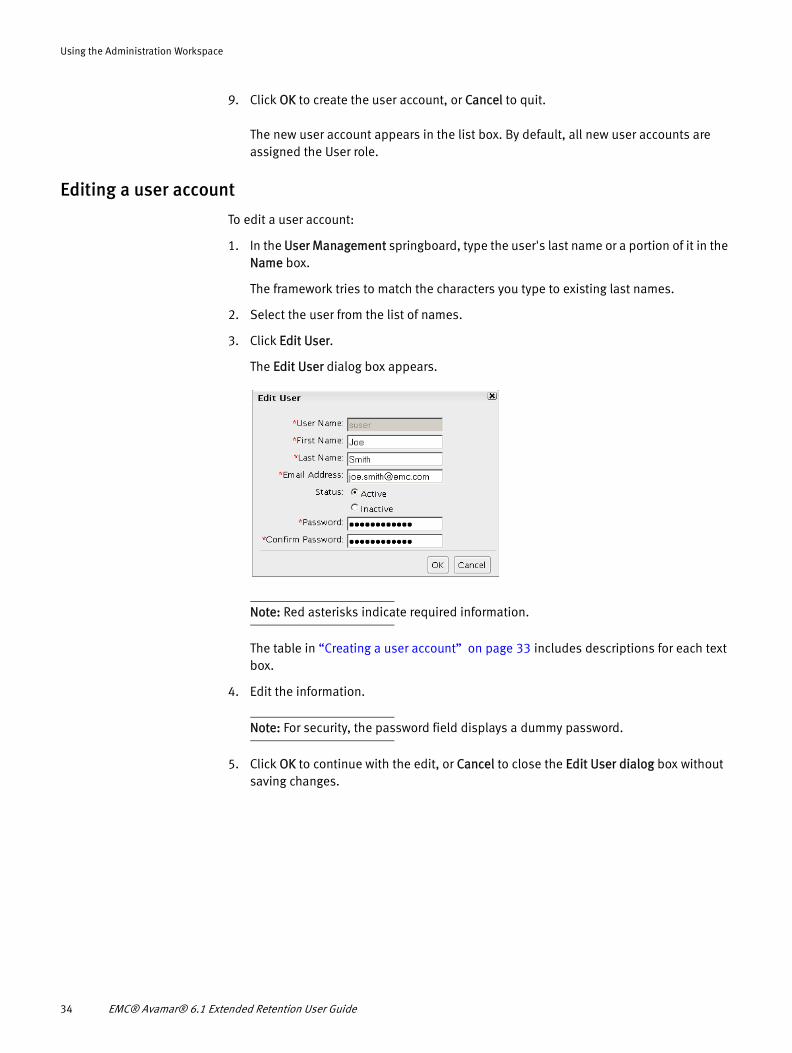
Editing a user account
To edit a user account:
1. In the User Management springboard, type the user's last name or a portion of it in the Name box.
The framework tries to match the characters you type to existing last names.
2. Select the user from the list of names.
3. Click Edit User.
The Edit User dialog box appears.
Note: Red asterisks indicate required information.
The table in “Creating a user account” on page 33 includes descriptions for each text box.
4. Edit the information.
Note: For security, the password field displays a dummy password.
5. Click OK to continue with the edit, or Cancel to close the Edit User dialog box without saving changes.
34 EMC® Avamar® 6.1 Extended Retention User Guide
Using the Administration Workspace
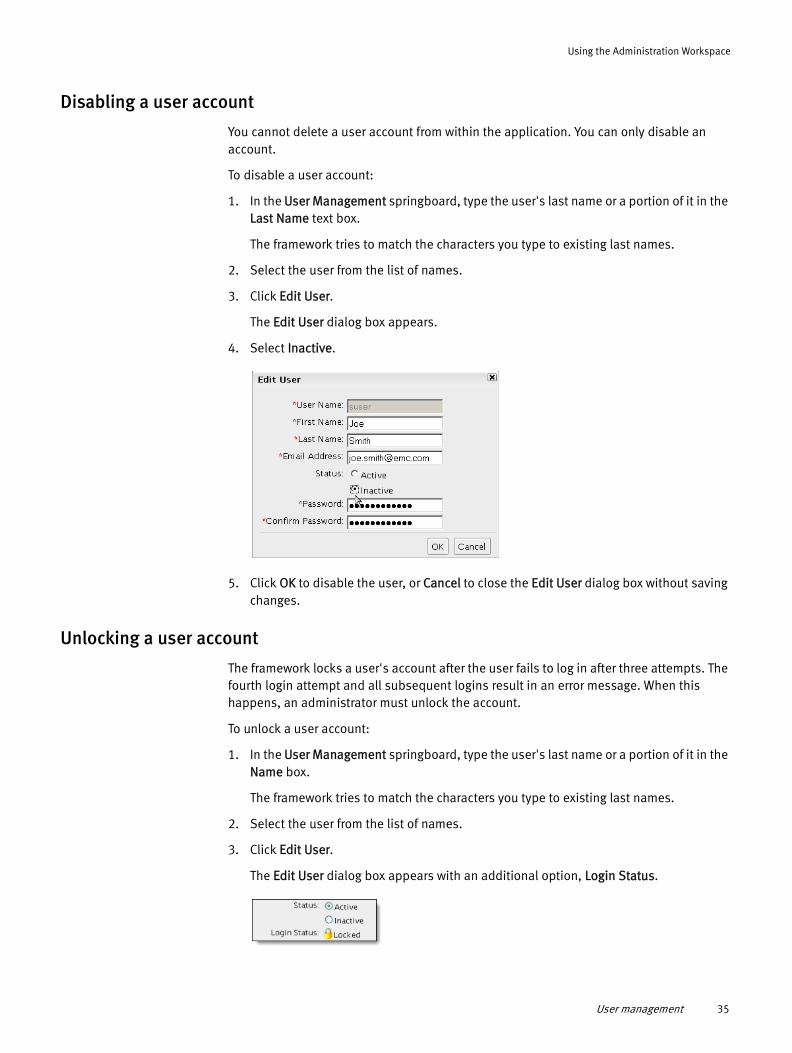
Disabling a user account
You cannot delete a user account from within the application. You can only disable an account.
To disable a user account:
1. In the User Management springboard, type the user's last name or a portion of it in the Last Name text box.
The framework tries to match the characters you type to existing last names.
2. Select the user from the list of names.
3. Click Edit User.
The Edit User dialog box appears.
4. Select Inactive.
5. Click OK to disable the user, or Cancel to close the Edit User dialog box without saving changes.
Unlocking a user account
The framework locks a user's account after the user fails to log in after three attempts. The fourth login attempt and all subsequent logins result in an error message. When this happens, an administrator must unlock the account.
To unlock a user account:
1. In the User Management springboard, type the user's last name or a portion of it in the Name box.
The framework tries to match the characters you type to existing last names.
2. Select the user from the list of names.
3. Click Edit User.
The Edit User dialog box appears with an additional option, Login Status.
User management 35
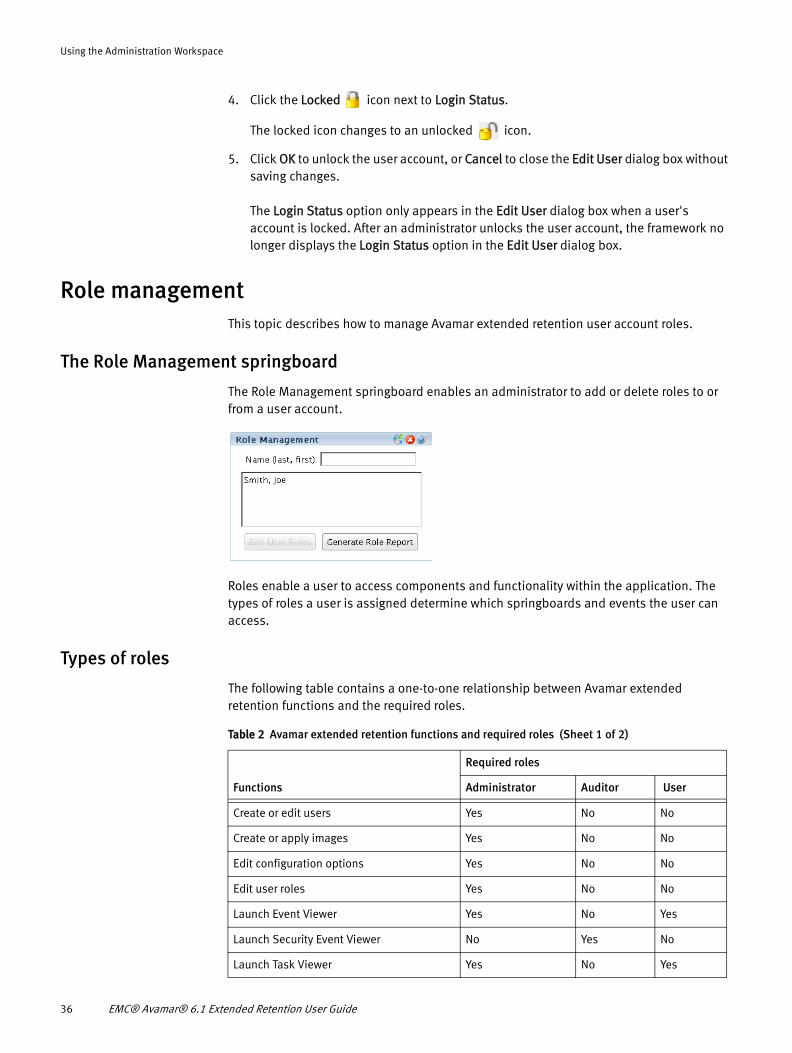
Using the Administration Workspace
4. Click the Locked icon next to Login Status.
The locked icon changes to an unlocked icon.
5. Click OK to unlock the user account, or Cancel to close the Edit User dialog box without saving changes.
The Login Status option only appears in the Edit User dialog box when a user's account is locked. After an administrator unlocks the user account, the framework no longer displays the Login Status option in the Edit User dialog box.
Role managementThis topic describes how to manage Avamar extended retention user account roles.
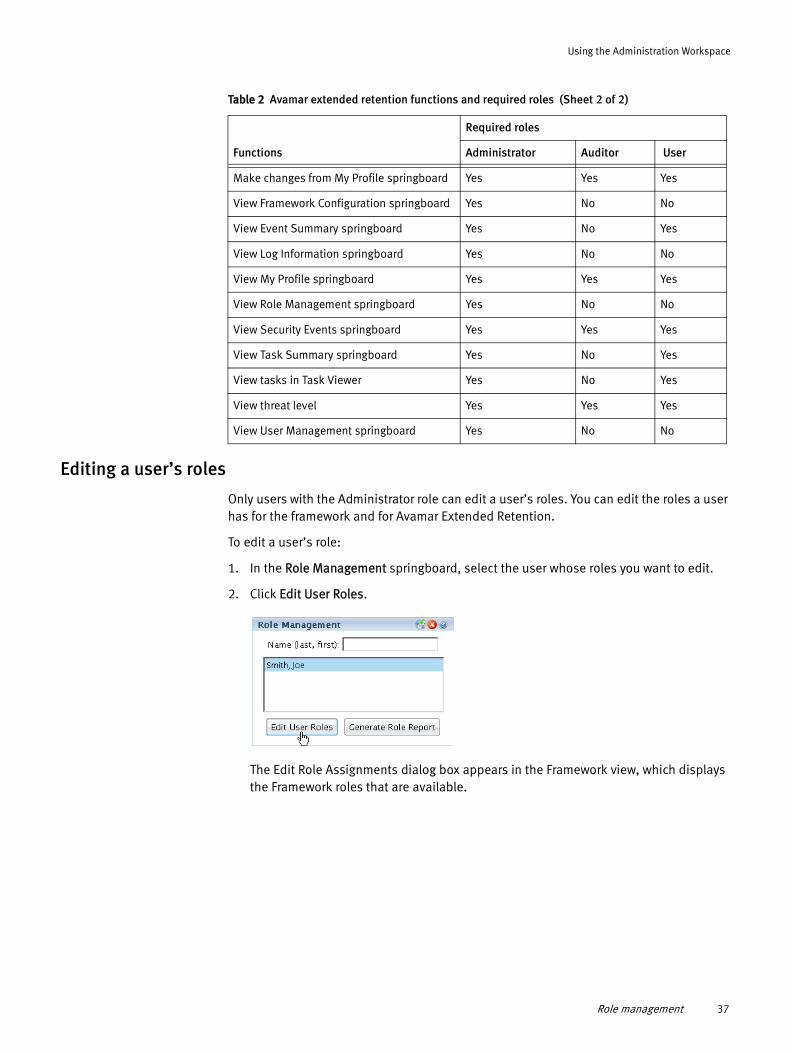
The Role Management springboard
The Role Management springboard enables an administrator to add or delete roles to or from a user account.
Roles enable a user to access components and functionality within the application. The types of roles a user is assigned determine which springboards and events the user can access.
Types of roles
The following table contains a one-to-one relationship between Avamar extended retention functions and the required roles.
Table 2 Avamar extended retention functions and required roles (Sheet 1 of 2)
Functions
Required roles
Administrator Auditor User
Create or edit users Yes No No
Create or apply images Yes No No
Edit configuration options Yes No No
Edit user roles Yes No No
Launch Event Viewer Yes No Yes
Launch Security Event Viewer No Yes No
Launch Task Viewer Yes No Yes
36 EMC® Avamar® 6.1 Extended Retention User Guide
Using the Administration Workspace
Editing a user’s roles
Only users with the Administrator role can edit a user’s roles. You can edit the roles a user has for the framework and for Avamar Extended Retention.
To edit a user’s role:
1. In the Role Management springboard, select the user whose roles you want to edit.
2. Click Edit User Roles.
The Edit Role Assignments dialog box appears in the Framework view, which displays the Framework roles that are available.
Make changes from My Profile springboard Yes Yes Yes
View Framework Configuration springboard Yes No No
View Event Summary springboard Yes No Yes
View Log Information springboard Yes No No
View My Profile springboard Yes Yes Yes
View Role Management springboard Yes No No
View Security Events springboard Yes Yes Yes
View Task Summary springboard Yes No Yes
View tasks in Task Viewer Yes No Yes
View threat level Yes Yes Yes
View User Management springboard Yes No No
Table 2 Avamar extended retention functions and required roles (Sheet 2 of 2)
Functions
Required roles
Administrator Auditor User
Role management 37
Using the Administration Workspace
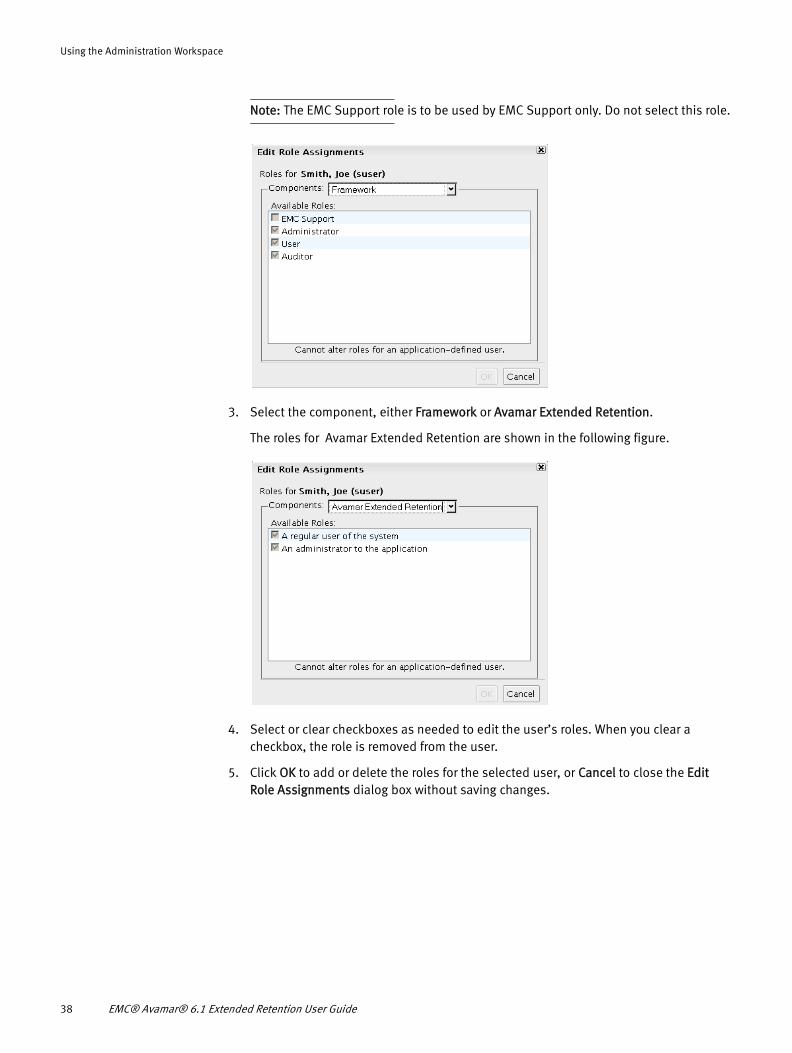
Note: The EMC Support role is to be used by EMC Support only. Do not select this role.
3. Select the component, either Framework or Avamar Extended Retention.
The roles for Avamar Extended Retention are shown in the following figure.
4. Select or clear checkboxes as needed to edit the user’s roles. When you clear a checkbox, the role is removed from the user.
5. Click OK to add or delete the roles for the selected user, or Cancel to close the Edit Role Assignments dialog box without saving changes.
38 EMC® Avamar® 6.1 Extended Retention User Guide
Using the Administration Workspace
Generating a user role report
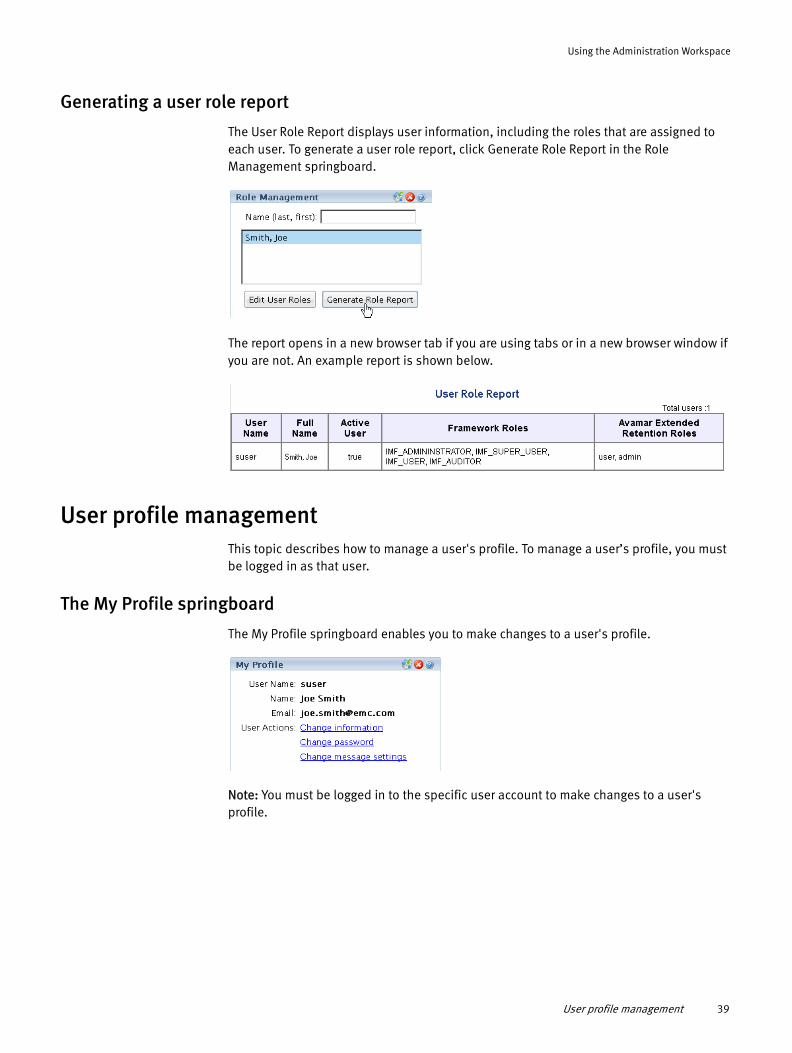
The User Role Report displays user information, including the roles that are assigned to each user. To generate a user role report, click Generate Role Report in the Role Management springboard.
The report opens in a new browser tab if you are using tabs or in a new browser window if you are not. An example report is shown below.
User profile managementThis topic describes how to manage a user's profile. To manage a user’s profile, you must be logged in as that user.
The My Profile springboard
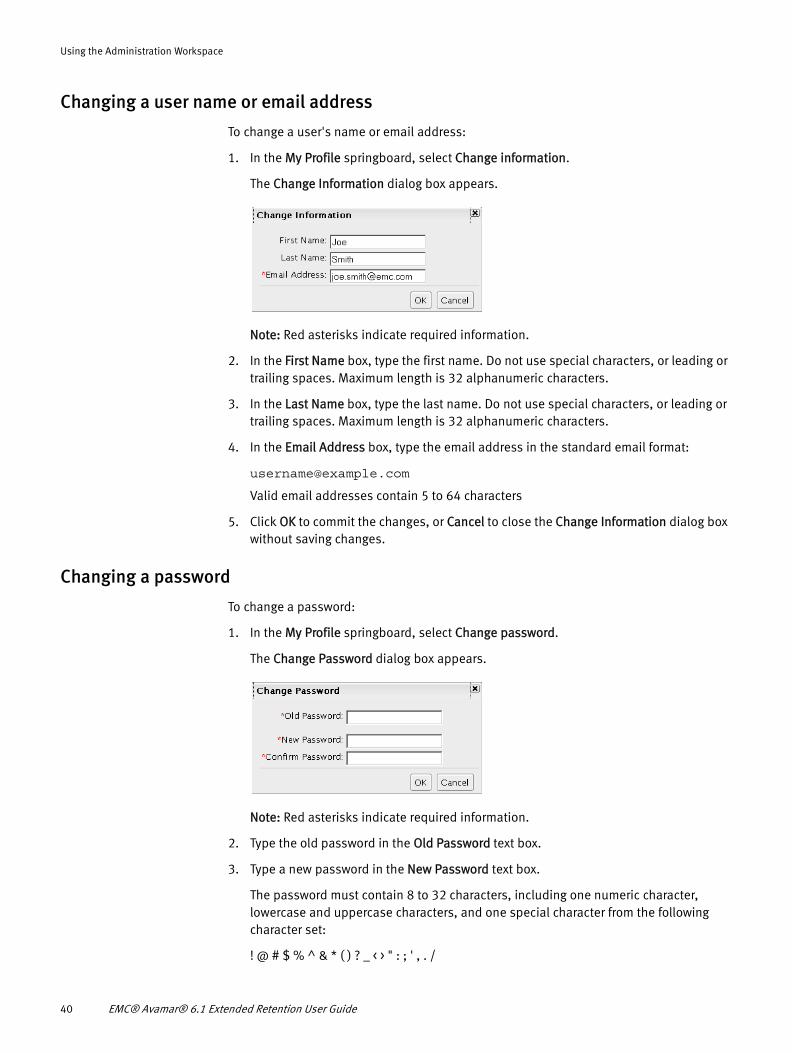
The My Profile springboard enables you to make changes to a user's profile.
Note: You must be logged in to the specific user account to make changes to a user's profile.
User profile management 39
Using the Administration Workspace
Changing a user name or email address
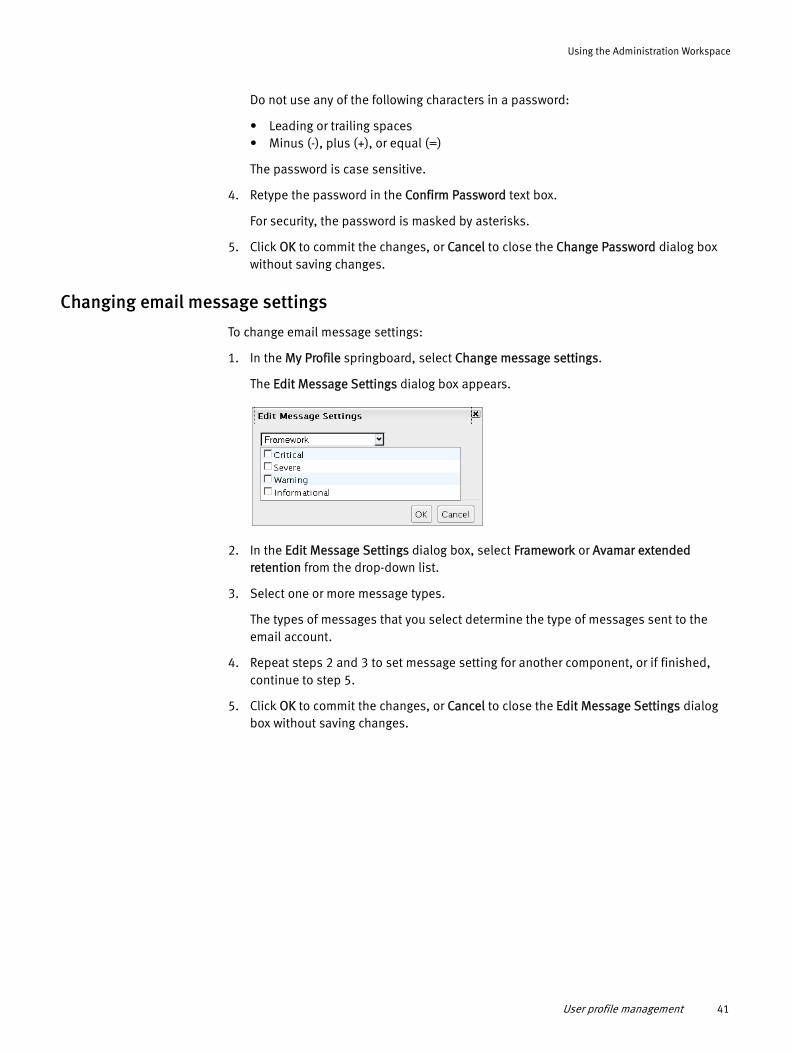
To change a user's name or email address:
1. In the My Profile springboard, select Change information.
The Change Information dialog box appears.
Note: Red asterisks indicate required information.
2. In the First Name box, type the first name. Do not use special characters, or leading or trailing spaces. Maximum length is 32 alphanumeric characters.
3. In the Last Name box, type the last name. Do not use special characters, or leading or trailing spaces. Maximum length is 32 alphanumeric characters.
4. In the Email Address box, type the email address in the standard email format:
Valid email addresses contain 5 to 64 characters
5. Click OK to commit the changes, or Cancel to close the Change Information dialog box without saving changes.
Changing a password
To change a password:
1. In the My Profile springboard, select Change password.
The Change Password dialog box appears.
Note: Red asterisks indicate required information.
2. Type the old password in the Old Password text box.
3. Type a new password in the New Password text box.
The password must contain 8 to 32 characters, including one numeric character, lowercase and uppercase characters, and one special character from the following character set:
! @ # $ % ^ & * ( ) ? _ < > " : ; ' , . /
40 EMC® Avamar® 6.1 Extended Retention User Guide
Using the Administration Workspace
Do not use any of the following characters in a password:
• Leading or trailing spaces• Minus (-), plus (+), or equal (=)
The password is case sensitive.
4. Retype the password in the Confirm Password text box.
For security, the password is masked by asterisks.
5. Click OK to commit the changes, or Cancel to close the Change Password dialog box without saving changes.
Changing email message settings
To change email message settings:
1. In the My Profile springboard, select Change message settings.
The Edit Message Settings dialog box appears.
2. In the Edit Message Settings dialog box, select Framework or Avamar extended retention from the drop-down list.
3. Select one or more message types.
The types of messages that you select determine the type of messages sent to the email account.
4. Repeat steps 2 and 3 to set message setting for another component, or if finished, continue to step 5.
5. Click OK to commit the changes, or Cancel to close the Edit Message Settings dialog box without saving changes.
User profile management 41
Using the Administration Workspace
System configurationThis topic describes how to configure system and message settings in the Avamar Extended Retention Framework.
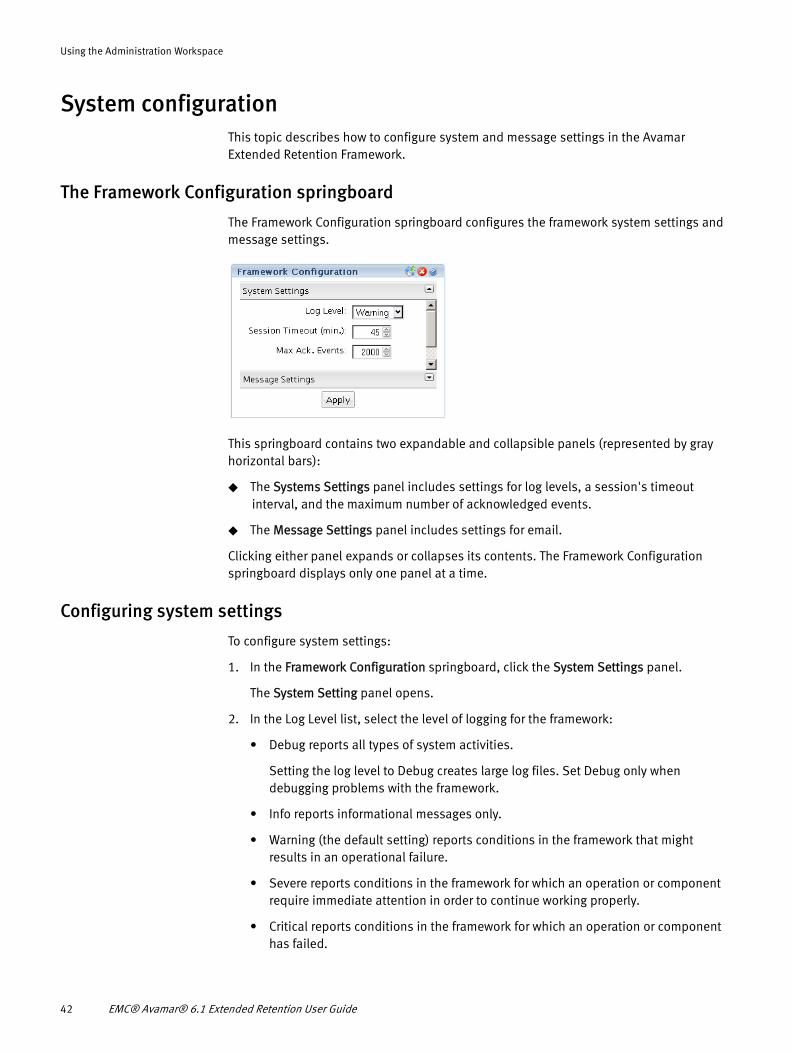
The Framework Configuration springboard
The Framework Configuration springboard configures the framework system settings and message settings.
This springboard contains two expandable and collapsible panels (represented by gray horizontal bars):
◆ The Systems Settings panel includes settings for log levels, a session's timeout interval, and the maximum number of acknowledged events.
◆ The Message Settings panel includes settings for email.
Clicking either panel expands or collapses its contents. The Framework Configuration springboard displays only one panel at a time.
Configuring system settings
To configure system settings:
1. In the Framework Configuration springboard, click the System Settings panel.
The System Setting panel opens.
2. In the Log Level list, select the level of logging for the framework:
• Debug reports all types of system activities.
Setting the log level to Debug creates large log files. Set Debug only when debugging problems with the framework.
• Info reports informational messages only.
• Warning (the default setting) reports conditions in the framework that might results in an operational failure.
• Severe reports conditions in the framework for which an operation or component require immediate attention in order to continue working properly.
• Critical reports conditions in the framework for which an operation or component has failed.
42 EMC® Avamar® 6.1 Extended Retention User Guide
Using the Administration Workspace
3. For Session Timeout, select the amount of time before the framework logs out an inactive user. Session timeouts range from 1 to 9999 minutes with a default of 45 minutes.
No notification is displayed when a session times out; however, the user will not be able to interact with the framework's interface after it has timed out. If a session times out, the user must log back in to the Avamar Extended Retention framework.
4. For Max Ack. Events, select the number of acknowledged events to retain in the events database. Acknowledged events range from 100 to 9999 with a default of 2000.
If the number of acknowledged events exceeds the Max Ack. Events setting, the framework deletes the oldest events in the events database to manage the size of the events database.
5. Click Apply.
The Configuration dialog box appears.
6. Click OK to acknowledge the Configuration dialog box.
Enabling and disabling message settings
To enable message settings:
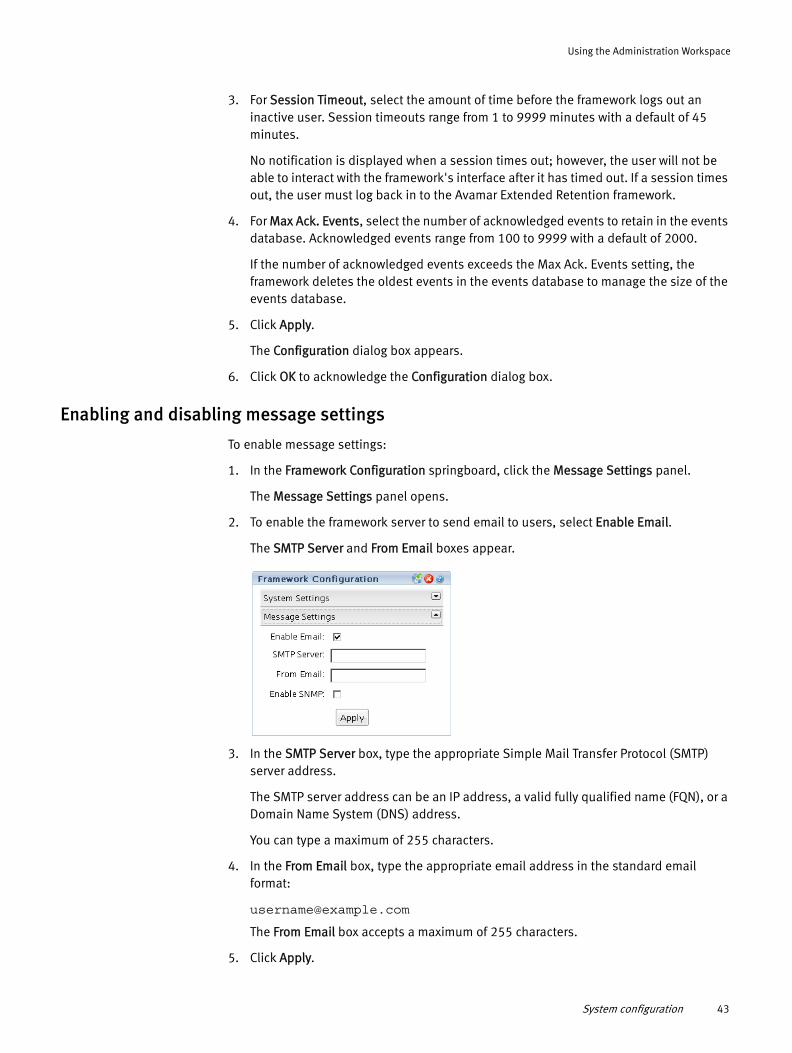
1. In the Framework Configuration springboard, click the Message Settings panel.
The Message Settings panel opens.
2. To enable the framework server to send email to users, select Enable Email.
The SMTP Server and From Email boxes appear.
3. In the SMTP Server box, type the appropriate Simple Mail Transfer Protocol (SMTP) server address.
The SMTP server address can be an IP address, a valid fully qualified name (FQN), or a Domain Name System (DNS) address.
You can type a maximum of 255 characters.
4. In the From Email box, type the appropriate email address in the standard email format:
The From Email box accepts a maximum of 255 characters.
5. Click Apply.
System configuration 43
Using the Administration Workspace
The Configuration dialog box appears.
6. Click OK to acknowledge the Configuration dialog box.
To disable message settings:
1. Clear the Enable Email checkbox.
2. Click Apply.
3. Click OK to in the Framework Configuration message.
Enabling SNMP
Simple Network Management Protocol (SNMP) is an "Internet-standard protocol for managing devices on IP networks." It is used mostly in network management systems to monitor network-attached devices for conditions that warrant administrative attention.1
In Avamar extended retention, any event that is visible in the Event Viewer will generate an SNMP trap. To configure SNMP, you must enable it in the Framework Configuration springboard, and then configure registered targets for the SNMP traps. See “Configuring SNMP traps” on page 121 for instructions on setting traps.
This section describes how to enable SNMP in the Framework Configuration springboard.
To enable SNMP:
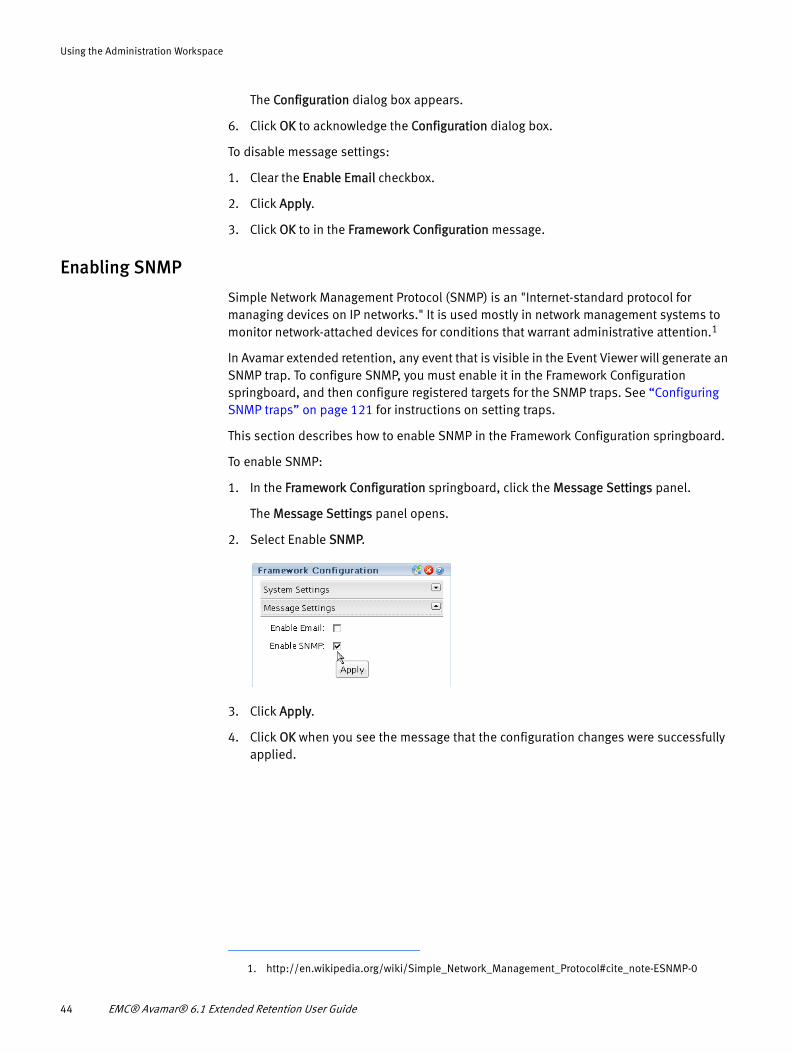
1. In the Framework Configuration springboard, click the Message Settings panel.
The Message Settings panel opens.
2. Select Enable SNMP.
3. Click Apply.
4. Click OK when you see the message that the configuration changes were successfully applied.
1. http://en.wikipedia.org/wiki/Simple_Network_Management_Protocol#cite_note-ESNMP-0
44 EMC® Avamar® 6.1 Extended Retention User Guide
Using the Administration Workspace
System eventsThis topic describes the Event Summary springboard and how to use the Event Viewer.
The Event Summary springboard
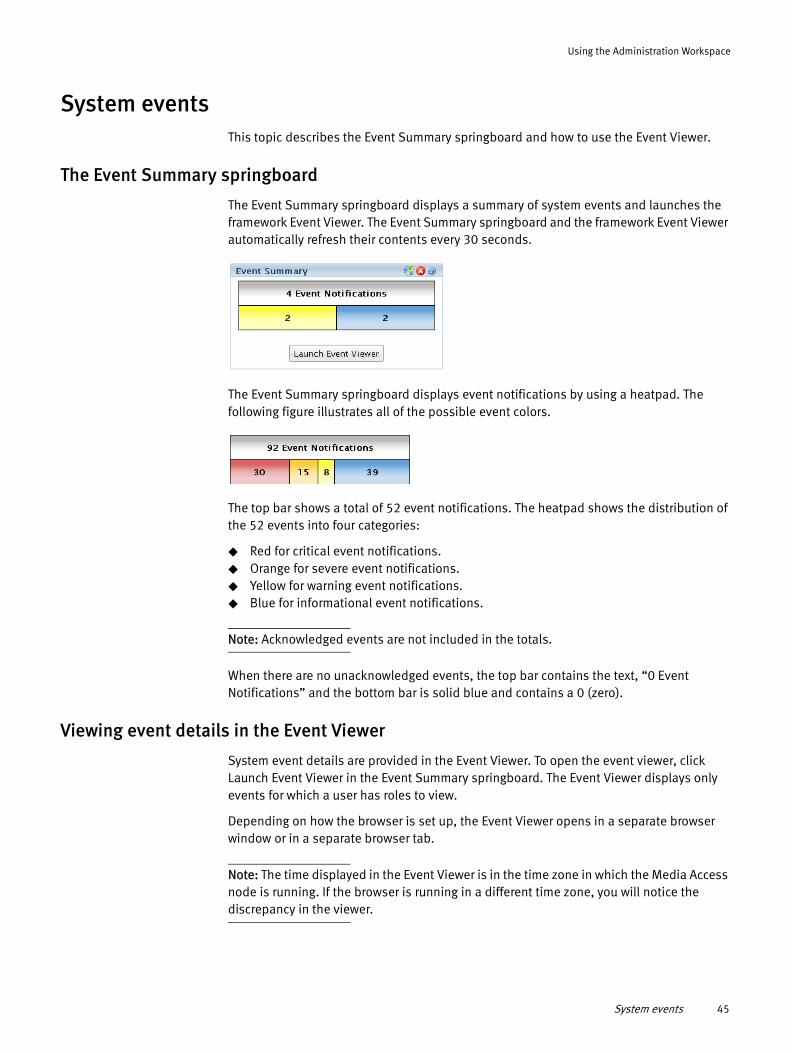
The Event Summary springboard displays a summary of system events and launches the framework Event Viewer. The Event Summary springboard and the framework Event Viewer automatically refresh their contents every 30 seconds.
The Event Summary springboard displays event notifications by using a heatpad. The following figure illustrates all of the possible event colors.
The top bar shows a total of 52 event notifications. The heatpad shows the distribution of the 52 events into four categories:
◆ Red for critical event notifications.◆ Orange for severe event notifications.◆ Yellow for warning event notifications.◆ Blue for informational event notifications.
Note: Acknowledged events are not included in the totals.
When there are no unacknowledged events, the top bar contains the text, “0 Event Notifications” and the bottom bar is solid blue and contains a 0 (zero).
Viewing event details in the Event Viewer
System event details are provided in the Event Viewer. To open the event viewer, click Launch Event Viewer in the Event Summary springboard. The Event Viewer displays only events for which a user has roles to view.
Depending on how the browser is set up, the Event Viewer opens in a separate browser window or in a separate browser tab.
Note: The time displayed in the Event Viewer is in the time zone in which the Media Access node is running. If the browser is running in a different time zone, you will notice the discrepancy in the viewer.
System events 45
Using the Administration Workspace
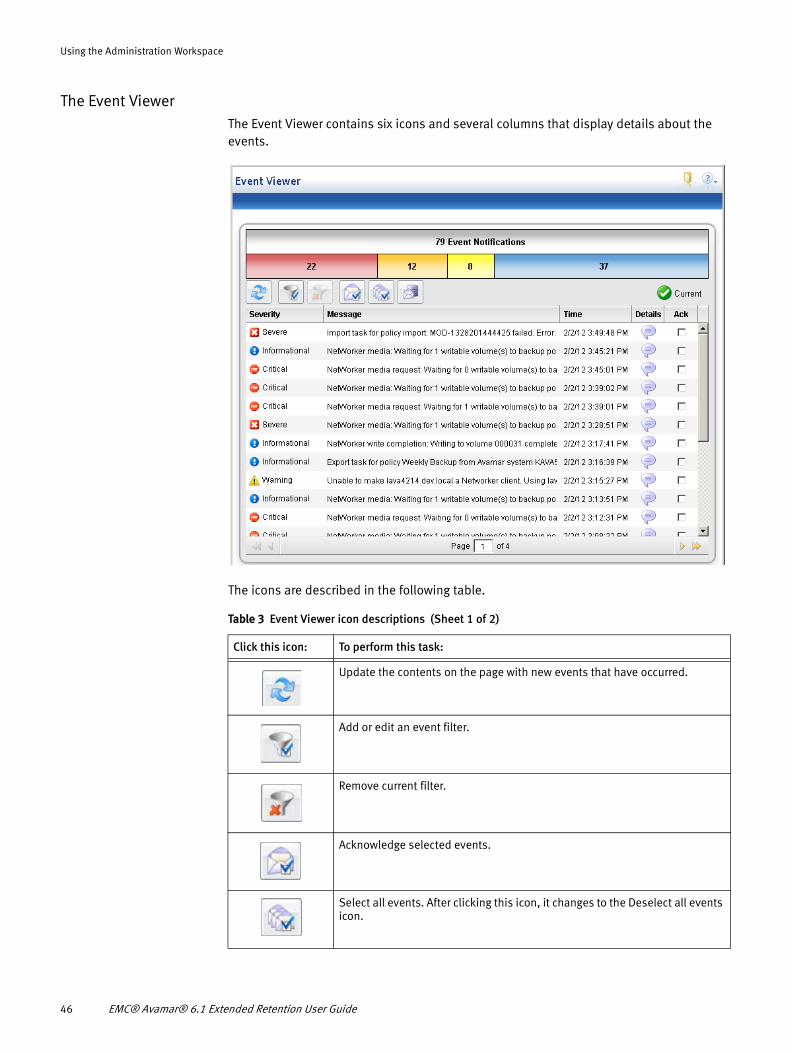
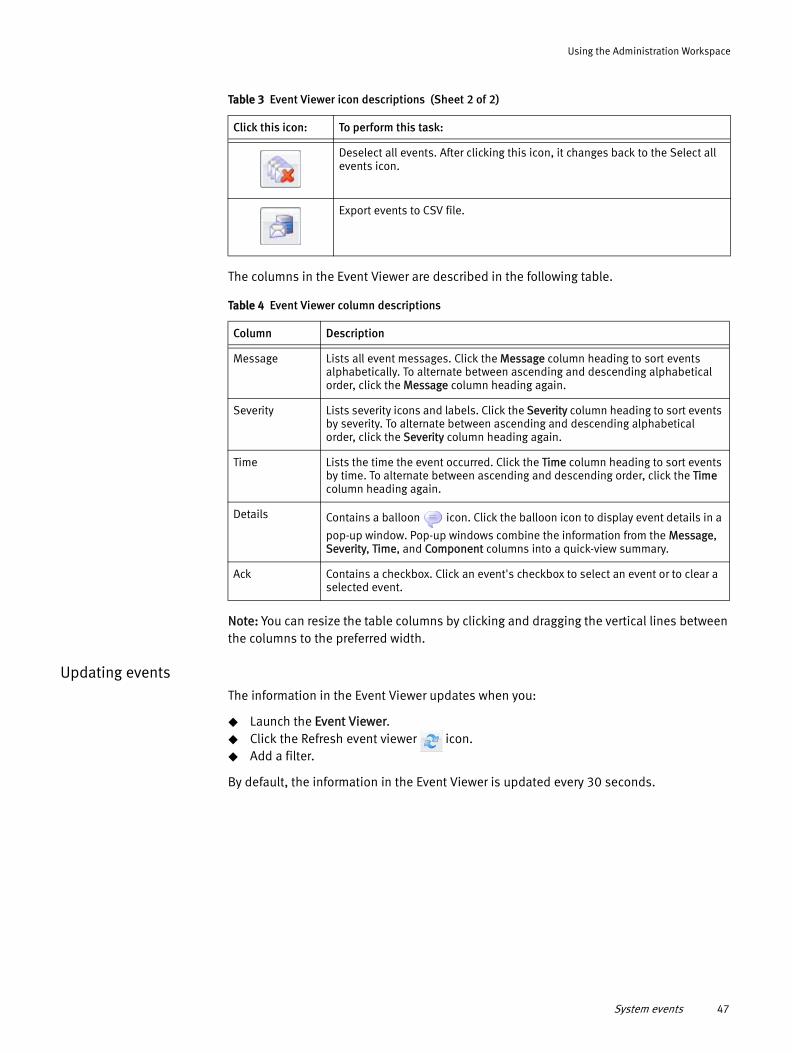
The Event ViewerThe Event Viewer contains six icons and several columns that display details about the events.
The icons are described in the following table.
Table 3 Event Viewer icon descriptions (Sheet 1 of 2)
Click this icon: To perform this task:
Update the contents on the page with new events that have occurred.
Add or edit an event filter.
Remove current filter.
Acknowledge selected events.
Select all events. After clicking this icon, it changes to the Deselect all events icon.
46 EMC® Avamar® 6.1 Extended Retention User Guide
Using the Administration Workspace
The columns in the Event Viewer are described in the following table.
Note: You can resize the table columns by clicking and dragging the vertical lines between the columns to the preferred width.
Updating eventsThe information in the Event Viewer updates when you:
◆ Launch the Event Viewer.◆ Click the Refresh event viewer icon.◆ Add a filter.
By default, the information in the Event Viewer is updated every 30 seconds.
Deselect all events. After clicking this icon, it changes back to the Select all events icon.
Export events to CSV file.
Table 3 Event Viewer icon descriptions (Sheet 2 of 2)
Click this icon: To perform this task:
Table 4 Event Viewer column descriptions
Column Description
Message Lists all event messages. Click the Message column heading to sort events alphabetically. To alternate between ascending and descending alphabetical order, click the Message column heading again.
Severity Lists severity icons and labels. Click the Severity column heading to sort events by severity. To alternate between ascending and descending alphabetical order, click the Severity column heading again.
Time Lists the time the event occurred. Click the Time column heading to sort events by time. To alternate between ascending and descending order, click the Time column heading again.
Details Contains a balloon icon. Click the balloon icon to display event details in a
pop-up window. Pop-up windows combine the information from the Message, Severity, Time, and Component columns into a quick-view summary.
Ack Contains a checkbox. Click an event's checkbox to select an event or to clear a selected event.
System events 47
Using the Administration Workspace
The icon to the right of the taskbar displays the status for the information.
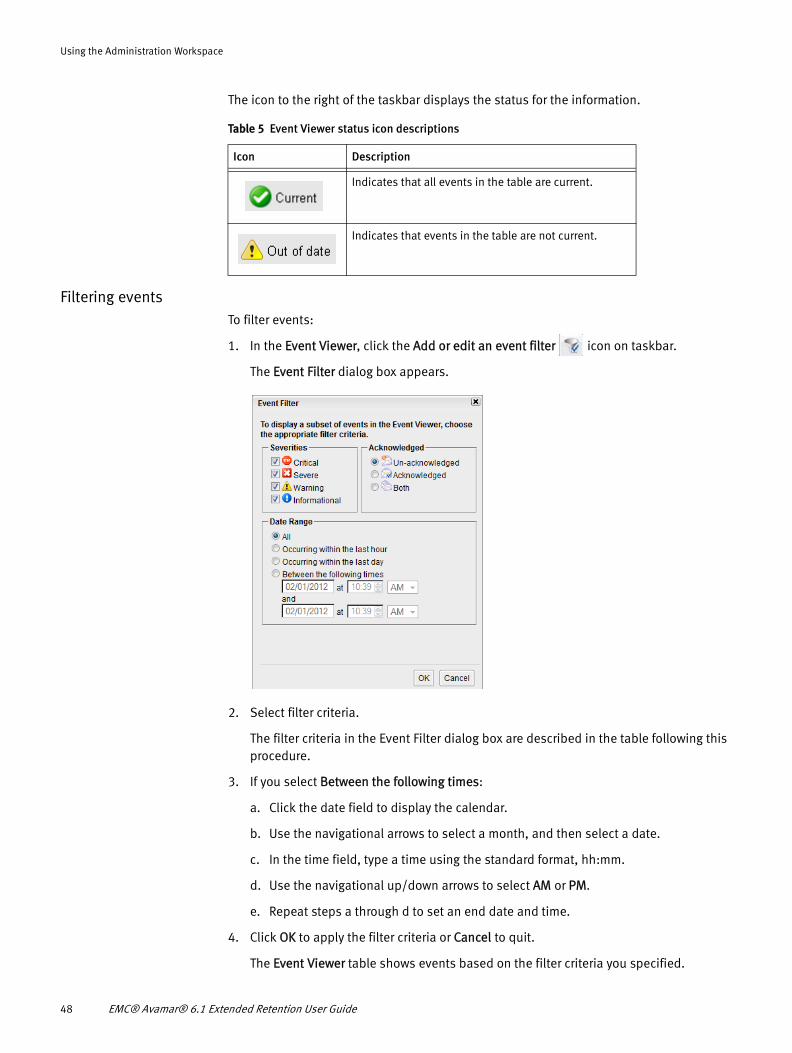
Filtering eventsTo filter events:
1. In the Event Viewer, click the Add or edit an event filter icon on taskbar.
The Event Filter dialog box appears.
2. Select filter criteria.
The filter criteria in the Event Filter dialog box are described in the table following this procedure.
3. If you select Between the following times:
a. Click the date field to display the calendar.
b. Use the navigational arrows to select a month, and then select a date.
c. In the time field, type a time using the standard format, hh:mm.
d. Use the navigational up/down arrows to select AM or PM.
e. Repeat steps a through d to set an end date and time.
4. Click OK to apply the filter criteria or Cancel to quit.
The Event Viewer table shows events based on the filter criteria you specified.
Table 5 Event Viewer status icon descriptions
Icon Description
Indicates that all events in the table are current.
Indicates that events in the table are not current.
48 EMC® Avamar® 6.1 Extended Retention User Guide
Using the Administration Workspace
5. Click the Remove event filter icon to clear filter criteria.
The Event filter criteria are described in the following table.
Acknowledging eventsTo acknowledge events:
1. In the Event Viewer, select events by clicking checkboxes in the Ack column:
• To select all events, click the Select all events icon.
• To clear all events, click the deselect all events icon.
2. Click the Acknowledge selected events icon.
The framework removes acknowledged events from the Event Viewer table.
Viewing details for an eventTo view event details:
1. In the Event Viewer, click the balloon icon in the Details column.
The Event Detail window appears.
2. Click the close icon to close the Event Detail window.
Table 6 Event filter criteria panels
Panel Criteria
Severities Select one or more types:
Critical displays critical events.
Severe displays severe events.
Warning displays warning messages.
Informational displays informational messages.
Acknowledged Select a type of acknowledgment:
Un-acknowledged displays all unacknowledged events.
Acknowledged displays all acknowledged events.
Both displays both unacknowledged and acknowledged events.
Date Range Select a date range:• All displays all events.• Occurring within the last hour displays events within the last hour.• Occurring within the last day displays events within the last day (24 hours).• Between the following times displays events based on a beginning and
ending date and time.
System events 49
Using the Administration Workspace
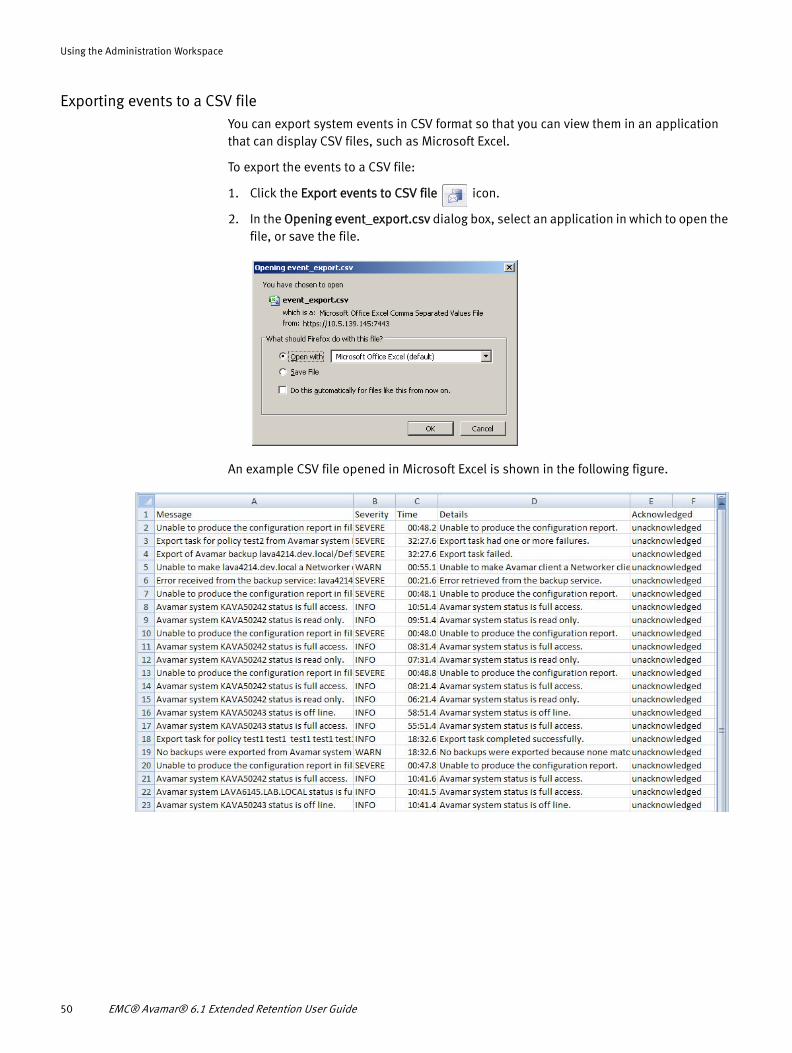
Exporting events to a CSV fileYou can export system events in CSV format so that you can view them in an application that can display CSV files, such as Microsoft Excel.
To export the events to a CSV file:
1. Click the Export events to CSV file icon.
2. In the Opening event_export.csv dialog box, select an application in which to open the file, or save the file.
An example CSV file opened in Microsoft Excel is shown in the following figure.
50 EMC® Avamar® 6.1 Extended Retention User Guide
Using the Administration Workspace
TasksThis topic describes the Task Summary springboard and how to use the Task Viewer.
The Task Summary springboard
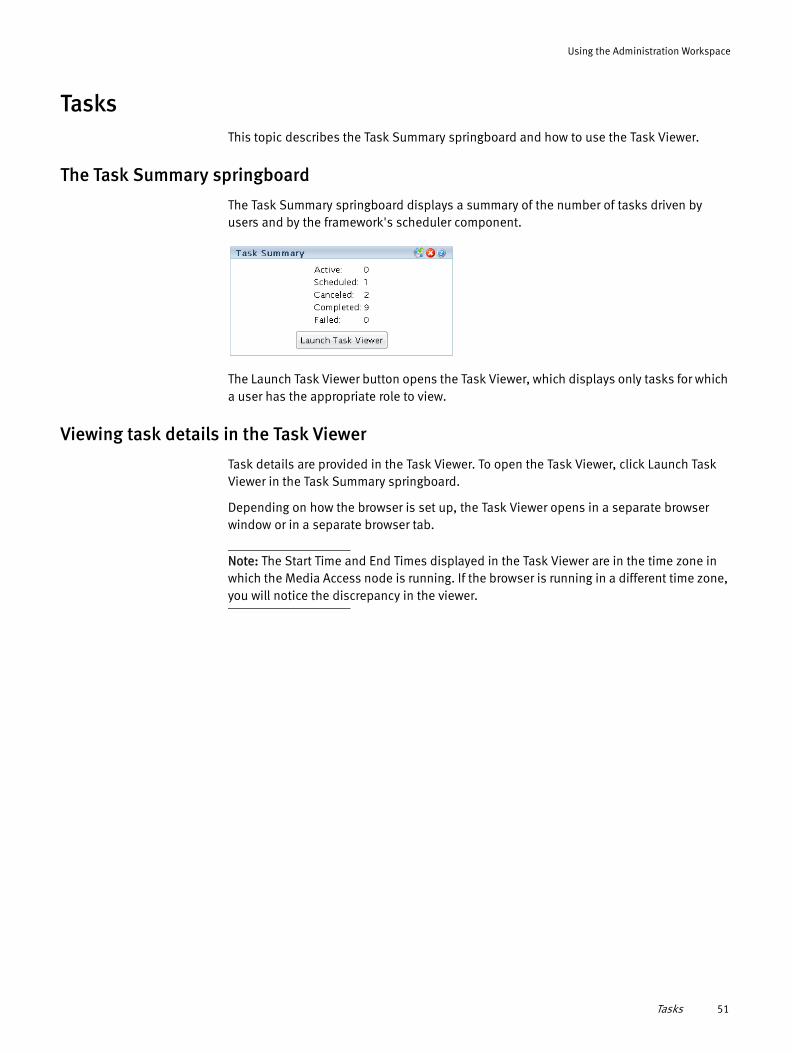
The Task Summary springboard displays a summary of the number of tasks driven by users and by the framework's scheduler component.
The Launch Task Viewer button opens the Task Viewer, which displays only tasks for which a user has the appropriate role to view.
Viewing task details in the Task Viewer
Task details are provided in the Task Viewer. To open the Task Viewer, click Launch Task Viewer in the Task Summary springboard.
Depending on how the browser is set up, the Task Viewer opens in a separate browser window or in a separate browser tab.
Note: The Start Time and End Times displayed in the Task Viewer are in the time zone in which the Media Access node is running. If the browser is running in a different time zone, you will notice the discrepancy in the viewer.
Tasks 51
Using the Administration Workspace
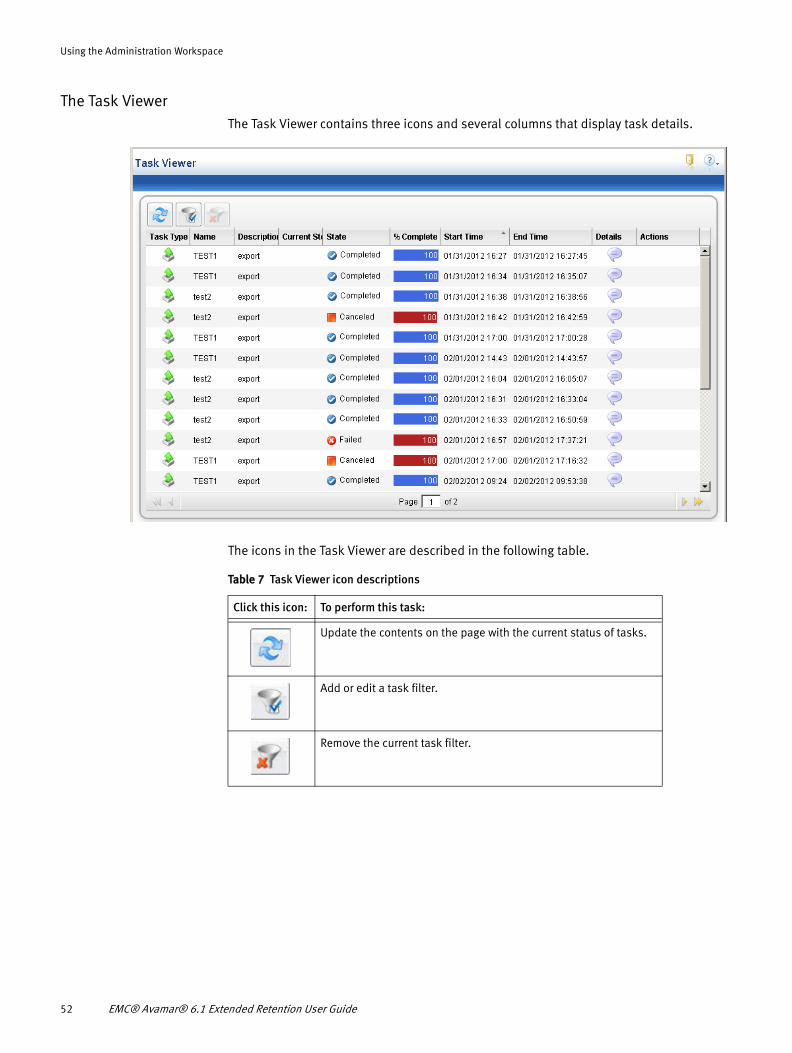
The Task ViewerThe Task Viewer contains three icons and several columns that display task details.
The icons in the Task Viewer are described in the following table.
Table 7 Task Viewer icon descriptions
Click this icon: To perform this task:
Update the contents on the page with the current status of tasks.
Add or edit a task filter.
Remove the current task filter.
52 EMC® Avamar® 6.1 Extended Retention User Guide
Using the Administration Workspace
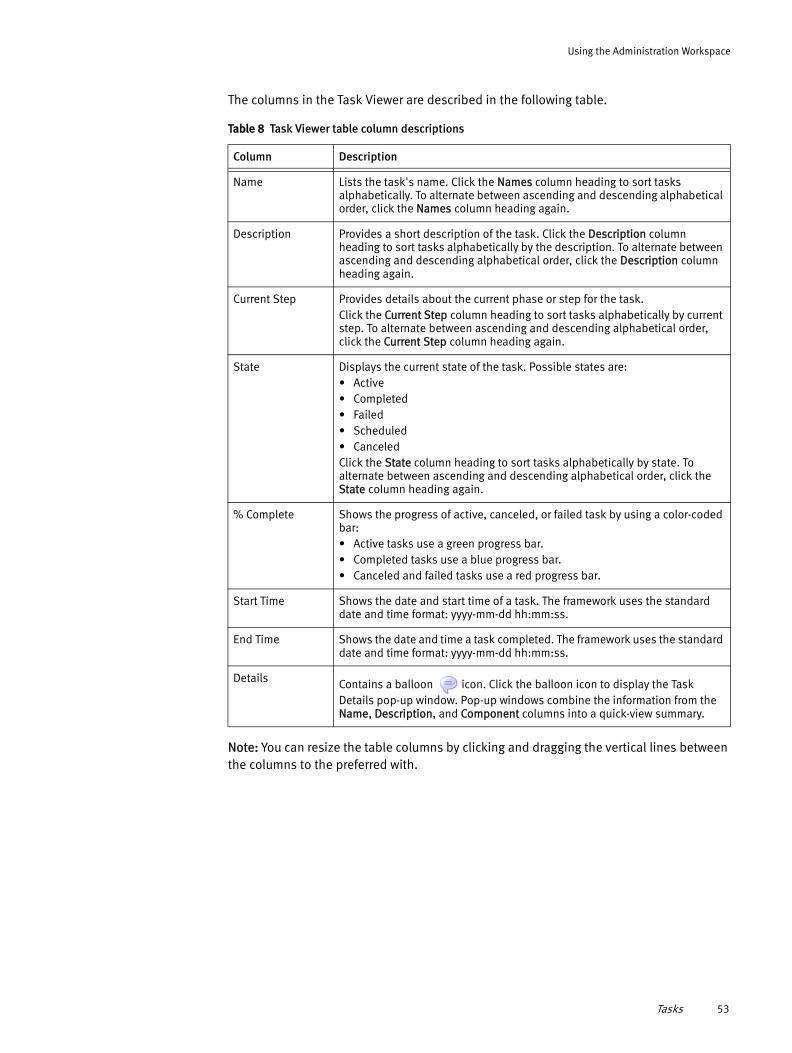
The columns in the Task Viewer are described in the following table.
Note: You can resize the table columns by clicking and dragging the vertical lines between the columns to the preferred with.
Table 8 Task Viewer table column descriptions
Column Description
Name Lists the task's name. Click the Names column heading to sort tasks alphabetically. To alternate between ascending and descending alphabetical order, click the Names column heading again.
Description Provides a short description of the task. Click the Description column heading to sort tasks alphabetically by the description. To alternate between ascending and descending alphabetical order, click the Description column heading again.
Current Step Provides details about the current phase or step for the task.Click the Current Step column heading to sort tasks alphabetically by current step. To alternate between ascending and descending alphabetical order, click the Current Step column heading again.
State Displays the current state of the task. Possible states are:• Active• Completed• Failed• Scheduled• CanceledClick the State column heading to sort tasks alphabetically by state. To alternate between ascending and descending alphabetical order, click the State column heading again.
% Complete Shows the progress of active, canceled, or failed task by using a color-coded bar:• Active tasks use a green progress bar.• Completed tasks use a blue progress bar.• Canceled and failed tasks use a red progress bar.
Start Time Shows the date and start time of a task. The framework uses the standard date and time format: yyyy-mm-dd hh:mm:ss.
End Time Shows the date and time a task completed. The framework uses the standard date and time format: yyyy-mm-dd hh:mm:ss.
Details Contains a balloon icon. Click the balloon icon to display the Task Details pop-up window. Pop-up windows combine the information from the Name, Description, and Component columns into a quick-view summary.
Tasks 53
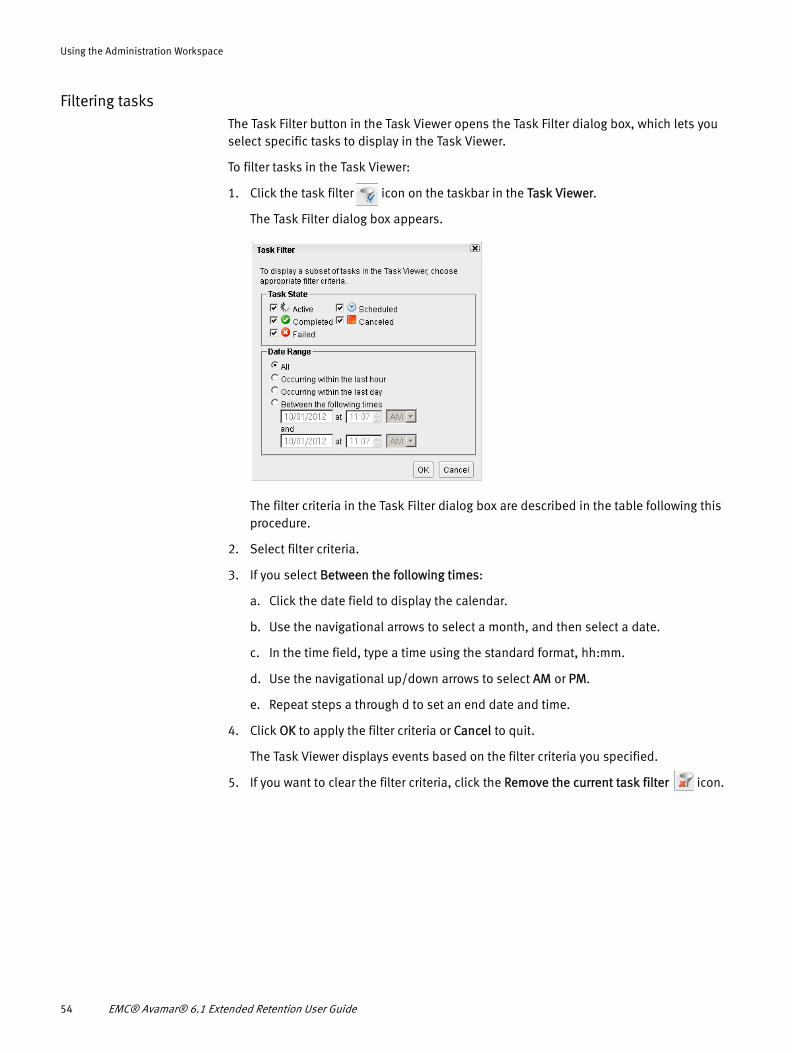
Using the Administration Workspace
Filtering tasksThe Task Filter button in the Task Viewer opens the Task Filter dialog box, which lets you select specific tasks to display in the Task Viewer.
To filter tasks in the Task Viewer:
1. Click the task filter icon on the taskbar in the Task Viewer.
The Task Filter dialog box appears.
The filter criteria in the Task Filter dialog box are described in the table following this procedure.
2. Select filter criteria.
3. If you select Between the following times:
a. Click the date field to display the calendar.
b. Use the navigational arrows to select a month, and then select a date.
c. In the time field, type a time using the standard format, hh:mm.
d. Use the navigational up/down arrows to select AM or PM.
e. Repeat steps a through d to set an end date and time.
4. Click OK to apply the filter criteria or Cancel to quit.
The Task Viewer displays events based on the filter criteria you specified.
5. If you want to clear the filter criteria, click the Remove the current task filter icon.
54 EMC® Avamar® 6.1 Extended Retention User Guide
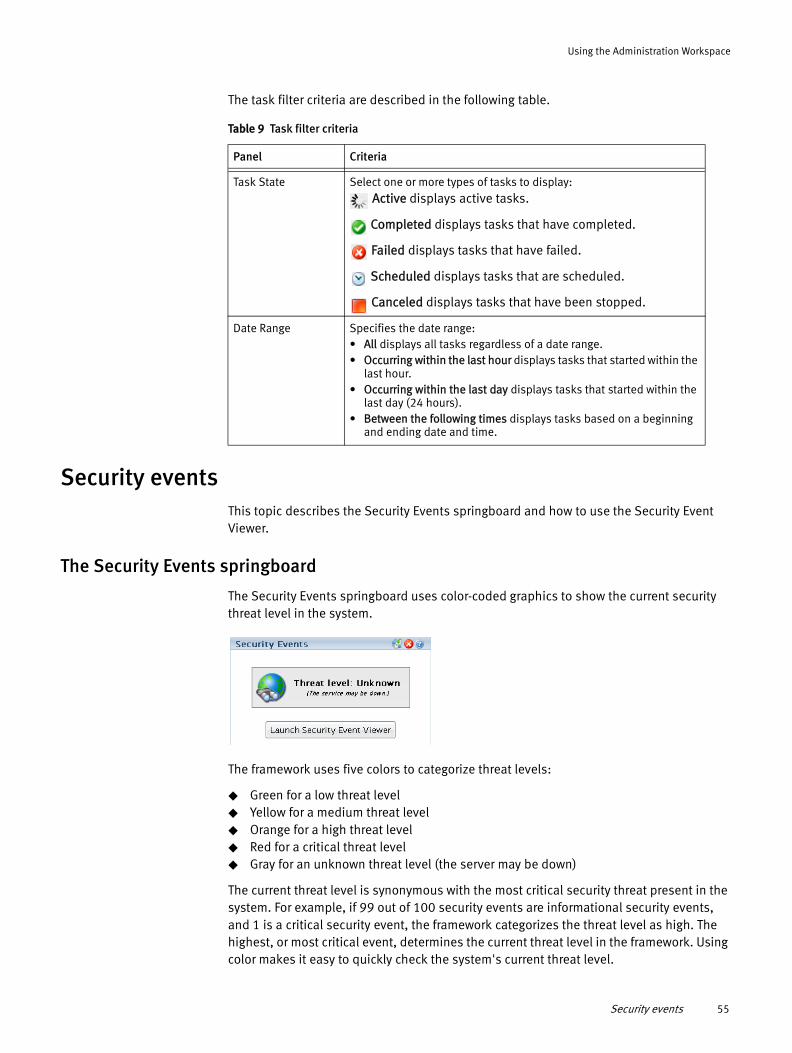
Using the Administration Workspace
The task filter criteria are described in the following table.
Security eventsThis topic describes the Security Events springboard and how to use the Security Event Viewer.
The Security Events springboard
The Security Events springboard uses color-coded graphics to show the current security threat level in the system.
The framework uses five colors to categorize threat levels:
◆ Green for a low threat level◆ Yellow for a medium threat level◆ Orange for a high threat level◆ Red for a critical threat level◆ Gray for an unknown threat level (the server may be down)
The current threat level is synonymous with the most critical security threat present in the system. For example, if 99 out of 100 security events are informational security events, and 1 is a critical security event, the framework categorizes the threat level as high. The highest, or most critical event, determines the current threat level in the framework. Using color makes it easy to quickly check the system's current threat level.
Table 9 Task filter criteria
Panel Criteria
Task State Select one or more types of tasks to display: Active displays active tasks.
Completed displays tasks that have completed.
Failed displays tasks that have failed.
Scheduled displays tasks that are scheduled.
Canceled displays tasks that have been stopped.
Date Range Specifies the date range:• All displays all tasks regardless of a date range.• Occurring within the last hour displays tasks that started within the
last hour.• Occurring within the last day displays tasks that started within the
last day (24 hours).• Between the following times displays tasks based on a beginning
and ending date and time.
Security events 55
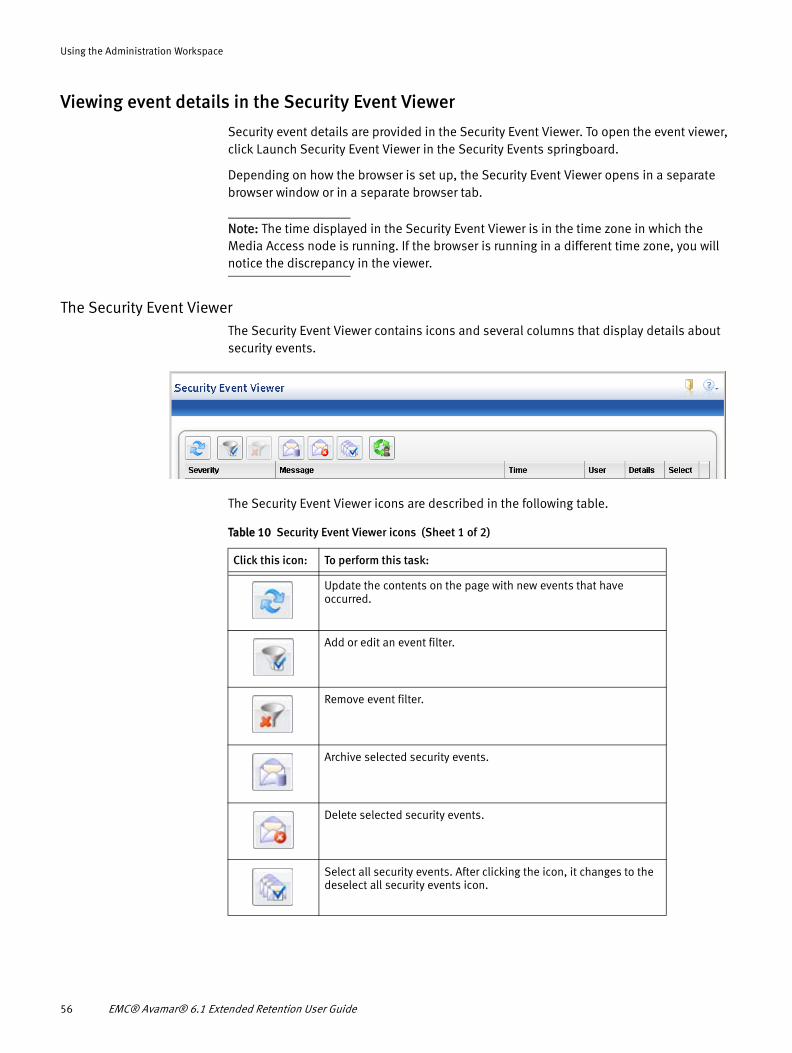
Using the Administration Workspace
Viewing event details in the Security Event Viewer
Security event details are provided in the Security Event Viewer. To open the event viewer, click Launch Security Event Viewer in the Security Events springboard.
Depending on how the browser is set up, the Security Event Viewer opens in a separate browser window or in a separate browser tab.
Note: The time displayed in the Security Event Viewer is in the time zone in which the Media Access node is running. If the browser is running in a different time zone, you will notice the discrepancy in the viewer.
The Security Event ViewerThe Security Event Viewer contains icons and several columns that display details about security events.
The Security Event Viewer icons are described in the following table.
Table 10 Security Event Viewer icons (Sheet 1 of 2)
Click this icon: To perform this task:
Update the contents on the page with new events that have occurred.
Add or edit an event filter.
Remove event filter.
Archive selected security events.
Delete selected security events.
Select all security events. After clicking the icon, it changes to the deselect all security events icon.
56 EMC® Avamar® 6.1 Extended Retention User Guide
Using the Administration Workspace
The columns in the Security Event Viewer are described in the following table.
Note: You can resize the table columns by clicking and dragging the vertical lines between the columns to the preferred with.
Deselect all security events. After clicking this icon, it changes back to the Select all security events icon.
Reset threat level.
Table 10 Security Event Viewer icons (Sheet 2 of 2)
Click this icon: To perform this task:
Table 11 Security Event Viewer column descriptions
Column Description
Message Lists all security event messages. Click the Message column heading to sort security events alphabetically. To alternate between ascending and descending alphabetical order, click the Message column heading again.
Severity Lists severity icons and labels. Click the Severity column heading to sort security events by severity. To alternate between ascending and descending alphabetical order, click the Severity column heading again.
Time Lists the time the security event occurred. Click the Time column heading to sort security events by time. To alternate between ascending and descending order, click the Time column heading again.
User Lists the user account associated to the security event.
DetailsContains an information icon. Click the information icon to display security event details in a pop-up window. Pop-up windows combine the information from the Message, Severity, Time, and Component columns into a quick-view summary.
Select Contains a checkbox. Click a security event's checkbox to select a security event or to clear a selected security event.
Security events 57
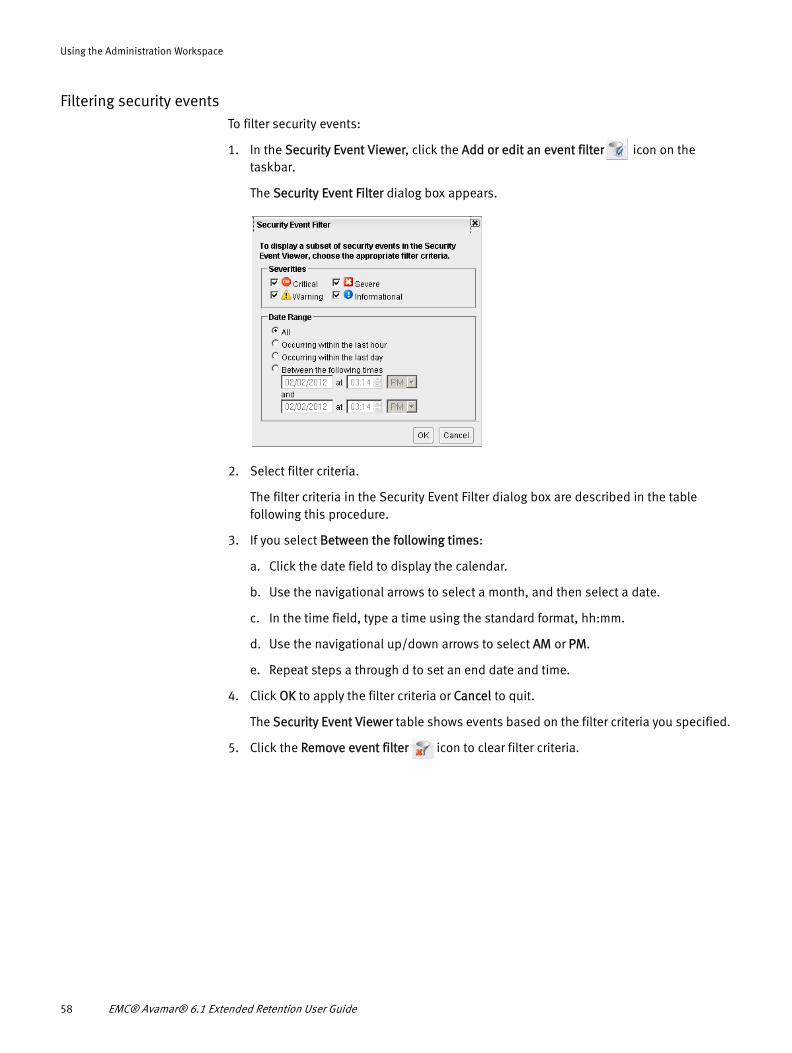
Using the Administration Workspace
Filtering security eventsTo filter security events:
1. In the Security Event Viewer, click the Add or edit an event filter icon on the taskbar.
The Security Event Filter dialog box appears.
2. Select filter criteria.
The filter criteria in the Security Event Filter dialog box are described in the table following this procedure.
3. If you select Between the following times:
a. Click the date field to display the calendar.
b. Use the navigational arrows to select a month, and then select a date.
c. In the time field, type a time using the standard format, hh:mm.
d. Use the navigational up/down arrows to select AM or PM.
e. Repeat steps a through d to set an end date and time.
4. Click OK to apply the filter criteria or Cancel to quit.
The Security Event Viewer table shows events based on the filter criteria you specified.
5. Click the Remove event filter icon to clear filter criteria.
58 EMC® Avamar® 6.1 Extended Retention User Guide
Using the Administration Workspace
The security event filter criteria are described in the following table.
Archiving security eventsTo archive security events:
1. In the Security Event Viewer, click the checkbox for each security event to archive.
Note: Click the Select all events icon to select all security events.
2. Click the Archive selected events icon.
An informational dialog box appears.
3. In the dialog box, click OK to archive the security events, or Cancel to quit.
The security events are written to the SecurityArchive.xml file, which is located in a directory on the Media Access node. The directory location is specified by the <archiveLocation></archiveLocation> XML tags in the /opt/EMC/IMFSecurityLogger/config/SecurityLog.config file.
Deleting security eventsTo delete security events:
1. In the Security Event Viewer, click the checkbox for each security event to delete.
Note: Click the Select all events icon to select all security events.
2. Click the Delete selected events icon.
An informational dialog box appears.
Note: Deleting a security event permanently deletes it from the Security Events database. Alternatively, save the event to the archive file (SecurityArchive.xml). See “Archiving security events” on page 59.
Table 12 Security Event Viewer filter criteria
Panel Criteria
Severities Select one or more types of security events to display:
Critical displays critical security events.
Severe displays severe security events.
Warning displays warning security messages.
Informational displays informational security messages.
Date Range Specifies the date range:• All displays all security events regardless of a date range.• Occurring within the last hour displays security events within the last
hour.• Occurring within the last day displays security events within the last day
(24 hours).• Between the following times displays security events based on a
beginning and ending date and time.
Security events 59
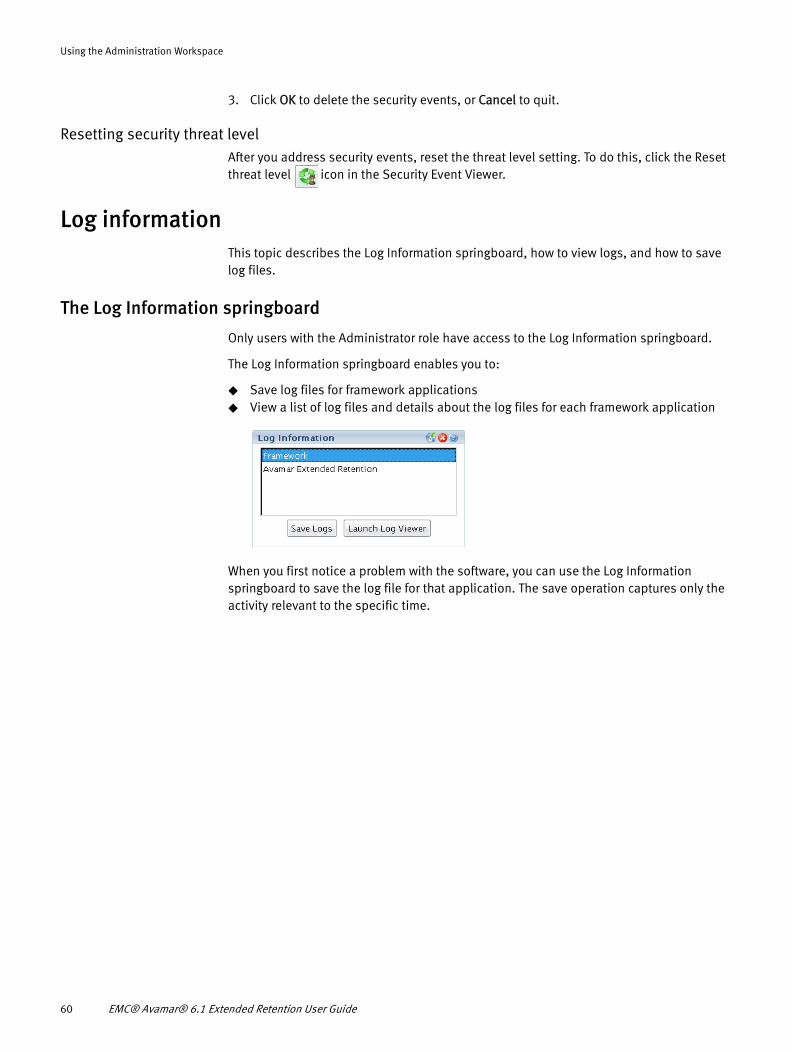
Using the Administration Workspace
3. Click OK to delete the security events, or Cancel to quit.
Resetting security threat levelAfter you address security events, reset the threat level setting. To do this, click the Reset threat level icon in the Security Event Viewer.
Log informationThis topic describes the Log Information springboard, how to view logs, and how to save log files.
The Log Information springboard
Only users with the Administrator role have access to the Log Information springboard.
The Log Information springboard enables you to:
◆ Save log files for framework applications◆ View a list of log files and details about the log files for each framework application
When you first notice a problem with the software, you can use the Log Information springboard to save the log file for that application. The save operation captures only the activity relevant to the specific time.
60 EMC® Avamar® 6.1 Extended Retention User Guide
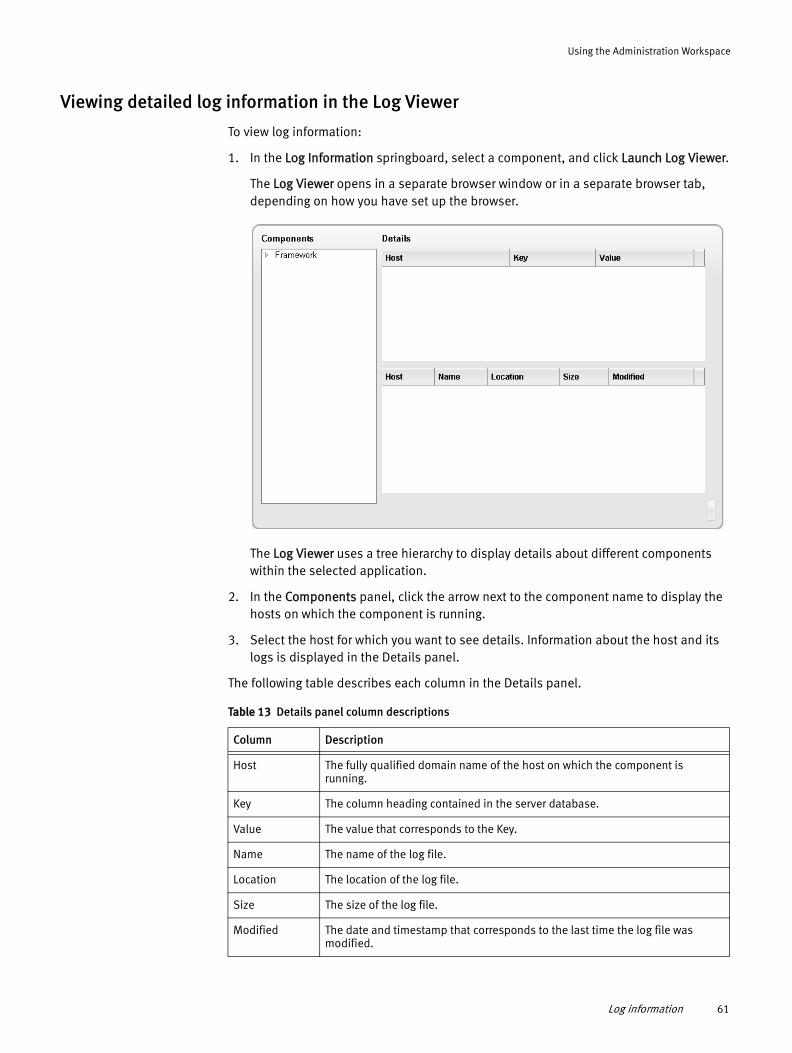
Using the Administration Workspace
Viewing detailed log information in the Log Viewer
To view log information:
1. In the Log Information springboard, select a component, and click Launch Log Viewer.
The Log Viewer opens in a separate browser window or in a separate browser tab, depending on how you have set up the browser.
The Log Viewer uses a tree hierarchy to display details about different components within the selected application.
2. In the Components panel, click the arrow next to the component name to display the hosts on which the component is running.
3. Select the host for which you want to see details. Information about the host and its logs is displayed in the Details panel.
The following table describes each column in the Details panel.
Table 13 Details panel column descriptions
Column Description
Host The fully qualified domain name of the host on which the component is running.
Key The column heading contained in the server database.
Value The value that corresponds to the Key.
Name The name of the log file.
Location The location of the log file.
Size The size of the log file.
Modified The date and timestamp that corresponds to the last time the log file was modified.
Log information 61

Using the Administration Workspace
Saving log files
To save a log file:
1. In the Log Information springboard, select an application.
2. Click Save Logs. The following status messages appears in the springboard:
Saving Logs...Logs Saved
All log files for the selected component are saved to a folder that contains the current date in its name.
62 EMC® Avamar® 6.1 Extended Retention User Guide
CHAPTER 4Using the Avamar Extended Retention Workspace
The following topics describe how to use the Avamar Extended Retention workspace:
◆ Opening Avamar Extended Retention springboards ................................................. 64◆ Managing library media .......................................................................................... 71◆ Exporting Avamar backups to tape .......................................................................... 91◆ Browsing and importing Avamar backups.............................................................. 109◆ Generating an import and export job history report ............................................... 116
This chapter has been updated with new features that were developed for the 6.1 Service Pack 1 release of Avamar Extended Retention. These features are described under Revision 03 in “Revision history” on page 8 in the Preface.
If you are using version 6.1, which does not include the new features, please use the Online Help for the definitive set of instructions for that version of Avamar Extended Retention.
Using the Avamar Extended Retention Workspace 63
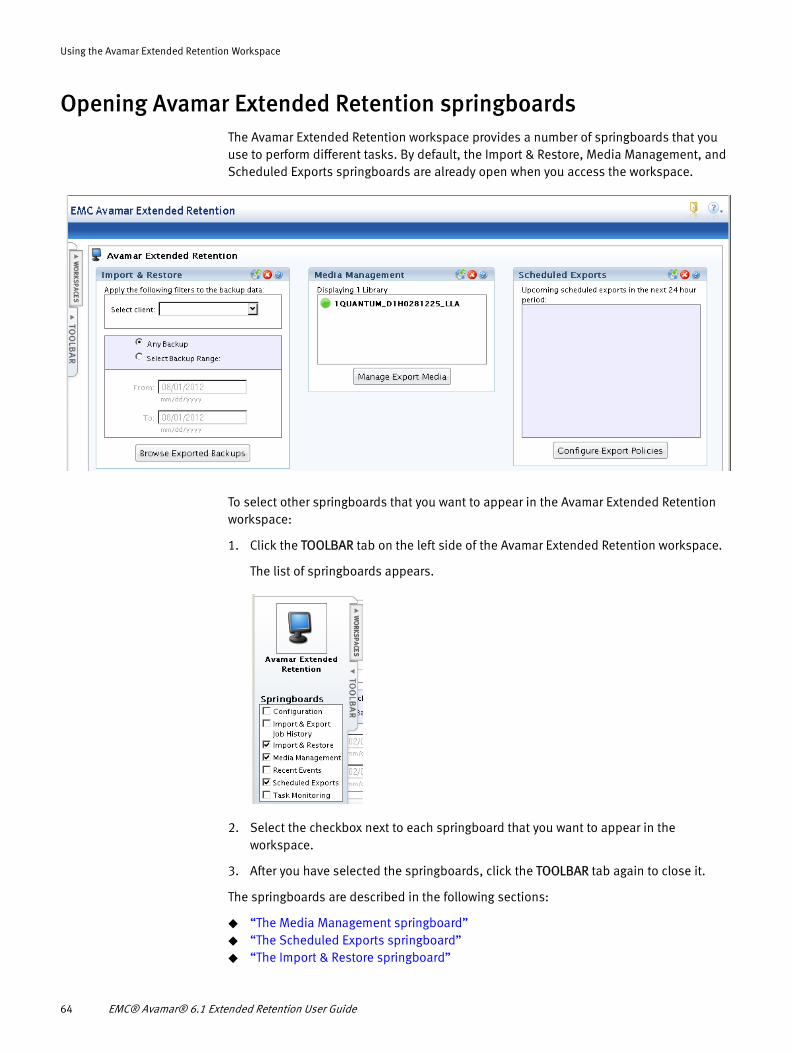
Using the Avamar Extended Retention Workspace
Opening Avamar Extended Retention springboardsThe Avamar Extended Retention workspace provides a number of springboards that you use to perform different tasks. By default, the Import & Restore, Media Management, and Scheduled Exports springboards are already open when you access the workspace.
To select other springboards that you want to appear in the Avamar Extended Retention workspace:
1. Click the TOOLBAR tab on the left side of the Avamar Extended Retention workspace.
The list of springboards appears.
2. Select the checkbox next to each springboard that you want to appear in the workspace.
3. After you have selected the springboards, click the TOOLBAR tab again to close it.
The springboards are described in the following sections:
◆ “The Media Management springboard”◆ “The Scheduled Exports springboard”◆ “The Import & Restore springboard”
64 EMC® Avamar® 6.1 Extended Retention User Guide
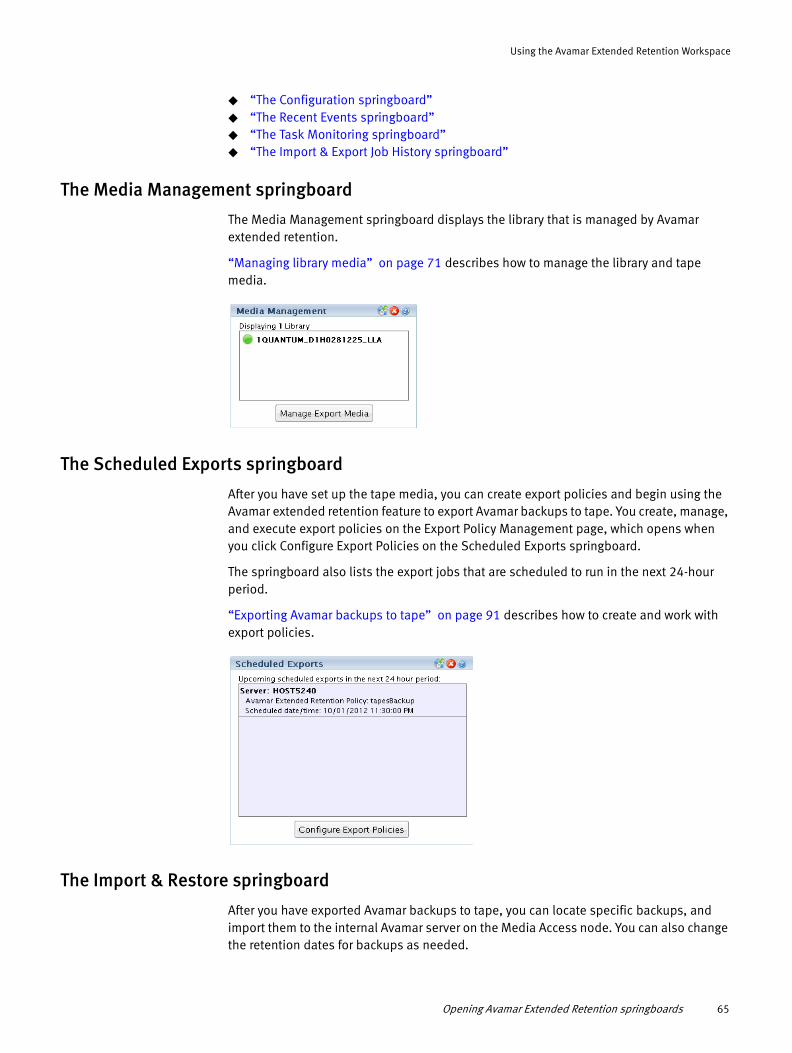
Using the Avamar Extended Retention Workspace
◆ “The Configuration springboard”◆ “The Recent Events springboard”◆ “The Task Monitoring springboard”◆ “The Import & Export Job History springboard”
The Media Management springboard
The Media Management springboard displays the library that is managed by Avamar extended retention.
“Managing library media” on page 71 describes how to manage the library and tape media.
The Scheduled Exports springboard
After you have set up the tape media, you can create export policies and begin using the Avamar extended retention feature to export Avamar backups to tape. You create, manage, and execute export policies on the Export Policy Management page, which opens when you click Configure Export Policies on the Scheduled Exports springboard.
The springboard also lists the export jobs that are scheduled to run in the next 24-hour period.
“Exporting Avamar backups to tape” on page 91 describes how to create and work with export policies.
The Import & Restore springboard
After you have exported Avamar backups to tape, you can locate specific backups, and import them to the internal Avamar server on the Media Access node. You can also change the retention dates for backups as needed.
Opening Avamar Extended Retention springboards 65
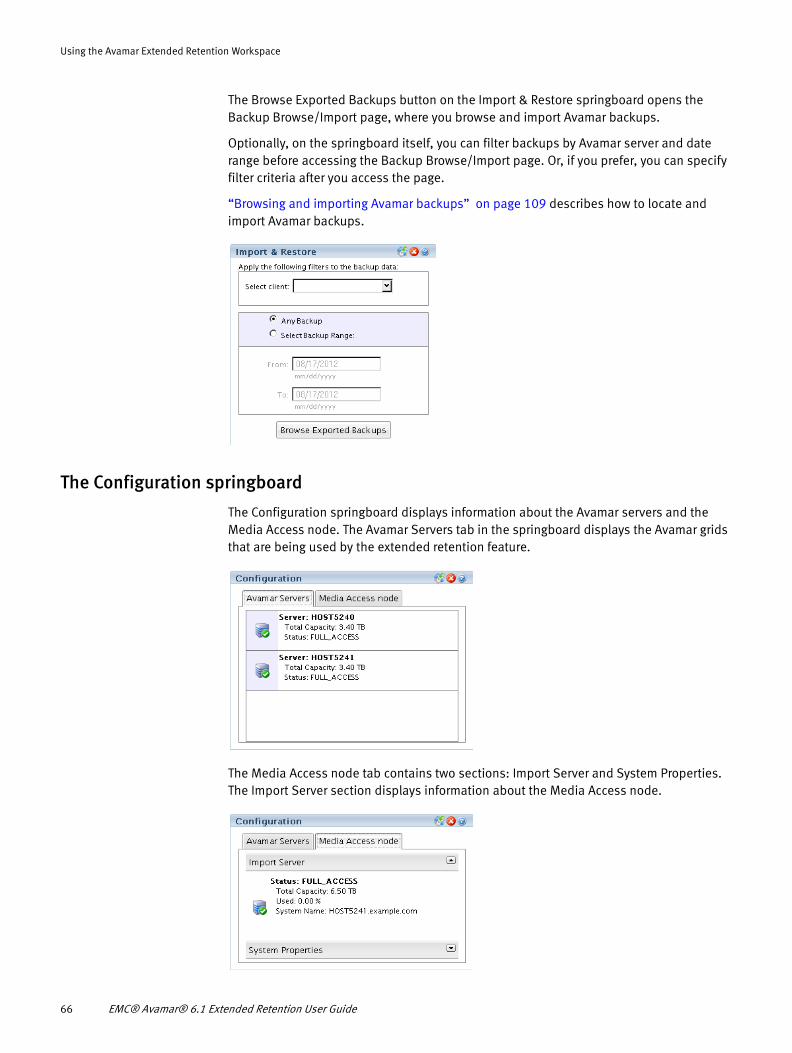
Using the Avamar Extended Retention Workspace
The Browse Exported Backups button on the Import & Restore springboard opens the Backup Browse/Import page, where you browse and import Avamar backups.
Optionally, on the springboard itself, you can filter backups by Avamar server and date range before accessing the Backup Browse/Import page. Or, if you prefer, you can specify filter criteria after you access the page.
“Browsing and importing Avamar backups” on page 109 describes how to locate and import Avamar backups.
The Configuration springboard
The Configuration springboard displays information about the Avamar servers and the Media Access node. The Avamar Servers tab in the springboard displays the Avamar grids that are being used by the extended retention feature.
The Media Access node tab contains two sections: Import Server and System Properties. The Import Server section displays information about the Media Access node.
66 EMC® Avamar® 6.1 Extended Retention User Guide
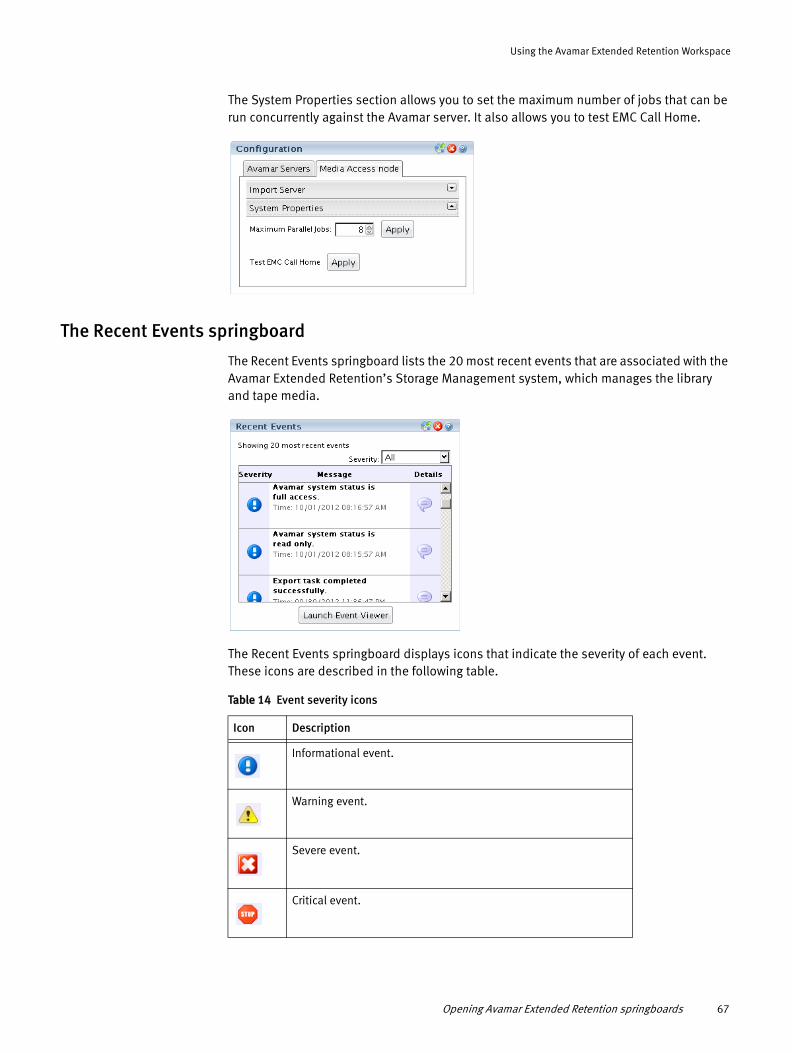
Using the Avamar Extended Retention Workspace
The System Properties section allows you to set the maximum number of jobs that can be run concurrently against the Avamar server. It also allows you to test EMC Call Home.
The Recent Events springboard
The Recent Events springboard lists the 20 most recent events that are associated with the Avamar Extended Retention’s Storage Management system, which manages the library and tape media.
The Recent Events springboard displays icons that indicate the severity of each event. These icons are described in the following table.
Table 14 Event severity icons
Icon Description
Informational event.
Warning event.
Severe event.
Critical event.
Opening Avamar Extended Retention springboards 67
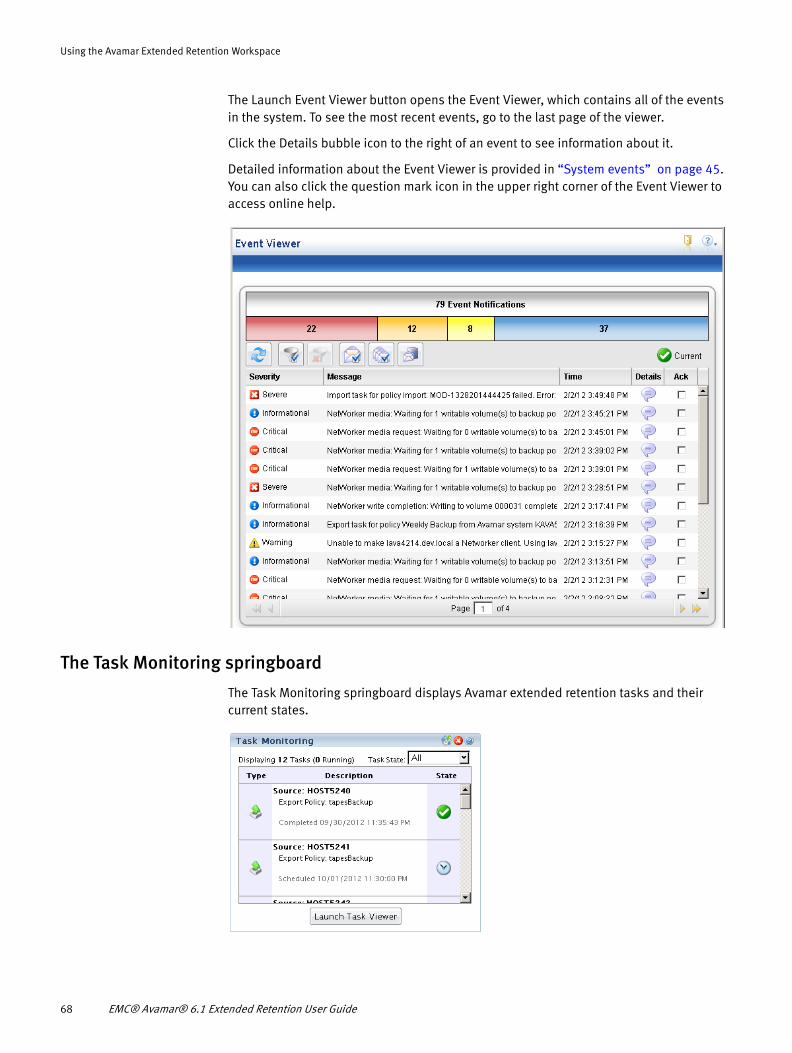
Using the Avamar Extended Retention Workspace
The Launch Event Viewer button opens the Event Viewer, which contains all of the events in the system. To see the most recent events, go to the last page of the viewer.
Click the Details bubble icon to the right of an event to see information about it.
Detailed information about the Event Viewer is provided in “System events” on page 45. You can also click the question mark icon in the upper right corner of the Event Viewer to access online help.
The Task Monitoring springboard
The Task Monitoring springboard displays Avamar extended retention tasks and their current states.
68 EMC® Avamar® 6.1 Extended Retention User Guide
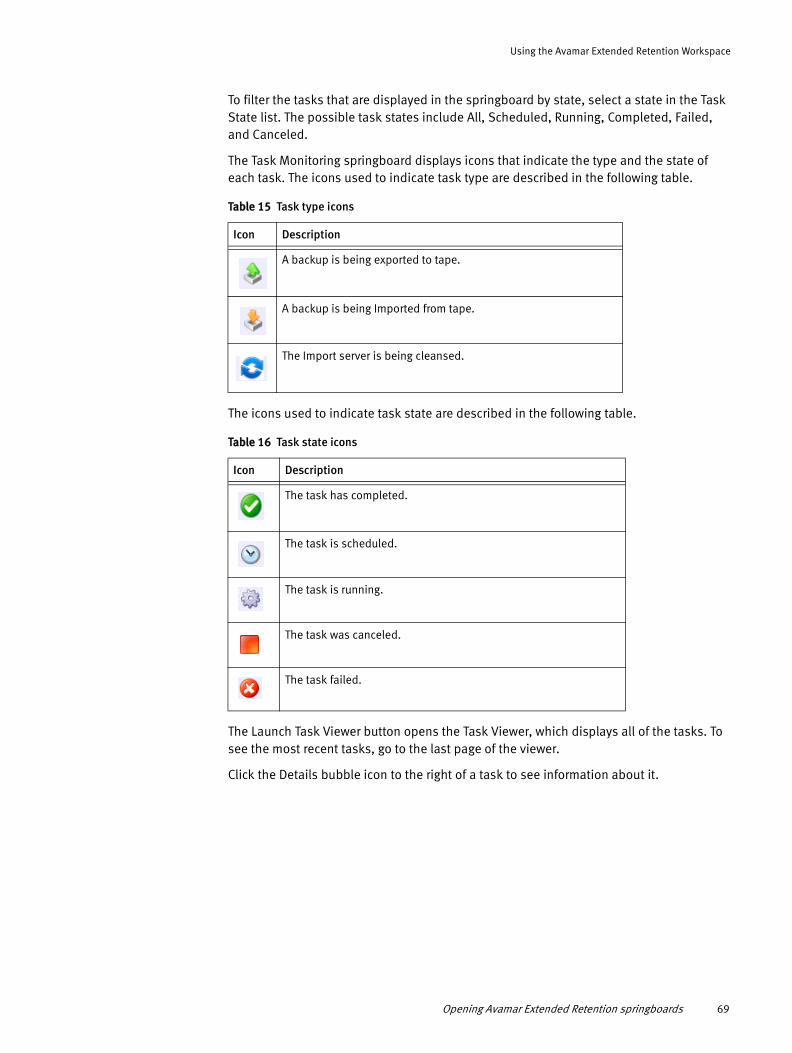
Using the Avamar Extended Retention Workspace
To filter the tasks that are displayed in the springboard by state, select a state in the Task State list. The possible task states include All, Scheduled, Running, Completed, Failed, and Canceled.
The Task Monitoring springboard displays icons that indicate the type and the state of each task. The icons used to indicate task type are described in the following table.
The icons used to indicate task state are described in the following table.
The Launch Task Viewer button opens the Task Viewer, which displays all of the tasks. To see the most recent tasks, go to the last page of the viewer.
Click the Details bubble icon to the right of a task to see information about it.
Table 15 Task type icons
Icon Description
A backup is being exported to tape.
A backup is being Imported from tape.
The Import server is being cleansed.
Table 16 Task state icons
Icon Description
The task has completed.
The task is scheduled.
The task is running.
The task was canceled.
The task failed.
Opening Avamar Extended Retention springboards 69
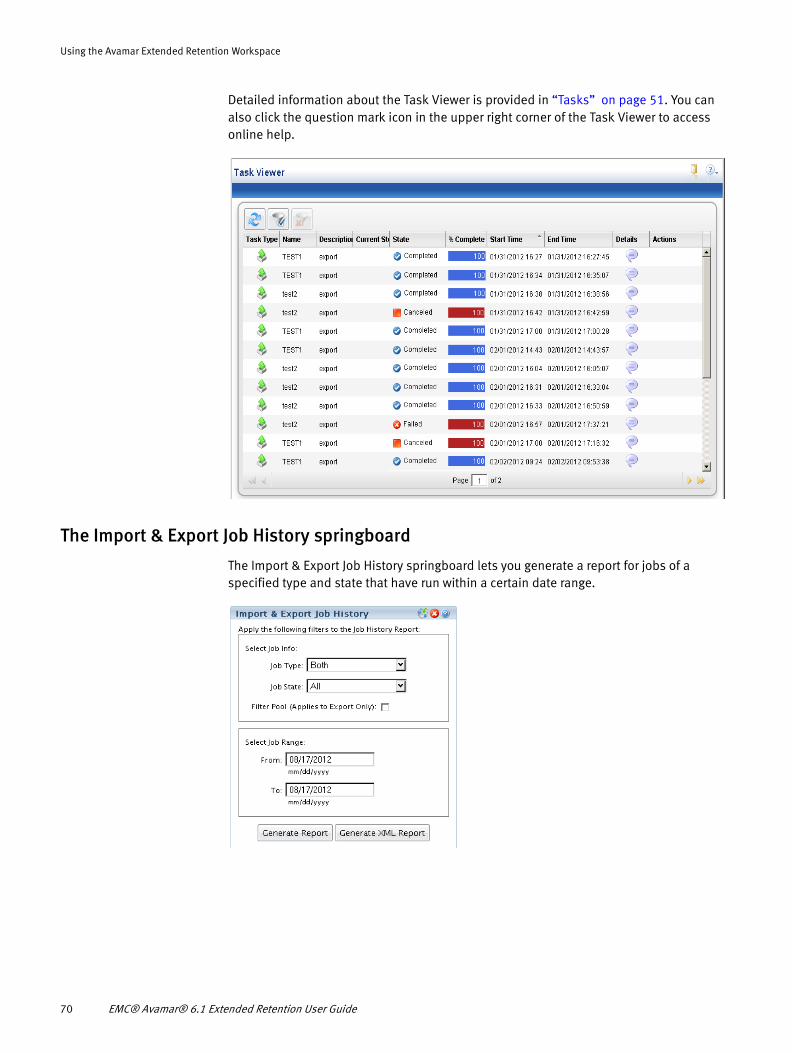
Using the Avamar Extended Retention Workspace
Detailed information about the Task Viewer is provided in “Tasks” on page 51. You can also click the question mark icon in the upper right corner of the Task Viewer to access online help.
The Import & Export Job History springboard
The Import & Export Job History springboard lets you generate a report for jobs of a specified type and state that have run within a certain date range.
70 EMC® Avamar® 6.1 Extended Retention User Guide
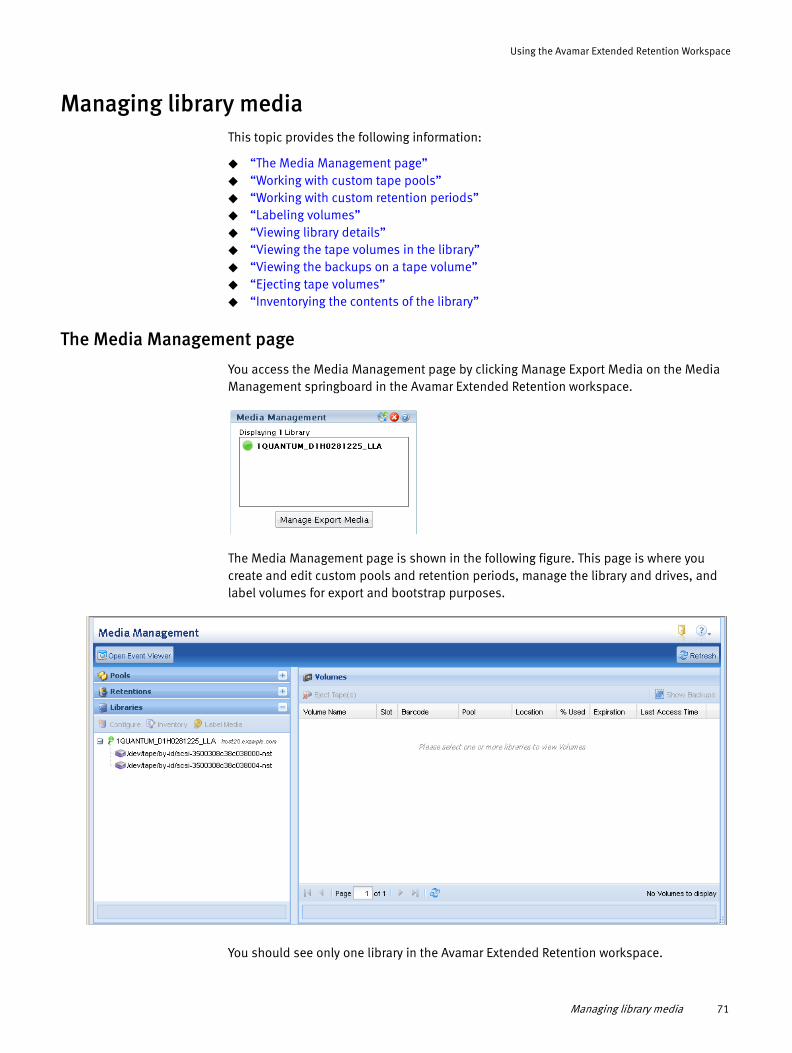
Using the Avamar Extended Retention Workspace
Managing library mediaThis topic provides the following information:
◆ “The Media Management page”◆ “Working with custom tape pools”◆ “Working with custom retention periods”◆ “Labeling volumes”◆ “Viewing library details”◆ “Viewing the tape volumes in the library”◆ “Viewing the backups on a tape volume”◆ “Ejecting tape volumes”◆ “Inventorying the contents of the library”
The Media Management page
You access the Media Management page by clicking Manage Export Media on the Media Management springboard in the Avamar Extended Retention workspace.
The Media Management page is shown in the following figure. This page is where you create and edit custom pools and retention periods, manage the library and drives, and label volumes for export and bootstrap purposes.
You should see only one library in the Avamar Extended Retention workspace.
Managing library media 71
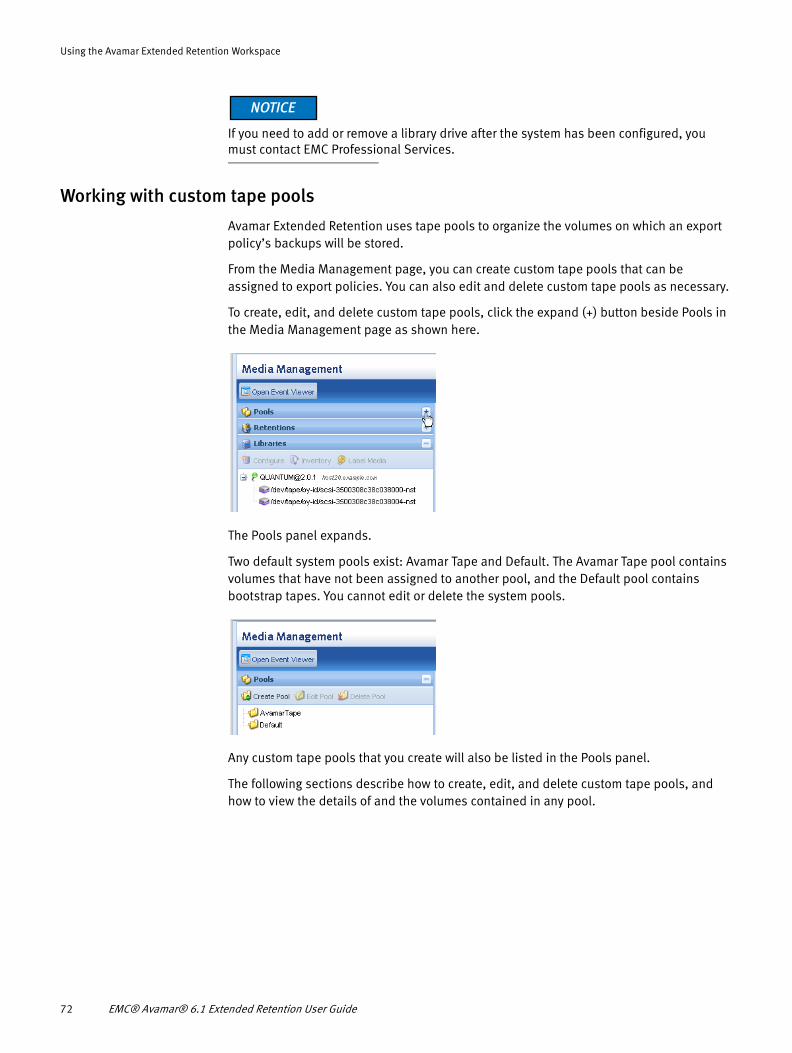
Using the Avamar Extended Retention Workspace
If you need to add or remove a library drive after the system has been configured, you must contact EMC Professional Services.
Working with custom tape pools
Avamar Extended Retention uses tape pools to organize the volumes on which an export policy’s backups will be stored.
From the Media Management page, you can create custom tape pools that can be assigned to export policies. You can also edit and delete custom tape pools as necessary.
To create, edit, and delete custom tape pools, click the expand (+) button beside Pools in the Media Management page as shown here.
The Pools panel expands.
Two default system pools exist: Avamar Tape and Default. The Avamar Tape pool contains volumes that have not been assigned to another pool, and the Default pool contains bootstrap tapes. You cannot edit or delete the system pools.
Any custom tape pools that you create will also be listed in the Pools panel.
The following sections describe how to create, edit, and delete custom tape pools, and how to view the details of and the volumes contained in any pool.
72 EMC® Avamar® 6.1 Extended Retention User Guide
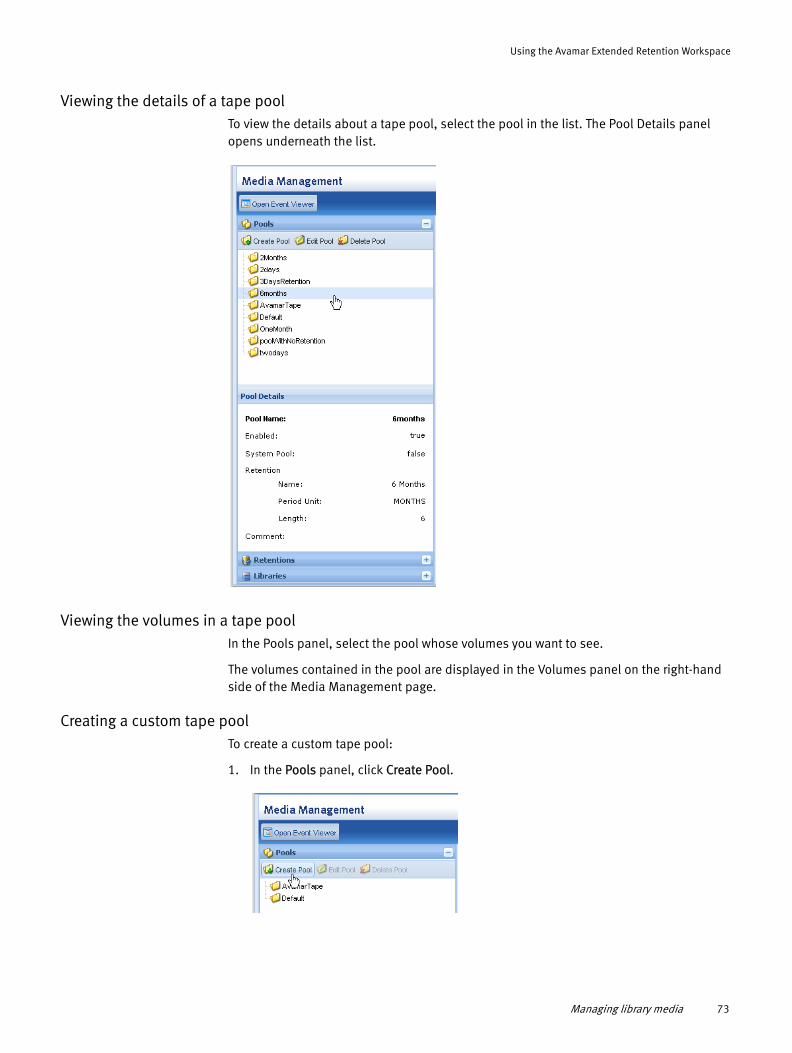
Using the Avamar Extended Retention Workspace
Viewing the details of a tape poolTo view the details about a tape pool, select the pool in the list. The Pool Details panel opens underneath the list.
Viewing the volumes in a tape poolIn the Pools panel, select the pool whose volumes you want to see.
The volumes contained in the pool are displayed in the Volumes panel on the right-hand side of the Media Management page.
Creating a custom tape poolTo create a custom tape pool:
1. In the Pools panel, click Create Pool.
Managing library media 73
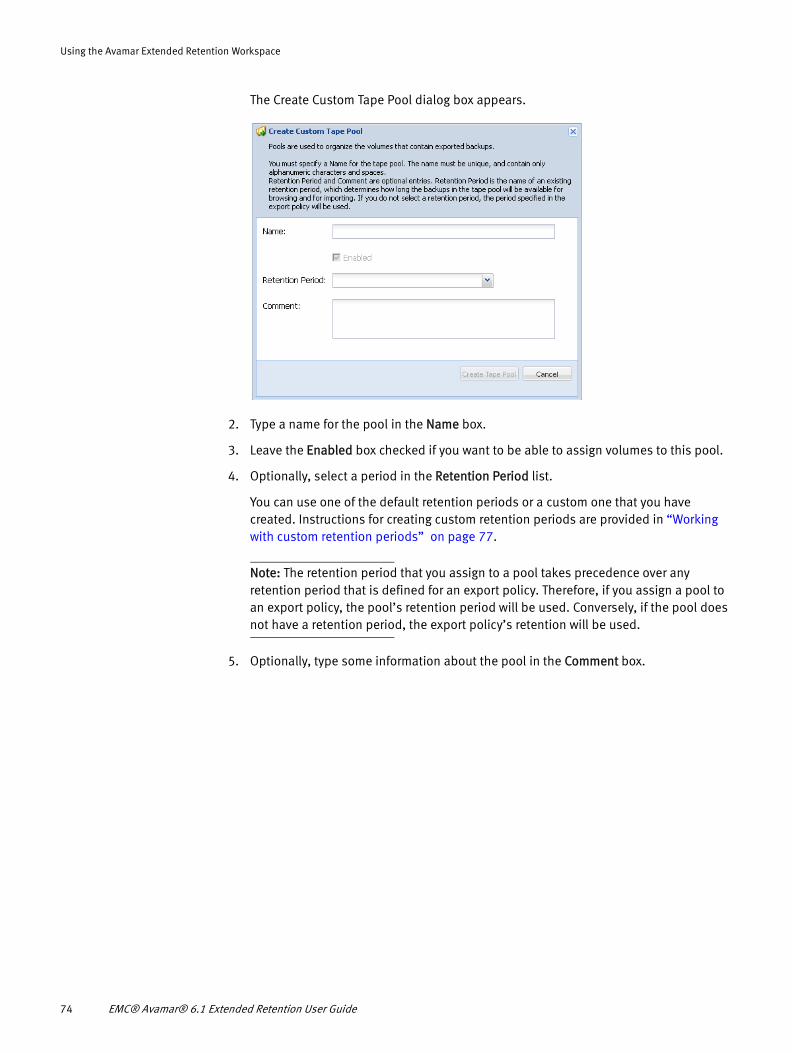
Using the Avamar Extended Retention Workspace
The Create Custom Tape Pool dialog box appears.
2. Type a name for the pool in the Name box.
3. Leave the Enabled box checked if you want to be able to assign volumes to this pool.
4. Optionally, select a period in the Retention Period list.
You can use one of the default retention periods or a custom one that you have created. Instructions for creating custom retention periods are provided in “Working with custom retention periods” on page 77.
Note: The retention period that you assign to a pool takes precedence over any retention period that is defined for an export policy. Therefore, if you assign a pool to an export policy, the pool’s retention period will be used. Conversely, if the pool does not have a retention period, the export policy’s retention will be used.
5. Optionally, type some information about the pool in the Comment box.
74 EMC® Avamar® 6.1 Extended Retention User Guide
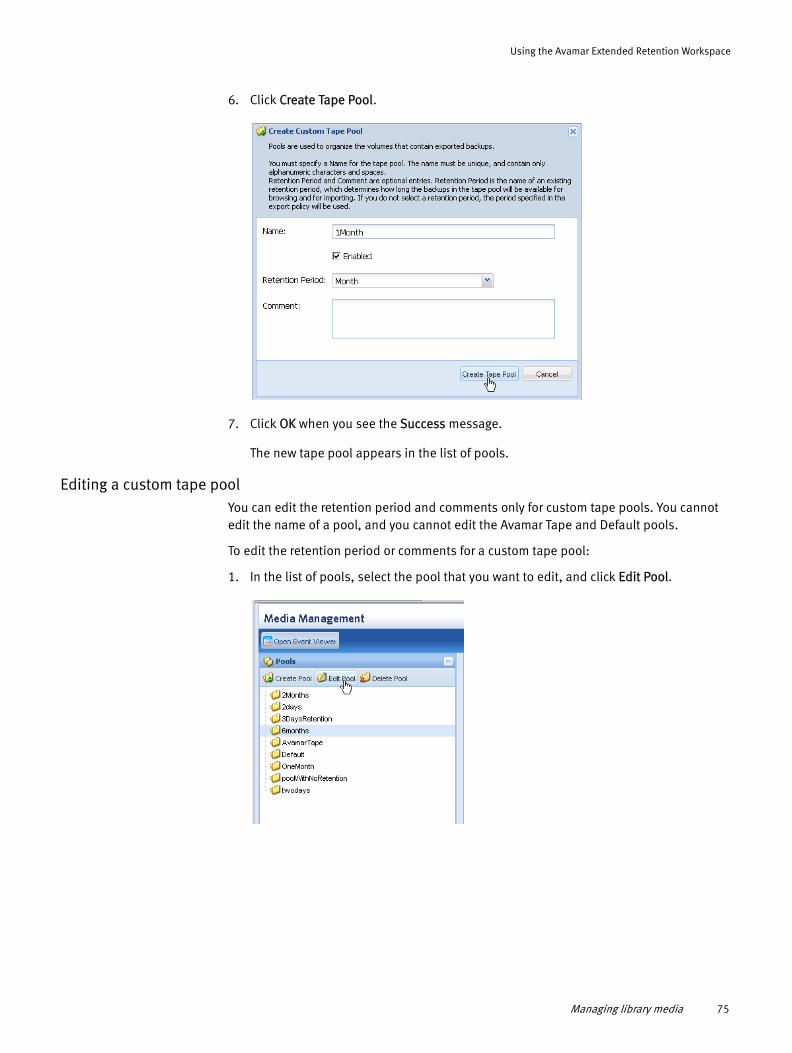
Using the Avamar Extended Retention Workspace
6. Click Create Tape Pool.
7. Click OK when you see the Success message.
The new tape pool appears in the list of pools.
Editing a custom tape poolYou can edit the retention period and comments only for custom tape pools. You cannot edit the name of a pool, and you cannot edit the Avamar Tape and Default pools.
To edit the retention period or comments for a custom tape pool:
1. In the list of pools, select the pool that you want to edit, and click Edit Pool.
Managing library media 75
Using the Avamar Extended Retention Workspace
The Edit Tape Pool dialog box appears.
2. Modify the Retention Period and Comment entries as needed.
3. Click Edit Tape Pool.
4. Click OK when you see the Success message.
Deleting a custom tape poolYou can delete only custom tape pools that do not contain any volumes. You cannot delete the Avamar Tape and Default pools.
To delete a custom tape pool:
1. In the list of pools, select the empty pool that you want to delete, and click Delete Pool.
2. Click Yes when you are asked to confirm the deletion.
3. Click OK when you see the Success message.
The pool is removed from the list of tape pools.
76 EMC® Avamar® 6.1 Extended Retention User Guide
Using the Avamar Extended Retention Workspace
Working with custom retention periods
Avamar Extended Retention uses retention periods to control how long the backups that have been exported to tape can be viewed, imported, and restored. Retention periods can be assigned to the backups that are specified in export policies and to custom tape pools.
From the Media Management page, you can create custom retention periods that can be assigned to export policies and tape pools. You can delete custom retention periods as necessary.
To create and delete custom retention periods, click the expand/retract (+) button beside Retentions in the Media Management page as shown here.
The Retentions panel expands. Twelve default system retention periods exist by default, as shown in the following figure. You can assign these retention periods to custom tape pools and to export policies, but you cannot delete them.
Any custom retention periods that you create will also be listed in the Retentions panel.
The following sections describe how to view the details of any retention period, and how to create and delete custom retention periods.
Managing library media 77
Using the Avamar Extended Retention Workspace
Viewing the details of a retention periodTo view information about a retention period, select the retention in the list.
The Retention Details and Pools panels appear on the right-hand side of the Media Management page. The Retention Details panel provides details about the retention period, and the Pools panel provides information about the tape pools that use the retention period.
Creating a custom retention periodTo create a retention period:
1. In the Retentions panel, click Create Retention.
78 EMC® Avamar® 6.1 Extended Retention User Guide
Using the Avamar Extended Retention Workspace
The Create Custom Retention Period dialog box appears.
2. Type a name for the retention period in the Name box.
3. Select a number and a duration in the Period lists.
4. Click Create Retention Period.
5. Click OK when you see the Success message.
The new retention period appears in the list of retentions.
Managing library media 79

Using the Avamar Extended Retention Workspace
Deleting a custom retention periodYou can delete only custom retention periods that are not being used by a tape pool. You cannot delete any of the default system retention periods.
To delete a custom retention period:
1. In the Retentions panel, select the custom retention period that you want to delete.
2. Click Delete Retention.
3. Click Yes when you are asked to confirm the deletion.
4. Click OK when you see the Success message.
The retention period is removed from the list of retentions.
80 EMC® Avamar® 6.1 Extended Retention User Guide

Using the Avamar Extended Retention Workspace
Labeling volumes
You must label the volumes in the library that you want to use as export tapes, and you must also label at least one volume as a bootstrap tape. The bootstrap tape is used for disaster recovery purposes.
Note: Labeling media takes time. The Event Viewer states that the labeling is queued; however, the amount of time required to label the media depends on the library’s current activity.
To label volumes in the library:
1. In the Media Management page, select the library in the Libraries panel.
Volumes in the library that have not been labeled are listed in the Volumes panel as unlabeled as shown in the following figure.
Managing library media 81
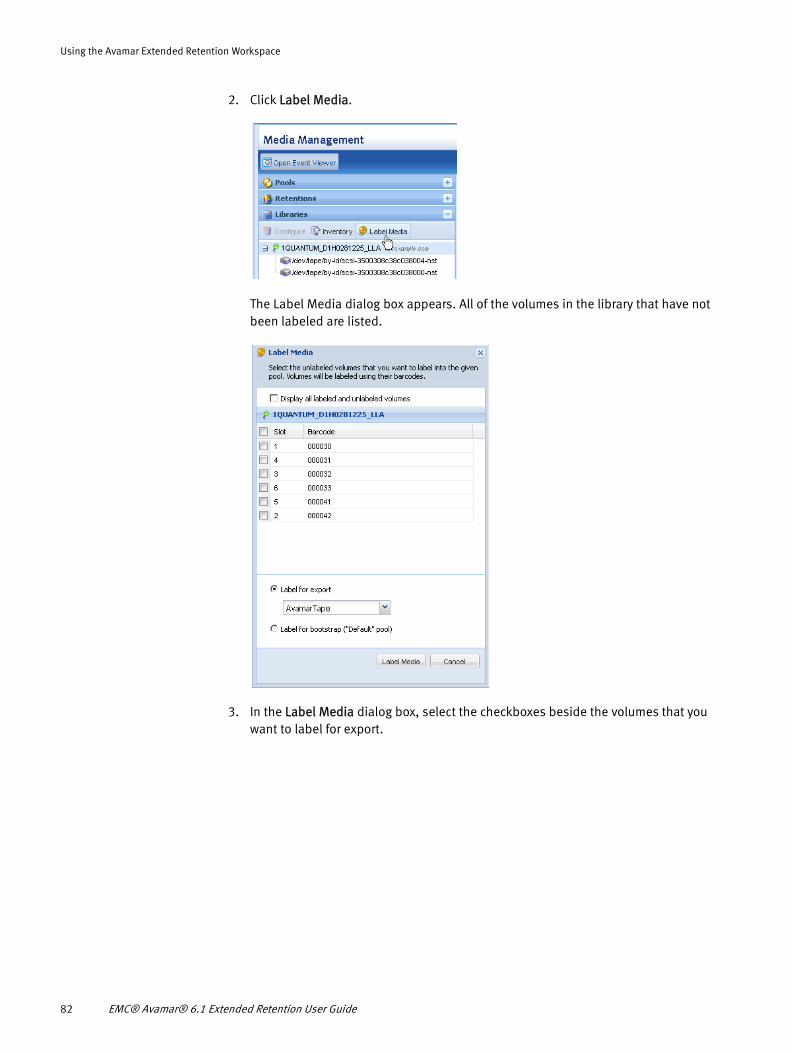
Using the Avamar Extended Retention Workspace
2. Click Label Media.
The Label Media dialog box appears. All of the volumes in the library that have not been labeled are listed.
3. In the Label Media dialog box, select the checkboxes beside the volumes that you want to label for export.
82 EMC® Avamar® 6.1 Extended Retention User Guide
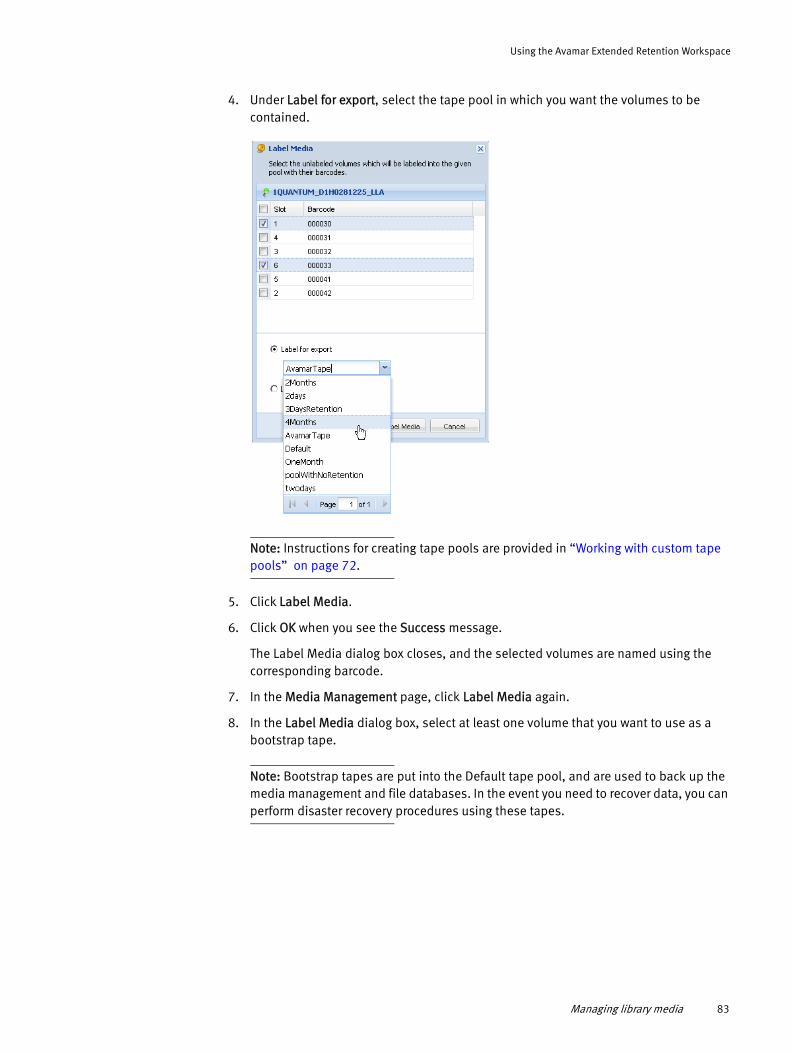
Using the Avamar Extended Retention Workspace
4. Under Label for export, select the tape pool in which you want the volumes to be contained.
Note: Instructions for creating tape pools are provided in “Working with custom tape pools” on page 72.
5. Click Label Media.
6. Click OK when you see the Success message.
The Label Media dialog box closes, and the selected volumes are named using the corresponding barcode.
7. In the Media Management page, click Label Media again.
8. In the Label Media dialog box, select at least one volume that you want to use as a bootstrap tape.
Note: Bootstrap tapes are put into the Default tape pool, and are used to back up the media management and file databases. In the event you need to recover data, you can perform disaster recovery procedures using these tapes.
Managing library media 83
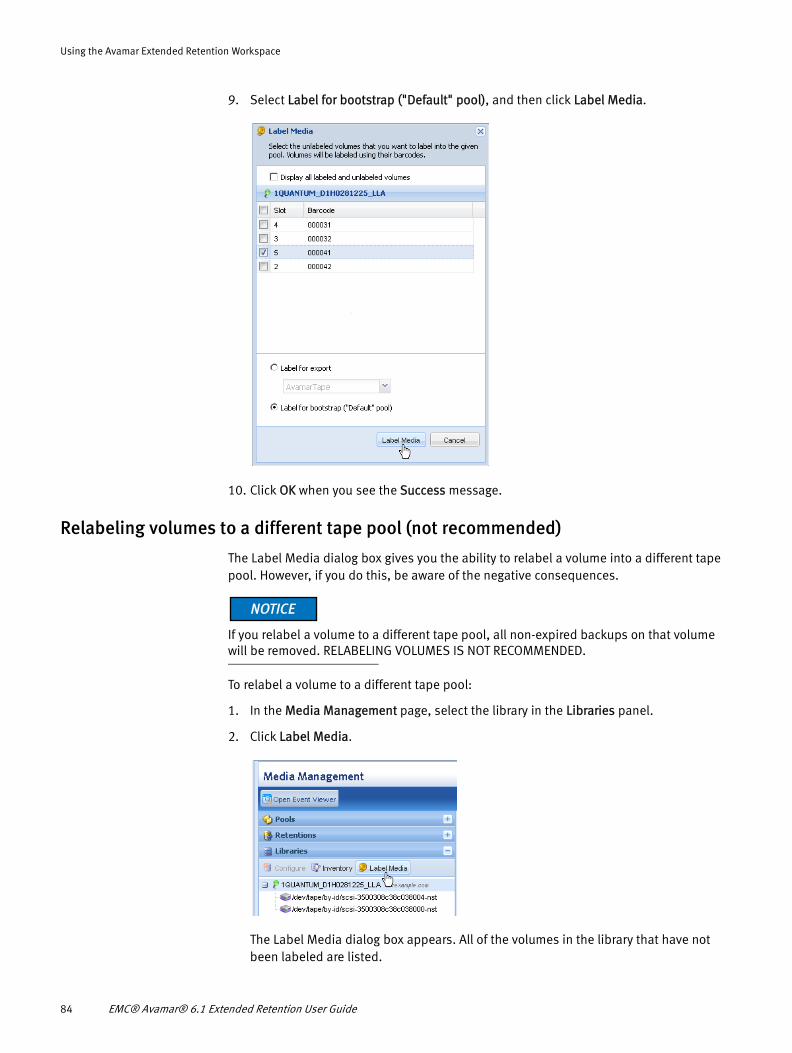
Using the Avamar Extended Retention Workspace
9. Select Label for bootstrap ("Default" pool), and then click Label Media.
10. Click OK when you see the Success message.
Relabeling volumes to a different tape pool (not recommended)
The Label Media dialog box gives you the ability to relabel a volume into a different tape pool. However, if you do this, be aware of the negative consequences.
If you relabel a volume to a different tape pool, all non-expired backups on that volume will be removed. RELABELING VOLUMES IS NOT RECOMMENDED.
To relabel a volume to a different tape pool:
1. In the Media Management page, select the library in the Libraries panel.
2. Click Label Media.
The Label Media dialog box appears. All of the volumes in the library that have not been labeled are listed.
84 EMC® Avamar® 6.1 Extended Retention User Guide
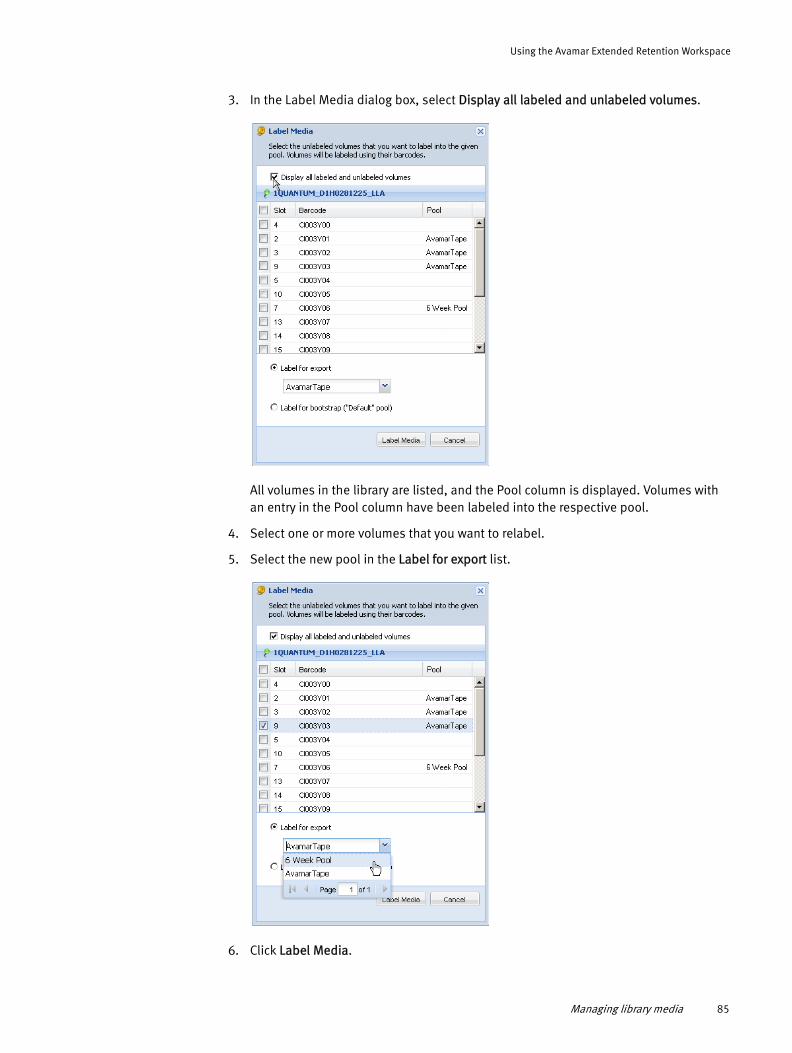
Using the Avamar Extended Retention Workspace
3. In the Label Media dialog box, select Display all labeled and unlabeled volumes.
All volumes in the library are listed, and the Pool column is displayed. Volumes with an entry in the Pool column have been labeled into the respective pool.
4. Select one or more volumes that you want to relabel.
5. Select the new pool in the Label for export list.
6. Click Label Media.
Managing library media 85

Using the Avamar Extended Retention Workspace
7. Click Yes when you see the first Relabeling Volume warning message.
8. Click Yes again to reconfirm your decision in the second warning message.
9. Click OK when you see the Success message.
Viewing library details
To view details about the library, select the library in the Libraries panel. Information about the library is displayed in the Library Details panel as shown here.
Library details are described in the following table.
Table 17 Library Details panel columns
Detail Description
Name The name of the library, followed by the fully qualified domain name.
Type The type of library. Values can be NDMP, SILO, SCSI, UNKNOWN.
86 EMC® Avamar® 6.1 Extended Retention User Guide
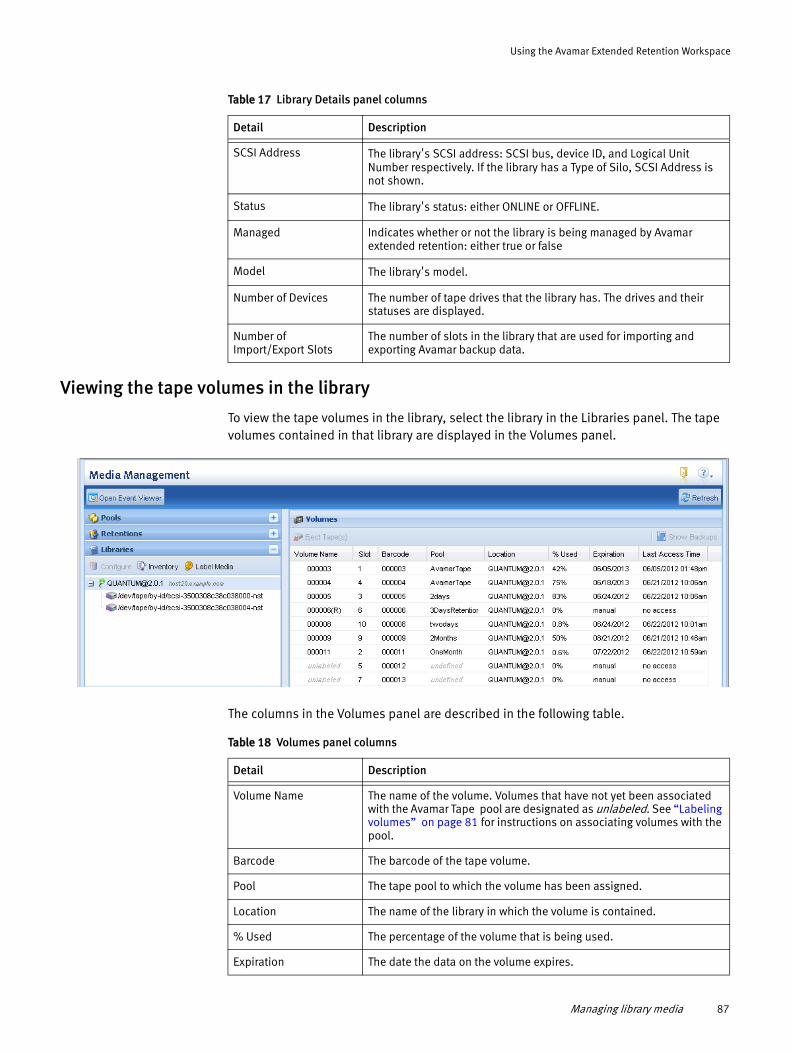
Using the Avamar Extended Retention Workspace
Viewing the tape volumes in the library
To view the tape volumes in the library, select the library in the Libraries panel. The tape volumes contained in that library are displayed in the Volumes panel.
The columns in the Volumes panel are described in the following table.
SCSI Address The library's SCSI address: SCSI bus, device ID, and Logical Unit Number respectively. If the library has a Type of Silo, SCSI Address is not shown.
Status The library's status: either ONLINE or OFFLINE.
Managed Indicates whether or not the library is being managed by Avamar extended retention: either true or false
Model The library's model.
Number of Devices The number of tape drives that the library has. The drives and their statuses are displayed.
Number of Import/Export Slots
The number of slots in the library that are used for importing and exporting Avamar backup data.
Table 17 Library Details panel columns
Detail Description
Table 18 Volumes panel columns
Detail Description
Volume Name The name of the volume. Volumes that have not yet been associated with the Avamar Tape pool are designated as unlabeled. See “Labeling volumes” on page 81 for instructions on associating volumes with the pool.
Barcode The barcode of the tape volume.
Pool The tape pool to which the volume has been assigned.
Location The name of the library in which the volume is contained.
% Used The percentage of the volume that is being used.
Expiration The date the data on the volume expires.
Managing library media 87

Using the Avamar Extended Retention Workspace
Viewing the backups on a tape volume
To view the backups on a tape volume:
1. Select the library in the Libraries panel.
The volumes in the library are listed in the Volumes panel.
2. In the Volumes panel, select the volume whose backups you want to see.
3. Click Show Backups, located in the upper-right corner of the panel.
The Backups panel appears. It contains the backups that are on the selected volume.
Last Access Time The last time the volume was accessed.
Table 18 Volumes panel columns
Detail Description
88 EMC® Avamar® 6.1 Extended Retention User Guide
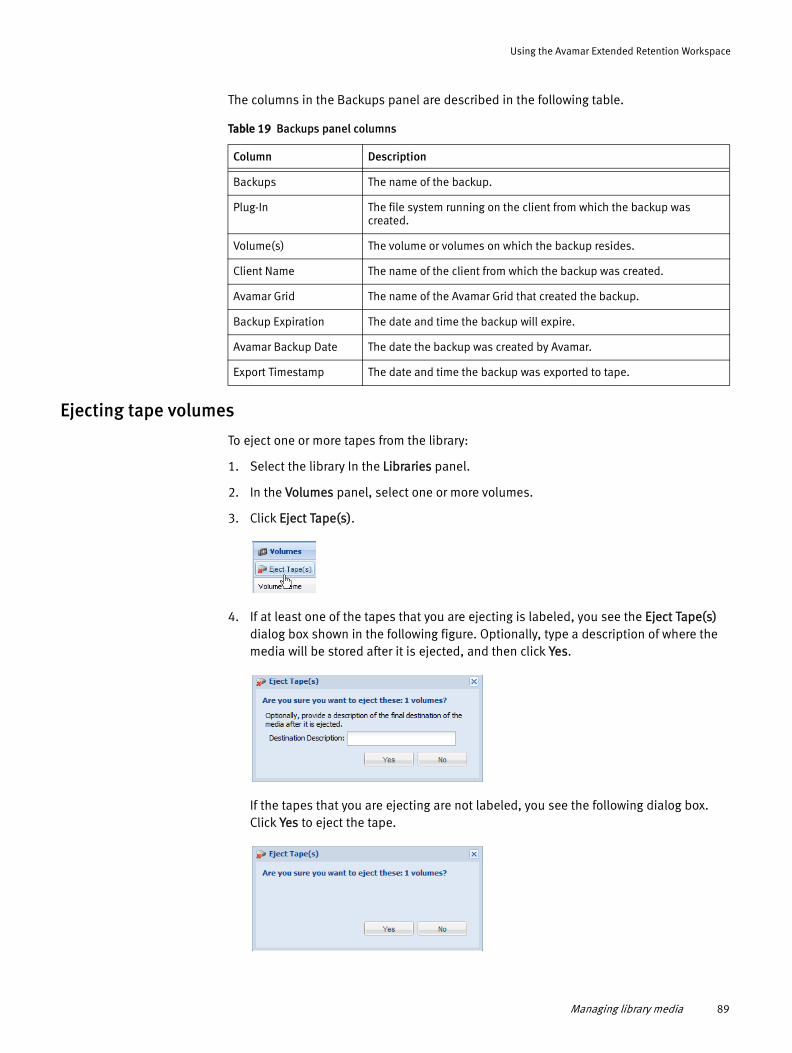
Using the Avamar Extended Retention Workspace
The columns in the Backups panel are described in the following table.
Ejecting tape volumes
To eject one or more tapes from the library:
1. Select the library In the Libraries panel.
2. In the Volumes panel, select one or more volumes.
3. Click Eject Tape(s).
4. If at least one of the tapes that you are ejecting is labeled, you see the Eject Tape(s) dialog box shown in the following figure. Optionally, type a description of where the media will be stored after it is ejected, and then click Yes.
If the tapes that you are ejecting are not labeled, you see the following dialog box. Click Yes to eject the tape.
Table 19 Backups panel columns
Column Description
Backups The name of the backup.
Plug-In The file system running on the client from which the backup was created.
Volume(s) The volume or volumes on which the backup resides.
Client Name The name of the client from which the backup was created.
Avamar Grid The name of the Avamar Grid that created the backup.
Backup Expiration The date and time the backup will expire.
Avamar Backup Date The date the backup was created by Avamar.
Export Timestamp The date and time the backup was exported to tape.
Managing library media 89
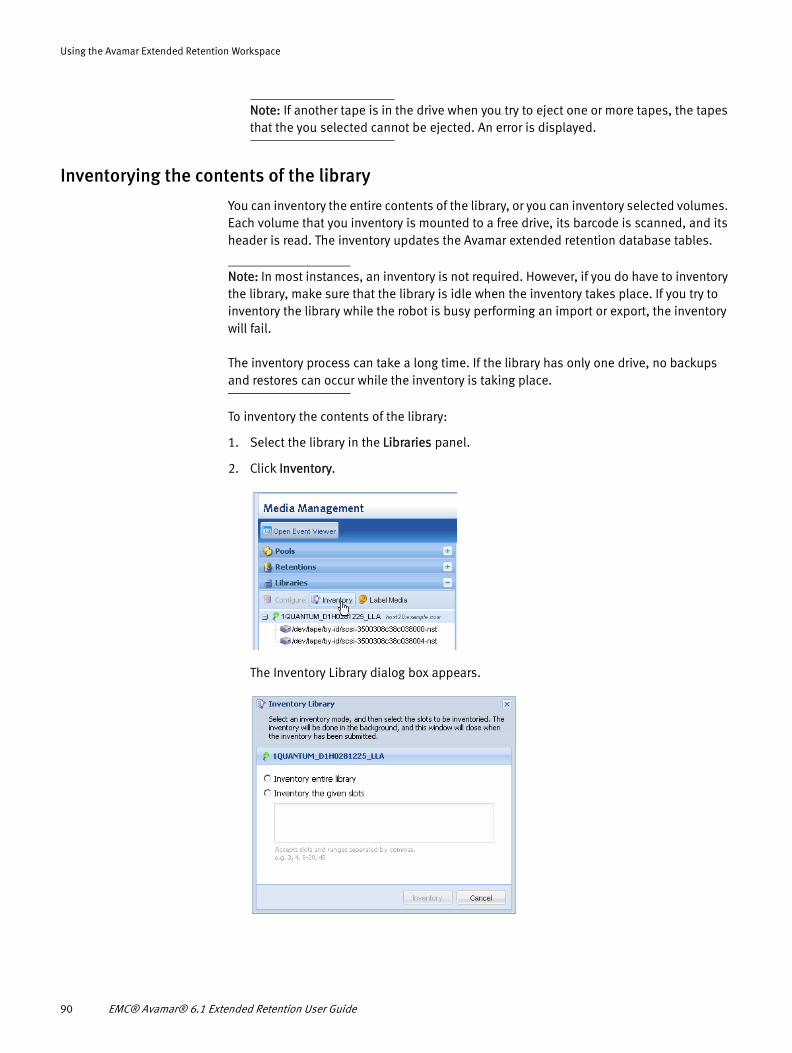
Using the Avamar Extended Retention Workspace
Note: If another tape is in the drive when you try to eject one or more tapes, the tapes that the you selected cannot be ejected. An error is displayed.
Inventorying the contents of the library
You can inventory the entire contents of the library, or you can inventory selected volumes. Each volume that you inventory is mounted to a free drive, its barcode is scanned, and its header is read. The inventory updates the Avamar extended retention database tables.
Note: In most instances, an inventory is not required. However, if you do have to inventory the library, make sure that the library is idle when the inventory takes place. If you try to inventory the library while the robot is busy performing an import or export, the inventory will fail.
The inventory process can take a long time. If the library has only one drive, no backups and restores can occur while the inventory is taking place.
To inventory the contents of the library:
1. Select the library in the Libraries panel.
2. Click Inventory.
The Inventory Library dialog box appears.
90 EMC® Avamar® 6.1 Extended Retention User Guide
Using the Avamar Extended Retention Workspace
3. In the Inventory Library dialog box, do one of the following:
• Select Inventory entire library.
• Select Inventory the given slots, and then type the slot numbers in the box. Separate individual slots with commas, and use a dash to type a range of slots. For example:
3, 4, 6-9
Note: If you enter invalid slot numbers, you receive an error such as err.action.exception, server could not complete your request.
4. Click Inventory.
A progress bar appears.
5. Click OK when you see the Success message.
Exporting Avamar backups to tapeThis topic provides the following information:
◆ “The Export Policy Management page”◆ “Creating an export policy”◆ “Editing an export policy”◆ “Deleting an export policy”◆ “Performing on-demand exports”◆ “Viewing export job details for active policies in the Task Viewer”
The Export Policy Management page
You access the Export Policy Management page by clicking Configure Export Policies on the Scheduled Exports springboard in the Avamar Extended Retention workspace.
On the Export Policy Management page, you can create and manage the export policies that run scheduled exports of Avamar backup data to tape; you can also perform on-demand exports.
Exporting Avamar backups to tape 91
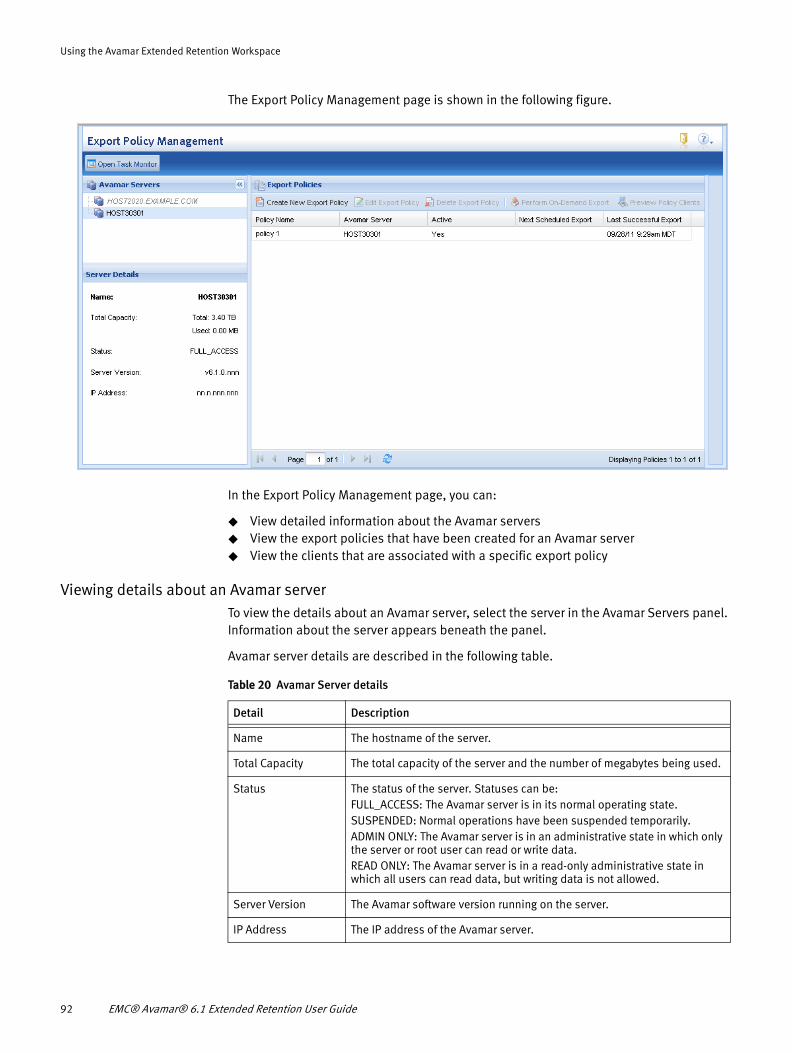
Using the Avamar Extended Retention Workspace
The Export Policy Management page is shown in the following figure.
In the Export Policy Management page, you can:
◆ View detailed information about the Avamar servers◆ View the export policies that have been created for an Avamar server◆ View the clients that are associated with a specific export policy
Viewing details about an Avamar serverTo view the details about an Avamar server, select the server in the Avamar Servers panel. Information about the server appears beneath the panel.
Avamar server details are described in the following table.
Table 20 Avamar Server details
Detail Description
Name The hostname of the server.
Total Capacity The total capacity of the server and the number of megabytes being used.
Status The status of the server. Statuses can be:FULL_ACCESS: The Avamar server is in its normal operating state.SUSPENDED: Normal operations have been suspended temporarily.ADMIN ONLY: The Avamar server is in an administrative state in which only the server or root user can read or write data.READ ONLY: The Avamar server is in a read-only administrative state in which all users can read data, but writing data is not allowed.
Server Version The Avamar software version running on the server.
IP Address The IP address of the Avamar server.
92 EMC® Avamar® 6.1 Extended Retention User Guide
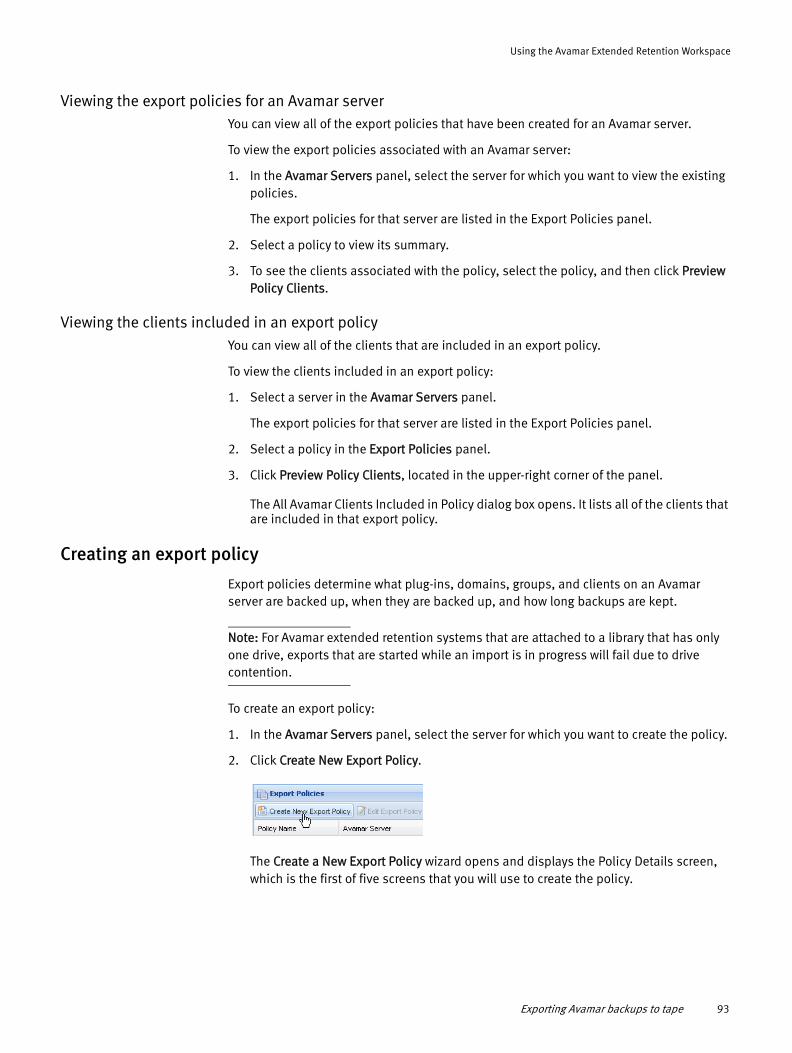
Using the Avamar Extended Retention Workspace
Viewing the export policies for an Avamar serverYou can view all of the export policies that have been created for an Avamar server.
To view the export policies associated with an Avamar server:
1. In the Avamar Servers panel, select the server for which you want to view the existing policies.
The export policies for that server are listed in the Export Policies panel.
2. Select a policy to view its summary.
3. To see the clients associated with the policy, select the policy, and then click Preview Policy Clients.
Viewing the clients included in an export policyYou can view all of the clients that are included in an export policy.
To view the clients included in an export policy:
1. Select a server in the Avamar Servers panel.
The export policies for that server are listed in the Export Policies panel.
2. Select a policy in the Export Policies panel.
3. Click Preview Policy Clients, located in the upper-right corner of the panel.
The All Avamar Clients Included in Policy dialog box opens. It lists all of the clients that are included in that export policy.
Creating an export policy
Export policies determine what plug-ins, domains, groups, and clients on an Avamar server are backed up, when they are backed up, and how long backups are kept.
Note: For Avamar extended retention systems that are attached to a library that has only one drive, exports that are started while an import is in progress will fail due to drive contention.
To create an export policy:
1. In the Avamar Servers panel, select the server for which you want to create the policy.
2. Click Create New Export Policy.
The Create a New Export Policy wizard opens and displays the Policy Details screen, which is the first of five screens that you will use to create the policy.
Exporting Avamar backups to tape 93
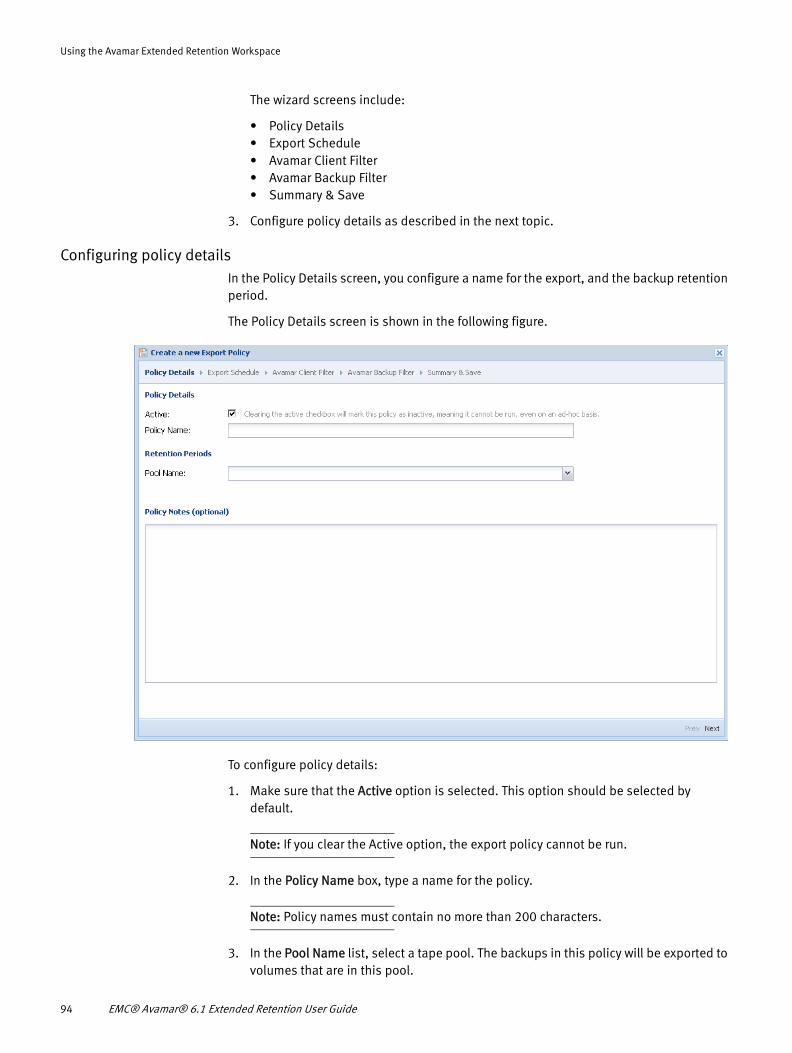
Using the Avamar Extended Retention Workspace
The wizard screens include:
• Policy Details• Export Schedule• Avamar Client Filter• Avamar Backup Filter• Summary & Save
3. Configure policy details as described in the next topic.
Configuring policy detailsIn the Policy Details screen, you configure a name for the export, and the backup retention period.
The Policy Details screen is shown in the following figure.
To configure policy details:
1. Make sure that the Active option is selected. This option should be selected by default.
Note: If you clear the Active option, the export policy cannot be run.
2. In the Policy Name box, type a name for the policy.
Note: Policy names must contain no more than 200 characters.
3. In the Pool Name list, select a tape pool. The backups in this policy will be exported to volumes that are in this pool.
94 EMC® Avamar® 6.1 Extended Retention User Guide
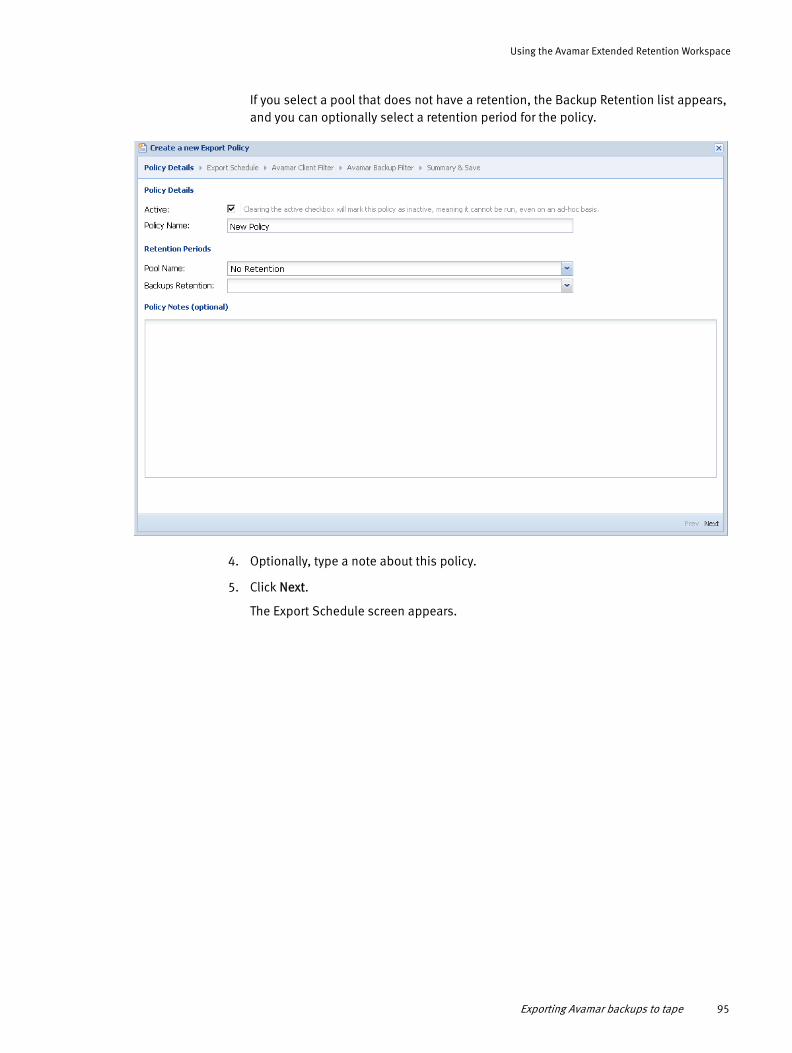
Using the Avamar Extended Retention Workspace
If you select a pool that does not have a retention, the Backup Retention list appears, and you can optionally select a retention period for the policy.
4. Optionally, type a note about this policy.
5. Click Next.
The Export Schedule screen appears.
Exporting Avamar backups to tape 95
Using the Avamar Extended Retention Workspace
Configuring the export scheduleIn the Export Schedule screen, you configure the schedule on which exports will occur for this policy. You specify the frequency at which the schedule will run, and you configure detailed settings based on the selected frequency.
The Export Schedule screen is shown in the following figure.
To configure the export schedule:
1. Select a Frequency option.
The frequency option that you select determines the configuration options that appear on the right side of the screen.
2. Configure the options for the selected frequency.
Details for these options are described in:
• “Regular intervals” on page 97 • “Specific weekdays” on page 97 • “Nth day of each month” on page 97 • “Specific date each month” on page 98• “On demand” on page 98
After you have configured the export frequency, the next five scheduled exports are shown in the lower panel of the Export Schedule screen.
3. Click Next.
The Avamar Client Filter screen appears.
96 EMC® Avamar® 6.1 Extended Retention User Guide

Using the Avamar Extended Retention Workspace
Regular intervals
The Regular Intervals frequency lets you schedule the export to run at regular intervals; every specified number of days, weeks, or months. Selecting this frequency displays the configuration options shown in the following figure.
To configure regular intervals:
1. In the Run every lists, select a number and a time period.
2. In the at list, select the time of day that you want the schedule to run.
3. In the starting on box, click the calendar icon, and select a date.
Specific weekdays
The Specific Weekdays frequency lets you schedule the export to run on a specific day each week. Selecting this frequency displays the configuration options shown in the following figure.
To configure specific days of the week:
1. Select a day beside Every.
2. In the at list, select the time of day that you want the schedule to run.
3. In the starting on box, click the calendar icon, and select a date.
Nth day of each month
The Nth Day of each Month frequency lets you schedule the export to run on a specific weekday of each month. Selecting this frequency displays the configuration options shown in the following figure.
Exporting Avamar backups to tape 97
Using the Avamar Extended Retention Workspace
To configure the Nth day of each month:
1. In the Run on the list, select a number.
2. Select a day of the week.
3. In the of each month, at box, select the time of day that you want the schedule to run.
4. In the starting on box, click the calendar icon, and select a date.
Specific date each month
The Specific Date each Month frequency lets you schedule the export to run on a specific date each month. Selecting this frequency displays the configuration options shown in the following figure.
To configure a specific date each month:
1. In the Run on the list, select a number.
2. In the of each month, at list, select the time of day that you want the schedule to run.
3. In the starting on box, click the calendar icon, and select a date.
On demand
The On Demand frequency does not have configuration options.
98 EMC® Avamar® 6.1 Extended Retention User Guide
Using the Avamar Extended Retention Workspace
Configuring the Avamar client filterIn the Avamar Client Filter screen, you select the domains, groups, and clients that will be included in this export policy.
The Avamar Client Filter screen is shown in the following figure.
To configure the Avamar client filter:
1. Click Create/Edit Client Filter.
Exporting Avamar backups to tape 99
Using the Avamar Extended Retention Workspace
The Avamar Domains, Avamar Groups, and Avamar Clients panels expand from the left side of the screen as shown in the following figure.
2. In the Avamar Domains panel, select a domain.
When you select a domain, any client groups and clients that are associated with that domain appear in the Avamar Groups and Avamar Clients panels respectively.
3. To include a domain and its clients in the policy, click and drag the domain to the Included Avamar Domains panel.
Note: When you drag a domain to the Included Avamar Domains panel, its subdomains are not included in the export policy. You must drag each domain and subdomain separately as shown in the following figure.
When you include domains and subdomains in a policy by dragging them to the Included Avamar Domains panel, the clients in those domains and subdomains are also included in the policy.
100 EMC® Avamar® 6.1 Extended Retention User Guide
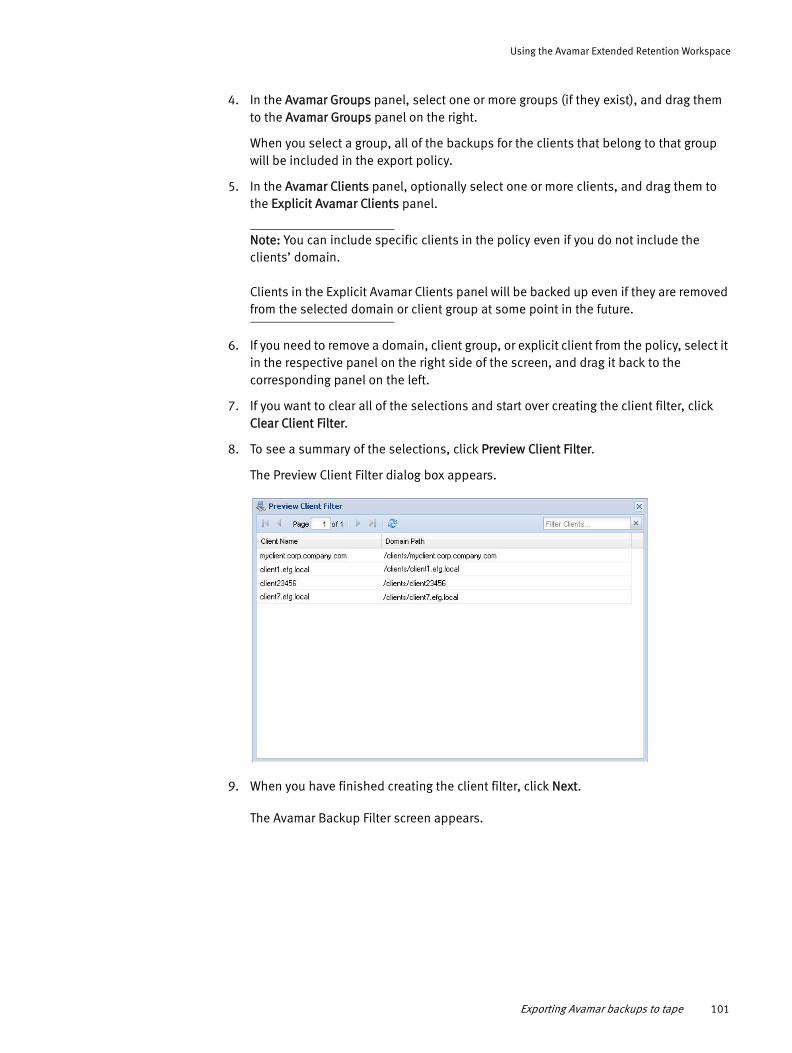
Using the Avamar Extended Retention Workspace
4. In the Avamar Groups panel, select one or more groups (if they exist), and drag them to the Avamar Groups panel on the right.
When you select a group, all of the backups for the clients that belong to that group will be included in the export policy.
5. In the Avamar Clients panel, optionally select one or more clients, and drag them to the Explicit Avamar Clients panel.
Note: You can include specific clients in the policy even if you do not include the clients’ domain.
Clients in the Explicit Avamar Clients panel will be backed up even if they are removed from the selected domain or client group at some point in the future.
6. If you need to remove a domain, client group, or explicit client from the policy, select it in the respective panel on the right side of the screen, and drag it back to the corresponding panel on the left.
7. If you want to clear all of the selections and start over creating the client filter, click Clear Client Filter.
8. To see a summary of the selections, click Preview Client Filter.
The Preview Client Filter dialog box appears.
9. When you have finished creating the client filter, click Next.
The Avamar Backup Filter screen appears.
Exporting Avamar backups to tape 101
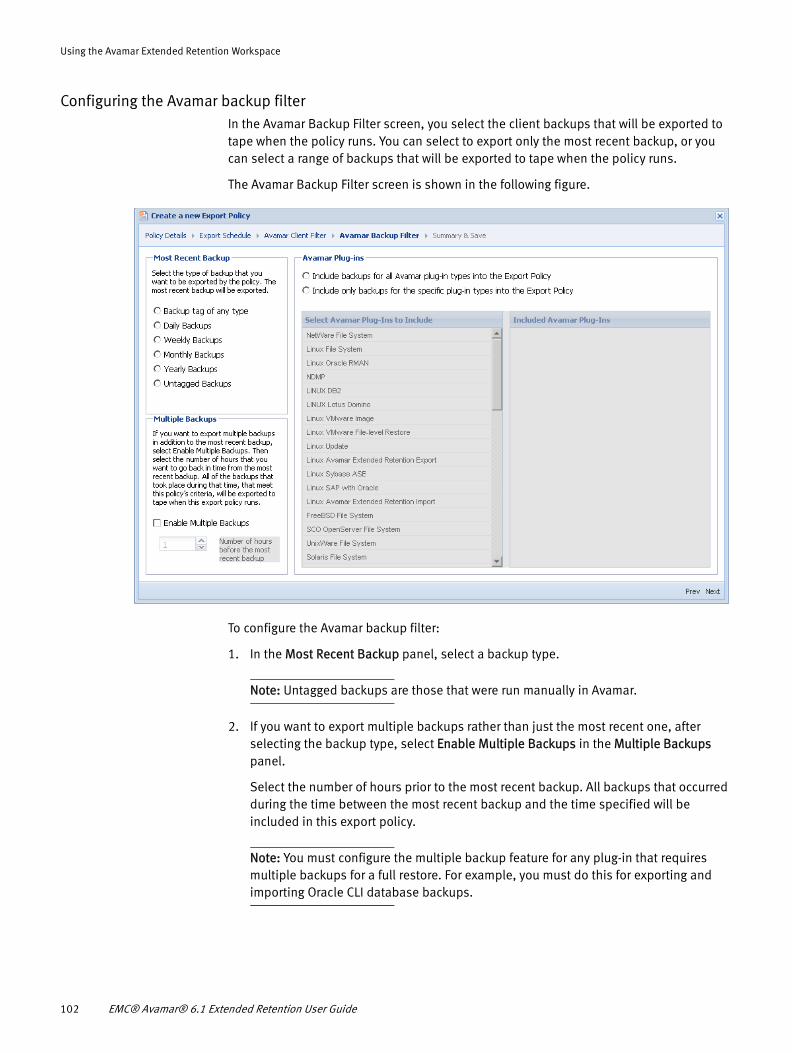
Using the Avamar Extended Retention Workspace
Configuring the Avamar backup filterIn the Avamar Backup Filter screen, you select the client backups that will be exported to tape when the policy runs. You can select to export only the most recent backup, or you can select a range of backups that will be exported to tape when the policy runs.
The Avamar Backup Filter screen is shown in the following figure.
To configure the Avamar backup filter:
1. In the Most Recent Backup panel, select a backup type.
Note: Untagged backups are those that were run manually in Avamar.
2. If you want to export multiple backups rather than just the most recent one, after selecting the backup type, select Enable Multiple Backups in the Multiple Backups panel.
Select the number of hours prior to the most recent backup. All backups that occurred during the time between the most recent backup and the time specified will be included in this export policy.
Note: You must configure the multiple backup feature for any plug-in that requires multiple backups for a full restore. For example, you must do this for exporting and importing Oracle CLI database backups.
102 EMC® Avamar® 6.1 Extended Retention User Guide
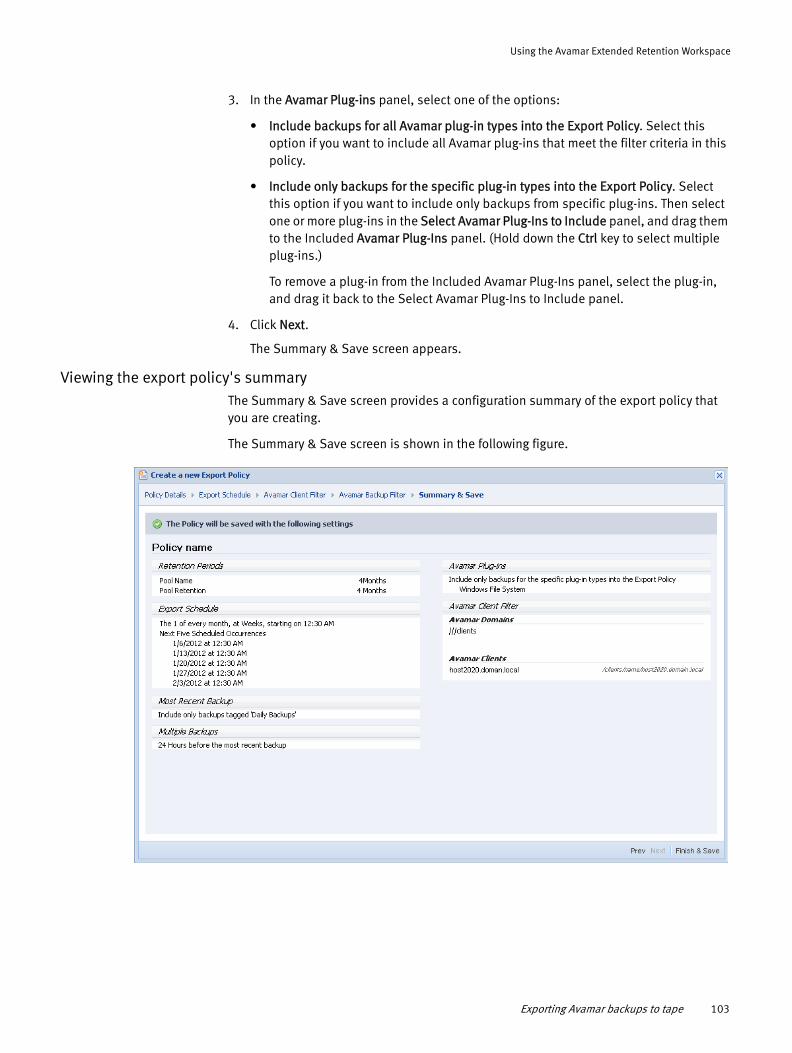
Using the Avamar Extended Retention Workspace
3. In the Avamar Plug-ins panel, select one of the options:
• Include backups for all Avamar plug-in types into the Export Policy. Select this option if you want to include all Avamar plug-ins that meet the filter criteria in this policy.
• Include only backups for the specific plug-in types into the Export Policy. Select this option if you want to include only backups from specific plug-ins. Then select one or more plug-ins in the Select Avamar Plug-Ins to Include panel, and drag them to the Included Avamar Plug-Ins panel. (Hold down the Ctrl key to select multiple plug-ins.)
To remove a plug-in from the Included Avamar Plug-Ins panel, select the plug-in, and drag it back to the Select Avamar Plug-Ins to Include panel.
4. Click Next.
The Summary & Save screen appears.
Viewing the export policy's summaryThe Summary & Save screen provides a configuration summary of the export policy that you are creating.
The Summary & Save screen is shown in the following figure.
Exporting Avamar backups to tape 103
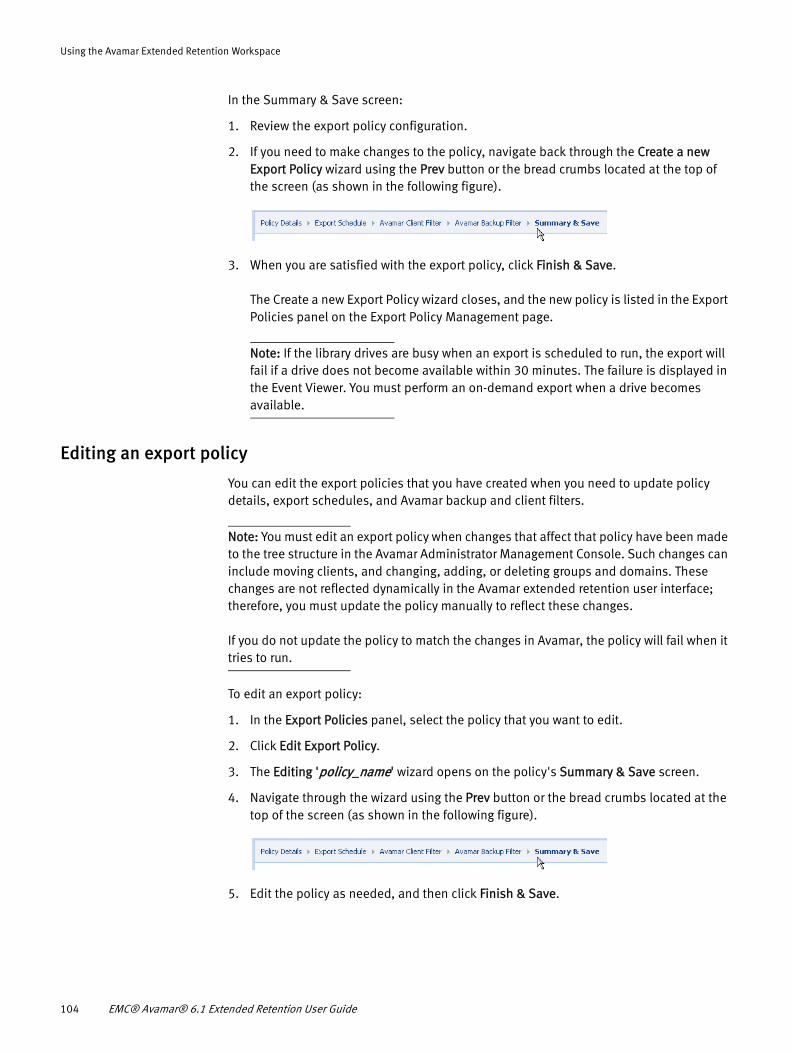
Using the Avamar Extended Retention Workspace
In the Summary & Save screen:
1. Review the export policy configuration.
2. If you need to make changes to the policy, navigate back through the Create a new Export Policy wizard using the Prev button or the bread crumbs located at the top of the screen (as shown in the following figure).
3. When you are satisfied with the export policy, click Finish & Save.
The Create a new Export Policy wizard closes, and the new policy is listed in the Export Policies panel on the Export Policy Management page.
Note: If the library drives are busy when an export is scheduled to run, the export will fail if a drive does not become available within 30 minutes. The failure is displayed in the Event Viewer. You must perform an on-demand export when a drive becomes available.
Editing an export policy
You can edit the export policies that you have created when you need to update policy details, export schedules, and Avamar backup and client filters.
Note: You must edit an export policy when changes that affect that policy have been made to the tree structure in the Avamar Administrator Management Console. Such changes can include moving clients, and changing, adding, or deleting groups and domains. These changes are not reflected dynamically in the Avamar extended retention user interface; therefore, you must update the policy manually to reflect these changes.
If you do not update the policy to match the changes in Avamar, the policy will fail when it tries to run.
To edit an export policy:
1. In the Export Policies panel, select the policy that you want to edit.
2. Click Edit Export Policy.
3. The Editing 'policy_name' wizard opens on the policy's Summary & Save screen.
4. Navigate through the wizard using the Prev button or the bread crumbs located at the top of the screen (as shown in the following figure).
5. Edit the policy as needed, and then click Finish & Save.
104 EMC® Avamar® 6.1 Extended Retention User Guide
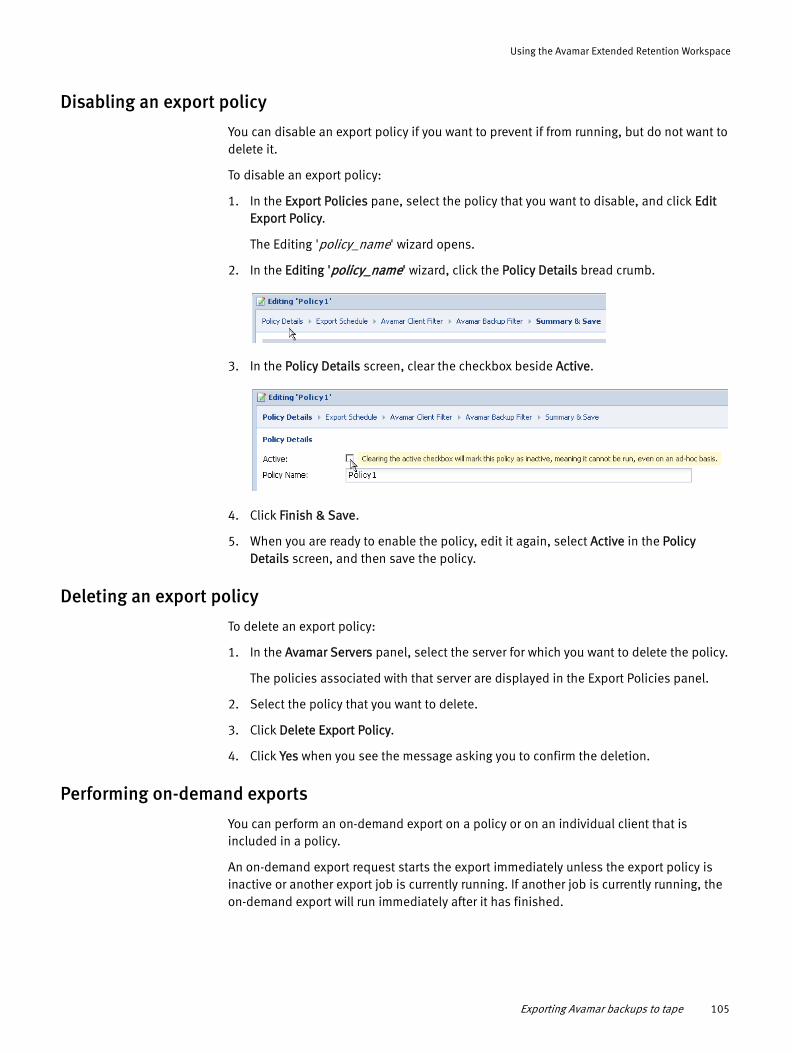
Using the Avamar Extended Retention Workspace
Disabling an export policy
You can disable an export policy if you want to prevent if from running, but do not want to delete it.
To disable an export policy:
1. In the Export Policies pane, select the policy that you want to disable, and click Edit Export Policy.
The Editing 'policy_name' wizard opens.
2. In the Editing 'policy_name' wizard, click the Policy Details bread crumb.
3. In the Policy Details screen, clear the checkbox beside Active.
4. Click Finish & Save.
5. When you are ready to enable the policy, edit it again, select Active in the Policy Details screen, and then save the policy.
Deleting an export policy
To delete an export policy:
1. In the Avamar Servers panel, select the server for which you want to delete the policy.
The policies associated with that server are displayed in the Export Policies panel.
2. Select the policy that you want to delete.
3. Click Delete Export Policy.
4. Click Yes when you see the message asking you to confirm the deletion.
Performing on-demand exports
You can perform an on-demand export on a policy or on an individual client that is included in a policy.
An on-demand export request starts the export immediately unless the export policy is inactive or another export job is currently running. If another job is currently running, the on-demand export will run immediately after it has finished.
Exporting Avamar backups to tape 105
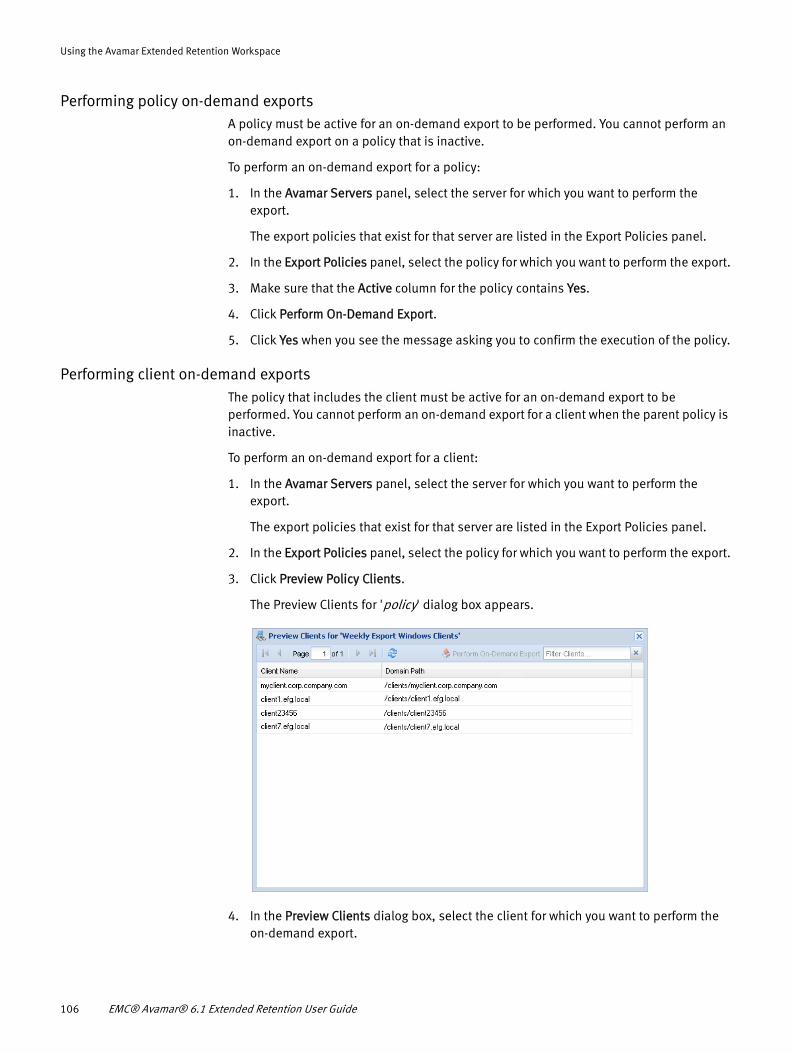
Using the Avamar Extended Retention Workspace
Performing policy on-demand exportsA policy must be active for an on-demand export to be performed. You cannot perform an on-demand export on a policy that is inactive.
To perform an on-demand export for a policy:
1. In the Avamar Servers panel, select the server for which you want to perform the export.
The export policies that exist for that server are listed in the Export Policies panel.
2. In the Export Policies panel, select the policy for which you want to perform the export.
3. Make sure that the Active column for the policy contains Yes.
4. Click Perform On-Demand Export.
5. Click Yes when you see the message asking you to confirm the execution of the policy.
Performing client on-demand exportsThe policy that includes the client must be active for an on-demand export to be performed. You cannot perform an on-demand export for a client when the parent policy is inactive.
To perform an on-demand export for a client:
1. In the Avamar Servers panel, select the server for which you want to perform the export.
The export policies that exist for that server are listed in the Export Policies panel.
2. In the Export Policies panel, select the policy for which you want to perform the export.
3. Click Preview Policy Clients.
The Preview Clients for 'policy' dialog box appears.
4. In the Preview Clients dialog box, select the client for which you want to perform the on-demand export.
106 EMC® Avamar® 6.1 Extended Retention User Guide
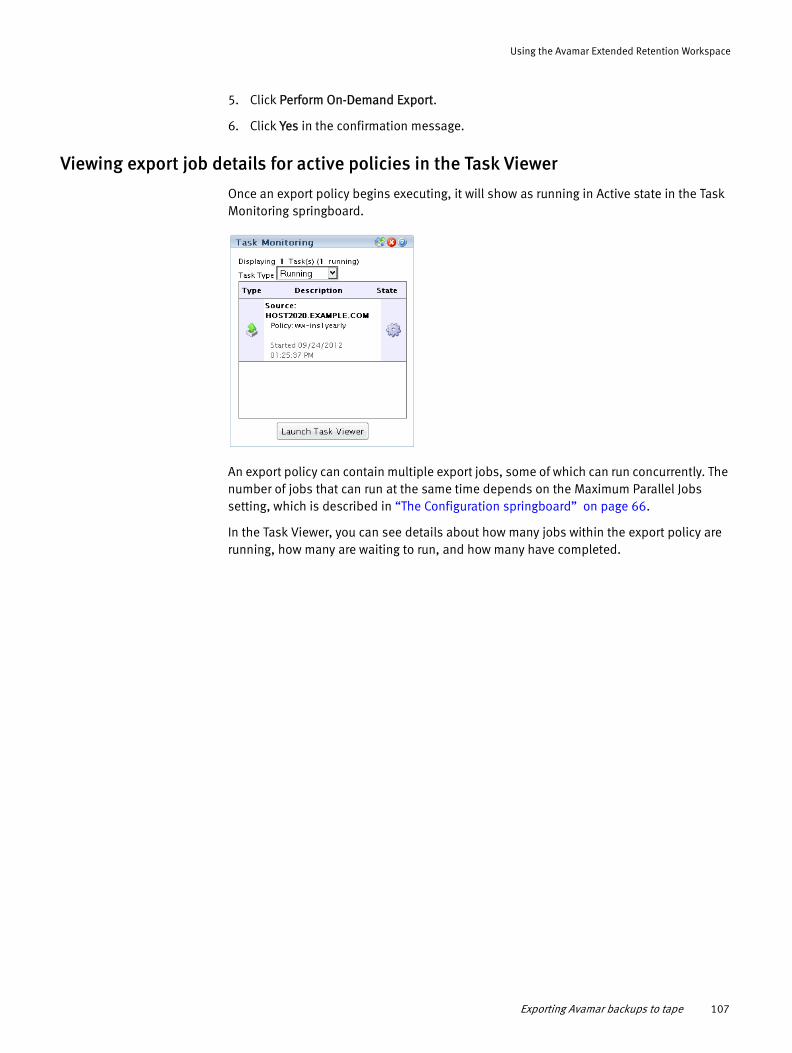
Using the Avamar Extended Retention Workspace
5. Click Perform On-Demand Export.
6. Click Yes in the confirmation message.
Viewing export job details for active policies in the Task Viewer
Once an export policy begins executing, it will show as running in Active state in the Task Monitoring springboard.
An export policy can contain multiple export jobs, some of which can run concurrently. The number of jobs that can run at the same time depends on the Maximum Parallel Jobs setting, which is described in “The Configuration springboard” on page 66.
In the Task Viewer, you can see details about how many jobs within the export policy are running, how many are waiting to run, and how many have completed.
Exporting Avamar backups to tape 107
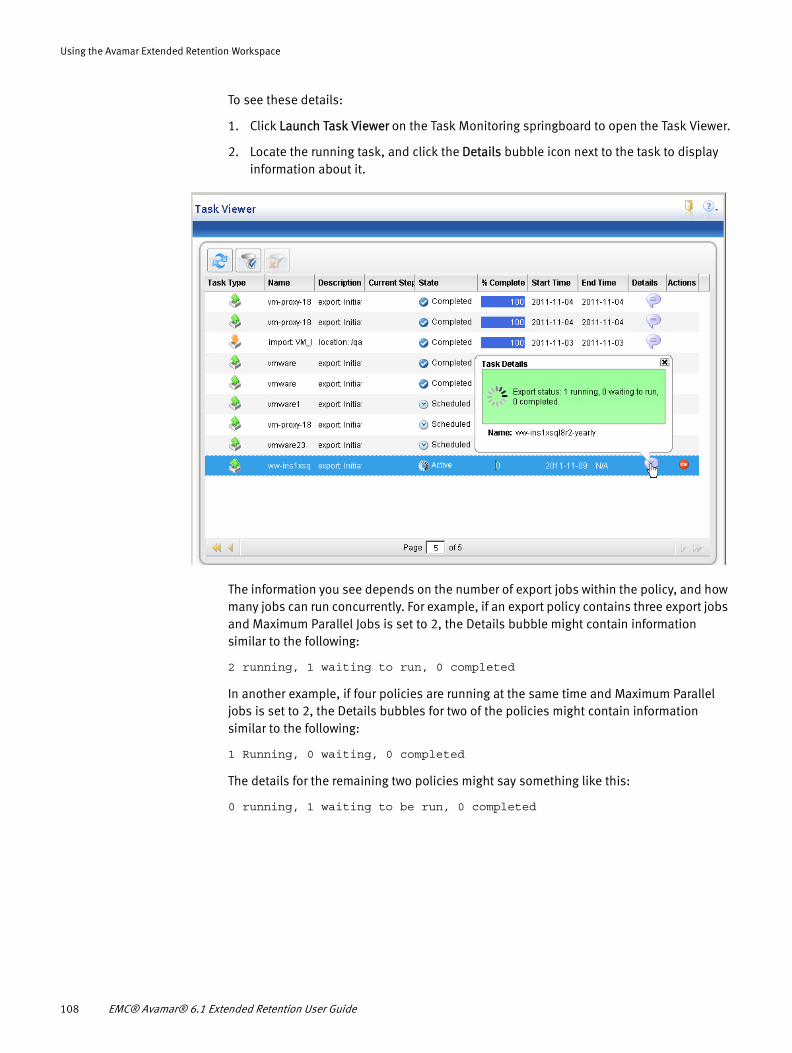
Using the Avamar Extended Retention Workspace
To see these details:
1. Click Launch Task Viewer on the Task Monitoring springboard to open the Task Viewer.
2. Locate the running task, and click the Details bubble icon next to the task to display information about it.
The information you see depends on the number of export jobs within the policy, and how many jobs can run concurrently. For example, if an export policy contains three export jobs and Maximum Parallel Jobs is set to 2, the Details bubble might contain information similar to the following:
2 running, 1 waiting to run, 0 completed
In another example, if four policies are running at the same time and Maximum Parallel jobs is set to 2, the Details bubbles for two of the policies might contain information similar to the following:
1 Running, 0 waiting, 0 completed
The details for the remaining two policies might say something like this:
0 running, 1 waiting to be run, 0 completed
108 EMC® Avamar® 6.1 Extended Retention User Guide
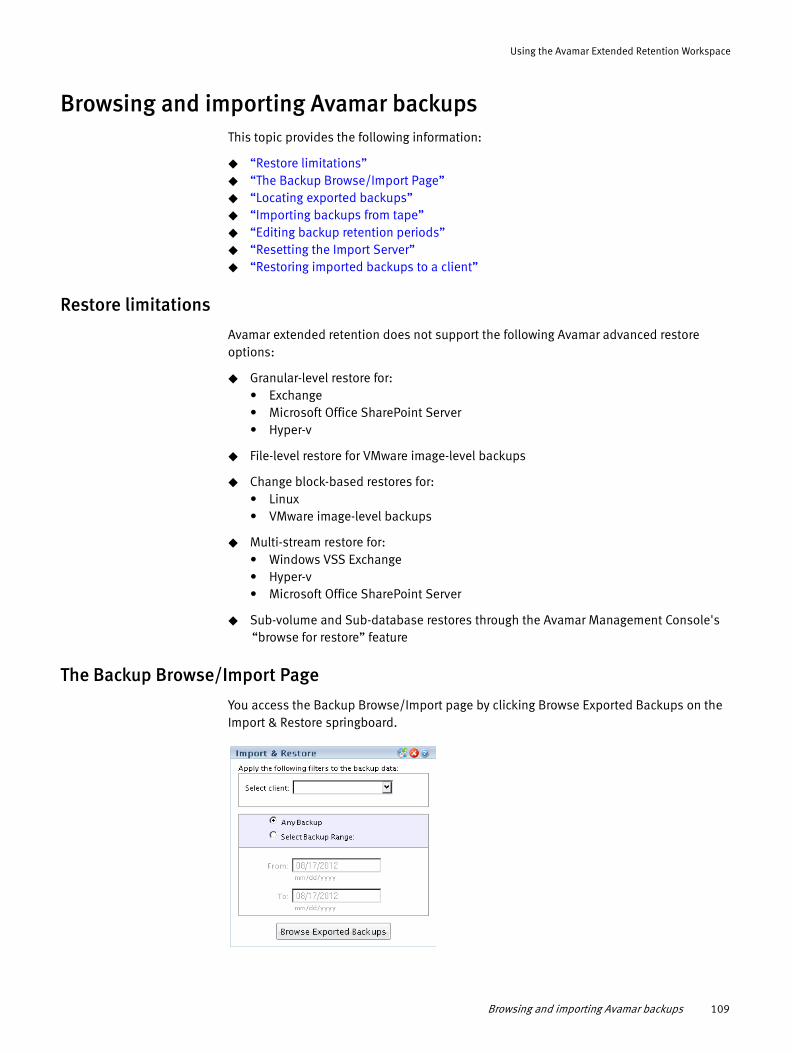
Using the Avamar Extended Retention Workspace
Browsing and importing Avamar backupsThis topic provides the following information:
◆ “Restore limitations”◆ “The Backup Browse/Import Page”◆ “Locating exported backups”◆ “Importing backups from tape”◆ “Editing backup retention periods”◆ “Resetting the Import Server”◆ “Restoring imported backups to a client”
Restore limitations
Avamar extended retention does not support the following Avamar advanced restore options:
◆ Granular-level restore for:• Exchange• Microsoft Office SharePoint Server• Hyper-v
◆ File-level restore for VMware image-level backups
◆ Change block-based restores for:• Linux• VMware image-level backups
◆ Multi-stream restore for:• Windows VSS Exchange• Hyper-v• Microsoft Office SharePoint Server
◆ Sub-volume and Sub-database restores through the Avamar Management Console's “browse for restore” feature
The Backup Browse/Import Page
You access the Backup Browse/Import page by clicking Browse Exported Backups on the Import & Restore springboard.
Browsing and importing Avamar backups 109
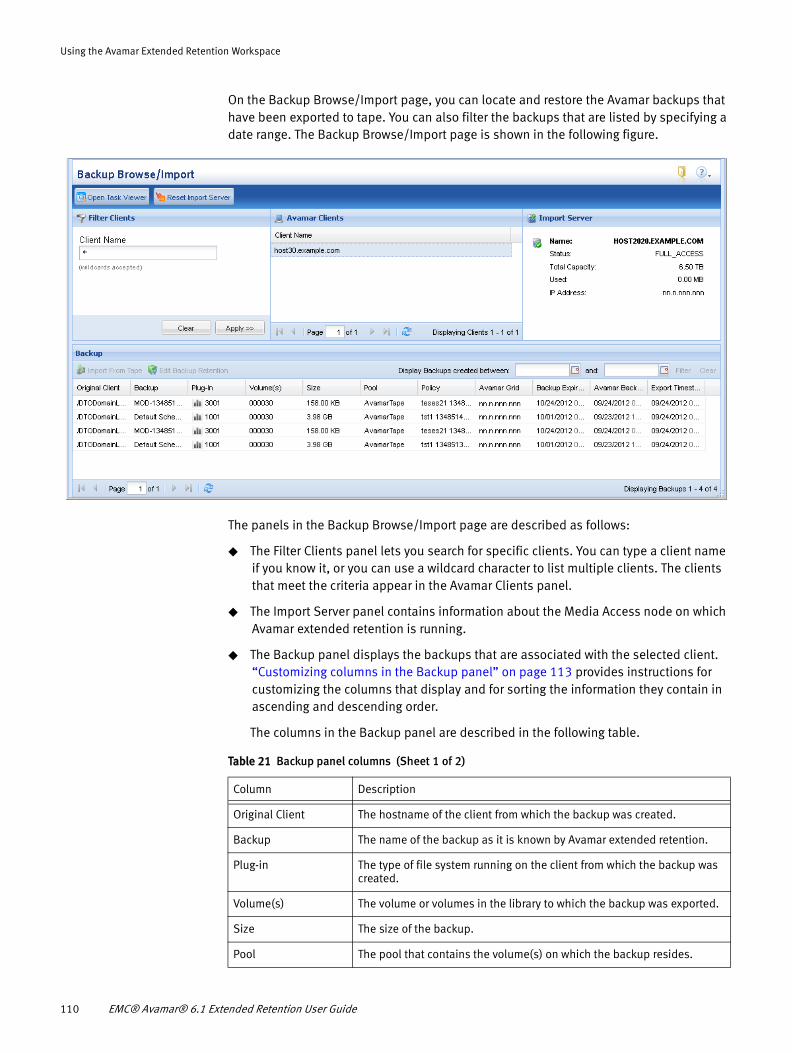
Using the Avamar Extended Retention Workspace
On the Backup Browse/Import page, you can locate and restore the Avamar backups that have been exported to tape. You can also filter the backups that are listed by specifying a date range. The Backup Browse/Import page is shown in the following figure.
The panels in the Backup Browse/Import page are described as follows:
◆ The Filter Clients panel lets you search for specific clients. You can type a client name if you know it, or you can use a wildcard character to list multiple clients. The clients that meet the criteria appear in the Avamar Clients panel.
◆ The Import Server panel contains information about the Media Access node on which Avamar extended retention is running.
◆ The Backup panel displays the backups that are associated with the selected client. “Customizing columns in the Backup panel” on page 113 provides instructions for customizing the columns that display and for sorting the information they contain in ascending and descending order.
The columns in the Backup panel are described in the following table.
Table 21 Backup panel columns (Sheet 1 of 2)
Column Description
Original Client The hostname of the client from which the backup was created.
Backup The name of the backup as it is known by Avamar extended retention.
Plug-in The type of file system running on the client from which the backup was created.
Volume(s) The volume or volumes in the library to which the backup was exported.
Size The size of the backup.
Pool The pool that contains the volume(s) on which the backup resides.
110 EMC® Avamar® 6.1 Extended Retention User Guide
Using the Avamar Extended Retention Workspace
Locating exported backups
In the Browse/Import Backup page, you can view all of the Avamar backups for the selected client that have been exported to tape. You can also filter the Avamar backups by creation date for that client; for example, you can view the Avamar backups that were created between October 12 and October 19 that are now on tape.
To locate a client and its associated backups:
1. In the Filter Clients panel in the Client Name box, type part of a client name using an asterisk (*) as a wildcard character. For example:
client*
or
*
Note: If you type the entire client name and the system is unable to make a complete match, the client will not be listed in the Client Name panel. Using an asterisk in the search criteria is highly recommended.
2. Press Enter or click Apply.
The clients that match the filter criteria are listed in the Client Name panel.
3. In the Client Name panel, select the client whose backups you want to see.
The backups for that client are listed in the Backup panel.
Policy The name of the export policy that initiated the backup.
Avamar Grid The IP address of the Avamar grid on which the client was activated when it was backed up.
Backup Expiration The date and time the backup will expire.
Avamar Backup Date The date and time the backup was created by the Avamar server to which the client was activated.
Export TImestamp The date and time the backup was exported to tape by Avamar extended retention.
Table 21 Backup panel columns (Sheet 2 of 2)
Column Description
Browsing and importing Avamar backups 111
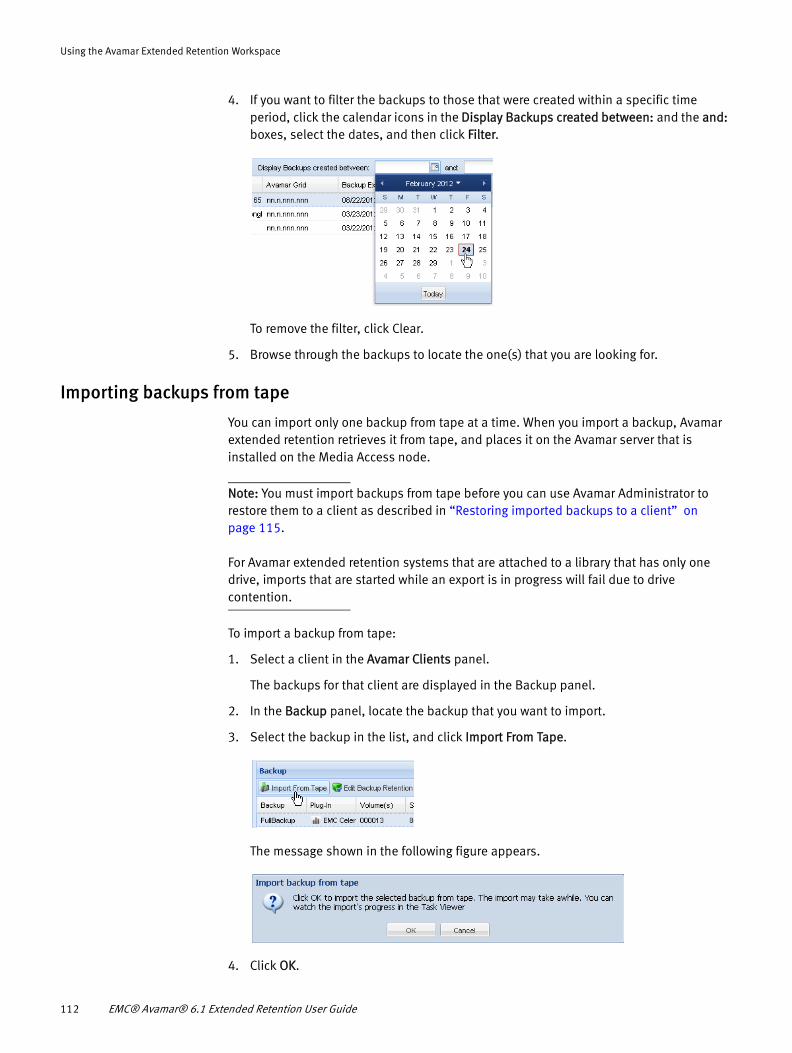
Using the Avamar Extended Retention Workspace
4. If you want to filter the backups to those that were created within a specific time period, click the calendar icons in the Display Backups created between: and the and: boxes, select the dates, and then click Filter.
To remove the filter, click Clear.
5. Browse through the backups to locate the one(s) that you are looking for.
Importing backups from tape
You can import only one backup from tape at a time. When you import a backup, Avamar extended retention retrieves it from tape, and places it on the Avamar server that is installed on the Media Access node.
Note: You must import backups from tape before you can use Avamar Administrator to restore them to a client as described in “Restoring imported backups to a client” on page 115.
For Avamar extended retention systems that are attached to a library that has only one drive, imports that are started while an export is in progress will fail due to drive contention.
To import a backup from tape:
1. Select a client in the Avamar Clients panel.
The backups for that client are displayed in the Backup panel.
2. In the Backup panel, locate the backup that you want to import.
3. Select the backup in the list, and click Import From Tape.
The message shown in the following figure appears.
4. Click OK.
112 EMC® Avamar® 6.1 Extended Retention User Guide
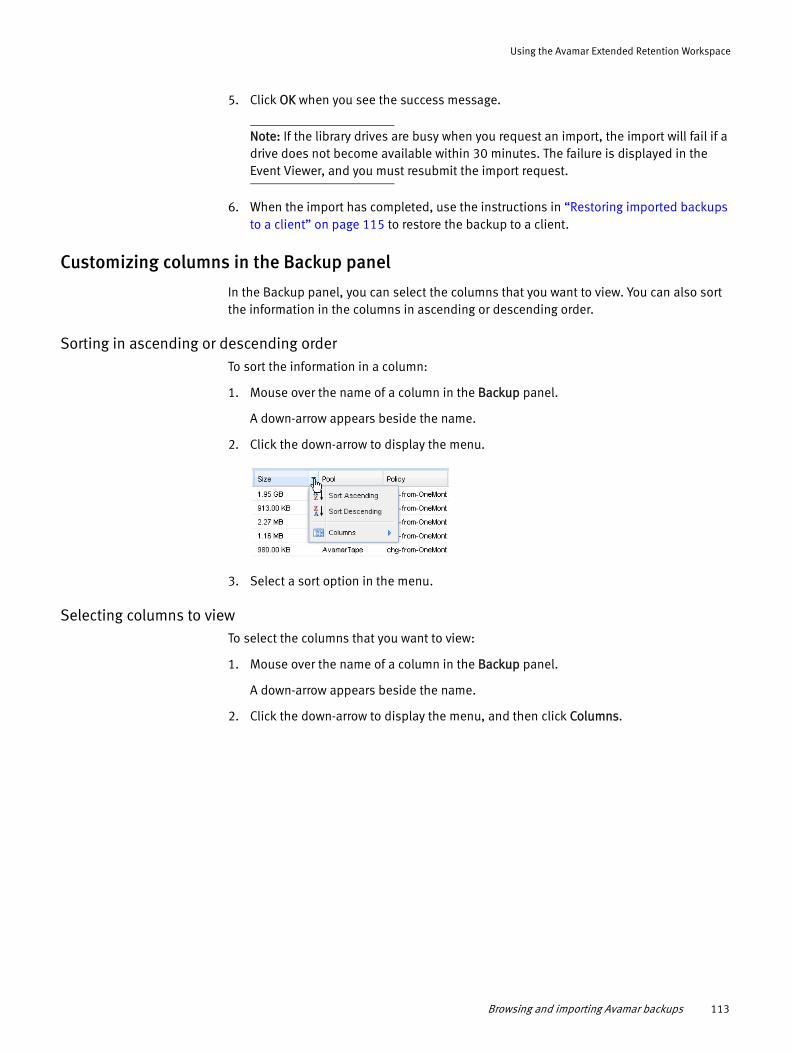
Using the Avamar Extended Retention Workspace
5. Click OK when you see the success message.
Note: If the library drives are busy when you request an import, the import will fail if a drive does not become available within 30 minutes. The failure is displayed in the Event Viewer, and you must resubmit the import request.
6. When the import has completed, use the instructions in “Restoring imported backups to a client” on page 115 to restore the backup to a client.
Customizing columns in the Backup panel
In the Backup panel, you can select the columns that you want to view. You can also sort the information in the columns in ascending or descending order.
Sorting in ascending or descending orderTo sort the information in a column:
1. Mouse over the name of a column in the Backup panel.
A down-arrow appears beside the name.
2. Click the down-arrow to display the menu.
3. Select a sort option in the menu.
Selecting columns to viewTo select the columns that you want to view:
1. Mouse over the name of a column in the Backup panel.
A down-arrow appears beside the name.
2. Click the down-arrow to display the menu, and then click Columns.
Browsing and importing Avamar backups 113
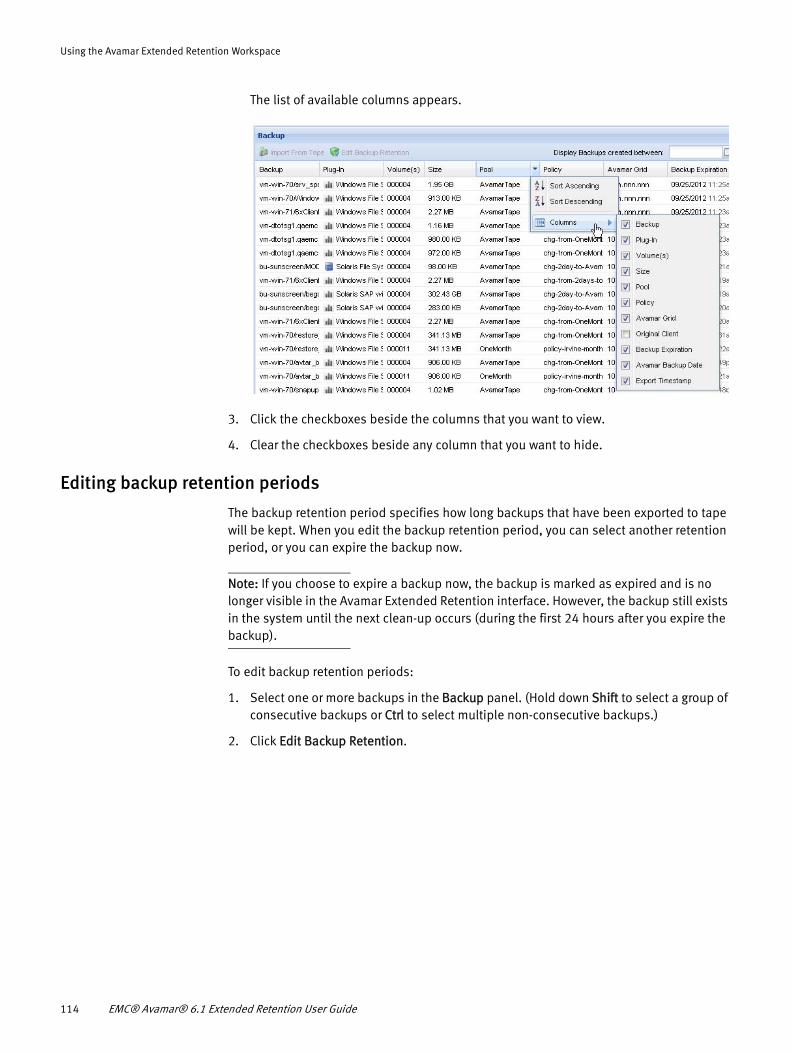
Using the Avamar Extended Retention Workspace
The list of available columns appears.
3. Click the checkboxes beside the columns that you want to view.
4. Clear the checkboxes beside any column that you want to hide.
Editing backup retention periods
The backup retention period specifies how long backups that have been exported to tape will be kept. When you edit the backup retention period, you can select another retention period, or you can expire the backup now.
Note: If you choose to expire a backup now, the backup is marked as expired and is no longer visible in the Avamar Extended Retention interface. However, the backup still exists in the system until the next clean-up occurs (during the first 24 hours after you expire the backup).
To edit backup retention periods:
1. Select one or more backups in the Backup panel. (Hold down Shift to select a group of consecutive backups or Ctrl to select multiple non-consecutive backups.)
2. Click Edit Backup Retention.
114 EMC® Avamar® 6.1 Extended Retention User Guide
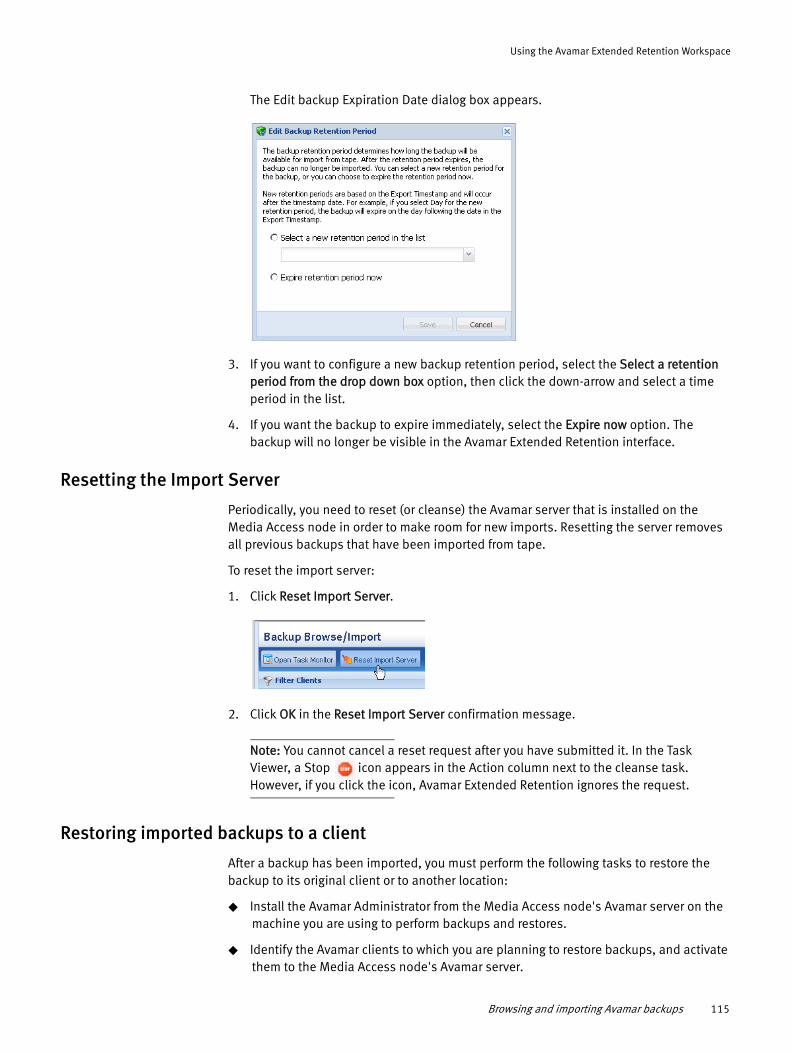
Using the Avamar Extended Retention Workspace
The Edit backup Expiration Date dialog box appears.
3. If you want to configure a new backup retention period, select the Select a retention period from the drop down box option, then click the down-arrow and select a time period in the list.
4. If you want the backup to expire immediately, select the Expire now option. The backup will no longer be visible in the Avamar Extended Retention interface.
Resetting the Import Server
Periodically, you need to reset (or cleanse) the Avamar server that is installed on the Media Access node in order to make room for new imports. Resetting the server removes all previous backups that have been imported from tape.
To reset the import server:
1. Click Reset Import Server.
2. Click OK in the Reset Import Server confirmation message.
Note: You cannot cancel a reset request after you have submitted it. In the Task Viewer, a Stop icon appears in the Action column next to the cleanse task. However, if you click the icon, Avamar Extended Retention ignores the request.
Restoring imported backups to a client
After a backup has been imported, you must perform the following tasks to restore the backup to its original client or to another location:
◆ Install the Avamar Administrator from the Media Access node's Avamar server on the machine you are using to perform backups and restores.
◆ Identify the Avamar clients to which you are planning to restore backups, and activate them to the Media Access node's Avamar server.
Browsing and importing Avamar backups 115
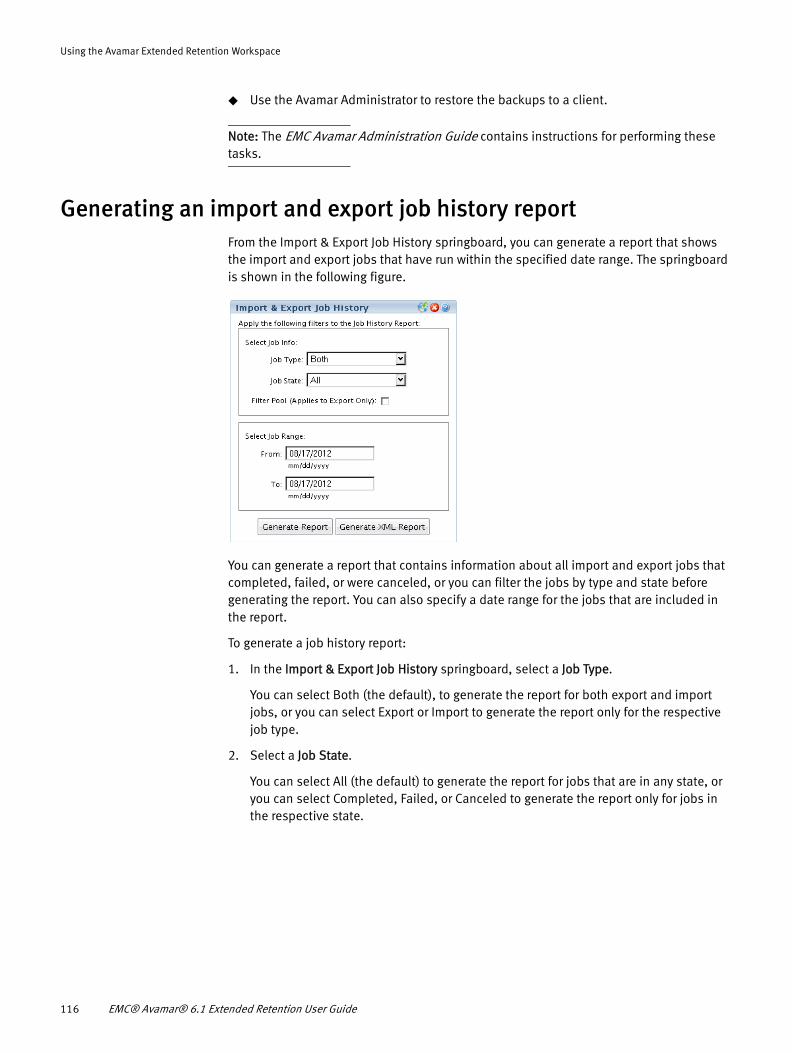
Using the Avamar Extended Retention Workspace
◆ Use the Avamar Administrator to restore the backups to a client.
Note: The EMC Avamar Administration Guide contains instructions for performing these tasks.
Generating an import and export job history reportFrom the Import & Export Job History springboard, you can generate a report that shows the import and export jobs that have run within the specified date range. The springboard is shown in the following figure.
You can generate a report that contains information about all import and export jobs that completed, failed, or were canceled, or you can filter the jobs by type and state before generating the report. You can also specify a date range for the jobs that are included in the report.
To generate a job history report:
1. In the Import & Export Job History springboard, select a Job Type.
You can select Both (the default), to generate the report for both export and import jobs, or you can select Export or Import to generate the report only for the respective job type.
2. Select a Job State.
You can select All (the default) to generate the report for jobs that are in any state, or you can select Completed, Failed, or Canceled to generate the report only for jobs in the respective state.
116 EMC® Avamar® 6.1 Extended Retention User Guide
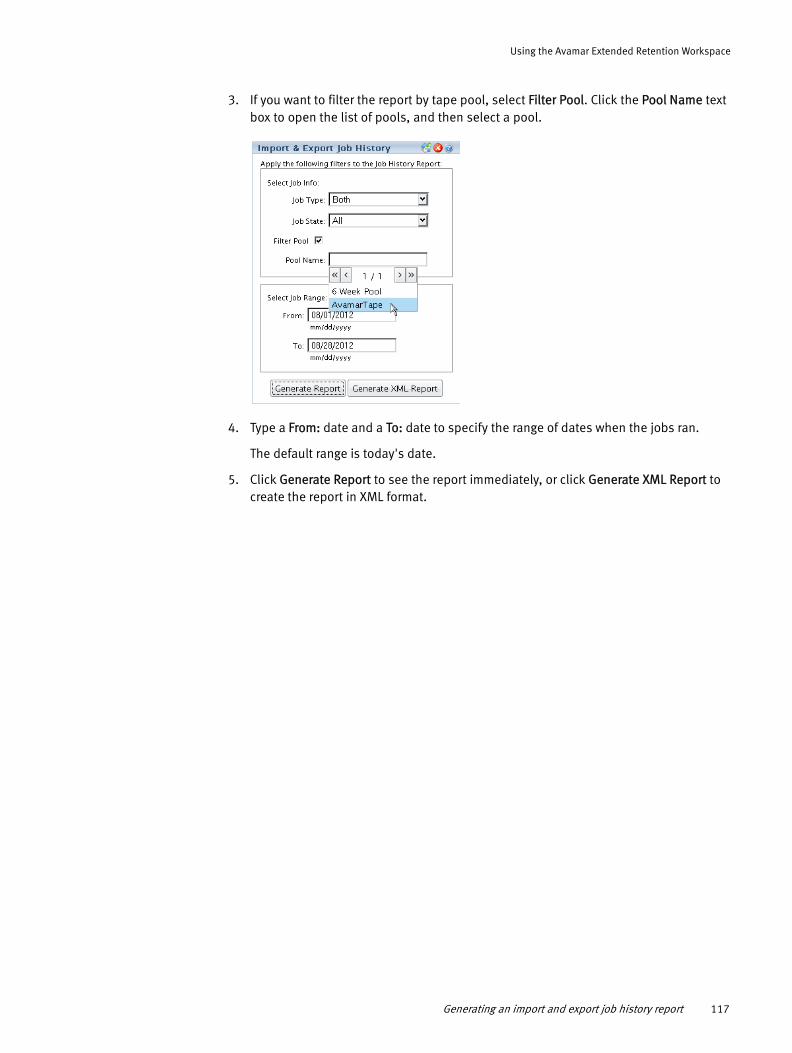
Using the Avamar Extended Retention Workspace
3. If you want to filter the report by tape pool, select Filter Pool. Click the Pool Name text box to open the list of pools, and then select a pool.
4. Type a From: date and a To: date to specify the range of dates when the jobs ran.
The default range is today's date.
5. Click Generate Report to see the report immediately, or click Generate XML Report to create the report in XML format.
Generating an import and export job history report 117
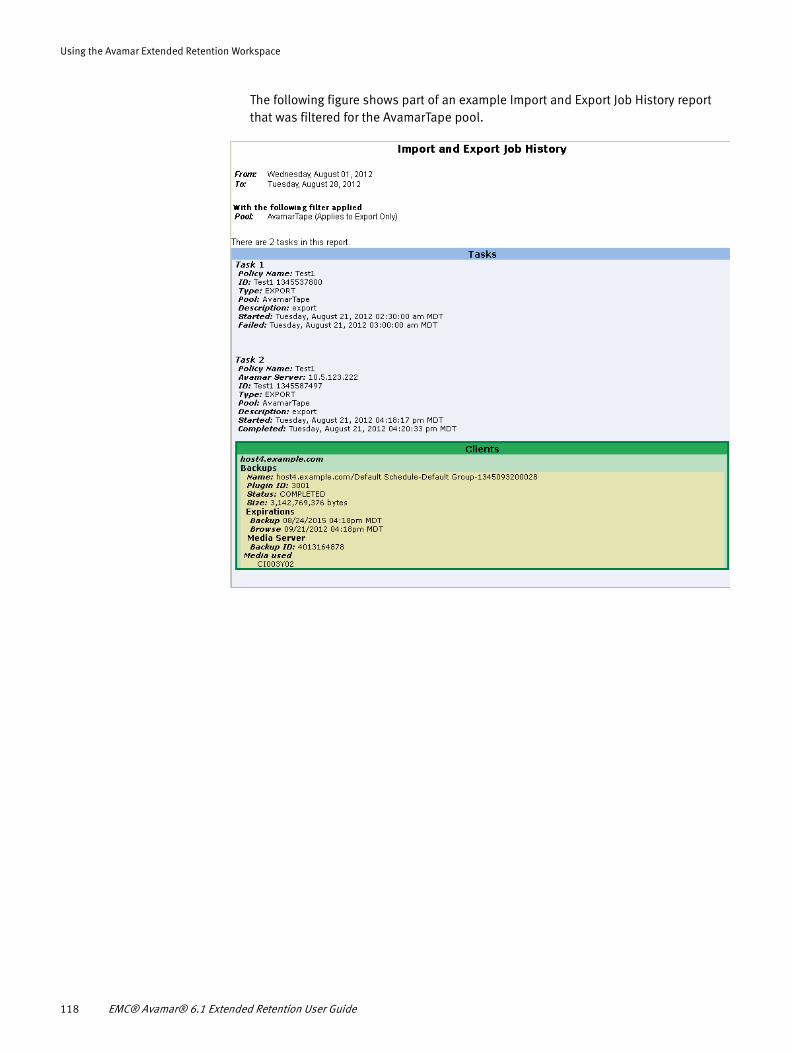
Using the Avamar Extended Retention Workspace
The following figure shows part of an example Import and Export Job History report that was filtered for the AvamarTape pool.
118 EMC® Avamar® 6.1 Extended Retention User Guide
CHAPTER 5Administration
The following topics describe the administrative tasks that you can perform for Avamar Extended Retention:
◆ Customizing drop-down text in the login dialog box............................................... 120◆ Configuring SNMP traps ........................................................................................ 121◆ Configuring the system to use an ACSLS library ..................................................... 128◆ Viewing current software versions ......................................................................... 131◆ Shutting down the Media Access node .................................................................. 131
This chapter is new and contains some new features that were developed for the 6.1 Service Pack 1 release of Avamar Extended Retention. These features, SNMP trap configuration and ACSLS library configuration, are only available with Service Pack 1.
If you are using version 6.1, which does not include the new features, please use the Online Help for the definitive set of instructions for that version of Avamar Extended Retention.
Administration 119
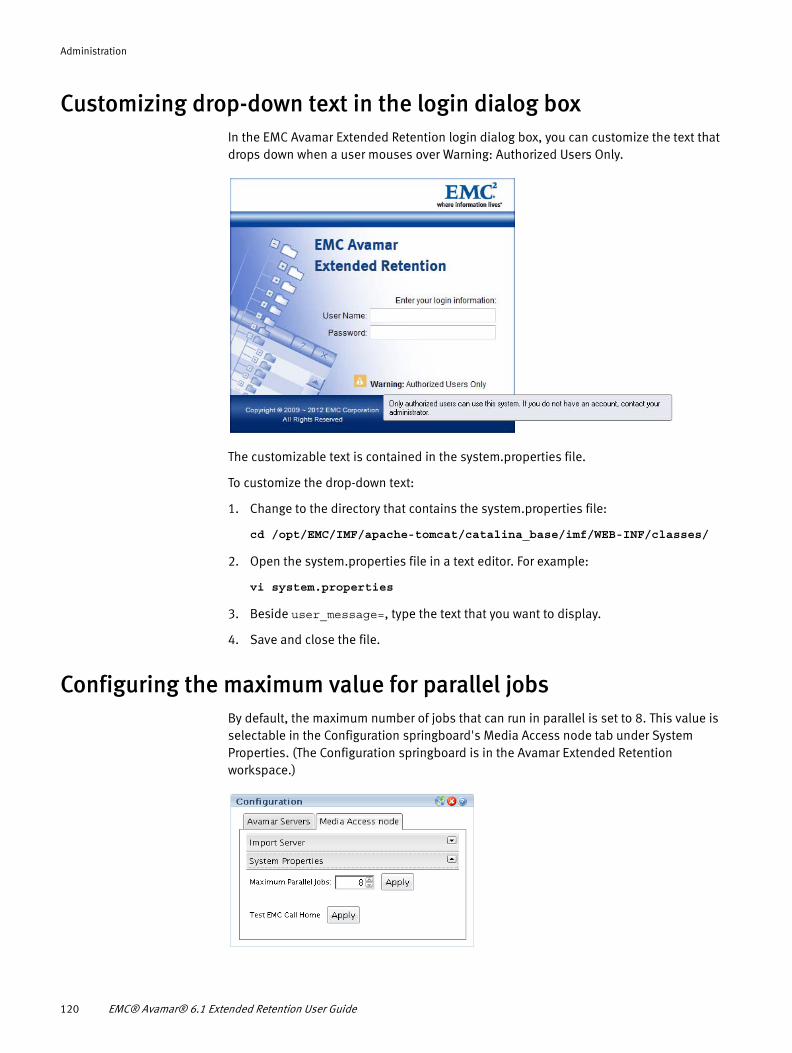
Administration
Customizing drop-down text in the login dialog boxIn the EMC Avamar Extended Retention login dialog box, you can customize the text that drops down when a user mouses over Warning: Authorized Users Only.
The customizable text is contained in the system.properties file.
To customize the drop-down text:
1. Change to the directory that contains the system.properties file:
cd /opt/EMC/IMF/apache-tomcat/catalina_base/imf/WEB-INF/classes/
2. Open the system.properties file in a text editor. For example:
vi system.properties
3. Beside user_message=, type the text that you want to display.
4. Save and close the file.
Configuring the maximum value for parallel jobsBy default, the maximum number of jobs that can run in parallel is set to 8. This value is selectable in the Configuration springboard's Media Access node tab under System Properties. (The Configuration springboard is in the Avamar Extended Retention workspace.)
120 EMC® Avamar® 6.1 Extended Retention User Guide
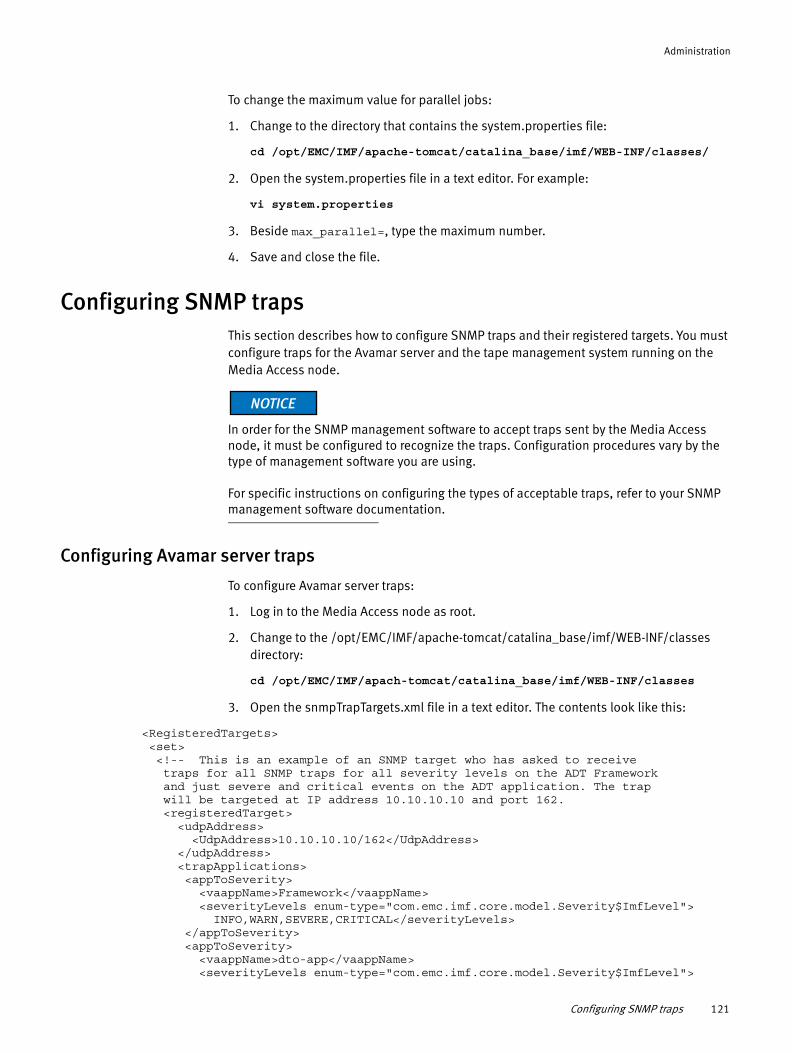
Administration
To change the maximum value for parallel jobs:
1. Change to the directory that contains the system.properties file:
cd /opt/EMC/IMF/apache-tomcat/catalina_base/imf/WEB-INF/classes/
2. Open the system.properties file in a text editor. For example:
vi system.properties
3. Beside max_parallel=, type the maximum number.
4. Save and close the file.
Configuring SNMP trapsThis section describes how to configure SNMP traps and their registered targets. You must configure traps for the Avamar server and the tape management system running on the Media Access node.
In order for the SNMP management software to accept traps sent by the Media Access node, it must be configured to recognize the traps. Configuration procedures vary by the type of management software you are using.
For specific instructions on configuring the types of acceptable traps, refer to your SNMP management software documentation.
Configuring Avamar server traps
To configure Avamar server traps:
1. Log in to the Media Access node as root.
2. Change to the /opt/EMC/IMF/apache-tomcat/catalina_base/imf/WEB-INF/classes directory:
cd /opt/EMC/IMF/apach-tomcat/catalina_base/imf/WEB-INF/classes
3. Open the snmpTrapTargets.xml file in a text editor. The contents look like this:
<RegisteredTargets> <set> <!-- This is an example of an SNMP target who has asked to receive traps for all SNMP traps for all severity levels on the ADT Framework and just severe and critical events on the ADT application. The trap will be targeted at IP address 10.10.10.10 and port 162. <registeredTarget> <udpAddress> <UdpAddress>10.10.10.10/162</UdpAddress> </udpAddress> <trapApplications> <appToSeverity> <vaappName>Framework</vaappName> <severityLevels enum-type="com.emc.imf.core.model.Severity$ImfLevel"> INFO,WARN,SEVERE,CRITICAL</severityLevels> </appToSeverity> <appToSeverity> <vaappName>dto-app</vaappName> <severityLevels enum-type="com.emc.imf.core.model.Severity$ImfLevel">
Configuring SNMP traps 121
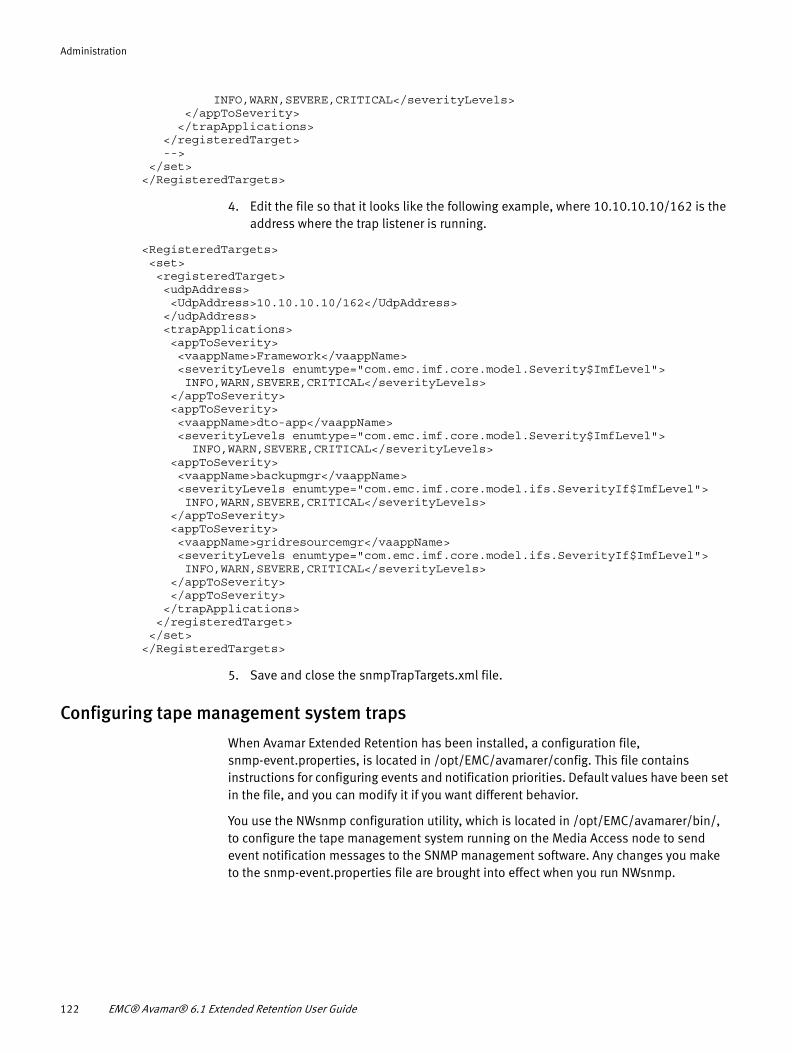
Administration
INFO,WARN,SEVERE,CRITICAL</severityLevels> </appToSeverity> </trapApplications> </registeredTarget> --> </set></RegisteredTargets>
4. Edit the file so that it looks like the following example, where 10.10.10.10/162 is the address where the trap listener is running.
<RegisteredTargets> <set> <registeredTarget> <udpAddress> <UdpAddress>10.10.10.10/162</UdpAddress> </udpAddress> <trapApplications> <appToSeverity> <vaappName>Framework</vaappName> <severityLevels enumtype="com.emc.imf.core.model.Severity$ImfLevel"> INFO,WARN,SEVERE,CRITICAL</severityLevels> </appToSeverity> <appToSeverity> <vaappName>dto-app</vaappName> <severityLevels enumtype="com.emc.imf.core.model.Severity$ImfLevel"> INFO,WARN,SEVERE,CRITICAL</severityLevels> <appToSeverity> <vaappName>backupmgr</vaappName> <severityLevels enumtype="com.emc.imf.core.model.ifs.SeverityIf$ImfLevel"> INFO,WARN,SEVERE,CRITICAL</severityLevels> </appToSeverity> <appToSeverity> <vaappName>gridresourcemgr</vaappName> <severityLevels enumtype="com.emc.imf.core.model.ifs.SeverityIf$ImfLevel"> INFO,WARN,SEVERE,CRITICAL</severityLevels> </appToSeverity> </appToSeverity> </trapApplications> </registeredTarget> </set></RegisteredTargets>
5. Save and close the snmpTrapTargets.xml file.
Configuring tape management system traps
When Avamar Extended Retention has been installed, a configuration file, snmp-event.properties, is located in /opt/EMC/avamarer/config. This file contains instructions for configuring events and notification priorities. Default values have been set in the file, and you can modify it if you want different behavior.
You use the NWsnmp configuration utility, which is located in /opt/EMC/avamarer/bin/, to configure the tape management system running on the Media Access node to send event notification messages to the SNMP management software. Any changes you make to the snmp-event.properties file are brought into effect when you run NWsnmp.
122 EMC® Avamar® 6.1 Extended Retention User Guide
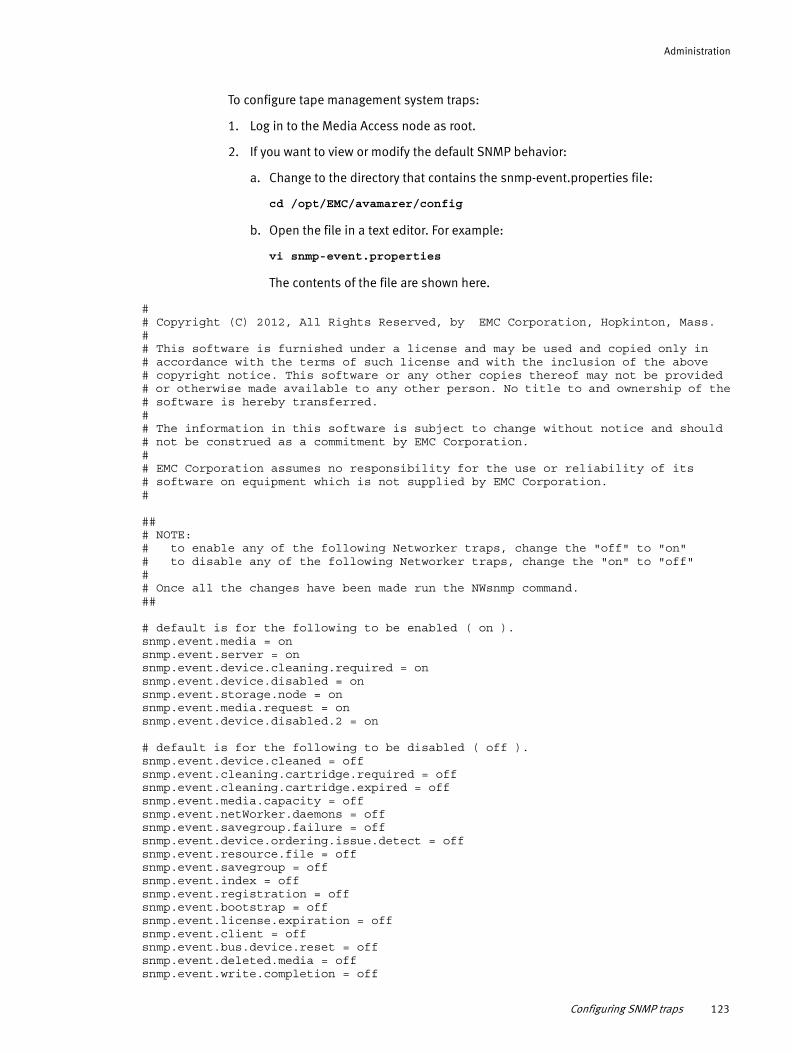
Administration
To configure tape management system traps:
1. Log in to the Media Access node as root.
2. If you want to view or modify the default SNMP behavior:
a. Change to the directory that contains the snmp-event.properties file:
cd /opt/EMC/avamarer/config
b. Open the file in a text editor. For example:
vi snmp-event.properties
The contents of the file are shown here.
## Copyright (C) 2012, All Rights Reserved, by EMC Corporation, Hopkinton, Mass.## This software is furnished under a license and may be used and copied only in# accordance with the terms of such license and with the inclusion of the above# copyright notice. This software or any other copies thereof may not be provided# or otherwise made available to any other person. No title to and ownership of the# software is hereby transferred.## The information in this software is subject to change without notice and should# not be construed as a commitment by EMC Corporation.## EMC Corporation assumes no responsibility for the use or reliability of its# software on equipment which is not supplied by EMC Corporation.#
### NOTE:# to enable any of the following Networker traps, change the "off" to "on"# to disable any of the following Networker traps, change the "on" to "off"## Once all the changes have been made run the NWsnmp command.##
# default is for the following to be enabled ( on ).snmp.event.media = onsnmp.event.server = onsnmp.event.device.cleaning.required = onsnmp.event.device.disabled = onsnmp.event.storage.node = onsnmp.event.media.request = onsnmp.event.device.disabled.2 = on
# default is for the following to be disabled ( off ).snmp.event.device.cleaned = offsnmp.event.cleaning.cartridge.required = offsnmp.event.cleaning.cartridge.expired = offsnmp.event.media.capacity = offsnmp.event.netWorker.daemons = offsnmp.event.savegroup.failure = offsnmp.event.device.ordering.issue.detect = offsnmp.event.resource.file = offsnmp.event.savegroup = offsnmp.event.index = offsnmp.event.registration = offsnmp.event.bootstrap = offsnmp.event.license.expiration = offsnmp.event.client = offsnmp.event.bus.device.reset = offsnmp.event.deleted.media = offsnmp.event.write.completion = off
Configuring SNMP traps 123
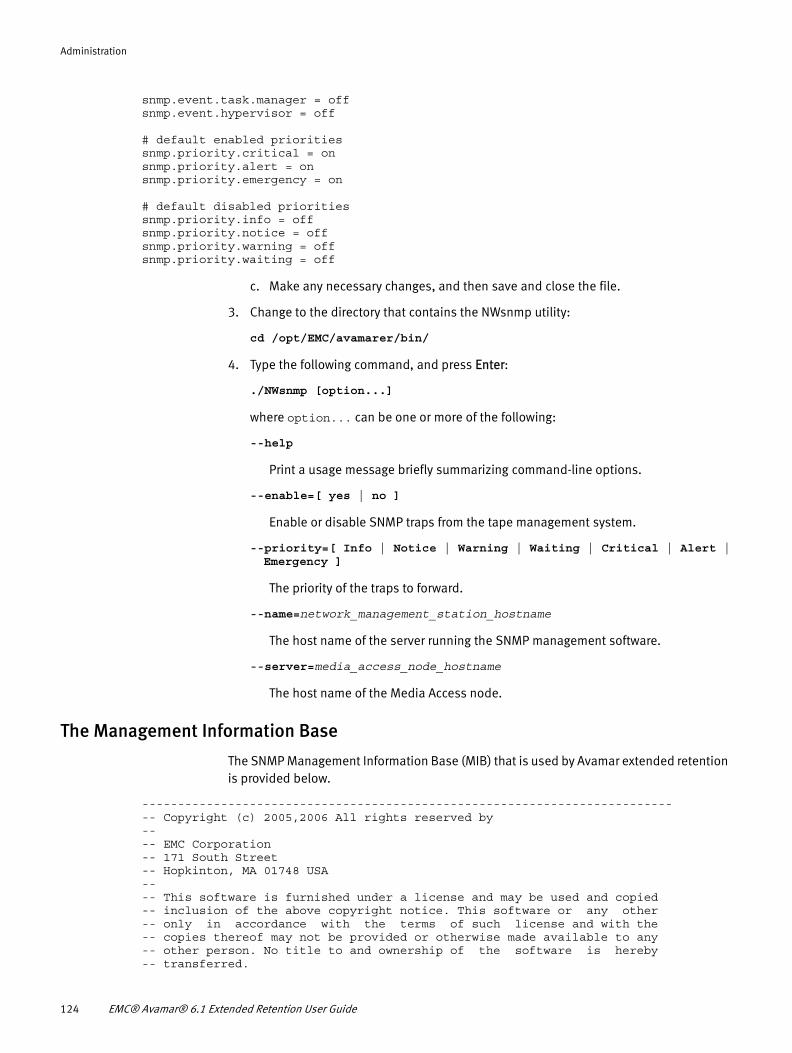
Administration
snmp.event.task.manager = offsnmp.event.hypervisor = off
# default enabled prioritiessnmp.priority.critical = onsnmp.priority.alert = onsnmp.priority.emergency = on
# default disabled prioritiessnmp.priority.info = offsnmp.priority.notice = offsnmp.priority.warning = offsnmp.priority.waiting = off
c. Make any necessary changes, and then save and close the file.
3. Change to the directory that contains the NWsnmp utility:
cd /opt/EMC/avamarer/bin/
4. Type the following command, and press Enter:
./NWsnmp [option...]
where option... can be one or more of the following:
--help
Print a usage message briefly summarizing command-line options.
--enable=[ yes | no ]
Enable or disable SNMP traps from the tape management system.
--priority=[ Info | Notice | Warning | Waiting | Critical | Alert | Emergency ]
The priority of the traps to forward.
--name=network_management_station_hostname
The host name of the server running the SNMP management software.
--server=media_access_node_hostname
The host name of the Media Access node.
The Management Information Base
The SNMP Management Information Base (MIB) that is used by Avamar extended retention is provided below.
---------------------------------------------------------------------------- Copyright (c) 2005,2006 All rights reserved by---- EMC Corporation-- 171 South Street-- Hopkinton, MA 01748 USA ---- This software is furnished under a license and may be used and copied-- inclusion of the above copyright notice. This software or any other-- only in accordance with the terms of such license and with the-- copies thereof may not be provided or otherwise made available to any-- other person. No title to and ownership of the software is hereby-- transferred.
124 EMC® Avamar® 6.1 Extended Retention User Guide

Administration
---- The information in this software is subject to change without notice-- and should not be construed as a commitment by EMC Corporation.---- EMC Corporation assumes no responsibility for the use or reliability-- of this software.------------------------------------------------------------------------------ -- Author Identification---- SMC Shannon J Moyes Clark, EMC------------------------------------------------------------------------------------ 000 SMC 02-18-2009 Created Original Model------------------------------------------------------------------------------
EMCIMF-MIB
DEFINITIONS ::= BEGIN
IMPORTS enterprises FROM RFC1155-SMI OBJECT-TYPE FROM RFC-1212 TRAP-TYPE FROM RFC-1215; DisplayString FROM RFC1213-MIB MODULE-IDENTITY FROM SNMPv2-SMI
-------------------------------------------------------------Textual conventions for this MIB emc OBJECT IDENTIFIER ::= { enterprises 1139 }
IMF OBJECT IDENTIFIER ::= { emc 20 }--------------------------------------------------------------Groups in IMF
event OBJECT IDENTIFIER ::= {IMF 1}
imfComponent OBJECT IDENTIFIER ::={IMF 2} imfSeverity OBJECT IDENTIFIER ::={IMF 3}
imfEventType OBJECT-TYPE SYNTAX DisplayString (SIZE (0..61)) ACCESS read-only STATUS mandatory DESCRIPTION "This is the textual value to define the event
type, as defined by all IMF Events. " ::= { event 1 }
eventTimestamp OBJECT-TYPE SYNTAX DisplayString (SIZE (0..100)) ACCESS read-only STATUS mandatory DESCRIPTION "Date event was reported" ::= { event 2 }
Configuring SNMP traps 125
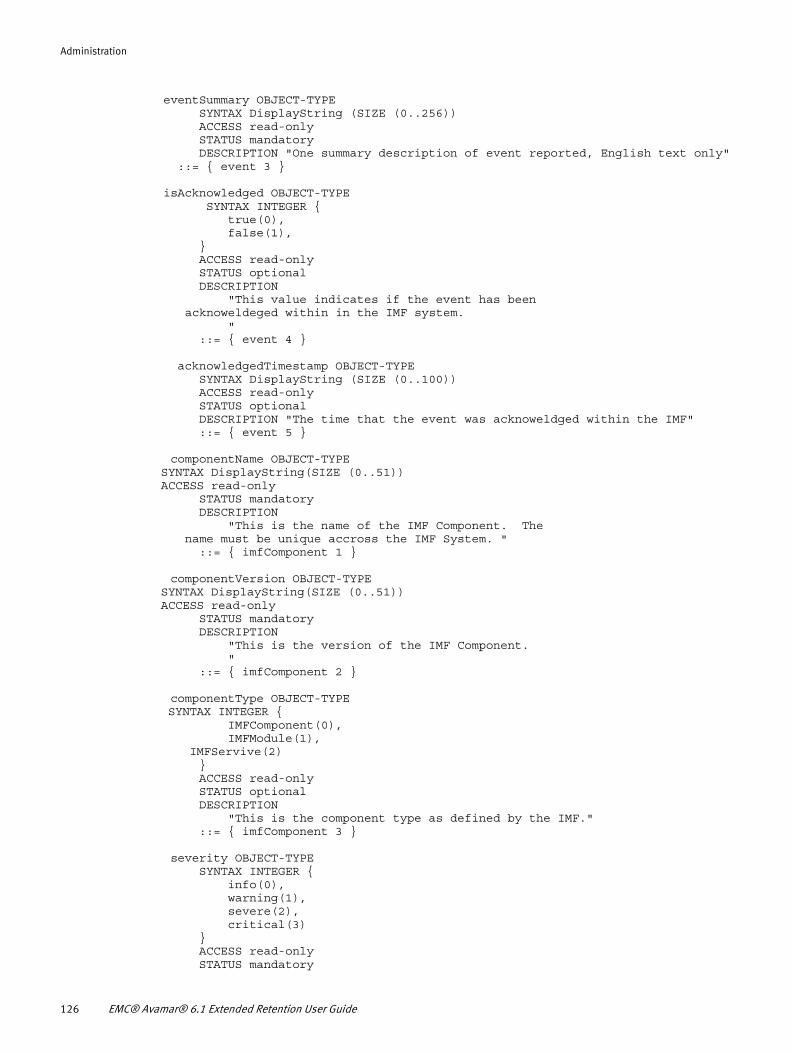
Administration
eventSummary OBJECT-TYPE SYNTAX DisplayString (SIZE (0..256)) ACCESS read-only STATUS mandatory DESCRIPTION "One summary description of event reported, English text only" ::= { event 3 }
isAcknowledged OBJECT-TYPE SYNTAX INTEGER { true(0), false(1), } ACCESS read-only STATUS optional DESCRIPTION "This value indicates if the event has been
acknoweldeged within in the IMF system. " ::= { event 4 }
acknowledgedTimestamp OBJECT-TYPE SYNTAX DisplayString (SIZE (0..100)) ACCESS read-only STATUS optional DESCRIPTION "The time that the event was acknoweldged within the IMF" ::= { event 5 }
componentName OBJECT-TYPESYNTAX DisplayString(SIZE (0..51))ACCESS read-only
STATUS mandatory DESCRIPTION "This is the name of the IMF Component. The
name must be unique accross the IMF System. " ::= { imfComponent 1 }
componentVersion OBJECT-TYPESYNTAX DisplayString(SIZE (0..51))ACCESS read-only
STATUS mandatory DESCRIPTION "This is the version of the IMF Component. " ::= { imfComponent 2 } componentType OBJECT-TYPE
SYNTAX INTEGER { IMFComponent(0), IMFModule(1),
IMFServive(2) } ACCESS read-only STATUS optional DESCRIPTION "This is the component type as defined by the IMF." ::= { imfComponent 3 }
severity OBJECT-TYPE SYNTAX INTEGER { info(0), warning(1), severe(2), critical(3) } ACCESS read-only STATUS mandatory
126 EMC® Avamar® 6.1 Extended Retention User Guide
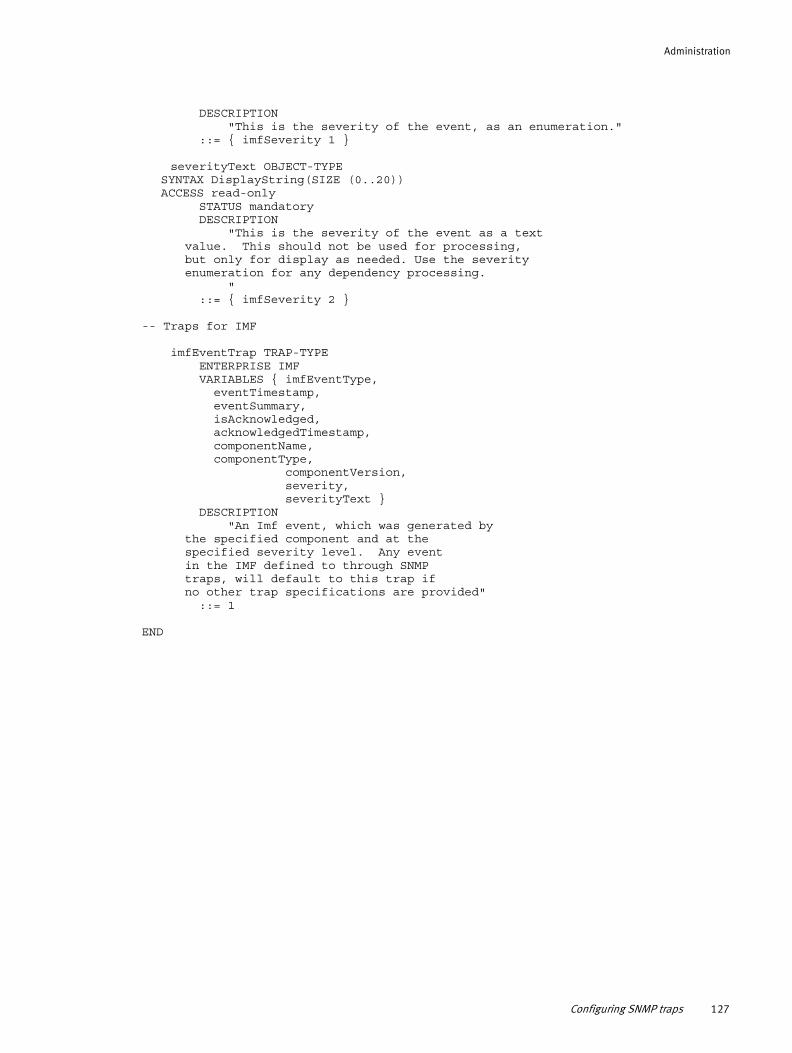
Administration
DESCRIPTION "This is the severity of the event, as an enumeration." ::= { imfSeverity 1 }
severityText OBJECT-TYPESYNTAX DisplayString(SIZE (0..20))ACCESS read-only
STATUS mandatory DESCRIPTION "This is the severity of the event as a text
value. This should not be used for processing, but only for display as needed. Use the severityenumeration for any dependency processing.
" ::= { imfSeverity 2 }
-- Traps for IMF
imfEventTrap TRAP-TYPE ENTERPRISE IMF VARIABLES { imfEventType,
eventTimestamp, eventSummary, isAcknowledged, acknowledgedTimestamp, componentName, componentType,
componentVersion, severity, severityText } DESCRIPTION "An Imf event, which was generated by
the specified component and at the specified severity level. Any eventin the IMF defined to through SNMP traps, will default to this trap ifno other trap specifications are provided"
::= 1
END
Configuring SNMP traps 127
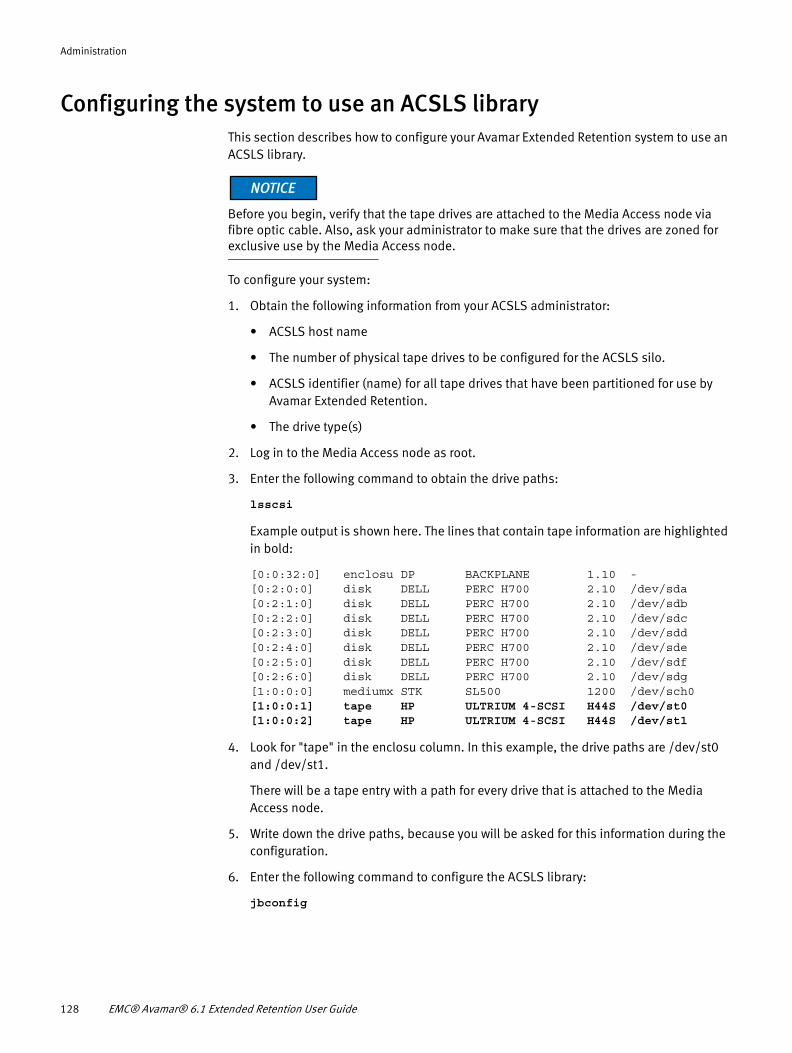
Administration
Configuring the system to use an ACSLS libraryThis section describes how to configure your Avamar Extended Retention system to use an ACSLS library.
Before you begin, verify that the tape drives are attached to the Media Access node via fibre optic cable. Also, ask your administrator to make sure that the drives are zoned for exclusive use by the Media Access node.
To configure your system:
1. Obtain the following information from your ACSLS administrator:
• ACSLS host name
• The number of physical tape drives to be configured for the ACSLS silo.
• ACSLS identifier (name) for all tape drives that have been partitioned for use by Avamar Extended Retention.
• The drive type(s)
2. Log in to the Media Access node as root.
3. Enter the following command to obtain the drive paths:
lsscsi
Example output is shown here. The lines that contain tape information are highlighted in bold:
[0:0:32:0] enclosu DP BACKPLANE 1.10 -[0:2:0:0] disk DELL PERC H700 2.10 /dev/sda[0:2:1:0] disk DELL PERC H700 2.10 /dev/sdb[0:2:2:0] disk DELL PERC H700 2.10 /dev/sdc[0:2:3:0] disk DELL PERC H700 2.10 /dev/sdd[0:2:4:0] disk DELL PERC H700 2.10 /dev/sde[0:2:5:0] disk DELL PERC H700 2.10 /dev/sdf[0:2:6:0] disk DELL PERC H700 2.10 /dev/sdg[1:0:0:0] mediumx STK SL500 1200 /dev/sch0[1:0:0:1] tape HP ULTRIUM 4-SCSI H44S /dev/st0[1:0:0:2] tape HP ULTRIUM 4-SCSI H44S /dev/st1
4. Look for "tape" in the enclosu column. In this example, the drive paths are /dev/st0 and /dev/st1.
There will be a tape entry with a path for every drive that is attached to the Media Access node.
5. Write down the drive paths, because you will be asked for this information during the configuration.
6. Enter the following command to configure the ACSLS library:
jbconfig
128 EMC® Avamar® 6.1 Extended Retention User Guide
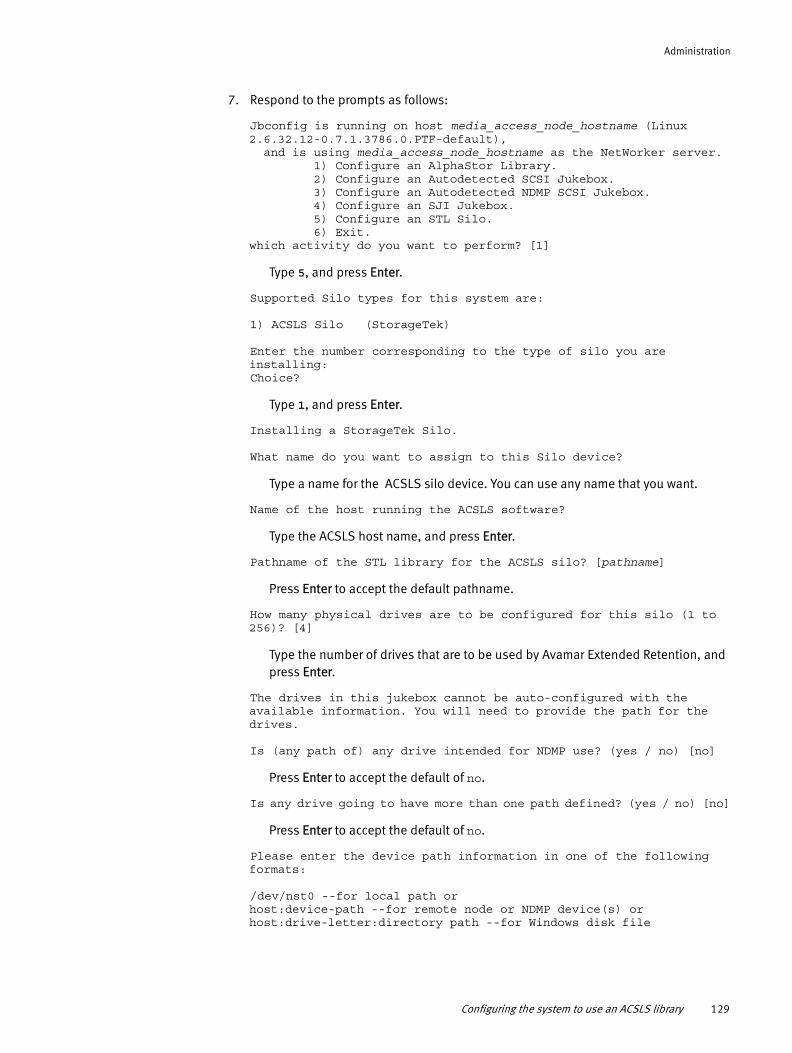
Administration
7. Respond to the prompts as follows:
Jbconfig is running on host media_access_node_hostname (Linux 2.6.32.12-0.7.1.3786.0.PTF-default), and is using media_access_node_hostname as the NetWorker server. 1) Configure an AlphaStor Library. 2) Configure an Autodetected SCSI Jukebox. 3) Configure an Autodetected NDMP SCSI Jukebox. 4) Configure an SJI Jukebox. 5) Configure an STL Silo. 6) Exit.which activity do you want to perform? [1]
Type 5, and press Enter.
Supported Silo types for this system are:
1) ACSLS Silo (StorageTek)
Enter the number corresponding to the type of silo you are installing:Choice?
Type 1, and press Enter.
Installing a StorageTek Silo.
What name do you want to assign to this Silo device?
Type a name for the ACSLS silo device. You can use any name that you want.
Name of the host running the ACSLS software?
Type the ACSLS host name, and press Enter.
Pathname of the STL library for the ACSLS silo? [pathname]
Press Enter to accept the default pathname.
How many physical drives are to be configured for this silo (1 to 256)? [4]
Type the number of drives that are to be used by Avamar Extended Retention, and press Enter.
The drives in this jukebox cannot be auto-configured with the available information. You will need to provide the path for the drives.
Is (any path of) any drive intended for NDMP use? (yes / no) [no]
Press Enter to accept the default of no.
Is any drive going to have more than one path defined? (yes / no) [no]
Press Enter to accept the default of no.
Please enter the device path information in one of the following formats:
/dev/nst0 --for local path orhost:device-path --for remote node or NDMP device(s) orhost:drive-letter:directory path --for Windows disk file
Configuring the system to use an ACSLS library 129
Administration
For every device we configure, we're going to need the silo name as well as the path name(s). When you are done entering the system paths for a silo device, we will ask for the corresponding silo name. An example of the name we need for this type of silo is: 1,0,1,0
Drive 1, element 1
Drive path ?
Type the drive path, and press Enter.
Corresponding silo name value ?
Type the drive identifier given to you by the ACSLS administrator, and press Enter.
Please choose a model from the following types
A list of drive types is displayed. Locate the drive type in the list.
Enter the drive type of drive 1?
Type the number corresponding to the drive in the list, and press Enter.
Jukebox has been added successfully
The following configuration options have been set:
> Silo software managed tape autocleaning on. > Barcode reading to on because this is a silo. > Volume labels that match the barcodes.
You can review and change the characteristics of the autochanger and its associated devices using the NetWorker Management Console.
Would you like to configure another jukebox? (yes/no) [no]
Press Enter to accept the default of no.
8. Open the /etc/init.d/networker script in a text editor; for example:
vi /etc/init.d/networker
9. Add the following lines above the start session:
export CSI_HOSTNAME='<acsls_hostname>'export SSI_HOSTNAME='<media_access_node_hostname>'
10. Add the following lines to the start session:
if [ -f /usr/sbin/ssi ]; then /usr/sbin/ssi > /nsr/logs/ssi.log 2>&1 & (echo ' ssi') > /dev/consolefiif [ -f /usr/sbin/mini_el ]; then /usr/sbin/mini_el -l /nsr/logs/mini_el.log 2>&1 & (echo ' mini_el') > /dev/consolefi
11. Add to the following lines to the stop session.
if [ -f /usr/sbin/ssi ]; then /usr/bin/pkill -9 ssi (echo ' ssi') > /dev/consolefi
130 EMC® Avamar® 6.1 Extended Retention User Guide
Administration
if [ -f /usr/sbin/mini_el ]; then /usr/bin/pkill -9 mini_el (echo ' mini_el') > /dev/consolefi
12. Save and close the networker script.
13. Restart the tape library management system by entering the following commands:
service networker stopservice networker start
14. Verify that the ACSLS library is ready to access commands:
nsrjb -C -j <acsls_name>
where acsls_name is the name of the silo device.
15. Look for the following message:
Jukebox acsls_name: (Ready to accept commands)
Note: It may take several minutes for the device to become "ready."
16. Allocate media to the ACSLS device using the following command:
nsrjb -a -j <acsls_name> -s <media_access_node_hostname> -T <media_identifier>
Viewing current software versionsTo view the current versions of all Avamar extended retention-related software:
1. Log in to the Media Access node as root.
2. Type the following command, and press Enter:
/opt/EMC/avamarer/bin/AERVersion
Version information is displayed.
Shutting down the Media Access nodeIf you need to shut down the Media Access node for any reason, you need to stop Avamar extended retention and the internal Avamar server instance first.
To stop Avamar extended retention and Avamar:
1. Log in to the Media Access node as root.
2. Stop Avamar extended retention by typing:
/opt/EMC/avamarer/bin/aerctl stop
3. Stop Avamar by typing:
/opt/EMC/avamarer/bin/dpnctl stop
4. Shut down the Media Access node.
Viewing current software versions 131

Administration
132 EMC® Avamar® 6.1 Extended Retention User Guide
CHAPTER 6Disaster Recovery
The following topics describe how to create a disaster recovery image and how to recover the Avamar extended retention server in the event of a disaster:
◆ Definition of a disaster .......................................................................................... 134◆ Creating a disaster recovery image ........................................................................ 134◆ Recovering the Avamar extended retention server ................................................. 135
Disaster Recovery 133
Disaster Recovery
Definition of a disasterA disaster is any situation in which the day-to-day access to data (for example, working files, software programs, or system files) is disrupted. A disaster also can damage network components, such as data, devices, hardware, media, and software.
A disaster can result from these situations:
◆ Hardware and software failures
◆ Infrastructure interruptions, inconsistencies, or loss of services, such as communication or network connections
The degree of loss during a disaster can range from one or more files to an entire computer system. The severity of the disaster determines the procedures necessary to recover data.
Creating a disaster recovery imageThis section describes how to create a disaster recovery image, which can be used to recover the Avamar extended retention server in the event of a disaster.
IMPORTANT
You should create a cron job to perform this procedure on a regular basis so that you always have a recent recovery image in case you need it.
To create a disaster recovery image:
1. Log in to the Media Access node as root.
2. Change to the disaster recovery directory:
cd /opt/EMC/avamarer/bin/
3. Enter the following command to create the recovery image:
./avamar-er-dr --export --pass=<postgres_super_user_password>
A zip file containing the recovery image is created in the /opt/EMC/snapshot directory. The file is named using the following format:
[mmddyyyy-hhmmss]-avamar-er-dr-[Avamar-ER-Version#]-Snapshot.zip
For example:
12212011-115415-avamar-er-dr-1.0.0.0-Snapshot.zip
The example file was created December 21, 2011 at 11:54:15 am.
4. Copy this file to another system for safekeeping.
134 EMC® Avamar® 6.1 Extended Retention User Guide
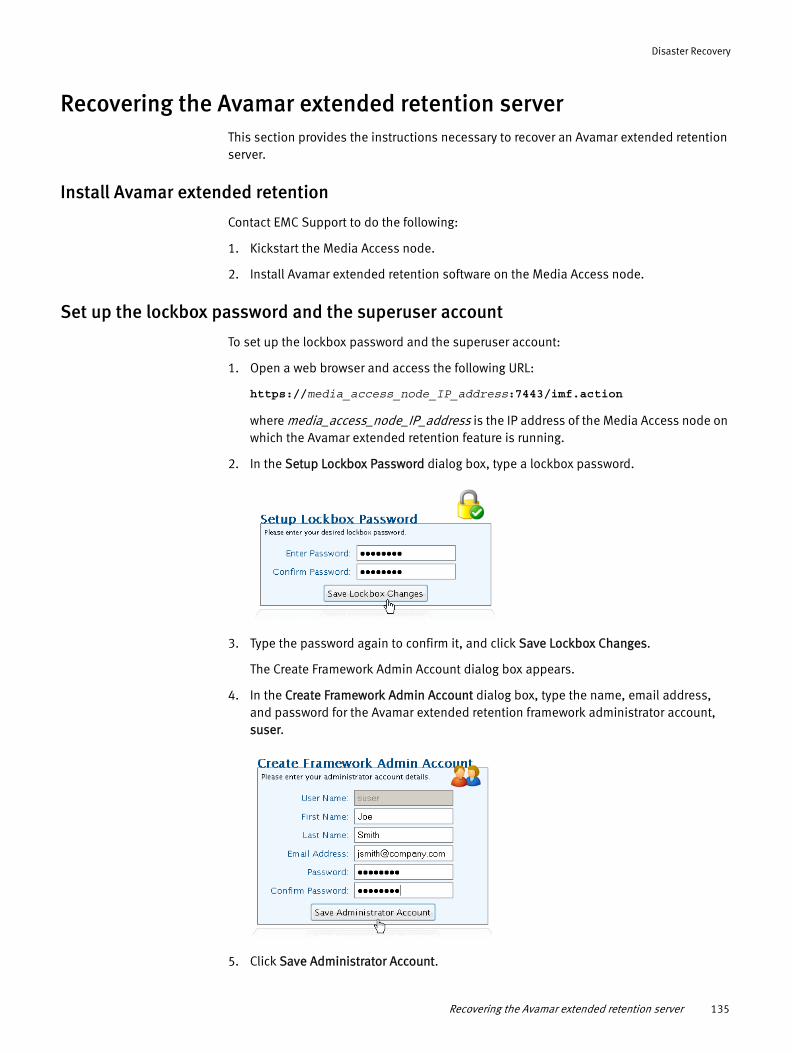
Disaster Recovery
Recovering the Avamar extended retention serverThis section provides the instructions necessary to recover an Avamar extended retention server.
Install Avamar extended retention
Contact EMC Support to do the following:
1. Kickstart the Media Access node.
2. Install Avamar extended retention software on the Media Access node.
Set up the lockbox password and the superuser account
To set up the lockbox password and the superuser account:
1. Open a web browser and access the following URL:
https://media_access_node_IP_address:7443/imf.action
where media_access_node_IP_address is the IP address of the Media Access node on which the Avamar extended retention feature is running.
2. In the Setup Lockbox Password dialog box, type a lockbox password.
3. Type the password again to confirm it, and click Save Lockbox Changes.
The Create Framework Admin Account dialog box appears.
4. In the Create Framework Admin Account dialog box, type the name, email address, and password for the Avamar extended retention framework administrator account, suser.
5. Click Save Administrator Account.
Recovering the Avamar extended retention server 135
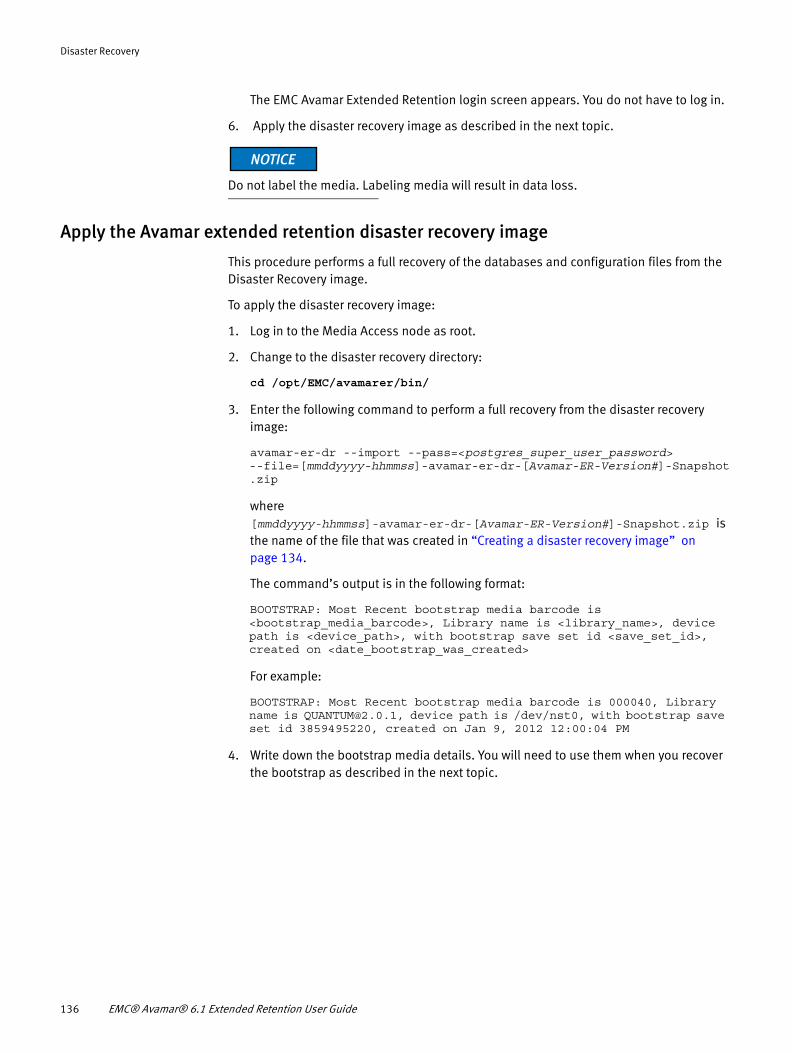
Disaster Recovery
The EMC Avamar Extended Retention login screen appears. You do not have to log in.
6. Apply the disaster recovery image as described in the next topic.
Do not label the media. Labeling media will result in data loss.
Apply the Avamar extended retention disaster recovery image
This procedure performs a full recovery of the databases and configuration files from the Disaster Recovery image.
To apply the disaster recovery image:
1. Log in to the Media Access node as root.
2. Change to the disaster recovery directory:
cd /opt/EMC/avamarer/bin/
3. Enter the following command to perform a full recovery from the disaster recovery image:
avamar-er-dr --import --pass=<postgres_super_user_password> --file=[mmddyyyy-hhmmss]-avamar-er-dr-[Avamar-ER-Version#]-Snapshot.zip
where [mmddyyyy-hhmmss]-avamar-er-dr-[Avamar-ER-Version#]-Snapshot.zip is the name of the file that was created in “Creating a disaster recovery image” on page 134.
The command’s output is in the following format:
BOOTSTRAP: Most Recent bootstrap media barcode is <bootstrap_media_barcode>, Library name is <library_name>, device path is <device_path>, with bootstrap save set id <save_set_id>, created on <date_bootstrap_was_created>
For example:
BOOTSTRAP: Most Recent bootstrap media barcode is 000040, Library name is [email protected], device path is /dev/nst0, with bootstrap save set id 3859495220, created on Jan 9, 2012 12:00:04 PM
4. Write down the bootstrap media details. You will need to use them when you recover the bootstrap as described in the next topic.
136 EMC® Avamar® 6.1 Extended Retention User Guide
Disaster Recovery
Recover the bootstrap
Recovering the bootstrap overwrites the media database and recovers the resource files. For this task, use the bootstrap media details that you captured in the previous task to recover the bootstrap.
To recover the bootstrap:
1. Mount the bootstrap media using the following command:
/usr/sbin/nsrjb -l -r -v -n -f <device_path> -T <bootstrap_media_barcode>
where device_path is the path name for the drive in which the bootstrap media will be loaded, and bootstrap_media_barcode is the media identifier.
2. Enter the following command to scan and recover the bootstrap media.
/usr/sbin/scanner -i -v <device_path>
where device_path is the path name for the drive in which the bootstrap volume is loaded.
3. Enter the following command to recover the database and resource files:
mmrecov
If the server has devices configured and enabled, the following prompt appears.
What is the name of the device you plan on using [device_path]?
where device_path is the path name for the drive in which the bootstrap media is loaded.
4. At the following prompt, enter the save set ID that was displayed when you applied the disaster recovery image in the previous topic.
Enter the latest bootstrap save set ID []:
5. At the following prompt, press Enter to accept the default.
Enter starting file number (if known) [0]:
6. At the following prompt, press Enter to accept the default.
Enter starting record number (if known) [0]:
7. Stop Networker by typing:
service networker stop
8. Rename the res directory for the current installation by typing:
mv /nsr/res /nsr/res.orig
9. Rename the recovered res folder by typing:
mv /nsr/res.R /nsr/res
10. Restart Networker by typing:
service networker start
Recovering the Avamar extended retention server 137

Disaster Recovery
11. Enter the following command:
nsrck
Example output is shown below:
nsrck: checking index for 'host1.domain.com'nsrck: /DTO/nsr/index/host1.domain.com contains 13275 records occupying 3998 KBnsrck: checking index for 'host2.domain.com'nsrck: /DTO/nsr/index/host2.domain.com contains 0 records occupying 0 KBnsrck: Completed checking 2 client(s)
12. Verify that the export backups exist by typing:
mminfo -av
Example output is shown below:
volume type client date time size ssid fl lvl name000039 LTO Ultrium-5 FQND 01/03/12 10:38:02 1734 MB 4228070705 cr manual DTO-1315425730@A4:BA000039 LTO Ultrium-5 FQND 01/03/12 13:36:18 1734 MB 4160972491 cr manual DTO-1315425730@A4:BA000040 LTO Ultrium-5 FQND 01/03/12 12:00:00 3637 KB 4211298415 cr full index:FQDN000040 LTO Ultrium-5 FQND 01/03/12 12:00:01 408 B 4194521199 cr full index:FQDN000040 LTO Ultrium-5 FQND 01/03/12 12:01:08 89 KB 4177743988 cr full bootstrap000040 LTO Ultrium-5 FQND 01/09/12 12:00:01 3637 KB 3876272433 cr full index:FQDN000040 LTO Ultrium-5 FQND 01/09/12 12:00:04 97 KB 3859495220 cr full bootstrap
138 EMC® Avamar® 6.1 Extended Retention User Guide

CHAPTER 7Troubleshooting
The following topics describe how to troubleshoot issues that you may experience while using Avamar extended retention:
◆ Modifying software components – caveats............................................................ 140◆ Import server issues.............................................................................................. 140◆ External Avamar server issues ............................................................................... 143◆ Import failures ...................................................................................................... 146◆ Export failures....................................................................................................... 148◆ Jobs take a long time to run................................................................................... 151◆ Library issues........................................................................................................ 151◆ A task failed or completed with exceptions............................................................ 153◆ The file index is reporting that it is full................................................................... 153◆ JavaScript errors.................................................................................................... 153◆ Timeout messages ................................................................................................ 153
Troubleshooting 139
Troubleshooting
Modifying software components – caveatsThe Avamar extended retention feature contains a number of components that enable selected Avamar client backups to be exported to and imported from a tape library, and restored to an Avamar client. The following list states what you are and are not permitted to do regarding changing the configuration of any component.
IMPORTANT
Making unauthorized changes to any Avamar extended retention component will result in an unsupported configuration.
◆ You can use read-only operations against components to assist in diagnosing issues.
◆ You must not make any changes to component configurations except:
• Through the Avamar extended retention user interface
• As documented by formal Avamar extended retention documentation or Technical Notes
• As directed by Avamar extended retention Support, Applications Engineering, or Engineering
◆ You must not apply hot fixes, patches, or upgrades unless officially supported by Avamar extended retention.
Import server issuesThe Import server is the instance of the Avamar server that is running on the Media Access node.
The Import server does not display in the GUI
The Import server is displayed in the Avamar Extended Retention GUI in the following locations:
◆ The Configuration springboard in the Media Access node tab◆ The Task Monitoring springboard when tasks are scheduled, running, or completed◆ In the Export Policy Management page◆ The Import Server panel in the Backup Browse/Import page
If you do not see the Import server in the GUI, one of the following issues may be causing the problem.
The transport system service may be downTo determine whether the transport system service is down:
1. Log in to the Media Access node as root.
2. Enter the following command:
ps -ef | grep Tran
Two processes should be running, with one the child of the other.
140 EMC® Avamar® 6.1 Extended Retention User Guide
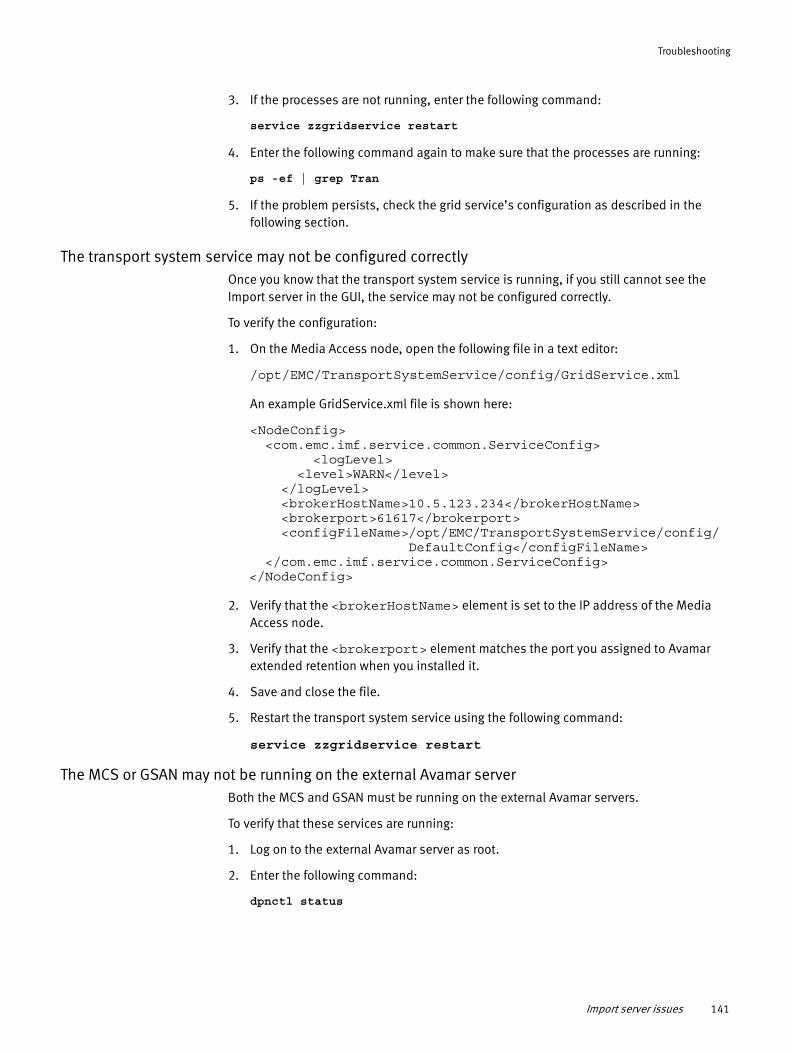
Troubleshooting
3. If the processes are not running, enter the following command:
service zzgridservice restart
4. Enter the following command again to make sure that the processes are running:
ps -ef | grep Tran
5. If the problem persists, check the grid service’s configuration as described in the following section.
The transport system service may not be configured correctlyOnce you know that the transport system service is running, if you still cannot see the Import server in the GUI, the service may not be configured correctly.
To verify the configuration:
1. On the Media Access node, open the following file in a text editor:
/opt/EMC/TransportSystemService/config/GridService.xml
An example GridService.xml file is shown here:
<NodeConfig> <com.emc.imf.service.common.ServiceConfig> <logLevel> <level>WARN</level> </logLevel> <brokerHostName>10.5.123.234</brokerHostName> <brokerport>61617</brokerport> <configFileName>/opt/EMC/TransportSystemService/config/ DefaultConfig</configFileName> </com.emc.imf.service.common.ServiceConfig></NodeConfig>
2. Verify that the <brokerHostName> element is set to the IP address of the Media Access node.
3. Verify that the <brokerport> element matches the port you assigned to Avamar extended retention when you installed it.
4. Save and close the file.
5. Restart the transport system service using the following command:
service zzgridservice restart
The MCS or GSAN may not be running on the external Avamar serverBoth the MCS and GSAN must be running on the external Avamar servers.
To verify that these services are running:
1. Log on to the external Avamar server as root.
2. Enter the following command:
dpnctl status
Import server issues 141
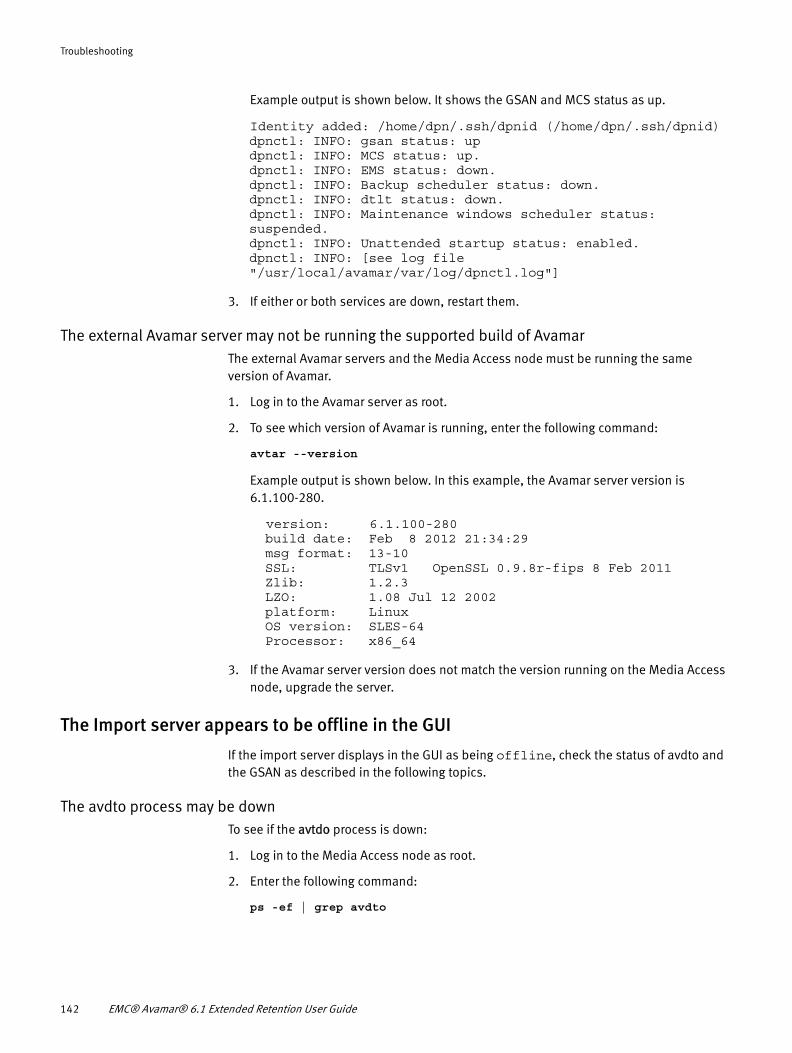
Troubleshooting
Example output is shown below. It shows the GSAN and MCS status as up.
Identity added: /home/dpn/.ssh/dpnid (/home/dpn/.ssh/dpnid)dpnctl: INFO: gsan status: updpnctl: INFO: MCS status: up.dpnctl: INFO: EMS status: down.dpnctl: INFO: Backup scheduler status: down.dpnctl: INFO: dtlt status: down.dpnctl: INFO: Maintenance windows scheduler status: suspended.dpnctl: INFO: Unattended startup status: enabled.dpnctl: INFO: [see log file "/usr/local/avamar/var/log/dpnctl.log"]
3. If either or both services are down, restart them.
The external Avamar server may not be running the supported build of AvamarThe external Avamar servers and the Media Access node must be running the same version of Avamar.
1. Log in to the Avamar server as root.
2. To see which version of Avamar is running, enter the following command:
avtar --version
Example output is shown below. In this example, the Avamar server version is 6.1.100-280.
version: 6.1.100-280 build date: Feb 8 2012 21:34:29 msg format: 13-10 SSL: TLSv1 OpenSSL 0.9.8r-fips 8 Feb 2011 Zlib: 1.2.3 LZO: 1.08 Jul 12 2002 platform: Linux OS version: SLES-64 Processor: x86_64
3. If the Avamar server version does not match the version running on the Media Access node, upgrade the server.
The Import server appears to be offline in the GUI
If the import server displays in the GUI as being offline, check the status of avdto and the GSAN as described in the following topics.
The avdto process may be downTo see if the avtdo process is down:
1. Log in to the Media Access node as root.
2. Enter the following command:
ps -ef | grep avdto
142 EMC® Avamar® 6.1 Extended Retention User Guide
Troubleshooting
If it is running, you will see output like the following:
root 1078 1023 0 14:56 pts/0 00:00:00 grep avdtoroot 7590 1 0 Mar01 ? 00:00:00 /usr/local/avamar/bin/dto/avdto.bin --vardir=/usr/local/avamar/var/dto --bindir=/usr/local/avamar/bin/dto --vardir=/usr/local/avamar/var/dto --daemon --logfile=/usr/local/avamar/var/dto/avdto_daemon.log
3. If it is not running, enter the following command:
service avdto start
The GSAN may have failed on the Media Access nodeIf the GSAN has gone down, you must reset the import server.
To check the status of the GSAN:
1. Log in to the Media Access node as root.
2. Enter the following command:
dpnctl status
Example output is shown below.
Identity added: /home/dpn/.ssh/dpnid (/home/dpn/.ssh/dpnid)dpnctl: INFO: gsan status: updpnctl: INFO: MCS status: up.dpnctl: INFO: EMS status: down.dpnctl: INFO: Backup scheduler status: down.dpnctl: INFO: dtlt status: down.dpnctl: INFO: Maintenance windows scheduler status: suspended.dpnctl: INFO: Unattended startup status: enabled.dpnctl: INFO: [see log file "/usr/local/avamar/var/log/dpnctl.log"]
If the GSAN is down, reset the import server as follows:
1. In the Avamar Extended Retention workspace, click Browse Exported Backups on the Import & Restore springboard.
2. In the Backup Browse/Import page, click Reset Import Server.
3. Click OK when you see the Reset Import Server message.
External Avamar server issuesThe following issues are specific to the external Avamar servers whose backups are being exported by the Avamar extended retention system.
Note: These Avamar servers are referred to as “external” to distinguish them from the Avamar server that is running on the Media Access node.
Avamar servers incorrectly appear offline in the GUI
Synchronize the clocks between the external Avamar servers and the Media Access node.
External Avamar server issues 143
Troubleshooting
Avamar servers do not appear in the GUI
The external Avamar grids should be displayed in the Avamar Extended Retention GUI in the following locations:
◆ The Configuration springboard in the Avamar Servers tab◆ The Task Monitoring springboard when tasks are scheduled, running, or completed◆ In the Export Policy Management page
If you do not see the Avamar servers in the GUI, one of the following issues may be causing the problem.
The transport system service may be downTo determine whether the transport system service is down:
1. Log in to the external Avamar server as root.
2. Enter the following command:
ps -ef | grep Tran
Two processes should be running, with one the child of the other.
3. If the processes are not running, enter the following command:
service zzgridservice restart
4. Enter the following command again to make sure that the processes are running:
ps -ef | grep Tran
5. Repeat this process on each of the external Avamar servers.
6. If the problem persists, check the grid service’s configuration as described in the following section.
The transport system service may not be configured correctlyOnce you know that the transport system service is running, if you still cannot see the external Avamar servers in the GUI, you may have miss-configured the service, causing it not to communicate with the Media Access node.
To verify the configuration:
1. On the Avamar server, open the following file in a text editor:
/opt/EMC/TransportSystemService/config/GridService.xml
An example GridService.xml file is shown here:
<NodeConfig> <com.emc.imf.service.common.ServiceConfig> <logLevel> <level>WARN</level> </logLevel> <brokerHostName>10.5.123.234</brokerHostName> <brokerport>61617</brokerport> <configFileName>/opt/EMC/TransportSystemService/config/ DefaultConfig</configFileName> </com.emc.imf.service.common.ServiceConfig></NodeConfig>
144 EMC® Avamar® 6.1 Extended Retention User Guide
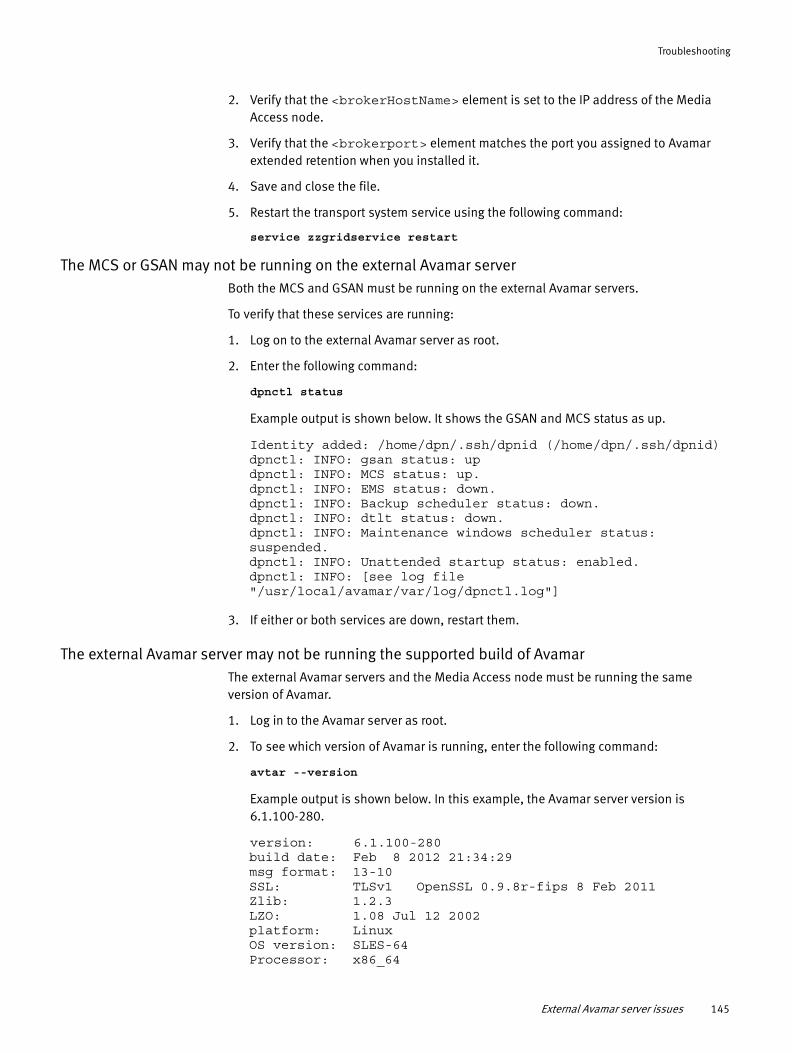
Troubleshooting
2. Verify that the <brokerHostName> element is set to the IP address of the Media Access node.
3. Verify that the <brokerport> element matches the port you assigned to Avamar extended retention when you installed it.
4. Save and close the file.
5. Restart the transport system service using the following command:
service zzgridservice restart
The MCS or GSAN may not be running on the external Avamar serverBoth the MCS and GSAN must be running on the external Avamar servers.
To verify that these services are running:
1. Log on to the external Avamar server as root.
2. Enter the following command:
dpnctl status
Example output is shown below. It shows the GSAN and MCS status as up.
Identity added: /home/dpn/.ssh/dpnid (/home/dpn/.ssh/dpnid)dpnctl: INFO: gsan status: updpnctl: INFO: MCS status: up.dpnctl: INFO: EMS status: down.dpnctl: INFO: Backup scheduler status: down.dpnctl: INFO: dtlt status: down.dpnctl: INFO: Maintenance windows scheduler status: suspended.dpnctl: INFO: Unattended startup status: enabled.dpnctl: INFO: [see log file "/usr/local/avamar/var/log/dpnctl.log"]
3. If either or both services are down, restart them.
The external Avamar server may not be running the supported build of AvamarThe external Avamar servers and the Media Access node must be running the same version of Avamar.
1. Log in to the Avamar server as root.
2. To see which version of Avamar is running, enter the following command:
avtar --version
Example output is shown below. In this example, the Avamar server version is 6.1.100-280.
version: 6.1.100-280build date: Feb 8 2012 21:34:29msg format: 13-10SSL: TLSv1 OpenSSL 0.9.8r-fips 8 Feb 2011Zlib: 1.2.3LZO: 1.08 Jul 12 2002platform: LinuxOS version: SLES-64Processor: x86_64
External Avamar server issues 145
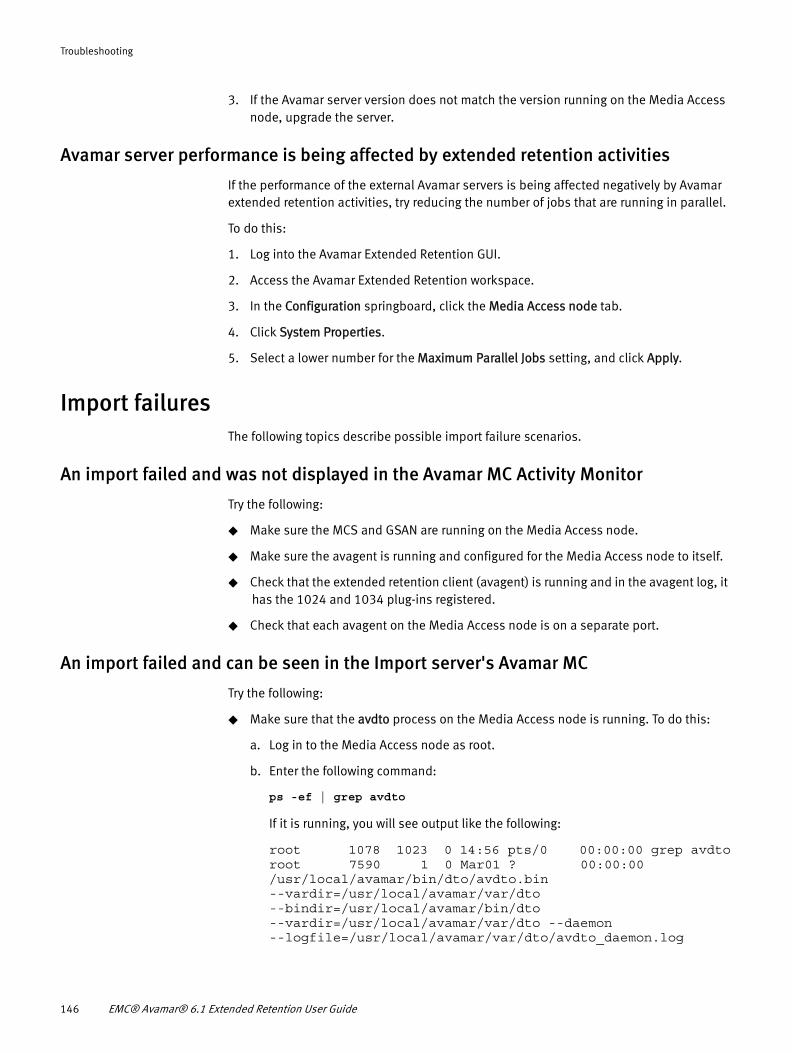
Troubleshooting
3. If the Avamar server version does not match the version running on the Media Access node, upgrade the server.
Avamar server performance is being affected by extended retention activities
If the performance of the external Avamar servers is being affected negatively by Avamar extended retention activities, try reducing the number of jobs that are running in parallel.
To do this:
1. Log into the Avamar Extended Retention GUI.
2. Access the Avamar Extended Retention workspace.
3. In the Configuration springboard, click the Media Access node tab.
4. Click System Properties.
5. Select a lower number for the Maximum Parallel Jobs setting, and click Apply.
Import failuresThe following topics describe possible import failure scenarios.
An import failed and was not displayed in the Avamar MC Activity Monitor
Try the following:
◆ Make sure the MCS and GSAN are running on the Media Access node.
◆ Make sure the avagent is running and configured for the Media Access node to itself.
◆ Check that the extended retention client (avagent) is running and in the avagent log, it has the 1024 and 1034 plug-ins registered.
◆ Check that each avagent on the Media Access node is on a separate port.
An import failed and can be seen in the Import server's Avamar MC
Try the following:
◆ Make sure that the avdto process on the Media Access node is running. To do this:
a. Log in to the Media Access node as root.
b. Enter the following command:
ps -ef | grep avdto
If it is running, you will see output like the following:
root 1078 1023 0 14:56 pts/0 00:00:00 grep avdtoroot 7590 1 0 Mar01 ? 00:00:00/usr/local/avamar/bin/dto/avdto.bin--vardir=/usr/local/avamar/var/dto--bindir=/usr/local/avamar/bin/dto--vardir=/usr/local/avamar/var/dto --daemon--logfile=/usr/local/avamar/var/dto/avdto_daemon.log
146 EMC® Avamar® 6.1 Extended Retention User Guide
Troubleshooting
c. If it is not running, enter the following command:
service avdto start
◆ Check the Event Viewer for events that might provide more information.
◆ Make sure that imports are not trying to run while the library drives are being used for exports.
Backups do not appear in the Backup Browse/Import page
Do the following:
1. Log in to the Media Access node as root.
2. Run the following command to verify that the backup exists:
mminfo -av
If no backups are displayed, that means they have not been exported to tape.
An Avamar client does not appear in the Backup Browse/ Import page
If you do not see an Avamar client in the Backup Browse/Import page, the following sections may provide information about what is causing the problem.
Avamar clients in generalSometimes, the Avamar server on the Media Access node cannot create a client during an export operation due to nslookup issues; in other words, the server cannot “see” the client for which it is exporting the backup. When this happens, the backup is still exported to tape, but it will be “archived” under the Media Access node client itself. When you select that backup and restore it, the system restores the original client that could not be created because of the lookup issues.
To avoid this problem, make sure that the DNS or the /etc/hosts file on the Media Access node has been configured to “see” all of the clients that are being backed up by the external Avamar servers.
Note: If you create a backup on a client that is using an alias that is not DNS resolvable, the client backup will be exported, but it will show up under the Avamar Extended Retention client name rather than under is own name.
Celerra NDMP clientsFor Celerra NDMP clients, when you configure an Avamar Accelerator node to be part of the Avamar extended retention environment, you are prompted to enter a name that will be used to register the NDMP client with Avamar. This client name must be the fully qualified domain name of the Data Mover, which in this case is the Media Access node.
The configuration prompts are shown below:
Import failures 147
Troubleshooting
Choose an action: 1. Add a new system 2. Edit an existing system 3. Remove a system from the list 4. Exit setupEnter action: [4]: 1Setting up a new system account
What kind of system do you want to setup? 1. EMC Celerra 2. NetApp FilerEnter choice: 1Starting setup for EMC CelerraNetwork address or DNS name of the EMC Celerra [filer.company.com]:hostname.example.com
The ndmp user password on "hostname.example.com":Repeat password:
Password encoding scheme ("md5" or "text") to use for "hostname.example.com" [md5]:
Checking username and password... avndmp returning with exitcode 0verifiedAvamar account name for "hostname.example.com" [hostname.example.com]:
Export failuresThe sections in this topic describe possible export failure scenarios.
Exports are failing in general
Make sure that the Avamar extended retention client has been registered with the internal and external Avamar servers.
To verify that the client has been registered:
1. Log in to the Media Access node as root.
2. Change to the /data01/avamar/var/dto directory:
cd /data01/avamar/var/dto
3. List the contents of the directory:
ls -al
For each server with which the Avamar extended retention client was registered, including the instance of Avamar that is running on the Media Access node, you should see a directory named with the following format:
AvamarServerIPAddress-MediaAccessNode
where MediaAccessNode can be the FQDN or IP address of the Media Access node.
Example output is shown here:
drwxr-xr-x 2 root root 4096 Feb 7 10.5.123.234-MediaAccessNode.example.comdrwxr-xr-x 2 root root 4096 Feb 7 10.5.160.185-10.5.160.195drwxr-xr-x 2 root root 4096 Feb 7 10.5.170.165-MediaAccessNode.example.com
148 EMC® Avamar® 6.1 Extended Retention User Guide
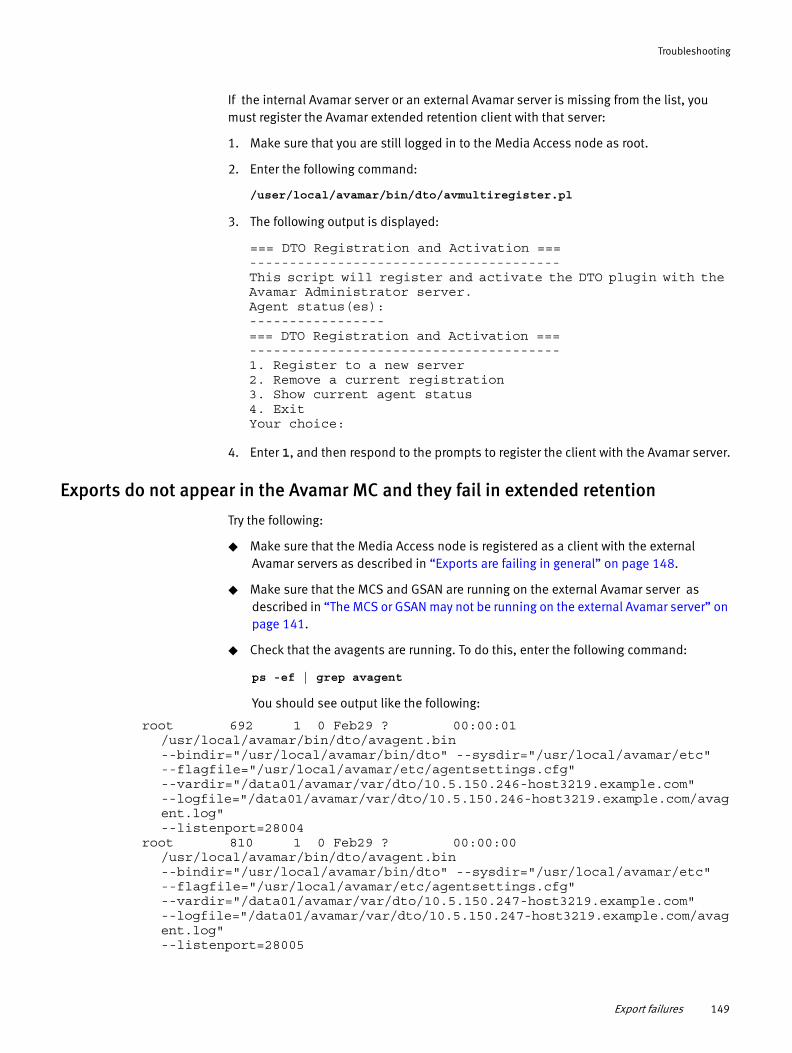
Troubleshooting
If the internal Avamar server or an external Avamar server is missing from the list, you must register the Avamar extended retention client with that server:
1. Make sure that you are still logged in to the Media Access node as root.
2. Enter the following command:
/user/local/avamar/bin/dto/avmultiregister.pl
3. The following output is displayed:
=== DTO Registration and Activation ===---------------------------------------This script will register and activate the DTO plugin with the Avamar Administrator server.Agent status(es):-----------------=== DTO Registration and Activation ===---------------------------------------1. Register to a new server2. Remove a current registration3. Show current agent status4. ExitYour choice:
4. Enter 1, and then respond to the prompts to register the client with the Avamar server.
Exports do not appear in the Avamar MC and they fail in extended retention
Try the following:
◆ Make sure that the Media Access node is registered as a client with the external Avamar servers as described in “Exports are failing in general” on page 148.
◆ Make sure that the MCS and GSAN are running on the external Avamar server as described in “The MCS or GSAN may not be running on the external Avamar server” on page 141.
◆ Check that the avagents are running. To do this, enter the following command:
ps -ef | grep avagent
You should see output like the following:
root 692 1 0 Feb29 ? 00:00:01 /usr/local/avamar/bin/dto/avagent.bin--bindir="/usr/local/avamar/bin/dto" --sysdir="/usr/local/avamar/etc"--flagfile="/usr/local/avamar/etc/agentsettings.cfg"--vardir="/data01/avamar/var/dto/10.5.150.246-host3219.example.com"--logfile="/data01/avamar/var/dto/10.5.150.246-host3219.example.com/avagent.log"--listenport=28004
root 810 1 0 Feb29 ? 00:00:00 /usr/local/avamar/bin/dto/avagent.bin--bindir="/usr/local/avamar/bin/dto" --sysdir="/usr/local/avamar/etc"--flagfile="/usr/local/avamar/etc/agentsettings.cfg"--vardir="/data01/avamar/var/dto/10.5.150.247-host3219.example.com"--logfile="/data01/avamar/var/dto/10.5.150.247-host3219.example.com/avagent.log"--listenport=28005
Export failures 149
Troubleshooting
root 7733 1 0 Mar01 ? 00:00:01 /usr/local/avamar/bin/dto/avagent.bin--bindir="/usr/local/avamar/bin/dto" --sysdir="/usr/local/avamar/etc"--flagfile="/usr/local/avamar/etc/agentsettings.cfg"--vardir="/data01/avamar/var/dto/10.5.139.219-host3219.example.com"--logfile="/data01/avamar/var/dto/10.5.139.219-host3219.example.com/avagent.log"--listenport=28003
◆ Make sure that each avagent on the Media Access node is on a separate port. The --listenport setting in the ps output displays the port.
◆ Make sure that the Avamar extended retention client (avagent) is running and in the avagent log. The --logfile setting in the ps output displays the log location. The log should indicate that plugins 1034 and 1024 have been registered successfully. For example:
2012-03-05 14:19:28 avagent Info <7502>: Registration of client /clients/host3219.example.com with MCS 10.5.123.219:28001 successful.2012-03-05 14:19:28 avagent Info <5928>: Registration of plugin 1034 Unix successful.2012-03-05 14:19:28 avagent Info <5928>: Registration of plugin 1024 dto successful.2012-03-05 14:19:28 avagent Info <5619>: Registration of client and plugins complete.
An export failed and appears in the MC Activity Monitor
Do the following:
◆ Follow standard troubleshooting for all Avamar plug-ins.
◆ If you have a single drive, make sure that an import is not running at the same time as the export. Try the export again when the drive is available.
Not all exports were written to tape, but the export task completed
Do the following:
◆ Check the Event viewer to see if a client was skipped because it did not match the policy.
◆ Check the Avamar MC to confirm that a backup is found within the rules of the policy.
The Event Viewer indicates that an export event was skipped
Try performing an on-demand export of the backup that was not exported.
An export worked but the client is not in the import list
If the Media Access node cannot resolve the host name for a given client, it will:
◆ Create a user event indicating that it cannot resolve the client.◆ Store the backup under the extended retention client.
You can do one or both of the following:
◆ Look for the backup under the extended retention client.◆ Add the client to the network lookup for the Media Access node.
150 EMC® Avamar® 6.1 Extended Retention User Guide
Troubleshooting
Jobs take a long time to runCommunication may have failed between the Avamar MC and Avamar extended retention. The job may have actually completed, but Avamar extended retention still shows it as running.
Library issuesThe following issues pertain to the tape library attached to the Media Access node.
The library does not appear in the GUI
The library that is used by Avamar extended retention must not be shared. It must be zoned for exclusive use by the Media Access node, and the robot must be controlled only by Avamar extended retention.
Do the following:
1. Log in to the Media Access node as root.
2. Change to the /opt/EMC/scsilibdetector/bin/ directory:
cd /opt/EMC/scsilibdetector/bin/
3. Enter the following command:
./scsilibdetector
You should see information similar to the following for the library:
Vendor: IBM Version: A.50 SCSI ID: 2.0.1 Slots ( Storage: 44 Import/Export: 3 Drives: 2 )
4. If the library is detected, wait for it to display in the GUI.
5. If the library is not detected, do the following:
• Check the fiber connection between the Media Access node and the library• Ask the IT department to check the zoning• Restart the Media Access node
The library appears as UNKNOWN in the GUI
If the library is shown as UNKNOWN in the Media Management springboard, Avamar extended retention was not able to configure it automatically. Try configuring the library manually as described in the following procedure.
Jobs take a long time to run 151
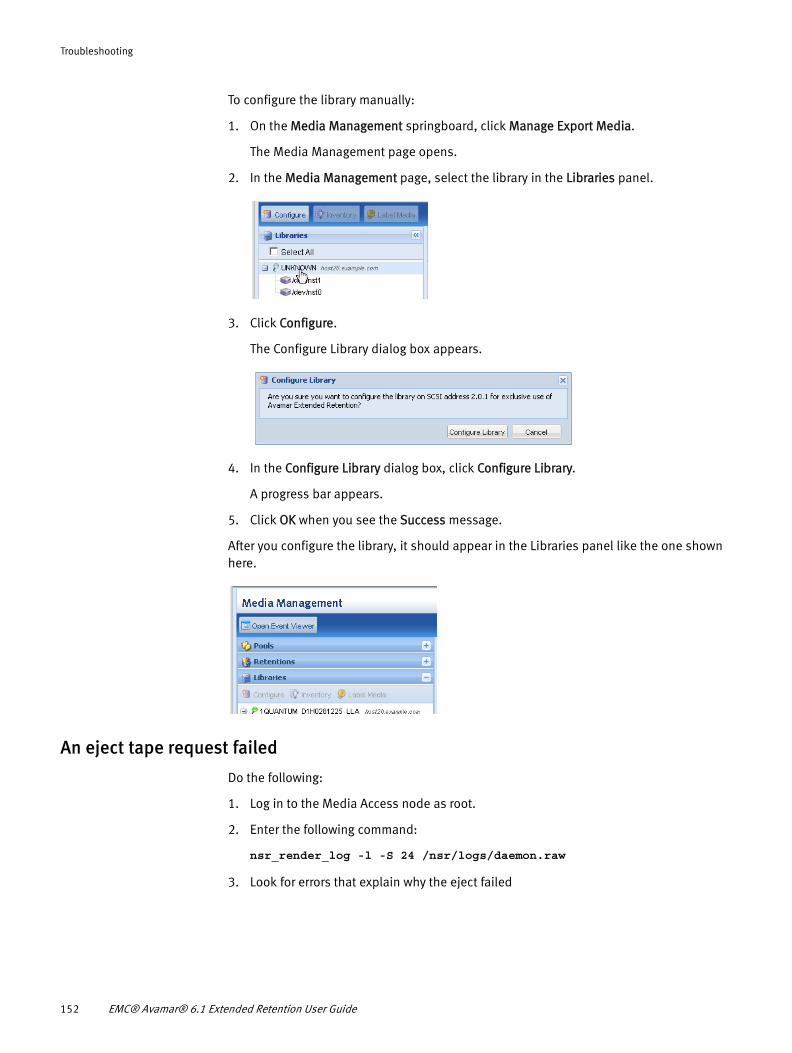
Troubleshooting
To configure the library manually:
1. On the Media Management springboard, click Manage Export Media.
The Media Management page opens.
2. In the Media Management page, select the library in the Libraries panel.
3. Click Configure.
The Configure Library dialog box appears.
4. In the Configure Library dialog box, click Configure Library.
A progress bar appears.
5. Click OK when you see the Success message.
After you configure the library, it should appear in the Libraries panel like the one shown here.
An eject tape request failed
Do the following:
1. Log in to the Media Access node as root.
2. Enter the following command:
nsr_render_log -l -S 24 /nsr/logs/daemon.raw
3. Look for errors that explain why the eject failed
152 EMC® Avamar® 6.1 Extended Retention User Guide
Troubleshooting
A task failed or completed with exceptionsDo the following:
1. Log in to the Media Access node as root.
2. Enter the following command:
nsr_render_log -l -S 24 /nsr/logs/daemon.raw
3. Look for errors that explain why the task failed.
The file index is reporting that it is fullThe Media Access node’s Avamar server disk is getting full. You need to change the secondary retention period for one or more backups. To do this:
1. Log in to Avamar Extended Retention, and access the Avamar Extended Retention workspace.
2. On the Import & Restore springboard, click Browse Exported Backups to open the Backup Browse/Import page.
3. In the Filter Clients panel, type * in the Client Name box, and then click Apply.
4. Select a client in the Avamar Clients panel to display the backups for that client in the Backup panel.
5. Select one or more backups in the Backup panel.
6. Click Edit Secondary Retention.
The Edit Secondary Retention Period dialog box appears.
7. In the Edit Secondary Retention Period dialog box, select a shorter retention period, or select to expire the retention period now, and then click Save.
JavaScript errorsIf you get a Java script error, try refreshing the browser. If that does not work, try restarting the browser.
Timeout messagesIf you receive a timeout message while trying to perform a task, refresh the browser, and then retry the operation.
A task failed or completed with exceptions 153

Troubleshooting
154 EMC® Avamar® 6.1 Extended Retention User Guide

INDEX
Aaccounts
being locked out of 22creating 33disabling 35editing 34role types 36unlocking 35
ACSLS library configuration 128Administration workspace 23
definition of 24springboards
Event Summary 45Framework Configuration 42Log Information 60My Profile 39Role Management 36Security Events 55Task Summary 51User Management 32
using 31, 119archiving security events 56, 59Avamar backups
browsing and importing 109exporting to tape 91filtering 102
for all Avamar plug-ins 103for most recent backup 102for multiple backups 102for specific Avamar plug-ins 103
Avamar client filters 99Avamar extended retention
capabilities and limitations 15important terms and definitions 16introduction to 13logging in to 20, 135logging out of 30springboards
Configuration 66Import & Export Job History 70, 116Import & Restore 65Media Management 65opening 64Recent Events 67Scheduled Exports 65Task Monitoring 68
user name, suser 22workspace
accessing 27description of 24using 63
Avamar serverexternal 16import 16
troubleshooting external 143troubleshooting import 140viewing export policies for 93viewing status of 66
BBackup Browse/Import page 110
sorting information in Backup panel 113backups
definition of 16deleting from the import server 115exporting most recent 102exporting multiple 102filtering 102
for all Avamar plug-ins 103for most recent 102for multiple 102for specific Avamar plug-ins 103
importing from tape 112locating for import 111metadata 16performing on-demand exports for 105restoring to a client 115retention periods
editing 114setting 94
selecting columns to view in Backup panel 113sorting information in columns 113viewing
on a tape volume 88best practices
clear browser cache before first login 18create administrative user account 17create disaster recovery image 18label bootstrap tapes 18operational 17synchronize backup creation and export 17
bootstrap tapeslabeling 81, 83
bootstrap, recovering 137Browse/Import page
customizing columns in Backup panel 113browsers supported by Avamar extended retention 20
Ccapabilities and limitations 15client filters 99clients
locating for import 111performing on-demand exports for 106viewing those included in an export policy 93
Configuration springboard 66configuring
Avamar backup filters 102
EMC® Avamar® 6.1 Extended Retention User Guide 155
Index
Avamar client filters 99export policies 93export policy details 94export schedules 96log level 42message settings 43, 44session timeout 43SNMP 44system settings 42the system 42
copying springboards to My Workspace 28CSV files
exporting system events to 50
Ddefinitions and terms 16deleting
backups from the import server 115export policies 105
disabling an export policy 105disaster recovery
applying a recovery image 136creating a recovery image 134image 18
Eediting
backup retention periods 114email address in user profile 40export policies 104Springboards list in My Workspace 28user account 34
ejecting tape volumes 89email
disabling message settings 44editing address 40editing message settings 41enabling message settings 43
EMC online support website 7Event Summary springboard 45Event Viewer 45, 68
acknowledging events 49exporting events in CSV format 50filtering events 48updating the events table 47viewing details for a single event 49
eventsacknowledging 49security 55
archiving 59deleting 59resetting the security threat level 60viewing in the Security Event Viewer 56
system 45acknowledging 49exporting in CSV format 50filtering 48updating 47viewing details for a single event 49
viewing details in the Event Viewer 45export
clients, on-demand for clients 106definition of 16labeling tapes for 81performing on-demand 105policies
configuringAvamar backup filter 102Avamar client filter 99export schedule 96policy details 94
creating 93definition of 16deleting 105disabling 105editing 104performing on-demand exports for 106summary 103viewing
by Avamar server 93clients included in 93export job details 107
schedulesconfiguring 96Nth day of each month 97on-demand 98regular intervals 97specific date each month 98specific weekdays 97
Export Policy Management page 91external Avamar servers
definition of 16troubleshooting 143
Ffiltering
backups 102security events 58system events 48tasks 54
frameworkadministrator account 21, 135configuring system settings 42disabling message settings 44enabling message settings 43
Framework Configuration springboard 42enabling SNMP 44
GGoogle Chrome 20
IImport & Export Job History
report 116springboard 70, 116
Import & Restore springboard 65, 109Import server
definition of 16
156 EMC® Avamar® 6.1 Extended Retention User Guide
IndexIndex
in Backup Browse/Import page 110resetting 115status of on Configuration springboard 66troubleshooting 140
import, definition of 16important terms and definitions 16importing Avamar backups from tape 112inventorying library contents 90
Jjobs, setting the maximum number that can run in parallel 67
Llabeling tape volumes 81libraries
ACSLS 128inventorying 90labeling tape volumes in
as bootstrap tapes 81as export tapes 81
physical and virtual 14viewing details of 86viewing tape volumes in 87
lockbox password 21, 135Log Information springboard 60Log Viewer 61logging
in 20, 135out 30
loginaccount lockout 22failure
error message 22unlocking a user account 35
logs 60configuring the log level 42saving log files 62viewing in the Log Viewer 61
MManagement Information Base 124Max Ack. Events, configuring 43Media Access node 16media management
labeling tape volumes 81Media Management springboard 71, 151message settings 42
disabling 44enabling 43
MIB 124Mozilla Firefox 20My Profile springboard 39My Workspace 27
adding springboards to Springboards list 28copying springboards to 27removing springboards from Springboards list 29
NNth day of each month 97
Oon-demand exports
configuring 98performing for a client 106performing for an export policy 106
online help 29
Pparallel jobs, setting the maximum number that can run 67password
changing 40requirements 33, 40
physical libraries 14policy. See export policiespools. See tape pools
RRecent Events springboard 67recovery images
applying 136creating 134
regular intervals 97report, Import & Export Job History 116resetting
a user password 40the import server 115the security threat level 57
restore, definition of 17restoring backups to a client 115retention periods
creating 78custom 77default system 77definition of 17deleting 80editing for backups 114setting for backups 94viewing associated pools 78viewing details 78
role management 36editing a user’s roles 37generating a user role report 39role types 36
Role Management springboard 36
SScheduled Exports springboard 65, 91Security Event Viewer
deleting events in 59filtering events in 58resetting the security threat level in 60viewing event details in 56
security events 55archiving 56, 59deleting 56, 59
EMC® Avamar® 6.1 Extended Retention User Guide 157
Index
filtering 56, 58removing 56selecting 56
Security Events springboard 55security threat level 55
resetting 57, 60session timeout 23
configuring 43SNMP
configuring 44enabling 44MIB 124
SNMP traps 121configuring for Avamar server 121configuring for tape management system 122
sorting backup column information 113specific date each month 98specific weekdays 97springboards
adding to a workspace 25Configuration 66copying to My Workspace 27, 28definition of 17Event Summary 45Framework Configuration 42Import & Export Job History 70, 116Import & Restore 65, 109list 24Log Information 60Media Management 65, 71, 151moving 26My Profile 39opening 64Recent Events 67removing from a workspace 25Role Management 36Scheduled Exports 65, 91Security Events 55Task Monitoring 68, 107Task Summary 51User Management 32
Springboards listadding springboards to in My Workspace 28editing 28removing springboards from in My Workspace 29
Storage Management Systemdefinition of 17events for 67
supported browsers 20suser 22system configuration 42
disabling message settings 44enabling message settings 43
system events 45acknowledging 49exporting in CSV format 50filtering 48sorting 47updating 47viewing details for a single event 49
viewing event details in the Event Viewer 45system settings 42
configuring 42log level 42Max Ack. Events 43session timeout 43
Ttape pools
creating 73custom 72default system 72deleting 76editing 75relabeling volumes in 84viewing associated retention periods 78viewing details of 73viewing volumes in 73
tape volumesejecting 89importing Avamar backups from 112labeling 81
as bootstrap 83for export 82
relabeling to a different pool 84viewing backups on 88viewing those in a pool 73
Task Monitoring springboard 68, 107Task Summary springboard 51Task Viewer 51, 69
filtering tasks 54opening 107viewing export job details in 107
tasks 51filtering 52, 54removing a filter 52viewing details of in the Task Viewer 51
terms and definitions 16threat level 55
resetting 60timeout, session 23TOOLBAR tab 24, 25troubleshooting 139
export failures 148external Avamar server issues 143file index reporting full 153import failures 146import server issues 140JavaScript errors 153library issues 151task failed or completed with exceptions 153timeout messages 153
Uunlocking a user account 22, 35user accounts
creating 33disabling 35editing 34
158 EMC® Avamar® 6.1 Extended Retention User Guide
IndexIndex
role types 36unlocking 35
user management 32creating user accounts 33disabling a user account 35editing user accounts 34unlocking user accounts 35
User Management springboard 32user name
description of 33suser 22
user profile management 39changing name and email address 40changing password 40editing email message settings 41
User Role Report 39user roles
editing 37
Vviewers
Event 45, 68Log 61Security Event 56Task 51, 69
virtual libraries 14volumes. See tape volumes
Wweb browsers
Mozilla Firefox 20Windows Internet Explorer 20
Windows Internet Explorer 20workspaces
accessing 24Administration 23, 24Avamar Extended Retention 27definition of 17displaying springboards in 26hiding springboards in 26moving springboards around in 26My Workspace 27
adding springboards to Springboards list 28copying springboards to 27removing springboards from Springboards list 29
opening springboards in 64WORKSPACES tab 24
EMC® Avamar® 6.1 Extended Retention User Guide 159

Index
160 EMC® Avamar® 6.1 Extended Retention User Guide