eMARS 102 Introduction to Vendors 3 Resource Center/3.11 Training...eMARS 102: Intro to Vendors ....
28
Updated 03/22/2019 eMARS 102 Introduction to Vendors 3.11 Customer Resource Center eMARS Training Phone: 502-564-9641 email: [email protected] http://finance.ky.gov/internal/emars/
Transcript of eMARS 102 Introduction to Vendors 3 Resource Center/3.11 Training...eMARS 102: Intro to Vendors ....

Updated 03/22/2019
eMARS 102 Introduction to Vendors 3.11
Customer Resource Center eMARS Training
Phone: 502-564-9641 email: [email protected]
http://finance.ky.gov/internal/emars/

eMARS 102: Intro to Vendors
2 of 28
This page is intentionally left blank.

eMARS 102: Intro to Vendors
3 of 28
Table of Contents
1 – Purpose ........................................................................................................................................... 4 2 – Vendor/Customer Creation (VCC) .................................................................................................... 4
Vendor/Customer Table (VCUST) ...................................................................................................... 5 Create VCC Document ....................................................................................................................... 5 Header Section ................................................................................................................................... 7 Vendor/Customer Section ................................................................................................................... 7 Address Section ............................................................................................................................... 11 1099 Reporting Information Section.................................................................................................. 15 Business Type Section ..................................................................................................................... 17 Commodity Section .......................................................................................................................... 17 Certification Section .......................................................................................................................... 18
3 – Vendor/Customer Modification (VCM) ............................................................................................ 18 Create VCM Document..................................................................................................................... 19 Modify Existing Address ................................................................................................................... 21 Modify Existing Contact .................................................................................................................... 22 Add New Address ............................................................................................................................. 23 Updating Certification ....................................................................................................................... 25 Other Vendor Modifications .............................................................................................................. 26
4 – Employee Records ......................................................................................................................... 26 5 – Miscellaneous Vendors .................................................................................................................. 26 6 – Vendor Self Service Site ................................................................................................................ 26 7 – Appendix ........................................................................................................................................ 27

eMARS 102: Intro to Vendors
4 of 28
eMARS Introduction to Vendors
1 – Purpose The Introduction to Vendors class is designed to provide users with basic understanding of vendors within eMARS. The topics covered in this class are:
1. Vendor/Customer Creation (VCC) 2. Vendor/Customer Table (VCUST) 3. Vendor/Customer Modification (VCM) 4. Employee Records 5. Miscellaneous Vendors 6. Vendor Self Service Site (VSS)
2 – Vendor/Customer Creation (VCC) In order to request a new Vendor be added to the Commonwealth’s Vendor file, departments can process a Vendor/Customer Creation (VCC) document. The VCC document allows users to establish a new vendor that can then be used on Procurement or Accounts Payable documents. Creating a new vendor will add a record to the Vendor/Customer (VCUST) table and the 1099 Reporting Information (1099I) table. Before Vendors are activated they must be approved by the Office of the Controller. The VCC document cannot be modified or cancelled once it has been submitted to Final. A Vendor/Customer Modification (VCM) document must be created to reverse the effects or change the original document. Please assemble the following information from the vendor prior to creating a VCC document:
• Legal Name • Alias/DBA Name(if applicable) • Tax Organizations Type(Individual/Company) and 1099 Classification • Federal Tax ID number (EIN or SSN) • Ordering/Procurement and Payment address information • Ordering/Procurement and Payment contact information (name, address, email, phone and fax)
The Office of the Controller recommends requesting a Federal W-9 form for any vendor being added to or changed on the VCUST table. This will serve as proper documentation that additions and updates match vendor provided information. The user can also utilize the EZ Vendor Registration Application or Vendor Registration Application. These forms are available online at: W-9.pdf
EZ Vendor Registration Application.pdf Vendor Registration Application.pdf

eMARS 102: Intro to Vendors
5 of 28
Vendor/Customer Table (VCUST) The Vendor/Customer (VCUST) table allows users to search for existing vendors and review information on existing records. Users should verify the desired vendor is not already registered in the eMARS system before creating a VCC. Use the VCUST table to search for the desired vendor prior to creating a new record. This will verify that no duplicate entries are made. To search for vendors on the VCUST table, type VCUST in the Jump to field and click Go.
The Vendor/Customer table will display a search box to look up vendors already registered. From here, users can search to determine if desired vendor is already registered. The recommended way to search for a vendor is by Legal Name and TIN.
Create VCC Document To create a VCC document to add a new Vendor you must complete the following steps: Type VCC in the Jump to field and click Go.
NOTE: When searching for a vendor you may add a wildcard (*) between at the beginning and end of the search if you are unsure how it might be listed (example: *Kentucky*Proud*)

eMARS 102: Intro to Vendors
6 of 28
You can also access your Procurement or Accounts Payable workspace and click Vendor Maintenance, select Vendor Documents and click Vendor/Customer Creation (VCC).
The Document Catalog opens with the VCC document code pre-populated. Switch into create mode by clicking Create.
Enter your Department, select Auto Numbering and click Create.

eMARS 102: Intro to Vendors
7 of 28
Header Section The VCC document opens to the Header General Information section.
Complete the Header (optional)
• The Document Name allows the user to identify a brief name for the VCC document. This field will allow for 60 characters
• The Record Date identifies the date in which the VCC document was submitted. This will default on the document. Please leave this field blank as it will infer the correct values.
• The Document Description is used to further document the purpose of the Vendor Customer Creation document. It is recommended that the Vendor’s Legal Name is entered in this field.
Vendor/Customer Section Complete the Vendor/Customer section:
• The Vendor/Customer field identifies the unique Vendor Code that will be associated with the new record. Users should not enter text into this field. To populate the Vendor Customer field users must select the Auto Generate check-box to generate the unique Vendor/Customer Number.
• The Alias/DBA (Optional) field allows entry of an alternate name, alias, operating name or Doing Business As (DBA) used to identify the account. If populated, this field will print on checks paid to this vendor. This field may be sixty (60) characters long. This field is optional and should be left blank unless different than legal name.

eMARS 102: Intro to Vendors
8 of 28
• The Location Name field allows the user to identify a location name for the vendor. This field will be used to identify if the vendor is EFT eligible. Users should put “EFT Eligible” here if they are adding banking information to the new vendor, or they will need to put the address from Street 1 for the vendor.
• The Organization Type (Required) identifies the type of vendor being registered. Users can select the following:
o Individual- is used when the vendor is classified as an individual and will be operating under their Social Security Number (SSN) or their 1099 classification is Sole Proprietor and they are using an Employer Identification Number (EIN). This will also require the First Name and Last Name fields to be populated with the associated information.
o Company- is used when the vendor is classified as a company and will be operating under an Employer Identification Number (EIN). When the Company Organization Type is identified users will also be required to enter in the Company Name field.
o The only special characters valid in the Company Name field are the hyphen “-” or ampersand “&”. These should only be included if shown on the vendor’s W-9.
• The Active From date identifies the date the vendor becomes active. Users should leave this field blank. This field will default.
Click the Organization tab: Complete the Organization section.
• The 1099 Classification (Required) field provides additional information about the type of
organization being registered. The following rules apply to the Classification field:
NOTE: When selecting the Organization Type, users will need to verify the Organization Type on the Vendor’s W-9 or their Vendor Registration Application.
eMARS 102: Intro to Vendors
9 of 28
Organization Type Field Allowable Classifications Individual Individual, Sole Proprietorship, or Nonresident Alien, Employee, Other Company Partnership, Corporation, Trust, Foreign, State Government, Other
Government, LLC filing as Partner, LLC filing as Corp, LLC filing as Sole Prop, Other.
• The Taxpayer ID Number (Required) field allows users to associate a Tax Identification
Number (TIN) with the Vendor record. The entered TIN must be 9 characters and cannot include spaces or hyphens.
• The Taxpayer ID Number Type (Required) field is used to identify the type of TIN, SSN or EIN
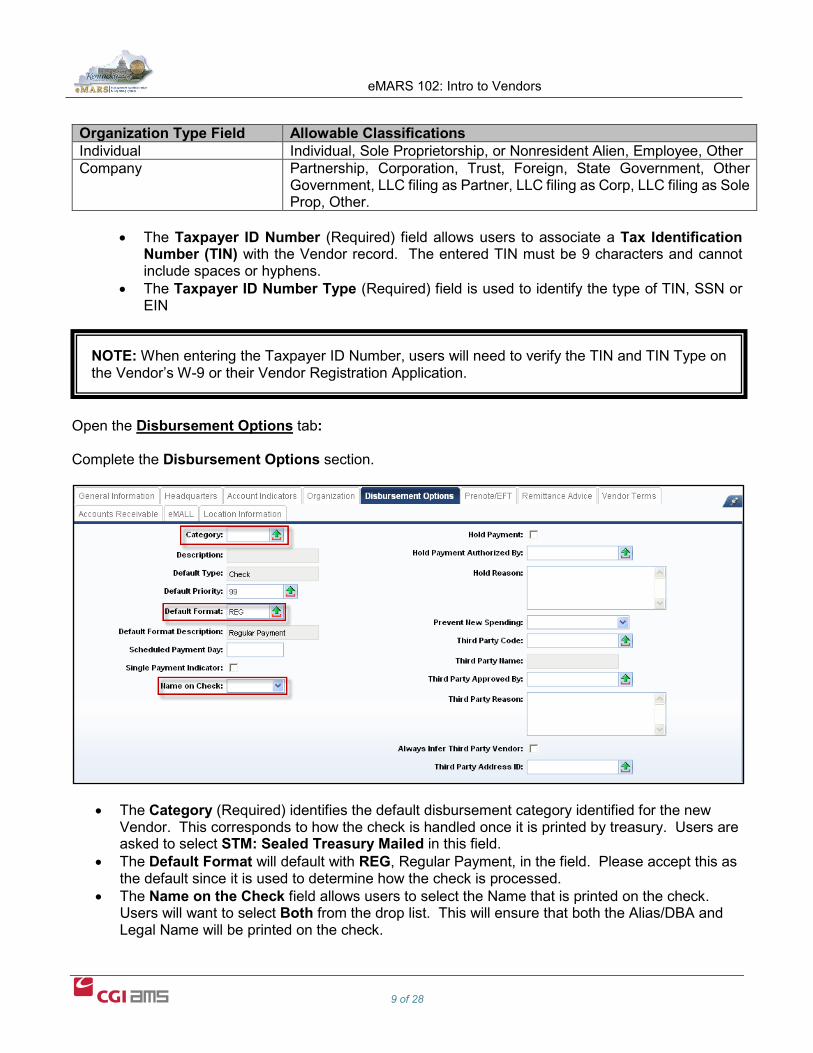
Open the Disbursement Options tab: Complete the Disbursement Options section.
• The Category (Required) identifies the default disbursement category identified for the new Vendor. This corresponds to how the check is handled once it is printed by treasury. Users are asked to select STM: Sealed Treasury Mailed in this field.
• The Default Format will default with REG, Regular Payment, in the field. Please accept this as the default since it is used to determine how the check is processed.
• The Name on the Check field allows users to select the Name that is printed on the check. Users will want to select Both from the drop list. This will ensure that both the Alias/DBA and Legal Name will be printed on the check.
NOTE: When entering the Taxpayer ID Number, users will need to verify the TIN and TIN Type on the Vendor’s W-9 or their Vendor Registration Application.

eMARS 102: Intro to Vendors
10 of 28
Complete the Prenote/EFT section if the Vendor has elected to receive their payments through Electronic Funds Transfer (EFT) (Optional).
The Prenote/EFT section is used to establish the information required to send electronic payments to Vendors. The following fields will be required when completing this section:
• The Generate EFT Payments box will need to be checked for Vendors requesting EFT payments. • The ABA Number is the unique number assigned to identify the bank. This number also
corresponds to the Routing Number associated with the vendor’s bank account. All applicable ABA numbers have been loaded into eMARS. The value maybe selected by using the Pick List.
• The Account Type identifies the type of bank account that will be used(Checking or Savings). • The Account Number is the number of the bank account to be used for EFT payments. Do not
put any dashes in this field. • The EFT Format should be CCD. • The EFT Status refers to the electronic funds transfer format that is used to apply the EFT
Transactions for this vendor. Select “Eligible for EFT” for Vendors requesting EFT payments.
NOTE: An email address is required for the payment contact for vendors that have chosen to have payments electronically deposited. This individual will receive email notifications regarding payments prior to the payments being deposited into their bank accounts.

eMARS 102: Intro to Vendors
11 of 28
Address Section Complete the Address Section: The Address section on the Vendor Customer Creation document allows users to enter the Address(es) and Contact(s) information for the new vendor being registered. Each new vendor registered using the VCC document will require two separate address lines. Each new vendor will be required to have a Payment and an Ordering/Procurement address. Each Customer (someone that will be paying the Commonwealth) created will require a Billing address. Complete the General Information Tab: (click Insert New Line)
• The Address Type identifies the type of address being recorded. Different Address Types are
required for different types of registration. The available types are listed below:
o Billing – The Billing address type is used to identify the address that will be used on Accounts Receivable documents (required for all new Customers).
o Payment – The payment address is used to identify the address that will be used on Accounts Payable and Disbursement documents (required for all new Vendors).
o Ordering/Procurement – This address is used to identify the address that will be used on all Procurement related documents (required for all new Vendors).
o Account Administrator/Web Registrar – This address identifies the address for the VSS (Vendor Self Service) Administrator.
• The Default Record box allows users to identify if the recorded address will be the default
address type for the associated vendor. When an address is marked as a default record, it will populate that address on all associated documents. For example, if an Ordering address type is marked as the default, this address will infer on all Procurement documents. It is required for all new vendors registered to have a default payment and ordering/procurement address.

eMARS 102: Intro to Vendors
12 of 28
Open the Address Information tab:
The Address Information tab identifies the address for the line:
• The Address ID is a unique address code that is assigned to the vendor record. This allows for multiple addresses to be associated with the vendor. The system will assign the Address ID when the Auto Generate box is selected.
• The Auto Generate box should always be selected for new addresses. Auto Generate will create the Address ID to associate with the address line.
• The Address for the vendor will need to be entered in the Street 1, Street 2 (if needed), City, State/Province and Zip/Postal Code fields.
• A valid Phone number for the vendor will be required. Format phone numbers as 123-456-7890. Open the Contact Information tab:
• The Principal Contact ID field is a unique contact code that is assigned to the vendor record. This allows for multiple contacts to be listed for the associated vendor. The system will assign the Principal Contact ID when the Auto Generate box is selected.
• The Auto Generate box should always be selected for a new contact. The Auto Generate will create the Principal Contact ID associated with the address line.
• The Principal Contact field displays the name of the vendor’s principal contact corresponding to the Address Type (required).

eMARS 102: Intro to Vendors
13 of 28
o If the Address Type is Ordering, the Principal Contact field displays the name of principal contact responsible for questions concerning procurements.
o If the Address Type is Billing, the Principal Contact field displays the name of principal contact responsible for questions concerning billings.
o If the Address Type is Payments, the Principal Contact field displays the name of principal contact responsible for questions concerning payments.
• The Correspondence Type identifies how the vendor is to be communicated with. Users can select one of the following:
o Email – the Email correspondence type is the preferred correspondence type for all vendors. When the correspondence type is set to Email, users will be required to also record a valid email address. The email address must be in a valid e-mail format (e.g. [email protected]). When a valid email address is associated with the contact on the vendor record, they will receive system generated email regarding Bid Notifications and Electronic Payment Notifications.
o Fax – when Fax is identified as the correspondence type, a fax number will be required. If fax is selected, the system will not automatically send faxes to the vendor.
o Postal Service – when the Postal Service correspondence type is entered, users will also be required to have a physical address associated with the Address Line. This would have been entered in the Address Information section. If a different address exists for the contact identified, users can use the Contact Address Information section to identify the address associated with the contact.
• The Phone field is used to record the Phone Number for the created Contact. This field is will be required in order for the document to be approved. Format phone numbers as 123-456-7890.
NOTE: An email address is required for the payment contact for vendors that have chosen to have payments electronically deposited. This individual will receive email notifications regarding payments prior to the payments being deposited into their bank accounts.

eMARS 102: Intro to Vendors
14 of 28
Inserting Multiple Addresses Same Address & Contact: If the address and contact information is the same, once you have created one Address, Copy and Insert Copied Line in order to create both required address types. To copy and paste an Address first click on the “Copy Line” Icon next to the line you wish to copy. Secondly click on the Insert Copied Line link. At a minimum you will have to change the Address Type field.
After copying and inserting the original Address Line, users will need to change the Address Type to a different Address Type. This can be done by simply changing the Address Type to the second required Type for the Vendor (i.e. if the first address line was established as the Payment address, then the copied line will need to be set to Ordering). View the associated Address and Contact Information that copied. Users will want to make sure that the Address ID and the Principal Contact ID values in the fields are identical to the original line. Different Address & Contact: If the addresses and contacts are different, then the second address should be added by inserting a new line. Same Address/Different Contact: If the address is the same, but the contact information is different, Auto Generate should not be checked for the Principal Contact ID. Different Address/Same Contact: If the address is different, but the contact information is the same, Auto Generate should not be checked for the Address ID.

eMARS 102: Intro to Vendors
15 of 28
1099 Reporting Information Section Open the 1099 Reporting Information section:
The Commonwealth uses the information from the 1099 Reporting Information section to create the Federal 1099 forms used to report non-employee income. Therefore, when creating a VCC document to establish a vendor, it is of utmost importance that the legal name entered on the document matches exactly what this company has on file with the IRS. If the data does not match, it may result in large fines for the Commonwealth.
Complete the Taxpayer Information tab:
This panel will be pre-populated with the Legal Name and Tax ID Number entered in the Vendor/Customer section of the VCC document. This section allows users to identify the 1099 reporting status for the vendor. It is the user’s responsibility to complete the following required fields:
• The Address, City, State and Zip Code identify the address that will be used for 1099 reporting purposes (required).
• The 1099 Reportable flag states that all related transactions qualify to be reported to the IRS during the 1099 reporting process (required).
NOTE: When establishing a new Vendor, users will want to make sure all information entered regarding the 1099 Reporting status is correct. The Legal Name, Organization Type and TIN should all correspond with the Vendor’s W-9.

eMARS 102: Intro to Vendors
16 of 28
Complete the Certification tab:
• The Send to IRS flag indicates that a 1099 Reporting Information entry is ready to be selected
for extract by the IRS TIN/Name Match Extract process(required).
NOTE: If the 1099 section is not editable, then the Tax ID Number has already been used on a previous vendor record. Please contact the Customer Resource Center to identify the existing record.
eMARS 102: Intro to Vendors
17 of 28
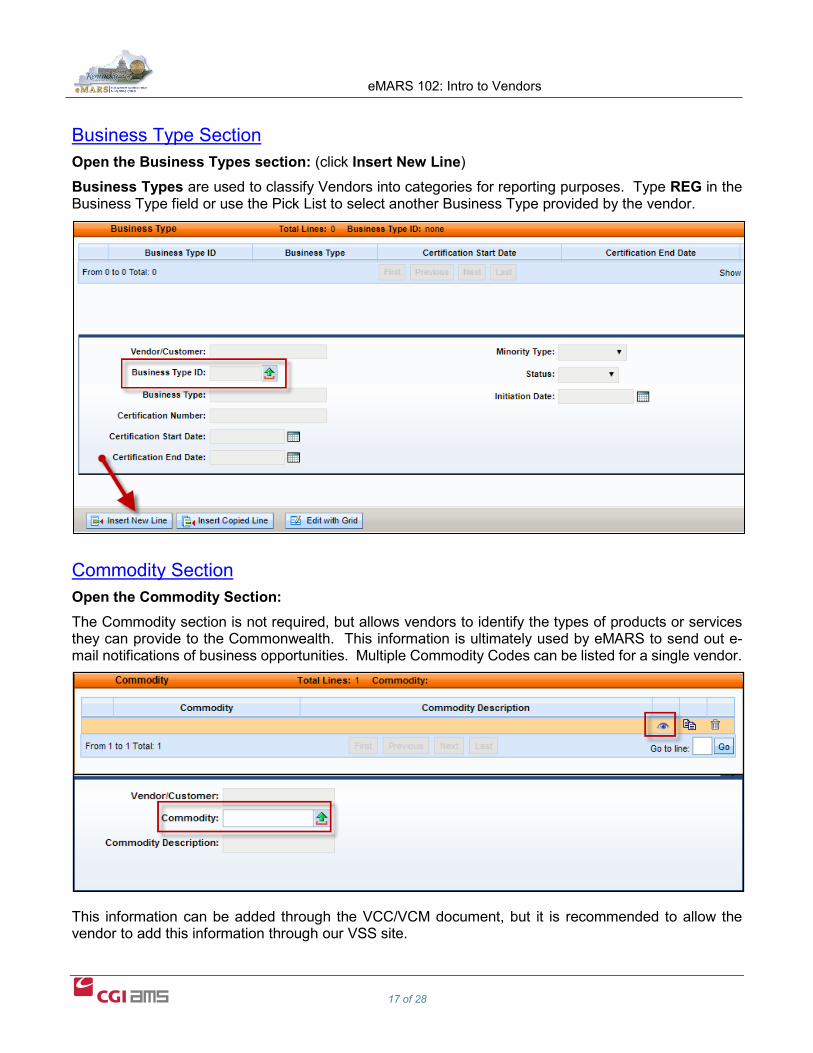
Business Type Section Open the Business Types section: (click Insert New Line) Business Types are used to classify Vendors into categories for reporting purposes. Type REG in the Business Type field or use the Pick List to select another Business Type provided by the vendor.
Commodity Section Open the Commodity Section: The Commodity section is not required, but allows vendors to identify the types of products or services they can provide to the Commonwealth. This information is ultimately used by eMARS to send out e-mail notifications of business opportunities. Multiple Commodity Codes can be listed for a single vendor.
This information can be added through the VCC/VCM document, but it is recommended to allow the vendor to add this information through our VSS site.

eMARS 102: Intro to Vendors
18 of 28
Certification Section Complete the Certification section: (click Insert New Line)
The Certification Section allows the newly created vendor to be used on Procurement and Payment documents in the eMARS system. When processing a Vendor Customer Creation document for a new vendor, users will need to indicate a Vendor Active Status as Active and the Vendor Approval Status as Complete. If creating a new Customer account then users will need to change the Customer Status fields accordingly. Click Validate to check for errors. Click Submit. The document will be sent to the Finance Statewide Accounting Services Vendor Worklist for further processing and Approval.
3 – Vendor/Customer Modification (VCM) A Vendor/Customer Modification (VCM) document is used to modify or add to an existing Vendor or Customer record. This document is used to update Vendor Customer table information, Customer Account Options table information, and 1099 Reporting Information table information. No agency approvals are required. This document will be sent through workflow. Before changes on the VCM are accepted and applied to the Vendor file they must be approved by the Office of the Controller.
NOTE: Not all fields in the VCC and VCM are required. Please see the Appendix for a list of all the required fields.
eMARS 102: Intro to Vendors
19 of 28
Users can submit requests to modify existing vendor information. They will need to complete a VCM document for approval and submit correspondence from the vendor (ie invoice, email, vendor application, W-9, etc.). You will need to email or fax the correspondence from vendor to SAS with referencing VCM document ID. (Email: [email protected] or Fax: 502-564-5319)
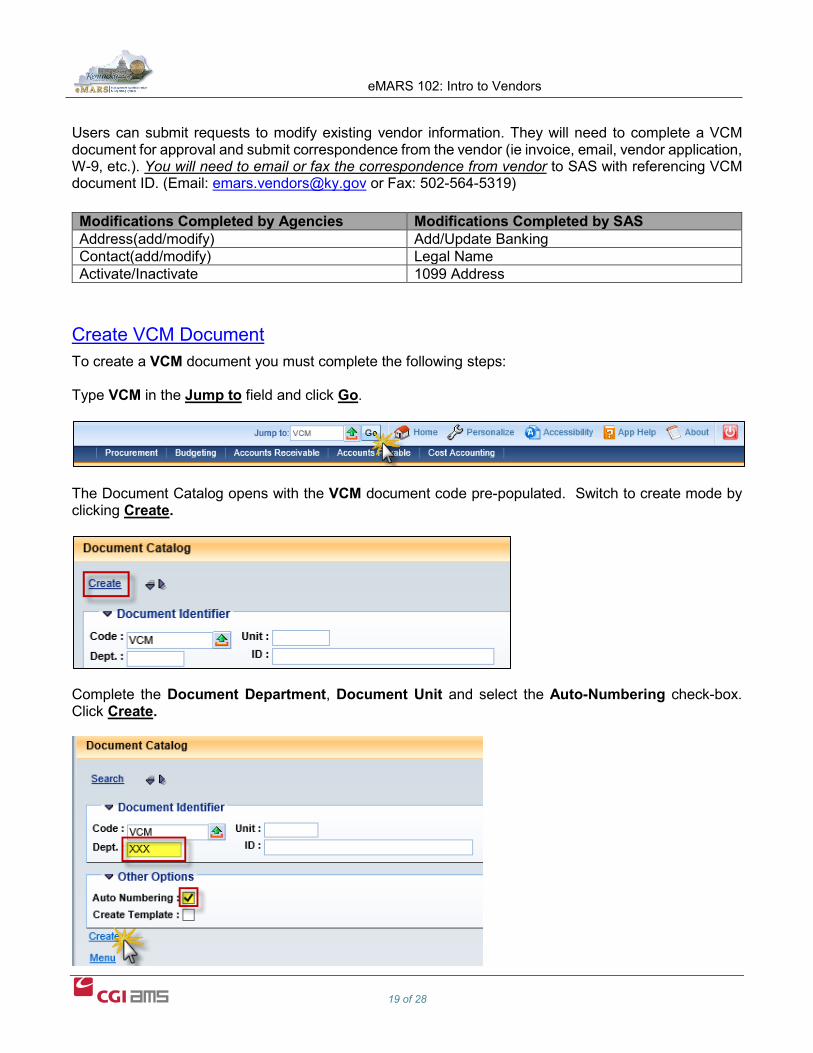
Create VCM Document To create a VCM document you must complete the following steps: Type VCM in the Jump to field and click Go.
The Document Catalog opens with the VCM document code pre-populated. Switch to create mode by clicking Create.
Complete the Document Department, Document Unit and select the Auto-Numbering check-box. Click Create.
Modifications Completed by Agencies Modifications Completed by SAS Address(add/modify) Add/Update Banking Contact(add/modify) Legal Name Activate/Inactivate 1099 Address

eMARS 102: Intro to Vendors
20 of 28
A new blank VCM document opens to the Header section General Information tab. Complete the General Information section by selecting the appropriate Vendor/Customer number using the pick list or by typing the vendor number in the Vendor/Customer field. This indicates the Vendor record that you will be modifying. You will need to click Save if you have typed the vendor number in order to pull in the information from the VCUST table.
NOTE: Include the change being made to the vendor record in the Document Description field on the Header of the VCM.

eMARS 102: Intro to Vendors
21 of 28
Modify Existing Address 1. In the VCM document, click on Master Address section in the Secondary Navigation Panel 2. Click Insert a New Line 3. Select the Line Action of Modify and click Save
4. Open the Modify Existing Master Address tab 5. Select the Address ID that you want to change
6. Open the Address Information tab 7. Change the address
8. Validate and Submit the document
NOTE: The Location Name should be updated if the Master Address has been updated, unless the vendor has EFT information on their record. In this case, the Location Name should remain EFT Eligible.
eMARS 102: Intro to Vendors
22 of 28
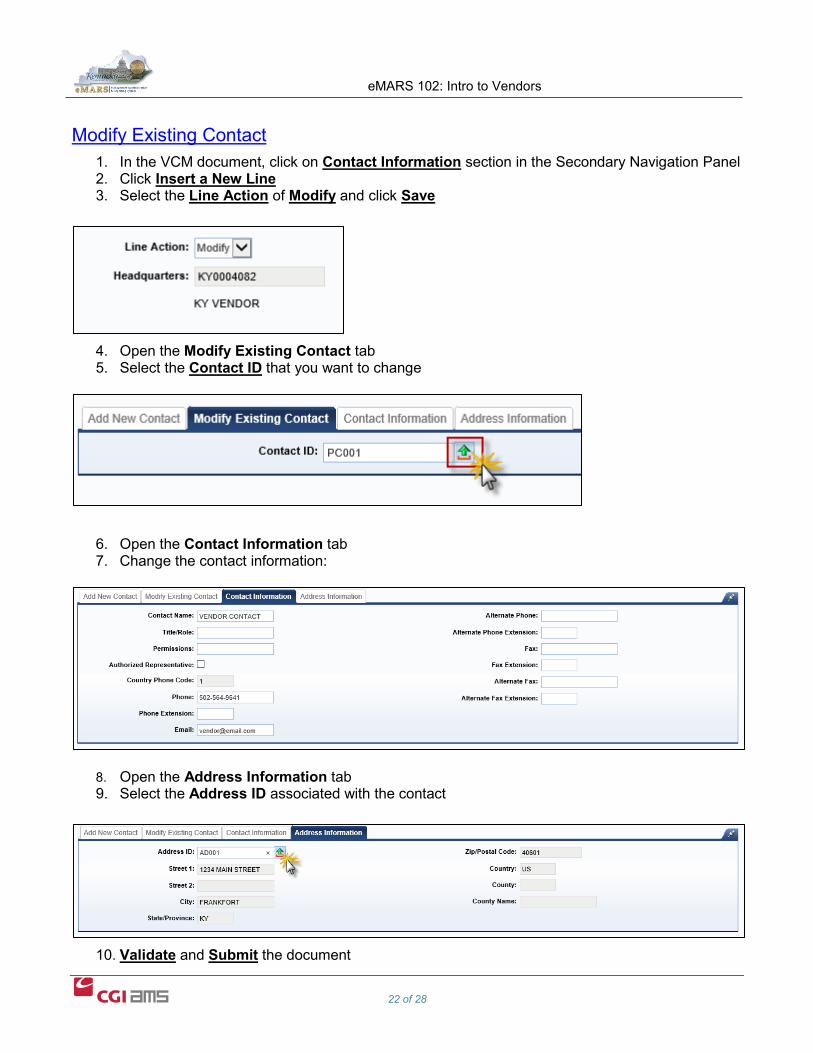
Modify Existing Contact 1. In the VCM document, click on Contact Information section in the Secondary Navigation Panel 2. Click Insert a New Line 3. Select the Line Action of Modify and click Save
4. Open the Modify Existing Contact tab 5. Select the Contact ID that you want to change
6. Open the Contact Information tab 7. Change the contact information:
8. Open the Address Information tab 9. Select the Address ID associated with the contact
10. Validate and Submit the document
eMARS 102: Intro to Vendors
23 of 28
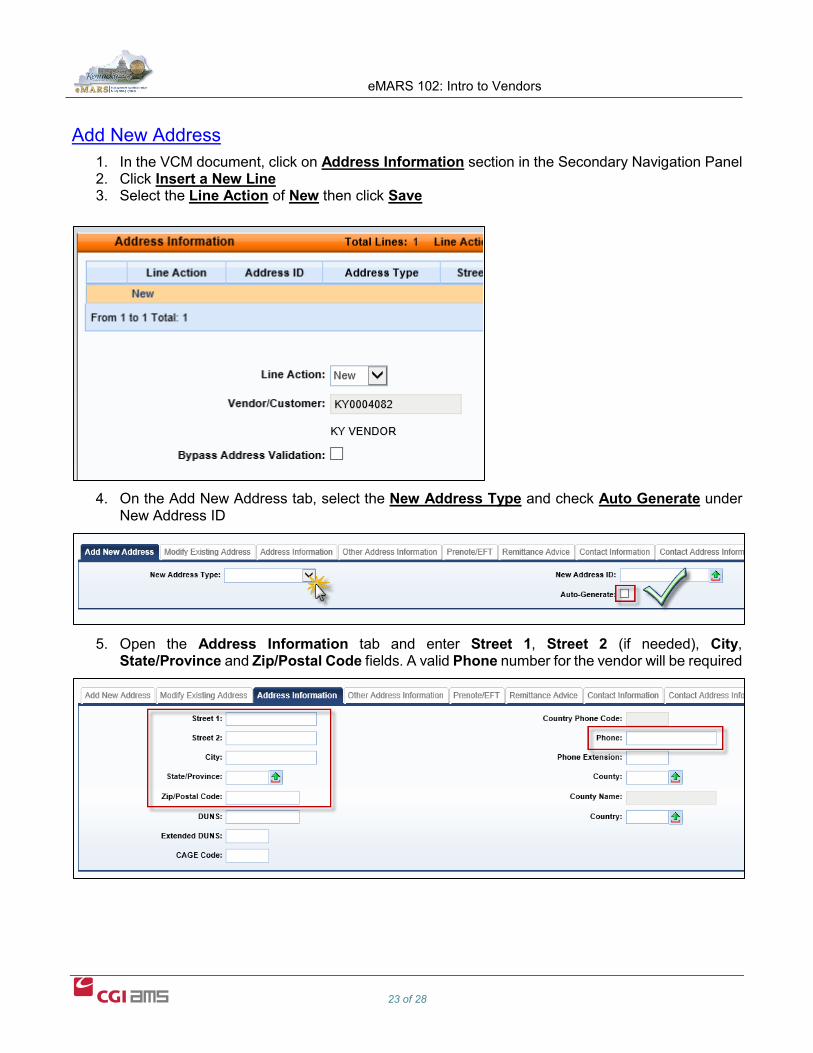
Add New Address 1. In the VCM document, click on Address Information section in the Secondary Navigation Panel 2. Click Insert a New Line 3. Select the Line Action of New then click Save
4. On the Add New Address tab, select the New Address Type and check Auto Generate under
New Address ID
5. Open the Address Information tab and enter Street 1, Street 2 (if needed), City,
State/Province and Zip/Postal Code fields. A valid Phone number for the vendor will be required
eMARS 102: Intro to Vendors
24 of 28
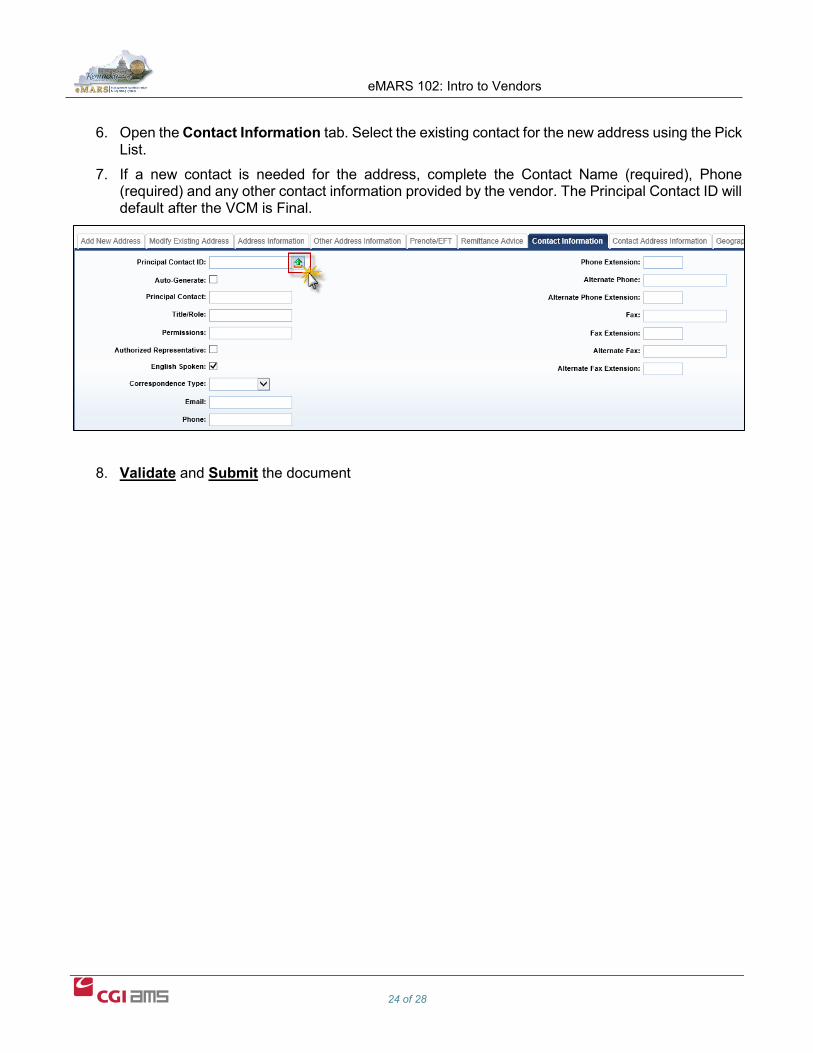
6. Open the Contact Information tab. Select the existing contact for the new address using the Pick List.
7. If a new contact is needed for the address, complete the Contact Name (required), Phone (required) and any other contact information provided by the vendor. The Principal Contact ID will default after the VCM is Final.
8. Validate and Submit the document

eMARS 102: Intro to Vendors
25 of 28
Updating Certification In order to make an existing record active/inactive, in the VCM document, click on the Certification section in the Secondary Navigation Panel.
1. Click Insert a New Line 2. Then click Load Values(this populates the information from VCUST)
The following table displays the requirements for making a record active/inactive as a vendor or customer:
3. Update the fields according to whether the record needs to be made active or inactive. 4. Validate and Submit the document
Active Inactive Vendor Active Status Active Inactive Vendor Approval Status Complete Incomplete Customer Active Status Active Inactive Customer Approval Status Complete Incomplete

eMARS 102: Intro to Vendors
26 of 28
Other Vendor Modifications Legal Name – If the legal name for a vendor has changed, the vendor should submit this request to the Office of the Controller via a W-9 or through VSS. 1099 Classification/Address – If the 1099 classification or address has changed, the vendor should submit this request to the Office of the Controller via a W-9 or through VSS. Add/Update Banking – The vendor should complete the SAS63 for any banking changes on an existing vendor record. Taxpayer ID Number – If the vendor’s TIN has changed, a new vendor record will need to be created and the old record will need to be made Inactive. The user can create the VCM to make the old record Inactive, and the vendor can register the new TIN on VSS or the agency can create a VCC. These requests to modify existing vendor information can be emailed or faxed to the Office of the Controller. (Email: [email protected] or Fax: 502-564-5319)
4 – Employee Records Employee Records are created and updated through KHRIS. Agency personnel will no longer be allowed to process VCC/VCM documents for KHRIS employees for travel reimbursement or to maintain their eMARS Employee Information, as this will now sync with KHRIS.
5 – Miscellaneous Vendors Did you know that for one-time or infrequent payments there are miscellaneous vendors that may be used? The following four miscellaneous vendor codes are set up in eMARS for this purpose. Using these vendors requires more information to be entered on the payment request (i.e. name, address, and taxpayer information if the object is 1099 reportable). However, by utilizing these vendor codes for those one-time or infrequent payments, you will save time and effort by not having to create a new vendor customer record within eMARS.
6 – Vendor Self Service Site Vendors can also register their company using the eMARS Vendor Self Service (VSS) website. The vendor self service site allows vendors to maintain their own accounts (address, contact information, commodities, etc). KY VSS Registration Guide.pdf

eMARS 102: Intro to Vendors
27 of 28
7 – Appendix The following list identifies the fields and the specified value for each as required by SAS when submitting VCC or VCM documents:
Vendor Customer Section General Information Tab Vendor Customer – Begins with KY or KS Auto Generate - Checked Location Name – Needs to be Street 1 from the address or EFT Eligible for vendors with
banking information Organization Type – Must be entered(Individual/Company)
• Company – complete Company Name field • Individual – complete Frist Name & Last Name fields, Middle Name(if provided) • The only special characters valid in the Company Name field are the hyphen “-” or
ampersand “&”. These should only be included if shown on the vendor’s W-9. Account Indicators Tab None of these should be checked without justification in comments Organization Tab 1099 Classification – Must be entered Taxpayer ID Number – Must be entered and valid Taxpayer ID Number Type – Must be entered and valid Disbursement Options Tab Category – STM Default Priority – 99 Default Format – REG Single Payment Indicator – blank/unchecked Name on Check – Both Prenote/EFT Tab
If EFT payments are requested vendor needs to complete and sign SAS63 form: Generate EFT Payment – Checked ABA Number – Entered and valid(routing number) Account Type – Checking or Savings Account Number – Entered EFT Format – CCD EFT Status – Eligible for EFT Address Section If the vendor has a single address that will be used for the Ordering and Payment
address, only create one Address ID (AD001). To do this, copy the existing address line, Insert Copied Line and change the address type.
If two address codes are on the document with the same address, the document will be rejected.
General Information Tab Address Type – There must be at least two addresses (one payment and one ordering) Default Record – Checked for Payment and Ordering address Address Information Tab Address ID should be AD001 Street 1, Street 2 (if needed), City, State/Province and Zip/Postal Code fields A valid Phone number for the vendor will be required(ie. 123-456-7890)

eMARS 102: Intro to Vendors
28 of 28
Contact Information Tab Principal Contact ID should be PC001 Principal Contact and a valid Phone Number is required A valid Phone number for the vendor will be required(ie. 123-456-7890) 1099 Reporting Information Section Taxpayer Information Tab Vendor Customer, Taxpayer ID Number, TIN Type – Must be entered Name, Address, City, State, Zip Code – Must be entered 1099 Reportable – Checked Certification Tab Send to IRS – Checked Business Type Section Business Type ID – Must have one business type entered(REG) Certification Section Vendor Active Status – Active Vendor Certification Status – Complete
When creating VCC documents, there are certain fields that the Controller's Office requires be completed with specific values. This vendor checklist shows the fields that are required and the specified values. Any VCC or VCM document that does not have these values correct will be rejected by Statewide Accounting Services (SAS). Rejecting VCC or VCM documents could potentially cause delays in other documents needing to be processed that reference the vendor customer code. Please spend a few minutes verifying the information in these fields before submitting the VCC/VCM to ensure all values are correct. Doing so will save time and ensure accuracy of our vendor information.
Contact Us: If you have general eMARS questions, please contact the help desk at (502) 564-9641, Toll Free at (877) 973-4357 or [email protected]. Send vendor correspondence and questions to [email protected].
Ouick Links: W-9.pdf EZ Vendor Registration Application.pdf Vendor Registration Application.pdf KY VSS Registration Guide.pdf SAS-63.pdf