EM Panel User’s Manual - NWTC user... · EM Panel User’s Manual ... * On a TFT liquid crystal...
88
Hitachi Software Engineering America, Ltd. November, 2001 EM Panel User’s Manual Version 2.0
Transcript of EM Panel User’s Manual - NWTC user... · EM Panel User’s Manual ... * On a TFT liquid crystal...

Hitachi Software Engineering America, Ltd. November, 2001
EM Panel User’s Manual Version 2.0
ii
About this Manual Descriptions Windows NT is defined as the Microsoft® Windows NT® Workstation Operating system Version 4.0 and the Microsoft Windows NT Server Operating system Version 4.0. Windows 95 and Windows 98, or Windows, is defined as the Microsoft Windows® 95 Operating System and the Microsoft Windows 98 Operating System. Windows 2000 is defined as the Microsoft Windows 2000 Professional Operating System and the Microsoft Windows 2000 Server Operating System
Trademarks LEADTOOLS is a program name of LEAD Technologies Inc. LEADTOOLS is a registered trademark of LEAD Technologies Inc. Microsoft® is a registered trademark of Microsoft Corp. in the U.S. and other countries. Microsoft Internet Explorer is a product name of Microsoft Corp. in the U.S. and other countries. Microsoft NetMeeting is a product name of Microsoft Corp. in the U.S. and other countries. TCP/IP is a protocol standardized by the U. S. Department of Defense. Windows is a registered trademark or trademark of Microsoft Corp. in the U.S. and other countries. Windows NT is a registered trademark of Microsoft Corp. in the U. S. and other countries. Products LEADTOOLS®(Copyright© 1991-1997 by LEAD Technologies, Inc.) is included as a runtime module. smARTwriter for Windows 95/NT by Art Recognition Technologies, Inc
iii
Table of Contents
Chapter 1 – Installation Hardware Installation and Configuration 1.1 LCD Interactive Hardware Installation....................................................... 3 Checking Packed Components ............................................................ 3 Hardware Cabling Diagram.................................................................. 6 LCD Monitor Installation....................................................................... 7 Tablet Installation ................................................................................ 8 Using the StarBoard EM Pen ............................................................... 9 Calibrating the StarBoard EM Panel ................................................... 11 Adjusting the LCD Monitor ................................................................. 12
1.2 Integrating with a Projector .................................................................... 15
ShareWizard Software Installation 1.3 Software Installation.......................................................................... ... 15 1.4 Entering Enduser Information............................................................. ... 16 1.5 Choosing Program Destination .......................................................... ... 16 1.6 Customizing Install Options ............................................................... ... 17 1.7 Startup Options................................................................................. ... 17
1.8 Installing Adobe Acrobat Reader........................................................ ... 18 1.9 Installing smARTwriter....................................................................... ... 18
LCD Interactive Panel Installation
1.10 Rebooting and LCD Panel Installation ................................................ ... 18 1.11 Communications Port Setup .............................................................. ... 19 1.12 Final Installation and Rebooting ......................................................... ... 19 1.13 Calibration Sequence ........................................................................ ... 20 1.14 Touch Panel Menu ............................................................................ ... 20 1.15 Calibration Menu............................................................................... ... 21
Button Menu...................................................................................................... ... 21
1.16 Sound Menu..................................................................................... ... 22 1.17 Diagnostic Menu ............................................................................... ... 22 1.18 About ELO........................................................................................ ... 22
iv
Chapter 2 – ShareWizard Launcher ShareWizard Launcher 2.1 Running Launcher for the First Time....................................................... 25 2.2 Launching Applications.......................................................................... 25 2.3 The Launcher Menu .............................................................................. 26 2.4 The About Dialog Box............................................................................ 26 2.5 Closing the Launcher............................................................................. 26 Customizng ShareWizard Launcher 2.6 The Default Settings.............................................................................. 26 2.7 Changing Docking Edges ...................................................................... 26 2.8 Floating Window and Button Arrangement Styles .................................... 27 2.9 Large and Small Views .......................................................................... 27 2.10 Show Text ............................................................................................ 27 2.11 Always on Top ...................................................................................... 28 2.12 Auto Hide ............................................................................................. 28 2.13 Auto Fit................................................................................................. 28
Chapter 3 – ShareWizard Pen
Description 3.1 Introduction to ShareWizard Pen............................................................ 31 3.2 The Windows of ShareWizard Pen ......................................................... 31 3.3 The Main Window ................................................................................. 31 3.4 The Buttons of ShareWizard Pen ........................................................... 32 3.5 Making Annotations with the Pen Tool .................................................... 33 3.6 Making Annotations with the Highlighter Tool .......................................... 33 3.7 Erasing Annotations .............................................................................. 33 3.8 Changing Colors ................................................................................... 33 3.9 Changing Tool Thickness....................................................................... 33 3.10 Deleting All Annotations on the Current page .......................................... 34 3.11 Adding a New Page............................................................................... 34 3.12 Saving Pages........................................................................................ 34 3.13 Printing................................................................................................. 34 Advanced Operations 3.14 Capturing Screen Images ...................................................................... 35 3.15 Opening a File ...................................................................................... 35 3.16 Using Image Browser ............................................................................ 35 3.17 Deleting Captured Pages....................................................................... 36 3.18 Changing the Page Order ...................................................................... 36 3.19 Designating the Default “Save File” Location.......................................... 36 3.20 Configuring the Cursor Display Status .................................................... 36 3.21 Configuring the Button Size.................................................................... 37 3.22 Configuring the Display Style ................................................................. 37 3.23 Configuring Confirmations...................................................................... 38
Tips & Notes....................................................................................................... 39

v
Chapter 4 – Handwriting Recognition Basic Operation 4.1 Introduction to Handwriting Recognition.................................................. 43 4.2 Activating and Deactivating the Program ................................................ 43 4.3 Using the Program ................................................................................ 43 4.4 Input Devices........................................................................................ 43 4.5 Limitations............................................................................................ 44 4.6 How Does It Work? ............................................................................... 44 4.7 Handwriting Recognition........................................................................ 44 4.8 Achieving Good Recognition.................................................................. 44 4.9 Modes of Handwriting Recognition ......................................................... 45 4.10 Writing Text .......................................................................................... 45 4.11 Selecting Text....................................................................................... 45 4.12 Using Gestures..................................................................................... 46 4.13 Using the Edit Gesture and the Correction Vector ................................... 46 4.14 Starting with Dots.................................................................................. 46 4.15 Terminating Handwriting Recognition ..................................................... 48 The Handwriting Recognition Menu 4.16 smARTwriter......................................................................................... 48 4.17 Trainer ................................................................................................. 48 4.18 Properties............................................................................................. 48 4.19 Help ..................................................................................................... 48 Training Handwriting Recognition 4.20 Training Text ........................................................................................ 49 4.21 Training Shortcuts................................................................................. 50 4.22 Training Gestures ................................................................................. 50 4.23 Training International and Special Characters......................................... 51 Customizing Handwriting Recognition 4.24 General Properties................................................................................ 52 4.25 Ink Properties ....................................................................................... 52 4.26 Hot Key ................................................................................................ 53 4.27 Library Properties.................................................................................. 54 4.28 Constraints ........................................................................................... 55 Quick Trainer 4.29 Using Quick Trainer .............................................................................. 56 Using a Personal Handwriting Recognition Library 4.30 Creating a Personal Library ................................................................... 57
4.31 Creating and Opening Multiple Libraries ................................................. 57

vi
Chapter 5 – MultiMedia Notepad Features 5.1 Description and Features....................................................................... 61 Operation and Menu Descriptions 5.2 Starting Multimedia Notepad .................................................................. 62 5.3 Title Bar................................................................................................ 62 5.4 Menu Bar.............................................................................................. 62 5.5 File Menu ............................................................................................. 62 5.6 Edit Menu ............................................................................................. 63 5.7 Tools Menu........................................................................................... 64 5.8 Page Menu ........................................................................................... 66 5.9 Insert Menu........................................................................................... 67 5.10 Audio/Video Menu................................................................................. 68 5.11 Database Menu..................................................................................... 70 5.12 Utilities Menu ........................................................................................ 73 5.13 View Menu............................................................................................ 73 5.14 Help Menu ............................................................................................ 74 5.15 Main Display and Scroll Bars.................................................................. 75 5.16 Command Icons Bar.............................................................................. 75 5.17 Tool Icons Bar....................................................................................... 75 5.18 Page Control Bar................................................................................... 76 5.19 Status Bar............................................................................................. 76
Chapter 6 – ShareWizard Video Pen 6.1 Introduction........................................................................................... 79 6.2 Playing a Video File............................................................................... 79 6.3 Annotating on a Still Frame.................................................................... 80
6.4 Viewing and Working with Saved Frames ............................................... 81 6.5 Selecting a Location to Save Annotated Frames ..................................... 82

1
Chapter 1
SSttaarrBBooaarrdd EEMM PPaanneell IInnssttaallllaattiioonn

2
Table of Contents
Hardware Installation and Configuration
1.1 EM Panel Hardware Installation...........................................................3 Checking packed components.....................................................3 Hardware Cabling Diagram .........................................................6 LCD Monitor Installation..............................................................7 Tablet Installation ......................................................................8 Using the StarBoard EM Pen ......................................................9 Calibrating the StarBoard EM Panel ..........................................11 Adjusting the LCD Monitor ........................................................12 1.2 Integrating with a Projector................................................................15
ShareWizard Software Installation 1.3 Software Installation ............................................................................15 1.4 Entering Enduser Information...............................................................16 1.5 Choosing Program Destination.............................................................16 1.6 Customizing Install Options..................................................................17 1.7 Startup Options ...................................................................................17 1.8 Installing Adobe Acrobat Reader..........................................................18 1.9 Installing smARTwriter.........................................................................18
LCD Interactive Panel Installation
1.10 Rebooting and LCD Panel Installation ..................................................18 1.11 Communications Port Setup ................................................................19 1.12 Final Installation and Rebooting ...........................................................19 1.13 Calibration Sequence ..........................................................................20 1.14 StarBoard EM Panel Menu ..................................................................20 1.15 Calibration Menu.................................................................................21 1.16 Button Menu.......................................................................................21 1.17 Sound Menu.......................................................................................22 1.18 Diagnostic Menu .................................................................................22 1.19 About ELO .........................................................................................22
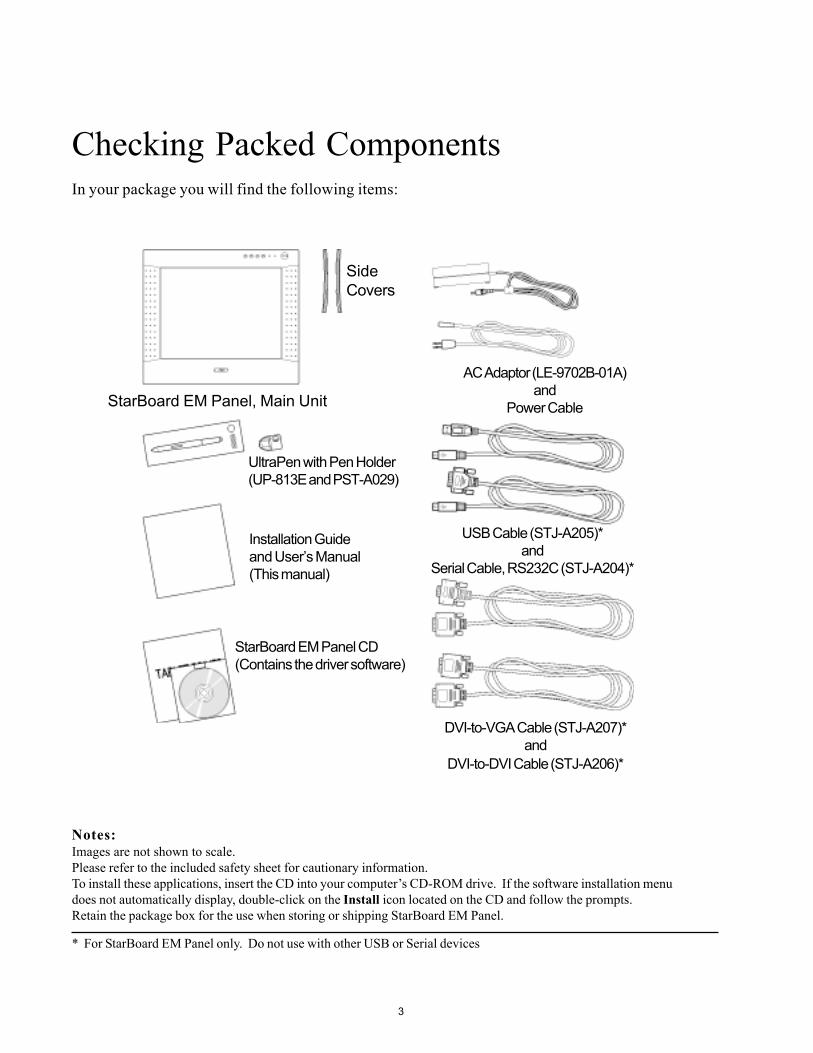
Checking Packed ComponentsIn your package you will find the following items:
StarBoard EM Panel, Main Unit
SideCovers
AC Adaptor (LE-9702B-01A)and
Power Cable
UltraPen with Pen Holder(UP-813E and PST-A029)
USB Cable (STJ-A205)*and
Serial Cable, RS232C (STJ-A204)*
Installation Guideand User’s Manual(This manual)
StarBoard EM Panel CD(Contains the driver software)
DVI-to-VGA Cable (STJ-A207)*and
DVI-to-DVI Cable (STJ-A206)*
Notes:Images are not shown to scale.Please refer to the included safety sheet for cautionary information.To install these applications, insert the CD into your computer’s CD-ROM drive. If the software installation menudoes not automatically display, double-click on the Install icon located on the CD and follow the prompts.Retain the package box for the use when storing or shipping StarBoard EM Panel.
* For StarBoard EM Panel only. Do not use with other USB or Serial devices
3

Component Functions
The LCD monitor and tablet sensor function as an integrated input and output device.* The LCD resolution is1024 x 768 pixels at 16,777,216 colors. The tablet sensor reports pen coordinates, pressure, switch, anderaser information.
On Screen Display(OSD) ControlsThese controls enableyou to adjust a variety ofdisplay settings
Status LampLights green when the pentip or a side switch ispressed, or when theeraser enters proximity ofthe LCD screen
Power LampLights green when power has been suppliedto both StarBoard EM Panel and the computerand a video signal is present. Glows orangewhen your computer is starting up and if yourcomputer enters a power management modein which video signals are not sent.
Power SwitchTurns power to the unit on or off.
Pen HolderCan be attached or detachedfrom the location shown.When attached, the holdercan be moved up and down
LCD Display Screen
Side CoverCloses the side slot onwhich the pen holder isnot attached
* On a TFT liquid crystal display, a very small number of pixels may be permanently illuminated or not illuminated at all. This does not mean that the display is defective. When exerting hard downward pressure on the display screen surface, you may notice the temporary appearance of a moire pattern. This is temporary and does not mean the display is defective. When a still image is displayed for a long period of time without refreshing the screen, an after-image may remain for a short period of time.
4

Important: Be sure to adjust the tilt angle of the stand to the low tilt positionbefore packaging StarBoard EM Panel. If you do not close the stand, thenotched mechanism may be damaged during transportation and storage. Donot lift the unit by the stand; this may damage the stand mechanism. When liftingor moving the unit, always do so by grasping the main body casing.
StandThe stand can be used toadjust the tilt angle of theunit from low (18 from thehorizontal) to high (73 fromhorizontal)
Connector Panel CoverTo remove the cover, slideit to the right
Stand Adjustment LeverPull this lever to adjust the stand. Release thelever to lock the stand in place
Be careful to avoidcatching your fingerin the gap of themovable portion ofthe stand
5
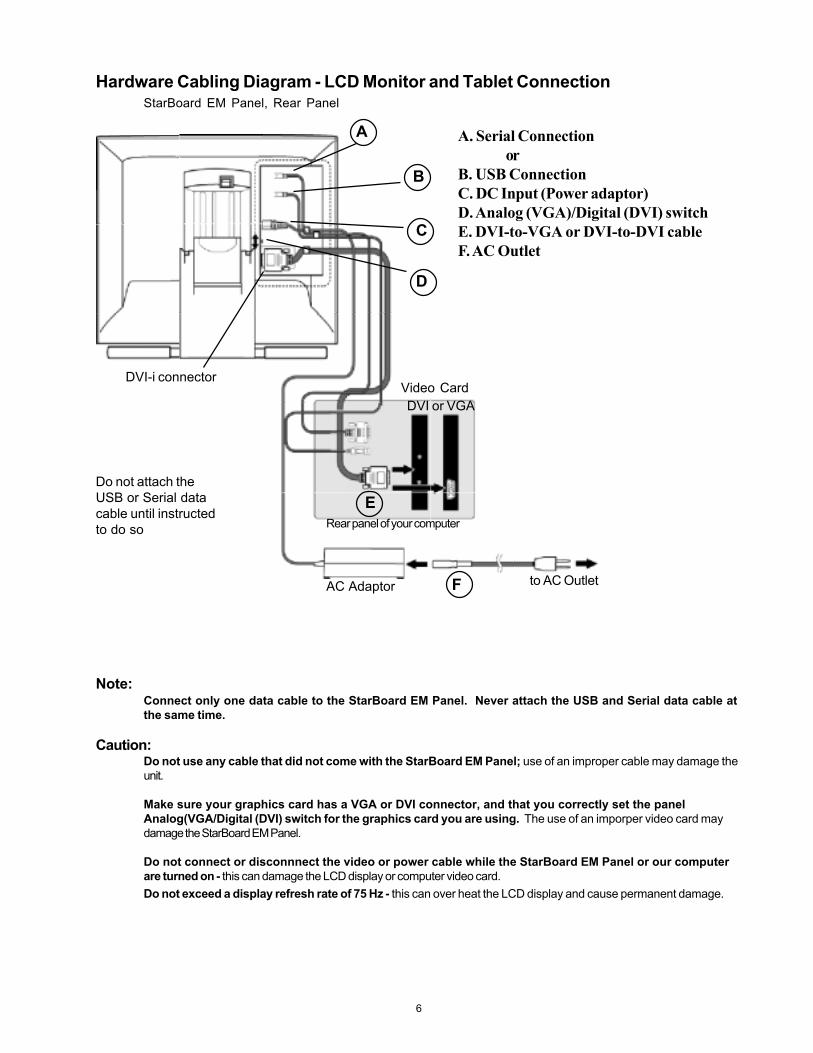
Hardware Cabling Diagram - LCD Monitor and Tablet ConnectionStarBoard EM Panel, Rear Panel
Video CardDVI or VGA
Rear panel of your computer
AC Adaptor to AC Outlet
E
F
A
B
C
D
Do not attach theUSB or Serial datacable until instructedto do so
DVI-i connector
A. Serial Connectionor
B. USB ConnectionC. DC Input (Power adaptor)D. Analog (VGA)/Digital (DVI) switchE. DVI-to-VGA or DVI-to-DVI cableF. AC Outlet
Note:Connect only one data cable to the StarBoard EM Panel. Never attach the USB and Serial data cable atthe same time.
Caution:Do not use any cable that did not come with the StarBoard EM Panel; use of an improper cable may damage theunit.
Make sure your graphics card has a VGA or DVI connector, and that you correctly set the panelAnalog(VGA/Digital (DVI) switch for the graphics card you are using. The use of an imporper video card maydamage the StarBoard EM Panel.
Do not connect or disconnnect the video or power cable while the StarBoard EM Panel or our computerare turned on - this can damage the LCD display or computer video card.Do not exceed a display refresh rate of 75 Hz - this can over heat the LCD display and cause permanent damage.
6

LCD Monitor Installation
StarBoard EM Panel can be used alone or with another display, such as a CRT monitor or LCD Projector. Touse Panel with another display, you will need two graphics cards or a graphics card with dual output. Depend-ing on the capabilities of your video card and operating system, you may be able to set up the StarBoard EMPanel as a mirrored, extended, or independent monitor. Refer to your video card documentation for moreinformation on its capabilities.
In the first stage of the installation process you will install the Panel as a monitor on your system. As you workthrough the first stage of the installation process, please refer to the Hardware Cabling Diagram - LCD Monitorand Tablet Connection when making cable connections.
Important: Do not connect the USB or Serial data cable until instructed to do so.
� Turn off your computer.Caution: Never connect or disconnect the video or power cable while your computer or StarBoardEM Panel is powered on - this can damage the LCD display or video card.
� Determine if your computer has an analog (VGA) or digital (DVI) connection. Then set the Analog(VGA)/Digital (DVI) switch for the video card you are using. Move the switch up for Analog (VGA) ,and move it down for Digital (DVI).
� Choose the video cable appropriate for the video card that you are using. If you are connecting to aVGA card, use the DVI-to-VGA cable. (Note that an analog (VGA) connector has 15 pins.) If you areconnecting to a DVI card, use the DVI-to-DVI cable. Connect the DVI connector end to the StarBoardEM Panel, and the other end to your computer’s video card. Be sure to tighten the thumbscrews on theconnectors. If your computer has only one video connector, you will need to unplug your previousmonitor.
� Connect the AC adaptor to the StarBoard EM Panel. Then connect the AC adaptor power cable andplug the adaptor into an AC outlet.
� Turn on the StarBoard EM Panel. The power lamp will light.
� Next, turn on your computer. (For Windows, if the New Hardware Wizard displays, follow theprompts while making sure the select the default options.)
Note: For Windows, the StarBoard EM Panel color profile will be added to your computer’s colormanagement system during this installation. If you are prompted for the location of the StarBoard EMPanel Monitor files, insert the StarBoard Installation CD into your computer’s CD-ROM drive and followthe prompts to install any monitor software. You may then want to select the StarBoard EM Panelprofile in the system’s Display Properties control panel for use with StarBoard EM Panel.
7
Tablet Installation
After you have completed the LCD monitor installation and configured the monitor settings, you will need toinstall the StarBoard EM Panel cabling and the Panel driver software. When installing the StarBoard EMPanel driver for the StarBoard EM Panel, Hardware Cabling Diagram - LCD Monitor and Tablet Connection:
� First, shut down and power off your computer and the StarBoard EM Panel.
� For USB installation: Choose the StarBoard EM Panel USB cable and plug the round end into theport labeled USB. Plug the other end into an available USB port on your computer.
Important: Do not use any other cable except the StarBoard EM Panel USBcable; make sure you select the correct cable and that you plug it into thecorrect port. If the connection is difficult to make, do not force the plug intothe port. Instead, verify that there are no bent pins and that you have thecorrect cable and port.
� For Serial Installation: Choose the StarBoard EM Panel serial cable and plug the round end intothe port labeled IOIOI. Plug the other end into an available serial port on your computer.If you are using Windows 98, ME, 2000, or XP. It is recommended to use the USB connection for Panelinterface.
Important: Do not use any other cable except the StarBoard EM Panel serialcable; make sure you select the correct cable and that you plug it into thecorrect port. If the connection is difficult to make, do not force the plug intothe port. Instead, verify that there are no bent pins and that you have thecorrect cable and port.
� At the back of the StarBoard EM Panel, insert all three cables between the cable guides and then slidethe connector panel cover into place over the cable connectors. Do not skip this step, as the panelcover will reduce the possiblilty of accidentally disconnecting the cables.
� Next, depending on your operating system and tablet interface that you will be using (USB or serial),refer to one of the following sections for software installation instructions.
8
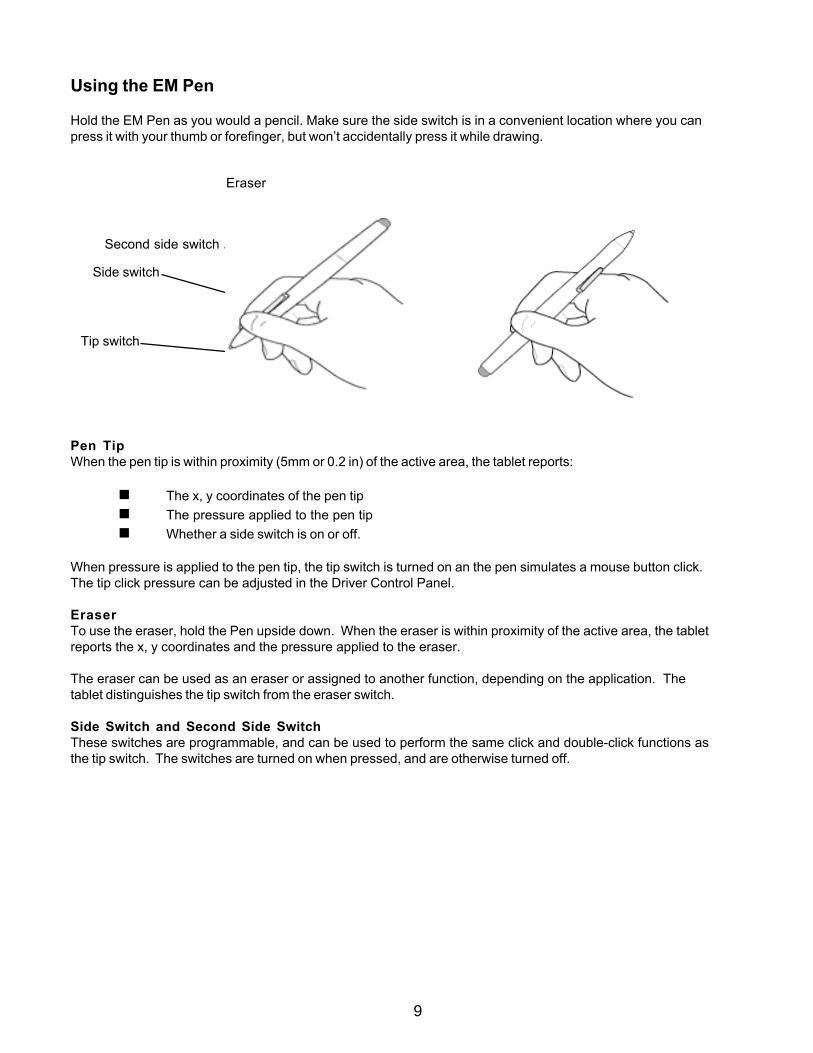
Using the EM Pen
Hold the EM Pen as you would a pencil. Make sure the side switch is in a convenient location where you canpress it with your thumb or forefinger, but won’t accidentally press it while drawing.
Pen TipWhen the pen tip is within proximity (5mm or 0.2 in) of the active area, the tablet reports:
� The x, y coordinates of the pen tip� The pressure applied to the pen tip� Whether a side switch is on or off.
When pressure is applied to the pen tip, the tip switch is turned on an the pen simulates a mouse button click.The tip click pressure can be adjusted in the Driver Control Panel.
EraserTo use the eraser, hold the Pen upside down. When the eraser is within proximity of the active area, the tabletreports the x, y coordinates and the pressure applied to the eraser.
The eraser can be used as an eraser or assigned to another function, depending on the application. Thetablet distinguishes the tip switch from the eraser switch.
Side Switch and Second Side SwitchThese switches are programmable, and can be used to perform the same click and double-click functions asthe tip switch. The switches are turned on when pressed, and are otherwise turned off.
Eraser
Second side switch
Side switch
Tip switch
9
Caring for the StarBoard EM Panel
To clean the StarBoard EM Panel casing, use a soft cloth and mild detergent (such as dishwashingliquid) diluted with water. Do not use paint thinner, benzine, alcohol, or other solvents to clean the unit casing orEM Pen
To clean the display screen, use a soft, dry cloth. If neccessary, slightly moisten the cloth with water andtry again. When cleaning, apply only a light amount of pressure to the display screen and do not make thesurface wet. Do not use detergent to clean the display screen; this may damage the coating on the screen.Please note that damage of this is not covered by the manufacturer’s warranty
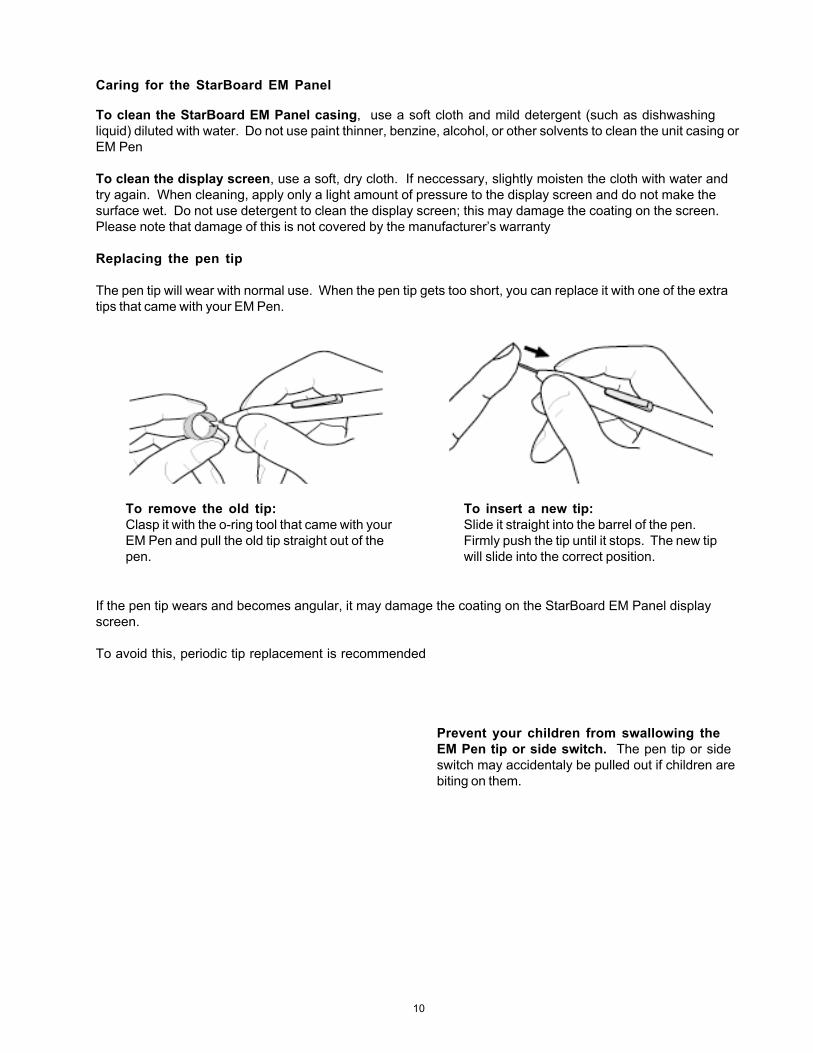
Replacing the pen tip
The pen tip will wear with normal use. When the pen tip gets too short, you can replace it with one of the extratips that came with your EM Pen.
To remove the old tip:Clasp it with the o-ring tool that came with yourEM Pen and pull the old tip straight out of thepen.
To insert a new tip:Slide it straight into the barrel of the pen.Firmly push the tip until it stops. The new tipwill slide into the correct position.
If the pen tip wears and becomes angular, it may damage the coating on the StarBoard EM Panel displayscreen.
To avoid this, periodic tip replacement is recommended
Prevent your children from swallowing theEM Pen tip or side switch. The pen tip or sideswitch may accidentaly be pulled out if children arebiting on them.
10
You may want to calibrate the Starboard EM Panel Display in order to line up the screen cursor position withthe position of the EM Pen on the display screen. This may be required to adjust for parallax caused by theacrylic overlay. By default, StarBoard EM Panel attempts to locate the monitor having the optimum resolution(i.e., 1024 x 768) and maps to that monitor. After setting Starboard EM Panel in its working position, follow theprocedure below to calibrate the tablet
In the Control Panel, select theCalibration tab.
If you are working with multiplemonitors, select the Monitor thatcorresponds to StarBoard EMPanel.
Click on the Calibrate... button todisplay the monitor calibrationscreen.
Hold the pen as you normally do,and use the pen tip to click on thecross-hairs in the upper-left corner.
Then click on the cross-hairs thatare displayed in the lower-rightcorner.
Note: The calibration settingapplies to all applications.
Cross-hairs
Windows screen captures shown
Adjustment pattern for phaseand pitch (VGA only)
Calibrating StarBoard EM Panel
Select the Panel Driver Iconinside the Windows Control Panel
11
Adjusting the LCD Monitor
Factory Presets: To enable the StarBoard EM Panel to display the image with the best quality based on theincoming signal, the unit is programmed with some standard display modes set as defaults.
Auto Adjust: When the panel receives a signal that is other than a default display mode, and if the horizontalfrequency is between 28 to 64 kHz and the vertical frequency is between 48 to 75 kHz, an Auto adjust functionwill automatically set the horizontal and vertical postion, phase, and pitch. This function is only applicable toVGA operation.
User Settings: When you manually set the display using the On Screen Display (OSD) function, the settingsare stored within the StarBoard EM Panel for use the next time the unit receives a similar signal. This isapplicable to all display modes.
Working with on screen display settingsStarBoard EM Panel is equipped with an On Screen Display function. The OSD function enables you to adjustand optimize a variety of display settings at the touch of a button. The OSD controls are located at the front ofthe unit.
Menu buttonOpens or closes the OSD menu.
Selection buttonsUse these buttons to select an option that can thenbe activated when you press the Enter button. afteractivating a selected option, press the + button toincrease a selected item value, and press the -button to decrease it.
Enter buttonActivates or deactivates the selectedOSD menu option.
12
The basic process for working with the OSD is as follows:
� Press the Menu button to open the OSD main menu.
� Use the + or - buttons to select an option. When the option you want to adjust is highlighted press theEnter button. The current settings and adjustment sub-menu for that option will appear.
� Use the + or - buttons to adjust the option settings.
� When you have made your changes, press the Enter button to save. To exit, press the Menu button.Note: All settings are automatically saved when the OSD menu closes.
When you open the On Screen Dispay (OSD), the following menu options are displayed as icons:
Contrast Select toincrease or decreaseimage contrast
Brightness Selectto increase ordecrease imagebrightness
Phase (VGA only)Select to reduce oreliminate horizontaldistortion lines. Toautomatically adjust,use the Reset option.
Pitch (VGA only)Select to reduce oreliminate verticaldistoration lines. Toautomatically adjust ,use the Reset option.
13

Horizontal Center(VGA only) Select tomove the screen imageleft or right. To automati-cally adjust, use theReset option.
Vertical Center (VGAonly) Select to movethe screen image up ordown. To automaticallyadjust, use the Resetoption.
Menu Position Selectto move the OSD menuaround the displayscreen
Reset Provides twooptions: Use AutoAdjust to reset only theimage parameters. UseRecall to reset allscreen options to thefactory default.Selecting the exit iconexit the Reset windowwithout resetting anything
Color Provides settingsfor 9300 , 6500 , and5000 Kelvin. Alsoprovides a User optionthat enables you to adjustRed and Blue indepen-dently. Choose a settingto work with and pressEnter to activate yourselection. Change theUser setting by selectingthe icon:
Backlight Select toincrease or decreasethe backlight brightnesslevel.
In the User Adjustmnetwindow, change Redand Blue to calibratecolor centering onGreen. To exit, selectthe icon:
Language Select tochoose a languageoption for the OSD:English, Deutsch,Francais, Espanol,Italiano, or Japanese.
14
15
1.2 Integrating with a Projector The StarBoard EM Panel can act as a control and annotation device for large-scale projection presentations. Two possible configurations for integrating the LCD Panel with a projector:
1. Connect the LCD Panel’s AC power and serial cable as described above. 2. If the projector has both DB-15 VGA IN and OUT ports, then
a. Connect a VGA cable from the computer to the projector’s VGA-IN port b. Connect another VGA cable between the projector’s VGA-OUT port to the LCD
Panel This configuration should pass the video signal from the PC, through the projector and out to the panel. Both the projector and the LCD Panel will have the same video.
3. If there is no VGA OUT on the projector to pass the signal through, use a VGA
distribution amplifier (DA) or splitter. These devices take a single signal cable in and create two or more separate signals out. a. Connect VGA cable from computer to the distribution amplifier IN port. b. The distribution amplifier will provide two equal VGA signals out.
o Connect one VGA cable to the projector o Connect the other to the StarBoard EM Panel
1.3 Software Installation
The installation routine will automatically perform setup when the StarBoard Suite installation disk is inserted in the CD drive. The StarBoard Suite Logo will appear, during the initial scan for system requirements. ShareWizard Installation program will prompt user to read the License Agreement. Please read carefully before proceeding.
16
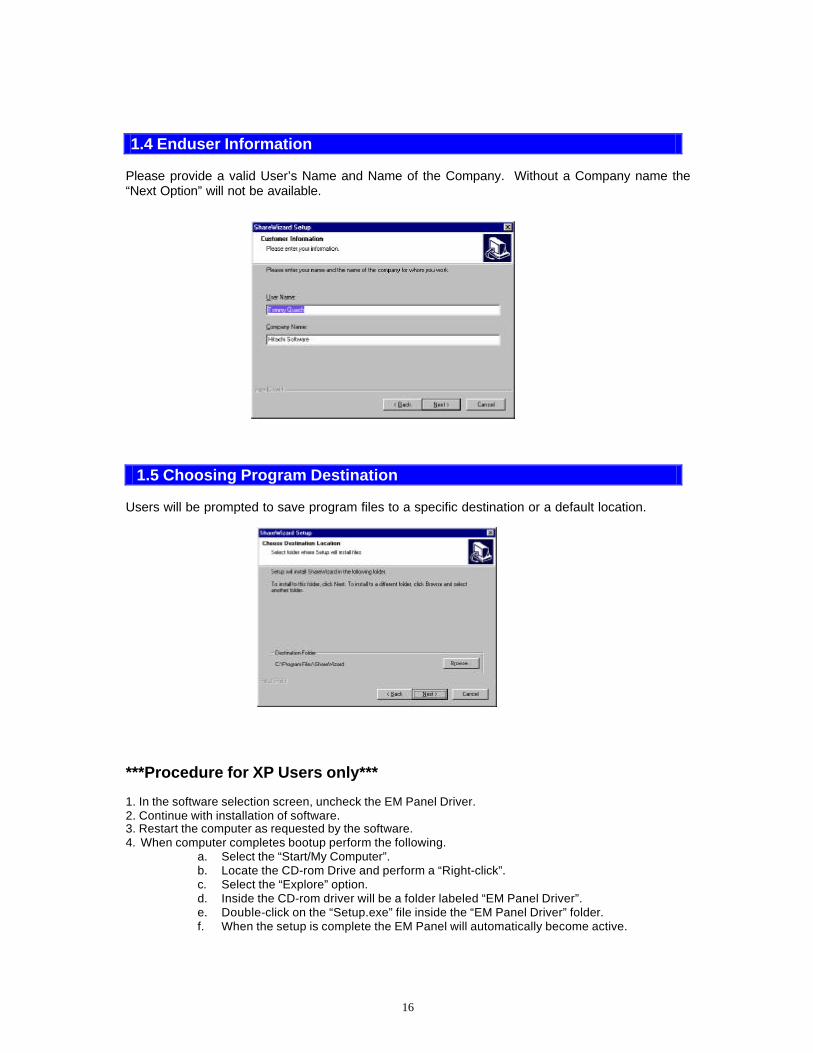
1.4 Enduser Information
Please provide a valid User’s Name and Name of the Company. Without a Company name the “Next Option” will not be available.
1.5 Choosing Program Destination
Users will be prompted to save program files to a specific destination or a default location.
***Procedure for XP Users only*** 1. In the software selection screen, uncheck the EM Panel Driver. 2. Continue with installation of software. 3. Restart the computer as requested by the software. 4. When computer completes bootup perform the following.
a. Select the “Start/My Computer”. b. Locate the CD-rom Drive and perform a “Right-click”. c. Select the “Explore” option. d. Inside the CD-rom driver will be a folder labeled “EM Panel Driver”. e. Double-click on the “Setup.exe” file inside the “EM Panel Driver” folder. f. When the setup is complete the EM Panel will automatically become active.
17
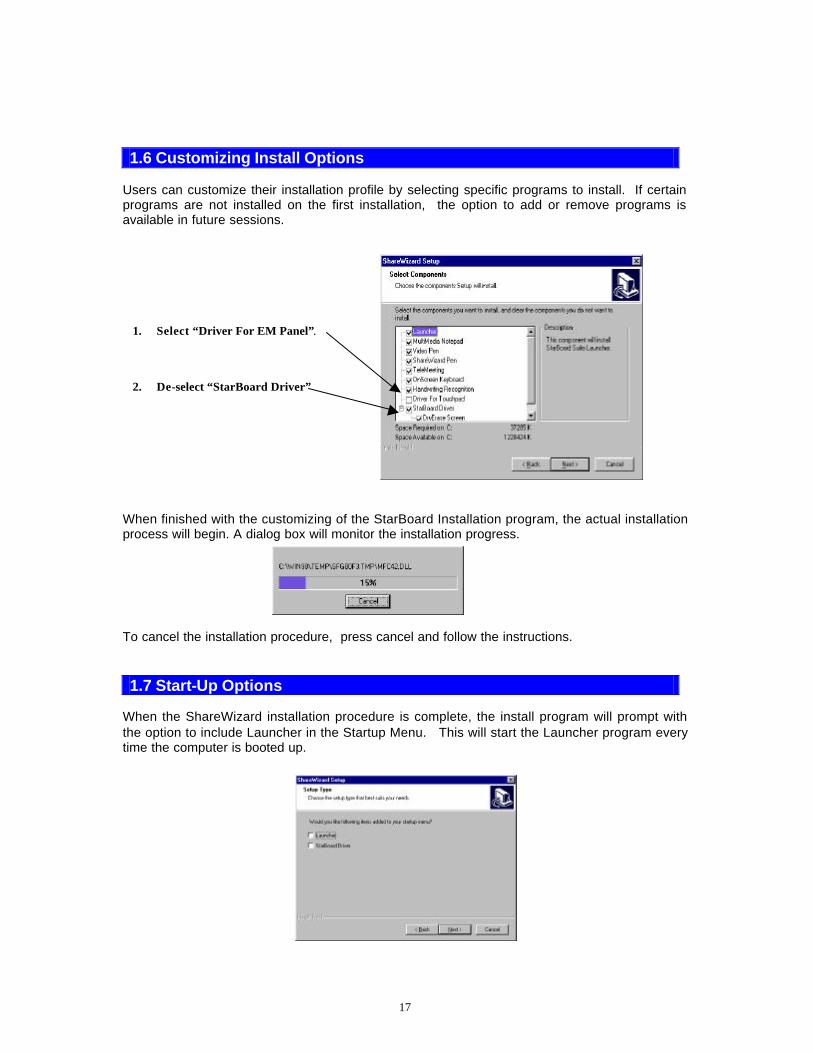
1.6 Customizing Install Options Users can customize their installation profile by selecting specific programs to install. If certain programs are not installed on the first installation, the option to add or remove programs is available in future sessions.
When finished with the customizing of the StarBoard Installation program, the actual installation process will begin. A dialog box will monitor the installation progress.
To cancel the installation procedure, press cancel and follow the instructions.
1.7 Start-Up Options When the ShareWizard installation procedure is complete, the install program will prompt with the option to include Launcher in the Startup Menu. This will start the Launcher program every time the computer is booted up.
1. Select “Driver For EM Panel”. 2. De-select “StarBoard Driver”
18
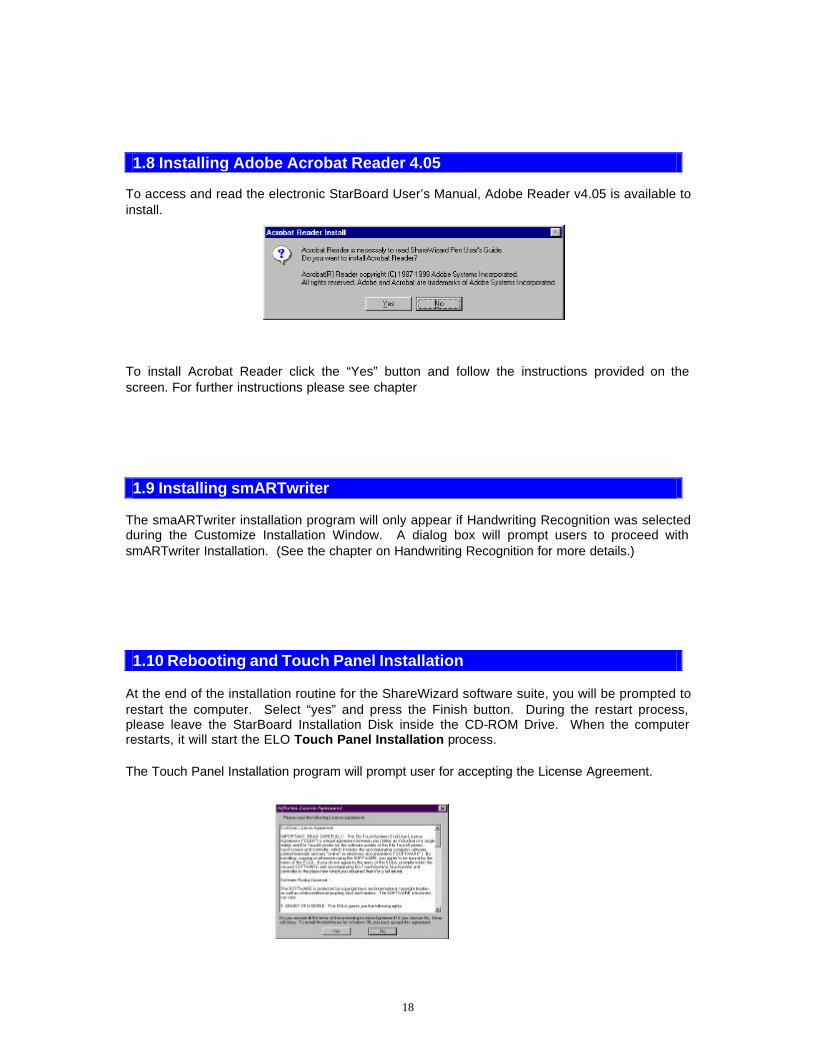
1.8 Installing Adobe Acrobat Reader 4.05
To access and read the electronic StarBoard User’s Manual, Adobe Reader v4.05 is available to install.
To install Acrobat Reader click the “Yes” button and follow the instructions provided on the screen. For further instructions please see chapter
1.9 Installing smARTwriter The smaARTwriter installation program will only appear if Handwriting Recognition was selected during the Customize Installation Window. A dialog box will prompt users to proceed with smARTwriter Installation. (See the chapter on Handwriting Recognition for more details.)
1.10 Rebooting and Touch Panel Installation At the end of the installation routine for the ShareWizard software suite, you will be prompted to restart the computer. Select “yes” and press the Finish button. During the restart process, please leave the StarBoard Installation Disk inside the CD-ROM Drive. When the computer restarts, it will start the ELO Touch Panel Installation process. The Touch Panel Installation program will prompt user for accepting the License Agreement.
19
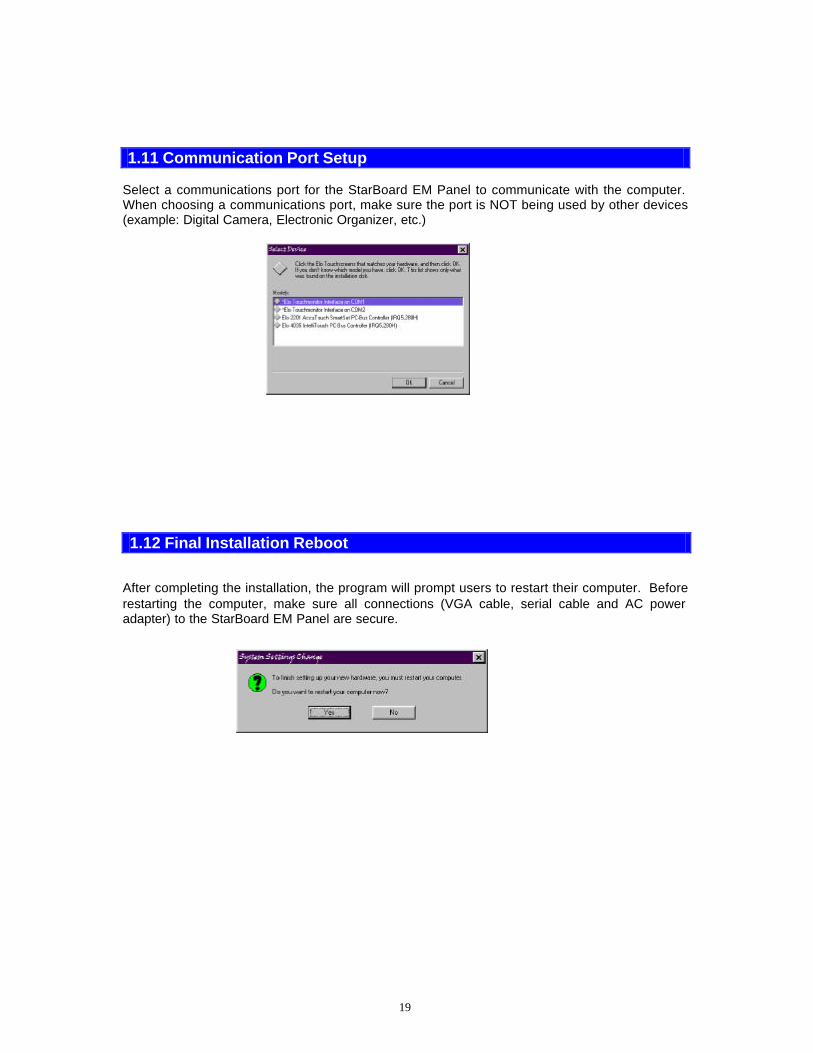
1.11 Communication Port Setup
Select a communications port for the StarBoard EM Panel to communicate with the computer. When choosing a communications port, make sure the port is NOT being used by other devices (example: Digital Camera, Electronic Organizer, etc.)
1.12 Final Installation Reboot
After completing the installation, the program will prompt users to restart their computer. Before restarting the computer, make sure all connections (VGA cable, serial cable and AC power adapter) to the StarBoard EM Panel are secure.
20
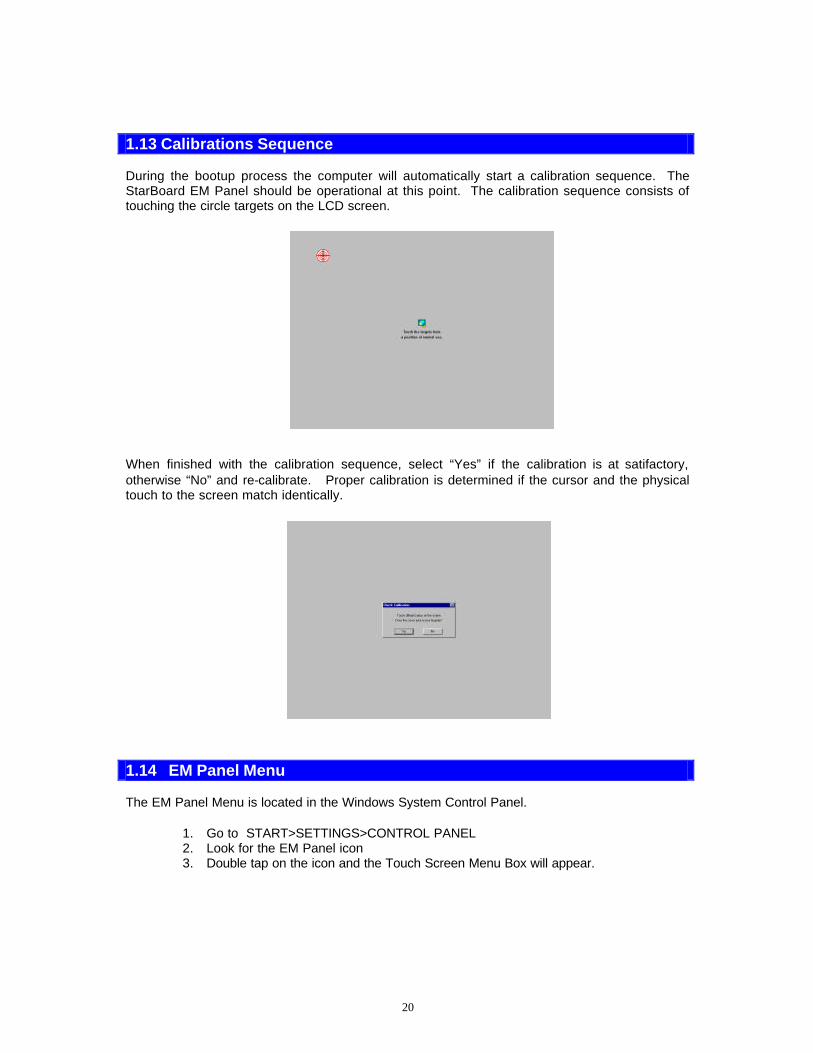
1.13 Calibrations Sequence During the bootup process the computer will automatically start a calibration sequence. The StarBoard EM Panel should be operational at this point. The calibration sequence consists of touching the circle targets on the LCD screen.
When finished with the calibration sequence, select “Yes” if the calibration is at satifactory, otherwise “No” and re-calibrate. Proper calibration is determined if the cursor and the physical touch to the screen match identically.
1.14 EM Panel Menu The EM Panel Menu is located in the Windows System Control Panel.
1. Go to START>SETTINGS>CONTROL PANEL 2. Look for the EM Panel icon 3. Double tap on the icon and the Touch Screen Menu Box will appear.

21
1.15 Calibration Menu The Calibration Menu has an option which allow users to re-calibrate the EM Panel for a more precise touch input.
1.16 Button Menu The Button Menu provides users with the option to manipulate the characteristics of each touch made on the Screen.
Double Clicking Expands tapping area to allow a more relaxed tapping distance.
Hide Cursor Hides the cursor. This setting is recommended when users become familiar with the StarBoard EM Panel.
Mouse Click Button Sets the attributes of the mouse button emulation mode. In the
Dialog box that appears in the upper right hand corner, there will be an image of a standard mouse device. To generate a right mouse click, simply tap on the right button of the image. The next touch command received on the Touch Panel will register as a right mouse click. This command allows a right-mouse click for one time only. For a second time users must tap the mouse image again.

22
1.17 Sound Menu The Sound menu provides the option to change the audio characteristics (ON/OFF, pitch, and duration) of the StarBoard EM Panel. As a default, the sound option is always on.
1.18 Diagnostic Menu The Diagnostics Tab provides useful information identifying the type of StarBoard EM Panel connected and the quality of the touch communications with the computer.
1.19 About the ELO Software Standard The About Us Menu shows information about the driver software version.

23
Chapter 2
GGeettttiinngg SSttaarrtteedd wwiitthh SShhaarreeWWiizzaarrdd LLaauunncchheerr

24
Table of Contents
ShareWizard Launcher 2.1 Running Launcher for the First Time ....................................................... 25 2.2 Launching Applications.......................................................................... 25 2.3 The Launcher Menu .............................................................................. 26 2.4 The About Dialog Box............................................................................ 26 2.5 Closing the Launcher............................................................................. 26 Customizing ShareWizard Launcher 2.6 The Default Settings .............................................................................. 26 2.7 Changing Docking Edges....................................................................... 26 2.8 Floating Window and Button Arrangement Styles .................................... 27 2.9 Large and Small Views .......................................................................... 27 2.10 Show Text ............................................................................................. 27 2.11 Always on Top....................................................................................... 28 2.12 Auto Hide.............................................................................................. 28 2.13 Auto Fit................................................................................................. 28

25
2.1 Running Launcher for the First Time When StarBoard Suite Launcher is opened for the first time, a Dialog box like the one shown below will appear. It shows a list of StarBoard Suite applications that can be launched with the Launcher buttons.
To have this dialog box displayed in the future, check the box above the OK button. If not selected, the dialog box will only appear when the list of available StarBoard Suite applications changes (e.g. if an application is installed or uninstalled). The Launcher will be created in the default style, docked to the top edge on your screen as shown below:
2.2 Launching ShareWizard Applications
To launch a StarBoard Suite application, simply click on the program button in the Launcher. When the cursor is positioned above a launching button, the name of the corresponding application will be displayed as a tool tip.

26
2.3 The Launcher Menu
The Launcher menu can be displayed by right clicking anywhere on the Launcher bar. A right click can be performed by tapping the StarBoard with the opposite end of the marker pen.
Active menu items have checks to the left of their name. The first five menu items above the separator customize the apprearance and behavior of Launcher. A more detailed explanation of each option can be found in Sections 2.13 through 2.20 of this chapter.
2.4 The “About StarBoard Suite” Dialog Box To view information about StarBoard Suite, select “About StarBoard Suite” from the menu. A dialog box identical to the one shown when the Launcher is opened for the first timewill appear.
2.5 Closing the Launcher To close Launcher, either:
• Select exit from the menu • Click on the close button of Launcher if it is in floating mode (see Sections 2.12-2.15)
2.6 The Default Settings By default, the Small View, Show Text, Always On Top, and Auto Fit options are checked, while the Auto Hide option is unchecked. Each option is explained in detail in the following sections. Launcher is initially docked to the top edge of the screen.
2.7 Changing Docking Edges Launcher can be docked to any of the four edges of your screen. To move Launcher from one edge to another, simply click on a non-button area of Launcher, drag, and drop Launcher at the desired edge.

27
2.8 Floating Window and Button Arrangement Styles Launcher can also be displayed as a floating toolbar. To change the Launcher display, drag and drop Launcher to anywhere within the work area of Windows. When Launcher is in floating mode, the button arrangement (such as the number of rows) can be changed by dragging the window frame and resizing Launcher.
2.9 Large and Small Views By choosing View Small or View Large from the menu, the view of the buttons can be changed. The following is an example of each view mode:
Small View:
Large View:
2.10 Show Text If “Show Text” is checked, the application name will appear by each button. Small View with Text:
Large View with Text:

28
2.11 Always On Top When “Always on Top” is checked, Launcher will remain on top of other applications even when it is not active or the focused window. Otherwise, Launcher acts like an ordinary window.
2.12 Auto Hide When “Auto Hide” is enabled, Launcher moves off the screen when not in use. Only a thin edge will be visible. To access Launcher, position the mouse over the thin edge, and Launcher will move into view. When the mouse leaves the Launcher window area, Launcher will once again move off the edge of the screen. To hold Launcher in place when Auto Hide is enabled, click on the Launcher window to activate. To release Launcher, simply select another window.
2.13 Auto Fit When “Auto Fit” is checked, the size of the docked Launcher is automatically adjusted to take up the minimum amount of window space. Launcher cannot be resized when docked in this mode. When “Auto Fit” is unchecked, the docked Launcher is resizable by dragging the frame. However, Launcher cannot have an area smaller than the total area of the buttons.

Chapter 3
SShhaarreeWWiizzaarrdd PPeenn
30
Table of Contents Description 3.1 Introduction.........................................................................................................31 3.2 The Windows of ShareWizard Pen........................................................................31 3.3 The Main Window................................................................................................31 3.4 The Buttons of ShareWizard Pen..........................................................................32 Basic Operations 3.5 Making Annotations with the Pen Tool...................................................................33 3.6 Making Annotations with the Highlighter Tool.........................................................33 3.7 Erasing Annotations ............................................................................................33 3.8 Changing Colors .................................................................................................33 3.9 Changing Tool Thickness .....................................................................................33 3.10 Deleting All Annotations on the Current page ........................................................34 3.11 Adding a New Page.............................................................................................34 3.12 Saving Pages......................................................................................................34 3.13 Printing...............................................................................................................34 Advanced Operations 3.14 Capturing Screen Images ....................................................................................35 3.15 Opening a File ....................................................................................................35 3.16 Using Image Browser ..........................................................................................35 3.17 Deleting Captured Pages .....................................................................................36 3.18 Changing the Page Order ....................................................................................36 3.19 Designating the Default “Save File” Location ........................................................36 3.20 Configuring the Cursor Display Status ..................................................................36 3.21 Configuring the Button Size..................................................................................37 3.22 Configuring the Display Style ...............................................................................37 3.23 Configuring Confirmations ...................................................................................38
Tips & Notes........................................................................................................................39
31
3.1 Introduction ShareWizard Pen is a robust annotation program that allows users to:
1. Draw or Highlight over computer applications and captured images 2. Save annotated images in a variety of formats 3. Print annotated images
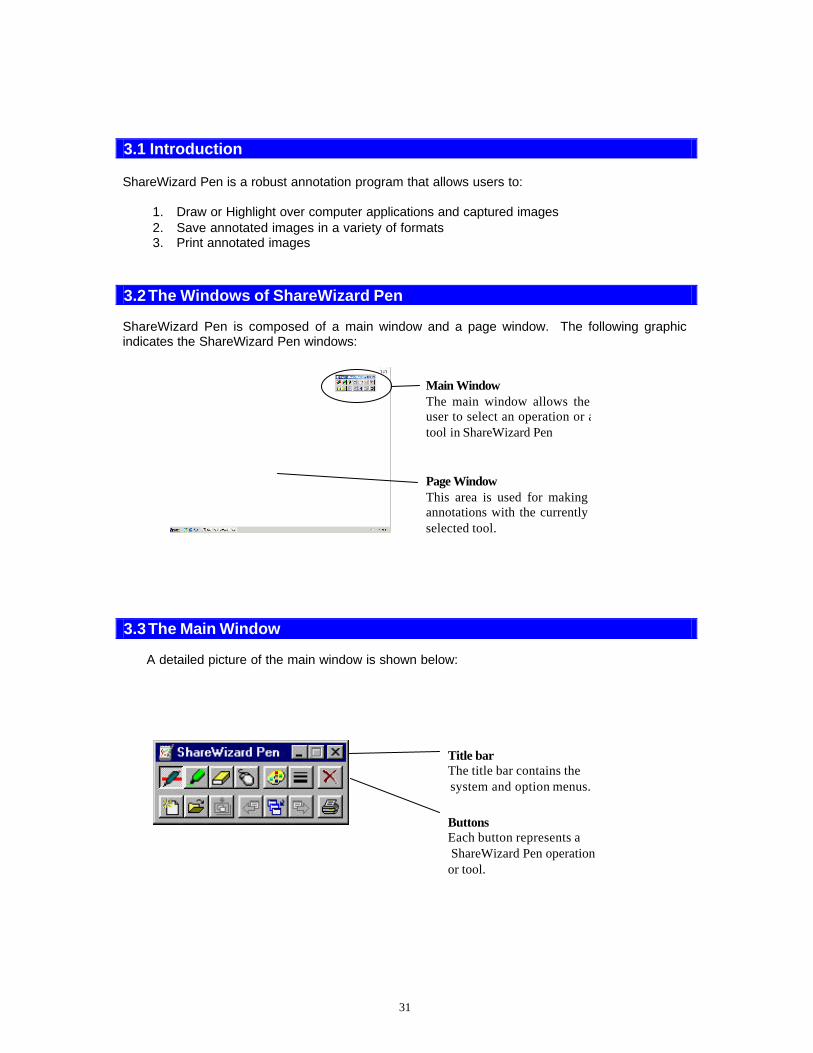
3.2 The Windows of ShareWizard Pen
ShareWizard Pen is composed of a main window and a page window. The following graphic indicates the ShareWizard Pen windows:
3.3 The Main Window A detailed picture of the main window is shown below:
Title bar The title bar contains the system and option menus.
Buttons Each button represents a ShareWizard Pen operation or tool.
Main Window The main window allows the user to select an operation or atool in ShareWizard Pen
Page Window This area is used for making annotations with the currently selected tool.

32
3.4 The Buttons of ShareWizard Pen
The following chart explains the function of each button in ShareWizard Pen. If a button is grayed out, then it is temporarily not a valid selection.
Button Name Description
Pen Makes annotations with the pen tool
Highlighter Makes annotations with the highlighter tool
Eraser Erases desired annotations
Mouse Closes the screen capture window and returns to normal mouse operation
Palette Selects the color of the pen / highlighter
Thickness Selects the thickness of the pen / highlighter / eraser
Delete All Erases all annotations on the current page
New Page Creates a new page
Open Opens a file
Capture Captures the screen display
Previous Moves to the previous page if one exists
Browser Opens the page browser
Next Moves to the next page if one exists
Print Prints out the current page
33
3.5 Making Annotations with the Pen Tool
Click on the button in the main window to turn the mouse pointer into the Pen tool. The pen is now active for making annotations over any application or screen image. The current color of the Pen Tool will be displayed on a horizontal line through the icon
3.6 Making Annotations with the Highlighter Tool Click on the button in the main window to turn the mouse pointer into the Highlighter tool. This marking tool is now active for highlighting
3.7 Erasing Annotations Click on the button in the main window to turn the Pen or Highlighter tool into the Eraser tool. Select the Eraser button and drag on the page window to delete any annotations underneath the eraser cursor.
3.8 Changing Colors To change colors for the pen or highlighter tool, click on the button in the main window and choose a color from the pull-down color palette.
3.9 Changing Tool Thickness To change the line thickness for the pen, highlighter or eraser tool, click on the button in the main window and choose a line thickness from the pull-down menu
34
3.10 Deleting All Annotations on the Current Page
Click on the button in the main window to delete all annotations on the current page. A dialog box to confirm the operation will appear. To delete annotations, click [OK] or click [No] to cancel and preserve the current page’s annotations.
3.11 Adding a New Page
Click on the button in the main window to add a new blank page.
3.12 Saving Pages
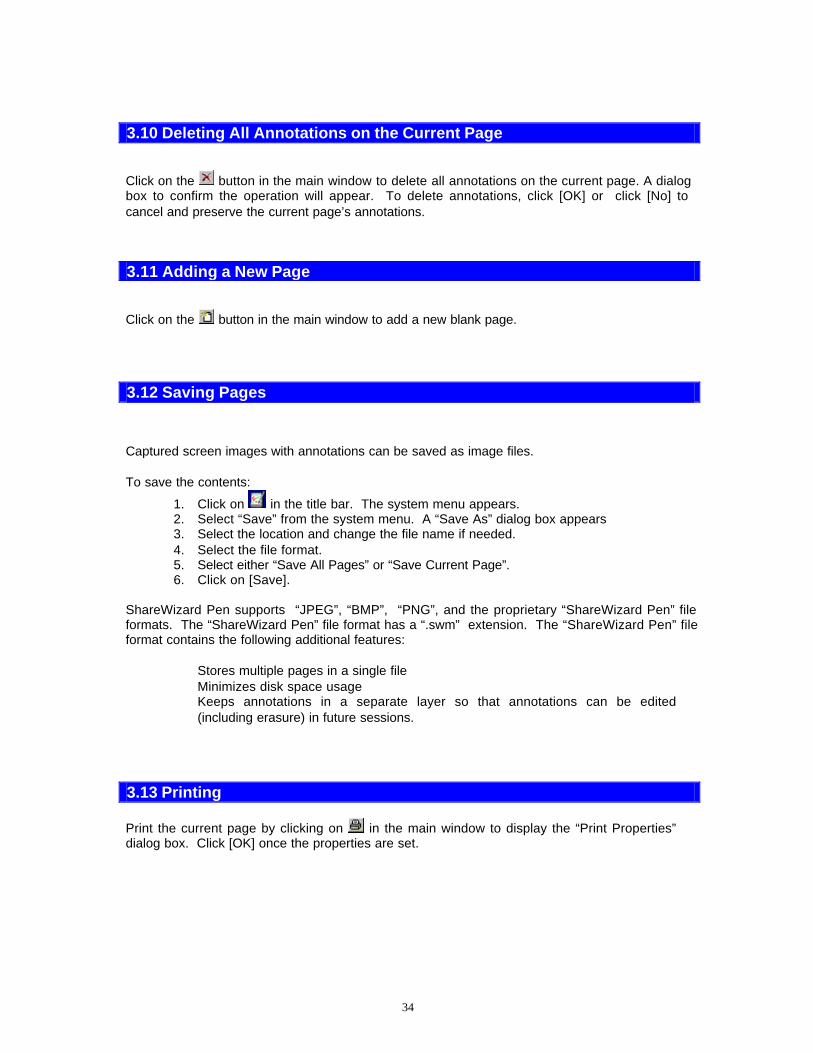
Captured screen images with annotations can be saved as image files. To save the contents:
1. Click on in the title bar. The system menu appears. 2. Select “Save” from the system menu. A “Save As” dialog box appears 3. Select the location and change the file name if needed. 4. Select the file format. 5. Select either “Save All Pages” or “Save Current Page”. 6. Click on [Save].
ShareWizard Pen supports “JPEG”, “BMP”, “PNG”, and the proprietary “ShareWizard Pen” file formats. The “ShareWizard Pen” file format has a “.swm” extension. The “ShareWizard Pen” file format contains the following additional features:
� Stores multiple pages in a single file � Minimizes disk space usage � Keeps annotations in a separate layer so that annotations can be edited
(including erasure) in future sessions.
3.13 Printing Print the current page by clicking on in the main window to display the “Print Properties” dialog box. Click [OK] once the properties are set.

35
3.14 Capturing Screen Images
Screen images can be captured so that annotations can be added interactively. Capturing is a simple process that can be used at any time with minimal interruption, making it ideal for live presentations.
To capture a desktop image:
1. Click on in the main window to go into mouse operation mode. 2. Open any document with the appropriate application.
3. Click on , , or , and ShareWizard Pen will capture the entire desktop image.
3.15 Opening a File
Previous sessions’ image files (*.bmp, *.jpg *.png or *.swm) or Dry-Erase Screen files (*.wnr), can be opened for display in the page window.
To open a file:
1. Click on in the main window to open the “Open” dialog box. 2. After, selecting a file, click on the [Open] button. 3. The selected file is opened and becomes available for annotating.
3.16 Image Browser
It is often convenient to switch between different pages during a presentation To move to a different page:
1. Click on in the main window to open the “Browse” dialog box. 2. Select one of pages and click on the [Select] button.
The “Browse” dialog box contains a list of valid pages for the current session. If a desired page is not in the list, it can be added either by clicking on if it is a prepared page or by clicking on
if it is a new image capture. To move forward and backward through the page list, click either or .
36
3.17 Deleting Captured Pages
To delete a page:
1. Click on in the main window to open the “Browse” dialog box. 2. Select one of pages and click on the [Delete] button.
Only the current page cannot be deleted. To delete the current page, first move to an alternate page and then repeat the above steps.
3.8 Changing the Page Order To change the page order
1. Click on in the main window to open the “Browse” dialog box. 2. Drag & drop the target page to change the page order.
3.19 Designating the Default “Save File” Location
The default location of the folder in the “Save As” dialog can be designated. To configure the save location
1. Click on in the title bar to access the system menu. 2. Select “Option” in the menu. The “Option” dialog box then appears 3. Click on the “Save” tab if it is not already the active tab 4. Type in the default location in the “Folder Name” box or click on the [Browse]
button to search for a folder. 5. Click on [OK] to confirm the change.
3.20 Configuring the Cursor Display Status The Cursor Display Status can be configured.
Show : The cursor is always shown. Hide : The cursor is hidden when the pen is away from the
StarBoard. None : The cursor is always hidden.
To change the status of the cursor:
1. Click on in the title bar to access the system menu. 2. Select “Option” in the system menu. The “Option” dialog box then appears 3. Click on the “Cursor” tab to show the cursor options 4. Choose the cursor display status. 5. Click on [OK] to confirm the change.
37
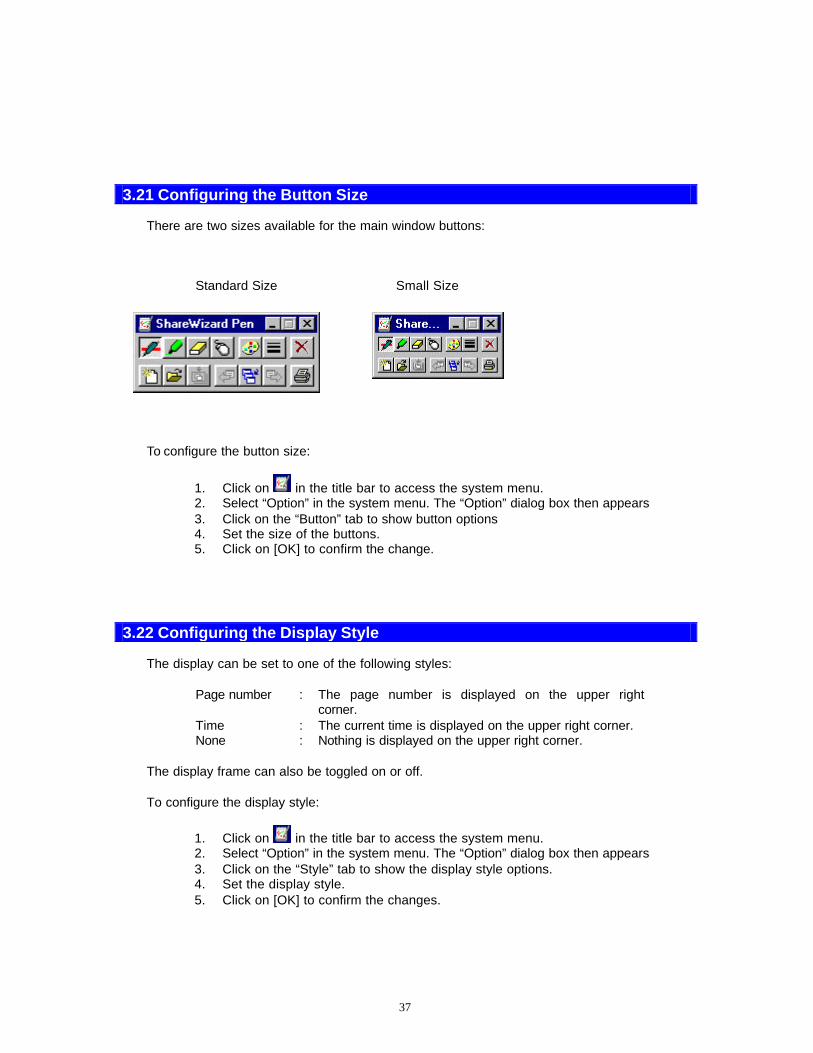
3.21 Configuring the Button Size There are two sizes available for the main window buttons:
Standard Size Small Size
To configure the button size:
1. Click on in the title bar to access the system menu. 2. Select “Option” in the system menu. The “Option” dialog box then appears 3. Click on the “Button” tab to show button options 4. Set the size of the buttons. 5. Click on [OK] to confirm the change.
3.22 Configuring the Display Style The display can be set to one of the following styles:
Page number : The page number is displayed on the upper right corner.
Time : The current time is displayed on the upper right corner. None : Nothing is displayed on the upper right corner.
The display frame can also be toggled on or off. To configure the display style:
1. Click on in the title bar to access the system menu. 2. Select “Option” in the system menu. The “Option” dialog box then appears 3. Click on the “Style” tab to show the display style options. 4. Set the display style. 5. Click on [OK] to confirm the changes.

38
3.23 Configuring Confirmations The settings of the “Delete All” dialog box can be configured. The display of the “Delete All” confirmation dialog can also be toggled on or off. To configure the confirmations:
1. Click on in the title bar to access the system menu. 2. Select “Option” in the system menu. The “Option” dialog box then appears. 3. Click on the “Confirmation” tab to show the confirmation options. 4. Set the confirmation settings. 5. Click on [OK] to confirm the changes.
39
Tips & Notes
The Display Color Palette
While ShareWizard Pen is running, do not change the color palette of the display from over 256 colors to less than 256 colors without restarting the computer. This may affect the color of annotations. We recommend a display with High-Color (16-bit) or more.
Capturing the screen Please wait for an application to finish drawing before attempting a screen capture. Otherwise, the captured image may be incomplete.
Microsoft NetMeeting
When ShareWizard Pen is running, Collaborating using Microsoft NetMeeting’s application sharing may not work properly. To use MS NetMeeting’s collaboration feature, first exit or minimize ShareWizard Pen.
Printing Print functions may not work with certain printers. In such cases, set the Spool Settings to "Print Directly to the printer" and try printing again.
Multiple Monitors
ShareWizard Pen does not support multiple monitors. Annotations can only be made within the primary monitor.
IME 98 Toolbar
IME 98 may not be hidden underneath the ShareWizard Pen window.
Opening an Image File
Opening an image file with a size that differs from the display screen size may result in a poor image conversion.
Quality of Image Files
The quality of an image file decreases when saved in JPEG format. For maximum quality, use BITMAP or PNG.
Maximum Number of Pages
The maximum number of pages depends on memory size and free disk space. Make sure that disk space is available when creating pages.
CHM Format Help File
If Internet Explorer version 4.0 or later is not installed (e.g., Windows 95), there is no way to view CHM format help files. In this case, view the HTML format help files instead. Open (installed folder) Help\index.htm with your web browser.
Exiting ShareWizard Pen Some dialogs may remain opened after exiting. In this case, simply close the dialog to exit.

40

Chapter 4
HHaannddwwrriittiinngg RReeccooggnniittiioonn

42
Table of Contents 4.1 Introduction......................................................................................................43 Basic Operation 4.2 Activating and Deactivating Handwriting Recognition..........................................43 4.3 Using the Program ...........................................................................................43 4.4 Input Devices ...................................................................................................43 4.5 Limitations .......................................................................................................44 4.6 How Does It Work?...........................................................................................44 4.7 Handwriting Recognition...................................................................................44 4.8 Achieving Good Recognition .............................................................................44 4.9 Modes of Handwriting Recognition ....................................................................45 4.10 Writing Text......................................................................................................45 4.11 Selecting Text...................................................................................................45 4.12 Using Gestures ................................................................................................46 4.13 Using the Edit Gesture and the Correction Vector ...............................................46 4.14 Starting with Dots.............................................................................................46 4.15 Terminating Handwriting Recognition.................................................................48 The Handwriting Recognition Menu 4.16 smARTwriter ....................................................................................................48 4.17 Trainer.............................................................................................................48 4.18 Properties........................................................................................................48 4.19 Help ................................................................................................................48 Training Handwriting Recognition 4.20 Training Text .....................................................................................................49 4.21 Training Shortcuts ............................................................................................50 4.22 Training Gestures .............................................................................................50 4.23 Training International and Special Characters.....................................................51 Customizing Handwriting Recognition 4.24 General Properties ...........................................................................................52 4.25 Ink Properties ..................................................................................................52 4.26 Hot Key ...........................................................................................................53 4.27 Library Properties.............................................................................................54 4.28 Constraints ......................................................................................................55 Quick Trainer 4.29 Using Quick Trainer ..........................................................................................56 Using a Personal Handwriting Recognition Library 4.30 Creating a Personal Library...............................................................................57 4.31 Creating and Opening Multiple Libraries ............................................................57
43
4.1 Introduction The Handwriting Recognition program allows users to input text directly into most software applications simply by printing in their own handwriting on the StarBoard.
4.2 Activating and Deactivating Handwriting Recognition
To activate the Handwriting Recognition program:
1. Select Handwriting Recognition from the ShareWizard Launcher or go to START>Programs>smARTwriter for Windows >smARTwriter.
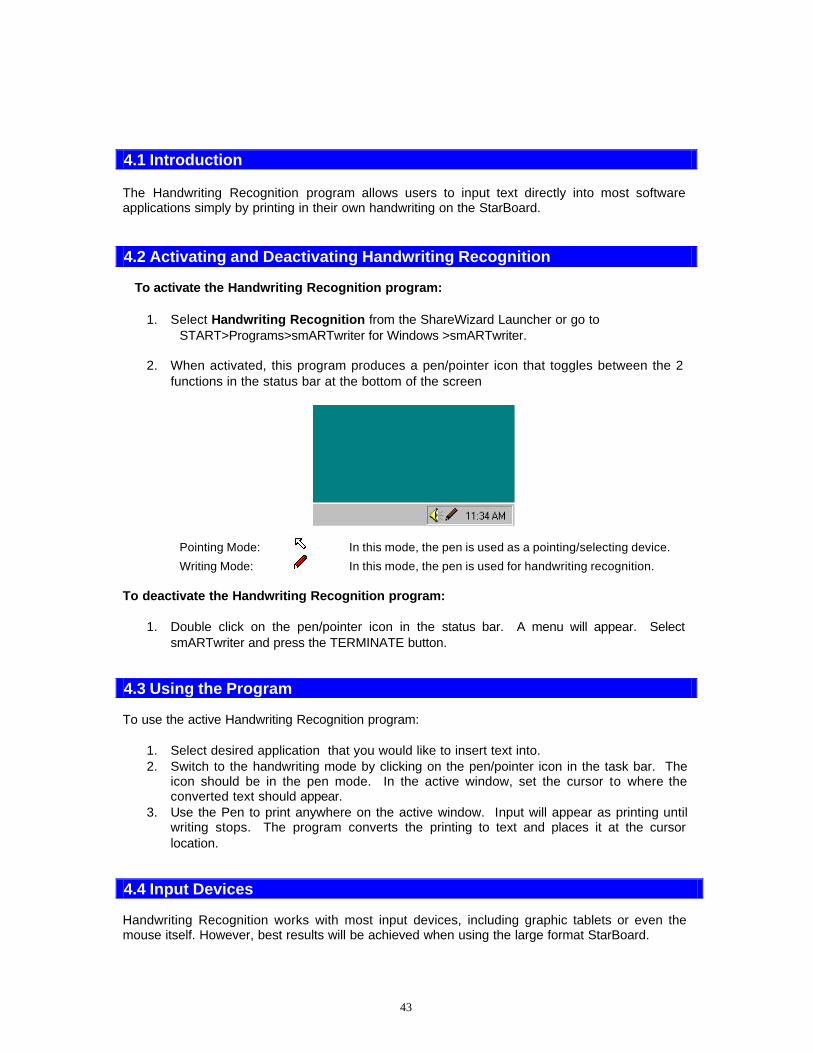
2. When activated, this program produces a pen/pointer icon that toggles between the 2
functions in the status bar at the bottom of the screen
Pointing Mode: In this mode, the pen is used as a pointing/selecting device.
Writing Mode: In this mode, the pen is used for handwriting recognition. To deactivate the Handwriting Recognition program:
1. Double click on the pen/pointer icon in the status bar. A menu will appear. Select smARTwriter and press the TERMINATE button.
4.3 Using the Program To use the active Handwriting Recognition program:
1. Select desired application that you would like to insert text into. 2. Switch to the handwriting mode by clicking on the pen/pointer icon in the task bar. The
icon should be in the pen mode. In the active window, set the cursor to where the converted text should appear.
3. Use the Pen to print anywhere on the active window. Input will appear as printing until writing stops. The program converts the printing to text and places it at the cursor location.
4.4 Input Devices Handwriting Recognition works with most input devices, including graphic tablets or even the mouse itself. However, best results will be achieved when using the large format StarBoard.
44
4.5 Limitations Currently, Handwriting Recognition can only recognize printed (not connected or cursive) writing. It does not support delayed strokes (that is, the “i” should be dotted and the “t” crossed immediately after writing them).
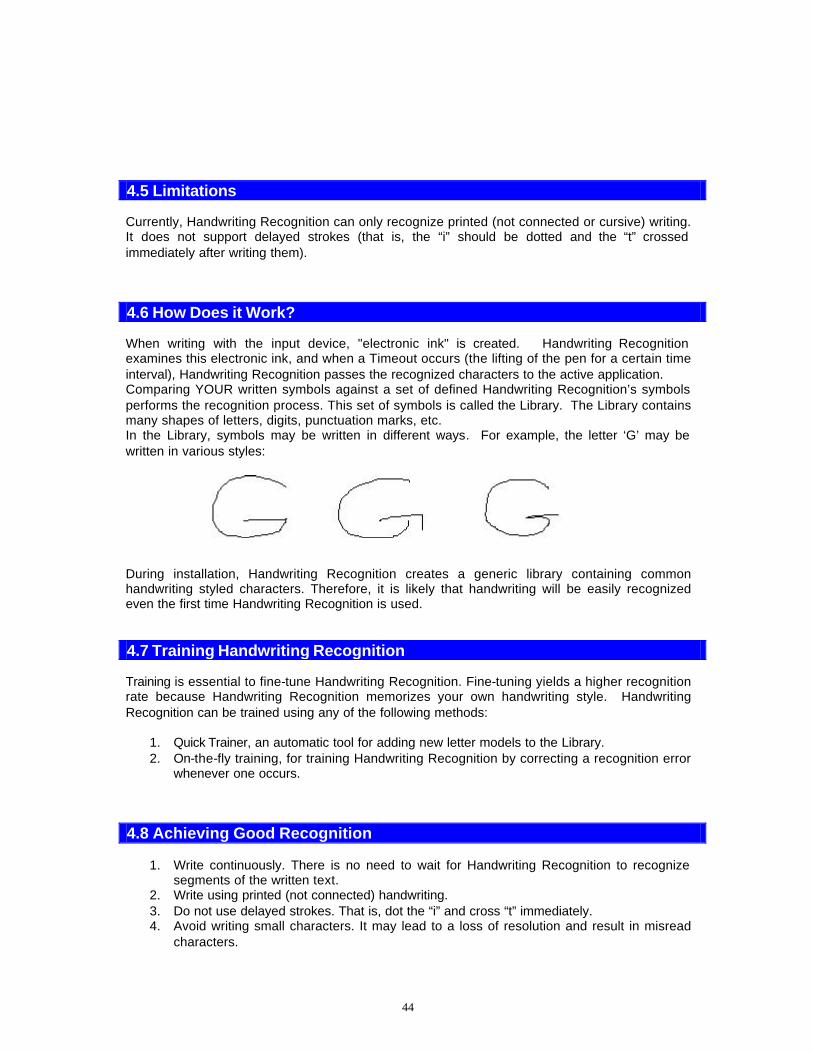
4.6 How Does it Work? When writing with the input device, "electronic ink" is created. Handwriting Recognition examines this electronic ink, and when a Timeout occurs (the lifting of the pen for a certain time interval), Handwriting Recognition passes the recognized characters to the active application. Comparing YOUR written symbols against a set of defined Handwriting Recognition’s symbols performs the recognition process. This set of symbols is called the Library. The Library contains many shapes of letters, digits, punctuation marks, etc. In the Library, symbols may be written in different ways. For example, the letter ‘G’ may be written in various styles:
During installation, Handwriting Recognition creates a generic library containing common handwriting styled characters. Therefore, it is likely that handwriting will be easily recognized even the first time Handwriting Recognition is used.
4.7 Training Handwriting Recognition Training is essential to fine-tune Handwriting Recognition. Fine-tuning yields a higher recognition rate because Handwriting Recognition memorizes your own handwriting style. Handwriting Recognition can be trained using any of the following methods:
1. Quick Trainer, an automatic tool for adding new letter models to the Library. 2. On-the-fly training, for training Handwriting Recognition by correcting a recognition error
whenever one occurs.
4.8 Achieving Good Recognition
1. Write continuously. There is no need to wait for Handwriting Recognition to recognize segments of the written text.
2. Write using printed (not connected) handwriting. 3. Do not use delayed strokes. That is, dot the “i” and cross “t” immediately. 4. Avoid writing small characters. It may lead to a loss of resolution and result in misread
characters.

45
After using Handwriting Recognition for a few days, editing the Library and deleting redundant or incorrect models is recommended.
4.9 Modes of Handwriting Recognition Pen operations and handwriting recognition are controlled and customized via the Handwriting Recognition tray icon (bottom right corner of the screen). The icon indicates the following modes:
Pointing Mode: In this mode, the pen is used as a pointing/selecting device.
Writing Mode: In this mode, the pen is used as a writing device.
Tapping once on the icon toggles between the modes. Double-tapping the icon opens the Handwriting Recognition menu.
4.10 Writing Text To write text:
1. Switch to Pointing Mode and run an application (Word, Excel, PowerPoint etc.).
2. Switch to Writing Mode . Make sure the insertion cursor appears in the document area. Write to the screen. Handwriting Recognition reads this ‘ink,' recognizes it, and converts it into printed text.
3. Using the pen, write a few words in the document area. Write continuously (one letter after the other). It is not necessary to pause after each letter. The recognized text appears at the insertion point.
4.11 Selecting Text To select text while in an application such as Microsoft Word:
1. Switch to Pointing Mode . 2. Drag the pen over the desired text. The selected text will be highlighted.
Or
1. Switch to Writing Mode . 2. Hold down the pen next to the desired text (for about half a second) until the program
beeps. 3. Drag the pen over the text.
46
To select a single word (in any mode), just double-tap on the word.
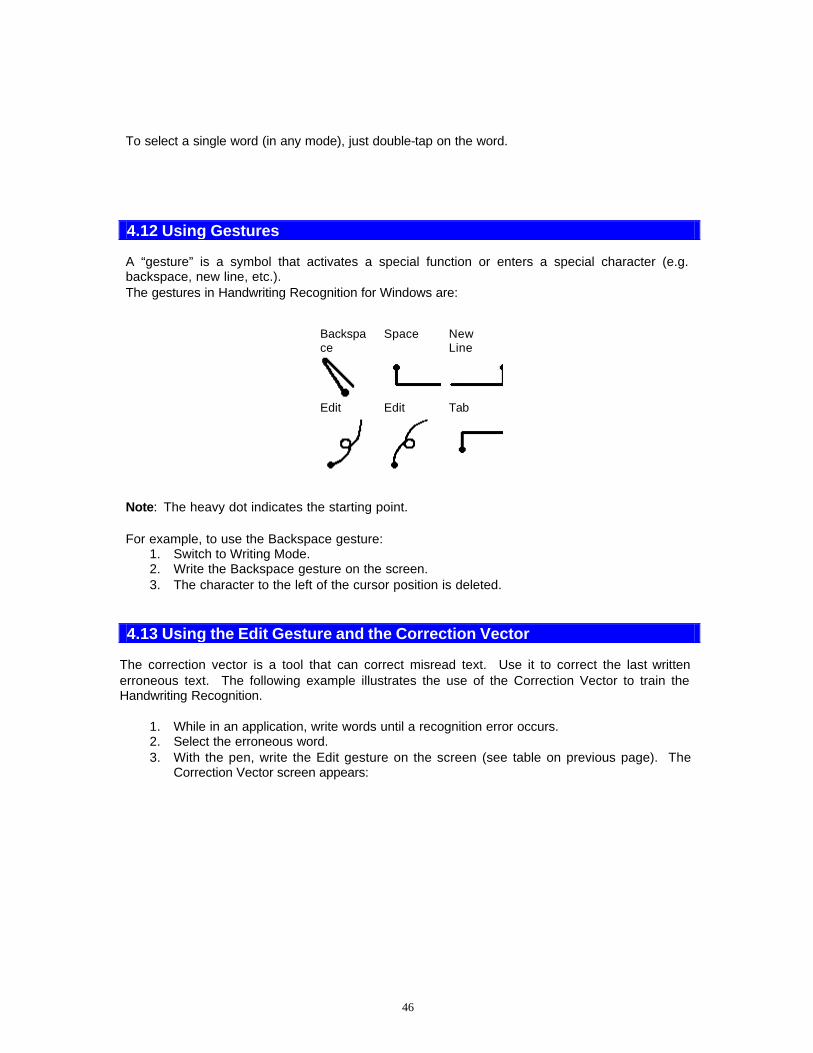
4.12 Using Gestures A “gesture” is a symbol that activates a special function or enters a special character (e.g. backspace, new line, etc.). The gestures in Handwriting Recognition for Windows are:
Backspace
Space New Line
Edit Edit Tab
Note: The heavy dot indicates the starting point. For example, to use the Backspace gesture:
1. Switch to Writing Mode. 2. Write the Backspace gesture on the screen. 3. The character to the left of the cursor position is deleted.
4.13 Using the Edit Gesture and the Correction Vector
The correction vector is a tool that can correct misread text. Use it to correct the last written erroneous text. The following example illustrates the use of the Correction Vector to train the Handwriting Recognition.
1. While in an application, write words until a recognition error occurs. 2. Select the erroneous word. 3. With the pen, write the Edit gesture on the screen (see table on previous page). The
Correction Vector screen appears:
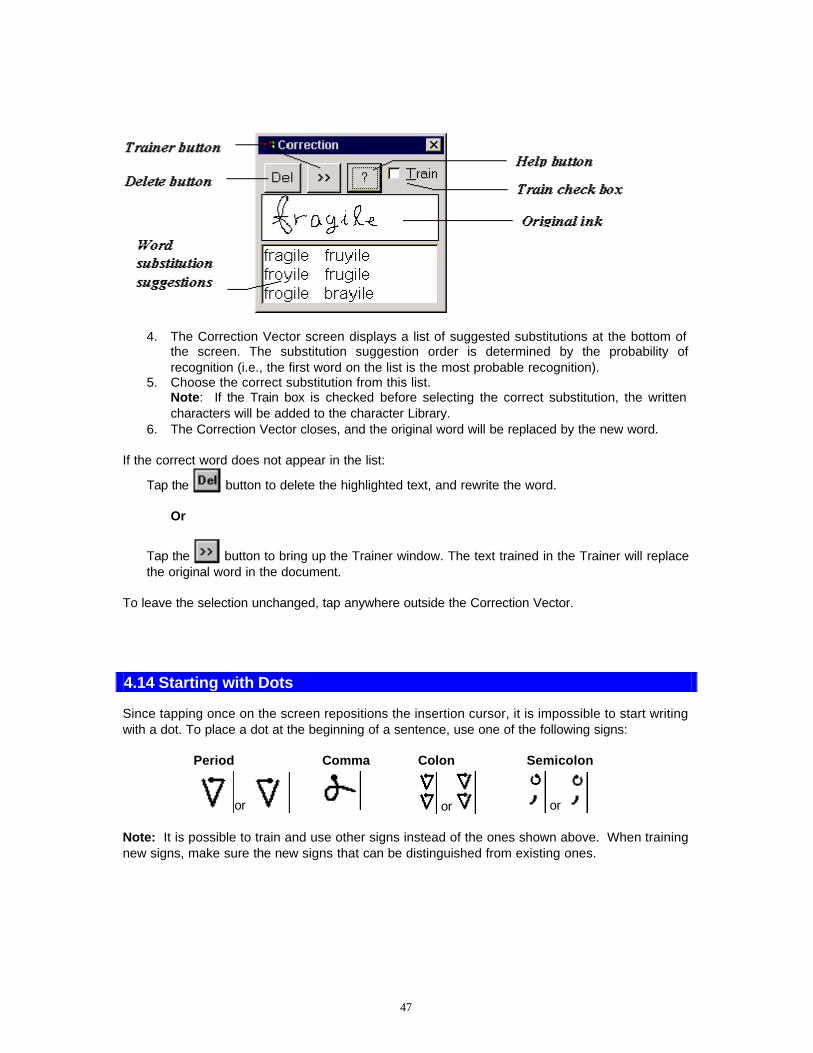
47
4. The Correction Vector screen displays a list of suggested substitutions at the bottom of
the screen. The substitution suggestion order is determined by the probability of recognition (i.e., the first word on the list is the most probable recognition).
5. Choose the correct substitution from this list. Note: If the Train box is checked before selecting the correct substitution, the written characters will be added to the character Library.
6. The Correction Vector closes, and the original word will be replaced by the new word. If the correct word does not appear in the list:
Tap the button to delete the highlighted text, and rewrite the word. Or
Tap the button to bring up the Trainer window. The text trained in the Trainer will replace the original word in the document.
To leave the selection unchanged, tap anywhere outside the Correction Vector.
4.14 Starting with Dots Since tapping once on the screen repositions the insertion cursor, it is impossible to start writing with a dot. To place a dot at the beginning of a sentence, use one of the following signs:
Period Comma Colon Semicolon
or or or Note: It is possible to train and use other signs instead of the ones shown above. When training new signs, make sure the new signs that can be distinguished from existing ones.
48
4.15 Terminating Handwriting Recognition To terminate Handwriting Recognition:
1. Double-tap the Handwriting Recognition icon in the icon tray (lower right corner of the screen).
2. From the Handwriting Recognition menu, select Handwriting Recognition. 3. Tap the Terminate button.
Note: Some applications cannot operate without Handwriting Recognition (all pen-aware applications). Terminating Handwriting Recognition causes these applications to shut down.
4.16 smARTwriter
Selecting this option when double-tapping the Pen/Pointer icon will display the About HS Handwriting Recognition dialog box with the version of the installed Handwriting Recognition and copyright information. This dialog box also contains the Terminate button.
4.17 Trainer Select this tool to “teach” Handwriting Recognition your unique handwriting style. By training Handwriting Recognition, handwriting recognition improves. When the Trainer opens, it displays the last text written to the screen (i.e., the last written “ink”). Handwriting Recognition can then be taught how to interpret that “ink." For more information concerning the trainer, please refer to the “Training Text” section.
4.18 Properties This menu option allows customization of Handwriting Recognition. For more information concerning the trainer, please refer to the “Customizing Handwriting Recognition” section.
4.19 Help The help button displays in-program help for Handwriting Recognition.
49
4.20 Training Text If a recognition error occurs, train the Handwriting Recognition so that it can recognize that letter or sentence the next time the program encounters it. To train text:
1. Choose Trainer from the Handwriting Recognition menu. The Trainer window displays the last “ink” captured in the upper portion of the window and the misread text below.
2. Select the misread letter by tapping on either the “ink” or misread letter. To select several successive letters, simply drag the pen across the desired letters.
3. A list of possible characters for each selected symbol will appear on the bottom left of the Trainer screen. Tap on the correct character or letter to select it. It will automatically appear in the appropriate slot in the “Train As” area of the screen.
4. If the correct letter does not appear, write the correct replacement in the Train As area. Once the correct replacement is written, either selected from the list of possible characters or through handwritten input, in the Train As area, tap the Train button.
5. Close the Trainer window.
Note: Do not select more than one character at a time for training.

50
4.21 Training Shortcuts
Handwriting Recognition allows for the use of abbreviations while writing. These abbreviations are known as shortcuts in the Handwriting Recognition environment. The Trainer allows the creation of symbols for such shortcuts. To create a shortcut:
1. Write a symbol to be used as the shortcut and then open the Trainer. 2. Select the symbol from the top portion of the Trainer screen.
3. Write the corresponding text in the “Train As” area and tap Train. Now, every time that symbol is written on the screen, Handwriting Recognition will replace it with the corresponding text in the document.
4. To close the Trainer window, either tap the button in the upper right-hand corner of the window or tap anywhere outside the Trainer window.
4.22 Training Gestures
The Trainer can add custom gesture marks in the library. In addition, it can train a gesture to perform basic editing commands. The following example explains how to include a custom gesture for the Undo command in the library.
1. Write the symbol to be used as the Undo command gesture, and open the Trainer. 2. Tap the Gesture button to select it. 3. Select the symbol from the top of the Trainer screen. 4. Tap on the down arrow next to the Train As Gesture to display the pull down menu and
select Undo.
51
5. Tap the Train button. From now on, every time the symbol is written, Handwriting
Recognition will interpret it as the BackSpace command. Note: If there is an existing gesture for the command in the library and a new gesture is trained for the same command, either gesture can be used to perform the command.
6. To close the Trainer window, either tap the button in the upper right-hand corner of the window or tap anywhere outside the Trainer window. Note: Only one ink stroke can be trained as a gesture at a time.
4.23 Training International and Special Characters The Trainer can include symbols to be used for special characters such as international and extended characters in the library. To include a custom symbol for an international character:
1. Write the symbol to be used as the international character and then open the Trainer. 2. Tap the Inter. radio button to select it. 3. Select the symbol from the top of the Trainer screen. 4. Select the appropriate character from the lower portion of the window.
5. Tap the Train button. From now on, every time the symbol is written, the Handwriting
Recognition will interpret it as the international character. 6. To close the Trainer window either tap the button in the upper right-hand corner of the
window or anywhere outside the Trainer window.
52
4.24 General Properties This tab allows customization of the behavior of Handwriting Recognition.
Timeout: Controls the time Handwriting Recognition waits before it attempts recognition of
the “ink”, starting from the moment the pen lifts off the screen. Correction vector size: Sets the number of suggested words to display in the Correction Vector window. Linguistics: Enables or disables the Handwriting Recognition modular linguistic layer.
The modular linguistic layer allows Handwriting Recognition to recognize rules and guidelines within a language. For example, if the “g” in “reading” is written very similar to a “y," the linguistic layer (if enabled) detects that “iny” is not a typical ending in English, and that “ing” is a more probably the correct ending. As a result, Handwriting Recognition outputs “reading” as the recognized word. The linguistic layer is active by default after installation of Handwriting Recognition. However, it is useful to disable the linguistics layer for writing a sequence of characters that is not plain English text.
Space after recognition: Adds a space after each recognition (i.e., after each Timeout) when enabled.
4.25 Ink Properties This tab allows customization of the way the electronic ink appears on the screen.
53
Ink Width: Changes the width of the electronic ink displayed when the up or down arrows are clicked. The larger the number in this field, the thicker the ink appears on the screen. Ink Color: Displays a sample and changes the color selected for the ink. To change the color, click on the Change button to display the Color dialog box.
The Color dialog box is a Windows standard color setting palette. It allows the selection of a new color for the electronic ink (the color the handwriting appears on the screen).
4.26 Hot Key This tab allows the selection of a hot key or shortcut to toggle between Writing Mode and Pointing Mode.
Select one of the predefined hot keys, or select “Other” to establish another preferred shortcut. When one of the Ctrl or Shift keys is assigned, the toggling occurs after pressing and releasing the selected key.

54
4.27 Library Properties The set of characters and shapes recognized by Handwriting Recognition is called the Library of Models. After installation, a pre-defined Library with over 450 distinct characters is set.The Library tab contains the list of supported character shapes and symbols. If necessary, some redundant or unnecessary models can be deleted to improve recognition. In addition, if there are multiple users on the computer, it is a good idea to create more than one Library of Models (one for each user). By doing so, each individual can have a Library, and Handwriting Recognition will be able to recognize each individual's personal handwriting.
Library name: Displays the Library name and the total number of models in the Library, in the
upper portion of the Library tab Usually, the Library name is the user name. Characters List box: Displays on the left side of the Library tap all of the characters, shortcuts, and
gestures that exist in the current Library To select a character, simply tap it. Models box: Displays the models for the selected character. The last model entered (trained) is the leftmost. Tap a model to select it. Del button: Deletes the selected model when tapped. Library Box: Allows the saving of changes made to an existing library, the creation of a new
library, and the clearing of any changes made to a library since the last save. Clear button: Clears the Library by erasing all character shapes added with the training tools.
All changes made in the Library since the last save will be lost. A confirmation dialog box will display.If “Load the Standard Library” is checked (recommended), before tapping [OK], the standard model library will be loaded after clearing the existing one. If “Create an Empty Library” is checked, an empty library with no models will be loaded. Handwriting Recognition must then be trained before use.
Editing a Library: Select the Library tab, and then make the necessary changes to the existing
models with the control buttons described above.

55
Creating a New Library: Select the Library tab and then choose Change. A “Load Library File” dialog
box appears. Write the new Library name in the File name box, and tap [OK]. A confirmation dialog box appears. To create a new library, tap [OK]. If a different Library is open, a prompt will ask if the old Library should be saved before the creation of a new one. A new Library is now available, and a dialog box suggesting that you complete a training session appears. It is strongly recommended that you complete the training session before proceeding. Tap [OK] to continue.
Changing the Library: To change the Library to a previously created one:
1. Select the Library tab and then choose Change. The Load Library File box appears, listing the libraries available. (library files have extension .LBR).
2. Choose a library from the list or write the library's name and tap [OK]. Saving a Library: A library should be saved any time changes are made to it. After making the necessary changes to a Library, click on the Save button.
4.28 Constraints This tab allows the enabling or disabling of recognition constraint settings. Using this symbol filtering tool is another method for improving recognition. As explained earlier in this document, the Library contains hundreds of symbols that Handwriting Recognition searches through to match every character that is written. The Constraints filtering tool reduces the character search range, resulting in fewer misread characters. The following is an example for setting Constraints options:
1. Select the Constraints tab.
2. In this window, all characters supported by Handwriting Recognition are divided into five
sets. If a set’s check box is marked, Handwriting Recognition then searches through this set each time it attempts a recognition.
3. Uncheck all sets except the Lower Case and then tap [OK]. Now anything written is considered a lower case letter.
4. Configure the Constraints settings. The best settings depend on the content and structure of the writing session. Once completed, tap [OK].
56
4.29 Using Quick Trainer Quick Trainer allows the recognition software to learn YOUR style of writing, thus producing higher recognition results. It takes less than ten minutes to complete one Quick Trainer session. To run Quick Trainer:
1. Access the Quick Trainer program by going to:
START>Programs>smARTwriter for Windows>Quick Trainer 2. This launches the trainer program.
1. Copy the characters in the slots or boxes to the space below, with one character in each slot. Print in your normal style and pace.
2. The letters that are immediately recognized will be highlighted. If the program does not recognize a letter, do not go back and try to correct at this time. You will be given more sentences with the unrecognized letter later on. The percentage bar at the bottom of the window indicates the progress of the session.
3. After writing all the words on the page, recognized or not, tap the Accept button. This will start the next page of the trainer. To clear the entire screen, tap the Clear button.
Note: The Quick Trainer session can be repeated as often as needed. Repeating sessions
may improve recognition results.
57
4.30 Creating a Personal Library After successfully completing Quick Trainer, the user will be prompted to save this Handwriting Recognition library. Answering “yes” will save the library in the user’s registration name.
4.31 Creating and Opening Multiple Libraries The Handwriting Recognition program allows for multiple unique libraries to be created and retrieved. If multiple presenters are using the StarBoard’s Handwriting Recognition feature, each presenter can create their own library and call it up when they are using the board.
To Create a New Unique Library:
1. Double tap on the pen/pointer icon in the task bar. This opens up the handwriting recognition menu.
2. Select “Properties”, then the “Library” tab
3. Select the “Change” button.
o This opens the “Load Library File” dialogue box. o Type in the new presenter’s name in the “File name” box. o Press the “Open” key o A response warning states that the file does not exist. Press “OK” to create
a new library. o It responds that a new library has been opened and prompts you to begin a
new quick training session

58
To open a previously saved library:
1 Double tap on the pen/pointer icon in the task bar. This opens up the handwriting recognition menu.
2 Select “Properties,” then “Library”
2. Select the “Change” button.
o This opens the “Load Library File” dialogue box. o Select the presenter’s library filename (*.LBR). o Press the “Open” key

Chapter 5
MMuullttiiMMeeddiiaa NNootteeppaadd

60
Table of Contents Features 5.1 Description and Features..................................................................................61 Operation 5.2 Starting Multimedia Notepad.............................................................................62 5.3 Title Bar...........................................................................................................62 5.4 Menu Bar.........................................................................................................62 5.5 File Menu.........................................................................................................62 5.6 Edit Menu ..............................................................................................63 5.7 Tools menu ......................................................................................................64 5.8 Page menu ......................................................................................................66 5.9 Insert Menu .....................................................................................................67 5.10 Audio/Video Menu ............................................................................................68 5.11 Database Menu................................................................................................70 5.12 Utilities Menu ...................................................................................................73 5.13 View Menu.......................................................................................................73 5.14 Help Menu .......................................................................................................74 5.15 Main Display and Scroll Bars.............................................................................75 5.16 Command Icons Bar.........................................................................................75 5.17 Tool Icons Bar ..................................................................................................75 5.18 Page Control Bar..............................................................................................76 5.19 Status Bar........................................................................................................76
61
5.1 Description and Features Multimedia Notepad is a powerful and robust project-based program that organizes and controls presentations in an electronic flipchart format.
Features 1. Microsoft Word documents, Excel spreadsheets, PowerPoint presentations and other
applications can be imported into Multimedia Notepad. Each page of the imported document is assigned a page in the electronic flipchart. A variety of image file formats can also be imported.
2. Multimedia Notepad provides tools for drawing and annotating documents.
3. The drawing toolbar can be used to create and diagram charts.
4. Objects and documents in OLE format can also be imported into a project for editing in Multimedia Notepad.
5. Audio and video files can be embedded into a Notepad presentation and played back at any time.
6. The handwriting recognition and on-screen keyboard utilities allow direct data entry from the whiteboard.
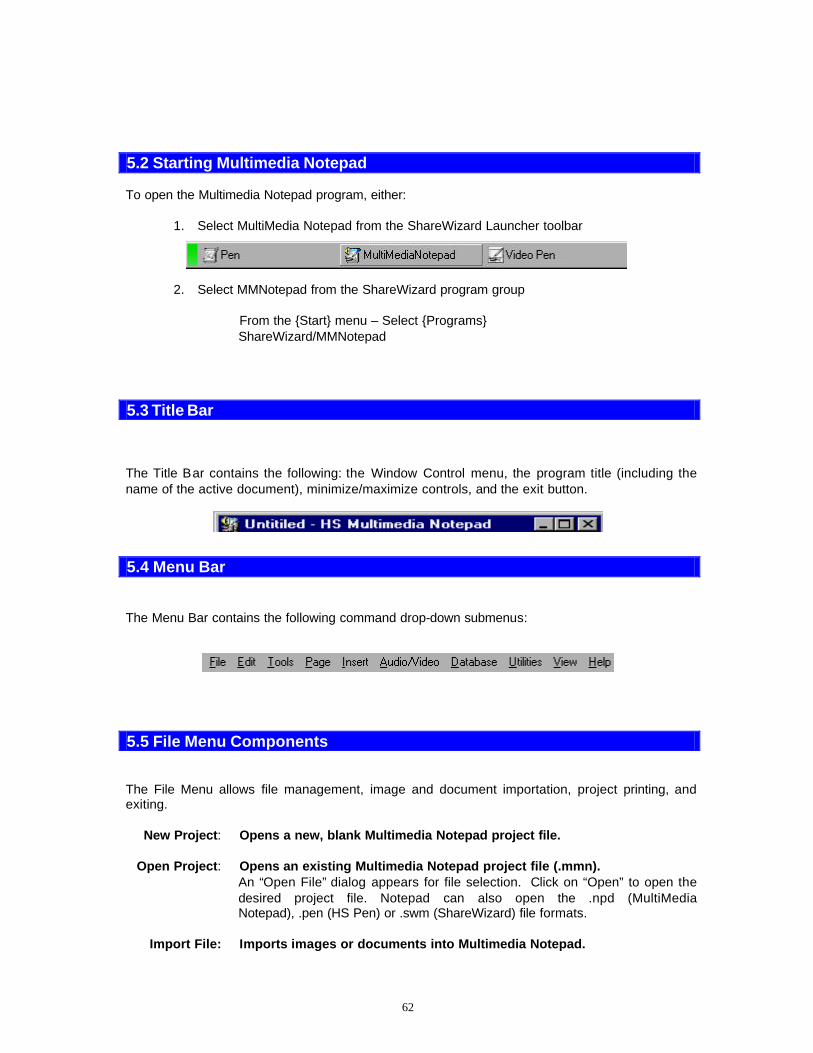
62
5.2 Starting Multimedia Notepad To open the Multimedia Notepad program, either:
1. Select MultiMedia Notepad from the ShareWizard Launcher toolbar
2. Select MMNotepad from the ShareWizard program group
From the {Start} menu – Select {Programs}
ShareWizard/MMNotepad
5.3 Title Bar The Title Bar contains the following: the Window Control menu, the program title (including the name of the active document), minimize/maximize controls, and the exit button.
5.4 Menu Bar The Menu Bar contains the following command drop-down submenus:
5.5 File Menu Components The File Menu allows file management, image and document importation, project printing, and exiting. New Project: Opens a new, blank Multimedia Notepad project file. Open Project: Opens an existing Multimedia Notepad project file (.mmn).
An “Open File” dialog appears for file selection. Click on “Open” to open the desired project file. Notepad can also open the .npd (MultiMedia Notepad), .pen (HS Pen) or .swm (ShareWizard) file formats.
Import File: Imports images or documents into Multimedia Notepad.
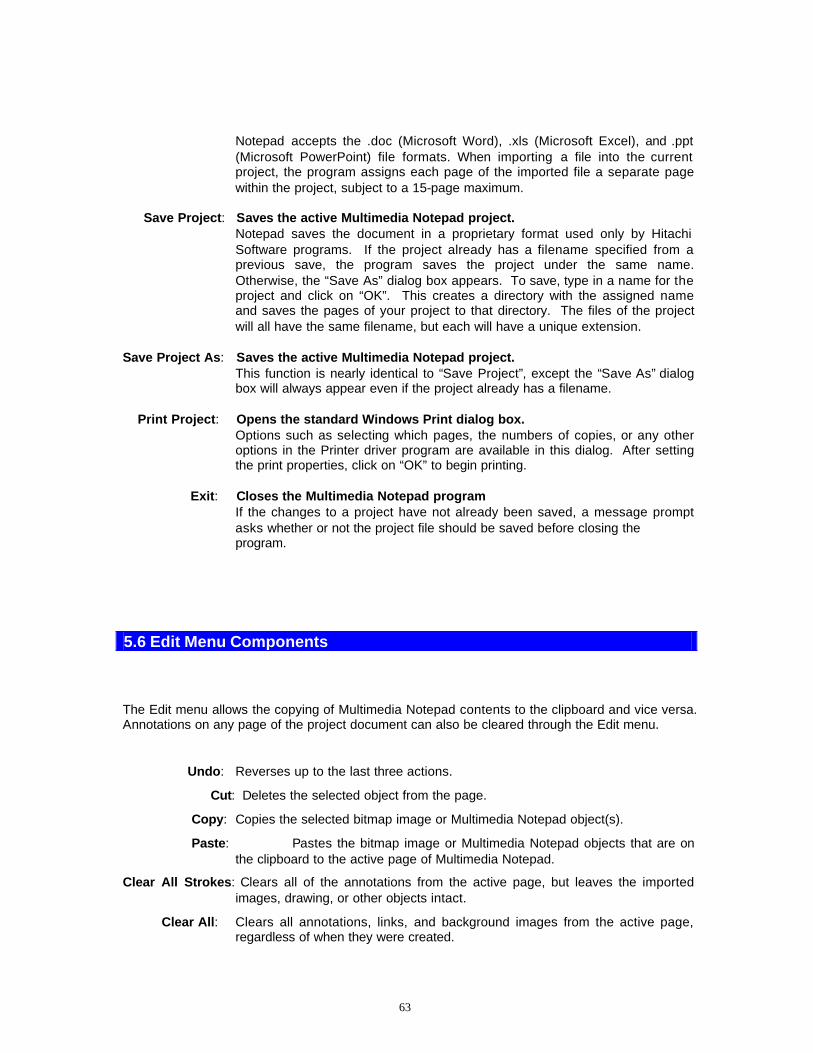
63
Notepad accepts the .doc (Microsoft Word), .xls (Microsoft Excel), and .ppt (Microsoft PowerPoint) file formats. When importing a file into the current project, the program assigns each page of the imported file a separate page within the project, subject to a 15-page maximum.
Save Project: Saves the active Multimedia Notepad project.
Notepad saves the document in a proprietary format used only by Hitachi Software programs. If the project already has a filename specified from a previous save, the program saves the project under the same name. Otherwise, the “Save As” dialog box appears. To save, type in a name for the project and click on “OK”. This creates a directory with the assigned name and saves the pages of your project to that directory. The files of the project will all have the same filename, but each will have a unique extension.
Save Project As: Saves the active Multimedia Notepad project.
This function is nearly identical to “Save Project”, except the “Save As” dialog box will always appear even if the project already has a filename.
Print Project: Opens the standard Windows Print dialog box.
Options such as selecting which pages, the numbers of copies, or any other options in the Printer driver program are available in this dialog. After setting the print properties, click on “OK” to begin printing.
Exit: Closes the Multimedia Notepad program
If the changes to a project have not already been saved, a message prompt asks whether or not the project file should be saved before closing the program.
5.6 Edit Menu Components The Edit menu allows the copying of Multimedia Notepad contents to the clipboard and vice versa. Annotations on any page of the project document can also be cleared through the Edit menu.
Undo: Reverses up to the last three actions.
Cut: Deletes the selected object from the page.
Copy: Copies the selected bitmap image or Multimedia Notepad object(s).
Paste: Pastes the bitmap image or Multimedia Notepad objects that are on the clipboard to the active page of Multimedia Notepad.
Clear All Strokes: Clears all of the annotations from the active page, but leaves the imported images, drawing, or other objects intact.
Clear All: Clears all annotations, links, and background images from the active page, regardless of when they were created.
64
Toggle Fill: Toggles the selected object between outline and solid color modes.
Links: Edits existing OLE links in the current project.
Objects: Allows the opening or editing of existing OLE objects in the current project.
5.7 Tools Menu Components The Tools Menu contains the Pen, Highlight Pen and Erase tools. The current active tool displays a check mark to the left of the tool name. Select: Activates the select command
To select an object, tap on any object in the Main Display Window. Pen: Activates the pen tool
The pen tool allows the drawing of lines in the Main Display Window. Highlight: Activates the highlighter tool
The highlight tool allows the highlighting in the Main Display Window.
Eraser: Activates the eraser tool The eraser tool erases freehand annotations.
Fill: Activates the fill color function When this function is selected, any shape created in the Main Display with the shape commands will be filled with the active color in the color palette. This function does not apply color to already existing shapes in the Main Display. To fill an existing drawing shape with a solid color, use the Toggle Fill command.
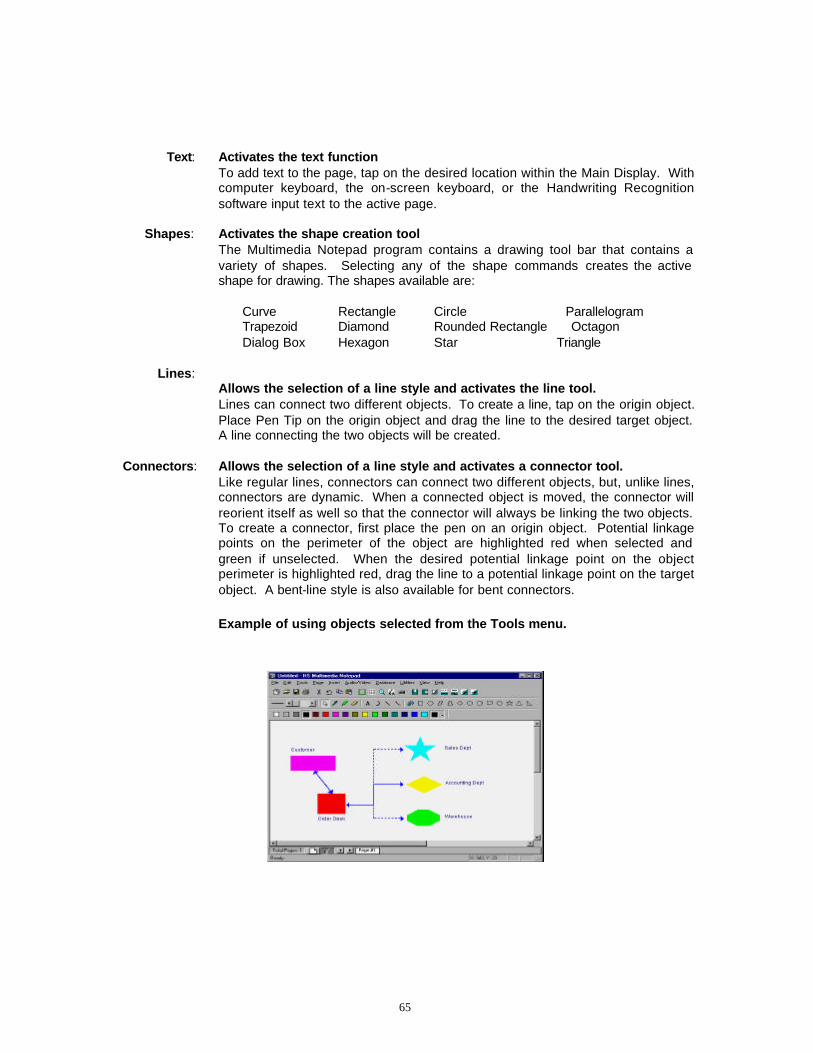
65
Text: Activates the text function
To add text to the page, tap on the desired location within the Main Display. With computer keyboard, the on-screen keyboard, or the Handwriting Recognition software input text to the active page.
Shapes: Activates the shape creation tool
The Multimedia Notepad program contains a drawing tool bar that contains a variety of shapes. Selecting any of the shape commands creates the active shape for drawing. The shapes available are:
Curve Rectangle Circle Parallelogram Trapezoid Diamond Rounded Rectangle Octagon Dialog Box Hexagon Star Triangle Lines: Allows the selection of a line style and activates the line tool.
Lines can connect two different objects. To create a line, tap on the origin object. Place Pen Tip on the origin object and drag the line to the desired target object. A line connecting the two objects will be created.
Connectors: Allows the selection of a line style and activates a connector tool.
Like regular lines, connectors can connect two different objects, but, unlike lines, connectors are dynamic. When a connected object is moved, the connector will reorient itself as well so that the connector will always be linking the two objects. To create a connector, first place the pen on an origin object. Potential linkage points on the perimeter of the object are highlighted red when selected and green if unselected. When the desired potential linkage point on the object perimeter is highlighted red, drag the line to a potential linkage point on the target object. A bent-line style is also available for bent connectors.
Example of using objects selected from the Tools menu.
66
5.8 Page Menu Components The Page Menu contains functions that help in managing pages within the project. Add: Adds a new, empty page to the project, document after the last existing
page. Insert: Inserts a new, empty page to the project before the active page in the Main
Display. Remove: Removes the displayed page of the project document and renumbers the
remaining pages of the project accordingly. Save Current Page as Image: Saves the current page as an image file.
When this option is selected, a “Save As” dialog box appears. Once the filename and file format are selected, click on [OK] to save the image.
Page Sorter: Opens the Sorter dialog box. In the Sorter dialog box, all of the pages in the
project appear as thumbnail images.
The following options are available:
Slide Bar: Scrolls through the pages of the project Go To: Switches to the selected page when “Go To” is clicked Delete: Deletes the selected page from the project Insert: Inserts a blank page before the selected page
The pages in the project can also be rearranged by clicking and dragging the thumbnail image to the desired location.
Font Options: Opens the font dialog box.
In the font dialog box, the font type, style, size, effects and color attributes can be modified. After making a selection, a sample with the selected font and font characteristics will appear in the Sample box.
67
5.9 Insert Menu Components The Insert Menu allows for the insertion of objects and images into a Multimedia Notepad project. Insert Picture: Loads and inserts an image file.
Notepad can import the .cmp, .jpg, .pcx, or .bmp file formats to the current page. An “Open” dialog box will appear for filename selection.
The imported image file may be annotated as in this example:
Insert OLE Object: Imports an OLE Object
An OLE object is linked to the original file and program that created it. After double clicking on an imported OLE object, the original program will open, and the image or document can be further modified.
68
5.10 Audio/Video Menu Components
The Audio/Video Menu allows the creation and editing of audio and video recordings. The project must be saved and given a name before this feature can be used.
Add Audio: Creates or imports from a file a sound recording and embeds it within the active project page
1. When this command is activated, the cursor changes into a floating
hypertext button with a speaker image on it. 2. Move the cursor to the desired hypertext button location. 3. Double click or double tap at the location. This embeds the hypertext
button and opens the Audio Record/Playback dialog box.
4. Create or import an audio file. The dialog box also allows for playback
and re-recording. 5. Clicking on [OK] saves the audio sample. The Audio Record/Playback
dialog box will close and the audio icon will appear in the display area.
69
Playing the Embedded Audio: Plays the audio track when activated
1. Activate the Select tool. 2. Double click on the audio icon to begin playing. 3. Allow the audio clip to finish before resuming operations, or click on the
Audio Stop command from the Audio/Video menu. Add Video: Embeds a video clip into the active project page.
1. When this command is activated, the cursor changes into a floating hypertext button with a video player image on it.
2. Move the cursor to the desired hyper-text button location. 3. Double tap at the location to fix the embedded hyper-text button. The
“Open” dialog box will appear. Select a video file (in .mpg, .avi, or .mov file formats) for the hypertext button to play.
4. Click on “Open” to close the “Open” dialog box and place the video icon in the display area.
Playing the Embedded Video
1. Activate the Select tool. 2. Double click on the video icon to start the video viewer. The first frame of
the video will be visible in the viewer window. 3. The standard video controls to start, stop, rewind and fast-forward the
video become available. 4. Use the pen and eraser tools to annotate a video frame. When a drawing
tool is selected, the video freezes at the current frame. 5. Select the video start control when finished to save the annotated still
frame to a file as a bitmap image. The video clip will then continue.

70
Play: Plays a selected embedded audio or video clip. AudioStop: Stops a currently playing audio clip.
5.11 Database Menu Components This option sets up a database with up to five fields. The database establishes objects in a diagram and assigns input data to each object. Creating a Database Structure
1. Select “Open” from the Database menu to open the Database dialog box.
2. Select “Setup Database” to open the Database Tablet Setup dialog box.

71
3. The system sets up two mandatory fields—“Object ID” and “Page ID”. To add to
the database structure, enter the field names and information. In the “Attribute Info” text boxes, set the following parameters:
a) Type the field name in the Name box. A field name can contain up to 64 characters.
b) Select the field type from the “Type” box drop-down list. The options are Double, Long, and Text types.
c) If the type is a Text field, specify the length. For Double and Long field types, the program fixes the size automatically.
4. Click on “Add” to accept your field entry. The information should appear in the “All
Defined Attributes” box. 5. To change an entry, delete the entry and add the entry again with the correct
information. 6. Click on “Close” to close the Database Tablet Setup dialog box
Building the Objects in the display area created with the drawing tools can be attached Database to a record.
1. To attach a record to an object, double click on an object in the display area
with the select tool. The “Database” dialog box will appear with the selected object highlighted.
2. Type the database information for this object in the appropriate fields. 3. Click on “Close” to return to the display area. Once the information is set,
the database information related to that object will be shown when the object is double clicked.
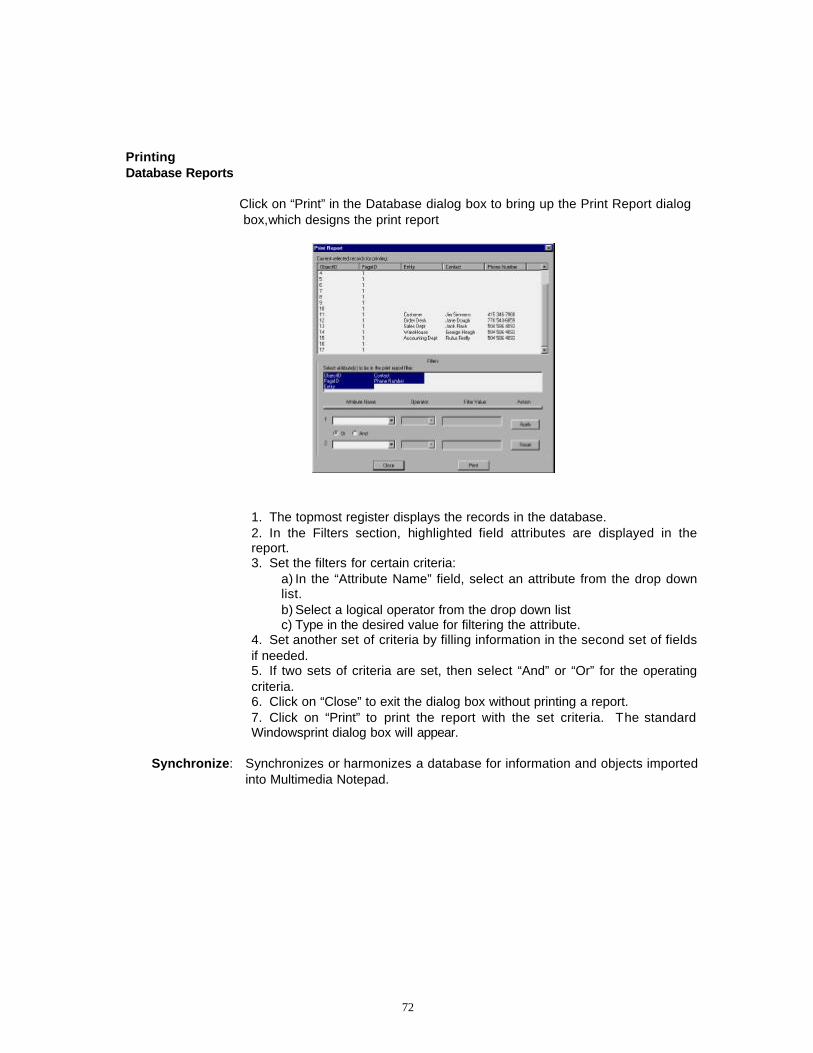
72
Printing Database Reports Click on “Print” in the Database dialog box to bring up the Print Report dialog
box,which designs the print report
1. The topmost register displays the records in the database. 2. In the Filters section, highlighted field attributes are displayed in the report. 3. Set the filters for certain criteria:
a) In the “Attribute Name” field, select an attribute from the drop down list. b) Select a logical operator from the drop down list c) Type in the desired value for filtering the attribute.
4. Set another set of criteria by filling information in the second set of fields if needed. 5. If two sets of criteria are set, then select “And” or “Or” for the operating criteria. 6. Click on “Close” to exit the dialog box without printing a report. 7. Click on “Print” to print the report with the set criteria. The standard Windowsprint dialog box will appear.
Synchronize: Synchronizes or harmonizes a database for information and objects imported
into Multimedia Notepad.
73
5.12 Utilities Menu Components Handwriting Recognition: The Handwriting Recognition program converts handwriting into printed text
(ASCII format).
To operate the Handwriting Recognition program 1. Select the Handwriting Recognition icon and then select the Text Tool. 2. Place the text cursor in the desired location, and write text by hand
anywhere on the main display. The handwriting will be converted and copied into the text area.
3. Clicking on the pen-shaped icon in Microsoft Windows system tray toggles the handwriting recognition function on and off. This system tray icon can also access Handwriting examples and other related information. (See Chapter 5 – Handwriting Recognition for more details.)
The On-Screen Keyboard allows you to enter text without the computer
keyboard.
To operate the On-Screen Keyboard: 1. Click on the Keyboard icon. 2. Function keys such as Esc, Alt, and Cap lock are also available on the On-Screen Keyboard. 3. To close the On-screen Keyboard, click on the “X” button in the upper right-hand corner.
5.13 View Menu Components
The “View” Menu can hide or display many of the toolbars. A check next to the toolbar name in the menu means that the toolbar is currently visible. To change the status of any toolbar, click on its name in the “View” menu to toggle the toolbar on and off. Other options in the View Menu include:
Grid Lines: Toggles the grid lines on and off. The grid lines can aid in drawing straight lines and
Zoom: aligning objects in the display area. Opens a new window that can zoom the content
of the display in and out. When you wish to return to the main program, click on “Close”. Pages can also be changed within the zoom window. The horizontal and vertical slide bars are used to view parts of the display that are not visible in the zoom window.
On Screen Keyboard:
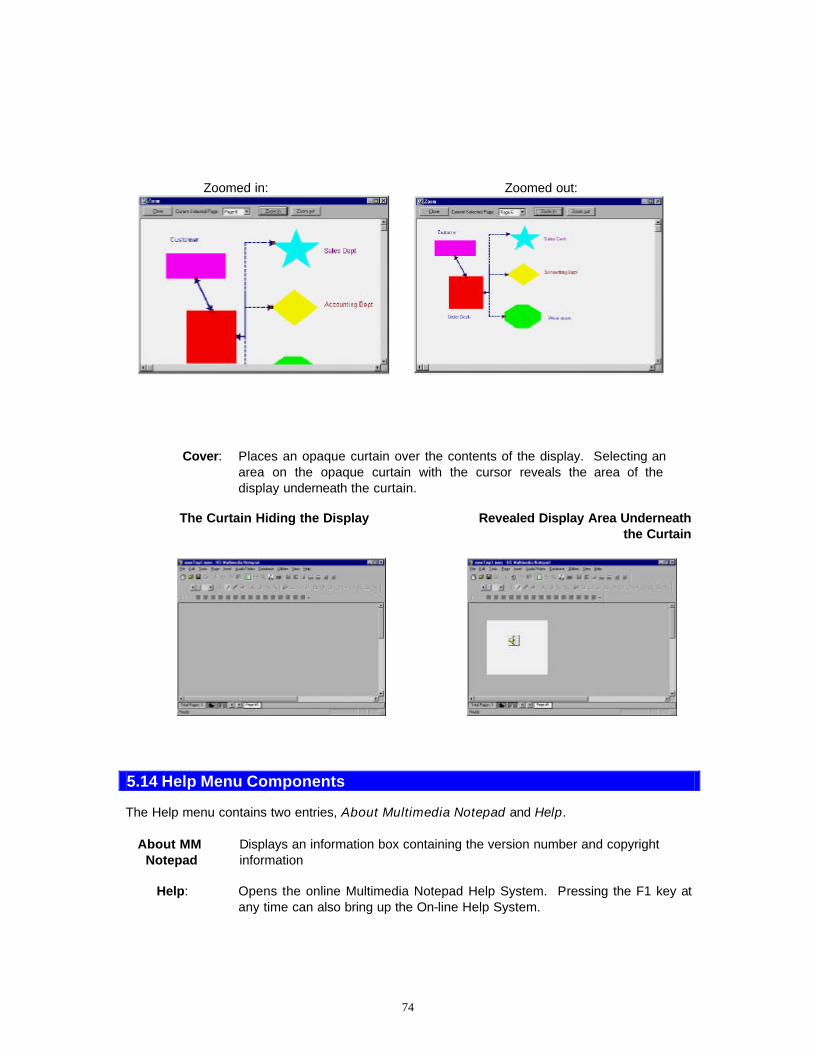
74
Zoomed in: Zoomed out:
Cover: Places an opaque curtain over the contents of the display. Selecting an
area on the opaque curtain with the cursor reveals the area of the display underneath the curtain.
The Curtain Hiding the Display Revealed Display Area Underneath
the Curtain
5.14 Help Menu Components The Help menu contains two entries, About Multimedia Notepad and Help. About MM Displays an information box containing the version number and copyright Notepad information Help: Opens the online Multimedia Notepad Help System. Pressing the F1 key at
any time can also bring up the On-line Help System.

75
5.15 Main Display & Scroll Bars The Main Display area is for importing images and documents, as well as annotating and drawing with the program tools. The vertical and horizontal scrollbars allow movement around the Main Display area if the display area is larger than the window area.
5.16 Command Icons Bar The Command Icons Toolbar contains the most frequently used commands of the Menu. The functions of these icons can be found in the Menu Bar section. The Command Icons are:
Command Icon Functions: New Cover Apply Dotted Style Open Grid Lines Apply Elbow Style Save Zoom Apply Start Arrow Style Print Hand Writing Recognition Apply End Arrow Style Cut On Screen Keyboard Undo Vertical Flip Copy Horizontal Flip Paste Toggle Fill
5.17 Tool Icons Bar The “Tool Icons” Bar contains the icons and controls of tools for drawing and annotating in the Main Display area. The functions of the tools in the “Tool Icons” Bar are identical to the counterparts in the “Tools” Menu.
Tool Size Display: Displays the exact size and color of the tools for drawing. Tool Size Control: Controls the tool thickness
1. To decrease the size, click on the left-facing arrow labeled "fine". 2. To increase the size, click on the right-facing arrow labeled "thick". 3. The sliding bar can also be moved to change the tool size. 4. The line in the Tool Control Display also changes to reflect the current tool
size.
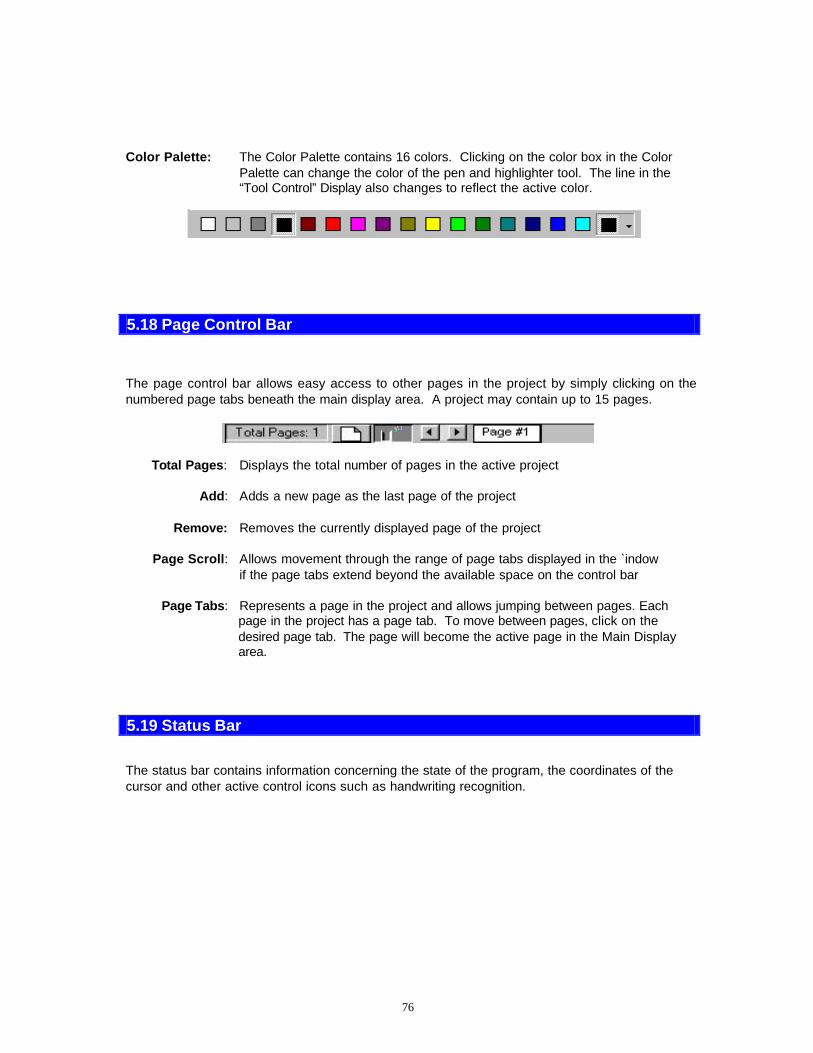
76
Color Palette: The Color Palette contains 16 colors. Clicking on the color box in the Color Palette can change the color of the pen and highlighter tool. The line in the “Tool Control” Display also changes to reflect the active color.
5.18 Page Control Bar
The page control bar allows easy access to other pages in the project by simply clicking on the numbered page tabs beneath the main display area. A project may contain up to 15 pages.
Total Pages: Displays the total number of pages in the active project Add: Adds a new page as the last page of the project Remove: Removes the currently displayed page of the project Page Scroll: Allows movement through the range of page tabs displayed in the `indow if the page tabs extend beyond the available space on the control bar Page Tabs: Represents a page in the project and allows jumping between pages. Each
page in the project has a page tab. To move between pages, click on the desired page tab. The page will become the active page in the Main Display area.
5.19 Status Bar
The status bar contains information concerning the state of the program, the coordinates of the cursor and other active control icons such as handwriting recognition.

Chapter 6
SShhaarreeWWiizzaarrdd VViiddeeooPPeenn

78
Table of Contents
Operations 6.1 Introduction..................................................................................................... 79 6.2 Playing a Video File ......................................................................................... 79 6.3 Annotating on a Still Frame .............................................................................. 80 6.4 Viewing and Working with a Saved Frame ......................................................... 81 6.5 Selecting a Location to Save Annotated Frames ................................................ 82
79
6.1 Introduction
ShareWizard VideoPen allows users to control Windows video files.
1. Play, Rewind, Stop and Freeze frame.
2. Draw over video freeze frames with VideoPen
3. Save and Print annotated frames.
6.2 Playing a Video File
1. When the Video Pen opens, the Video Viewer Main Toolbar first appears.
2. To open a video clip file, select the File Icon from the Main Toolbar. The file Browser
opens.
3. The File Browser allows:
• Selecting a video clip file from the default VideoPen directory • Moving to any other directory that contains video clips
4. After choosing a file, the VideoPen viewing frame opens with the video clip loaded. All of
the icons on the Main Toolbar also become active.
5. The Main Toolbar Icons provides the following controls:
• Start, Pause, Rewind, Forward, and Backward for navigating through the clip • Zoom control for changing the size of the video viewer window • Opening another video file • Accessing help • Exiting the VideoPen program • Selecting the Pen for frame annotation
80
6.3 Annotating a Still Frame 1. Start playing the video clip by clicking on the Forward icon on the Main Toolbar.
2. Select the Pen icon from the Main Toolbar. This opens the Pen Toolbar and freezes the
video clip at the current frame.
3. The selected frame becomes available for annotation. From the Pen Toolbar, use the color palette to change colors or the slide control to change the width of the drawing line.
4. A Highlighter tool (transparent ink) can highlight frame segments, and an Eraser tool can
erase annotations from the screen.
5. To save your annotated still video frame: • Select the Snapshot icon (the camera) to save in standard bitmap format. This format
may be used with any software application that reads the .bmp format. • Select the Save icon (disk) to save in a two-layer format. This format separates the
annotations from the underlying image. Other Hitachi Software utilities can then be used to edit the annotations. The two-layer format is a special proprietary format (.pen) and may only be viewed and changed through Hitachi Software programs. Note: After the file is saved, the movie file will continue to play. All saved files are
placed in the time-stamped folder inside the date-stamped folder. Both of the saving functions automatically save the image in a directory that contains the current date, in the form of MMDD, as the name. The saved image also records the time in its name in the form of HHMMSS.
6. The File icon browses through file directories for opening video clips.
7. The Clear Ink icon (the “x”) removes all annotations from the still video frame.
8. The annotated image can be saved to the clipboard and imported to other applications
by clicking on the Clipboard icon.
9. To close the annotation window and Pen toolbar and return to the Main Toolbar and viewing window, click on the exit control in the upper right corner of the annotation window.
81
6.4 Viewing and Working with a Saved Frame 1. When the Pen Toolbar is open, the selected annotation frame can be opened for editing
by clicking on the Works in Progress icon.
2. This dialog allows the following functions:
• Scrolling through the captured still frames by using the “Previous” and “Next”
button. • Opening a selected frame to full size by clicking on the thumbnail of that frame
and then clicking on the “Open Selected File” button. • Closing the “Works in Progress” thumbnail viewer with the “Close” button.
3. After opening a thumbnail to full size, the Pen Toolbar appears. Annotations can be edited with the Pen Toolbar utilities.
4. To view the annotated image in a larger format, click on the “Maximize” button in the
annotation window.
5. Click on either of the “Save” icons to save the changes.
82
6.5 Selecting a Location to Save Annotated Frames
1. When an image is saved with the AutoSave functions, it time-stamps the image and stores it in the default directory with the current date.
2. To change the directory where AutoSave stores the image, click on the “Saving Preference” icon. This opens the “Choose File” dialog box
3. Find the desired directory folder for storing AutoSaved images. Click on the Select button to confirm the location. The File Browser will close and the VideoPen screen will reappear.