Elmo HARmonica Hands-on Tuning Guide - BEC and MPC/Drives/Digital Drives... · This guide contains...
40
Elmo HARmonica Hands-on Tuning Guide September 2003
Transcript of Elmo HARmonica Hands-on Tuning Guide - BEC and MPC/Drives/Digital Drives... · This guide contains...

Elmo HARmonica Hands-on Tuning Guide
September 2003

Important Notice This document is delivered subject to the following conditions and restrictions:
This guide contains proprietary information belonging to Elmo Motion Control Ltd. Such information is supplied solely for the purpose of assisting users of the Elmo HARmonica servo drive in tuning the device.
The text and graphics included in this manual are for the purpose of illustration and reference only. The specifications on which they are based are subject to change without notice.
Information in this document is subject to change without notice. Corporate and individual names and data used in examples herein are fictitious unless otherwise noted.
Doc. no. HARTG0903 Copyright 2003
Elmo Motion Control Ltd. All rights reserved.
Revision History
Document version 1.0: September 2003
Elmo Motion Control Ltd. 64 Gisin St., P.O. Box 463 Petach Tikva 49103 Israel
Tel: +972 3 929-2300 Fax: +972 3 929-2322
Elmo Motion Control Inc. 900H River St. Kennedy Industrial Park Windsor, CT 06095 USA
Tel: +1 860 683-0095 Fax: +1 860 683-0336
Elmo Motion Control GmbH Steinbeisstrasse 41 D-78056 Villingen-Schwenningen Germany
Tel: +49 07720 8577-60 Fax: +49 07720 8577-70
www.elmomc.com

Contents
1. Introduction ............................................................................................................................ 1
2. Tuning Current....................................................................................................................... 1
3. Tuning Velocity...................................................................................................................... 1 3.1 Auto-tuning Velocity................................................................................................... 1
3.1.1 Step 1................................................................................................................. 1 3.1.2 Step 2................................................................................................................. 2 3.1.3 The Auto-tuning Procedure............................................................................ 3
3.2 Manually Tuning Velocity .......................................................................................... 3 3.2.1 Manual Tuning with a Low-pass Filter ........................................................14 3.2.2 Manual Tuning of a PI Controller with a Notch Filter ...............................17
3.3 Advanced Manual Tuning.........................................................................................20
4. Tuning Position .....................................................................................................................25 4.1 Introduction.................................................................................................................25 4.2 Tuning the Position Loop ..........................................................................................26 4.3 Lowering the Speed....................................................................................................32


1. Introduction When a new motor is connected to the HARmonica servo drive, you should use the Composer Wizard to set the motor parameters and to tune the control loops. The Wizard will assist you in choosing the optimal drive parameters, step-by-step.
In the Wizard dialog, you are asked to enter the maximum continuous current and maximum velocity of the motor.
2. Tuning Current Each time you connect a new motor to the drive, you must tune the current loop of the drive. Current tuning is fully automatic: The Composer creates a step command to the current loop and finds the optimum PI parameters according to step response iterations.
3. Tuning Velocity
3.1 Auto-tuning Velocity
3.1.1 Step 1 If you are tuning the drive for a velocity application, select Auto Tuning for
Speed Design from the Select the Tuning Type drop-down list.
If you are tuning the drive as a velocity drive under a position controller, select Auto Tuning for Speed Design from the Select the Tuning Type drop-down list.
There is no need to perform velocity auto-tuning if you intend to auto-tune the drive as a position controller.
1

3.1.2 Step 2
1. From the Auto Tuning Mode drop-down list:
Select Expert tuning for bounded if position boundaries cannot be exceeded.
Select Expert tuning for free motion if there is no restriction on the system motion.
2. Using the Response slider to select the system margin you require:
Choose a value towards Fast and Sensitive if you require a more responsive (agile) system.
Choose a value towards Slow and Stable if you need a more robust system, which is required in a number of cases, among them:
Machines whose mechanics may vary, as when handling loads of different masses
A machine type that uses one type of control parameters, although the mechanics of each machine may differ from each other.
3. Use the System Noise slider to select the level of plant noise. The trade-offs are obvious: Fast and Noisy to Slow and Quiet.
4. Activate the auto-tuning procedure by clicking Run Auto Tuning.
2 Elmo HARmonica Tuning Guide HARTG0903

3.1.3 The Auto-tuning Procedure
The auto tuning procedure is built on the following steps.
1. The tuner creates a velocity step command and finds a low bandwidth control loop, to enable the motor to move while performing system identification.
2. The tuner injects a current command at different frequencies, while moving the motor at a constant speed. The tuner records the velocity and position response to the current different frequencies.
3. The tuner calculates the open loop transfer function of the mechanical system as sent to the drive (including sensors and delay influence).
4. The tuner calculates the drive transfer function in order to control the system.
5. The composer displays the step response of the control system.
3.2 Manually Tuning Velocity
1. From the Select the Tuning type drop-down list, select Manual Tuning. The following dialog box will be displayed.
2. Set KP to 10 and KI to 0.
3. Be sure that the Advanced Filter is OFF.
4. Set the Displacement to a maximum of +/-1000. If the position boundaries do not allow this displacement, reduce it as needed.
5. Set the Velocity to 20000 cnt/sec.
6. Uncheck the Profiler Mode check button.
7. Click Run Test. The Wizard will perform a step command and will record the system response, displayed in a two-pane scope window.
3

8. In the first pane, you can see the Velocity and the Velocity command and in the second, you can see the Current command. If the current command has reached the peak current, reduce the velocity command and repeat the test, multiplying KP by 2.
If machine vibrations are dangerous, multiply KP by 1.5 each time, instead of 2.
9. Repeat step 8 until you reach one of the following:
The step response exhibits an overshoot of about 20%.
The step response is unacceptable;, for example, it shows resonant oscillation.
The system exhibits a large overshoot and undershoot, a sign of being close to instability. In this case, decrease KP by at least a factor of 2.0.
4 Elmo HARmonica Tuning Guide HARTG0903

5

6 Elmo HARmonica Tuning Guide HARTG0903

7

8 Elmo HARmonica Tuning Guide HARTG0903

Here we can see that we have reached a 25% overshoot and the beginning of oscillations.
10. At this point reduce KP to 75% of its value and repeat the test.
9

We can see that the oscillations have disappeared and the overshoot has been reduced to 10%.
11. At this point, we can add KI to the controller. If one of the phenomena described in step 9 has returned, revert to the previous value of KP.
12. In order to set the first value of KI, measure the rise time of the step.
10 Elmo HARmonica Tuning Guide HARTG0903

In this case, it is 0.0016 sec.
13. Set KI/KP to 1/rise time = 625. KI = (KI/KP) * KP = 75,000
If machine vibrations are dangerous, set KI/KP to 0.5/rise time and increase KI until an undershoot or oscillations occur.
14. Set the KI value and repeat the test.
15. We can see that the system has reached saturation. Therefore, reduce the speed
to 15000 cnt/sec. The following performance results:
11

This shows a nice response with no undershoot or oscillations. The system has stabilized after 3.25 msec.
16. Had the KI been too great, oscillations or too large an undershoot would have occurred. To observe this case, increase KI to 90,000.
We can see a large undershoot. If a response such as this occurs, reduce KI until you reach a satisfactory response.
17. A robust system is required in a number of circumstances, among them:
Machines whose mechanics may vary, as when handling loads of different masses
A machine type that uses one type of control parameters, although the mechanics of each machine may differ from each other.
12 Elmo HARmonica Tuning Guide HARTG0903

In either of these cases, the gain must be reduced to enable a larger system margin. To see this, reduce KP and run the test:
18. Set the following parameters:
Rise time = 0.0018 sec
KI/KP = 1 / Rise time = 555
KI = 80 * 555 = 44400
We can see we that the resulting settling time is 5.75 msec.
There is no reason to attempt to reach the highest bandwidth. Reducing the bandwidth can help attain a much more stable system.
13

3.2.1 Manual Tuning with a Low-pass Filter
Going back to KP = 40 and KI = 0 we can see high frequency vibrations in both the Velocity and Current command.
Adding a low-pass filter with a high frequency will reduce the RMS noise of the current and will help us achieve a quieter system.
14 Elmo HARmonica Tuning Guide HARTG0903

Adding the low-pass filter results in an overshoot at KP = 80.
A KP of 100 gives an overshoot of 20% and the beginning of oscillations.
15

Reducing KP to 75 results in the following performance:
Rise time = 0.002 sec results in KI/KP = 500.
When adding a low-pass filter, do not set the KI/KP higher than filter frequency.
16 Elmo HARmonica Tuning Guide HARTG0903

Set KI = 500 * 75 = 37500. The following performance results:
Settling time is 5.5 msec.
It is recommended to set a low-pass filter of 600 Hz with a damping of 0.55 at the beginning of each tuning procedure.
3.2.2 Manual Tuning of a PI Controller with a Notch Filter
During the design of a PI controller, the designer can conclude from the test results if a notch filter is required and in which frequency it should be added. Following is a characteristic example, using the second (resonant) test system.
Start by designing a PI controller. For KP, we have the test results given in the following figure. The measured current exhibits oscillations, which is a hint of the existence of resonance.
0 0.1 0.2 0.3 0.4 0.5-3
-1.8-0.60.61.8
3x 10⁴
Time (sec.)
Cou
nts/
sec.
Speed Reference
0 0.1 0.2 0.3 0.4 0.5-0.8
-0.160.481.121.76
2.4
Am
pere
T ime (sec.)
Figure 3-1: Example of use of a notch – the current exhibits a periodic noise waveform
17

In this example the measured speed also exhibits oscillations. In most cases, however, the resonance phenomenon is more clearly identified from the current response than from the speed response.
Measure the resonance frequency, that is, how many oscillations appear in a second. By enlarging an interval of the measured current, you can measure 30 cycles in 0.0837 seconds, which fits a resonance frequency of 10/0.0387=359Hz.
0.3 0.32 0.34 0.36 0.38 0.40.2
0.24
0.28
0.32
0.36
0.4
Am
pere
T ime (sec.) Figure 3-2: Zoom of current test measurement for measuring expected plant resonance.(RSpeed2)
Now add a notch at frequency 359 with a damping of 0.07. Click the Designer button in the Advanced Filter block, choose a notch filter, type its corner frequency and use the slider to choose the damping factor (as shown in the following dialog box). Click OK to return to the Tuning Velocity Loop dialog box, and then click Run Test to perform a test. The outcome is shown in Figure 3-3. Note that the resonance phenomenon disappeared (compare Figure 3-1 with Figure 3-3). The improvement is apparent in Figure 3-4, which is zoomed to the scale of Figure 3-2.
18 Elmo HARmonica Tuning Guide HARTG0903

0 0.1 0.2 0.3 0.4 0.5-3
-1.8-0.60.61.8
3x 10⁴
Time (sec.)
Cou
nts/
sec.
Speed Reference
0 0.1 0.2 0.3 0.4 0.5-0.8
-0.160.481.121.76
2.4
Am
pere
T ime (sec.) Figure 3-3: Test results showing how notch eliminates current oscillations due to mechanical resonance
0.3 0.32 0.34 0.36 0.38 0.40.2
0.24
0.28
0.32
0.36
0.4
Am
pere
T ime (sec.)
Figure 3-4: Zoom of current test measurement for the same controller used in Figure 3-2 with notch.
Figure 3-4 reveals two remaining oscillations: one about 75 Hz and the other 860 Hz. The oscillation at 75 Hz is due to cogging and not due to a mechanical resonance. In order to prove this, repeat the test with twice the velocity command: If this frequency doubles, it is due to cogging; if it remains the same, it is due to resonance. The resonance at 860 Hz is very close to half the Nyquist frequency, and may be damped using the low-pass filter option.
19
Repeat the test with different damping values according to the following guideline: Try using the largest damping factor value, which knocks out the resonance. Do not try using damping factors that are too small (0.07 is considered small) because too low a damping factor introduces more phase delay, and is less robust to resonant frequency variations1.
Continue the PI manual tuning process for designing KI and KP as described in the previous section.
3.3 Advanced Manual Tuning
For this procedure, we will use the tuning from low-pass filter (section 3.2.1). Going slow with the parameters we set will cause instability due to lack of information.
A step response of 500 cnt/sec with the same parameters will look like this:
1 The resonant frequency may change due to load or posture changes.
20 Elmo HARmonica Tuning Guide HARTG0903

Reducing the gains to KP = 20, KI = 15000 results in the following performance:
In order to gain stability at low velocities, we use gain scheduling and reduce the gains at low speeds. We can see that the KI/KP factor is higher at low speed in order to overcome friction.
Advanced manual tuning is very similar to manual tuning. The advance manual tuning dialog box provides a multiple set of KP and KI parameters and the velocity to which the gains refer. We will use one set of parameters each time and tune the corresponding velocity.
21

1. First set the Displacement to +/-1000 and the Velocity to 20,000. You will see the last row in the table marked. Uncheck the Gain Scheduling ON and Profiler Mode check boxes. Running a test in this way it exactly the same as running a test in manual tuning.
2. Set the same parameters as found previously on the marked row.
3. Check the Accept check box of the row after you have received acceptable parameters. There is no need to tune all the available velocities in the table. Choosing three or four velocities to tune will suffice.
4. To tune 505 cnt/sec as the second speed, set the velocity to 505 and change the Displacement to +/-100.
5. Start by setting the value of KP and KI to half of the first value.
6. Setting the parameters as follows:
This should result in the following graph:
22 Elmo HARmonica Tuning Guide HARTG0903

7. Now, reduce the parameters until you get satisfactory results for the steady state velocity. In our case, we saw that KP = 20 and KI = 15000 gave us satisfactory performance.
8. Check the Accept check box on the 505 cnt/sec row and proceed to the next speed.
9. Select 240 cnt/sec as the last speed and set the parameters as follows:
23

The results will be:
10. After setting acceptable parameters for each tuned speed and checking Accept in that row, click Interpolate and then check Gain Scheduling ON.
24 Elmo HARmonica Tuning Guide HARTG0903

4. Tuning Position
4.1 Introduction
According to the following formula, it can be seen that implementing a PI velocity loop resulted in a position controller equivalent to a PID controller with KIPID = 0; KPPID = KIspeed ; KDPID = KPspeed
Pos SpeedI P I
Pos Speed SpeedP P P I
SpeedD P
K K KPID K K K K PIP
K K
× = × +
Running a position with KPposition = 0 and the speed PI controller found previously gives us the following result:
25

This graph shows that the position loop is closed without closing the position constant error.
4.2 Tuning the Position Loop 1. Reduce the velocity KI by half, and set a step in velocity:
26 Elmo HARmonica Tuning Guide HARTG0903

2. Set position KPposition = 0.5/rise time. This will give a position bandwidth that equals the velocity bandwidth divided by 4. In this case, KPposition = 0.5/0.0018 = 280. This results in the following performance:
27

28 Elmo HARmonica Tuning Guide HARTG0903

3. To better tuning position loop, complete the Wizard process and then select Tools - Advanced Manual Tuning from the Composer main menu.
4. Click in the toolbar to open the motion monitor and select the following parameters to record:
Display 1: Position Error
Display 2: Velocity, Velocity command
Display 3: Current command
5. Set the Trigger Mode to Auto, the Source to Begin Motion and the Delay to 10%. Set the Resolution to 0.36 msec.
6. In the Advanced Manual Tuning dialog box, set the last row as displayed in the following dialog box, and use the parameters from the manual setting. Set the Step to 2000 and the Speed to 20,000 cnt/sec.
7. Uncheck the Gain Scheduling ON button.
29

8. Start the recorder and press Run Test. The following graph will be displayed:
30 Elmo HARmonica Tuning Guide HARTG0903

We would expect an overshoot on the velocity followed by a small undershoot.
9. You may iterate on the KI parameter of the inner loop and on the outer loop parameter KP. The iteration range for the KI of the inner loop should not exceed 50% of its original value, and the iteration on the outer loop should not exceed 100% of its original value.
Increasing the position KP to 400 gives the following:
A second overshoot has occurred on the velocity and position error, which reflect instability.
31

10. Increase the position KP to 500 The following performance results:
More oscillations are evident.
4.3 Lowering the Speed
We can see from the graph that the system vibrates at low and zero speeds.
This is due to a delay in the information caused by the sensor at low speed. The velocity loop should not be closed at a bandwidth greater than V/10.
1000 cnt/sec will give a maximum bandwidth of 100Hz
Once the velocity bandwidth is reduced, we should also reduce the position bandwidth.
32 Elmo HARmonica Tuning Guide HARTG0903

In practice, KPposition <=V/5, the velocity KP should be reduced by the same factor as position KP, and the velocity KI should be reduced by a square of that factor.
In our case, KP should not be reduced until 280*5 = 1400 cnt/sec.
1. Copy the parameters of the last row to the entire table by selecting Interpolate All on that row, using the right-button pop-up menu.
2. Check the accept button of 1388 cnt/sec row in the table.
3. Set several speed parameters according to the rule described before and check each relevant Accept check box. Set the following rows:
694 cnt/sec Position KP = 700/5 = 140 280/140 = 2 Velocity KP = 75/2 = 37 Velocity KI = 18750/(22) = 4687
457 cnt/sec Position KP = 700/5 = 92 280/92 = 3 Velocity KP = 75/3 = 25 Velocity KI = 18750/(32) = 2083
280 cnt/sec Position KP = 280/5 = 56 280/56 = 5 Velocity KP = 75/5 = 15 Velocity KI = 18750/(52) = 750
4. After setting the parameters and checking Accept on those rows, accept the parameters by selecting Interpolate All.
5. Check Gain Scheduling ON.
20,000 cnt/sec (150 RPM)
33
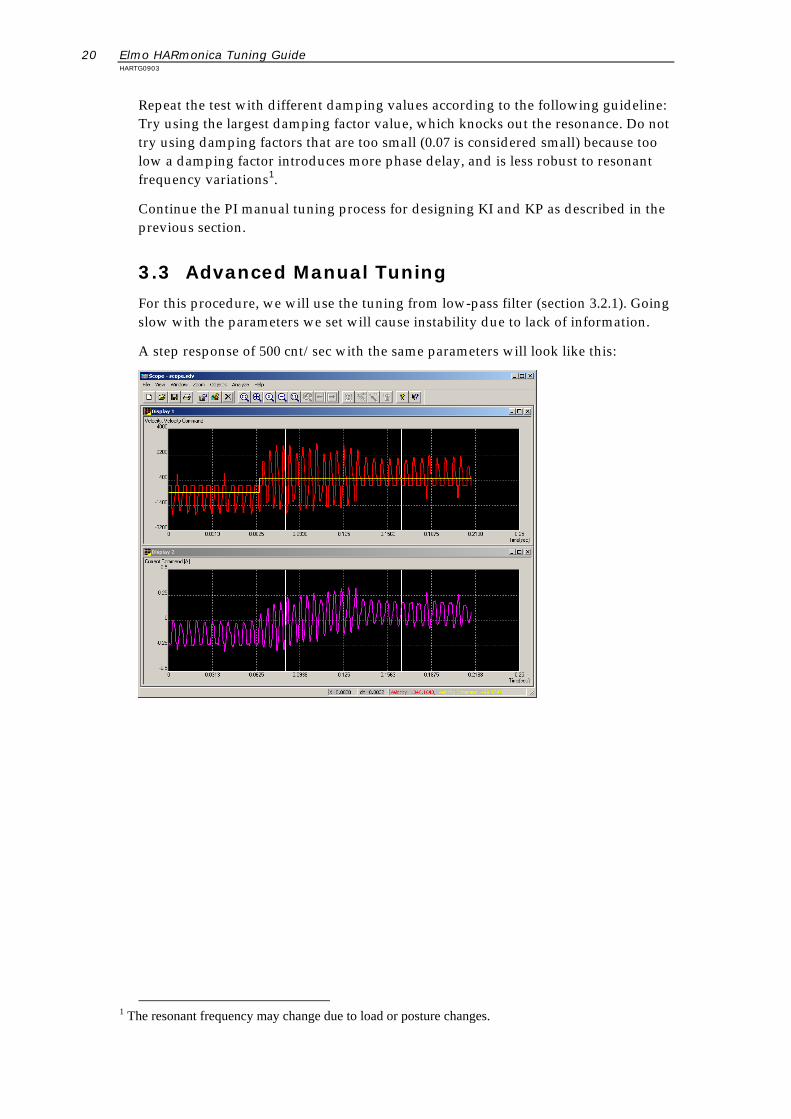
1000 cnt/sec (7.5 RPM)
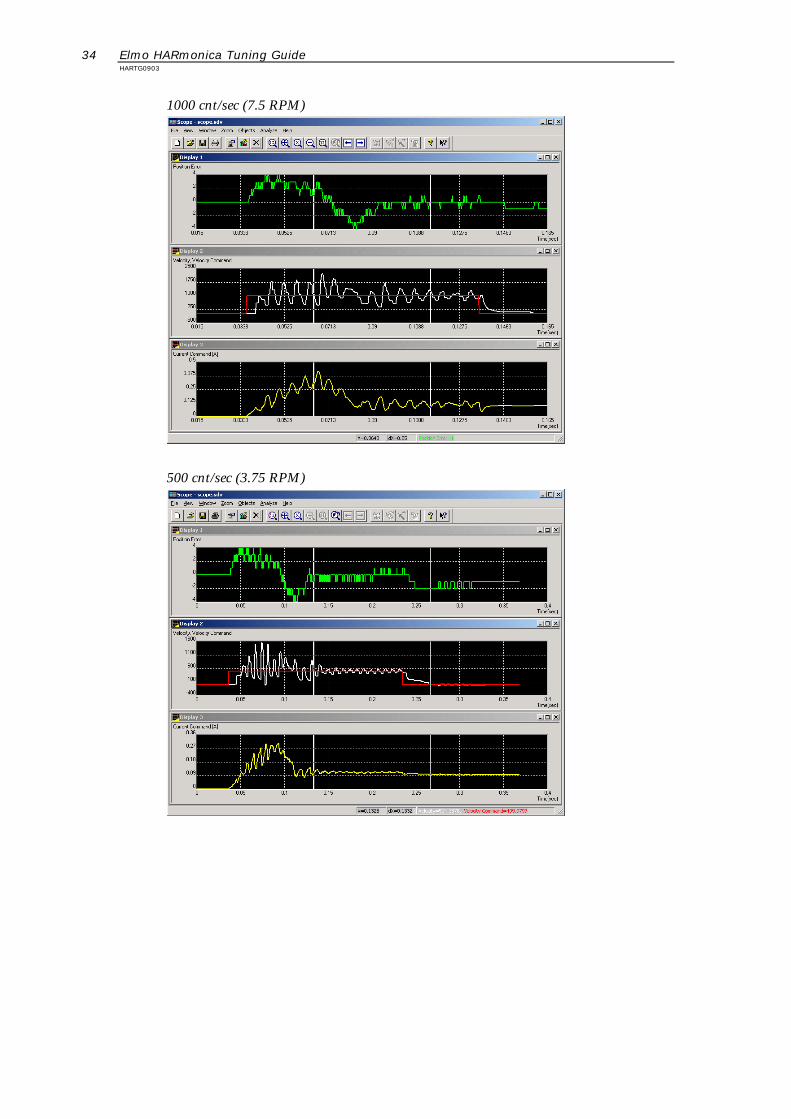
500 cnt/sec (3.75 RPM)
34 Elmo HARmonica Tuning Guide HARTG0903

6. Check the Accept check box of the tuned velocities and select Interpolate All again.
7. Check the Gain Scheduling ON check box and close the Advanced Manual Tuning dialog box.
In order to make the system more rigid, you can increase the GS[10]parameter. In order to make the system more stable at low speeds and at no speed, reduce GS[10].
The Composer sets a default value of GS[10] that equals the highest position KP/2.5.
A step with GS[10]=280:
Oscillations can be seen at the end of the motion.
A step with GS[10]=10:
35

The position error remains for a log period.
Too low a value for GS[10] gives a poor response to external disturbance.
Remember to save your application after tuning with the Advanced Manual Tuning option. The application is not saved automatically on exit.
36 Elmo HARmonica Tuning Guide HARTG0903