Ellucian Solution Manager User Guide - help.suu.edu · Verify app server deployment ... Info to...
89
Ellucian Solution Manager User Guide Release 1.6 March 2016
Transcript of Ellucian Solution Manager User Guide - help.suu.edu · Verify app server deployment ... Info to...
Ellucian Solution Manager User GuideRelease 1.6March 2016

Notices
©2016 Ellucian. Confidential & Proprietary 2
NoticesWithout limitation: Ellucian®, Banner®, Colleague®, and Luminis® are trademarks of the Elluciangroup of companies that are registered in the U.S. and certain other countries; and EllucianAdvance™, Ellucian Course Signals™, Ellucian Degree Works™, Ellucian PowerCampus™, EllucianRecruiter™, Ellucian SmartCall™, are also trademarks of the Ellucian group of companies. Othernames may be trademarks of their respective owners.© 2014-2016 Ellucian.
Contains confidential and proprietary information of Ellucian and its subsidiaries. Use of thesematerials is limited to Ellucian licensees, and is subject to the terms and conditions of one or morewritten license agreements between Ellucian and the licensee in question.
In preparing and providing this publication, Ellucian is not rendering legal, accounting, or othersimilar professional services. Ellucian makes no claims that an institution's use of this publicationor the software for which it is provided will guarantee compliance with applicable federal or statelaws, rules, or regulations. Each organization should seek legal, accounting, and other similarprofessional services from competent providers of the organization's own choosing.
Ellucian4375 Fair Lakes CourtFairfax, VA 22033United States of America
Contents
©2016 Ellucian. Confidential & Proprietary 3
Contents
Get Started with Ellucian Solution Manager....................................................................6Navigate the admin console......................................................................................................... 6Enter system settings....................................................................................................................7Manage users................................................................................................................................8
Manage Banner Environments with Solution Manager.............................................10Define an existing Banner environment in Solution Manager.................................................... 11
Network communication between machines........................................................................ 11Add an existing environment to Ellucian Solution Manager.................................................11Define existing environment details......................................................................................12Manage machines.................................................................................................................15
Add a machine............................................................................................................... 15Configure machine properties........................................................................................16
Manage applications.............................................................................................................19Add a new application................................................................................................... 19Configure application properties.................................................................................... 20
INB Applications: explanation of the default compile login sequence..................... 25Enter environment credentials..............................................................................................25
Banner schema passwords file path..............................................................................26Configure Banner environment servers...................................................................................... 26
Access administrative links...................................................................................................26Verify wget............................................................................................................................ 26Create script execution user for managed environment...................................................... 27
Set up script execution user credentials on the Jobsub machine..................................28Set up script execution user credentials on the Jobsub machine (Windows)................ 28
Automatically install Banner upgrades........................................................................................29Set up staging directories.....................................................................................................29Set up the known_hosts file.................................................................................................30Download new releases....................................................................................................... 31
View and download available releases in Solution Manager.........................................32View installed products and available releases................................................................... 32
Access currently installed products and available releases...........................................32View Ellucian Solution Manager supported upgrades................................................... 33
Verify upgrade tasks.............................................................................................................34Verify upgrade-specific configuration data for managed environments......................... 34Verify upgrade-related application configuration information.........................................34
Verify app server deployment..................................................................................35Verify INB Application Properties / INB Compiler Application Properties................ 35
Verify upgrade-related credentials information.............................................................. 38Install upgrades into Banner environment............................................................................40
Select upgrade releases to install into banner environment..........................................40Install releases with upgrade-specific properties........................................................... 41
Start upgrade installation job................................................................................................42View and monitor upgrade jobs........................................................................................... 43
Contents
©2016 Ellucian. Confidential & Proprietary 4
Advanced upgrade features................................................................................................. 45Banner upgrade restartablility........................................................................................ 45Using environment variables to control BMUI functionality............................................45Customize the automated upgrade installation script.................................................... 46
Adding customizations before or after all upgrades................................................46Template for the prebmui.sh script..........................................................................47Template for the postbumui.sh script...................................................................... 48Adding pre upgrade custom scripting......................................................................49Pre upgrade - generic task......................................................................................49Pre upgrade - upgrade specific task....................................................................... 50Post upgrade db - upgrade specific task................................................................ 50Post upgrade code - upgrade specific task.............................................................50Post upgrade - generic task.................................................................................... 51
Deployment Jobs.........................................................................................................................52Manage deployment jobs..................................................................................................... 52Verify deployment agents..................................................................................................... 52
Verify Jenkins slave on application server (Windows)...................................................52Verify Windows service........................................................................................... 53
Banner XE application and Banner Online Help deployments.............................................53Mount staging areas and seed help content................................................................. 53Set up script execution application user credentials......................................................54Set up script execution application user credentials (Windows)....................................54Define machines.............................................................................................................55Define app servers.........................................................................................................55Define applications......................................................................................................... 56Kick off deployments......................................................................................................57
Banner Pages deployments................................................................................................. 58Set up Banner Pages.................................................................................................... 58Define a Banner Pages App Server.............................................................................. 60Kick off Banner Pages deployments..............................................................................61Deploy Banner Pages Customizations.......................................................................... 61
Sample Windows environment setup batch script......................................................................64
Provision Banner Environments.........................................................................................67Provision a new Banner environment.........................................................................................67
Provisioning overview........................................................................................................... 67Provision an environment..................................................................................................... 69Templates..............................................................................................................................70
Template information......................................................................................................70Set up an environment......................................................................................................... 70Configure an environment.................................................................................................... 71Machines............................................................................................................................... 73
Configure a machine......................................................................................................73Add applications....................................................................................................................75
Configure application properties.................................................................................... 75Kick off environment provisioning.........................................................................................80Start the environment machines...........................................................................................82
Virtual machine-specific information.............................................................................. 82Pxeboot machines................................................................................................... 82
Monitor provisioning jobs......................................................................................................83

Contents
©2016 Ellucian. Confidential & Proprietary 5
Access newly provisioned environments..............................................................................84Use VMWare to provision an environment.......................................................................... 84
Get started with VMWare...............................................................................................84Provision a new application to an existing environment.............................................................85
Prerequisites......................................................................................................................... 85Provision a new Banner application.....................................................................................86Using VMware to provision a new Banner application.........................................................87
Self-Update Ellucian Solution Manager........................................................................... 89Self-update feature......................................................................................................................89
Get Started with Ellucian Solution Manager
©2016 Ellucian. Confidential & Proprietary 6
Get Started with Ellucian Solution ManagerGet Started with Ellucian Solution Manager
Ellucian Solution Manager is installed on a server (referred to as the admin server) connected to aninstitution’s managed Banner environments.
Ellucian Solution Manager refers to the product. The web user interface is referred to as SolutionManager or the Solution Manager Admin Console.
Note: Review the Ellucian Solution Manager Installation and Configuration Guide beforecontinuing. Use the current guide after Ellucian Solution Manager has been installed.
Navigate the admin console
Review a summary of how to navigate the Solution Manager admin console.
Before you begin
Access the Solution Manager application though a browser using the following URL scheme:http://<your-admin-server-hostname>:8081/admin/adminMain
Note: Use the available Worksheets contained in the Ellucian Solution Manager Installation andConfiguration Guide to record configuration information needed to complete forms in SolutionManager
Environments and system settings will not be populated after first signing into the admin console.
To access all Ellucian Solution Manager documentation, go to the Ellucian Client Support >Ellucian Hub > Ellucian Support Center. Select Ellucian Solution Manager from theDocumentation Libraries drop-down list.
Procedure
1. Click on the main navigation tabs to access the associated Solution Manager functionality.2. Click the Help icon at the top of the admin console for information to assist in completing the
forms.The initial landing page for the Solution Manager application is the Environments page, whichcan be accessed by clicking on the Environments navigation tab. When Solution Manager isfirst installed, there will be no environments defined, so the page will be blank except for twobuttons at the bottom of the page.
• Click Add to add a new environment.• Click Get new releases to download updates.
See Options to provision, install, and connect to Banner environments for more information.After you have added environments to Solution Manager, the Environments page will display atable listing all of the environments.

Get Started with Ellucian Solution Manager
©2016 Ellucian. Confidential & Proprietary 7
3. Click in a row of the environment table to view and edit detailed information related to thatenvironment. The Environment page will display the following navigation pane.Each of the tabs relates to the selected environment. Select an item from the secondarynavigation tabs to the left, such as Env Settings.
4. Click Add to add an item for the selected environment.5. Update settings for the environment, then click Save.6. To return to the main navigation tabs, click on the Home icon at the top of the navigation panel.7. To end the session, click Sign Out in the upper right corner of the admin console before closing
the browser.
Enter system settings
Define the Solution Manager system settings at first use. These credentials will be used to connectto the Ellucian Solution Manager automated release download services. The login and passwordmust be authorized to access the Ellucian Documentation & Download Center.
About this task
If you receive an error message when trying to log in, the Solution Manager Admin Server may beunable to connect to the Release Services Server. See the "Prerequisite Validation Scripts" sectionof the Ellucian Solution Manager 1.6 Prerequisites document for more information. Go to EllucianClient Support > Ellucian Hub > Ellucian Support Center. Select Ellucian Solution Managerfrom the Documentation Libraries drop-down list.
Procedure
1. Complete System Settings fields after logging in.The login and password will be used to authenticate web service requests that SolutionManager sends to Ellucian. The web service requests will check for and download environmentprovisioning templates, scripts and associated content files, and available Banner upgradereleases and associated documentation and installation metadata.
Table 1: System settings fields
Property Description Sample Data
Download RootURL
Read-only field that displays the Ellucian URL fromwhich software is being downloaded.
https://esmsvc.ellucian.com:8443
Institution Name Enter the institution name. EllucianUniversity
Download CenterLogin
Enter your login to the Ellucian Documentation &Download Center. The login and password are usedto authenticate web service requests that EllucianSolution Manager sends to Ellucian.
ddpom

Get Started with Ellucian Solution Manager
©2016 Ellucian. Confidential & Proprietary 8
Property Description Sample DataThe login entered must be authorized for codedownload in the Ellucian Download Center. Thecredentials will be validated when you attemptto save the page through the connection to theEllucian Solution Manager Release Services at theURL specified in the Download Root URL field.
Password Enter the password to the Ellucian Documentation &Download Center.
*****
Send onDownloads
Select or clear the check box under DiagnosticInfo to indicate whether or not to upload diagnosticconfiguration information from Ellucian SolutionManager to Ellucian when checking for availablereleases.
2. Click Send Now to send environment information to Ellucian.3. Click View Info to view the environment information that was sent.4. Select Save to validate your Download Center login credentials and save the data entered
on the page. You will not be allowed to save the page with invalid Download Center logincredentials.
5. Select Environments, to display the institution name at the top of the Environments page.
Manage users
Define and manage users who have access Ellucian Solution Manager. Credentials must beauthorized to access the Ellucian Documentation & Download Center.
Procedure
1. In the admin console, click Users.2. Click Add to add a new user. Otherwise, click in the row of an existing user.3. Update the user management information.
Table 2: User fields
Property Description Sample Data
Username Add a name for the user you are defining in SolutionManager.
admin
New Password Enter a password for the user. *****
Confirm NewPassword
Confirm the password for the user. *****
Get Started with Ellucian Solution Manager
©2016 Ellucian. Confidential & Proprietary 9
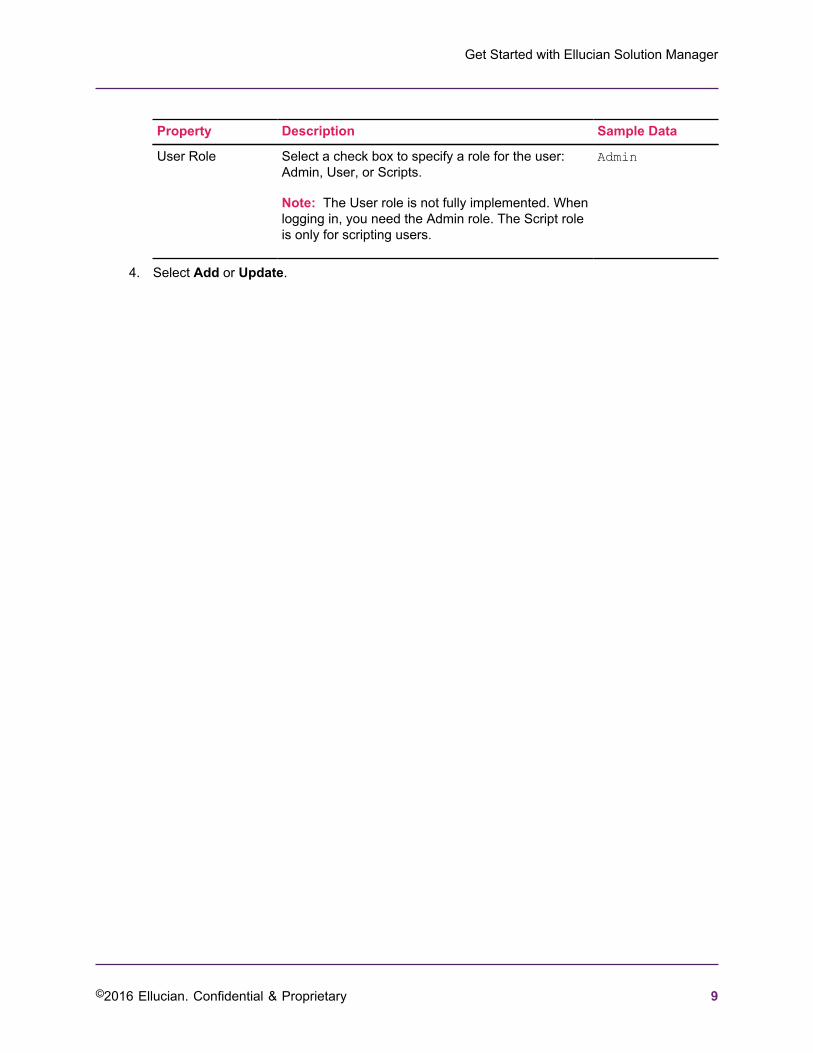
Property Description Sample Data
User Role Select a check box to specify a role for the user:Admin, User, or Scripts.
Note: The User role is not fully implemented. Whenlogging in, you need the Admin role. The Script roleis only for scripting users.
Admin
4. Select Add or Update.

Manage Banner Environments with Solution Manager
©2016 Ellucian. Confidential & Proprietary 10
Manage Banner Environments with SolutionManagerManage Banner Environments with Solution Manager
Configure the Solution Manager admin console and Banner environments.
Use the available worksheets to record configuration information needed to complete forms inSolution Manager. Access the developer worksheets found in the Ellucian Solution ManagerInstallation and Configuration Guide.
Tip: To enter paths for Windows environments on machine, application, and app serverforms, make sure to specify Windows paths (with backslashes). To enter paths for Unix / Linuxenvironments, enter Unix paths (including forward slashes).
Note: Windows users must configure a Windows environment setup batch script with the nameWinEnvSetup.bat on the Jobsub machine. Do not change the name of the script.
1. Complete the fields in the template script provided.2. Create an Upgrades folder under $BANNER_HOME if one does not exist already.3. Place the file in the Upgrades folder in the Banner home directory. The batch script will be run
automatically by Solution Manager during an upgrade, when needed. For the template batchscript, see Sample Windows environment setup batch script on page 64.
Topic Comments
Define an existing Bannerenvironment in SolutionManager on page 11
Define the characteristics of your Banner environment to SolutionManager, including the global environment settings, environmentcredentials, login sequence, machines, and applications hosted onthose machines.
Configure Bannerenvironment servers onpage 26
To manage your Banner environment using Ellucian SolutionManager, define characteristics of your environment in the SolutionManager Admin Console. This includes global environment settings,machines, applications hosted on the machines, and may includeenvironment credentials and login sequences, depending on what youplan to accomplish.
Automatically installBanner upgrades on page29
Use Ellucian Solution Manager to install Banner upgrade releases intomanaged Banner environments.
Deployment Jobs on page52
Banner releases can contain one or more associated deployments. Adeployment job is created automatically when the release is includedon an upgrade job that has been started. Solution Manager supportsBanner 9 application, Banner 9 online help, Banner 8 online help, andBanner Pages deployments.
Sample Windowsenvironment setup batchscript on page 64
Use this as your Windows environment setup batch script templateWinEnvSetup.bat. (You must not change the name of the script.)

Manage Banner Environments with Solution Manager
©2016 Ellucian. Confidential & Proprietary 11
Define an existing Banner environment in Solution Manager
Define the characteristics of the Banner environment to Solution Manager, including the globalenvironment settings, environment credentials, login sequence, machines, and applications hostedon those machines.
Network communication between machines
Consider the network access requirements for Ellucian Solution Manager for running upgrades anddeployments.
On the admin server, open the following ports for every environment machine:
Port Protocol Reason
8080 tcp Jenkins
8081 tcp Admin Console
80821 tcp JNLP for Jenkins
Add an existing environment to Ellucian Solution Manager
Connect Solution Manager to an existing Banner environment.
About this task
View installed products, access release documentation, and enable automated upgrade anddeployment features of Solution Manager for the environment.
Procedure
1. Select Environments, then click Add.2. Enter an environment name and description.3. Select Existing to define an existing environment to Solution Manager.
Table 3: Environment configuration settings
Field Description Sample Data
Environment Name Specify a name for the existing environment inEllucian Solution Manager.
M013036
1 Port 8082 is recommended. Go to Jenkins. Choose Manage Jenkins > Configure Global Security > TCPport for JNLP slave agents to set a different JNLP communication port.

Manage Banner Environments with Solution Manager
©2016 Ellucian. Confidential & Proprietary 12
Field Description Sample Data
Description Enter an environment description in EllucianSolution Manager.
BannerenvironmentMO13036
Environment Type Define an existing environment. Existing
4. Click Add.
Define existing environment details
Add details of the existing Banner environments to Solution Manager to view the Banner productsinstalled in that environment.
Procedure
1. On the main Environments page, click anywhere in the row of the newly created environmentin the Environments table (excluding icons).
2. Click on the Env Settings tab to display the Environment Configuration Information page.3. Enter basic configuration information about the existing environment.
Table 4: Add existing environment fields
Field Description Sample Data
Environment Name Specify a name for the existing environment inEllucian Solution Manager.
M013036
Description Enter an environment description in EllucianSolution Manager.
BannerenvironmentMO13036
Environment Type Define an existing environment. Existing
4. Complete the fields to define an existing environment to Ellucian Solution Manager.
Table 5: Existing environment detail fields
Property Description Sample Data
Description Displays the information that was entered whenadding the environment to the Ellucian SolutionManager configuration database. Change thedescription if necessary.
Bannerenvironment MO13036
Environment Type Displays the environment type. Existing
DB SID Enter the Oracle database SID for the environment. SMPL
DB Version Displays the database version. 11.2.0.2.0

Manage Banner Environments with Solution Manager
©2016 Ellucian. Confidential & Proprietary 13
Property Description Sample Data
Database Port Displays 1521, which is the default Oraclecommunications port.
Note: If the Oracle database for the environmentdoes not use port 1521 for Oracle databasecommunications, enter the appropriate portnumber.
1521
Is Production Select the check box if this is your productionenvironment. Otherwise, clear the check box.
Not selected
Banner Code TreePath
Enter the Banner code tree path on the Jobsubmachine (also referred to as the Banner homedirectory) for the environment.
/u01/app/sghe/banner/SMPL
Upgrade AgentName
Enter the upgrade agent name defined duringinstallation and configuration.
M019036_BMUI_AGENT
Upgrade DebugLevel
Select the appropriate upgrade debug level, whichdefaults to Debug.
Agent Status Displays the online status of the agent. Idle
Banner XE SharedConfig Dir
This value should contain the textshared_configuration. There is no need tochange the default.
shared_configuration
Banner Wait For(secs)
3600
Banner Wait ForForms (secs)
7200
Wait For Display Cleared
Upgrade DebugLevel
Select a debug level, such as Trace, Debug, Info,Warn, Error, or Fatal.
Debug
Admin Server -Private Network
Subnet For use when adding a new environment forprovisioning: Enter the IP subnet for the networkthat connects the admin server to the applicationin the existing Banner environment containing theBanner code tree (either the database applicationor the Jobsub application for the environment).
Network IP For all functions: Enter the IP address of the adminserver on the network that connects the adminserver to the existing Banner environment.
192.168.100.101
Gateway IP For use when adding a new environment forprovisioning: Enter the domain name of the

Manage Banner Environments with Solution Manager
©2016 Ellucian. Confidential & Proprietary 14
Property Description Sample Datanetwork that contains the appservers in the existingBanner environment.
EnvironmentApplication Servers- Public Network
Domain Enter the domain used to access the applicationservers in the Banner environment.
ellucian.com
Subnet For use when adding a new environmentfor provisioning: Enter the IP subnet used toconnect to the application servers in the Bannerenvironment you are provisioning.
Gateway IP For use when adding a new environment forprovisioning: Enter the gateway IP address of thenetwork that contains the application servers in theBanner environment you are provisioning.
Environment Status Displays the environment status. Ready
EnvironmentConfiguration
Identity ServicesURL
ForBanner Pages deployments on page 58:Enter the URL of the user authentication serviceused with the Banner Pages deployment, suchas Ellucian Identity Services (EIS) or CentralAuthentication Service (CAS).
For additional information see the InstallationGuide for a Banner Pages release, such as theHuman Resources 9.0 release or Banner AdminPages 9.2 release.
https://m03420.ellucian.com:8443/cas
ApplicationNavigator URL
For Banner Pages deployments on page 58:Enter the base URL for accessing the ApplicationNavigator instance used to access the BannerPages deployment.
For additional information see the InstallationGuide for a Banner Pages release, such as theHuman Resources 9.0 or Banner Admin pages 9.2release.
https://m034197.ellucian.com:8888
Reports ServerURL
For Banner Pages deployments on page 58:Enter the URL for the reports server.
For additional information, see the “Jasper ServerInstallation and Configuration for Banner Finance
https://034185.ellucian.com:8080/jasperserver-pro

Manage Banner Environments with Solution Manager
©2016 Ellucian. Confidential & Proprietary 15
Property Description Sample DataReports” section of the Banner Admin Pages 9.2Installation Guide.
5. Click Save.
Manage machines
For each physical or virtual machine that resides in the Banner environment, create a definition forthe machine in Solution Manager. Enter either private or public network information for a machine.
To define public and private properties for all logical servers, define a machine and assign it tovarious applications. Note that a VM is a physical machine with its own IP address and host name.
Note: The configuration pages for the database and Jobsub machines only prompt for networkconfiguration information for the private admin network because Solution Manager does not requirethe IP addresses of those machines, if any, on the external institution network.
Add a machine
Add and configure the properties of an environment machine.
Before you begin
If you are entering configuration information for an existing Banner environment where the Bannercode tree is the same machine as the database, Solution Manager requires that the machinebe defined as two separate machines with unique hostnames. You may need to set up an aliashostname for the machine for that purpose. Configure the DB machine role to reference themachine using one hostname, and the Jobsub machine role to reference the machine using theother hostname.
Procedure
1. Select Machines, then click Add to add a new machine2. Enter an Admin Host name.3. Select the type of machine and click Add to return to the Machines page.
Note: It is possible to change the properties associated with a machine later, but the samecannot be done for Admin Host Name or Role. If you add a machine with an incorrect AdminHost Name or Role, you must remove the machine by selecting the machine and clicking onRemove Machine, then re-adding the machine with the correct Admin Host Name and Role.
Manage Banner Environments with Solution Manager
©2016 Ellucian. Confidential & Proprietary 16
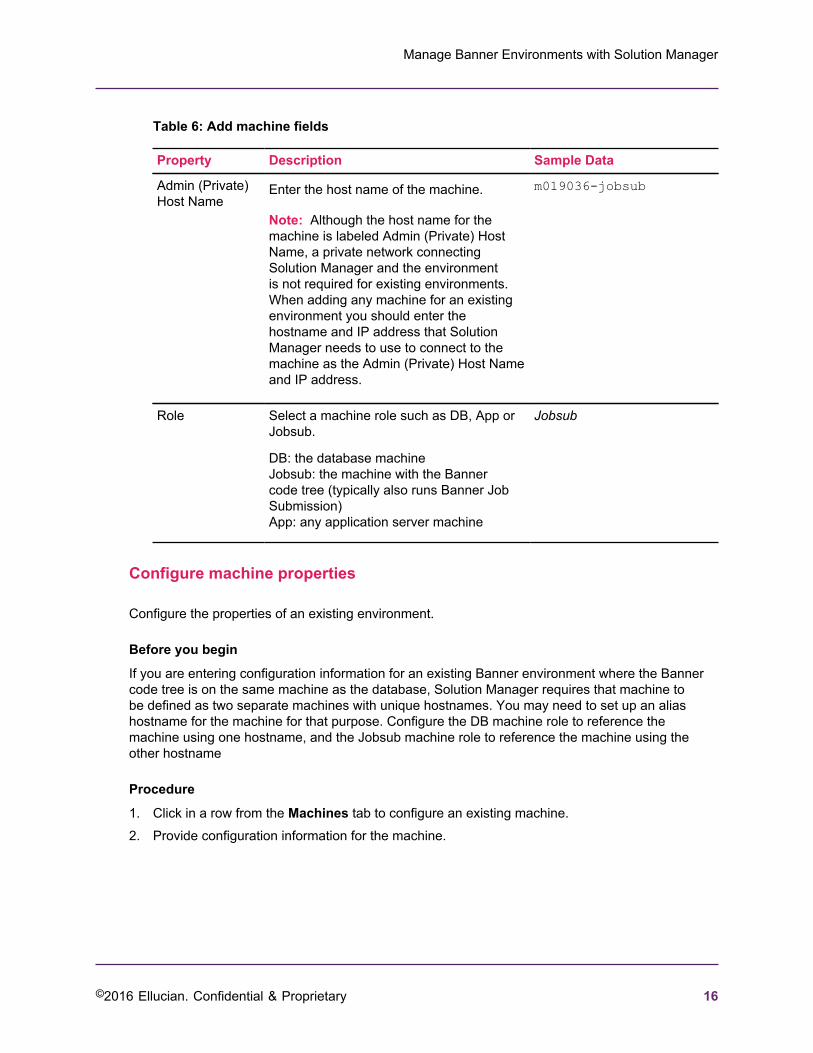
Table 6: Add machine fields
Property Description Sample Data
Admin (Private)Host Name
Enter the host name of the machine.
Note: Although the host name for themachine is labeled Admin (Private) HostName, a private network connectingSolution Manager and the environmentis not required for existing environments.When adding any machine for an existingenvironment you should enter thehostname and IP address that SolutionManager needs to use to connect to themachine as the Admin (Private) Host Nameand IP address.
m019036-jobsub
Role Select a machine role such as DB, App orJobsub.
DB: the database machineJobsub: the machine with the Bannercode tree (typically also runs Banner JobSubmission)App: any application server machine
Jobsub
Configure machine properties
Configure the properties of an existing environment.
Before you begin
If you are entering configuration information for an existing Banner environment where the Bannercode tree is on the same machine as the database, Solution Manager requires that machine tobe defined as two separate machines with unique hostnames. You may need to set up an aliashostname for the machine for that purpose. Configure the DB machine role to reference themachine using one hostname, and the Jobsub machine role to reference the machine using theother hostname
Procedure
1. Click in a row from the Machines tab to configure an existing machine.2. Provide configuration information for the machine.

Manage Banner Environments with Solution Manager
©2016 Ellucian. Confidential & Proprietary 17
Table 7: Configure machine fields
Property Description Sample Data
Machine Role Displays the role of the machine.
Jobsub NetworkType
This field is not used for existing environments.
Machine Status Set the machine status:
• Ready: Use this status for any machine inthe existing environment which already hasBanner software installed and operating.
• Unprovisionedor OSInstalled: Should onlybe specified if you are adding a machinefor the purpose of provisioning a newapplication.
Ready
Machine OS Select an operating system from the drop-down list. Unix should be used if the machine isrunning Linux or any Unix variant.
Unix
Admin (Private)Network Host Name
The machine host name. m019036-jobsub
IP The IP address for the machine on the networkthat the Admin Server will use to communicatewith the machine unless you are configuringa machine for provisioning a new applicationinto the existing environment. In that case,if you want to provision the application ontoa machine which already has the operatingsystem installed, you should set the MachineStatus to OSInstalled and enter the rootpassword here. Solution Manager will usethe root password you specify to log onto themachine through SSH to configure the machineand install a Jenkins agent for provisioning thenew application onto the machine..
149.24.19.36
Root Password This field is not used for existing environmentsunless you are configuring a machine forprovisioning a new application into the existingenvironment. In that case, if you want toprovision the application onto a machine whichalready has the operating system installed, youshould set the Machine Status to OSInstalledand enter the root password here. SolutionManager will use the root password you specifyto log onto the machine via SSH to configurethe machine and install a Jenkins agent for
Manage Banner Environments with Solution Manager
©2016 Ellucian. Confidential & Proprietary 18
Property Description Sample Dataprovisioning the new application onto themachine.
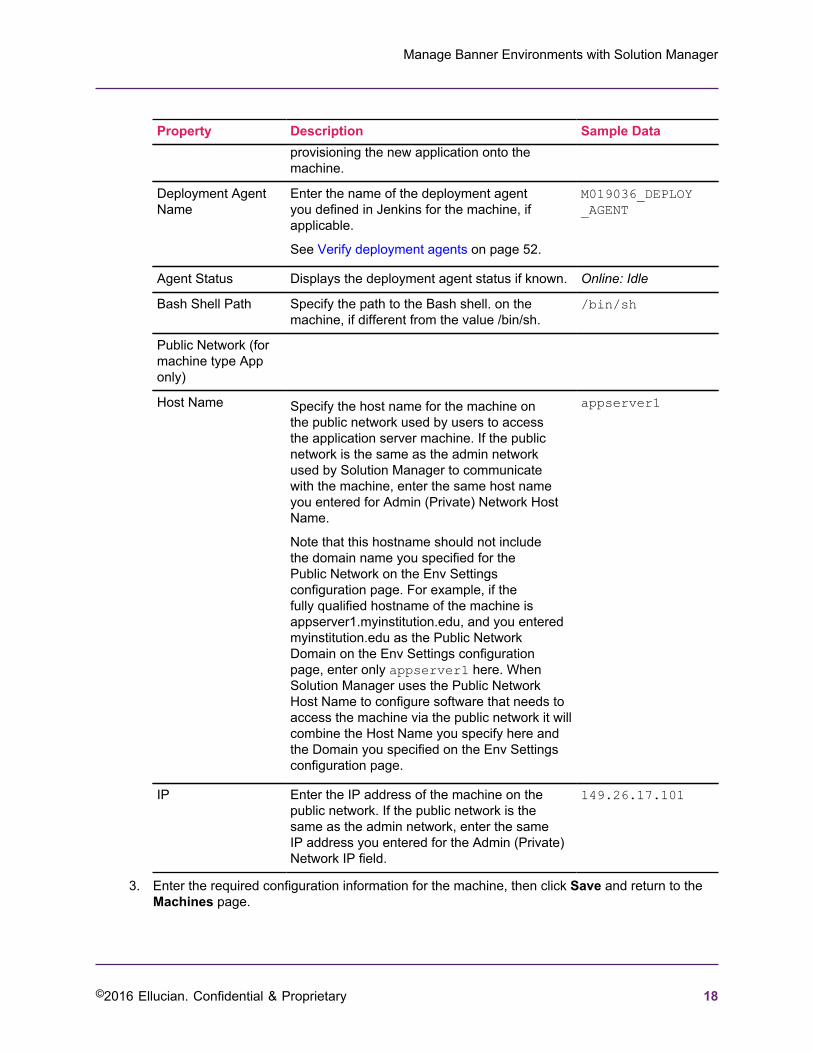
Deployment AgentName
Enter the name of the deployment agentyou defined in Jenkins for the machine, ifapplicable.
See Verify deployment agents on page 52.
M019036_DEPLOY_AGENT
Agent Status Displays the deployment agent status if known. Online: Idle
Bash Shell Path Specify the path to the Bash shell. on themachine, if different from the value /bin/sh.
/bin/sh
Public Network (formachine type Apponly)
Host Name Specify the host name for the machine onthe public network used by users to accessthe application server machine. If the publicnetwork is the same as the admin networkused by Solution Manager to communicatewith the machine, enter the same host nameyou entered for Admin (Private) Network HostName.
Note that this hostname should not includethe domain name you specified for thePublic Network on the Env Settingsconfiguration page. For example, if thefully qualified hostname of the machine isappserver1.myinstitution.edu, and you enteredmyinstitution.edu as the Public NetworkDomain on the Env Settings configurationpage, enter only appserver1 here. WhenSolution Manager uses the Public NetworkHost Name to configure software that needs toaccess the machine via the public network it willcombine the Host Name you specify here andthe Domain you specified on the Env Settingsconfiguration page.
appserver1
IP Enter the IP address of the machine on thepublic network. If the public network is thesame as the admin network, enter the sameIP address you entered for the Admin (Private)Network IP field.
149.26.17.101
3. Enter the required configuration information for the machine, then click Save and return to theMachines page.
Manage Banner Environments with Solution Manager
©2016 Ellucian. Confidential & Proprietary 19
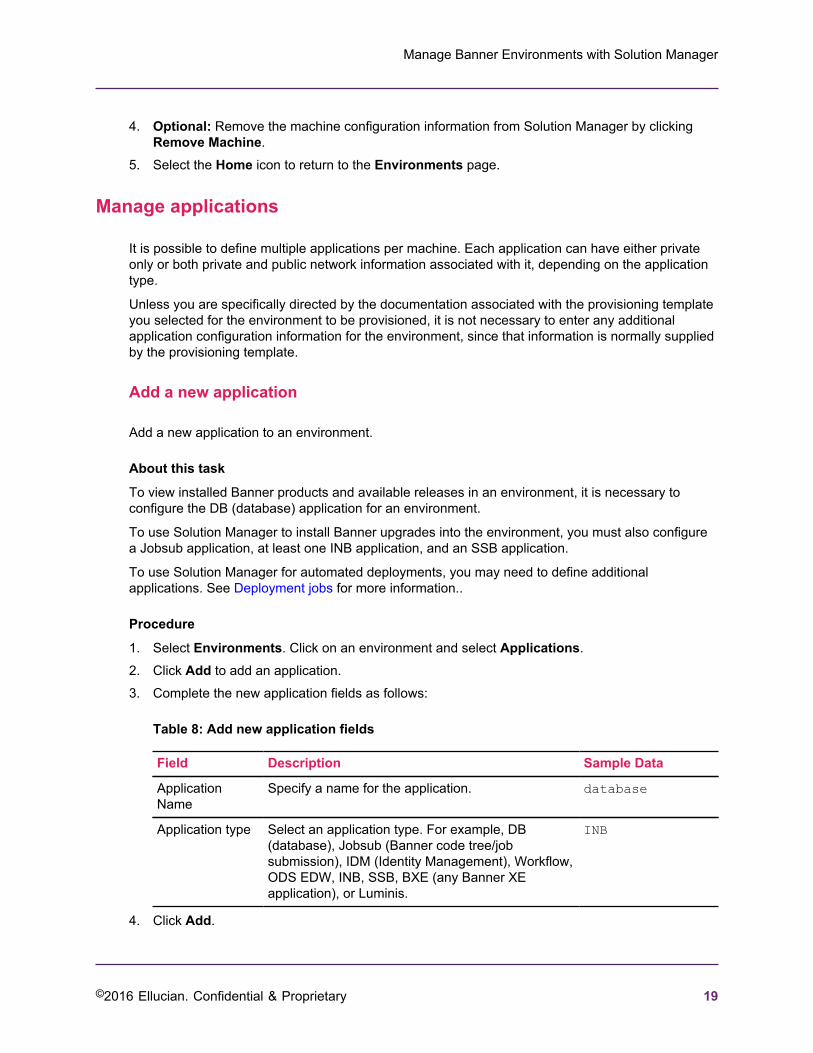
4. Optional: Remove the machine configuration information from Solution Manager by clickingRemove Machine.
5. Select the Home icon to return to the Environments page.
Manage applications
It is possible to define multiple applications per machine. Each application can have either privateonly or both private and public network information associated with it, depending on the applicationtype.
Unless you are specifically directed by the documentation associated with the provisioning templateyou selected for the environment to be provisioned, it is not necessary to enter any additionalapplication configuration information for the environment, since that information is normally suppliedby the provisioning template.
Add a new application
Add a new application to an environment.
About this task
To view installed Banner products and available releases in an environment, it is necessary toconfigure the DB (database) application for an environment.
To use Solution Manager to install Banner upgrades into the environment, you must also configurea Jobsub application, at least one INB application, and an SSB application.
To use Solution Manager for automated deployments, you may need to define additionalapplications. See Deployment jobs for more information..
Procedure
1. Select Environments. Click on an environment and select Applications.2. Click Add to add an application.3. Complete the new application fields as follows:
Table 8: Add new application fields
Field Description Sample Data
ApplicationName
Specify a name for the application. database
Application type Select an application type. For example, DB(database), Jobsub (Banner code tree/jobsubmission), IDM (Identity Management), Workflow,ODS EDW, INB, SSB, BXE (any Banner XEapplication), or Luminis.
INB
4. Click Add.
Manage Banner Environments with Solution Manager
©2016 Ellucian. Confidential & Proprietary 20
5. Enter configuration information for that application by clicking in that application's row in theApplications table. Access the Application Configuration Information page.
6. Complete the application fields.
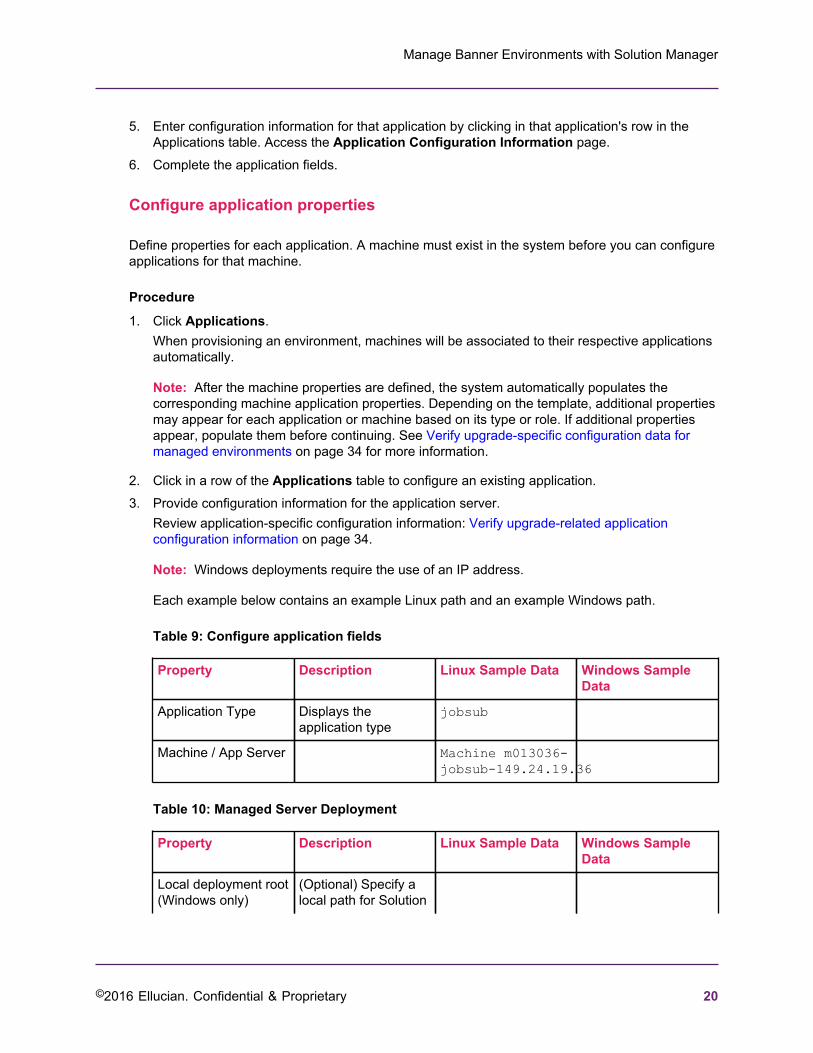
Configure application properties
Define properties for each application. A machine must exist in the system before you can configureapplications for that machine.
Procedure
1. Click Applications.When provisioning an environment, machines will be associated to their respective applicationsautomatically.
Note: After the machine properties are defined, the system automatically populates thecorresponding machine application properties. Depending on the template, additional propertiesmay appear for each application or machine based on its type or role. If additional propertiesappear, populate them before continuing. See Verify upgrade-specific configuration data formanaged environments on page 34 for more information.
2. Click in a row of the Applications table to configure an existing application.3. Provide configuration information for the application server.
Review application-specific configuration information: Verify upgrade-related applicationconfiguration information on page 34.
Note: Windows deployments require the use of an IP address.
Each example below contains an example Linux path and an example Windows path.
Table 9: Configure application fields
Property Description Linux Sample Data Windows SampleData
Application Type Displays theapplication type
jobsub
Machine / App Server Machine m013036-jobsub-149.24.19.36
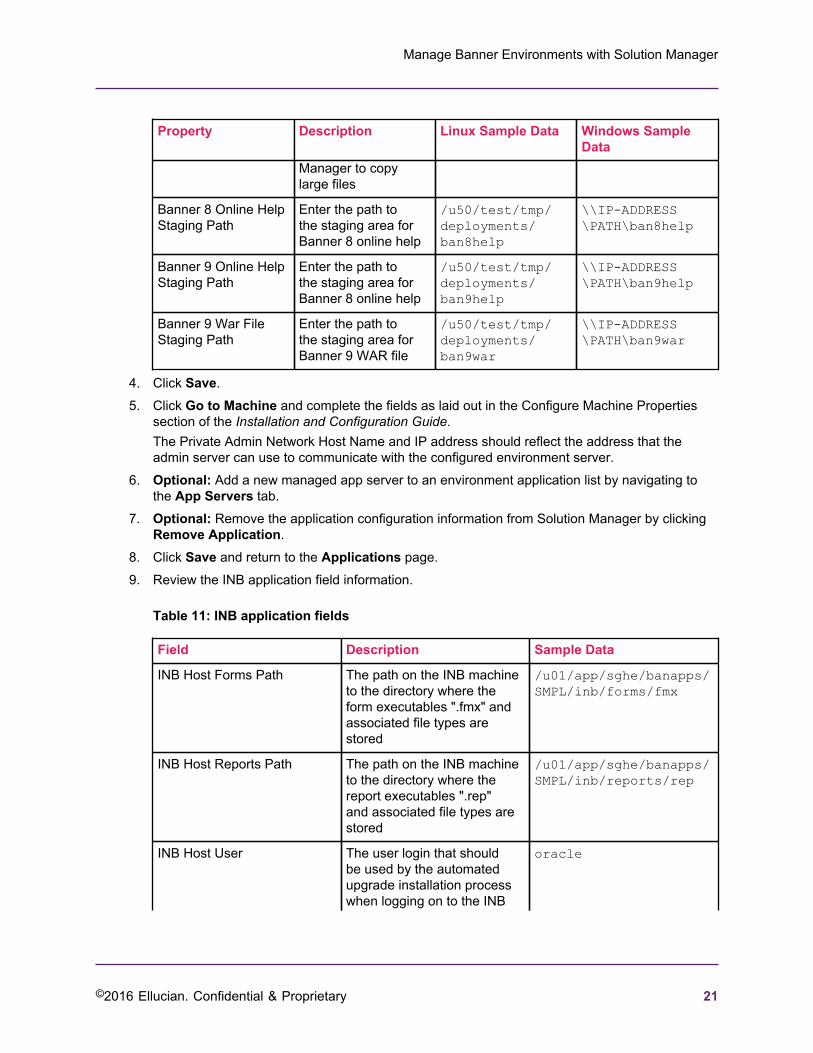
Table 10: Managed Server Deployment
Property Description Linux Sample Data Windows SampleData
Local deployment root(Windows only)
(Optional) Specify alocal path for Solution
Manage Banner Environments with Solution Manager
©2016 Ellucian. Confidential & Proprietary 21
Property Description Linux Sample Data Windows SampleData
Manager to copylarge files
Banner 8 Online HelpStaging Path
Enter the path tothe staging area forBanner 8 online help
/u50/test/tmp/deployments/ban8help
\\IP-ADDRESS\PATH\ban8help
Banner 9 Online HelpStaging Path
Enter the path tothe staging area forBanner 8 online help
/u50/test/tmp/deployments/ban9help
\\IP-ADDRESS\PATH\ban9help
Banner 9 War FileStaging Path
Enter the path tothe staging area forBanner 9 WAR file
/u50/test/tmp/deployments/ban9war
\\IP-ADDRESS\PATH\ban9war
4. Click Save.5. Click Go to Machine and complete the fields as laid out in the Configure Machine Properties
section of the Installation and Configuration Guide.The Private Admin Network Host Name and IP address should reflect the address that theadmin server can use to communicate with the configured environment server.
6. Optional: Add a new managed app server to an environment application list by navigating tothe App Servers tab.
7. Optional: Remove the application configuration information from Solution Manager by clickingRemove Application.
8. Click Save and return to the Applications page.9. Review the INB application field information.
Table 11: INB application fields
Field Description Sample Data
INB Host Forms Path The path on the INB machineto the directory where theform executables ".fmx" andassociated file types arestored
/u01/app/sghe/banapps/SMPL/inb/forms/fmx
INB Host Reports Path The path on the INB machineto the directory where thereport executables ".rep"and associated file types arestored
/u01/app/sghe/banapps/SMPL/inb/reports/rep
INB Host User The user login that shouldbe used by the automatedupgrade installation processwhen logging on to the INB
oracle

Manage Banner Environments with Solution Manager
©2016 Ellucian. Confidential & Proprietary 22
Field Description Sample Datamachine to update the form orreport executables
INB Host Pwd The password for the loginthat should be used bythe automated upgradeinstallation process whenlogging on to the INB machineto update the form or reportexecutables
*******
10. Review the INB compiler properties. These fields should only be entered if the INB applicationthat you are configuring is one that will be used to compile INB forms during upgradeprocessing.
Table 12: INB compiler properties
Property Description Sample Data
Host SID Name This is the Oracle SID usedon the INB forms compilermachine to set up the properenvironment for the formsand reports compilations.(For more information abouthow this field is used, see thedescription of the CompileLogin Sequence below.)
SMPL
Host TNSADMIN Path The path to the Oracleadmin directory in the Oracleinstance on the INB formscompiler machine that isset up for forms and reportscompilation.
/u01/app/oracle/middleware/as_1/network/admin
Host FMB Path The path on the INB formscompiler machine to thedirectory where the ".fmb"files (and associated filetypes) are stored for formscompilation.
/home/oracle/compiledir/formcompile
Host RDF path The path on the INB formscompiler machine to thedirectory where the ".rdf" files(and associated file types) arestored for reports compilation.
/home/oracle/compiledir/reportcompile
Banner Links The path on the Bannercode tree server (the Jobsub

Manage Banner Environments with Solution Manager
©2016 Ellucian. Confidential & Proprietary 23
Property Description Sample Datamachine for the environment)to the "links" directory in theBanner code tree.
Warning! On Windows, itis necessary to create thisfolder / path manually.
The automated upgradeinstallation process uses thisdirectory to access form andreport source files to transferthem to the forms compilermachine and performs theform and report compilations.
Compile Host Oracle HomePath
The path to Oracle homedirectory for the Oracleinstance on the INB formscompiler application that isset up for forms and reportscompilation.
/u01/app/oracle/middleware/as_1
Compile Host User The user login that shouldbe used by the automatedupgrade installation processto log on to the INB formscompiler application to doforms and reports compilation.
oracle
Compile Host Pwd The password for the loginthat should be used bythe automated upgradeinstallation process to log onto the INB forms compilerapplication to do forms andreports compilation.
*******
Compile Login Sequence A series of instructions forthe automated upgradeinstallation process to usewhen logging on to the INBforms compiler for forms andreports compilation.
The login instructions mustbe set up to recognize anyprompts that occur during thelogin sequence and to provideappropriate responses tothose prompts. The login
Wait $RC source/usr/local/bin/oraenvWait ORACLE SID =[SMPL] ?RC as_1Wait $ADDPROPbanner.form.compile.twotask.enable=yesADDPROPbanner.form.compile.twotask=

Manage Banner Environments with Solution Manager
©2016 Ellucian. Confidential & Proprietary 24
Property Description Sample Datasequence must also setthe Oracle environment fordoing the forms and reportscompilation.
See INB Applications:explanation of the defaultcompile login sequence formore information.
11. Review the SSB application field information.
Table 13: SSB application fields
Field Description Sample data
Local Deployment Root (Optional) Specify a local pathfor Solution Manager to copylarge files.
Banner 8 Online Help StagingPath
The location where Banner8 online help files are madeavailable for deployment.
/banapp/staging/ban8help
Banner 9 Online Help StagingPath
The location where Banner9 online help files are madeavailable for deployment.
/banapp/staging/ban9help
Table 14: SSB Application Properties
Field Description Sample data
User ID The login that should be usedby BMUI to connect to theSSB application for copyingitems to the web server'sdocument root.
oracle
Password The password that shouldbe used by BMUI to connectto the SSB application forcopying items to the webserver's document root.
*******
WebServer Doc Root Path The path to the folder on theSSB application server wherethe upgrade process will placeimages, CSS and JS files.
/banapp/ssb
Banner SSB Cascade EARFile Staging Path
The path to the folder onthe SSB application server
/banapp/ssb/java
Manage Banner Environments with Solution Manager
©2016 Ellucian. Confidential & Proprietary 25
Field Description Sample datawhere EAR files needing SSBdeployment will be placed byBMUI.
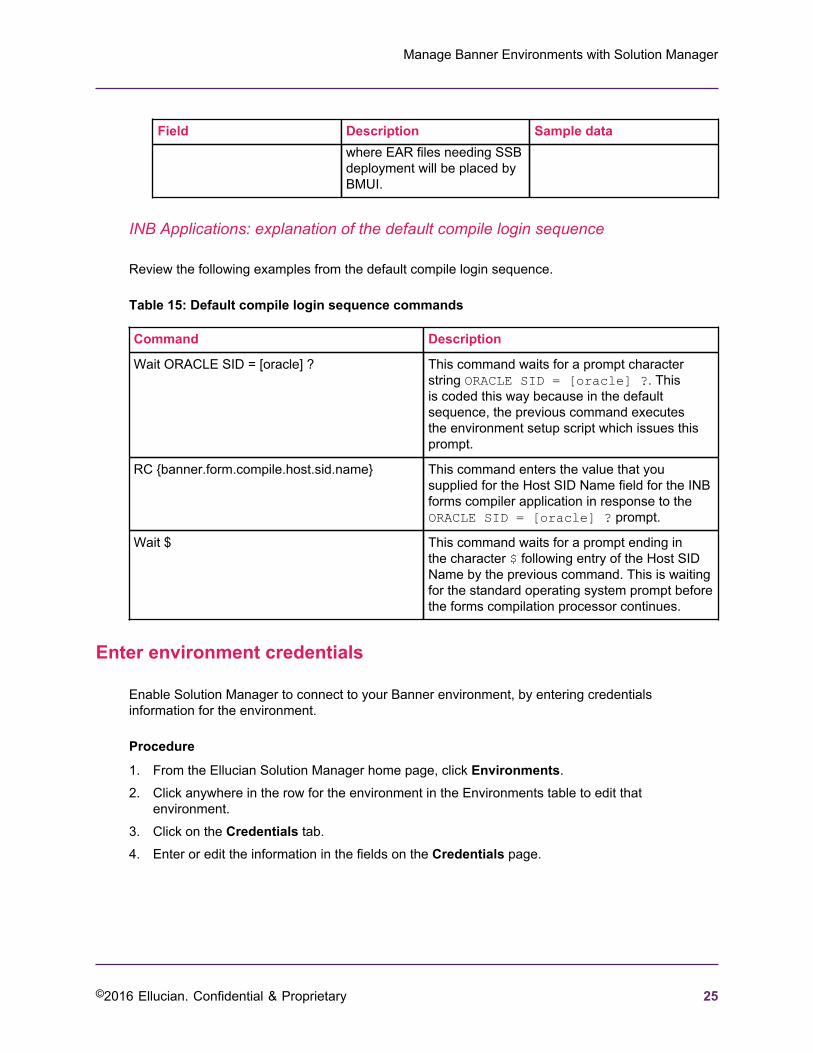
INB Applications: explanation of the default compile login sequence
Review the following examples from the default compile login sequence.
Table 15: Default compile login sequence commands
Command Description
Wait ORACLE SID = [oracle] ? This command waits for a prompt characterstring ORACLE SID = [oracle] ?. Thisis coded this way because in the defaultsequence, the previous command executesthe environment setup script which issues thisprompt.
RC {banner.form.compile.host.sid.name} This command enters the value that yousupplied for the Host SID Name field for the INBforms compiler application in response to theORACLE SID = [oracle] ? prompt.
Wait $ This command waits for a prompt ending inthe character $ following entry of the Host SIDName by the previous command. This is waitingfor the standard operating system prompt beforethe forms compilation processor continues.
Enter environment credentials
Enable Solution Manager to connect to your Banner environment, by entering credentialsinformation for the environment.
Procedure
1. From the Ellucian Solution Manager home page, click Environments.2. Click anywhere in the row for the environment in the Environments table to edit that
environment.3. Click on the Credentials tab.4. Enter or edit the information in the fields on the Credentials page.

Manage Banner Environments with Solution Manager
©2016 Ellucian. Confidential & Proprietary 26
Banner schema passwords file path
The Banner schema passwords file path is used to provide an alternative source for Banner schemapasswords.
The Banner upgrade process (BMUI) will use this path to locate a file containing the schemapasswords on the Jobsub machine. A full file path and filename should be entered in the field.The file should specify all required schema passwords in the same format as a Banner upgrade"login.sql" file.
/local/file/path/filename.sql
Configure Banner environment servers
Manage Banner environments using Ellucian Solution Manager, define characteristics of yourenvironment in the Solution Manager admin console. This includes global environment settings,machines, applications hosted on the machines, and may include environment credentials and loginsequences.
Access administrative links
Complete the fields to define an existing environment to Ellucian Solution Manager. For eachEnvironment, access to administrative URLs is provided on the Links tab.
Table 16: Existing environment detail fields
Field Description Sample Data
Environment Name Specify a name for the existing environment inEllucian Solution Manager.
M013036
Description Enter an environment description in EllucianSolution Manager.
BannerenvironmentMO13036
Environment Type Define an existing environment. Existing
Verify wget
To use the upgrade feature, wget 1.16.1 or later must be installed on the Banner environmentJobsub machine and any app servers where Banner 8 OH, Banner 9 OH, or Banner 9.x apps will bedeployed.
Add wget to the system path on your machine so that it can be found by Solution Manager. Forexample, /etc/profile or /etc/profile.d in Linux. Review Enter system settings on page 7for any additional requirements before you begin.

Manage Banner Environments with Solution Manager
©2016 Ellucian. Confidential & Proprietary 27
Note: Verify that Jenkins is installed.
Create script execution user for managed environment
Ellucian Solution Manager requires that a special script execution user be set up to allow managedenvironments to execute automated installation jobs.
About this task
Note: It is only necessary to define one scripting user in the Solution Manager admin console.The credentials for this scripting user can then be used on the JobSub machine and all applicationserver machines and across environments.
Ellucian Solution Manager automatically creates the script execution user for environmentsprovisioned by Ellucian Solution Manager
Perform these steps to create the script execution user and to set up credentials for the user in yourexisting managed Banner environment.
Procedure
1. Click on the Users tab to display the User Management page.2. Click Add to add a new user. The User page displays.3. Complete the script execution user information:
Table 17: Script execution user fields
Field Description Sample Data
Username The username for the script execution user for yourenvironment.
TEST1_SCRIPTING
New Password The password of your choice for the new script executionuser.
*****
Confirm NewPassword
Confirms the password of your choice for the new scriptexecution user.
*****
User Role Select the Scripts check box for the user role. Scripts
4. Click Add to add the new script execution user.

Manage Banner Environments with Solution Manager
©2016 Ellucian. Confidential & Proprietary 28
Set up script execution user credentials on the Jobsub machine
Set up the credentials for the new script execution user in the managed Banner environment.
Procedure
1. Log onto the Jobsub machine in your environment as the user that is used to run the Bannerupgrade installation script. This is the same user specified in the Install User field when settingup credentials for the environment.
2. Create a file named .wgetrc, containing the following lines in the home directory of the InstallUser (substituting the scripting user name and password set up in place of <envt-scripting-username> and <envt-scripting-user-pwd>):
http_user = http_password = <scripting-user-pwd>auth-no-challenge = on
3. Save the file.4. Change the permissions on the file so that only the Install User can view the contents of the file
by entering the following command:
$ chmod 600 .wgetrc
Set up script execution user credentials on the Jobsub machine (Windows)
Set up the credentials for the new script execution user in the Windows managed Bannerenvironment.
Procedure
1. Log onto the Jobsub machine in your environment as the user that is used to run the Bannerupgrades.This is the same user you will specify as the Install User when setting up credentials for theenvironment.
2. Locate the home directory for this user, then create a subdirectory named esm if it does notalready exist. For instance, if the user is "Banner", the directory would be similar to c:\Users\Banner\esm.
3. In the esm directory, create a file titled esmGetFromWeb.xml, containing the following lines(substituting the scripting user name and password you set up):
<Settings> <Creds> <Username><scripting-username></Username> <Password><scripting-user-pwd></Password> </Creds></Settings>
4. Save the file.

Manage Banner Environments with Solution Manager
©2016 Ellucian. Confidential & Proprietary 29
Automatically install Banner upgrades
Use Ellucian Solution Manager to install Banner upgrade releases into managed Bannerenvironments.
A managed Banner environment constitutes either an environment provisioned with Banner,as described in Provision a new Banner environment on page 67, or an existing Bannerenvironment for which configuration information has been entered into the Ellucian SolutionManager configuration database. Managed Banner environments are described further in Add anexisting environment to Ellucian Solution Manager on page 11.
Set up staging directories
Many Banner product releases have associated deployments (packaged web applications likeBanner Online Help or Banner XE applications) that must be configured for use after a releaseupgrade is installed.
About this task
Solution Manager automatically handles staging of this content during an upgrade, and after theupgrade, deploys the content to web application servers.
Procedure
1. Ensure that the staging directories have been created on the Jobsub machine.
The Install User must have full permissions to the staging directories.
Ellucian recommends creating and maintaining separate staging directories for eachenvironment.
The staging directories must be identified in the Solution Manager admin console on theJobsub's application detail page. This is where Solution Manager places deployment artifactsduring the upgrade process.
2. Ensure that the staging paths are entered on the application detail pages for the targetedapplication servers.These should indicate a path on the targeted application server that points to the Jobsub’sstaging area using a share or a mounted directory.
3. Create unique staging directories for each of the deployment types (i.e., Banner 8 Online Help,Banner 9 Online Help, and Banner 9 XE deployments).
4. Enter the paths on each appropriate application defined in the Solution Manager admin console.For additional information regarding configuring application paths, see Configure applicationproperties on page 20. Information on application deployment can be found in DeploymentJobs on page 52.

Manage Banner Environments with Solution Manager
©2016 Ellucian. Confidential & Proprietary 30
Set up the known_hosts file
The Solution Manager Banner upgrade process (BMUI) uses SSH and SFTP connections betweenBanner environment servers during the upgrade process.
About this task
For all expected communication paths between Banner environment servers, Solution Managerautomatically populates the known_hosts file. The BMUI process will search for the "Are yousure you want to continue connecting?" prompt and will automatically send a responseof yes. In some cases the connection may fail because of an invalid entry for the target server inthe known_hosts file so that BMUI does not receive the expected message, which will cause theupgrade job to fail. If that happens, use the following procedure to fix the problem.
Procedure
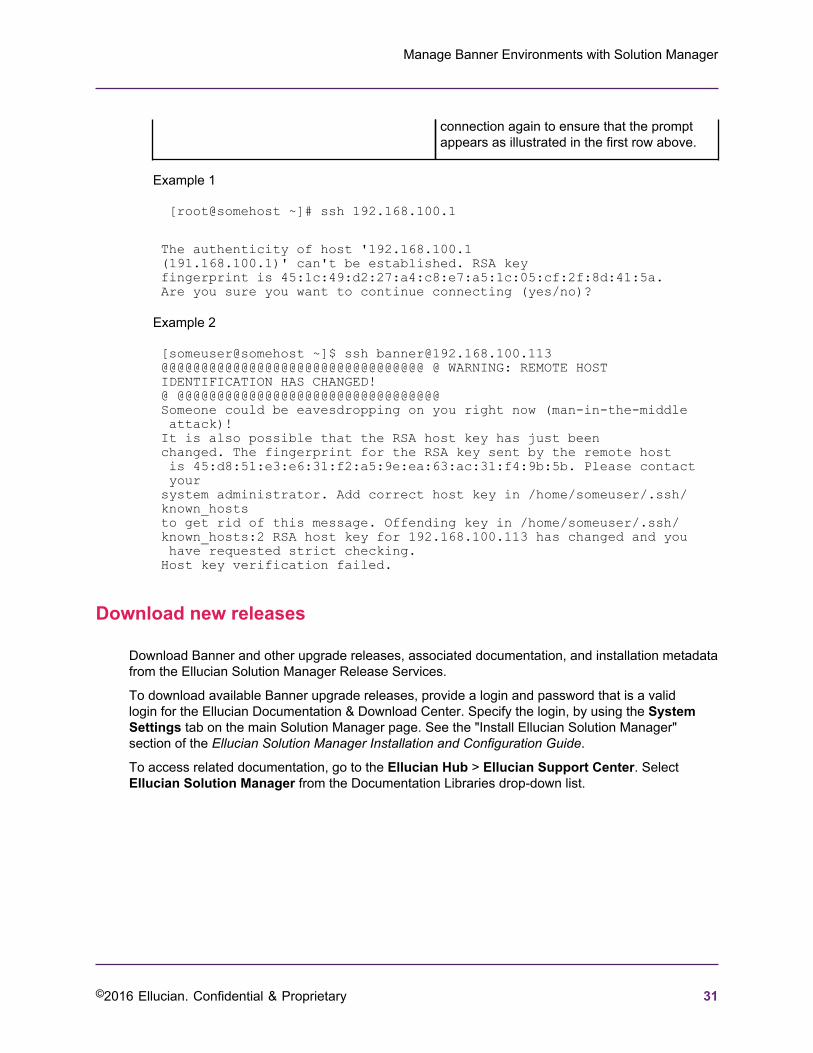
Open a secure session manually (using SSH) from the admin server to the environmentserver where the connection failed as the system user that was being used by BMUI when theconnection failed. Then manually attempt to connect via SSH to the target server for which theBMUI connection failed.The table below shows the conditions that may occur when you attempt the SSH connectiondepending on what is contained in the known_hosts file.
Relationship is not defined A prompt will appear (see example 1 below).Respond yes to continue.
The known_hosts will automatically update.The next secure session will not include aprompt.
Relationship is defined and is correct The secure session will be opened if therelationship is already defined and correctfor the current user-id to the target host. Noadditional prompting will occur.
Relationship is defined and is incorrect You will receive a message indicating thatthe connection cannot be completed becausehost key verification failed (see example 2below). This can happen if the operatingsystem was re-installed on the target server,or if you are attempting to connect using ahostname, the IP address has changed sincethe last connection was made to the targetedserver from the current server.
In this case, you must edit the known_hostsfile and remove any lines in that file (storedin the SSH directory of the login ID you usedto log in to the system to attempt the SSHconnection) that match the hostname orIP address of the target machine. Try the
Manage Banner Environments with Solution Manager
©2016 Ellucian. Confidential & Proprietary 31
connection again to ensure that the promptappears as illustrated in the first row above.
Example 1
[root@somehost ~]# ssh 192.168.100.1
The authenticity of host '192.168.100.1(191.168.100.1)' can't be established. RSA key fingerprint is 45:1c:49:d2:27:a4:c8:e7:a5:1c:05:cf:2f:8d:41:5a. Are you sure you want to continue connecting (yes/no)?
Example 2
[someuser@somehost ~]$ ssh [email protected] @@@@@@@@@@@@@@@@@@@@@@@@@@@@@@@@@ @ WARNING: REMOTE HOST IDENTIFICATION HAS CHANGED! @ @@@@@@@@@@@@@@@@@@@@@@@@@@@@@@@@@ Someone could be eavesdropping on you right now (man-in-the-middle attack)! It is also possible that the RSA host key has just been changed. The fingerprint for the RSA key sent by the remote host is 45:d8:51:e3:e6:31:f2:a5:9e:ea:63:ac:31:f4:9b:5b. Please contact your system administrator. Add correct host key in /home/someuser/.ssh/known_hosts to get rid of this message. Offending key in /home/someuser/.ssh/known_hosts:2 RSA host key for 192.168.100.113 has changed and you have requested strict checking. Host key verification failed.
Download new releases
Download Banner and other upgrade releases, associated documentation, and installation metadatafrom the Ellucian Solution Manager Release Services.
To download available Banner upgrade releases, provide a login and password that is a validlogin for the Ellucian Documentation & Download Center. Specify the login, by using the SystemSettings tab on the main Solution Manager page. See the "Install Ellucian Solution Manager"section of the Ellucian Solution Manager Installation and Configuration Guide.
To access related documentation, go to the Ellucian Hub > Ellucian Support Center. SelectEllucian Solution Manager from the Documentation Libraries drop-down list.
Manage Banner Environments with Solution Manager
©2016 Ellucian. Confidential & Proprietary 32
View and download available releases in Solution Manager
Use Ellucian Solution Manager to automatically download Banner and other upgrade releases,associated documentation, and installation metadata from the Ellucian Solution Manager ReleaseServices hosted on ellucian.com.
Before you begin
Note that a BMUI upgrade occurs each time "Get new releases" is selected. This is done to ensurethat the latest version is available.
Procedure
1. On the Solution Manager, Environments page, click Get New Releases.
A download progress page that monitors the progress of checking for and downloadingavailable releases will appear. The download log summary may list releases that SolutionManager Release Services reports as “available” but could not be downloaded.
2. Control the refresh rate of the screen by navigating to the Auto Refresh (secs) field, thenadjusting the refresh interval. Click Refresh.When the download is complete, a "Download Complete" message will appear in theMonitor page.
3. Navigate to the Environments page, then click on the Environment you wish to update.4. Display the available upgrades by clicking on Products.
View installed products and available releases
Use Ellucian Solution Manager to view the products installed in the Banner environment, andreleases available for installation.
Releases may be available for either an environment provisioned by Ellucian Solution Manager asdescribed in Provision Banner Environments on page 67, or for an existing environment definedto Ellucian Solution Manager as described in Add an existing environment to Ellucian SolutionManager on page 11.
Access currently installed products and available releases
The Products page provides access to the list of installed products and product versions.
Procedure
1. Click on a row in the Environments table, then select the Products tab on the EnvironmentInformation page to view currently installed product versions.
2. View the product's installation history in the corresponding Current Installed Release column.3. Click OK to return to the Products page.
Manage Banner Environments with Solution Manager
©2016 Ellucian. Confidential & Proprietary 33
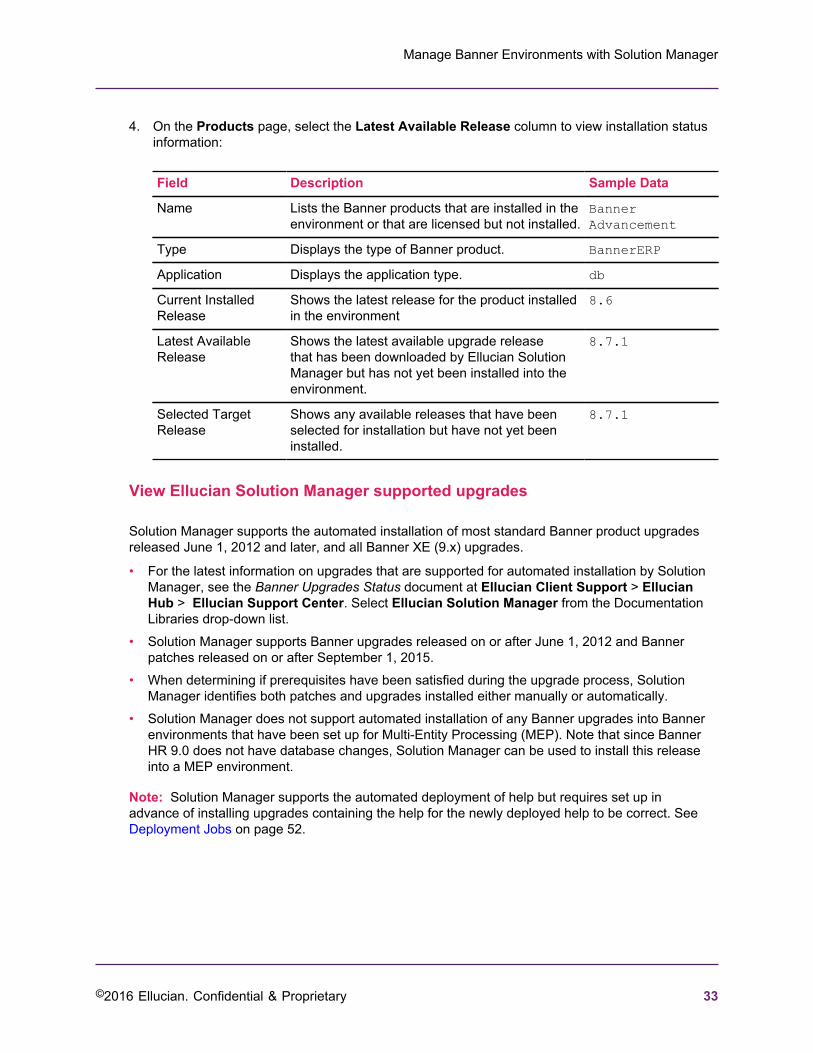
4. On the Products page, select the Latest Available Release column to view installation statusinformation:
Field Description Sample Data
Name Lists the Banner products that are installed in theenvironment or that are licensed but not installed.
BannerAdvancement
Type Displays the type of Banner product. BannerERP
Application Displays the application type. db
Current InstalledRelease
Shows the latest release for the product installedin the environment
8.6
Latest AvailableRelease
Shows the latest available upgrade releasethat has been downloaded by Ellucian SolutionManager but has not yet been installed into theenvironment.
8.7.1
Selected TargetRelease
Shows any available releases that have beenselected for installation but have not yet beeninstalled.
8.7.1
View Ellucian Solution Manager supported upgrades
Solution Manager supports the automated installation of most standard Banner product upgradesreleased June 1, 2012 and later, and all Banner XE (9.x) upgrades.
• For the latest information on upgrades that are supported for automated installation by SolutionManager, see the Banner Upgrades Status document at Ellucian Client Support > EllucianHub > Ellucian Support Center. Select Ellucian Solution Manager from the DocumentationLibraries drop-down list.
• Solution Manager supports Banner upgrades released on or after June 1, 2012 and Bannerpatches released on or after September 1, 2015.
• When determining if prerequisites have been satisfied during the upgrade process, SolutionManager identifies both patches and upgrades installed either manually or automatically.
• Solution Manager does not support automated installation of any Banner upgrades into Bannerenvironments that have been set up for Multi-Entity Processing (MEP). Note that since BannerHR 9.0 does not have database changes, Solution Manager can be used to install this releaseinto a MEP environment.
Note: Solution Manager supports the automated deployment of help but requires set up inadvance of installing upgrades containing the help for the newly deployed help to be correct. SeeDeployment Jobs on page 52.

Manage Banner Environments with Solution Manager
©2016 Ellucian. Confidential & Proprietary 34
Verify upgrade tasks
The following tasks must be complete in order to upgrade Banner environments.
Verify that the items listed have been added or configured:
• Upgrade-specific configuration data for managed environments• Upgrade-related application configuration• Upgrade-specific credentials
Verify upgrade-specific configuration data for managed environments
Verify upgrade-specific configuration data for your managed environments.
Environments provisioned by Ellucian Solution Manager are managed Banner environments. It isnot necessary to enter upgrade-specific configuration data for provisioned environments unlesschanges have been made to the configuration information from what was entered during theprovisioning of the environment. If configuration information is changed, then you must also editthe configuration information for the existing Banner environments that you have added to EllucianSolution Manager.
Verify upgrade-related application configuration information
Verify that the upgrade-related application configuration steps are complete.
Procedure
1. Click on the Applications tab to ensure that a database application have been defined, a JobSub application, and at least one INB application. If you have not configured these minimallyrequired applications, enter the information for those applications now. Complete the upgrade-related application configuration fields:
Select target releases to install into your managed Banner environment and initiate anautomated upgrade installation job. Solution Manager constructs a script that is used toautomate the execution of the selected upgrades and any required prerequisites.
Field Description Sample Data
DatabaseApplication
The Database application is the application that isrunning the Oracle database for the environment.
m013036-db
Job SubApplication
The Job Sub application is the application on whichthe Banner code tree (or Banner home) directoryis located. The Banner home directory for yourenvironment may not be running on a separatephysical server. It may be running on the same physicalserver as the database for the environment. Enterthe configuration information that Solution Manager
m013036-jobsub
Manage Banner Environments with Solution Manager
©2016 Ellucian. Confidential & Proprietary 35
Field Description Sample Datarequires to connect to the server on which the Bannercode tree (home directory) is located.
INB Application(s) Solution Manager has the ability to compile forms andreports for the environment on a designated INB formscompiler server and to copy the compiled executablefiles to additional INB applications that are used toexecute the forms and reports to provide access to theenvironment to users.
• You must configure at least one INB application.• If you only configure one INB application, it must
also be configured as the INB compiler application.• If you configure multiple INB applications, you must
designate one of them as the INB forms compilerapplication by clicking on the radio button in theCompile column of the Applications table.
m013036-inb
SSB Application The SSB deployment requires an SSB application. m013036-ssb
2. To enter or edit configuration information for an application, click anywhere on the row for theapplication in the Applications table to access the Application Configuration page.
Verify app server deployment
Verify App Server Deployment properties.
If it is necessary to perform any Banner 9 application or Banner 8 or 9 online help deploymentsafter installing an upgrade, the App Server Deployment properties must be defined. See Define appservers on page 55 for more information.
Verify INB Application Properties / INB Compiler Application Properties
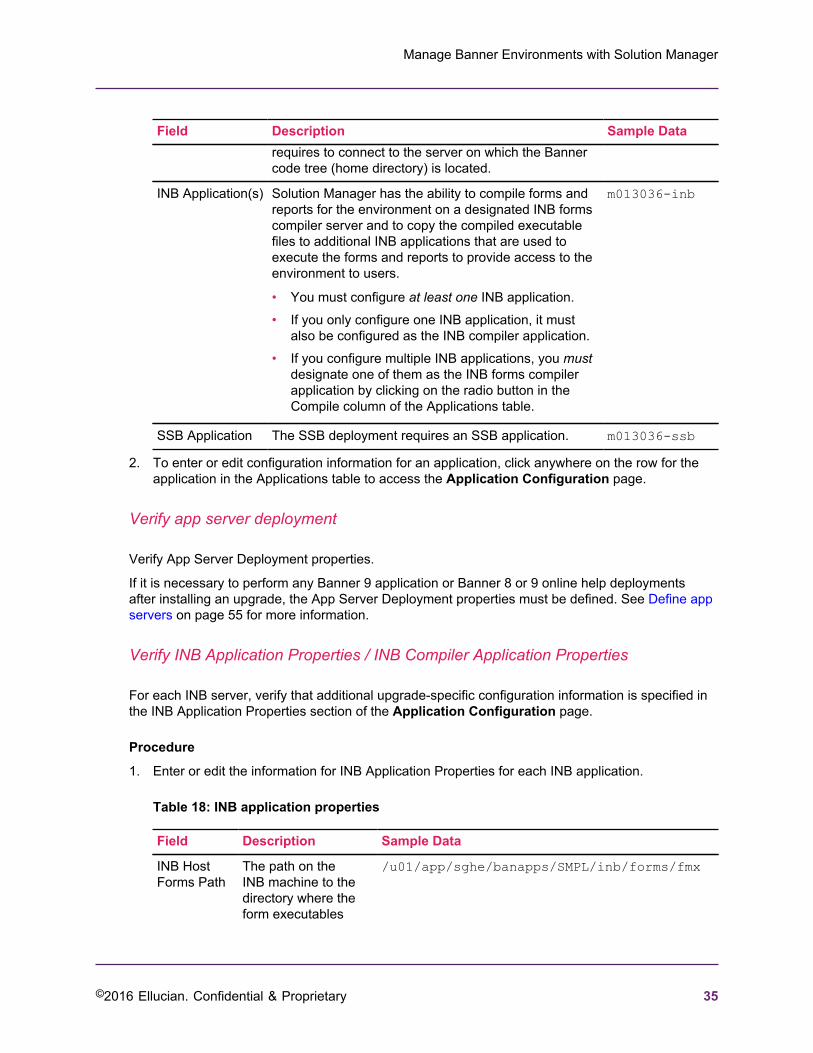
For each INB server, verify that additional upgrade-specific configuration information is specified inthe INB Application Properties section of the Application Configuration page.
Procedure
1. Enter or edit the information for INB Application Properties for each INB application.
Table 18: INB application properties
Field Description Sample Data
INB HostForms Path
The path on theINB machine to thedirectory where theform executables
/u01/app/sghe/banapps/SMPL/inb/forms/fmx
Manage Banner Environments with Solution Manager
©2016 Ellucian. Confidential & Proprietary 36
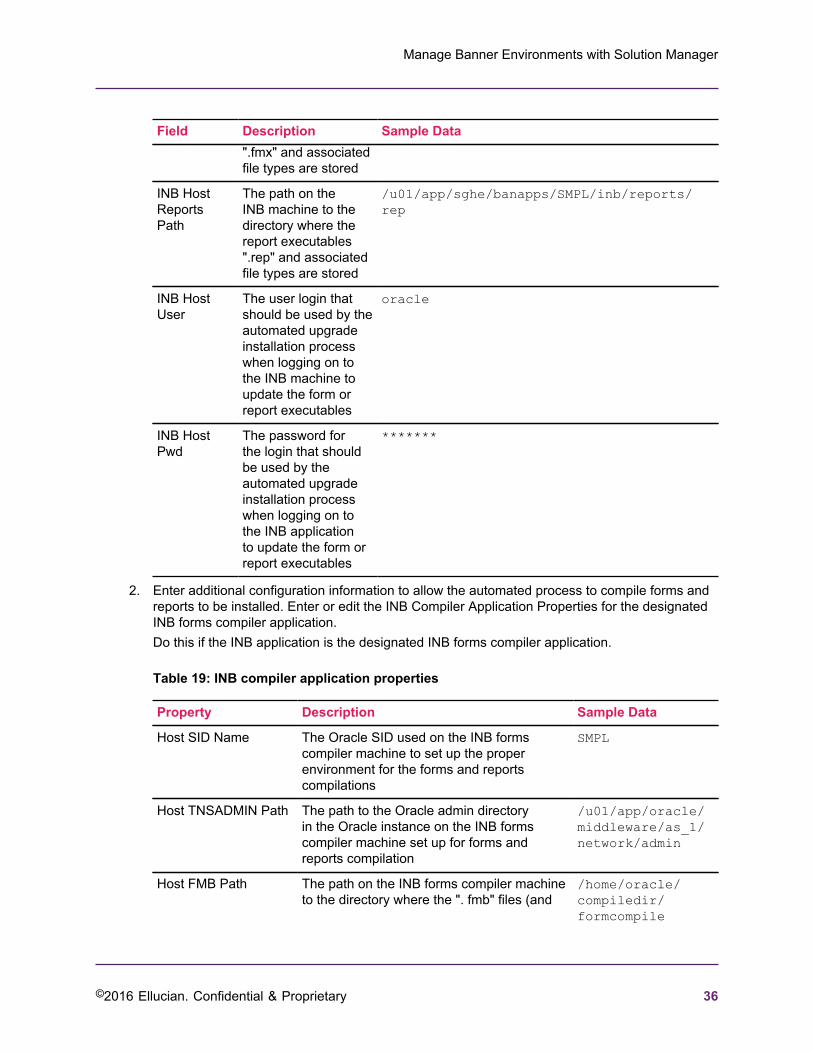
Field Description Sample Data".fmx" and associatedfile types are stored
INB HostReportsPath
The path on theINB machine to thedirectory where thereport executables".rep" and associatedfile types are stored
/u01/app/sghe/banapps/SMPL/inb/reports/rep
INB HostUser
The user login thatshould be used by theautomated upgradeinstallation processwhen logging on tothe INB machine toupdate the form orreport executables
oracle
INB HostPwd
The password forthe login that shouldbe used by theautomated upgradeinstallation processwhen logging on tothe INB applicationto update the form orreport executables
*******
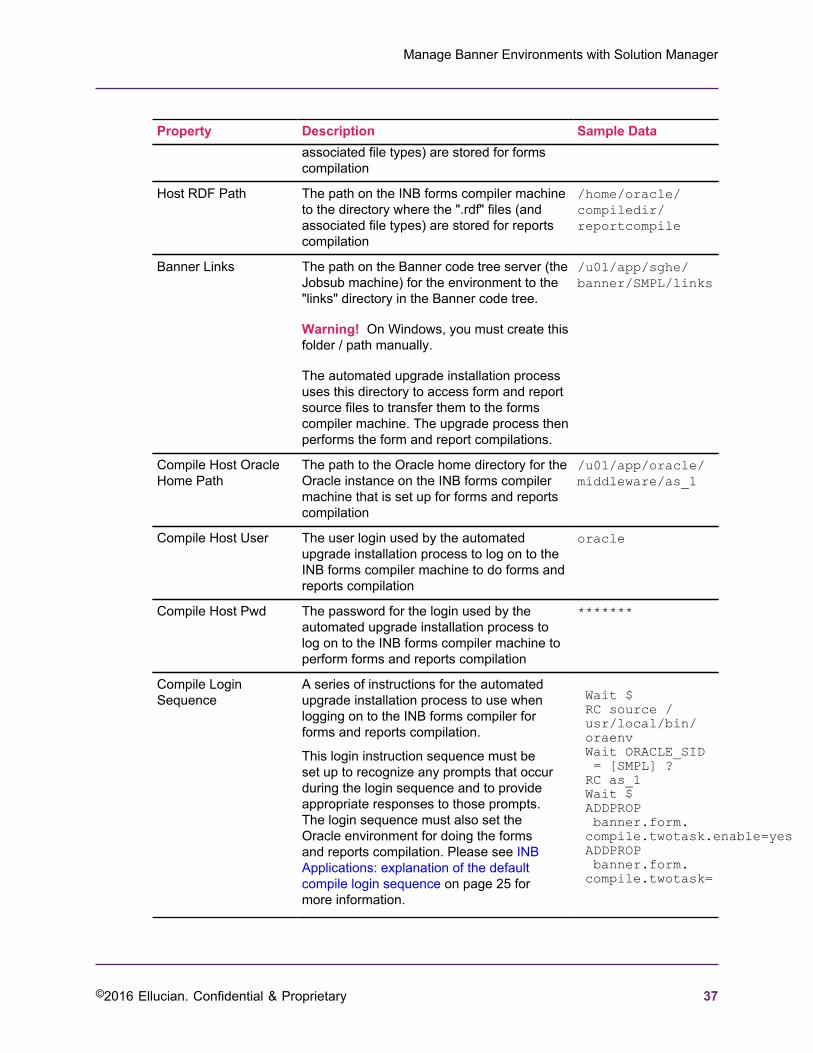
2. Enter additional configuration information to allow the automated process to compile forms andreports to be installed. Enter or edit the INB Compiler Application Properties for the designatedINB forms compiler application.Do this if the INB application is the designated INB forms compiler application.
Table 19: INB compiler application properties
Property Description Sample Data
Host SID Name The Oracle SID used on the INB formscompiler machine to set up the properenvironment for the forms and reportscompilations
SMPL
Host TNSADMIN Path The path to the Oracle admin directoryin the Oracle instance on the INB formscompiler machine set up for forms andreports compilation
/u01/app/oracle/middleware/as_1/network/admin
Host FMB Path The path on the INB forms compiler machineto the directory where the ". fmb" files (and
/home/oracle/compiledir/formcompile
Manage Banner Environments with Solution Manager
©2016 Ellucian. Confidential & Proprietary 37
Property Description Sample Dataassociated file types) are stored for formscompilation
Host RDF Path The path on the INB forms compiler machineto the directory where the ".rdf" files (andassociated file types) are stored for reportscompilation
/home/oracle/compiledir/reportcompile
Banner Links The path on the Banner code tree server (theJobsub machine) for the environment to the"links" directory in the Banner code tree.
Warning! On Windows, you must create thisfolder / path manually.
The automated upgrade installation processuses this directory to access form and reportsource files to transfer them to the formscompiler machine. The upgrade process thenperforms the form and report compilations.
/u01/app/sghe/banner/SMPL/links
Compile Host OracleHome Path
The path to the Oracle home directory for theOracle instance on the INB forms compilermachine that is set up for forms and reportscompilation
/u01/app/oracle/middleware/as_1
Compile Host User The user login used by the automatedupgrade installation process to log on to theINB forms compiler machine to do forms andreports compilation
oracle
Compile Host Pwd The password for the login used by theautomated upgrade installation process tolog on to the INB forms compiler machine toperform forms and reports compilation
*******
Compile LoginSequence
A series of instructions for the automatedupgrade installation process to use whenlogging on to the INB forms compiler forforms and reports compilation.
This login instruction sequence must beset up to recognize any prompts that occurduring the login sequence and to provideappropriate responses to those prompts.The login sequence must also set theOracle environment for doing the formsand reports compilation. Please see INBApplications: explanation of the defaultcompile login sequence on page 25 formore information.
Wait $ RC source /usr/local/bin/oraenv Wait ORACLE_SID = [SMPL] ? RC as_1 Wait $ ADDPROP banner.form.compile.twotask.enable=yes ADDPROP banner.form.compile.twotask=

Manage Banner Environments with Solution Manager
©2016 Ellucian. Confidential & Proprietary 38
3. The forms compilation process run by the automated upgrade installation process uses "SSH"to log into the INB forms compiler from the Banner code tree (or "Jobsub") machine to runthe forms and reports compilations. The Compile Login Sequence allows you to customizewhat happens when the forms compilation process logs into the forms compilation machine toproperly set up the environment for running forms and reports compilation.
The Compile Login Sequence uses properties containing values derived from previouslyentered configuration information:
• {banner.form.compile.host.user.password}
This property contains the value entered in the Compile Host Pwd field.• {banner.form.compile.host.sid.name}
This property contains the value entered in the Host SID Name field.
Note: The Compile Login Sequence commands are executed by the automated upgradeinstallation process immediately after issuing the "login <login-ID>" (where "<login-ID>" is thevalue entered in the Compile Host User field) and responding to the password prompt withthe corresponding password. To edit the Compile Login Sequence, use the Wait and RCcommands and the properties listed above to respond to any additional prompts that occur afterlogging into the INB forms compiler machine to set the environment for forms compilation.
Verify upgrade-related credentials information
After entering or editing the upgrade-specific application configuration information, verify that theupgrade-specific credentials information for the environment has been entered.
Procedure
1. From the Ellucian Solution Manager home page, click Environments.2. Click anywhere in the row for the environment in the Environments table to edit that
environment.3. Click on the Credentials tab.4. Enter or edit the information in the fields on the Credentials page.
Field Description Sample Data
Show passwords The Show Passwords check box at the bottom rightof the screen.
Select the check box to temporarily display thecontents of password fields shown on the screen toverify that the passwords are set correctly. After youupdate the page or if you clear the check box, anypassword fields are obscured.
Cleared
Database The passwords for Oracle system administrationusers for the Oracle database (needed by the

Manage Banner Environments with Solution Manager
©2016 Ellucian. Confidential & Proprietary 39
Field Description Sample DataBanner upgrade installation process to execute SQLscripts)
SYSTEMPassword
The password for the SYSTEM user ******
SYS Password The password for the SYS user ******
Banner Installer The logins and associated passwords needed by theBanner upgrade installation process, in addition tothe login instruction sequence used by the upgradeinstallation process to log on to the application withthe Banner code tree to run the upgrades.
Upgrade OwnerUser
The Oracle user that is set up to own themodification tables for upgrades (defaults to“upgrade1”).
upgrade1
Upgrade OwnerPwd
The password for the upgrade owner user. ******
Install User The login that the upgrade installation processshould use to log into the application containing theBanner code tree to install the upgrades.
banner orAdministratorfor Windows
Install Pwd The install user password ******
Install User LoginSequence
Edit the instructions for the installation process forprocessing the login of the install user on to theapplication containing the Banner code tree to installthe upgrades.
Note: This uses the same commands describedfor the Compile Login Sequence for the INB formscompiler application, but different properties from theconfiguration information that you have entered forthe environment.
The Install User Login Sequence available propertiesare:
• {banner.target.user.password} = The valueentered in the Install Pwd field.
• {banner.target.sid} = The value entered in the DBSID field on the Env Settings tab.
Wait $ RC source\u02/jobsub\scripts\banenv_{banner.target.sid}Wait $RC export TNS_ADMIN="<pathto the tnsnames.ora file inthe jobsub/db machine>"Wait $

Manage Banner Environments with Solution Manager
©2016 Ellucian. Confidential & Proprietary 40
Install upgrades into Banner environment
To install available Banner upgrade releases into a managed Banner environment, first select thereleases to be installed.
Before you begin
Administrators must set up the Banner 8 help, Banner 9 help, and Banner 9 application stagingareas before installing software. The Banner 8 and Banner 9 help must be seeded into thedeployment areas. See Mount staging areas and seed help content on page 53 for moreinformation.
Specify the path to the Bash shell on the Jobsub machine definition, such as /bin/sh. Version3.2.25 or later is the required Bash for Solution Manager.
Procedure
1. Access Solution Manager and click anywhere in the row for the environment you want toupdate.
2. Select Upgrade to display the Start Upgrade Job page to enter any final configurationinformation needed for the upgrade installation. Begin the upgrade installation job.
3. Select the upgrades that you want to install into the environment from the Products page.4. Select the Products tab to view installed and available releases in the environment.
Select upgrade releases to install into banner environment
Select an upgrade to install into the managed Banner environment.
About this task
The Products page displays a table containing all of the Banner products that you have installed inthe managed Banner environment and licensed Banner products that have not yet been installed inthe environment.
Procedure
1. Select the Latest Available Release column in the row for a product that has an availablerelease on the Products page.Solution Manager displays all of the upgrade releases available for the product (that are not yetinstalled into the environment).
2. Select the Target Release to be loaded.
• It is not necessary to choose the release that is the next release after the latest versioncurrently installed.
• If you choose a later release, Ellucian Solution Manager will automatically determine anyprerequisites that are required to install your selected target release and will select andinstall those releases in addition to your selected target release.

Manage Banner Environments with Solution Manager
©2016 Ellucian. Confidential & Proprietary 41
Note: If a prerequisite release is not installed in the environment and is also not in the availablereleases, an error message will be displayed. It will not be possible to select the target releasewithout the prerequisite.
For example, to install the Financial Aid 8.17 release, click on the button on the 8.17 row inthe Available Releases table. Ellucian Solution Manager determines that to install the 8.17upgrade, the 8.16 upgrade must be installed. Ellucian Solution Manager automatically selectsthe 8.16 upgrade and indicates that by highlighting the 8.16 release row in the AvailableReleases table.
3. Select OK to accept your selected target release. Otherwise, click Clear Selection to clear theselected target release. Either action returns you to the Products page.
In some cases, a selected target release could have a prerequisite from another product thatneeds to be installed. In that case, Solution Manager displays the prerequisites from otherproducts in a separate table below the Available Releases table.
Select Releases Displays the upgrade releases that you selected from theProducts page before selecting Upgrade.
Prerequisite Releases Displays any uninstalled prerequisites for the selected releasesthat will be installed along with the selected releases.
After selecting a target release for a product, it will appear in the Target Selected Releasecolumn of the Products table (in the row for the product that the release applies to).
4. Optionally, to remove a selected target release that shows up on the Products page, click onthe release you want to remove in the Target Selected Release column of the Products table todisplay the Available Releases Detail page for that product. Otherwise, select Clear Selectionto clear the selected target release and return to the Products page.
Install releases with upgrade-specific properties
Some Upgrade Releases contain upgrade-specific properties that require additional action. Identifythe type of release.
Procedure
1. Begin by selecting the upgrade release to be installed into the managed Banner environment.2. Navigate to the Selected Target Release column of the Products table (in the row for the
product that the release applies to). Click in the row to view the details.A selected target release may have a prerequisite from another product that needs to beinstalled as well.Solution Manager shows you the prerequisites from other products in a separate table below theAvailable Releases table.
3. Click on the icon featured in the Upgrade Properties column to view upgrade details.4. Review the upgrade-specific instructions and enter any requested parameters, then select the
check box for each step as indicated. If the check box is selected, the step has already beencompleted.
Manage Banner Environments with Solution Manager
©2016 Ellucian. Confidential & Proprietary 42
Note: All upgrade-specific properties must be entered and all upgrade-specific instructionsmust be acknowledged (by selecting the check boxes) before Solution Manager will allow you tostart the upgrade process.
5. Optional: Click Reset to set all upgrade-specific properties to the values that were last saved inthe database, rather than what has been entered so far on this form.
6. Click Cancel to close and return to the main form without saving.7. Click OK when finished.
For other application upgrades a template will be published for an application. When madeavailable, the template and its contents will be available for download.
Start upgrade installation job
After selecting the desired target release for one or more products and the selected releases areready for installation, it is possible to initiate automated installation of the selected releases and theiruninstalled prerequisites.
Before you begin
Review the upgrade manuals for upgrades that have been selected to install and any prerequisiteupgrades that were automatically selected for installation by Solution Manager. Ensure that theenvironment is ready for each upgrade to be installed. Sometimes, an upgrade manual containsinstructions for performing steps manually, such as ensuring that certain data exists in theenvironment prior to installing the upgrade. Make certain that any required actions are performed inthe environment prior to initiating the automated upgrade installation job.
About this task
During an upgrade, Solution Manager re-copies required library forms to the INB server with everyupgrade. In addition to the forms delivered by the upgrade, Solution Manager copies all of theseforms from the $BANNER_LINKS directory on the job sub server to the fmb directory on the INBserver:
• toqolib.fmb• goqrlib.fmb• goqrpls.pll• goqwflw.pll• toqrpls.pll• goqolib.fmb• goqorep.pll• eoqrpls.pll
If custom changes are made to any of these files, keep the necessary changes to the forms byensuring that all customizations are made in the $BANNER_LINKS directory.
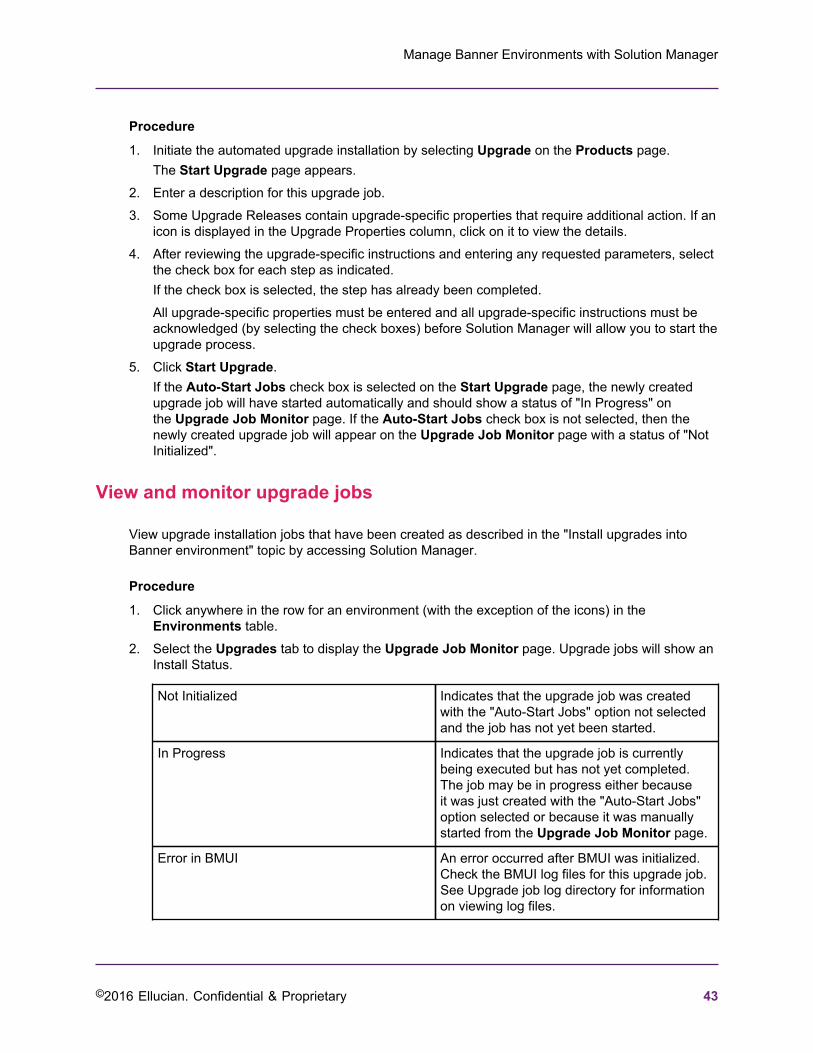
Manage Banner Environments with Solution Manager
©2016 Ellucian. Confidential & Proprietary 43
Procedure
1. Initiate the automated upgrade installation by selecting Upgrade on the Products page.The Start Upgrade page appears.
2. Enter a description for this upgrade job.3. Some Upgrade Releases contain upgrade-specific properties that require additional action. If an
icon is displayed in the Upgrade Properties column, click on it to view the details.4. After reviewing the upgrade-specific instructions and entering any requested parameters, select
the check box for each step as indicated.If the check box is selected, the step has already been completed.All upgrade-specific properties must be entered and all upgrade-specific instructions must beacknowledged (by selecting the check boxes) before Solution Manager will allow you to start theupgrade process.
5. Click Start Upgrade.If the Auto-Start Jobs check box is selected on the Start Upgrade page, the newly createdupgrade job will have started automatically and should show a status of "In Progress" onthe Upgrade Job Monitor page. If the Auto-Start Jobs check box is not selected, then thenewly created upgrade job will appear on the Upgrade Job Monitor page with a status of "NotInitialized".
View and monitor upgrade jobs
View upgrade installation jobs that have been created as described in the "Install upgrades intoBanner environment" topic by accessing Solution Manager.
Procedure
1. Click anywhere in the row for an environment (with the exception of the icons) in theEnvironments table.
2. Select the Upgrades tab to display the Upgrade Job Monitor page. Upgrade jobs will show anInstall Status.
Not Initialized Indicates that the upgrade job was createdwith the "Auto-Start Jobs" option not selectedand the job has not yet been started.
In Progress Indicates that the upgrade job is currentlybeing executed but has not yet completed.The job may be in progress either becauseit was just created with the "Auto-Start Jobs"option selected or because it was manuallystarted from the Upgrade Job Monitor page.
Error in BMUI An error occurred after BMUI was initialized.Check the BMUI log files for this upgrade job.See Upgrade job log directory for informationon viewing log files.
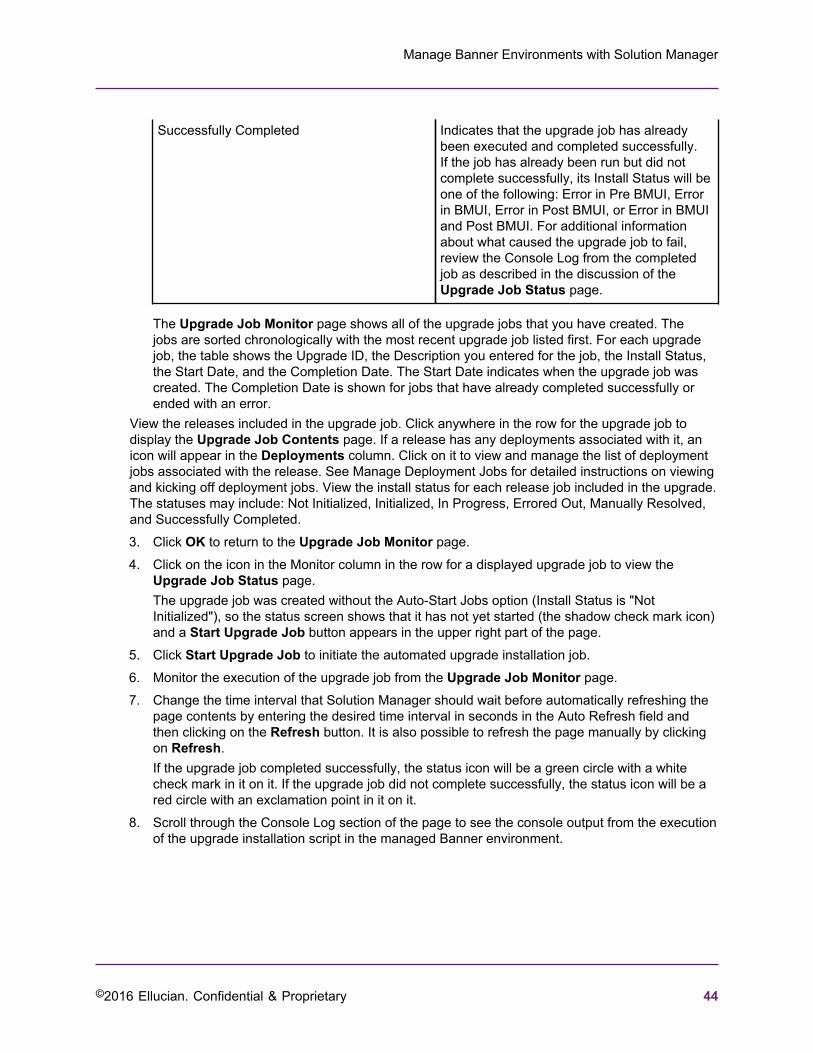
Manage Banner Environments with Solution Manager
©2016 Ellucian. Confidential & Proprietary 44
Successfully Completed Indicates that the upgrade job has alreadybeen executed and completed successfully.If the job has already been run but did notcomplete successfully, its Install Status will beone of the following: Error in Pre BMUI, Errorin BMUI, Error in Post BMUI, or Error in BMUIand Post BMUI. For additional informationabout what caused the upgrade job to fail,review the Console Log from the completedjob as described in the discussion of theUpgrade Job Status page.
The Upgrade Job Monitor page shows all of the upgrade jobs that you have created. Thejobs are sorted chronologically with the most recent upgrade job listed first. For each upgradejob, the table shows the Upgrade ID, the Description you entered for the job, the Install Status,the Start Date, and the Completion Date. The Start Date indicates when the upgrade job wascreated. The Completion Date is shown for jobs that have already completed successfully orended with an error.
View the releases included in the upgrade job. Click anywhere in the row for the upgrade job todisplay the Upgrade Job Contents page. If a release has any deployments associated with it, anicon will appear in the Deployments column. Click on it to view and manage the list of deploymentjobs associated with the release. See Manage Deployment Jobs for detailed instructions on viewingand kicking off deployment jobs. View the install status for each release job included in the upgrade.The statuses may include: Not Initialized, Initialized, In Progress, Errored Out, Manually Resolved,and Successfully Completed.3. Click OK to return to the Upgrade Job Monitor page.4. Click on the icon in the Monitor column in the row for a displayed upgrade job to view the
Upgrade Job Status page.The upgrade job was created without the Auto-Start Jobs option (Install Status is "NotInitialized"), so the status screen shows that it has not yet started (the shadow check mark icon)and a Start Upgrade Job button appears in the upper right part of the page.
5. Click Start Upgrade Job to initiate the automated upgrade installation job.6. Monitor the execution of the upgrade job from the Upgrade Job Monitor page.7. Change the time interval that Solution Manager should wait before automatically refreshing the
page contents by entering the desired time interval in seconds in the Auto Refresh field andthen clicking on the Refresh button. It is also possible to refresh the page manually by clickingon Refresh.If the upgrade job completed successfully, the status icon will be a green circle with a whitecheck mark in it on it. If the upgrade job did not complete successfully, the status icon will be ared circle with an exclamation point in it on it.
8. Scroll through the Console Log section of the page to see the console output from the executionof the upgrade installation script in the managed Banner environment.

Manage Banner Environments with Solution Manager
©2016 Ellucian. Confidential & Proprietary 45
Advanced upgrade features
Refer to the following advanced upgrade features that are available using Ellucian Solution Managerafter performing an initial download of new releases and upgrade of an existing environment.
Banner upgrade restartablility
The following is applicable to Banner upgrade jobs only: If the previous Banner upgrade job failsand the release that failed is restartable, it is necessary to select that job before you can kick offanother Banner upgrade job.
If manual installation is preferred, go to the Upgrades screen to mark it as Manually Resolved.
Unless one of these is executed, it will not be able to kick off any other upgrades. Please note thatnot all releases are restartable. If a release installation fails, you can do the following: Go to theUpgrades form, click and select the failed upgrade. Then verify whether the release is restartable ornot in the Is Restartable column.
Note: Only use the Manually Resolved button when you are certain that the upgrade job is notcurrently in progress and the update has been manually installed successfully.
You should not use the Manually Resolved button when an update job is in progress.
Using environment variables to control BMUI functionality
You may use environment variables to control the Solution Manager Banner upgrade processor(BMUI) functionality one of two ways.
When the BMUI process is called to install a Banner upgrade, BMUI reads all of the environmentvariables that begin with BMUI_* on the job sub machine. Alternately, you can include theenvironment variables in the Solution Manager Admin Console Login sequence so that there isnever a need to update a profile file on the Jobsub machine.
Note: Environment variables (defined or not) will have no impact on BMUI functionality if the relatedproperty name is explicitly mentioned in the install.properties file using the Solution ManagerAdmin Console.
You can control the tasks listed in the table below using environment variables. The same idea canbe extended to other functionality, as appropriate.
Note: You must define each ENV variable in the shell's profile. Make sure to remove a variablefrom the profile when it is not needed. Otherwise, define the variable in the Solution Manager AdminConsole Login sequence.
The Login sequence uses the following commands:
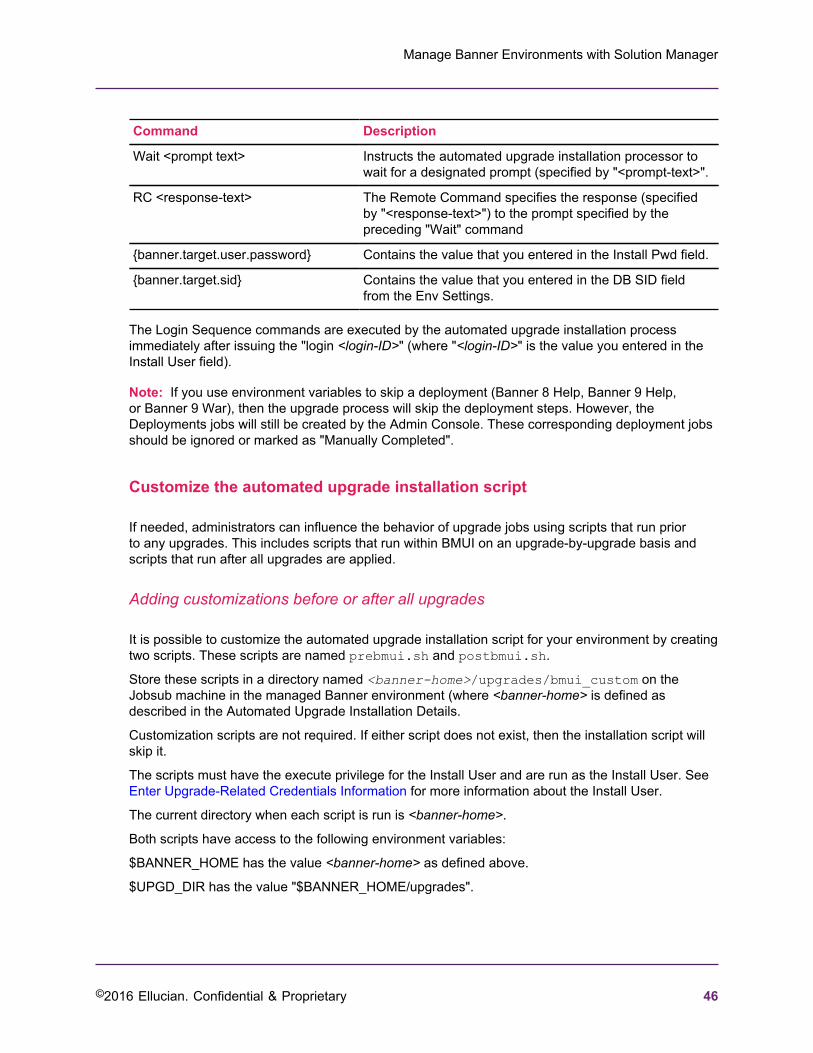
Manage Banner Environments with Solution Manager
©2016 Ellucian. Confidential & Proprietary 46
Command Description
Wait <prompt text> Instructs the automated upgrade installation processor towait for a designated prompt (specified by "<prompt-text>".
RC <response-text> The Remote Command specifies the response (specifiedby "<response-text>") to the prompt specified by thepreceding "Wait" command
{banner.target.user.password} Contains the value that you entered in the Install Pwd field.
{banner.target.sid} Contains the value that you entered in the DB SID fieldfrom the Env Settings.
The Login Sequence commands are executed by the automated upgrade installation processimmediately after issuing the "login <login-ID>" (where "<login-ID>" is the value you entered in theInstall User field).
Note: If you use environment variables to skip a deployment (Banner 8 Help, Banner 9 Help,or Banner 9 War), then the upgrade process will skip the deployment steps. However, theDeployments jobs will still be created by the Admin Console. These corresponding deployment jobsshould be ignored or marked as "Manually Completed".
Customize the automated upgrade installation script
If needed, administrators can influence the behavior of upgrade jobs using scripts that run priorto any upgrades. This includes scripts that run within BMUI on an upgrade-by-upgrade basis andscripts that run after all upgrades are applied.
Adding customizations before or after all upgrades
It is possible to customize the automated upgrade installation script for your environment by creatingtwo scripts. These scripts are named prebmui.sh and postbmui.sh.
Store these scripts in a directory named <banner-home>/upgrades/bmui_custom on theJobsub machine in the managed Banner environment (where <banner-home> is defined asdescribed in the Automated Upgrade Installation Details.
Customization scripts are not required. If either script does not exist, then the installation script willskip it.
The scripts must have the execute privilege for the Install User and are run as the Install User. SeeEnter Upgrade-Related Credentials Information for more information about the Install User.
The current directory when each script is run is <banner-home>.
Both scripts have access to the following environment variables:
$BANNER_HOME has the value <banner-home> as defined above.
$UPGD_DIR has the value "$BANNER_HOME/upgrades".

Manage Banner Environments with Solution Manager
©2016 Ellucian. Confidential & Proprietary 47
Any output from either script is redirected into the Upgrade Job Logs directory (See AutomatedUpgrade Installation Details).
The prebmui.sh script is executed by the upgrade installation script before it executes the multi-upgrade installation tool. This script can be used to perform custom actions in the environment priorto installing the upgrades included in the upgrade job. For example, the script can verify that nousers are logged into the environment database and can lock users out of the database while theupgrades are running.
Normal output from the prebmui.sh script is directed to the file named prebmui.log in theUpgrade Job Logs directory.
Error output from the prebmui.sh script is directed to the file named prebmui_err.log file in theUpgrade Job Logs directory.
If there is an issue during the execution of the prebmui.sh script that causes the installation jobto halt, exit the script with a non-zero system return code. The installation script will halt and set anappropriate status for the upgrade job in Ellucian Solution Manager.
Template for the prebmui.sh script
Review the prebmui.sh script information.
#!/bin/bash # This optional custom script allows you to perform any environment-# or institution-specific tasks before BMUI is executed to install # upgrades.# # A normal exit from this script will allow BMUI to run. # Use exit with a non-zero code to stop BMUI from running. # echo "This is the prebmui.sh custom script."
The postbmui.sh script is executed by the upgrade installation script after BMUI finishesprocessing the upgrades installed by the upgrade job, and can be used to perform custom actionsin the environment after upgrades are installed. For example, if you used the prebmui.sh script tolock users out of the environment database, use the postbmui.sh script to open up the databaseto user logins again if the installation of the upgrades was successful.
The postbmui.sh script is executed regardless of whether BMUI successfully installed theselected upgrades or not. The script can access the environment variable $BMUI_STATUS to testthe exit status of the multi-upgrade installer.
Normal output from the postbmui.sh script is directed to the file named postbmui.log in theUpgrade Job Logs directory.
Error output from the postbmui.sh script is directed to the file named postbmui_err.log file inthe Upgrade Job Logs directory.
Exit the script with a non-zero system return code with an integer value from 1 to 9 to indicate anerror condition or other non-standard condition.
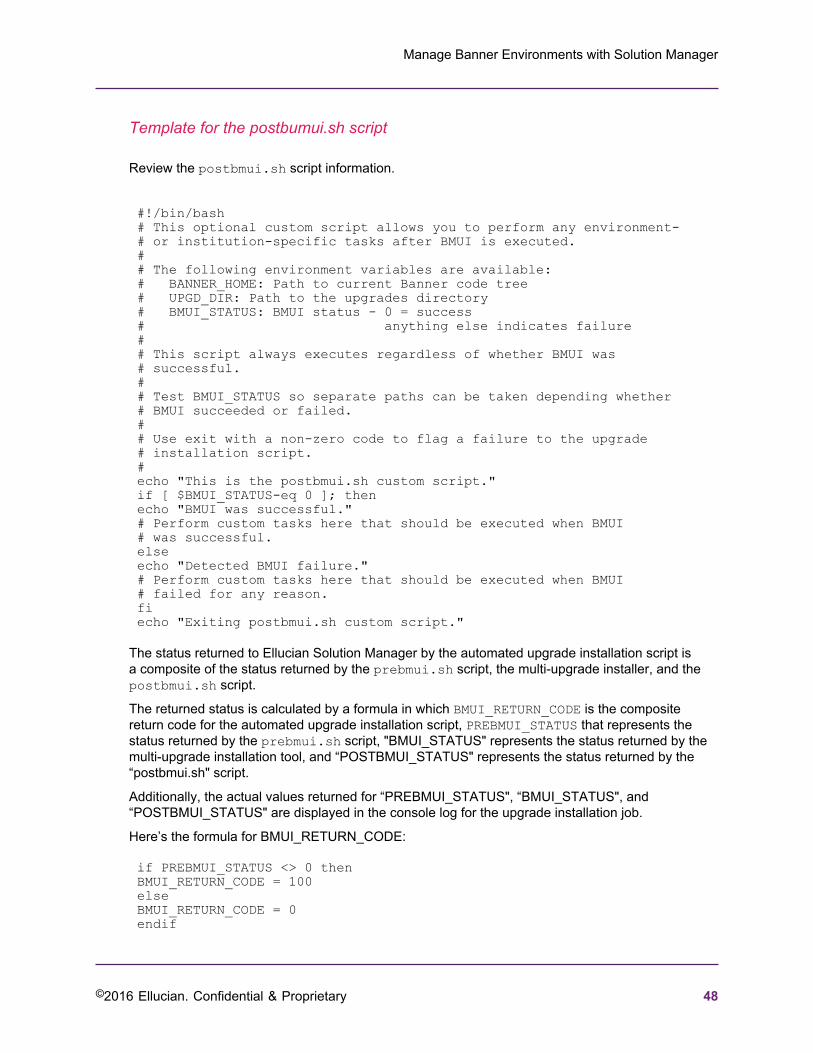
Manage Banner Environments with Solution Manager
©2016 Ellucian. Confidential & Proprietary 48
Template for the postbumui.sh script
Review the postbmui.sh script information.
#!/bin/bash # This optional custom script allows you to perform any environment-# or institution-specific tasks after BMUI is executed. # # The following environment variables are available:# BANNER_HOME: Path to current Banner code tree# UPGD_DIR: Path to the upgrades directory# BMUI_STATUS: BMUI status - 0 = success# anything else indicates failure# # This script always executes regardless of whether BMUI was # successful. # # Test BMUI_STATUS so separate paths can be taken depending whether # BMUI succeeded or failed.# # Use exit with a non-zero code to flag a failure to the upgrade # installation script. # echo "This is the postbmui.sh custom script." if [ $BMUI_STATUS-eq 0 ]; then echo "BMUI was successful." # Perform custom tasks here that should be executed when BMUI # was successful. else echo "Detected BMUI failure."# Perform custom tasks here that should be executed when BMUI # failed for any reason. fi echo "Exiting postbmui.sh custom script."
The status returned to Ellucian Solution Manager by the automated upgrade installation script isa composite of the status returned by the prebmui.sh script, the multi-upgrade installer, and thepostbmui.sh script.
The returned status is calculated by a formula in which BMUI_RETURN_CODE is the compositereturn code for the automated upgrade installation script, PREBMUI_STATUS that represents thestatus returned by the prebmui.sh script, "BMUI_STATUS" represents the status returned by themulti-upgrade installation tool, and “POSTBMUI_STATUS" represents the status returned by the“postbmui.sh" script.
Additionally, the actual values returned for “PREBMUI_STATUS", “BMUI_STATUS", and“POSTBMUI_STATUS" are displayed in the console log for the upgrade installation job.
Here’s the formula for BMUI_RETURN_CODE:
if PREBMUI_STATUS <> 0 then BMUI_RETURN_CODE = 100 else BMUI_RETURN_CODE = 0 endif

Manage Banner Environments with Solution Manager
©2016 Ellucian. Confidential & Proprietary 49
BMUI_RETURN_CODE = BMUI_RETURN_CODE + ( BMUI_STATUS * 10 ) + POSTBMUI_STATUS
Adding pre upgrade custom scripting
It is possible to manage the following shell scripts with added customizations during an upgrade job.These scripts are run sequentially, and the return/exit code plays a significant role in the success ofthe BMUI installation process.
For every upgrade job that is run, Ellucian Solution Manager invokes the pre-BMUI script, then eachof the BMUI custom installation scripts, and then finally the post-BMUI script after all upgrades areinstalled.
These scripts provides a variety of opportunities to influence the upgrade process. Scripts can begeneric (not tied to any particular upgrade but occurring before or after each upgrade) or can bespecific to a particular upgrade.
The table below contains information about the delivered custom installation scripts:
Task Name Task Type Shell Script
Pre Upgrade Generic pre_upgrade.shl
Pre Upgrade Upgrade Specific pre_ {banner.current.upgrade}.shl
Post Upgrade DB Upgrade Specific post_db_{banner.current.upgrade}.shl
Post Upgrade Code Upgrade Specific post_code_{banner.current.upgrade}.shl
Post Upgrade Generic post_upgrade.shl
Pre upgrade - generic task
This task is run unconditionally before an upgrade installation. It provides a way for customers touse their custom implementations for any Banner Upgrade installation.
For example, take a backup of code and database instance before each upgrade installation orperform a custom task before each upgrade installation. BMUI / Ellucian Solution Manager proceedsupon completing the task successfully; however BMUI stops installation of the upgrade if the taskexits with error code other than zero(0).
# This optional custom script allows you to perform generic upgrade task # before any upgrade installation is initiated. # # This is called by shell with command sh +xe <custom path>/pre_upgrade.shl # All the Shell environment variables are available# # Return/exit status - 0 = success # anything else indicates failure#
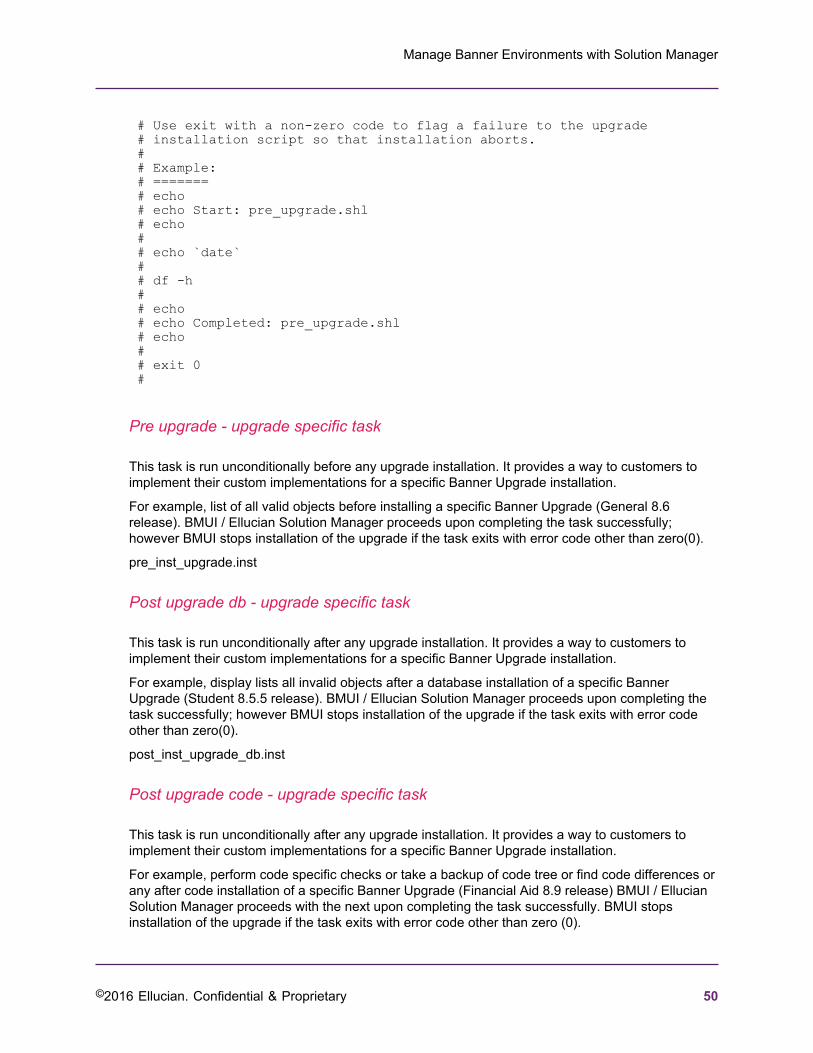
Manage Banner Environments with Solution Manager
©2016 Ellucian. Confidential & Proprietary 50
# Use exit with a non-zero code to flag a failure to the upgrade # installation script so that installation aborts. # # Example: # ======= # echo # echo Start: pre_upgrade.shl # echo # # echo `date` # # df -h # # echo # echo Completed: pre_upgrade.shl # echo # # exit 0 #
Pre upgrade - upgrade specific task
This task is run unconditionally before any upgrade installation. It provides a way to customers toimplement their custom implementations for a specific Banner Upgrade installation.
For example, list of all valid objects before installing a specific Banner Upgrade (General 8.6release). BMUI / Ellucian Solution Manager proceeds upon completing the task successfully;however BMUI stops installation of the upgrade if the task exits with error code other than zero(0).
pre_inst_upgrade.inst
Post upgrade db - upgrade specific task
This task is run unconditionally after any upgrade installation. It provides a way to customers toimplement their custom implementations for a specific Banner Upgrade installation.
For example, display lists all invalid objects after a database installation of a specific BannerUpgrade (Student 8.5.5 release). BMUI / Ellucian Solution Manager proceeds upon completing thetask successfully; however BMUI stops installation of the upgrade if the task exits with error codeother than zero(0).
post_inst_upgrade_db.inst
Post upgrade code - upgrade specific task
This task is run unconditionally after any upgrade installation. It provides a way to customers toimplement their custom implementations for a specific Banner Upgrade installation.
For example, perform code specific checks or take a backup of code tree or find code differences orany after code installation of a specific Banner Upgrade (Financial Aid 8.9 release) BMUI / EllucianSolution Manager proceeds with the next upon completing the task successfully. BMUI stopsinstallation of the upgrade if the task exits with error code other than zero (0).
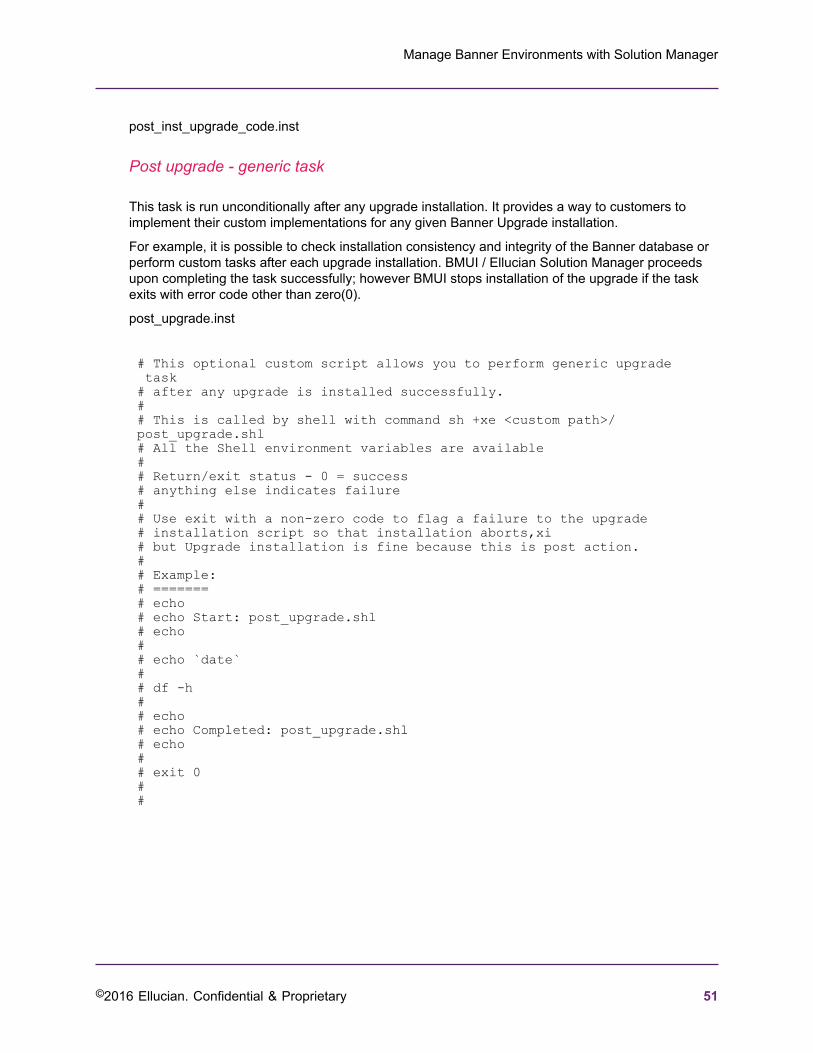
Manage Banner Environments with Solution Manager
©2016 Ellucian. Confidential & Proprietary 51
post_inst_upgrade_code.inst
Post upgrade - generic task
This task is run unconditionally after any upgrade installation. It provides a way to customers toimplement their custom implementations for any given Banner Upgrade installation.
For example, it is possible to check installation consistency and integrity of the Banner database orperform custom tasks after each upgrade installation. BMUI / Ellucian Solution Manager proceedsupon completing the task successfully; however BMUI stops installation of the upgrade if the taskexits with error code other than zero(0).
post_upgrade.inst
# This optional custom script allows you to perform generic upgrade task # after any upgrade is installed successfully. # # This is called by shell with command sh +xe <custom path>/post_upgrade.shl # All the Shell environment variables are available# # Return/exit status - 0 = success # anything else indicates failure ## Use exit with a non-zero code to flag a failure to the upgrade # installation script so that installation aborts,xi # but Upgrade installation is fine because this is post action. # # Example: # ======= # echo # echo Start: post_upgrade.shl # echo # # echo `date` # # df -h# # echo # echo Completed: post_upgrade.shl # echo # # exit 0 # #

Manage Banner Environments with Solution Manager
©2016 Ellucian. Confidential & Proprietary 52
Deployment Jobs
Banner releases can contain one or more associated deployments. A deployment job is createdautomatically when the release is included on an upgrade job that has been started. SolutionManager supports Banner 9 Application, Banner 9 Online Help, Banner 8 Online Help, and BannerPages deployments.
Manage deployment jobs
If a Banner release has a deployment associated with it, a deployment job is automatically createdwhen the upgrade job for that release is executed.
Procedure
1. Prior to kicking off a deployment job, define one or more app servers for each application serverwhere the jobs will be deployed.
2. Define additional deployment settings for an application before kicking off the deployment jobs.These settings need to be defined only for the Job Sub application and any other app serverwith which there is an associated app server.
Verify deployment agents
Deployment agents are Jenkins agents that facilitate the communication between servers, andorchestrate the deployment steps.
In order for all deployment steps to be executed, Solution Manager requires a Jenkins agent tobe running on the Job Sub server (where Solution Manager builds the application), and an agentrunning on each application server targeted for deployment.
When the existing Banner environment was added to Solution Manager, an upgrade agent wascreated on the Jobsub machine. Ellucian recommends reusing your existing upgrade agent fordeployment steps that run on the Jobsub machine. (Creating a separate agent on the Jobsubmachine specifically for deployments is optional.) Be sure to specify this agent name in the Jobsubmachine definition in the Admin Console, in the Deployment Agent Name field. Similarly, whenthe environment was added, a deployment agent was created on each application server targetedfor deployment. Be sure to specify the deployment agent name in the corresponding applicationdefinition in the Admin Console, in the Deployment Agent Name field.
See the Ellucian Solution Manager Installation and Configuration Guide for more information.
Verify Jenkins slave on application server (Windows)
Verify the Jenkins slave on your Windows application server in your managed Banner environment.
See the "Install Jenkins slave on Windows application server" section of the Ellucian SolutionManager Installation and Configuration Guide for more information.
Manage Banner Environments with Solution Manager
©2016 Ellucian. Confidential & Proprietary 53
Verify Windows service
After the installation is complete, it will start up the agent in a small Java window. Verify that aWindows service was added so that Jenkins will start each time the system boots up.
Banner XE application and Banner Online Help deployments
Deploy Banner 9.x Applications, Banner 9 Online Help, and Banner 8 Online Help.
About this task
For specific instructions regarding deployment of Banner Pages, see Banner Pages deployments onpage 58 .
Mount staging areas and seed help content
To perform automated deployments, Solution Manager requires access from the target applicationserver to staged deployment content on the Jobsub machine.
About this task
These staging directories should already exist on the Jobsub machine prior to executing upgrades.See Manage applications on page 19 for more information.
Procedure
1. Create NFS mounts to the staging areas on the Jobsub machine on the application server.Solution Manager retrieves new deployment content from these directories and builds theapplication .war file from the content.
2. Define the NFS mounted paths to the Banner 9 Online Help, Banner 8 Online Help and Banner9 WAR staging directories that should already be in place on the Jobsub machine.
3. In Solution Manager, navigate to the appropriate application and enter the newly mounted pathsfor the three staging areas.This allows Solution Manager to access the staged content the Jobsub machine.
4. Optional: For Online Help Only: Deploy a seed copy of Online Help in the Online Help stagingarea. This must be done before running any online help deployment jobs in Solution Manager.a) Retrieve and unpack bannerOH.war into Banner 8 help staging directory.b) Retrieve and unpack banner9OH.war into Banner 9 help staging directory.
Note: If the seed copy of the online help .war file is not deployed, online help deployment jobswill cease. Java errors regarding a missing MANIFEST.MF file will appear.

Manage Banner Environments with Solution Manager
©2016 Ellucian. Confidential & Proprietary 54
Set up script execution application user credentials
Set up the wget credentials for the appropriate user on the target application server.
Procedure
1. Log onto the target application in the environment as the user who is responsible for installingdeployments.
2. In the home directory of this user, create a file named .wgetrc, containing the following lines(substituting the scripting user name and password set up in place of scripting-username andscripting-user-pwd):
http_user = <scripting-username>http_password = <scripting-user-pwd>auth-no-challenge = on
3. Save the file.4. Change the permissions on the file so that only the user can view the contents of the file by
entering the following command: $ chmod 600 .wgetrc
Set up script execution application user credentials (Windows)
Set up the Windows application credentials for the script execution user in your managed Bannerenvironment.
Procedure
1. Log onto the target application server in your environment as the user who is responsible forinstalling deployments.
2. Locate the home directory for this user, and create a subdirectory named esm if it does notalready exist. For instance, if the user is "Administrator", the directory would be similar to c:\Users\Administrator\esm.
3. In the esm directory, create a file named esmGetFromWeb.xml, containing the following lines(substituting the scripting user name and password you set up for the environment):
<Settings> <Creds> <Username><scripting-username></Username> <Password><scripting-user-pwd></Password> </Creds></Settings>
4. Save the file.

Manage Banner Environments with Solution Manager
©2016 Ellucian. Confidential & Proprietary 55
Define machines
In Solution Manager, define the machine(s) on which the target web application server is installed.
Procedure
1. Go to the Machines tab for the environment to add a new machine.2. Enter the Admin (Private) Host Name of the machine.
a) Choose the app role, then click Add to save the new machine definition.b) Click in the row for the new machine in the Machines table to open up the Machine
configuration page.c) Enter the Deployment Agent Name.d) Enter the rest of the configuration information for the machine and click Save.For detailed instructions on defining a machine in Solution Manager, see Manage machines onpage 15.
Define app servers
Add one or more app servers for the application and define properties for the app server.
About this task
Banner environments may have one or more App Servers that serve Banner Online Help or Banner9 applications. The App Servers must be identified in Solution Manager. A single VM may containone or more of these App Servers, so Solution Manager supports multiple App Servers per VM.
Note: Solution Manager supports both WebLogic and Tomcat app servers. Solution Manager doesnot natively support Weblogic Clusters. Ellucian recommends following Oracle's guidelines for usingthe Oracle Tool Suite to use Solution Manager for deployments to a Weblogic Cluster.
Procedure
1. Click on the App Servers tab.2. Select Add AppServer.3. Enter appropriate information.
Table 20: Application configuration fields
Property Description Sample Data
Machine Select the desired machine from the drop-down list. M03036-EXISTINGENVIRONMENT-Xe2Machine-ADMIN -192.168.50.10
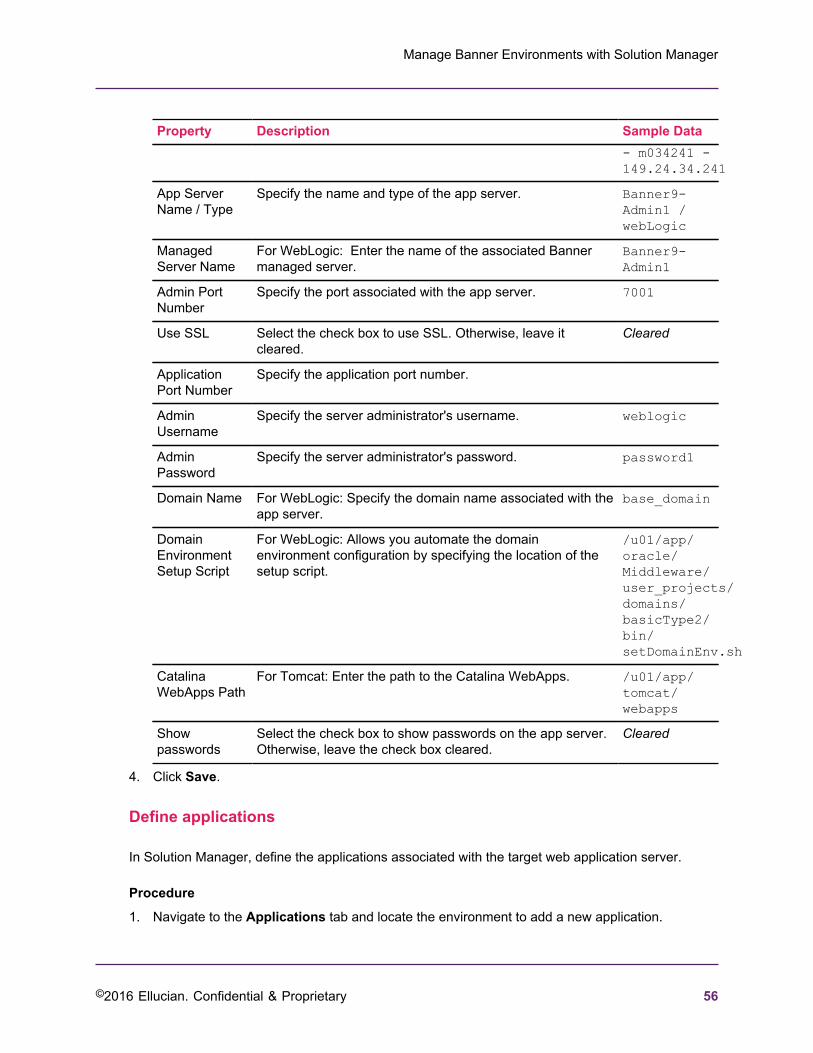
Manage Banner Environments with Solution Manager
©2016 Ellucian. Confidential & Proprietary 56
Property Description Sample Data- m034241 -149.24.34.241
App ServerName / Type
Specify the name and type of the app server. Banner9-Admin1 /webLogic
ManagedServer Name
For WebLogic: Enter the name of the associated Bannermanaged server.
Banner9-Admin1
Admin PortNumber
Specify the port associated with the app server. 7001
Use SSL Select the check box to use SSL. Otherwise, leave itcleared.
Cleared
ApplicationPort Number
Specify the application port number.
AdminUsername
Specify the server administrator's username. weblogic
AdminPassword
Specify the server administrator's password. password1
Domain Name For WebLogic: Specify the domain name associated with theapp server.
base_domain
DomainEnvironmentSetup Script
For WebLogic: Allows you automate the domainenvironment configuration by specifying the location of thesetup script.
/u01/app/oracle/Middleware/user_projects/domains/basicType2/bin/setDomainEnv.sh
CatalinaWebApps Path
For Tomcat: Enter the path to the Catalina WebApps. /u01/app/tomcat/webapps
Showpasswords
Select the check box to show passwords on the app server.Otherwise, leave the check box cleared.
Cleared
4. Click Save.
Define applications
In Solution Manager, define the applications associated with the target web application server.
Procedure
1. Navigate to the Applications tab and locate the environment to add a new application.
Manage Banner Environments with Solution Manager
©2016 Ellucian. Confidential & Proprietary 57
2. Enter the Application Name.a) Choose the type of application, and click Add to save the new definition.b) Click on the row for the new application in the table to open up the application configuration
page.c) Use the Machine/App Server drop-down to select the App Server and Machine
combination that corresponds to the web application server installed for deployment of thisapplication.
d) Enter the paths to the mounted staging areas.3. Click Save.
For detailed instructions on defining an application in Solution Manager, see Manageapplications.
Kick off deployments
After the deployment settings have been defined and one or more app servers have been definedfor the environment, you can kick-off the deployment jobs for a release.
Procedure
1. Click on the Upgrades tab to view the list of deployments associated with a particular release.2. Click on the row for a particular upgrade to see the list of releases included on that upgrade.
Alternatively, you can click on the Deployments tab to see all the deployment jobs for anenvironment.If a release has one or more deployment jobs associated with it, a deploy icon will be displayedin the Deployments column.
3. Click on the Deployments icon to view the list of deployments for that release.4. Click on the row that corresponds with the deployment to be kicked off.
If an upgrade job containing multiple upgrades is installed, each upgrade with deploymentcontent will create a new entry in the Deployments tab. For multiple online help deploymentjobs, only one deployment needs to be run.
5. Choose one or more App Servers where you would like to deploy.6. Edit any information that shows on the deploy screen (for example, the App Name can be
customized, if desired, for Banner 9 War deployments).7. Click on Start Deployment to start the deployment job.
The Start Deployment button will only appear if the corresponding release is successfullyinstalled in the environment. As the deployment job is running, a monitor window will show theprogress of the deployment.
8. Click on Start Deployment to start the deployment job.
The Start Deployment button will only appear if the corresponding release is installedsuccessfully in the environment. As the deployment job is running, a monitor window will showthe progress of the deployment. When the deployment job completes successfully, each of thethree steps should show an icon that is a green circle with a white check mark.

Manage Banner Environments with Solution Manager
©2016 Ellucian. Confidential & Proprietary 58
If the deployment job fails, hangs or displays an error message, manually mark the deploymentjob as either "Cancelled" or "Completed". For example, if the deployment is manually resolvedoutside of Solution Manager, click Mark Cancelled or Mark Completed.
The application can be re-deployed after a deployment job has completed by running thedeployment job again. This is useful if you would like to deploy to a new app server or simply re-deploy to the original app server. The deployment screen will show a history of deployment runsin a table at the bottom of the deployment screen.
Banner Pages deployments
This section describes instructions for deploying Banner Pages deployments, such as the BannerHuman Resources 9.x or Banner Admin Pages 9.2 releases.
For all other deployment types, see Banner XE application and Banner Online Help deployments onpage 53. Before using Solution Manager to deploy a Banner Pages application, you must enterweb application server configuration information into Solution Manager as described below.
For additional information about requirements for deploying a Banner Pages application, see theInstallation and Configuration Guide accompanying the release.
Set up Banner Pages
Define an App Server in Solution Manager for the web application server to which you wish todeploy the Banner Pages application.
About this task
You must also set up a deployment agent on the machine where the web application servermachine. The deployment agent should be installed to run as the same system account that youuse to run the web application server. See Verify deployment agents on page 52 for additionalinformation on setting up a deployment agent.
Procedure
Define the machine on which the web application server is installed.1. Define the machine as part of the environment setup.
a) Navigate to the Machines tab.b) Enter the Admin (Private) Host Name of the machine.c) Choose the App role, and click Add to save the new machine definition.d) Click on the row for the new machine in the Machines table to open up the Machine
configuration page.e) Enter the Deployment Agent Name. This is the name of the agent you defined for this
particular server in Verify deployment agents on page 52.f) Enter the rest of the configuration information for the machine.
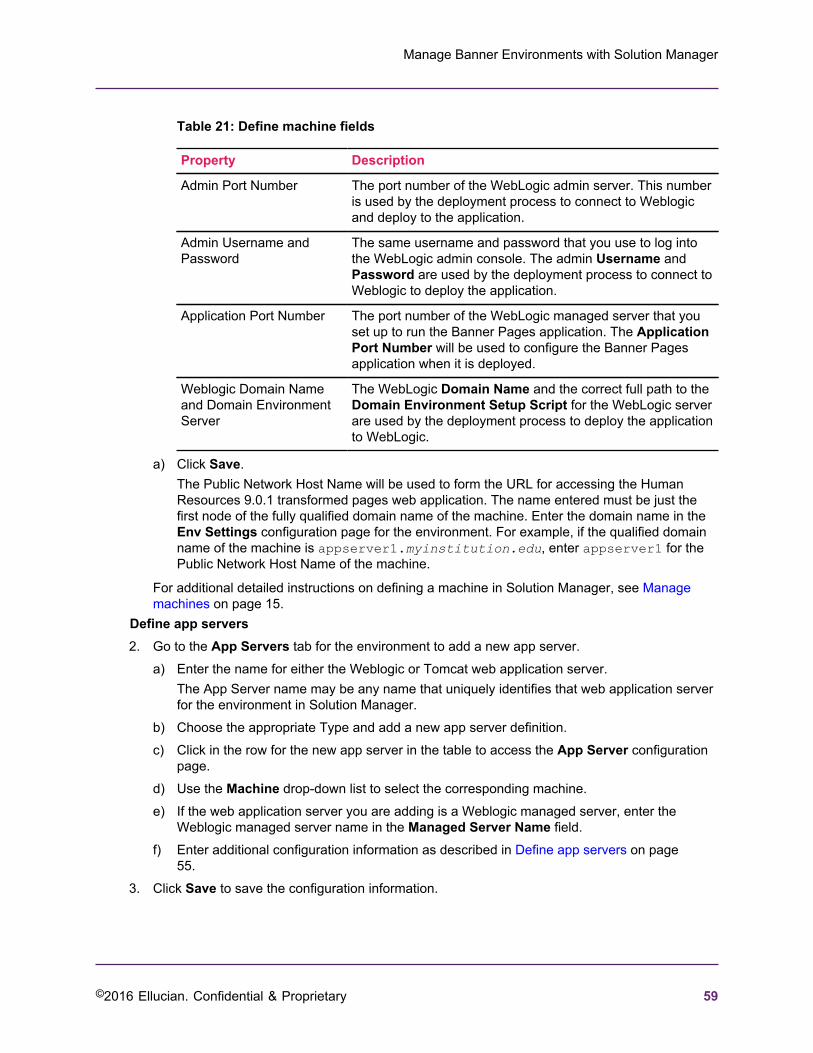
Manage Banner Environments with Solution Manager
©2016 Ellucian. Confidential & Proprietary 59
Table 21: Define machine fields
Property Description
Admin Port Number The port number of the WebLogic admin server. This numberis used by the deployment process to connect to Weblogicand deploy to the application.
Admin Username andPassword
The same username and password that you use to log intothe WebLogic admin console. The admin Username andPassword are used by the deployment process to connect toWeblogic to deploy the application.
Application Port Number The port number of the WebLogic managed server that youset up to run the Banner Pages application. The ApplicationPort Number will be used to configure the Banner Pagesapplication when it is deployed.
Weblogic Domain Nameand Domain EnvironmentServer
The WebLogic Domain Name and the correct full path to theDomain Environment Setup Script for the WebLogic serverare used by the deployment process to deploy the applicationto WebLogic.
a) Click Save.The Public Network Host Name will be used to form the URL for accessing the HumanResources 9.0.1 transformed pages web application. The name entered must be just thefirst node of the fully qualified domain name of the machine. Enter the domain name in theEnv Settings configuration page for the environment. For example, if the qualified domainname of the machine is appserver1.myinstitution.edu, enter appserver1 for thePublic Network Host Name of the machine.
For additional detailed instructions on defining a machine in Solution Manager, see Managemachines on page 15.
Define app servers2. Go to the App Servers tab for the environment to add a new app server.
a) Enter the name for either the Weblogic or Tomcat web application server.The App Server name may be any name that uniquely identifies that web application serverfor the environment in Solution Manager.
b) Choose the appropriate Type and add a new app server definition.c) Click in the row for the new app server in the table to access the App Server configuration
page.d) Use the Machine drop-down list to select the corresponding machine.e) If the web application server you are adding is a Weblogic managed server, enter the
Weblogic managed server name in the Managed Server Name field.f) Enter additional configuration information as described in Define app servers on page
55.3. Click Save to save the configuration information.

Manage Banner Environments with Solution Manager
©2016 Ellucian. Confidential & Proprietary 60
4. Set up a staging directory on your Jobsub machine and enter the Banner 9 War File StagingPath on the Application that you defined for the Jobsub machine for your environment.This path will be used by the deployment process to stage the Banner Pages application fordeployment. See Manage deployment jobs on page 52 for more information about setting upstaging directories for Solution Manager automated deployments.
5. Go to the Applications tab for the environment.a) Click on the row for the Jobsub type application in the Applications table.b) Enter configuration information for the Jobsub application.
6. Enter the Banner 9 War File Staging Path and click Save to save the configuration information.
Define a Banner Pages App Server
Define an Application in Solution Manager for the Banner Pages application
Procedure
Note: If the application has not yet been defined in Solution Manager, do so now.
1. Go to the Applications tab for the environment.2. Give the application a unique name and select the BXE type.3. Click Add to add the new application.4. Click on the row for the new application in the Applications table to enter configuration
information.
• Use the Machine/App Server drop-down to select the app server and machine combinationthat corresponds to the web application server installed for deployment of the Banner Pagesapplication.
• Enter the Banner 9 War File Staging Path from the perspective of the machine on whichthe transformed pages web application server is installed. This path will be used by thedeployment process to stage the Banner Pages application for deployment.
See Manage deployment jobs on page 52 for detailed instructions of how to set up stagingdirectories for Solution Manager automated deployments.
5. Click Save to save the application configuration information.Environment Configuration6. Go to the Env Settings tab for the environment and enter the required information in the Define
Environment Details fields.This information will be used by the deployment process to configure and deploy the BannerPages application.
7. Click Save to save the Env Settings configuration information.Enter the Credentials information8. Go to the Credentials tab for the environment. Enter the required information in the Enter
environment credentials on page 25 section of this guide.

Manage Banner Environments with Solution Manager
©2016 Ellucian. Confidential & Proprietary 61
This information will be used by the deployment process to configure and deploy the BannerPages application.
9. Click Save to save the Credentials configuration information.
Kick off Banner Pages deployments
Kick off deployment jobs after the Banner Pages deployment settings and associated app serversare defined for the environment.
Procedure
Note: For customized Banner Pages to be deployed automatically by Solution Manager with theEllucian-released Banner Pages, follow the instructions in Deploy Banner Pages Customizations onpage 61 first.
1. Go to the Deployments tab for the given environment and click on the row in the Deploymentstable that corresponds to the upgrade job you used to install the Banner Pages upgrade.
2. Select the application server to target for deployment of the Banner Pages application from thetable of application servers.
3. Click on Start Deployment to start the deployment job.4. Go to the Deployments tab for the environment and click on the Monitor icon to monitor the
deployment job.5. After deployment is completed, check the Installation Guide for the Banner Pages release to
see if there are any additional steps that need to be performed following deployment before theapplication is ready for use.Banner Pages are now accessible by logging into Application Navigator and selecting thedesired page.
Deploy Banner Pages Customizations
Customization of Banner Pages releases is performed using the Banner pages extensions toolkitprovided by Ellucian. The modified and custom pages are then built into an extension JAR file,which must be included in the Banner Pages WAR file that is deployed by Solution Manager.
After you build the Banner pages extension JAR file, Solution Manager can automatically deployyour extensions along with the Banner Pages release from Ellucian, as long as you place yourextension files in the appropriate location in the Banner code tree in a ZIP file (with the appropriatename and structure).
Ellucian Banner Pages releases are delivered in a set of files named release-<name>-<version>.zip.
• For the Banner Human Resources and Position Control 9.0. 9.1, and 9.1.1 releases,the <name> portion of the filename is HumanResources (for example, release-HumanResources-9.1.1.3.zip).
• For the Banner Admin Pages 9.2 release, which includes Banner General, Finance, HumanResources, Position Control, Document Management and Document Retention. The <name>

Manage Banner Environments with Solution Manager
©2016 Ellucian. Confidential & Proprietary 62
portion is Admin (for example, release-Admin-9.2.0.18.zip, and release-Admin-Finance-9.2.0.18.zip).
Ellucian Banner Pages releases are delivered into the java sub-directory of the appropriate productin the Banner code tree.
Extension ZIP file name and location
In order for Solution Manager to automatically deploy your extensions along with the EllucianBanner Pages release, your extension JAR files must be packaged in a ZIP file with the namerelease-<name>-<ext-unique-ID>-<version>.zip, where <name> matches the nameof the Ellucian Banner Pages release that you are extending, <ext-ID> is an identifier for yourextension, and <version> matches the version of the release you are extending. The extension ZIPfile may contain one or more extension JAR files. You may create more than one extension ZIP fileas long as each has a unique <ext-ID>.
For the Banner Human Resources 9.0, 9.1, and 9.1.1 releases:
• The extension file must be named release-HumanResources-<ext-ID>-<version>.zip.For example, an extension ZIP file for the Banner Human Resources 9.1.1 release might benamed release-HumanResources-MyHRExt-9.1.1.3.zip.
• In order for an extension ZIP file to be automatically deployed by Solution Manager it mustbe located in the <banner-home>/payroll/java directory, the same directory where theEllucian-delivered file is stored (where <banner-home> is the value in the Banner Code TreePath field on the Env Settings page in Solution Manager for the environment, commonlyreferred to as “Banner home”).
For the Banner Admin Pages 9.2 release:
• The extension file must be named release-Admin-<ext-ID>-<version>.zip, where<ext-ID> is a unique identifier that is different from any of the product identifiers for releasepackages that are part of the Ellucian Banner Admin Pages 9.2 release and is unique for theBanner product that is extended, and <version> must be at least a three-part version numberin the format “9.2.x”. For example, valid extension ZIP file names for extensions of the Financeproduct for the Banner Admin Pages 9.2 release (which is delivered as release-Admin-Finance-9.2.0.x.zip) would be release-Admin-MyFinExt-9.2.0.zip, or release-Admin-MyFinExt2-9.2.0.1.zip.
• If you have multiple extensions, the <ext-ID> portion of the name must be unique within a Bannerproduct directory. For example, two files named release-Admin-MyFinExt-9.2.0.zipand release-Admin-MyFinExt-9.2.1.zip would be considered two versions of the sameextension, and only the higher version number would be deployed. But in the example givenin the previous item, both release-Admin-MyFinExt-9.2.0.zip and release-Admin-MyFinExt2-9.2.0.1.zip would be deployed because they each have a unique <ext-ID>portion of the name and so would be considered to be different extensions.
• In order for an extension ZIP file to be automatically deployed by Solution Manager it mustbe located in the “java” sub-directory of any Banner product directory under Banner homeexcept it must not be under the “upgrades” directory or the “bmui” directory. For example filesnamed <banner-home>/posnctl/java/release-Admin-MyPCExt-9.2.0.3.zip and<banner-home>/custom/java/release-Admin-MyBanExt-9.2.0.2.zip would bothbe picked up by the Solution Manager deployment logic. A file named <banner-home>/upgrades/general-admin-9020018u/java/release-Admin-MyBanExt-9.2.0.5.zipwould not be picked up for deployment because even though the name is the proper format the

Manage Banner Environments with Solution Manager
©2016 Ellucian. Confidential & Proprietary 63
directory path in which the file is located contains a directory named “upgrades”. A file named<banner-home>/custom/java/ext/release-Admin-MyBanExt-9.2.1.zip also wouldnot be picked up because it is not directly in a sub-directory named “java”.
At deployment time, Solution Manager will deploy the JAR files in the extension ZIP file with thehighest valid version number with the same <ext-ID>. For example, if there are two files in the<banner-home>/finance/java directory named release-Admin-MyFinExt-9.2.0.5.zipand release-Admin-MyFinExt-9.2.1.zip, the JAR files from the file with the version number“9.2.1” would be deployed because “9.2.1” is a higher version number than “9.2.0.5”. A file in thesame directory named release-Admin-MyFinExt-9.3.0.1.zip would not be selected fordeployment because the first two components of the version number don’t match the Ellucianrelease (“9.2”).
Extension ZIP file structure
The JAR files in each extension zip file must be stored in an appropriate directory structure in orderto be automatically deployed with the Ellucian-released Banner Pages release. The JAR file namesmust not duplicate the names of any of the JAR files delivered in the Ellucian releases.
• An extension ZIP file for the Banner Human Resources 9.0, 9.1, or 9.1.1 release may containone or more extension JAR files and must have the following directory structure:
BannerHumanResources ext WEB-INF lib <file-name-1>.jar <file-name-2>.jar
• Extension ZIP files for the Banner Admin Pages 9.2 release may contain one or more extensionJAR files and must have the following directory structure (note that this is the same directorystructure as the ZIP files delivered by Ellucian as part of the Banner Admin Pages 9.2 release forall products except Banner General):
BannerAdmin ext WEB-INF lib <file-name-1>.jar <file-name-2>.jar
<unique-identifier> is a string that uniquely identifies the extensions (the string must containalphabetic and numeric characters only), and <version> matches the version number of the EllucianBanner pages being extended and customized.
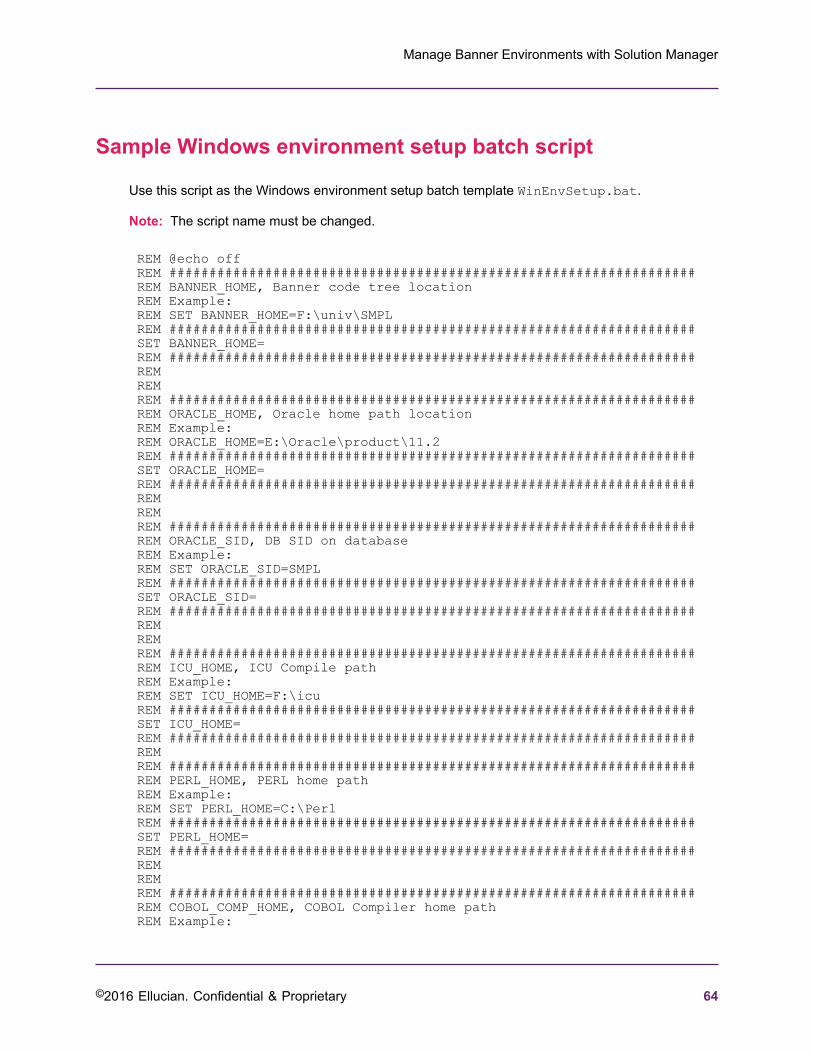
Manage Banner Environments with Solution Manager
©2016 Ellucian. Confidential & Proprietary 64
Sample Windows environment setup batch script
Use this script as the Windows environment setup batch template WinEnvSetup.bat.
Note: The script name must be changed.
REM @echo offREM ##################################################################REM BANNER_HOME, Banner code tree locationREM Example:REM SET BANNER_HOME=F:\univ\SMPLREM ##################################################################SET BANNER_HOME=REM ##################################################################REMREMREM ##################################################################REM ORACLE_HOME, Oracle home path locationREM Example:REM ORACLE_HOME=E:\Oracle\product\11.2REM ##################################################################SET ORACLE_HOME=REM ##################################################################REMREMREM ##################################################################REM ORACLE_SID, DB SID on database REM Example: REM SET ORACLE_SID=SMPLREM ##################################################################SET ORACLE_SID=REM ##################################################################REMREMREM ##################################################################REM ICU_HOME, ICU Compile path REM Example:REM SET ICU_HOME=F:\icuREM ##################################################################SET ICU_HOME=REM ##################################################################REMREM ##################################################################REM PERL_HOME, PERL home path REM Example:REM SET PERL_HOME=C:\PerlREM ##################################################################SET PERL_HOME=REM ##################################################################REM REMREM ##################################################################REM COBOL_COMP_HOME, COBOL Compiler home path REM Example:

Manage Banner Environments with Solution Manager
©2016 Ellucian. Confidential & Proprietary 65
REM SET COBOL_COMP_HOME=E:\NetCobol10_1REM ##################################################################SET COBOL_COMP_HOME=REM ##################################################################REM REMREM ##################################################################REM COBOL_HOME, COBOL Library path REM Example:REM SET COBOL_HOME=C:\Program Files\Common Files\Fujitsu\NetCOBOLREM ##################################################################SET COBOL_LIB_HOME=REM ##################################################################REM REMREM ##################################################################REM VS_VC_PATH, Visual Studio's Visual C pathREM Example:REM SET VS_VC_PATH=D:\msvc8\VCREM ##################################################################SET VS_VC_PATH=REM ##################################################################REM REMREM ##################################################################REM MS_SDK, Microsoft Software delevopment kit pathREM Example:REM SET MS_SDK=D:\msvc8\SDKREM ##################################################################SET MS_SDK=REM ##################################################################REM REMREM ##################################################################REM VC_VER, Microsoft Visual Studio batch script to set environment REM variablesREM Example: REM SET VC_VER=vcvars32.batREM ##################################################################SET VC_VER=REM ##################################################################REM REMREM ##################################################################REM ProC's default configuration pathREM Example: REM PROC_DFLT=PROC config=E:\Oracle\product\11.1\precomp\admin\pcscfg.cfgREM ##################################################################SET PROC_DFLT=PROC config=REM ##################################################################REM REMREM ##################################################################REM ProCOB's default configuration pathREM Example:
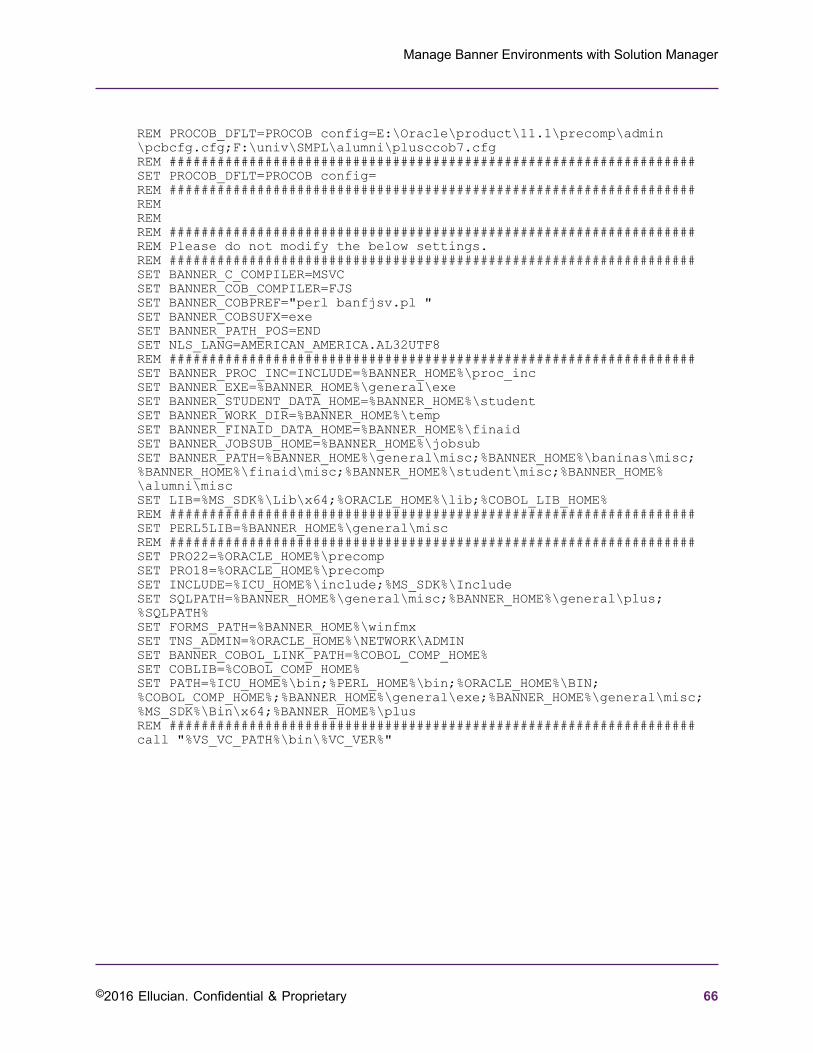
Manage Banner Environments with Solution Manager
©2016 Ellucian. Confidential & Proprietary 66
REM PROCOB_DFLT=PROCOB config=E:\Oracle\product\11.1\precomp\admin\pcbcfg.cfg;F:\univ\SMPL\alumni\plusccob7.cfgREM ##################################################################SET PROCOB_DFLT=PROCOB config=REM ##################################################################REM REMREM ##################################################################REM Please do not modify the below settings.REM ##################################################################SET BANNER_C_COMPILER=MSVCSET BANNER_COB_COMPILER=FJSSET BANNER_COBPREF="perl banfjsv.pl "SET BANNER_COBSUFX=exeSET BANNER_PATH_POS=ENDSET NLS_LANG=AMERICAN_AMERICA.AL32UTF8REM ##################################################################SET BANNER_PROC_INC=INCLUDE=%BANNER_HOME%\proc_incSET BANNER_EXE=%BANNER_HOME%\general\exeSET BANNER_STUDENT_DATA_HOME=%BANNER_HOME%\studentSET BANNER_WORK_DIR=%BANNER_HOME%\tempSET BANNER_FINAID_DATA_HOME=%BANNER_HOME%\finaidSET BANNER_JOBSUB_HOME=%BANNER_HOME%\jobsubSET BANNER_PATH=%BANNER_HOME%\general\misc;%BANNER_HOME%\baninas\misc;%BANNER_HOME%\finaid\misc;%BANNER_HOME%\student\misc;%BANNER_HOME%\alumni\miscSET LIB=%MS_SDK%\Lib\x64;%ORACLE_HOME%\lib;%COBOL_LIB_HOME%REM ##################################################################SET PERL5LIB=%BANNER_HOME%\general\miscREM ##################################################################SET PRO22=%ORACLE_HOME%\precompSET PRO18=%ORACLE_HOME%\precompSET INCLUDE=%ICU_HOME%\include;%MS_SDK%\IncludeSET SQLPATH=%BANNER_HOME%\general\misc;%BANNER_HOME%\general\plus;%SQLPATH%SET FORMS_PATH=%BANNER_HOME%\winfmxSET TNS_ADMIN=%ORACLE_HOME%\NETWORK\ADMINSET BANNER_COBOL_LINK_PATH=%COBOL_COMP_HOME%SET COBLIB=%COBOL_COMP_HOME%SET PATH=%ICU_HOME%\bin;%PERL_HOME%\bin;%ORACLE_HOME%\BIN;%COBOL_COMP_HOME%;%BANNER_HOME%\general\exe;%BANNER_HOME%\general\misc;%MS_SDK%\Bin\x64;%BANNER_HOME%\plusREM ##################################################################call "%VS_VC_PATH%\bin\%VC_VER%"

Provision Banner Environments
©2016 Ellucian. Confidential & Proprietary 67
Provision Banner EnvironmentsProvision Banner Environments
Provision a Banner environment or provision a new application to an existing Banner environment.
Provision a new Banner environment
Solution Manager allows for the installation of a complete Banner environment, including theoperating system and infrastructure software and Banner ERP software, onto a set of physical orvirtual machines (VMs) pre-allocated with appropriate hardware resources.
The installation process is referred to as "provisioning the environment". The environment isprovisioned based on a provisioning template (referred to as "template") that contains provisioningscripts and content files. Solution Manager allows for the automatic download of provisioningtemplates, associated scripts, and content files from the Ellucian Solution Manager ReleaseServices hosted on ellucian.com.
Appropriate hardware resources include items such as CPUs, memory, disk storage, and networkinterface cards.
Note: If the provisionCleanup flag is not present or is set to anything other than "Yes" inthe config.properties file for the Ellucian Solution Manager application (/u01/adminApp/config.properties), then all of the provisioning scripts will be left in the provisionedenvironment for diagnostic purposes. These scripts contain passwords. If the provisioningscripts are to be deleted as a final step in provisioning, set the cleanup flag by adding the line"provisionCleanup=Y" to the config.properties file before provisioning an environment. Ifthe script artifacts are left in place when provisioning an environment, you must manually removethese files to remove the leftover information. These files are in the Jenkins workspace directory (/u01/Jenkins/workspace) for each provisioned application.
Provisioning overview
Solution Manager supports two modes for provisioning an environment.
The first mode provisions the software, including the operating system, onto machines that have nosoftware installed except for a BIOS with pxe-boot capability. This mode requires using a separate,virtual private network for each managed environment, with the admin server having separateconnections to each environment's private admin network. During provisioning, the SolutionManager admin server acts as the DHCP server on the private network and responds to the pxe-boot of each machine to initiate the download and installation of the operating system on eachmachine (a process called "kickstarting" the machine).
The private admin network also ensures that administration and transactional communicationswithin each environment are not visible to the admin networks of other environments or to thegeneral institutional network. For non-critical environments, a single private admin network formultiple environments can be used, with the admin server having a single connection to thenetwork. Ensure that each machine in each environment has a unique address on the private adminnetwork.

Provision Banner Environments
©2016 Ellucian. Confidential & Proprietary 68
The following diagram illustrates the network topology used for the full provisioning mode in whichSolution Manager uses the pxe-boot/kickstart process to provision the operating system and theapplication software in the new environment.
The second provisioning mode supported by Solution Manager, referred to as "OS-installedprovisioning", requires you to pre-install the operating system on each machine in the environmentto be provisioned. Solution Manager then uses SSH to connect to each machine initially duringprovisioning to finalize the configuration of the machine and install a Jenkins agent before initializingthe provisioning steps which install the application software in the environment.
OS-installed provisioning does not require a private admin network connecting the SolutionManager admin server to the machine in the environment, but Solution Manager still refers to theconnections between the admin server and the machines in the environment as the "Private AdminNetwork" in the forms used to configure the environment.
You choose whether to use the full provisioning mode or the OS-installed provisioning mode (withthe operating system already installed) when you enter the configuration information into SolutionManager for the machines in the environment to be provisioned, as described in Configure anenvironment.
Solution Manager uses a template to provision an environment (referred to as a “provisioningtemplate”). The template provides the information needed by Solution Manager to define theenvironment configuration and to install the software needed to provision a Banner environmenton the targeted machines. Templates can be designed for different environment configurations,and each template has its own specific hardware and networking requirements, in addition tospecifications for the operating system version and configuration that needs to be pre-installedon the machines in an environment to be provisioned if you choose the OS-installed provisioningoption. Templates are downloaded automatically when you download new releases with SolutionManager. Each template has associated documentation that you can get from the Ellucian SupportCenter Documentation Library, under Ellucian Solution Manager. Each provisioning template also

Provision Banner Environments
©2016 Ellucian. Confidential & Proprietary 69
requires you to download provisioning content files. For more information about how to manageprovisioning templates and content items associated with each template see Templates.
Before beginning the environment provisioning process:
1. Ensure that you have a set of virtual machines defined or physical machines installed withthe necessary specifications and network topology. To get the full requirements for thehardware, software, and network topology for the environment you wish to provision, see thedocumentation that accompanies the template that you plan to use for provisioning, along withthe Ellucian Solution Manager Installation and Configuration Guide.
2. Determine which subnet address will be used for the virtual private network (that will serve asthe admin network for the environment) if you plan to use the full provisioning mode.
3. Determine which IP addresses and host names are to be assigned to the Admin Server and toeach of the environment machines on the admin network.
4. Assign IP addresses and host names to the environment application server endpoints exposedon the institution network (the "public network").
Note: Record this information so that it is available to enter into Solution Manager during theprovisioning configuration process.
Provision an environment
The process of "provisioning" the environment entails installing Banner ERP software includingOracle database software and required application server software, optionally including theoperating system and infrastructure software if you choose the full-provisioning mode, onto a setof physical or virtual machines that have been pre-allocated with appropriate hardware resources(CPUs, memory, disk storage, and network interface cards).
Procedure
1. Define (or “add”) the new environment into Ellucian Solution Manager.2. Enter appropriate configuration information for the environment.3. Tell Ellucian Solution Manager to provision the environment, which generates kickstart or
configuration scripts for all environment machines and a series of provisioning jobs that installBanner and all of the required infrastructure software for the Banner environment.
The kickstart or configuration scripts are tailored for each machine in the environment. Eachkickstart or configuration script installs the OS (if the full provisioning mode is chosen) andcertain common infrastructure software, including a Jenkins remote job execution agent, onthe target machine according to its role in the Banner environment and configures the machineaccording to its role in the Banner environment.
The series of provisioning jobs that installs Banner into the environment installs additionalrequired infrastructure software (such as Oracle database, Oracle Fusion Middleware, singlesign on, and LDAP) and the Banner database schema and programs on each machine asappropriate for that machine’s role in the environment.
4. After generating the provisioning scripts and jobs (which occurs when you kick off provisioning)if the full provisioning mode is chosen you must pxe-boot each machine from the private admin

Provision Banner Environments
©2016 Ellucian. Confidential & Proprietary 70
network interface so that it gets the operating system installled with the appropriate kickstartscript.
In this mode the admin server serves as the DHCP server for the private admin network toassign each environment machine the appropriate IP address (based on the MAC address ofthe network adapter that connects the machine to the private admin network) and as the TFTPserver for the kickstart scripts.
After each machine is kickstarted, it connects to the Admin Server, and the Admin Server startsthe series of provisioning jobs via Jenkins to install the appropriate Banner components on eachmachine according to its role in the Banner environment.
If the OS-installed provisioning mode is chosen, when you kick off provisioning the AdminServer will connect to each machine you configured for the new environment via SSH using theconfiguration information, including the root password that you entered for the machine. Thiswill execute a configuration script that will set the machine up for the provisioning jobs, includinginstallation of the required Jenkins remote job execution agent, before starting the provisioningjobs via Jenkins that install the Banner system.
Templates
Review information about the template to be used for defining, populating, or provisioning anenvironment.
Template information
Review information about the template used to define and populate an environment. You can alsouse the template to provision an environment.
Procedure
1. Select Templates to view templates that you have downloaded.If the Templates table does not display any rows, click Refresh Templates at the bottom of thepage.
2. Click anywhere except in the View column on the row for the template in the Templatestable to access the Template Contents page to acquire the content files associated with theprovisioning template.
Set up an environment
Add an environment the first time you use Ellucian Solution Manager. Then define and configure theenvironment for provisioning.
About this task
Note: Upon opening Solution Manager, the Environments and System Settings will be empty.

Provision Banner Environments
©2016 Ellucian. Confidential & Proprietary 71
Procedure
1. From the Solution Manager options, select Environments.2. Click Add.3. Provide the environment details:
Table 22: Add environment fields
Field Description Sample Data
Environment name Specify a name for the environment. M013036
Description Enter an environment description. BannerenvironmentMO13036
Environment type Define a new or existing environment. New
Template Choose a template to use for provisioning a newenvironment.
BannerProducts
4. Enter an Environment Name and Description.5. Choose an action.
Entry Description
New Define an environment that is not yetprovisioned.
Existing Define an environment that has already beenprovisioned.
Configure an environment
Define and configure an environment for provisioning.
Procedure
1. Enter the relevant environment configuration information for the environment being provisionedby selecting the Env Settings tab.
Note: On the Env Settings page, the Environment Type field will display "Existing" if theenvironment was added to Solution Manager as an existing environment. It will display "New"if it was added as a new environment to be provisioned. If it was added as a new environmentto be provisioned, the Template field displays the name of the provisioning template that wasselected when the environment was added.

Provision Banner Environments
©2016 Ellucian. Confidential & Proprietary 72
Table 23: Configure environment fields
Property Description Sample Data
Description Displays the information that was entered whenadding the environment to the Ellucian SolutionManager configuration database. You can changethe description.
BannerenvironmentMO13036
Environment Type Displays the environment type. New
DB SID Enter the SID name you want to use for theOracle database instance in the environment to beprovisioned.
SMPL
Admin Server -Private Network
Subnet Enter the IP subnet for the network that connectsthe Admin Server to the machines in theenvironment to be provisioned
192.168.100
Network IP Enter the IP address of the Admin Server on theadmin network that connects the Admin Server tothe machines in the environment to be provisioned.
192.168.100.101
Gateway IP Enter the gateway IP address of the adminnetwork.
EnvironmentAppservers - PublicNetwork
Domain Enter the domain name that will be used to accessthe application servers in the environment to beprovisioned.
ellucian.com
Subnet Enter the IP subnet for the network that will beused to access the application servers in theenvironment to be provisioned.
Gateway IP Enter the gateway IP address of the network thatwill be used to access the application servers in theenvironment to be provisioned.
Environment Status Displays the environment status. Unprovisioned
EnvironmentConfiguration
Is Cascade used(Y/N)
Not used during environment provisioning. Y
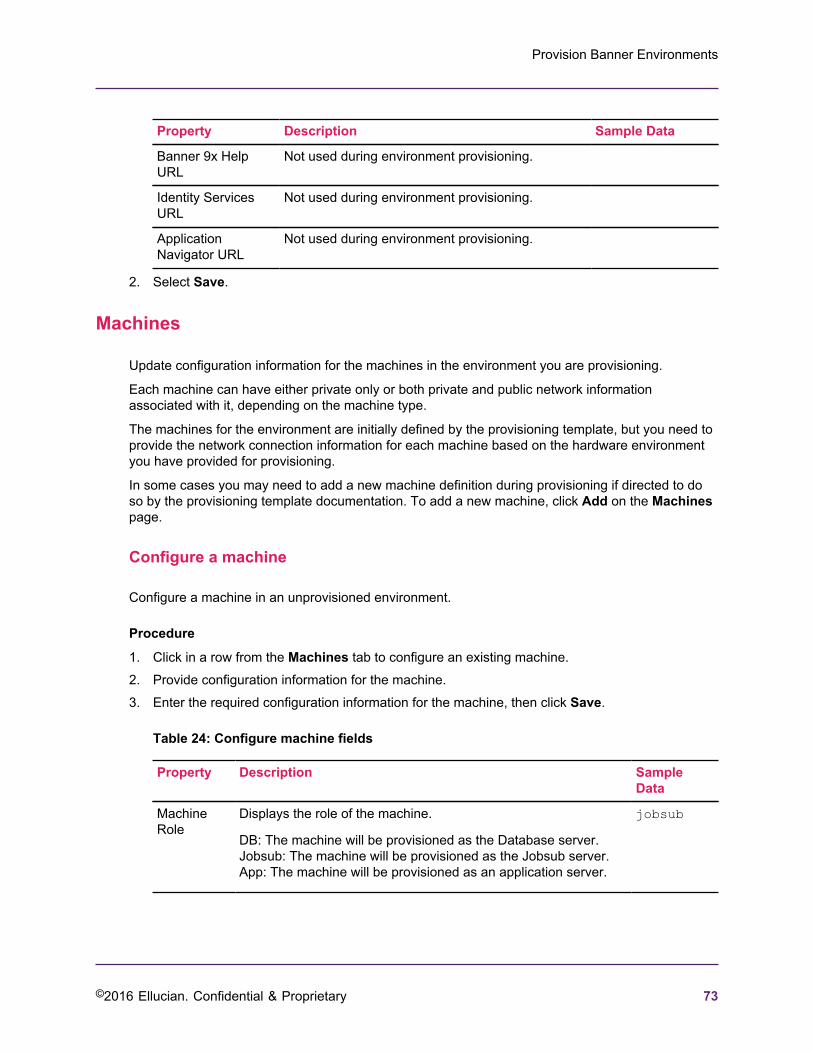
Provision Banner Environments
©2016 Ellucian. Confidential & Proprietary 73
Property Description Sample Data
Banner 9x HelpURL
Not used during environment provisioning.
Identity ServicesURL
Not used during environment provisioning.
ApplicationNavigator URL
Not used during environment provisioning.
2. Select Save.
Machines
Update configuration information for the machines in the environment you are provisioning.
Each machine can have either private only or both private and public network informationassociated with it, depending on the machine type.
The machines for the environment are initially defined by the provisioning template, but you need toprovide the network connection information for each machine based on the hardware environmentyou have provided for provisioning.
In some cases you may need to add a new machine definition during provisioning if directed to doso by the provisioning template documentation. To add a new machine, click Add on the Machinespage.
Configure a machine
Configure a machine in an unprovisioned environment.
Procedure
1. Click in a row from the Machines tab to configure an existing machine.2. Provide configuration information for the machine.3. Enter the required configuration information for the machine, then click Save.
Table 24: Configure machine fields
Property Description SampleData
MachineRole
Displays the role of the machine.
DB: The machine will be provisioned as the Database server.Jobsub: The machine will be provisioned as the Jobsub server.App: The machine will be provisioned as an application server.
jobsub

Provision Banner Environments
©2016 Ellucian. Confidential & Proprietary 74
Property Description SampleData
NetworkType
Displays the network type of the machine. internal
MachineStatus
Set the machine status:
• Unprovisioned: An empty machine that Ellucian SolutionManager will kickstart when the machine is pxe-booted duringprovisioning to install the OS and required infrastructuresoftware, including the Jenkins provisioning agent.
• OSInstalled: Machines that already have an operating systemon them. Solution Manager uses SSH to connect to themachine to perform post configuration processes (this requiresa root password to connect to the existing root account).The post configuration process will update configurationinformation on the machine and will reboot several timesbefore the machine is ready to start executing provisioningjobs.
• Ready: This status is only used for configuring machines in anexisting environment and should not be used when configuringmachines for environment provisioning.
Note: Before provisioning, all machines in an Unprovisionedstate must have the Admin Host Name, Admin IP, and AdminMAC properties completed. All machines in the OSInstalled statemust have the Admin Host Name, Admin IP, and Root Passwordproperties completed.
Ready
Admin(Private)NetworkHost Name
The machine host name on the admin network. m019036-jobsub
IP The admin network IP address for the machine. 149.24.19.36
MACAddressadminnetwork
The MAC address of the network card connecting the machine tothe admin network. (Only used for machines in the Unprovisionedstate.)
149.24.19.36
RootPassword
Enter the root password for the network. (Only used for machinesin the OSInstalled state.
Bash ShellPath
Not used for provisioning.
PublicNetworkHost Name
This field only appears if the Machine Role is defined as App.Enter the host name for the machine on the public network usedby users to access the application server machine. If the publicnetwork is the same as the admin network used by Solution
appserver1

Provision Banner Environments
©2016 Ellucian. Confidential & Proprietary 75
Property Description SampleData
Manager to communicate with the machine, enter the same hostname you entered for Admin (Private) Network Host Name.
Note that this hostname should not include the domain nameyou specified for the Public Network on the Env Settingsconfiguration page. For example, if the fully qualified hostnameof the machine is appserver1.myinstitution.edu, and you enteredmyinstitution.edu as the Public Network Domain on the EnvSettings configuration page, enter only appserver1 here.When Solution Manager uses the Public Network Host Nameto configure software that needs to access the machine via thepublic network it will combine the Host Name you specify hereand the Domain you specified on the Env Settings configurationpage.
PublicNetwork IP
Enter the IP address of the machine on the public network. If thepublic network is the same as the admin network, enter the sameIP address you entered for the Admin (Private) Network IP field.
149.26.17.101
Add applications
Enter configuration information for the virtual machines in your environment. Each server can haveprivate only or both private and public network information associated with it, depending on theapplication type.
Configure application properties
Define properties for each application. A machine must exist in the system before you can configureapplications for that machine.
Procedure
1. Click Applications.When provisioning an environment, machines will be associated to their respective applicationsautomatically.
Note: After the machine properties are defined, the system automatically populates thecorresponding machine application properties. Depending on the template, additional propertiesmay appear for each application or machine based on its type or role. If additional propertiesappear, populate them before continuing. See Verify upgrade-specific configuration data formanaged environments on page 34 for more information.
2. Click in a row of the Applications table to configure an existing application.3. Provide configuration information for the application server.

Provision Banner Environments
©2016 Ellucian. Confidential & Proprietary 76
Review application-specific configuration information: Verify upgrade-related applicationconfiguration information on page 34.
Note: Windows deployments require the use of an IP address.
Each example below contains an example Linux path and an example Windows path.
Table 25: Configure application fields
Property Description Linux Sample Data Windows SampleData
Application Type Displays theapplication type
jobsub
Machine / App Server Machine m013036-jobsub-149.24.19.36
Table 26: Managed Server Deployment
Property Description Linux Sample Data Windows SampleData
Local deployment root(Windows only)
(Optional) Specify alocal path for SolutionManager to copylarge files
Banner 8 Online HelpStaging Path
Enter the path tothe staging area forBanner 8 online help
/u50/test/tmp/deployments/ban8help
\\IP-ADDRESS\PATH\ban8help
Banner 9 Online HelpStaging Path
Enter the path tothe staging area forBanner 8 online help
/u50/test/tmp/deployments/ban9help
\\IP-ADDRESS\PATH\ban9help
Banner 9 War FileStaging Path
Enter the path tothe staging area forBanner 9 WAR file
/u50/test/tmp/deployments/ban9war
\\IP-ADDRESS\PATH\ban9war
4. Click Save.5. Click Go to Machine and complete the fields as laid out in the Configure Machine Properties
section of the Installation and Configuration Guide.The Private Admin Network Host Name and IP address should reflect the address that theadmin server can use to communicate with the configured environment server.
6. Optional: Add a new managed app server to an environment application list by navigating tothe App Servers tab.
7. Optional: Remove the application configuration information from Solution Manager by clickingRemove Application.
8. Click Save and return to the Applications page.
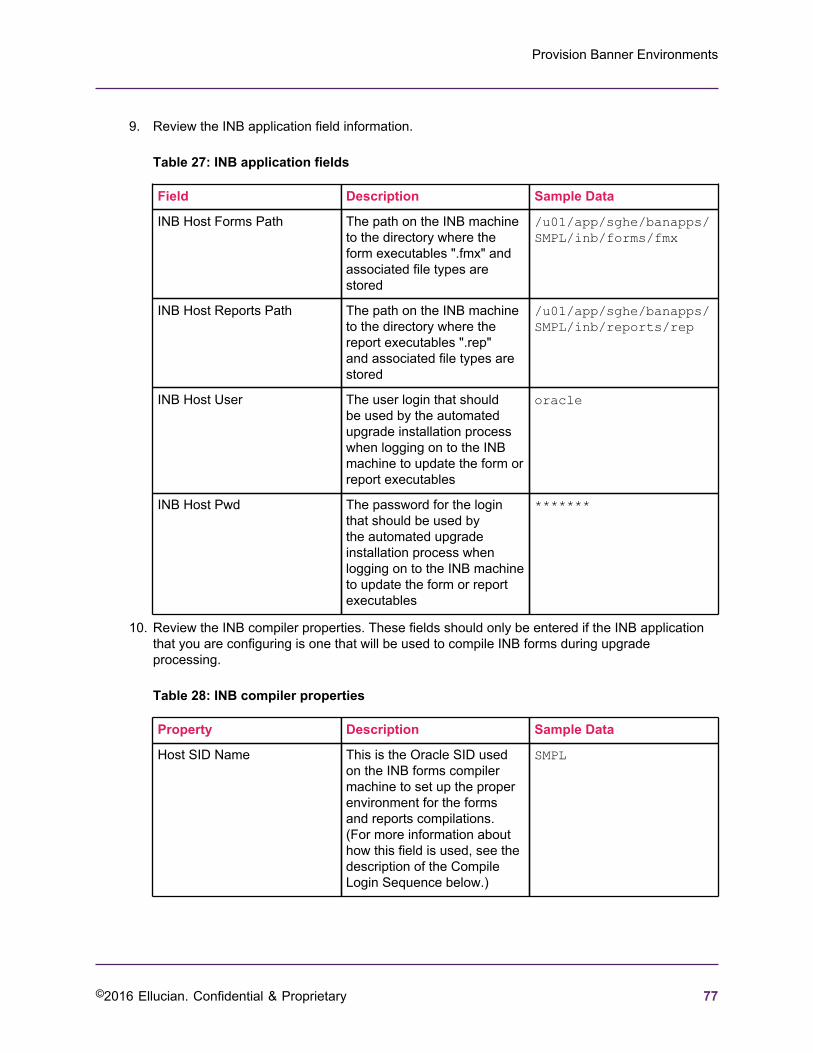
Provision Banner Environments
©2016 Ellucian. Confidential & Proprietary 77
9. Review the INB application field information.
Table 27: INB application fields
Field Description Sample Data
INB Host Forms Path The path on the INB machineto the directory where theform executables ".fmx" andassociated file types arestored
/u01/app/sghe/banapps/SMPL/inb/forms/fmx
INB Host Reports Path The path on the INB machineto the directory where thereport executables ".rep"and associated file types arestored
/u01/app/sghe/banapps/SMPL/inb/reports/rep
INB Host User The user login that shouldbe used by the automatedupgrade installation processwhen logging on to the INBmachine to update the form orreport executables
oracle
INB Host Pwd The password for the loginthat should be used bythe automated upgradeinstallation process whenlogging on to the INB machineto update the form or reportexecutables
*******
10. Review the INB compiler properties. These fields should only be entered if the INB applicationthat you are configuring is one that will be used to compile INB forms during upgradeprocessing.
Table 28: INB compiler properties
Property Description Sample Data
Host SID Name This is the Oracle SID usedon the INB forms compilermachine to set up the properenvironment for the formsand reports compilations.(For more information abouthow this field is used, see thedescription of the CompileLogin Sequence below.)
SMPL
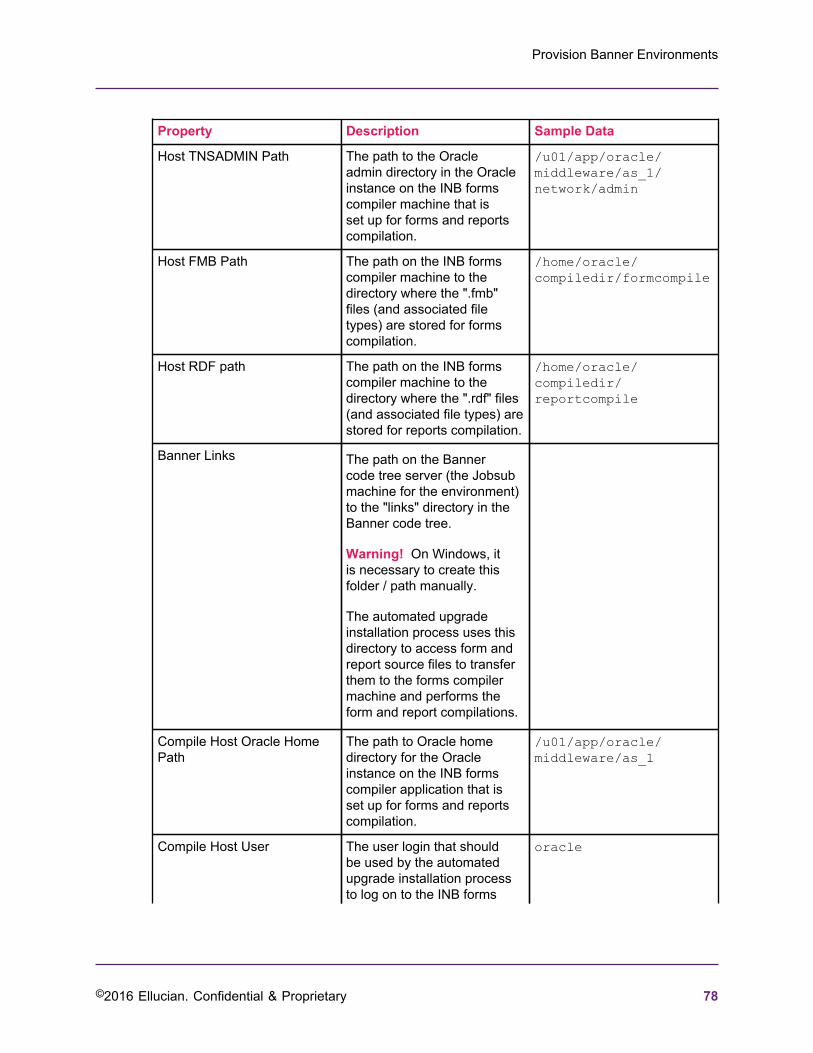
Provision Banner Environments
©2016 Ellucian. Confidential & Proprietary 78
Property Description Sample Data
Host TNSADMIN Path The path to the Oracleadmin directory in the Oracleinstance on the INB formscompiler machine that isset up for forms and reportscompilation.
/u01/app/oracle/middleware/as_1/network/admin
Host FMB Path The path on the INB formscompiler machine to thedirectory where the ".fmb"files (and associated filetypes) are stored for formscompilation.
/home/oracle/compiledir/formcompile
Host RDF path The path on the INB formscompiler machine to thedirectory where the ".rdf" files(and associated file types) arestored for reports compilation.
/home/oracle/compiledir/reportcompile
Banner Links The path on the Bannercode tree server (the Jobsubmachine for the environment)to the "links" directory in theBanner code tree.
Warning! On Windows, itis necessary to create thisfolder / path manually.
The automated upgradeinstallation process uses thisdirectory to access form andreport source files to transferthem to the forms compilermachine and performs theform and report compilations.
Compile Host Oracle HomePath
The path to Oracle homedirectory for the Oracleinstance on the INB formscompiler application that isset up for forms and reportscompilation.
/u01/app/oracle/middleware/as_1
Compile Host User The user login that shouldbe used by the automatedupgrade installation processto log on to the INB forms
oracle
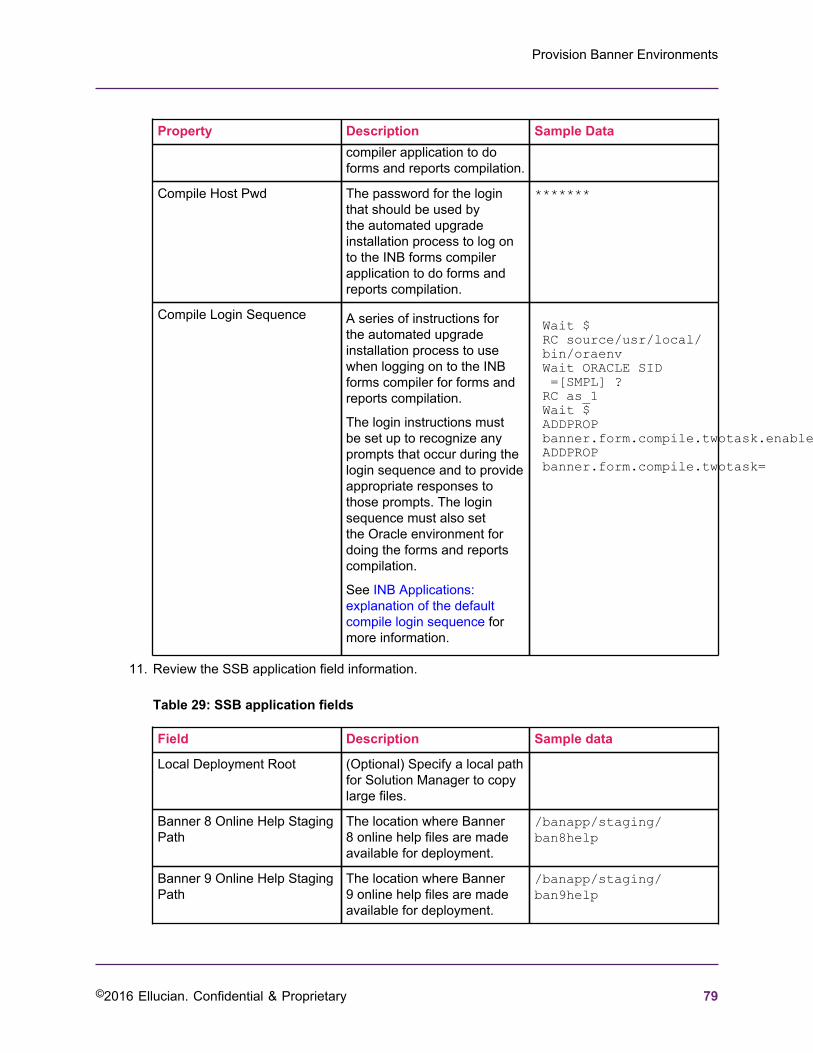
Provision Banner Environments
©2016 Ellucian. Confidential & Proprietary 79
Property Description Sample Datacompiler application to doforms and reports compilation.
Compile Host Pwd The password for the loginthat should be used bythe automated upgradeinstallation process to log onto the INB forms compilerapplication to do forms andreports compilation.
*******
Compile Login Sequence A series of instructions forthe automated upgradeinstallation process to usewhen logging on to the INBforms compiler for forms andreports compilation.
The login instructions mustbe set up to recognize anyprompts that occur during thelogin sequence and to provideappropriate responses tothose prompts. The loginsequence must also setthe Oracle environment fordoing the forms and reportscompilation.
See INB Applications:explanation of the defaultcompile login sequence formore information.
Wait $RC source/usr/local/bin/oraenvWait ORACLE SID =[SMPL] ?RC as_1Wait $ADDPROPbanner.form.compile.twotask.enable=yesADDPROPbanner.form.compile.twotask=
11. Review the SSB application field information.
Table 29: SSB application fields
Field Description Sample data
Local Deployment Root (Optional) Specify a local pathfor Solution Manager to copylarge files.
Banner 8 Online Help StagingPath
The location where Banner8 online help files are madeavailable for deployment.
/banapp/staging/ban8help
Banner 9 Online Help StagingPath
The location where Banner9 online help files are madeavailable for deployment.
/banapp/staging/ban9help

Provision Banner Environments
©2016 Ellucian. Confidential & Proprietary 80
Table 30: SSB Application Properties
Field Description Sample data
User ID The login that should be usedby BMUI to connect to theSSB application for copyingitems to the web server'sdocument root.
oracle
Password The password that shouldbe used by BMUI to connectto the SSB application forcopying items to the webserver's document root.
*******
WebServer Doc Root Path The path to the folder on theSSB application server wherethe upgrade process will placeimages, CSS and JS files.
/banapp/ssb
Banner SSB Cascade EARFile Staging Path
The path to the folder onthe SSB application serverwhere EAR files needing SSBdeployment will be placed byBMUI.
/banapp/ssb/java
Kick off environment provisioning
Use the Kick Off Environment Provisioning form to start the provisioning process after definingand configuring an environment. Ensure that all configuration information is accurately entered forthe machines in the target environment before kicking off environment provisioning for the newenvironment.
Procedure
1. Select Environments from Ellucian Solution Manager options, .2. In the list of available Environments, click the Provision icon associated with the new
unprovisioned environment.3. Complete the required fields.
Table 31: Kick off environments fields
Property Description Sample Data
Kickstart OS Dir Specify a path to the directory where the operatingsystem installation file is stored. The Kickstart OSDir should not be changed unless the documentationassociated with the provisioning template you
/u02/installs/oel5/58
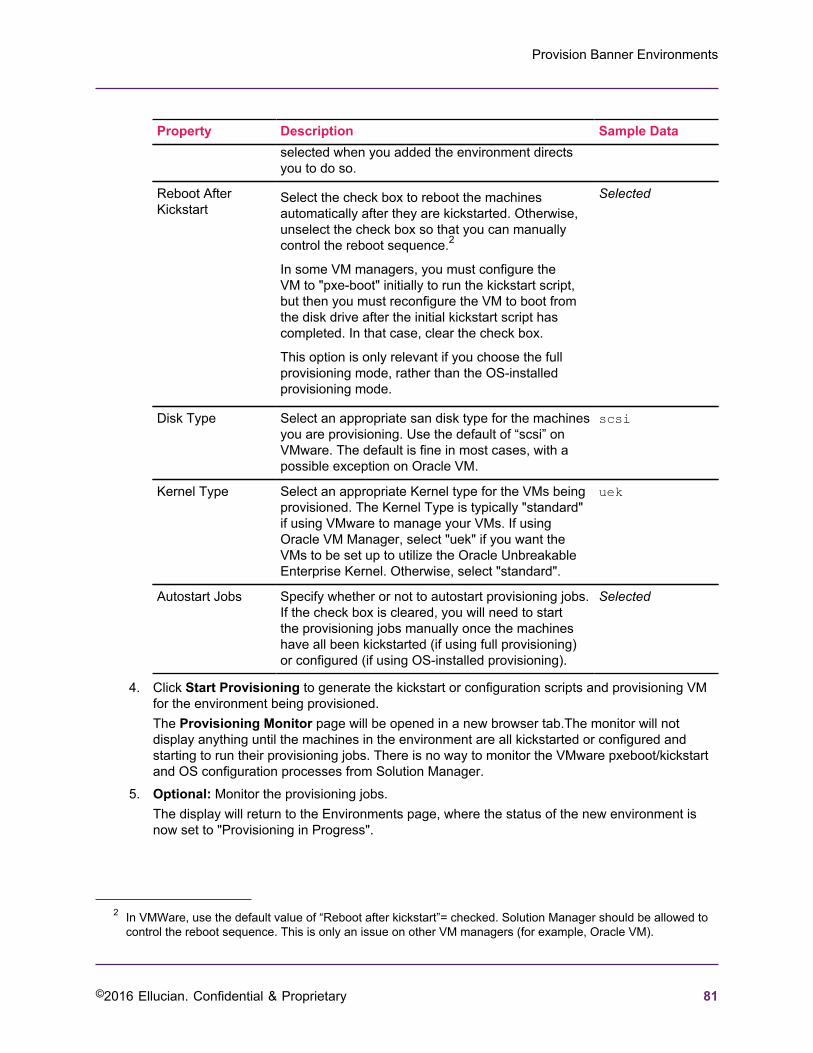
Provision Banner Environments
©2016 Ellucian. Confidential & Proprietary 81
Property Description Sample Dataselected when you added the environment directsyou to do so.
Reboot AfterKickstart
Select the check box to reboot the machinesautomatically after they are kickstarted. Otherwise,unselect the check box so that you can manuallycontrol the reboot sequence.2
In some VM managers, you must configure theVM to "pxe-boot" initially to run the kickstart script,but then you must reconfigure the VM to boot fromthe disk drive after the initial kickstart script hascompleted. In that case, clear the check box.
This option is only relevant if you choose the fullprovisioning mode, rather than the OS-installedprovisioning mode.
Selected
Disk Type Select an appropriate san disk type for the machinesyou are provisioning. Use the default of “scsi” onVMware. The default is fine in most cases, with apossible exception on Oracle VM.
scsi
Kernel Type Select an appropriate Kernel type for the VMs beingprovisioned. The Kernel Type is typically "standard"if using VMware to manage your VMs. If usingOracle VM Manager, select "uek" if you want theVMs to be set up to utilize the Oracle UnbreakableEnterprise Kernel. Otherwise, select "standard".
uek
Autostart Jobs Specify whether or not to autostart provisioning jobs.If the check box is cleared, you will need to startthe provisioning jobs manually once the machineshave all been kickstarted (if using full provisioning)or configured (if using OS-installed provisioning).
Selected
4. Click Start Provisioning to generate the kickstart or configuration scripts and provisioning VMfor the environment being provisioned.The Provisioning Monitor page will be opened in a new browser tab.The monitor will notdisplay anything until the machines in the environment are all kickstarted or configured andstarting to run their provisioning jobs. There is no way to monitor the VMware pxeboot/kickstartand OS configuration processes from Solution Manager.
5. Optional: Monitor the provisioning jobs.The display will return to the Environments page, where the status of the new environment isnow set to "Provisioning in Progress".
2 In VMWare, use the default value of “Reboot after kickstart”= checked. Solution Manager should be allowed tocontrol the reboot sequence. This is only an issue on other VM managers (for example, Oracle VM).

Provision Banner Environments
©2016 Ellucian. Confidential & Proprietary 82
Start the environment machines
After jobs are provisioned, start the machines for the environment.
If you chose the full provisioning mode, pxe-boot each machine from the private admin network (ifyou are using VMs you will need to boot the machines from the VM manager) to access the kickstartscript for the machine which loads
• the operating system
and• the Ellucian Solution Manager required infrastructure software onto the machine then registers
the Solution Manager administration agent on the machine with the admin server.
If you chose the OS-installed provisioning mode, make sure that each machine is started and readyto accept SSH logins from the Admin Server so that Solution Manager can run the machine rolespecific configuration scripts generated when you kicked off environment provisioning on eachmachine.
Virtual machine-specific information
The procedure for kickstarting VMs varies for different VM managers.
For VMware, the VMs can be set to boot from the network interface that is on the private virtualnetwork, then fall through to boot from the disk drive if the network boot times out. With that setup,you power on the VM and then access the console. The console should show the VM acquiring itsIP address on the admin network from the admin server acting as the DHCP server on the adminnetwork, and then display a "boot" prompt as it boots from the admin network interface.
Pxeboot machines
Configure virtual machines to pxeboot.
Procedure
1. Go to the console on the database server to access the BIOS configuration screen for the VM.2. Set the machine to boot from the network.
a) Access the BOOT menu.b) Use the up/down sequence to move the network interfaces (intel e1000) to the top of the
list.3. Press F10 to save and exit the BIOS screen.4. Type linux in the boot: field after encountering the BIOS prompt.5. To begin the kickstart process, press Enter.
If using VMWare, consult Get started with VMWare.

Provision Banner Environments
©2016 Ellucian. Confidential & Proprietary 83
During the kickstart process, the virtual machine will reboot several times. Each time after theinitial reboot, the virtual machine will pause at the boot: prompt for about 15 seconds beforebooting from the disk drive.
After a VM has registered itself with the Admin Server, then any provisioning jobs for thatapplication can be run by Solution Manager.
6. Start each of the machines.The provisioning jobs adhere to the sequence db application > job sub > application >appservers. For optimal results, start the machines in the following order:a) Start db.b) Start job sub.c) Start bannerapp.d) Start apps.e) Start idm.f) Start bxe.
Monitor provisioning jobs
You can monitor provisioning jobs and review the status of each job.
Procedure
1. Click the Monitor icon on the environment being provisioned.The Provisioning Monitor page appears. The status column indicates the status of eachprovisioning job.
Status Icon Description
The provisioning job has not yet started.
The provisioning job is in progress.
The provisioning job completed successfully.
The provisioning job failed.
Note: If a provisioning job fails and you reset the environmentto kickoff provisioning again by PXE booting any machines, thenyou need to ensure that the machine statuses for those machinesis set back to "Unprovisioned" in Ellucian Solution Managerbefore kicking off provisioning.
The provisioning job is complete.

Provision Banner Environments
©2016 Ellucian. Confidential & Proprietary 84
2. Control the refresh rate of the screen by changing the refresh interval in the Auto Refresh(secs) field, then click Refresh.
Access newly provisioned environments
When provisioning jobs are complete, and you have completed any post-provisioning instructions inthe documentation that is associated with the provisioning template you selected when you addedthe environment to Solution Manager, the newly provisioned Banner environment will be ready foruse.
Completed provisioning jobs can be viewed by clicking on the Monitor icon in the row for theenvironment in the Environments table.
To begin managing the new environment with Solution Manager, including processing upgrades anddeployments, click anywhere in the row for the environment in the Environments table to accessthe Environment page. Use the navigation tabs on the Environments page to view installedand available releases, add additional machines, appservers, or applications to the environmentor modify configuration information for any of those, and install and deploy upgrades. Select theLinks tab to access Banner components in the environment, as described in the documentationassociated with the provisioning template you selected when you added the environment to SolutionManager
Use VMWare to provision an environment
A system administrator can use the VMWare console to access and configure the settings particularto provisioning that will ensure that the VMs will come online. Provisioning can then begin throughuse of the Solution Manager server provisioning functionality..
Get started with VMWare
The VMWare console contains a list of available machines that you can access in order to configurethe settings for provisioning. This will ensure that the VMs come online.
Procedure
1. Access the Summary tab.
View an empty VM shell that was set up by IT with memory, CPU, and disk space allocated.These specifics needed are documented in Ellucian Solution Manager Installation andAdministration. The VMWare administrator at your client site will create this.
2. View Oracle Linux installed on a VM.VMs that will be fully provisioned by Solution Manager start without an operating systeminstalled. Solution Manager will install the operating system during the pxeboot/kickstart of themachine unless you specifically want to add an operating system and set the machine to the“OSInstalled” state within Solution Manager to force a machine to be configured using SSHinstead of pxeboot.
3. Go to the Commands > Edit Settings tab.
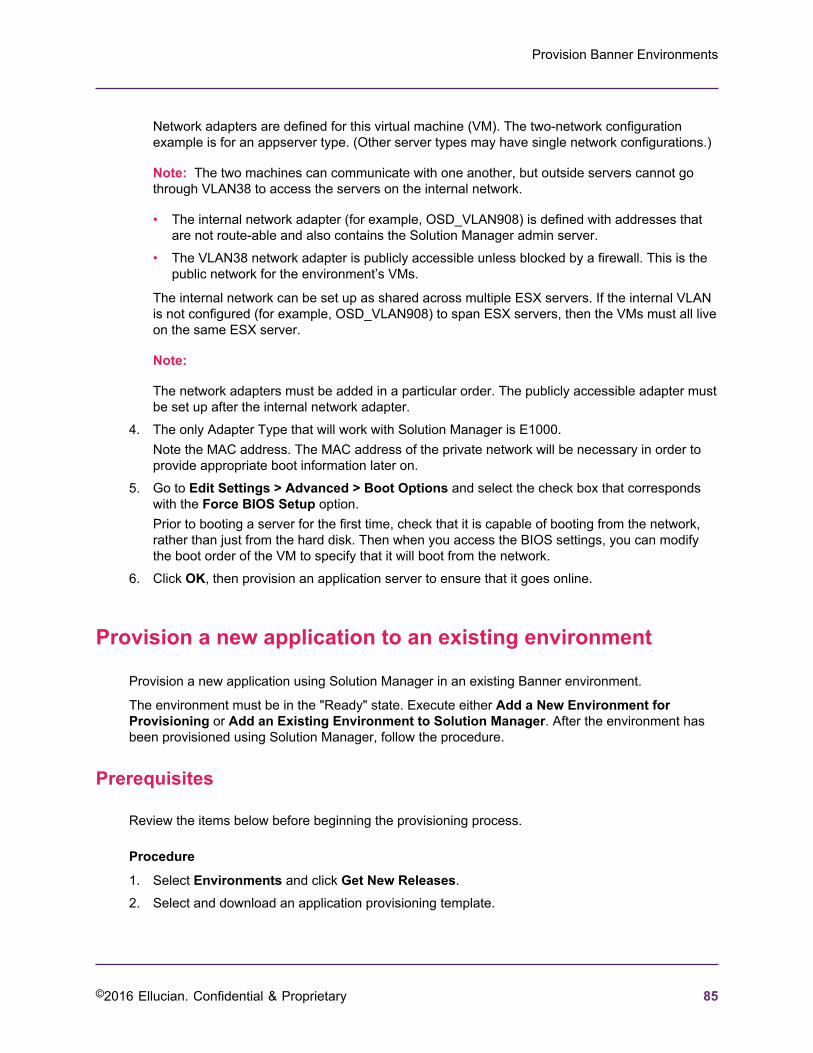
Provision Banner Environments
©2016 Ellucian. Confidential & Proprietary 85
Network adapters are defined for this virtual machine (VM). The two-network configurationexample is for an appserver type. (Other server types may have single network configurations.)
Note: The two machines can communicate with one another, but outside servers cannot gothrough VLAN38 to access the servers on the internal network.
• The internal network adapter (for example, OSD_VLAN908) is defined with addresses thatare not route-able and also contains the Solution Manager admin server.
• The VLAN38 network adapter is publicly accessible unless blocked by a firewall. This is thepublic network for the environment’s VMs.
The internal network can be set up as shared across multiple ESX servers. If the internal VLANis not configured (for example, OSD_VLAN908) to span ESX servers, then the VMs must all liveon the same ESX server.
Note:
The network adapters must be added in a particular order. The publicly accessible adapter mustbe set up after the internal network adapter.
4. The only Adapter Type that will work with Solution Manager is E1000.Note the MAC address. The MAC address of the private network will be necessary in order toprovide appropriate boot information later on.
5. Go to Edit Settings > Advanced > Boot Options and select the check box that correspondswith the Force BIOS Setup option.Prior to booting a server for the first time, check that it is capable of booting from the network,rather than just from the hard disk. Then when you access the BIOS settings, you can modifythe boot order of the VM to specify that it will boot from the network.
6. Click OK, then provision an application server to ensure that it goes online.
Provision a new application to an existing environment
Provision a new application using Solution Manager in an existing Banner environment.
The environment must be in the "Ready" state. Execute either Add a New Environment forProvisioning or Add an Existing Environment to Solution Manager. After the environment hasbeen provisioned using Solution Manager, follow the procedure.
Prerequisites
Review the items below before beginning the provisioning process.
Procedure
1. Select Environments and click Get New Releases.2. Select and download an application provisioning template.

Provision Banner Environments
©2016 Ellucian. Confidential & Proprietary 86
For example, "bnr_svr_provision".3. After selecting Templates, click on the row for the application provisioning template.4. Download the template contents using either the Get Local option or by selecting the Get From
Ellucian option.5. After all of the content is downloaded, select Mark Template Active.
The template will appear in the Application Provisioning workflows.
Provision a new Banner application
An environment that displays a status of "Ready" can have an application provisioned to it.
Procedure
1. After selecting the Environments tab, click in the Provision column for the selectedenvironment.
2. Choose an application provisioning template from the drop-down list. A template may provisionone or more applications to the environment.
3. Enter a name for each new application to be provisioned. The template may require one ormore existing applications during the provisioning process.
4. If the template prompts for existing applications, select the existing application(s) that thetemplate will use during provisioning. The existing application(s) that are referenced by thetemplate must have a Solution Manager agent that is online when provisioning is kicked off, asprovisioning steps may execute on these systems.A template may contain additional properties. These properties could be application-specific orenvironment-specific, or simply specific to that provisioning job.
5. Click the Setup Server Provisioning button. This sets the environment to an "ApplicationProvisioning Pending" status and defines the entries for the new applications that will beprovisioned.The following two steps are essential even if properties have been previously specified.Selecting a new template for provisioning could add new fields to these pages that are requiredby the provisioning process.
6. Go to those new machines and applications to define all of the relevant properties.7. Now return to the Environment Settings page and to all of the existing application pages to
specify any new fields that appear.8. On the Provision page, complete the provisioning fields.9. Clear the check box for any Goals that can be skipped during the provisioning process. This is
advanced functionality and should only be used when requested by Ellucian support staff.A template may contain additional properties. These properties could be application-specific orenvironment-specific or simply specific to that provisioning job.
10. Select the Kickoff Application Provisioning button to start the application provisioningprocess. It may take several minutes before the first job starts up and appears in the MonitorProvisioning Jobs page.

Provision Banner Environments
©2016 Ellucian. Confidential & Proprietary 87
• For an OSInstalled application, SSH will run automatically then run the Solution Manageragent. The machine will come online to do its provisioning.
• For the kickstart via PXE Boot option (no OSInstalled), consult Using VMWare to Provisionan Environment.
• The environment will show a status of "Application Provisioning in Progress".11. Use Monitor on the Environments page to monitor the provisioning progress. Once complete,
the environment will revert to a "Ready" state.
Using VMware to provision a new Banner application
Return to the Solution Manager Admin Console to an environment in a “Ready” state.
Procedure
1. Click the Provision icon for an environment in the Ready state from the Environmentspage and add a new application to the environment by selecting an appropriate applicationprovisioning template from the drop-down list.The environment will enter a Server Provisioning Pending state. Additional applications,appservers, or machines may be added to the environment based on the applicationprovisioning template chosen (see the documentation accompanying the template you selectedfor details of what the template will add to the environment).Configure any new machines (see Machines), applications (see Manage Applications), orappservers required for the application provisioning template. Additional information regardingrequired configuration information will be in the documentation accompanying the template youselected.
2. Return to the Provision page by clicking on the Provision icon in the row for the environmentin the table on the Environments page.See the documentation accompanying the application provisioning template for information onwhat data to enter for the fields on this page.
3. Select Kickoff Server Provisioning.
The status will change to "Server Provisioning in Progress".
For an OSInstalled server, ensure that the machine is booted and ready to accept SSHconnections so that Solution Manager can automatically run SSH to configure the machineand install the Jenkins agent. Then the machine will come online to execute any requiredprovisioning steps.
4. If you chose full provisioning mode for any new machines, return to the VMware console.a) Select the machine to boot from the menu. Click on it and select Open the Console.
Repeat this sequence for all of the machines that need to be booted.b) Select the Play icon and Power On.
f you have the system set to force boot to BIOS on the next startup, continue with the nextstep. Otherwise, skip to step "e" below.
c) Click within the window in order to control the virtual machine.d) On the Boot tab, move "Intel E1000" to the top of the list.

Provision Banner Environments
©2016 Ellucian. Confidential & Proprietary 88
e) Click Save and Exit.f) Enter linux at the boot prompt and hit Enter.
This initiates the kickstart process, with the operating system installation files being pulledfrom the Solution Manager server. Several reboots will occur as the post installationprocesses occur. Then the machine comes online in Jenkins awaiting its Solution Managerjobs and provisions the IDM service.
Warning! Repeat that set of steps in VMWare for each machine.
5. Click Save and Exit.You can now use the Monitor Provisioning Jobs functionality in Solution Manager.
Self-Update Ellucian Solution Manager
©2016 Ellucian. Confidential & Proprietary 89
Self-Update Ellucian Solution ManagerSelf-Update Ellucian Solution Manager
When updates are available for the Solution Manager application or database, they can bedownloaded into the database. At the end of the download process, there is an automatic check foravailable Ellucian Solution Manager updates.
Procedure
1. Access Solution Manager through either Google Chrome or Mozilla Firefox.Microsoft Internet Explorer is not supported.
2. Use a supported operating system for Ellucian Solution Manager.
Self-update feature
When updates are available for the Ellucian Solution Manager application or database, they can bedownloaded to the database.
Procedure
1. Click on the Get New Releases button. After downloading Ellucian Solution Manager updates,a new System Updates tab appears if a more current version is available.
2. Refresh the URL when the download completes. The System Updates tab will appear.The page within the System Updates tab lists all of the available update versions with links tothe associated release documentation.
3. Click on an icon in the Rel Doc. Review the related documentation, then click Perform Update.
If only one available update version number is higher than the current Ellucian SolutionManager version, the page will automatically show details about that update.
The application will shut down temporarily while the update is performed.
An Upgrade in Progress notification will appear. Ellucian recommends avoiding clicking onthat page, as it may result in a 404 Not Found error. No further action is necessary. If an erroroccurs, a backup of the war file was made before the update and can be restored manually.The backed up war file will be located in the persistence directory on the admin server underEsmUpgradesStage\StageBackup\.
If the administrator is unable to access Solution Manager after an upgrade attempt and findsthat Tomcat is not running, they should attempt to restart the program.
When the update is complete, the page will refresh and display the updated application.