Electronic Production Part Approval Process (ePPAP) 15_ePPAP Training.pdfThe Ford ePPAP system is an...
44
Module 15 Module 15 ePPAP 1 Electronic Production Part Approval Process (ePPAP)
Transcript of Electronic Production Part Approval Process (ePPAP) 15_ePPAP Training.pdfThe Ford ePPAP system is an...
Module 15
Module 15 ePPAP
1
Electronic Production Part Approval Process (ePPAP)

The Purpose of this module is to inform our supply base about the Electronic Production Part Approval Process (ePPAP).
2
Module 15 ePPAP
Purpose
Become familiar with the web-based ePPAP system.
Understand the process to obtain access to the Ford ePPAP system through a CSA.
Learn how to submit an ePPAP for different parts.
Know how to upload the correct files for ePPAP approval.
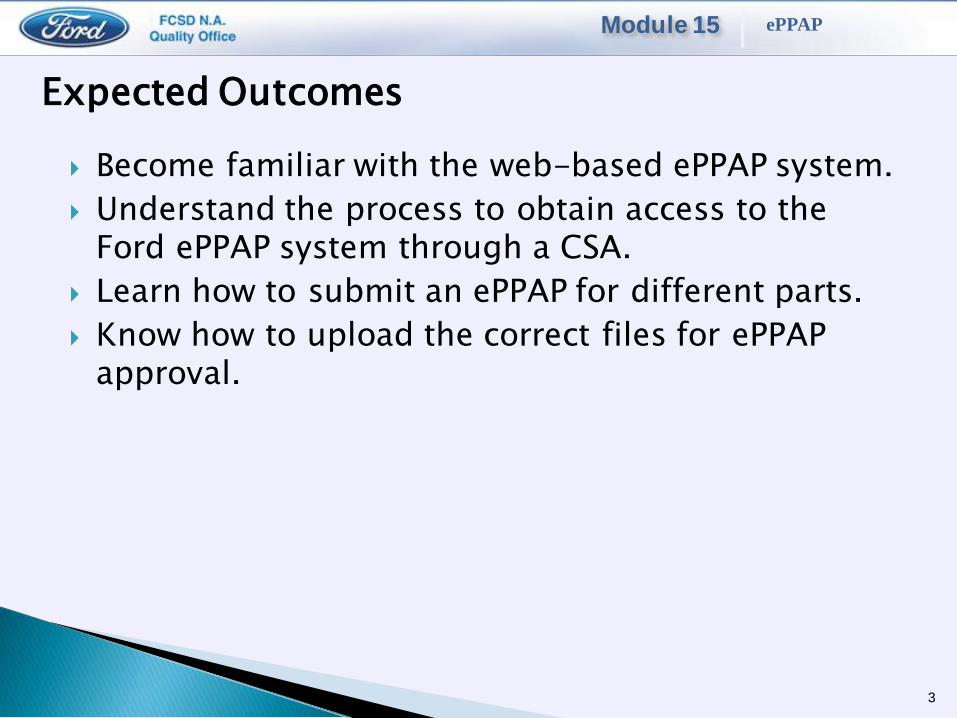
3
Module 15 ePPAP
Expected Outcomes

The Ford ePPAP system is an online website which
allows for the submitting of PPAP’s via Covisint and
receiving electronic approval.
Globally applicable
◦ North America (NA)
◦ South America (SA)
◦ Asia Pacific Africa (APA)
4
Module 15 ePPAP
What is the ePPAP System?

Currently, only the following organizations use the ePPAP system.
Global Users North America – (FCSD only)
North America – Vehicle Personalization
South America – (FCSD only)
Asia Pacific, Africa, Australia – (FCSD only)
Europe – manual paper submittal only
Ford production will continue to use the manual process.
5
Module 15 ePPAP
Which Ford divisions use the ePPAP system?

Provide the requested list of Site Codes to your Corporate Security Administrator (CSA) for authorization in order to create PPAPs for those Sites. This list of Sites may be communicated to your CSA by any convenient means (email, phone or in person).
6
Module 15 ePPAP
Setting up System Access
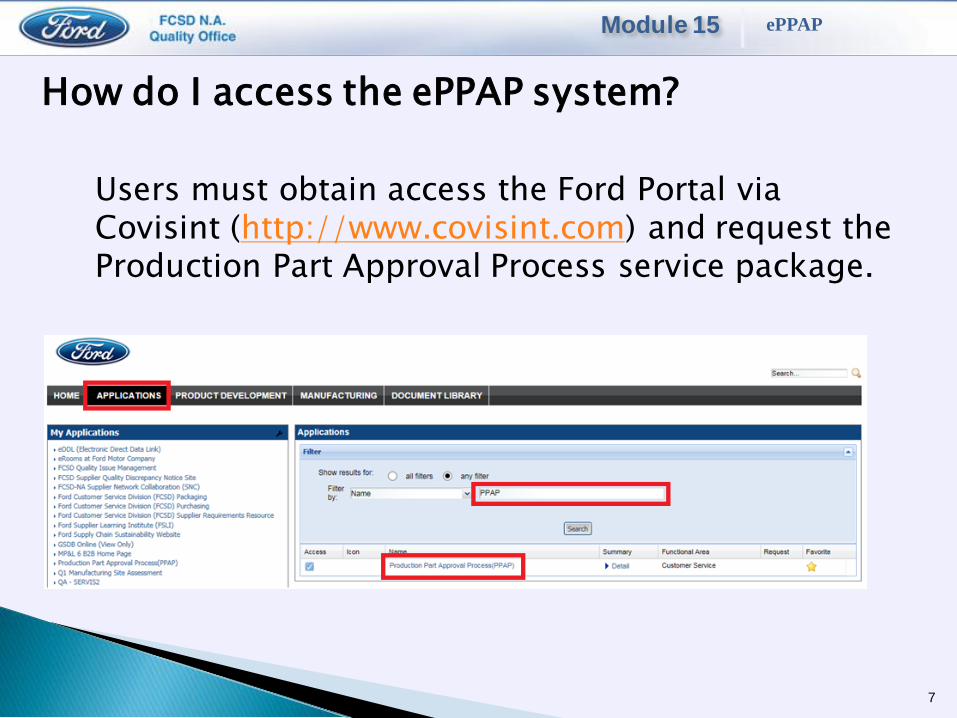
Users must obtain access the Ford Portal via Covisint (http://www.covisint.com) and request the Production Part Approval Process service package.
7
Module 15 ePPAP
How do I access the ePPAP system?

ePPAP Homepage
8
Module 15 ePPAP

9
Module 15 ePPAP
The Home Page Menu Buttons
Returns the user to the home site from any ePPAP
page.
Displays all open items requiring action from the user.
Allows the user to locate PPAP records Data and
action requirements needed for PPAP approval.
Data and action requirements needed for PPAP approval.
Provides training to users new to the PPAP
system.
E-mail address for online support.

Module 15 ePPAP
Does the Part Need a PPAP for Service?
1. All parts shipped to Ford Motor Company that do not have a PPAP for production will need a service PPAP within the ePPAP system.
2. It should be noted that the ePPAP system is not currently being used by production.
3. ePPAP is used globally. The only exception is Europe.4. The When do I need to complete a PPAP for Service link provides
additional information.
10
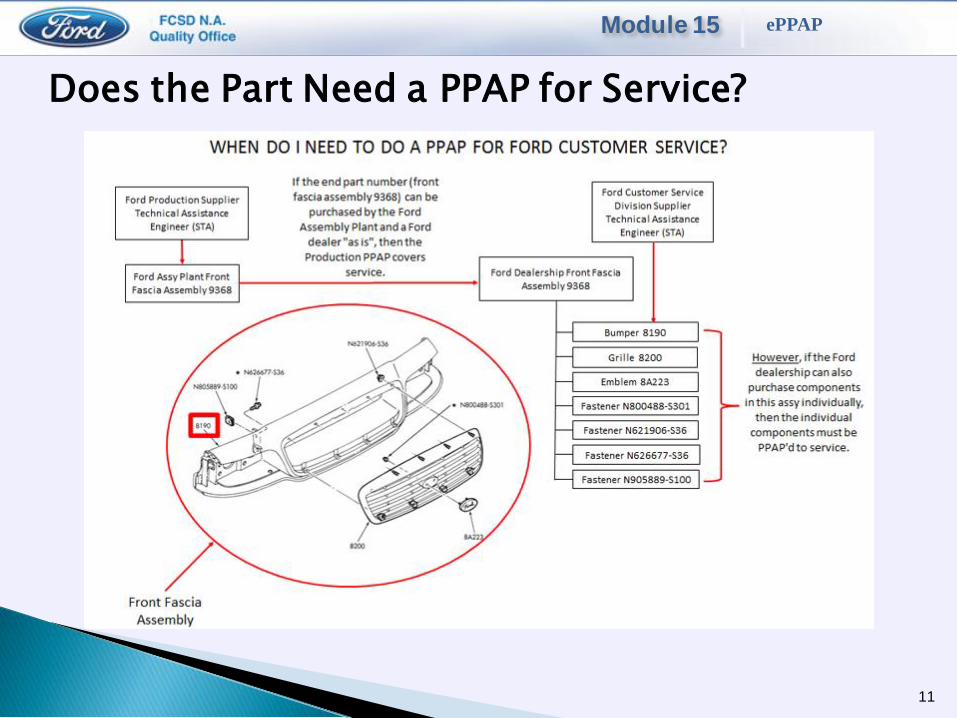
Does the Part Need a PPAP for Service?
11
Module 15 ePPAP
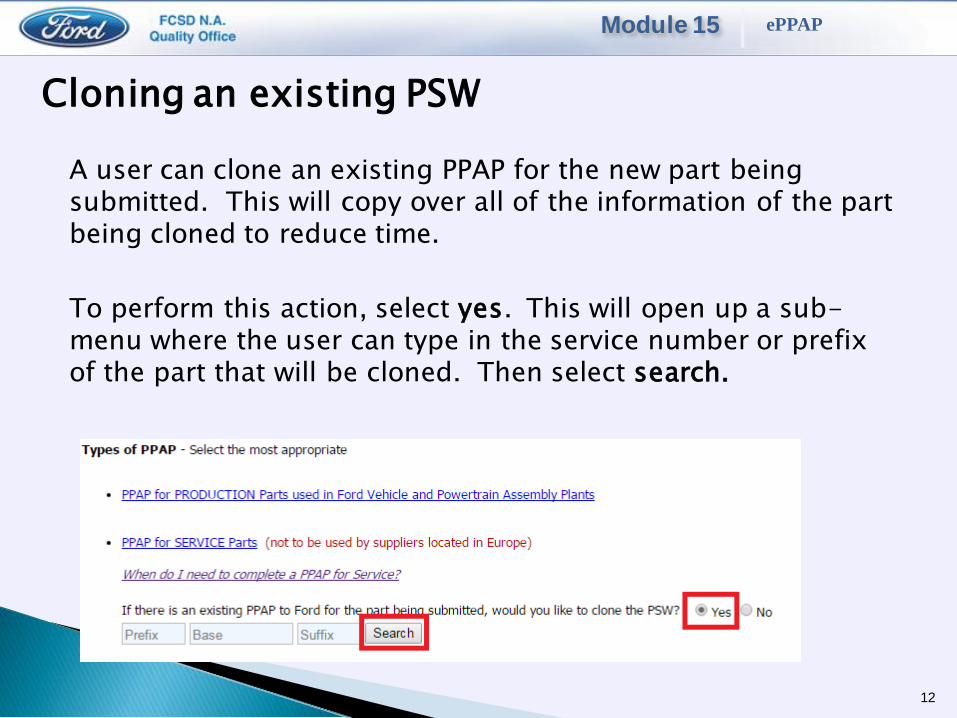
A user can clone an existing PPAP for the new part being submitted. This will copy over all of the information of the part being cloned to reduce time.
To perform this action, select yes. This will open up a sub-menu where the user can type in the service number or prefix of the part that will be cloned. Then select search.
12
Module 15 ePPAP
Cloning an existing PSW

After searching for a part number, the search results will display below. Select the clone link next to the PPAP number to clone the displayed part.
13
Module 15 ePPAP
Cloning an existing PSW

The PSW form will display with all of the information populated – it can be edited to represent a new part number or a different phase of PPAP.
14
Module 15 ePPAP
Cloning an existing PSW

Selecting no to the question of cloning a PSW will prompt the user to create a new PSW.
15
Module 15 ePPAP
Creating a new PSW – Home Page

The data entry field for the Part Submission Warrant form requires the user to enter data regarding the supplier
information.
16
Module 15 ePPAP
Creating a new PSW - Page One

For further explanation of requirements, select the information icon located near the specific item description. These icons are used throughout the entire PPAP and can be accessed at any
time for further clarification.
17
Module 15 ePPAP
Creating a new PSW - Page One

Selecting the information icon near the “Ford Part Name” description displays where the supplier may obtain the correct
information.
18
Module 15 ePPAP
Creating a new PSW - Page One
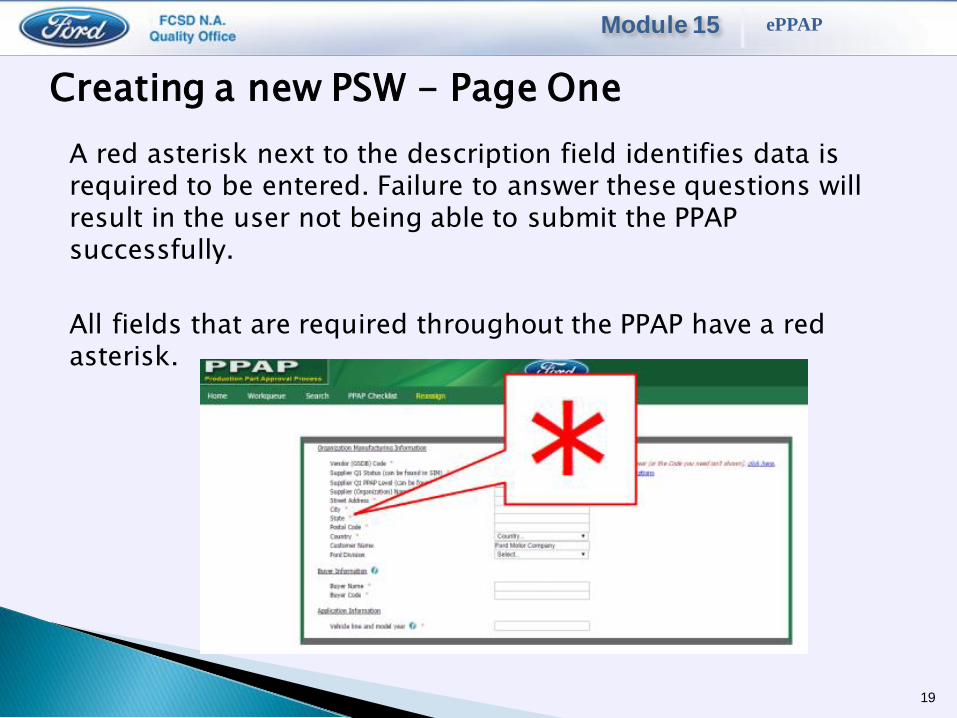
A red asterisk next to the description field identifies data is required to be entered. Failure to answer these questions will result in the user not being able to submit the PPAP successfully.
All fields that are required throughout the PPAP have a red asterisk.
19
Module 15 ePPAP
Creating a new PSW - Page One

If the correct vendor (GSDB) code is not displayed in the dropdown menu your company has not authorized you to complete PPAP for the desired location.
Issue – site code is not displaying
Result – not able to save a completed form
Action – work with CSA to add GSDB codes to the PPAP application within FSP or Covisint
20
Module 15 ePPAP
Creating a new PSW - Page One

Warning – without a site code displayed users are not able to save an incomplete PPAP for completion at a later time – do not proceed until site authorization has been provided by your
organization.
21
Module 15 ePPAP
Creating a new PSW - Page One

Enter the correct data for the Part Submission Warrant – items marked with a red asterisk are required for a successful
submittal.
22
Module 15 ePPAP
Creating a new PSW - Page One

Selecting the PPAP level, 1, 3, 5 – information required for successful submission. Incorrect selection may result in delayed
tooling payment or part approval for shipment.
23
Module 15 ePPAP
Creating a new PSW - Page One

Select the correct PPAP level identified in Supplier Improvement Metric (SIM) – selecting a different level than the level chosen on page 3 will create a PPAP level mismatch warning. Your STA has the authority to allow you to submit a PPAP at a different level –select confirm if you have been approved to submit a non-
conforming PPAP level..
24
Module 15 ePPAP
Creating a new PSW - Page One

Enter the appropriate information into the data fields.
Buyer information can be located on the “GPMA” screen in 3270 – IMS2
25
Module 15 ePPAP
Creating a new PSW - Page One

Select the Add button to enter in the an engineering part number– the ePPAP system is capable of entering multiple part numbers on one PPAP for family of parts or common
manufacturing methods – contact your STA for further details.
26
Module 15 ePPAP
Creating a new PSW - Page Two
27
Module 15 ePPAP
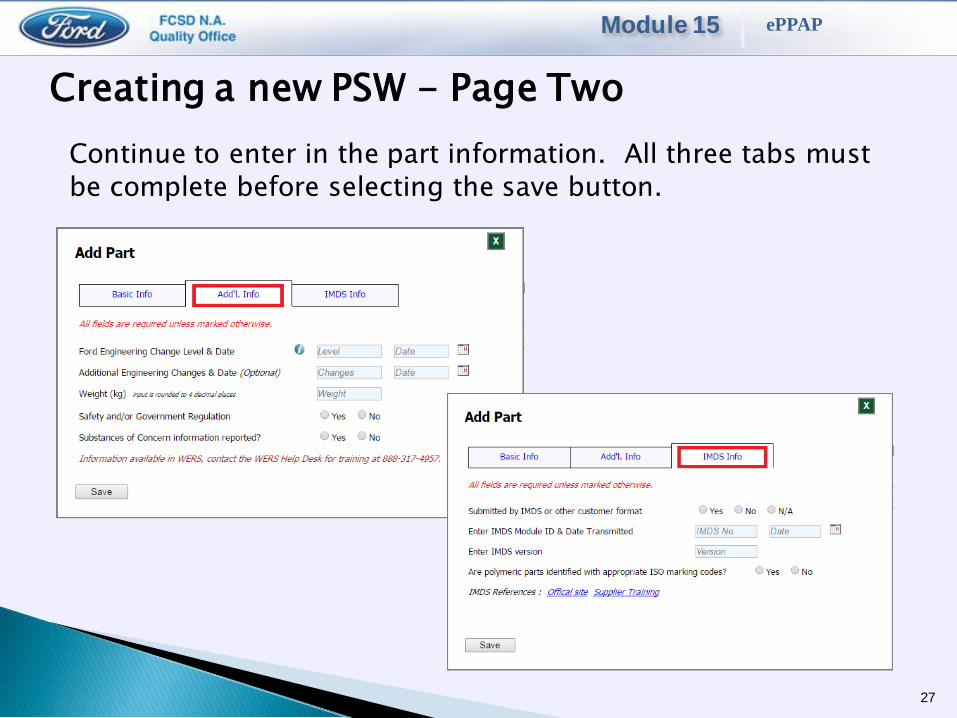
Creating a new PSW - Page Two
Continue to enter in the part information. All three tabs must
be complete before selecting the save button.

Multiple parts can be added to a PPAP using the same process outlined in the prior two slides. Simply select the Add button and repeat the steps. Once a single or multiple parts have been added, each part will display on this page. A part can also be deleted or edited from this screen by selecting the edit pencil or remove part option.
28
Module 15 ePPAP
Creating a new PSW - Page Two

Enter the required data in all fields – do not leave fields blank,
enter (N/A) Not Applicable
29
Module 15 ePPAP
Creating a new PSW – Page Three
Enter the required data in all fields – do not leave fields blank,
enter (N/A) Not Applicable
30
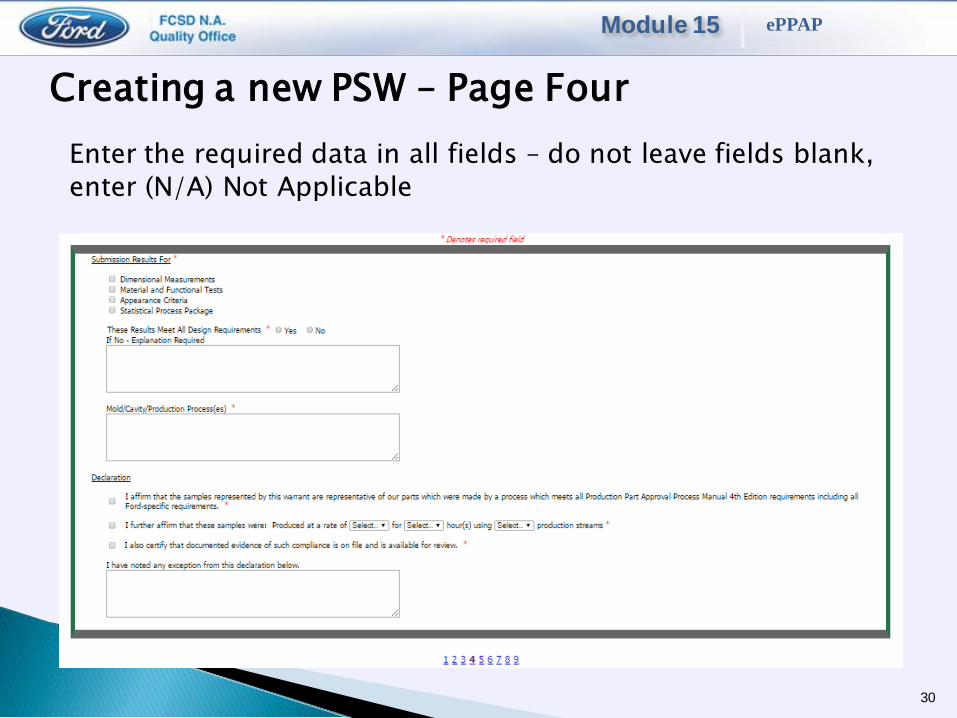
Module 15 ePPAP
Creating a new PSW – Page Four

Enter the required data in all fields – do not leave fields blank,
enter (N/A) Not Applicable
31
Module 15 ePPAP
Creating a new PSW – Page Five

Where applicable, tool tagging evidence is required for final approval of a PPAP – select the Tool Tagging/Marking Requirements link for additional information regarding this
Ford Motor Company policy.
32
Module 15 ePPAP
Creating a new PSW – Page Five

Enter the required data in all fields – do not leave fields blank,
enter (N/A) Not Applicable
33
Module 15 ePPAP
Creating a new PSW – Page Six

Uploading data files
34
Module 15 ePPAP
Creating a new PSW – Page Seven

If your company policy forbids the uploading of documentation into the Ford ePPAP system due to proprietary information, contact your STA for further instructions. Regardless of your company policy, you must upload the following information
2.2.01 Blueprint
2.2.02 WERS Notice or alert (located in 3270 – IMS6)
2.2.14 Pictures of parts showing branding information (Ford logo, engineering number, site code) or copy of branding exemption
2.2.17 Pictures of label
2.2.17 GPMA Screen (located in 3270 – IMS2)
2.2.17 Tool Pictures with tool tagging requirements
35
Module 15 ePPAP
Uploading files – Page Seven
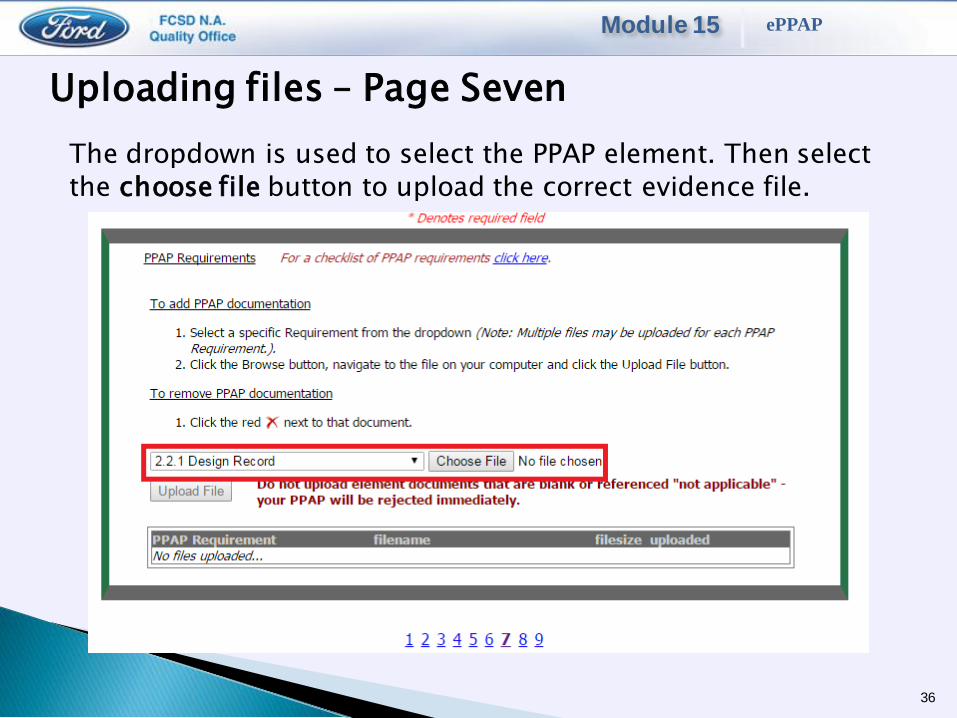
The dropdown is used to select the PPAP element. Then select
the choose file button to upload the correct evidence file.
36
Module 15 ePPAP
Uploading files – Page Seven
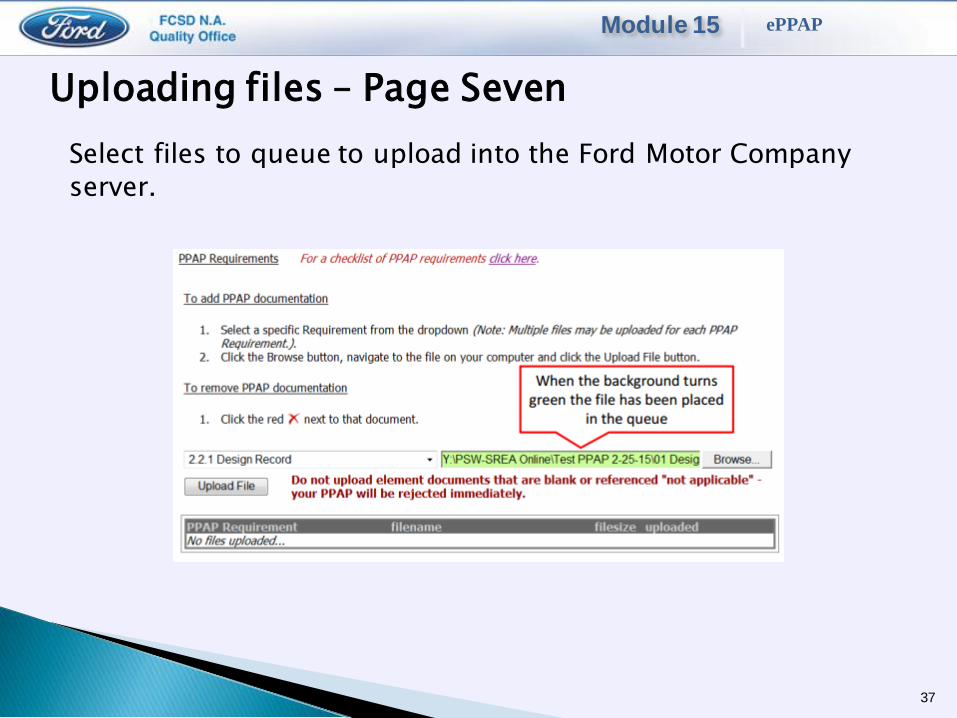
Select files to queue to upload into the Ford Motor Company
server.
37
Module 15 ePPAP
Uploading files – Page Seven
File Type – all files can be uploaded, CAD, .pdf, Excel, Word, etc. – however the recipient must have the appropriate software to open. If you select a CAD file that is not compatible with Ford, zip the file and place a note in the comments what CAD system must be used to access the data.
File Size – there is no size restriction, however if the upload times out select file upload after each selection. Ford bandwidth has no time out restriction. This is usually a supplier time-out from their own IT.
File Quantities – there is no limit to the number of files that can be uploaded, however it is recommended if you have multiple files for one element that they be zipped together into one file. As an example, if there were more than three dimensional files they should be zipped together.
38
Module 15 ePPAP
File Restrictions:

There cannot be any special characters in the file name, i.e. %, *, /, &. File names can only consist of alpha-numeric or spaces
Recommendation – place the AIAG 4th edition element number at the beginning of the file name for ease of uploading into the
correct element.
39
Module 15 ePPAP
File Naming Recommendations / Restrictions:
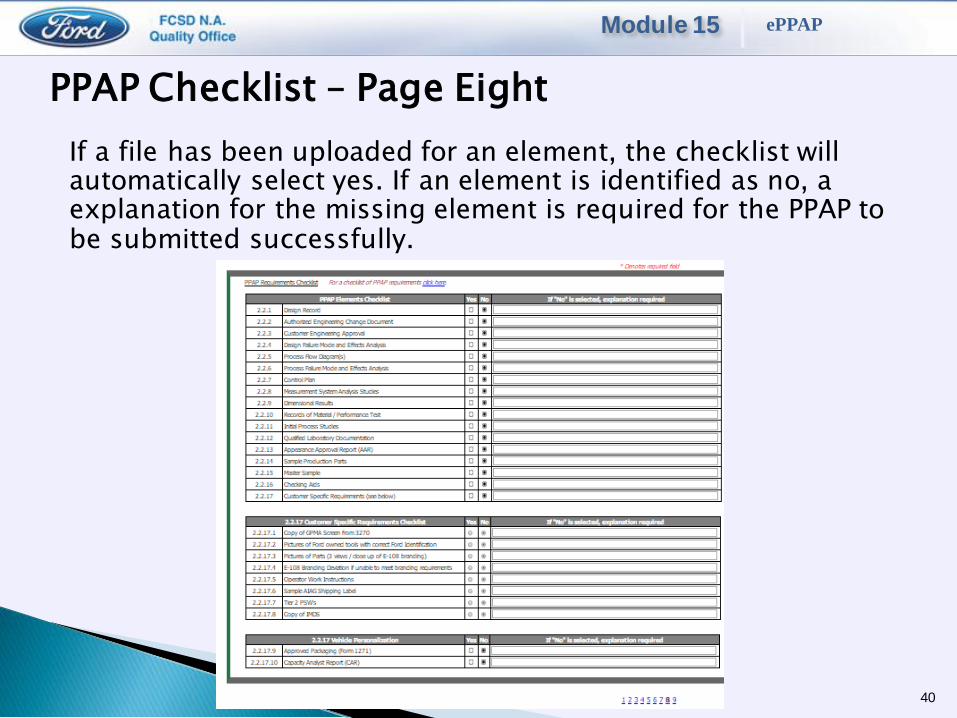
If a file has been uploaded for an element, the checklist will automatically select yes. If an element is identified as no, a explanation for the missing element is required for the PPAP to be submitted successfully.
40
Module 15 ePPAP
PPAP Checklist – Page Eight
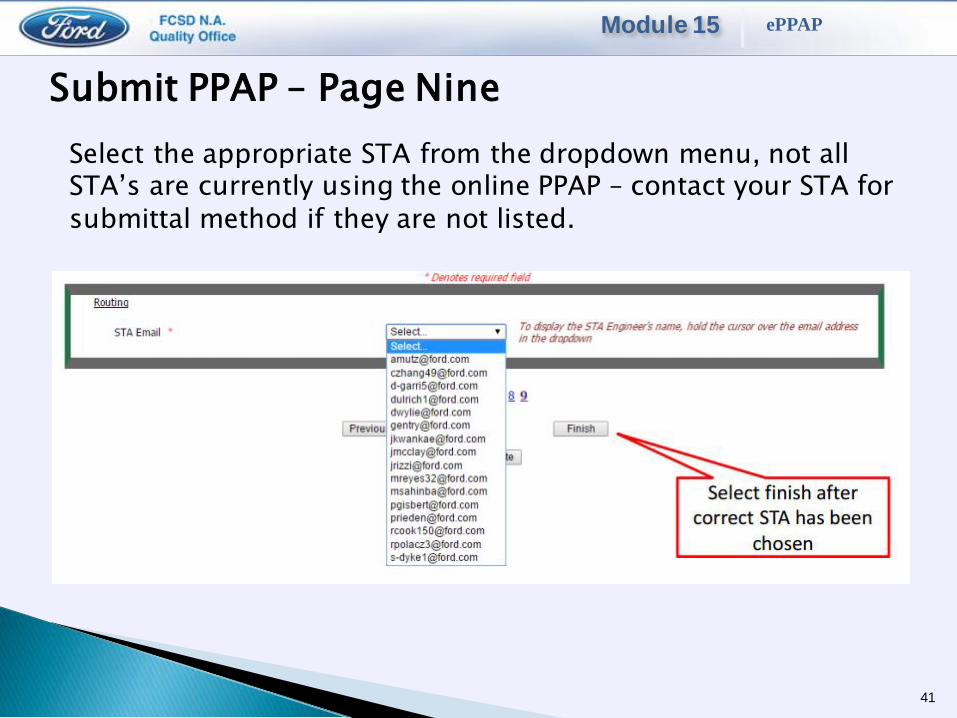
Select the appropriate STA from the dropdown menu, not all STA’s are currently using the online PPAP – contact your STA for
submittal method if they are not listed.
41
Module 15 ePPAP
Submit PPAP – Page Nine

If any fields have been left blank, the ePPAP system will direct
you to the error and highlight the item that must be completed
42
Module 15 ePPAP
Errors

The summary page is displayed allowing the user to confirm all data is complete and correct. If all information is correct, select
submit.
43
Module 15 ePPAP
PPAP Summary

Once a PPAP has been successfully submitted a unique number
is generated and will be displayed on the screen.
44
Module 15 ePPAP
PPAP Unique Number
An email will be sent to your STA immediately after the PPAP submission.