ELECTRIC PRESSURE WASHER - The Home Depot€¦ · water jet. If necessary you can use detergents....
12
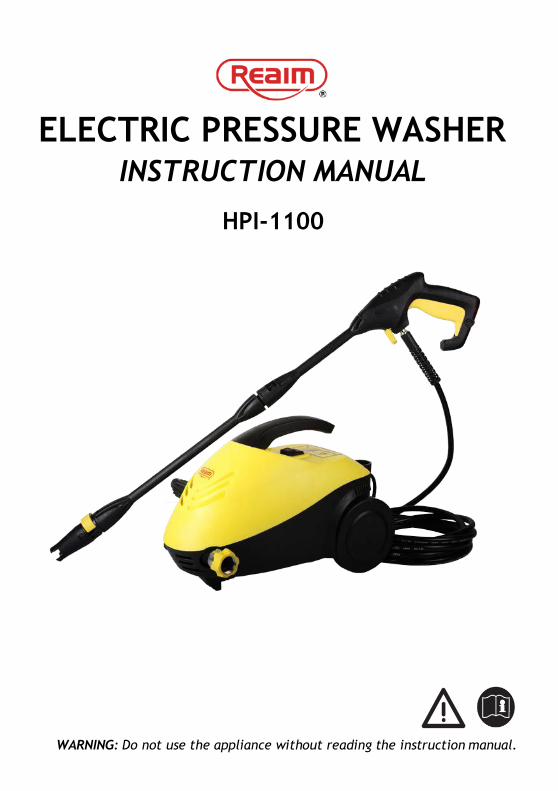
ELECTRIC PRESSURE WASHER INSTRUCTION MANUAL HPI-1100 WARNING: Do not use the appliance without reading the instruction manual.
Transcript of ELECTRIC PRESSURE WASHER - The Home Depot€¦ · water jet. If necessary you can use detergents....
ELECTRIC PRESSURE WASHER INSTRUCTION MANUAL
HPI-1100
WARNING: Do not use the appliance without reading the instruction manual.

-1-
nly
CONTENT 2. TECHNICAL DATA
Motor Brush
Max. pressure 1200PSI
Max. flow 1.35GPM
Current 9A
Voltage 120V/60 Hz
Max. water temperature
40°C
1. APPLICATION
Your electric pressure washer has been designed for outdoor cleaning. Cleaning of: machines, vehicles, structures, tools, facades, terraces, gardening tools…
WARNING: Read this manual and general safety instruction carefully before using the appliance, for your own safety. Your power tool should o be passed on together with these instructions.
3. PRODUCT OVERVIEW
1. Water inlet coupling 2. Electrical plug 3. Water outlet
4. Switch 5. Wheel 6. High pressure hose 7. Trigger gun
8. Trigger lock 9. Lance 10. Adjustable nozzle 11. High pressure detergent bottle 12. Turbo nozzle (optional)
13. Angle nozzle (optional) 14. Brush (optional) 15. Patio Cleaner (optional)
Chapter Page
1. Application 1
2. Technical data 1
3. Product overview 1
4. Safety symbols on the device and/or in the instructions
2
5. General safety instructions 2
6. Special safety instructions for this device
2
7. Operation instructions 3
8. Connection requirements 6
9. Instruction for use 6
10. After use instructions 7
11. Maintenance, cleaning and repair 7
12. Trouble shooting 9
13. WEEE - Waste of electric and electronic equipment
10
14. Warranty 10

-2-
Caution! Please read the accompanying documents!
The symbol Caution! indicates a source of danger. It draws your attention to a working routine, a method of working, a condition or other situation which may lead to physical injury if performed incorrectly or with insufficient care.
Warning Sign on the Device
Never point the high-pressure jet at people, animals, the device itself or electrical parts.
5. GENERAL SAFETY INSTRUCTIONS
Read the operating instructions carefully before putting the appliance into operation and keep the instructions including the warranty, the receipt and, if possible, the box with the internal packing.
The appliance is designed exclusively for private use and for the envisaged purpose. This appliance is not fit for commercial use .The device is intended for conditional use out of doors. Please keep it away from heat, direct sunlight, moisture and rain (it must never be immersed into liquids), frost and sharp edges. Do not use the appliance with wet hands. If the appliance is humid or wet, unplug it immediately. Do not put it in water.
When cleaning or putting it away, switch off the appliance and always
pull out the plug from the socket (pull on the plug, not the cable) if the appliance is not being used and remove the attached accessories.
Do not operate the machine without supervision. If you should leave the workplace, always switch the machine off or remove the plug from the socket (pull the plug itself ,not the lead).
To protect children from the dangers posed by electrical appliances, make sure that the cable is hanging low and that children do not have access to the appliance.
Check the appliance and the cable for damage on a regular basis. Do not use the appliance if it is damaged.
Do not try to repair the appliance on your own .Always contact an authorized technician. To avoid the exposure to danger, always have a faulty cable be replaced only by the manufacturer, by our customer service or by a qualified person and with a cable of the same type.
Use only original spare parts.
Pay Careful attention to the following “Special Safety Instructions”.
If the high-pressure washer is handled incorrectly, this may prove hazardous for individuals and materials. Children and young people are often not able to evaluate risks. They should therefore not be allowed to operate the device.
6. SPECIAL SAFETY INSTRUCTIONS FOR
THIS DEVICE
4. SAFETY SYMBOLS ON THE DEVICE
AND/OR IN THE INSTRUCTIONS

-3-
Never leave the device unattended as long as the main switch is turned on.
During work breaks the manual spray gun should be secured by use of the lock.
spray gun and the jet pipe as tightly as possible. If required, you should wear appropriate protective clothing as protection against spray.
Here there is a Danger of Death
Never operate the device in rooms where there is a risk of explosion. Never touch the mains plug with wet hands. As additional protection the installation of a residual current device (RCD) with a rated breaking current of not more than 30mA is recommended in the electric circuit of the bathroom. Please consult a qualified electrical engineer.
Before operating the device always check the mains power cable, the mains plug and high-pressure hose for damage. Damaged cables must be replaced immediately by an approved qualified electrician. Also damaged high-pressure hoses are to be replaced immediately.
The following should be taken into consideration when cleaning motor vehicles: Tires and tire valves may be damaged by the high-pressure jet and then burst. The first indications of this are discoloration of the tire. Only the fan jet should be used. A distance of at least 50cm should be maintained during the cleaning process.
Here there is Danger of Injury
The jet of water emerging from the high-pressure nozzle causes the manual spray gun to recoil. Please ensure you are standing in a stable location. Hold the manual
7. OPERATION INSTRUCTIONS 7.1 Connection of garden hose
1. Screw the water inlet coupling (1) tight on to the water inlet. Note: The inlet filter must always be fitted in the water inlet pipe to filter out sand, lime stone and other impurities as these will damage the pump valves. Caution: Failure to fit the filter will invalidate the guarantee.
2. Connect the garden hose with a standard quick coupling.
7.2 Mounting of high pressure hose
1. Attach the high pressure hose (6) to
the trigger gun (7) and machine. 2. Detach the high pressure hose by
pressing the pawl (A) or button (B).
A
B
7.3 Mounting of lance and nozzle
1. Push the lance (9) into the trigger
gun (7). 2. When inserted turn it.

-4-
Caution: Make sure the lance (9) is properly fixed to the gun (7).
3. Attach the nozzles (10-15). Caution: When attaching the nozzle (10-15) the button (A) on the nozzle (10-15) should come out again. Check before activating the trigger that the nozzle (10-15) is properly fixed.
7.4 Water connection
IMPORTANT! Only use water without any impurities. If there is a risk of sand particles in the inlet water (i.e. from your own well), an additional filter should be mounted. 1. Let the water run through the water
hose before connecting it to the machine to prevent sand and dirt from penetrating the machine. Note: Check that the filter is fitted in the water inlet pipe and that it is not clogged up.
2. Connect the water hose to the water supply by means of the quick connector (inlet water, max. pressure: 10 bar, max. temperature: 40°C).
3. Turn on the water.
7.5 Start/stop of the machine
The trigger gun (7) and lance (9) is affected by a thrust during operation - therefore always hold it firmly with both hands.
IMPORTANT: Point the nozzle at the ground.
1. Check that the machine is in upright
position. NOTE: Do not place the machine in high grass!
2. Release the trigger lock (8) 3. Activate the trigger of the trigger
gun (7) and let the water run until all air has escaped from the water hose.
4. Press the Start/stop switch (4). 5. Activate the trigger of the trigger
gun (7). 6. Always adjust the distance and thus
the pressure of the nozzle to the surface, which is to be cleaned.
Do not cover the machine during operation or use it in a room without adequate ventilation!
NOTE: If the machine is left or not used for 5 minutes, it must be switched off on the start/stop switch (4) "O": 1. Press the start/stop switch (4) "O". 2. Disconnect the electrical plug (2)
from the socket. 3. Shut off the water supply and
activate the trigger of the trigger gun (7) to relieve the machine of pressure.
4. Lock the trigger gun (7). When releasing the trigger of the trigger gun (7), the machine automatically stops. The machine will
2
A
1
3
-5-
start again when you re-activate the trigger gun (7).
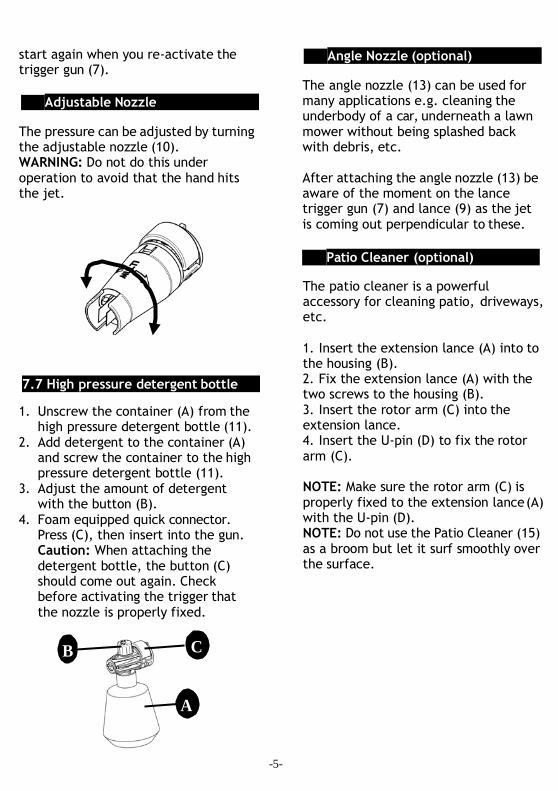
7.6 Adjustable Nozzle
The pressure can be adjusted by turning the adjustable nozzle (10). WARNING: Do not do this under operation to avoid that the hand hits the jet.
7.8 Angle Nozzle (optional)
The angle nozzle (13) can be used for many applications e.g. cleaning the underbody of a car, underneath a lawn mower without being splashed back with debris, etc.
After attaching the angle nozzle (13) be aware of the moment on the lance trigger gun (7) and lance (9) as the jet is coming out perpendicular to these.
7.9 Patio Cleaner (optional)
The patio cleaner is a powerful accessory for cleaning patio, driveways, etc.
7.7 High pressure detergent bottle
1. Unscrew the container (A) from the high pressure detergent bottle (11).
2. Add detergent to the container (A) and screw the container to the high pressure detergent bottle (11).
3. Adjust the amount of detergent with the button (B).
4. Foam equipped quick connector. Press (C), then insert into the gun. Caution: When attaching the detergent bottle, the button (C) should come out again. Check before activating the trigger that the nozzle is properly fixed.
1. Insert the extension lance (A) into to the housing (B). 2. Fix the extension lance (A) with the two screws to the housing (B). 3. Insert the rotor arm (C) into the extension lance. 4. Insert the U-pin (D) to fix the rotor arm (C).
NOTE: Make sure the rotor arm (C) is properly fixed to the extension lance (A) with the U-pin (D). NOTE: Do not use the Patio Cleaner (15) as a broom but let it surf smoothly over the surface.
B C
A

-6-
9. INSTRUCTIONS FOR USE
9.1 Use
The device is intended for private use only.
Clean machines, vehicles, buildings, tools, facades, terraces, garden tools etc. with the high-pressure water jet. If necessary you can use detergents. Please use detergents sparingly, noting the quantities recommended by the producer.
8. CONNECTION REQUIREMENTS
NOTE:The cleaning of motors/engines and other surfaces that may be covered with oil is only allowed in conjunction with an appropriate oil separator.
Do not clean any surfaces that may contain hazardous materials, such as asbestos.
8.1 Electrical connection
Only connect the machine to a properly installed safety socket. Before inserting the mains lead into the socket, check whether the voltage you intend to use complies with that of the machine.
8.2 Extension Lead
Only extension leads that are protected against water spray should be used with high mechanical strength and an internal diameter of at least
3 x 1.5mm2.
8.3 Water Connection
The electric pressure washer is suitable for connection to a standard domestic water supply. Please observe the regulations of your water supply company.
9.2 Water
If necessary, clean the supply water with a water filter, any impurities in the water could damage the pump.
Operating the high-pressure cleaner without water will damage the pump. Please ensure before switching on the cleaner that the water supply is available.
9.3 Bleeding the Device before Use
The device must be connected to the electricity and water supply
Unscrew the high-pressure hose (6) from the high-pressure connection of the device.
Switch on the device and allow it to run until the water coming out of
C D
B
A

-7-
the high-pressure connection no longer contains any bubbles.
Switch off the machine at the main switch(4) and screw the high-pressure hose (6) back on.
9.4 Cleaning Method
1. Spray the detergent sparingly on to the dry surface. Allow it to act for a short time without letting the detergent dry. 2. Rinse off the loosened dirt with the high-pressure jet.
9.5 Water Loss
It is normal for the pump to lose small quantities of water. If there is a sizeable leak, please contact our service department.
9.6 Protection against Damage
Please do not underestimate the pressure produced by the electric pressure washer. If you would like to clean sensitive surfaces it is better to use the fan jet. In the case of paints or insulated facades please begin at a considerable distance away. Move slowly close depending on the degree of soiling –to the object to be cleaned. Check the progress of you work at short intervals in order to prevent damage.
NOTE: Never point the high pressure jet at other people, animals, the device itself or electrical equipment!
10. AFTER USE INSTRUCTIONS
The machine should be stored in a frost-free room! Pump, hose and accessories should
always be emptied of water prior to storing as follows: 1. Stop the machine (press the start/stop switch (4) “O” and detach water hose, high pressure hose (6) and nozzle (10-15). 2. Restart the machine (4) and activate the trigger of the trigger gun (7). Let the machine run until no more water runs through the trigger gun (7) 3. Stop the machine, unplug and wind up hose and cable.
Should the machine by mistake be frozen, it will be necessary to check it for damage.
WARNING: Never start up a frozen machine. Frost damages are not covered by the guarantee!
WARNING: Always disconnect the electrical plug from the socket prior to maintenance or cleaning.
To ensure a long and problem free working life, please take the following advice:
Wash out water hose, high pressure hose, spray lance and accessories before mounting.
Clean the connectors of dust and sand.
Rinse the detergent spraying attachment after use.
Clean the nozzles.
Any repair should always be made in an authorized workshop with original spare parts.
11. MAINTENANCE, CLEANING AND
REPAIR
EN

-8-
11.1 Cleaning of inlet filter
Clean the water inlet filter regularly once a month or more frequently according to use.
Carefully loosen the filter with a screwdriver and clean it. Check that it is intact before re-mounting it.
The inlet filter must always be fitted inside the water inlet pipe to filter out sand, limestone and other impurities, as they will damage the pump valves.
CAUTION: Failure to fit the filter will invalidate the warranty
11.2 Cleaning of air vents
The machine should be kept clean so as to let cooling air pass freely through the machine vents.
11.3 Greasing of couplings
To ensure an easy connection and that o-rings do not dry up; the couplings should be greased regularly.
-9-
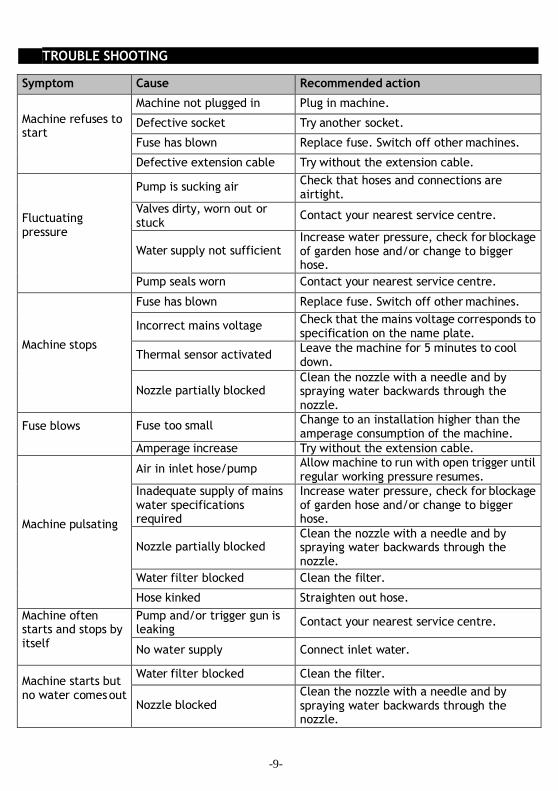
12. TROUBLE SHOOTING
Symptom Cause Recommended action
Machine refuses to start
Machine not plugged in Plug in machine.
Defective socket Try another socket.
Fuse has blown Replace fuse. Switch off other machines.
Defective extension cable Try without the extension cable.
Fluctuating pressure
Pump is sucking air Check that hoses and connections are airtight.
Valves dirty, worn out or stuck
Contact your nearest service centre.
Water supply not sufficient
Increase water pressure, check for blockage of garden hose and/or change to bigger hose.
Pump seals worn Contact your nearest service centre.
Machine stops
Fuse has blown Replace fuse. Switch off other machines.
Incorrect mains voltage Check that the mains voltage corresponds to specification on the name plate.
Thermal sensor activated Leave the machine for 5 minutes to cool down.
Nozzle partially blocked Clean the nozzle with a needle and by spraying water backwards through the nozzle.
Fuse blows Fuse too small Change to an installation higher than the amperage consumption of the machine.
Amperage increase Try without the extension cable.
Machine pulsating
Air in inlet hose/pump Allow machine to run with open trigger until regular working pressure resumes.
Inadequate supply of mains water specifications required
Increase water pressure, check for blockage of garden hose and/or change to bigger hose.
Nozzle partially blocked Clean the nozzle with a needle and by spraying water backwards through the nozzle.
Water filter blocked Clean the filter.
Hose kinked Straighten out hose.
Machine often starts and stops by itself
Pump and/or trigger gun is leaking
Contact your nearest service centre.
No water supply Connect inlet water.
Machine starts but no water comes out
Water filter blocked Clean the filter.
Nozzle blocked Clean the nozzle with a needle and by spraying water backwards through the nozzle.

-10-
13. WEEE - WASTE OF ELECTRIC AND ELECTRONIC EQUIPMENT
The symbol on the product or on its packing indicates that this product
may not be treated as household waste. Instead it shall be handed over to
the applicable collection point for the recycling of electrical and
electronic equipment. By ensuring this product is disposed of correctly,
you will help prevent potential negative consequences for the
environment and human health, which could otherwise be caused by inappropriate
waste handling of this product. For more detailed information about recycling of this
product, please contact your local city office, your household waste disposal service or
the shop where you purchased the product.
14. WARRANTY
This product is warranted for a 12 months period effective from the date of purchase
by the first user.
Damage and/or defects resulting from inappropriate use do not fall under the
warranty provisions.
We also disclaim all liability for any bodily injury resulting from inappropriate use of
the tool.
At the same time, no claim can be made on the warranty if the damage of the device
is the result of negligent maintenance or overload.
Definitely excluded from the warranty is damage resulting from fluid permeation,
excessive dust penetration, intentional damage (on purpose or by gross
carelessness), inappropriate usage (use for purposes for which the device is not
suitable), incompetent usage (e.g. not following the instructions given in the
manual), inexpert assembly, lightning strike, erroneous net voltage. This list is not
exhaustive.
Acceptance of claims under warranty can never lead to the prolongation of the
warranty period nor commencement of a new warranty period in case of a device
replacement.
We reserve the right to reject a claim whenever the purchase cannot be verified or
when it is clear that the product has not been properly maintained (Clean
ventilation slots, carbon brushes serviced regularly, etc.).

-11-
Any transportation costs shall always be borne by the customer, unless agreed
otherwise in writing.
You can always obtain more information by the email [email protected] or at
the number 888-899-1688.
Zhejiang Xinchang Bigyao Power Tool Co., Ltd
Head Office:
Mengjiatang Industrial Zone, Xinchang County, Zhejiang Province, China
USA Office: 101 wales avenue,Avon,MA 02322,United States Service Hotline: 888-899-1688 Email: [email protected]