EIGRP - cisco.com · Additional Guidelines AmaximumofoneEIGRPprocessissupported. Configure an EIGRP...
20
EIGRP This chapter describes how to configure the Cisco ASA to route data, perform authentication, and redistribute routing information using the Enhanced Interior Gateway Routing Protocol (EIGRP). • About EIGRP, on page 1 • Guidelines for EIGRP, on page 2 • Configure an EIGRP Process, on page 3 • Configure EIGRP, on page 3 • Customize EIGRP, on page 6 • Monitoring for EIGRP, on page 17 • History for EIGRP, on page 18 About EIGRP EIGRP is an enhanced version of IGRP developed by Cisco. Unlike IGRP and RIP, EIGRP does not send out periodic route updates. EIGRP updates are sent out only when the network topology changes. Key capabilities that distinguish EIGRP from other routing protocols include fast convergence, support for variable-length subnet mask, support for partial updates, and support for multiple network layer protocols. A router running EIGRP stores all the neighbor routing tables so that it can quickly adapt to alternate routes. If no appropriate route exists, EIGRP queries its neighbors to discover an alternate route. These queries propagate until an alternate route is found. Its support for variable-length subnet masks permits routes to be automatically summarized on a network number boundary. In addition, EIGRP can be configured to summarize on any bit boundary at any interface. EIGRP does not make periodic updates. Instead, it sends partial updates only when the metric for a route changes. Propagation of partial updates is automatically bounded so that only those routers that need the information are updated. As a result of these two capabilities, EIGRP consumes significantly less bandwidth than IGRP. Neighbor discovery is the process that the ASA uses to dynamically learn of other routers on directly attached networks. EIGRP routers send out multicast hello packets to announce their presence on the network. When the ASA receives a hello packet from a new neighbor, it sends its topology table to the neighbor with an initialization bit set. When the neighbor receives the topology update with the initialization bit set, the neighbor sends its topology table back to the ASA. The hello packets are sent out as multicast messages. No response is expected to a hello message. The exception to this is for statically defined neighbors. If you use the neighbor command, or configure the Hello Interval in ASDM, to configure a neighbor, the hello messages sent to that neighbor are sent as unicast messages. Routing updates and acknowledgements are sent out as unicast messages. EIGRP 1
Transcript of EIGRP - cisco.com · Additional Guidelines AmaximumofoneEIGRPprocessissupported. Configure an EIGRP...

EIGRP
This chapter describes how to configure the Cisco ASA to route data, perform authentication, and redistributerouting information using the Enhanced Interior Gateway Routing Protocol (EIGRP).
• About EIGRP, on page 1• Guidelines for EIGRP, on page 2• Configure an EIGRP Process, on page 3• Configure EIGRP, on page 3• Customize EIGRP, on page 6• Monitoring for EIGRP, on page 17• History for EIGRP, on page 18
About EIGRPEIGRP is an enhanced version of IGRP developed by Cisco. Unlike IGRP and RIP, EIGRP does not send outperiodic route updates. EIGRP updates are sent out only when the network topology changes. Key capabilitiesthat distinguish EIGRP from other routing protocols include fast convergence, support for variable-lengthsubnet mask, support for partial updates, and support for multiple network layer protocols.
A router running EIGRP stores all the neighbor routing tables so that it can quickly adapt to alternate routes.If no appropriate route exists, EIGRP queries its neighbors to discover an alternate route. These queriespropagate until an alternate route is found. Its support for variable-length subnet masks permits routes to beautomatically summarized on a network number boundary. In addition, EIGRP can be configured to summarizeon any bit boundary at any interface. EIGRP does not make periodic updates. Instead, it sends partial updatesonly when the metric for a route changes. Propagation of partial updates is automatically bounded so that onlythose routers that need the information are updated. As a result of these two capabilities, EIGRP consumessignificantly less bandwidth than IGRP.
Neighbor discovery is the process that the ASA uses to dynamically learn of other routers on directly attachednetworks. EIGRP routers send out multicast hello packets to announce their presence on the network. Whenthe ASA receives a hello packet from a new neighbor, it sends its topology table to the neighbor with aninitialization bit set. When the neighbor receives the topology update with the initialization bit set, the neighborsends its topology table back to the ASA.
The hello packets are sent out as multicast messages. No response is expected to a hello message. The exceptionto this is for statically defined neighbors. If you use the neighbor command, or configure the Hello Intervalin ASDM, to configure a neighbor, the hello messages sent to that neighbor are sent as unicast messages.Routing updates and acknowledgements are sent out as unicast messages.
EIGRP1

Once this neighbor relationship is established, routing updates are not exchanged unless there is a change inthe network topology. The neighbor relationship is maintained through the hello packets. Each hello packetreceived from a neighbor includes a hold time. This is the time in which the ASA can expect to receive a hellopacket from that neighbor. If the ASA does not receive a hello packet from that neighbor within the hold timeadvertised by that neighbor, the ASA considers that neighbor to be unavailable.
The EIGRP protocol uses four key algorithm technologies, four key technologies, including neighbordiscovery/recovery, Reliable Transport Protocol (RTP), and DUAL, which is important for route computations.DUAL saves all routes to a destination in the topology table, not just the least-cost route. The least-cost routeis inserted into the routing table. The other routes remain in the topology table. If the main route fails, anotherroute is chosen from the feasible successors. A successor is a neighboring router used for packet forwardingthat has a least-cost path to a destination. The feasibility calculation guarantees that the path is not part of arouting loop.
If a feasible successor is not found in the topology table, a route recomputation must occur. During routerecomputation, DUAL queries the EIGRP neighbors for a route, who in turn query their neighbors. Routersthat do no have a feasible successor for the route return an unreachable message.
During route recomputation, DUAL marks the route as active. By default, the ASA waits for three minutesto receive a response from its neighbors. If the ASA does not receive a response from a neighbor, the routeis marked as stuck-in-active. All routes in the topology table that point to the unresponsive neighbor as afeasibility successor are removed.
EIGRP neighbor relationships are not supported through the IPsec tunnel without a GRE tunnel.Note
Guidelines for EIGRPFirewall Mode Guidelines
Supported only in routed firewall mode. Transparent firewall mode is not supported.
Cluster Guidelines
EIGRP does not form neighbor relationships with cluster peers in individual interface mode.
IPv6 Guidelines
Does not support IPv6.
Context Guidelines
• EIGRP instances cannot form adjacencies with each other across shared interfaces because, by default,inter-context exchange of multicast traffic is not supported across shared interfaces. However, you canuse the static neighbor configuration under EIGRP process configuration under EIGRP process to bringup EIGRP neighbourship on a shared interface.
• Inter-context EIGRP on separate interfaces is supported.
EIGRP2
EIGRPGuidelines for EIGRP

Additional Guidelines
A maximum of one EIGRP process is supported.
Configure an EIGRP ProcessProcedure
Step 1 In the main ASDM window, choose Configuration > Device Setup > Routing > EIGRP.Step 2 Enable the EIGRP routing process by checking the Enable this EIGRP process check box on the Process
Instances tab. See Enable EIGRP, on page 3 or Enable EIGRP Stub Routing, on page 4.Step 3 Define the networks and interfaces that will participate in EIGRP routing on the Setup > Networks tab. See
Define a Network for an EIGRP Routing Process, on page 6 for more information.Step 4 (Optional) Define route filters on the Filter Rules pane. Route filtering provides more control over the routes
that are allowed to be sent or received in EIGRP updates. See Filter Networks in EIGRP, on page 13 for moreinformation.
Step 5 (Optional) Define route redistribution in the Redistribution pane.
You can redistribute routes discovered by RIP andOSPF to the EIGRP routing process. You can also redistributestatic and connected routes to the EIGRP routing process. See Redistribute Routes Into EIGRP, on page 11for more information.
Step 6 (Optional) Define static EIGRP neighbors on the Static Neighbor pane.
See Define an EIGRP Neighbor, on page 10 for more information.
Step 7 (Optional) Define summary addresses on the Summary Address pane.
See Configure the Summary Aggregate Addresses on Interfaces, on page 8 for more information aboutdefining summary addresses.
Step 8 (Optional) Define interface-specific EIGRP parameters on the Interfaces pane. These parameters includeEIGRP message authentication, hold time, hello interval, delay metric, and the use of split-horizon. SeeConfigure Interfaces for EIGRP, on page 6 for more information.
Step 9 (Optional) Control the sending and receiving of default route information in EIGRP updates on the DefaultInformation pane. By default, default routes are sent and accepted. See Configure Default Information inEIGRP, on page 15 for more information.
Configure EIGRPThis section describes how to enable the EIGRP process on your system. After you have enabled EIGRP, seethe following sections to learn how to customize the EIGRP process on your system.
Enable EIGRPYou can only enable one EIGRP routing process on the ASA.
EIGRP3
EIGRPConfigure an EIGRP Process
Procedure
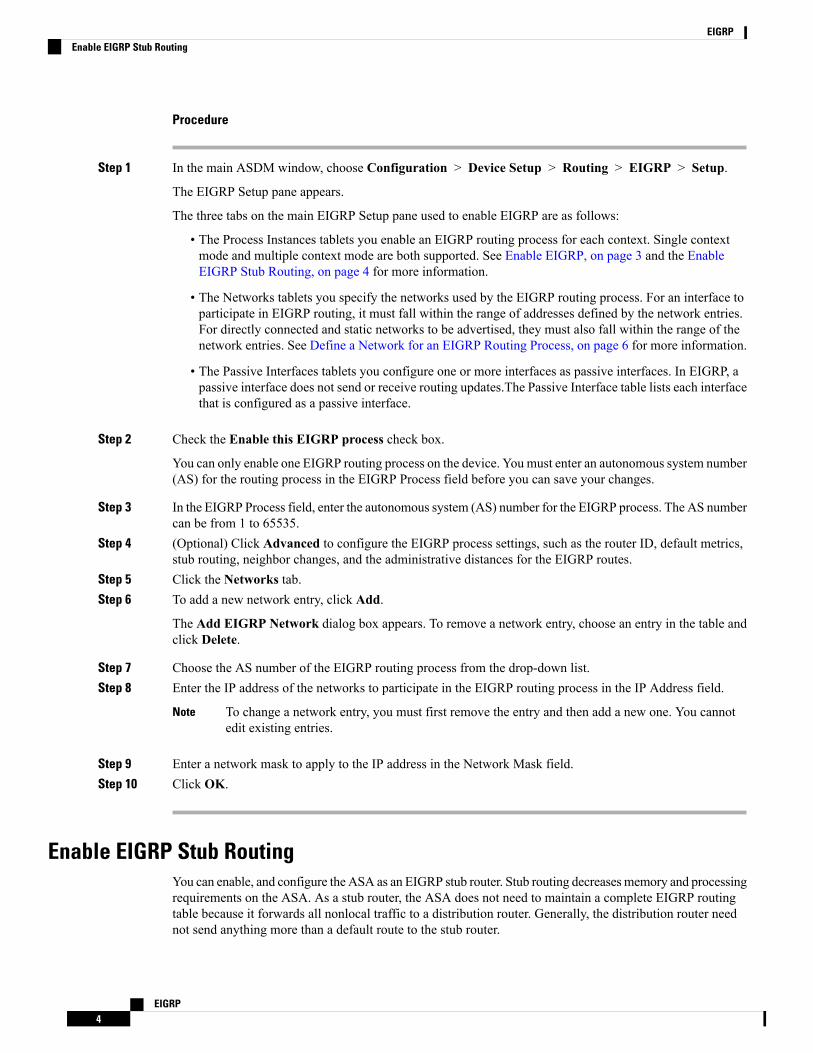
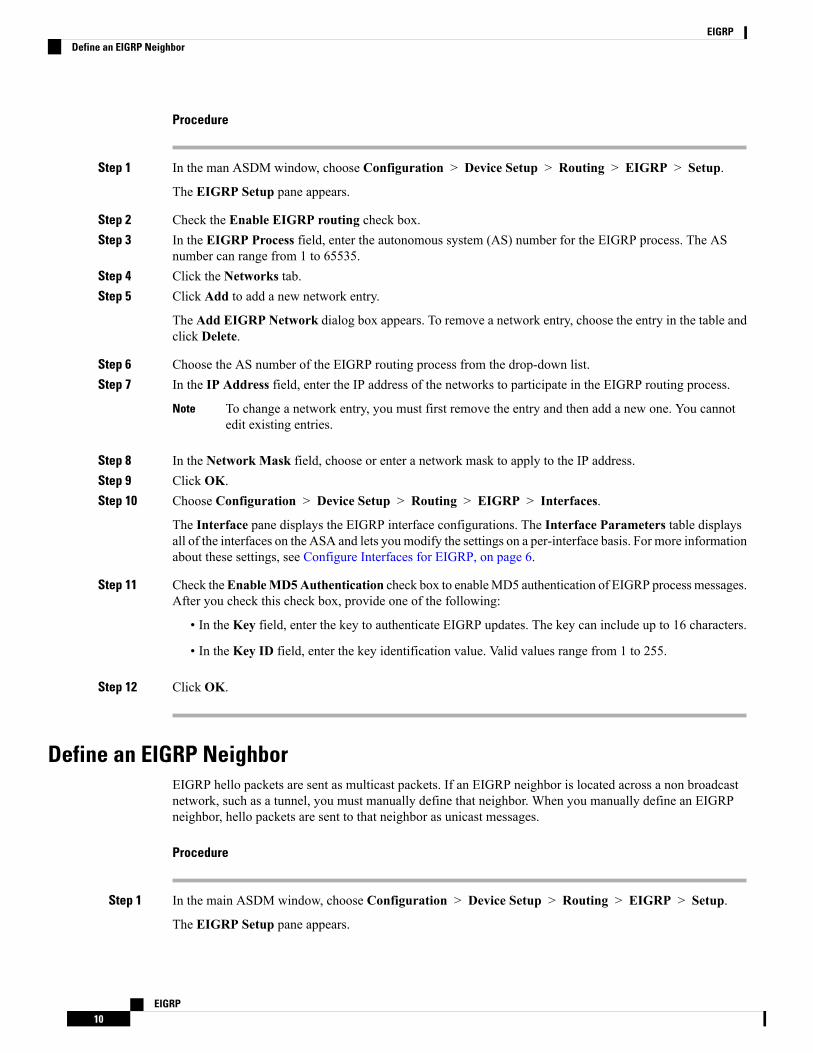
Step 1 In the main ASDM window, choose Configuration > Device Setup > Routing > EIGRP > Setup.
The EIGRP Setup pane appears.
The three tabs on the main EIGRP Setup pane used to enable EIGRP are as follows:
• The Process Instances tablets you enable an EIGRP routing process for each context. Single contextmode and multiple context mode are both supported. See Enable EIGRP, on page 3 and the EnableEIGRP Stub Routing, on page 4 for more information.
• The Networks tablets you specify the networks used by the EIGRP routing process. For an interface toparticipate in EIGRP routing, it must fall within the range of addresses defined by the network entries.For directly connected and static networks to be advertised, they must also fall within the range of thenetwork entries. See Define a Network for an EIGRP Routing Process, on page 6 for more information.
• The Passive Interfaces tablets you configure one or more interfaces as passive interfaces. In EIGRP, apassive interface does not send or receive routing updates.The Passive Interface table lists each interfacethat is configured as a passive interface.
Step 2 Check the Enable this EIGRP process check box.
You can only enable one EIGRP routing process on the device. You must enter an autonomous system number(AS) for the routing process in the EIGRP Process field before you can save your changes.
Step 3 In the EIGRP Process field, enter the autonomous system (AS) number for the EIGRP process. The AS numbercan be from 1 to 65535.
Step 4 (Optional) Click Advanced to configure the EIGRP process settings, such as the router ID, default metrics,stub routing, neighbor changes, and the administrative distances for the EIGRP routes.
Step 5 Click the Networks tab.Step 6 To add a new network entry, click Add.
The Add EIGRP Network dialog box appears. To remove a network entry, choose an entry in the table andclick Delete.
Step 7 Choose the AS number of the EIGRP routing process from the drop-down list.Step 8 Enter the IP address of the networks to participate in the EIGRP routing process in the IP Address field.
To change a network entry, you must first remove the entry and then add a new one. You cannotedit existing entries.
Note
Step 9 Enter a network mask to apply to the IP address in the Network Mask field.Step 10 Click OK.
Enable EIGRP Stub RoutingYou can enable, and configure the ASA as an EIGRP stub router. Stub routing decreasesmemory and processingrequirements on the ASA. As a stub router, the ASA does not need to maintain a complete EIGRP routingtable because it forwards all nonlocal traffic to a distribution router. Generally, the distribution router neednot send anything more than a default route to the stub router.
EIGRP4
EIGRPEnable EIGRP Stub Routing

Only specified routes are propagated from the stub router to the distribution router. As a stub router, the ASAresponds to all queries for summaries, connected routes, redistributed static routes, external routes, and internalroutes with the message “inaccessible.” When the ASA is configured as a stub, it sends a special peerinformation packet to all neighboring routers to report its status as a stub router. Any neighbor that receivesa packet informing it of the stub status will not query the stub router for any routes, and a router that has astub peer will not query that peer. The stub router depends on the distribution router to send the correct updatesto all peers.
Procedure
Step 1 In the main ASDM window, choose Configuration > Device Setup > Routing > EIGRP > Setup.
The EIGRP Setup pane appears.
Step 2 Check the Enable EIGRP routing check box.Step 3 In the EIGRP Process field, enter the autonomous system (AS) number for the EIGRP process. The AS
number can be from 1 to 65535.Step 4 Click Advanced to configure the EIGRP stub routing process.
The Edit EIGRP Process Advanced Properties dialog box appears.
Step 5 In the Stub area on the Edit EIGRP Process Advanced Properties dialog box, choose one or more of thefollowing EIGRP stub routing processes:
• Stub Receive only—Configures the EIGRP stub routing process to receive route information from theneighbor routers but does not send route information to the neighbors. If this option is selected, youcannot select any of the other stub routing options.
• Stub Connected—Advertises connected routes.
• Stub Static—Advertises static routes.
• Stub Redistributed—Advertises redistributed routes.
• Stub Summary—Advertises summary routes.
Step 6 Click OK.Step 7 Click the Networks tab.Step 8 Click Add to add a new network entry.
The Add EIGRP Network dialog box appears. To remove a network entry, choose the entry in the table andclick Delete.
Step 9 Choose the AS number of the EIGRP routing process from the drop-down list.Step 10 Enter the IP address of the networks to participate in the EIGRP routing process in the IP Address field.
To change a network entry, you must first remove the entry and then add a new one. You cannotedit existing entries.
Note
Step 11 Enter a network mask to apply to the IP address in the Network Mask field.Step 12 Click OK.
EIGRP5
EIGRPEnable EIGRP Stub Routing

Customize EIGRPThis section describes how to customize the EIGRP routing.
Define a Network for an EIGRP Routing ProcessThe Network table lets you specify the networks used by the EIGRP routing process. For an interface toparticipate in EIGRP routing, it must fall within the range of addresses defined by the network entries. Fordirectly connected and static networks to be advertised, they must also fall within the range of the networkentries.
The Network table displays the networks configured for the EIGRP routing process. Each row of the tabledisplays the network address and associated mask configured for the specified EIGRP routing process.
Procedure
Step 1 In the main ASDM window, choose Configuration > Device Setup > Routing > EIGRP > Setup.
The EIGRP Setup pane appears.
Step 2 Check the Enable EIGRP routing check box.Step 3 In the EIGRP Process field, enter the autonomous system (AS) number for the EIGRP process. The AS
number can be from 1 to 65535.Step 4 Click the Networks tab.Step 5 Click Add to add a new network entry.
The Add EIGRP Network dialog box appears. To remove a network entry, choose the entry in the table andclick Delete.
Step 6 Choose the AS number of the EIGRP routing process from the drop-down list.Step 7 Enter the IP address of the networks to participate in the EIGRP routing process in the IP Address field.
To change a network entry, you must first remove the entry and then add a new one. You cannotedit existing entries.
Note
Step 8 Enter a network mask to apply to the IP address in the Network Mask field.Step 9 Click OK.
Configure Interfaces for EIGRPIf you have an interface that you do not want to have participate in EIGRP routing, but that is attached to anetwork that you want advertised, you can configure the ASA that includes the network to which the interfaceis attached, and prevent that interface from sending or receiving EIGRP updates.
EIGRP6
EIGRPCustomize EIGRP

Procedure
Step 1 In the main ASDM window, choose Configuration > Device Setup > Routing > EIGRP > Setup.
The EIGRP Setup pane appears.
Step 2 Check the Enable EIGRP routing check box.Step 3 Click OK.Step 4 Choose Configuration > Device Setup > Routing > EIGRP > Interfaces.
The Interface pane appears and displays the EIGRP interface configurations. The Interface Parameterstable displays all of the interfaces on the ASA and lets you modify the following settings on a per-interfacebasis:
• Authentication key and mode.
• The EIGRP hello interval and hold time.
• The interface delay metric used in EIGRP metric calculations.
• The use of split-horizon on the interface.
Step 5 Choose an interface entry by double-clicking an interface entry, or choose the entry and click Edit.
The Edit EIGRP Interface Entry dialog box appears.
Step 6 In the EIGRP Process field, enter the AS number for the EIGRP process. The AS number can range from 1to 65535.
Step 7 In the Hello Interval field, enter the interval between EIGRP hello packets sent on an interface.
Valid values range from 1 to 65535 seconds. The default value is 5 seconds.
Step 8 In the Hold Time field, enter the hold time, in seconds. Valid values range from 1 to 65535 seconds. Thedefault value is 15 seconds.
Step 9 Check the Enable check box for Split Horizon.Step 10 In the Delay field, enter the delay value. The delay time is in tens of microseconds. Valid values range from
1 to 16777215.Step 11 Check theEnableMD5Authentication check box to enableMD5 authentication of EIGRP process messages.Step 12 Enter the Key or Key ID values.
• In the Key field, enter the key to authenticate EIGRP updates. The key can contain up to 16 characters.
• In the Key ID field, enter the key identification value. Valid values range from 1 to 255.
Step 13 Click OK.
Configure Passive InterfacesYou can configure one or more interfaces as passive interfaces. In EIGRP, a passive interface does not sendor receive routing updates. In ASDM, the Passive Interface table lists each interface that is configured as apassive interface.
EIGRP7
EIGRPConfigure Passive Interfaces

Procedure
Step 1 In the main ASDM window, choose Configuration > Device Setup > Routing > EIGRP > Setup.
The EIGRP Setup pane appears.
Step 2 Check the Enable EIGRP routing check box.Step 3 Click OK.Step 4 Click the Passive Interfaces tab.Step 5 Choose the interface that you want to configure from the drop-down list.Step 6 Check the Suppress routing updates on all interfaces check box to specify all interfaces as passive. Even
if an interface is not shown in the Passive Interface table, it will be configured as passive when the check boxis checked.
Step 7 Click Add to add a passive interface entry.
The Add EIGRP Passive Interface dialog box appears. Choose the interface that you want to make passiveand click Add. To remove a passive interface, choose the interface in the table and click Delete.
Step 8 Click OK.
Configure the Summary Aggregate Addresses on InterfacesYou can configure a summary addresses on a per-interface basis. You need to manually define summaryaddresses if you want to create summary addresses that do not occur at a network number boundary or if youwant to use summary addresses on an ASAwith automatic route summarization disabled. If any more specificroutes are in the routing table, EIGRPwill advertise the summary address out the interface with a metric equalto the minimum of all more specific routes.
Procedure
Step 1 In the main ASDM window, choose Configuration > Device Setup > Routing > EIGRP > Interfaces.
The Interface pane shows the EIGRP interface configurations. The Interface Parameters table shows all ofthe interfaces on the ASA and lets you modify the settings on a per-interface basis. For more informationabout these settings, see Configure Interfaces for EIGRP, on page 6.
Step 2 To configure the EIGRP parameters for an interface, double-click an interface entry or select the entry andclick Edit.
Step 3 Click OK.Step 4 Choose Configuration > Device Setup > Routing > EIGRP > Summary Address.
The SummaryAddress pane displays a table of the statically-defined EIGRP summary addresses. By default,EIGRP summarizes subnet routes to the network level. You can create statically defined EIGRP summaryaddresses to the subnet level from the Summary Address pane.
Step 5 ClickAdd to add a new EIGRP summary address, or to clickEdit to edit an existing EIGRP summary addressin the table.
EIGRP8
EIGRPConfigure the Summary Aggregate Addresses on Interfaces

The Add Summary Address or Edit Summary Address dialog box appears. You can also double-click anentry in the table to edit that entry.
Step 6 In the EIGRP Process field, enter the autonomous system (AS) number for the EIGRP process. The ASnumber can be from 1 to 65535.
Step 7 In the Interface drop-down list, choose the interface from which the summary address is advertised.Step 8 In the IP Address field, enter the IP address of the summary route.Step 9 In the Netmask field, choose or enter the network mask to apply to the IP address.Step 10 Enter the administrative distance for the route in the Administrative Distance field. If left blank, the route
has the default administrative distance of 5.Step 11 Click OK.
Change the Interface Delay ValueThe interface delay value is used in EIGRP distance calculations. You can modify this value on a per-interfacebasis.
Procedure
Step 1 In the main ASDM window, choose Configuration > Device Setup > Routing > EIGRP > Interfaces.
The Interface pane shows the EIGRP interface configurations. The Interface Parameters table shows all ofthe interfaces on the ASA and lets you modify the settings on a per-interface basis. For more informationabout these settings, see Configure Interfaces for EIGRP, on page 6.
Step 2 Double-click an interface entry or choose the Interface entry and click Edit to configure the delay value inthe EIGRP parameters for an interface.
The Edit EIGRP Interface Entry dialog box appears.
Step 3 In theDelay field, enter the delay time, which is in tens of microseconds. Valid values are from 1 to 16777215.Step 4 Click OK.
Enable EIGRP Authentication on an InterfaceEIGRP route authentication providesMD5 authentication of routing updates from the EIGRP routing protocol.The MD5 keyed digest in each EIGRP packet prevents the introduction of unauthorized or false routingmessages from unapproved sources.
EIGRP route authentication is configured on a per-interface basis. All EIGRP neighbors on interfaces configuredfor EIGRP message authentication must be configured with the same authentication mode and key foradjacencies to be established.
Before you can enable EIGRP route authentication, you must enable EIGRP.Note
EIGRP9
EIGRPChange the Interface Delay Value
Procedure
Step 1 In the man ASDM window, choose Configuration > Device Setup > Routing > EIGRP > Setup.
The EIGRP Setup pane appears.
Step 2 Check the Enable EIGRP routing check box.Step 3 In the EIGRP Process field, enter the autonomous system (AS) number for the EIGRP process. The AS
number can range from 1 to 65535.Step 4 Click the Networks tab.Step 5 Click Add to add a new network entry.
The Add EIGRP Network dialog box appears. To remove a network entry, choose the entry in the table andclick Delete.
Step 6 Choose the AS number of the EIGRP routing process from the drop-down list.Step 7 In the IP Address field, enter the IP address of the networks to participate in the EIGRP routing process.
To change a network entry, you must first remove the entry and then add a new one. You cannotedit existing entries.
Note
Step 8 In the Network Mask field, choose or enter a network mask to apply to the IP address.Step 9 Click OK.Step 10 Choose Configuration > Device Setup > Routing > EIGRP > Interfaces.
The Interface pane displays the EIGRP interface configurations. The Interface Parameters table displaysall of the interfaces on the ASA and lets you modify the settings on a per-interface basis. For more informationabout these settings, see Configure Interfaces for EIGRP, on page 6.
Step 11 Check theEnableMD5Authentication check box to enableMD5 authentication of EIGRP process messages.After you check this check box, provide one of the following:
• In the Key field, enter the key to authenticate EIGRP updates. The key can include up to 16 characters.
• In the Key ID field, enter the key identification value. Valid values range from 1 to 255.
Step 12 Click OK.
Define an EIGRP NeighborEIGRP hello packets are sent as multicast packets. If an EIGRP neighbor is located across a non broadcastnetwork, such as a tunnel, you must manually define that neighbor. When you manually define an EIGRPneighbor, hello packets are sent to that neighbor as unicast messages.
Procedure
Step 1 In the main ASDM window, choose Configuration > Device Setup > Routing > EIGRP > Setup.
The EIGRP Setup pane appears.
EIGRP10
EIGRPDefine an EIGRP Neighbor

Step 2 Check the Enable EIGRP routing check box.Step 3 In the EIGRP Process field, enter the AS number for the EIGRP process. The AS number can range from 1
to 65535.Step 4 Choose Configuration > Device Setup > Routing > EIGRP > Static Neighbor.
The Static Neighbor pane appears and displays the statically-defined EIGRP neighbors. An EIGRP neighborsends EIGRP routing information to and receives EIGRP routing information from the ASA. Normally,neighbors are dynamically discovered through the neighbor discovery process. However, on point-to-point,nonbroadcast networks, you must statically define the neighbors.
Each row of the Static Neighbor table displays the EIGRP autonomous system number for the neighbor, theneighbor IP address, and the interface through which the neighbor is available.
From the Static Neighbor pane, you can add or edit a static neighbor.
Step 5 Click Add or Edit to add or edit a EIGRP static neighbor.
The Add or Edit EIGRP Neighbor Entry dialog box appears.
Step 6 Choose the EIGRP AS number from the drop-down list for the EIGRP process for which the neighbor isbeing configured.
Step 7 Choose the Interface Name from the Interface Name drop-down list, which is the interface through whichthe neighbor is available.
Step 8 Enter the IP address of the neighbor in the Neighbor IP Address field.Step 9 Click OK.
Redistribute Routes Into EIGRPYou can redistribute routes discovered by RIP and OSPF into the EIGRP routing process. You can alsoredistribute static and connected routes into the EIGRP routing process. You do not need to redistributeconnected routes if they fall within the range of a network statement in the EIGRP configuration.
For RIP only: Before you begin this procedure, you must create a route map to further define which routesfrom the specified routing protocol are redistributed in to the RIP routing process.
Note
Procedure
Step 1 In the main ASDM window, choose Configuration > Device Setup > Routing > EIGRP > Setup.
The EIGRP Setup pane appears.
Step 2 Check the Enable EIGRP routing check box.Step 3 In the EIGRP Process field, enter the AS number for the EIGRP process. The AS number can range from 1
to 65535.Step 4 Choose Configuration > Device Setup > Routing > EIGRP > Redistribution.
EIGRP11
EIGRPRedistribute Routes Into EIGRP

TheRedistribution pane displays the rules for redistributing routes from other routing protocols to the EIGRProuting process. When redistributing static and connected routes to the EIGRP routing process, metrics arenot required to be configured, although this is recommended. Each row of the Redistribution pane tableincludes a route redistribution entry.
Step 5 Click Add to add a new redistribution rule. If you are editing an existing redistribution rule, go to Step 6.
The Add EIGRP Redistribution Entry dialog box appears.
Step 6 Choose the address in the table and click Edit to edit an existing EIGRP static neighbor, You can alsodouble-click an entry in the table to edit that entry.
The Edit EIGRP Redistribution Entry dialog box appears.
Step 7 Choose the AS number of the EIGRP routing process to which the entry applies from the drop-down list.Step 8 In the Protocol area, click the radio button next to one of the following protocols for the routing process:
• Static to redistribute static routes to the EIGRP routing process. Static routes that fall within the scopeof a network statement are automatically redistributed into EIGRP; you do not need to define aredistribution rule for them.
• Connected to redistribute connected routes into the EIGRP routing process. Connected routes that fallwithin the scope of a network statement are automatically redistributed into EIGRP; you do not need todefine a redistribution rule for them.
• RIP to redistributes routes discovered by the RIP routing process to EIGRP.
• OSPF to redistribute routes discovered by the OSPF routing process to EIGRP.
Step 9 In the Optional Metrics area, choose one of the following metrics used for the redistributed route:
• Bandwidth, which is the EIGRP bandwidth metric in kilobits per second. Valid values range from 1 to4294967295.
• Delay, which is the EIGRP delay metric, in 10-microsecond units. Valid values range from 0 to4294967295.
• Reliability, which is the EIGRP reliability metric. Valid values range from 0 to 255; 255 indicates 100percent reliability.
• Loading, which is the EIGRP effective bandwidth (loading) metric. Valid values range from 1 to 255;255 indicates 100 percent loaded.
• MTU, which is the MTU of the path. Valid values range from 1 to 65535.
Step 10 Choose the route map from the Route Map drop-down list to define which routes are redistributed into theEIGRP routing process. For more details about how to configure a route map, see Route Maps.
Step 11 In theOptional OSPF Redistribution area, click one of the following OSPF radio buttons to further specifywhich OSPF routes are redistributed into the EIGRP routing process:
• Match Internal to match routes internal to the specified OSPF process.
• Match External 1 to match type 1 routes external to the specified OSPF process.
• Match External 2 to match type 2 routes external to the specified OSPF process.
• Match NSSA-External 1 to match type 1 routes external to the specified OSPF NSSA.
EIGRP12
EIGRPRedistribute Routes Into EIGRP

• Match NSSA-External 2 to match type 2 routes external to the specified OSPF NSSA.
Step 12 Click OK.
Filter Networks in EIGRP
Before you begin this process, you must create a standard ACL that defines the routes that you want toadvertise. That is, create a standard ACL that defines the routes that you want to filter from sending or receivingupdates.
Note
Procedure
Step 1 In the main ASDM window, choose Configuration > Device Setup > Routing > EIGRP > Setup.
The EIGRP Setup pane appears.
Step 2 Check the Enable EIGRP routing check box.Step 3 In the EIGRP Process field, enter the AS number for the EIGRP process. The AS number can range from 1
to 65535.Step 4 Choose Configuration > Device Setup > Routing > EIGRP > Filter Rules.
The Filter Rules pane appears and displays the route filtering rules configured for the EIGRP routing process.Filter rules let you control which routes are accepted or advertised by the EIGRP routing process.
Each row of the Filter Rule table describes a filter rule for a specific interface or routing protocol. For example,a filter rule with a direction of in on the outside interface would apply filtering to any EIGRP updates receivedon the outside interface. A filter rule with a direction of out with OSPF 10 specified as the routing protocolwould apply the filter rules to routes redistributed into the EIGRP routing process in outbound EIGRP updates.
Step 5 Click Add to add a filter rule. If you are editing an already existing filter rule, skip to Step 6.
The Add Filter Rules dialog box appears.
Step 6 To edit a filter rule, choose the filter rule in the table and click Edit.
The Edit Filter Rules dialog box appears. You can also double-click a filter rule to edit the rule. To removea filter rule, choose the filter rule in the table and click Delete.
Step 7 Choose the AS number from the drop-down list of the EIGRP routing process to which the entry applies.Step 8 Choose the direction of the filter routes from the drop-down list.
Choose in for rules that filter routes from incoming EIGRP routing updates. Choose out to filter routes fromEIGRP routing updates that are sent by the ASA.
If you choose out, the Routing process field becomes active. Choose the type of route to be filtered. You canfilter routes redistributed from static, connected, RIP, and OSPF routing processes. Filters that specify arouting process filter those routes from updates sent on all interfaces.
Step 9 Enter the OSPF process ID in the ID field.
EIGRP13
EIGRPFilter Networks in EIGRP
Step 10 Click the Interface radio button and choose the interface to which the filter applies.Step 11 Click Add or Edit to define an ACL for the filter rule. Clicking Edit opens the Network Rule dialog box for
the selected network rule.Step 12 In the Action drop-down list, choose Permit to allow the specified network to be advertised; choose Deny
to prevent the specified network from being advertised.Step 13 In the IP Address field, type IP address of the network being permitted or denied. To permit or deny all
addresses, use the IP address 0.0.0.0 with a network mask of 0.0.0.0.Step 14 From the Netmask drop-down list, choose the network mask applied to the network IP address. You can type
a network mask into this field or select one of the common masks from the list.Step 15 Click OK.
Customize the EIGRP Hello Interval and Hold TimeThe ASA periodically sends hello packets to discover neighbors and to learn when neighbors becomeunreachable or inoperative. By default, hello packets are sent every 5 seconds.
The hello packet advertises the ASA hold time. The hold time indicates to EIGRP neighbors the length oftime the neighbor should consider the ASA reachable. If the neighbor does not receive a hello packet withinthe advertised hold time, then the ASA is considered unreachable. By default, the advertised hold time is 15seconds (three times the hello interval).
Both the hello interval and the advertised hold time are configured on a per-interface basis. We recommendsetting the hold time to be at minimum three times the hello interval.
Procedure
Step 1 In the main ASDM window, choose Configuration > Device Setup > Routing > EIGRP > Setup.
The EIGRP Setup pane appears.
Step 2 Check the Enable EIGRP routing check box.Step 3 Click OK.Step 4 Choose Configuration > Device Setup > Routing > EIGRP > Interfaces.
The Interface pane appears and displays all of the EIGRP interface configurations.
Step 5 Double-click an interface entry or choose the entry and click Edit.
The Edit EIGRP Interface Entry dialog box appears.
Step 6 Choose the EIGRP AS number from the drop-down list, which is populated from system numbers that wereset up when you enabled the EIGRP routing process.
Step 7 In the Hello Interval field, enter the interval between EIGRP hello packets sent on an interface.
Valid values range from 1 to 65535 seconds. The default value is 5 seconds.
Step 8 In the Hold Time field, specify the hold time, in seconds.
Valid values range from 1 to 65535 seconds. The default value is 15 seconds.
EIGRP14
EIGRPCustomize the EIGRP Hello Interval and Hold Time

Step 9 Click OK.
Disable Automatic Route SummarizationAutomatic route summarization is enabled by default. The EIGRP routing process summarizes on networknumber boundaries. This can cause routing problems if you have noncontiguous networks.
For example, if you have a router with the networks 192.168.1.0, 192.168.2.0, and 192.168.3.0 connected toit, and those networks all participate in EIGRP, the EIGRP routing process creates the summary address192.168.0.0 for those routes. If an additional router is added to the network with the networks 192.168.10.0and 192.168.11.0, and those networks participate in EIGRP, they will also be summarized as 192.168.0.0. Toprevent the possibility of traffic being routed to the wrong location, you should disable automatic routesummarization on the routers creating the conflicting summary addresses.
Procedure
Step 1 In the main ASDM window, choose Configuration > Device Setup > Routing > EIGRP > Setup.
The EIGRP Setup pane appears.
Step 2 Check the Enable EIGRP routing check box.Step 3 Click the Process Instance tab.Step 4 Click Advanced.Step 5 In the Summary area, uncheck the Auto-Summary check box.
This setting is enabled by default.Note
Step 6 Click OK.
Configure Default Information in EIGRPYou can control the sending and receiving of default route information in EIGRP updates. By default, defaultroutes are sent and accepted. Configuring the ASA to disallow default information to be received causes thecandidate default route bit to be blocked on received routes. Configuring the ASA to disallow defaultinformation to be sent disables the setting of the default route bit in advertised routes.
In ASDM, the Default Information pane displays a table of rules for controlling the sending and receiving ofdefault route information in EIGRP updates. You can have one in and one out rule for each EIGRP routingprocess (only one process is currently supported).
By default, default routes are sent and accepted. To restrict or disable the sending and receiving of defaultroute information, perform the following steps:
Procedure
Step 1 In the main ASDM window, choose Configuration > Device Setup > Routing > EIGRP > Setup.
EIGRP15
EIGRPDisable Automatic Route Summarization

The main EIGRP Setup pane appears.
Step 2 Check the Enable EIGRP routing check box.Step 3 Click OK.Step 4 Do one of the following:
• Click Add to create a new entry.
• To edit an entry, double-click the entry in the table or select an entry in the table and click Edit.
The Add Default Information or Edit Default Information dialog box appears for that entry. TheEIGRP AS number is automatically selected in the EIGRP field.
Step 5 In the Direction field, choose the direction for the rule from the following options:
• in—The rule filters default route information from incoming EIGRP updates.
• out—The rule filters default route information from outgoing EIGRP updates.
You can have one in rule and one out rule for each EIGRP process.
Step 6 Add network rules to the network rule table. The network rules define which networks are allowed and whichare not when receiving or sending default route information. Repeat the following steps for each network ruleyou are adding to the default information filter rule.a) Click Add to add a network rule. Double-click an existing network rule to edit the rule.b) In the Action field, click Permit to allow the network or Deny to block the network.c) Enter the IP address and network mask of the network being permitted or denied by the rule in the IP
Address and Network Mask fields.
To deny all default route information from being accepted or sent, enter 0.0.0.0 as the network addressand choose 0.0.0.0 as the network mask.
d) Click OK to add the specified network rule to the default information filter rule.
Step 7 Click OK to accept the default information filter rule.
Disable EIGRP Split HorizonSplit horizon controls the sending of EIGRP update and query packets. When split horizon is enabled on aninterface, update and query packets are not sent for destinations for which this interface is the next hop.Controlling update and query packets in this manner reduces the possibility of routing loops.
By default, split horizon is enabled on all interfaces.
Split horizon blocks route information from being advertised by a router out of any interface from which thatinformation originated. This behavior usually optimizes communications among multiple routing devices,particularly when links are broken. However, with nonbroadcast networks, there may be situations where thisbehavior is not desired. For these situations, including networks in which you have EIGRP configured, youmay want to disable split horizon.
If you disable split horizon on an interface, you must disable it for all routers and access servers on thatinterface.
To disable EIGRP split horizon, perform the following steps:
EIGRP16
EIGRPDisable EIGRP Split Horizon

Procedure
Step 1 In the main ASDM window, choose Configuration > Device Setup > Routing > EIGRP > Interfaces.
The Interface pane appears and displays the EIGRP interface configurations.
Step 2 Double-click an interface entry or choose the entry and click Edit.
The Edit EIGRP Interface Entry dialog box appears.
Step 3 Choose the EIGRPAutonomous system (AS) number from the drop-down list, which is populated from systemnumbers that were set up when you enabled the EIGRP routing process.
Step 4 Uncheck the Split Horizon check box.Step 5 Click OK.
Restart the EIGRP ProcessYou can restart an EIGRP process or clear redistribution or clear counters.
Procedure
Step 1 In the main ASDM window, choose Configuration > Device Setup > Routing > EIGRP > Setup.
The EIGRP Setup pane appears.
Step 2 Click Reset.
Monitoring for EIGRPYou can use the following commands to monitor the EIGRP routing process. For examples and descriptionsof the command output, see the command reference. Additionally, you can disable the logging of neighborchange messages and neighbor warning messages.
To monitor or disable various EIGRP routing statistics, perform the following steps:
Procedure
Step 1 In the main ASDM window, chooseMonitoring > Routing > EIGRP Neighbor.
Each row represents one EIGRP neighbor. For each neighbor, the list includes its IP address, the interface towhich the neighbor is connected, the holdtime, the uptime, the queue length, the sequence number, the smoothedround trip time, and the retransmission timeout. The list of possible state changes are the following:
• NEW ADJACENCY—A new neighbor has been established.
EIGRP17
EIGRPRestart the EIGRP Process

• PEER RESTARTED—The other neighbor initiates the reset of the neighbor relationship. The routergetting the message is not the one resetting the neighbor.
• HOLD TIME EXPIRED—The router has not heard any EIGRP packets from the neighbor within thehold-time limit.
• RETRYLIMIT EXCEEDED—EIGRP did not receive the acknowledgment from the neighbor for EIGRPreliable packets, and EIGRP has already tried to retransmit the reliable packet 16 times without anysuccess.
• ROUTE FILTER CHANGED—The EIGRP neighbor is resetting because there is a change in the routefilter.
• INTERFACE DELAY CHANGED—The EIGRP neighbor is resetting because there is a manualconfiguration change in the delay parameter on the interface.
• INTERFACE BANDWIDTH CHANGED—The EIGRP neighbor is resetting because there is a manualconfiguration change in the interface bandwidth on the interface.
• STUCK IN ACTIVE—The EIGRP neighbor is resetting because EIGRP is stuck in active state. Theneighbor getting reset is the result of the stuck-in-active state.
Step 2 Click the EIGRP neighbor that you want to monitor.Step 3 To remove the current list of neighbors, click Clear Neighbors.Step 4 To refresh the current list of neighbors, click Refresh.
By default, neighbor change and neighbor warning messages are logged.Note
History for EIGRPTable 1: Feature History for EIGRP
Feature InformationPlatform ReleasesFeature Name
Support was added for routing data,performing authentication, andredistributing and monitoring routinginformation using the Enhanced InteriorGateway Routing Protocol (EIGRP).
We introduced the following screen:Configuration > Device Setup > Routing >EIGRP.
7.0(1)EIGRP Support
EIGRP routing is supported in multiplecontext mode.
We modified the following screen:Configuration > Device Setup > Routing >EIGRP > Setup.
9.0(1)Dynamic Routing in Multiple ContextMode
EIGRP18
EIGRPHistory for EIGRP

Feature InformationPlatform ReleasesFeature Name
For EIGRP, bulk synchronization, routesynchronization, and layer 2 load balancingare supported in the clustering environment.
9.0(1)Clustering
For EIGRP, the Auto-Summary field is nowdisabled by default.
We modified the following screen:Configuration > Device Setup > Routing >EIGRP > Setup > Edit EIGRP ProcessAdvanced Properties.
9.2(1)EIGRP Auto-Summary
EIGRP19
EIGRPHistory for EIGRP

EIGRP20
EIGRPHistory for EIGRP