
Eighty Eight 2.0: User Guide, v108cd06a172c2d20c4255-2a9a7d21c621a8092610b7bde7a3e905.r6… ·...
22
Transcript of Eighty Eight 2.0: User Guide, v108cd06a172c2d20c4255-2a9a7d21c621a8092610b7bde7a3e905.r6… ·...


2
Introduction Conceived and designed as an exceptional virtual embodiment of a Steinway CD 327 grand piano, Eighty Eight Ensemble 2.0 affords piano and keyboard players the opportunity to experience a truly world-class grand piano from the comfort of their digital audio workstation.
Exhaustively sampled and expertly voiced, Eighty Eight Ensemble was recorded within the same acoustic confines as the award-winning SONiVOX Symphonic Collection, utilizing the same recording philosophy of the simplest signal chain with the highest quality analog-to-digital converters and mic preamps. The result is an instrument of stunning clarity, finesse, and power.
Eighty Eight Ensemble includes a wealth of additional instruments, pads, and textures to supply the composer a considerable arsenal of tools to stimulate and serve the creative muse. Credits
Jack O’Donnell, Executive Producer
Jennifer Hruska Ryan Pietras Scott Stepenuck Ishaan Chhabra
Colman O’Reilly Bobby Zlatkov Feuler Tovar David Szebeda
Jason Jordan Jeremy Bridge John Teele Andrew Tomasello
Erik Pearson Chris Rudzinski Jamie Billings Aaron Hachen
Samara Winterfeld Bryce Kanzer Katy Cone
System Requirements and Product Support For complete system requirements, compatibility information, and product registration, visit the SONiVOX website: sonivoxmi.com. For technical support, please contact us through the Support page of our website: sonivoxmi.com/support.

3
Installation Important: If you are using a version of Eighty Eight that is older than Version 2.0, this installation will not overwrite or uninstall that version. Also, any files you use or save with either version are neither backward-compatible nor forward-compatible—you cannot use files from Eighty Eight 1.0 with Eighty Eight 2.0 and vice versa.
Windows 1. Place all of the installer's parts in the same location (we recommend a folder on your
Desktop).
2. Double-click the part1 file.
3. Follow the on-screen instructions.
Tip: You do not need the installer files after the installation is complete, but we recommend saving them or backing them up instead of deleting them.
Note: Eighty Eight uses PACE copy protection, so it will install the PACE InterLok driver on your system if you do not already have it. As most audio software uses PACE copy protection, though, this is probably already installed on your system. Mac OS X 1. Place all of the installer's parts in the same location (we recommend a folder on your
Desktop).
2. Double-click the EightyEight 2.dmg file.
3. Double-click the drive that appears on your Desktop or in your Finder to open it.
4. Double-click the .pkg installer file.
5. Follow the on-screen instructions.
Tip: You do not need the installer files after the installation is complete, but we recommend saving them or backing them up instead of deleting them.
4
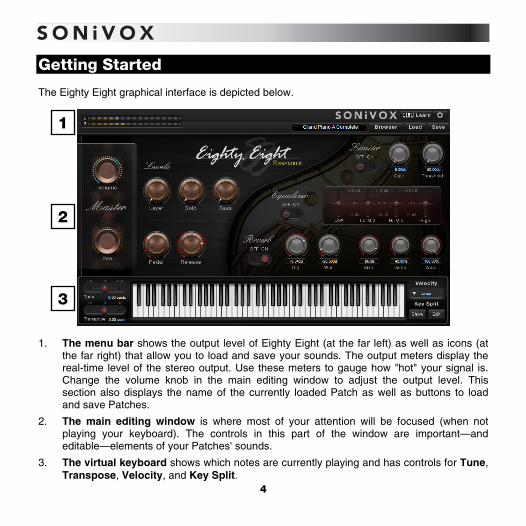
Getting Started The Eighty Eight graphical interface is depicted below.
1. The menu bar shows the output level of Eighty Eight (at the far left) as well as icons (at
the far right) that allow you to load and save your sounds. The output meters display the real-time level of the stereo output. Use these meters to gauge how "hot" your signal is. Change the volume knob in the main editing window to adjust the output level. This section also displays the name of the currently loaded Patch as well as buttons to load and save Patches.
2. The main editing window is where most of your attention will be focused (when not playing your keyboard). The controls in this part of the window are important—and editable—elements of your Patches' sounds.
3. The virtual keyboard shows which notes are currently playing and has controls for Tune, Transpose, Velocity, and Key Split.
1
2
3

5
Using Patches Patches are the sounds inside Eighty Eight. Over 100 Patches are included for you to play with, and any of these can be edited using the knobs and sliders and saved as new Patches. Any Eighty Eight file with the extension .svx is an Patch file. Loading a Patch To play Patches, you must first load one into the interface. To load a Patch:
1. Click the Load button.
2. Choose Load SVX File.
3. Locate and select the Patch file (.svx) you want to play (in the folders in the Eighty Eight folder), and click Open.
Tip: You can also select Patches from the Browser. Please see the Browser section for more information.
Tip: Each instance of the plugin can have one Patch loaded at a time. If you want to use more than one Patch in a project, simply open another instance of Eighty Eight on another track in your software.
Saving a Patch To save your own custom Patches, click the Save button, and select Save SVX File. This will open a dialog asking you where and with what name you would like to save your Patch.

6
MIDI Learn Learn
The MIDI Learn feature lets you to assign or "map" its controls to any hardware MIDI controller. To do this:
1. Click the Learn button to enter Learn Mode, which lets you to assign hardware MIDI controls to the parameters.
2. While in Learn Mode, adjust a parameter in Eighty Eight and then move a knob or slider on your hardware MIDI controller. That knob or slider will now control that parameter.
3. Click the Learn button again to exit Learn Mode. Remove If you want to change or clear a MIDI assignment, you will need to "remove" it. To do that, follow these steps:
1. Right-click the knob you wish to reassign or unlearn.
2. Select one of the two options:
• Remove Learn: Clears the hardware control assignment for the selected parameter only.
• Remove Learn [All]: Clears the hardware control assignments for all parameters.
You can now assign that knob to any other MIDI hardware control (described above in the Learn section).

7
Operation This section describes the controls and different sections of Eighty Eight.
Adjusting the Controls • Knobs: Change the position of a knob (e.g., Volume, Pan, Gain,
Threshold, etc.) by clicking and dragging it up or down. Release it when you reach the desired position. Double-clicking the knob sets it to the 12 o'clock position. If the knob's numerical value is displayed under the knob, you can double-click the value, enter it, and press your keyboard's Enter button.
• Sliders: Change the position of a slider (e.g., Tune,
Transpose, EQ faders, etc.) by clicking and dragging it. Release it when you reach the desired position. You can also simply click anywhere along the slider's track, and the slider will "jump" to that position.
• Switches: Enable or disable a function with switch (e.g., Limiter,
Equalizer, Reverb, etc.) by clicking it. • Drop-Down Menus: Open an available drop-down menu by clicking the
downward arrow ( ) next to the field (e.g., Velocity). Click an option to select it.
8
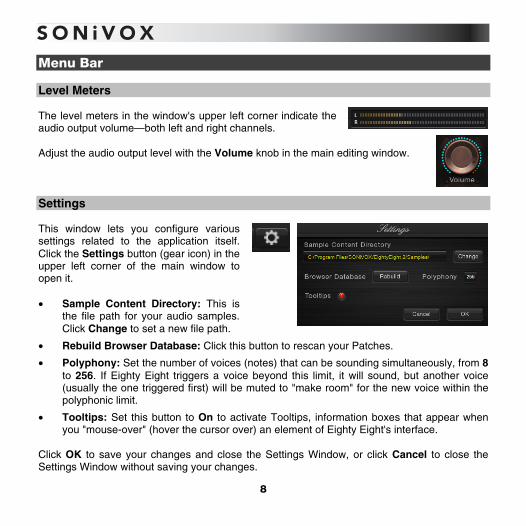
Menu Bar Level Meters The level meters in the window's upper left corner indicate the audio output volume—both left and right channels. Adjust the audio output level with the Volume knob in the main editing window. Settings This window lets you configure various settings related to the application itself. Click the Settings button (gear icon) in the upper left corner of the main window to open it. • Sample Content Directory: This is
the file path for your audio samples. Click Change to set a new file path.
• Rebuild Browser Database: Click this button to rescan your Patches.
• Polyphony: Set the number of voices (notes) that can be sounding simultaneously, from 8 to 256. If Eighty Eight triggers a voice beyond this limit, it will sound, but another voice (usually the one triggered first) will be muted to "make room" for the new voice within the polyphonic limit.
• Tooltips: Set this button to On to activate Tooltips, information boxes that appear when you "mouse-over" (hover the cursor over) an element of Eighty Eight's interface.
Click OK to save your changes and close the Settings Window, or click Cancel to close the Settings Window without saving your changes.

9
Patch and Preset Controls You can load or save Patches or MIDI Learn Presets by using the buttons in the upper right corner of the window. The name of the current Patch is shown to the left of the Browser button. Click the Load button to load a file:
• Load SVX File: Select this to find a Patch (.svx) to load.
• Load MIDI Learn: Select this to load a MIDI Learn Preset (.sml).
Click the Save button to save a file:
• Save SVX File: Select this to name and save your current Patch (.svx).
• Save MIDI Learn: Select this to name and save your current MIDI Learn Preset (.sml).
• Save Default MIDI Learn: Select this to save your current MIDI Learn settings as the default.
See the Using Patches part of the Getting Started section for step-by-step instructions of how to use these controls.

10
Browser
Click the Browser to enter or exit the Browser, which lets you view and load your available Patches (.svx) and sort them according to their Attributes.
Load a Patch by double-clicking it from the Filename list.
Click various Attributes in the Class, Genre, and Character lists to show only the Patches with those characteristics. To change a Patch's Attributes:
1. Double-click it to load it.
2. Click the Attributes button.
3. Click any Attribute(s) you want to select or deselect.
4. To save these Attributes to the Patch, click the Save (disk icon) button. To clear any unsaved Attribute selections, click the Refresh (circular arrow) button.
11
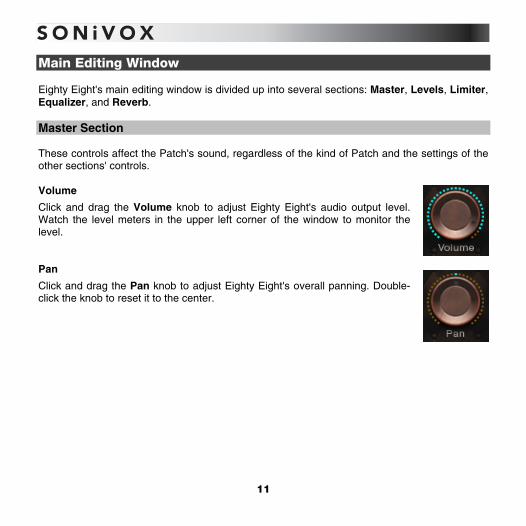
Main Editing Window Eighty Eight's main editing window is divided up into several sections: Master, Levels, Limiter, Equalizer, and Reverb. Master Section These controls affect the Patch's sound, regardless of the kind of Patch and the settings of the other sections' controls. Volume
Click and drag the Volume knob to adjust Eighty Eight's audio output level. Watch the level meters in the upper left corner of the window to monitor the level. Pan
Click and drag the Pan knob to adjust Eighty Eight's overall panning. Double-click the knob to reset it to the center.

12
Levels Section The knobs in the Levels Section set the relative volume for instrument-specific parameters. Each Patch uses a certain instrument (or combination of instruments), which can be affected by one or more of these knobs. Layer
In Pad Patches (from the Patches folder, usually with Choir, Pad, Strings, or Synth in the name), this knob sets the volume of the pad (non-piano/lead) layer.
Solo
In Combi Patches (from the Combis folder, usually with multiple instruments in the name), this knob sets the volume of the lead layer. The lead layer is mapped by default to the key range of E5 – C8 but is editable using Key Split (see the Key Split section for more information).
Bass
In Combi Patches (from the Combis folder, usually with multiple instruments in the name), this knob sets the volume of the bass layer. The bass layer is mapped by default to the key range of A0 – B2 but is editable using Key Split (see the Key Split section for more information).
Pedal
In all Patches, this knob sets the volume of the samples triggered when you release the sustain pedal.
Release
In Piano Patches (from the Pianos folder and other Patches with Piano in the name), this knob sets the volume of the "release" samples.

13
Limiter Section Off-On
Click this switch to turn the Limiter on or off. Gain
This knob sets the make-up gain the limiter applies to the signal after it reaches the threshold. Threshold
This knob sets the audio volume level at which the limiter will activate. Lower settings reduce the piano's perceived dynamic range, introducing a more "aggressive" character to the sound. Equalizer Section Off-On
Click this switch to turn the Equalizer on or off. Faders
The four faders control the "boost" (increase) or "cut" (reduction) of the Low, Low-Mid, High-Mid, or High frequency bands of the Patch's sound.

14
Reverb Section Off-On
Click this switch to turn the Reverb on or off. Dry, Wet
These two knobs determine the blend between the signal without reverb (Dry) and the reverb signal (Wet). It's important to strike the right balance between these two settings, which affect how the listener imagines the piano being played in a particular room or other space. If the Dry knob is up but the Wet knob is at the minimum setting, you will hear only the piano sound without any reverb. If the Wet knob is up but the Dry knob is at the minimum setting, you will hear only the reverberations—none of the "original" performance at all.
Size
This knob determines the size of the virtual room—the emulated reverberant space. Damp
This knob determines the reverb's high-frequency damping. Wide
This knob determines the "spread" of the reverb's stereo signal.

15
Keyboard
The virtual keyboard at the bottom of the window shows which notes are being played. The controls next to it determine its performance.
Pitch Tune
This slider sets the keyboard's fine tuning (in cents). To set it, you can (A) click and drag the slider, (B) click on the desired position, or (C) double-click the value under the slider, type in a value, and press your keyboard's Enter key. Transpose
This slider sets the keyboard's transposition (in semitones or half-steps). To set it, you can (A) click and drag the slider, (B) click on the desired position, or (C) double-click the value under the slider, type in a value, and press your keyboard's Enter key.
Velocity The Velocity setting determines the keyboard's velocity curve—how the keyboard responds to how hard you play it with varying amounts of force. A soft curve (Soft, Software, Softest) means that you have to play with a lot of force to produce a heavier sound. A hard curve (Hard, Harder, Hardest) means that you can produce a heavier sound more easily, with little force. The Linear setting has no curve, so the heaviness of the sound you produce will always be proportional to the force you use.

16
Key Split Eighty Eight's Key Split feature lets you set Zones on the keyboard that each correspond to a different sound within the Patch (e.g., one Zone triggers a piano sound while another Zone triggers a bass sound). Important:
• You can use Key Split only when using a Patch with the Key Split Combis Attribute (by default), as shown in the Browser.
• A Key Split Combi Patches have two Zones or three Zones.
• Although you can save your own versions of the Key Split Combi Patches, you cannot create new combination Patches using different sounds.
Zones can overlap each other, or they can be discrete. You do not need to include every key on the keyboard in a Zone; keys can be in neither Zone and, therefore, will produce no sound. To display the Key Split Zones, click the Show button next to the virtual keyboard. The Zones will appear as differently shaded boxes over the keys. (When you first use Key Split, both Zones will span the entire keyboard length, so it will initially seem as if there is only one large Zone.) To hide them again, click the Show button again. Unselected Zone 1 Zone 1 / Zone 2 Zone 2 overlap
17
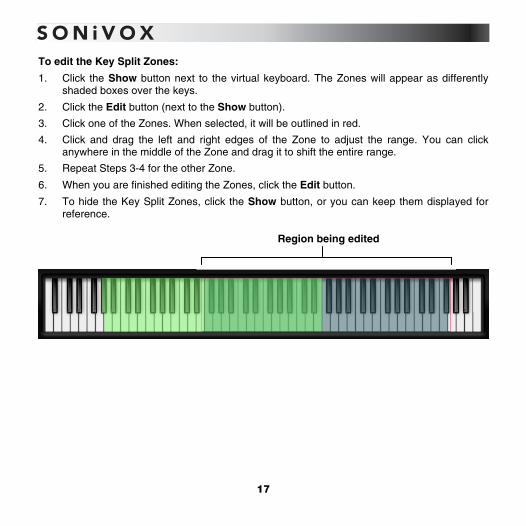
To edit the Key Split Zones:
1. Click the Show button next to the virtual keyboard. The Zones will appear as differently shaded boxes over the keys.
2. Click the Edit button (next to the Show button).
3. Click one of the Zones. When selected, it will be outlined in red.
4. Click and drag the left and right edges of the Zone to adjust the range. You can click anywhere in the middle of the Zone and drag it to shift the entire range.
5. Repeat Steps 3-4 for the other Zone.
6. When you are finished editing the Zones, click the Edit button.
7. To hide the Key Split Zones, click the Show button, or you can keep them displayed for reference.
Region being edited

18
Automation Many of Eighty Eight's parameters can be automated inside your DAW. This section has a few tips about automating those parameters. If you haven't used automation in your tracks before, though, consult your DAW's reference manual for specific instructions on automating plug-in parameters. When automating parameters, select the desired parameter from the list of Eighty Eight's automation parameters and either draw the automation in with your mouse or use a hardware controller to record it. When you start playback, you will see the parameters change in the interface in real time. You can automate the following parameters:
EQ Low Level Layer Limiter Gain Tune
EQ Lo-Mid Level Solo Limiter Threshold Transpose
EQ Hi-Mid Level Bass Modulation Wheel Volume
EQ High Level Pedal Pitch Bend Wheel Pan
Level Release All Reverb Parameters
Tip: If you have a hardware controller that sends MIDI continuous control (CC) messages, you can assign them to control your effects' parameters in real time. Simply assign these knobs to a CC, and record automation as you would any other parameter. (See the MIDI Learn section for more information.) It's common to use a combination of recording and drawing the automation in your DAW to get a good feel or to edit things after you've recorded them.
19
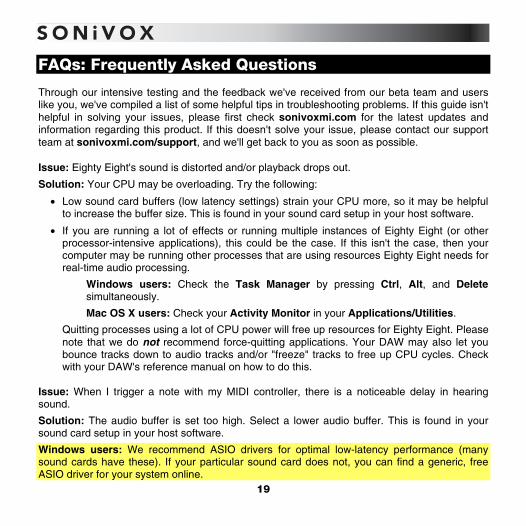
FAQs: Frequently Asked Questions Through our intensive testing and the feedback we've received from our beta team and users like you, we've compiled a list of some helpful tips in troubleshooting problems. If this guide isn't helpful in solving your issues, please first check sonivoxmi.com for the latest updates and information regarding this product. If this doesn't solve your issue, please contact our support team at sonivoxmi.com/support, and we'll get back to you as soon as possible. Issue: Eighty Eight's sound is distorted and/or playback drops out.
Solution: Your CPU may be overloading. Try the following:
• Low sound card buffers (low latency settings) strain your CPU more, so it may be helpful to increase the buffer size. This is found in your sound card setup in your host software.
• If you are running a lot of effects or running multiple instances of Eighty Eight (or other processor-intensive applications), this could be the case. If this isn't the case, then your computer may be running other processes that are using resources Eighty Eight needs for real-time audio processing.
Windows users: Check the Task Manager by pressing Ctrl, Alt, and Delete simultaneously.
Mac OS X users: Check your Activity Monitor in your Applications/Utilities.
Quitting processes using a lot of CPU power will free up resources for Eighty Eight. Please note that we do not recommend force-quitting applications. Your DAW may also let you bounce tracks down to audio tracks and/or "freeze" tracks to free up CPU cycles. Check with your DAW's reference manual on how to do this.
Issue: When I trigger a note with my MIDI controller, there is a noticeable delay in hearing sound.
Solution: The audio buffer is set too high. Select a lower audio buffer. This is found in your sound card setup in your host software.
Windows users: We recommend ASIO drivers for optimal low-latency performance (many sound cards have these). If your particular sound card does not, you can find a generic, free ASIO driver for your system online.

20
Issue: My plug-in does not show up.
Solution: Before proceeding, make sure that you have the latest updates installed. Once you have the latest updates, try the following for your software:
• Steinberg Cubase™ or Nuendo™: From the Devices menu, open the plug-in information window. Make sure that the installed plug-in can be seen. Click the checkbox next to the plug-in name to activate it. Restart Cubase or Nuendo and the changes should take effect.
• Apple® Logic®: Make sure that the plug-in was installed correctly by checking the local plug-ins folder ([your hard drive] Library Audio Plug-ins Components) for installed items. Start the Logic AU Manager from Logic Menu Preferences. Rescan individual plug-ins or reset and rescan all plug-ins. After scanning, you may need to activate a plug-in by clicking the checkbox next to it.
• Ableton™ Live: If you are using a custom VST/AU folder, make sure you installed Eighty Eight into the same folder as the rest of your plug-ins. Also, make sure that in Live's Preferences, you have directed Live to search that folder for plug-ins.
• MOTU® Digital Performer®: Rescanning all the plug-ins often solves this problem. To force Digital Performer to rescan all plug-ins, delete the plug-in preference file AudioUnit info cache from this folder: [your hard drive] Users [your home directory] Library Preferences Digital Performer.
• Cakewalk® SONAR™ X1 or X2: SONAR's VST plug-in folder is stored inside the program's preferences. To edit these preferences, create a new project, go to Edit Preferences. Click VST Settings in the sidebar (to the left under the File sub-heading). At the top of that window, there is a list of folders that SONAR searches for VST plug-ins. If you do not see the folder that you installed in that list, click Add and navigate to the folder in which you installed Eighty Eight. Highlight the folder and click OK and then click the Scan VST Folders button (under the VST Scan heading).
21
Trademarks and Licenses Copyright © 2011 Sonic Network, Inc. This SONiVOX product and all its individual components referred to in this document are protected under United States and international copyright laws, with all rights reserved. Eighty Eight Ensemble 2.0 is provided as a license to you, the customer. Ownership of Eighty Eight is maintained solely by Sonic Network, Inc.
All terms of use for Eighty Eight are documented in the End-User License Agreement found in the product installer. If you have any questions regarding this license, please contact us through our Support page at sonivoxmi.com/support. SONiVOX® is a registered trademark of Sonic Network Inc. Other names used in this publication may be trademarks and are acknowledged.
Ableton is a trademark of Ableton AG.
Apple, Logic, Mac, and OS X are trademarks of Apple Inc., registered in the U.S. and other countries.
ASIO, Cubase, Nuendo, and VST are trademarks of Steinberg Media Technologies GmbH.
Cakewalk and SONAR are trademarks or registered trademarks of Cakewalk, Inc.
MOTU and Digital Performer are registered trademarks of Mark of the Unicorn, Inc.
Windows is a registered trademark of Microsoft Corporation in the United States and other countries.
All other product or company names are trademarks or registered trademarks of their respective owners.


![HINDUSTAN AERONAUTICS LIMITED AIRCRAFT OVERHAUL …hal-india.co.in/Common/Uploads/TenderDoc/9362... · Rs 2,68,089/-[Rupees Two Lakhs, Sixty Eight Thousand, Eighty Nine only] which](https://static.fdocuments.us/doc/165x107/5e897959029c4c3f8f118468/hindustan-aeronautics-limited-aircraft-overhaul-hal-indiacoincommonuploadstenderdoc9362.jpg)