EHSS USER GUIDE
31
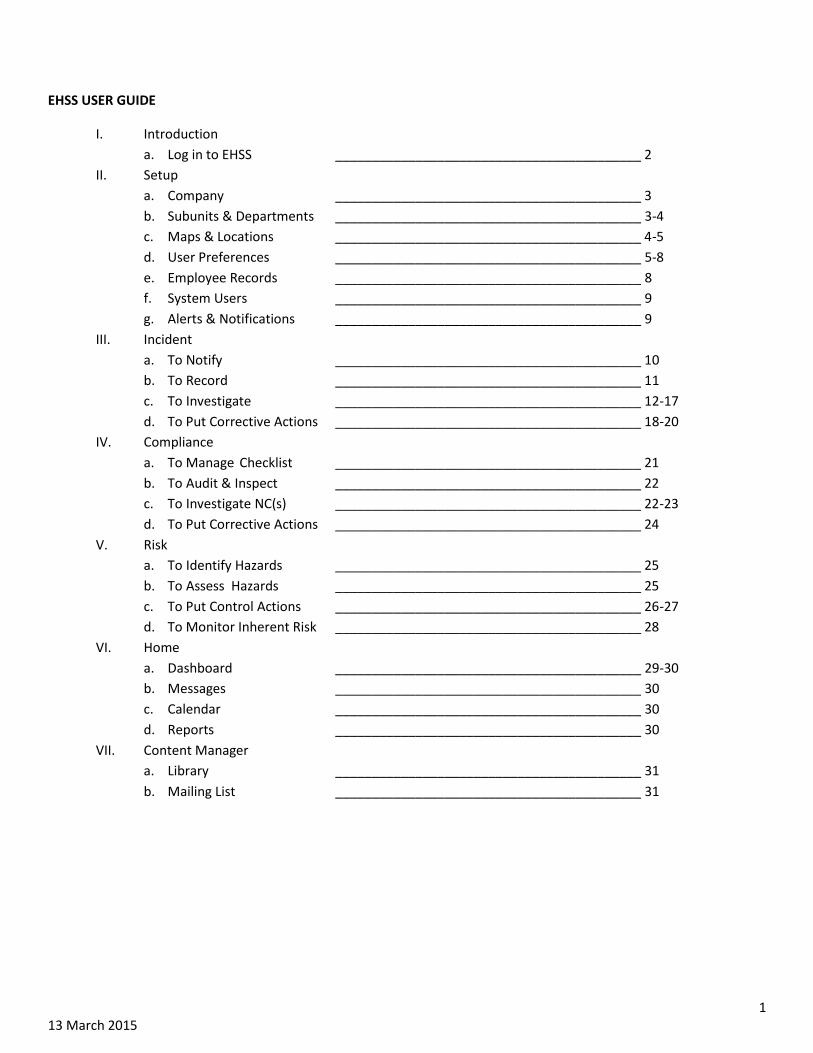
1 13 March 2015 EHSS USER GUIDE I. Introduction a. Log in to EHSS __________________________________________ 2 II. Setup a. Company __________________________________________ 3 b. Subunits & Departments __________________________________________ 3-4 c. Maps & Locations __________________________________________ 4-5 d. User Preferences __________________________________________ 5-8 e. Employee Records __________________________________________ 8 f. System Users __________________________________________ 9 g. Alerts & Notifications __________________________________________ 9 III. Incident a. To Notify __________________________________________ 10 b. To Record __________________________________________ 11 c. To Investigate __________________________________________ 12-17 d. To Put Corrective Actions __________________________________________ 18-20 IV. Compliance a. To Manage Checklist __________________________________________ 21 b. To Audit & Inspect __________________________________________ 22 c. To Investigate NC(s) __________________________________________ 22-23 d. To Put Corrective Actions __________________________________________ 24 V. Risk a. To Identify Hazards __________________________________________ 25 b. To Assess Hazards __________________________________________ 25 c. To Put Control Actions __________________________________________ 26-27 d. To Monitor Inherent Risk __________________________________________ 28 VI. Home a. Dashboard __________________________________________ 29-30 b. Messages __________________________________________ 30 c. Calendar __________________________________________ 30 d. Reports __________________________________________ 30 VII. Content Manager a. Library __________________________________________ 31 b. Mailing List __________________________________________ 31
Transcript of EHSS USER GUIDE
1 13 March 2015
EHSS USER GUIDE
I. Introduction
a. Log in to EHSS __________________________________________ 2
II. Setup
a. Company __________________________________________ 3
b. Subunits & Departments __________________________________________ 3-4
c. Maps & Locations __________________________________________ 4-5
d. User Preferences __________________________________________ 5-8
e. Employee Records __________________________________________ 8
f. System Users __________________________________________ 9
g. Alerts & Notifications __________________________________________ 9
III. Incident
a. To Notify __________________________________________ 10
b. To Record __________________________________________ 11
c. To Investigate __________________________________________ 12-17
d. To Put Corrective Actions __________________________________________ 18-20
IV. Compliance
a. To Manage Checklist __________________________________________ 21
b. To Audit & Inspect __________________________________________ 22
c. To Investigate NC(s) __________________________________________ 22-23
d. To Put Corrective Actions __________________________________________ 24
V. Risk
a. To Identify Hazards __________________________________________ 25
b. To Assess Hazards __________________________________________ 25
c. To Put Control Actions __________________________________________ 26-27
d. To Monitor Inherent Risk __________________________________________ 28
VI. Home
a. Dashboard __________________________________________ 29-30
b. Messages __________________________________________ 30
c. Calendar __________________________________________ 30
d. Reports __________________________________________ 30
VII. Content Manager
a. Library __________________________________________ 31
b. Mailing List __________________________________________ 31

2 13 March 2015
I. Introduction
Login to EHSS
II. Setup
Click Setup from the Left Menu or Top Menu
Left Menu
Top Menu

3 13 March 2015
a. Company: Fill up Company Information and Save.
1. Currency – select currency and update current value
2. Logo Upload – browse logo from files and upload
3. Theme Setting – select desired theme color
4. Records Archive and Restore – archive and restore previous records per year
b. Unit: Add, Edit or Delete SubUnit and Save.
1. SubUnit – rename SubUnit or add departments and areas
InSafety
1
2
3
4
1
4 13 March 2015
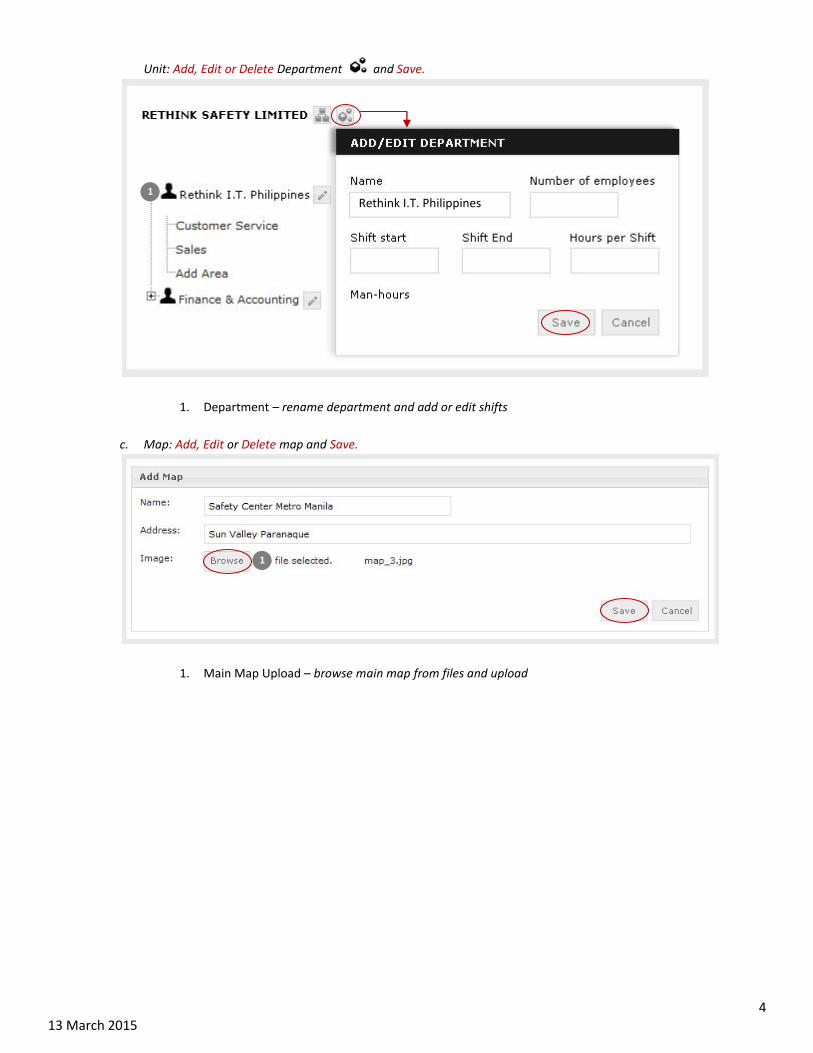
Unit: Add, Edit or Delete Department and Save.
1. Department – rename department and add or edit shifts
c. Map: Add, Edit or Delete map and Save.
1. Main Map Upload – browse main map from files and upload
Rethink I.T. Philippines 1
1
5 13 March 2015
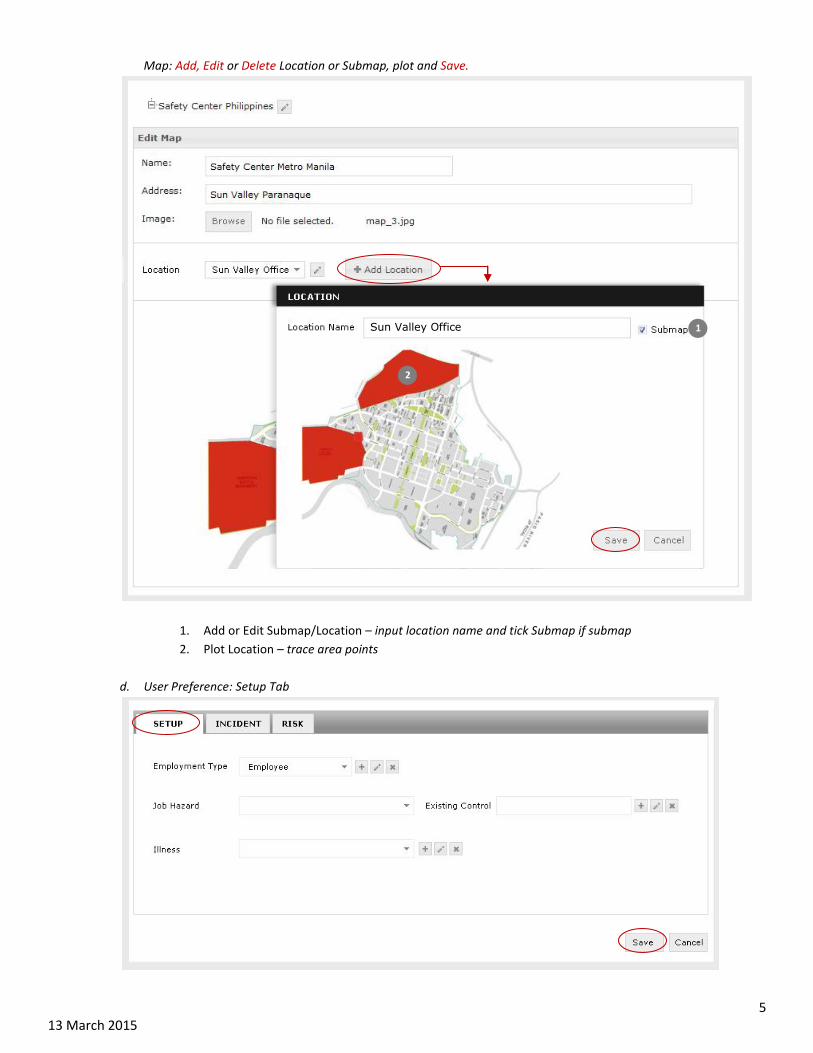
Map: Add, Edit or Delete Location or Submap, plot and Save.
1. Add or Edit Submap/Location – input location name and tick Submap if submap
2. Plot Location – trace area points
d. User Preference: Setup Tab
Sun Valley Office 1
2

6 13 March 2015
User Preference: Incident Tab
1. Nature of Incident – add, edit or delete options
2. Property – add, edit or delete options
3. Environmental Impact – add, edit or delete options
4. Incident Severity Rating – select or edit and input description of each class
1
2
3
4
7 13 March 2015
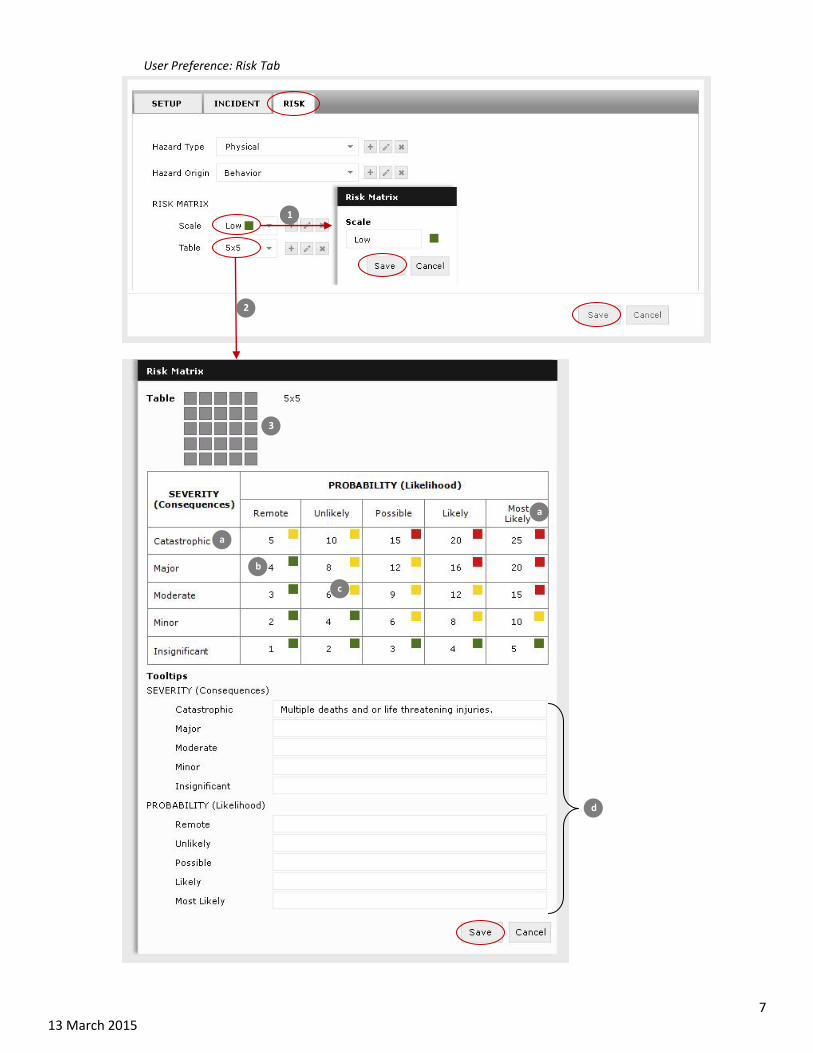
User Preference: Risk Tab
1
2
3
a
a
b
c
d

8 13 March 2015
1. Matrix Scale – set rating with corresponding color
2. Matrix Table – set number of columns and rows
a. Labels – input probability and severity labels
b. Cell Score – input score per cell
c. Cell Scale – select scale per cell
d. Severity and Probability Definition – add or edit description of each class
e. Employee Record: Add,Edit or Hide Employee Details and Save.

9 13 March 2015
f. System User: Add, Edit or Hide System User and Disconnect Session.
1. User Roles
a. Power User – can access all modules including Setup
b. Safety Officer – assigns or performs investigations, actions, audits/inspections, and add hazard
c. Investigation / Action Officer – performs assigned investigations, actions, audits/inspections
d. Notifier – can only access Notice of Incident Form (NOI)
* Systems Administrator – can only access Setup Module
2. Access Level – set SubUnit access limit per user
3. Session Status – disconnect user session
g. Alert: Set Email Notification Alerts for System Users and Save.
1 2
3

10 13 March 2015
III. INCIDENT
a. Notify: Fill up Notice of Incident (NOI) Form and Submit.
1. Required fields
a. Date of Incident
b. Time of Incident
c. Exact Location of the Incident
d. Department Responsible
e. Nature of Incident
f. Activity at that Time

11 13 March 2015
b. Record: Classify incident notification.
1. Notifications – tick an incident to process
2. Classification
a. classify as Incident for accidents and near misses
b. classify as Hazard for observations notification
c. Archive if notification needs no processing
3. Investigation Team
a. Yes – Safety officer assigns and forms an investigation team
b. No, Start immediately – Safety officer starts investigation immediately
4. Primary Coordinator – Assign Investigation Officer
5. Target Completion Date – Set investigation due date
1
2
3
4
5

12 13 March 2015
c. Investigate: Gather data, Identify rootcause, Formulate conclusion and Close investigation.
1. Open Investigation – tick an investigation to process.
2. Incident Title – Safety Officer or Investigation Officer defines the incident title.
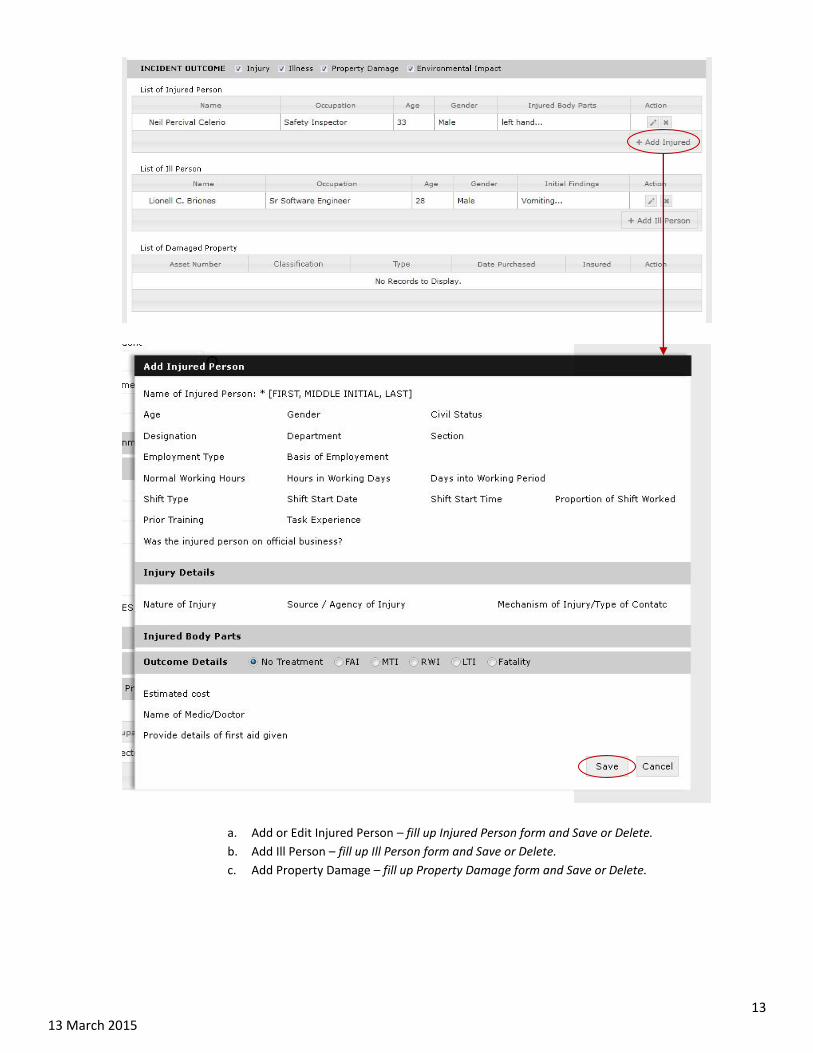
3. Incident Outcome – Safety Officer or Investigation Officer records Injured person(s), property
damage(s), environmental impact or illness(es).
1
2
3
4
5
6
7
13 13 March 2015
a. Add or Edit Injured Person – fill up Injured Person form and Save or Delete.
b. Add Ill Person – fill up Ill Person form and Save or Delete.
c. Add Property Damage – fill up Property Damage form and Save or Delete.

14 13 March 2015
4. Analysis Methods: Note that these are just optional methods
a. Systematic Cause Analysis Technique (SCAT)
The SCAT method guides the user systematically to work backwards from the loss to identify
where the organization lacks control over deficiencies that led to the occurrence of the
incident.
A Loss is the main consequence of the incident. It represents an unintended harm or damage,
for example damaged equipment, a broken arm, loss of production, etc.
A SCAT analysis can only have one Loss. When the user wants to analyze more Losses, multiple
SCAT diagrams need to be made. A Loss can be the result of one or more Events. An Event is a
happening or a moment in which the state of the incident changes. Each Event is analyzed with
a cause chain of three cause types. The Direct Cause is a substandard act or substandard
conditions that triggered the Event. Examples are:
Inspection not performed by new employee
Failure to secure lift
Safety valve is broken
The Basic Causes include personal and job or system factors that together made it possible for
the Direct Cause to occur. Examples are:
Maintenance department understaffed
High workload
Wear and Tear
A Lack of Control factor can be inadequate program standards or compliance to standards that
cause the Basic Causes to occur. These factors always act on an organizational latent level.

15 13 March 2015
They will influence a range of unsafe conditions and can therefore cause different incidents.
Examples are:
Inadequate leadership
No task or risk assessments
Lack of training
This chart gives a list of generic descriptions for each of the causes. Picking the descriptions
from the SCAT chart can be very useful when comparing different incidents. Every user will
pick from the same list for every incident. For each cause level there can be multiple items per
incident explaining the event. Actions for improvement can be made on every cause level, but
will be most effective on the Lack of Control causes because these will address the latent
failures in the organization.
b. Why Why Analysis
The 5 Whys is one of the simplest technique in analyzing a problem or incident to help identify
the root cause. By repeatedly asking the question "Why" (five is a good rule of thumb), you can
peel away the layers of symptoms which can lead to the root cause of a problem. Why why is
most useful when problems involve human factors or interactions.
How To Complete The 5 Whys
i. Write down the specific problem. Writing the issue helps you formalize the problem
and describe it completely. It also helps a team focus on the same problem.
ii. Ask Why the problem happens and write the answer down below the problem.
iii. If the answer you just provided doesn't identify the root cause of the problem that
you wrote down in step 1, ask Why again and write that answer down.
iv. Loop back to step 3 until the team is in agreement that the problem's root cause is
identified. Again, this may take fewer or more times than five Whys.

16 13 March 2015
c. Fishbone Diagram
The Fishbone Analysis is a technique used to facilitate root cause analysis for a defined
problem or incident. Fishbone is brainstorming in a structured format. The technique uses
graphical means to relate the causes of a problem to the problem itself, in other words, to
determine cause and effect. The diagram focuses on the causes rather than the effect. Because
there may be a number of causes for a particular problem, this technique helps us to identify
the root cause of the problem in a structured and uncomplicated manner. It also helps us to
work on each cause prior to finding the root cause.
You may find it helpful to use the Fishbone diagram in the following cases:
To analyze and find the root cause of a complicated problem or incident
When there are many possible causes for a problem
If the traditional way of approaching the problem (trial and error, trying all possible
causes, and so on) is very time consuming
The problem is very complicated and the project team cannot identify the root cause
The analysis starts with a problem to be investigated. This problem is written in the form of a
question on the right side of the page. An arrow, or sometimes a drawing of a fish head, will
point to the question under consideration. To the left of the problem statement, a horizontal
line divides the paper in two. This is the "backbone" of the fishbone diagram.
The next set of bones represents the most important categories of the factors which might
lead to the basic cause; the names of these categories are written along the top and bottom of
the paper, with angled arrows pointing back to the backbone as well as towards the head, thus
forming a herringbone pattern. The EHSS system used eight categories that relate to industrial
issues: processes, policies, procedures, people, technology, environment, materials and
machineries.

17 13 March 2015
Analysis gets underway after the fundamental skeletal structure is in position. Variables are
listed that play a part in each subset of elements that result in the underlying or root cause.
These are displayed on top of arrows directing you to the subset lines, which themselves may
possess lines of their own directing toward them, further delineating the variables that play a
part. While this may proceed ad infinitum, naturally it will be hard to sketch more than a
minimal number of levels.
With the skeleton of the diagram in place a team brainstorms about each category, looking for
reasons that produce the end result. Generally, it is good to phrase a problem as a question
and ask team members to answer the question in the context of each category. In general, the
question is "Why is this happening?" Then, for each category, the question shifts to "How are
factors in this category causing this?"
The brainstorming continues until team members can no longer think of useful items to add to
the diagram. At this point, the results are analyzed to identify the most likely root causes of the
problem. Finding the same issue within multiple categories is a good indication that it is an
important root cause in the system. Likewise, areas of the diagram that are densely populated
with detail.
5. Incident Severity – a score of 1, 2, 3, 4 or 5 measures the severity of the impact (harm) caused to either
a person or organisation following an incident. In determining the actual severity consider the outcome
of the incident in terms of harm to people/resources/environment/reputation/quality.
6. Conclusion: Add more root causes.
7. Close investigation – click on lock icon to close investigation.
18 13 March 2015
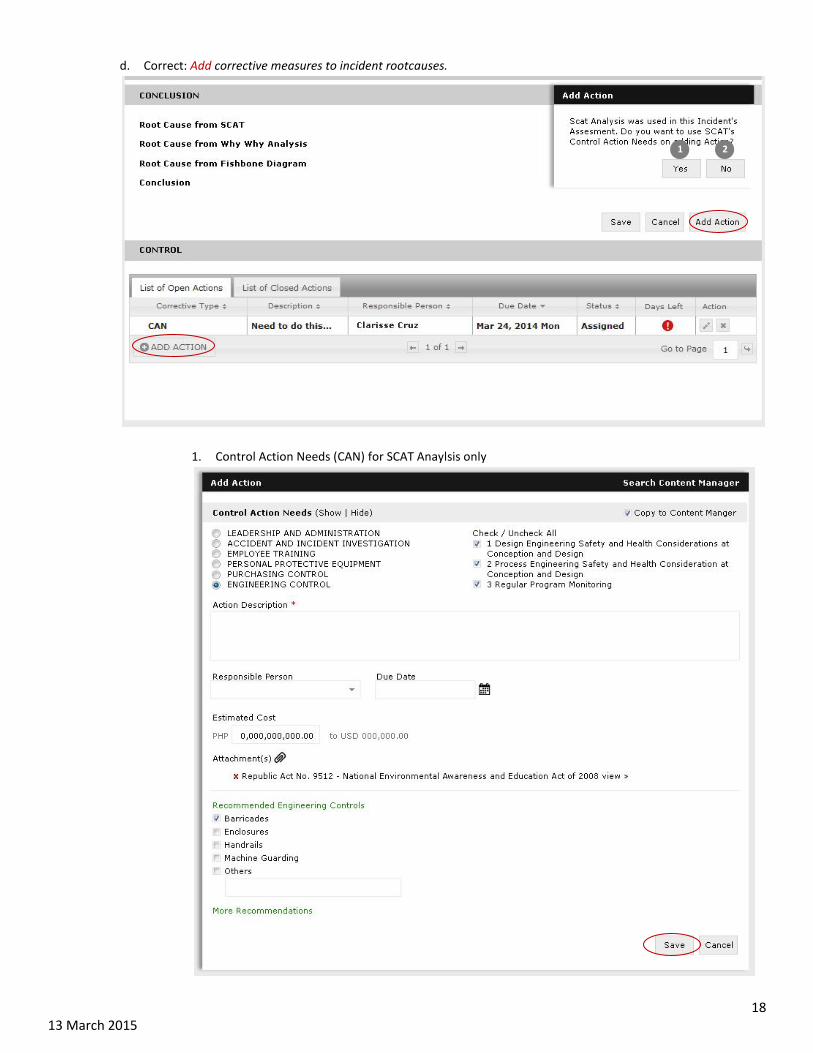
d. Correct: Add corrective measures to incident rootcauses.
1. Control Action Needs (CAN) for SCAT Anaylsis only
1 2

19 13 March 2015
2. Elimination, Substitution, Engineering, Administrative, PPE (ESEAP)
a. ESEAP Action Description – Safety Officer adds a detailed description for the chosen action.
b. Responsible Person & Due Date – Safety Officer assigns an Action Officer and sets the due
date.
c. Estimated Cost – define cost of all actions needed.
d. Recommended Actions – EHSS push relevant recommendations.
e. Save & Send Assignments – Safety Officer may opt to save and send the actions by ticking on
the names of the assigned Action Officers
a
b
c
d
e

20 13 March 2015
Save & Send Assignments: Action officer accepts and completes task. Safety Officer confirms.
Close Incident: Safety officer closes the incident when investigation is closed and all actions are
confirmed completed. All incident rootcauses are now forwarded to the hazard list in Risk Module.
21 13 March 2015
IV. COMPLIANCE
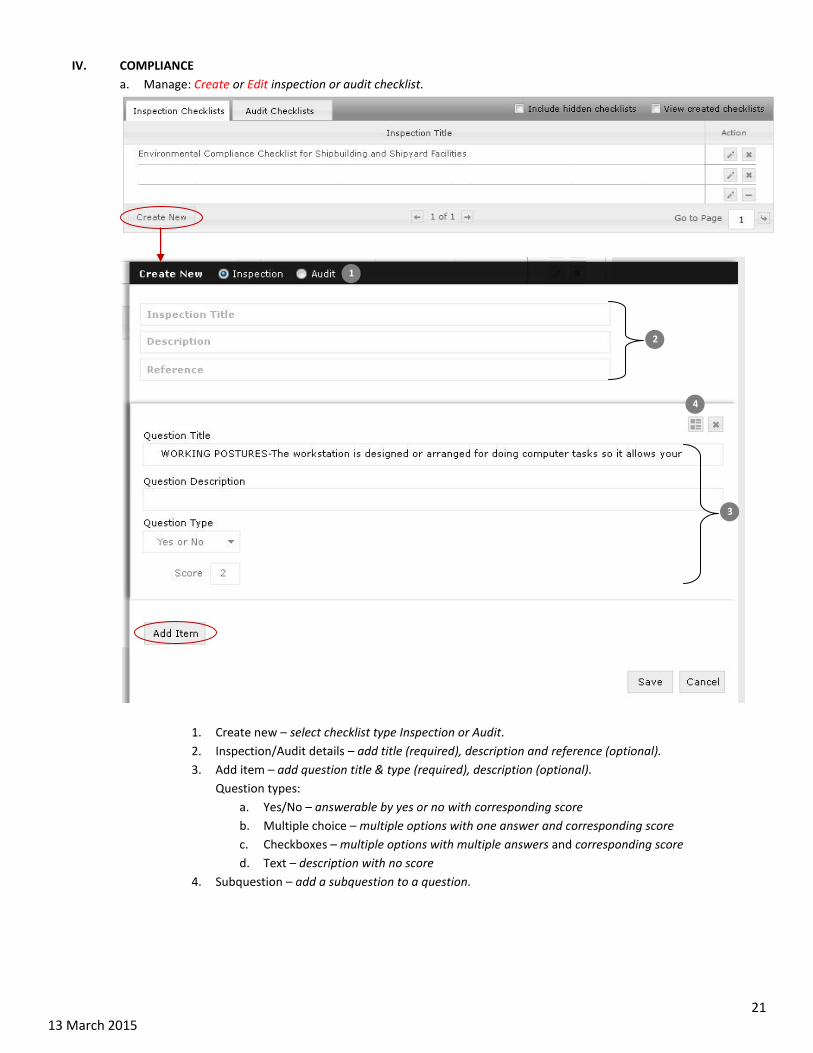
a. Manage: Create or Edit inspection or audit checklist.
1. Create new – select checklist type Inspection or Audit.
2. Inspection/Audit details – add title (required), description and reference (optional).
3. Add item – add question title & type (required), description (optional).
Question types:
a. Yes/No – answerable by yes or no with corresponding score
b. Multiple choice – multiple options with one answer and corresponding score
c. Checkboxes – multiple options with multiple answers and corresponding score
d. Text – description with no score
4. Subquestion – add a subquestion to a question.
2
3
1
4

22 13 March 2015
b. Audit/Inspect: Schedule and Assign safety audit/inspection.
1. Inspection/Audit details – select compliance checklist and location to be inspected/audited and assign
inspector/auditor.
2. Compliance frequncy –select inspection/audit schedule by weekly, monthly, quarterly or annually.
3. Passing Percentage – set passing inspection/audit score, usually 100%.
c. Investigate: Gather data, Identify rootcause and Formulate conclusion.
1. Nonconformance (NC) Category
a. Safety – nonconformity related to fire, OSH, environment, housekeeping hazards
b. Operation – nonconformity related to customer service & administrative nonconforminty
c. Technical – nonconformity related to electrical, mechanical, civil nonconforminty
1
2
3
3
4
5 1
2
23 13 March 2015
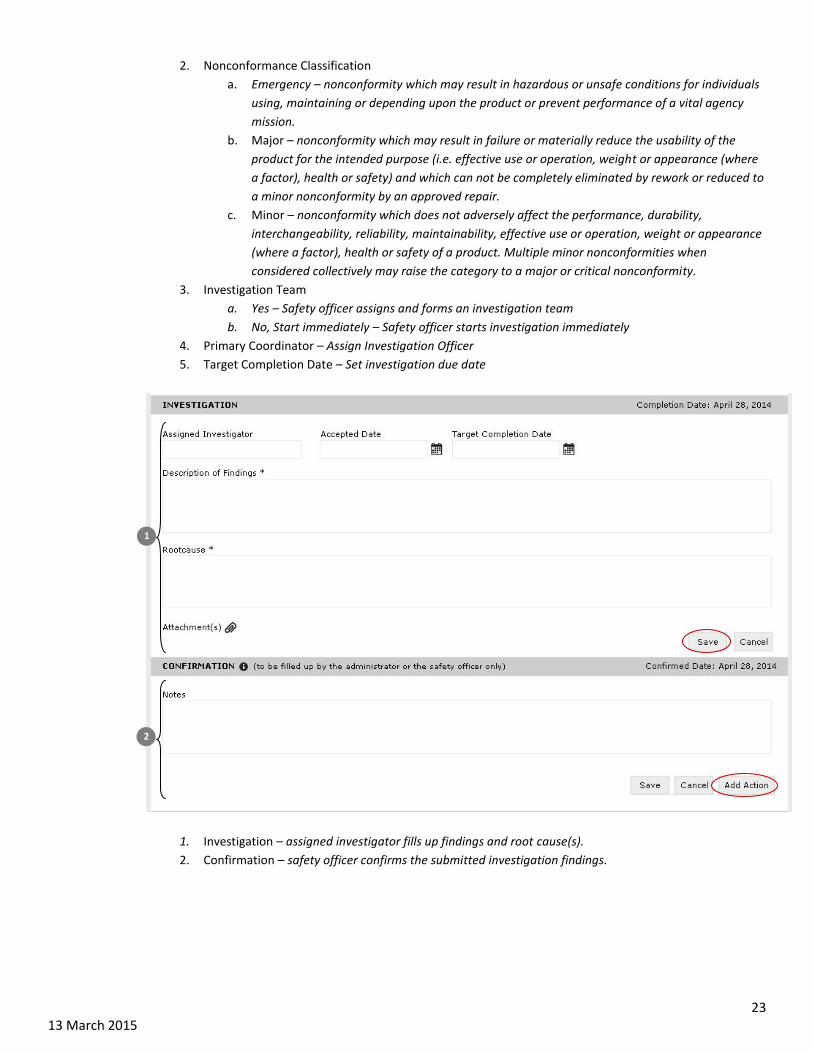
2. Nonconformance Classification
a. Emergency – nonconformity which may result in hazardous or unsafe conditions for individuals
using, maintaining or depending upon the product or prevent performance of a vital agency
mission.
b. Major – nonconformity which may result in failure or materially reduce the usability of the
product for the intended purpose (i.e. effective use or operation, weight or appearance (where
a factor), health or safety) and which can not be completely eliminated by rework or reduced to
a minor nonconformity by an approved repair.
c. Minor – nonconformity which does not adversely affect the performance, durability,
interchangeability, reliability, maintainability, effective use or operation, weight or appearance
(where a factor), health or safety of a product. Multiple minor nonconformities when
considered collectively may raise the category to a major or critical nonconformity.
3. Investigation Team
a. Yes – Safety officer assigns and forms an investigation team
b. No, Start immediately – Safety officer starts investigation immediately
4. Primary Coordinator – Assign Investigation Officer
5. Target Completion Date – Set investigation due date
1. Investigation – assigned investigator fills up findings and root cause(s).
2. Confirmation – safety officer confirms the submitted investigation findings.
1
2

24 13 March 2015
d. Correct/Prevent: Add corrective measures to nonconformance.
1. Action Description – Safety Officer adds a detailed description for the chosen action.
2. Responsible Person & Due Date – Safety Officer assigns an Action Officer and sets the due date.
3. Estimated Cost – define cost of all actions needed.
4. Save & Send Assignments – Safety Officer may opt to save and send the actions by ticking on the names
of the assigned Action Officers.
Save & Send Assignments: Action officer accepts and completes task. Safety Officer confirms.
1
2
3
4
25 13 March 2015
V. RISK
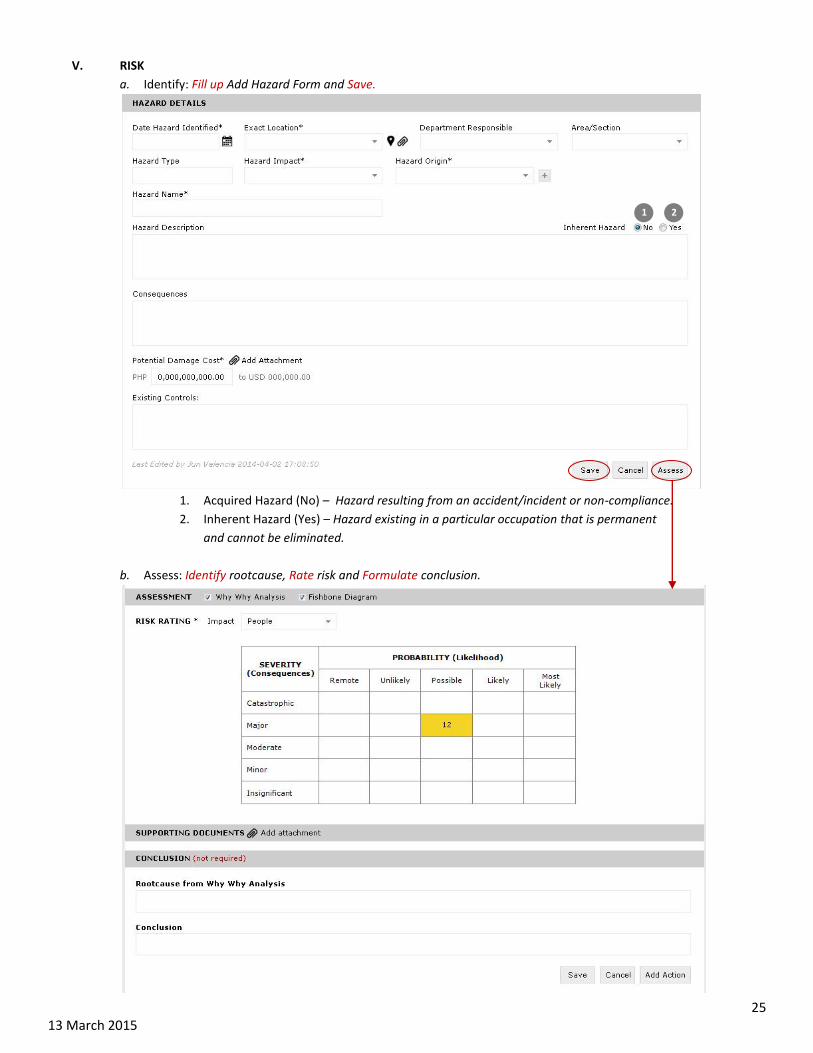
a. Identify: Fill up Add Hazard Form and Save.
1. Acquired Hazard (No) – Hazard resulting from an accident/incident or non-compliance.
2. Inherent Hazard (Yes) – Hazard existing in a particular occupation that is permanent
and cannot be eliminated.
b. Assess: Identify rootcause, Rate risk and Formulate conclusion.
1 2

26 13 March 2015
c. Control: Add preventive measures to hazards.
Elimination, Substitution, Engineering, Administrative, PPE (ESEAP)
1
2
3
4
5

27 13 March 2015
1. ESEAP Action Description – Safety Officer adds a detailed description for the chosen action.
2. Responsible Person & Due Date – Safety Officer assigns an Action Officer and sets the due date.
3. Estimated Cost – define cost of all actions needed.
4. Recommended Actions – EHSS push relevant recommendations.
5. Save & Send Assignments – Safety Officer may opt to save and send the actions by ticking on the names of
the assigned Action Officers
Save & Send Assignments: Action officer accepts and completes task. Safety Officer confirms.

28 13 March 2015
d. Monitor: Monitor all actions for inherent hazards.
1. Continue Review – retain existing action.
2. Needs Follow up Action – existing action is not enough and needs additional action(s).
3. Stop Review – existing action not appropriate anymore and needs new action.
1 2
2
3
29 13 March 2015
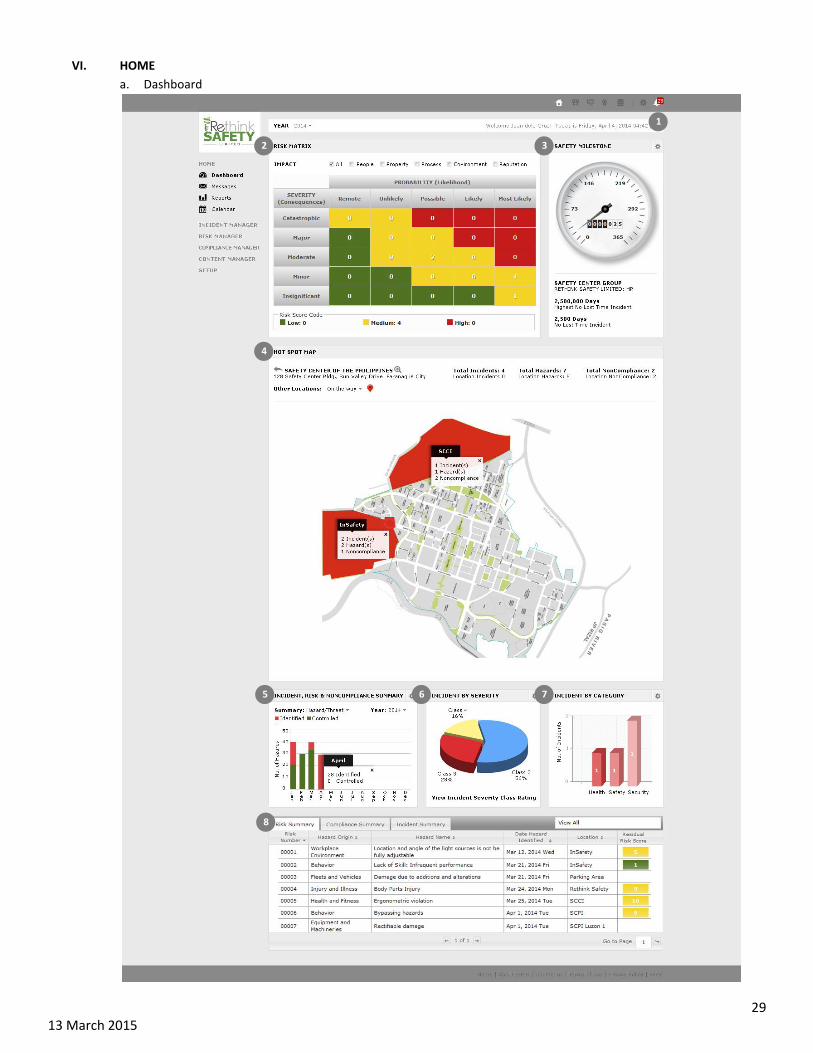
VI. HOME
a. Dashboard
2 3
1
4
5 6 7
8
30 13 March 2015
1. Risk Matrix
2. Safety Milestone
3. Hot Spot Map
4. Incident, Risk & Compliance Graph
5. Incident by Severity Graph
6. Incident by Category
7. Incident, Risk & Compliance Summary
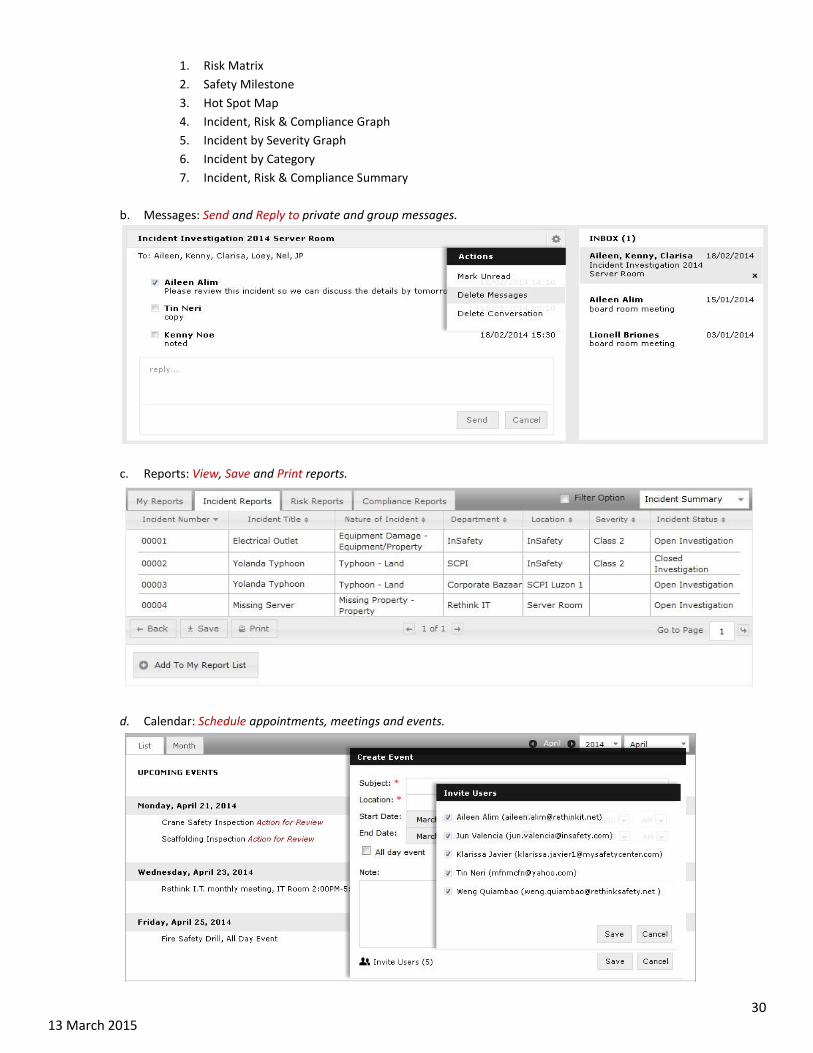
b. Messages: Send and Reply to private and group messages.
c. Reports: View, Save and Print reports.
d. Calendar: Schedule appointments, meetings and events.
31 13 March 2015
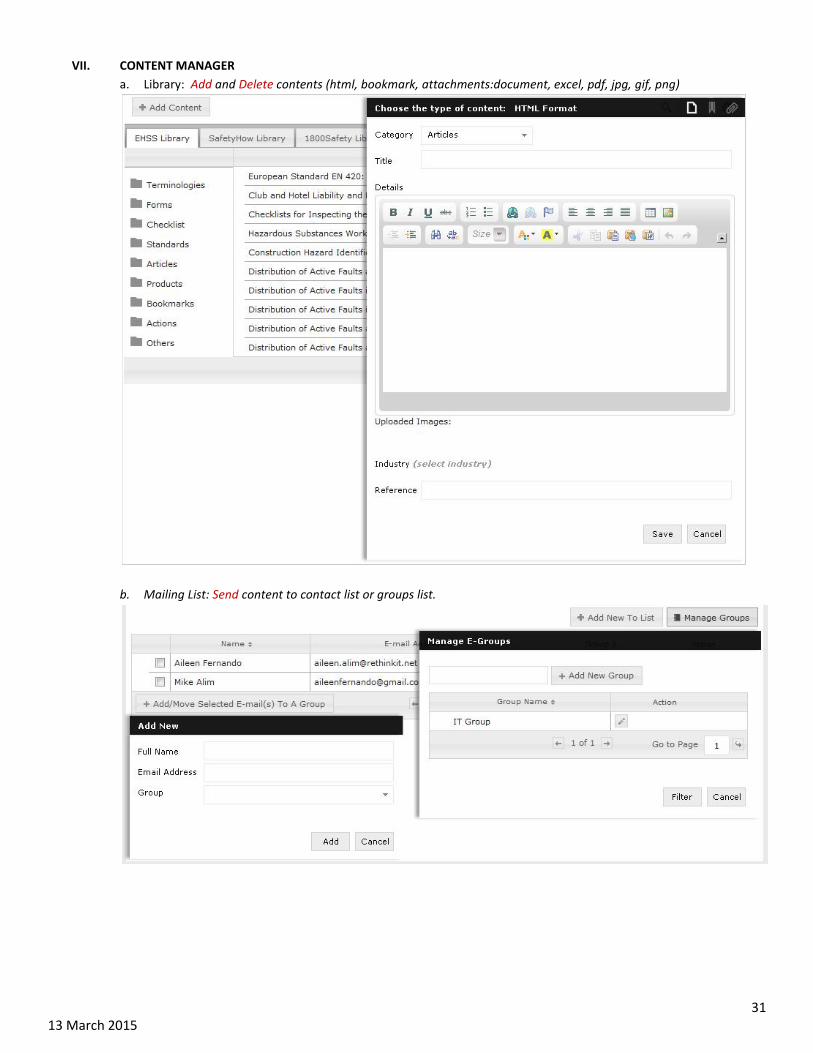
VII. CONTENT MANAGER
a. Library: Add and Delete contents (html, bookmark, attachments:document, excel, pdf, jpg, gif, png)
b. Mailing List: Send content to contact list or groups list.